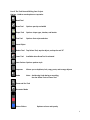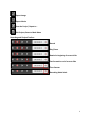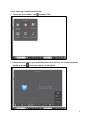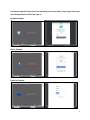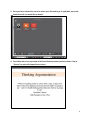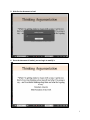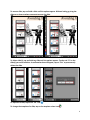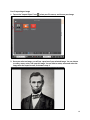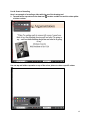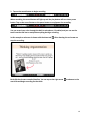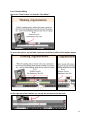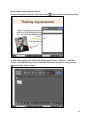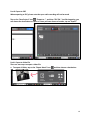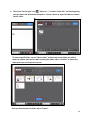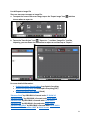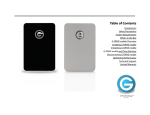
1
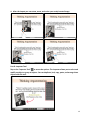
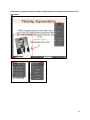
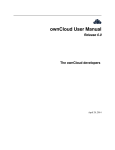
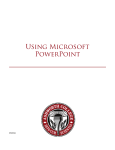
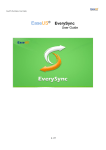
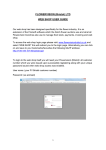
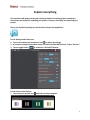
Explain Everything
This document will guide you through creating an Explain Everything project, importing a
PowerPoint and image file, modifying your project, creating a recording, and exporting your
project.
Tap on the Explain Everything icon on the iPad to launch the application.
Part A: Settings and Preferences
1. Tap on the settings and preferences icon to adjust the settings.
2. A common setting that would be handy is to show the MIC MUTE button. Tap on “Record.”
3. Tap on toggle button
Part B: Create a New Project
1. Tap on the new project icon
to enable the “MIC MUTE button.”
and select a colour template.
1
Part C: The Tool Bar and Editing Your Project
Options - Hold to reveal options or tap twice.
Hand Tool
Draw Tool
Options: pen tip and width
Shape Tool
Options: shape type, shadow, and border
Text Tool
Options: font styles and sizes
Insert Object
Delete Tool
Tap Delete Tool, tap the object, and tap the red “X”
Eraser Tool
Available when Draw Tool is activated
Laser Pointer Options: pointer style
Inspector
Allows you to duplicate, lock, copy, paste, and arrange objects
Undo
Note: Avoid using Undo during a recording;
Use the Delete Tool or Eraser Tool
Zoom and Pan Tool
Presenter Mode
Colour Pickers
Options: colours and opacity
2
Export Image
Export Movie
Save the Project / Export to…
Exit Project; Return to Main Menu
Recording and Playback Toolbar:
Record
Play/Pause
Rewind to beginning of current slide
Fast forward to end of current slide
Time Counter
Recording Mode Switch
3
Part D: Importing a PowerPoint Document
1. Tap on the “Insert Object” icon
and select “File.”
2. Choose the source where you would like to insert your file from. You can also tap on the
double up arrows
to see more choices, as seen below.
4
You may be required to log into the corresponding source you choose. Tap to login. Enter your
email and password and then tap “sign in.”
Dropbox Example:
GDrive Example:
OneDrive Example:
5
3. Once you have selected the source to access your files and log in, if applicable, tap on the
PowerPoint file you would like to import.
4. You will be able to see a preview of the PowerPoint document you have chosen. Tap on
“Choose” to select this PowerPoint to insert.
6
5. Wait for the document to load.
6. Once the document is loaded, you can begin to modify it.
7
Part E: Navigating Through the Slides
To navigate to the previous slide, tap the “left arrow” on the slide sorter toolbar.
To navigate to the next slide, tap the “right arrow” on the slide sorter toolbar.
To add a slide, tap the “+” icon on the slide sorter toolbar.
To view all your slides, tap on the “Slide Counter” to bring up the slide sorter window. Tap on
a specific slide to navigate to it.
8
To move a slide, tap and hold a slide until the options appear. Without letting go, drag the
slide up or down to where you want to move the slide.
To delete slide(s), tap and hold any slide until the options appear. Tap the red “X” on the
slide(s) you want to delete. A confirmation box will appear, tap on “Yes” to permanently
delete the slide.
To duplicate a slide, tap on the “2X” icon
.
To change the template of a slide, tap on the template colour icon
.
9
Part F: Importing an Image
1. Tap on the “Import Object” icon
, select your file source, and choose your image.
2. Once you select an image, you will see a preview of your selected image. You can choose
to rotate, move, resize, and crop this image. You are able to rotate, move and resize the
image after the import as well, as shown in step 4.
10
a. Tap on the rotate icon to rotate your image 90 degrees clockwise.
b. Tap on the crop tool icon to crop your image. Tap, hold, and drag from one area of the
image to another to draw your crop box. Once you let go, you can move and adjust
your crop box. When finished, tap on the crop tool icon again to crop your image.
c. Tap on the lasso tool to define an area of the image to import. Tap, hold and drag to
draw an outline around the area you want to keep. When finished, tap on the lasso
tool again.
11
d. Use your two fingers to rotate, move, and resize your image. Below is an example of
how to resize the image.
3. When you are happy with your image, tap “Done.”
Your image is now inserted into your project.
12
4. After the import you can rotate, move, and resize your newly inserted image.
Part G: Inspector Tool
Tap on the “Inspector Tool”
to access the options. The inspector allows you to select and
modify an object or group of objects. You can duplicate, lock, copy, paste, and arrange these
objects with this tool.
13
From here on, tap on an object you wish to modify and select to perform the functions from
the options.
14
Part H: Create a Recording
Here is an example of recording a video with the use of the drawing tool.
1. Tap and hold or tap twice on the draw tool
to select a width size and the colour picker
to select a colour.
You can tap and hold or tap twice on any of the colour pickers to select a specific colour.
15
2. Tap on the record button to begin recording.
When recording, the record button will light up and the play button will turn into a pause
button. Tap on the record button or the pause button to stop/pause the recording.
You can record your voice through the built in microphone, if enabled, and you can use the
tools from the tool bar to manipulate anything during a recording.
In this example a red arrow is drawn with the draw tool
stop the recording.
. After drawing the red arrow we
Each slide has its own recorded timeline. You can tap on the right arrow
next slide and begin recording for that slide.
to advance to the
16
Part I: Timeline Editing
Tap on the “Time Counter” to view the “Time Editor.”
To access the options, tap and hold a track you would like to edit until the options appear.
On the right side of the timeline, you can tap the lock icon to lock the track.
17
Part J: Saving and Exporting Your Project
To save your project, tap on the “Save Project” icon
. Enter a project name and tap “Save.”
To export your project as an Explain Everything project file (xpl), “Export to…”, and then
“Project.” Just like importing, you can choose the destination to export to. Once you have
chosen a location, tap on “Export.”
18
Part K: Export to PDF
When exporting to PDF, please note that your audio recording will not be saved.
Tap on the “Save Project” icon
, “Export to…”, and then “PDF file.” Just like importing, you
can choose the destination to export to. Once you have chosen a location, tap on “Export.”
Park L: Export to Video File
There are two ways to export a video file.
a. To export all slides, tap on the “Export Movie” icon
and then choose a destination.
19
b. Tap on the “Save Project” icon
, “Export to…”, and then “Video file.” Just like importing,
you can choose the destination to export to. You can choose to export all videos or choose
specific slides.
To choose specific slides, tap on “Choose slides” and then tap on the slides you wish to
export as a video. Once you are done selecting the slides, tap on “Confirm” to choose the
slides and return to the previous screen.
Once you have chosen a location, tap on “Export.”
20
Part M: Export to Image File
There are two ways to export an image file.
a. To export the current slide as an image, tap on the “Export Image” icon
choose where to export to.
and then
b. Tap on the “Save Project” icon
, “Export to…”, and then “Image file.” Just like
importing, you can choose the destination to export to and then tap on “Export.”
For more detailed information:
• Explain Everything Tutorial Videos from Explain Everything
• Explain Everything Help iOS from Explain Everything (PDF)
• Explain Everything User Manual (iBook)
“Gestures Pinch” by GRPH3B18 is licensed under CC BY-SA 3.0
“Gestures Rotate” by GRPH3B18 is licensed under CC BY-SA 3.0
“Gestures Pan” by GRPH3B18 is licensed under CC BY-SA 3.0
“Gestures Tap” by GRPH3B18 is licensed under CC BY-SA 3.0
“Gestures Long Press” by GRPH3B18 is licensed under CC BY-SA 3.0
“Abraham Lincoln November 1863” in Public Domain
21