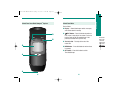
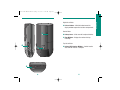
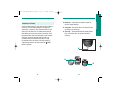
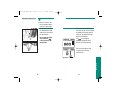
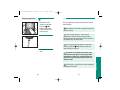
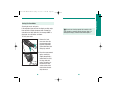
1
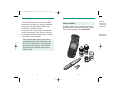
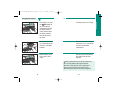
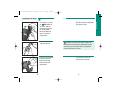
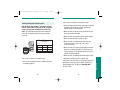
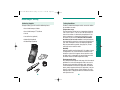
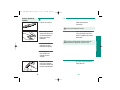
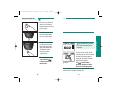
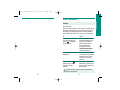
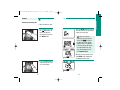
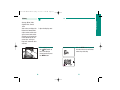
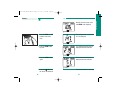
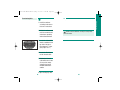
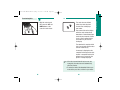
361-11264 CMPCT Manual (Eng) 8/8/02 3:45 PM Page 2
FRONT INSIDE
COVER- Blank
Important Tips
• Store full test drum in the original vial with
See page 25.
the cap tightly sealed until ready to use. Once
removed from the vial, test drum can be used
for 90 days or until the use-by date printed
on the vial label, whichever comes first.
• Keep the vial until the test drum is empty
See page 52.
and removed from the meter. When performing a quality control test, you will need
to refer to the expected values printed on
the vial label. The expected values are also
located on the control value insert.
• The meter is factory set with the beeper
See page 32.
turned on. We recommend that you always
leave the beeper turned on.
• The meter automatically advances a test
See page 25.
strip from the test drum when the
TEST
button is pressed. Do not puncture the
aluminum foil or remove a test strip
directly from the test drum.
• Holding the meter in an upright position,
See pages 48
gently touch and hold blood drop or control
and 60.
solution to the black notch on the front edge
of the test strip. Do not pull your finger away
until the
is displayed and the beep
is heard.
• Do not reuse a test strip that has been
See page 51.
completely released from the meter.
• Wait until the current test drum loaded
See page 25.
in the meter is empty before opening the
test drum compartment.
Inside Front Cover = BLANK
FIRST TEXT
PAGE
Rule at top of
pages
throughout
print: PMS
3288
Bold Headings
throughout
print:
PMS 3288
Bullets Print
PMS 3288
1/2 pt Rules
print:
PMS 3288
throughout
361-11264 CMPCT Manual (Eng) 8/8/02 3:45 PM Page 2
Table of Contents
Welcome. . . . . . . . . . . . . . . . . . . . . . . . . . . . . . . . . . 3
Where To Find Help. . . . . . . . . . . . . . . . . . . . . . . . . . 5
About This Manual . . . . . . . . . . . . . . . . . . . . . . . . . . 6
Getting Started . . . . . . . . . . . . . . . . . . . . . . . . . . . . 13
About your Accu-Chek Compact™ System . . . . . . 14
About your Meter. . . . . . . . . . . . . . . . . . . . . . . . 15
About the Test Drum . . . . . . . . . . . . . . . . . . . . . 18
Changing the Batteries. . . . . . . . . . . . . . . . . . . . 21
Installing the Test Drum . . . . . . . . . . . . . . . . . . . 25
Removing the Test Drum . . . . . . . . . . . . . . . . . . 30
Setting the Beeper, Year, Time, and Date . . . . . . . 32
Control Testing . . . . . . . . . . . . . . . . . . . . . . . . . . . . 42
What is Control Testing?. . . . . . . . . . . . . . . . . . . 42
When Should I Check My
Accu-Chek Compact™ System? . . . . . . . . . . . . . 42
Gathering Supplies . . . . . . . . . . . . . . . . . . . . . . 43
Running a Control Test. . . . . . . . . . . . . . . . . . . . 44
Understanding Your Control Results . . . . . . . . . . 52
Blood Sugar Testing . . . . . . . . . . . . . . . . . . . . . . . . 54
Gathering Supplies . . . . . . . . . . . . . . . . . . . . . . 54
Testing Conditions . . . . . . . . . . . . . . . . . . . . . . . 55
Getting a Good Drop of Blood . . . . . . . . . . . . . . . 56
Running a Blood Test . . . . . . . . . . . . . . . . . . . . . 58
Understanding Your Test Results . . . . . . . . . . . . . 64
1
Content Section
Headings print
PMS 3288
Page Numbers
at Bottom of
Page Print:
PMS 3288
throughout
361-11264 CMPCT Manual (Eng) 8/8/02 3:45 PM Page 4
Welcome
Other Information . . . . . . . . . . . . . . . . . . . . . . . . . . 71
Memory . . . . . . . . . . . . . . . . . . . . . . . . . . . . . . 71
Storing Results. . . . . . . . . . . . . . . . . . . . . . . . 71
Reviewing Stored Results . . . . . . . . . . . . . . . . 72
Mean Value, Highest Value, Lowest Value . . . . . 76
Transferring Data. . . . . . . . . . . . . . . . . . . . . . . . 81
Caring for Your Meter. . . . . . . . . . . . . . . . . . . . . 86
Storage and Handling . . . . . . . . . . . . . . . . . . . 86
Cleaning the Meter and Optics . . . . . . . . . . . . 88
Troubleshooting Guide . . . . . . . . . . . . . . . . . . . . 92
Product Limitations . . . . . . . . . . . . . . . . . . . . . 106
Product Specifications . . . . . . . . . . . . . . . . . . . 106
Product Safety Information . . . . . . . . . . . . . . . . 107
Additional Supplies . . . . . . . . . . . . . . . . . . . . . 108
Warranty . . . . . . . . . . . . . . . . . . . . . . . . . . . . . 109
Accu-Chek Compact™
Limited 3-Year Warranty . . . . . . . . . . . . . . . . 109
Non-Warranty Service Policy . . . . . . . . . . . . . 110
Warranty and Service Instructions . . . . . . . . . 110
References . . . . . . . . . . . . . . . . . . . . . . . . . . . 112
Patent Information . . . . . . . . . . . . . . . . . . . . . . 112
Thank you for selecting the Accu-Chek Compact™ meter.
The key benefits of this meter over other blood glucose
meters are:
2
3
1. No more individual strip handling:
• Test strips are now loaded in a test drum, with
each test drum containing 17 test strips.
• When the test drum is inserted, the meter
automatically moves the test drum to the correct
position and reads the code on the test drum.
2. Automatic strip delivery and ejection:
• Simply press the
TEST button and a test strip
advances from the test drum.
• Gently touch the front edge of the test strip to the
drop of blood on your fingertip. The strip will draw
up the blood automatically.
• Once a test is done and you have received your
blood sugar result, the strip is ejected easily.
3. Automatic coding:
• The meter codes itself by reading the barcode
on the label of the test drum when the test drum
is inserted.
Content Section
Headings print
PMS 3288
361-11264 CMPCT Manual (Eng) 8/8/02 3:45 PM Page 6
The Accu-Chek Compact™ meter automatically stores
blood glucose test results. It can store up to 100 blood
glucose values with time and date. Results can be
transferred to a computer if you wish.
It’s as easy as that - no other steps are required! With
the Accu-Chek Compact™ meter, you have all you need
to monitor your blood sugar wherever you are, whatever
you are doing - quickly and simply.
Before you begin testing, please read this manual
thoroughly. It provides all the information you need
to use the Accu-Chek Compact™ meter. Remember
to return the enclosed warranty card. This ensures
that you receive any updates on your Accu-Chek
Compact™ meter.
4
Where to Find Help
Accu-Chek Customer Care is available to answer your
questions 24 hours a day. We offer assistance in Spanish
and many other languages. Call 1-800-858-8072.
SM
Screened
boxes behind
text print: 10%
of PMS 3288
Image prints as
B/W Halftone
MEM
SET
5
361-11264 CMPCT Manual (Eng) 8/8/02 3:45 PM Page 8
About This Manual
This manual is set up into the following sections:
Section
Title
Content
1
Getting Started
Learn the system’s parts and features,
install batteries, install test drum, and set
beeper/time/date
13
2
Control Testing
Run control tests and understand results
42
3
Blood Sugar Testing
Run blood sugar test and understand results
54
4
Other Information
Reference memory results, caring for your
meter, transfer data, and troubleshooting guide
71
6
Page
7
1/2 Point Rules
Print PMS 3288
throughout
361-11264 CMPCT Manual (Eng) 8/8/02 3:45 PM Page 10
• Some pages in this manual have a single column that
may contain text, and/or pictures:
(example page)
8
• Any text that appears in the light teal shaded box with
any of these symbols is important information that
should be read carefully:
Warning!
This symbol warns of a situation
that may pose a risk to your health
(e.g., you may calculate the wrong
insulin dose).
Caution!
This symbol indicates that your
meter is at risk of being damaged (e.g.
through improper cleaning), or that
there may be a problem during testing.
Important!
This symbol highlights important
information that will help you get the
most out of your meter.
9
Screened
boxes behind
text print 10%
of PMS 3288
throughout
361-11264 CMPCT Manual (Eng) 8/8/02 3:45 PM Page 12
• Other pages in this manual have three columns:
❶
This column has pictures
or introductory information
about the section.
❸
❷
This column tells you
what action to perform.
1. Press the
button.
TEST
This column shows what the meter displays AFTER the
action is completed and/or may give details about the action.
On the display you will see “ ”,
followed by the display segment
test and then the date line.
Numerical
bullets print
PMS 3288
throughout
Hand and
Meter Icons
Print: PMS
3288 throughout
Sample screen
displays print
as B/W line art
and halftones
Page 10 image
Prints as B/W
halftone
10
11
361-11264 CMPCT Manual (Eng) 8/8/02 3:45 PM Page 14
Getting Started
1. Learn the system parts and features
Getting Started
Follow these four important steps before using the meter
for the first time:
2. Install batteries
3. Install test drum
4. Run controls
The results that appear on the meter display
throughout this manual are for illustration purposes
only. You may expect to see different results on your
own Accu-Chek Compact™ meter.
12
13
Section Tabs
Print PMS 3288
with reverse
type throughout
361-11264 CMPCT Manual (Eng) 8/8/02 3:45 PM Page 16
About Your Meter
Front of Meter
❶ Display – Shows blood sugar results, messages,
and results stored in memory.
❹
SET
MEM
❺
❷
TEST Button – Press this button to perform a
test, to eject a test strip at the end of a test, or to
turn the meter off. At the completion of a test,
pressing this button will eject the strip.
❸ Test Strip Slot – Test strip sticks out of the
meter here.
❶
❹ MEM Button – Press this button to review values
in memory.
❺ SET Button – Press this button to set the
Time/Date/Beeper.
❷
❸
14
15
Getting Started
About Your Accu-Chek Compact™ System
Directional
Rules from
numerical
bullets Print
PMS 3288
throughout
361-11264 CMPCT Manual (Eng) 8/8/02 3:45 PM Page 18
❻ Release Button – Slide this button toward the
display window to open the test drum compartment.
Back of Meter
❼
❼ Battery Cover – Slide cover off to replace batteries.
❽ View Window – Displays the number of strips
remaining.
Top Side of Meter
❻
❽
❾ Infrared (IR) Interface Window – Used to transfer
data from the meter to a computer.
❾
16
17
Getting Started
Right Side of Meter
361-11264 CMPCT Manual (Eng) 8/8/02 3:45 PM Page 20
The Accu-Chek Compact™ meter does not use individual
test strips. The Accu-Chek Compact™ test strips are
contained in a test drum. Each test drum holds 17 test
strips. Each test drum has a barcode printed along its
label. When you insert the test drum, your meter reads
this barcode (the meter will not display a code number).
Therefore, you do not need to code your meter as
the meter codes itself automatically when it reads
the barcode on the test drum. A test strip advances
automatically from the test drum when the
TEST
button is pressed.
❷ Test Drum – Barcode on label is read by the meter
so coding is not necessary.
❸ Test strip – Touch drop of blood or control solution
here at the black notch on the front end of the
test strip.
❸
❶
❷
18
19
Getting Started
❶ Drum vial – Label shows acceptable ranges for
glucose control solutions.
About the Test Drum
361-11264 CMPCT Manual (Eng) 8/8/02 3:45 PM Page 22
Your meter is shipped with two 1.5 volt (AAA) alkaline
batteries that need to be installed before testing. Battery
life will vary depending on usage, so always keep spares
on hand.
The meter saves battery power by automatically turning
off after five minutes of nonuse. When a blood sugar
test is finished, the meter turns off automatically after
60 seconds.
When battery power is low, the battery symbol
will
appear. This indicates that there is enough power to
finish testing with the current test drum loaded in the
meter. When this test drum is empty, change the batteries and the test drum at the same time.
When you replace the batteries, any blood sugar
results you have in memory will be retained (together
with additional test information such as test date and
display messages).
Time and date will need to be reset when
batteries are replaced.
When replacing batteries, always replace both at
the same time and make sure both batteries are the
same brand.
20
21
Getting Started
Changing the Batteries
361-11264 CMPCT Manual (Eng) 8/8/02 3:45 PM Page 24
Changing the Batteries
The battery cover is on a hinge.
2. Remove the old batteries, if applicable. Insert
two new 1.5 volt AAA
batteries.
Be sure to insert the batteries
so that the + and – ends match
the marks in the battery
compartment.
3. Slide the battery cover
back in place until it
snaps.
After you replace the batteries,
you need to reset the time
and date.
We recommend you wait until the current test
drum is empty before replacing the batteries.
Otherwise, it may take the meter a long time to
advance to the next test strip, and the use-by
date warning may also be incorrect (see page 25).
22
23
Getting Started
1. If the meter is on, press
the
TEST button to
turn it off. With the
meter turned off, slide
the battery cover to
unlock and then open
the battery compartment on the back of
the meter.
361-11264 CMPCT Manual (Eng) 8/8/02 3:45 PM Page 26
General Information
Handle the test drums with care! Once you
remove a test drum from its vial, you have 90
days to use up all the test strips. Do not open the
test drum compartment until all of the strips have
been used. Whenever the test drum compartment is
opened and closed, or when the batteries are replaced,
the meter thinks a new test drum has been inserted
and resets the 90-day countdown. The 90-day use-by
period no longer has any significance (see page 100).
If a partly used test drum is removed from the
meter and reinserted, the message “CTRL” flashes
in the display, indicating that a control test should
be performed. Perform a control test (see Running
a Control Test, on page 44) to ensure that the strips
are still usable. The display indicating the 90-day useby period (flashing test drum symbol and date) is still
invalid, however. If you use an expired test drum, you
may obtain incorrect blood sugar results.
24
25
Getting Started
Installing the Test Drum
361-11264 CMPCT Manual (Eng) 8/8/02 3:45 PM Page 28
Installing the Test Drum
2. Remove a new test
drum from the vial.
3. Insert the new test drum
by sliding it onto the
plastic post located
inside the test drum
compartment.
26
Wait for the motor to stop before
you open the meter.
Keep the vial until the test drum is empty and
removed from the meter. When performing a quality
control test, you will need to refer to the expected
values printed on the vial label.
The test drum can only be
inserted in one direction.
27
Getting Started
1. If the meter is on, press
the
TEST button to
turn it off. With the
meter turned off, slide
the release button
toward the display to
open the test drum
compartment.
361-11264 CMPCT Manual (Eng) 8/8/02 3:45 PM Page 30
Installing the Test Drum
The meter automatically moves
the test drum to the correct
position and reads the code on
the test drum. A dot appears in
the view window on the back
of the meter.
When you perform a blood sugar test, the meter
counts the number of test strips that have been used
and displays the number of strips remaining. When
all the strips have been used, the dot reappears in the
view window, and “End” and the test drum symbol
flash on the display, indicating that the test drum
is empty.
28
29
Getting Started
4. Close the test drum
compartment in the
direction of the arrow.
361-11264 CMPCT Manual (Eng) 8/8/02 3:45 PM Page 32
Removing the Test Drum
Getting Started
1. Slide the release button
toward the display window to open the test
drum compartment.
Hold the meter upright.
The empty test drum
drops out.
30
31
361-11264 CMPCT Manual (Eng) 8/8/02 3:45 PM Page 34
General Information
The Accu-Chek Compact™ meter allows you to set the
beeper, year, time, and date.
Beeper
The Accu-Chek Compact™ meter is factory set with the
beeper turned on. We recommend that you always leave
the beeper turned on. The meter beeps to announce that
it is starting to test and to confirm that the test strip has
received a sufficient amount of blood or control solution
for the test. It also beeps when it displays a message
on the display screen.
Year
The Accu-Chek Compact™ meter allows you to set the
year. The year is not displayed during testing or review
of blood sugar results. It is still important, however,
because February 29 in a leap year will only be recognized when the year is properly set. The current year
setting is also needed to clearly identify your blood sugar
results if you transfer them from your meter’s memory
to a computer.
32
Time and Date
If you have a new meter or you have just replaced the
batteries, the date will be reset to 01.01.2000, and the
time to 00:00 hours. Setting the time and date is an
optional feature. If you do not set the time and date,
your results will not be affected. However, prior to testing
and each time you replace the batteries, the time and
date should be reset if you plan to review your memory
to check when a test was done or if you plan to download the results into a software program.
If you do not set the date and time, these fields
will be filled with zeroes during testing. Your blood
sugar results saved in memory will be numbered
consecutively. However, only blood sugar results that
are saved with the date and time will be included in
the statistical display (average, minimum, and maximum values). See Memory on page 76.
You may choose between the 12-hour format (0-12
o’clock with a.m. or p.m.) and the military 24-hour
format (0-24). When the 12-hour format is selected,
the date is displayed with the month first, followed by
the day. When the 24-hour format is selected, the date
is displayed with the day first, followed by the month.
33
Getting Started
Setting the Beeper, Year, Time, and Date
361-11264 CMPCT Manual (Eng) 8/8/02 3:45 PM Page 36
Setting the Beeper, Year,
Time, and Date
After the SET button is pressed,
the meter turns on without
advancing a test strip from the
test drum.
The meter is factory set with
the beeper turned on. We
recommend that you always
leave the beeper turned on.
2. Press the MEM button
to turn the beeper on
or off.
34
3. Press the SET button
again.
The last two numbers of the year
field flash.
4. Press the MEM button
to change the year.
The meter scrolls upwards
through the year values. If you
hold the MEM button down, the
meter fast-scrolls to 2032 and
begins again at 2000.
35
Getting Started
1. If the meter is on, press
the
TEST button to
turn it off. With the
meter turned off, press
the SET button.
361-11264 CMPCT Manual (Eng) 8/8/02 3:45 PM Page 38
Setting the Beeper, Year,
Time, and Date
Getting Started
5. Press the SET button
until 12h appears.
6. Press MEM to change
between the 12-hour
and 24-hour time
format.
The 24-hour time format is also
known as military time.
7. Press the SET button.
The hour field flashes.
8. Press the MEM button
to select the correct
hour.
You may hold the MEM button
down to scroll forward quickly.
The AM or PM will not
appear until after the hour
has been selected.
9. Press the SET button.
36
The minutes field flashes.
37
361-11264 CMPCT Manual (Eng) 8/8/02 3:45 PM Page 40
Setting the Beeper, Year,
Time, and Date
11. Press the SET button.
At this point, the AM or
PM designation will appear.
The month field flashes.
This occurs if in the 12hour format; the day field will
flash if in the 24-hour format.
12. Press the MEM button
to select the correct
month.
13. Press the SET button.
The day field flashes.
This occurs if in the 12hour format; the month field
will flash if in the 24-hour
format.
38
39
Getting Started
10. Press the MEM button
to select the correct
minutes.
361-11264 CMPCT Manual (Eng) 8/8/02 3:45 PM Page 42
Setting the Beeper, Year,
Time, and Date
15. Press the
TEST
button to turn the
meter off.
The current settings are saved
automatically.
You may leave this setting mode at any time by
pressing the
TEST button to turn the meter off. The
settings you have entered will be saved.
40
41
Getting Started
14. Press the MEM button
to select the correct
day.
361-11264 CMPCT Manual (Eng) 8/8/02 3:45 PM Page 44
Control Testing
What is Control Testing?
Control testing is a way for you to check that your meter
and strips are working correctly. The control test is done
the same way you would perform a blood sugar test, only
you use the control solution instead of blood.
Why should I run a Control Test?
There are a number of factors that can affect the ability
of your Accu-Chek Compact meter and strips to give a
correct reading. Damage to your system (meter and
strips) can occur if handled, stored, or used improperly.
If damaged, there is a possibility that the results you get
from your system will be incorrect.
The control solution contains a known amount of sugar.
If you run a control test and the results fall within the
acceptable range, then you can feel assured that your
meter and strips are working correctly.
When should I check my Accu-Chek
Compact™ System?
42
Gathering Supplies
Note: The Accu-Chek Compact™ Care Kit is packaged
with one level of control solution. When purchased at
the store, control solutions are packaged with two levels
per box.
To do a control check, you will need the following items:
• Accu-Chek Compact™ Meter
• Accu-Chek Compact™ Control Solution(s)
Control values are located on the label of the test
drum vial and on the control value insert found in
the box that contains the test drums.
• Accu-Chek Compact™ Test Drum
Use only Accu-Chek Compact™ test drums with the Accu-Chek
Compact™ meter. It is important that you use the right glucose control
solutions for your Accu-Chek Compact™ Test Drum.
When you open a new bottle of control solution,
write the date on the label. Opened bottles of control
solution are good for three months or until the
expiration date, whichever comes first.
43
Control Testing
• Before using your meter to test blood sugar for
the first time.
• When you want to check the way you are performing
your blood sugar test.
• When you open a new test drum vial.
• If the meter is dropped or damaged.
• If the meter flashes CTRL, indicating that a control
test is required.
• After you have cleaned the meter.
• If you leave the cap off the test drum vial.
• If your result does not agree with how you feel.
• If you have repeated a test and the blood sugar result
is still lower or higher than expected.
• When you want to check the performance of the meter
and test drum together.
361-11264 CMPCT Manual (Eng) 8/8/02 3:45 PM Page 46
Running a Control Test
1. Open the display
cover and gather your
supplies.
2. Press the
button.
TEST
You have five minutes in which to perform
the test. After five minutes, the meter will shut
off and the entire test
procedure will need to
be repeated.
On the display, you will see
“ ”, followed by the display
segment test and then the
date line.
Make sure that no
segments are missing from
any of the 8 8 8 characters
at power-on (in the display
segment test). If a segment
is missing, please do not run
any more blood tests. Call
Accu-Chek Customer Care
at 1-800-858-8072.
SM
44
Control Testing
3. Wait for the test strip to
advance from the meter.
The flashing hand symbol and blood drop symbol appears and the
meter beeps.
45
361-11264 CMPCT Manual (Eng) 8/8/02 3:45 PM Page 48
Running a Control Test
4. Press the SET button.
CTRL is displayed and will be
stored in memory along with the
result so it is flagged as a control
test result in memory.
Be sure to press the SET button
before running a control. If you
don’t, then the meter will think
you’ve run a blood test. This will
result in confusing information
for your health care provider.
Results of control checks that are flagged with
“CTRL” are not used in statistical calculations (average,
minimum, and maximum values). If they are not
flagged, they will be included in statistical calculations.
5. Invert the control bottle
and squeeze until a
hanging droplet of
solution appears.
Control Testing
46
47
361-11264 CMPCT Manual (Eng) 8/8/02 3:45 PM Page 50
Running a Control Test
6. Hold the meter so the
test strip points downward at a slight angle.
7. Gently touch and hold
the droplet to the front
edge of the test strip on
the black notch.
The test starts as soon as the
test strip has the correct amount
of solution. If the beep signal is
turned on, the meter will beep
when the test begins.
Do not pull the bottle
away until the
is displayed and the
meter beeps.
The
on the display
gradually disappears while
the test is being performed.
The test result appears and
is stored in the memory
automatically.
▲ EXAMPLE
Control Testing
48
49
361-11264 CMPCT Manual (Eng) 8/8/02 3:46 PM Page 52
Running a Control Test
8. Holding the meter
straight up and down,
press the
TEST
button to turn off the
meter and release the
used test strip.
You may repeat the procedure using a different level of
control solution.
Do not open the test drum compartment when the
motor is running.
The Accu-Chek Compact™ meter turns off
automatically after five minutes of nonuse. After a
blood sugar result has been displayed, the meter turns
off automatically after 60 seconds.
If the display goes blank before the test strip is
released, press the
TEST button to release the
strip and turn the meter off.
9. Dispose of the used test
strip.
Retain the vial in which the test drum came
until you have used up the last test strips. When
you perform a control test, you will need to refer
to the list of expected values printed on the test
drum vial label.
50
51
Control Testing
Do not reuse a test strip that has been completely
released from the meter.
361-11264 CMPCT Manual (Eng) 8/8/02 3:46 PM Page 54
If the result is not within the acceptable range:
Understanding Your Control Results
Both the Accu-Chek Compact™ test drum vial label
and the control value insert indicate the acceptable
ranges for Low Level and High Level control solutions. The result displayed on your meter should fall
within the acceptable range for the level of solution
you used.
• Check the expiration date of the test drum and control
solutions. If the test drum or control solutions are
expired, dispose of them promptly.
• Make sure that the 90-day use-by period for the test
drum has not been exceeded.
• Make sure that you used the correct control solution.
• Make sure that the optical system is clean.
ACCU-CHEK Compact ™
Control Range
for Lot
Control
Target
Range
Hi
Lo
0000000(50)
(example)
• Make sure that you performed the test within the
correct temperature range +50° F to +104° F
(+10° C to +40° C).
• Make sure that the cap was placed tightly on the test
drum vial and control solutions. The test drums and
control solutions can be damaged when they are not
capped and stored properly.
• Make sure that you followed the testing steps exactly.
• Repeat the control test with a new test strip.
• You can feel confident that your test drum and meter
are working properly.
If the result is still not within the acceptable range, your
blood sugar results may not be reliable. Contact AccuChek Customer Care for help at 1-800-858-8072,
24 hours a day.
52
SM
53
Control Testing
If the result is within the acceptable range:
361-11264 CMPCT Manual (Eng) 8/8/02 3:46 PM Page 56
Blood Sugar Testing
Gathering Supplies
To begin testing, you will need the following items:
• Accu-Chek Compact™ Meter
• Accu-Chek Compact™ Test Drum
• Lancet
• Lancet Device (optional)
• Cotton Balls (optional)
54
Blood Sugar Testing
• Alcohol Wipes (optional)
Testing Conditions
To obtain reliable blood sugar results, ensure the following conditions are met:
Temperature range
The test must be carried out at a temperature between
+50° F and +104° F (+10° C and +40° C) because all
chemical reactions are affected by temperature. If the
test is performed at a temperature outside this range,
the result may be incorrect. Do not make treatment
decisions based on such results. At ambient temperatures outside this range, the meter turns off automatically or error messages or values are displayed together
with the thermometer symbol. (See page 94.) Do not
artificially heat or cool the meter.
Humidity
Relative humidity must be below 85%. A sudden change
in temperature can cause moisture to condense on or
inside the meter. If this happens, do not turn the meter
on. Wait until it is thoroughly dry again. Make sure that
the meter returns to room temperature slowly.
Electromagnetic fields
Very strong electromagnetic fields may affect the meter’s
performance. Such electromagnetic fields can occur in
the open near transmitters (CB radio, radio, television)
in the household near electrical equipment (microwave
ovens, poorly suppressed electrical equipment), and particularly near mobile phones. If this happens, the error
message “Err” is displayed. Move to a different location
and repeat the test.
55
361-11264 CMPCT Manual (Eng) 8/8/02 3:46 PM Page 58
Getting a Good Drop
of Blood
1. Prepare lancet device.
Follow manufacturer’s
instructions.
Do not reuse disposable lancets.
2. Wash hands in warm,
soapy water. Rinse and
dry completely. Warm
fingers to increase
blood flow.
Health Care Professionals: Follow the infection
control procedures appropriate for your facility.
4. Grasp finger near area
to be pricked and
squeeze for three
seconds.
5. Keeping hand down,
prick side of fingertip
and squeeze gently until
you get a drop of blood.
56
Be careful not to squeeze the
finger too hard.
57
Blood Sugar Testing
3. Let arm hang down at
side briefly to allow
blood flow to fingertip.
If you use an alcohol wipe to
clean your finger, make sure
finger is completely dry before
proceeding.
361-11264 CMPCT Manual (Eng) 8/8/02 3:46 PM Page 60
Running a Blood Test
1. Open the display cover
and gather your
supplies.
2. Press the
button.
TEST
Make sure that no
segments are missing from
any of the 8 8 8 characters
at power-on (in the display
segment test). If a segment is
missing, please do not run any
more blood tests. Call AccuChek Customer Care at
1-800-858-8072.
SM
3. Wait for the test strip to
advance from the meter.
The flashing hand symbol and blood drop symbol appear and the
meter beeps.
58
59
Blood Sugar Testing
You have five minutes in which to perform
the test. After five minutes, the meter will shut
off and the entire test
procedure will need to
be repeated.
On the display, you will see
“ ”, followed by the display
segment test and then the
date line.
361-11264 CMPCT Manual (Eng) 8/8/02 3:46 PM Page 62
Running a Blood Test
4. Use the lancet device to
obtain a small drop of
blood resting on the side
of your finger.
5. Hold the meter so the
test strip points downward at a slight angle.
Do not pull your finger
away until the
is displayed and the
meter beeps.
Do not bend the test strip
or an error message will be
displayed.
The test starts as soon as the
test strip has the correct amount
of blood. If the beep signal is
turned on, the meter will beep
when the test begins.
▲ EXAMPLE
The
on the display
gradually disappears while
the test is being performed.
The meter beeps and the test result appears. The result
is stored in the memory automatically.
60
61
Blood Sugar Testing
6. Gently touch and hold
the black notch on the
front edge of the test
strip to the blood drop.
The blood is drawn
into the test strip
automatically.
361-11264 CMPCT Manual (Eng) 8/8/02 3:46 PM Page 64
Running a Blood Test
7. Holding the meter
straight up and down,
press the
TEST
button to turn the
meter off and release
the test strip.
Do not open the test drum compartment when the
motor is running.
The Accu-Chek Compact™ meter turns off
automatically after five minutes of nonuse. After a
blood sugar result has been displayed, the meter turns
off automatically after 60 seconds.
8. Dispose of the used test
strip. Place the lancet
in a puncture proof
container with a lid,
such as a sharps container or a coffee can.
Retain the vial in which the test drum came
until you have used up the last test strips. When
you perform a control test, you will need to refer
to the list of expected values printed on the test
drum vial label.
Do not reuse a test strip that has been completely
released from the meter.
62
63
Blood Sugar Testing
If the display goes blank before the test strip is
released, press the
TEST button to release the
strip and turn the meter off.
361-11264 CMPCT Manual (Eng) 8/8/02 3:46 PM Page 66
Understanding Your Test Results
What’s Normal?
The normal fasting adult blood sugar range for a nondiabetic is 70 - 105 mg/dL1. One or two hours after
meals, normal blood sugar levels should be less than
140 mg/dL2. Your doctor will determine the range
that is appropriate for you.
Unusual Test Results
AND...
THEN...
your blood sugar result is
within the “normal” range,
you experience symptoms
of high or low blood sugar,
run a control test with your control solutions (see page
42, Control Testing ). If the control result is within the
acceptable range, review the proper testing procedure
and repeat your blood test. If your blood sugar result still
does not reflect the way you feel, contact your doctor.
64
65
Blood Sugar Testing
IF...
361-11264 CMPCT Manual (Eng) 8/8/02 3:46 PM Page 68
AND...
THEN...
your blood sugar result
seems unusually high
or low,
does not reflect the
way you feel, check the
following:
• Was the meter properly
cleaned?
• Was the test drum vial
cap tightly sealed?
• Was the test drum used
for more than 90 days
after opening?
• Was the test drum used
after the expiration date?
(use-by date found on
the vial)
• Was the test drum
stored in extreme
temperatures such as
in the car in very cold
or hot weather?
run a control test with your control solutions (see page
42, Control Testing). If the control result is within the
acceptable range, review the proper testing procedure
and repeat your blood test. If your blood sugar result still
does not reflect the way you feel, contact your doctor.
you get a low blood sugar
result or LO is displayed
(blood sugar result is
lower than the low end
of the system's reading
range – refer to your test
drum package insert for
more information),
you also experience
symptoms of low blood
sugar: sweating, trembling,
blurred vision, rapid heart
beat, tingling or numbness
around the mouth or
fingertips,
contact your doctor immediately.
66
Blood Sugar Testing
IF...
“If..., and...,
then...” Print
PMS 3288
throughout
67
361-11264 CMPCT Manual (Eng) 8/8/02 3:46 PM Page 70
AND...
THEN...
you get a low blood sugar
result or LO is displayed
(blood sugar result is lower
than the low end of the
system's reading range refer to your test drum
package insert for more
information),
symptoms are absent,
run a control test with your control solutions (see page
42, Control Testing). If the control result is within the
acceptable range, review the proper testing procedure
and repeat your blood sugar test. If LO still appears for
your blood sugar test result, follow your doctor’s
instructions. If the control result is not within the
acceptable range, turn to page 53.
your blood sugar result is
above 240 mg/dL,
this has occurred for several days,
check urine ketone levels with Chemstrip® K or
Chemstrip® uGK Test Strips. Contact your doctor.
you get a high blood sugar
result or HI is displayed
(blood sugar result is
higher than 600 mg/dL –
refer to your test drum
package insert for more
information),
you also experience
symptoms of high blood
sugar: fatigue, increased
appetite or thirst, frequent
urination, blurred vision,
headache or achiness,
contact your doctor immediately.
HI is displayed (blood
sugar result is higher than
600 mg/dL, meter is dirty,
or strips may be expired
or damaged by improper
storage),
symptoms are absent,
check that the test drum has not expired or been damaged, then retest. If HI still appears, run a control test
with your control solutions (see page 42, Control
Testing). If the control result is within the acceptable
range, review the proper testing procedure and repeat
your blood sugar test. If HI still appears for your blood
sugar result, follow your doctor’s instructions. If the
control result is not within the acceptable range, turn
to page 53.
68
69
Blood Sugar Testing
IF...
361-11264 CMPCT Manual (Eng) 8/8/02 3:46 PM Page 72
Other Information
Storing Results
The Accu-Chek Compact™ meter stores up to 100 results
with date and time. When the meter has 100 results in
the memory, the oldest result will be deleted automatically and the next test result is stored as the first result.
IF...
THEN...
any important information
(e.g. the thermometer
symbol ) is displayed
during the test,
the meter will store this
information together with
that result in memory.
Further information on
the safety warnings
may be found in the
Troubleshooting Guide
starting on page 92.
the meter displays a result
of LO or HI,
the meter will store these
in the memory like all other
results. They will not be
included in test result
averages.
the time, date and
symbol appears when
reviewing results in
memory,
the test drum used to
obtained the stored result
was not usable (more than
90 days old).
Results stored in memory will not be lost when
you replace the batteries.
70
71
Other Information
Memory
361-11264 CMPCT Manual (Eng) 8/8/02 3:46 PM Page 74
Memory
1. Open the display cover.
After the MEM button is pressed,
the meter then turns on without
advancing a test strip.
2. If the meter is on, press
the
TEST button to
turn it off. With the
meter turned off, press
the MEM button.
Make sure that no
segments are missing from
any of the 8 8 8 characters
at power-on (in the display
segment test). If a segment
is missing, please do not run
any more blood tests. Call
Accu-Chek Customer Care
at 1-800-858-8072.
SM
▲ EXAMPLE
Wait for the most recent result
and MEMO to be displayed at
the bottom of the screen.
3. Press the SET button to
move towards the “oldest” result stored.
▲ EXAMPLE
72
73
Other Information
Reviewing Stored Results
361-11264 CMPCT Manual (Eng) 8/8/02 3:46 PM Page 76
Memory
You can hold down the
buttons to scroll through your
results more quickly.
▲ EXAMPLE
5. Press the
TEST
button to turn the
meter off.
74
75
Other Information
4. Press the MEM button
to scroll forward to the
“newest” result again.
361-11264 CMPCT Manual (Eng) 8/8/02 3:46 PM Page 78
Memory
Other Information
Average (Mean) Value,
Highest Value, Lowest
Value
1. Open the display cover.
Your meter can display the
highest and lowest blood
sugar results and the average of current test results.
Statistics are based on the
results stored for the last
seven days, as long as
they were saved with date
and time.
2. If the meter is on, press
the
TEST button to
turn it off. With the
meter turned off, press
the MEM button.
76
After the MEM button is pressed,
the meter then turns on without
advancing a test strip.
77
361-11264 CMPCT Manual (Eng) 8/8/02 3:46 PM Page 80
Memory
▲ EXAMPLE
3. Press the MEM and SET
buttons at the same
time.
The average result and the letter
“A” are displayed.
▲ EXAMPLE
4. Press the MEM button
by itself.
The highest measured result is
displayed with date and time.
▲ EXAMPLE
5. Press the MEM button
again.
The lowest measured result is
displayed with date and time.
▲ EXAMPLE
6. Press the
TEST button to turn the meter off.
78
This will not advance a test strip.
79
Other Information
Wait for the most recent result
and MEMO to be displayed.
361-11264 CMPCT Manual (Eng) 8/8/02 3:46 PM Page 82
The blood sugar results stored in your meter can be
downloaded to a computer. This way you can track
long-term trends in your blood sugar values.
To download stored blood sugar results to a
computer, you need an Accu-Chek™ infrared cable
(not included) and:
• Accu-Chek Compass™ software (Cat. No. 3134008)
The Accu-Chek™ infrared cable is available
from Customer Service at 1-800-428-5076
(Cat. No. 3183408).
80
81
Other Information
Transferring Data
361-11264 CMPCT Manual (Eng) 8/8/02 3:46 PM Page 84
Transferring Data
Other Information
1. Install the software
according to the manufacturer's instructions.
2. Initiate the software and
read the manufacturer’s
instructions regarding
information download.
Make sure the software is ready to accept data
from the meter.
3. Locate the infrared (IR)
interface window on the
top side of the AccuChek Compact™ meter.
(See pages 16-17.)
4. Locate the IR window
on the infrared cable.
5. Position the infrared
cable within four inches
(10 cm) of the meter
and point the two IR
windows toward one
another.
6. Open the display cover.
82
83
361-11264 CMPCT Manual (Eng) 8/8/02 3:46 PM Page 86
Transferring Data
The meter turns on without
advancing a test strip from
the test drum and displays
two arrows.
Two arrows flash on the display
while the meter automatically
downloads all stored blood sugar
results to your computer. If there
is only a small amount of data,
the arrows may not flash on
the display.
The download is complete within
just a few seconds and the meter
turns off automatically.
A message is displayed on the
computer indicating that the data
transfer is complete. Refer to the
software user’s manual for the
specific message displayed.
• If the data transmission did not occur or was
incomplete, the meter turns off automatically
after five minutes.
• To make the most of the download feature, you
must set the year, date, and time in your meter.
84
85
Other Information
7. With the meter turned
OFF, press the SET and
MEM buttons at the
same time and release.
361-11264 CMPCT Manual (Eng) 8/8/02 3:46 PM Page 88
Storage and Handling
Please refer to the test drum package insert for the
storage temperature for the test drums.
Protect the meter from extremes in temperature and
humidity (the amount of dampness in the air). Avoid
storing in rooms such as kitchens, bathrooms, and
laundry areas.
If the test drum is in the meter, follow the
temperature storage directions found in the test drum
package insert. When the batteries and test drum
are inserted, do not store the meter above +86° F
(+30° C). (See page 106.) At temperatures at or above
+122° F (+50° C), the batteries could leak and damage
the meter. Store the meter in a dry place to keep it in
good condition.
If the meter is dropped, perform a control check with
Accu-Chek Compact™ Control Solutions before doing a
blood sugar test to ensure proper operation.
The Accu-Chek Compact™ carrying case protects your
meter, keeps it free from dust, and stores supplies.
86
87
Other Information
Caring for Your Meter
361-11264 CMPCT Manual (Eng) 8/8/02 3:46 PM Page 90
Cleaning the meter and optics
If the outside of your meter or the display are dirty, wipe
them off with a slightly dampened cloth. If blood has
entered the test strip guide or if the message “OFF” is
displayed, clean the meter as follows:
Do not use cleaning agents that contain acetic
acid (vinegar) or scouring agents because they can
damage the display and the measurement optics.
To clean your meter:
1. Remove the front
nose cover from the
measurement optics
by gently squeezing
it from both sides and
lifting it up and off.
2. Clean the measurement
optics carefully by
slightly dampening a
cotton swab or a soft,
lint-free cloth with
water. The optics are
located in the front
center section of the
meter where the test
strip advances.
88
89
Other Information
Caring For Your Meter
361-11264 CMPCT Manual (Eng) 8/8/02 3:46 PM Page 92
90
The cover must be snapped down completely
or the strip won’t advance properly.
91
Other Information
3. Replace the cover by
first setting it on top
of the optics window.
Snap down one side
of the cover first and
then snap down the
other side.
361-11264 CMPCT Manual (Eng) 8/8/02 3:46 PM Page 94
The following are display messages and error messages
that may appear on the meter’s display screen. Several
messages may be displayed simultaneously. For example, a combination such as a thermometer, test drum
symbol, blood sugar result, date, and “CTRL” flashing
means that the temperature during measurement was
not between +50° F to +104° F and the 90-day countdown period has ended.
DISPLAY
If you are unable to resolve a concern, please call
Accu-Chek Customer Care at 1-800-858-8072,
24 hours a day, 365 days a year. Do not make treatment decisions based on an error message.
SM
“Display,
Cause and
Action” Print
PMS 3288
throughout
CAUSE
ACTION
a. Batteries are dead.
a. Insert new batteries.
b. Ambient temperature is too low.
b. Move somewhere warmer and repeat test.
c. Display is damaged.
c. Call Accu-Chek Customer Care .
d. Meter is defective.
d. Call Accu-Chek Customer Care .
Battery power is sufficient for
several more tests.
Continue testing until all the test strips in the current test
drum have been used. Then, insert two new batteries
(type AAA) and a new test drum.
SM
SM
Meter will not
turn on.
92
Other Information
Troubleshooting Guide
93
361-11264 CMPCT Manual (Eng) 8/8/02 3:46 PM Page 96
DISPLAY
ACTION
Insufficient battery power – no
further tests can be performed.
Insert two new batteries (type AAA).
The meter was exposed to temperatures below +14° F (-10° C)
and the batteries are starting to
freeze.
Always store the meter above +14° F (-10° C).
Temperature was outside the
indicated range during testing.
The displayed result may only be used for reference purposes. It is saved along with the thermometer symbol.
The meter shuts off
after three seconds.
Clock has stopped.
Clock is slow after
the meter is
turned on.
To perform an accurate test, let the meter and test drum
slowly cool down or warm up and repeat the test. The
optimum measuring temperature is between +50° F
(+10° C) and +104° F (+40° C).
▲ EXAMPLE
It is too warm or too cold for the
test, i.e. warmer than +104° F
(+40° C) or colder than +50° F
(+10° C).
94
No test result is displayed or saved. Let the meter and
test drum slowly cool down or warm up and repeat the
test. The optimum measuring temperature is between
+50° F (+10° C) and +104° F (+40° C).
95
Other Information
CAUSE
361-11264 CMPCT Manual (Eng) 8/8/02 3:46 PM Page 98
DISPLAY
ACTION
There was not enough blood on
the test strip to start the test.
Repeat the test with a larger drop of blood.
The test drum in the meter is
empty.
Insert a new test drum. If the message is still displayed,
call Accu-Chek Customer CareSM.
The door was opened and closed
with a partly used test drum
inside or a partly used test drum
was inserted.
The meter cannot determine how long the test drum
has been outside the meter or whether it is still usable.
If you are certain that the 90-day use-by period has not
been exceeded, you may continue to use the test drum.
Perform a control check to verify that the test drum is
not expired. The result of the control test will be stored
in memory along with “CTRL”. The test drum symbol is
displayed until a new test drum is inserted.
A dot appears in
the view window on
the back of the
meter.
OR
96
If you do not perform a control test, the flashing test
drum symbol and the flashing “CTRL” will appear with
every new test until a new test drum is inserted. Until
this point, all results will be stored along with the flashing test drum symbol and “CTRL”.
97
Other Information
CAUSE
361-11264 CMPCT Manual (Eng) 8/8/02 3:46 PM Page 100
CAUSE
ACTION
“E - 2” flashes
The bar code information stored
in the meter is lost or unusable.
Open the test drum compartment and close again.
Make sure there is a test drum loaded in the meter. If
not, call Accu-Chek Customer Care at 1-800-858-8072.
SM
The 90-day use-by counter will no longer be valid.
Run a control test.
There is no test drum in the meter.
Insert a test drum.
The bar code on the test drum
is damaged.
Discard old test drum and insert a new test drum.
Make sure there is a test drum loaded in the meter. If
not, call Accu-Chek Customer Care at 1-800-858-8072.
SM
The 90-day use-by period has
been exceeded. The test strips
in the test drum are not usable.
Discard old test drum and insert a new test drum.
OR
appears during
testing.
98
99
Other Information
DISPLAY
361-11264 CMPCT Manual (Eng) 8/8/02 3:46 PM Page 102
DISPLAY
ACTION
a. A test error has occurred.
a. Repeat the test.
b. There is electromagnetic
interference.
b. Move away from possible sources of interference.
Such electromagnetic fields can occur in the open
near transmitters (CB radio, radio, television) in the
household near electrical equipment (microwave
ovens, poorly suppressed electrical equipment), and
particularly near mobile phones.
a. The test strip was forcibly
removed during testing.
a. Repeat the test, this time releasing the strip by using
the
TEST button.
b. The strip was bent during
contact with blood or controls,
or during measurement.
b. Repeat the test.
c. Optic cover is not completely
snapped on.
c. Snap the cover on (see pages 88-90).
The test strip is stuck in the
guide.
Pull the strip out of the meter. Carefully open the test
drum compartment and remove the test drum. Reinsert
the test drum. Close the test drum compartment. Keep
the use-by period in mind when reusing the test drum
because the 90-day use-by counter in the meter is no
longer correct.
100
101
Other Information
CAUSE
361-11264 CMPCT Manual (Eng) 8/8/02 3:46 PM Page 104
DISPLAY
ACTION
a. The test strip was touched
against the blood drop too
soon.
a. Turn the meter off, then back on again. Repeat the
test. Wait until the hand symbol has appeared in the
display before touching the test strip against the blood
drop or control solution drop.
b. The optical system is dirty.
b. Clean the optical system and repeat the test (see page
88, Cleaning the meter).
c. The test strip is unusable.
c. Repeat the test with a new test strip.
d. The meter was turned off and
on again. The strip is still in
the meter.
d. Hold the meter straight up and down and let the strip
drop out. Or remove the strip manually, even if it takes
a small amount of force.
e. The test strip was forcibly
removed during testing.
e. Repeat the test, this time releasing the strip by means
of the
TEST button.
f. The strip was bent during
contact with blood or controls,
or during measurement.
f. Repeat the test with a new strip.
g. The test strips are too old.
g. Discard the old test drum. Insert a new test drum.
The blood sugar result may be
above the high end of the meter’s
reading range.
See Understanding Your Test Results on page 64 for
more information.
102
103
Other Information
CAUSE
361-11264 CMPCT Manual (Eng) 8/8/02 3:46 PM Page 106
DISPLAY
ACTION
The blood sugar result may be
below the low end of the meter’s
reading range.
See Understanding Your Test Results on page 64 for
more information.
a. An error occurred while data
was being downloaded.
a. Download the data again and ensure that the meter
is in download mode before initiating the software (see
page 82, Transferring Data).
b. A bright light source is too
close to the download cable
or the meter.
b. Move the light source.
c. Positioning and distance from
the infrared (IR) cable is not
correct.
c. Move the two units to within four inches (10 cm).
Make sure the two IR transmission windows are
correctly positioned.
d. A computer software error
occurred.
d. Read the manual for the download software and
check that it is correctly installed.
The meter is defective.
Call Accu-Chek Customer Care at 1-800-858-8072.
104
SM
105
Other Information
The computer
displays a download-related error
message and the
Accu-Chek
Compact™ meter
is turned off or the
download symbols
do not appear.
CAUSE
361-11264 CMPCT Manual (Eng) 8/8/02 3:46 PM Page 108
Please read the information packaged with your test
drum regarding up-to-date product specifications
and limitations.
Product Specifications
Display
Digital LCD with symbols
Automatic
power-off
After 60 seconds / 5 minutes
(depending on testing status)
Power supply
Two 1.5 volt AAA alkaline batteries
(do not use rechargeable)
Battery life
Approximately 500 tests
Meter type
Accu-Chek Compact™ Meter
Interface
Infrared interface
Measuring range
10 - 600 mg/dL (0.6 - 33.3 mmol/L)
LED/IRED
Class I
Sample size
3.5 µL
Measuring time
Approximately 15 seconds
(depending on blood sugar level)
System operating +50° F to +104° F
conditions
(+10° C to +40° C)
Meter storage
conditions
With batteries and test drum:
+36° F to +86° F
(+2° C to +30° C)
Product Safety Information
Explanation of Symbols on Meter Label
See Accompanying Documentation
This product fulfills the requirements of Directive
89/336 EEC on electromagnetic compatibility.
The Accu-Chek
Compact meter has been
Listed by Underwriter’s
Laboratories Inc.® in
accordance with UL
3101-1 and CAN/CSA
C22.2 No. 1010-1.
Relative humidity Less than 85% relative humidity
operating range
Memory capacity 100 blood glucose values with
time and date
Dimensions
4” x 2” x 1.2” (103 x 52 x 31 mm)
Weight
Approximately 4.2 oz. (120 g)
with batteries and test drum
106
107
Other Information
Product Limitations
361-11264 CMPCT Manual (Eng) 8/8/02 3:46 PM Page 110
Warranty
The following supplies and accessories are available
from your authorized Roche Diagnostics Diabetes Health
Care Center, pharmacies, or your medical/surgical
supply dealer:
Test Drums
Accu-Chek Compact™ Test Drums
Cat. No. 3038106
Glucose Controls
Accu-Chek Compact™ Control Solutions
Cat. No. 3038459
Lancets
Accu-Chek® Softclix® Lancet Device
Cat. No. 957
Accu-Chek® Softclix® Lancets
Cat. No. 971 (100/box)
Accu-Chek® Softclix® Lancets
Cat. No. 988 (200/box)
108
Accu-Chek Compact™ Limited Three-Year Warranty
Roche Diagnostics warrants that your Accu-Chek Compact™
meter will be free from defects in material and workmanship
for three years from the date of purchase. If, during this threeyear period, the meter does not work properly because of a
defect in materials or workmanship, Roche Diagnostics will
repair the meter or replace it with a new Accu-Chek Compact™
meter or equivalent product free of charge. The warranty of the
repaired or replacement meter will expire on the date of the
original warranty expiration or ninety (90) days after shipment
of a replacement system, whichever period is longer. This warranty applies only to the original purchaser of the meter.
This warranty does not apply to the performance of an AccuChek Compact™ meter that has been damaged by accident or
has been altered, misused, tampered with or abused in any
way. Roche Diagnostics will handle meters that show damage
or abuse according to its Non-Warranty Service Policy,
described on page 110.
The purchaser’s exclusive remedy with respect to the
Accu-Chek Compact™ meter shall be repair or replacement,
at the option of Roche Diagnostics. In no event shall Roche
Diagnostics be liable to the purchaser or any other person for
any incidental, consequential, special or indirect, or punitive
damages arising from or in any way connected with the purchase or operation of the meter or its parts. No warranty of
merchantability or fitness for a particular purpose, if any is
implied from the sale of the meter, shall extend for a longer
duration than three (3) years from the date of purchase.
109
Other Information
Additional Supplies
361-11264 CMPCT Manual (Eng) 8/8/02 3:46 PM Page 112
Non-Warranty Service Policy
Roche Diagnostics’ Non-Warranty Service Policy applies to
meters where the above warranty has not become effective,
has become inapplicable, or has expired. Roche Diagnostics
will repair or replace, at its option, meters returned to it for a
service charge (not to exceed $35). Replacement will be with
like or similar product. Replacement (or repaired) meters will
be warranted for a period of ninety (90) days from shipment
under a limited warranty providing for replacement of parts
and labor at no charge.
Warranty and Service Instructions
All requests for return of Accu-Chek Compact™ meters under
the above warranty or service policy must be made to AccuChek Customer Care by calling 1-800-858-8072. You will
be mailed a return authorization label which must be affixed
to your carton for shipping the system to Roche Diagnostics.
Cartons received without this label will be returned to you
at your expense. Customers experiencing difficulties should
review the Troubleshooting Guide section found on page
92 of this manual. Further inquiries should be directed to
Accu-Chek Customer Care at 1-800-858-8072.
IMPORTANT – READ CAREFULLY BEFORE USE
A RESTRICTED LICENSE LIMITS USE OF THE ACCU-CHEK
COMPACT™ SYSTEM.
The Accu-Chek Compact™ System (meter, including test drum
and test strips) and its use are protected by US patent numbers
5,720,924; 5,863,800; 5,206,147; 5,334,508; 5,240,860;
5,382,523; 5,521,060; 6,036,919; 4,924,879; and Re. 35,803;
and may be covered by one or more of the following Patents:
5,575,403; 5,738,244; 5,630,986; 5,632,410; 5,660,791;
5,810,199; and 5,510,266. A license to use the Accu-Chek
Compact™ system is only granted when the Accu-Chek Compact™
meter is used with the Accu-Chek Compact™ test drums and test
strips. Accu-Chek Compact™ test strips are provided with a specifically matched bar code on the associated test drum. These test
drums and associated bar code are specifically manufactured for
operation with the Accu-Chek Compact™ meter. Use of other test
strips or test drums with unmatched bar codes or even with a
matched bar code supplied by another manufacturer may prevent
or impair the proper function of the Accu-Chek Compact™ system.
SM
SM
Be sure to fill out and mail the warranty card that comes with
the Accu-Chek Compact™ system.
110
Using the Accu-Chek Compact™ system indicates your acceptance
of the restricted license to use the Accu-Chek Compact™ system
only with Accu-Chek Compact™ test drums and test strips. If you
do not agree to the terms and conditions of the restricted license,
you may return, to the place of purchase, the unused Accu-Chek
Compact™ system (or Accu-Chek Compact™ meter, if you only
purchased a meter) for a full refund. If you have any questions,
please call Accu-Chek Customer Care at 1-800-858-8072.
SM
Except where prohibited by statute, all warranties covering the
Accu-Chek Compact™ system are voided by the use of the AccuChek Compact™ system with any test strips other than the AccuChek Compact™ test drums.
111
Other Information
Some states do not allow limitations on how long an implied
warranty will last or the exclusion of incidental or consequential
damages, so the above limitation and exclusion may not apply
to you. This warranty gives you specific legal rights, which vary
from state to state.
361-11264 CMPCT Manual (Eng) 8/8/02 3:46 PM Page 114
References
1. Tietz, N.W., Textbook of Clinical Chemistry,
p. 2190 (1994).
2. American Diabetes Association Position Statement,
Diabetes Care, Vol. 19 (Suppl. 1), p. S4 (1996).
Patent Information
This product may be covered by one or more of
the following U.S. Patents: 5,720,924; 5,863,800;
5,206,147; 5,334,508; 5,240,860; 5,382,523;
5,521,060; 6,036,919; 4,924,879; Re. 35,803.
5,575,403; 5,738,244; 5,630,986; 5,632,410;
5,660,791; 5,810,199; and 5,510,266.
112
INSERT/START
Spanish Cover
HERE
(Signature pg.
115)
361-11264 CMPCT Manual (Eng) 8/8/02 3:46 PM Page 116
ACCU-CHEK, ACCU-CHEK COMPACT, ACCU-CHEK CUSTOMER CARE, CHEMSTRIP,
and SOFTCLIX are trademarks of a member of the Roche Group.
©2001 Roche Diagnostics. All rights reserved. 052705400-0601
Roche Logo
Prints: PMS
300
Distributed in the U.S.A. by:
Roche Diagnostics Corporation
9115 Hague Road
Indianapolis, IN 46256
Made in Germany
www.accu-chek.com