1
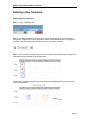
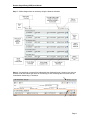
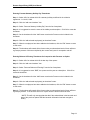
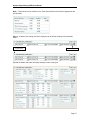
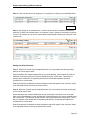
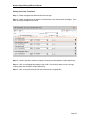
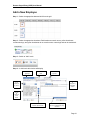
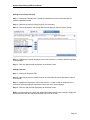
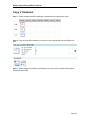
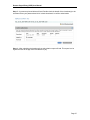
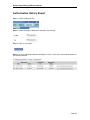
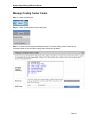
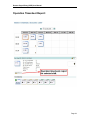
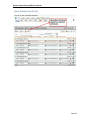
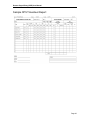
Remote Payroll Entry (RPE) User Manual
Remote Payroll Entry (RPE) System
User Manual
Page 1
Remote Payroll Entry (RPE) User Manual
Table of Content
Welcome _______________________________________________________ 3
Getting Started __________________________________________________ 4
Timesheets _____________________________________________________ 5
Overview – Page Layout .................................................................................5
Entering a New Timesheet..............................................................................6
Entering Regular Timesheets.................................................................................... 6
Entering Foreman Statutory Holiday Pay Timesheets ............................................ 14
Entering Balance Of Earning Timesheets for Companies with Foreman on Option14
Entering Foreman Vacation Pay Timesheets.......................................................... 15
Entering Bereavement Leave Timesheets (for foremen) ........................................ 15
Editing Employee Details .............................................................................16
Editing a Regular Timesheet ................................................................................... 16
Editing Year End Timesheets.................................................................................. 18
Editing Gross Only Timesheets............................................................................... 19
Copying a Timesheet Detail Record ............................................................20
Add a New Employee ....................................................................................21
Adding Employees by Name ................................................................................... 22
Adding Employees by Registration Number............................................................ 22
Adding Regular Work Force Employees ................................................................. 22
Adding Foreman Employees ................................................................................... 22
Adding Service Group Foreman.............................................................................. 23
Adding Linesman .................................................................................................... 23
Delete a Timesheet........................................................................................24
Copy a Timesheet..........................................................................................25
Authorizing a Timesheet _________________________________________ 26
Exporting a Timesheet___________________________________________ 28
Exporting Costing ______________________________________________ 29
Authorization History Report _____________________________________ 30
Manage Costing Center Codes ____________________________________ 31
Manage Commodity Codes _______________________________________ 32
Manage Occupation Codes _______________________________________ 33
Operation Timesheet Report: _____________________________________ 34
Preview Authorization Report: ____________________________________ 37
Page 2
Remote Payroll Entry (RPE) User Manual
Welcome
Welcome to the employers.bcmea.com Remote Payroll Entry system
The Remote Payroll Entry (RPE) system provides access to online submission and retrieval of
payroll information. This system is accessed by the association's member company management
and senior staff.
Should you require further assistance, you may contact bcmea.com technical support line at
(778) 835 0348 of use the “contact us” link to send us you comments and/or feedback.
We would like to hear from you.
Page 3
Remote Payroll Entry (RPE) User Manual
Getting Started
The Remote Payroll Entry system can be accessed at
https://rpe.waterfrontemployersofbc.com
Enter User Name and Password and click go.
Page 4
Remote Payroll Entry (RPE) User Manual
Timesheets
The following sections provide information on the functions available through the timesheet
pages.
Overview – Page Layout
Once logged in to Remote Payroll Entry, the page shown below will be presented. Please
familiarize yourself with the features shown.
Default date is the beginning
of the current pay period.
Click on box
to select
that date
and shift
(indicated
by orange
box)
Shows
details of
the
selected
date and
shift
Click to add a
new timesheet
Shows timesheets already entered. Timesheets in
red contain errors, timesheets in yellow contain
warnings, and timesheets in green are able to be
authorized
Page 5
Remote Payroll Entry (RPE) User Manual
Entering a New Timesheet
Entering Regular Timesheets
Step 1 – Select Timesheets Tab.
Step 2 – The date defaults to the first day of the current payroll period (i.e. the first Sunday of
every week). A specific date can be selected by clicking on the calendar button or by typing it in
manually. Using the arrow buttons will shift the date in one week increments.
Step 3 – Click on the box corresponding to the date and shift of the timesheet to be entered. The
selected box will be indicated by an orange square.
The number of employees working on a particular day can be displayed by hovering the cursor
over the indicated icon.
Page 6
Remote Payroll Entry (RPE) User Manual
Step 4 – Click on “add new timesheet” button
Step 5 – On the subsequent page select the appropriate template from the drop down menu. The
Employees Working at Company template will automatically give the list of the employees
plugged in for that date and shift. The Empty Time Sheet template will allow the manual entry of
employees. Add a description if necessary, and click OK.
Cruise start/end times can also be selected for the applicable companies.
Step 6 - The edit page, shown below, will load. Enter Ship, Ship Code and Account Code. Select
the appropriate Port Code, Site-Berth and Operation from the drop down menus.
Page 7
Remote Payroll Entry (RPE) User Manual
Step 7 – Make changes here as necessary using the features indicated.
Step 8 – Any warnings or errors will be indicated by the displayed icon(s). Hovering over the icon
with the cursor will indicate the nature of the warning or error. Warnings and errors can also be
viewed when Authorizing a Timesheet.
Page 8
Remote Payroll Entry (RPE) User Manual
Loading a Worksheet
This menu selection is currently only available for companies utilizing excel worksheets to
dispatch employees, as a method of loading excel spreadsheet information to the timesheet
system.
Note: The following procedures are for Office 2003 and higher.
Step 1 – At left navigation menu click on “Worksheet Import”.
Step 2 – The “Import Worksheet” page as shown below will load.
‘Help” contains procedures to
define worksheet zones in
Office 2003 format; newer
versions of Office may differ
slightly
Step 3 – Enter an Order date and Shift, then browse to the predefined worksheet on your local
drive and click on “Go” button. (For more information about predefined worksheet format, please
read the help section on the web site.)
A warning message as shown below will appear and alert user not to close the browser or back
out of the page. Click on “OK” to proceed.
A successful message as shown below will be displayed when process is done.
Page 9
Remote Payroll Entry (RPE) User Manual
Indicates import worksheet
process was successful
Step 4 – At left navigation menu click on “Timesheets”.
Step 5 – A “Timesheet” webpage as shown below will load. The calendar will show a Person
icon when there is a worksheet loaded.
Indicates where a worksheet
is loaded
Page 10
Remote Payroll Entry (RPE) User Manual
Step 6 – Click on the box corresponding to the date and shift of the timesheet to be added (the
selected box will be indicated by an orange square), then click on the Add New Timesheet icon.
The template dropdown list will contain the worksheet imported.
Step 7 – Select the appropriate template and then click the “OK” button.
Wait until the timesheet is built.
Page 11
Remote Payroll Entry (RPE) User Manual
Step 8 – Modify the timesheet and then click on the Save button.
Timesheet detail is saved and re-loaded.
Step 9 – When you return to the timesheet main page, a padlock icon indicates whether the
timesheets are locked or unlocked. If locked, click on the check box next to the padlock icon to
unlock. (The timesheets are all locked / unlocked on a toggle basis.)
Click check box to lock or
unlock timesheets
Step 10 – To unlock an individual timesheet, click on the timesheet number, then un-tick the
check box in the timesheet detail page. Click on the “Save” button the save the timesheet.
The selected timesheet detail page will load. A padlock icon with check box is located on the top
of the timesheet table.
Page 12
Remote Payroll Entry (RPE) User Manual
NOTE: When a timesheet is locked, only users with authorization rights can access the
timesheet, The check box is disabled for unauthorized users.
When a locked timesheet is clicked on by an unauthorized user, the following message will
display:
Page 13
Remote Payroll Entry (RPE) User Manual
Entering Foreman Statutory Holiday Pay Timesheets
Step 1 – Select shift 2 on a date which IS a statutory holiday as defined in the collective
agreement. i.e. Jan 01, 2008
Step 2 – Click the “add new timesheet” icon.
Step 3 – Select “Foreman Statutory Holiday Pay” from the list of templates.
Step 4 – It is suggested to enter the name of the holiday as a description. Click OK to create the
timesheet.
Step 5 – On the timesheet click the “Add” button to select the Foreman to be included in the
timesheet.
Step 6 – Click the “add selected employee(s) to timesheet” button.
Step 7 – When the employees have been added to the timesheet, click the “Edit” button to return
to edit mode.
Step 8 – The timesheet will contain all the foremen that you selected and each of them will have
a gross pay amount of 8 hours multiplied by the current hourly rate for occupation code 05.
Entering Balance Of Earning Timesheets for Companies with Foreman on Option
Step 1 – Select shift 2 on a date which IS the last day of the quarter.
Step 2 – Click the “add new timesheet” icon.
Step 3 – Select “Foreman Balance of Earnings” from the list of templates.
Step 4 – It is suggested to enter “BOE”, the quarter and the year as a description. Click OK to
create the timesheet.
Step 5 – On the timesheet click the “Add” button to select the Foreman to be included in the
timesheet.
Step 6 – Click the “add selected employee(s) to timesheet” button.
Step 7 – When the employees have been added to the timesheet, click the “Edit” button to return
to edit mode.
Step 8 – The timesheet will contain all the foremen that you selected and each of them will have
a gross pay amount. If the foremen are not on “option” then the amount should be 0.00.
* NOTE: This will only auto-populate the data if the selected date is the last week end
date of the previous quarter AND the last week information has been merged to
history.
Page 14
Remote Payroll Entry (RPE) User Manual
Entering Foreman Vacation Pay Timesheets
Step 1 – Select shift 2 of the prior year’s December 31st date. e.g., If the current year is 2008,
then select December 31, 2007.
Step 2 – Click the “add new timesheet” icon.
Step 3 – Select “Foreman Vacation Pay” from the list of templates.
Step 4 – It is suggested to enter the name “Foreman Vacation Pay” and the year as the
description. Click OK to create the timesheet.
Step 5 – On the timesheet click the “Add” button and select the Foreman to be included in the
timesheet.
Step 6 – Click the “Add selected employees to timesheet:” button.
Step 7 – When the employees have been added to the timesheet, click the “Edit” button to return
to edit mode.
Step 8 – The timesheet will contain all the foremen that you selected and each of them will have
a gross pay amount.
Entering Bereavement Leave Timesheets (for foremen)
Step 1 – Select shift 2 on any date.
Step 2 – Click the “add new timesheet” icon.
Step 3 – Select “Foreman Bereavement Leave” from the list of templates.
Step 4 – It is suggested to enter the name “Bereavement Leave” as the description. Click OK to
create the timesheet.
Step 5 – On the timesheet click the “add” button and select the Foreman to be included in the
timesheet.
Step 6 – Click the “add selected employee(s) to timesheet” button.
Step 7 – When the employee has been added to the timesheet, click the “Edit” button to return to
edit mode.
Step 8 – The timesheet will contain the foremen that you selected and each of them will have a
gross pay amount of 8 hours multiplied by the current hourly rate for occupation code 05.
Page 15
Remote Payroll Entry (RPE) User Manual
Editing Employee Details
Editing a Regular Timesheet
Step 1 – Select the appropriate date and shift from the grid.
Step 2 – Select the appropriate timesheet. Red timesheets contain errors, yellow timesheets
contain warnings, and green timesheets do not contain errors or warnings and can be authorized.
Step 3 – Use the drop down menus to change costing centre, commodity, occupation code, and
skill differential respectively
Click on the expand button to activate the other details to edit. Once expanded a window like the
one shown below will display. From here the necessary changes can be made.
Page 16
Remote Payroll Entry (RPE) User Manual
Note – There should not be Variation in the Total Hours between the Collective Agreement and
the Allocated.
Step 4 – If desired, the costing line for an employee can be split by clicking on the indicated
button.
Expand details
Split costing line
Expand the details and make necessary changes to each costing line.
Page 17
Remote Payroll Entry (RPE) User Manual
Step 5 – User can also remove an employee or a costing line by clicking on the indicated button.
Delete Line
Step 6 – By clicking on the indicated icon, comments and notes can be added to the selected
detail line. A white icon indicates there is no comment or note; a yellow icon indicates a comment
or note. The comment or note can be viewed without expanding the details by hovering the cursor
over the icon.
Editing Year End Timesheets
Case 1: When the Foreman year end split (December 31) occurs earlier than the pay ending
date for the current payroll week:
When timesheets are created in dates after the year end split date, all the foreman records are
held back, meaning that they will not be processed during the current week. There will be a
warning at the timesheet level explaining that foremen records after split date will not be
submitted in the current week.
After the timesheet is submitted, the same timesheet number will appear in the next week, ready
to be submitted with the remaining Foreman records.
Case 2: When the Foreman year end split (December 31) occurs later than the pay ending date
for the current payroll week:
When timesheets are created in dates after the pay ending date, but before the year end split
date, all the Longshoreman records are held back, meaning that they will not be processed during
the current week. The Foreman records however, will be processed in the current week. There
will be a warning at the timesheet level explaining that foremen records after split date will be
submitted in the current week.
After the timesheet is submitted, the same timesheet number will appear in the next week, ready
to be submitted with the remaining Longshoreman records.
Page 18
Remote Payroll Entry (RPE) User Manual
Editing Gross Only Timesheets
Step 1 – Select the appropriate date and shift from the grid.
Step 2 – Select the appropriate timesheet. A window like the one shown below will display. From
here necessary changes can be made.
Step 3 – Use the drop down menus to change site-berth, port and operation codes respectively.
Step 4 – Click on the appropriate employee line to edit. Use the drop down menus to change
costing codes and occupation codes respectively.
Step 5 – Click on the gross amount and enter new amount as appropriate.
Page 19
Remote Payroll Entry (RPE) User Manual
Copying a Timesheet Detail Record
Step 1 – Select “Copy” mode.
Step 2 – Select the employee with the shift details to be copied; it will be outlined in orange once
selected.
Step 3 – Click the paste icon for each employee to apply the copied shift details to that employee.
A green checkmark will display to indicate details will be pasted to that employee. Note: Only
enabled (non-grayed) fields will be copied.
Step 4 – Click the “Save” button to apply and see the copied changes.
Step 5 – Click on “Edit” mode to continue working on timesheet.
Page 20
Remote Payroll Entry (RPE) User Manual
Add a New Employee
Step 1 – Select the appropriate date and shift from the grid.
Step 2 – Select the appropriate timesheet. Red timesheets contain errors, yellow timesheets
contain warnings, and green timesheets do not contain errors or warnings and can be authorized.
Step 3 – Switch to “Add” mode.
Step 4 – In Add mode this window will display
Click to add an
Employee
Click to add an
RWF
Click to add
a Foreman
Search
for an
employee
by name
Use to add
an
employee by
registration
number
Results
for
employee
name
search
Use to transfer employees
between adjacent fields
Click to add the employee(s)
shown in the field above to the
timesheet
Page 21
Remote Payroll Entry (RPE) User Manual
Adding Employees by Name
Step 1 – Enter the employee first or last name in the Name field and click “find”. The employees
who’s name match the entry will be added to the “employee(s) found” list.
Step 2 – Optionally choose the Costing Code, Occupation or the Commodity.
Step 3 – Highlight the employee in the list and click the “>” button to add the employee to the
selection.
Step 4 – Click the “add selected employee(s) to timesheet” button.
Adding Employees by Registration Number
Step 1 – Optionally choose the Costing Code, Occupation or the Commodity.
Step 2 – Enter the employee registration number and click “add to selection”
Step 3 – Click the “add selected employee(s) to timesheet” button.
Adding Regular Work Force Employees
Step 1 – Choose the RWF Tab.
Step 2 – Optionally choose the Costing Code, Occupation or the Commodity.
Step 3 – Highlight the RWF employee in the list and click the “>” button to add the employee to
the selection.
Step 4 – Click the “add selected employee(s) to timesheet” button.
Adding Foreman Employees
Step 1 – Choose the Foreman Tab.
Step 2 – Optionally choose the Costing Code, Occupation or the Commodity.
Step 3 – Highlight the Foreman employee in the list and click the “>” button to add the employee
to the selection.
Step 4 – Click the “add selected employee(s) to timesheet” button.
Page 22
Remote Payroll Entry (RPE) User Manual
Adding Service Group Foreman
Step 1 – Choose the Foreman Tab. Foreman List shows Service Group Foreman with SG
besides registration number.
Step 2 – Optionally choose the Costing Code or the Commodity.
Step 3 – Choose Occupation code 5 Only Ship foreman apply for Service Group Foreman.
Step 4 – Highlight the Foreman employee in the list and click the “>” button to add the employee
to the selection.
Step 5 – Click the “add selected employee(s) to timesheet” button.
Adding Linesman
Step 1 – Choose the Employee Tab.
Step 2 – Optionally choose the Costing Code or the Commodity & Choose Occupation code 15
for Linesmen.
Step 3 – Highlight the employee in the list and click the “>” button to add the employee to the
selection or enter the employee registration number and click “add to selection”
Step 4 – Click the “add selected employee(s) to timesheet” button.
Note: Linesman added to the sheet with default Skill Differential NO, when change to Apply skill
differential means pay the lead hand rate adds 0.80 cents to the skill.
Page 23
Remote Payroll Entry (RPE) User Manual
Delete a Timesheet
Step 1 – Select the appropriate date and shift from the grid.
Step 2 – Select the appropriate timesheet and drag and drop into Trash bin.
Page 24
Remote Payroll Entry (RPE) User Manual
Copy a Timesheet
Step 1 – Select the date and shift containing the timesheet to be copied from the grid.
Step 2 – Drag and drop the timesheet to be copied on to the appropriate Date and Shift on the
grid.
Step 3 – Make changes if necessary by selecting the new copy of the timesheet and using the
Edit and/or Add modes.
Page 25
Remote Payroll Entry (RPE) User Manual
Authorizing a Timesheet
Step 1 – Select the Authorize tab.
Step 2 – A screen like the one below will be displayed once the Authorized tab is selected.
Please be familiar with the features shown. (Note: errors can also be seen in Edit Timesheet
mode).
Click to edit
timesheet
Click to print the
error / warning
report.
Indicates the
timesheet
contains errors
and cannot be
authorized.
Click to expand
/ collapse
timesheet
details
Indicates the
timesheet is
ready to be
authorized.
Indicates the
timesheet contains
warnings that have
to be reviewed
prior to
authorization.
Check box to
select timesheet
for authorization
Click Checkmark
to override ALL
warnings for
selected timesheet
Check box to
override the
warning listed
Click to approve
and accept the
selected
warnings.
Step 3 – Click to print timesheet (optional). Button will be blue when it is activated.
Step 4 – Click for final submission of the selected timesheets into the payroll. Button will be blue
when it is activated.
Page 26
Remote Payroll Entry (RPE) User Manual
Step 5 – A screen as pictured below will load. Double check the details of the timesheet(s) to be
submitted. Enter your password and click “submit timesheets” to confirm authorization.
Step 6 – After submitting the timesheet(s) an authorization report will load. This report is to be
signed and sent to the pay office to authorize to pay.
Page 27
Remote Payroll Entry (RPE) User Manual
Exporting a Timesheet
Step 1 – Select the Export tab.
Step 2 – Select Export Timesheets from the side panel.
Step 3 – Select the range of dates from which the timesheets are to be exported from.
Step 4 – Select the shift(s) from which the timesheets are to be exported from.
Step 5 – Select the Data Element(s) to include in the exported timesheet(s).
Page 28
Remote Payroll Entry (RPE) User Manual
Exporting Costing
Step 1 – Select the Export tab.
Step 2 – Select Export Timesheets from the side panel.
Step 3 – Using the drop down menu, select the date and payroll run from which the costing data
is to be exported and click on “export”.
Page 29
Remote Payroll Entry (RPE) User Manual
Authorization History Report
Step 1 – Select the Reports Tab.
Step 2 – Select the range of dates to be included in the report(s).
Step 3 – Click on “run report”.
Step 4 – A list of submitted timesheets will display. Click on “View / Print Authorization Report” for
the desired timesheet.
Page 30
Remote Payroll Entry (RPE) User Manual
Manage Costing Center Codes
Step 1 – Select the Admin tab.
Step 2 – Select Costing Center from the side panel.
Step 3 – A screen like the one pictured below will load. From here Costing Center Codes can be
removed if shown in blue and also Costing Center Codes can be added.
Page 31
Remote Payroll Entry (RPE) User Manual
Manage Commodity Codes
Step 1 – Select the Admin tab.
Step 2 – Select Costing Center from the side panel.
Step 3 – A screen like the one pictured below will load. From here Commodity Codes that appear
in the lists can be altered (i.e. remove unused codes). Use the blue arrows to transfer the
highlighted code(s) between fields.
Page 32
Remote Payroll Entry (RPE) User Manual
Manage Occupation Codes
Step 1 – Select the Admin tab
Step 2 – Select Occupation Codes from the side panel
Step 3 – A screen like the one pictured below will load. From here Occupation Codes that appear
in the lists can be altered (i.e. remove unused codes). Use the blue arrows to transfer the
highlighted code(s) between fields.
Page 33
Remote Payroll Entry (RPE) User Manual
Operation Timesheet Report:
Page 34
Remote Payroll Entry (RPE) User Manual
Page 35
Remote Payroll Entry (RPE) User Manual
Sample OPS Timesheet Report:
Page 36
Remote Payroll Entry (RPE) User Manual
Preview Authorization Report:
In authorization page
Page 37
Remote Payroll Entry (RPE) User Manual
Sample Preview Authorization Report.
Page 38