1
TimePunch
TimePunch
Watcher
User Manual
TimePunch03.06.2013
KG, Wormser Str. 37, 68642 Bürstadt
Document Information:
Document-Name
User Manual, TimePunch Watcher
Revision-Number
13
Saved at
03.06.2013
Number of Pages
25
Publisher:
TimePunch KG
Wormser Str. 37
68642 Bürstadt
TimePunch03.06.2013
KG, Wormser Str. 37, 68642 Bürstadt
TIMEPUNCH WATCHER
Table of contents
Introduction ..............................................................................................4
Installation .............................................................................................4
Working with the TimePunch Watcher ...............................................................5
Basics ...................................................................................................5
Starting the time recording .........................................................................6
Pausing and stopping the time recording ..........................................................6
Cancelling the time recording ......................................................................7
Changing the current project and adding a description .........................................8
Modifying time entries in the past..................................................................9
Adding a time entry ................................................................................9
Adjusting an existing time entry .................................................................9
Deleting a time entry ..............................................................................9
Manage projects and tasks ........................................................................... 10
Create a new project ............................................................................... 11
Modifying an existing project ..................................................................... 11
Basics............................................................................................... 11
Tasks ............................................................................................... 11
Details ............................................................................................. 13
Deleting an existing project ....................................................................... 14
Create and modify common tasks ................................................................ 15
Settings.................................................................................................. 16
Recording Settings .................................................................................. 16
Display Settings ..................................................................................... 19
Start-Options ........................................................................................... 22
Permissions ............................................................................................. 23
Revision 2
Page 3 of 25
TIMEPUNCH WATCHER
Introduction
The TimePunch Watcher is one of the most important parts in TimePunch, because it
offers the possibility to track the work time directly at the PC.
Due to that fact, most people who are using TimePunch had already been aware of it and
also may have been be using it in one or the other manner.
Installation
The TimePunch Watcher is part of the Standard Installation of TimePunch and will be
automatically installed. If the TimePunch Watcher is not needed, then the Watcher needs
to be deselected in the installation package of TimePunch.
Revision 2
Page 4 of 25
TIMEPUNCH WATCHER
Working with the TimePunch Watcher
This chapter describes how to use the TimePunch Watcher and to get out most of it.
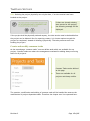
Basics
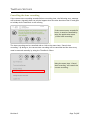
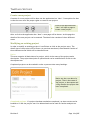
The TimePunch Watcher is kept simple and rely on the design principals of the new
Windows 8 Style. The picture shows the
different areas of the TimePunch
Watcher.
Red – What needs to be done?
In this area one has to choose which
project / task shall be done next.
Orange – What’s the current task?
This area shows the current project /
task that will be tracked at the moment.
What’s next?
Green – What has been done?
This list contains all tasks of the current
day. To that list naturally belongs the
current task too that will be shown with
an open end.
What’s current?
Blue – The command centre
Using the buttons at the lower area, the
time recording can be started, paused
and stopped. Additionally you will see
other settings in the menu too.
What‘s happend?
Revision 2
Page 5 of 25
TIMEPUNCH WATCHER
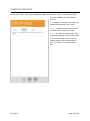
Starting the time recording
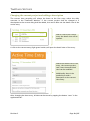
In order to start the time recording, a project needs to be selected first. That can be done
with a click to the project and task selection, like the following area shows.
Project and Task need to be
selected first.
After choosing the project and task, the time recording can be started with a click to the
button “start” at the application bar.
The time recording can be
started with a click to the
button „start“.
Hint: If you want to switch the current project or task, then you don’t have to stop the
current time recording. It’s sufficient to select a new project or task and to press “start”
again. The previous project will then be stopped automatically and the new one will be
started.
Pausing and stopping the time recording
The time recording can be paused with a click to “pause” and ended with a click to
“stop”.
The button „pause“ and „stop“
can be used to stop time
recording.
Revision 2
Page 6 of 25
TIMEPUNCH WATCHER
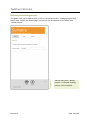
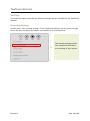
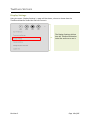
Cancelling the time recording
If the current time recording exceeds 24 hour recording time, the following error message
will be shown. Normally that can only be happen when the user shut down the PC and goes
to holiday while TimePunch is still running.
If the current entry exceeds 24
hours, it must be cancelled by
using the application menu
„Cancel time recording“
The time recording can be cancelled with a click to the menu item “Cancel time
recording”. By doing so, the current time recording will be cancelled and the time entry
must be entered manually by using the TimePunch Client.
Using the menu item “Cancel
time recording” will cancel the
current recording.
Revision 2
Page 7 of 25
TIMEPUNCH WATCHER
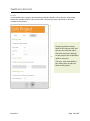
Changing the current project and adding a description
The current time recording will always be shown as the first entry within the daily
overview in the TimePunch Watcher. If the current project shall be changed or a
description to the current doing shall be added, this can be done via the detail view of the
active entry.
With a click to the current
entry the detail view will be
opened.
A click to the current entry (light green border) will open the detail view of the entry.
Within the detail view of the
entry, the current project,
task, start time and break
time can be modified.
Additionally there’s the
possibility to add a
description to the current
time entry.
After changing the time entry, all data can be stored by tapping the button “save” in the
application bar.
Revision 2
Page 8 of 25
TIMEPUNCH WATCHER
Modifying time entries in the past
Depending on the current user rights, also existing time entries can be adjusted or
modified. There are three different ways to achieve this.
Adding a time entry
If the time line need to be enhanced with an additional entry (e.g. adding an ad-hoc
meeting), new time entries can be added manually by clicking the application bar “new”.
By clicking the application
bar “new” a new entry can
be created.
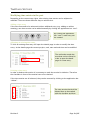
Adjusting an existing time entry
To click an existing time entry will open the details page in order to modify the time
entry. At the details page the current project, task, start and end time can be modified.
The red border marks the
area that can be clicked in
order to open the detail
page of a time entry.
Deleting a time entry
In order to delete time entries it’s necessary to mark the entries for deletion. Therefore
the checkbox in front of the entries have to be checked.
If the time entries are all selected, they can be removed by clicking to the application bar
“delete”.
The time entries that shall be
deleted have to be marked
with the checkbox and then
deleted with the „delete“
Revision 2
Page 9 of 25
TIMEPUNCH WATCHER
Manage projects and tasks
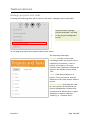
Creating and modifying tasks will be done via the menu “Manage projects and tasks”.
Using the menu „Manage
projects and tasks“ will lead
to the project-management
screen.
At this page all projects and common tasks will be shown.
The following rules apply:
Projects: In order to start time
recording at least one project will be
required for accounting. If such a
project is not there or not even
created, then TimePunch will book the
times on the default project called
“NN”.
Tasks: Tasks always belong to a
project. They are used for a better
distinction of the time entries within a
project.
Common Tasks: Such tasks are valid
for every project and simplifies the
project-management, because they
only have to be defined once. A good
example for common tasks are
“Meeting” or “Common Stuff”.
Revision 2
Page 10 of 25
TIMEPUNCH WATCHER
Create a new project
Creation of a new project will be done via the application bar “New”. Prerequisite for that
is that the user owns the proper rights to create a new project.
Click to the application bar
“New” will open a page to
create a new project.
After a click to the application bar “New” a new page will be shown. At this page the
details of the new project can be entered. The detail view consists of three different
areas.
Modifying an existing project
In order to modify an existing project it’s sufficient to click at the project entry. The
detail view of the project will be shown. As previous mentioned, these details consists of
three different areas which will be described next.
Basics
This area contains all basic data of a project, which is the name of the project and a
description. The project description is optional and can be modified with a click to the
description text.
Completed projects can be marked in order to prevent time entry bookings.
Basics are the core data of a
project. That is the name of
the project, a description and
a flag whether the project has
been completed.
Completed projects: If a project has been marked as completed, no time entries can be
booked to it. But the project won’t be deleted and can be used for further analysis too.
Tasks
Revision 2
Page 11 of 25
TIMEPUNCH WATCHER
In the area “tasks” all project dependent tasks will be shown. That’s are all tasks which
are only available for the selected
project.
Add: Adding new tasks can be done by
adding the application bar “add”.
Modify: Already existing tasks can be
renamed with a click to the task.
Delete: In order to delete tasks, they
need to be marked with the check box
in front of the tasks. After that the
marked tasks can be deleted with a
click to “delete” in the application
bar.
Revision 2
Page 12 of 25
TIMEPUNCH WATCHER
Details
In the Details area, project and accounting relevant details will be shown. Accounting
details are always valid for the current user, whereas the time restriction is directly
related to the project.
Accounting data is always
valid for the current user and
can vary for different users.
The time restriction belongs
to the project and is therefore
valid for any user.
The max. work time defines
how many hours a staff can
book to the project.
Revision 2
Page 13 of 25
TIMEPUNCH WATCHER
Deleting an existing project
The detail view can be opened with a click to the project at the “manage projects and
tasks” page. Within the details page, the project can be deleted via the menu item
“delete project”.
Via the menu item “delete
project” an already existing
project can be deleted.
Revision 2
Page 14 of 25
TIMEPUNCH WATCHER
Hint: Deleting the project physically can only be done, if no time entries have been
booked at the project.
If there are already existing
time entries for the project,
the following message will be
displayed.
If the project shall be physically deleted anyway, the time entries must be deleted before
the project can be deleted. But for reporting reasons, it’s a better option to mark the
project as completed, instead of deleting it physically. That also prevents staff from
booking the project.
Create and modify common tasks
At the second page “common tasks” one can define tasks which are available for any
project. Common tasks can reduce the management overhead for adding always recurring
tasks for all projects.
Common Tasks can be defined
at this page.
These are available for all
projects and always visible.
The creation, modification and editing of common tasks will be handled the same as the
modification of project-dependent tasks. Therefore the chapter won’t be repeated here.
Revision 2
Page 15 of 25
TIMEPUNCH WATCHER
Settings
The following chapter describes the different settings that are available for the TimePunch
Watcher.
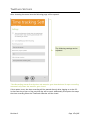
Recording Settings
Via the menu “Time tracking settings” of the TimePunch Watcher one can get to the page
where the user can adjust the manner how TimePunch is recording times.
The recording settings define
how TimePunch will handle
the recording of time entries.
Revision 2
Page 16 of 25
TIMEPUNCH WATCHER
After choosing the menu item the following page will be opened.
The following settings can be
adjusted.
Time Recording starts directly when the watcher gets launched and it stops recording
automatically when the watcher gets closed.
If this option is set, the time recording will be started directly after logging on to the PC.
In that case the project of the previous day will be used. Additionally this option also stops
the time recording when the TimePunch Watcher will be closed.
Revision 2
Page 17 of 25
TIMEPUNCH WATCHER
Use simplified pause time recording
If this option has been set, the handling of break times will be simplified. There won’t be
an additional button with that a break-time-recording can be started. If the user wants to
create a break, it’s enough to stop the current work-time-recording and restart it after the
break.
The time between stopping and restarting will be automatically calculated as break time.
Recording precision
This setting defines how the start and end time of a recording gets rounded. As a default
there’s a 1 minute rounding in place. But in many other companies it might be more useful
to set the recording precision to e.g. 5 minutes. But that depends where you are working.
Remind for project update
Using that option TimePunch will remind you to check the time recording from time to
time. When there’s a lot of buzz in the office, it might be useful that TimePunch shows
itself in order to remind you to validate the project you are working on.
After locking Windows
With this setting one can define how TimePunch reacts when Windows will be locked. The
following possibilities can be chosen:
Pause time recording
After locking Windows a break time recording will instantly started. After the break
TimePunch will continue recording the previous project.
Ignore 5 to 30 minutes of absense
If that option has been chosen, TimePunch carries on until the defined time span
has been reached. If the PC is still locked, the complete time starting from locking
Windows until signing in again will be tracked as break time. If the staff logs on
before the time span has been reached, then no break time at all will be recorded.
Don’t pause time recording at all
Even if the PC is locked, TimePunch will record that time as work time. Only if the
staff manually paused the recording or switched it off, a break time will be
recorded.
But it doesn’t matter which settings has been chosen: If the locking time exceeds 6 hours,
the time recording will be closed with the locking time as the end time.
Revision 2
Page 18 of 25
TIMEPUNCH WATCHER
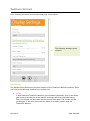
Display Settings
Using the menu „Display Settings“ a page will be shown, where to choose how the
TimePunch Watcher looks like and how to use it
The Display Settings defines
how the TimePunch Watcher
looks like and how to use it.
Revision 2
Page 19 of 25
TIMEPUNCH WATCHER
After choosing the menu item the following page will be shown.
The following settings can be
choosen.
Window Style
The Window Style defines how the main window of the TimePunch Watcher behaves. There
you’ll have the following possibilities to choose from.
Hidden
In that mode the TimePunch Watcher gets collapsed completely. Only if the mouse
gets moved to the border of the monitor and stays still for the defined latency
time, the window will be moved into the screen back again. The window will be
closed again, if the user clicks with the mouse to another position than the
TimePunch Watcher.
Revision 2
Page 20 of 25
TIMEPUNCH WATCHER
Touch friendly
In that mode the window won’t be collapsed completely, but stays about 5mm
visible at the border of the screen. That’s enough to tap to the window in order to
activate it again.
Visible
If that settings is active, TimePunch stays always visible at the screen. This is
always useful, if TimePunch can stay at a second or third monitor on a defined
place.
Manual
If the manual settings has been chosen TimePunch won’t open automatically. In
order to open the Window the user has to click to the TimePunch Icon at the system
tray.
Invisible
Using this setting the TimePunch Watcher won’t be shown at all. Only if the
TimePunch Watcher gets started twice using the start menu of windows will show
the TimePunch Watcher again
Hint: This setting only makes sense in combination with the recording setting “Time
Recording starts directly when the watcher gets launched and it stops recording
automatically when the watcher gets closed.” Because with this setting the
TimePunch Watcher will record the daily working time automatically and without
showing the TimePunch Watcher to the user.
TimePunch Watcher Icon
Using that setting it can be defined, if and when the Icon of the TimePunch Watcher will
be shown.
Show TimePunch Watcher in Task Bar
The TimePunch Watcher will be shown with all other opened software in the task
bar of Windows.
Show TimePunch Watcher in System Tray
With that setting the TimePunch Watcher will be shown in the system tray of
windows. A click to the icon will open the TimePunch Watcher itself.
Don’t show the TimePunch Watcher Icon at all
Using that setting the TimePunch Watcher won’t be shown as an icon; neither in
the task bar nor in the system tray of windows.
Revision 2
Page 21 of 25
TIMEPUNCH WATCHER
Window Docking & Show at desktop
Using the settings for the window docking and the desktop, one can define where the
TimePunch Watcher stays at the screen.
Start-Options
The TimePunch Watcher can be started with different start options. Normally that’s not
necessary, but it can be useful with special configurations.
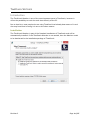
In order to start the TimePunch Watcher with a command parameter, one should look for
the TimePunch Watcher in the Startup folder of Windows. With a right button click the
properties can be opened.
There can be set two start parameters.
/principal={TimePunch Profile}
Using the start parameter “/principal” the used TimePunch Profile can be set. The
principal is the account owner. That means it‘s a complete switch of the user profile. If
the TimePunch Watcher gets started with that principal, the user also have the permissions
of the new profile.
To make that work, it’s necessary that the target profile is protected with a password.
That’s a security feature, because otherwise a project staff could access the data of his
chief if his account is not password protected.
/identity={TimePunch Profile}
Using the start parameter “/identity“ the used TimePunch Profile can be switched. In
opposite to the previous command, only the TimePunch profile for recording the time will
be exchanged. The permissions won’t change this way. Therefore the parameter
"/identity" will only function, if the current principal owns administration rights. Because
otherwise it’s not allowed to switch the profile.
This feature can be compared with the possibility to switch the user profile within the
TimePunch Client.
Revision 2
Page 22 of 25
TIMEPUNCH WATCHER
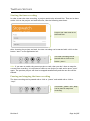
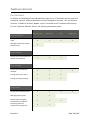
Permissions
As default all installations have administration rights first. If TimePunch will be used in an
enterprise network, different permissions can be assigned to the users. This can be done
with the “TimePunch Profiles” Module, which is included in the TimePunch PRO Version.
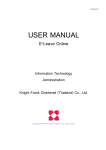
For the TimePunch Watcher there’s the following permission matrix.
Administrator
Full Access
Edit
Logging only
Login
x
x
x
x
Manage TimePunch Profiles
(switch users)
x
x
x
x
Access to the TimePunch
Watcher
x
x
x
Change active time entry
x
x
x
Change recording settings
x
x
x
Access to the active projects
x
x
x
Managing the projects
x
x
x
x
x
x
Login Permissions
Synchronization
Access to the Synchronization
Wizard of TimePunch
Time recording
x
Project access
Send projects using the
TimePunch Sync Wizard
Receive projects via
TimePunch Sync Wizard
Revision 2
x
x
Page 23 of 25
TIMEPUNCH WATCHER
Task access
Access to the active tasks
x
x
x
x
Managing the common tasks
x
x
Access to the time entries
x
x
x
x
Modify existing time entries
x
x
x
x
x
x
x
x
Time entries
Send time entries using the
TimePunch Sync Wizard
Receive time entries using the
TimePunch Sync Wizard
Restricted modification of
existing time entries.
Revision 2
x
Page 24 of 25
TIMEPUNCH WATCHER
End of the Document
Revision 2
Page 25 of 25