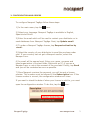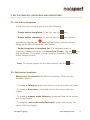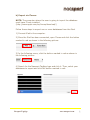
1
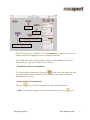
User’s manual
NACSPORT TAG&GO USER’S MANUAL
1. Introduction
2. Configuration and orders
3. Button template (categories and descriptors)
3.1
3.2
List button templates
Edit button templates
3.2.1 Button properties
4. Analyse (registering actions)
5. Databases
5.1
5.2
List of databases
Export databases
Nacsport Tag&go
www.nacsport.com
1
1. INTRODUCTION
Nacsport Tag&go is an iPad app for easily registering actions for an
event you are watching or filming.
Data is collected by using a button template (with categories and
descriptors) created by the user on the iPad, or imported from the
following Nacsport software: Basic, Basic Plus, Scout Plus, Pro Plus and
Elite.
Once the event has finished, the resulting database of information can
be exported for opening in any Nacsport software and also exported as
an XML file so it can be used in other timeline based video analysis
products (such as Gamebreaker © or SportsCode ©). Linking this
information with a video will easily show you all your registered actions
from the iPad.
Nacsport Tag&go can be downloaded for free on iTunes with the
following limitations:
-
You cannot import templates from other iPads or Nacsport software.
You cannot duplicate templates within the app.
Only the first 15 category registers in a database can be exported to
Nacsport software (or as an XML file).
To obtain full features of this app, it is compulsory to request for a
license. More information here.
Nacsport Tag&go
www.nacsport.com
2
2. CONFIGURATION AND ORDERS
To configure Nacsport Tag&go follow these steps:
1) In the main menu, tap the
icon.
2) Select your language. Nacsport Tag&go is available in English,
Spanish and Dutch.
3) Enter the email which will be used to contact your distributor or to
send databases from Nacsport Tag&go. Next, tap Update email.
4) To order a Nacsport Tag&go license, tap Request activation by
email.
5) Select the country of your distributor to send the purchase order
mail. If your country has not got a Nacsport reseller, select the
Nacsport icon.
6) An email will be opened next. Enter your name, surname and
team/organisation in the text fields. Mark with an (X) if you are a
Nacsport user or not at the moment of the purchase. Finally, tap Send
and you will be contacted as soon as possible.
7) Once Nacsport receives the payment, you will be sent a license
number. This number must be entered in the Subscription box. If the
license number is correct, the configuration window will close.
If you want to check the date of when your licence is valid to, you must
open the configuration window. To do this, tap the
Nacsport Tag&go
icon.
www.nacsport.com
3
3. BUTTON TEMPLATE (CATEGORIES AND DESCRIPTORS)
3.1. List button templates
In this work environment you can do the following:
- Create button templates. To do this, tap the
icon.
- Delete button templates. To do this, tap the
icon, select a
template by tapping the
icon and tap Delete. Another option:
Swipe left on your template and tap Delete.
- Import template to template list. The template must be
previously loaded via iTunes (see import via iTunes), tap the
icon
and tap Accept. If you wish, you can modify the name of the template
before tapping Accept.
- Help. To receive support for this environment, tap the
icon.
3.2. Edit button templates
Buttons can be created with different purposes. These are the
available options:
- To create a Category: press and hold on the screen with one finger.
- To create a Descriptor: press and hold on the screen with two
fingers.
- To create a manual mode Category: press and hold on the screen
with three fingers.
- To create an auto-add mode Descriptor: press and hold on the
screen with four fingers.
Nacsport Tag&go
www.nacsport.com
4
Category
Descriptor
Auto-add mode descriptor
Manual mode Category
Once the button is created, it can be moved by tapping it with one
finger and then dragging it to the desired position.
To modify the size of the button, select it and spread or pinch it.
Alternatively, use the “button size” sliders.
- Duplicate button templates:
To copy a button template, tap the
icon, select a name for the
new template and tap Accept. Then, select your choice between
duplicating it or not.
- Export button templates:
Tap the
icon, enter the recipient email and tap Send.
- Help. To receive support for this environment, tap the
Nacsport Tag&go
icon.
www.nacsport.com
5
3.2.1 Button properties
This view consists of 3 sections:
General options:
- Block/unblock movement of the configuration window.
To block the movement of the configuration window, tap the
icon.
To unblock the movement of the configuration window, tap the
icon.
- Multiple button selection: To do this, keep your finger pressed for one
second on the button which will be used as a reference, or tap the
multiple selection button
. Next, start tapping the buttons you
wish to select (these buttons will have an orange border after being
selected).
-
Delete button: Select a button and tap the
message will appear.
icon. A confirmation
-
Change screen background colour: Tap the
your choice.
icon and select
Button appearance:
New name: Tap in the blank box and enter the name for the selected
button. If the name is coloured in red, this means that the name is
already selected for another button.
Text appearance: Tap the
icon to modify the colour, visibility, size
and alignment of your text. The window that appears can be blocked to
change the appearance of following buttons by tapping the
Nacsport Tag&go
icon.
www.nacsport.com
6
Button visible during register: If you do not want to make your button
visible during registering, tap this selection circle.
Visible counter: If you do not want to make your counter visible during
registering, tap this selection circle.
Size of the button: To modify the size (width and height) of the button,
move the two circles to the right or left.
Button behaviour:
1) Category:
There are two ways to register actions:
Default mode: The length of each register (action) is 10 seconds,
5 seconds before (PRE) and 5 seconds after (POST) the buttons is
pressed. You can change these PRE and POST times to suit your
requirements.
Manual mode: The user will decide the start and end of a register
by manually tapping when it starts and then again when it ends.
The default PRE and POST times are 0 seconds, but they can be
modified.
How to create manual mode categories:
To have a category button in manual mode, tap the white circle
next to “manual mode” under “Button Behaviour”.
In manual mode, category buttons will keep recording until you
turn them off with a tap. This can also be done automatically by
setting other manual mode category buttons to have an exclusive
link to each other.
Example: With two manual mode category buttons “Possession”
and “No Possession”, you can set these as exclusive to each other
so that only one can be on at a time; giving you exact possession
times in a game for both teams.
Nacsport Tag&go
www.nacsport.com
7
How to create excluding categories:
NOTE: To show the exclusions window, at least two category
buttons must be in manual mode.
a) Tap a button which is in manual mode. If there are at least two buttons
in manual mode, the exclusion window will appear with the buttons
which are available to be excluded.
b) From the list, tap the other buttons that you wish to be excluded to
your currently selected button.
How to use excluding categories:
To use excluding categories in the Analyse area:
Tap excluding buttons when actions are going on during
registering.
When one of the excluding buttons (category) is tapped, the other
buttons which are exclusively linked to it stop registering
automatically.
Nacsport Tag&go
www.nacsport.com
8
2)Descriptor:
Descriptors determine how, when and where actions take place.
They are like ‘adjectives’ for categories.
If you wish to add any of them automatically without tapping on
them, select “Descriptor added in each click”.
Different options for descriptors:
When using the Analyse function, you can automatically add a
descriptor into active categories without having to tap that
descriptor button. In the template creation mode, tap your
descriptor and then press the white circle underneath “Descriptor
added in each click”.
To hide the red mark which shows on the top left side of
descriptor buttons, tap the white circle next to “Remove the red
dot” in template edition mode.
Nacsport Tag&go
www.nacsport.com
9
4. ANALYSE (REGISTERING ACTIONS)
To start registering actions in Tag&go, follow these steps:
1) Tap Analyse so you can either select a template to use or begin with
the template you were last editing.
2) Enter the name for the database you are creating and tap Accept.
3) Tap “Click to start 1st period” and then tap the buttons in the
template when actions happen.
4) When the period finishes, tap “Click to end 1st period”.
5) Before the start of the second period, tap “Click to start 2nd
period”.
6) When the second period finishes, tap “Click to end 2nd period”.
7) If your activity has multiple periods of play, repeat steps 5) and 6)
as many times as you need until the event really finishes.
8) When the event finishes, tap End of event and select YES.
During Analyse mode, you are able to delete the last register you made
by tapping the
fingers.
icon or by double tapping on the screen with two
You can also show/hide the actions register window by swiping one
finger in the screen from left to right, and vice versa
Nacsport Tag&go
www.nacsport.com
1
0
5. DATABASES
5.1. List databases
To access a database, tap Databases from the main menu then select
your chosen database.
5.2. Export databases
There are two options to export databases:
a) Export by email:
Follow these steps to export a database:
1) Select the database which will be exported.
2) Tap the
icon (.tgnac format) to export the selected database for
use in Nacsport software.
Tap the
icon (.xml format) to export the selected database for use
in Nacsport software or another timeline based product (such as
Gamebreaker © or SportsCode ©).
3) Accept the message on the screen, enter recipient email and tap
Send.
NOTE: In step 2, once you have tapped one of the two options, the
database automatically goes to iTunes in your iPad. More information is
in the following Export via iTunes section.
Nacsport Tag&go
www.nacsport.com
1
1
b) Export via iTunes:
NOTE: The computer where the user is going to import the database
must have iTunes installed
(http://www.apple.com/es/itunes/download/)
Follow these steps to export one or more databases from the iPad:
1) Connect iPad to the computer.
2) Once the iPad has been connected, open iTunes and click the button
marked in red as shown in the following picture:
3) In the following menu, click the button marked in red as shown in
the following picture:
4) Search for the Nacsport Tag&go logo and click it. Then, select your
databases to export and click the button marked in red:
Nacsport Tag&go
www.nacsport.com
1
2
Nacsport Tag&go
www.nacsport.com
1
3