1
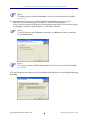
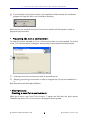
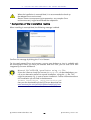
Q-CHECKER ® V 1.19.2
®
for CATIA V5
Text version 26-Mar-07 4:51 PM
INSTALLATION MANUAL
Symbols Used in the Manual
The following symbols are used in this guide; they should allow you to navigate throughout the text with
greater ease:
Warning triangle
The warning triangle refers to critical circumstances ,
which should be considered in order to avoid any problems in your work.
Hint symbol
The light bulb relates to hints,
which provide you with practical examples
to simplify your work.
Note symbol
The hand symbol refers to note,
which you should bear in mind, in order to work without problems.
Work steps' symbol
The work steps' symbol
refers to a
step-by-step instruction sheet.
T R A N S C A T PLM in the Internet:
http://www.transcat-plm.com
Q-C H E C K ER in the Internet:
http://www.q-checker.com
Q-C H E C K ER Hotline:
Phone:
E-mail:
© TRANSCAT PLM GmbH & Co. KG, 2007
+49 721 970 43 100
[email protected]
TABLE
OF
CONTENTS
Table of Contents
1.
Software and Hardware Requirements ........................................ 4
2.
Installing and Uninstalling under Windows.................................. 5
2.1
Installation ...........................................................................................................5
• Preparing the CATIA environment ..................................................................................................8
2.2
Deinstallation ..................................................................................................... 11
3.
Installing under U N IX ............................................................... 12
3.1
Unpacking Files .................................................................................................. 12
3.2
The Created Directory Structure .......................................................................... 13
3.3
Adapting Q-C HECKER to the Local C ATIA Installation ............................................ 14
3.3.1
3.3.1.1
3.3.1.2
3.3.1.3
3.3.1.4
Creating a New CATIA Environment.........................................................................................14
Adapting the Declarations to the Existing Directories............................................................16
Q-CHECKER License Declaration .............................................................................................. 17
Specifying the Action Options ................................................................................................. 17
Creating an Environment.........................................................................................................18
3.3.2
3.3.2.1
3.3.2.2
3.3.2.3
Expanding an Existing CATIA Environment..............................................................................19
Adapting the Declaration to the Local Directories ................................................................ 20
Q-CHECKER License Declaration ............................................................................................. 20
Starting CATIA with the Q-CHECKER Environment ...................................................................21
3.3.3
Adapt “qcheckerV5” Start Script............................................................................................. 22
4.
Language Selection .................................................................. 23
4.1
Language Specification for the First Program Start ............................................. 23
4.1.1
Language Selection by the User ..............................................................................................23
5.
Installation of License Passwords .............................................24
5.1
License Request ................................................................................................. 24
5.2
Installation of Nodelock Licenses ....................................................................... 25
5.3
Installation of Concurrent Licenses .................................................................... 26
6.
Installing Check Profiles .......................................................... 29
7.
Troubleshooting ...................................................................... 31
***
© TRANSCAT PLM GmbH & Co. KG
3
Q-CHECKER V5 Version 1.19.x
1.
1.
SOFTWARE
AND
HARDWARE REQUIREMENTS
Software and Hardware Requirements
Hardware:
CATIA:
•
•
•
•
•
All CATIA platforms (P1, P2 and P3) are supported.
PC
IBM RS/6000
HP
SGI
SUN
Operation system:
(minimal requirements):
•
•
•
•
•
Windows 2000/XP
AIX 5.1, 5.2, 5.3
HP-UX 11
IRIX 6.5.16m
SOLARIS 2.8
Minimal required version: V5 R14
Depending on the CATIA platform, the following
CATIA configuration packages must be installed and
the following licenses must be available:
CATIA P1 platform:
• all configuration packages
• at least MD1 license
CATIA P2 platform:
• at least MD2 + SA2 + PM2 configuration package
and PX1 product
• at least MD2 license
CATIA P3 platform:
• on request
To be able to execute the Q-CHECKER MML (Multi-
Model Link) Reference Not Published
criterion, a PX1 license is required.
Additionally required software
• MOZILLA, NETSCAPE NAVIGATOR or MICROSOFT INTERNET EXPLORER
On of these Internet browsers is required to browse Q-CHECKER HTML reports.
• ADOBE ACROBAT READER (minimum required version 4.0)
ACROBAT READER is necessary to browse Q-CHECKER online help.
Supported Standards:
• VDA-Recommendation VDA-4955/2
© TRANSCAT PLM GmbH & Co. KG
4
Q-CHECKER V5 Version 1.18.x
2.
INSTALLING
AND
UNINSTALLING
UNDER
WINDOWS
2.
Installing and Uninstalling
under Windows
2.1
Installation
Steps
To install Q-CHECKER, follow these steps:
(1) Insert the Q-CHECKER CD-ROM in your CD-ROM drive.
(2) Start the installation by double-clicking on the file
CDROM:\qcheckerV5Rxx_1192_setup.exe.
(3) Follow the installation instructions displayed on the screen.
The different installation dialog windows will be described below.
• Starting the installation
After starting the qcheckerV5Rxx_1192_setup.exe file; the following "Welcome"
screen will be displayed.
To continue the installation, click the Next button.
To abort the installation, click the Cancel button.
The installation can be aborted in every one of the installation steps by clicking the
Cancel button; all installation actions performed will be undone then.
© TRANSCAT PLM GmbH & Co. KG
5
Q-CHECKER V5 Version 1.18.x
2.
INSTALLING
AND
UNINSTALLING
UNDER
WINDOWS
• Selecting the installation directory for the program files
(1) Specify the installation directory where do you want to install the Q-CHECKER files:
• Q-CHECKER itself
• the Q-CHECKER report files
Note:
This path may be modified afterwards in the CATIA environment file (variable
QCADMIN).
• the Q-CHECKER user files
© TRANSCAT PLM GmbH & Co. KG
6
Q-CHECKER V5 Version 1.18.x
2.
INSTALLING
AND
UNINSTALLING
UNDER
WINDOWS
Note:
This path may be modified afterwards in the CATIA environment file (variable
QCUSER ).
(2) Select whether Q-CHECKER is to be installed with database connection or not.
Normally, you should select the first option—„without DB connection“.
Only in case you work with Q-MONITOR and want to store the Q-CHECKER check results
in a database, select the second option—„with DB connection“.
Note:
To use Q-CHECKER with database connection, an additional license is required
(TC-qcheckerV5-db).
Note:
This setting may be modified afterwards in the CATIA environment file (variable
QCLICDB).
If all specifications are made, they will be displayed all together in the dialog box following
thereafter.
© TRANSCAT PLM GmbH & Co. KG
7
Q-CHECKER V5 Version 1.18.x
2.
INSTALLING
AND
UNINSTALLING
UNDER
WINDOWS
(3) If you will click now the Next button, the installation will be started, the installation
program will copy the files in the installation directory.
When the files are installed, the CATIA Environment window will be opened in order to
prepare the environment.
• Preparing the C ATIA environment
To make Q-CHECKER available in CATIA, a CATIA environment must be prepared. To do this,
in the „CATIA Environment“ dialog box, there can be chosen between two alternatives:
q
w
q
w
Creating a new CATIA environment with all required entries.
Adapting an existing environment in order to integrate the Q-CHECKER workbench in
it.
Both alternatives will be explained below.
• Alternative (1):
Creating a new CATIA environment
Select the Create new CATIA Environment q option and click then the Next button.
Thereafter the New CATIA Environment dialog box will be opened.
© TRANSCAT PLM GmbH & Co. KG
8
Q-CHECKER V5 Version 1.18.x
2.
INSTALLING
AND
UNINSTALLING
UNDER
WINDOWS
Enter in the text box the name of the CATIA environment to be created. The name should
be chosen so that it will be comprehensible that it is CATIA with integrated Q-CHECKER
workbench.
ATTENTION:
The name of the environment must contain n o b l a n k s .
Click then on the Next button to create the CATIA environment.
• Alternative (2):
Adapting an existing C ATIA environment
Select in the CATIA Environment dialog box the Modify existing CATIA Environment
option w and click than the Next button.
Thereafter, a file selection window is opened with the environment directory displayed,
that is preselected on your computer for the respective CATIA version. (Example: If you are
installing Q-CHECKER for CATIA R16, the environment preselected for CATIA R16 will be
opened.) If you environment files are saved in an other directory, open this directory.
Select now the CATIA environment file that you want to modify for the work with
Q-CHECKER, and click than the Open button.
After this, the selected CATIA environment file will be adapted automatically.
© TRANSCAT PLM GmbH & Co. KG
9
Q-CHECKER V5 Version 1.18.x
2.
INSTALLING
AND
UNINSTALLING
UNDER
WINDOWS
When the installation is accomplished, it is recommended to check up
the adapted CATIA environment.
Reason: Some circumstances (write protection, very complex CATIA
environment etc.) might have affected the adaptation.
• Completion of the installation routine
When installing is accomplished, the following message is edited.
Confirm this message by clicking the Finish button.
For the newly-created CATIA environment, now on your desktop an icon is available with
the environment name, you have just entered. With this icon, you can start CATIA with
integrated Q-CHECKER workbench.
M a n u a l Q - C H E C K E R i n s t a l l a t i o n u s i n g zip f i l e
If you don’t want to install Q-CHECKER via setup.exe, us described above, you
can as an alternative perform a manual installation, using the zip file. This
might be necessary e. g. in case of server installation. Further information about
this installation you can find in the document
Product_Installation_ using_ZIP-archive.pdf
that you can download from the Q-CHECKER download site
www.transcat-plm.com/tcPLM/sw/download/d_qV5.htm.
© TRANSCAT PLM GmbH & Co. KG
10
Q-CHECKER V5 Version 1.18.x
2.
2.2
INSTALLING
AND
UNINSTALLING
UNDER
WINDOWS
Deinstallation
Steps
To uninstall Q-CHECKER, follow these steps:
(1) In the Start menu select
Settings > Control Panel > Add/Remove Programs .
(2) Select Q-CHECKER and press the Add/Remove... button.
For detailed information about directories and the different files please see chapter 3
Installing under UNIX on page 12.
© TRANSCAT PLM GmbH & Co. KG
11
Q-CHECKER V5 Version 1.18.x
3.
INSTALLING
UNDER
UNIX
3.
Installing under U NIX
3.1
Unpacking Files
Steps
The unpacking operation comprises several steps. Depending on the format
of your files, steps can be skipped.
(1)
If the data is available as qcheckerV5_1192.tgz, proceed as follows:
Action
OS 1 Example
Rename tar archive
*
mv qcheckerV5_1192.tgz qcheckerV5_1192.tar.gz
1
Note:
* stands for any CATIA V5-UNIX operation system
Continue with workstep (2).
(2)
If the data is available as qcheckerV5_1192.tar.gz file, proceed as follows:
Action
OS 1 Example
Copy tar archive into an
installation directory of choice.
*
cp qcheckerV5_1192.tar.gz /catdat/tcsoft
Change directory to the
installation directory
*
cd /catdat/tcsoft
Unpack the archive file
*
gzip –d -c qcheckerV5_1192.tar.gz | tar –xvf -
NOTE:
Unpack the compressed *.gzip file in a UNIX system
and not under WINDOWS. Some of the WINDOWS packers
during unpacking corrupt the content of the *.gzip, so
that it can no more be used under UNIX.
© TRANSCAT PLM GmbH & Co. KG
12
Q-CHECKER V5 Version 1.18.x
3.
3.2
INSTALLING
UNDER
The Created Directory Structure
Directory
OS 1 Description
qcheckerV5_1.19.2/load/aix_a
AIX
Program modules for AIX
qcheckerV5_1.19.2/load/irix_a
SGI
Program modules for SGI
qcheckerV5_1.19.2/load/hpux_b
HP
Program modules for HP
qcheckerV5_1.19.2/load/solaris_a
SUN Program modules for SUN
qcheckerV5_1.19.2/nedit/
*
Editor
qcheckerV5_1.19.2/KweQChecker
*
Q-CHECKER checks as knowledgeware
qcheckerV5_1.19.2/docV5/lang_DE
*
PDF Product documentation in German
qcheckerV5_1.19.2/docV5/lang_EN
*
PDF Product documentation in English
qcheckerV5_1.19.2/docV5/lang_JP
*
PDF Product documentation in
Japanese
qcheckerV5_1.19.2/docV5/lang_FR
*
PDF Product documentation in French
qcheckerV5_1.19.2/htmlV5/lang_DE
*
HTML online-help in German
qcheckerV5_1.19.2/htmlV5/lang_EN
*
HTML online-help in English
qcheckerV5_1.19.2/htmlV5/lang_JP
*
HTML online-help in Japanese
qcheckerV5_1.19.2/htmlV5/lang_FR
*
HTML online-help in French
qcheckerV5_1.19.2/adminV5/<Environment>
*
Administration files and check profiles 2
qcheckerV5_1.19.2/adminV5/<Environment>/plugin/
KweQCheckerPlugin
*
Knowledgeware plug-ins (if used)
qcheckerV5_1.19.2/adminV5/<Environment>/structure *
1
2
UNIX
2
Start model 2
qcheckerV5_1.19.2/adminV5/<Environment>/db
*
Database directory 2
qcheckerV5_1.19.2/qcheckerV5
*
Start script
qcheckerV5_1.19.2/readmeV5.txt
*
Up-to-date program information and
modifications
qcheckerV5_1.19.2/QCHECKER.in
*
Example for batch input file
qcheckerV5_1.19.2/QCheckerEnv.csh
*
C-Shell script to expand an existing
environment
qcheckerV5_1.19.2/QCheckerEnv.sh
*
Shell script to expand an existing
environment
qcheckerV5_1.19.2/QCheckerSetEnv.sh
*
Shell script to create a new environment
Note:
* stands for any CATIA V5-UNIX operation system
<Environment*> stands for the environment name. Q-CHECKER is delivered with one environment named
„Default“.
© TRANSCAT PLM GmbH & Co. KG
13
Q-CHECKER V5 Version 1.18.x
3.
3.3
INSTALLING
UNDER
UNIX
Adapting Q-C HECKER to the
Local C ATIA Installation
There are two ways to adapt Q-CHECKER to the local installation:
(1) C r e a t i n g a n e w CATIA environment with automatic creation of a
CATIA Q-CHECKER icon in the application manager (see chapter 3.3.1).
(2) E x p a n d i n g an e x i s t i n g CATIA environment (see chapter 3.3.2).
3.3.1
Creating a New C ATIA Environment
To create a new CATIA environment with the Q-CHECKER software the shell script
QCheckerSetEnv.sh is delivered.
In the following, you will find an excerpt from this file. Adapt in this file the passages
marked gray to the realities of your local Q-CHECKER installation. Further information you
can find in the following subchapters.
...
# Name of the new environment
QCHECKER_ENV="CATIA_QCHECKER"
#
# Store the new environment in this directory
QCHECKER_ENV_PATH="/transcat/catiav5r14/CATEnv"
#
# Installation directory of Q-Checker
QCHECKER_INSTALLATION="/catdat/tcsoft/qcheckerV5_1.19.2"
#
# Catia installation directory
CATIA_INSTALLATION="/usr/catiav5r14"
#
...
#
chcatenv -e $QCHECKER_ENV -d $QCHECKER_ENV_PATH -var
QCPATH=${QCHECKER_INSTALLATION} -new
chcatenv -e $QCHECKER_ENV -d $QCHECKER_ENV_PATH -var
QCDOC=${QCHECKER_INSTALLATION}/docV5 -new
chcatenv -e $QCHECKER_ENV -d $QCHECKER_ENV_PATH -var
QCHTML=${QCHECKER_INSTALLATION}/htmlV5 -new
chcatenv -e $QCHECKER_ENV -d $QCHECKER_ENV_PATH -var
QCLOAD=${QCHECKER_INSTALLATION}/load/$OSDS/code/bin -new
chcatenv -e $QCHECKER_ENV -d $QCHECKER_ENV_PATH -var QCADMIN=${QCHECKER_INSTALLATION}/adminV5 -new
chcatenv -e $QCHECKER_ENV -d $QCHECKER_ENV_PATH -var
QCUSER=\$USER_HOME/qcuserV5 -new
chcatenv -e $QCHECKER_ENV -d $QCHECKER_ENV_PATH -var
QCREPORT=\$USER_HOME/qcreportV5 -new
chcatenv -e $QCHECKER_ENV -d $QCHECKER_ENV_PATH –var
QCLICDB=NO -new chcatenv -e
...
#
setcatenv -e $QCHECKER_ENV -d $QCHECKER_ENV_PATH -p $CATIA_INSTALLATION:$QCHECKER_INSTALLATION/load
-new yes -desktop yes –a global \
&& change_cat_env || echo "\aCreating the environment failed."
© TRANSCAT PLM GmbH & Co. KG
14
Q-CHECKER V5 Version 1.18.x
3.
INSTALLING
UNDER
UNIX
NOTE:
If you install on your computer b o t h Q-CHECKER V4 and V5
version, you should create s e p a r a t e user and report directories
for each version.
If the QCHECKER.usr files and the check reports are stored in
separate directories
(e. g. \$USER_HOME/qcuserV4 and \$USER_HOME/qcuserV5 ),
this will facilitate to distinguish between the different report files
and will prevent that files accidentally will overwrite one another.
© TRANSCAT PLM GmbH & Co. KG
15
Q-CHECKER V5 Version 1.18.x
3.
3.3.1.1
INSTALLING
UNDER
UNIX
Adapting the Declarations to the Existing Directories
Adapt the following Q-CHECKER variables to your local directory structure. The specifications in the example above are only an e x a m p l e .
Variable name
Explication
QCHECKER_ENV
Name of the new CATIA environment
QCHECKER_ENV_PATH
Path where the CATIA environment file is created
QCHECKER_INSTALLATION
Installation path of Q-CHECKER
CATIA_INSTALLATION
Installation path of CATIA V5
QCPATH
Installation path of Q-CHECKER
(identical with the variable QCHECKER_INSTALLATION)
QCDOC
Path for the Q-CHECKER documentation files
QCHTML
Path for the Q-CHECKER HTML online-help
QCLOAD
Path for the Q-CHECKER load modules
QCADMIN
Path for the Q-CHECKER administrator files
QCUSER
Path for storing the user profiles
QCREPORT
Path for storing the report files
QCLICDB
Q-CHECKER license declaration (see chapter 3.3.2.2 on page 20)
QCLANGCAT
YES
• CATIA language is taken over as Q-CHECKER language. German, French
and English languages are supported.
NO
• The language selection is made in the Q-CHECKER options dialog box.
QCHECKER_EDM_PATH
Path setting for the QCHECKER_EDM_SAVE keyword.
QCHECKER_EDM_SAVE
Controlling an inquiry prompt asking about saving of models that have been
processed by an EDM system.
1
An inquiry prompt is displayed whether the processed model is to be
saved or n0t.
• If with the keyword QCHECKER_EDM_PATH a p a t h h a s b e e n
s p e c i f i e d , the inquiry prompt is displayed only if the respective
model was taken from the specified path.
• If with the keyword QCHECKER_EDM_PATH n o p a t h was specified,
the inquiry prompt is displayed in every case.
0
Q-CHECKER works as normal—no inquiry prompt is displayed.
NOTE:
In the standard installation, the QCADMIN path is user
i n d e p e n d e n t . The files in this directory can be used by all users.
As QCUSER and QCREPORT path should used the h o m e directory of
the respective user, since the files in this directory are user dependent
and should be separate for each user.
© TRANSCAT PLM GmbH & Co. KG
16
Q-CHECKER V5 Version 1.18.x
3.
3.3.1.2
INSTALLING
UNDER
UNIX
Q-C HECKER License Declaration
The product Q-CHECKER consists of 2 modules. In the CATIA environment file, it is
specified which license is to be used when starting the program. Depending on the license
acquired, set the variable QCLICDB in the following table to YES or NO , as shown in the
following table.
Product name
QCLICDB
TC-qcheckerV5
NO
TC-qcheckerV5-DB
YES
For the product name, please, refer to the license document received from TRANSCAT PLM.
3.3.1.3
Specifying the Action Options
To generate CATIA environments, different options are available:
Variable
Value
Description
-new
YES
An already existing environment with the same name will be
o v e r w r i t t e n . (Recommended)
NO
An already existing environment with the same name will n o t be overwritten, the existing environment remains.
YES
Generates a desktop i c o n of the environment. (Recommended)
NO
N o desktop icon of the environment is generated.
GLOBAL
A g l o b a l environment will be created. (Recommended)
N o t e : To create a global environment you must have the administrator
rights.
USER
A u s e r environment will be created.
-desktop
-a
© TRANSCAT PLM GmbH & Co. KG
17
Q-CHECKER V5 Version 1.18.x
3.
3.3.1.4
INSTALLING
UNDER
UNIX
Creating an Environment
To create the above defined CATIA environment, execute the
QCheckerSetEnv.sh shell script.
Steps
OS 1
Example
(1) Go to the installation directory
*
cd /catdat/tcsoft/qcheckerV5_1.19.2
(2) Execute the script
./QCheckerSetEnv.sh
1
Note:
* stands for any CATIA V5-UNIX operation system
NOTE:
To create a global environment, you must have
a d m i n i s t r a t o r rights.
NOTE:
The CATIA—Q-CHECKER icon (see the following screenshot) is displayed
in the my_CATIA folder of the Application Manager only after re-log in.
Continue the installation with the chapter 3.3.3 Adapt “qcheckerV5” Start Script on
page 22.
© TRANSCAT PLM GmbH & Co. KG
18
Q-CHECKER V5 Version 1.18.x
3.
3.3.2
INSTALLING
UNDER
UNIX
Expanding an Existing C ATIA Environment
To expand an existing CATIA environment, with Q-CHECKER the shell scripts
QCheckerEnv.sh and QCheckerEnv.csh are delivered.
In the following, we give an extract of this file. Adapt in this file the passages marked gray
to your local Q-CHECKER installation. For further information, please refer to the following
subchapters.
set +u
QCPATH=/catdat/tcsoft/qcheckerV5_1.19.2
\export QCPATH
QCDOC=${QCPATH}/docV5
\export QCDOC
QCHTML=${QCPATH}/htmlV5
\export QCHTML
QCLOAD=${QCPATH}/load/$OSDS/code/bin
\export QCLOAD
QCADMIN=${QCPATH}/adminV5
\export QCADMIN
QCUSER=$USER_HOME
\export QCUSER
QCREPORT=$USER_HOME
\export QCREPORT
QCLICDB=NO
\export QCLICDB
QCCAA=${QCPATH}/load/$OSDS
\export QCCAA
NOTE:
If you install on your computer b o t h Q-CHECKER V4 and V5
version, you should create s e p a r a t e user and report directories for each version.
If the QCHECKER.usr files and the check reports are stored in
separate directories (e. g. $USER_HOME/qcuserV4 and
$USER_HOME/qcuserV5), this will facilitate to distinguish
between the different report files and will prevent that files
accidentally will overwrite one another.
© TRANSCAT PLM GmbH & Co. KG
19
Q-CHECKER V5 Version 1.18.x
3.
3.3.2.1
INSTALLING
UNDER
UNIX
Adapting the Declaration to the Local Directories
The values shown in the example file above are given only as an e x a m p l e ; please adapt
them to your local realities.
Entity name
Description
QCPATH
Q-CHECKER installation path
QCDOC
Path for the Q-CHECKER documentation files
QCHTML
Path for the Q-CHECKER HTML online-help
QCLOAD
Path for the Q-CHECKER load modules
QCADMIN
Path for the Q-CHECKER administrator files
QCUSER
Path for storing the user profiles
QCREPORT
Path for storing the report files
QCLICDB
Q-CHECKER license declaration (see chapter 3.3.2.2 on page 20)
QCLANGCAT
YES
• CATIA language is taken over as Q-CHECKER language. The
supported languages are German, French and English.
NO
• The language selection is made in the Q-CHECKER options
dialog box.
NOTE:
In the standard installation, the QCADMIN path is user i n d e p e n d e n t .
The files in this directory can be used by all users.
As QCUSER and QCREPORT path should used the h o m e directory of
the respective user, since the files in this directory are user dependent
and should be separate for each user.
3.3.2.2
Q-C HECKER License Declaration
In addition to Q-CHECKER a second module is available, assuming the database connection. For that reason it must be defined in the CATIA environment file if the database
connection is to be enabled or not. Depending on the license you have acquired, please
set the values of the following variables on the value YES or NO , as shown in the table:
Product
License name
Value for QCLICDB
Q-CHECKER
TC-qcheckerV5
NO
Q-CHECKER DATABASE CONNECTION
TC-qcheckerV5-DB
YES
© TRANSCAT PLM GmbH & Co. KG
20
Q-CHECKER V5 Version 1.18.x
3.
INSTALLING
UNDER
UNIX
As default value of the variable in the CATIA environment file YES is set (for the
“TC-qcheckerV5” product).
Please take the license name from the license certificate, received from TRANSCAT PLM or
your Q-CHECKER reseller. You can find the license name also at the end of the license mail,
sent by TRANSCAT PLM.
3.3.2.3
Starting C ATIA with the Q-C HECKER Environment
To integrate Q-CHECKER in an already existing CATIA environment,
you have to start CATIA as follows:
Steps
OS 1 Example
(1) Set CATIA environment
(here: CATIA default
environment)
*
. /transcat/catiav5r14/CATEnv/
CATIA_P3.V5R14.B14.sh
(2) Set Q-CHECKER
environment
*
. /catdat/tcsoft/qcheckerV5_1.19.2/QCheckerEnv.sh
(3) Start CATIA
*
CNEXT
1
Note:
* stands for any CATIA V5-UNIX operation system
Continue the installation with the chapter 3.3.3 Adapt “qcheckerV5” Start Script on
page 22.
© TRANSCAT PLM GmbH & Co. KG
21
Q-CHECKER V5 Version 1.18.x
3.
3.3.3
INSTALLING
UNDER
UNIX
Adapt “qcheckerV5” Start Script
In the start-script, please adapt the QCHECKER_PATH directory name marked gray to your
local installation.
#!/bin/ksh
#-----------------------------------------------------------------------#
Q-CHECKER
#
(C) TransCAT PLM GmbH & Co. KG
#
#
Am Sandfeld 11c
#
76149 Karlsruhe
#
Tel.: +49-721-9 70 43 - 0
#-----------------------------------------------------------------------#
# Set the path name or the directory where the QCHECKER and
# the load modules are installed.
#
# for example:
#
# export QCHECKER_PATH
= "/catdat/tcsoft/qcheckerV5"
# export QCHECKER_LOAD_PATH
= "$QCHECKER_PATH/load/$CATIA_OS"
#-----------------------------------------------------------------------#
export QCHECKER_PATH="/catdat/tcsoft/qcheckerV5_1.19.2"
export QCHECKER_LOAD_PATH="$QCHECKER_PATH/load/${CATIA_OS}"
export QCHECKER_LOAD_JAVA="$QCHECKER_PATH/load/"
...
qchecker_show_pdq ()
{
# Enter the program and document that should be displayed when clicking on
# the PDQ help icon on the Q-Checker start panel. This functionality is
# optional and not required to run Q-Checker! Example:
# netscape "/catdat/tcsoft/qcheckerV5_1.19.2/docV5/pdq_help.html" &
acroread "/catdat/tcsoft/qcheckerV5_1.19.2/docV5/pdq_help.pdf" &
© TRANSCAT PLM GmbH & Co. KG
22
Q-CHECKER V5 Version 1.18.x
4.
4.
LANGUAGE SELECTION
Language Selection
The Q-CHECKER supports German (DE) , English (EN) , French (FR) and Japanese (JP) .
An alteration of the selected language affects the user interface, the soft copy and the
check reports.
4.1
Language Specification for the
First Program Start
In the QCHECKER.par file, the language is specified, in which Q-CHECKER is opened on
the first start.
qchecker.DEFAULT_LANGUAGE
qchecker.DEFAULT_LANGUAGE
qchecker.DEFAULT_LANGUAGE
qchecker.DEFAULT_LANGUAGE
See also the Q-CHECKER
QCHECKER.par file .
4.1.1
=
=
=
=
user
DE
EN
FR
JP
(for
(for
(for
(for
German)
English)
French)
Japanese)
manual—section
Administration —subchapter
Language Selection by the User
While starting Q-CHECKER for the first time, the QCHECKER.usr file is created. In this file,
the user-specific settings are stored (among others, the language setting). This file is
stored, if no other settings have been made, in the home directory of the respective user.
The language setting in this file is made with the variable
qchecker.USER_LANGUAGE .
The value of this variable can be changed manually in the file by the means of an editor.
The selected language will be applied after saving this file and restarting Q-CHECKER.
The language setting also can be changed i n t e r a c t i v e l y by the user, using the
Q-CHECKER Options menu. To apply the change in the language selection, in this case
too, Q-CHECKER needs to be r e s t a r t e d . For the interactive language selection by the user
see also Q-CHECKER User Manual—chapter “Administration”, subchapter
“QCHECKER.usr— User Settings”.
© TRANSCAT PLM GmbH & Co. KG
23
Q-CHECKER V5 Version 1.18.x
5.
5.
INSTALLATION
OF
LICENSE PASSWORDS
Installation of License Passwords
TRANSCAT PLM uses for Q-CHECKER the license system LUM , which is also used for CATIA
licensing. TRANSCAT PLM offers two types of licenses:
License type
Description
Nodelock
License for on o n e only computer (license bound to the CPU ID)
Concurrent
License is available in the n e t w o r k . A license server is needed.
NOTE:
A license can be entered:
• on a UNIX workstation only by the r o o t u s e r ,
• on PC only by users, having administrator rights.
5.1
License Request
To ensure a fast and errorless processing of your license request, we ask you to request
your license on the following website:
http://www.q-checker.com/license
3
The CPU ID will be output if you enter one of the following commands:
Platform
Command
Example of a CPU ID
AIX
uname -m
009481814C00
AIX
on p5-Series workstations
/usr/opt/ifor/ls/bin 9481768C
/i4target -O
IRIX
(FLEXlm host ID)
lmhostid
6909b894
HP-UX
(Permanent Target ID)
/var/lum/i4target
ffff28ea
SOLARIS
hostid
807fe3ee
WINDOWS (win32mac)
i4target
5DDE26F2
LINUX
i4target -O
557cd770
i4blt –H s –N
cluster_name
9c1bb2a7e1a8.8d.41.d1.9c.4c
.00.00.00
(MAC/LLA Address)
CLUSTER
© TRANSCAT PLM GmbH & Co. KG
24
Q-CHECKER V5 Version 1.18.x
5.
5.2
INSTALLATION
OF
LICENSE PASSWORDS
Installation of Nodelock Licenses
In the nodelock file, the Nodelock password must be entered, using a text editor. The
nodelock file is situated platform-depending in one of the following directories:
IBM:
/var/ifor
HP:
/var/lum
SGI:
/var/lum
SUN:
/var/lum
WINDOWS 2000/XP:
c:\Documents and Settings\All
Users\Application Data\IBM\LUM
Enrolling a Nodelock license under UNIX
Action
OS 1
Entries
(1) Log in as root user
*
su – root
(2) Go to the password directory
AIX
IRIX
HP
cd /var/ifor
cd /var/lum
cd /var/lum
SUN
cd /var/lum
(3) Create or edit the nodelock file
*
vi nodelock
(4) Add new lines at the end (vi command)
*
<ESC>Go
(5) Enter the password text
*
(see text below the table)
(6) Save the file (vi command)
*
<ESC>wq
(7) Specify the file permissions
*
chmod 644 nodelock
1
Note:
* stands for any CATIA V5-UNIX operation system
Inserting password text
In the license e-mail received from TRANSCAT PLM, you will find a text analog to that in the
following example:
Copy the following 2 lines into your nodelock file:
# TransCAT: TC-qcheckerV5, Version 1.x, gueltig bis 31.12.2037
7db765b90080.02.81.96.00.18.00.00.00 64tkq3wfzxi2gzci5j7t8p49keaa "" "1"
To enter the password in the file, copy these two lines beginning from the # sign (and
including it) to your nodelock file.
© TRANSCAT PLM GmbH & Co. KG
25
Q-CHECKER V5 Version 1.18.x
5.
INSTALLATION
OF
LICENSE PASSWORDS
Enrolling a Nodelock license under WINDOWS
To enroll nodelock licenses under WINDOWS, open in the password directory (see on the
top of this chapter) the nodelock file with any editor (e. g. WORDPAD).
If no nodelock file does yet exist, it must be created with an editor. Insert in the
nodelock file the password text as described above for UNIX.
NOTE:
The nodelock file has n o name extension—
n e i t h e r under UNIX n o r under WINDOWS.
Most of editors automatically add to the file name an extension (e. g. .txt). If an extension has been added, it
must be deleted—otherwise the file will be inoperative.
5.3
Installation of Concurrent Licenses
Concurrent licenses are generated for a specific license-server and are bound to its
CPU ID.
The prerequisite is that a LUM license manager is installed, configured and active, so that
you can enter the concurrent password text. To enroll the license keys of the Concurrent
type, you can use: the i4blt command line interface (in all platform cases) or the Graphic
User Interface (since LUM version 4.6.5 for WINDOWS and all UNIX platforms, previous
LUM versions only for AIX and WINDOWS).
For detailed information see your LUM documentation—chapter 6 "Using License Use
Management Runtime", which is delivered with your operating system.
NOTE:
A license can be entered
• on a UNIX workstation o n l y by the r o o t u s e r ,
• on PC o n l y by users, having a d m i n i s t r a t o r
rights.
© TRANSCAT PLM GmbH & Co. KG
26
Q-CHECKER V5 Version 1.18.x
5.
INSTALLATION
OF
LICENSE PASSWORDS
The tools and entries for the license manager are located in the following directories:
Operating System
Directory
IBM (AIX)
/usr/opt/ifor/bin
HP (HP-UX)
/var/lum
SGI (IRIX)
/var/lum
SUN (SOLARIS)
/var/lum
WINDOWS (2000/XP)
X:\ifor\WIN\BIN
(X is the drive, on which LUM is installed)
Enrolling a Concurrent license
For the registration three possibilities are available which will be described below.
• Automatic registration
If you have got the license certificate as a t t a c h m e n t , we recommend the automatic
registration.
In order to install the license, store the license file in a directory of your choice on the LUM
server. Then enter the following command:
Command
Description
i4blt –a -f filename
‚filename’ stands for to the path and name of the license file.
• Registration using the IMPORT function of the GUI i4blt version
After starting the GUI i4blt version, the license certificate file can be read in and registered by the means of the IMPORT function.
STEPS
(1) Start i4blt Tool
(2) Select Products menu item and
go to the single product ... submenu.
(3) In the Enroll Product window press the Import key
(4) In the following IMPORT window
select the license certificate and confirm with 'OK' .
(5) After the return to the Enroll Product window conclude the
registration pressing the OK button.
© TRANSCAT PLM GmbH & Co. KG
27
Q-CHECKER V5 Version 1.18.x
5.
INSTALLATION
OF
LICENSE PASSWORDS
• Manual registration with the i4blt command line interface
To enter the license use to following syntax:
i4blt -a -n Server-Name -v "VendorName [VendorID
-p "ProductName ProduktVersion ProductPassword"
VendorPassword]"
(The text above is shown on the screen in o n e line.)
Example:
i4blt -a -v "TransCAT 7db765b90080.02.81.96.00.18.00.00.00
-p "TC-qchecker 1 46pdi5veptf5wket9xriygptqpnaaaa"
ak9nui9b2ftjs" ##
ATTENTION:
• The text must be entered in o n e line without line brake.
• The two number signs ## stand for 1 space sign.
Please take parameters for the keywords from your license certificate in a n a l o g y to the
following example:
N o t e : The parameters in the example may d i f f e r from the parameters in your license
certificate.
Example:
# i4admin -a -v "TransCAT" 7db765b90080.02.81.96.00.18.00.00.00 chh5afnqs6jx6
# i4admin –a -p "TransCAT" "TC-qcheckerV5" vmbif9d3s3vfcttqcpaiv83ug2qsaaa "1"
[LicenseCertificate]
CheckSum=D08CE54292F1ECE4720A49A52ADC70E1
TimeStamp=382196610
VendorName=TransCAT
VendorPassword=chh5afnqs6jx6
VendorID=7db765b90080.02.81.96.00.18.00.00.00
ProductName=TC-qcheckerV5
ProductID=5000
ProductVersion=1
ProductPassword=vmbif9d3s3vfcttqcpaiv83ug2qsaaa
ProductAnnotation=
LicenseStyle=concurrent
LicenseStartDate=02/05/2002
LicenseDuration=14214
LicenseEndDate=12/31/2037
LicenseCount=1
MultiUseRules=none
RegistrationLevel=3
TryAndBuy=No
SoftStop=No
TargetType=13
TargetTypeName=IBM AIX
TargetID=4fbf5a4c
© TRANSCAT PLM GmbH & Co. KG
28
Q-CHECKER V5 Version 1.18.x
6.
6.
INSTALLING CHECK PROFILES
Installing Check Profiles
To use Q-CHECKER, check profiles are needed, containing the definitions for the checks to
be executed.
Users that execute Q-CHECKER checks in order to test CAT data to be transferred to an
OEM (Original Equipment Manufacturer), can get the current check profiles from their
OEM or by downloading them from the Q-CHECKER web side
www.q-checker.com.
The download is free of charge. Before the first download, the user must register (under
Registration ). Please, note your user name and password exactly, you will need them
again for every log-in for download. The passwords being encrypted on the server,
TRANSCAT PLM has no control over the passwords. If the password once would be lost, a
new registration will be required.
If download problems should occur or if the needed check profiles are not available on the
web side, please address directly to TRANSCAT PLM:
[email protected]
Steps
The unpacking operation comprises t h r e e s t e p s . Depending on the
format of your files, the steps (1) and/or (2) can be skipped.
(1) If the profile file is available as packed and compressed *.taz file,
do first the following operation:
Action
OS 1 Example
Rename the tar archive
*
1
mv *.taz *.tar.Z
Note:
* stands for any CATIA V5-UNIX operation system
Continue with work step (2).
(2) If the profile file is available as *.tar.Z file,
do the following operation:
Action
OS 1 Example
Uncompress the tar archive
*
© TRANSCAT PLM GmbH & Co. KG
uncompress *.tar.Z
29
Q-CHECKER V5 Version 1.18.x
6.
INSTALLING CHECK PROFILES
Continue with work step (3).
(3) To conclude the profile installation, do the following operations
(these actions are to be taken in every case):
Action
OS 1 Example
Copy tar archive into the admin
directory
*
cp *.tar .../qcheckerV5_1.19.2/adminV5
Go to the admin directory
*
cd .../qcheckerV5_1.19.2/adminV5
Unpack the archive file
*
tar –xvf *.tar
1
Note:
* stands for any CATIA V5-UNIX operation system
While unpacking the profile archive, a new environment directory is created and the corresponding files are copied in the target directories. The new environment will be available
after Q-CHECKER restart; the check-profiles in it will be available as s t a n d a r d profiles.
© TRANSCAT PLM GmbH & Co. KG
30
Q-CHECKER V5 Version 1.18.x
7.
7.
TROUBLESHOOTING
Troubleshooting
Problem:
For solution see:
• Under WINDOWS, in CATIA the Q-CHECKER icon is available, but
Q-CHECKER can not be started.
! Problem 1—page 31
• No Q-CHECKER icon in CATIA.
! Problem 2—page 32
• Under WINDOWS Q-CHECKER set-up aborts.
! Problem 3—page 33
• Under UNIX, Q-CHECKER can not be started.
! Problem 4—page 34
• Q-CHECKER license can not be found.
! Problem 5—page 35
PROBLEM 1
• SYMPTOM
Under WINDOWS, in CATIA the Q-CHECKER icon is available, but Q-CHECKER can not be
started.
• CAUSE
The qcheckerV5.vbs start script is a VISUALBASIC (VB) script. Virus scanners can block
VB scripts.
• SOLUTION
Check out if the problem is caused by a virus scanner. If appropriate, change the configuration of the virus scanner.
© TRANSCAT PLM GmbH & Co. KG
31
Q-CHECKER V5 Version 1.18.x
7.
TROUBLESHOOTING
PROBLEM 2
• SYMPTOM
No Q-CHECKER icon in CATIA.
• POSSIBLE SOLUTIONS
• Prerequisite not fulfilled: CATIA configurations MD2 + SA2 + PM2 and PX1 package
must be installed.
• CATIA has been started with wrong CATIA environment where Q-CHECKER is not included.
• Wrong Q-CHECKER release (e.g. Q-CHECKER for R14, but CATIA R16 installed).
• Icon hidden.
Check in CATIA if the QCheckerTB tool bar is activated.
(Menu View > Toolbars > Customize > Commands tab card > Select on the value
list on the left All Commands, and search in the box on the right in the displayed list
for Q-CHECKER)
• Check whether the Q-CHECKER icon is available when an other type of CATIA document is
loaded (CATProduct, CATPart, CATDrawing).
• Check whether the Q-CHECKER icon appears if the CATIA „PartDesign“ workbench is
active.
• Delete all CATSettings and restart CATIA.
© TRANSCAT PLM GmbH & Co. KG
32
Q-CHECKER V5 Version 1.18.x
7.
TROUBLESHOOTING
PROBLEM 3
• SYMPTOM
Under WINDOWS Q-CHECKER set-up aborts.
• REASON
The Windows registry didn’t contain keywords under
HKEY_LOCAL_MACHINE\SOFTWARE\Dassault Systemes\B12\0
The keyword DEST_FOLDER must point to the CATIA installation directory.
The keyword DEST_FOLDER_OSDS must point to the CATIA installation directory
\intel_a
• SOLUTION
(1) Add/modify the keywords/values in the registry.
(2) Re-install CATIA from CD.
© TRANSCAT PLM GmbH & Co. KG
33
Q-CHECKER V5 Version 1.18.x
7.
TROUBLESHOOTING
PROBLEM 4
• SYMPTOM
Under UNIX, Q-CHECKER can not be started.
Error message: Can’t find libCATGeometricObjects.a .
• SOLUTION
Export the LIBPATH in the qcheckerV5 script file (see red line in the extract of the
qcheckerV5 file).
The echo $LIBPATH command (line in blue) is destined only for verification and can be
erased when the problem is solved.
Extract of the qcheckerV5 file
#-----------------------------------------------------------------------#
# Call the Q-CHECKER catia
#
#-----------------------------------------------------------------------if [ "${1}" = "-c" ]; then
if [ "${OSDS}" = "aix_a" ]; then
# replace dead_circumflex by asciicircum for QT
export DEAD_CIRCUM_KEY=`xmodmap -pke | grep dead_circumflex | head -1`
xmodmap -e "`echo ${DEAD_CIRCUM_KEY} | sed -e s/dead_circumflex/asciicircum/g`"
# replace dead_tilde by asciitilde for QT
export DEAD_TILDE_KEY=`xmodmap -pke | grep dead_tilde | head -1`
xmodmap -e "`echo ${DEAD_TILDE_KEY} | sed -e s/dead_tilde/asciitilde/g`"
fi
export LIBPATH=/usr/catiav5r12/B12/aix_a/code/bin:$LIBPATH
echo $LIBPATH
"${QCHECKER_LOAD_PATH}"/TCAQChecker -c "${2}"
if [ "${OSDS}" = "aix_a" ]; then
xmodmap -e "`echo ${DEAD_CIRCUM_KEY}`"
xmodmap -e "`echo ${DEAD_TILDE_KEY}`"
fi
exit
fi
#------------------------------------------------------------------------
© TRANSCAT PLM GmbH & Co. KG
34
Q-CHECKER V5 Version 1.18.x
7.
TROUBLESHOOTING
PROBLEM 5
• SYMPTOM
Q-CHECKER license can not be found.
• VERIFYING THE PROBLEM
The license problem can be verified, using the TCALIC program. It simulates the
Q-CHECKER license mechanism and allows to get granted LUM licenses and to release
them. In order to get granted the license, the program searches first for a nodelock
license. If no nodelock license can be found, then in the network for a Concurrent
license is searched. If available; the license is drawn.
The TCALIC program is located in Q-CHECKER directory .../load/<operating
system>/code/bin .
In order to execute TCALIC, in a UNIX shell on a client computer enter the following
command
(Sample)
TCLIC <Product ID> <Product Version>
TCLIC 5000 1
TCLIC 5001 1
! Example for the case that you have the TC-qcheckerV5 license;
! Example for the case that you have the TC-qcheckerV5-DB license.
If you don’t know which license do you have, refer to the license certificate or to the Basic
License Tool (in case of network licenses).
NOTE:
To be able to use Q-CHECKER with database connection, i. e. in connection
with Q-MONITOR, both TC-qcheckerV5 and TC-qcheckerV5-DB licenses
are required.
© TRANSCAT PLM GmbH & Co. KG
35
Q-CHECKER V5 Version 1.18.x
7.
TROUBLESHOOTING
The program output is as follows:
**************************************************************************
catadm-rsprog10:/catdat/tcsoft/qcheckerV5_1.16.2/load/aix_a/code/bin>TCALIC 5000 1
TCLIC try to get license for:
=============================
Product ID: 5000
Product Version: 1
Try to get NODELOCKED license
tc_i4_ini_c: >tc_i4_ini_c: License not found in the database.<
License not granted
===================
Try to get CONCURRENT license
License granted
=================
Type q to release the license
**************************************************************************
In the example above the program searched for Q-CHECKER for CATIA V5 license. The check
resulted in no nodelocked license be found (License not granted) . The subsequent
search for a Concurrent license was successful, the license could be drawn (License
granted) . The license may be released again by pressing the q key (as soon as you have
been invited by TCALIC to do this).
• POSSIBLE SOLUTIONS
Verify:
•
Is the license key registered correctly?
See section 5 Installation of License Passwords from page 24.
• Are the license settings in the CATIA environment file made correctly?
If you do you not have a TC-qcheckerV5-DB license, set the following value for the
QCLICDB database parameter: NO .
***
© TRANSCAT PLM GmbH & Co. KG
36
Q-CHECKER V5 Version 1.18.x
Q-C HECKER in the Internet:
http://www.q-checker.com
Q-C HECKER hotline:
Phone:
+49 721 970 43 100
E-mail:
[email protected]
© T RANSCAT PLM GmbH & Co. KG, 2007