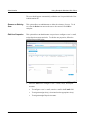
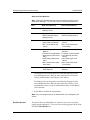
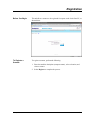
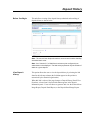
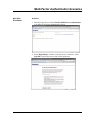
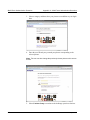
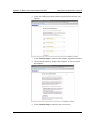
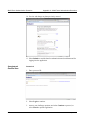
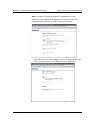
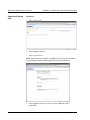
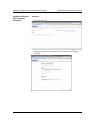
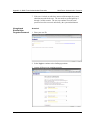
1
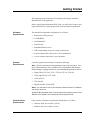
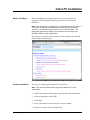
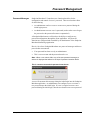
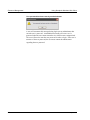
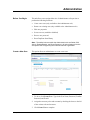
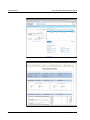
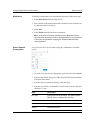
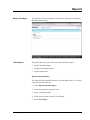
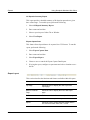
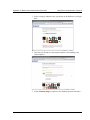
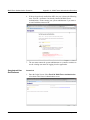
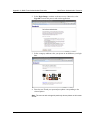
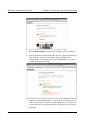
Sendpoint Merchant Web Client User Manual Original Publication 01/08 This document is protected under the trade secret and copyright laws as the property of Metavante® Corporation. Year of first distribution: 2008. Copying or other reproduction, or any other disclosure to third parties, is strictly prohibited. 01/08 Metavante Corporation Table of Contents Deployment Getting Started. . . . . . . . . . . . . . . . . . . . . . . . . . . . . . . . . . . . . . . . . . . .1-1 Client PC Installation . . . . . . . . . . . . . . . . . . . . . . . . . . . . . . . . . . . . . . .1-3 Using Sendpoint Merchant Web Client Overview . . . . . . . . . . . . . . . . . . . . . . . . . . . . . . . . . . . . . . . . . . . . . . . .2-1 Deposits. . . . . . . . . . . . . . . . . . . . . . . . . . . . . . . . . . . . . . . . . . . . . . . . .2-3 Password Management . . . . . . . . . . . . . . . . . . . . . . . . . . . . . . . . . . . . .2-5 Change Password . . . . . . . . . . . . . . . . . . . . . . . . . . . . . . . . . . . . . . . . .2-7 Administration . . . . . . . . . . . . . . . . . . . . . . . . . . . . . . . . . . . . . . . . . . . .2-9 Registration . . . . . . . . . . . . . . . . . . . . . . . . . . . . . . . . . . . . . . . . . . . . .2-13 Deposit History . . . . . . . . . . . . . . . . . . . . . . . . . . . . . . . . . . . . . . . . . .2-15 Reports . . . . . . . . . . . . . . . . . . . . . . . . . . . . . . . . . . . . . . . . . . . . . . . .2-19 Using Sendpoint Merchant Web Client . . . . . . . . . . . . . . . . . . . . . . . .2-23 Multi-Factor Authentication Scenarios Multi-Factor Authentication Scenarios . . . . . . . . . . . . . . . . . . . . . . . . . A-1 Sendpoint Merchant Web Client User Manual 01/08 i Table of Contents ii 01/08 Metavante Corporation Deployment 01/08 Metavante Corporation Getting Started This manual provides instructions for installing and using the Sendpoint Merchant Web Client application. Before using Sendpoint Merchant Web Client, you will need to acquire valid login credentials (user name and password) from the financial organization. Hardware Requirements Scanner Requirements The minimum recommended configuration is as follows: Pentium 4 2.0 GHz processor 512 MB RAM 40 GB hard drive Network card Broadband Internet access USB 2.0 depending on specific scanner requirements Screen resolution 800 x 600 (1024 x 768 recommended) A check scanner connected to your workstation Currently supported check scanners include the following: Note: This list is accurate as of the publication date of this document. This list of scanner devices is not a complete list of all possibilities after delivery. Device testing is ongoing and devices are continually being added to this list. Digital Check (TS 210e, TS 215, TS 220e, TS 230, TS 4120) Unisys (MyVisionX, UEC 7000) Canon (CR-55) CTS (LS100) Magtek (Excella, Excella STX) Notes: You will need to refer to the individual scanner manual for installation and setup instructions. Sendpoint Merchant Web Client 2.5 only supports the following scanners with Windows Vista: Digital Check TellerScan and Unisys MyVisionX. Client Software Requirements Client software minimum recommended configuration is as follows: Windows 2000, Service Pack 4 (32 bit) Windows XP, Service Pack 2 (32 bit) Sendpoint Merchant Web Client User Manual 01/08 1-1 Getting Started 1-2 Deployment Windows Vista (32 bit) Internet Explorer 6 or 7 01/08 Metavante Corporation Client PC Installation Before You Begin Before installing the processing components, the user must have the appropriate scanner installation package as provided by the financial institution. Note: Internet Explorer is a prerequisite to completing the following steps. It is important to note that the installation procedures will vary by scanner. Therefore, it is important to verify steps for each scanner installed. This deployment page will vary based on the individual merchant inputs and available hardware setup configurations. Upon the first visit to this software, the user will be prompted to select that scanner from the following list: Scanner Installation The steps for completing the installer file are as follows: Note: This must be performed while logged into Windows as a local administrator. 1. Launch the deployment Web page provided by the financial institution. 2. Select the appropriate scanner link. 3. Select Save. 4. Select a download location for the driver and select Save. 5. Extract the contents of the downloaded file. Sendpoint Merchant Web Client User Manual 01/08 1-3 Client PC Installation Deployment 6. Launch the Setup.exe file and follow the instructions to complete installation. Note: The Installation Wizard and procedures will vary by scanner, so make certain to follow every step carefully. Pay special attention when following prompts on when to connect power to the scanner and when to connect the scanner to the PC. 7. Upon completion of the installation process, select Finish. Security The external Web server’s domain that Sendpoint Merchant Web Client communicates with should be added as a trusted Internet Web site. Note: It is possible, especially using Internet Explorer 7.0, that the Logout link and/or Logo link in the upper left corner may open in a new browser window if they direct you to a different domain than that in which Web Client itself runs. If this happens, please add those domain(s) also to the Trusted Sites zone by following the same steps listed here. In addition to configuring the Web site for Sendpoint Merchant Web Client as a Trusted Site, there is a sub-setting that must be verified to ensure seamless operation of the Web client. As seen in the attached screen sample, you need to set “Access data sources across domains” to “Enable” under the Miscellaneous heading found in the Custom Level settings for Trusted Sites on the Security tab of Internet Options for Internet Explorer. 1-4 01/08 Metavante Corporation Deployment Client PC Installation Adding External Web Server to Trusted Site List 1. Launch Internet Explorer. 2. Select Tools. 3. Select Internet Options. 4. Select Security Tab. 5. Select Trusted Sites. 6. Select Sites. 7. Enter the address of the domain (Example: https://www.provider name.com). 8. Select Add. 9. Select OK. Sendpoint Merchant Web Client User Manual 01/08 1-5 Client PC Installation 1-6 Deployment 01/08 Metavante Corporation Using Sendpoint Merchant Web Client 01/08 Metavante Corporation Overview With Sendpoint Merchant Web Client, there are six tabs that the user can access (depending on roles assigned to the user): Change Password, Administration, Registration, Deposits, History, and Reports. However, when the user first logs into Web Client, the Deposits tab is initially presented. Note: The actual tabs available will be dependent on the system role assigned to the user. The Administration and Registration tabs will only be present for the following roles: Administrator and Supervisor. The top right corner of the Web page displays the following: Name Function Help Displays an online user guide for the Web Client application. Logout Exits the user from the Web Client application. Username Identifies the user that is currently logged into the Web Client application. Merchant name Identifies the merchant that is currently logged into the Web Client application. Sendpoint Merchant Web Client User Manual 01/08 2-1 Overview 2-2 Using Sendpoint Merchant Web Client 01/08 Metavante Corporation Deposits The Deposits tab allows the user to create a deposit and view open and recent deposits. Name Function Create Deposit Allows a user to create a new deposit providing the Account, Deposit Control Total, and any other additional, optional fields. Note: All additional fields are customized by the individual financial organization. Proceed Allows a user to create an electronic deposit. My Open Deposits Open deposits are deposits that have not been finalized (submitted for deposit). Additional items can be captured to an open deposit. Select an active database field link of any entry to access an open deposit. Note: Column headers are customized by the individual financial organization. Contact the appropriate merchant provider for any questions regarding column headers. My Recent Deposits All deposits that have been finalized are listed in this section. Select an active database field link of any entry to access a finalized deposit Note: Column headers are customized by the individual financial organization. Contact the appropriate merchant provider for any questions regarding column headers. Sendpoint Merchant Web Client User Manual 01/08 2-3 Deposits 2-4 Using Sendpoint Merchant Web Client 01/08 Metavante Corporation Password Management Password Messages Sendpoint Merchant 2.5 introduces new functions that allow for the configuration and control of a user’s password. These new functions allow for the following: An administrator can force a user to create a new password during the initial login process. An administrator can reset a user’s password (such as when a user forgets the password or the password becomes compromised). A Sendpoint Merchant user will not have the ability to configure any password configurations through the client application. All password functions are configured and controlled by an administrator of the Sendpoint Merchant distributing organization. Here is a list of new Sendpoint Merchant user password messages and how to proceed when encountered. Your password has been reset by an administrator. This is a new account and the password must be set. Note: When a user selects OK to any of the new password messages, a window is displayed that allows for the input of password creation details. This is a new account and the password must be set A user will encounter this message during the initial login into the Sendpoint Merchant application. An administrator can configure a user to recreate a new password upon the initial login. If a user is required to create a new password during the initial login, then the user should create a new password. Sendpoint Merchant Web Client User Manual 01/08 2-5 Password Management Using Sendpoint Merchant Web Client Your password has been reset by an administrator A user will encounter this message during login once an administrator has reset the user’s password. An administrator usually will reset a user’s password when the user cannot remember it or it has become compromised. The user will need to enter the new password in order to login. If the user is unaware of the new password, the user must contact the administrator regarding the new password. 2-6 01/08 Metavante Corporation Change Password Before You Begin This tab allows a user to reset his/her password, as shown below. Reset the Password To reset the password, follow the instructions provided below: 1. Enter the current user password in the Password field. 2. Enter the new user password in the New Password field. 3. Re-enter the new user password in the Confirm New Password field. 4. Select Change Password to complete the process. Sendpoint Merchant Web Client User Manual 01/08 2-7 Change Password 2-8 Using Sendpoint Merchant Web Client 01/08 Metavante Corporation Administration Before You Begin This tab allows a user assigned the role of Administrator or Supervisor to perform the following functions: Create a new user (only available to the Administrator role) Remove an existing user (only available to the Administrator role) Edit user properties Set user access (enabled or disabled) Reset a user password Reset Duplicate Item History Note: The default columns within the Administration tab are Delete, Edit, Unlock, Enable/Disable, and Reset Password. All other displayed columns are optional and configured by the individual financial organization. Create a New User This option allows an administrator to create a new user. 1. To do so, click Create User. Type in the User Name, Password, Confirm Password, and E-mail. 2. Assign the necessary roles and accounts by checking the boxes to the left of the various roles and accounts. 3. Click Create User to complete. Sendpoint Merchant Web Client User Manual 01/08 2-9 Administration Using Sendpoint Merchant Web Client The user should appear automatically within the user list provided in the User Administration tab. Remove an Existing User This option allows an administrator to delete the existence of a user. To do so, select the Delete icon next to the user to be removed. Click OK to complete. Edit User Properties This option allows an administrator or supervisor to configure a user’s e-mail, assign deposit accounts and roles. To edit the user properties, follow the instructions provided below. 1. Select the Edit icon to configure a user’s e-mail, role(s), and deposit accounts. 2-10 To configure a user’s e-mail, enter the e-mail in the E-mail field. To assign/unassign role(s), select/unselect the appropriate role(s). To assign/unassign Deposit Accounts. 01/08 Metavante Corporation Using Sendpoint Merchant Web Client Administration Roles and Their Behavior Note: Having the Administrator role does not implicitly give the user the subsequent privileges. For full access, give the user all available roles. Role Web Client Behavior Administrator Supervisor Reset Duplicate History Manage Users Register Client Reset Duplicate History Manage Users View Reports (All Users) View History (All Users) Run / View Queries (All Users) Reviewer Smart Client Behavior Depositor Operator Create, Capture, Correct, Balance Transmit / Finish Deposits View Reports (Own Items Only) View History (Own Items Only) Run / View Queries (Own Items Only) Not Applicable - Same as Web Depositor Reset Duplicate History Register Client Reset Duplicate History View Reports (All Local Users) Run / View Queries (All Local Users) Create, Capture, Correct, Balance Transmit / Finish Deposits View Reports (All Local Users) View History (All Local Users) Run / View Queries (All Local Users) Create, Capture, Correct, Balance The Modify Users privilege allows the following functions to other non-Administrator users under the same merchant: Reset Password, Unlock, Enable/Disable, and Change E-mail Address. The Manage Users privilege allows the following functions to other non-Administrator users under the same merchant: Add New Users, Assign/Remove roles (except for Administrator Role), and all Modify Users functions. 2. Select Save to confirm all configurations. Note: Any user assigned the role of Administrator is not displayed in this section. Set User Access This option allows an administrator or supervisor to prevent a user from logging into the application. To prevent a user from logging into Web Client, clear the Enable/Disable box. Sendpoint Merchant Web Client User Manual 01/08 2-11 Administration Using Sendpoint Merchant Web Client Resetting Passwords This option allows an administrator or supervisor to reset a user’s password. To reset a user’s password, select the Reset link, enter the password, and select Save. Resetting Duplicate Item History This option allows an administrator or supervisor to reset Duplicate Item History. To reset the duplicate item history, select Reset Duplicate Items. 2-12 01/08 Metavante Corporation Registration Before You Begin This tab allows a scanner to be registered for capture to the local client PC, as shown below. To Register a Scanner To register a scanner, perform the following: 1. Enter the machine description (computer name), select a location, and select a scanner. 2. Select Register to complete the process. Sendpoint Merchant Web Client User Manual 01/08 2-13 Registration 2-14 Using Sendpoint Merchant Web Client 01/08 Metavante Corporation Deposit History Before You Begin This tab allows viewing of the deposit history submitted and searching of deposited items as shown below. Note: The user will see all deposits made to accounts and locations that they are authorized to view. Note: As of Version 2.5, a DebitCount column may be configured by an administrator to be displayed. The field strictly represents only the number of debits in a given deposit. View Deposit History This option allows the user to view the deposit history by selecting the link found in the left-most column (the field that appears in this position is customized by the financial organization). When this link is selected, the page changes to Deposit History Detail View. From here, selected item’s deposit information appears in the Deposit Information panel. Users can choose to generate and view the Selected Item Image Report, Deposit Detail Report, or the Deposit Detail Image Report. Sendpoint Merchant Web Client User Manual 01/08 2-15 Deposit History 2-16 Using Sendpoint Merchant Web Client 01/08 Metavante Corporation Using Sendpoint Merchant Web Client Mark Items Deposit History To identify items that have been electronically deposited, follow these steps: 1. Select Mark Items within the Deposits tab. 2. Place all items in the scanner backwards so that the front of each item can be endorsed with the rear ink jet. 3. Select Start. 4. Select Finish when all items have been marked. Note: All items that have been marked using the Mark Items feature should be either temporarily stored or destroyed based on the instructions of the financial organization supplying the Sendpoint Merchant Web Client application. Search Deposit History Items Users can search for a specific item(s) using any combination of available criteria. 1. To search for items, enter the appropriate search terms and select Search. 2. Searches may include item type of either Deposit Ticket (deposit amount) or Deposit Item (check). 3. Searches may be conducted within any valid date range. 4. Searches may contain a combination of search terms (Amount > $100.00 and Serial <> 100). Field Description Item Type Type of item or items to search. The options are All, Deposit Ticket, or Deposit Item (checks). Start/End Date Date range to be searched. User User who captured the item. Amount Amount of the item. Sendpoint Merchant Web Client User Manual 01/08 2-17 Deposit History 2-18 Using Sendpoint Merchant Web Client Field Description Serial Serial number of the item. Account Account number of the item. Transit Routing Transit Routing number of the item. Sequence Sequence number of the item. 01/08 Metavante Corporation Reports Before You Begin This tab allows for the configuration, presentation, and output of Sendpoint Merchant-related reports. View Reports This option allows the user to select one of the following reports: Deposit Summary Report All Deposits Summary Report Export Capture Data Deposit Summary Report This report provides a detailed summary of an individual deposit. To run this report, perform the following: 1. Select Deposit Summary Report. 2. Select the appropriate deposit account. 3. Enter a start and end date. 4. Select a report layout of either Tab or Window. 5. Select View Report. Sendpoint Merchant Web Client User Manual 01/08 2-19 Reports Using Sendpoint Merchant Web Client All Deposits Summary Report This report provides a detailed summary of all deposits captured on a given date or date range. To run this report, perform the following: 1. Select All Deposit Summary Report. 2. Enter a start and end date. 3. Select a report layout of either Tab or Window. 4. Select View Report. Export Capture Data This feature allows deposit data to be exported in a CSV format. To run this report, perform the following: 1. Select Export Capture Data. 2. Enter a start and end date. 3. Select Export Report. 4. Choose to save or cancel the Export Capture Data Report. 5. If saving the report, configure a report name and select a location to save the file. Report Layout This section describes the functions and features available within all reports. 2-20 Name Function Flip Page Allows the user to display the next or previous report page. Back to First/Last Page Allows the user to display the first or last report page. Refresh Performs a refresh of the active report Web page. Print Allows the user to print the report. Export Allows the user to output and save deposit data in one of three formats: CSV, PDF, or XLS. 01/08 Metavante Corporation Using Sendpoint Merchant Web Client Reports Name Function Zoom In/Out Allows the user to increase or decrease the resolution of the report. Find | Next Allows the user to locate text within the report. Sendpoint Merchant Web Client User Manual 01/08 2-21 Reports 2-22 Using Sendpoint Merchant Web Client 01/08 Metavante Corporation Using Sendpoint Merchant Web Client Before You Begin You can create new deposits, update and modify any open deposits, and review the history and detail of submitted deposits. To use Sendpoint Merchant Web Client on your Internet/intranet browser, follow the steps described in this section. Create a New Deposit 1. Be sure that your scanner is installed, connected, and powered on; then launch your browser and enter the URL for Sendpoint Merchant Web Client. The login screen appears. 2. Enter your user name and password, then press Enter or click the Log In button. The Sendpoint Merchant Web Client Create Deposit Screen appears. Sendpoint Merchant Web Client User Manual 01/08 2-23 Using Sendpoint Merchant Web Client Using Sendpoint Merchant Web Client 3. Select the account you need from the Account drop-down list. Note: If you do not see the account you need, contact your system administrator. 4. Calculate the deposit total and enter the amount into the Deposit Control Total field. This is the expected total for the deposit and is required. 5. Ensure that all custom fields are completed. All required fields will be highlighted in yellow. All custom fields used for local use will be listed towards the bottom of the list. 6. Click Proceed. Note: The following steps assume that this is a first time use. If this is not the first time use of Sendpoint Merchant Web Client on this workstation, then this action will take the user directly to the capture page. Steps 7-13 will be skipped. 2-24 01/08 Metavante Corporation Using Sendpoint Merchant Web Client Using Sendpoint Merchant Web Client 7. The ActiveX Install Security Warning dialog box appears. 8. Select Install. 9. The Registration dialog box appears. Note: This will only happen the first time this is accessed. 10. Fill in the fields as follows: Enter the PC name in the Machine Description field. Select the correct location from the drop-down list. Select the appropriate scanner for use in capturing items from the drop-down list. Sendpoint Merchant Web Client User Manual 01/08 2-25 Using Sendpoint Merchant Web Client Using Sendpoint Merchant Web Client 11. Select Register. 12. The Device Cab Install Security Warning dialog box appears. 13. Select Install. 14. The Capture page appears. 15. Load items into the scanner. 16. Click Start Scan. The Capture Items pop-up box appears. Items are then scanned and added to the deposit. 17. When you are finished, click Stop Scan in the Capture Items pop-up box. 18. The Capture Items page appears. 2-26 01/08 Metavante Corporation Using Sendpoint Merchant Web Client Using Sendpoint Merchant Web Client 19. Review the deposit, then click Proceed. If the calculated total matches the deposit total, and there are no failed items, then a virtual deposit ticket is created. If there are any failed items, the Correct Items Web page appears displaying those items, and their corresponding failures and exceptions. If there are no failures, the Balance Web page appears. 20. If any exceptions exist within the deposit, then the Correct Items Web page appears. This Web page allows for items to be repaired for any of the following conditions: Duplicate Captured Items Missing an Assigned Amount Additional Data Entry Required Image Quality Errors Sendpoint Merchant Web Client User Manual 01/08 2-27 Using Sendpoint Merchant Web Client Using Sendpoint Merchant Web Client Considered as a Reject Analysis Field Type Description Duplicate Item If a duplicate item is captured, then the user is presented both the current and original images for verification. Only a user assigned the role of administrator can accept a duplicate item into the deposit. Amount Recognition Failed User must manually enter the amount of the item if Sendpoint Merchant does not successfully identify the amount during capture. Item Data Entry Allows for a user to enter data that will be assigned to the item in question. User must enter data for any field highlighted in yellow; however, any field that is not highlighted in yellow is optional. Image Quality Exceptions Lists all of the image quality and usability error associated with each item. Only a user assigned the role of administrator can accept an image with image quality and usability errors. Reject Item Exception Provides an explanation of why an item is labeled a reject. An item can be considered a reject based on the following: The item is a foreign (for example, the item drawn in Canada or Mexico). The scanner is unable to successfully read the MICR. The item routing number is not a valid U.S. number. To accept an exception item into the deposit, all required data entry fields must contain data. Click Accept once all required fields are populated with data. If the choice to remove the item is made by selecting the Remove button, the item will be removed and the operator will be asked to acknowledge and verify that this is what is wanted. Note: Any item that is removed can be recaptured. If the recaptured item continues to fail and the user can not accept it, then it must be deposited through traditional means (within a paper deposit, for example). 2-28 01/08 Metavante Corporation Using Sendpoint Merchant Web Client Using Sendpoint Merchant Web Client 21. When the last exception in the Correct Item Web page is corrected, the Balance Web page appears. If the combined item total does not match that of the deposit, then the deposit can be balanced and is eligible for submission. Click Proceed to continue. To edit the amount of an item, select the item in the grid and edit the amount below the image. Click Save to finalize any change. Note: If Save is not selected, then any changes made will not be implemented. Sendpoint Merchant Web Client User Manual 01/08 2-29 Using Sendpoint Merchant Web Client Using Sendpoint Merchant Web Client 22. When the deposit is in balance, the Review Capture Items Web page appears. Click Finish Deposit to submit and close the deposit. If you are finished entering deposits, click Proceed to be sent to the Sendpoint Merchant Web Client Review Capture Items screen. 2-30 01/08 Metavante Corporation Using Sendpoint Merchant Web Client Using Sendpoint Merchant Web Client Note: Once the Finish Deposit button is clicked, the deposit is transmitted to the financial organization and no further changes are possible. Verify the information here and select Finish Deposit. You will be given options to view reports immediately following this selection. The following Web page appears once the deposit is submitted and closed. You are given two options here for viewing reports. The first is to view the Deposit Detail Report, and the second is to view the Deposit Detail Image Report. To return to the Initial Deposits Web page, click Home. Sendpoint Merchant Web Client User Manual 01/08 2-31 Using Sendpoint Merchant Web Client Using Sendpoint Merchant Web Client A sample of the Deposit Detail Report is shown below. 2-32 01/08 Metavante Corporation Using Sendpoint Merchant Web Client Using Sendpoint Merchant Web Client A sample of the Deposit Detail Image Report is shown below. Modify an Open Deposit You can add items to and modify individual items within an open deposit. To modify an open deposit, do the following: Add Items 1. If you have not already done so, login as described under Creating a New Deposit. 2. Under My Open Deposits, click the link for the deposit that you need. The Capture Items page appears. 3. Load items into the scanner and click Start Scan. The Capture Items pop-up box appears. Items are then scanned and added to the selected open deposit. Sendpoint Merchant Web Client User Manual 01/08 2-33 Using Sendpoint Merchant Web Client Using Sendpoint Merchant Web Client 4. Continue by stopping the capture process as described in Creating a New Deposit. Modify Items 1. If you have not already done so, login as described in under Creating a New Deposit. 2. Under My Recent Deposits, click the link for the deposit you need. The Capture Items page appears. 3. Select the item you need, then modify the item as described in the correction process under Using Sendpoint Merchant Web Client. Note: Items can only be modified within the Balance section of an open deposit. 2-34 01/08 Metavante Corporation Multi-Factor Authentication Scenarios 01/08 Metavante Corporation Multi-Factor Authentication Scenarios New User Enrollment Scenario 1 1. Enter the Login Screen. Select Enroll in Multi-Factor Authentication to be taken to the Secure Authentication screen. 2. Select Begin Setup to continue to the next screen. Otherwise, select Sign Off to cancel this process and exit the application. Sendpoint Merchant Web Client User Manual 01/08 A-1 Multi-Factor Authentication Scenarios Appendix A—Multi-Factor Authentication Scenarios 3. Select a category and then select your picture as an addition to your login data. 4. Enter the user ID and your personal pass-phrase corresponding to the selected picture. Note: The user can also change the previously chosen picture on this screen as well. 5. Select Continue Setup to continue to the challenge question selections. A-2 01/08 Metavante Corporation Appendix A—Multi-Factor Authenticationi Scenarios Multi-Factor Authentication Scenarios 6. Select four challenge questions from the drop-down lists and enter your answers. 7. Select Continue Setup to continue to the computer registration selection. 8. The user has the option to “Register this computer” or “Do not register this computer.” 9. Select Continue Setup to continue to the review screen. Sendpoint Merchant Web Client User Manual 01/08 A-3 Multi-Factor Authentication Scenarios Appendix A—Multi-Factor Authentication Scenarios 10. Preview and change any data previously entered. 11. Select Submit to send the data for authentication and enrollment and for logging into the application. Unregistered Enrolled User Scenario 2 1. Enter your user ID. 2. Select Login to continue. 3. Answer your challenge questions and select Continue to proceed, or select Cancel to quit the application. A-4 01/08 Metavante Corporation Appendix A—Multi-Factor Authenticationi Scenarios Multi-Factor Authentication Scenarios Notes: An option to register the computer is available here as well. Notice that if your computer is not registered, you have to answer your challenge questions before being able to enter your password. 4. Type the password and select Login to log into the Sendpoint Merchant Web Client application, or select Cancel to quit the application. Sendpoint Merchant Web Client User Manual 01/08 A-5 Multi-Factor Authentication Scenarios Registered Enrolled User Appendix A—Multi-Factor Authentication Scenarios Scenario 3 1. Enter your user ID. 2. Select Login to continue. 3. Input your password. Note: Notice that if your computer is registered, you do not have to answer your challenge questions before being able to input your password. 4. Select Login to begin your session or select Cancel to exit the application. A-6 01/08 Metavante Corporation Appendix A—Multi-Factor Authenticationi Scenarios Registered Enrolled User Forgotten Password Multi-Factor Authentication Scenarios Scenario 4 1. Enter your user ID. 2. Select the “Forgot your password?” link to continue to the challenge questions. Sendpoint Merchant Web Client User Manual 01/08 A-7 Multi-Factor Authentication Scenarios Appendix A—Multi-Factor Authentication Scenarios 3. Answer your challenge questions. 4. Select Continue to continue to the Change Password screen or Cancel to exit the application. 5. Enter the new password data and select Save to log into the application. 6. If the user forgets the password or cannot answer the challenge questions, it will be necessary to re-enroll into MFA. The user needs to contact the system administrator for re-enrollment. A-8 01/08 Metavante Corporation Appendix A—Multi-Factor Authenticationi Scenarios Multi-Factor Authentication Scenarios 7. If the user is locked out after three unsuccessful attempts, the system administrator unlocks the user. The user needs to go through steps 1 through 3 of this scenario. The user can continue to use the same password once the account is unlocked by the system administrator. Unregistered Enrolled User Forgotten Password Scenario 5 1. Enter your user ID. 2. Select Login to continue to the challenge questions. 3. Answer all four pre-set questions correctly. Sendpoint Merchant Web Client User Manual 01/08 A-9 Multi-Factor Authentication Scenarios Appendix A—Multi-Factor Authentication Scenarios 4. The user is taken to the Password screen. 5. Select the “Forgot your password?” link to continue to the Enter New Password dialog. 6. The user is prompted to enter the new password and confirm the password since the challenge questions have already been successfully answered. A-10 01/08 Metavante Corporation Appendix A—Multi-Factor Authenticationi Scenarios Multi-Factor Authentication Scenarios 7. If the user is locked out, the merchant administrator unlocks the user in the Configuration Management Administrator tool. The user then needs to repeat steps 1 through 3. Registered Enrolled User Forgotten Challenge Questions Scenario 6 1. Enter you user ID. 2. Select Login to continue to password entry. 3. Select the “Forgot your password?” link to continue to the challenge questions. The user has three attempts to answer all four challenge questions correctly. Sendpoint Merchant Web Client User Manual 01/08 A-11 Multi-Factor Authentication Scenarios Appendix A—Multi-Factor Authentication Scenarios 4. After three unsuccessful attempts, the user is prompted with the error message “If you have forgotten answers to your challenge questions, contact your system administrator to get your account activated.” 5. The user will be locked out and any previous enrollment will be cleared. The user needs to contact the system administrator to unlock the user ID and will then be required to re-enroll using the re-activated user ID and a valid password to access the application. Unregistered User Forgets Challenge Questions A-12 Scenario 7 1. Enter your user ID. 01/08 Metavante Corporation Appendix A—Multi-Factor Authenticationi Scenarios Multi-Factor Authentication Scenarios 2. Select Login to continue to the challenge questions. Answer all four pre-set questions correctly. 3. After three unsuccessful attempts, the user is prompted with the error message “If you have forgotten answers to your challenge questions, contact your system administrator to get your account activated.” 4. The user will then be locked out and will be required to contact the system administrator to re-enroll using the re-activated user ID and a valid password to access the application. Sendpoint Merchant Web Client User Manual 01/08 A-13 Multi-Factor Authentication Scenarios Registered User Re-Enrollment Appendix A—Multi-Factor Authentication Scenarios Scenario 8 1. Select Enroll in Multi-Factor Authentication. 2. Select Begin Setup to continue to the next screen. Otherwise, select Sign Off to cancel this process and exit the application. A-14 01/08 Metavante Corporation Appendix A—Multi-Factor Authenticationi Scenarios Multi-Factor Authentication Scenarios 3. Select a category and then select your picture as an addition to your login data. 4. Enter the user ID and your personal pass-phrase corresponding to the selected picture. 5. Select Continue Setup to continue to the challenge question selections. Sendpoint Merchant Web Client User Manual 01/08 A-15 Multi-Factor Authentication Scenarios Appendix A—Multi-Factor Authentication Scenarios 6. If the user has already enrolled into MFA, the user is shown the following error: User ID- <username> has already enrolled in Multi-Factor Authentication. Please contact your system administrator if you want to re-enroll with the same user ID. 7. The user must contact the system administrator to re-enroll or continue to use the existing user name for logging in to the application. Unregistered User Re-Enrollment Scenario 9 1. Enter the Login Screen. Select Enroll in Multi-Factor Authentication to be taken to the Secure Authentication screen. A-16 01/08 Metavante Corporation Appendix A—Multi-Factor Authenticationi Scenarios Multi-Factor Authentication Scenarios 2. Select Begin Setup to continue to the next screen. Otherwise, select Sign Off to cancel this process and exit the application. 3. Select a category and then select your picture as an addition to your login data. 4. Enter the user ID and your personal pass-phrase corresponding to the selected picture. Note: The user can also change the previously chosen picture on this screen as well. Sendpoint Merchant Web Client User Manual 01/08 A-17 Multi-Factor Authentication Scenarios Appendix A—Multi-Factor Authentication Scenarios 5. Select Continue Setup to continue to the challenge question selections. 6. If the user has already enrolled into MFA, the user is shown the following error: User ID- <username> has already enrolled in Multi-Factor Authentication. Please contact your system administrator if you want to re-enroll with the same user ID. 7. Contact the system administrator to re-enroll. In this scenario, the user is locked out and needs to contact the system administrator. It is required to re-enroll using the re-activated user ID and a valid password to access the application. A-18 01/08 Metavante Corporation