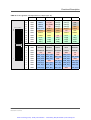
1
Artisan Technology Group is your source for quality
new and certified-used/pre-owned equipment
• FAST SHIPPING AND
DELIVERY
• TENS OF THOUSANDS OF
IN-STOCK ITEMS
• EQUIPMENT DEMOS
• HUNDREDS OF
MANUFACTURERS
SUPPORTED
• LEASING/MONTHLY
RENTALS
• ITAR CERTIFIED
SECURE ASSET SOLUTIONS
SERVICE CENTER REPAIRS
Experienced engineers and technicians on staff
at our full-service, in-house repair center
WE BUY USED EQUIPMENT
Sell your excess, underutilized, and idle used equipment
We also offer credit for buy-backs and trade-ins
www.artisantg.com/WeBuyEquipment
InstraView REMOTE INSPECTION
LOOKING FOR MORE INFORMATION?
Visit us on the web at www.artisantg.com for more
information on price quotations, drivers, technical
specifications, manuals, and documentation
SM
Remotely inspect equipment before purchasing with
our interactive website at www.instraview.com
Contact us: (888) 88-SOURCE | [email protected] | www.artisantg.com
Embedded Solutions
20D002-00 E3 - 2001-12-04
D2 - 6U Advanced Pentium
CompactPCI Workstation
User Manual
Board-Level Computers
for Industrial Applications
Artisan Technology Group - Quality Instrumentation ... Guaranteed | (888) 88-SOURCE | www.artisantg.com
D2 - 6U Advanced Pentium CompactPCI Workstation
D2 - 6U Advanced Pentium CompactPCI Workstation
The D2 is a high-end PentiumIII-class workstation optimized for industrial
requirements in control and instrumentation in terms of functionality, environmental
conditions and cost. It needs only one slot in a CompactPCI system. Its "Socket 7+"based computing core supports CPUs such as AMD's K6-III+ processor with
100MHz bus frequency and 400MHz and more internal clock speeds. The fast chip
set comes with 100MHz CPU and 33MHz PCI bus clock and supports the latest
DRAM technology. All PCI components are carefully selected for optimum support
regarding long-term availability.
In addition to state-of-the-art PC functionality - such as 10/100Mbit Ethernet,
UARTs, EIDE, LPT, Microsoft ACPI, floppy, GPIO and USB - the D2 is equipped
with a bundle of industrial functions. These unique features are highly reliable,
SMT-mounted SDRAM in addition to SO-DIMMs, SRAM as NOVRAM disk,
flexible CompactFlash™ extension up to 100MB and more, BIOS extensions for
non-video, boot from CompactFlash™ etc., support of PXI trigger signals (National
Instruments), three local PC•MIP™ mezzanines for flexible and individual
workstation I/O extensions like graphics, SCSI, additional serial lines, field buses
etc. and various board and system control mechanisms.
The D2 is carefully prepared for all types of industrial qualification procedures such
as extended temperature range (-40..+85°C), shock, vibration, humidity etc.
Technical Data
CompactPCI Bus
• 6U CompactPCI CPU board rev. 2.1 compliant
• Ali Aladdin V chip set
- compliance with PCI specification 2.1
- up to 33 MHz PCI frequency
• 32-bit CompactPCI system slot functionality
• 7 possible external loads due to PCI-to-PCI bridge
• DEC 21150 PCI-to-PCI bridge
• single-slot solution
• V(I/O): +3.3V or +5V (Universal Board)
CPU
•
•
•
•
Pentium with MMX, 266MHz Tillamook, K6-III+ (Pentium III class)
passive cooling
up to 550MHz CPU frequency
up to 100MHz local bus frequency
MEN Mikro Elektronik GmbH
20D002-00 E3 - 2001-12-03
Artisan Technology Group - Quality Instrumentation ... Guaranteed | (888) 88-SOURCE | www.artisantg.com
2
Technical Data
Memory
• 512KB Level 2 Cache
• 32..288MB DRAM
- 32MB on board
- 128MB each on two SO-DIMM sockets
- 100MHz SDRAM clock
• up to 4 MB battery-backed SRAM for user applications
- via local PCI bus
- no loss of data
• CompactFlash™ card interface for on-board Flash ATA
• 2Mbit BIOS Flash
Interfaces
• two serial communication ports (COM1/COM2)
• COM1: RS232 physical interface
- 9-pin D-Sub connectors at front panel or via CompactPCI J4/J5
• COM2 via CompactPCI J5/J4
• full-duplex 10/100Mbit/s PCI Ethernet controller
- 21143 PCI LAN controller
- 10Base-T/100Base-TX interface at front panel (RJ45 connector)
- simultaneous transmission of 10Mbit/s and 100Mbit/s frames
• three USB (Universal Serial Bus) interfaces
- via CompactPCI J4/J5
- conforming to Open HCI 1.0a
• keyboard and mouse at 6-pin PS2 connector at front panel
• parallel port (SPP, EPP, ECP) via CompactPCI J4/J5
• optional GPIOs at J4/J5 or Fast IR interface
PXI
• five trigger lines compliant with PXI Specification rev. 1.0
Local Extensions
• PC•MIP I/O at front panel or via CompactPCI rear I/O
• three PC•MIP mezzanine extension slots compliant with PC•MIP specification
(2 Type I/II slots, 1 Type I slot)
Mass Storage
• two fast IDE interfaces
- up to 33 MB/s (supports UltraDMA and PIO mode 4)
- via Compact PCI J3/J4
• floppy-disk controller
- 2.88 MB
- via CompactPCI J4/J5
Miscellaneous
• battery-backed real-time clock
MEN Mikro Elektronik GmbH
20D002-00 E3 - 2001-12-03
Artisan Technology Group - Quality Instrumentation ... Guaranteed | (888) 88-SOURCE | www.artisantg.com
3
Technical Data
• external user-definable watchdog
• integrated hardware monitor
- alarm function
- supervises temperature, all voltages including back-up battery, and power
supply (via CompactPCI)
• reset button at front panel
- can be disabled through software
• LEDs at front panel: IDE, LAN, Power, user-definable
• power supply controlled by CPU: software-controlled power down
Electrical Specifications
• supply voltage/power consumption:
- +5V: 4.85V..5.25V @ 2.95A (K6-III/450MHz), 1.66A (Tillamook/266MHz)
- +3.3V: 3.0V..3.6V @ 0.98A (K6-III/450MHz), 0.83A (Tillamook/266MHz)
- +12V: 11.4V..12.6V; -12V: -11.4V..-12.6V (power consumption determined
by PC•MIPs used)
• MTBF: 66,200h @ 50°C
Mechanical Specifications
• dimensions: conforming to CompactPCI specification for 6U boards
• CompactPCI slots:
- 4HP total for processors < 8W power dissipation
- 8HP for processors > 8W power dissipation
- only 4HP on CompactPCI backplane
• weight: 530g
Environmental Specifications
• temperature range (operation):
- 0..+60°C (Pentium MMX/266MHz) or -40..+85°C (K6-III+/450)
- airflow: min. 10m³/h
• temperature range (storage): -40..+85°C
• relative humidity range (operation): max. 95% non-condensing
• relative humidity range (storage): max. 95% non-condensing
• altitude: -300m to + 3,000m
• shock: 15g/0.33ms, 6g/6ms
• vibration: 1g/5..2,000Hz
Safety
• PCB manufactured with a flammability rating of 94V-0 by UL recognized manufacturers
EMC
• tested according to IEC1000-4-2 (burst) and IEC1000-4-4 (ESD) with regard to
CE conformity
MEN Mikro Elektronik GmbH
20D002-00 E3 - 2001-12-03
Artisan Technology Group - Quality Instrumentation ... Guaranteed | (888) 88-SOURCE | www.artisantg.com
4
Technical Data
BIOS
•
•
•
•
Plug and Play Award BIOS for industrial applications
CMOS back-up: configuration data stored in EEPROM
boot support for CompactFlash interface (DOS, VxWorks)
console redirection: serial console administration via terminal (VT100; DOS,
VxWorks)
Software Support
• WindowsNT
• VxWorks
MEN Mikro Elektronik GmbH
20D002-00 E3 - 2001-12-03
Artisan Technology Group - Quality Instrumentation ... Guaranteed | (888) 88-SOURCE | www.artisantg.com
5
Block Diagram
Block Diagram
1MB
L2 Cache
128MB
SO-DIMM
Pentium/K6
(Super Socket 7+)
128MB
SO-DIMM
32MB
on-board DRAM
Legend:
Northbridge
Ali M1541
Counter/
Timer
PXI
R
R
F R
R
R
USB
R
Ethernet
10/100Base-T(X)
21143
R
CompactPCI Midplane
R
J3/J4/J5 Rear I/O Connectors
F
IDE
PCI-to-ISA
Floppy Disk
Southbridge
Super I/O
COM1 COM2
M1543
Parallel Port
Transition
Module
F
PC•MIP
Type I/II
F R
PC•MIP
Type I/II
F
PC•MIP
Type I
R
SRAM
CompactFlash
F
CompactPCI Backplane
PCI-to-PCI
Bridge
21150
Front Panel
R
Mouse/Keyboard
PCI/PCMCIA
1131
F
R
ISA Bus
PCI
Bus
Rear I/O
CompactPCI J1/J2
Temperature
Real-Time
Power
Clock
Manager
R
MEN Mikro Elektronik GmbH
20D002-00 E3 - 2001-12-03
Artisan Technology Group - Quality Instrumentation ... Guaranteed | (888) 88-SOURCE | www.artisantg.com
6
Ordering Information
Ordering Information
Standard Hardware
02D002-00
D2, CompactPCI 6U, single board computer, Pentium MMX/
266MHz, , 1MB cache, 1MB SRAM, 32MB DRAM, 100Mbit
Ethernet, 3 PC•MIP slots, 1-slot front panel
02D002-03
D2, CompactPCI 6U, single board computer, K6-III+/450, 1MB
cache, 32MB DRAM, 100Mbit Ethernet, 3 PC•MIP slots,
temperature range 0..+45°C
Accessories
0500-0002
battery M4T28... for Timekeeper M48T86 (spare part)
05A000-10
keyboard/mouse Y-cable, 6-pin mini DIN plug to two 6-pin mini DIN
receptacles (0.1m)
0751-0001
CompactFlash 32MB ATA/true IDE
0751-0002
CompactFlash card 8MB
0751-0003
CompactFlash card 192MB
0751-0005
CompactFlash card, 32MB, Type I, -40..+85°C
0751-0007
CompactFlash card, 512MB, Type I, -40..+85°C
0752-0007
DRAM SO-DIMM 64MB SDRAM, 10ns, 3.3V
0752-0008
DRAM SO-DIMM 128MB SDRAM, 10ns, 3.3V
08CT02-00
CompactPCI transition module 6U/80mm, I/O connection for D2
08SA01-00
serial interface adapter, RS232, not optically isolated
08SA02-00
serial interface adapter, RS422/485, half duplex, optically isolated
08SA02-01
serial interface adapter, RS422/485, full duplex, optically isolated
08SA03-00
serial interface adapter, RS232, optically isolated
08SA04-00
serial interface adapter, TTY, optically isolated
08SA05-00
serial interface adapter, RS232, not optically isolated
Basic Systems
0701-0004
CompactPCI 19" 3U rack-mount enclosure, 6U CompactPCI
midplane, ATX power supply, fan, 2 batteries
0701-0010
CompactPCI 19" 7U rack-mount enclosure, 6U 8-slot CompactPCI
midplane, ATX power supply, prepared for FD, HD and CD, 1U fan
tray
EIDE, floppy and CD-ROM drives are delivered as requested.
Different rack sizes, power supplies and backplanes (3U/6U, J1..J5) on request.
MEN Mikro Elektronik GmbH
20D002-00 E3 - 2001-12-03
Artisan Technology Group - Quality Instrumentation ... Guaranteed | (888) 88-SOURCE | www.artisantg.com
7
Ordering Information
Standard Software
10ABMX-08 Microsoft Windows NT 4.0: workstation license, German OEM
version, CD-ROM and manual
10ABMX-09 Microsoft WindowsNT 4.0: workstation license, English OEM
version, CD-ROM and manual
10D002-60
VxWorks V.5.4/Tornado II standard BSP for D2
13D002-00
WindowsNT: driver package for D2 (object code, MEN)
13M000-06 MDIS4 for WindowsNT system package
download
13M000-07 MDIS4 for VxWorks system package
download
13M000-08 MDIS4 for OS-9 system package
download
13M000-13 MDIS4 for Linux system package
download
13P003-70
WindowsNT V.4.0: Ethernet driver for P3/D1/D2/F2 (DEC, object
code for x86), documentation of third-party supplier
download
13Z001-06
low-level sources LM78 (MDIS4) incl. documentation (PDF)
download
13Z002-06
low-level sources for Z8536/watchdog (MDIS4) incl. documentation
(PDF)
download
13Z004-06
low-level sources for ALI1543 user LEDs (MDIS4), incl.
documentation (PDF)
download
13Z008-06
DeviceNet sources for ALI1543, GPIO (MDIS4), incl. documentation
(PDF)
download
User Manuals
20D002-00
D2 user manual
download
20CT02-00
CT02 user manual
download
20SA00-00
SA adapter user manual
download
MEN Mikro Elektronik GmbH
20D002-00 E3 - 2001-12-03
Artisan Technology Group - Quality Instrumentation ... Guaranteed | (888) 88-SOURCE | www.artisantg.com
8
About this Document
About this Document
This user manual describes the hardware functions of the board, connection of
peripheral devices and integration into a system. It also provides additional
information for special applications and configurations of the board.
The manual does not include detailed information on individual components (data
sheets etc.). A list of literature is given in the appendix.
History
Edition
Description
Technical Content
Date of Issue
E1
First edition
Jürgen Steinert
1999-10-19
E2
Second edition
Jürgen Steinert
2001-03-23
E3
Third edition
Klaus Weinert
2001-12-04
Conventions
!
italics
bold
hyperlink
This sign marks important notes or warnings concerning proper functionality of the
product described in this document. You should read them in any case.
Folder and file names are printed in italics.
Bold type is used for emphasis.
Hyperlinks are printed in blue color.
The globe will show you where hyperlinks lead directly to the Internet, so you can
look for the latest information online.
0xFF
Hexadecimal numbers are preceded by "0x", which is the usual C-language
convention, and are printed in a monospace type, e.g. 0x00FFFF.
IRQ#
/IRQ
Signal names followed by "#" or preceded by a slash ("/") indicate that this signal is
either active low or that it becomes active at a falling edge.
in/out
Signal directions in signal mnemonics tables generally refer to the corresponding
board or component, "in" meaning "to the board or component", "out" meaning
"coming from it".
Vertical lines on the outer margin signal technical changes to the previous edition of
the document.
MEN Mikro Elektronik GmbH
20D002-00 E3 - 2001-12-03
Artisan Technology Group - Quality Instrumentation ... Guaranteed | (888) 88-SOURCE | www.artisantg.com
9
About this Document
Short Glossary of PC•MIP Terms
For a complete glossary of PC•MIP terms and definitions, please refer to the
PC•MIP specification.
Front
The front of the PC•MIP module is the flat surface of the module that faces outward,
away from the carrier board, when the module is mounted on the carrier.
J1, J2
J1 and J2 are two 64-pin receptacle connectors on the PC•MIP module that carry the
32-bit PCI bus via which the carrier and the module communicate. J1 and J2 mate to
P1 and P2 on the carrier board respectively.
J3
J3 is the 64-pin I/O receptacle connector between the module and the carrier board.
14 ground pins are defined on this connector by the specification, but the remaining
50 pin functions are defined by each module. J3 mates to P3 on the carrier board.
J4
J4 is a term reserved for the "front panel" I/O connector on type II PC•MIP
modules, but not on type I modules. The selection of the physical connector is left to
manufacturer of the type II module, and is not defined in the specification. J4
typically mates to a an equivalent P4 connector on a cable.
Rear
The rear of the PC•MIP module is the flat surface of the module that faces inward,
towards the carrier board, when the module is mounted on the carrier.
MEN Mikro Elektronik GmbH
20D002-00 E3 - 2001-12-03
Artisan Technology Group - Quality Instrumentation ... Guaranteed | (888) 88-SOURCE | www.artisantg.com
10
About this Document
!
ESD Warning
Computer boards and components contain very delicate Integrated Circuit (IC)
chips. Electrostatic discharge (ESD) can damage components. To protect the board
and other components against damage from static electricity, you should follow
some precautions whenever you work on your computer.
• Power down and unplug your computer system when working on the inside.
• Hold components by the edges and try not to touch the IC chips, leads, or circuitry.
• Use a grounded wrist strap before handling computer components.
• Place components on a grounded antistatic pad or on the bag that came with the
component whenever the components are separated from the system.
• Store the board only in its original ESD-protected packaging. Retain the original
packaging in case you need to return the board to MEN for repair.
Copyright Information
MEN reserves the right to make changes without further notice to any products herein. MEN makes no
warranty, representation or guarantee regarding the suitability of its products for any particular
purpose, nor does MEN assume any liability arising out of the application or use of any product or
circuit, and specifically disclaims any and all liability, including without limitation consequential or
incidental damages.
"Typical" parameters can and do vary in different applications. All operating parameters, including
"Typicals" must be validated for each customer application by customer's technical experts.
MEN does not convey any license under its patent rights nor the rights of others.
MEN products are not designed, intended, or authorized for use as components in systems intended for
surgical implant into the body, or other applications intended to support or sustain life, or for any other
application in which the failure of the MEN product could create a situation where personal injury or
death may occur. Should Buyer purchase or use MEN products for any such unintended or
unauthorized application, Buyer shall indemnify and hold MEN and its officers, employees,
subsidiaries, affiliates, and distributors harmless against all claims, costs, damages, and expenses, and
reasonable attorney fees arising out of, directly or indirectly, any claim of personal injury or death
associated with such unintended or unauthorized use, even if such claim alleges that MEN was
negligent regarding the design or manufacture of the part.
All brand or product names are trademarks or registered trademarks of their respective holders.
Information in this document has been carefully checked and is believed to be accurate as of the date of
publication; however, no responsibility is assumed for inaccuracies. MEN will not be liable for any
consequential or incidental damages arising from reliance on the accuracy of this document. The
information contained herein is subject to change without notice.
Copyright © 2001 MEN Mikro Elektronik GmbH. All rights reserved.
Germany
MEN Mikro Elektronik GmbH
Neuwieder Straße 7
90411 Nuremberg
Phone +49-911-99 33 5-0
Fax +49-911-99 33 5-99
E-mail [email protected]
www.men.de
France
MEN Mikro Elektronik SA
18, rue René Cassin
ZA de la Châtelaine
74240 Gaillard
Phone +33 (0) 450-955-312
Fax +33 (0) 450-955-211
E-mail [email protected]
www.men-france.fr
UK
MEN Micro Ltd
Whitehall, 75 School Lane
Hartford, Northwich
Cheshire UK, CW8 1PF
Phone +44 (0) 1477-549-185
Fax +44 (0) 1477-549-178
E-mail [email protected]
www.menmicro.co.uk
USA
MEN Micro, Inc.
3740 North Josey Lane, Suite 203
Carrollton, TX 75007
Phone 972-939-2675
Fax 972-939-0055
E-mail [email protected]
www.menmicro.com
MEN Mikro Elektronik GmbH
20D002-00 E3 - 2001-12-03
Artisan Technology Group - Quality Instrumentation ... Guaranteed | (888) 88-SOURCE | www.artisantg.com
11
Contents
Contents
1 Getting Started . . . . . . . . . . . . . . . . . . . . . . . . . . . . . . . . . . . . . . . . . . . . . . . .
1.1 Map of the Board. . . . . . . . . . . . . . . . . . . . . . . . . . . . . . . . . . . . . . . . .
1.2 Configuring the Hardware . . . . . . . . . . . . . . . . . . . . . . . . . . . . . . . . . .
1.3 Integrating the Board into a System . . . . . . . . . . . . . . . . . . . . . . . . . .
1.4 Troubleshooting at Start-up . . . . . . . . . . . . . . . . . . . . . . . . . . . . . . . . .
1.5 Configuring BIOS . . . . . . . . . . . . . . . . . . . . . . . . . . . . . . . . . . . . . . . .
1.6 Installing Operating System Software. . . . . . . . . . . . . . . . . . . . . . . . .
16
16
17
18
18
19
19
2 Functional Description . . . . . . . . . . . . . . . . . . . . . . . . . . . . . . . . . . . . . . . . . .
2.1 Power Supply. . . . . . . . . . . . . . . . . . . . . . . . . . . . . . . . . . . . . . . . . . . .
2.2 Clock Supply . . . . . . . . . . . . . . . . . . . . . . . . . . . . . . . . . . . . . . . . . . . .
2.3 Processor Core. . . . . . . . . . . . . . . . . . . . . . . . . . . . . . . . . . . . . . . . . . .
2.3.1
Socket 7+. . . . . . . . . . . . . . . . . . . . . . . . . . . . . . . . . . . . . . . .
2.3.2
Host-to-PCI Bridge . . . . . . . . . . . . . . . . . . . . . . . . . . . . . . . .
2.3.3
Main Memory (DRAM) . . . . . . . . . . . . . . . . . . . . . . . . . . . .
2.3.4
L2 Cache . . . . . . . . . . . . . . . . . . . . . . . . . . . . . . . . . . . . . . . .
2.4 CompactPCI Interface . . . . . . . . . . . . . . . . . . . . . . . . . . . . . . . . . . . . .
2.4.1
General . . . . . . . . . . . . . . . . . . . . . . . . . . . . . . . . . . . . . . . . .
2.4.2
Extensions . . . . . . . . . . . . . . . . . . . . . . . . . . . . . . . . . . . . . . .
2.5 Ethernet Interface . . . . . . . . . . . . . . . . . . . . . . . . . . . . . . . . . . . . . . . .
2.5.1
Implementation on D2 . . . . . . . . . . . . . . . . . . . . . . . . . . . . .
2.5.2
General . . . . . . . . . . . . . . . . . . . . . . . . . . . . . . . . . . . . . . . . .
2.5.3
10Base-5 . . . . . . . . . . . . . . . . . . . . . . . . . . . . . . . . . . . . . . . .
2.5.4
10Base-2 . . . . . . . . . . . . . . . . . . . . . . . . . . . . . . . . . . . . . . . .
2.5.5
10Base-T . . . . . . . . . . . . . . . . . . . . . . . . . . . . . . . . . . . . . . . .
2.5.6
100Base-T . . . . . . . . . . . . . . . . . . . . . . . . . . . . . . . . . . . . . . .
2.6 CompactFlash/SRAM Interface . . . . . . . . . . . . . . . . . . . . . . . . . . . . .
2.6.1
CompactFlash Interface . . . . . . . . . . . . . . . . . . . . . . . . . . . .
2.6.2
Battery-backed SRAM . . . . . . . . . . . . . . . . . . . . . . . . . . . . .
2.6.3
Booting from CompactFlash/SRAM . . . . . . . . . . . . . . . . . .
2.7 Super I/O Controller . . . . . . . . . . . . . . . . . . . . . . . . . . . . . . . . . . . . . .
2.7.1
COM1 Port . . . . . . . . . . . . . . . . . . . . . . . . . . . . . . . . . . . . . .
2.7.2
Keyboard/Mouse Interface . . . . . . . . . . . . . . . . . . . . . . . . . .
2.7.3
EIDE Interface . . . . . . . . . . . . . . . . . . . . . . . . . . . . . . . . . . .
2.7.4
USB Interface . . . . . . . . . . . . . . . . . . . . . . . . . . . . . . . . . . . .
2.7.5
GPIO Interface . . . . . . . . . . . . . . . . . . . . . . . . . . . . . . . . . . .
2.8 PC•MIP Slots. . . . . . . . . . . . . . . . . . . . . . . . . . . . . . . . . . . . . . . . . . . .
2.8.1
Installing a PC•MIP . . . . . . . . . . . . . . . . . . . . . . . . . . . . . . .
2.8.2
PC•MIP Connectors . . . . . . . . . . . . . . . . . . . . . . . . . . . . . . .
2.8.3
Signal Mapping from PC•MIP Connector to Rear I/O . . . . .
2.9 Front LEDs and Reset Button . . . . . . . . . . . . . . . . . . . . . . . . . . . . . . .
2.10 System Trigger, Watchdog and Hardware Monitor . . . . . . . . . . . . . . .
20
20
20
21
21
21
22
23
24
24
25
32
32
33
33
33
34
34
35
35
36
36
37
37
38
39
39
39
40
40
41
41
43
44
MEN Mikro Elektronik GmbH
20D002-00 E3 - 2001-12-03
Artisan Technology Group - Quality Instrumentation ... Guaranteed | (888) 88-SOURCE | www.artisantg.com
12
Contents
3 Award BIOS. . . . . . . . . . . . . . . . . . . . . . . . . . . . . . . . . . . . . . . . . . . . . . . . . . .
3.1 Main Setup Menu . . . . . . . . . . . . . . . . . . . . . . . . . . . . . . . . . . . . . . . .
3.2 Special Features Setup. . . . . . . . . . . . . . . . . . . . . . . . . . . . . . . . . . . . .
3.3 Console Redirection . . . . . . . . . . . . . . . . . . . . . . . . . . . . . . . . . . . . . .
3.3.1
Configuring BIOS . . . . . . . . . . . . . . . . . . . . . . . . . . . . . . . . .
3.3.2
Configuring a Terminal Cable. . . . . . . . . . . . . . . . . . . . . . . .
3.3.3
Configuring the Terminal . . . . . . . . . . . . . . . . . . . . . . . . . . .
3.4 BIOS Restrictions . . . . . . . . . . . . . . . . . . . . . . . . . . . . . . . . . . . . . . . .
3.5 BIOS Troubleshooting. . . . . . . . . . . . . . . . . . . . . . . . . . . . . . . . . . . . .
46
46
48
49
49
50
50
51
51
4 Organization of the Board . . . . . . . . . . . . . . . . . . . . . . . . . . . . . . . . . . . . . . .
4.1 Local PCI Bus . . . . . . . . . . . . . . . . . . . . . . . . . . . . . . . . . . . . . . . . . . .
4.1.1
Device Numbers . . . . . . . . . . . . . . . . . . . . . . . . . . . . . . . . . .
4.1.2
Interrupt Routing. . . . . . . . . . . . . . . . . . . . . . . . . . . . . . . . . .
4.2 CompactPCI Bus . . . . . . . . . . . . . . . . . . . . . . . . . . . . . . . . . . . . . . . . .
4.2.1
Device Numbers . . . . . . . . . . . . . . . . . . . . . . . . . . . . . . . . . .
4.2.2
Interrupt Routing and Buffering . . . . . . . . . . . . . . . . . . . . . .
4.3 ISA Bus . . . . . . . . . . . . . . . . . . . . . . . . . . . . . . . . . . . . . . . . . . . . . . . .
52
52
52
52
53
53
53
53
5 Appendix . . . . . . . . . . . . . . . . . . . . . . . . . . . . . . . . . . . . . . . . . . . . . . . . . . . . .
5.1 Literature and WWW Resources. . . . . . . . . . . . . . . . . . . . . . . . . . . . .
5.1.1
CompactPCI/PCI. . . . . . . . . . . . . . . . . . . . . . . . . . . . . . . . . .
5.1.2
PXI . . . . . . . . . . . . . . . . . . . . . . . . . . . . . . . . . . . . . . . . . . . .
5.1.3
PC•MIP . . . . . . . . . . . . . . . . . . . . . . . . . . . . . . . . . . . . . . . . .
5.1.4
EIDE . . . . . . . . . . . . . . . . . . . . . . . . . . . . . . . . . . . . . . . . . . .
5.1.5
Parallel Peripherals - EPP . . . . . . . . . . . . . . . . . . . . . . . . . . .
5.1.6
Ethernet . . . . . . . . . . . . . . . . . . . . . . . . . . . . . . . . . . . . . . . . .
5.1.7
USB . . . . . . . . . . . . . . . . . . . . . . . . . . . . . . . . . . . . . . . . . . . .
5.2 Board Revisions. . . . . . . . . . . . . . . . . . . . . . . . . . . . . . . . . . . . . . . . . .
5.3 Component Plans. . . . . . . . . . . . . . . . . . . . . . . . . . . . . . . . . . . . . . . . .
54
54
54
54
54
54
54
55
55
55
56
MEN Mikro Elektronik GmbH
20D002-00 E3 - 2001-12-03
Artisan Technology Group - Quality Instrumentation ... Guaranteed | (888) 88-SOURCE | www.artisantg.com
13
Figures
Figure 1.
Figure 2.
Figure 3.
Figure 4.
Figure 5.
Figure 6.
Figure 7.
Figure 8.
Map of the Board - Front Panel and Top View . . . . . . . . . . . . . . . . . .
Installing an SO-DIMM DRAM Module . . . . . . . . . . . . . . . . . . . . . . .
Inserting a CompactFlash Card . . . . . . . . . . . . . . . . . . . . . . . . . . . . . .
Installation of a PC•MIP (example for slot A or B) . . . . . . . . . . . . . . .
Front Panel LEDs and Reset Button. . . . . . . . . . . . . . . . . . . . . . . . . . .
BIOS CMOS Setup Utility - Main Menu . . . . . . . . . . . . . . . . . . . . . . .
Component Plan of D2 Rev. 02 - Top Side . . . . . . . . . . . . . . . . . . . . .
Component Plan of D2 Rev. 02 - Bottom Side . . . . . . . . . . . . . . . . . .
MEN Mikro Elektronik GmbH
20D002-00 E3 - 2001-12-03
Artisan Technology Group - Quality Instrumentation ... Guaranteed | (888) 88-SOURCE | www.artisantg.com
16
22
35
41
43
46
56
57
14
Tables
Table 1.
Table 2.
Table 3.
Table 4.
Table 5.
Table 6.
Table 7.
Table 8.
Table 9.
Table 10.
Table 11.
Table 12.
Table 13.
Table 14.
Table 15.
Table 16.
Table 17.
Table 18.
Table 19.
Table 20.
Table 21.
Table 22.
Pin Assignment of CompactPCI J2 (110-pin type "B" modified) . . . .
Signal Mnemonics for CompactPCI J2 . . . . . . . . . . . . . . . . . . . . . . . .
Pin Assignment of CompactPCI J3 (95-pin type "B" modified) . . . . .
Signal Mnemonics of Connector J3 . . . . . . . . . . . . . . . . . . . . . . . . . . .
Pin Assignment of CompactPCI J4 (110-pin type "A") . . . . . . . . . . . .
Signal Mnemonics of Connector J4 . . . . . . . . . . . . . . . . . . . . . . . . . . .
Pin Assignment of CompactPCI J5 (110-pin type "B" modified) . . . .
Signal Mnemonics for CompactPCI J5 . . . . . . . . . . . . . . . . . . . . . . . .
Pin Assignment of the 8-pin RJ45 Ethernet 10Base-T/100Base-TX
Connector . . . . . . . . . . . . . . . . . . . . . . . . . . . . . . . . . . . . . . . . . . . . . . .
Signal Mnemonics for Ethernet 10Base-T/100Base-TX Interface. . . .
Pin Assignment of the 9-pin D-Sub COM1 Plug Connector . . . . . . . .
Signal Mnemonics for Serial Port COM1 . . . . . . . . . . . . . . . . . . . . . .
Pin Assignment of the 6-Pin Mini DIN Keyboard/Mouse Connector .
Signal Mnemonics for Keyboard/Mouse Interface . . . . . . . . . . . . . . .
Correspondence between GPIO and UART3 Pins . . . . . . . . . . . . . . . .
Signal Mapping from PC•MIP J3/P3 to Rear I/O . . . . . . . . . . . . . . . .
Port Pin Assignment of the Z8536 CIO . . . . . . . . . . . . . . . . . . . . . . . .
Pin Assignment for Terminal Cable . . . . . . . . . . . . . . . . . . . . . . . . . . .
Device Numbers on Local PCI Bus . . . . . . . . . . . . . . . . . . . . . . . . . . .
Device Numbers on CompactPCI Backplane. . . . . . . . . . . . . . . . . . . .
ISA Bus Plug and Play Device IDs . . . . . . . . . . . . . . . . . . . . . . . . . . .
Table of Hardware Revisions . . . . . . . . . . . . . . . . . . . . . . . . . . . . . . . .
MEN Mikro Elektronik GmbH
20D002-00 E3 - 2001-12-03
Artisan Technology Group - Quality Instrumentation ... Guaranteed | (888) 88-SOURCE | www.artisantg.com
25
25
26
27
28
29
31
31
32
32
37
37
38
38
39
42
44
50
52
53
53
55
15
Getting Started
1
Getting Started
Before you install the D2 in your system you should check if you need to make any
changes to the factory configuration. The following overview of the board and the
subsequent chapters including a "check list" will help you do this.
1.1
Map of the Board
Figure 1. Map of the Board - Front Panel and Top View
P2
PC•MIP Slot A
J5
(rear I/O possible)
P1
PC•MIP slots
P2
PC•MIP
Bezel Keepers
PC•MIP Slot B
P1
PC•MIP Slot E
P3
(rear I/O possible)
Finished Bezel
of I/O Connector
P3
P2
J4
(no rear I/O)
P1
LAN
Ethernet
(100Base-TX/
10Base-T)
RST
Injectors/Ejectors with
Threaded Standoffs and
Captive Screws
Reset Button
0
USER2
1
USER1
2
LAN2 USER
3
LAN1 media
4
IDE active 1
5
IDE active 0
6
Heartbeat
7
Power Good
8
Standby
LEDs
J3
CPU Core
Compact
Flash
J2
DRAM SIMM Socket
Bank 1
COM 1
COM1 (RS232)
J1
KB/MS
Keyboard/Mouse
DRAM SIMM Socket
Bank 0
MEN Mikro Elektronik GmbH
20D002-00 E3 - 2001-12-03
Artisan Technology Group - Quality Instrumentation ... Guaranteed | (888) 88-SOURCE | www.artisantg.com
16
Getting Started
1.2
Configuring the Hardware
You should check your hardware requirements before installing the board in a
system, since most modifications are difficult or even impossible to do when the
board is mounted in a rack.
The following check list will give an overview on what you might want to configure.
DRAM SO-DIMM modules
The D2 may be shipped without any DRAM on board, depending on the model
ordered. You should check on your main memory needs and install suitable 8byte SO-DIMM modules.
Refer to Chapter 2.3.3 Main Memory (DRAM) on page 22 for a detailed
installation description and hints on supported SO-DIMM modules.
CompactFlash
Refer to Chapter 2.6.1 CompactFlash Interface on page 35 for a detailed
installation description and hints on supported CompactFlash cards.
PC•MIP mezzanine modules
Refer to Chapter 2.8.1 Installing a PC•MIP on page 40 for a detailed
installation description.
CT02 transition module
MEN offers the CT02 transition module for connection of mass storage devices
and other peripherals.
If you want to use this interface adapter together with the D2, you must install
the adapter in the rack before you install the CPU board. For details on
connection and installation please refer to the CT02 manual.
MEN Mikro Elektronik GmbH
20D002-00 E3 - 2001-12-03
Artisan Technology Group - Quality Instrumentation ... Guaranteed | (888) 88-SOURCE | www.artisantg.com
17
Getting Started
1.3
!
Integrating the Board into a System
Keep in mind that the D2 is a pure motherboard! To get into BIOS and carry out the
following steps, you will have to connect at least a terminal or a graphics card,
VGA monitor and keyboard. The D2 supports connection of a terminal to COM1/
COM2. If you want to make use of this option, please refer to Chapter 3.3 Console
Redirection on page 49.
The following check list will help you make your D2 board run a system with
minimum configuration.
Power down the system.
Remove all boards from the CompactPCI system.
Insert the D2 into the system slot of your CompactPCI system, making sure that
the CompactPCI connectors are properly aligned.
Note: The D2 must be inserted into the system slot! The system slot of every
CompactPCI system is marked by a
triangle on the backplane and/or
at the front panel. It also has red guide rails.
!
Power up the system.
You can fork up BIOS now by hitting the DEL key.
Now you can make configurations in BIOS setup (see Chapter 3 Award BIOS
on page 46).
Observe the installation instructions in your WindowsNT or VxWorks documentation.
1.4
Troubleshooting at Start-up
Usually, problems at start-up of a system can be dealt with through BIOS. You can
start the board with BIOS default settings for troubleshooting. Please refer to
Chapter 3.5 BIOS Troubleshooting on page 51.
D2 Models without VBAT and +5V_STDBY
There may be problems at start-up with D2 models up to hardware revision 02.xx
that do not have VBAT and +5V_STDBY lines (for ATX power supplies). When the
system was powered down for longer periods of time, there may be problems at
system start-up. The D2 starts normally only after powering down and up several
times.
The reason for this behavior lies in the missing VBAT and +5V_STDBY lines.
To guarantee a safe start-up, you must connect +5V to the VBAT line at the power
supply/utility connector of the CT02. In addition you must connect the
+5V_STDBY pin to ground. Then, the D2 will not expect an ATX-compatible
power supply.
MEN Mikro Elektronik GmbH
20D002-00 E3 - 2001-12-03
Artisan Technology Group - Quality Instrumentation ... Guaranteed | (888) 88-SOURCE | www.artisantg.com
18
Getting Started
1.5
Configuring BIOS
The D2 is equipped with an Award Elite BIOS which is compliant with the Plug and
Play BIOS specification, V. 1.0A and the PCI BIOS specification, V. 1.0.
Normally you won’t need to make any changes in the BIOS setup. If you do,
however, you find further details on the D2’s Award BIOS in Chapter 3 Award BIOS
on page 46.
1.6
Installing Operating System Software
The D2 fully supports WindowsNT version 4.0 and VxWorks version 5.3.1.
!
By standard, no operating system is installed on the board. Please refer to your
WindowsNT or VxWorks documentation on how to install the software!
Note: Please keep in mind that you need a hard disk and probably a CD-ROM drive
to install operating system software.
MEN Mikro Elektronik GmbH
20D002-00 E3 - 2001-12-03
Artisan Technology Group - Quality Instrumentation ... Guaranteed | (888) 88-SOURCE | www.artisantg.com
19
Functional Description
2
Functional Description
2.1
Power Supply
Power is fed via the CompactPCI backplane in accordance with the CompactPCI
specification.
The D2 supports soft power down and up operation as described in the ATX
specification. The necessary signals (PS_ON, +5V_STDBY, PWR_BTN#) are
provided at the J4 connector for use via the CT02 transition module.
PS_ON is used as an output to the ATX power supply.
PWR_BTN# is normally connected to a push button of the ATX power supply unit.
Pushing the button shortly switches the power supply on. Pushing the button for
more than four seconds switches the power supply off, i.e. the D2 is put to standby
mode.
In standby mode, the yellow "Standby" LED at the front panel will be lighted (see
Figure 1, Map of the Board - Front Panel and Top View, on page 16).
The power supply/utility connector implemented on the CT02 transition module
also provides I²C signals SCL and SDA, and battery backup lines (VBAT and GND
(VBAT-)) for the D2’s SRAM. You can either connect these lines to the ATX power
supply or use an external battery to supply SRAM.
Note: Pull-up resistors required for I²C operation are implemented on the D2 CPU
board itself.
!
Note: If you have a complete CompactPCI system from MEN, the power pins will
already be wired correctly. If you do not have a complete system, make sure
to wire the three power pins as is adequate. Please refer to the ATX specification for wiring recommendations.
2.2
Clock Supply
A clock supply generates all clocks necessary for operation of the D2, i.e. the clocks
for the Pentium local bus and PCI bus in particular. The configuration depends on
the processor installed and is done by MEN.
MEN Mikro Elektronik GmbH
20D002-00 E3 - 2001-12-03
Artisan Technology Group - Quality Instrumentation ... Guaranteed | (888) 88-SOURCE | www.artisantg.com
20
Functional Description
2.3
Processor Core
2.3.1
Socket 7+
The D2 is equipped with a 321-pin socket compliant to the Intel® Socket 7+
specification. Supported processor types are:
• Mobile Pentium Processor with Voltage Reduction Technology (type P54C with
VRT)
• Pentium Tillamook processor with MMX technology
• Pentium with MMX Technology (type P55C)
• AMD K6-III(+)
Contact MEN for other processor options.
!
Note: MEN gives no warranty on functionality and reliability of the D2 if you use
any other processor than that supplied by MEN. Please contact either MEN
directly or your local MEN sales office!
Processors supplied by MEN are equipped with an appropriate heat sink or fan/heat
sink assembly, respectively. The fans/heat sinks supplied by MEN will match the
thermal characteristics of the processor. Moreover, in case a fan/heat sink assembly
is used, MEN selects fans with an appropriate MTBF (usually 210,000 h at 60°C)
and a tachometer pulse pin. The tachometer pulses will be monitored on the D2.
MEN provides driver software for the hardware monitor of the D2, which allows to
generate an alarm to the user before the application fails! For current software
support, please refer to our website: www.men.de.
!
Note: Don’t use any other heat sinks or fans than that supplied by MEN!
2.3.2
Host-to-PCI Bridge
The D2 uses the Ali Aladdin V chipset. The host-to-PCI bridge ("Northbridge") of
this chip set is called M1541. The M1541 contains the host interface unit, the
DRAM and L2 cache controllers, and the PCI interface unit. The M1541 acts as the
PCI system master.
The M1541 is initialized by BIOS.
MEN Mikro Elektronik GmbH
20D002-00 E3 - 2001-12-03
Artisan Technology Group - Quality Instrumentation ... Guaranteed | (888) 88-SOURCE | www.artisantg.com
21
Functional Description
2.3.3
Main Memory (DRAM)
The D2 provides two SO-DIMM sockets for installation of 512MB DRAM
maximum.
32MB of DRAM (128MB max.) may be soldered to the D2 directly. The on-board
DRAM covers bank 2.
We recommend use of SDRAM SO-DIMMs complying with the PC100
specification for maximum performance. These modules shall support 100MHz
operation with a maximum clock-to-output of 6ns.
You may use either single or double-sided modules using 4 Mbit, 16 Mbit, 64 Mbit
or 256 Mbit DRAM chips with x64 organization. Supply voltage for the SO-DIMM
modules is 3.3V.
2.3.3.1
Installing a SO-DIMM Module
The D2 is normally shipped without any DRAM SO-DIMM modules installed. To
install SO-DIMM modules, please stick to the following procedure.
Figure 2. Installing an SO-DIMM DRAM Module
SO-DIMM Socket
Safety
Tab Contact
Groove
Plastic
Clip
Safety
Notch
Plastic
Clip
SO-DIMM Memory Module
The DRAM module will only fit as shown above because of a safety tab on the SODIMM socket which requires a notch in the SO-DIMM module.
!
Power down the system before installing a SO-DIMM module to avoid damage
of the D2!
Place the memory module into the socket at a 45° angle and make sure that the
safety tab and notch are aligned.
Carefully push the memory module into the contact groove of the socket.
Press the memory module down until it clicks into place.
The plastic clips of the socket now hold the memory module in place.
To release the module, squeeze both plastic clips outwards and carefully pull
the module out of the socket.
MEN Mikro Elektronik GmbH
20D002-00 E3 - 2001-12-03
Artisan Technology Group - Quality Instrumentation ... Guaranteed | (888) 88-SOURCE | www.artisantg.com
22
Functional Description
2.3.3.2
Supported SO-DIMM Modules
You can install standard SO-DIMM modules with SDRAM components. See
Chapter Ordering Information on page 7 for memory modules available from MEN.
!
Note: MEN gives no warranty on functionality and reliability of the D2 if you use
any other module than that qualified and/or supplied by MEN. Please contact
either MEN directly or your local MEN sales office.
2.3.4
L2 Cache
The D2 is equipped with 1MB L2 cache.
MEN Mikro Elektronik GmbH
20D002-00 E3 - 2001-12-03
Artisan Technology Group - Quality Instrumentation ... Guaranteed | (888) 88-SOURCE | www.artisantg.com
23
Functional Description
2.4
CompactPCI Interface
2.4.1
General
The D2 is a 6U CompactPCI system slot board. It implements a 32-bit PCI interface
to the CompactPCI backplane which may use either a 5V or 3.3V signaling voltage.
The local PCI bus and the CompactPCI bus are coupled using a DEC DS21150 PCIto-PCI bridge. This has several advantages:
• The D2 presents only one load to the CompactPCI backplane and thus surpasses
the CompactPCI specification. This results in increased reliability.
• The D2 supports independent clocks for any CompactPCI slot as defined in the
CompactPCI specification 2.1.
• The D2 provides seven REQ#/GNT# pairs, which means that PCI bus masters
are supported on any CompactPCI slot.
• The D2 supports either 3.3V or 5V signaling voltage on the CompactPCI backplane. This guarantees maximum flexibility in the design of a CompactPCI system.
• Concurrent operation of local PCI and CompactPCI.
MEN Mikro Elektronik GmbH
20D002-00 E3 - 2001-12-03
Artisan Technology Group - Quality Instrumentation ... Guaranteed | (888) 88-SOURCE | www.artisantg.com
24
Functional Description
2.4.2
Extensions
2.4.2.1
CompactPCI J1/J2
The D2 supports the latest features incorporated in the CompactPCI specification
2.1: It provides separate clocks for slots 7 and 8 (CLK5, CLK6) and supports
geographic addressing.
Moreover it supports the PXI specification (issued by National Instruments, Inc.): It
provides five independently programmable trigger lines connected to
PXI_TRIG[4:0].
In addition the central backup battery is connected to the CompactPCI backplane.
Connector types:
• shielded, 2mm-pitch, 5-row receptacle according to IEC 917 and IEC 1076-4101
The pin assignment of connectors J1 and J2 as defined in the CompactPCI
specification will not be repeated here. The table below shows the special features of
the D2 (i.e. the upper half of J2) only.
Table 1. Pin Assignment of CompactPCI J2 (110-pin type "B" modified)
F E D C B A
22
21
F
E
D
C
B
A
22
GND
GA[0]
GA[1]
GA[2]
GA[3]
GA[4]
21
GND
RES
RES
RES
GND
CLK[6]
20
GND
RES
GND
RES
GND
CLK[5]
19
GND
RES
RES
RES
GND
GND
18
GND
RES
GND
RES
17
GND
GNT[6]#
REQ[6]#
PBRST#
16
GND
RES
GND
PS_DEG#
15
GND
GNT[5]#
REQ[5]#
PS_FAIL#
PXI_TRIG[4] PXI_TRIG[3]
GND
PXI_TRIG[2]
PXI_TRIG[0] PXI_TRIG[1]
GND
RES
Table 2. Signal Mnemonics for CompactPCI J2
PXI
CompactPCI
Signal
Direction
Function
GND
-
logic ground
CLK[6:5]
out
clocks 5 and 6
GA[4:0]
in
geographic address bits
REQ#/GNT#[6:5] in/out
request/grant pairs 5:6
PBRST#
in
push button reset
PS_FAIL#
in
power supply fail
PS_DEG#
in
power supply degenerate
RES
-
reserved
PXI_TRIG[4:0]
in/out
trigger lines according to PXI specification 1.0
MEN Mikro Elektronik GmbH
20D002-00 E3 - 2001-12-03
Artisan Technology Group - Quality Instrumentation ... Guaranteed | (888) 88-SOURCE | www.artisantg.com
25
Functional Description
2.4.2.2
CompactPCI J3/J4/J5
CompactPCI J3/J4/J5 are used to put peripheral interfaces off the board: These
connectors contain interfaces such as PC•MIP I/O, EIDE, serial I/O, floppy disk and
parallel port.
CT02 Transition Module
MEN offers a transition module for connection to J3/J4/J5 that implements all
interfaces led through this connector for direct connection. If you use this adapter,
please refer to its user manual for a detailed description.
The tables below show the pin assignment of J3/J4/J5. The connector types are
identical with J1/J2. The different functional groups are marked through different
colors in the tables.
Table 3. Pin Assignment of CompactPCI J3 (95-pin type "B" modified)
F
F E D C B A
19
18
1
E
D
C
B
A
+12V
GND
+12V
GND
+5V
GND
SIDE_CS1#
+5V
19
GND
18
GND
17
GND
SIDE_A[2]
SIDE_A[0]
SIDE_A[1]
SIDE_IRQ
SIDE_DAK#
16
GND
SIDE_RDY
SIDE_RD#
GND
SIDE_WR#
GND
15
GND
SIDE_DRQ
GND
SIDE_D[15]
SIDE_D[0]
SIDE_D[14]
14
GND
SIDE_D[1]
SIDE_D[13]
SIDE_D[2]
SIDE_D[12]
SIDE_D[3]
13
GND
SIDE_D[11]
SIDE_D[4]
SIDE_D[10]
SIDE_D[5]
SIDE_D[9]
12
GND
SIDE_D[6]
SIDE_D[8]
SIDE_D[7]
GND
SIDE_RST#
11
GND
+5V
+5V
+3.3V
+3.3V
+3.3V
10
GND
-
-
-
-
-
9
GND
-
-
-
-
-
8
GND
-
-
-
-
-
7
GND
-
-
-
-
-
6
GND
-
-
-
-
-
5
GND
-
-
-
-
-
4
GND
-
-
-
-
-
3
GND
-
-
-
-
-
2
GND
-
-
-
-
-
1
GND
-
-
-
-
-
SIDE_ACT# SIDE_CS3#
MEN Mikro Elektronik GmbH
20D002-00 E3 - 2001-12-03
Artisan Technology Group - Quality Instrumentation ... Guaranteed | (888) 88-SOURCE | www.artisantg.com
26
Functional Description
Table 4. Signal Mnemonics of Connector J3
Secondary IDE
Power
Signal
Direction
Function
GND
-
digital ground
+3.3V
-
+3.3V power supply
+5V
-
+5V power supply
+12V
-
+12V power supply
SIDE_RST#
out
secondary IDE reset; active low
SIDE_D[15:0] in/out
secondary IDE data [15:0]
SIDE_A[2:0]
out
secondary IDE address [2:0]
SIDE_WR#
out
secondary IDE write strobe; active low
SIDE_RD#
out
secondary IDE read strobe; active low
SIDE_RDY#
in
secondary IDE ready; active low
SIDE_DRQ
in
secondary IDE DMA request
SIDE_DAK#
out
secondary IDE DMA acknowledge; active low
SIDE_IRQ
in
secondary IDE interrupt request
SIDE_CS1#
out
secondary IDE chip select 1; active low
SIDE_CS3#
out
secondary IDE chip select 3; active low
SIDE_ACT#
in
secondary IDE active; active low
MEN Mikro Elektronik GmbH
20D002-00 E3 - 2001-12-03
Artisan Technology Group - Quality Instrumentation ... Guaranteed | (888) 88-SOURCE | www.artisantg.com
27
Functional Description
Table 5. Pin Assignment of CompactPCI J4 (110-pin type "A")
F E D C B A
25
24
F
E
D
C
B
A
25
GND
USBP1+
PWR_BTN#
GPIO[4]
GPIO[0]
VBAT
24
GND
USBP1-
PS_ON
GPIO[5]
GPIO[1]
SDA
23
GND
USBP0+
+5V_STDBY
GPIO[6]
GPIO[2]
SCL
22
GND
USBP0-
+5V
GPIO[7]
GPIO[3]
RI2#
21
GND
USB_OVR#
DCD2#
CTS2#
DSR2#
RTS2#
20
GND
DTR2#
RXD2#
TXD2
+5V
RI1#
19
GND
DCD1#
CTS1#
DSR1#
RTS1#
DTR1#
18
GND
RXD1
TXD1
+5V
SLCT
PE
17
GND
BUSY
ACK#
PD[7]
PD[6]
PD[5]
16
GND
PD[4]
PD[3]
SLIN#
PD[2]
INIT#
15
GND
PD[1]
ERR#
PD[0]
AFD#
STB#
Voltage Key
Voltage Key
1
11
GND
DSKCHG#
HDSEL#
RDATA#
WP#
TRK0#
10
GND
WGATE#
WDATA#
STEP#
DIR#
MOTOR1#
9
GND
DRVSEL0#
DRVSEL1#
MOTOR0#
INDEX#
DENSEL
8
GND
+12V
GND
+12V
GND
+5V
7
GND
PIDE_ACT# PIDE_CS3#
GND
PIDE_CS1#
+5V
6
GND
PIDE_A[2]#
PIDE_A[0]
PIDE_A[1]
PIDE_IRQ
PIDE_DAK#
5
GND
PIDE_RDY#
PIDE_RD#
GND
PIDE_WR#
GND
4
GND
PIDE_DRQ
GND
PIDE_D[15]
PIDE_D[0]
PIDE_D[14]
3
GND
PIDE_D[1]
PIDE_D[13]
PIDE_D[2]
PIDE_D[12]
PIDE_D[3]
2
GND
PIDE_D[11]
PIDE_D[4]
PIDE_D[10]
PIDE_D[5]
PIDE_D[9]
1
GND
PIDE_D[6]
PIDE_D[8]
PIDE_D[7]
GND
PIDE_RST#
MEN Mikro Elektronik GmbH
20D002-00 E3 - 2001-12-03
Artisan Technology Group - Quality Instrumentation ... Guaranteed | (888) 88-SOURCE | www.artisantg.com
28
Functional Description
Table 6. Signal Mnemonics of Connector J4
Floppy Disk
Primary IDE
Power Lines
Signal
Direction
Function
+12V
-
+12V power supply
+3.3V
-
+3.3V power supply
+5V
-
+5V power supply
+5V_STDBY
-
+5V standby power supply
GND
-
digital ground
PS_ON
out
power supply on
PWR_BTN#
in
power button
VBAT
-
battery backup voltage
PIDE_A[2:0]
out
primary IDE address [2:0]
PIDE_ACT#
in
primary IDE active
PIDE_CS1#
out
primary IDE chip select 1
PIDE_CS3
out
primary IDE chip select 3
PIDE_D[15:0]
in/out
primary IDE data [15:0]
PIDE_DAK#
out
primary IDE DMA acknowledge
PIDE_DRQ
in
primary IDE DMA request
PIDE_IRQ
in
primary IDE interrupt request
PIDE_RD#
out
primary IDE read strobe
PIDE_RDY#
in
primary IDE ready
PIDE_RST#
out
primary IDE reset
PIDE_WR#
out
primary IDE write strobe
DENSEL
out
floppy disk density select
DIR#
out
floppy disk direction
DRVSEL0#
out
floppy disk drive select 0
DRVSEL1#
out
floppy disk drive select1
DSKCHG#
in
floppy disk disk change
HDSEL#
out
floppy disk head select
INDEX#
in
floppy disk index
MOTOR0#
out
floppy disk motor on 0
MOTOR1#
out
floppy disk motor on 1
RDATA#
in
floppy disk read data
STEP#
out
floppy disk step
TRK0#
in
floppy disk track 0
WDATA#
out
floppy disk write data
WGATE#
out
floppy disk write gate
WP#
in
floppy disk write protect
MEN Mikro Elektronik GmbH
20D002-00 E3 - 2001-12-03
Artisan Technology Group - Quality Instrumentation ... Guaranteed | (888) 88-SOURCE | www.artisantg.com
29
Functional Description
USB
GPIO Utility
COM2
COM1
Parallel Port
Signal
Direction
Function
ACK#
in
parallel port acknowledge
AFD#
out
parallel port auto feed
BUSY
in
parallel port busy
ERR#
in
parallel port error
INIT#
out
parallel port init
PD[7:0]
in/out
parallel port data [7:0]
PE
in
parallel port paper end
SLCT
out
parallel port select
SLIN#
in
parallel port select in
STB#
out
parallel port strobe
CTS1#
in
serial port 1 clear to send
DCD1#
in
serial port 1 data carrier detect
DSR1#
in
serial port 1 data set ready
DTR1#
out
serial port 1 data terminal ready
RI1#
in
serial port 1 ring indicator
RTS1#
out
serial port 1 request to send
RXD1
in
serial port 1 Receive data
TXD1
out
serial port 1 transmit data
CTS2#
in
serial port 2 clear to send
DCD2#
in
serial port 2 data carrier detect
DSR2#
in
serial port 2 data set ready
DTR2#
out
serial port 2 data terminal ready
RI2#
in
serial port 2 ring indicator
RTS2#
out
serial port 2 request to send
RXD2
in
serial port 2 receive data
TXD2
out
serial port 2 transmit data
SCL
in/out
I²C serial clock
SDA
in/out
I²C serial data
GPIO[7:0]
in/out
general purpose I/Os [7:0]
USBP0-, USBP0+
in/out
USB port 0 differential pair
USBP1-, USBP1+
in/out
USB port 1 differential pair
USB_OVR#
in
USB overcurrent detection
MEN Mikro Elektronik GmbH
20D002-00 E3 - 2001-12-03
Artisan Technology Group - Quality Instrumentation ... Guaranteed | (888) 88-SOURCE | www.artisantg.com
30
Functional Description
Table 7. Pin Assignment of CompactPCI J5 (110-pin type "B" modified)
F
F E D C B A
22
21
1
E
D
C
B
A
22
GND
MIPE_IO[46] MIPE_IO[47] MIPE_IO[48] MIPE_IO[49] MIPE_IO[50]
21
GND
MIPE_IO[41] MIPE_IO[42] MIPE_IO[43] MIPE_IO[44 MIPE_IO[45
20
GND
MIPE_IO[36] MIPE_IO[37] MIPE_IO[38] MIPE_IO[39] MIPE_IO[40]
19
GND
MIPE_IO[31] MIPE_IO[32] MIPE_IO[33] MIPE_IO[34] MIPE_IO[35]
18
GND
MIPE_IO[26] MIPE_IO[27] MIPE_IO[28] MIPE_IO[29] MIPE_IO[30]
17
GND
MIPE_IO[21] MIPE_IO[22] MIPE_IO[23] MIPE_IO[24] MIPE_IO[25]
16
GND
MIPE_IO[16] MIPE_IO[17] MIPE_IO[18] MIPE_IO[19] MIPE_IO[20]
15
GND
MIPE_IO[11] MIPE_IO[12] MIPE_IO[13] MIPE_IO[14] MIPE_IO[15]
14
GND
MIPE_IO[6]
MIPE_IO[7]
MIPE_IO[8]
MIPE_IO[9] MIPE_IO[10]
13
GND
MIPE_IO[1]
MIPE_IO[2]
MIPE_IO[3]
MIPE_IO[4]
MIPE_IO[5]
12
GND
+5V
+5V
+3.3V
+3.3V
+3.3V
11
GND
MIPA_IO[46] MIPA_IO[47 MIPA_IO[48] MIPA_IO[49] MIPA_IO[50]
10
GND
MIPA_IO[41] MIPA_IO[42 MIPA_IO[43] MIPA_IO[44] MIPA_IO[45
9
GND
MIPA_IO[36] MIPA_IO[37] MIPA_IO[38] MIPA_IO[39] MIPA_IO[40]
8
GND
MIPA_IO[31] MIPA_IO[32] MIPA_IO[33] MIPA_IO[34] MIPA_IO[35]
7
GND
MIPA_IO[26] MIPA_IO[27] MIPA_IO[28] MIPA_IO[29] MIPA_IO[30]
6
GND
MIPA_IO[21] MIPA_IO[22] MIPA_IO[23] MIPA_IO[24] MIPA_IO[25]
5
GND
MIPA_IO[16] MIPA_IO[17] MIPA_IO[18] MIPA_IO[19] MIPA_IO[20]
4
GND
MIPA_IO[11] MIPA_IO[12] MIPA_IO[13] MIPA_IO[14] MIPA_IO[15]
3
GND
MIPA_IO[6]
MIPA_IO[7]
MIPA_IO[8]
MIPA_IO[9] MIPA_IO[10]
2
GND
MIPA_IO[1]
MIPA_IO[2]
MIPA_IO[3]
MIPA_IO[4]
MIPA_IO[5]
1
GND
+5V
+5V
+3.3V
+3.3V
+3.3V
Table 8. Signal Mnemonics for CompactPCI J5
Signal
Direction
Function
+3.3V
-
+3.3V power supply
+5V
-
+5V power supply
GND
-
logic ground
MIPA_IO[50:1] in/out
PC•MIP A rear panel I/Os [50:1], signals from
PC•MIP slot A
MIPE_IO[50:1] in/out
PC•MIP 3 rear panel I/Os [50:1], signals from
PC•MIP slot E
MEN Mikro Elektronik GmbH
20D002-00 E3 - 2001-12-03
Artisan Technology Group - Quality Instrumentation ... Guaranteed | (888) 88-SOURCE | www.artisantg.com
31
Functional Description
2.5
Ethernet Interface
2.5.1
Implementation on D2
The Ethernet interface is built around Intel’s DS21143 Fast Ethernet Controller.
This chip connects directly to the local PCI bus. The physical interface is
implemented as 10Base-T/100Base-TX (Twisted Pair) with a standard 8-pin RJ45
connector at the front panel.
Connector types:
• modular 8/8-pin mounting jack according to FCC68
• mating connector:
modular 8/8-pin plug according to FCC68
Table 9. Pin Assignment of the 8-pin RJ45 Ethernet 10Base-T/100Base-TX
Connector
1
1
TD+
2
TD-
3
RD+
4
-
5
-
6
RD-
7
-
8
-
8
Table 10. Signal Mnemonics for Ethernet 10Base-T/100Base-TX Interface
Signal
Direction
Function
TD+/-
out
differential pair of transmit data lines
RD+/-
in
differential pair of receive data lines
Full-duplex operation is also supported and full-duplex and half-duplex network
environments are autodetected using the IEEE802.3 autonegotiation algorithm.
The Ethernet interfaces allow data rates of 100Mbit/s and even 200Mbit/s with fullduplex operation.
The DS21143 supports a Microwire EEPROM to store the Ethernet MAC address
and chip-specific data for power-on configuration. This EEPROM is programmed
by MEN with a unique MAC address reserved for MEN. You should not alter its
contents.
For further details about the DS21143, please refer to the literature listed in Chapter
5.1 Literature and WWW Resources on page 54.
For resources on the WWW, please refer to the links in Chapter 5.1.6 Ethernet on
page 55.
MEN Mikro Elektronik GmbH
20D002-00 E3 - 2001-12-03
Artisan Technology Group - Quality Instrumentation ... Guaranteed | (888) 88-SOURCE | www.artisantg.com
32
Functional Description
Quelle: http://webopedia.intern
et.com/
TERM/E/
Ethernet.html
2.5.2
General
Ethernet is a local-area network (LAN) protocol that uses a bus or star topology and
supports data transfer rates of 100Mbps and more. The Ethernet specification served
as the basis for the IEEE 802.3 standard, which specifies the physical and lower
software layers. Ethernet uses the CSMA/CD access method to handle simultaneous
demands. It is one of the most widely implemented LAN standards.
Ethernet networks provide high-speed data exchange in areas that require
economical connection to a local communication medium carrying bursty traffic at
high-peak data rates.
A classic Ethernet system consists of a backbone cable and connecting hardware
(e.g. transceivers), which links the controllers of the individual stations via
transceiver (transmitter-receiver) cables to this backbone cable and thus permits
communication between the stations.
2.5.3
10Base-5
The yellow 10Base-5 thick-wire AUI line is the original type of Ethernet cable. The
simplest configuration is to connect the AUI connector of each station to this yellow
cable using a transceiver line and a transceiver. An Ethernet cable like this must not
be longer than 500m, and may have a maximum of 100 transceivers. The distance
between two transceivers must be at least 2.5m.
A transceiver contains the transmit and receive logic. It ensures regeneration-free
data transfers up to 500m cable length and carries out collision detection and carrier
sensing. Another task is electrical isolation between the station and the thick-wire
cable. The transceiver is supplied by the station via the transceiver cable. There are
also mini-transceivers that can be plugged directly to the AUI connector of the
Ethernet device.
The thick-wire cable must be electrically terminated by a 50-Ω termination resistor.
The line must only be grounded at one end (not at both).
2.5.4
10Base-2
This Ethernet variety conforms to the 10Base-2 standard and primarily functions
like the normal thick-wire Ethernet, but it employs a somewhat thinner, more
flexible and less expensive coaxial cable, therefore it is called Cheapernet.
Thin-wire connection has its advantages and disadvantages. Many stations
(workstations, terminal servers, PCs) are provided with a direct connection for
Cheapernet in addition to the flexible AUI connector. Using this connection, you
will save the transceiver cable and transceiver. Stations with an AUI connector can
be connected using a transceiver cable and a thin-wire transceiver (often called
station adapter). Thin-wire mini-transceivers can be plugged directly to the AUI
connector, making a transceiver cable unnecessary.
A drawback of Cheapernet is that the total line length must not exceed 185m and
there must not be more than 30 stations (minimum distance between the stations:
0.5m). Another drawback is that the thin-wire line must be separated in order to
install a station. The station adapter is connected to the two separated parts of the
coaxial cable using a T link. The T link must be plugged directly on the station
adapter and may not be extended by means of a coaxial cable. Therefore, the coaxial
MEN Mikro Elektronik GmbH
20D002-00 E3 - 2001-12-03
Artisan Technology Group - Quality Instrumentation ... Guaranteed | (888) 88-SOURCE | www.artisantg.com
33
Functional Description
cable must be led to the station in a loop for stations with an integrated thin-wire
adapter. The ends of the thin-wire line must be terminated.
Quelle: http://webopedia.intern
et.com/
TERM/E/
Ethernet.html
2.5.5
10Base-T
10Base-T is one of several adaptations of the Ethernet (IEEE 802.3) standard for
Local Area Networks (LANs). The 10Base-T standard (also called Twisted Pair
Ethernet) uses a twisted-pair cable with maximum lengths of 100 meters. The cable
is thinner and more flexible than the coaxial cable used for the 10Base-2 or
10Base-5 standards. Since it is also cheaper, it is the preferable solution for costsensitive applications.
Cables in the 10Base-T system connect with RJ45 connectors. A star topology is
common with 12 or more computers connected directly to a hub or concentrator.
The 10Base-T system operates at 10Mbps and uses baseband transmission methods.
Quelle: http://webopedia.intern
et.com/
TERM/E/
Ethernet.html
2.5.6
100Base-T
The 100Base-T networking standard supports data transfer rates up to 100Mbps.
100Base-T is actually based on the older Ethernet standard. Because it is 10 times
faster than Ethernet, it is often referred to as Fast Ethernet. Officially, the 100Base-T
standard is IEEE 802.3u.
Like Ethernet, 100Base-T is based on the CSMA/CD LAN access method. There
are several different cabling schemes that can be used with 100Base-T, including:
• 100Base-TX:
• 100Base-T4:
• 100Base-FX:
two pairs of high-quality twisted-pair wires
four pairs of normal-quality twisted-pair wires
fiber optic cables
Note: The D2 only supports 100Base-TX. It does not support 100Base-T4 and
100Base-FX.
MEN Mikro Elektronik GmbH
20D002-00 E3 - 2001-12-03
Artisan Technology Group - Quality Instrumentation ... Guaranteed | (888) 88-SOURCE | www.artisantg.com
34
Functional Description
2.6
CompactFlash/SRAM Interface
A PCI PC card controller is used to interface both the CompactFlash disk and
1..4 MB of battery-backed SRAM to the host. The PC card controller is an enhanced
version of the industry standard PCIC (Intel 82365SL) and backward-compatible to
this device.
2.6.1
CompactFlash Interface
CompactFlash is a standard for small form factor ATA Flash drives. It is electrically
compatible to the PC Card 1995 and PC Card ATA standards.
The CompactFlash standard is supported by industry’s leading vendors of Flash
cards such as SanDisk™, Hitachi, Smart, Panasonic and others.
2.6.1.1
Installing CompactFlash
The D2 is shipped without a CompactFlash card installed. To install CompactFlash,
please stick to the following procedure.
Figure 3. Inserting a CompactFlash Card
P2
P3
PC•MIP Slot A
J5
(rear I/O possible)
P1
PC•MIP slots
P2
PC•MIP
Bezel Keepers
PC•MIP Slot B
P1
(rear I/O possible)
P3
PC•MIP Slot E
Finished Bezel
of I/O Connector
P2
J4
(no rear I/O)
P1
LAN
Ethernet
(100Base-TX/
10Base-T)
RST
Injectors/Ejectors with
Threaded Standoffs and
Captive Screws
Reset Button
0
USER2
1
USER1
2
LAN2 USER
3
LAN1 media
4
IDE active 1
5
IDE active 0
6
Heartbeat
7
Power Good
8
Standby
LEDs
J3
CompactFlash
Card
CPU Core
Compact
Flash
J2
DRAM SIMM Socket
Bank 1
COM 1
COM1 (RS232)
J1
KB/MS
Keyboard/Mouse
DRAM SIMM Socket
Bank 0
Ejector
Insert the card carefully as indicated by the arrow on top of the card, making
sure that all the contacts are aligned properly and the card is firmly in the card
socket.
Remove the CompactFlash card by pressing the ejector.
Observe manufacturer notes on usage of CompactFlash cards.
Note: You do not need to power down the system to change CompactFlash cards.
However, make sure that the card’s data is not used when you remove the card!
MEN Mikro Elektronik GmbH
20D002-00 E3 - 2001-12-03
Artisan Technology Group - Quality Instrumentation ... Guaranteed | (888) 88-SOURCE | www.artisantg.com
35
Functional Description
2.6.1.2
Supported CompactFlash Cards
The D2 supports standard CompactFlash cards, e.g. from SanDisk. For
CompactFlash cards available from MEN see Chapter Ordering Information on
page 7.
2.6.2
Battery-backed SRAM
The D2 supports 1 MB to 4 MB of battery-backed SRAM. The standard model of
the D2 features 1 MB of SRAM but may be upgraded to 2 MB and 4 MB. For short
power-down intervals, a local GoldCap capacitor supplies the backup voltage.
A central buffer battery bridges longer power-down cycles. This central battery also
buffers the real-time clock and CMOS RAM.
The backup voltage is connected via the CT02 transition module. Please refer to the
CT02 user manual for connection options.
2.6.3
Booting from CompactFlash/SRAM
When you configure BIOS to boot from PCMCIA, BIOS assigns disk drives to the
media in the order that it finds them. This means that BIOS searches for media with
a bootable partition. The SRAM is located in socket 0 of the CardBus controller, the
CompactFlash in socket 1. When the SRAM is detected as a bootable medium, it is
assigned drive name A:. If you boot from CompactFlash, this is assigned drive name
C:.
MEN Mikro Elektronik GmbH
20D002-00 E3 - 2001-12-03
Artisan Technology Group - Quality Instrumentation ... Guaranteed | (888) 88-SOURCE | www.artisantg.com
36
Functional Description
2.7
Super I/O Controller
The Super I/O controller comprises the keyboard/mouse controller, floppy disk
controller, two serial ports with 16C550-compatible UARTs, one IEEE1284compatible parallel port, real-time clock and CMOS RAM. It is compatible with the
PC-AT standard.
You can connect a keyboard, mouse (via Y-cable) and COM1 (UART1) directly at
the front panel. The parallel port (LPT), COM2 and floppy disk interfaces are
available via CompactPCI connector J4 (see Chapter 2.4.2.2 CompactPCI J3/J4/J5
on page 26) or via MEN’s CT02, respectively.
2.7.1
COM1 Port
Through BIOS you can select whether you want to use the front-panel RS232
interface or one of MEN’s SA adapters with different line drivers via the CT02
transition module (see Chapter 3.2 Special Features Setup on page 48).
Note: COM2 is only wired via CT02 and MEN SA adapter.
Connector types:
• 9-pin D-Sub receptacle according to DIN41652/MIL-C-24308
• mating connector:
9-pin D-Sub plug according to DIN41652/MIL-C-24308, with thread bolt UNC
4-40, available for ribbon cable (insulation piercing connection), hand-soldering
connection or crimp connection
Table 11. Pin Assignment of the 9-pin D-Sub COM1 Plug Connector
6
9
1
5
6
DSR
1
DCD
7
RTS
2
RXD
8
CTS
3
TXD
9
RI
4
DTR
5
GND
Table 12. Signal Mnemonics for Serial Port COM1
Signal
Direction
Function
CTS
in
clear to send
DCD
in
data carrier detect
DSR
in
data set ready
DTR
out
data terminal ready
GND
-
logic ground
RI
in
ring indicator
RTS
out
request to send
RXD
in
receive data
TXD
out
transmit data
MEN Mikro Elektronik GmbH
20D002-00 E3 - 2001-12-03
Artisan Technology Group - Quality Instrumentation ... Guaranteed | (888) 88-SOURCE | www.artisantg.com
37
Functional Description
2.7.2
Keyboard/Mouse Interface
A 6-pin mini DIN connector is provided to connect a standard PS/2 keyboard and
mouse or other pointing device.
The connector pinout allows you to connect either a standard keyboard or both a
keyboard and mouse.
!
Note: For the connection of both devices a special cable is necessary. MEN offers a
Y-cable for easy connection of a keyboard and mouse. For ordering numbers
please refer to Chapter Ordering Information on page 7.
Connector types:
• 6-pin circular mini DIN receptacle
• mating connector:
6-pin circular mini DIN plug, available for soldering and crimp connection
Table 13. Pin Assignment of the 6-Pin Mini DIN Keyboard/Mouse Connector
4 6
2
1
3 5
6
MSCLK
5
KBCLOCK
4
+5V
3
GND
2
MSDATA
1
KBDATA
Table 14. Signal Mnemonics for Keyboard/Mouse Interface
Signal
Direction
Function
+5V
-
+5V supply, max. DC current 200mA
GND
-
logic ground
KBCLOCK
out
keyboard clock
KBDATA
in/out
keyboard data
MSCLOCK
out
mouse clock
MSDATA
in/out
mouse data
MEN Mikro Elektronik GmbH
20D002-00 E3 - 2001-12-03
Artisan Technology Group - Quality Instrumentation ... Guaranteed | (888) 88-SOURCE | www.artisantg.com
38
Functional Description
2.7.3
EIDE Interface
The EIDE controller is built into the Southbridge. It supports two EIDE channels
(primary and secondary) and ATA-4 (PIO mode 4, DMA mode 2). You can connect
hard-disk drives or CD-ROM drives to the two ports.
The maximum data rate is 22MB/s.
Connection of EIDE1 and EIDE2 is via CompactPCI J3/J4 or via MEN’s CT02
transition module (see CT02 Transition Module, Chapter 2.4.2.2 CompactPCI J3/
J4/J5 on page 26).
2.7.4
USB Interface
The USB controller is also integrated in the Southbridge. It drives one host port
according to the USB specification Open HCI 1.0a. The D2 supports three USB
interfaces, one of them using GPIO lines 4 and 5 (see Chapter 2.7.5 GPIO Interface
on page 39).
You can enable or disable the USB interface in BIOS (see Chapter 3.2 Special
Features Setup on page 48).
You can connect USB devices via the CT02 transition module and a MEN SA
adapter (in preparation).
2.7.5
GPIO Interface
The F2 supports six GPIO lines, which provide a third USB interface and an
infrared serial interface.
Depending on the BIOS setting, you can connect this interface via a 10-pin plug on
the CT02 rear I/O adapter (cf. pin assignments in the CT02 user manual and Chapter
2.4.2.2 CompactPCI J3/J4/J5 on page 26).
Table 15. Correspondence between GPIO and UART3 Pins
Pin
GPIO Function
UART3 Function
GPIO[0]
GPIO 0
infrared serial interface IRTX line
GPIO[1]
GPIO 1
infrared serial interface IRXH line
GPIO[2]
GPIO 2
infrared serial interface IRRX line
GPIO[3]
GPIO 3
infrared serial interface CVROFF line
GPIO[4]
GPIO 4
third USB port, USBP2+
GPIO[5]
GPIO 5
third USB port, USBP2-
GPIO[6]
reserved
-
GPIO[7]
GPIO 7
-
MEN Mikro Elektronik GmbH
20D002-00 E3 - 2001-12-03
Artisan Technology Group - Quality Instrumentation ... Guaranteed | (888) 88-SOURCE | www.artisantg.com
39
Functional Description
2.8
PC•MIP Slots
The D2 has three PC•MIP slots: two for Type-I/ Type-II modules (slots A and B)
and one for Type-I modules (slot E).
The PC•MIP slots enable the user to add functionality to the D2 CPU board, from
graphics to process I/O.
!
Note: Please note that only PC•MIP slots A and E support rear I/O!
2.8.1
Installing a PC•MIP
Perform the following steps to install a PC•MIP on slot A or B:
Power down your system and remove the D2 from the system.
If you want to install a Type-II PC•MIP (with front connector), you must
remove the blank bezel at the front panel of the D2 first:
Remove the respective bezel keeper by loosening the keeper screw at the solder
side of the D2. (See Figure 1, Map of the Board - Front Panel and Top View, on
page 16).
Place the finished bezel supplied with your PC•MIP in the front panel cut-out
and reinstall the bezel keeper.
If you are installing a Type-II PC•MIP, carefully put the module’s front connector through the finished bezel, holding the module at a 45° angle.
Place the PC•MIP on the target slot of the D2, aligning the three connectors
(P1/J1, P2/J2, P3/J3) and the two standoffs.
Screw the PC•MIP to the carrier by alternately tightening the two captive
screws on the label side of the PC•MIP. The module will be "injected" safely.
If you want to install a PC•MIP on slot E, the procedure is easier:
Place the PC•MIP on the target slot of the D2, aligning the three connectors
(P1/J1, P2/J2, P3/J3) and the two standoffs.
Screw the PC•MIP to the carrier by alternately tightening the two captive
screws on the label side of the PC•MIP. The module will be "injected" safely.
!
Note: It is possible to plug Type-I modules on Type-II slots. However, you cannot
do this vice versa, since the front connectors of Type-II modules would collide with the enclosure.
MEN Mikro Elektronik GmbH
20D002-00 E3 - 2001-12-03
Artisan Technology Group - Quality Instrumentation ... Guaranteed | (888) 88-SOURCE | www.artisantg.com
40
Functional Description
Figure 4. Installation of a PC•MIP (example for slot A or B)
System Front
Panel
Captive Screw
J3
P3
PC•MIP Front
I/O Connector
(Type II module)
PC•MIP (Type I or II)
Standoff
J1
P1
Captive Screw
Standoff
Carrier Board
Keeper
Keeper Screw
To deinstall PC•MIPs from the carrier board, just loosen the appropriate screws at
the label side of the PC•MIP. The injector/ejector system will "eject" the PC•MIP.
2.8.2
PC•MIP Connectors
PC•MIP modules connect to the D2’s PCI bus via the two identical 64-pin
connectors P1 and P2. The connector layout is fully compatible to the PC•MIP
specification and will not be repeated here.
Connector P3 leads PC•MIP signals to rear I/O, see Chapter 2.8.3 Signal Mapping
from PC•MIP Connector to Rear I/O on page 41.
Connector types of P1, P2 and P3:
• 64-pin plug connector according to IEEE P1386, e.g. Molex 71436-0164
• mating connector:
64-pin receptacle connector according to IEEE P1386, e.g. Molex 71439-0164
2.8.3
Signal Mapping from PC•MIP Connector to Rear I/O
The signal assignment of 64-pin connector P3 depends on the PC•MIP module used.
The following table gives only the mapping of I/O signals from PC•MIP connector
J3/P3 to rear I/O connectors.
!
Note: You will find special mapping tables for the standard 50-pin and 68-pin connectors on transition modules in the respective MEN PC•MIP user manual.
MEN Mikro Elektronik GmbH
20D002-00 E3 - 2001-12-03
Artisan Technology Group - Quality Instrumentation ... Guaranteed | (888) 88-SOURCE | www.artisantg.com
41
Functional Description
Table 16. Signal Mapping from PC•MIP J3/P3 to Rear I/O
2
64
1
63
2
MIP_IO[2]
1
MIP_IO[1]
4
MIP_IO[4]
3
MIP_IO[3]
6
MIP_IO[5]
5
GND
8
MIP_IO[7]
7
MIP_IO[6]
10
GND
9
MIP_IO[8]
12
MIP_IO[10]
11
MIP_IO[9]
14
MIP_IO[11]
13
GND
16
MIP_IO[13]
15
MIP_IO[12]
18
GND
17
MIP_IO[14]
20
MIP_IO[16]
19
MIP_IO[15]
22
MIP_IO[17]
21
GND
24
MIP_IO[19]
23
MIP_IO[18]
26
GND
25
MIP_IO[20]
28
MIP_IO[22]
27
MIP_IO[21]
30
MIP_IO[23]
29
GND
32
MIP_IO[25]
31
MIP_IO[24]
34
GND
33
MIP_IO[26]
36
MIP_IO[28]
35
MIP_IO[27]
38
MIP_IO[29]
37
GND
40
MIP_IO[31]
39
MIP_IO[30]
42
GND
41
MIP_IO[32]
44
MIP_IO[34]
43
MIP_IO[33]
46
MIP_IO[35]
45
GND
48
MIP_IO[37]
47
MIP_IO[36]
50
GND
49
MIP_IO[38]
52
MIP_IO[40]
51
MIP_IO[39]
54
MIP_IO[41]
53
GND
56
MIP_IO[43]
55
MIP_IO[42]
58
GND
57
MIP_IO[44]
60
MIP_IO[46]
59
MIP_IO[45]
62
MIP_IO[48]
61
MIP_IO[47]
64
MIP_IO[50]
63
MIP_IO[49]
Note: The GND pins of the J3/P3 connector are not mapped.
MEN Mikro Elektronik GmbH
20D002-00 E3 - 2001-12-03
Artisan Technology Group - Quality Instrumentation ... Guaranteed | (888) 88-SOURCE | www.artisantg.com
42
Functional Description
2.9
Front LEDs and Reset Button
The D2 has nine front panel LEDs and a reset button. The reset button is controlled
by the BIOS. It can be enabled or disabled in the BIOS setup.
Figure 5. Front Panel LEDs and Reset Button
LAN
RST
Reset Button
0
USER2
1
USER1
2
LAN2 USER
3
LAN1 media active
4
IDE active 1
5
IDE active 0
6
Heartbeat
7
Power Good
8
Standby
COM 1
The USER LEDs can be programmed by software as needed.
MEN Mikro Elektronik GmbH
20D002-00 E3 - 2001-12-03
Artisan Technology Group - Quality Instrumentation ... Guaranteed | (888) 88-SOURCE | www.artisantg.com
43
Functional Description
2.10
System Trigger, Watchdog and Hardware Monitor
The D2 uses a Z8536 component as a system trigger, watchdog and hardware
monitor. The ports of the Z8536 are assigned as follows:
Table 17. Port Pin Assignment of the Z8536 CIO
Port Pin
Signal Name
Direction
PA0
WD_TRIG
out
watchdog
PA1
-
-
-
PA2
-
-
-
PA3
-
-
-
PA4
SCL
in
I2C bus SCL in - hardware monitor
PA5
SCL
out
I2C bus SCL out - hardware monitor
PA6
SDA
in
I2C bus SDA in - hardware monitor
PA7
SDA
out
I2C bus SDA out - hardware monitor
PB0
PXI_TRIG[3]
out
PXI trigger PXI_TRIG[3] out
PB1
out
PXI trigger PXI_TRIG[3] out enable (0 = enable, 1 = disable)
PB2
out
PXI trigger PXI_TRIG[4] out enable (0 = enable, 1 = disable)
PB3
out
PXI trigger PXI_TRIG[2] out enable (0 = enable, 1 = disable)
out
PXI trigger PXI_TRIG[4] out
out
PXI trigger PXI_TRIG[0] out enable (0 = enable, 1 = disable)
PB4
PXI_TRIG[4]
PB5
Description
PB6
PXI_TRIG[0]
in
PXI trigger PXI_TRIG[0] in
PB7
PXI_TRIG[1]
in
PXI trigger PXI_TRIG[1] in
PC0
PXI_TRIG[2]
out
PXI trigger PXI_TRIG[2] out
PC1
PXI_TRIG[0]
out
PXI trigger PXI_TRIG[0] out
PC2
PXI_TRIG[1]
out
PXI trigger PXI_TRIG[1] out
out
PXI trigger PXI_TRIG[1] out enable (0 = enable, 1 = disable)
PC3
System Trigger
The system trigger supports trigger lines PXI_TRIG[4:0] according to the PXI
specification 1.0 (see Chapter 5.1 Literature and WWW Resources on page 54).
The maximum trigger frequency is 1MHz.
Watchdog
You can enable or disable the watchdog. If the watchdog is not retriggered within a
4.2-second interval, the platform will be hard-reset.
MEN Mikro Elektronik GmbH
20D002-00 E3 - 2001-12-03
Artisan Technology Group - Quality Instrumentation ... Guaranteed | (888) 88-SOURCE | www.artisantg.com
44
Functional Description
Hardware Monitor
The hardware monitor watches
• all voltages: +5V, +3.3V, +12V, -12V, switched mode power supply for processor
core, buffer battery.
The monitor will generate an alarm if the threshold values are exceeded.
• the speed of the processor fan
• the temperature on the board
• the power supply: support of PS_FAIL# and PS_DEG# according to the CompactPCI specification.
- PS_DEG# can be sampled via the LM79 (BTI).
- PS_FAIL# causes a reset.
!
MEN provides driver software for the hardware monitor of the D2, which allows
you to generate an alarm signal if the threshold values are exceeded. For current
software support, please refer to our website: www.men.de.
MEN Mikro Elektronik GmbH
20D002-00 E3 - 2001-12-03
Artisan Technology Group - Quality Instrumentation ... Guaranteed | (888) 88-SOURCE | www.artisantg.com
45
Award BIOS
3
Award BIOS
The following chapter gives a rough overview of the Award BIOS Setup program.
The Setup program lets you modify basic system configuration settings. The
settings are then stored in a dedicated battery-backed memory, called CMOS RAM,
that retains the information when the power is turned off.
The D2’s Award BIOS is a customized version of an industry-standard BIOS for
IBM PC AT-compatible personal computers. It provides critical low-level support
for the system central processing, memory, and I/O subsystems.
The Award BIOS has been customized by adding important, but nonstandard,
features such as virus and password protection, power management, and detailed
fine-tuning of the chipset controlling the system.
For D2, the BIOS was further enhanced by special, hardware-dependent, functions.
!
For a detailed description of the standard functions of the Award BIOS please refer
to their website: www.award.com. This chapter will give details only on the special
D2 functions.
3.1
Main Setup Menu
When you enter the Award BIOS CMOS Setup Utility by pressing DEL at start-up,
a Main Menu appears on the screen. The Main Menu allows you to select from
several Setup functions and two exit choices. Use the arrow keys to select among the
items and press Enter to accept and enter the sub-menu.
Figure 6. BIOS CMOS Setup Utility - Main Menu
MEN Mikro Elektronik GmbH
20D002-00 E3 - 2001-12-03
Artisan Technology Group - Quality Instrumentation ... Guaranteed | (888) 88-SOURCE | www.artisantg.com
46
Award BIOS
The following is a brief summary of each Setup category.
Standard CMOS Setup
Options in the original PC AT-compatible BIOS.
BIOS Features Setup
Award enhanced BIOS options.
Chipset Features Setup
Options specific to your system chipset.
Power Management Setup
Advanced Power Management (APM) options.
PnP/PCI Configuration
Plug and Play standard and PCI Local Bus configuration options.
Load BIOS Defaults
BIOS defaults are factory settings for the most stable, minimal-performance
system operations.
Load Setup Defaults
Setup defaults are factory settings for optimal-performance system operations.
Integrated Peripherals
I/O subsystems that depend on the integrated peripherals controller in your
system.
Special Features Setup
Hardware-dependent settings for D2 (see Chapter 3.2 Special Features Setup
on page 48).
Password Setting
Change, set, or disable a password. In BIOS versions that allow separate user
and supervisor passwords, only the supervisor password permits access to
Setup. The user password generally allows only power-on access.
IDE HDD Auto Detection
Automatically detect IDE hard disk parameters.
Save & Exit Setup
Save settings in nonvolatile CMOS RAM and exit Setup.
Exit Without Saving
Abandon all changes and exit Setup.
MEN Mikro Elektronik GmbH
20D002-00 E3 - 2001-12-03
Artisan Technology Group - Quality Instrumentation ... Guaranteed | (888) 88-SOURCE | www.artisantg.com
47
Award BIOS
3.2
Special Features Setup
This section describes the hardware-specific BIOS settings of the D2 such as
UART1 (COM1), GPIO and reset button modes.
UART1 High Speed Mode
This option selects the baud rate mode for UART1 (COM1).
On
high-speed baud rates up to 460,800 baud
Off
standard baud rates up to 115,200 baud
UART1 Transceiver
This option defines if UART1 (COM1) is used at the front panel or via the rear I/O
transition module (CT02).
Internal
UART1 at front panel
External
UART1 at CompactPCI rear I/O transition module
UART3/GPIO 0-3 Select
IR-UART3 is not supported on the D2. The pins are used for general purpose I/O at
the rear I/O transition module (CT02) via the CompactPCI bus.
Input
GPIO pin is configured as input
Output
GPIO pin is configured as output
USB/GPIO 4-5 Select
This option allows you to select between a third USB port and general purpose I/O
GPIO 4..5 for use at the rear I/O transition module (CT02).
GPIO
3rd USB
GPIO is enabled
Input
GPIO pin is configured as input
Output
GPIO pin is configured as output
3rd USB is enabled
Reset Button
Enabled
the reset button at the front is enabled
Disabled
the reset button at the front is disabled
MEN Mikro Elektronik GmbH
20D002-00 E3 - 2001-12-03
Artisan Technology Group - Quality Instrumentation ... Guaranteed | (888) 88-SOURCE | www.artisantg.com
48
Award BIOS
3.3
Console Redirection
The D2’s Award BIOS features "console redirection", allowing you to supervise and
influence the boot procedure of the D2 using a terminal, similar to a monitor. To do
this, you can use software such as HyperTerm under Windows, or Award’s APM
software (Award Preboot Manager). See also www.award.com.
3.3.1
Configuring BIOS
As of revision 00.02, BIOS is preconfigured for the system to boot both with or
without a graphics card, so that you do not need to configure BIOS to perform
console redirection.
Without a graphics card, the boot process is performed up to the BIOS setup, where
you can make changes using a terminal.
This mechanism is controlled via the "Award Preboot Agent" and "Agent after boot"
accessible in the BIOS Features Setup.
Award Preboot Agent
Enabled
if a terminal is connected, the agent redirects to this console
while the system is booting (default)
Disabled
no redirection
Agent after boot
Enabled
if a terminal is connected, the agent redirects to this console
after the system has booted
Disabled
no redirection (default)
Options "Serial Port" (terminal connection) and "Use Host Drive A" (used by APM
software) should not be changed. The default configuration ensures that the system
can be booted both with or without a graphics card and that you can make necessary
settings in BIOS in any event.
If you do not need the Preboot Agent at all, you should disable it.
MEN Mikro Elektronik GmbH
20D002-00 E3 - 2001-12-03
Artisan Technology Group - Quality Instrumentation ... Guaranteed | (888) 88-SOURCE | www.artisantg.com
49
Award BIOS
3.3.2
Configuring a Terminal Cable
For connection of the D2 to a terminal using a serial cable, we recommend the
following pin assignment (compatible with APM software):
Table 18. Pin Assignment for Terminal Cable
D2 Side
Terminal/PC Side
1 DCD
4 DTR
2 RXD
3 TXD
3 TXD
2 RXD
4 DTR
1 DCD
5 GND
5 GND
6 DSR
-
7 RTS
8 CTS
8 CTS
7 RTS
9 RI
-
3.3.3
Configuring the Terminal
Set your terminal to the following values:
•
•
•
•
•
19200 baud
8 data bits
no parity
1 stop bit
Xon/Xoff protocol
MEN Mikro Elektronik GmbH
20D002-00 E3 - 2001-12-03
Artisan Technology Group - Quality Instrumentation ... Guaranteed | (888) 88-SOURCE | www.artisantg.com
50
Award BIOS
3.4
BIOS Restrictions
BIOS Version 00.00 to 00.03
• If the Preboot Agent is enabled, you must permanently allocate the serial interfaces, e. g. COM 1 to 3F8 IRQ 4 and COM2 to 2F8 IRQ3.
• The D2’s PCI-to-PCI bridge is not initialized properly when there are additional
cards in the system that have a large I/O space (e. g. CompactPCI boards or
PC•MIP mezzanines). As of version 00.03, VGA BIOS may be 64KB large.
BIOS Version < 00.03
• BIOS displays a CPU host clock of 83 MHz/ASyn in the Chipset Features Setup.
This entry is correct! The D2 is operated with an FSB of 83MHz and a multiplier
of 5.5. These values cannot be changed. They depend on the processor and are
permanently wired.
3.5
BIOS Troubleshooting
In case you have any problems with start-up of the D2, e.g. after a BIOS update, you
can start the board with BIOS default values. This will allow you to start up the
board and check your BIOS settings.
This is how it works:
Press the "Insert" key on your keyboard before power-up.
Power up the system with the "Insert" key pressed.
Release the "Insert" key when the D2 has beeped.
Now the D2 is run with the BIOS default values. Although these values are used,
they do not overwrite your BIOS settings.
You can now check, modify and store your BIOS settings as usual.
To activate your new BIOS configuration, reset the D2.
If your problems persist, please turn to our customer support: [email protected].
MEN Mikro Elektronik GmbH
20D002-00 E3 - 2001-12-03
Artisan Technology Group - Quality Instrumentation ... Guaranteed | (888) 88-SOURCE | www.artisantg.com
51
Organization of the Board
4
Organization of the Board
The D2 is backward-compatible to the PC-AT. It provides the standard periphery
found on today’s personal computers. All addresses and other resources (i.e.
interrupts and DMA channels) used by these standard components are compatible to
the IBM PC. For a description of these components please refer to the IBM AT
technical reference (see Chapter 5.1 Literature and WWW Resources on page 54) or
other literature.
You can use the BIOS services to locate devices on the D2 and allocate and
deallocate hardware resources for them (see Chapter 3 Award BIOS on page 46).
4.1
Local PCI Bus
Several devices reside on the local PCI bus:
• host-to-PCI bridge ("Northbridge")
• PCI-to-ISA bridge ("Southbridge")
• PCI-to-PCI bridge which couples the local PCI bus and the CompactPCI backplane
• Fast Ethernet controller
• PCMCIA controller
• PC•MIP slots
4.1.1
Device Numbers
The following list contains the device numbers for the local PCI bus of the D2. The
Vendor and Device IDs for each device are given for reference only. Note that the
Southbridge is a multifunction device and has unique Device IDs for each function.
Table 19. Device Numbers on Local PCI Bus
Device No.
Device
Vendor/Device ID
0x00
Northbridge
0x07
Southbridge
8086/7000 (function 0)
8086/7010 (function 1)
8086/7020 (function 2)
0x14
PCI-to-PCI bridge
1011/0022
0x11
Ethernet controller 1011/0014
0x10
PCMCIA controller 104c/ac15
0x13
PC•MIP slot
4.1.2
defined by module used
Interrupt Routing
Interrupt routing conforms to the recommendations of the PCI specification, rev. 2.1
(see Chapter 5.1 Literature and WWW Resources on page 54).
MEN Mikro Elektronik GmbH
20D002-00 E3 - 2001-12-03
Artisan Technology Group - Quality Instrumentation ... Guaranteed | (888) 88-SOURCE | www.artisantg.com
52
Organization of the Board
4.2
CompactPCI Bus
4.2.1
Device Numbers
The system slot on a CompactPCI backplane is labeled as slot number 1. The
peripheral slots are numbered 2..8 starting from the slot next to the system slot
towards the slot opposite the system slot.
Peripheral CompactPCI boards plugged into these slots appear as devices on PCI
bus number 1. The mapping is listed below.
Table 20. Device Numbers on CompactPCI Backplane
Device Number
Slot Number
0x0F
2
0x0E
3
0x0D
4
0x0C
5
0x0B
6
0x0A
7
0x09
8
4.2.2
Interrupt Routing and Buffering
Interrupts are routed on the backplane. The CompactPCI interrupts are connected to
the local PCI bus interrupts by an open drain buffer to increase signal integrity.
4.3
ISA Bus
All standard components are compatible with the PC-AT standard. Non-standard
components are connected to the ISA bus via the ISA Plug and Play controller. The
Plug and Play ID is "SEN 0010".
When booting, the Plug and Play controller comes up with device name
"MEN CompactPCI Workstation D002 Rxx", where Rxx is the revision of the D2’s
Plug and Play controller.
The interface to the system trigger, watchdog and hardware monitor as well as the
CAN bus interface are implemented via the Plug and Play controller.
The resources needed are all allocated via Plug and Play BIOS.
Table 21. ISA Bus Plug and Play Device IDs
Device ID
SEN 0010
Device
monitor interface
Resources needed
one 8-byte I/O window
one 4-byte I/O window
one interrupt
Hardware of the monitor unit is based on the LM79 and CIO Z8536 devices. The
two components share one interrupt.
MEN Mikro Elektronik GmbH
20D002-00 E3 - 2001-12-03
Artisan Technology Group - Quality Instrumentation ... Guaranteed | (888) 88-SOURCE | www.artisantg.com
53
Appendix
5
Appendix
5.1
Literature and WWW Resources
5.1.1
CompactPCI/PCI
• CompactPCI Specification Revision 2.0 R2.1:
1997; PCI Industrial Computers Manufacturers Group (PICMG)
www.picmg.org
• PCI Local Bus Specification Revision 2.1:
1995; PCI Special Interest Group
P.O. Box 14070
Portland, OR 97214, USA
www.pcisig.com
5.1.2
PXI
• PXI Specification, PCI eXtensions for Instrumentation, An Implementation of
CompactPCI, Revision 1.0; 1997; National Instruments, Inc.
www.natinst.com
5.1.3
PC•MIP
• PC•MIP Draft Standard:
draft standard ANSI/VITA 29;
VMEbus International Trade Association
7825 E. Gelding Dr., Ste. 104,
Scottsdale, AZ 85260
www.vita.com
You can download the latest draft specification also from MEN’s website:
www.men.de.
5.1.4
EIDE
• EIDE:
Information Technology - AT Attachment-3 Interface (ATA-3), Revision 6,
working draft; 1995; Accredited Standards Committee X3T10
5.1.5
Parallel Peripherals - EPP
• Parallel Port (EPP):
1284-1994 IEEE Standard Signaling Method for a Bidirectional Parallel Peripheral Interface for Personal Computers; 1994; IEEE
www.ieee.org
MEN Mikro Elektronik GmbH
20D002-00 E3 - 2001-12-03
Artisan Technology Group - Quality Instrumentation ... Guaranteed | (888) 88-SOURCE | www.artisantg.com
54
Appendix
5.1.6
Ethernet
• Ethernet controller DS21041:
Digital Semiconductor 21041 PCI Ethernet LAN Controller, Data Sheet; 1996;
Digital Equipment Corporation
www.digital.com
• Ethernet in general:
- The Ethernet, A Local Area Network, Data Link Layer and Physical
Layer Specifications, Version 2.0; 1982; Digital Equipment Corporation, Intel Corp., Xerox Corp.
- ANSI/IEEE 802.3-1996, Information Technology - Telecommunications
and Information Exchange between Systems - Local and Metropolitan
Area Networks - Specific Requirements - Part 3: Carrier Sense Multiple
Access with Collision Detection (CSMA/CD) Access Method and Physical Layer Specifications; 1996; IEEE
www.ieee.org
• www.ots.utexas.edu/ethernet/descript-100quickref.html
links to documents describing Ethernet, components, media, the Auto-Negotiation system, multi-segment configuration guidelines, and information on the Ethernet Configuration Guidelines book
• www.iol.unh.edu/training/ethernet.html
collection of links to Ethernet information, including tutorials, FAQs, and guides
• www.made-it.com/CKP/ieee8023.html
Connectivity Knowledge Platform at Made IT technology information service,
with lots of general information on Ethernet
• www.yahoo.com/Computers_and_Internet/Communications_and_Networking/
LANs/Ethernet/
Yahoo!’s Ethernet directory
5.1.7
USB
• USB:
Universal Serial Bus Specification Revision 1.0; 1996; Compaq, Digital Equipment Corporation, IBM PC Company, Intel, Microsoft, NEC, Northern Telecom
www.usb.org
5.2
Board Revisions
Table 22. Table of Hardware Revisions
Revision
Comment
Restrictions
00.xx
first revision released none known
01.xx
second revision
The ISA/PNP Controller still displays hardware
revision 00. This is a MEN error. See Chapter
4.3 ISA Bus on page 53.
02.xx
third revision
none known
MEN Mikro Elektronik GmbH
20D002-00 E3 - 2001-12-03
Artisan Technology Group - Quality Instrumentation ... Guaranteed | (888) 88-SOURCE | www.artisantg.com
55
Appendix
5.3
Component Plans
Figure 7. Component Plan of D2 Rev. 02 - Top Side
MEN Mikro Elektronik GmbH
20D002-00 E3 - 2001-12-03
Artisan Technology Group - Quality Instrumentation ... Guaranteed | (888) 88-SOURCE | www.artisantg.com
56
Appendix
Figure 8. Component Plan of D2 Rev. 02 - Bottom Side
MEN Mikro Elektronik GmbH
20D002-00 E3 - 2001-12-03
Artisan Technology Group - Quality Instrumentation ... Guaranteed | (888) 88-SOURCE | www.artisantg.com
57
You can request the circuit diagrams for the current revision of the product described in this
manual by completely filling out and signing the following non-disclosure agreement.
Please send the agreement to MEN by mail. We will send you the circuit diagrams along with a
copy of the completely signed agreement by return mail.
MEN reserves the right to refuse sending of confidential information for any reason that MEN
may consider substantial.
Non-Disclosure Agreement
for Circuit Diagrams provided by MEN Mikro Elektronik GmbH
between
MEN Mikro Elektronik GmbH
Neuwieder Straße 7
D-90411 Nürnberg
(”MEN”)
and
____________________
____________________
____________________
____________________
(”Recipient”)
We confirm the following Agreement:
MEN
Recipient
Date:
______________________
Date:
______________________
Name:
______________________
Name:
______________________
Function:
______________________
Function:
______________________
Signature:
Signature:
____________________________________
____________________________________
The following Agreement is valid as of the date of MEN’s signature.
Neuwieder Straße 7
D-90411 Nürnberg
Phone +49-911-99 33 5-0
Fax +49-911-99 33 5-99
E-Mail [email protected]
WWW www.men.de
Non-Disclosure Agreement for Circuit Diagrams page 1 of 2
ISO 9001 certified
Artisan Technology Group - Quality Instrumentation ... Guaranteed | (888) 88-SOURCE | www.artisantg.com
1
Subject
The subject of this Agreement is to protect all information contained in the circuit diagrams of the
following product:
Article Number:__________________ [filled out by recipient]
MEN provides the recipient with the circuit diagrams requested through this Agreement only for
information.
2
Responsibilities of MEN
Information in the circuit diagrams has been carefully checked and is believed to be accurate as
of the date of release; however, no responsibility is assumed for inaccuracies. MEN will not be liable for any consequential or incidental damages arising from reliance on the accuracy of the circuit diagrams. The information contained therein is subject to change without notice.
3
Responsibilities of Recipient
The recipient, obtaining confidential information from MEN because of this Agreement, is obliged
to protect this information.
The recipient will not pass on the circuit diagrams or parts thereof to third parties, neither to individuals nor to companies or other organizations, without the written permission by MEN. The circuit diagrams may only be passed to employees who need to know their content. The recipient
protects the confidential information obtained through the circuit diagrams in the same way as he
protects his own confidential information of the same kind.
4
Violation of Agreement
The recipient is liable for any damage arising from violation of one or several sections of this
Agreement. MEN has a right to claim damages amounting to the damage caused, at least to
DM 100,000.
5
Other Agreements
MEN reserves the right to pass on its circuit diagrams to other business relations to the extent
permitted by the Agreement.
Neither MEN nor the recipient acquire licenses for the right of intellectual possession of the other
party because of this Agreement.
This Agreement does not result in any obligation of the parties to purchase services or products
from the other party.
6
Validity of Agreement
The period after which MEN agrees not to assert claims against the recipient with respect to the
confidential information disclosed under this Agreement shall be _______ months [filled out by
MEN]. (Not less than twenty-four (24) nor more than sixty (60) months.)
7
General
If any provision of this Agreement is held to be invalid, such decision shall not affect the validity of
the remaining provisions and such provision shall be reformed to and only to the extent necessary to make it effective and legal.
This Agreement is only effective if signed by both parties.
Amendments to this Agreement can be adopted only in writing. There are no supplementary oral
agreements.
This Agreement shall be governed by German Law.
The court of jurisdiction shall be Nuremberg.
Neuwieder Straße 7
D-90411 Nürnberg
Phone +49-911-99 33 5-0
Fax +49-911-99 33 5-99
E-Mail [email protected]
WWW www.men.de
Non-Disclosure Agreement for Circuit Diagrams page 2 of 2
ISO 9001 certified
Artisan Technology Group - Quality Instrumentation ... Guaranteed | (888) 88-SOURCE | www.artisantg.com
Fax Reply
Who you are...
Name
__________________________ Phone No.
__________________________
Company
__________________________ Fax No.
__________________________
Department __________________________ E-mail
__________________________
Use our online forms
at www.men.de
What we can do for you...
Product Support
Manual Feedback
Product Article No.
__________________
Manual Article No. __________________
Revision
__ __ . __ __ . __ __
Edition
If the product is a mezzanine module:
Carrier Article No.
__________________
Revision
__ __ . __ __ . __ __
• Technical Support
• User Manuals
E ___
Useful or awful?
very useful totally awful
Operating system
Usage
OS-9
I read the manual and decided to buy the
related product.
VxWorks
WindowsNT
other:
___________________________________
I read the manual when I got the product.
I refer to the manual only when I have
problems.
Your problems/comments...
Neuwieder Straße 7
D-90411 Nürnberg
Phone +49-911-99 33 5-0
Fax +49-911-99 33 5-99
E-Mail [email protected]
WWW www.men.de
ISO 9001 certified
Artisan Technology Group - Quality Instrumentation ... Guaranteed | (888) 88-SOURCE | www.artisantg.com
Artisan Technology Group is your source for quality
new and certified-used/pre-owned equipment
• FAST SHIPPING AND
DELIVERY
• TENS OF THOUSANDS OF
IN-STOCK ITEMS
• EQUIPMENT DEMOS
• HUNDREDS OF
MANUFACTURERS
SUPPORTED
• LEASING/MONTHLY
RENTALS
• ITAR CERTIFIED
SECURE ASSET SOLUTIONS
SERVICE CENTER REPAIRS
Experienced engineers and technicians on staff
at our full-service, in-house repair center
WE BUY USED EQUIPMENT
Sell your excess, underutilized, and idle used equipment
We also offer credit for buy-backs and trade-ins
www.artisantg.com/WeBuyEquipment
InstraView REMOTE INSPECTION
LOOKING FOR MORE INFORMATION?
Visit us on the web at www.artisantg.com for more
information on price quotations, drivers, technical
specifications, manuals, and documentation
SM
Remotely inspect equipment before purchasing with
our interactive website at www.instraview.com
Contact us: (888) 88-SOURCE | [email protected] | www.artisantg.com