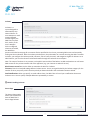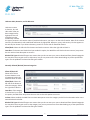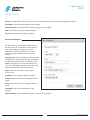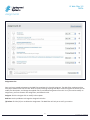
1
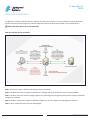
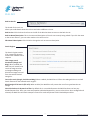
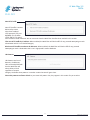
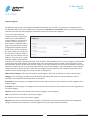
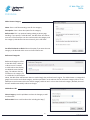
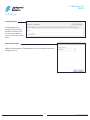
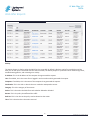
Lightspeed Systems
Web Filter
Onsite Training User Manual
Table of Contents: LS Web Filter 102
04/ Web Filter Overview
05/ Policy Overview
06/ Rule Sets
11/ Assignments
16/ Control Lists
20/ Module Settings
22/ Database
25/ Web Filter Reports
Table of Contents: LS Web Filter 102
34/ Authentication
36/ Name Resolution
37/ Assignments
39/ Assignment Lists
40/ Overrides
42/ Advanced Rule Sets
46/ Bandwidth Management
48/ Custom Access Page
Table of Contents: LS Web Filter 101
04/ Web Filter Overview
05/ Policy Overview
06/ Rule Sets
11/ Assignments
16/ Control Lists
20/ Module Settings
22/ Database
25/ Web Filter Reports
Introduction
The purpose of this document is to teach a new
administrator of the next generation Lightspeed Web
Filter how to manage Web traffic through policies by
creating custom rule sets, IP-based assignments, and
control lists.
LS Web Filter 101
TRECA
Web Module Review
The Web Filter analyzes outbound Internet requests and determines whether or not the requests should be allowed or
blocked. It performs lookups against its Content Database and then allows or blocks based on rules called Policies.
LAB #1: Web Filter Warm Up (no simulated lab)
How the web filter allows and blocks
Step 1: An end user opens a browser and attempts to go to Facebook.
Step 2: The Web Filter sees the request and performs a category look-up of the domain in the Content Database.
Step 3: The filter checks the domain’s category against any matching policy assignments and permits requests to Allowed
categories to complete.
Step 4: The filter redirects any requests to Blocked Categories to its access page on the Management interface.
Step 5: User’s browser displays the Access Denied page.
4
LS Web Filter 101: Web Module Review
LS Web Filter 101
TRECA
Policy Overview
What is a policy?
A policy is a set of rules that controls the behavior of a Lightspeed Rocket feature such as the Web Filter, Power Agent, or
Security Agent. Policies can be configured to provide customized feature behavior based on to whom or what they are
applied. A Policy is made of two things: a Rule Set that defines how the feature behaves; and an Assignment that defines
whom or what (Assignees) the Rule Set should affect. Assignees can be an IP Address, IP Range, User, Computer, Group,
or Organizational Unit (OU).
The Web Filter comes with a default Tier Policy that offers basic CIPA filtering access to all assignees right out-of-the-box.
You can create custom policies to differentiate access for your users, and Lightspeed has also included some pre-defined
rule sets and policies for your immediate use.
The process for creating custom policies is straightforward:
1. Create and customize a new rule set.
2. Create a new assignment by defining an assignee.
3. Apply the rule set to the assignee and test.
Policies for IP assignments are the easiest for the Web Filter to implement because all Internet-bound traffic has an IP
address. For policies related to user names, the Web Filter requires assistance from Lightspeed’s Security Agent, User
Agent, or manual Authentication for name resolution and directory lookups.
You manage Web Filter policies from the Policy Management Dashboard.
Policy Management Dashboard
The Policy Management Dashboard
is where you control web access by
defining Assignees, Rule Sets and
Advanced Rule sets. The default view is
Assignments.
Assignments: The Assignments link
is where you go to define Users, OUs,
groups, computers and IP addresses as
Assignees.
Rule Sets: The Rule Sets link is where
you go to create rules that control access
to the Internet. When assigned, the rules are applied 24 hours a day, 7 days a week.
Advanced Rule Sets: The Advanced Rule Sets is where you go to define a set of different rules that control access based
on the current time and day of the week.
Although Assignments appear in the Dashboard first, we are going to cover Rule Sets and re-visit Assignments next
5
LS Web Filter 101: Policy Overview
LS Web Filter 101
TRECA
Rule Sets
Rules Sets
The Rule Sets page displays a list of all
rule sets sorted in chronological order
from oldest to newest. You can modify
rule sets by clicking on the rule set
name, and view assignments for each.
New Rule Set: Click this button to create
a new rule set.
Rule Set: Click the name of a rule set to
view/modify it.
Assignment to: (Read only) This column
displays all assignees to the selected
rule set.
(X) Delete: Click the (X) icon to delete a custom rule set. It appears when you hover in the area to the right of a rule set.
The Web Filter will ask you to verify your action.
New Rule Set
When you click on the New Rule Set link, this dialog box
appears to help you create your new rule set. If you want to
make changes to this information later, you can do it from the
Rule Sets list.
Name: Enter the rule set name.
Description: Enter a description of your rule set. Add words
describing any special settings you are making (e.g. Teacher
Rule Set with Overrides).
Copy rule set from: You must use another rule set as a template
to make your own. Use the pulldown to pick an existing rule set
such as Default to use as a template.
6
LS Web Filter 101: Rule Sets
LS Web Filter 101
TRECA
Rule Sets
Rule Set Details
The header for the rule set
allows you to edit details about the rule set and select a different rule set.
Rule Set List: Click the three-lined icon to the left of the Rule Set Name to return to the Rule Set List.
Rule Set Name/Description: This is the name and description of the rule set currently being edited. If you click the name
or the arrows next to it, you can select another rule set from a list.
Edit Name & Description: Click this link to change the rule set name or description.
Search Engines
The Search Engines section
is for customizing how the
content filter handles search
requests.
Filter Image search
thumbnails (Google and
Bing): When enabled, the
Web Filter will examine the
results of image searches
on Google and Bing and
block those images sourced
from sites within blocked
categories.
Force safe search (Google, YouTube and Bing): When enabled, the Web Filter will force the setting which turns on Safe
Search features for the selected search engines.
Block Google HTTPS search (fail-safe): When enabled, the Web Filter will prevent the use of encrypted searches on
Google.
Select blocked search keywords to filter: By default this is not enabled because the Web Filter does not have any
blocked keyword lists. Once you create and populate a Blocked Keyword list, you can select it here. Once configured and
selected, the Web Filter will block attempts to search for words and phrases within blocked keyword lists.
7
LS Web Filter 101: Rule Sets
LS Web Filter 101
TRECA
Rule Sets
Non-HTTP Traffic
Non HTTP traffic is content
delivered by means
other than standard
HTTP protocols (TCP port
80/8080). This includes
HTTPS, SMTP, FTP, and all
other content transfer methods. You can customize how the Web Filter handles these methods in this section.
Filter non-HTTP traffic by IP address: When enabled, the Web Filter will block traffic for any protocol attempting to reach
a destination which is in a blocked category.
Block non-HTTP traffic to unknown IP addresses: When enabled, the Web Filter will block traffic for any protocol
attempting to reach a destination that is not in Lightspeed’s content database.
URL Patterns
URL Patterns are lists of
domains, IP addresses,
URLs and words/wildcards
that the Web Filter will
always allow or block
regardless of content
category. You define these patterns in another section that we will get to later.
Select URL patterns to allow or block: As you create URL pattern lists, they appear in this section for you to select.
8
LS Web Filter 101: Rule Sets
LS Web Filter 101
TRECA
Rule Sets
Lockouts
Lockouts is a
system designed to
automatically stop
network abuse. As
users attempt to reach
content deemed
Lockout-eligible, the
Web Filter monitors
their activity. If the
user’s attempts
hit the configured
tolerance threshold,
the Web Filter
presents a blocked access page for an amount of time specified in the rule set, preventing Web access and essentially
locking out the workstation. After the Lockout period expires, the workstation can resume accessing the Web. To enable
Lockouts, you configure the lockout period, tolerance, who to notify via email, and categories eligible for lockout. As an
administrator, you can also release a locked workstation through the Lockouts Current Report.
Note: The scope of Lockouts is any content on the public Internet side of the Rocket. Locked workstations can still access
Web content on the private network side of the appliance (e.g. your intranet or webmail servers).
Block internet access for: Use the slider to customize the time for a lockout.
Tolerance: Enter the threshold settings before a lockout occurs. A user must get blocked by the lockout category for the
number of times you specify within the time period you determine before the workstation becomes locked.
Email Notifications: When you specify an email address here, the Web Filter will send you a notification whenever a
lockout occurs. You can specify multiple addresses separated by a comma.
LAB #7: Enabling Lockouts
Access Page
The Access Page section
allows you to customize
how the Web Filter’s
Access Page behaves.
9
LS Web Filter 101: Rule Sets
LS Web Filter 101
TRECA
Rule Sets
Overrides
The Override feature is built into the Access Page that allows a user to get to content normally blocked by their rule set
for a time period that you configure. To enable overrides, you must define which categories can be overridden within
a user’s rule set. An example of when an override may be suitable is the need to grant a teacher access to a site such
as Facebook. Facebook is normally categorized in the forums.social-networking category and blocked. However, if you
configured forums.social-networking to allow overrides in the teacher’s rule set, the teacher could reach Facebook
after acknowledging an override prompt in the Access page. You can safeguard the feature by requiring end-user
authentication to ensure overrides are only done by the intended user.
Override duration: Use the slider bar to configure how long a user can gain access beyond his normal Web Filter settings
during an override. Once the timer has expired, the user’s normal settings return.
Require authentication for an override: When enabled, the Web Filter will present an Override authentication prompt
when the user attempts to reach content that is normally blocked but designated as Override-enabled. If the user passes
the authentication check, he will gain access to the content requested for the amount of time designated by the Override
duration. Once the timer has expired, the user’s normal settings return, and he will need to re-authenticate to Override.
Allow users to submit blocked websites for review: When enabled, the Web Filter will present a prompt to submit
blocked content for review.
• Require email address and review reason: When enabled, the Web Filter will require the user to enter his name and
reason for review before the allowing the submission to occur.
Enable custom access page: If you have created custom access pages, the Web Filter will display this option. Otherwise,
this section does not appear.
Custom Access Page dropdown: Once you have created custom access pages, use the pulldown to select which page to
display.
Content Categories
The Web Filter relies on its Content Database and Rule Sets to make decisions on allowing or blocking domains, IPs and
URLs. Within the Content Database individual sites are not allowed or blocked. They are organized into groups with
common traits called Categories. It is this within section of the Rule Set that you allow or block these categories. The
categories are sectioned into four main groups: Unknown, Custom/Local Categories, Normally Blocked, and Normally
Allowed.
The interface is similar between them and the process for allowing and blocking is straightforward.
10
LS Web Filter 101: Rule Sets
LS Web Filter 101
TRECA
Rule Sets
Unknown URLs, Domains, and IP Addresses
Unknown content
is domains, IPs, and
URLs which have not
been categorized by
Lightspeed. You can
configure how the
content filter handles
this type of content in this section. Note: If you block unknowns, you may err on the side of caution. Most of the content
necessary for education is well established and known by Lightspeed. New porn, proxy, and security risk sites appear on
the web by the minute. If you allow unknowns, you will err on the side of unwanted content.
Allow/Block: Select the left side of the button to allow the content. Select the right side to block it.
Overrides: If unknowns are blocked and you enable this option, the Web Filter will block unknown content, but present
the user with an Override option to access it.
Blocked File Types: Blocked file types are content that you do not want your users to download from allowed categories.
You may allow users to gain access to Unknowns, but you can prevent users from downloading any of the specified file
types. Use the pulldown to select what file types to block.
Normally Allowed/Blocked/Custom Categories
Allow All/Block All:
Select one of these
shortcut buttons to set
all categories within the
section to allow or block.
Allow/Block: Select the
left side of the button to
allow the category. Select
the right side to block it.
Overrides: If the category
is blocked and you enable
this option, the Web Filter will present the user with an Override option to access it.
Lockout: When enabled, the Web Filter monitors attempts to access the category and will lock workstations when users
exceed lockout thresholds.
Blocked File Types: Blocked file types are content that you do not want your users to download from allowed categories.
You may allow users to gain access to the category, but you can prevent users from downloading any of the specified file
types. Use the pulldown to select what file types to block.
11
LS Web Filter 101: Rule Sets
LS Web Filter 101
TRECA
Rule Sets
LAB #2: Customizing A Rule Set to Allow Content
Rule Set Review:
True or False: By default, the Web Filter blocks words such as “porn”, “proxy” and “marijuana”.
True or False: By default, a user can submit blocked content for review.
True or False: The domains youtube.com and facebook.com are always blocked.
12
LS Web Filter 101: Rule Sets
LS Web Filter 101
TRECA
Assignments
Assignments/Manage Assignments
The Assignments page is where you
view and define policy assignments. This
is the default look of the page on a new
Web Filter. As you create assignees and
policy assignments, the Web Filter will
populate a list of your work here. We’ll
go into more detail on how to manage
assignments after we’ve created a few.
Assignments Query (magnifying glass
icon): Click this icon to do a search on
an assignment and its corresponding
rule set. We’ll discuss how to use this
tool after we’ve created a few assignments.
New Assignment: Click this button to open a utility to define new assignees and apply rule sets to them.
Tier Policy: This is the policy assigned to everyone in a new installation. If the Web Filter cannot match a user to an
assignment, this policy acts as the fail-safe providing basic CIPA filtering. You can change the Rule Set by selecting a
different one from the pulldown.
New Assignee
The New Assignee utility is what you use to add users, groups,
IPs, etc. so that you can later apply rule sets to them. The utility
gives you the choice of manually adding assignments or browsing
your directory server to find them. By default, the utility starts in
the Browse mode.
Manually Add Assignee: Select this link if you want to manually
enter the assignee’s information or create IP-based assignments.
Authentication Source: Use this pulldown to select which
authentication source to browse for the assignee.
Assignee Type: Use this pulldown to select the type of assignee
you want to add. The utility will display all the valid types
available for the source you selected above. Among the valid
possibilities are: Computer Name, Computer OU, User Group,
User Name, User OU.
Query (magnifying glass icon): Enter at least three characters of the assignee you’re looking for. Your browser may display
previous results from its cache, however, you’ll still need to click the Search button to start the query.
Search: Click this button to begin the search.
11
LS Web Filter 101: Assignments
LS Web Filter 101
TRECA
Assignments
Results: The Web Filter will display the results in the box below your query. Select your assignee from the list.
Description: Type a short description for the assignee.
Web Filter Rules: Use this pulldown to apply a Rule Set to the assignee.
Save: Click Save to keep your unsaved changes.
Cancel: Click Cancel to discard your changes.
Manually Add Assignee
The Manual version of the New Assignee utility is
for power users. It’s a little faster to use because
it has fewer options to configure. To create
assignments reliably you will need to be very
familiar with your authentication source field
formats.
Assignee Type: Use this pulldown to select the type
of assignee you want to add. The utility will display
the following: Computer Name, Computer OU, IP
Address, IP Range, User Group, User Name, and
User OU. Depending on which type you select, the
utility will display fields specific to the type.
Name: Enter the name of the Device, Name,
Group, or OU.
IP Address: Enter a single IP address assignee.
IP Start: Enter the first IP of the range you want to
create.
IP End: Enter the last IP of the range you want to
create.
Description: Type a short description for the
assignee.
Web Filter Rules: Use this pulldown to apply a rule set to the assignee.
12
LS Web Filter 101: Assignments
LS Web Filter 101
TRECA
Assignments
Assignments List
Once you have created Assignments, the Web Filter populates this list with Assignees. The Web Filter evaluates policies
from top to bottom with the “fail-safe” Root Tier policy catching anything that doesn’t match assignments above. You can
modify the description, and change the applied rule set, and delete Assignments from this list. If you need to modify an
assignment, you must create a new assignment, and delete the old.
Assignee: Click the Assignee link to modify its description.
Rule Set: Use the pulldown to change the Assignee’s Rule Set.
(X) Delete: Click the (X) icon to delete the Assignment. The Web Filter will ask you to verify your action.
13
LS Web Filter 101: Assignments
LS Web Filter 101
TRECA
Assignments
Reordering Assignments
We’ve discussed how the Web Filter evaluates the Assignments from the top of the list down to the Tier Policy. As you
create new Assignments, the Web Filter places them at the top of the list. The order of the Assignments is up to you,
but you should place the most specific Assignments (Users, IPs, Computers) at the top of the list, and the more general
Assignments (Groups, OUs) toward the bottom. Should you need to reorder assignments, you can do this by selecting
an Assignment with your mouse, and dragging it to its new location in the list. In the image above, we’re moving the
Computer OU assignment for Domain Controllers to the second position in the list.
LAB #3: Creating A Policy from an IP-based Assignment
14
LS Web Filter 101: Assignments
LS Web Filter 101
TRECA
Assignments
Assignments Query
Occasionally you may need to verify what rule
set the Web Filter applies to an assignee. The
Assignment Query utility gives you several
fields to investigate. To get to the Assignment
Query, click on the magnifying glass next to
“Assignments”. To find what policies apply to
an assignee, type the known information about
the assignee into the appropriate field and
click the Check Assignment button. The utility
returns the first Assignment it finds. To close
the Assignment Query window, click on the
magnifying glass icon again.
IP Address: (Required) Enter the IP address of
the user’s computer.
Computer Name: Enter the computer name.
Computer OU: Enter the computer OU.
Username: Enter the user’s name.
User OU: Enter the user’s organizational unit.
User Groups: Enter the user’s group.
Date and Time: If you have Advanced Rule Sets, type the time and date in question.
Check assignment: Click this button to start the query.
15
LS Web Filter 101: Assignments
LS Web Filter 101
TRECA
Control Lists
Blocked File Extensions
Blocked File Extensions are types of content that you want the Web Filter to block to prevent your users from
downloading. This gives you control to allow users to view websites while protecting their computers from potentially
harmful downloads. Lightspeed provides three lists by default: Audio Files, Compressed Files, and Executable Files.
New List: Click this button to create your own custom extension list.
Name: Click on the name link to edit the list of extensions within it.
Extensions: Displays the content of the list.
Assigned To: Displays what rule sets where you have applied the selected list.
(X) Delete: Click this icon to delete the selected list. The Web Filter will ask you to verify your action before proceeding.
LAB #6: Blocked File Extensions
16
LS Web Filter 101: Control Lists
LS Web Filter 101
TRECA
Control Lists
New List/Edit List
The utility for adding a new list or modifying an existing one use
the same logic. When you add an extension, you do not include the
preceeding period “.”, just the letters.
Name: Enter a short descriptive name for your list.
Description: Enter a description for the list.
File Extensions: Add one extension per line to the list. No period “.” is
necessary.
Assigning Blocked Extensions
To apply a blocked file extension set, edit
the rule set, scroll to categories, and use
the pulldown to associate the blocked
extension set to the category. Save the
rule set.
Blocked Search Keywords
Blocked Search Keywords are words
that you want the Web Filter to block to
prevent your users from using in search
engine queries. You can add single words or
phrases. The Web filter ignores case and word order of phrases. By default, Lightspeed does not supply any lists, and you
must create your own. The system is list-driven so you can create multiple lists and apply them to rule sets as necessary.
This gives you the flexibility to block students from searching for network hacking tools while allowing your IT staff to
look for useful networking utilities.
New List: Click this button to create a new list.
List Name: Click this link to edit the selected list.
Words: Displays the words within the list.
Assigned to: Displays all rule sets where you have applied the list.
17
LS Web Filter 101: Control Lists
LS Web Filter 101
TRECA
Control Lists
New List/Edit List
The utility for creating a new list or modifying an existing one
use the same logic.
Name: Enter a descriptive the name for your list.
Description: Enter a more detailed description of the list.
Search Keywords: Enter the words you want to block one word
or phrase per line.
Selecting Blocked Keyword List
As you create lists, they appear within
rule sets for selection. To apply a blocked
keyword list, edit the rule set, scroll to the
Search Engines section, and select the list
checkbox. Save the rule set.
LAB #4A: Understanding the Web Filter’s SafeSearch Behavior
LAB #4B: Filtering Google Images
LAB #4C: Creating Blocked Search Engine Keywork Lists
18
LS Web Filter 101: Control Lists
LS Web Filter 101
TRECA
Control Lists
URL Pattern
URL Patterns are lists of domains, IP
addresses, URLs and words/wildcards that
the Web Filter will always allow or block
regardless of content category. Lightspeed
designed this system to help you quickly
allow or block specific items without having to re-categorize them in the Content Database. By default, Lightspeed does
not supply any lists, and you must create your own. The system is list-driven so you can create multiple lists and apply
them to rule sets as necessary.
New List: Click this button to create a new list.
List Name: Click this link to edit the selected list.
Words: Displays the items within the list.
Assigned to: Displays all rule sets where you’ve applied the list.
New List/Edit URL Patterns List
Name: Enter a descriptive the name for your list.
Description: Enter a more detailed description of the list.
URL Patterns: Enter the items you want to include in the list one
item per line. You can get detailed instructions on how to form the
items by visiting Lightspeed’s Wiki and researching article www.
lightspeedsystems.com/x/sAy8Ag
Applying a URL Pattern List
As you create URL Pattern Lists,
the Web Filter displays them in the
URL Patterns section of rule sets. To
enable a list, select the checkbok and
then choose Allow or Block, then
Save the rule set.
LAB #5: Creating A URL Patterns List
19
LS Web Filter 101: Control Lists
LS Web Filter 101
TRECA
Module Settings
Database/Statistics Data
Retention
The retention slider indicates how long the Rocket
should retain statistical analysis data in the live
database.
General
The General section
provides additional
controls to the
Web filter beyond
normal domaincentric access. The
first two options are
configurable only on
the Root Tier and
affect all traffic on
the Rocket. The rest
of the options are
configurable by subtiers.
Decode SSL
Certificates: Select
this option if you want
the Web Filter to
examine the contents
of SSL certificates and
provide access based
on what is found. This can stop encrypted access to normally blocked content and encrypted proxies.
Bypass on failure: This option controls the fail-over network hardware included with your Rocket. Select this option if
you want traffic to pass freely through the Rocket in a power loss, appliance restart, or software failure event. Uncheck
this option if you want Internet traffic to stop in the previously-mentioned scenarios.
Block P2P networks: Select this option if you want the Web filter to extend to and stop peer-to-peer networks.
Block Proxies: Select this option if you want the Web Filter to block all proxy requests.
Disable Google encrypted search: Select this option to stop attempts to use Google’s encrypted search.
YouTube EDU Code: If you have a YouTube educational account, enter its code here. This will cause the Web Filter to
enforce the YouTube education filter for all YouTube access.
20
LS Web Filter 101: Module Settings
LS Web Filter 101
TRECA
Module Settings
Blocked Web Site Reviewers
If you allow end-users to submit blocked web sites for review, the Web Filter places the sites into a report that you must
proactively run to see the contents. If you specify email addresses in this section, the Web Filter will send a notification
to those addressees that a site needs attention.
Blocked Website Reviewers: Enter the email addresses where the Web Filter should send review notifications.
21
LS Web Filter 101: Module Settings
LS Web Filter 101
TRECA
Database
Custom Categories
The Web Filter comes with a pre-categorized database of domains, IPs, and URLs. If you need to re-categorize entries,
the Web Filter offers two custom categories for this purpose: local-allow and local-block. Typically, you will place general
individual items that you want allowed or blocked for everyone into these two categories.
If you need to some specially
category handling, the Web Filter
allows you to create additional
custom categories. The reason for
creating a custom category can
be as simple as needing to allow a
large set of related sites normally
categorized as blocked to a select
group of users while not allowing
the entire category to everyone. In
the case above, we want Teachers
to have access to YouTube, but not
Students. To do this we’ve created
a custom category called YouTube.
YouTube.com is normally categorized as Adult. If we wanted to allow YouTube without a custom category, we would have
to allow the entire Adult category, which would allow many other domains that we wouldn’t want the teachers reach.
We could move YouTube to local-allow, but that category is normally allowed for everyone and the Students could reach
YouTube. To resolve this we move YouTube-related domains into the new category. The Adult category remains blocked,
and we now have an option to allow or block the new category based on policy. Further, web filter reports will record
statistics on that custom category so you can see how it is being used.
Add a Custom Category: Select this link to add a custom category. You’ll find more details on how this works below.
Category: Click the category to edit its name, description and redirect URL. Note: You cannot modify the name or
description of the default-installed local-allow or local-block.
local-allow: Use this category to recategorize items that you want everyone on your network to access regardless of its
original category.
local block: Use this category to recategorize items that you want everyone on your network to not access regardless of
its original category.
Domains: Click this link to view domains in the custom category. See more below.
URLs: Click this link to view URLs in the custom category.
IPs: Click this link to view IPs in the custom category.
X(Delete): Click this link to delete the custom category. The Web Filter will reset all content within to the Lightspeed
category. The Web Filter will present a reminder page to verify your request before proceeding.
22
LS Web Filter 101: Database
LS Web Filter 101
TRECA
Database
Add a Custom Category
Name: Enter a self-documenting name for the category.
Description: Enter a short description for the category.
Redirect URL: This is an optional setting relating to Access page
handling. If you specify a valid URL here, the Web Filter will redirect
users to it in the event the user hits content within the category and
the category is blocked for that user. Normally, this is left blank.
Set default behavior to block: Select this option if you want the new
category to be blocked within current rule and future sets.
Redirected Categories
Redirected Categories refers
to the Web Filter’s ability to
re-direct a user’s browser
to a URL rather than display
a traditional Access Denied
page. The redirect URL has
no effect on the category if it
is not blocked. In the example
above, the Web Filter administrator wants to make Google the preferred search engine. The Administrator re-categorized
google.com into the Local-Allow category, and then specified it as the redirect URL for the Search category. When a user
attempts to reach content within the Search category and that user’s rule set has the Search category blocked, the user’s
browser would automatically redirect to Google.
Add Redirect URL
Select Category: Use this pulldown to select the Category to add
a redirect URL.
Redirect URL: Enter a valid redirect URL including the http://.
23
LS Web Filter 101: Database
LS Web Filter 101
TRECA
Database
Locked Categories
Locked categories are
categories that you never
want to be accessed. They
cannot be overridden by
rule sets, Overrides, or Web
Zones.
Add Locked Category
Adding a locked category is straightforward. Use the pulldown to select the
category and save.
24
LS Web Filter 101: Database
LS Web Filter 101
TRECA
Web Filter Reports
Activity
The Activity Report is displays what the Web Filter has recorded. By default it displays activity from midnight until the
time you run the report. Combined with the Search function, the Activity Report is a powerful tool for discovering trends,
troubleshooting policies, and reviewing user activity.
IP Address: This is the IP address of the computer that generated the request.
User: If available, this is the name of user logged in at the machine which generated the request.
Computer: If available, this is the name of the computer that generated the request.
Destination: This is the URL or domain the user reached or attempted to access.
Category: This is the category of the content.
Action: This is the action the Web Filter took whether Allowed or Blocked.
Reason: This is the policy that affected the traffic.
Rule Set: This is the rule set the policy used to determine the action.
Time: This is the time when the action occurred
25
LS Web Filter 101: Web Filter Reports
LS Web Filter 101
TRECA
Web Filter Reports
Blocked for review
The Access Page looks like this if you have Submit for Review enabled.
The end user fills out a form if you enable Require an email and
reason for the review. Otherwise, it is optional.
26
LS Web Filter 101: Web Filter Reports
LS Web Filter 101
TRECA
Web Filter Reports
Blocked for Review
The Blocked for Review report has built-in logic to help you manage blocked content.
IP Address: This is the IP address of the computer that generated the request.
URL: This is the URL that the user attempted to reach and wants you to review.
Email: (Optional) This is the email address of the user who made the request.
Reason: (Optional) This is the reason the user wants you to review the URL.
Category: This is the category where the content resides in Lightspeed’s database.
Recategorize: This is a link to a wizard to change the categorization.
Time: This is the time that the user made the request.
27
LS Web Filter 101: Web Filter Reports
LS Web Filter 101
TRECA
Web Filter Reports
Lockouts
If you have Lockout enabled on a category and an end-user
exceeds the lockout threshold, the Web Filter presents them
with an Access Page with this message.
Reviewing Lockouts
The Lockouts report has built-on logic to help you manage lockouts.
IP Address: This is the IP
address of the computer that
generated the lockout.
User: If available, this is the
name of user logged in at the
machine which generated
the lockout.
Computer: If available, this is the name of the computer that generated the lockout.
Category: This is the category that generated the lockout.
Time: This is the time that the lockout occurred.
Expires: This is the time when the lockout ends, and the workstation can resume access to the Internet.
Ending a Lockout
If you hover over the (X) to
the far right of the selected
lockout, the Expire Now
button appears. Click the
Expire Now button to end
the lockout and allow the workstation to resume.
28
LS Web Filter 101: Web Filter Reports
LS Web Filter 101
TRECA
Notes
29
LS Web Filter 101: Notes
LS Web Filter 101
TRECA
Notes
30
LS Web Filter 101: Notes
Table of Contents: LS Web Filter 102
34/ Authentication
36/ Name Resolution
37/ Assignments
39/ Assignment Lists
40/ Overrides
42/ Advanced Rule Sets
46/ Bandwidth Management
48/ Custom Access Page
Introduction
The purpose of this document is to build upon previous
work with IP-based policies from th101 training. We
will introduce advanced options that allow the Web
Filter to resolve names and allow the Administrator to
apply policies by user, group, and OUs. Once we have
name resolution in hand, we will tackle features such
as overrides, advanced rules sets, and web zones. We
will finish up with bandwidth management and custom
access pages.
LS Web Filter 102
TRECA
Authentication
LAB #01: Web Filter Warm-up
Authentication
Authentication is the Web Filter’s process for asking a
user for credentials before allowing the user to proceed.
By default, the Web Filter is set to Never authenticate.
The most common reasons for asking for credentials are
•
•
Overrides: To verify a user attempting to Override
the web filter.
Name Resolution: To identify a user who is currently
unknown to the Web Filter.
Access
Require users to authenticate before web browsing:
•
•
•
Never: Default. The Web Filter does not access for credentials for normal web activity.
Always: The Web Filter asks for credentials when a user first opens a browser and continues to request credentials
whenever the user’s authentication timer expires
Only when their identity is unknown: The Web Filter requests credentials whenever it does not have name
information associated with an IP address that is attempting to access the Web.
Authentication expiration: The Authentication Expiration is a countdown timer that tracks the amount of time a user has
been authenticated. When the countdown timer reaches zero, the Web filter will ask the user to re-authenticate before
proceeding. You can configure the timeout setting from five minutes up to twelve hours. Use your mouse to slide the
control to the appropriate time for your network.
34
LS Web Filter 102: Authentication
LS Web Filter 102
TRECA
Authentication
Exemptions
Exemptions are portions of your network where you do not want authentication to occur. Examples of where you might
exclude authentication is the office where administrative staff work or an elementary school where common accounts
are used.
Add Exemption: Click this button to start a wizard
where you can specify what parts of your network
do not need to authenticate.
IP Range/Mask: Enter the IP address range. Valid
entries are:
IP address with subnet mask:
192.168.1.1/255.255.255.0
IP Addresses separated by a dash: 192.168.1-1 –
192.168.1.254
IP Address and CIDR notation: 192.168.1.1/24
Comment: Enter the name of the room, building or
school you wish to exempt.
LAB #02: Understanding Authentication
35
LS Web Filter 102: Authentication
LS Web Filter 102
TRECA
Name Resolution
Name resolution is the passive act of finding out who is logged onto a computer and generating traffic. The way to do
this is with a lightweight client called the User Agent (UA) that you install that actively sends login/logoff events and
responds to requests from your Web Filter requesting user information.
How do you tell if you have good name resolution?
Check the Identification History report. Review the Action column to determine the method:
•
•
•
Heartbeat: The workstation’s User Agent is proactively sending user information to the Web Filter.
Interrogation: The Web Filter did not find a UA and used other methods to determine user information from the
workstation.
Login/Logout: The User Agent detected the event and reported it to the Web Filter.
36
LS Web Filter 102: Name Resolution
LS Web Filter 102
TRECA
Assignments
Although we covered Assignments in Web Filter 101, we will now introduce user-based assignments like User Name,
Group and OU.
Assignments/Manage Assignments
The Assignments page is where you view and define policy assignments. As you create assignees and policy assignments,
the Web Filter will populate a list of your work here.
Assignments Query (magnifying glass icon): Click this icon to do a search on an assignment and its corresponding rule
set. We’ll discuss how to use this tool after we’ve created a few assignments.
New Assignment: Click this button to open a utility to define new assignees and apply rule sets to them.
Tier Policy: The Tier Policy is the failsafe rule set the Web Filter will assign if a user matches no other assignments.
37
LS Web Filter 102: Assignments
LS Web Filter 102
TRECA
Assignments
New Assignment
The New Assignee utility is what you use to add
users, groups, IPs, etc. so that you can later apply
rule sets to them. The utility gives you the choice
of manually adding assignments or browsing your
directory server to find them. By default, the utility
starts in the Browse mode.
Manually Add Assignee: Select this link if you want
to manually enter the assignee’s information or
want to add a IP-based assignments.
Authentication Source: Use this pulldown to select
which authentication source to browse for the
assignee.
Assignee Type: Use this pulldown to select the
type of assignee you want to add. The utility will
display all the valid types available for the source
you selected above. Among the valid possibilities
are: Computer Name, Computer OU, User Group,
User Name, User OU.
Query (magnifying glass icon): Enter at least three
characters of the assignee you’re looking for. Your
browser may display previous results from its cache, however, you’ll still need to click the Search button to start the
query.
Search: Click this button to begin the search.
Results: The Web Filter will display the results in the box below your query. Select your assignee from the list.
Description: Type a short description for the assignee.
Web Filter Rules: Use this pulldown to apply a Rule Set to the assignee.
38
LS Web Filter 102: Assignments
LS Web Filter 102
TRECA
Assignment List
Once you have created Assignments, the Web Filter populates this list with Assignees. The Web Filter evaluates policies
from top to bottom with the “fail-safe” Root Tier policy catching anything that doesn’t match assignments above. You can
modify and delete aspects of each Assignment from this list.
Assignee: Click the Assignee link to modify its description.
Rule Set: Use the pulldown to change the Assignee’s Rule Set.
(X) Delete: Click the (X) icon to delete the Assignment. The Web Filter will ask you to verify your action.
LAB #03: Assigning a User Policy
LAB #04: Installing the User Agent
39
LS Web Filter 102: Assignment List
LS Web Filter 102
TRECA
Overrides
Rule Sets
We covered most of the Rule Set details in Web Fitering 101. We’ll now get into Overrides within rule sets.
The Override feature is built into the Access Page that allows a user to get to content normally blocked by their rule set
for a time period that you configure. An example of when an override may be suitable is the need to grant a teacher
access to a site such as Facebook. Facebook is normally categorized in the forums.social-networking category and
blocked. However, if you configured forums.social-networking to allow overrides in the teacher’s rule set, the teacher
could reach Facebook after acknowledging an override prompt in the Access page. You can safeguard the feature by
requiring end-user authentication to ensure overrides are only done by the intended user.
To enable overrides, you must:
•
•
Configure settings within the Access Page.
Define which categories can be overridden within a user’s rule set.
Access Page
The Access Page includes the logic to handle Overrides.
Override duration: Use the slider bar to configure how long a user can gain access beyond his normal Web Filter settings
during an override. Once the timer has expired, the user’s normal settings return.
Require authentication for an override: When enabled, the Web Filter will present an Override authentication prompt
when the user attempts to reach content that is normally blocked but designated as Override-enabled. If the user passes
the authentication check, he will gain access to the content requested for the amount of time designated by the Override
duration. Once the timer has expired, the user’s normal settings return, and he will need to re-authenticate to Override.
40
LS Web Filter 102: Overrides
LS Web Filter 102
TRECA
Overrides
Categories
Overrides: If the category is blocked and you enable this option, the Web Filter will present the user with an Override
option to access it.
LAB #05: Managing Overrides
41
LS Web Filter 102: Overrides
LS Web Filter 102
TRECA
Advanced Rule Sets
Advanced Rule Sets are policies that the Web Filter enforces on a time schedule. By default, the Web Filter enforces
assignments so they are always on with no regard to time or day. Advanced Rule Sets offer the flexibility to customize
stricter or more relaxed filtering based on time or day. For instance, you may want to allow Teachers to gain access to
personal web-based mail during lunch, and social networking after school. With a standard policy this customization
would be impossible as the ability to reach this content would be either on all the time, or off all the time. With an
Advanced Rule Set you can apply multiple rule sets at different times of the day and different days of the week.
New Advanced Rule Set: Select this button to create an advanced rule set.
Advance Rule Set Name: Click the name of the rule set to review and modify it.
Contains Rules: Displays the rule sets associated with the advanced rule set.
New Advanced Rule Set
The first step in creating an advanced rule set is naming and describing it.
Name: Enter a self-documenting name for the rule set.
Description: Enter a description for the rule set. Adding some reason
keywords and date will help you document your work.
42
LS Web Filter 102: Advanced Rule Sets
LS Web Filter 102
TRECA
Advanced Rule Sets
Advanced Rule Set Scheduler
The Advanced Rule Set Scheduler offers days of the week and times to customize when your rule set should take effect.
As you add rules, the scheduler will place them on the graph and display them as a list for your review. Note: You must
schedule rule sets to account for all times and days as any unaccounted time will be unfiltered.
Edit Name & Description: Click this link to edit the name and description of the rule set.
Add New Rule: Click this button to add a rule set.
Add New Rule
The process for adding rules is straightforward.
Select a rule from the pulldown, enter a short
description, specify the days and times you want
the rule to be in effect, and Save.
Note: You cannot overlap rule set times.
Select rule: Use the pulldown to select a rule set.
Short desc: Enter a short description for the rule.
Select Days: Select specific days for the rule set or
use one of the shortcut links.
Select Time: Select All Day or configure a specified
beginning and ending time range.
43
LS Web Filter 102: Advanced Rule Sets
LS Web Filter 102
TRECA
Advanced Rule Sets
Reviewing the Scheduler
This is what an Advanced Rule Set looks like when completed. The Web Filter color codes each rule set and the time
it’s scheduled. This example above allows access to webmail and social networking sites during lunch, after school and
on weekends while providing normal filtering at all other times. The Web Filter displays a list of the rule sets below the
graph where you can review and manage them.
44
LS Web Filter 102: Advanced Rule Sets
LS Web Filter 102
TRECA
Advanced Rule Sets
Modifying an Advanced Rule Set
The Web Filter displays the corresponding rule sets from the graph in this color-coded list. It displays the details of the
rule set including its schedule and contains links to modify or delete each rule set. To change the time or day of a rule
set, you must delete and re-add it.
Rule name: Click the link to modify the selected rule set.
(X) Delete: Click this link to delete the selected rule set.
LAB #06: Applying Advanced Rule sets
45
LS Web Filter 102: Advanced Rule Sets
LS Web Filter 102
TRECA
Bandwidth Management
The Web Filter controls bandwidth by monitoring throughput against these settings. As throughput meets the configured
threshold, the Web Filter denies new web sessions from connecting and displays a bandwidth alert via an access page. If
you configure any category exclusions, the Web Filter will continue to allow new web sessions within those categories.
Enable Bandwidth Management: Click this button to toggle Bandwidth Management on or off.
Set Threshold: Use the slider bar to set the percentage of bandwidth threshold. When bandwidth meets this limit, the
Web Filter starts managing sessions.
Select Exclusions: Use this section to define which categories to exclude from Bandwidth Management.
Add category: Click this button to start the category selection wizard.
46
LS Web Filter 102: Bandwidth Management
LS Web Filter 102
TRECA
Bandwidth Management
Add an excluded category
Select Category: Use this pulldown to select a
category to exclude from Bandwidth Management.
All categories are eligible.
Manage Exclusions
Once you’ve selected categories, they appear in this list. To remove them, click the delete icon. The Web Filter will ask
you to confirm your action.
LAB #7: Understanding Bandwidth Management
47
LS Web Filter 102: Bandwidth Management
LS Web Filter 102
TRECA
Custom Access Pages
A Custom Access Page is one you create to replace the standard Lightspeed block page. The Custom Access Page Utility
allows you to create the page using your own text and graphics, then apply it to specific rule sets.
New Page: Click this button to start the New Page utility and create the custom page.
Page Name: Click this link to modify the selected page.
Assigned To: Displays to which rule set you’ve applied the page.
New Page/Edit Custom Page Title/Description
The utility for creating a new page or modifying an
existing one use the same logic.
Name: Enter a descriptive name of your custom page.
Description: Enter a short description of the page.
48
LS Web Filter 102: Custom Access Pages
LS Web Filter 102
TRECA
Custom Access Pages
Customizing Your Access Page
Although you’ve created the beginnings of a custom access page, you must complete this next section with at least the
School Name and a Custom Banner image before you can save a valid Custom Access Page.
Edit Name & Description: Click this link to change the name and description of your page.
School Name: Enter the name of your school, district or company.
Custom Banner/Choose File: This is where you specify a graphic for the page. Click the button to select a graphic. Note
the graphic can only be 660 x 120 pixels.
49
LS Web Filter 102: Custom Access Pages
LS Web Filter 102
TRECA
Custom Access Pages
Body Text/Footer
Body Text: Enter and format the text you want to display in the main section of the page.
Footer Text: Enter and format the text you want to display on the bottom of the page.
Footer Graphic/Choose File: This is where you specify a graphic for the footer. Click the button to select a graphic. Note
the graphic can only be 50x50 pixels.
Save: Click this to save your changes.
Save and View: Click this button to save your changes and review your work. The Web Filter will open your page along
with the additional page logic for your review.
50
LS Web Filter 102: Custom Access Pages
LS Web Filter 102
TRECA
Custom Access Pages
Applying a Custom Access Page
As you create custom access pages, they appear within rule sets in the Access Page section
Enable custom access page: Check this box this if you want this rule set to use a custom access page.
Custom Access Page Pulldown: Use this pulldown to select the custom access page to display.
Note: If you do not have any custom access pages defined, this section does not appear in the rule list.
LAB #8: Understanding Access Pages
51
LS Web Filter 102: Custom Access Pages
LS Web Filter 102
TRECA
Training Resources
Wiki
Training Video Tutorials
Training Portal
Tips & Tricks Newsletter Archives
Take Off With Lightspeed Video Archives
Lightspeed Admin ListServ
Lightspeed Technical Support
52
LS Web Filter 102: Training Resources
LS Web Filter 102
TRECA
Notes
53
LS Web Filter 102: Notes