1
USERS MANUAL U.S.A. EDITION
WHISPER 3,5
-3600 RPMMarine diesel generating set 120V / 60 Hz
Digital Diesel Control
Art.no. 50200307
MASTERVOLT
Snijdersbergweg 93
1105 AN Amsterdam
The Netherlands
Tel.: +31-20-3422100
Fax: +31-20-6971006
www.mastervolt.com
V1. April 2004
This manual applies to the Mastervolt Whisper 3,5 marine generating set
controlled by Digital Diesel Control. First launched in April 2004. For
earlier models efer to other manuals available on our website;
www.mastervolt.com
CONTENTS:
1
INTRODUCTION
. . . . . . . . . . . . . . . . . . . . . . . . . . . . . . . . . . . . . . . . . . . . . . . . . . . . . . . . . . . . . . . . . . . .4
1.1
General
. . . . . . . . . . . . . . . . . . . . . . . . . . . . . . . . . . . . . . . . . . . . . . . . . . . . . . . . . . . . . . . . . . . .4
1.2
Service and maintenance . . . . . . . . . . . . . . . . . . . . . . . . . . . . . . . . . . . . . . . . . . . . . . . . . . . . . . . . . . . . . . . .4
1.3
Guarantee
. . . . . . . . . . . . . . . . . . . . . . . . . . . . . . . . . . . . . . . . . . . . . . . . . . . . . . . . . . . . . . . . . . . .4
1.4
Liability
. . . . . . . . . . . . . . . . . . . . . . . . . . . . . . . . . . . . . . . . . . . . . . . . . . . . . . . . . . . . . . . . . . . .5
1.5
Identification
1.5.1
2
INFORMATION
2.1
. . . . . . . . . . . . . . . . . . . . . . . . . . . . . . . . . . . . . . . . . . . . . . . . . . . . . . . . . . . . . . . . . . . .6
Safety
. . . . . . . . . . . . . . . . . . . . . . . . . . . . . . . . . . . . . . . . . . . . . . . . . . . . . . . . . . . . . . . . . . . .6
2.1.
General
. . . . . . . . . . . . . . . . . . . . . . . . . . . . . . . . . . . . . . . . . . . . . . . . . . . . . . . . . . . . . . . . . . . .6
2.1.2
Electrical safety . . . . . . . . . . . . . . . . . . . . . . . . . . . . . . . . . . . . . . . . . . . . . . . . . . . . . . . . . . . . . . . .6
2.1.3
Earth insulation failures . . . . . . . . . . . . . . . . . . . . . . . . . . . . . . . . . . . . . . . . . . . . . . . . . . . . . . . . . .6
2.1.4
Installation . . . . . . . . . . . . . . . . . . . . . . . . . . . . . . . . . . . . . . . . . . . . . . . . . . . . . . . . . . . . . . . . . . . .7
2.1.5
Operation
2.1.6
Fire and explosion . . . . . . . . . . . . . . . . . . . . . . . . . . . . . . . . . . . . . . . . . . . . . . . . . . . . . . . . . . . . . .7
2.1.7
Chemicals . . . . . . . . . . . . . . . . . . . . . . . . . . . . . . . . . . . . . . . . . . . . . . . . . . . . . . . . . . . . . . . . . . . .7
. . . . . . . . . . . . . . . . . . . . . . . . . . . . . . . . . . . . . . . . . . . . . . . . . . . . . . . . . . . . . . . . . . . .7
2.2
Transport lifting and storage . . . . . . . . . . . . . . . . . . . . . . . . . . . . . . . . . . . . . . . . . . . . . . . . . . . . . . . . . . . . . .8
2.3
The Whisper 3,5 generating set . . . . . . . . . . . . . . . . . . . . . . . . . . . . . . . . . . . . . . . . . . . . . . . . . . . . . . . . . . .8
2.4
2.5
2
. . . . . . . . . . . . . . . . . . . . . . . . . . . . . . . . . . . . . . . . . . . . . . . . . . . . . . . . . . . . . . . . . . . .5
Name plate . . . . . . . . . . . . . . . . . . . . . . . . . . . . . . . . . . . . . . . . . . . . . . . . . . . . . . . . . . . . . . . . . . . .5
2.3.1
Features
2.3.2
Remote control . . . . . . . . . . . . . . . . . . . . . . . . . . . . . . . . . . . . . . . . . . . . . . . . . . . . . . . . . . . . . . . . .8
. . . . . . . . . . . . . . . . . . . . . . . . . . . . . . . . . . . . . . . . . . . . . . . . . . . . . . . . . . . . . . . . . . . .8
2.3.3
Documentation . . . . . . . . . . . . . . . . . . . . . . . . . . . . . . . . . . . . . . . . . . . . . . . . . . . . . . . . . . . . . . . . .8
2.3.4
Accessorie included in the standard delivery . . . . . . . . . . . . . . . . . . . . . . . . . . . . . . . . . . . . . . . . . .8
Components
. . . . . . . . . . . . . . . . . . . . . . . . . . . . . . . . . . . . . . . . . . . . . . . . . . . . . . . . . . . . . . . . . . . .9
2.4.1
Main components . . . . . . . . . . . . . . . . . . . . . . . . . . . . . . . . . . . . . . . . . . . . . . . . . . . . . . . . . . . . . . .9
2.4.2
Generator control panel . . . . . . . . . . . . . . . . . . . . . . . . . . . . . . . . . . . . . . . . . . . . . . . . . . . . . . . . .10
2.4.3
Remote control panel . . . . . . . . . . . . . . . . . . . . . . . . . . . . . . . . . . . . . . . . . . . . . . . . . . . . . . . . . . .10
Technical information . . . . . . . . . . . . . . . . . . . . . . . . . . . . . . . . . . . . . . . . . . . . . . . . . . . . . . . . . . . . . . . . . . .10
2.5.1
Alternator
. . . . . . . . . . . . . . . . . . . . . . . . . . . . . . . . . . . . . . . . . . . . . . . . . . . . . . . . . . . . . . . . . . .10
2.5.2
Engine
. . . . . . . . . . . . . . . . . . . . . . . . . . . . . . . . . . . . . . . . . . . . . . . . . . . . . . . . . . . . . . . . . . .10
2.5.3
DC electrical control system . . . . . . . . . . . . . . . . . . . . . . . . . . . . . . . . . . . . . . . . . . . . . . . . . . . . .10
2.5.4
Battery charger . . . . . . . . . . . . . . . . . . . . . . . . . . . . . . . . . . . . . . . . . . . . . . . . . . . . . . . . . . . . . . . .11
2.5.5
Alarms and shut down . . . . . . . . . . . . . . . . . . . . . . . . . . . . . . . . . . . . . . . . . . . . . . . . . . . . . . . . . .11
2.5.6
Control
2.5.7
Remote control . . . . . . . . . . . . . . . . . . . . . . . . . . . . . . . . . . . . . . . . . . . . . . . . . . . . . . . . . . . . . . . .11
2.5.8
Hour counter . . . . . . . . . . . . . . . . . . . . . . . . . . . . . . . . . . . . . . . . . . . . . . . . . . . . . . . . . . . . . . . . .11
2.5.9
Load indicator . . . . . . . . . . . . . . . . . . . . . . . . . . . . . . . . . . . . . . . . . . . . . . . . . . . . . . . . . . . . . . . . .11
. . . . . . . . . . . . . . . . . . . . . . . . . . . . . . . . . . . . . . . . . . . . . . . . . . . . . . . . . . . . . . . . . . .11
2.5.10
Fuel specification . . . . . . . . . . . . . . . . . . . . . . . . . . . . . . . . . . . . . . . . . . . . . . . . . . . . . . . . . . . . . .11
2.5.11
Oil specification, oil viscosity, oil capacity,, oil pressure . . . . . . . . . . . . . . . . . . . . . . . . . . . . . . . . .11
April 2004 / WHISPER 3,5 / USA
3
4
Wiring, codes and colours . . . . . . . . . . . . . . . . . . . . . . . . . . . . . . . . . . . . . . . . . . . . . . . . . . . . . . .13
Lay out control PCB . . . . . . . . . . . . . . . . . . . . . . . . . . . . . . . . . . . . . . . . . . . . . . . . . . . . . . . . . . . .14
2.5.15
Electrical diagram 120V AC . . . . . . . . . . . . . . . . . . . . . . . . . . . . . . . . . . . . . . . . . . . . . . . . . . . . . .15
OPERATION
. . . . . . . . . . . . . . . . . . . . . . . . . . . . . . . . . . . . . . . . . . . . . . . . . . . . . . . . . . . . . . . . . . .16
3.1
General
. . . . . . . . . . . . . . . . . . . . . . . . . . . . . . . . . . . . . . . . . . . . . . . . . . . . . . . . . . . . . . . . . . .16
3.2
Operating instructions . . . . . . . . . . . . . . . . . . . . . . . . . . . . . . . . . . . . . . . . . . . . . . . . . . . . . . . . . . . . . . . . . .16
3.2.1
Summarised operating instructions . . . . . . . . . . . . . . . . . . . . . . . . . . . . . . . . . . . . . . . . . . . . . . . . . . . . . . . .16
3.2.2
Extended operating instructions . . . . . . . . . . . . . . . . . . . . . . . . . . . . . . . . . . . . . . . . . . . . . . . . . . . . . . . . . .16
MAINTENANCE AND CARE . . . . . . . . . . . . . . . . . . . . . . . . . . . . . . . . . . . . . . . . . . . . . . . . . . . . . . . . . . . . . . . . . .19
4.1
Alternator
. . . . . . . . . . . . . . . . . . . . . . . . . . . . . . . . . . . . . . . . . . . . . . . . . . . . . . . . . . . . . . . . . . .19
4.2
Engine
. . . . . . . . . . . . . . . . . . . . . . . . . . . . . . . . . . . . . . . . . . . . . . . . . . . . . . . . . . . . . . . . . . .19
4.2.1
General instructions . . . . . . . . . . . . . . . . . . . . . . . . . . . . . . . . . . . . . . . . . . . . . . . . . . . . . . . . . . . .19
4.2.2
Bleeding fuel lines . . . . . . . . . . . . . . . . . . . . . . . . . . . . . . . . . . . . . . . . . . . . . . . . . . . . . . . . . . . . .19
4.2.3
Valve clearance . . . . . . . . . . . . . . . . . . . . . . . . . . . . . . . . . . . . . . . . . . . . . . . . . . . . . . . . . . . . . . .19
4.2.4
Replacing fuel filter . . . . . . . . . . . . . . . . . . . . . . . . . . . . . . . . . . . . . . . . . . . . . . . . . . . . . . . . . . . .20
4.2.5
Cleaning oil strainer . . . . . . . . . . . . . . . . . . . . . . . . . . . . . . . . . . . . . . . . . . . . . . . . . . . . . . . . . . . .20
Regular maintenance . . . . . . . . . . . . . . . . . . . . . . . . . . . . . . . . . . . . . . . . . . . . . . . . . . . . . . . . . . . . . . . . . .20
4.3.1
Maintenance schedule . . . . . . . . . . . . . . . . . . . . . . . . . . . . . . . . . . . . . . . . . . . . . . . . . . . . . . . . . .21
4.3.2
Putting out of service . . . . . . . . . . . . . . . . . . . . . . . . . . . . . . . . . . . . . . . . . . . . . . . . . . . . . . . . . . .21
TROUBLE SHOOTING
5.1
5.2
5.3
5.4
6
Technical data . . . . . . . . . . . . . . . . . . . . . . . . . . . . . . . . . . . . . . . . . . . . . . . . . . . . . . . . . . . . . . . .12
2.5.13
2.5.14
4.3
5
2.5.12
. . . . . . . . . . . . . . . . . . . . . . . . . . . . . . . . . . . . . . . . . . . . . . . . . . . . . . . . . . . . . . . . . . .22
Alternator malfucntions / AC trouble . . . . . . . . . . . . . . . . . . . . . . . . . . . . . . . . . . . . . . . . . . . . . . . . . . . . . . .22
5.1.1
General
. . . . . . . . . . . . . . . . . . . . . . . . . . . . . . . . . . . . . . . . . . . . . . . . . . . . . . . . . . . . . . . . . . .22
5.1.2
Trouble shooting check list alternator . . . . . . . . . . . . . . . . . . . . . . . . . . . . . . . . . . . . . . . . . . . . . .22
Engine faults
. . . . . . . . . . . . . . . . . . . . . . . . . . . . . . . . . . . . . . . . . . . . . . . . . . . . . . . . . . . . . . . . . . .23
5.2.1
General
. . . . . . . . . . . . . . . . . . . . . . . . . . . . . . . . . . . . . . . . . . . . . . . . . . . . . . . . . . . . . . . . . . .23
5.2.2
Trouble shooting check list engine . . . . . . . . . . . . . . . . . . . . . . . . . . . . . . . . . . . . . . . . . . . . . . . . .23
5.2.3
Warnings
5.2.4
Service address . . . . . . . . . . . . . . . . . . . . . . . . . . . . . . . . . . . . . . . . . . . . . . . . . . . . . . . . . . . . . . .26
. . . . . . . . . . . . . . . . . . . . . . . . . . . . . . . . . . . . . . . . . . . . . . . . . . . . . . . . . . . . . . . . . . .26
Special procedures alternator . . . . . . . . . . . . . . . . . . . . . . . . . . . . . . . . . . . . . . . . . . . . . . . . . . . . . . . . . . . .26
5.3.1
Residual voltage check / excitation procedure . . . . . . . . . . . . . . . . . . . . . . . . . . . . . . . . . . . . . . . .26
5.3.2
Testing rotary diodes . . . . . . . . . . . . . . . . . . . . . . . . . . . . . . . . . . . . . . . . . . . . . . . . . . . . . . . . . . .26
5.3.3
Windings resistance values . . . . . . . . . . . . . . . . . . . . . . . . . . . . . . . . . . . . . . . . . . . . . . . . . . . . . .27
5.3.4
Meggering . . . . . . . . . . . . . . . . . . . . . . . . . . . . . . . . . . . . . . . . . . . . . . . . . . . . . . . . . . . . . . . . . . .27
Special procedures engine . . . . . . . . . . . . . . . . . . . . . . . . . . . . . . . . . . . . . . . . . . . . . . . . . . . . . . . . . . . . . .27
5.4.1
Readjusting RPM . . . . . . . . . . . . . . . . . . . . . . . . . . . . . . . . . . . . . . . . . . . . . . . . . . . . . . . . . . . . . .27
5.4.2
Tightening torques . . . . . . . . . . . . . . . . . . . . . . . . . . . . . . . . . . . . . . . . . . . . . . . . . . . . . . . . . . . . .27
5.4.3
Measuring exhaust backpressure . . . . . . . . . . . . . . . . . . . . . . . . . . . . . . . . . . . . . . . . . . . . . . . . .27
5.4.4
Disassembly instructions . . . . . . . . . . . . . . . . . . . . . . . . . . . . . . . . . . . . . . . . . . . . . . . . . . . . . . . .28
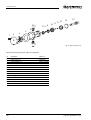
SPARE PARTS LIST
. . . . . . . . . . . . . . . . . . . . . . . . . . . . . . . . . . . . . . . . . . . . . . . . . . . . . . . . . . . . . . . . . . .29
Maintenance log . . . . . . . . . . . . . . . . . . . . . . . . . . . . . . . . . . . . . . . . . . . . . . . . . . . . . . . . . . . . . . .31
USA / WHISPER 3,5 / April 2004
3
INTRODUCTION
1 INTRODUCTION
1.1
GENERAL
The functioning of this generating set is subject to gua-
The Whisper 3,5 Marine Diesel Generating set is manu-
rantee. The period and conditions of this guarantee are
factured and marketed by Mastervolt.
laid down in the general conditions of delivery as regis-
It is important to read this manual before installing and
tered with the Chamber of Commerce and Industries in
operating the generating set. Both safety and durability
Amsterdam number 33279951 and are available on
rely very much on the correct identification, installation
request.
and a good understanding of ratings, features, design,
conditions. these are available at MASTERVOLT USA.
maintenance and operation procedures.
Some aspects of the warranty scheme are given here in
The information, specifications, illustrations and state-
more detail:
ments contained within this publication are given with our
Guarantee period 1000 hours or 24 months whichever
best intentions and are believed to be correct at the time
occurs first. Warrantee does not cover failures that are
of going to press.
caused by misuse or a faulty installation.
For
USA
deliveries
there
are
aditional
Our policy is one of continued development and we reserve the
right to amend any technical information without prior notice.
Example 1. Faulty installation:
Whilst every effort is made to ensure the accuracy of the
Seawater entering the engine is the most common cause
particulars contained within this publication neither the
of damage to combustion engines in boats. (Both to
manufacturer, distributor, or dealer in any circumstances
propulsion and generator engines.) The entry of water
shall be held liable for any inaccuracy or the consequen-
must be avoided under all conditions. Be aware that the
ces thereof.
conditions in blue water sailing can be extreme. Refer to
the installation manual for instructions but remember
WARNING:
these are for guidance only as many factors influence the
A warning symbol draws attention to spe-
installation of a generator. The ultimate responsibility will
cial warnings, instructions or procedures
always be with the owner to ensure a safe and compliant
which, if not strictly observed, may result in
installation.
damage or destruction of equipment, severe personal injury or loss of life.
DAMAGE CAUSED BY THE INGRESS
OF WATER IS NEVER COVERED BY
DANGER:
WARRANTEE.
This danger symbol refers to electric danger and draws attention to special war-
Example 2: Misuse:
nings, instructions or procedures which, if
Long term running with no load or too little load can
not strictly observed, may result in electri-
cause the exhaust to get choked with soot or carbon.
cal shock which will result in severe per-
Cleaning the exhaust is not covered by warrantee.
sonal injury or loss of life.
Example 3: Neglect
1.2
SERVICE AND MAINTENANCE
Sometimes the seal of the raw water pump starts leaking.
Regular service and maintenance should be carried out
Mostly this begins with a little drip and slowly gets worse.
according to the directions in this manual. For service
Regular visual inspection of the generator is necessary to
and maintenance one can appeal to the manufacturer or
prevent damage to occur from a leaking water pump.
the dealers.
When one find serious damage after weeks of neglect
warrantee claims will not be honoured.
1.3
GUARANTEE
Mastervolt guarantees that this generating set has been
Example 4: Neglect
built according to good workmanship, according to the
Whisper generators have an option for an auto start/stop
specifications in this manual and according to European
mode or interval mode.
Community safety regulations.
Mastervolt cannot be held responsible for damage
During production and prior to delivery, all of our genera-
caused by the unattended running generator.
ting sets are tested and inspected.
4
April 2004 / WHISPER 3,5 / USA
INTRODUCTION
Warranty means that faulty parts are repaired or replaced
lity for damage due to use of the generator, possible errors
free of charge. If necessary the whole generator unit will
in the manuals and the results thereof.
be exchanged. Labour necessary to complete repairs on
board a vessel executed by an authorised service
Automatic start/stop
engineer is covered, but is limited to a reasonable
Mastervolt cannot be held responsible for damage
number of hours and reasonable rates in relation to the
caused by the unattended running generator using
actual repair work that has to be done.
the auto-start/stop mode or interval mode.
Travel expenses and travel hours are not covered. Also
not covered is the labour required to take a generator out
1.5
of a boat or for reinstallation. There is no cover for labour
1.5.1 General
needed to get access to the generator, for example to
Before using this generating set it is very important to
remove
identify the set correctly. To communicate for service or
equipment
or
bulkheads
etc.
Refer
to
IDENTIFICATION
MASTERVOLT USA.
ordering parts it is also essential to correctly identify the
Goods to be delivered under warrantee will be invoiced.
generating set. Also for the daily operation of the genera-
Only after the faulty goods are returned will the invoice
ting set it is necessary that the operator knows the cor-
be credited. Payment in advance may be required or
rect specifications.
guaranteed by credit card. If after the faulty goods are
returned, it is indicated that the failure was not covered
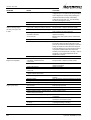
1.5.2 Nameplate
by warranty a credit will not be issued. For example if a
All required identification data are on the nameplate.
Printed Circuit Board is returned with clear damage
caused by seawater, warranty will be refused.
1
The identity of the generating set is given by the SE-
Freight costs to deliver spares by normal mail or carriers
RIAL NUMBER.
is covered under warranty. Special services like express
When this number is available the manufacturer can
mail, overnight delivery etc. are not covered. Taxes and
trace the specifications of the generating set. On the
duties are not covered. For shipments to remote off
nameplate are also some basic features of the set:
shore areas any additional costs incurred over normal
carriage will be invoiced to the customer.
The cost for returning faulty goods is not covered under
warranty.
If any problem arise which could be subject of guarantee,
procedures should be followed as described in the guarantee certificate, unauthorised repairs could lead to further damage and violate the guarantee conditions.
Should work take place, which is not in ac-
Model
Whisper 3,5
Article number
050900500
Serial number
cordance with the guidelines, instructions
and specifications contained in this user’s
Max. power
3.3 KVA /
3.3 kW cos phi = 1
Voltage
120V
Frequency
60 Hz
Currrent
27,5A
Phase
Single phase
Mastervolt does not accept responsibility for damage,
Dimensions
LxWxH
19,89x15,94x19,94 inches
505x400x500 mm
injuries or casualties which are the result of operation of
Weight
214 lbs. 97 kg
manual and the supplementary installation
manual, then damage may occur and the
generating set may not fulfil its specifications. In all these cases the guarantee may
become invalid.
1.4
LIABILITY
the generating set in specific conditions which brings
dangers which could not be foreseen, or could be avoided
by additional measures. Mastervolt does not accept liabi-
USA / WHISPER 3,5 / April 2004
Fig. 1: Nameplate.
5
INFORMATION
2
POWER
6
WEIGHT shows the net dry weight (approximately) .
The nameplate gives the nominal maximum load in
This is without fuel, oil, packing and external instal-
kVA = kW calculated with power factor one. When
lation equipment.
calculating a load one should always take into
account the power factor or Cos phi of this load. The
3
4
7
The CE symbol shows that the generating set is build
power should never exceed the nominal Power in kW
according to European Community safety regulations.
as shown on the nameplate. Power is rated at an
This includes the regulations regarding the safety of
ambient temperature of 104°F (40°C) and a seawater
pleasure craft, machinery, electric safety and electric
temperature of 77°F (25°C). For higher temperatures
magnetic compatibility (EMC) and other relevant
the generating set has to be derated.
directives.
VOLTAGE shows the nominal voltage.
Safety also relies on the installation, application and cir-
This voltage should be within the specified tolerance
cumstances. See also the remarks in this manual under
at the nominal frequency.
SAFETY
FREQUENCY is shown in Hz and is determined by
Before changing a factory setting you are advised to con-
the speed of the engine (RPM). 60 Hz correlates with
sult the manufacturer. When the generating set you have
3600 rpm.
to identify is not new you have to take into account the
possibility that former users changed the settings. Check
5
CURRENT shows the maximum current that is ac-
the settings (voltage, frequency, rpm) when there is any
ceptable at the specified frequency, voltage and po-
doubt.
wer factor.
2
INFORMATION
2.1
SAFETY
•
Do not work on the electrical system if it is still
connected to a current source. Only allow chan-
2.1.1 General
ges in your electrical system to be carried out by
When correctly installed and used in normal circumstan-
qualified electricians.
ces this generating set fulfils EC safety regulations. This
generating set could be part of an installation or could be
•
used in a way that additional regulations of the EC or
Connection and protection must be done in accordance with local standards.
other authorities have to be taken into account.
•
Using the auto-start/stop (interval) mode the
Circumstances could make it also neces-
generator
sary to take additional measures. Be awa-
working on the electrical system, the 3 Amp
re of wet conditions and hazardous envi-
fuse must be removed from the control panel
ronments caused by explosive gasses etc.
and the battery plus cable must be removed
can
start
unexpectedly.
When
from the battery.
2.1.2 Electrical safety
The voltage of 120 Volt generated by this
generating set is dangerous and if instruc-
Warning signs indicate parts which could
tions and procedures are not strictly obser-
be live.
ved may result in electrical shock which
will result in severe personal injury or loss
2.1.3 Earth insulation failures
of life.
According to local regulations and depending on the application it is necessary to take measures for protection
•
6
Check all wiring at least once a year. Defects,
against earth insulation failures. In the U.S.A. version
such as loose connections, burned cables etc.
neutral and ground are connected on the alternator. This
must be repaired immediately.
requires an insulation protection device as commonly
April 2004 / WHISPER 3,5 / USA
INFORMATION
used in the U.S.A. This installation is beyond the
•
Do not change the settings without consulting the
influence of Mastervolt and Mastervolt cannot held
manufacturer. Keep a record of setting changes in
responsible for any consequence as a result of the
this manual.
installation.
In all situations the transfer switches between shore,
2.1.6 Fire and explosion
inverter and generator should switch both neutral and
line. Ofcourse this is the case when using a Mastervolt
Fuels can be flammable. Proper handling
MASTERSWITCH.
limits the risk of fire and explosion.
2.1.4 Installation
•
Avoid refilling the fuel tank while the engine is
Whisper generating sets are not self contained and have
running. When oil or fuel is leaking do not use the
to be properly installed in enclosed areas such as a ma-
generating set.
chine room.
Installation includes measures to be taken
CO
•
to outlet exhaust fumes which contain
carbon
monoxide
and
are
Do not run the engine close to explosives or
gasses.
extremely
dangerous. Carbon Monoxide (CO) is an invisible
•
Hydrogen gas generated by charging batteries is
odorless gas. Inhalation produces headache, nausea or
explosive. Ensure for proper ventilation. Do not
death.
smoke or allow sparks, flames, or other sources
installation
includes
measures
for
proper
ventilation, safe electric connections, safe installation of
of ignition around batteries.
the starting battery, proper fitting of the cooling system
and fuel pipes etc. Refer to the installation manual.
•
Keep a fire extinguisher on hand.
2.1.5 Operation
•
Poor electrical connections or using wiring which
The Whisper 3,5 generating set does not have any
is not suited for the rated currents can cause
external moving parts like fans and V-belts and therefore
overheating and possibly fire.
is very safe.
Never the less take note of the signs on
2.1.7
the generating set which show symbols in
•
a triangle indicating danger.
Chemicals
Fuels, oils, coolants, and battery electrolyte can
be hazardous to personnel if not treated properly.
Do not swallow or have skin contact with these
•
•
The generating set should be operated by authori-
liquids. Do not wear clothing that has been
sed personnel only.
contaminated by fuel or lubricating oil.
Be aware of hot parts and especially parts of the
•
exhaust system.
Gaskets may be manufactured from asbestos.
Particles of this material should not be inhaled as
this may result in fatal diseases.
•
If the generating set is unsafe, fit danger notices
and disconnect the battery positive (+) lead so
•
•
On no account allow any unprotected skin to
that it cannot be started until the condition is cor-
come into contact with the injector spray as the
rected.
fuel may enter the blood stream with fatal results.
Do not attempt to operate the generating set with
•
Engines may be fitted with seals or O-rings
a known unsafe condition. Disconnect the battery
manufactured from "viton" or similar material. When
positive (+) lead prior to attempting any repairs or
exposed to abnormal high temperatures in excess
cleaning inside the enclosure.
of 750°F (400°C) an extremely corrosive acid is
produced which cannot be removed from the skin. If
•
Always consult the manual before carrying out
signs of decomposition are evident, or if in doubt,
maintenance.
always wear disposable heavy duty gloves.
USA / WHISPER 3,5 / April 2004
7
INFORMATION
2.2
TRANSPORT, LIFTING AND STORAGE
2.3.2 Remote control
The full automatic remote control panel including 15 mtr
When lifting the generating set avoid any
cable comes as standard with the Wisper 3,5.
risk of personal injuries, do not stand under the generating set.
2.3.3 Documentation
Included in the delivery is this users manual (number:
•
Use soft slings to avoid damage.
50200307) an installation manual (number: 50200314)
and a users manual for DCC (number: 50200261).
•
Included in the delivery is a lifting eye, only to be
Not included in the standard delivery but available as an
used to take the generator out of the capsule. Do
option are:
not use to lift the set including the capsule and
• Parts manual; number: 50200180
certainly not including the steel foundation plate !
• Workshop manual; number: 50200170
However in this manual there is a list of important parts
•
•
•
After transporting the generating set check for
for maintenance and spare parts as well as a chapter on
damage before installation.
maintenance and problem solving.
Long term storage can have detrimental effects
2.3.4 Accessories included in the standard delivery
on engine and alternator. The engine should be
•
Fuelfilter
put through an engine preservation procedure.
•
Fuel lift pump
(Refer to the maintenance chapter)
•
Lifting eye
•
Special hose connector for measuring exhaust
The alternator windings tend to condense. To mi-
backpressure
nimise condensation, store the generating set in a
(Refer to paragraph 5.4.3)
dry and warm storage area.
•
After removing the generating set from long term
storage perform an insulation check. (Refer to the
alternator maintenance paragraph for procedures)
•
While the battery is stored it should be recharge
every 12 weeks.
2.3
THE WHISPER 3,5
2.3.1 Features
This generating set includes a diesel engine which is
connected by close coupling to an alternator in a sound
attenuated capsule. The set is mounted on a steel base
frame and mounted securely on anti vibration mounting
pads to the capsule base. All cables and hoses are guided through the capsule’s left side. The set is not self
contained and is only operable after proper installation
using additional accessories and installation materials.
Installation accessories are listed in the installation manual and are available through the supplier of the generating set. The full automatic Digital Control is based on
microprocessor technology. Several automatic start/stop
functions can be programmed and monitored. (refer to
Digital Diesel Control users manual)
8
April 2004 / WHISPER 3,5 / USA
INFORMATION
2.4
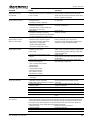
COMPONENTS
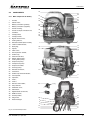
2.4.1 Main components to identify
18
19
27
1
Air inlet;
2
Starter motor;
3
Battery connection (positive);
4
Battery connection (negative);
5
AC 230 V wiring;
6
AC 230 V output connection box;
7
Fuel filter;
34
8
Fuel pipe inlet;
9
Fuel pipe return;
24
28
10
Bypass hose air vent;
11
Cooling water in;
12
Exhaust manifold (water cooled);
25
37
30
29
31
32
36
40
23
6
38
1
1
13
Thermo-switch exhaust;
14
Glow plug;
39
17
15
Injector;
14
16
Valve cover;
15
16
17
Decompression handle;
18
Oil filler cap;
19
Solenoid fuel valve;
20
Electric fuel lift pump;
21
Cooling water pump;
22
Oil pressure pump;
23
Fuel pressure pump
24
Oil pressure switch;
25
Oil sump pump;
26
Exhaust connection;
27
Fuel return;
28
Oil filler cap/ oil level indicator;
29
Control panel;
30
Capacitor;
31
Fuse 1;
32
Fuse 2;
33
Remote control cable;
34
Stop solenoid;
35
Oilstrainer cover;
36
Start button;
37
Digital Diesel Control unit;
38
RPM set screw;
39
Oil temp switch;
40
Plug screw;
41
Heat exchanger.
12
2
13
41
3
4
20
7
21
26
22
3
9
4
35
10
11
33
20
5
8
Fig. 2: Overview Whisper 3500.
USA / WHISPER 3,5 / April 2004
9
INFORMATION
2.5
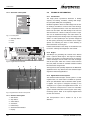
2.4.2 Generator control panel
TECHNICAL INFORMATION
2.5.1 AC alternator
3
The single phase synchronous alternator is directly
coupled, one bearing, brushless, rotating field design,
2
two pole (3600 RPM) and self regulating.
Residual magnetism causes a small voltage over the sta-
1
tor windings and allows a current to flow in the windings,
which is magnified because of the feed back effect between rotor and stator. The field windings in the rotor are
short-circuited over a diode to rectify the current. A capacitor over an additional winding in the stator which is at
Fig.. 3: Control panel.
an angle with the power-winding keeps the voltage stable
1
Start/stop button
within 5 % at the specified rpm and provides voltage fall
2
Fuse;
off with speed, preventing over-excitation at low engine
3
Fuse.
speeds and softening the effect of load switching to
relieve the burden on the engine.
Further technical data on the design of the alternator can
AC-1
be found in drawings and diagrams in this manual.
AC-2
heat start fuel fail
2.5.2 Engine
The Whisper 3,5 generating set is based on the Kubota
pull
Fig.. 4: Digital Diesel Control unit
+
gl
injected. The engine is oil cooled and the oil is cooled by
st
hold
fuel
reg
alt.
gnd
oil
exh
tem
str.
ct-2
ct-2
ct-1
ct-1
OC60 1 cylinder diesel engine. The engine is indirectly
a heat exchanger and raw water. The heat exchanger
and all other parts which are in direct contact with the
raw (sea) water are made of seawater resistant material
6
5
1
2
like naval brass and gunmetal.
The engine has been specially adapted for the Mastervolt
application and is very different from the standard engine
supplied for industrial applications!
2.5.3 Digital Diesel Control system
The standard electrical engine control system is 12 Volt
negative earth, non earth return is available as optional.
Check your identification data to determine which system
is applied. The system is designed according to the
"energise to run" system. The Digital Diesel Control is a
very advanced microprocessor based full automatic
7
4
Fig. 5: Digital Diesel remote control panel.
3
system. Besides automatic start the system offers many
monitoring options. Refer to the separate Digital Diesel
Control users manual.
2.4.3 Remote control panel
10
1
Start button;
The microprocessor unit is located on top of the
2
Stop button;
alternator.
3
Select button;
4
Set button;
5
Failure lamp;
6
Generator load indicator.
7
Display
April 2004 / WHISPER 3,5 / USA
INFORMATION
2.5.4 Battery charger
2.5.10 Fuel specification
There is an extra winding in the alternator generating 6
The engine must only be used with diesel fuel oil which
Amp 12 V. This current is rectified on the control PCB to
conforms to the standards for use in modern diesel en-
charge the battery. Both the current and the voltage are
gines. Fuel free from water and contaminants is of the ut-
regulated.
most importance.
2.5.5 Alarms and shut down
2.5.11 Oil information
In case of malfunctioning this will be indicated by the fai-
1
Specification:
lure light and detail will be shown on the display the
The oil must be suitable for oil changes as specified
engine will be shut down. There are three functions
in the maintenance chapter. The Kubota engine must
guarded: oil pressure, oil temperature and exhaust
be run on heavy duty lubricating oil meeting the requi-
temperature.
rements of API class CC or CD.
Exhaust temperature too high indicates the cooling water
to be blocked.
It is very important to use the correct oil
All alarm switches are closed when no malfunction
specification. Very often local oil suppliers
occurs. A contact is cut in case of an alarm. This means
recommend a higher class, because they
that the generating set will not work when the alarm
assume that a higher class is allowed. This
switches are broken or there is a loose wire. The system
is not the case. One should not follow
therefore is intrinsically safe. The panel will display
these recommendations.
details about the alarm.
Using the wrong specification will cause
high oil consumption.
2.5.6 Control
The generating set can be operated by push buttons on
2
the panel on the alternator or by the remote control. By
pushing the start button the control system is activated
Oil viscosity:
We recommend a multigrade oil 15W40.
3
Oil capacity:
and will start the engine automaticly. Pushing the STOP
Excluding the oil cooler the content of the crankcase
button will stop the engine and the electrical system will
is 1,3 U.S. qts ≈ 1,3 l. Including the oil cooler it is 1,5
be deactivated. Stopping the engine is executed by the
U.S. qts ≈1,5 l.
‘pull’ solenoid, at the same time the fuel valve solenoid
Do not overfill with lubricating oil as this may have a
will shut off.
detrimental effect on engine performance and cause
damage.
2.5.7 Remote control
All wiring connections from the remote control
to the
board are made by plug in connectors.
4
Oil pressure
An intermediate communication cable is in the standard
•
Minimum at idle 49 Kpa (0,5 kgf/cm2-7psi).
supply. If necessary an optional longer 8 wire twisted
•
Normal at 3600 rpm between 147 and 490 Kpa
•
Minimum at 3600 rpm 98 Kpa (1,0 kgf/cm2/
cable can be connected if the standard length does not
suit the required distance. Numerous remote control units
can be put in parallel by using the connectors on the
(1,5 up to 5 kgf/cm2- 21 up to 71 psi).
14 psi).
back of the units. (Refer to installation instructions)
2.5.8 Hour counter
The remote control offers several timer functions and
helps to schedule maintenance.
2.5.9 Load indicator
On the remote control the load will be indicated on the
display and by the LEDbar. The load is measured by a
current transformer on the alternator.
USA / WHISPER 3,5 / April 2004
11
INFORMATION
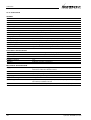
2.5.12 Technical data
GENERAL
Model
WHISPER 3,5
RPM
3600
Alternator
water cooled, synchronous
Engine
Kubota diesel, model OC60 (Japan)
Number of cylinders
1
Displacement
16,84 cubic inches (276 cm3 )
Bore X stroke
2,83 x 2,68 inches (72x68 mm)
Combustion air consumption
15 cfm (0.42 m3/min..) at nominal RPM
Continuous power engine/3600 RPM
DIN627OB 4,6 kW / 3600 RPM
Cooling system
indirect cooling by raw water.
Cooling water pump
pto driven Mastervolt self priming impeller pump, type K
Fuel lift pump engine
electric pump (12 V DC), additional pump available upon request
Starting battery (optional)
55-90 Ah
Fuel consumption
0,18 - 0,37 gph (0.7-1.4 litre/hour), load dependent
Control
Digital Diesel Control including automatic start/stop
ELECTRICAL SPECIFICATIONS
Output voltage
120V 60 Hz alternating current (AC) single phase
Output rating
3.3 KVA = 3.3 kW at powr factor cos phi = 1
Power factor
1
Voltage tolerance
± 5%
Frequency tolerance
± 5%
Alternator
brushless, two pole, synchronous
MECHANICAL SPECIFICATIONS
Supply includes
generating set, built into tugged GRP sound shield with steel base frame,
mounted on rubber anti vibration mounts
Dimensions wxdxh
19,88 x 15,94 x 19,69 inches(505x400x500 mm)
Colour
top white, bottom green
Weight (dry)
214 lbs ( 97 kg) including sound shield
Max. installation angle
25 degrees
Standard supplies
Digital Diesel remote panel 45 ft (15 m) cable, fuel liftpump, fuel filter, lifting eye,
user manual, installation manual
Optional
installation kits, mobile (vehicle) version, non earth return, spare part kits
12
April 2004 / WHISPER 3,5 / USA
INFORMATION
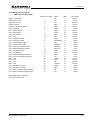
2.5.13 Wiring codes and colours
AWG (American Wire Gauge)
Cable code number
battery > starter motor
colour
AWG
cross section
red
4
16 mm2
starter motor > DCC
1
red
10
6 mm2
starter motor > LCP
13
red
14
2,5 mm2
battery > ground
ground > LCP ground (GND)
2
black
4
16 mm2
black
14
2,5 mm2
DDC > glow plug
3
brown
4
4 mm2
DDC > starter solenoid
4
yellow
14
2,5 mm2
LCP > fuel lift pump +
5
brown
16
1,5 mm2
LCP > fuel lift pump -
15
black
16
1,5 mm2
DDC > LCD
5
grey
16
1,5 mm2
DDC > oil pressure switch
6
purple
17
1 mm2
LCP > oil pressure switch
6
purple/black
17
1 mm2
DDC > oil temperature switch
7
blue
17
1 mm2
LCP > oil temperature switch
7
blue/black
17
1 mm2
DDC > exhaust temperature switch
8
blue/green
17
1 mm2
LCP > exhaust temperature switch
8
blue/rose
17
1 mm2
DCC > fuel valve solenoid
9
green
16
1,5 mm2
DCC > stop solenoid
20
pink
14
2,5 mm2
DCC > current measuring transformer
11
black
17
1 mm2
DCC > current measuring transformer
11
red
17
1 mm2
DCC > LCP
19
orange
16
1,5 mm2
DCC > LCP
12
black
16
1,5 mm2
DCC > LCP
14
red
16
1,5 mm2
DCC > LCP
16
red/green
16
1,5 mm2
DCC > generator AC output
33
brown
17
1 mm2
DCC > generator AC output
33
blue
17
1 mm2
LCP > battery charger winding generator
10
red
17
1 mm2
LCP > battery charger winding generator
10
red
17
1 mm2
DDC=Digital Diesel Control Unit
LCP=Local Control Panel
USA / WHISPER 3,5 / April 2004
13
CURRENT MEASURING
TRANSFORMER
TO REMOTE
CONTROL PANEL
BLUE (33)
AC-2
OIL TEMP.
SWITCH
ct-2
ct-2
EXHAUST TEMP.
SWITCH
OIL PRESS.
SWITCH
gnd
heat start fuel fail
fuel
GREEN 1,5 (9)
reg
FUEL
VALVE
SOLENOID
PINK 2,5 (20)
st
pull
STOP
SOLENOID
BATTERY CHARGER
WINDING GENERATOR
GLOW (PREHEAT)
PLUGS
+
ORANGE 1,5 (19)
FUEL LIFT
PUMP
BROWN 1,5 (5)
+
RED 1,5 (14)
GREY 1,5 (5)
BLACK 1,5 (12) J8
_
(OPTIONAL)
BATTERY
12VDC
J7
J5
J6
J4
J17
J15
J14
J16
J13
BLACK 16
GROUND TO
ENGINE BLOCK
BLACK 1.5 (15) J16
PURPLE/BLACK 1 (6) J14
BLUE/PINK 1 (8) J12
BLUE/BLACK 1 (7) J10
WCH/0
J3
ALT-L
RED 6 (1)
J12
J11
J10
J9
J2
ALT
J8
J1
ALT
RED 1,5 (10)
RED 1,5 (10)
BLACK 2,5 (2)
AC-1
ct-1
BLACK (11)
ct-1
RED (11)
str.
RED/GREEN 1 (16)
tem
BLUE 1 (7)
oil
PURPLE 1 (6)
exh
BLUE/GREEN 1 (8)
AC-1
BROWN 4 (3)
LOCAL CONTROL PANEL
F3
ALT
YELLOW 2,5 (4)
BROWN (33)
TAILOR MADE ENERGY
MASTERVOLT
STARTER
MOTOR
(OPTIONAL)
BATTERY
SWITCH
10A
RED 16
START/STOP
J22
RED 2,5 (13)
+
-
-
Fig. 7: Lay out control PCB.
+
-
-
3A
REGULATOR
J18
J19
+
-
10A
PUMP
+
-
-
-
J21
-
14
J20
-
TO GENERATOR AC OUTPUT
INFORMATION
2.5.14 Lay out control PCB
April 2004 / WHISPER 3,5 / USA
gl
hold
alt.
INFORMATION
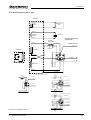
2.5.16 Electrical diagram 120V AC 60Hz
STATOR
J1
RED (10)
ALT
BATTERY
CHARGER
REGULATOR
WCH
J2
RED (10)
ALT
BROWN (1)
EXCITATION
WINDING
CAPACITOR
BROWN (2)
EARTH AND NEUTRAL
CONNECTED
CURRENT
TRANSFORMER
BLUE (3)
NWPK 3x4mm2
RED
(11)
MAIN WINDING
ROTOR
BROWN
BLACK
(11)
L1
DCC/ct-1
BROWN (4)
YELLOW/GREEN
BLACK (3)
N
BLUE (33)
MAIN WINDING
BROWN (33)
BLUE
PE
DCC/AC-1
WHITE (4)
YELLOW/GREEN
CURRENT
TRANSFORMER
EARTH AND NEUTRAL NOT CONNECTED
CURRENT
TRANSFORMER
120V 60Hz
RED
(11)
RED
(11)
BLACK
(11)
BROWN
120-240V 60Hz
BLACK
(11)
L1
DCC/ct-1
BROWN
L1
DCC/ct-1
YELLOW/GREEN
DCC/AC-1
BLUE (44)
BROWN (44)
N
BLUE (33)
BLUE (33)
BROWN (33)
BLUE
PE
BROWN (33)
YELLOW/GREEN
PE
BLUE
N
BLACK
L2
DCC/AC-2
CURRENT
TRANSFORMER
DCC/AC-1
YELLOW/GREEN
RED
(22)
YELLOW/GREEN
BLACK
(22)
DCC/ct-2
CURRENT
TRANSFORMER
RED
(11)
EARTH AND NEUTRAL CONNECTED
120-240V 60Hz
BLACK
(11)
DCC/ct-1
BROWN
DCC/AC-1
BLUE (44)
BROWN (44)
BLUE (33)
BROWN (33)
YELLOW/GREEN
L1
PE
BLUE
N
BLACK
L2
DCC/AC-2
CURRENT
TRANSFORMER
YELLOW/GREEN
Fig. 8: Electrical diagram 120 Volt.
RED
(22)
BLACK
(22)
DCC/ct-2
USA / WHISPER 3,5 / April 2004
15
OPERATION
3
OPERATION
3.1
GENERAL
In operation checks:
The generating set is operational after full installation and
1
Check for abnormal noise or vibration
filling up with: fuel, engine lubricating oil and cooling li-
2
Check the voltage
quid, filling the starter battery with acid, connecting the
3
Check sea water flow at exhaust outlet
battery to earth and connecting the digital remote control
4
Power source selector switch (off/shore power/gene-
panel.
rator power). Switch to power source generator. If a
MASTERSWITCH is installed, this operates automatically.
5
Before loading the generating set up to maximum,
have it run warm. Continuous load should be restricted to 70 % of maximum load.
3
Stopping generator:
1
2
Switch off all electrical devices (consumers). If the
generating set has been running under full load for a
longer period, do not shut it down abruptly. Reduce
1
the electrical load to about 30% of the rated load (i.e.
30% of 3 kW is approx. 1000 Watt) and let it run for
approx. 5 minutes.
2
Press the STOP button.
1
Filling cap;
3
Close the inlet sea water cock.
2
Min. oil level;
4
Switch to an other 120V power source, if available. If
3
Max. oil level.
a Masterswitch is installed, this is done automatically.
Fig. 9.
3.2.2
3.2
OPERATION INSTRUCTIONS
Extended operating instructions
Check when starting the first time or after a longer period
of rest:
3.2.1 Summarised operating instructions (daily use)
1
If there is any damage caused by transport or instal-
2
Check if installation conforms with the installation
3
Ensure the generating set is free to turn without ob-
switch off all consumers in the usual way. If a MAS-
4
Check all hoses and hose connections for leaks.
TERSWITCH is installed, this operates automatically.
5
Check all cables and cable end terminal connections.
4
Switch on battery switch (when installed).
6
Check the engine and generator mounting bolts.
5
Fuel valve: open.
Routine "pre-start" checks:
1
Check oil level (refer to fig. 9).
2
Engine cooling system (all valves open).
3
Power source selector switch (off/shore power/gene-
lation.
instructions.
rator power). Switch to power source switch "OFF", or
struction.
Routine "pre-start" checks:
Starting:
1
Check engine oil level.
Push the start button to initiate the full automatic
The generator switches off in case of insufficient oil-
starting procedure. You can monitor the procedure on
pressure. Even when the oil level is too low the oil
the display.
pressure can be high enough. Do not
run the
generator with the oil below the lowest mark, because
a smaller volume of oil will become contaminated
considerably quicker than a larger volume. Therefore
we recommend daily oil-checks.
Check oil level prior to starting the engine, or at least
5 minutes after the engine has stopped.
16
April 2004 / WHISPER 3,5 / USA
OPERATION
2
Check sea water cocks. Do not forget the valve of the
During the starting process, the cooling water pump is
water outlet in case of a water/exhaust gas separator.
driven with the engine. The cooling water is discharged
3
Check the water strainer.
to the exhaust outlet, because the engine does not run,
4
Check for leaks.
the exhaust pressure is not high enough to expel this
5
Regularly check the siphon vent in the cooling water
water.
supply.
Open the valve directly when the engine starts to prevent
If no MASTERSWITCH is used: Switch main Power
damaging the impeller.
Source Selector switch to "OFF" or switch off all de-
Water in the cylinder will cause serious damage to the
vices.
engine. For instance; a bent piston rod or a cracked
Switch on the battery switch.
cylinder head. In fact water in the cylinder is the main
6
7
cause for engine damage in pleasure craft.
Starting the generator:
By pushing the start button briefly the electric system
Checks once the generator is in operation:
is activated, the fuel lift pump starts pumping and the
1
Check for abnormal noise or vibration.
starting procedure will begin. (By pushing the stop
2
Check the voltage.
button the system is deactivated)
3
Check coolant flow.
Always check immediately after starting the generator
The Whisper 3,5 can even be started with an almost dis-
if cooling water flows at the exhaust outlet. If this is
charged battery using the cylinder compression release
not the case, check the cooling water pump. After
handle. The engine can then be rotated easily ("turned
having become acquainted with the generator you will
over") as the valves are opened i.e. in the decompres-
be able to recognise the coolant flowing through the
sion position.
system by listening for the noise of the water which is
You can also use the decompression handle to readjust
expelled.
the valve clearance and to fill the cooling system with anti
freeze for conservation in winter time.
Be aware that especially in harbours the
coolant water inlet can easily be blocked
by floating objects.
4
Power source selector switch (off/shore power/generator power). Switch to power source generator. If a
MASTERSWITCH is installed, this operates automatically.
Before loading the generating set up to maximum,
have it run warm. The first 50 hours of running the
continuous load should be restricted to 70 % of maximum load. Running for long periods at no load or light
load in the first 50 hours can cause cylinder glazing
and high oil consumption.
Fig. 10: Decompression handle.
Engine load during longer operation:
Please ensure that the generating set is not overloaded.
A restart protection prevents trying to start the engine
Overloading occurs when the electrical load (demand) is
when it is already running, which could cause damage.
so high that the generator cannot be turned around
properly by the diesel engine. Overloading causes the
In the event of starting problems (nume-
engine to run rough, while using oil and excessive fuel
rous attempts are made), close the sea-
and producing soot by the exhaust. The engine can even
water inlet cock while cranking to prevent
stop.
the outlet system and engine to fill up with
The generator should therefore only be loaded at the
water.
maximum rated power for short periods (2-3 hours) only!
The high peak current is meant for the ability to start
USA / WHISPER 3,5 / April 2004
17
OPERATION
electrical devices, that need a high current for starting
to allow the engine to get properly cool ( the influent
especially electric motors and compressors (from a still
sea water must flow through the system in order to
stand state).
cool the engine).
In order to prolong the generating set’s life expectancy,
If the generator is operating in a hot environment and
the nominal electrical demand on the system should be
you do not act as given above, the excessive heat in
about 70% or the rated generating set’s maximum load.
the engine can trip the "high temp" alarms. In that
Please note this when switching on your electrical
case, a restart of the engine is not possible for some
devices!
time. It is also recommended to switch off electrical
Nevertheless, the Whisper 3,5 is designed so as not to
users prior to stopping the generator because of the
overheat, even under extreme conditions.
voltage drop that occurs as the engine comes to a
halt. Such voltage drops may cause damage to elec-
Do not run the generator for very long periods at no load
tric motors, compressors (in refrigerators or air condi-
or at very low load. When this is necessary do load the
tioners etc.).
generator at least one hour in 10 hours for minimum
70%. Long term running at too low load will cause the
2
Press the STOP button.
3
Close the inlet sea water cock.
4
Switch to an other 120V power source, if available. If
exhaust to be choked by carbon.
Never remove the battery while the engine
is running, or any electrical cable while the
battery is connected in the circuit. Only
a Masterswitch is installed, this is done automatically.
disconnect the battery with the engine
stopped and all switches in "OFF" position.
If the engine is not running and ‘failure’ and
‘charging’ LED is blinking, reset by stop
Stopping the generating set:
button, otherwise it will drain the start battery.
1
Avoid stopping of the generator abruptly after a long
period of operation at high load! Doing so, you avoid
unnecessary thermal load to your generating set!
Act as follows:
Prior to switching off the generating set, decrease the
generator load (i.e. turn off most electrical users) and
let the generator run at low load for approx. 5 minutes
18
April 2004 / WHISPER 3,5 / USA
MAINTENANCE
4
MAINTENANCE
4.2.2 Bleeding fuel lines
Ensure there is sufficient fuel. The system is self
4.1
ALTERNATOR
bleeding. The first time starting up or after running out of
The alternator does not require any maintenance. Perio-
fuel it could be necessary to prime the fuel system. Push
dic inspection and cleaning is recommended, depending
the start button activating the electric system and
on environmental conditions.
activating the fuelpump. When more time is needed to
However when the alternator has been idle for a long pe-
bleed, push “start” and hold on the local control panel (so
riod attention to winding condition is recommended.
not on the remote panel) Hold as long as necessary to
The condition of windings can be assessed by measure-
bleed the system. Retighten the bleed screw when no
ment of insulation resistance to earth.
further air bubbles are expelled.
The CAPACITOR should be disconnected during this
test. A 500V ‘Megger’ or similar instrument should be
used. The insulation resistance to earth of all windings
should be in excess of 1.0 MOhm. Should the insulation
resistance be less than this value, drying out the generator windings is essential. Drying out can be carried out by
direct warm air from a fan heater or similar apparatus into
the generator air inlets or outlets.
All bearings are greased for life and not regreasable.
Fig. 11: Self bleeding fuel lines.
4.2
ENGINE
4.2.3
Valve clearance
Tightening torques, refer to § 5.4.2.
4.2.1 Preliminary instructions
When the engine is in cold condition both valves should
All regular maintenance can be executed when the en-
have a clearance between 0,0055 and 0,007 inches
closure is open. For repairs we recommend to take out
(0.14 and 0.18 mm). The adjustment has to be done at
the generating set to a workshop. The enclosure can be
T.D.C. of the compression stroke. Using a pocket light
completely removed by taking out the bolts form the
one can check the position of the flywheel (refer to
aluminium bars below the bottom of the capsule.
picture 12). By using the decompression handle one can
When oil and dirt have gathered in the enclosure measu-
crank the engine easily with a screwdriver to put the
res have to be taken to avoid spilling oil and polluting the
marks in line. Confirm that the valves do not move up or
environment.
down when the crankshaft is turned about 20 degrees in
normal and reverse direction of rotation. If the rocker
The first service on the engine should be carried out after
arms move the piston is on the T.D.C. of the intake or
25 hours of its life. This also applies after a major over-
exhauststroke. In such a case turn the crankshaft 360° in
haul. In the first 25 hours the engine should receive spe-
the direction of engine rotation again. The piston is now
cial attention:
at T.D.C. of the compression stroke. After readjustment
Long periods of light or no load running in the first 25
one should crank the engine for 20 rotations and check
hours may lead to cylinder glazing and high oil consump-
the valves again.
tion.
For the same reason it is of the greatest
importance to use the right oil specification.
The first time starting up or after running out of fuel it
could be necessary to prime the fuel system.
Fig. 12: Valve clearance.
USA / WHISPER 3,5 / April 2004
19
MAINTENANCE
4.2.4
Replacing fuel filter
AFTER FIRST 25 HOURS:
Filter change depends on contamination of the fuel, but
•
Change oil.
should be done however, at least every 300 running
Have the engine run until it is on temperature and
hours. Before changing the filter, clamp off the supply
stop it. Drain oil by the sump pump into a suitable
line. Remove the hoses from filter and attach them on the
retainer and fill up with fresh oil. Start the engine
new filter again. The arrow on the filter housing indicates
again and have it run for 5 minutes. Stop the engi-
the direction of the flow. A clogged filter results in a lack
ne again and pause for a few minutes to let the oil
of output of the generating set.
gather in the crankcase. Check the level again
and add oil when necessary.
4.2.5 Cleaning oil strainer
•
Check and tighten nuts, bolts, and unions, paying
gine. In the strainer is a magnet to catch the metal parts
•
Check the valve clearance.
which are in the lubricating oil. Once per 1000 hours or
•
Observe the exhaust at the normal full load. The
The oil strainer is behind a plug on the bottom of the en-
particular attention to the fuel system.
when the oil is contaminated one can clean the strainer
exhaust must be free from soot. Do not allow the
by washing it with petrol or a solvent. A green rubber plug
engine to run with a dirty exhaust without investi-
in the capsule gives access to the strainer. Before taking
gating the cause as this may result in an expensi-
out the plug one should sump the oil. Use tissues to
avoid spilling oil in the capsule.
ve breakdown.
•
Check the air vent on a regular basis.
When the air vent is not working properly the engine can fill up with water by siphoning. Water in
the combustion chamber causes serious damage
4.3
REGULAR MAINTENANCE
to the engine.
CHECK DAILY:
•
EVERY 100 HOURS:
Oil level (see fig. 13)
•
Change oil.
Take care the oil level is never below the mark.
•
Check the battery acid level.
•
Hoses for loose connections or deterioration.
•
Check battery terminals for corrosion
•
Water inlet filter.
•
Check impeller raw water pump (durability depends on the purity of the sea water. In sandy water and warm water wear will increase). When replacing the impeller the gasket between the pump
case and the cover should be replaced as well.
So when ordering a spare impeller order a gasket
as well. (50209011 impellor + gasket)
3
Remove the cover to get access to the impeller.
Remove the old impeller with the help of two
screwdrivers. Install the new impeller and add
some grease. Turn the blades in the direction of
2
rotation of the pump i.e. anti clockwise looking at
1
the impeller.
EVERY 300 HOURS:
1
Filling cap;
2
Min. oil level;
3
Max. oil level.
•
Replace the impeller of the raw water pump.
•
Check valve clearance.
•
replace the fuel filter
Fig. 13.
EVERY 1000 HOURS:
•
20
Clean the oil strainer.
April 2004 / WHISPER 3,5 / USA
TROUBLE SHOOTING
EVERY 2000 HOURS:
•
Check lubricating oil pressure
•
Clean and check or replace fuel injector nozzles
4.3.1 Maintenance schedule
Check oil level
daily
Check water strainer
daily
and check injection pressure.
•
Check the air filter element:
The air is taken in via the cover on the alternator.
Change oil
100 hours
Below this cover is a spongy material which filters
Check air vent
100 hours
Check impeller water pump
100 hours
require regular maintenance. Only in very dusty
Check valve clearance
300 hours
circumstances this filter should be cleaned. The
Replace impeller waterpump
300 hours
spongy material can be washed in solvent or re-
Replace fuel filter
300 hours
the air and holds some electrical components
which are cooled by the inlet air. This filter does not
placed.
•
Clean the oil strainer
1000 hours
The engine oil is indirectly cooled by raw water via
Check injector and injection pressure
2000 hours
an oil cooler/ heat exchanger. The alternator is
Check inlet air filter
2000 hours
Check the cooling system:
cooled by seawater which is pumped by the PTO
driven impeller pump through the cooler elements
4.3.2 Putting out of service
in the generator housing.
When not using the generating set for a longer period it is
All parts of the cooling system are of corrosion
recommended to execute an engine preservation proce-
free and seawater resistant materials such as
dure.
brass and gunmetal. In case of gathering of dirt in
the system it could be cleaned by compressed air.
1
Clean the engine.
2
Loosen the fuel suction pipe and fuel return and put
When overhauling the engine one could clean the
parts thoroughly or replace.
them in a can with preservation diesel fuel. Start the
When the generator set runs less than 100
engine and run the engine warm.
hours a year the oil should be changed
yearly.
3
Drain the hot engine oil and refill with preservation oil.
4
Stop the engine and loosen the inlet of the raw water
pump. Drain the water from the water lock. Lift the
valves by the decompression handle to avoid the
engine from starting and crank the engine having the
raw water inlet sucking anti freeze from a can until
the pump, heat exchanger and manifold are full.
5
Disconnect the battery and stove it in a place free of
frost and dry and charge it regularly.
6
Close inlet- and outlet openings with tape.
7
Protect the generating set against the influences of
bad weather conditions.
This method of preservation will be sufficient for 6 months.
Repeat steps 2, 3, and 4, every 6 months. Change oil
before using the engine again.
USA / WHISPER 3,5 / April 2004
21
TROUBLE SHOOTING
5
TROUBLE SHOOTING
5.1
ALTERNATOR/ ELECTRICAL FAULTS
If in doubt measure directly on the alternator terminals
with an independent instrument.
This should only be carried out by an experienced electri-
Beware of parts which are live!
cian.
Check if the engine is running correctly at 3600 (60 Hz)
Remove 3 Amp. fuse in the control panel
RPM according to its settings and does as well under
while working on the generator to prevent
load. A RPM drop of 5% at full load is acceptable. There-
the engine to start.
fore a no load setting should be at 3750 RPM = 62.5 Hz.
Under no circumstances should the RPM under full load
5.1.1 General
be below 3540 = 59 Hz.
If any problem should occur check basic conditions and
When the problem is in the RPM refer to the engine fault
examine all external wiring, switch gear and circuit
finding paragraph.
breakers. Also check if measuring instruments give the
Digital Diesel Control systemwill help to indicate failures
correct value.
and display causes.
5.1.2 Trouble shooting table
PROBLEM
No output (Voltage) at all.
CAUSE
• Circuit breaker "off" or faulty fuse
• Low engine RPM.
• Loss of residual magnetism.
• Capacitor loose or broken.
• Rotor diodes broken.
Generator output voltage too
low when no load is on it
(less than 105V).
• No load at all or very low load.
• Engine is not reaching the rated RPM.
• Defective capacitor.
• Defective diode (one of the two)
Generator output voltage too
low under load (less than 105V).
In no load condition it is ok.
• Generator is overloaded.
• Engine is not reaching the rated RPM.
• Defective capacitor.
Generator voltage too high,
(more than 130V).
• Engine is running too fast (RPM too high).
Generator voltage fluctuates.
22
• Over-energising due to defective
capacitors.
• Presence of a strong capacative load
(leading power factor).
• Disturbances on the electrical system/
user side.
• Engine runs irregularly.
SOLUTION
Check switches and fuses and measure directly on the alternator to exclude external causes.
Check the engine RPM and adjust (refer to
special procedures).
Check the residual magnetism and flash the
alternator (refer to special procedures).
Check by independent excitation if the problem is
in the capacitor or in the windings.
Check the diodes in the rotor (refer to special
procedures) The Whisper 3,5 has two diodes in
the rotor. It happens very rarely that both are
broken. When only one diode is broken the
voltage will be low but will not varnish completely.
Switch on a load and check voltage.
Refer to special procedures to readjust RPM.
Check capacitor and replace if necessary (refer
to special procedures).
Check the diodes in the rotor and replace (refer to
special procedures).
Switch off a load; (part off ) consumers.
Refer to engine RPM problems.
Check capacitor and replace if necessary (refer
to special procedures).
Check engine speed and adjust (refer to special
procedures).
Check capacitor specification and replace if
necessary.
Compensate for this capacity and seek for experts
advice.
Check if electrical load is fluctuating.
When engine runs irregularly refer to section:
"Engine runs irregularly".
April 2004 / WHISPER 3,5 / USA
TROUBLE SHOOTING
Generator is not able to start
an electric motor.
5.2
If the generator is unable to supply enough
power to start an AC electric motor,
this is usually because this motor draws
too much current during starting.
Check the electric motor’s current draw required
for starting. This should not exceed the
rated generator peak output current. This could be
remedied by providing stronger capacitors to the
motor or using a "soft-start". Inquire at your
nearest Mastervolt dealer or directly at the
manufacturer, Mastervolt in the Netherlands.
ENGINE FAULTS
system with cooling water because of the
water injected exhaust. When the water
Remove 3 Amp. fuse in the control panel
enters the cylinder through the valves this
while working on the generator to prevent
will bring severe damage to the engine.
the engine to start.
When the engine does not start and
repeated cranking is necessary shut off the
5.2.1 General
seawater inlet. Open the valve immediately
Most electrical problems relating to Voltage or Frequency
after the engine has started.
are due to wrong engine speed.
Note that RPM and Hz are basically the same.
A failure code is displayed whe a hardware faillure at the
Use the problem solving table to find the cause. When
generator is detected.
there is no obvious cause one can adjust the RPM (refer
failure code
to special procedures).
Communication Communication
When the engine is not cranking well, starting problems
Low start bat
almost always originate from battery problems or poor
Alternator
No output battery charging voltage
battery cable connections.
Exhaust temp
Exhaust temperature is too high
When the engine is cranking, well starting problems
Water temp
Coolant temperature is too high
almost always originate from lack of fuel or air bubbles in
Oil pressure
Oil pressure failure
the fuel pipes.
Low voltage
Generator AC output voltage is too low
High current
generator is in overload
problem
error
between
the
panel end the generator
When the engine does not start instantly,
Frequency
prolonged cranking can fill up the exhaust
Starter battery voltage too low
output frequency of the generator is too
low
5.2.2 Trouble shooting check list engine
PROBLEM
CAUSE
SOLUTION
Diesel engine fails to crank,
the starter makes clicking
noises, or the engine cranks
very slowly.
Almost certainly this is an electrical problem
or the engine is locked by water in the
cylinder or there is other severe damage.
Display will indicate “low battery voltage”
Check on water in the cylinder and further
damage by cranking while lifting the valves with
the decompression handle. When there is water
in the cylinder, then deactivate the control system,
disconnect the battery, remove the glow plug.
Crank the engine to remove the water through the
opening of the glow plug. Check oil on the presence of water and change oil. Find out how the
water entered the cylinder (check the air vent).
Take precautions to prevent it from happening
again. When there is no mechanical malfunction
the problem must be an electric malfunction.
Check position of the battery switch and switch
"ON".
Check battery voltage. Recharge the battery.
Inspect battery terminals and cables for a good
electrical connection (inspect against corrosion,
tattered wires, etc.)
Replace fuse.
• Starter battery switched "OF".
• Starter battery voltage insufficient
(battery too weak).
• Faulty fuse on control panel.
USA / WHISPER 3,5 / April 2004
23
TROUBLE SHOOTING
PROBLEM
CAUSE
• Wiring control system faulty.
• Starter broken.
• To thick engine lubricating oil.
Starter is turning engine
smoothly, but engine fails
to start.
• Out of fuel or faulty fuel, water in the fuel.
• Fuel inlet solenoid valve is not opening.
• Fuel lift pump is not working.
• Fuel filter is blocked.
• Air in fuel lines.
• Wrong valve clearance.
• Low compression because of dirty valves.
• Blocked injector.
Engine runs irregularly.
• Unsuitable contaminated fuel
• Lack of fuel.
• Choked fuel filter.
• Faulty fuel lift pump.
• Choked air filter.
• Lack of air.
• Choked exhaust system, exhaust blocked,
rubber exhaust hose kinked.
• Air in the fuel pipes.
SOLUTION
During the normal starting process, the battery
voltage drops to 11V (with a fully charged battery).
If the voltage does not drop during starting, the
electrical connection is faulty. If the battery
voltage drops lower than 11V, then the battery
has been discharged too deep.
Repair the starter motor.
Change oil for a lower viscosity.
Fill up with fuel or replace with better quality.
Check wire connections and circuitry to solenoid
valve. (Refer to DC wiring diagram).
Check fuel filter and fuel lift pump: clean or
replace if necessary.
Bleed air from fuel system (refer to maintenance
section).
Adjust valve clearance.
Clean valves. Take off the injection bent and
inspect the outlet port. When little rust is in the
port one can clean the valve by taking of the valve
spring and rotate the valve. When the outlet port
is strongly affected by rust, the exhaust system is
not properly installed. Water has entered the
exhaust port or backpressure is too high. (refer to
paragraph 5.4.3) Contact Mastervolt service
department for advice.
Have the injector tested and cleaned if necessary.
Fill up with fuel or replace by better quality.
Check fuel filter and fuel lift pump: clean or
replace if necessary.
Check and repair.
Check the air intake.
Check the exhaust hose.
Bleed air from fuel system (refer to maintenance
section).
• Blocked injector.
Have the injector tested and cleaned if necessary.
• Wrong valve clearance.
Adjust valve clearance.
• Temporarily hunting (this will disappear when engine has run in).
Engine speed drops.
• Too much oil.
• Lack of fuel.
• Lack of intake air.
• Choked exhaust system, exhaust blocked,
rubber exhaust hose kinked.
• Generator overloaded by over-energising.
• Generator over energised.
• Defective generator (windings, bearings,
or other).
• Damaged engine.
24
Drain oil to proper level.
Check fuel supply system: fuel pump and filter.
Check air intake.
Check exhaust system.
Reduce the electrical load (switch off some
consumers).
Check that the proper capacitor type is installed
and that it is connected correctly.
Generator must be sent to manufacturer for repair
of damaged bearing or winding.
Repair by Mastervolt service.
April 2004 / WHISPER 3,5 / USA
TROUBLE SHOOTING
PROBLEM
Engine does not stop
on command.
Engine exhaust smokes
Engine starts, but stops
after 10 to 30 seconds
Engine stops by itself.
CAUSE
SOLUTION
Faulty Digital Diesel Unit on stop solenoid
• Fuel inlet solenoid valve is not switching off. Stop the engine manually by the stop handle.
• Loss of control
Check wire connections to solenoid. Check valve
function. Replace if necessary.
• Faint blue smoke generally the result of light load
• Heavy blue smoke caused by lubricating oil:
Overfull oil sump or worn cylinder bore,
stuck broken or worn rings.
• Black smoke incomplete combustion caused by:
Overload, choked air filter, inlet temperature
too high, unsuitable fuel or water in fuel.
Display will help to identify failure
• Protection system stops the engine;
this can be caused by oil pressure
failure, lack of coolingwater
(exhaust temperature alarm)
Loose wire or faulty alarm switch.
Display will help to identify failure
• Overload or short circuit.
• Lack of fuel.
• Oil pressure low.(oil pressure switch
tripped).
• Excess heat in cooling system
(thermo-switch tripped).
• Lack of cooling water (exhaust
switch tripped).
• Impeller broken.
• Cooling water blocked.
• Water strainer blocked.
• Air or water in the fuel.
• Blocked air or fuel filter.
• Loss of compression by wear out
or damage.
Increase load.
Check the oil level.
Check the compression.
Check the fuel .
Check for overload.
Refer to paragraph 2.5.5. and 3.2.2 for
information on the alarmsystem. Bypassing the
switches can help to identify the failure.
Switch off the consumers and test for short circuit.
Check fuel supply system: fuel lines, pump, filter,
valves, tank level, etc.
Check oil level.
Check engine’s oil pressure and have it repaired
by Mastervolt.
Check cooling water system flow: water pump,
inlet water filter, coolant flow.
Repair by Mastervolt service.
Sooty, black exhaust.
• Generator is being overloaded.
Digital Diesel Control will indicate “overload”
• Insufficient intake air.
• Choked air filter.
• Fuel injector faulty.
• Valve clearance incorrect.
• Poor fuel quality.
• Poor quality lubricating oil.
• Continuous running with very low load.
Loss of power.
• Wrong measurement. Check if the load is measured correctly. Does the Amp meter show the
correct value? When calculating the load by multiplying voltage and amps this should be done
by using the exact values, taking into account the power factor of the consumers. When any
doubt measure the power directly with an appropriate instrument.
Bring the oil to the correct level.
• Overfull oil sump.
Replace the fuel filter.
• Choked fuel filter.
Check air inlet openings; clean air filter.
• Choked air filter
Check the exhaust system.
• Exhaust blocked.
USA / WHISPER 3,5 / April 2004
Check electrical load and switch off some
consumers.
Check intake air paths and filter, clean and
replace if necessary.
Replace injector.
Readjust valve clearance.
Use better quality diesel.
Use better quality oil.
Increase load and have the engine run for a few
hours.
25
TROUBLE SHOOTING
Over-temperature.
Engine stops very slowly
• Injector blocked.
• Loss of compression, sticking.
damaged piston ring.
• Wear out of cylinder.
Have the injector checked.
Have the compression measured.
Clean or replace the rings.
Have the compression measured and have the
engine overhauled.
• Overload.
• Low oil level.
• Water inlet system blocked.
• Broken impeller.
• Water strainer choked.
• Heat exchanger choked.
• Engine should stop within 3 seconds
after pushing stopping button
Take away the overload.
Fill up with oil.
Check the cooling system thoroughly.
5.2.3 Warning
When it takes more than 5 seconds the fuel
solenoid could be faulty: engine is stopped by
shut down fuel valve.
If the starter battery is used for flashing
one must take care. A short circuit can
cause heavy sparking, fire and injuries.
Generator must be shut off immediately if:
• Motor RPM suddenly rises or drops.
When flashing does not bring back voltage, the capaci-
• Unusual noise comes from generating set.
tor(s) should be renewed. When this does not help, the
• Exhaust gases suddenly colour dark.
rotating rectifier diodes should be tested and a winding
• Engine failure warning light is on
resistant test should be executed.
5.2.4 Service address
5.3.2 Testing rotary rectifier diodes
If you cannot correct a problem with the aid of the mal-
The diodes in the rotor can be checked with a multimeter.
function table, contact your Mastervolt Service Centre or
When both diodes are faulty the alternator will not generate
Mastervolt Amsterdam for an extended service list, tel:
any voltage. When only one diode is faulty the alternator
INT +31-20-3422100 www.mastervolt.com.
will generate about half the normal voltage.
The flexible lead connected to the diode should be discon-
5.3
SPECIAL PROCEDURES ALTERNATOR
nected at the terminal end, and the forward and reverse
resistance checked. A healthy diode will indicate a very
5.3.1 Residual voltage check / excitation procedure
high resistance (infinity) in the reverse direction, and a low
When residual magnetism disappears there is no resi-
resistance in the forward direction. A faulty diode will give a
dual voltage. Residual magnetism can disappear after
full deflection reading in both directions with the test meter
the generating set has been out of service for a long time
on the 10,000 ohms scale, or an infinity reading in both
or suffered a short circuit. This can be solved by charging
directions. The problem can also be in a faulty surge
the capacitor ("flashing") independently by a small 9 Volt
suppressor (which is a metal-oxide varistor connected
battery. This can be done while the engine is stationary
across the diodes) or the ESD capacitor. Replace the
and the wiring is connected.
diodes, the suppressors and the capacitors.
1 2 3
F
9V
Fig. 14.
26
Fig. 15.
1
2
3
Varistor (420V);
EMC capacitors (4,7nF - 630V);
Diodes (25A - 1200V).
April 2004 / WHISPER 3,5 / USA
TROUBLE SHOOTING
5.3.3 Winding resistant values
at ± 3750 RPM = 62.5 Hz. Under no circumstances
If after establishing and correcting any fault on the
should the RPM under full load be below 3540 RPM =
capacitor and diodes output is still low when separately
59 Hz. When no cause can be found for a wrong speed,
excited, then the main rotor, stator and exciter stator
the setting can be adjusted:
winding resistance should be checked as the fault must
be in one of these windings. The respective leads must
It is very important to identify the correct setting assem-
be disconnected before taking the readings.
bly (refer to fig. 16).
Resistance values should be within 10% of the values
The screw is to be locked in position with the lock-nut.
given in the table below:
5.4.2 Tightening torques
Resistance
• Resistance both main stator windings
in series
• Resistance both rotor windings
• Resistance battery charger winding
• Resistance exciter stator winding
60Hz
0.71 Ohm
2.1 Ohm
0.13 Ohm
2 Ohm
Valve clearance Refer to Maintenance, §4.2.3.
Cylinder head screws M10x1.5 51.9 to 56.8 Nm; 5.3 to
5.8 kgf-m; 38.3 to 42.0 ft-lbs.
Rocker arm bracket mounting M8x1.25 23.5 to 27.4 Nm;
2.4 to 2.8 kgf-m; 17.4 to 20.3 ft-lbs.
5.3.4 Meggering
5.4.3 measuring exhaust backpressure
One can try to measure resistance between the housing
The exhaust system must be of adequate size -
and the windings by a multimeter which should read
1 5/8”/ 40 mm no more-no less - and maximal length
infinity.
(refer to installation manual). This is true for all
When readings indicate infinity but a fault is suspected
generators, but specially for the Whisper 3,5, because
one can do a high voltage resistance test (MEGGERING)
this small engine has a small gasflow that easily can be
This procedure should be carried out by an expert
blocked by a water trap in the exhaust system. When any
doubt; backpressure has to be measured. An easy way
5.4
SPECIAL PROCEDURES ENGINE
to measure for back-pressure is to use a water column.
5.4.1 Setting the RPM
RPM is set by the manufacturer and should not need
readjustment! However a very slight offset after running
in could occur. RPM can be measured by a frequency
meter. Before readjustment check any other explanation
60
24
for the wrong speed. Engine speed is set at the factory
at nominal 3600 (60 Hz) RPM. A RPM drop of 5% at full
load is acceptable. Therefore a no load setting should be
Fig. 17: Measuring exhaust backpressure
A water column can be made visible in a plastic tube
along a yardstick and fitting the end to a hose connection
to fit in the adaptor on the injection bent after removing
the exhaust temperature switch.
The bent A hanging down should not be to short helping
to damp the pulsating effect of the gas discharge, that is
characteristic for a one cylinder engine. The water
column should be no more than 24 inches (60 cm.) of
Fig. 16: Setting assembly.
USA / WHISPER 3,5 / April 2004
water (0,87 PSI - 0,06 bar)
27
TROUBLE SHOOTING
5.4.4 Disassembling instructions
out the fitting to the oil cooler to be able to take off the
It could be necessary for repair or checks to disassemble
aluminium housing. All cables and wiring have to be
the generating set. One can take off the white cover
loosened first.
easily for regular maintenance and inspection. For further
repair or inspection one can take off the upper green part
6
The rotor can be taken off by removing the bolt which
as well.
goes through the shaft (normal clockwise threaded).
Following instructions will help:
The end of the shaft is specially threaded to press off
the rotor from the conic stub shaft, which is on the
1
When the generating set has to be taken out of its
flywheel, using a 0,25 inches (6-mm) rod of 6,5
enclosure we strongly advise not to do this in a
inches (165-mm) length and a M10 bolt.
narrow space on a boat, but to take out the complete
set and take it to a workshop.
7
Reassembling the generating set one should take
care of alignment, cleaning the surfaces between en-
2
To take out the generator all connections have to be
gine and alternator and tighten the bolds crosswise
taken off. The outgoing hose on the oil cooler is most
and gradually.
difficult to get to, but can be reached from above by
taking off the cover which is on the cylinder head of
8
Use Loctite 577 to seal the fittings, which should first
the engine. By taking out 4 screws from the alumi-
be cleaned and made free of oil and grease.
nium bars the generating set will come loose from the
Test the generating set first outside its capsule and
capsule.
check very carefully for leakages before putting it
back in its enclosure.
3
The easiest way to get the generator out of its capsule is by lifting the set using the lifting eye and removing the capsule downwards.
4
The cooler elements are welded to the alternator housing with silver and cannot be disassembled. However one can take off the complete alternator housing.
5
28
Before the alternator can be taken off one has to take
April 2004 / WHISPER 3,5 / USA
SPARE PARTS
6
SPARE PARTS LIST
A parts manual in English is available as an option number: 05-02-00180(***).
A work shop manual in English is available as an option number: 05-02-00170(***).
We recommend the following spares for service and maintenance.
• Kit A: parts for regular maintenance parts marked(*)
article no 50201260
• Kit B: parts for maintenance + spare parts: all parts marked (*)+(**)
article no 50201261
• Kit C: parts for "world travellers" all parts marked (*)+(**)+(***)
article no 50201262
ARTICLE NO
50209030
50201031
50201051
50221609
50201034
50201035
50202048
50201250
50209011
50201012
50209018
50201251
50209010
50201220
50201225
50201222
DESCRIPTION
Fuel filter (*)
Fuel lift pump (**)
Fuel valve solenoid (**)
Banjo eye fuel valve (**)
Copper washer connection bolt, M10 x 16 (**)
Copper washer, M12 x 18 (**)
Stop solenoid
Raw water pump complete Mastervolt type K (***) (refer to fig. 17)
Impeller + gasket (3,4,5) (*)
Cover type K (**) (2)
Bolts cover (**) (1)
Pump repair kit A consisting of:
- Shaft (13)
- Bearings (2 pcs.) (10)
- O-ring (9)
- Seals (2 pcs.) (8)
- Clips (1 set) (11, 12)
Pump repair kit B (**)(same as repair kit A excluding the shaft)
Oil cooler complete with appendages (***)
Oil pipes and fittings (***)
Water hoses with clamps (***)
50201060
50209132
50201290
50201085
50209100
50209104
50212154
50212170
50201066
Capacitor xx micro-farad (**) xx = give value when ordering
Measuring coil (***)
Rotary diodes (2 pcs) (including varistors and capacitors (**)
Alternator bearing including O-ring (**)
Digital Diesel Control unit (***)
Local control panel on the engine (***)
Fuses 3 Amps (*)
Fuses 10 Amps (*)
Wiring loom complete (***)
50209102
50209133
50202034
50202030
50202036
50202040
50202050
50202160
50209051
Remote control unit (***)
Cable remote control 10 mtr, including connectors
Gasket valve cover (**)
Cylinder head gasket kit
Overhaul gasket kit + seal kit (***)
Glow plug (**)
Nozzle injector (**)
Fuel pump (high pressure) complete (***)
Silicoone O-ring sound shield cover (**)
More extensive parts list on the internet: MASTERVOLT.COM (FAST MOVING PARTS)
USA / WHISPER 3,5 / April 2004
29
SPARE PARTS LIST
7
1
2
4
5
8
8 9
11
10 11
10
12
13
6
K
3
7
Fig. 18: Water pump type K.
Spare parts water pump type K, article no 050201250:
no
description
article no
1
screw cover, 6x
50209018
2
cover type K, 1x
50201012
3
screw impeller, 1x
refer to impeller
4
Impeller (1x), including screw (3)
50209013
5
Gasket, 1x
50209012
6
Pump housing, 1x
50201013
7
Hose connector, 2x, 12,5 MM x 3/8”
50221001
8
Seal, 2x
50209015
9
O-ring, 1x
50209017
10
Bearing, 2x
50209014
11
Clip, 2x
50209019
12
Clip, 1x
50209016
13
Shaft type K, 1x
50201011
Impeller kit: impeller + gasket + screw
50209011
30
April 2004 / WHISPER 3,5 / USA
INFORMATION MAINTENANCE
MAINTENANCE LOG
first service after 50 hours:
hour counter:
remarks:
next service (every 100 hours)
hour counter:
remarks:
USA / WHISPER 3,5 / April 2004
31
MASTERVOLT
Snijdersbergweg 93, 1105 AN Amsterdam, The Netherlands
Tel.: +31-20-3422100 / Fax: +31-20-6971006
www.mastervolt.com / [email protected]
32
April 2004 / WHISPER 3,5 / USA