1
PC Pandora User Manual
Help System
Table of Contents
1
INTRODUCTION
1.1 Features
2
GETTING STARTED!
2.1 Installation
2.2 Registration
2.3 Updates
3
VIEWING RECORDED DATA
3.1 Snapshots
3.2 Programs
3.3 Websites
3.4 Keystrokes
3.5 Chats
3.6 User Activity
3.7 E-mail
3.8 P2P
3.9 Webcam
3.10 File tracking
3.11 Search Queries
3.12 E-Mail Reports
3.13 Filter
4
COPY, SAVE, or DELETE RECORDED DATA
5
SETTINGS
5.1 General
5.2 Recording
5.3 Data Files
5.4 Users
file:///H|/PCPandora_5x_HelpSystem.htm (1 of 71)6/6/2008 7:58:31 AM
PC Pandora User Manual
6
IRIS EMAIL REPORTS
6.1 Getting Started
6.2 Accessing IRIS Settings
6.3 IRIS Field Descriptions
6.4 SMTP/POP Settings
7
BLOCK WEBSITES
8
BLOCK PROGRAMS
9
CHAT CONTROL
10 UNINSTALL
11 REQUIREMENTS
12 TROUBLE SHOOTING
13 FAQ
13.1 Questions about Registration
13.2 Questions about IRIS Email Reports
13.3 Questions about Snapshots
13.4 Questions about Emails
14 CONTACT US
1
INTRODUCTION
PC Pandora is a software based surveillance and monitoring application developed for Microsoft Windows. It will record and capture computer activity such as Keystrokes,
Instant Messenger, Emails, Search Queries entered into popular search engines, File Tracking to monitor file creation and deletion, Webcam snapshots to see exactly who is
using your computer, download Activity from P2P applications, User Activity which records computer login information, Websites Visited, Programs used and for how long, as
well as capture Snapshots (Screenshots) of the computer screen so you can see exactly what is being done on the computer. You may also Block Websites, programs, and
chat protocols as well as send E-mail Reports of the recorded data to a specified e-mail address so that you don’t have be on the PC that PC Pandora is installed on to view
recorded data. PC Pandora is simple and intuitive and recorded data is provided in a familiar Explorer style view.
View:
Once PC Pandora is installed on a computer in order for you to view the data recorded in PC Pandora you need to enter your secret key code combination and password.
Secret key code combination and password are provided during the Installation process and can be changed once PC Pandora is installed.
1.1
Features
The following below are different features that PC Pandora provides:
file:///H|/PCPandora_5x_HelpSystem.htm (2 of 71)6/6/2008 7:58:31 AM
PC Pandora User Manual
• Records Snapshots of your desktop.
• Records Programs used.
• Records Websites visited.
file:///H|/PCPandora_5x_HelpSystem.htm (3 of 71)6/6/2008 7:58:31 AM
PC Pandora User Manual
• Records Keystrokes.
• Records Instant Messenger conversations used by different Instant Messengers applications.
file:///H|/PCPandora_5x_HelpSystem.htm (4 of 71)6/6/2008 7:58:31 AM
PC Pandora User Manual
• Records User Activity which includes login names and passwords of PC user accounts.
• Records Send and Receive Emails.
file:///H|/PCPandora_5x_HelpSystem.htm (5 of 71)6/6/2008 7:58:31 AM
PC Pandora User Manual
• Records download activity from P2P applications.
• Records Webcam snapshots to see exactly who is using your computer.
file:///H|/PCPandora_5x_HelpSystem.htm (6 of 71)6/6/2008 7:58:31 AM
PC Pandora User Manual
• Records File Tracking to monitor files that are created, modified, or deleted.
• Records Search Queries placed in popular search engines.
file:///H|/PCPandora_5x_HelpSystem.htm (7 of 71)6/6/2008 7:58:31 AM
PC Pandora User Manual
• Sends an E-mail Reports of data recorded to a specified e-mail address.
• Blocks Websites.
file:///H|/PCPandora_5x_HelpSystem.htm (8 of 71)6/6/2008 7:58:31 AM
PC Pandora User Manual
• Blocks Programs.
file:///H|/PCPandora_5x_HelpSystem.htm (9 of 71)6/6/2008 7:58:31 AM
PC Pandora User Manual
• Blocks Chats.
• Settings - includes different options like which users you wish to record, what type of data you want recorded, when you want it to record, to how
much data you want recorded.
file:///H|/PCPandora_5x_HelpSystem.htm (10 of 71)6/6/2008 7:58:31 AM
PC Pandora User Manual
2
GETTING STARTED!
2.1 Installation
Installing PC Pandora is accomplished by running the installation utility (http://www.pcpandora.com), accepting the End User License Agreement (EULA), and completing a few
quick settings as detailed below.
file:///H|/PCPandora_5x_HelpSystem.htm (11 of 71)6/6/2008 7:58:31 AM
PC Pandora User Manual
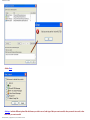
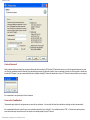
Create a Password:
Setting a password will protect others from viewing and deleting data that is recorded by PC Pandora. PC Pandora will request you to enter this password whenever you enter
your secret key combination, which will then bring up a password popup window (See below for example). Once your password is entered you will have access to view all data
recorded by PC Pandora. If you get a password prompt before completely installing PC Pandora this means that a version of PC Pandora is already installed on your computer.
It is recommended to set a password of at least 4 characters.
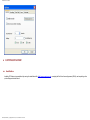
Create a Key Combination:
The password popup window will only appear when you enter the key combination. You can modify the default key combination to anything you desire (recommended).
It is recommended that there be at least 3 keys in your combination and that they do not utilize ALT + key combinations such as CTRL + C as those are commonly used as
menu shortcuts and may cause other users on the computer to accidentally attempt to open PC Pandora.
file:///H|/PCPandora_5x_HelpSystem.htm (12 of 71)6/6/2008 7:58:31 AM
PC Pandora User Manual
Select a Mode:
You need to select a PC Pandora mode. Below are your options.
• Stealth Mode - This is enabled by default. This causes PC Pandora to install with no visible indication that it is present, running, or recording activity on the computer.
• Visible mode - This causes a system tray icon to be displayed whenever PC Pandora is recording activity on the computer. All users will be able to see this icon and be
informed "your activity is being recorded". You can also enable this icon after installation as described in Settings and Configuration later in this Help file. Installing in Visible
mode also causes PC Pandora to create a visible icon in the Programs menu that provides access to the Viewer. If a user tries to access the Viewer using the Programs icon it
is protected and accessible only if the user enters the correct password.
Reboot:
Once the Setup has been completed PC Pandora will request that you reboot your computer. Select “Reboot now” to allow PC Pandora to complete the installation and
automatically begin recording all activity on your computer.
CONGRATULATIONS!
Once your computer is rebooted and successfully restarts, you are now recording all activity on the computer.
Note:
If you do not reboot as requested PC Pandora will not begin recording activity on your computer until such a time that you do choose to reboot.
Installing PC Pandora on your computer does not mean that you are registered. Without registration you are limited in viewing recorded data. To register please see the
registration section.
file:///H|/PCPandora_5x_HelpSystem.htm (13 of 71)6/6/2008 7:58:31 AM
PC Pandora User Manual
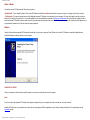
2.2 Registration
Registration is required to provide access to the Magnifier that allows you to view snapshots in full-screen mode and to view keystroke logs. You can verify your registration
status by opening PC Pandora, click Help in the tool bar menu and then click on About Pandora Viewer.
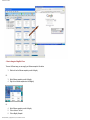
To register PC Pandora please do the following:
1.
2.
Open PC Pandora
Go to Help in tool bar and click Register
3.
4.
5.
Enter your registration key in the field provided. Note that it is easiest to copy the key then paste it into the field to avoid typos.
Click OK to begin your registration.
A registration status message will appear.
6.
Once your registration has been successful the Registration Complete message will appear.
7.
Click OK button to close this message and return to the PC Pandora Viewer.
file:///H|/PCPandora_5x_HelpSystem.htm (14 of 71)6/6/2008 7:58:31 AM
PC Pandora User Manual
8.
You can verify your registration status by going to Help in tool bar and click on About PC Pandora.
You do not have to renew registration at a later date.
If you run into any issues with registration please see our Troubleshooting section.
2.3 Updates
There is no automatic update notification, nor any method to check for updates from within PC Pandora. You must check for updates manually by visiting the PC Pandora
website available at http://www.pcpandora.com.
3
VIEWING RECORDED DATA
PC Pandora interface allows you to control and view recorded activity. You can access all data that has been recorded, start and stop the recorder, and configure how data is
recorded and saved.
To view recorded data you need to enter your secret key combination to bring up the password window.
Once the password window appears, enter your password and you will have access to view all recorded data in PC Pandora. If you have forgotten your key combination or
password please contact us. If your key combination does not bring up the password window see our troubleshooting section.
Below are the different types of data recorded by PC Pandora. If you need help viewing recorded data click on any of the following below:
•Snapshots
•Programs
•Website
file:///H|/PCPandora_5x_HelpSystem.htm (15 of 71)6/6/2008 7:58:31 AM
PC Pandora User Manual
•Keystrokes
•Instant Messenger
•User Activity
•Emails
•P2P
•Webcam
•File Tracking
•Search Queries
•E-mail Reports
Important! PC Pandora automatically stops recording whenever PC Pandora is opened. Closing PC Pandora will automatically resume the recording, or you can click Action \
Resume Record to force the recording to continue while the PC Pandora is open.
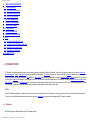
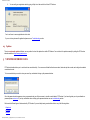
3.1 Snapshots
PC Pandora can capture images of the computer screen so you can see exactly what the user sees on the computer screen. In addition to the currently running program you
will be able to see other running programs in the task bar as well as the system tray.
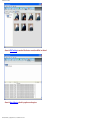
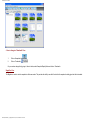
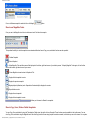
View:
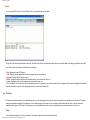
To view Snapshots, click on the Snapshots tab. The view is broken down into two halves (See below).
The left half of the view categorizes the snapshots by date. The right half of the view provides access to the snapshots based on the date selected in the left half. To change
amount of data recorded for Snapshots please see our Settings section.
file:///H|/PCPandora_5x_HelpSystem.htm (16 of 71)6/6/2008 7:58:31 AM
PC Pandora User Manual
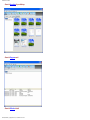
You are able to view Snap Shots in 3 different ways: Details, Thumbnails, and Magnifier View. Below are descriptions of all three.
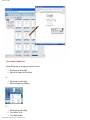
Detail View
Detail view provides an Explorer-like view of the snapshots. This includes Time, User, and Application columns. See below for example.
• How to change to Detail View:
1.
Click on Snapshots tab
2.
Click on Details
Or you can also change this by going to View in toolbar, select Snapshot Display Mode and click on Details.
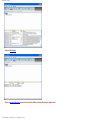
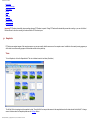
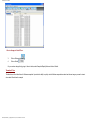
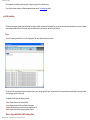
Thumbnail View
Thumbnail view is the default view for Snapshots. It provides the ability to quickly view the snapshots recorded and choose images you want to view in closer detail. See
below for example:
file:///H|/PCPandora_5x_HelpSystem.htm (17 of 71)6/6/2008 7:58:31 AM
PC Pandora User Manual
• How to change to Thumbnail View:
1.
Click on Snapshots tab
2.
Click on Thumbnails
Or you can also change this by going to View in toolbar, select Snapshot Display Mode and click on Thumbnails.
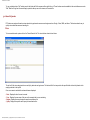
Magnifier View
The Magnifier is used to view the snapshots in full-screen mode. This provides the ability to see all of the detail in the snapshot including typed text that is viewable.
file:///H|/PCPandora_5x_HelpSystem.htm (18 of 71)6/6/2008 7:58:31 AM
PC Pandora User Manual
• How to change to Magnifier View:
There are 3 different ways you can magnify your snap shots. See below:
1.
2.
Select Snapshot you wish to Magnify
Double click on Snapshot (Left click on Mouse)
1.
2.
Select Snapshot you wish to Magnify
Right click on Snapshot and click Magnify
1.
2.
3.
Select Snapshot you wish to Magnify
Click on Action in Tool bar
Click on Magnify Snapshot
Or
Or
file:///H|/PCPandora_5x_HelpSystem.htm (19 of 71)6/6/2008 7:58:31 AM
PC Pandora User Manual
button
Or once Snapshot is selected click on the Magnify
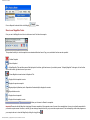
How to use Magnifier Tools:
Once you are in the Magnifier view it also includes some tools. See below for example:
This provides the ability to view the snapshots in an automated slideshow format. Copy, save, and delete functions are also provided.
= Deletes Snapshot
= Saves Snapshot
= Hides Magnifier Tools and blue arrow will be displayed in the bottom, right hand corner of your desktop screen. To display Magnifier Tools again, click on the blue
arrow at the bottom, right hand corner of your screen.
= Closes Magnifier view and returns to Snapshots Tab.
= Displays the first snapshot in series.
= Displays the previous snapshot.
= Begins playback (slideshow) mode. Snapshots will automatically be displayed in a series.
= Stops slideshow mode
= Displays the next snapshot.
= Displays the last snapshot in series
= Allows you to forward or Rewind to a snapshot.
Important! Remember that the Magnifier is displaying full-screen snapshots of the computer screen. As seen in the example below it is easy to confuse the snapshots for
your actual computer screen. However, in actuality you are viewing a snapshot of activity, not your actual computer screen. Prior to attempting to utilize other programs on
your computer be sure to close the Magnifier by clicking the top right icon
file:///H|/PCPandora_5x_HelpSystem.htm (20 of 71)6/6/2008 7:58:31 AM
.
PC Pandora User Manual
How to Copy, Save, Print or Delete Snapshots:
You can Copy, Save, and delete by using the Thumbnails or Details view, then right-click on a Snapshot. These functions are also available in the toolbar menu. You can
also Copy, Save, and delete using the Magnifier tools. Note that Copy from this screen simply copies the actual screenshot, not the data you see in the viewer. You may also
Print snapshots by selecting snapshot and right clicking or by going to File in tool bar menu.
If you are have issues viewing your Snapshot please see our Troubleshooting section.
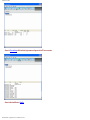
3.2 Programs
PC Pandora can capture all data related to programs run on the computer so you can see exactly what applications have been used. Captured data includes the date and
time of the activity, how long the program was active, how long the program was focused upon, which user ran the program, the application title, and the window text.
View:
To view Programs recorded click on the Programs tab. The view is broken down into two halves.
The top half of the view categorizes the activity by date, then by application, then by specific activity. The bottom half of the view provides the specific detail on the activity
based on the category selected in the top half.
The bottom half will display the following columns.
• Time - Displays the time the program was run.
•Recorded - Displays the amount of time that the program the program was active.
•Total - Displays the amount of time that the program was actively in view.
•User - Displays the name of the user that ran the program.
file:///H|/PCPandora_5x_HelpSystem.htm (21 of 71)6/6/2008 7:58:31 AM
PC Pandora User Manual
•Application - Displays the name of the application that was run.
•Window Title - Displays the window title (text in title bar of the application). Document names or sub-screen names are typically displayed here.
How to Copy and Delete Program Data:
To copy or delete select a program event in the bottom half of the screen and then right click on it. These functions are also available in the main toolbar menu under “Edit”.
Note that Copy from this screen simply copies the data you see in the viewer, not the actual program.
3.3 Websites
PC Pandora can capture all website URLs opened on the computer so you can see exactly what sites have been viewed. Captured data includes the date and time of the
activity, which user ran the program, the website title, the page size, and the website URL.
View:
To view websites recorded click on the Websites tab. The view is broken down into two halves. The top half of the view categorizes the activity by date, then by domain
name, then by specific URL, then by specific webpage. The bottom half of the view provides the specific detail on the URL based on the category selected in the top half.
Once the URL website is selected the bottom will display the following columns.
file:///H|/PCPandora_5x_HelpSystem.htm (22 of 71)6/6/2008 7:58:31 AM
PC Pandora User Manual
•Time - Displays the time the website was open.
•User - Displays the name of the user that viewed the website.
•Document Title - Displays the window title (text in title bar of the application). Document names or sub-screen names are typically displayed here.
•Size – Indicates the total document size of the webpage viewed.
•URL - Displays the specific URL (web address) that was open. You can double click on the URL and your internet browser will open up the URL (web address) as shown
above.
Go to Website:
You may go the Website recorded by doing the following
1.
2.
Select a specific URL in the bottom half of the screen
Then right-click the item and click on Go To Website
1.
Select a specific URL in the bottom half of the screen.
2.
Click on
Or
button at the top of the page.
You may also open up URL (website address) by going to Action in the Menu tool bar.
Copy and Delete Websites:
To Copy and Delete Website Data select a program event in the bottom half of the screen and then right-click it. These functions are also available in the main toolbar menu
under Edit. Note that Copy Line copies all of the data from this screen that you see in the viewer, and Copy Website Location (URL) copies just the URL from the data.
Block Websites:
You can block access to specific websites by right-clicking on any URL and choosing Add Website to Black List. This will automatically block future visits to that specific
website showing either a generic message or custom error message based on the Parent (Web site access control) Settings you have specified.
3.4 Keystrokes
PC Pandora can capture all keyboard input on the computer so you can see exactly what the user has typed. This is useful to see text entered into an instant message,
email, or other application.
View:
To view Keystrokes recorded click on the Keystrokes tab. The view is broken down into two halves.
file:///H|/PCPandora_5x_HelpSystem.htm (23 of 71)6/6/2008 7:58:31 AM
PC Pandora User Manual
The top half of the view categorizes the keystrokes by date and then by application. The bottom half of the view provides the specific detail on the activity based on the
category selected in the top half.
The bottom half will display the following columns:
•Time - Displays the time that the keystrokes were entered in.
•Recorded - Displays the amount of time that keystrokes were active.
•Total - Displays the amount of time that keystrokes were actively in view.
•User - Displays the name of the user that entered the keystrokes.
•Application - Displays the name of the application that was run.
•Key Presses - Displays the total number of keys that were pressed and logged.
The Magnifier is used to view the actual keystrokes that have been recorded (see below for example). To activate the Magnifier, right-click on a keystroke and select View
Keystroke or click on the
file:///H|/PCPandora_5x_HelpSystem.htm (24 of 71)6/6/2008 7:58:31 AM
button on the Keystroke toolbar.
PC Pandora User Manual
Below are the buttons used in Magnifier:
• Previous/Next: These are used to navigate backwards and forwards through keystroke logs, if applicable.
• Print: This is used so that you can Print your keystrokes.
• Delete: This is used so that you can delete keystrokes.
• Close: This closes the view keystrokes screen.
• Show key combinations: This causes the view keystrokes screen to include non-alphanumeric key presses in the display. These include keys such as Enter, CTRL,
Backspace, etc. This allows you to see a complete history of keyboard activity but can sometimes sacrifice readability of documents, emails, and instant message (IM)
conversations.
Copy and Delete Keystrokes:
To copy and delete Keystroke Data select a keystroke event in the bottom half of the screen and then right-click it. These functions are also available in the main toolbar
menu under Edit. Note that Copy from this screen simply copies the data you see in the viewer, not the actual keystrokes. You may also print, delete, and or copy using the
tool bar in the magnifier window.
3.5 Chats
PC Pandora can capture all instant messenger conversations for all of the popular messaging networks. This includes both inbound and outbound messages so you can see
the full and complete instant message conversation.
View:
To view recorded conversation(s) on Instant Messenger click on the Chats tab. The view is broken down into two halves.
file:///H|/PCPandora_5x_HelpSystem.htm (25 of 71)6/6/2008 7:58:31 AM
PC Pandora User Manual
The top half of the view categorizes the conversations by date and instant messaging network and messaging logon name. The bottom half of the view provides the specific
detail on the activity based on the category selected in the top half.
Once a conversation is selected the columns below are displayed:
• Date - Displays the date the messaging conversation occurred. The actual time the conversation occurred is detailed in the specific conversation.
•User - Displays the name of the local user that ran the chat.
• Protocol - Displays the messaging network used such as AIM, ICQ, MSN, Yahoo, etc.
• Local User - Displays the messaging logon name of the user on the computer that you are monitoring.
• Remote User - Displays the messaging logon name of the user that is being communicated with.
• Message - Details the total number of messages contained in the conversation.
• Characters - Details the total number of characters contained in the conversation.
Read Messages:
The Magnifier is used to view the actual messages that have been recorded. To activate the Magnifier right-click a conversation and choose Read Instant Messages, or click
file:///H|/PCPandora_5x_HelpSystem.htm (26 of 71)6/6/2008 7:58:31 AM
PC Pandora User Manual
the
button on the Instant Messages toolbar.
Below are the buttons used in Magnifier:
• Previous/Next: These are used to navigate backwards and forwards through instant messages, if applicable.
• Print: This is used so that you can Print your instant message(s).
• Print: This is used so that you can delete instant message(s).
• Close: This closes the view instant messages screen.
Copy and Delete Instant Messenger Data:
You can select text in the Instant Messages screen and then right-click to access menu items such as Copy or Delete. You may also print, delete, and or copy using the tool
bar in the magnifier window.
3.6 User Activity
PC Pandora can capture user activity information. This includes user login names / passwords of PC user accounts, and the different types of events that took place.
View:
To view recorded user activity click on the “User Activity” tab. The view is broken down into two halves.
file:///H|/PCPandora_5x_HelpSystem.htm (27 of 71)6/6/2008 7:58:31 AM
PC Pandora User Manual
The top half of the view categorizes the user activity by date and user login name. The bottom half of the view provides the specific detail on the activity based on the
category selected in the top half.
Once a user name is selected the columns below are displayed:
• Time - Displays the time the event occurred.
• Event - Displays the event that occurred such as Log On / Off, Screen Saver Stopped / Started, System Startup / Shut Down, Locked / Unlocked Workstation, etc.
• User - Displays the user name of the user on the computer that you are monitoring.
• Password - Displays the password of the user(s) you are monitoring. Note, if a Log On event contains no password that is because that user has no Log On password.
3.7 E-mail
PC Pandora can capture sent and received emails messages from any locally installed email client such as Microsoft Outlook, Outlook Express, Netscape, Thunderbird, etc.
Note that it currently does not capture send and receive emails from web based email services on this specific tab. For web based email services you need to utilize
Snapshots and Keystrokes logs.
View:
To view recorded send and receive emails, click on the Emails tab. The view is broken down into two halves.
file:///H|/PCPandora_5x_HelpSystem.htm (28 of 71)6/6/2008 7:58:31 AM
PC Pandora User Manual
The top half of the view categorizes the date and email user. The bottom half of the view provides the specific detail on the activity based on the category selected in the top
half.
Once a date or email user is selected the columns below are displayed:
• Date - Displays the date of when the email was sent or received.
• User - Displays the user name of the user on the computer that you are monitoring.
• Direction - Displays the direction of the email such as Sent or Received.
• From - Displays the email address of who sent the email.
• To - Displays the email address of who email address was sent to.
• Subject - Displays the password the subject of the email address.
• Size - Displays the file size of the email.
• Attachment - Displays the number of attachments in email.
• Program - Displays the program (email client) used.
Read Messages:
The Magnifier is used to view the actual email messages that have been recorded. To activate the Magnifier right-click on an email message and choose Read E-mail, or
click the
button on the Email toolbar.
file:///H|/PCPandora_5x_HelpSystem.htm (29 of 71)6/6/2008 7:58:31 AM
PC Pandora User Manual
Below are some of the Magnifiers features:
• Previous/Next: These buttons are used to navigate backwards and forwards through keystroke logs, if applicable.
• Print: This button is used so that you can Print your email message(s).
• Print: This button is used so that you can delete email message(s).
• Close: This button closes the View Email screen.
• Email Header: Below the Magnifiers tool bar is the email header, this includes information like From, To, CC, BCC, Date Subject, and any attachments that were include
in the email.
• Attachments: This field will include any attachments that were sent or received with the email. If no attachment(s) are included the drop down list will be blank. Note, that
attachments will be deleted if they are more then the size set in your PC Pandora settings.
• Open: This button is used to open your attachment(s) included in your email. Once you click Open, the message above will be displayed. To view attachment select Yes
button.
• Save as: This button is used to save your email. Once you click Save as, the message above will be displayed. To view attachment select Yes button.
Copy and Delete Emails Data:
You open email magnifier and use the tool bar at the top to Copy, Print, and or Delete email messages. You may also print, delete, and or copy using the tool bar in the
magnifier window.
3.8 P2P
PC Pandora can capture download activity from P2P application such as Kazaa (Kazaa lite, Kazaa etc), EDonkey (Emule, Edonkey, etc), Gnutella (Limewire, Bearshare,
etc), and Multinetwork (Filipipe, Zltrax, etc), and Torrent activity.
file:///H|/PCPandora_5x_HelpSystem.htm (30 of 71)6/6/2008 7:58:31 AM
PC Pandora User Manual
View:
To view recorded P2P activity, click on the P2P tab. The view is broken down into two halves.
The top half of the view categorizes the date and user. The bottom half of the view provides the specific detail on the activity based on the category selected in the top half.
Once a date or user is selected the columns below are displayed:
• Date - Displays the date of P2P activity
• User - Displays the user name of the user on the computer that you are monitoring.
• Program - Displays the P2P program is used.
• Media - Displays the type of media it tried to download, search, etc such as audio, video, etc.
• Action - Displays the event it tried to attempt such as download, search, etc.
• Text - Displays the text of the media it tried to download, search etc. For example, it they tried to download a file it will displays the file name they attempted to download. If
they were searching for a specific file it will display the text they entered in the Search field.
3.9 Webcam
PC Pandora can capture images from any attached webcam so you can see exactly who is using the computer and what they are physically doing. Note that PC Pandora
cannot capture webcam snapshots if the webcam is in use in another program. This means if a user is having a video chat the webcam will be in use an no webcam
snapshots will take place in PC Pandora. This feature does not record webcam video chats, it only records snapshots using the webcam when it is not in use.
View:
To view Webcam snapshots, click on the Webcam tab. The view is broken down into two halves (See below).
file:///H|/PCPandora_5x_HelpSystem.htm (31 of 71)6/6/2008 7:58:31 AM
PC Pandora User Manual
The left half of the view categorizes the webcam snapshots by date. The right half of the view provides access to the Webcam snapshots based on the date selected in the
left half. To change amount of data recorded for Webcam snapshots please see our Settings section.
You are able to view Webcam snapshots in 3 different ways: Details, Thumbnails, and Magnifier View. Below are descriptions of all three.
Detail View
Detail view provides an Explorer-like view of the Webcam snapshots. This includes Time, User, and Webcam columns. See below for example.
file:///H|/PCPandora_5x_HelpSystem.htm (32 of 71)6/6/2008 7:58:31 AM
PC Pandora User Manual
• How to change to Detail View:
3.
Click on Webcam tab
4.
Click on Details
Or you can also change this by going to View in toolbar, select Snapshot Display Mode and click on Details.
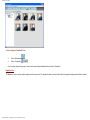
Thumbnail View
Thumbnail view is the default view for Webcam snapshots. It provides the ability to quickly view the Webcam snapshots recorded and choose images you want to view in
closer detail. See below for example:
file:///H|/PCPandora_5x_HelpSystem.htm (33 of 71)6/6/2008 7:58:31 AM
PC Pandora User Manual
• How to change to Thumbnail View:
3.
Click on Webcam tab
4.
Click on Thumbnails
Or you can also change this by going to View in toolbar, select Snapshot Display Mode and click on Thumbnails.
Magnifier View
The Magnifier is used to view the webcam snapshots in full-screen mode. This provides the ability to see all of the detail in the snapshot including typed text that is viewable.
file:///H|/PCPandora_5x_HelpSystem.htm (34 of 71)6/6/2008 7:58:31 AM
PC Pandora User Manual
• How to change to Magnifier View:
There are 3 different ways you can magnify your Webcam snapshots. See below:
3.
Double click on the Webcam snapshot you wish to Magnify
3.
4.
Select Webcam snapshot you wish to Magnify
Right click on Webcam snapshot and click Magnify
4.
5.
6.
Select Webcam snapshot you wish to Magnify
Click on Action in Tool bar
Click on Magnify Snapshot
Or
Or
file:///H|/PCPandora_5x_HelpSystem.htm (35 of 71)6/6/2008 7:58:31 AM
PC Pandora User Manual
Or once a Webcam snapshot is selected click on the Magnify
button
How to use Magnifier Tools:
Once you are in the Magnifier view it also includes some tools. See below for example:
This provides the ability to view the snapshots in an automated slideshow format. Copy, save, and delete functions are also provided.
= Deletes Snapshot
= Saves Snapshot
= Hides Magnifier Tools and blue arrow will be displayed in the bottom, right hand corner of your desktop screen. To display Magnifier Tools again, click on the blue
arrow at the bottom, right hand corner of your screen.
= Closes Magnifier view and returns to Snapshots Tab.
= Displays the first snapshot in series.
= Displays the previous snapshot.
= Begins playback (slideshow) mode. Snapshots will automatically be displayed in a series.
= Stops slideshow mode
= Displays the next snapshot.
= Displays the last snapshot in series
= Allows you to forward or Rewind to a snapshot.
How to Copy, Save, Print or Delete Snapshots:
You can Copy, Save, and delete by using the Thumbnails or Details view, then right-click on a Snapshot. These functions are also available in the toolbar menu. You can
also Copy, Save, and delete using the Magnifier tools. Note that Copy from this screen simply copies the actual screenshot, not the data you see in the viewer. You may also
file:///H|/PCPandora_5x_HelpSystem.htm (36 of 71)6/6/2008 7:58:31 AM
PC Pandora User Manual
Print snapshots by selecting snapshot and right clicking or by going to File in tool bar menu.
If you are have issues viewing your Webcam snapshots please see our Troubleshooting section.
3.10 File tracking
PC Pandora can capture all data related to files that are created, modified, or deleted on the computer so you can see exactly what data operations are occurring. Captured
data includes the date and time of the activity, which user affected the file, the file action, and the file path (location).
View:
To view File tracking recorded click on the File Tracking tab. The view is broken down into two halves.
The top half of the view categorizes the activity by date, then by user, then by specific file type. The bottom half of the view provides the specific detail on the activity based
on the category selected in the top half.
The bottom half will display the following columns.
• Time - Displays the time the file was affected.
•User - Displays the name of the user that ran the program.
•Action - Displays the type of action that occurred against the file.
•Path - Displays the full path (location) and name of the file.
How to Copy and Delete File Tracking Data:
file:///H|/PCPandora_5x_HelpSystem.htm (37 of 71)6/6/2008 7:58:31 AM
PC Pandora User Manual
To copy or delete select a File Tracking event in the bottom half of the screen and then right click on it. These functions are also available in the main toolbar menu under
“Edit”. Note that Copy from this screen simply copies the data you see in the viewer, not the actual file.
3.11 Search Queries
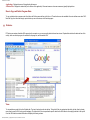
PC Pandora can capture all search queries entered into popular and common search engines such as Google, Yahoo, MSN, and others. This feature makes it easy to
quickly review what data users are searching for.
View:
To view recorded search queries click on the “Search Queries” tab. The view is broken down into two halves.
The top half of the view categorizes the user activity by date and user login name. The bottom half of the view provides the specific detail on the activity based on the
category selected in the top half.
Once a user name is selected the columns below are displayed:
• Date - Displays the time the event occurred.
• User - Displays the user name of the user on the computer that you are monitoring.
• Engine - Displays the search engine the search was performed in.
• Query- Displays the specific search query that was searched for.
file:///H|/PCPandora_5x_HelpSystem.htm (38 of 71)6/6/2008 7:58:31 AM
PC Pandora User Manual
3.12 E-Mail Reports
Email reports is data recorded by PC Pandora that include a summary of the recorded activity and most details of recorded activity to any email address of your choice. This
powerful feature allows you to view activity while not requiring you to have physical access to the computer being monitored.
See our Settings section to setup your E-mail Reports.
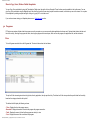
View:
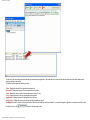
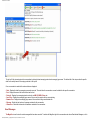
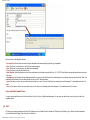
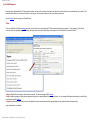
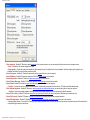
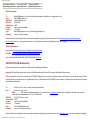
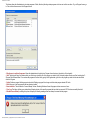
Once you’re IRIS (e-mail Reports) settings are done, you will receive an e-mail report from PC Pandora once data has been recorded. To view reports go to the E-mail
account in which you specified in the IRIS settings and open up the e-mail report sent. Below is an example of how it should look in Microsoft Outlook:
• Subject: Displays the time range in which data was recorded. This can be changed in IRIS settings.
• Body: Displays a summary of what data was captured during the time ranged displayed in the subject header. You can change the different data recorded you would like to
be included in the IRIS settings.
• Attachment: Attached to the e-mail includes all the details of the data recorded within the time period displayed in the subject header (as shown above).
Open attachment to view details.
file:///H|/PCPandora_5x_HelpSystem.htm (39 of 71)6/6/2008 7:58:31 AM
PC Pandora User Manual
3.13 Filter
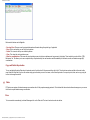
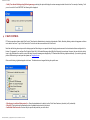
You may also view recorded data by using our Filter feature. This feature allows you to filter data that you want to be displayed making it easier to view data that you’re most
interested in.
View:
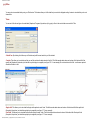
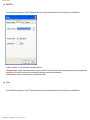
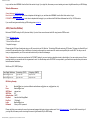
You can set a filter for each type of recorded data (Snapshots, Programs, Keystrokes, etc) by going to View in the main tool bar menu and click Filter.
•Match Case: By checking this it allows you to filter data only with the exact match in your filter criteria’s.
•Contain: This allows you to enter data so that you can filter and view the data entered in this field. This field searches data under each column of the bottom half of that
specific tab (Snapshots, Keystrokes,) not data that may be display in a magnifier (see figure 3.10.1 for an example) Do not enter dates in this field - use the were captured
after/before fields to do this.
•Begin with: This allows you to enter data that begins with a particular word / letter. This field searches data under each column of the bottom half of that specific tab
(Snapshots, Keystrokes,) not data that may display in a magnifier (see figure 3.7.1 for an example).
•End with: This allows you to enter data that ends with a particular word / letter. This field searches data under each column of the bottom half of that specific tab
(Snapshots, Keystrokes,) not data that may display in a magnifier (see figure 3.7.1 for an example).
file:///H|/PCPandora_5x_HelpSystem.htm (40 of 71)6/6/2008 7:58:31 AM
PC Pandora User Manual
•were captured after: This allows you to select a date and time that was recorder after a particular date and time. This field searches data in the Date & Recorded columns
of the bottom half of that specific tab (Snapshots, Keystrokes, etc). This does not search data that may display in a magnifier or in a non-Date/Time column.
•were captured before: This allows you to select a date and time that was recorder before a particular date and time. This field searches data in the Date & Recorded
columns of the bottom half of that specific tab (Snapshots, Keystrokes, etc). This does not search data that may be display in a magnifier.
•Ok: Allows you to save changes to the Set Filter window.
•Remove Filter: Allows you to remove the current filter and enter a new one.
•Cancel: Allow you to cancel any changes you have made in the Set Filter window.
4
COPY, SAVE, or DELETE RECORDED DATA
Below are they different data types that are recorded by PC Pandora that you may copy, save, or delete data. Select the data recorded you wish to copy, save, or delete.
•Snapshots
•Programs
•Website
•Keystrokes
•Instant Messenger
•User Activity
•Emails
•P2P
•Webcam
•File Tracking
•Search Queries
5
SETTINGS
The Settings dialog provides the ability to enable, disable, or modify the access to PC Pandora, change PC Pandoras password, control the ability to email reports, and alter
any of the other features available. This will be described in more detail in the sections below.
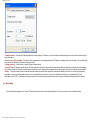
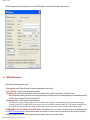
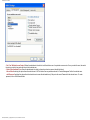
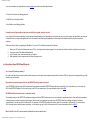
5.1 General
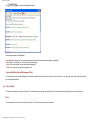
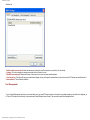
To go to the General settings click on Tools in PC Pandora tool bar at the top of viewer and select Options. The first tab is called the General tab.
file:///H|/PCPandora_5x_HelpSystem.htm (41 of 71)6/6/2008 7:58:31 AM
PC Pandora User Manual
• Disable Recorder - This option will completely disable the recording ability of PC Pandora. You will not be able to enable recording via the menus or other methods until you
uncheck this option.
• Show tray icon when recording - This option causes a system tray icon to be displayed whenever PC Pandora is recording activity on the computer. All users will be able
to see this icon and be informed "your activity is being recorded".
• Change password - Click this button to open the Change Password dialog.
• Inactivity Time - PC Pandora uses the value in this field to determine how long the computer has to remain unused before it should stop recording activity on the computer.
This is used to prevent PC Pandora from needlessly recording when there is no physical activity being performed on the computer, such as if the computer is left on overnight.
• Hotkey - To open the Viewer and see the data that has been recorded you must enter the special key combination as detailed in the field. You can modify the default key
combination to anything you desire (recommended). It is recommended that there be at least 3 keys in your combination and that they do not utilize simple ALT + key
combinations such as CTRL + C as those are commonly used as menu shortcuts and may cause other users on the computer to accidentally attempt to open PC Pandora.
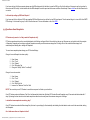
5.2 Recording
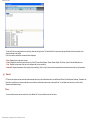
To go to the Recording settings click on Tools in PC Pandora tool bar at the top of viewer and select Options. Click on the second tab, which is called Recording.
file:///H|/PCPandora_5x_HelpSystem.htm (42 of 71)6/6/2008 7:58:31 AM
PC Pandora User Manual
• Take Snapshots - Enables PC Pandora to capture snapshots of the computer screen so you can see exactly what the user sees on the computer screen.
• Every - Controls the time interval snapshots are taken.
• Image quality - Controls the quality of the snapshots. Higher quality will result in a higher file size of each snapshot. Note that a higher quality setting for your
snapshots will result in the size limits being met more quickly.
• Record Programs - Enables PC Pandora to capture data on all programs that are run on the computer.
• Record Websites - Enables PC Pandora to capture the URL of all websites visited on the computer.
• Record Keystrokes - Enables PC Pandora to capture all keyboard input on the computer.
• Record Instant Messages - Enables PC Pandora to capture all Instant Messages entered in the computer.
• Record Email - Enables PC Pandora to capture all emails using email client software in the computer.
• Max Size - Controls the size limit of attachments within emails. If attachment(s) are greater then this max size, PC Pandora will delete attachment(s).
• Take Webcam Snapshots - Enables PC Pandora to capture snapshots from attached webcams so you can see exactly who is using your computer.
• Settings - Controls the webcam snapshots including the time period between snapshots, and the camera used to take the snapshot.
• Record User Activity - Enables PC Pandora to capture the log on and log off events for all users, as well as their Windows log on passwords, if any.
• Record P2P Activity - Enables PC Pandora to capture peer-to-peer activity including file downloads on popular networks.
• Record File Operations - Enables PC Pandora to capture all file creating, modification, and deletion events that occur on the computer.
• Ignore System Events – Forces the File Tracking to ignore system generated activity. Uncheck this option and you will see an enormous amount of file activity that is
not specifically generated by an actual user.
file:///H|/PCPandora_5x_HelpSystem.htm (43 of 71)6/6/2008 7:58:31 AM
PC Pandora User Manual
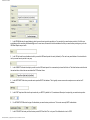
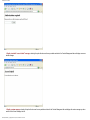
5.3 Data Files
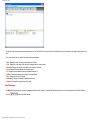
To go to the Data Files settings click on Tools in PC Pandora tool bar at the top of viewer and select Options. Click on the third tab, which is called Data Files.
• Folder to store data - This is the folder that the recorded data is saved to.
• Maximum total size - Limits the total disk space utilized for storing recorded data. This limit will be met quicker with a higher image quality setting and/or a higher delete
data after setting. This limit will be met slower with a lower image quality setting and/or lower deleted data after setting.
• Delete data after - Controls the maximum amount of days recorded data is saved.
5.4 Users
To go to the Data Files settings click on Tools in PC Pandora tool bar at the top of viewer and select Options. Click on the third tab, which is called Data Files.
file:///H|/PCPandora_5x_HelpSystem.htm (44 of 71)6/6/2008 7:58:31 AM
PC Pandora User Manual
• Record activities for every user: Selecting this option will record activity for all users that log into PC.
• Record activities for selected user only: Selecting this option will only record activity for users that are selected in the list.
• Record activity of newly created users: Enables to automatically record new user(s) account created.
6
IRIS EMAIL REPORTS
IRIS Email Reports is an optional feature that provides activity reports to you via standard email. Reports can include any data that is already recorded in the viewer. Thus
IRIS Email Reports allows you to view activity while not requiring you to have physical access to the computer being monitored. IRIS Email Reports is configured and setup
the same way as any other standard email programs such as Microsoft Outlook.
Topics:
• Getting Started – Step by Step Instructions
• Accessing IRIS Settings
• IRIS Field Descriptions
• SMTP/POP Email Server Settings
• Frequently Asked Questions
6.1 Getting Started
file:///H|/PCPandora_5x_HelpSystem.htm (45 of 71)6/6/2008 7:58:31 AM
PC Pandora User Manual
To start using IRIS Email Reports you need to understand the following concepts:
v Your computer connects to the internet via your internet service provider (ISP). This connection can be made via dial-up, cable internet, DSL, or other
methods. This is simply the physical connection that allows your computer access to the internet. Your computer can then surf the web, communicate online
using email or chat, play games online, and perform other internet activities.
v Your ISP typically provides you with one or more email accounts to use to send and receive email. These email accounts utilize your ISPs email servers.
These email servers are often only accessible to you when you are physically connected to the internet via your ISP. These email accounts are sometimes are
not available to you when connected to the internet via a different ISP. For example, COX does not allow access to their email service when connected to the
internet via RoadRunner or any other ISP.
v There are also a variety of free and fee-based email providers. These do not require you to connect to the internet via a specific ISP and are accessible from
any computer. Some examples of these are Hotmail, GMail, and Yahoo Mail. However, some of these come with their own set of restrictions such as requiring
you to use their service via their webpage only and otherwise prevent you from accessing your email via external programs such as Microsoft Outlook or IRIS
Email Reports.
v Important Though IRIS Email Reports is a very powerful feature it significantly increases the risk that the monitoring may be detected. This is due to the
internet activity that is required to send the email reports. This internet activity may possibly be detected by firewalls or other security applications. We strongly
recommend you thoroughly test the IRIS Email Reports to ensure any firewall messages or other unexpected messages that may appear can be disabled or
removed if that is your desire.
To start using IRIS Email Reports you need to gather the following information:
v Important An email service provider that does not require Secure Socket Layer (SSL) support in order to send emails. IRIS Email Reports does not currently
support SSL.
v An email service provider that provides remote access to their SMTP servers. Some email providers, such as web-based email providers, require you to use
their service from their specific website and do not provide the ability to send emails using other programs.
v If you monitoring a laptop that may connect to the internet using different internet service providers you will need an email service provider that is not tied to a
specific internet service provider.
v The following SMTP server and parameters from your email service provider.
1. Your email address
2. Email account login or username (often this is the same as, or a portion of, your email address)
3. Email account password
4. SMTP Host (server)
5. SMTP Port
6. Authentication Type: SMTP (the most common method), POP, or none.
7. Pop Host (if the authentication type is POP)
8. Pop Port (if the authentication type is POP)
9. Web mail access page. Nearly all email service providers provide a web-based access method so you can check your email away from your
personal computer.
All of the information above can be obtained by contacting your email service provider directly. Additionally, we have also provided a list of SMTP/POP email server settings
for many email service providers as a convenience to our users. However, we are not able to fully test and verify all of the settings provided. We strongly recommend you
contact your email service provider directly to ensure you have the correct settings.
Important Before proceeding further please validate that the user name you are entering is correct. Test your login by accessing your email account using the web mail
interface. For example, if your ISP is COX cable then you will want to visit http://webmail.west.cox.net/ and login. If your login fails this means you are entering an incorrect
Username/Password and your IRIS Settings will also fail if you enter the same login information.
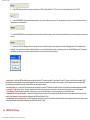
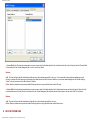
6.2 Accessing IRIS Settings
file:///H|/PCPandora_5x_HelpSystem.htm (46 of 71)6/6/2008 7:58:31 AM
PC Pandora User Manual
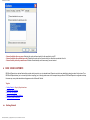
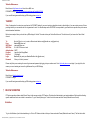
IRIS Email Reports is accessed by clicking the Tools menu then IRIS Email Reports. This will open the IRIS Options screen seen below.
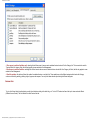
6.3 IRIS Field Descriptions
IRIS includes the following features and options.
• Send reports by e-mail - Enables the emailing of summary and detail reports of recorded activity.
• Every {N} hour(s) - Controls the interval that the reports are emailed.
• What data to send - Controls which recorded data is included in the email reports. Check on data you want included in your IRIS email reports.
Note: that snapshots significantly increase the size of the reports and may impact your ability to send or receive emails depending on the email limitations imposed by
the both the sender and recipient’s internet service provider (ISP).
• Maximum report size - Limits the maximum size of the email report.
Note: Setting this size too large may impact your ability to send or receive IRIS email reports. Depending on the email limitations imposed by the both the sender and recipients
internet service provider (ISP). For example, some ISPs enforce a maximize size per email of 3MB and/or a maximum total mailbox size of 10MB. Setting the maximum IRIS report
size to 5MB will cause the email to fail due to size restrictions enforced by the ISP. To negate this imply set the size limit at or below the restrictions enforced by your ISP.
• Email options - This is the critical portion of the IRIS options. These parameters must be set correctly or the reports will not be sent. We have provided a
list of SMTP/POP email server settings for many email service providers as a convenience to our users. However, we are not able to fully test and verify all of the settings
provided. We strongly recommend you contact your email service provider directly to ensure you have the correct settings.
file:///H|/PCPandora_5x_HelpSystem.htm (47 of 71)6/6/2008 7:58:31 AM
PC Pandora User Manual
1. In the FROM field enter the email address in which your email service provider provided you. For example if your email service provider is Cox Cable your
email address will be something like [email protected]. In most cases, this needs to be the email address in which your email service provider gave you or else
IRIS Email Reports may not work.
2. In the TO field enter the email address in which you want the IRIS email reports to be sent (delivered) to. This can be any email address. It is not restricted or
tied to your email service provider in any way.
3. In the SUBJECT field enter the subject you wish to use for IRIS email reports. It is recommended you leave this field as is. The default values contain the start
time and end time of when data was recorded within PC Pandora Viewer.
4. In the SMTP HOST field enter your email service provider SMTP Host address. This is typically a server name such as smtp.server.com and not an IP
address.
5.
In the PORT drop down field enter the port number for your SMTP. By default it is 25, sometimes a different port is required by your email service provider.
6.
For AUTHENTICATION select the type of Authentication your email service provider uses. This is most commonly SMTP authentication.
7.
In the POP HOST field enter your Email service provider POP Host field. This is only used if the Authentication is set to POP3.
file:///H|/PCPandora_5x_HelpSystem.htm (48 of 71)6/6/2008 7:58:31 AM
PC Pandora User Manual
8.
In the PORT drop down field enter the port number for your POP Host. By default its 110. This is only used if the Authentication is set to POP3.
9. In the USER NAME field enter the username provided to you by your email service provider. This may require you to enter your full email address or only the
first portion of your email address.
10. In the PASSWORD field enter the password your email service provider provided you with. This is the same password you use when accessing your web email
account.
11. Click on the “Send Test Message” button to test that you have set up IRIS correctly. If your settings are correct the “Messages sent OK” confirmation will be
displayed. If you receive an error please double check that you have entered the settings correctly. A simple typo error can cause IRIS Settings to fail. We strongly
recommend you contact your email service provider directly to ensure you have the correct settings.
• Send secretly - By default IRIS Email Reports are sent directly from the PC Pandora executable. “Send Secretly” forces PC Pandora to further hide the sending of IRIS
Email Reports by utilizing popular internet enabled applications that may already be installed and running on your computer. This feature decreases the risk that the IRIS
Email Reports may be detected due to the internet activity required to send the emails.
• But send directly if... - Instructs PC Pandora to send the reports directly from the PC Pandora executable if there are no popular internet enabled applications available
for use with the “Send Secretly” feature. This may increase the risk that the monitoring may be detected due to the internet activity required to send the email reports.
• View IRIS log - Displays the email send history. This is where you can view an explanation for any errors that may have occurred during send.
• Automatically Forward all incoming - Causes PC Pandora to forward you copies of all recorded emails that were Received on the computer being monitored. These
emails will be forwarded to the email address configured in the IRIS Email Reports To field.
• Automatically Forward all outgoing - Causes PC Pandora to forward you copies of all recorded emails that were Sent on the computer being monitored. These emails
will be forwarded to the email address configured in the IRIS Email Reports To field.
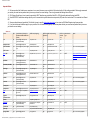
6.4 SMTP/POP Settings
file:///H|/PCPandora_5x_HelpSystem.htm (49 of 71)6/6/2008 7:58:31 AM
PC Pandora User Manual
Important Notes:
v We have provided the list below as a convenience to our users. However, we are not able to fully test and verify all of the settings provided. We strongly recommend
you contact your email service provider directly to ensure you have the correct settings. There is no guarantee the settings below will work.
v SSL (Secure Socket Layer) is not currently supported by IRIS. Therefore, any provider that lists SSL = YES in the table below will not work with IRIS.
v Some SMTP/POP email server settings require you to be connected to a specific internet service provider (ISP) and will not work when PC is connected to a different
ISP.
v Some providers below are hyperlinked. Click the link to jump to specific step by step instructions on how to set up IRIS Email Reports using these providers.
v If you notice that some fields are empty for your provider or it’s not linkable for step by step instructions please contact your email service provider directly to ensure
you have the correct settings.
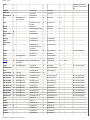
Table 6.4.1
Server
SSL
Email Address (Example for
FROM and USER NAME fields
in IRIS)
SMTP Host (Outgoing)
SMTP Port POP Host (Incoming)
(Default 25)
POP Port Authentication
(Default
Type
110)
1&1
No
[email protected]
(Full Email Address)
smtp.1and1.com
25
110
[email protected]
mail.adelphia.net
AT&T WorldNet
Yes
[email protected] (without @att. mailhost.worldnet.att.net
net)
AT&T Yahoo
Yes
AOL (2G) **
No
Adelphia Cable *
pop.1and1.com
25
mail.adelphia.net
110
25
postoffice.worldnet.att.net
110
smtp.att.yahoo.com
465
pop.att.yahoo.com
995
[email protected],
[email protected]
(Full Email Address)
smtp.aol.com, smtp.aim.com
587
pop.aol.com, pop.aim.com
110
BellSouth
[email protected]
(without @southbell.net)
mail.bellsouth.net
25
mail.bellsouth.net
110
Bluebottle (250 MB) ** No
[email protected]
mail.bluebottle.com
25, 26 or
587
mail.bluebottle.com
143
BlueLight
[email protected]
(Full Email Address)
smtp.bluelight.net
25
mail.bluelight.net
110
[email protected]
(without @cableone.net)
authmail.cableone.net
25
mail.cableone.net
110
No
Cableone
Charter
Yes
[email protected]
(Full Email Address)
smtp.charter.net
25
pop.charter.net
110
Comcast
Yes
[email protected]
(Full Email Address)
smtp.comcast.net
387
mail.comcast.net
110
[email protected]
smtp.compuserve.com
25 or 587
pop.compuserve.com
25
[email protected] (without
@cox.net)
Depends on Location
25
Depends on Location
110
[email protected]
smtp.cypresscom.net
25
Mail.northivy.com
110
Compaq.net
smtp.compaq.net
Compuserve
Cox *
No
Cypress
Communications
Dotster
No
[email protected]
(Full Email Address)
mail.earthlink.net, smtpauth.
earthlink.net
Frontier.net
No
(Full Email Address)
smtp.frontiernet.net
Yes
[email protected]
smtp.gmail.com
GoDaddy
Google GMail
SMTP
AOL provides FREE email accounts
which have been verified to work
with IRIS.
SSL is not currently supported.
POP3
SSL is not currently supported.
POP3
pop.registerapi.com
587
pop.earthlink.net
465
pop.gmail.com
use your ISP's SMTP mail server
file:///H|/PCPandora_5x_HelpSystem.htm (50 of 71)6/6/2008 7:58:31 AM
SSL is not currently supported.
pop3.compaq.net
smtpauth.registerapi.com
EarthLink
Notes
110
SMTP
mail.godaddy.com
995
SSL is not currently supported.
PC Pandora User Manual
Hotmail
Hotmail does not provide remote
SMTP access and will not work with
IRIS.
HughesNet
smtp.hughes.net
mail.hughes.net
ICMail (1 GB) **
mail.icmail.net
mail.icmail.net
Insight Broadband
No
Juno
mail.insightbb.com
[email protected]
(Full Email Address)
Lycos **
smtp.juno.com
25
pop.juno.com
110
smtp.mail.lycos.com or your
ISP's SMTP
110
pop.mail.lycos.com
25
Mac.com
smtp.mac.com
mail.mac.com
Mail.com
use your ISP's SMTP mail server
pop1.mail.com
Medicom
No
mail.mchsi.com
Millennium Digital
Media
No
mail.cablespeed.com
Mindspring
smtp.mindspring.com
pop.mindspring.com
Mpower
Communications
smtp.mpowercom.net
pop.mpowercom.net
MSN
smtp.email.msn.com
(cannot send pop3 email from
other domains)
pop3.email.msn.com
Netscape
Yes
smtp.isp.netscape.com
NetZero
25
smtp.netzero.net
PacBell
[email protected]
110
SSL is not currently supported.
pop.netzero.net
mail.pacbell.net
postoffice.pacbell.net
Pacifier
smtp.pacifier.com
PeoplePC
No
[email protected] (Full
Email Address)
Prodigy
Yes
[email protected]
RLWD Web Services
smtpauth.peoplepc.com
587
smtp.prodigy.net
25
smtpout.secureserver.net
Rediff
Rogers Broadband
pop3.isp.netscape.com
110
(with out @)
smtp.broadband.rogers.com
110
pop.prodigy.net
110
SMTP
SSL is not currently supported.
mail.yourfulldomainname
smtp.rediffmailpro.com
No
pop.peoplepc.com
pop.rediffmailpro.com
587
SBC Global Ameritech Yes
[email protected]
smtp.ameritech.yahoo.com
pop.ameritech.yahoo.com
SSL is not currently supported.
SBC Global Flash
[email protected]
smtp.flash.yahoo.com
pop.flash.yahoo.com
SSL is not currently supported.
Yes
SBC Global NVBell
Yes
[email protected]
smtp.nvbell.yahoo.com
pop.nvbell.yahoo.com
SSL is not currently supported.
SBC Global Pacbell
Yes
[email protected]
smtp.pacbell.yahoo.com
pop.pacbell.yahoo.com
SSL is not currently supported.
SBC Global Prodigy
Yes
[email protected]
smtpauth.prodigy.net
pop.sbcglobal.net
SSL is not currently supported.
SBC Global SNet
Yes
[email protected]
smtp.snet.yahoo.com
pop.snet.yahoo.com
SSL is not currently supported.
SBC Global SWBell
Yes
[email protected]
smtp.swbell.yahoo.com
pop.swbell.yahoo.com
SSL is not currently supported.
SBC Global Wans
Yes
[email protected]
smtp.wans.yahoo.com
pop.wans.yahoo.com
SSL is not currently supported.
SBC Global Yahoo!
Yes
[email protected]
smtp.sbcglobal.yahoo.com
pop.sbcglobal.yahoo.com
SSL is not currently supported.
Seanet
mx.seanet.com
pop.seanet.com
ServNet
mx.serv.net
SpeakEasy
SprintPCS
mail.speakeasy.net
No
Sprynet
smtp.sprintpcs.com
smtp.sprynet.com
mail.speakeasy.net
25
pop.sprintpcs.com
pop.sprynet.com
Starpower
smtp.starpower.net
pop.starpower.net
SuddenLink
smtp.suddenlink.net
pop.suddenlink.net
file:///H|/PCPandora_5x_HelpSystem.htm (51 of 71)6/6/2008 7:58:31 AM
110
PC Pandora User Manual
The River
mail.theriver.com
Time Warner – Road
Runner Business
Class
Yes
[email protected]
Depends on Location: Go to
http://help.rr.com/ select items in
dropdown list that apply to you,
and then select E-Mail Server
Addresses from the Top 10
FAQs section.
Time Warner – Road
Runner Residential
No
[email protected]
(Full Email Address)
25 or 587 if Depends on Location: Go to
Depends on Location: Go to
http://help.rr.com/ select items in 25 does not http://help.rr.com/ select items
work
dropdown list that apply to you,
in dropdown list that apply to
and then select E-Mail Server
you, and then select E-Mail
Addresses from the Top 10
Server Addresses from the
FAQs section.
Top 10 FAQs section.
Depends on Location: Go to
http://help.rr.com/ select items
in dropdown list that apply to
you, and then select E-Mail
Server Addresses from the
Top 10 FAQs section.
Toucan
smtp.toucansurf.com
pop3.toucansurf.com
USA.net
smtp.postoffice.net
pop.netaddress.com
Verizon
No
[email protected] (without
@verizon.net)
outgoing.verizon.net
25
incoming.verizon.net
VisiNet
smtp.visinet.net
pop.visinet.net
WildBlue
mail.wildblue.net
mail.wildblue.net
WHRO.net
mail.whro.net
Yahoo (Paid)
No
[email protected] (without
@yahoo.com)
smtp.mail.yahoo.com
SSL is not currently supported.
110
SMTP
110
mail.whro.net
25 or 465 pop.mail.yahoo.com
if 25 does
not work
110
SMTP
* = SMTP/POP Email Server Settings will not work when PC is connected to a different Internet Service Provider.
** = SMTP/POP Email Server Settings are free when signing up to there free email service.
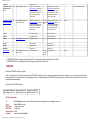
VERIZON
Below are POP/SMTP settings for Verizon.
Note: It’s always best to contact your email service for POP/SMTP settings if you are not certain on what data to enter in these fields or if you are receiving an error. We are
providing data for your convenience but it’s not guaranteed to work. You should always us the SMTP/POP server provided by your Email service provider or any other server
rather information listed below.
Mail Server (POP, SMTP) Settings
Your Email Address: Incoming (POP)
[email protected]
Incoming.verizon.net
Outgoing (SMTP)
outgoing.verizon.net
IRIS Setting Example,
To:
From:
SMTP Host:
SMTP Port:
Authentication:
Pop Host:
[email protected] (or enter a different email address: [email protected], [email protected], etc)
[email protected]
outgoing.verizon.net
25 (default)
SMTP
Leave this field Empty/Blank
file:///H|/PCPandora_5x_HelpSystem.htm (52 of 71)6/6/2008 7:58:31 AM
PC Pandora User Manual
Pop Port:
Login:
Password:
110 (default)
MemberID (or try it as [email protected] if entering MemberID only does not work)
Enter your Verizon password
Please verify that you are entering the correct login name and password by logging into your email account. Go to http://webmail.verizon.net/signin/ and login. If your login
fails, this means you are not entering an incorrect Login/Password for your IRIS Settings.
Website References:
Email Account: http://webmail.verizon.net/signin/
General Help: http://www22.verizon.com/CustomerSupport/ContactUs/Index/
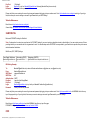
EARTHLINK
Below are POP/SMTP settings for EarthLink.
Note: It’s always best to contact your email service for POP/SMTP settings if you are not certain on what data to enter in these fields or if you are receiving an error. We are
providing data for your convenience but it’s not guaranteed to work. You should always us the SMTP/POP server provided by your Email service provider or any other server
rather information listed below.
Mail Server (POP, SMTP) Settings
Your Email Address:
[email protected]
Incoming (POP)
pop.earthlink.net
Outgoing (SMTP)
mailearthlink.net or smtpauth.earthlink.net
IRIS Setting Example,
To:
From:
SMTP Host:
SMTP Port:
Authentication:
Pop Host:
Pop Port:
Login:
Password:
[email protected] (or enter a different email address: [email protected], [email protected], etc)
[email protected]
smtpauth.earthlink.net
587
SMTP
Leave this field Empty/Blank
110 (default)
[email protected] (or try it with your MemberID without the @earthlink.net)
Enter your EarthLink password
Please verify that you are entering the correct login name and password by logging into your email account. Go to http://www.earthlink.net/, click WEBMAIL link at the very
top of the page and login. If your login fails, this means you are not entering an incorrect Login/Password for your IRIS Settings.
Website References:
Email Account: http://www.earthlink.net/ and click WEBMAIL link at the very top of the page.
POP/SMTP Settings: http://kb.earthlink.net/case.asp?article=192059
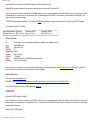
COX
file:///H|/PCPandora_5x_HelpSystem.htm (53 of 71)6/6/2008 7:58:31 AM
PC Pandora User Manual
Below are instructions on how to receive POP/SMTP settings for COX Internet Service Provider.
Important! These settings will not work if the computer is connected to the internet using an ISP other then COX.
Note: It’s always best to contact your email service for POP/SMTP settings if you are not certain on what data to enter in these fields or if you are receiving an error. We are
providing data for your convenience but it’s not guaranteed to work. You should always us the SMTP/POP server provided by your Internet Service Provider (ISP) or any
other server rather information listed below.
• POP/SMTP settings are different depending on your location. Click HERE and by selecting your location in the drop down list, it will display your POP/SMTP settings.
As an example, I selected CA, San Diego:
Your Email Address:
[email protected]
Location:
CA, San Diego
Incoming (POP)
pop.west.cox.net
Outgoing (SMTP)
smtp.west.cox.net
IRIS Setting Example,
To:
From:
SMTP:
SMTP Port:
Authentication:
Pop Host:
Pop Port:
Login:
Password:
[email protected] (or enter a different email address: [email protected], [email protected], etc)
[email protected]
smtp.west.cox.net
25
POP3
pop.west.cox.net
110 (default)
MemberID (only enter your MemberID without the @cox.net)
Enter your COX password
Please verify that you are entering the correct login name and password by logging into your email account. Go to http://webmail.west.cox.net/ and login. If your login fails,
this means you are not entering an incorrect Login/Password for your IRIS Settings.
Website References:
Email Account: http://webmail.west.cox.net/
POP/SMTP Settings: http://support.cox.com/sdccommon/asp/contentredirect.asp?sprt_cid=fcb44db0-3835-491c-bca8-2d56ac32a574
If you are still having issues with setting up IRIS settings please contact us.
PEOPLEPC
Below are POP/SMTP settings for PeoplePC.
Note: It’s always best to contact your email service for POP/SMTP settings if you are not certain on what data to enter in these fields or if you are receiving an error. We are
providing data for your convenience but it’s not guaranteed to work. You should always us the SMTP/POP server provided by your Email service provider or any other server
rather information listed below.
Mail Server (POP, SMTP) Settings
file:///H|/PCPandora_5x_HelpSystem.htm (54 of 71)6/6/2008 7:58:31 AM
PC Pandora User Manual
Your Email Address:
[email protected]
Incoming (POP)
pop.peoplepc.com
Outgoing (SMTP)
smtpauth.peoplepc.com
IRIS Setting Example,
To:
From:
SMTP Host:
SMTP Port:
Authentication:
Pop Host:
Pop Port:
Login:
Password:
[email protected] (or enter a different email address: [email protected], [email protected], etc)
[email protected]
smtpauth.peoplepc.com
587 (default)
SMTP
Leave this field Empty/Blank
110 (default)
[email protected] (or try it without the @peoplepc.com)
Enter your Verizon password
Please verify that you are entering the correct login name and password by logging into your email account. Go to http://www.authnow.com/goToWebmail.asp?
referrer=webmail and login. If your login fails, this means you are not entering an incorrect Login/Password for your IRIS Settings.
Website References:
Email Account: http://www.authnow.com/goToWebmail.asp?referrer=webmail
POP/SMTP: http://home.peoplepc.com/helpinfo/emailsettings/default.asp
If you are still having issues with setting up IRIS settings please contact us.
ROADRUNNDER (Residential)
Below is an example of how you should set up IRIS settings for RoadRunner Residential.
Important! IRIS Email Report feature does not work with RoadRunner Business Class as SSL is required with Business Class accounts.
Note: It’s always best to contact your email service for POP/SMTP settings if you are not certain on what data to enter in these fields or if you are receiving an error. We are
providing data for your convenience but it’s not guaranteed to work. You should always us the SMTP/POP server provided by your Email service provider or any other server
rather information listed below.
To:
From:
RoadRunner Email Address (or enter a different email address)
RoadRunner Email Address
SMTP:
SMTP settings are different depending on your location. Go to http://help.rr.com/ select items in dropdown list that apply to you, and then
select E-Mail Server Addresses from the Top 10 FAQs section.
SMTP Port:
25 or 587 if 25 does not work
Authentication: SMTP
Pop Host:
Leave this field Empty/Blank
Pop Port:
110 (default)
Your full RoadRunner email
Login:
Password:
Enter your RoadRunner password
Please verify that you are entering the correct login name and password by logging into your email account. Go to http://help.rr.com/, select items in dropdown list that apply
file:///H|/PCPandora_5x_HelpSystem.htm (55 of 71)6/6/2008 7:58:31 AM
PC Pandora User Manual
to you, and then select WEBMAIL from the Quick Links section to login. If your login fails, this means you are not entering an incorrect Login/Password for your IRIS Settings.
Website References:
General help page: http://help.rr.com/
Email Account: http://help.rr.com/, select items in dropdown list that apply to you, and then select WEBMAIL from the Quick Links section to login.
POP/SMTP Settings: http://help.rr.com/, select items in dropdown list that apply to you, and then select E-Mail Server Addresses from the Top 10 FAQs section.
If you are still having issues with setting up IRIS settings please contact us.
AOL (America Online)
Below are POP/SMTP settings for AOL (American Online). If you don't have an email account with AOL simply create a FREE account:
* Go to http://www.aol.com
* Click on the Mail Icon
* Click on Get Free AOL mail.
* Complete the signup.
Please note that AOL logs all emails sent using your AOL account into your AOL Sent box. This includes IRIS emails sent using PC Pandora. This issue only affects AOL and
not other ISP and email providers. Due to this behavior it is strongly recommended you create a new AOL email account specifically for use with IRIS. This way no one will
know your login/password to your AOL account and be able to see your Inbox/Sent messages.
Note: It’s always best to contact your email service for POP/SMTP settings if you are not certain on what data to enter in these fields or if you are receiving an error. We are
providing data for your convenience but it’s not guaranteed to work. You should always us the SMTP/POP server provided by your Email service provider or any other server
rather information listed below.
Mail Server (POP, SMTP) Settings
Your Email Address:
[email protected]
[email protected]
Incoming (POP)
pop.aol.com
pop.aim.com
Outgoing (SMTP)
smtp.aol.com
smtp.aim.com
IRIS Setting Example,
To:
From:
SMTP Host:
SMTP Port:
Authentication:
Pop Host:
Pop Port:
Login:
Password:
[email protected] (or enter a different email address: [email protected], [email protected], etc)
[email protected]
smtp.aol.com
587
SMTP
Leave this field Empty/Blank
110 (default)
[email protected]
Enter your AOL password
Please verify that you are entering the correct login name and password by logging into your email account. Go to http://www.aol.com/ , click on the MAIL icon and login. If
your login fails, this means you are not entering an incorrect Login/Password for your IRIS Settings.
file:///H|/PCPandora_5x_HelpSystem.htm (56 of 71)6/6/2008 7:58:31 AM
PC Pandora User Manual
Website References:
Email Account: http://www.aol.com/ then click on MAIL icon
POP/SMTP Settings: http://help.channels.aol.com/kjump.adp?articleId=217454
If you are still having issues with setting up IRIS settings please contact us.
YAHOO!
Note: It’s always best to contact your email service for POP/SMTP settings if you are not certain on what data to enter in these fields or if you are receiving an error. We are
providing data for your convenience but it’s not guaranteed to work. You should always us the SMTP/POP server provided by your Email service provider or any other server
rather information listed below.
Below is an example of how you should set up IRIS settings for Yahoo! This needs to be a paid Yahoo Email Account. This will not work if you have a free Yahoo Email
Account.
To:
From:
SMTP Host:
SMTP Port:
Authentication:
Pop Host:
Pop Port:
Login:
Password:
[email protected] (or enter a different email address: [email protected], [email protected])
[email protected]
smtp.mail.yahoo.com
25 or 465 if 25 does not work
SMTP
Leave this field Empty/Blank
110 (default)
MemberID (only enter your MemberID without the @yahoo.com)
Enter your Yahoo! password
Please verify that you are entering the correct login name and password by logging into your email account. Go to http://mail.yahoo.com and login. If your login fails, this
means you are not entering an incorrect Login/Password for your IRIS Settings.
Website References:
Email Account: http://mail.yahoo.com
POP/SMTP Settings:
If you are still having issues with setting up IRIS settings please contact us.
7
BLOCK WEBSITES
PC Pandora provides a feature called Parent. Parent is the access controls of PC Pandora. This allows the Administrator to set certain websites off limits and thus blocking
specific websites so that no one is able to access them. To go to Parent Options go to Tools in the tool bar menu and click Parent (Website Access Control).
Statistics:
To go to the Statistics of your blocked websites go to Tools in PC Pandora tool bar at the top of viewer and select Parent (Website Access Control). The first tab is called
file:///H|/PCPandora_5x_HelpSystem.htm (57 of 71)6/6/2008 7:58:31 AM
PC Pandora User Manual
Statistics tab.
• Enable website access control: Allows the administrator to be able to turn Parent feature on (checked) or off (unchecked).
• Category: This column displays the category names that will be off limits to the user.
• Blocked Access attempts: Displays the number of times user tries to access a domain (website address).
• View Parent Log: This button will bring up a window that will display a history of the specific websites that user tried to access and if PC Pandora successfully blocked it.
• Reset statistics: This well reset the statistics.
User Management:
To go to the User Management tab where you can select what user(s) you want PC Pandora to block web access from and what message you would like to be displayed, go
to Tools in PC Pandora tool bar at the top of viewer and select Parent (Website Access Control). The second tab is called User Management tab.
file:///H|/PCPandora_5x_HelpSystem.htm (58 of 71)6/6/2008 7:58:31 AM
PC Pandora User Manual
• Per-User Website Access Control: Allows the administrator to be able to turn Parent feature on or for particular user accounts. Once you select the user, then select
the option you wish to have under the How to block selected user.
• How to block selected User: Allows the administrator to be able to choose how select user account should be blocked
• Do not block: selecting this option allows the selected user to NOT be blocked from any websites selected in “Content Management” tab for the selected users.
• Ask Password: selecting this option allows the selected user to access blocked website only if they enter the correct Password for the selected users. To create
password, click on Set Password button.
file:///H|/PCPandora_5x_HelpSystem.htm (59 of 71)6/6/2008 7:58:31 AM
PC Pandora User Manual
• Display standard “access denied” message: selecting this option blocks users from any websites selected in the Content Management tab and displays an access
denied message.
• Display custom message: selecting this option blocks users from any websites selected in the Content Management tab and displays the custom message you have
entered in the Custom Message text box.
file:///H|/PCPandora_5x_HelpSystem.htm (60 of 71)6/6/2008 7:58:31 AM
PC Pandora User Manual
• Use Default Setting: selecting this option blocks users from any websites selected in the Content Management tab and displays access denied message.
Content Management:
To go to the Content Management where you select what you would like blocked, go to Tools in PC Pandora tool bar at the top of viewer and select Parent (Website Access
Control). The third tab is called Contact Management tab.
file:///H|/PCPandora_5x_HelpSystem.htm (61 of 71)6/6/2008 7:58:31 AM
PC Pandora User Manual
• Allow access to selected websites only: selecting this will allow users to have access to websites that are checked off in the Category list. This is meant to be used for
“Custom White List” category. Note, that this only applies to users selected in User Management.
• Block access to selected websites: selecting this will block users to have access to websites that are checked off in the Category list. Note, that this only applies to users
selected in User Management.
• Check for updates: this button will check for updates for websites that are on our black list. These websites are in the different categories listed under the Category
column such as adult, gambling, phishing, religion, spyware, and weapons. You may block these websites by selecting the different categories.
Custom List:
To go to the Custom list tab to add website you wish to be blocked or adding to the white list, go to Tools in PC Pandora tool bar at the top of viewer and select Parent
(Website Access Control). The forth third tab is called Custom Lists tab.
file:///H|/PCPandora_5x_HelpSystem.htm (62 of 71)6/6/2008 7:58:31 AM
PC Pandora User Manual
• Custom Black List: This allows the administrator to create a custom black list. Websites added to this list will be blocked. Note, that it will only be blocked if Custom Black
List is checked off in the Content Management tab – which is check on by default.
Buttons:
Add: This is an Add button that the administrator will be able use to add a domain manually (Ex: msn.com). You may also add a domain (websites addresses) by right
clicking on a website (Ex: http://www.msn.com) displayed in the Web tab and click Block Access to Website or you can select website displayed in the Web tab and go to
“Action” in the tool bar menu and click Block Access to Website.
Delete: Deletes a domain that was previously added. Deleting a domain no longer sets that certain domain Off Limits.
• Custom White List: this allows the administrator to create a custom white list. Websites added to this list will be allowed access and will not be blocked. Note, that it will
only be allowed access if Custom White List is checked off in the Content Management tab and radio selection Allow access is selected, which is NOT on by default.
Buttons:
Add: This is an Add button that the administrator will be able use to add a domain manually (Ex: msn.com).
Delete: Deletes a domain that was previously added. Deleting a domain no longer sets that certain domain Allow Access.
8
BLOCK PROGRAMS
file:///H|/PCPandora_5x_HelpSystem.htm (63 of 71)6/6/2008 7:58:31 AM
PC Pandora User Manual
This feature allows the Administrator to set certain programs off limits, effectively blocking certain programs so that no one is able to use them. To go to Program Access, go
to Tools in the tool bar menu and click Program Access.
• Block access to selected programs: Allows the administrator to be able to turn Program Access feature on (checked) or off (unchecked).
• Add: This button will bring up a window which you will allow you to add the file of the program you wish to block. Note most program files are .exe files located under C:
\Program Files\Software Name. You can also add programs to the block list by going to the Programs tab, right click on the program you wish to block and select Block
Access to Program.
• Delete: Deletes a program file that was previously added. Deleting a program file no longer sets that certain program domain Off Limits.
• Edit: Allows you to edit a program file that was previously added.
• Reset statistics: This well reset the “Access Attempts” column. Resetting Statistics will reset all programs to have an access of zero.
• View Log: This button will bring up a window that will display a history of the specific programs that user tried to access and if PC Pandora successfully blocked it.
• Blocked Access Silently: selecting this option will display the following message when user attempt to access blocked program.
file:///H|/PCPandora_5x_HelpSystem.htm (64 of 71)6/6/2008 7:58:31 AM
PC Pandora User Manual
• Notify User about blocking using following message: selecting this option will display the custom message inserted in the text box. For example, if entering “I told
you not to use this! You’re BUSTED!” the following will be displayed:
9
CHAT CONTROL
PC Pandora provides a feature called Chat Control. This allows the Administrator to set certain chat networks off limits, effectively blocking certain chat programs so that no
one is able to use them. To go to Chat Control click Tools in the tool bar menu and then click Chat Control.
Note that chat blocking does not prevent the chat program itself from being run or opened. Instead it simply prevents access to the chat networks that are configured to be
blocked. For example, if you configure Chat Control to Block AIM – AOL Instant Messenger then AIM will still physically run and open. However, the user will not be able to
logon to the AIM network nor send or receive AIM chats. No specific messages are displayed by PC Pandora and all blocking is performed silently. If you wish to physically
prevent AIM from being run and open then please use Program Access.
Chat control blocking is global and applies to all users. This feature does not support blocking for specific users.
• Block access to selected chat protocols – Allows the administrator to be able to turn the Chat Control feature on (checked) or off (unchecked).
• Block All: This checkbox will automatically select all available chat protocols to be blocked.
• Individual Chat Protocols: Or select only the specific chat protocols you wish to block.
file:///H|/PCPandora_5x_HelpSystem.htm (65 of 71)6/6/2008 7:58:31 AM
PC Pandora User Manual
10 UNINSTALL
To Uninstall PC Pandora please do the following:
1.
2.
3.
4.
Open PC Pandora
Go to File in the tool bar
Click on Uninstall on follow the step by step instructions.
Reboot when prompted to complete the uninstallation.
11 REQUIREMENTS
System Requirements:
• Windows Vista, XP, Windows Me, Windows 98, Windows 2000 or above.
• Intel or AMD processor running at 200 MHz or faster
• 32M of memory of more
• 10M - 15M of hard disk space for a typical day of recording
12 TROUBLE SHOOTING
Many of your questions can be answered at our support website at http://www.pcpandora.com/support/.
If you are having any issues or simply have a question please contact our customer support team. We strive to respond within 24 hrs to all email support. If you have sent an
email and have not heard from us, please check your junk mail box. You can also contact us via our live chat support on our website.
13 FAQ
Please visit http://www.pcpandora.com/support/ where we display our Frequently Asked Questions (FAQ) if not listed below.
13.1 Questions about Registration
I’m trying to register I’m receiving an error that my registration key is already been in use, what do I do now?
If you are receiving this error please contact our customer support team and include the registration key you are trying to use. Please note that if you are trying to use PC
Pandora on more then just one computer, you may need to purchase another registration key in order to register successfully (depends on the PC Pandora Package you
purchased). If you have purchased the PC Pandora Standard package, this will only give you a license to register PC Pandora on a single computer only.
I need to register but I don’t remember my registration key?
file:///H|/PCPandora_5x_HelpSystem.htm (66 of 71)6/6/2008 7:58:31 AM
PC Pandora User Manual
If you can’t remember your registration key, please contact us and send us the following information:
• First and Last Name used during purchase
• Order ID received after purchase
• Email address used during purchase
I already turned off my firewall and anti-virus and I still can’t register, what do I do now?
If you continue to have issues registering it may be easiest to simply disable/exit ALL applications in your system tray (by your clock), register, and then reboot your computer
to re-enable all of your system tray applications. Due to the variety of firewall and privacy applications on the market we are unable to provide you with more specific
directions.
If the above does not help, try registering in Safe Mode. To get your PC in Safe Mode, please do the following:
1.
2.
3.
4.
Reboot your PC and before Windows start press "F8" on your keyboard until a menu appears. You may need to do this several times to get the menu to show up.
In the menu, select "Safe Mode with Networking".
Login Computer, open viewer as usual and try to register.
After registration, reboot computer and it will return to regular mode.
13.2 Questions about IRIS Email Reports
Can I access IRIS settings remotely?
No, none of the features in our product provide remote access or remote control to the computer being monitored. However, IRIS can email you activity logs and thus provide
access to the recorded data.
My email service provider requires SSL for my SMTP/POP settings what do I do now?
If your SMTP/POP settings requires SSL (Secure Socket Layer) please use another SMTP/POP setting that do not require SSL. If you don’t have one, you can easily use
AOL’s free SMTP/POP settings. You first need to sign up for AOL’s free email account. For more information on this, click HERE.
Will IRIS Email Reports feature work on a wireless laptop?
This depends entirely on the SMTP/POP email server settings used. Some SMTP servers require you to be connected to a particular network, others will function regardless
of what network the computer is physically connected to. Please contact your email service provider if your SMTP/POP email server settings will work on a wireless
connection and if it can be connected to a different ISP. For example, Cox SMTP/POP settings will not work when PC is connected to a different ISP. You can easily use
AOL’s free email account with any internet connection. You first need to sign up for AOL’s free email account. For more information on this, click HERE.
What if the ISP on the PC I want to monitor is different then the one what I have?
file:///H|/PCPandora_5x_HelpSystem.htm (67 of 71)6/6/2008 7:58:31 AM
PC Pandora User Manual
This depends entirely on the SMTP/POP email server settings used. Some SMTP servers require you to be connected to a particular network, others will function regardless
of what network the computer is physically connected to. Please contact your ISP if your SMTP/POP email server settings will work on a wireless connection and if it can be
connected to a different ISP. For example, Cox SMTP/POP settings will not work when PC is connected to a different ISP. You can easily use AOL’s free email account with
any internet connection. You first need to sign up for AOL’s free email account. For more information on this, click HERE.
How do I access my IRIS settings?
Please check out our Accessing IRIS settings section.
I’m not receiving all the data recorded or some data is missing, why?
This mainly happens for two reasons:
A) You did not set up IRIS settings to send you that specific data.
B) IRIS Email Report has reached its maximum report size; therefore, could not include more data.
To fix this issue, simply go to your IRIS settings and check off data you wish IRIS email reports would include. Then change Maximum Report Size field to a higher value.
How do I receive more data?
To receive more data within your IRIS email reports please go to your IRIS settings and change Maximum Report Size field to a higher value. If this field is already set to its
highest value, you can do the following:
A) Change IRIS settings to send you email reports more frequently. For example, instead of every 1 hr, try every 30 minutes.
B) Uncheck items you wish to not include in IRIS email reports thus giving more space for other recorded activity that you may be more interested in.
C) Decrease the Snapshot quality to low. This will not affect the usability of the Snapshots, but will reduce them to grayscale. By doing this you reduce each Snapshots
storage size, thus more snapshots can be included in each report.
My IRIS Email Reports stopped working! What do I do?
If you were receiving reports successfully and it all of sudden stopped, it may be that PC Pandora is no longer installed or functioning correctly on the computer you are
monitoring. It also may be that your SMTP/POP settings have been updated / changed and you need to update the IRIS Settings as well. Physically go to the computer you
are monitoring and make sure you can still open viewer. Then go to your IRIS settings and see if you can still successfully send a TEST email report by pressing the Send
Test Message button.
If you are able to access viewer and sent a test message then please note that IRIS will attempt to send you regular reports per the time period you have configured in your
IRIS settings. By default this is 1 hour, which means IRIS will attempt to create and deliver a report every 60 minutes. However, there are a variety of scenarios that could
prevent the report from being delivered exactly on schedule. These are as follows:
* The computer is not powered on during the time period when IRIS is scheduled to deliver a report.
* The computer is not physically connected to the internet during the time period when IRIS is scheduled to deliver a report.
In the above scenarios the IRIS reports should be delivered the next time the computer is on and connected to the internet.
* IRIS is configured for one ISP, but the computer is connected to a different ISP. This could cause the IRIS configuration to be invalid. However, this is rarely the case.
* The email account the IRIS report is delivered to is full and cannot receive any new messages.
* There is a firewall or other security/protection application preventing IRIS from delivering the report. Any firewall should be configured so that PC Pandora can communicate
over the internet.
* You have configured IRIS to send reports "secretly" but there are no applications available for IRIS to utilize for secrete delivery. This will cause IRIS to attempt to send the
reports directly from PC Pandora 1 hour later than the normally scheduled time. It could also cause the reports to be not transmitted at all if a firewall is blocking PC
Pandora's internet access.
file:///H|/PCPandora_5x_HelpSystem.htm (68 of 71)6/6/2008 7:58:31 AM
PC Pandora User Manual
If you have ruled out all of these scenarios please open the IRIS settings and click the button to open the IRIS logs. Scroll to the bottom of the page to see the log entries for
the most recent IRIS activity. It should indicate the time IRIS attempted to send the report and the success or failure of that attempt. Please contact us with this information for
our review.
I still need help setting up IRIS Email Reports?
If you have read all of our Help and FAQ’s are regarding IRIS Email Reports and you still can’t set up IRIS email reports. Then the easiest thing to do is use AOL’s free SMTP/
POP settings. You first need to sign up for AOL’s free email account. For more information on this, click HERE.
13.3 Questions about Snapshots
PC Pandora only records 1 or 2 day’s worth of Snapshots, why?
PC Pandora monitors and stores the recorded data based on the Settings configured. Most of the activity logs take up very little space on your hard drive with the exception
of Snapshots. Depending on the settings configured Snapshots can easily reach the maximum storage size in Settings. Once it has reached its Max storage it will
automatically start deleting data - starting with Snapshots.
To record more snapshots please change your PC Pandora Settings:
Change it to record Snapshot at a lower quality:
1.
2.
3.
4.
5.
Open Viewer
Go to "Tools"
Go to "Options"
Go to "Recording" tab
Change the "Quality" field to "Low Quality"
Change it to record more data:
1.
2.
3.
4.
5.
Open Viewer
Go to "Tools"
Go to "Options"
Go to "Data Files" tab
Increase the "Maximum Total Size" field
NOTE: The more data you set PC Pandora to record the more space it will take on your hard drive.
Once PC Pandora reaches its Maximum Total Size it will automatically delete data. By default PC Pandora Records Snapshots every 30 seconds and deletes data after 7
days. By lowering the time intervals in which each snapshot are taken can also easily reach the maximum storage size in Settings.
I noticed that some snapshots are missing, why?
Once PC Pandora has reached its Max storage Size (this is set in your settings) it will automatically start deleting the oldest data to make room for the newest data, starting
with Snapshots.
Can I delete more then one Snapshot at time?
file:///H|/PCPandora_5x_HelpSystem.htm (69 of 71)6/6/2008 7:58:31 AM
PC Pandora User Manual
Currently there are only three methods for manually deleting snapshots:
1. Right-click any individual snapshot and choose Delete. This will delete a single snapshot.
2. Right-click any day in the top pane of the Snapshots tab and choose Delete. This will delete all snapshots for that specific day.
3. While using the Snapshot Magnifier to view snapshots click the red X button. This will delete the single snapshot currently being viewed.
If you have deleted snapshots but they still appear in the Snapshots tab please click View \ Refresh. If that fails close PC Pandora, reboot your computer, and then open PC
Pandora again.
13.4 Questions about Emails
Emails are not being recorded in my Email tab, why?
PC Pandora will log all inbound and outbound emails processed by Windows based email clients such as Outlook Express and Outlook in the Emails tab of the viewer. All
web-based emails such as Hotmail, Yahoo, Gmail, etc will still be captured. However, you will find those emails logged in Snapshots and Keystrokes tabs.
How do I find passwords for email accounts being used?
PC Pandora will capture all keystrokes, including passwords, that are physically entered on the keyboard via key presses. Passwords entered into webpage’s and
applications can be viewed in the Keystrokes logs. You can locate them easiest by sorting the view by the application or webpage you are looking for.
14 CONTACT US
Highly skilled technical support is available 24/7 from our website available at:
http://www.pcpandora.com/contact/?sector=1
Some of your questions can be answered at our support website and we also provide live chat support at:
http://www.pcpandora.com/support/.
Please provide the following so that we are able to help you more sufficiently.
• First and Last Name used during purchase
• Order ID received after purchase
• Registration Key received after purchase
• Email address used during purchase
file:///H|/PCPandora_5x_HelpSystem.htm (70 of 71)6/6/2008 7:58:31 AM
PC Pandora User Manual
file:///H|/PCPandora_5x_HelpSystem.htm (71 of 71)6/6/2008 7:58:31 AM