1
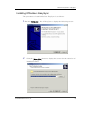
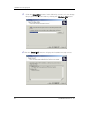
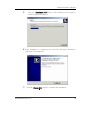
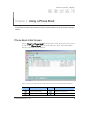
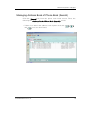
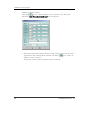
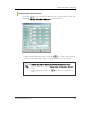
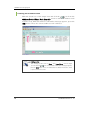
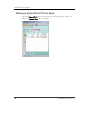
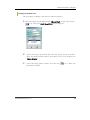
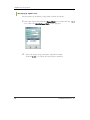
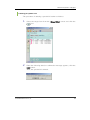
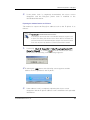
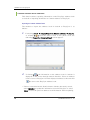
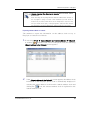
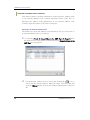
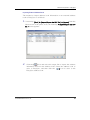
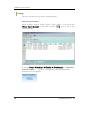
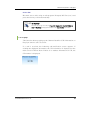
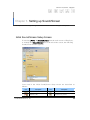
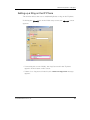
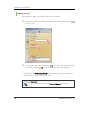
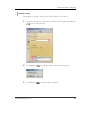
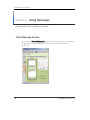
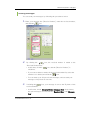
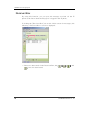
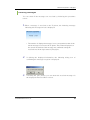
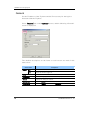
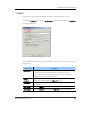
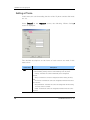
GABD-000154
Ed. 00
OfficeServ
EasySync User Manual
COPYRIGHT
This manual is proprietary to SAMSUNG Electronics Co., Ltd. and is protected by copyright.
No information contained herein may be copied, translated, transcribed or duplicated for any
commercial purposes or disclosed to third parties in any form without the prior written consent of
SAMSUNG Electronics Co., Ltd.
TRADEMARKS
WINDOWS 98 is a registered trademark of Microsoft Corporation.
In addition, product names mentioned in this document may be trademarks and/or registered
trademarks of their respective companies.
This manual should be read before the installation and operation, and the operator should
correctly install and operate the product by using this manual.
This manual may be changed for the system improvement, standardization and other technical reasons without
prior notice. For further information on the updated manual or have a question for the content of manual,
contact the address or homepage below:
Address: Document Center 2nd Floor IT Center. Dong-Suwon P.O. Box 105, 416, Maetan-3dong Yeongtonggu, Suwon-si, Gyeonggi-do, Korea 442-600
Home Page: http://www.samsungdocs.co.kr
Contact to Call Center at the telephone below if you have any questions or concerns regarding the
operation of your system.
Phone: 1588-4141
© 2005 SAMSUNG Electronics Co., Ltd.
All rights reserved.
OfficeServ EasySetPlus 사용설명서
Introduction
Purpose
EasySync is a program that enables users to use the functions of Internet Protocol (IP)
phones in Personal Computers (PC) conveniently. This document introduces EasySync and
describes its main functions and how to log in and set the environment.
Document Contents and Organization
This document consists of four chapters and abbreviations:
Chapter 1. Getting Started OfficeServ EasySync
This chapter introduces OfficeServ EasySync and describes how to install and log in
EasySync.
Chapter 2 Using The Phone Book
Among the functions of OfficeServ EasySync, this chapter describes how to manage the
phone book, interwork with the address book of your IP phone, and interwork with the
outlook address book and external address books.
Chapter 3. Setting Sound/Image
This chapter describes the image and bell sound interworking between OfficeServ and IP
phones.
© SAMSUNG Electronics Co., Ltd.
I
Ошибка! Стиль не определен.
Chapter 4 Using Messages
Among the functions of OfficeServ EasySync, this chapter describes internal message
transfer, outbox, inbox, and message box.
Chapter 5 Setting Environment
This chapter describes how to set the environment of EasySync and IP phones.
Abbreviations
Abbreviations frequently used in this document are described.
Conventions
The following types of paragraphs contain special information that must be carefully read
and thoroughly understood. Such information may or may not be enclosed in a rectangular
box, separating it from the main text, but is always preceded by an icon and/or a bold title.
CHECKPOINT
This paragraph contains information that users must check in order to guarantee
stable system operation.
NOTE
This paragraph contains supplementary information that should be read as a
reference.
II
© SAMSUNG Electronics Co., Ltd.
OfficeServ EasySetPlus 사용설명서
References
IP Phone User Manual (ITP-5112L):
Describes how to install IP phones (ITP-5112L) and use the basic functions of IP phones.
IP Phone Technical Manual (ITP-5112L):
Describes how to install IP phones (ITP-5112L) and use the detailed functions of IP
phones, and set the environment of IP phones.
Revision History
Edition No.
Date of Issue
Remarks
00
Nov. 2005
Original Draft
01
Feb. 2006
Modification
© SAMSUNG Electronics Co., Ltd.
III
Ошибка! Стиль не определен.
This page is intentionally left blank.
IV
© SAMSUNG Electronics Co., Ltd.
OfficeServ EasySetPlus 사용설명서
Table of Contents
Introduction
I
Purpose ................................................................................................................................... I
Document Contents and Organization ................................................................................ I
Conventions........................................................................................................................... II
References ............................................................................................................................ III
Revision History ................................................................................................................... III
Chapter 1. Getting Started OfficeServ EasySync
1
Overview of OfficeServ EasySync.........................................................................................1
Installation Environment ........................................................................................................1
Installing OfficeServ EasySync..............................................................................................3
Logging in OfficeServ EasySync ...........................................................................................6
Chapter 2. Using a Phone Book
8
Phone Book Initial Screen ..................................................................................................... 8
Managing Address Book of Phone Book (Search) ................................................................9
Adding an Address Book....................................................................................................... 10
Modifying an Address Book................................................................................................... 11
Deleting the Address Book.................................................................................................... 12
Managing Phone Book Group .............................................................................................13
Managing Speed Dial of Phone Book..................................................................................14
Adding a Speed Dial.............................................................................................................. 15
Modifying a Speed Dial.......................................................................................................... 16
Deleting a Speed Dial............................................................................................................ 17
Address Book Interface .......................................................................................................18
IP Phone Address Book Interface ......................................................................................... 18
Outlook Address Book Interface............................................................................................ 20
External Address Book Interface........................................................................................... 22
Dialing .................................................................................................................................... 24
© SAMSUNG Electronics Co., Ltd.
V
Ошибка! Стиль не определен.
CID Popup..............................................................................................................................25
Chapter 3. Setting up Sound/Screen
26
Initial Sound/Screen Setup Screen ..................................................................................... 26
Setting up IP Phone Background........................................................................................ 27
Adding an Image....................................................................................................................28
Modifying an Image................................................................................................................29
Deleting an Image..................................................................................................................30
Setting up a Ring on the IP Phone ..................................................................................... 31
Adding a Ring.........................................................................................................................32
Modify a Ring .........................................................................................................................33
Chapter 4. Using Messages
34
Initial Message Screen ....................................................................................................... 34
Sending Messages ............................................................................................................. 36
Sending Messages ................................................................................................................37
Inbox................................................................................ Ошибка! Закладка не определена.
Receiving Messages..............................................................................................................39
Replying/Resending/Saving/Deleting Messages ..................................................................40
Outbox ............................................................................. Ошибка! Закладка не определена.
Message Box...................................................................................................................... 42
Chapter 5. Setting Environment
43
Initial Screen of Environment Setting.................................................................................. 43
Default ............................................................................. Ошибка! Закладка не определена.
Utilities ............................................................................. Ошибка! Закладка не определена.
Setting a Phone .................................................................................................................. 46
Abbreviations
49
C ~ P.......................................................................................................................................49
VI
© SAMSUNG Electronics Co., Ltd.
OfficeServ EasySetPlus 사용설명서
Chapter 1. Getting Started OfficeServ
EasySync
This chapter introduces OfficeServ EasySync and describes how to install and log in EasySync.
Overview of OfficeServ EasySync
EasySync is a program that enables users to use IP functions in personal
computers conveniently.
EasySync has the following functions:
y
Phone book : Allows you to interwork the address books of EasySync
and your IP phone as well as interwork other programs and the address
book.
y
Image/Sound : Allows you to interwork the images/sounds of EasySync
and your IP phone.
y
Message : Allows you to control the transfer of messages between
EasySync and your IP phone and manage inbox, outbox and message
box.
Installation Environment
For the correct installation of OfficeServ EasySync, the following
installation environment should be provided.
The minimum computer specifications for the operation of OfficeServ
EasySync are listed in th table below:
© SAMSUNG Electronics Co., Ltd.
1
Ошибка! Стиль не определен.
System Requirements
Category
Standards
CPU
Intel Pentium IV 1 GHz
Main Memory
256 MB RAM
Operating System
Microsoft Widows 98 or higher
(OS)
Network
2
Network Interface card required
© SAMSUNG Electronics Co., Ltd.
OfficeServ EasySetPlus 사용설명서
Installing OfficeServ EasySync
The procedure to install OfficeServ EasySync is as follows:
1. Run the ‘Setup.exe’
2.
file of EasySync to display the following screen:
Click the [Next (N)>] button to display the screen for the selection of
installation folder.
© SAMSUNG Electronics Co., Ltd.
3
Ошибка! Стиль не определен.
3.
Click the [Next (N)>] button. In the following screen, you can change
the program installation folder by clicking the [Retrieve (R)] button.
4. Click the [Next (N)>] button to display the installation ready screen.
4
© SAMSUNG Electronics Co., Ltd.
OfficeServ EasySetPlus 사용설명서
5.
Click the [Installation (I)>] button. The following screen appears
and the program is installed.
6. If the installation is completed,
the OfficeServ EasySync installation
completion screen appears.
7.
Click the [Finish (F)>] button to complete the installation.
© SAMSUNG Electronics Co., Ltd.
5
Ошибка! Стиль не определен.
Logging in OfficeServ EasySync
The procedure to log in OfficeServ EasySync is as follows:
1.
Execute EasySync. The following screen will appear.
2. Enter the extension number and the password of a desired IP phone to
the ‘ID (Extension number)’ field and the 'Password’ field, respectively.
Click the [
] icon on the above screen to authenticate the IP phone.
When the authentication is completed, the OfficeServ EasySync main
screen appears.
6
© SAMSUNG Electronics Co., Ltd.
OfficeServ EasySetPlus 사용설명서
This page is intentionally left blank.
© SAMSUNG Electronics Co., Ltd.
7
OfficeServ EasySetPlus 사용설명서
Chapter 2. Using a Phone Book
This chapter describes the phone book management, the interface between a IP phone and an address book,
and the interface between outlook address book and an external address book among OfficeServ EasySync
functions.
Phone Book Initial Screen
Select [View] Æ [Phone Book] from the menu of the EasySync main screen
or select the [Phone Book] tab from the left tabs. Then, the following the
phone book initial screen appears.
The icons used in the phone book initial screen are described as follows:
Icon
Description
Icon
Description
Adds a phone book.
Deletes a phone book.
Modifies a phone book.
Saves a phone book.
© SAMSUNG Electronics Co., Ltd.
8
OfficeServ EasySetPlus 사용설명서
Managing Address Book of Phone Book (Search)
Click the [Search] tab from the phone book initial screen. Then, the
following the <Address Book of Phone Book (Search)> screen.
y
If there is no data in the address book of phone book, the [
and [ ] icons are deactivated.
© SAMSUNG Electronics Co., Ltd.
], [
],
9
Ошибка! Стиль не определен.
Adding an Address Book
Click the [
] icon to add an address book of phone book. Then, the
following <Add PhoneBook Address> screen appears:
y
10
Enter the target name, phone number, email, memo, and group, and set a
speed dial to the entered phone number. Click the [
] icon. Then, an
address book is created.
At the time, name or phone number must be entered.
© SAMSUNG Electronics Co., Ltd.
OfficeServ EasySetPlus 사용설명서
Modifying an Address Book
Click the [
] icon to modify an address book of phone book. Then, the
following <Modify PhoneBook Address> screen appears:
y
After modifying the target data, click the [
] icon. Then, the modified
data is saved. At the time, name or phone number must be entered.
Modifying data from the <Address Book of Phone Book (Search)> screen
Click the target item from the <Address Book of Phone Book (Search)>
screen.
After modifying the data, click the [
] icon. Then, the modified data is
saved.
© SAMSUNG Electronics Co., Ltd.
11
Ошибка! Стиль не определен.
Deleting the Address Book
Mark the check box of the target item and click the [ ] icon from the
<Address Book of Phone Book (Search)> screen to delete an address book
of phone book. When the deletion confirmation message appears, press the
[OK] button. Then, the selected address book is deleted.
Deleting an item
When deleting an item such as ‘Name’ and ‘Home Phone’, click the target
item and click the [
] icon. If the deletion confirmation message appears,
press the [OK] button. Then, the selected item is deleted. At the time, name
or phone number must exist.
12
© SAMSUNG Electronics Co., Ltd.
OfficeServ EasySetPlus 사용설명서
Managing Phone Book Group
Click the [Group] tab from the phone book initial screen. Then, the
following <Group> screen appears:
y
If there is no data in phone book, the [
deactivated.
], [
], and [
] icons are
y
Click the [
] icon from the <Group> screen to add a group. Then, the
input field of ‘Group Name’ is initialized. Enter the target group name into
Group Name and click the [ ] icon. Then, the group is added.
y
To modify an item, select the target item from the <Group> screen and
modify the item in ‘Group Name’. Click the [ ] icon. Then, the item is
modified. At the time, the group not classified cannot be modified.
y
To delete an item, select the target item from the <Group> screen and
click the [ ] icon. Then, the deletion confirmation message appears.
Click the [OK] button. Then, the group is deleted.
Deleting a group
The group not classified cannot be deleted. The groups deleted is set to the
group not classified.
© SAMSUNG Electronics Co., Ltd.
13
Ошибка! Стиль не определен.
Managing Speed Dial of Phone Book
Click the [Speed Dial] tab from the phone book initial screen. Then, the
following <Speed Dial> screen appears:
14
© SAMSUNG Electronics Co., Ltd.
OfficeServ EasySetPlus 사용설명서
Adding a Speed Dial
The procedure of adding a speed dial is taken as follows:
1. Select the target speed dial from the <Speed Dial> screen and click the
[
2.
] icon. Then, the <Add Speed Dial> screen appears:
Select the target speed dial and enter the target group and name.
Then, the phone numbers that a speed dial is not set are displayed in
‘Phone Number’.
3.
Select the target phone number and click the [
] icon. Then, the
speed dial is added.
© SAMSUNG Electronics Co., Ltd.
15
Ошибка! Стиль не определен.
Modifying a Speed Dial
The procedure of modifying a speed dial is taken as follows:
1. Select the target item from the <Speed Dial> screen and click the [
]
icon. Then, the <Modify Speed Dial> screen appears:
2.
Select the target group and name, and phone number.
Click the [
16
] icon. Then, the speed dial is modified.
© SAMSUNG Electronics Co., Ltd.
OfficeServ EasySetPlus 사용설명서
Deleting a Speed Dial
The procedure of deleting a speed dial is taken as follows:
1.
Select the target item from the <Speed Dial> screen and click the
[
2.
] icon.
When the following deletion confirmation message appears, click the
[OK] button.
Then, the speed dial is deleted.
© SAMSUNG Electronics Co., Ltd.
17
Ошибка! Стиль не определен.
Address Book Interface
EasySync provides a function of interworking with the IP phone, Outlook
address book and external address book.
IP Phone Address Book Interface
This function allows exporting information on the EasySync address book
to the IP phone or importing information on an IP address book .
Importing IP Phone Address Book
The method to import IP phone address book into EasySync is as follows:
Importing Phone Book Data on IP Phone
If the phone book data of the IP phone is imported, the existing data in the
phone book of the The OfficeServ EasySync program is all deleted, and the
phone book data of the IP phone is saved in the phone book of the
OfficeServ EasySync program. Pay attention to protect important data is
deleted.
1.
If selecting [Tool] Æ [Import(Export) the Phone book from(to) IP ] from the initial screen of the
Phone] Æ [Import], or clicking [
phone book, the following confirm message appears:
2. If
clicking the [OK] button, the following screen appears and the
address book is downloaded from the IP phone.
18
© SAMSUNG Electronics Co., Ltd.
OfficeServ EasySetPlus 사용설명서
3.
If the phone book is completely downloaded, the above screen
disappears and the EasySync phone book is modified to the
downloaded information.
Exporting the Address Book to an IP-Phone
The method to export the EasySync address book to the IP phone is as
follows:
Exporting the Phone Book Data on the IP Phone
If exporting the phone book data in the OfficeServ EasySync program to the
IP phone, the existing data stored in the IP Phone Book is all deleted, the
phone book data in the OfficeServ EasySync program is stored in the phone
book of the IP phone. Pay attention to protect important data is deleted.
1.
If selecting [Tool] Æ [Import(Export) the Phone book from(to) IP Phone] Æ [Export], or clicking [ ] from the initial screen of the
phone book, the following confirm message appears:
2. If clicking the [OK] button, the following screen appears and the
address book is uploaded to the IP phone.
3.
If the address book is completely uploaded, the above screen
disappears and the IP phone address book is modified to the uploaded
information.
© SAMSUNG Electronics Co., Ltd.
19
Ошибка! Стиль не определен.
Outlook Address Book Interface
This function allows exporting information on the EasySync address book
to Outlook or importing information on Outlook address to EasySync.
Importing an Outlook Address Book
The method to import the address book in Outlook to EasySync is as
follows:
1.
If selecting [Tool] Æ [Import/Export the Outlook address] Æ [Import],
] from the initial screen of the phone book, the
or clicking [
following <Import the Outlook address> screen appears:
2.
If clicking [
], the information on the address book in Outlook is
displayed on the screen through Outlook interface. Select an address
book to store to EasySync from the displayed address books and click
[ ] to store to the EasySync address book.
y
20
If there is data that has the identical name with the data newly stored,
select [Modify] to update the information stored in EasySync or select
[Skip] to store the previous address book information without updating.
© SAMSUNG Electronics Co., Ltd.
OfficeServ EasySetPlus 사용설명서
Message Appearing When Executing the Importing Microsoft Outlook Address
Book Function
When executing the Importing Microsoft Outlook Address Book function, if
the ‘A program is trying to access e-mail addresses you have stored in
Outlook. Do you want to allow this? If this is unexpected, it may be a virus
and you should choose [No].’ message appears, select the Allow Access
For check box to set up the allowed time, and then click the [Yes] button.
Exporting Address Book to Outlook
The method to export the information on the address book set up to
EasySync to Outlook is as follows:
1. If selecting [Tool] Æ [Import/Export the Outlook address] Æ [Export],
] from the initial screen of the phone book, the following
or clicking [
<Export address to the Outlook> screen appears:
2.
If the <Export address to the Outlook> screen appears, the address book
information on the EasySync phone book is automatically displayed. If
selecting the target address book from the Outlook address book and
clicking the [ ] icon, the selected address book is registered to the
Outlook address book.
© SAMSUNG Electronics Co., Ltd.
21
Ошибка! Стиль не определен.
External Address Book Interface
This function allows exporting information on the EasySync address book
to an external address book (Comma-separated values (CSV) file), or
importing the address book information on an external address book
(Comma-separated values (CSV) file) to EasySync.
Exporting to an External Address Book
The method to export the address book information set up to EasySync to
an external address book is as follows:
1.
If selecting [Tool] Æ [Import/Export the CSV file] Æ [Export] from
the initial screen of the phone book, the following <Export address to the
CSV file> screen appears.
2.
If selecting the address book to store and clicking the [
] icon, a
screen for file storage appears. Enter the target CSV file name and
click the [Store] button to store the address information to the CSV
file.
22
© SAMSUNG Electronics Co., Ltd.
OfficeServ EasySetPlus 사용설명서
Importing External Address Book
The method to import address book information on an external address
book to EasySync is as follows:
1.
If selecting [Tool] Æ [Import/Export the CSV file] Æ [Import] from the
initial screen of the phone book, the following < Import/Export the CSV
file > screen appears:
2.
Click the [
] icon and select the target file to import the address
information stored in the address book. Select the address book to
store to EasySync, and then click the [
] icon to store to the
EasySync address book.
© SAMSUNG Electronics Co., Ltd.
23
Ошибка! Стиль не определен.
Dialing
The user can dial to the IP phone, using EasySync.
Dialing using Phone Book
Select a phone number (home, mobile, office, others or fax) from the
<Phone Book (Search)> screen and click the [
] icon to dial to the
selected number.
If setting [Tools] Æ [Options] Æ [Useful] Æ [Notification] as <Notify when
IP-Phone is called > ‘ checked’ during dialing, the following dialing
information screen appears:
24
© SAMSUNG Electronics Co., Ltd.
OfficeServ EasySetPlus 사용설명서
Click to Dial
Block the test to dial, using an edit program (Notepad, MS Word, etc.) and
press the hot key to dial automatically.
Hot-Key Setup
The user can set up a hot key in [Tools] Æ [Options] Æ [Useful]->[Click to
Dial] Æ ‘Key Setup’ and apply the function in the ‘Use Hot Key ’ item below.
CID Popup
This function allows popping up the Channel Identifier (CID) information on
EasySync when a call is received.
If a call is received, the following call-notification screen appears. If
clicking the displayed information, the CID information is displayed on the
main screen of Phone Book. If there is no address information on CID, the
CID number is displayed.
© SAMSUNG Electronics Co., Ltd.
25
OfficeServ EasySetPlus 사용설명서
Chapter 3. Setting up Sound/Screen
This chapter describes image and ring sound interface between OfficeServ EasySync and IP phone.
Initial Sound/Screen Setup Screen
If selecting [View] Æ [Sound/Screen] from the main screen of EasySync,
or clicking the [Sound/Screen] tab on the left of the screen, the following
Sound/Screen window appears:
Icons used in the initial Sound/Screen Setup screen are described as
follows:
icon
Description
Icon
Description
Opens a file.
Updates the list.
Exports a file.
Preview a ring sound.
© SAMSUNG Electronics Co., Ltd.
26
OfficeServ EasySetPlus 사용설명서
Setting up IP Phone Background
This function allows the user to add/modify/delete IP phone images.
If clicking the [Screen] tab on the initial setup screen, the following screen
appears:
y
If executing the screen initially, a background image list is displayed on
the bottom of the screen.
y
If there is no image stored in the list, The ‘There is no image stored’
message appears.
© SAMSUNG Electronics Co., Ltd.
27
Ошибка! Стиль не определен.
Adding an Image
The method to add an image to the IP phone is as follows:
1.
Check an empty check box in the list and then click the [
] icon to add
the desired image.
2.
If selecting the image, the selected image is displayed on the ‘Preview’
screen.
Then, click the [
y
] icon to transmit the image to the IP phone.
If checking the [Use this image as backgroup] checkbox, the image is set
up as the background of the IP phone.
28
© SAMSUNG Electronics Co., Ltd.
OfficeServ EasySetPlus 사용설명서
Modifying an Image
The method to modify an image stored in the IP phone is as follows:
1.
Check the check box of the item to modify in the image list and click the
[
] icon to select the image to modify.
2. If selecting the image, the selected image is displayed on the ‘Preview’
screen.
If clicking the [
3.
] icon, the following confirm message appears:
Click the [OK] button to transmit the image to the IP phone.
© SAMSUNG Electronics Co., Ltd.
29
Ошибка! Стиль не определен.
Deleting an Image
The method to delete the image stored in the IP phone is as follows:
1.
Click the [ ] icon next to the item to delete in the list.
2.
If the following confirm message appears, click the [OK] button.
Then, the selected image is deleted.
30
© SAMSUNG Electronics Co., Ltd.
OfficeServ EasySetPlus 사용설명서
Setting up a Ring on the IP Phone
The function allows the user to add/modify/delete a ring on the IP phone.
If clicking the [Sound] tab on the initial setup screen, the <Sound> screen
appears:
y
If executing the screen initially, the ring list stored in the IP phone
appears on the bottom on the screen.
y
If there is no ring stored in the list, the ‘There is no ring stored’ message
appears.
© SAMSUNG Electronics Co., Ltd.
31
Ошибка! Стиль не определен.
Adding a Ring
The method to add a ring to the IP phone is as follows:
1.
Check the check box of the item to add in the ring list and click the [
]
icon to a ring.
2.
If selecting a ring and clicking the [
ring. Then, click the [
y
] icon, the user can preview the
] icon to transfer the ring to the IP phone.
If checking the [Basic Ring Setup] check button, the ring transmitted to
the IP phone is set up as the basic ring.
Ring Preview
To set up the ring preview, refer to [Tools] Æ [Options] in the manual.
32
© SAMSUNG Electronics Co., Ltd.
OfficeServ EasySetPlus 사용설명서
Modify a Ring
The method to modify a ring set up to the IP phone is as follows:
1.
Check the check box of the item to modify in the ring list and click the
[
] icon to select the ring.
2.
If clicking the [
3.
If clicking the [OK] button, the ring is modified.
© SAMSUNG Electronics Co., Ltd.
] icon, the following confirm message appears:
33
Ошибка! Стиль не определен.
Chapter 4. Using Messages
In this chapter, the OfficeServ EasySync, the message sending/receiving interwork and the method of
managing the outbox, inbox, and message box are described.
Initial Message Screen
By selecting [View]Æ[Message] of the menu on the EasySync main screen,
or [Message] on the left tab, the following initial message screen is
displayed.
34
© SAMSUNG Electronics Co., Ltd.
OfficeServ EasySetPlus 사용설명서
You can use the icons shown on the message screen according to the
following descriptions:
Icons
Descriptions
Sends messages.
Icons
Descriptions
Adds the numbers received when
sending messages.
Initializes the messages to
Sends answers.
be sent.
Saves messages in the message
Delivers messages.
Deletes
the
box.
selected
Adds the message box.
information.
© SAMSUNG Electronics Co., Ltd.
35
Ошибка! Стиль не определен.
Sending Messages
You can send messages to IP phone using this function.
If clicking the[Send] tab on the initial message screen, the following <Send
Message> is displayed.
y
36
On the send screen, you can write messages, and can enter the special
characters by clicking the special character table on the right side.
© SAMSUNG Electronics Co., Ltd.
OfficeServ EasySetPlus 사용설명서
Sending Messages
You can send your messages by following the procedures below:
1.
Enter your message into [Receive Number], enter the received number,
and click the [
2.
] icon.
By clicking the
[
] icon, the received number is added to the
‘Received Number List’.
3.
y
At this time, click the [
initialized.
y
If you want to delete a number in the received number list, select the
number to be deleted, and click the [ ] icon.
y
You can enter up to 80 bytes for the messages, and can send your
message to 20 persons at one time.
If clicking the [
] icon, and the [Receive Number] is
] icon, your message is sent to the IP phone of the
received number.
y
At this time, check [Received Box], [Message Box] check button,
the sent messages are saved at the [Received Box] and [Message
Box].
© SAMSUNG Electronics Co., Ltd.
37
Ошибка! Стиль не определен.
Received Box
By using this function, you can save the message received via the IP
phone at the Inbox when the EasySync is logged in the IP phone.
If clicking the [Received Box] tab on the initial screen for messages, the
following < Received Box > screen is displayed.
y
38
If there no data remain in the Received Box, the [
[ ] icons are deactivated.
], [
], [
], and
© SAMSUNG Electronics Co., Ltd.
OfficeServ EasySetPlus 사용설명서
Receiving Messages
You can check if the messages are received by following the procedure
below:
1. When a message is received to the IP phone, the following message
indicating the message arrival is displayed:
y
2.
The number of displayed messages is not corresponded to that of the
whole messages received to the IP phone. The number displayed on
the screen means that of the message not confirmed among the
received ones in the login status by EasySync.
If clicking the displayed information, the following dialog box of
confirming the message reception is displayed:
3.
If clicking the [OK] button, you can check the received message via
the displayed <Received Box> screen.
© SAMSUNG Electronics Co., Ltd.
39
Ошибка! Стиль не определен.
Replying/Resending/Saving/Deleting Messages
You can reply/resend/save the message saved at the Received Box by
following the procedure below:
40
y
Select at the received box the message to be replied, click the [
]
icon, and the Send Message screen is displayed. Written out the
message to be sent, and send it. The written message is replied to the
number where the message is sent.
y
Select the message to be re-sent at the inbox, click the [
] icon, and
the Send Message screen is displayed. Enter the received number, and
send the message. The message is re-sent to the designated number.
y
Check the check button of the message to be saved at the message box,
click the [ ] icon, and the message is saved at the message box. You
can check the message at the EasySync message box.
y
Check at the outbox the check button of the message to be deleted,
click the [ ] icon, and the checked message is deleted in the inbox.
© SAMSUNG Electronics Co., Ltd.
OfficeServ EasySetPlus 사용설명서
Sent Box
By using the ‘ EasySync send message’ when EasySync is logged in the
IP phone, you can save the sent message at the outbox.
Click the [Sent Box] tab on the initial message screen, and the following
<Sent Box> screen is displayed:
y
If there no data remain in the outbox, the [
are deactivated.
y
If you want to set the Sent Box save function, check [Save Sent Box] on
the <Send Message> screen. The successfully sent message is saved at
the Sent Box.
y
You can resend/save/delete the message saved at the outbox. For the
message resent/save/delete, see the part of [Received Box] Æ
[Message Reply/Resend/Save/Delete].
© SAMSUNG Electronics Co., Ltd.
], [
], and [
] icons
41
Ошибка! Стиль не определен.
Message Box
In the EasySync, you can save the message used in the message
sending/receiving or the newly made message at the message box.
Click the [Message Box] tab on the initial message screen, and the
following <Message Box> is displayed:
42
y
If there no data remain in the message box, the [
deactivated.
], [
] icons are
y
If you want to set the message box save function, check [Save Message
Box] check button on the <Send Message> screen. The successfully
sent message is saved at the saved box.
y
You can send/delete the message saved at the message box. For the
message send/delete, see the part of [Received Box] Æ [Message
Reply/Resend/Save/Delete].
y
If you want to add a new message to the message box, click the [ ]
icon. And the input box of the ‘ Message contents’ is initialized. Enter
the message to be added to the input box, click the [ ] icon, and a
new message is added.
© SAMSUNG Electronics Co., Ltd.
OfficeServ EasySetPlus 사용설명서
Chapter 5. Setting Environment
In this chapter, the method of setting the environments of the OfficeServ EasySync and the IP-Phone is
described.
Initial Screen of Options
Select [Tools]Æ [Options] on the <Login> screen, or click the [ ] icon
on [Tools] Æ [Options] on the EasySync main screen or on the toolbar of
the phone book initial screen, and the following <Options> screen is
displayed:
© SAMSUNG Electronics Co., Ltd.
43
Ошибка! Стиль не определен.
General
Set the IP address of the IP phone and the ID necessary for the login to
interwork with the IP phone.
Select [General] tab on the <Options> screen, and the following <General>
screen is displayed:
The detailed descriptions on the items on each screen are made in the
table below:
Screen Items
Phone
44
Descriptions
IP
Enters the IP address of the IP phone.
ID
Enters the ID when logged in.
Code
Selects the user’ s national code.
LANGUAGE
Select the language to be used in the EasySync.
Version
Displays the EasySync version.
Save Button
Press the [Save] button, and the modified contents are saved.
Close Button
Press the [Close] button, and the <Options> screen is terminated.
© SAMSUNG Electronics Co., Ltd.
OfficeServ EasySetPlus 사용설명서
Useful
In this menu, the additional useful functions of the EasySync are set.
Select the [Useful] tab on the < Options > screen, the following <Useful>
screen is displayed:
The detailed descriptions on the items of each screen are made in the
table below:
Screen Items
Click to Dial
Descriptions
- Key setting: Sets the hot key necessary for the Click to dial.
- Using shortcut key: Selects whether to use the hot key or not.
- Use confirming message before you call: Shows the confirming
message to the user before making calls.
Sound
Sets the path necessary for the bell sound pre-listening.
playback
- Select the path by clicking the [Search] button.
Notification
Selects whether the phone displays the notifying message in the
Send/Receive.
Save Button
Press the [Save] button, and the modified contents are saved.
Close Button
Press the [Close] button, and the <Options> screen is terminated.
© SAMSUNG Electronics Co., Ltd.
45
Ошибка! Стиль не определен.
Setting a Phone
In this menu, the call forwarding function of the IP phone and the dial mode
are set.
Select [Phone] on the <Options> screen, the following <Phone Setting>
screen is displayed:
The detailed descriptions on the items of each screen are made in the
table below:
Screen Items
FWD
Descriptions
- Call forwarding release: Releases the call forwarding of the IP phone.
- Call forwarding setting: Sets the call forwarding of the IP phone.
* Always: Forwards the call unconditionally to the designated
number.
* Busy: Forwards the call to the designated number during the busy
call.
* No Answer: Forwards the call to the designated number when there
is no answer.
* Busy/NoAnswer: Forwards the call to the designated number during
the busy call or no answer.
* DND : Forwards the call to the designated number when the call is
rejected.
46
© SAMSUNG Electronics Co., Ltd.
OfficeServ EasySetPlus 사용설명서
Dial Mode
-Enbloc mode: Whenever the figures are pressed, they are displayed
on the screen as they are.
-Overlap mode: If the figures are pressed, the soft menus are
displayed on the screen.
Save Button
Press the [Save] button, and the modified contents are saved.
Close Button
Press the [Close] button, and the <Options> screen is terminated.
© SAMSUNG Electronics Co., Ltd.
47
Ошибка! Стиль не определен.
This page is intentionally left blank.
48
© SAMSUNG Electronics Co., Ltd.
OfficeServ EasySetPlus 사용설명서
Abbreviations
C
CID
Channel Identifier
CSV
Comma Separated Values
I
IP
Internet Protocol
IIS
Internet Information Server
PC
Personal Computer
P
© SAMSUNG Electronics Co., Ltd.
49
Ошибка! Стиль не определен.
This page is intentionally left blank.
50
© SAMSUNG Electronics Co., Ltd.
OfficeServ
EasySync User Manual
©2005 Samsung Electronics Co., Ltd.
All rights reserved.
Information in this document is proprietary to SAMSUNG
Electronics Co., Ltd.
No part of this document may be copied, translated,
transcribed or duplicated by any form without the prior
written consent of SAMSUNG.


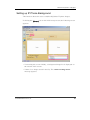
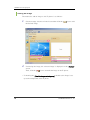
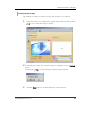
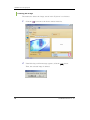

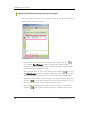
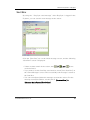
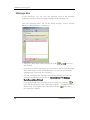
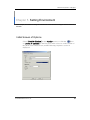


![SamsungProdBulletin_211_4_4x_Software_Release[1]](http://vs1.manualzilla.com/store/data/005825179_1-598976db56b1ef1012f4b9b7fb2b917f-150x150.png)