1
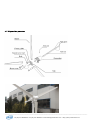
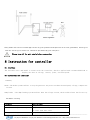
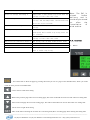
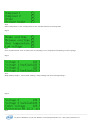
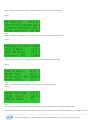
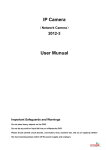
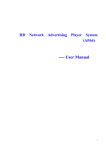
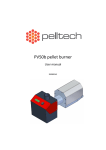
’S MANUAL FOR E-SERIS 5KW
USER
USER’
-------------------------------------------------------------------------------------------------------------------------------------------------------------------------------------Tel:(86) 574 26266608 Fax:(86) 574 26266618 Email:[email protected] Http://www.pvsolarchina.com
Warnings:
� Please excuse from specification alternations without notice;
� It is required to comply with the local law, regulations or the permission From local
。
government before installing WTGS;
WTGS;。
� Only under no wind weather should carry out the installation, maintenance And dismantling
。
of WTGS;
WTGS;。
� Please make sure the construction for WTGS mechanical and electronic facilities should be
。
done by professionals;
professionals;。
。
� Color or figuration of pictures might be varied against physical goods;
goods;。
� It is forbidden to leave the wind turbine generator working under unloaded state (such as
without connecting with batteries).
。
batteries).。
� The safety signs involving the manual are as followed;
。
Danger-Improper operation might lead to hurt people badly.
badly.。
。
Attention-Improper operation might lead to damage products or hurt People
People。
Contents
1. Abstruct .........................................................................................................................3
2.Where to use ………………..…………………………………………………………………………..3
3.Model and parameter………………………………………………………………………………..4
4.How to install the generator..…………………………………………………………………….5
5.How
to
install
guy
tower...................................................................................10
cable
6.Battery configuration………………………………………….…………………………………..19
7.Wiring diagram…………………………………………………………………………………….....20
-------------------------------------------------------------------------------------------------------------------------------------------------------------------------------------Tel:(86) 574 26266608 Fax:(86) 574 26266618 Email:[email protected] Http://www.pvsolarchina.com
8. Operation for controller………………………………………………………………………………………… 21
9.Maintenance…………………………………………………………………………….…………….27
10.Trouble removal……………………………………………………………………………………28
1
Abstruct
The wind turbine generator system is the equipments which could produce electricity by the rotating of
blades. The function of the controller is to rectify the output and protect the generator under severe
environment. The E-series generator could be applied in the system of wind and solar hybrid, as the controller
of it has a solar connector.
2 Where to use
This E-series generator could be both applied for home use and factory use, which is available for on-gird
and off-grid, While on-gird by matching on-grid inverter and off-gird by matching batteries and off-grid
inverter.
Not available for below:
1 No loading
2 Directly connecting with consumption
-------------------------------------------------------------------------------------------------------------------------------------------------------------------------------------Tel:(86) 574 26266608 Fax:(86) 574 26266618 Email:[email protected] Http://www.pvsolarchina.com
0
3 Parameter
Item
Rated
Rated
Rated
voltage
Curren
Power
(DCV) t(DCA) (W)
Start-u
p wind
speed
(m/s)
Rate
d
wind
spee
d
( m/
s)
Securi Wind
Gener
ty wind diamet ator
speed
er(M) type
(m/s)
GUAN
G
MANG
240
2.5
12
35
20
5000
6.2
PMG
RPM(r/m)
Bl
ad
e
ma
te
ri
al
Bl
ad
e
NO
.
200
GF
RP
3
4 How to install the generator
4.1
Site choosing
Wind turbine generator system should be installed at least 50m away from house or areas people gathering. It should be
avoided to have trees or buildings nearby to affect the wind speed or wind direction. It is forbidden to install the wind turbine
generator on soft lands, uneven ground or areas where the ground can be easily influenced by the climates. At the same time,
the distance between generator and battery should be also considered, as the longer the distance, the less the wastage. And
please use a thicker cable for long distance connection.
4.2 assembing and connection
Note:Please, firstly connect the controller with battery, and then the generator 2、Instruction for connection
of 5kw
-------------------------------------------------------------------------------------------------------------------------------------------------------------------------------------Tel:(86) 574 26266608 Fax:(86) 574 26266618 Email:[email protected] Http://www.pvsolarchina.com
3、Instruction for connection of dump loader of 5kw
-------------------------------------------------------------------------------------------------------------------------------------------------------------------------------------Tel:(86) 574 26266608 Fax:(86) 574 26266618 Email:[email protected] Http://www.pvsolarchina.com
4.3 Diagram for generator
-------------------------------------------------------------------------------------------------------------------------------------------------------------------------------------Tel:(86) 574 26266608 Fax:(86) 574 26266618 Email:[email protected] Http://www.pvsolarchina.com
4.4 installation
Connect the cable to the bottom of generator, and then make the cable go through the pole center.
-------------------------------------------------------------------------------------------------------------------------------------------------------------------------------------Tel:(86) 574 26266608 Fax:(86) 574 26266618 Email:[email protected] Http://www.pvsolarchina.com
Below is the identifier and corresponding wire,
Number
1
2
3
4
5
6
7
Wire
Motor
Motor
Motor
Temperat
Temperat
Brake(+) Brake(-)
lead wire
lead wire
lead wire
(A)
(B)
(C)
ure
ure
control
control
(+)
(-)
Note: About the temperature control wire, the red is positive and black is negative. The braking
cable is 2*2.5mm², with red positive and blue negative.
The third screw shouldn’t be release which closed to the insulating board. You could release
the second screw, put in the end, and tighten the screw.
2 Connect the generator with the pole by screw
3 blades
(1)The flange has been assembled on the motor shaft before delivery
(2)Please note the concave part of blades should face the wind, and tight the blade with flap by screw.
Balance is very important, and do not tight the screw before assembling all blades. For finding balance, please
make a same distance for every apex, and then tighten the screw.
(as below)。
-------------------------------------------------------------------------------------------------------------------------------------------------------------------------------------Tel:(86) 574 26266608 Fax:(86) 574 26266618 Email:[email protected] Http://www.pvsolarchina.com
Note: L1=L2=L3(with tolerance ±5mm)
。Tighten the screw after finding balance。
4、Assemble the nose cone by screw
-------------------------------------------------------------------------------------------------------------------------------------------------------------------------------------Tel:(86) 574 26266608 Fax:(86) 574 26266618 Email:[email protected] Http://www.pvsolarchina.com
5、Connect the tail with the generator with screw
6 Please connect cable from the tower to the controller. Note, controller should be firstly connect with battery
-------------------------------------------------------------------------------------------------------------------------------------------------------------------------------------Tel:(86) 574 26266608 Fax:(86) 574 26266618 Email:[email protected] Http://www.pvsolarchina.com
5 How to install guy cable tower
5.1 Foundation sizing
Please install the generator only under no wind weather.
To make the foundation in an open area,
Model
5KW
Guy cable tower
Foundation
Radius( m)
6
Center foundation( m)
0.9*0.9*1.2
Edge foundation ( m)
0.8*0.8*0.9
-------------------------------------------------------------------------------------------------------------------------------------------------------------------------------------Tel:(86) 574 26266608 Fax:(86) 574 26266618 Email:[email protected] Http://www.pvsolarchina.com
5.2 For making basement
Please dig the basement according to the designed size. Then put the anchor in the basement. Please assemble
the plate as below. For generator below 2kw,there are two pins needed to fit in the edge foundation; For above
3kw, there needs to be three screw tooth hole forwards to the front side.
Placing the concrete after making the basement ready(C25),as below,
Put the edge anchor into the edge basement, and please check the distance between the hook of basement
and the center, including the basic level of basement, and then placing concrete. Do as below,
-------------------------------------------------------------------------------------------------------------------------------------------------------------------------------------Tel:(86) 574 26266608 Fax:(86) 574 26266618 Email:[email protected] Http://www.pvsolarchina.com
To keep the balance of the tension between each cable, the height of the basement need to be same with the
base of the tower. Otherwise, the unbalance would cause trouble for the tower.
5.3 Assemble the tower
Connect the two section of subsidiary pole together, and insert it into the main tower, as below
Connect 4 pieces of steel wire to the end of the subsidiary pole, and then connect the steel wire which corresponding to the edge
basement with the U-shape spend orchid, as below,
-------------------------------------------------------------------------------------------------------------------------------------------------------------------------------------Tel:(86) 574 26266608 Fax:(86) 574 26266618 Email:[email protected] Http://www.pvsolarchina.com
The steel which corresponding to the front basement need to connect with the chain block, as below,
Erect the subsidiary pole, and fix the steel wire to the edge basement, as below,
-------------------------------------------------------------------------------------------------------------------------------------------------------------------------------------Tel:(86) 574 26266608 Fax:(86) 574 26266618 Email:[email protected] Http://www.pvsolarchina.com
Aim the pin hole of tower to the basement, and insert the pin with smearing grease, as below
1. Connect each section of the pole by screw as below,
-------------------------------------------------------------------------------------------------------------------------------------------------------------------------------------Tel:(86) 574 26266608 Fax:(86) 574 26266618 Email:[email protected] Http://www.pvsolarchina.com
2. To connect the steel wire after connecting the tower as below picture. For safety, you could twine the
tower with the steel wire for a circle before fixing the wire with the fixture. There need to be two fixtures
for each steel wire, and 10-20 cm need to be left in the end of the wire
Besides aiming the steel wire for front basement, the ends of all other steel wire need to connect with
the corresponding basement. And you could fix all wires after the installation of the tower as below
3. Put the tower on a wooden yoke, height of 1m to 1.5m, as below,
-------------------------------------------------------------------------------------------------------------------------------------------------------------------------------------Tel:(86) 574 26266608 Fax:(86) 574 26266618 Email:[email protected] Http://www.pvsolarchina.com
4. Generator installation ( In the manual for generator part)
5. You could erect the tower with a winch, tractor and crane. Please note, when using a winch and tractor,
there need to be a yoke for generator below 2kw, including 2kw. Pay attention to the tension of each steel
wire in the process of erecting in case of any unbalance.
6. Please installing the bolts to the three hole at the bottom of the tower after the erecting of the tower
7. To check the length of 4 pieces of steel wire, and fix it with fixture. Note, please leave a proper radian
for the steel wire。
10. You need to take the subsidiary pole away and release the steel wire after installation。
5.4 Lay down the tower
For laying down the tower, a no wind weather is needed, as well as a yoke, which is the same when for
installing。
8. Break the connection to stop the generator, which could be checked in the user’s manual.
9. 【If using a crane】
The harness should be tied to the generator by professional people. And then ,release
-------------------------------------------------------------------------------------------------------------------------------------------------------------------------------------Tel:(86) 574 26266608 Fax:(86) 574 26266618 Email:[email protected] Http://www.pvsolarchina.com
the screw and steel wire to lay down the generator slowly to the yoke.
1. 【If using a tractor or winch】First, release the steel wire of the basement, and then connect the
steel wire to tractor or winch according to the installing manner by reversing it. Finally, lay down
the tower on the yoke slowly.
6.Bettery Configuration
Battery should be placed in a dry building with constant temperature and
通风. By calculating the output
of generator, you could decide the number of the battery and the connection, series and parallel. Then please design
a cage for placing the battery, controller and inverter. To avoid electromagnetic interference, after connect the battery,
please smear the end of wire with grease or anti-corrosion material. The connecting wire between battery and controller
should be no less than 3M. You could check the parameter for choosing the battery.
Series connecting is to connect the anode of one battery to the cathode of another battery as below:
Parallel connecting is to connect the battery anode with anode, cathode with cathode as below :
-------------------------------------------------------------------------------------------------------------------------------------------------------------------------------------Tel:(86) 574 26266608 Fax:(86) 574 26266618 Email:[email protected] Http://www.pvsolarchina.com
※Please check the notification, using instruction and maintenance with BATTERY INSTRUCTION。
7 Wiring diagram
7.1 OFF GRID(Picture as below)
` Please make sure that the output voltage, voltage of battery and the input voltage of battery should be
same. Do not misconnect the end of battery, which would burn the generator, battery and inverter out.
7.2 ON-GRID(Picture as below)
-------------------------------------------------------------------------------------------------------------------------------------------------------------------------------------Tel:(86) 574 26266608 Fax:(86) 574 26266618 Email:[email protected] Http://www.pvsolarchina.com
Every model of E-series could be applied for on-grid system with the permission of local government, and on-gird
inverter and on-grid controller should be purchased by your own part.。
Please turn off the main supply before connection。
8 Instruction for controller
8.1 Interface
The interface uses a 485 model to connect with the controller, which is applied with customized KNN LCD to
display the data of voltage, current, power, and wind speed.
8.3 Instruction for controller
1 Summary
Brake:The brake system would act to stop the generator for protection when the wind speed, voltage, temperature
overrun.
Dump loader :The dump loading system would act when the voltage overrun, which could release the electricity
Parameter setting
Parameter
Instructions
Voltage unloading 1
Dump loader 1 acting when over this voltage
Return of
Dump loader 1would stop action when the voltage
is lower than this value
Voltage unloading 1
Voltage unloading 2
Dump loader 1 and 2 acting when over this
-------------------------------------------------------------------------------------------------------------------------------------------------------------------------------------Tel:(86) 574 26266608 Fax:(86) 574 26266618 Email:[email protected] Http://www.pvsolarchina.com
voltage
Return of Voltage unloading 2
Dump loader 1 and 2 would stop action when the
voltage is lower than this value
Brake
The dump loader 1 and 3 would act when over this
voltage; And the dump loader 1 and 2 would stop
after the action of brake
voltage
Return of brake volatge
The brake would stop action when lower than this
voltage
Security wind speed
The dump loader 1 and 2 would act when over this
wind speed; And it would stop acting after the
Note: The PLC is
closed
before
delivery, and it
could only be turned
on
after
the
installation
of
wind turbine.
act of brake.
The return of security of wind speed
The brake would act after a while when the
voltage is lower than this value
The protection time before brake t1
The acting time of dump loader before brake
The protection time after brake t2
The acting time of dump loader after brake
Brake pressue
The value of pressure on brake
Security current
The dump loader 1 and 2 act after the brake; and
then it would stop acting.
8.4、Interface
1. Button
:You could return to the front page by pressing this when you are in a page of non-installed state, which you could
return to when you are in a installed state
:Cursor moves to left when setting
:Back to the previous page when in a non-setting page; The value would add one more one time when in a setting state.
:Move to the next page when in a non-setting page; The value would reduce one for one time when in a setting state.
:Cursor move to right when setting.
:Move to the state of chooing the set when in a non-setting state; Move to setting page when chooing the setting state.
-------------------------------------------------------------------------------------------------------------------------------------------------------------------------------------Tel:(86) 574 26266608 Fax:(86) 574 26266618 Email:[email protected] Http://www.pvsolarchina.com
:The confirm the revising in the state of setting and returen to the state of choosing setting.
:Re-enter the initial setting ( only available in page 10)
:Manual brake (Available in every page)
:Manual release (Available in every page)
:Error on timeout when clearing the release of brake ( only available in page 10))
:To release the manual brake ( only available in page 10)
:The clear the error on time out of brake ( only available in page 10)
Page 1 to page 4 is the page for illustrating the state; Page 5 to page 10 is the page for setting the parameter
Page 1
Item:
Voltage of battery, the output current of wind turbine, the output voltage of solar panel, wind speed
Page 2
Item:
Pressure, the power of wind turbine, the power of solar panel
备注:当温度过高报警时,或者解刹到位时,压力值显示为负值,此为正常现象。
Note: The pressure value could be negative when the temperatur is so hign or the brake releasing act, and this is normal state.
Page 3
-------------------------------------------------------------------------------------------------------------------------------------------------------------------------------------Tel:(86) 574 26266608 Fax:(86) 574 26266618 Email:[email protected] Http://www.pvsolarchina.com
Item:
State if dump loader 1, state of dump loader 2, state of brake and state of releasing brake
Page 4
Item
Error on brake timeout, error on release time out, alarming on over temperature and alarming on under vpoltage.
Page 5
Item:
Dump loading voltage 1, return of dum loading 1, dump loading2 and return of dump loading 2
Page 6
Item
-------------------------------------------------------------------------------------------------------------------------------------------------------------------------------------Tel:(86) 574 26266608 Fax:(86) 574 26266618 Email:[email protected] Http://www.pvsolarchina.com
Brake voltage, return of brake voltage, the value of under voltage and security wind speed
Page 7
Item
Return of security wind speed, security current, return of security current and brake pressure
Page 8
Item:
Release pressure, delay of over voltage, delay of over wind speed and pressure up limit
Page 9
Item:
Delay of over current, the normal braking time, security time and delay of brake
Page 10
Item
The over time of brake, the braking time when the brake system is abnormal ad if to release the manual brake
All the parameter has been settled before delivery, and there is no need for users to revise the data again. If you need to revise it,
-------------------------------------------------------------------------------------------------------------------------------------------------------------------------------------Tel:(86) 574 26266608 Fax:(86) 574 26266618 Email:[email protected] Http://www.pvsolarchina.com
please feel free to contact us for confirm.
9 Maintenance
Please check and maintain the generator at a certain time as the environment for generator might be very
scurviness. Please lay down the tower before storm coming in case of any trouble。
ial
ber
Item
Check blades: look for cracks or abnormal bends.
If you locate any damage caused by storms or
weather, replace the blades as using damaged or
unbalanced blades will compromise
the
efficiency and lifetime of windmill.
After
storm
Every
Moth
Every
Year
√
Every 5
year
√
Replace lubricant
√
Check to see if nuts and bolts have remained tight
on mill and tower
√
Check electric power cables for corrosion and
√
√
√
damage. If you detect any abnormal corrosion,
replace cables.
Please repaint the tower if the painting failed
by reason of climate.
√
To check if every control system working well
√
Please check the electrolyte level of the
battery. And please add if not enough by
following the instruction.
√
-------------------------------------------------------------------------------------------------------------------------------------------------------------------------------------Tel:(86) 574 26266608 Fax:(86) 574 26266618 Email:[email protected] Http://www.pvsolarchina.com
10 Trouble shooting
(1)Why the Electrical equipment failure after connecting with the system?
○ Please check the remaining power the battery, and the electrical equipment would not work if the power
is not enough. If the power is enough, please check if the connection between battery and inverter is correct.
(2)Why cannot charge the battery?
○ To check if the blades rotate, and the generator would not work if the wind speed is so low or so high.
If the rotating of blade is Ok, please disconnect the battery and inverter from the generator, and then
check the output of generator by voltmeter. If the output is OK, please check the battery follow the
instruction to see if the battery damaged. If the voltmeter is zero, please check if it’s the problem
of generator’s cable.
(3)Why the blade do not move or move slowly with a normal wind speed?
○ The rotating of blade would be abnormal if the output line is short-circuited. And please check the
generator’s cable with disconnecting the battery and inverter from the generator.
(4)If we could extend the using of electrical equipment by adding the capacity of battery?
○ It would be a waste of battery and do harm to the battery, if add the capacity of battery without professional
suggestion because it would put the battery always in the state of lacking power.
Please contact with our engineer by e-mail or mobile if you can ‘not solve the problem.
* Color may be different from physical products of picture.
* Please give a kind understanding if the manual has been modified without prior notification.
* Two years warranty would be offered from the date of purchasing
( Non-artificial and Force
purchasing(
)
majeure
majeure)
-------------------------------------------------------------------------------------------------------------------------------------------------------------------------------------Tel:(86) 574 26266608 Fax:(86) 574 26266618 Email:[email protected] Http://www.pvsolarchina.com