1
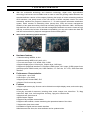
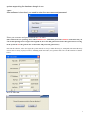
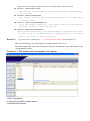
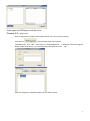
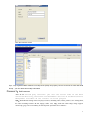
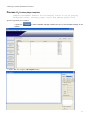
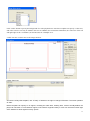
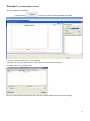
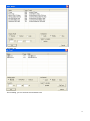
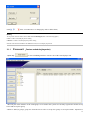
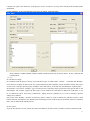
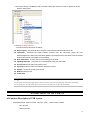
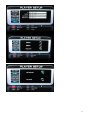
HD Network Advertising Player System (AP64) ---- User Manual 1 1 SYSTEM OVERVIEW With the multimedia technology and electronic technology, digital video, high-definition technology has become an inevitable trend.In order to meet the growing market demand, the standard definition version of the company following the launch of online advertising machine AP63 solutions, and timely launch of the HD version of AP64 complete solution for online advertising machine.The program is based on C / S mode network information distribution system, which consists of advertising client (set-top box, STB) and server management software of two parts.Advertising clients can smoothly play high-resolution 1080i, 13M stream high-definition film sources; server side with management software to meet the needs of high and low, to achieve the function of backward compatibility, you can at the same time both SD and HD versionsclient for playback management and monitoringAP64 AP64 online advertising system structure Hardware features 1.Video decoding: MPEG2, H.264 2.Audio decoding: MPEG/1/2/3, AAC, AC3 3.TV mode and output: YUV, HDMI, VGA, CVBS 4.Support display layers: Video layers, Graphic layer, OSD layer 5.Support for peripheral interfaces: VGA output, HDMI output, YUV output, CVBS output of two general-purpose RS232 serial port, USB Interface, CF card slot, IR / VFD, SATA hard disk interface Performance Characteristics 1.VGA output - up to 720P 2.HD Output - up to 1080I 3.Support picture format: BMP, JPG 4.Support 7x24 hours a day to work Features 1.Support split-screen play: Screen can be divided into multiple display areas, and used to play different content 2.Can play a wealth of resources, including video, audio, images, text, video files:. Ts,. Mpg audio files:. Mp3,. Aac,. Ac3 image files: 24. Bmp,. Jpeg text: normal txt file 3.Supports text, picture scroll 4.Spots feature support 5.Support Play template customization 6.Support cable network, remote monitoring the operational status of the client 7.Support the client timer switch 8.Available in English and two switch interface 9.Maintenance-free client, the client software can be updated online 2 Application areas 1.Crporate image, brand franchise stores and other information management systems for issuing 2.Banks, hospitals, securities and other bulletin board system 3.Telecommunications, postal services, Mobile, China Unicom and other information distribution system operating room 4.Stations, airports and other trips, flight information release and announcement system 5.Buildings, shopping malls and other video advertising system 6.National Press newspaper, multimedia, newspapers and advertising system 7.Video advertising and stadium announcement system 8.Communities, restaurants, entertainment and other public places and areas of notices or advertising system 2 SYSTEM HARDWARE COMPONETS Server and client set-top boxes achieving the Internet and order interaction through the TCP / IP network. Bellow that is diagram HD AP64 online advertising system. ▲ Server Part Install the AP64 server software on a computer. Requirements: Up to P4, with Windows 2000/XP/2003 or later operating system. ▲ Client Part Clients include: 1.HD set-top box advertising board 2.Board set-top box can be "wired" ,"wireless" and “3G” connection with the server in three ways 3.CF card:plug into the player board. Use good quality CF card with speed of 133 * or up to 133* 4.DC power supply: DC 12V input for the set-top box with the motherboard power supply (receiving 12V \ 3A power adapter) 5.Monitor: You can use ordinary or high-definition TV for the display, or, customers can configure their own circumstances 3 ▲Hardware configuration set-top box motherboard 1.Boot ROM: Standard 512KB/SPI/ FLASH 2.SD RAM: DDR2 (256MB) 3.Storage device: (choose one) Support FAT32 & EXT3 format 2.5 "HDD Support FAT32 & EXT3 format CF card 4. Audio: Dual-channel stereo output 5.Video Output: YUV, CVBS, HDMI, VGA (Note: YUV, CVBS, VGA can not output; HDMI, VGA can not output) 6. Network Connection: Support 10M/100Mbits network connectivity, standard RJ45 interfaces 7. USB2.0 host control, support U disk read and write, USB data communication 8.IR: Support IR receiver, remote control switch 9.Other peripheral interfaces: Two UART interfaces (one for debugging, a feature can be used for external expansion interface) 10.Support hardware encryption 3 MANAGEMENT SOFTWARE SERVER GUIDE Main functions of server management software,genarate the playlist(playorder) and update the play states. include: Manage user Manage source Manage STB Manage play template Custom player content Custom schedule(task) Custom play list Monitor STB Monitor FTP download 1. Install login and start 1.Install Install AP64 software on the computer, Provide you with the package will usually include a server directory. Double-click the directory "ADPlayer.exe" file, the computer system will automatically perform the installation. According to the installation process prompts appear on the screen can be, recommended default settings. 2.login Installation AP64 software (ADPlayer.exe), directly double-click the computer icon on the desktop shortcut or from Windows ADPlayer system status bar and then click Start Program ADADPlayer to start the server management software. Note:For the official release, necessary to start the server PC's USB port plug in the AP64 4 system supporting the hardware dongle to run 3.Start After software is launched, you need to enter the user name and password. Please put username and password both are k to enter (The software has set a privilege user, called administrator, with initial password is 666666. To the first run, you can use this privilege user to login. After logined in, users can add general user. Since then general users can log in the system.So k is the general user of username and password general user) First run the software, after user login, the system will ask to set up a main directory (ie, FTP path). The main directory used to store a variety of play resources, including audio and video, text, pictures and so on. Set the interface as shown below Brow the Main DIR 5 OK to confirm. Main DIR: C:/=>program files=>AD-LNAD=>LNAD=>content FTPName:k FTPPass:k Re-type:k FTPAddress:is the IP address of your computer which install LNAD server. LimitRate: defaulted 1000 Click OK to confirm Note: After the completion of the above dialog box, click \"OK\", FTP server will automatically restart after a moment can be used normally The main interface as follows: The following step “Quick Order”may not choose for the operation 3.process and steps Process 1:copy resource files to the directory After set up directory, you need copy resource files to it Process 2:regist STB Add STB information in the server, includes MAC address (if IP address is setting right,MAC address will appear on the server page,you do not need to know the MAC first) Process 3:Add resource Add resource files from directory to resource manage template Process 4:custom player template 6 - Display the screen and play background screen, divide player region, add system clock Process 5:Custom player content Add resources from the template of all regional players (audio and video, text, picture) Process 6:Custom schedule (task) Play specific task for a specific period. Each player task includes a list of player content Process 7:Custom and generate player list - For a STB (Group) arrange one or more player tasks, and then generate playlists (order) for download and play Process 8:Modify and update playlists -After generated the orders, there may be needed to be modified. If revised, there exist only in the implementation of update playlist in accordance with the new client to the new playlist. Process 1: copy resource files to the directory(C:/program files/AD/content)the default directory After set up the directory, you need copy the next play resource file to it. If not, client will not play these content.For example,you will play video files,then open video floder to copy the playing files to there. Process 2-1:The system will auto appear “not register: 1.Click “NoRegister” 2. right-click the MAC numbers and ok 3.And choose the group 7 4.start again the STB player.It will be online Process 2-2:Regist STB Only the registed mac STB by LNAD system server can connect server correctly. Click the icon on the left side of the main interface. First Add Group:click“add”in the button of“STB Management” in STB by the left side to appear dialog of editor STB Group,input corresponding information and click “OK” Click this STBgroup to add MAC address.to click add to appear 8 Then the interface will be Tips:Only registered MAC address in set-top boxes (STB) can properly connect to the server. After add STB Group,you can delete and modify information Process 3:Add resource After all the waited play resources put into the server side of the main resources directory, there must also be added to the list of the main resource management interface as the content of client players Tips:AP64 HD advertising clients can play resources, including video, audio, pictures, text. Among them, the video encoding format is H.264, mpeg2, suffix .264,. Mpg; audio file suffix. Mp3; image support 24-bit bmp, jpeg; text as an ordinary txt file1.Specific operations are as follows: 9 2.Click quick key to enter resource manage interface. And list the resources files already in the system and its related information 3.click“add”to appear add element dialog In this dialog, there appeared all the directory resource files (note: waited-add resource must copy in advance to the directory) 4. Double-click one of file, and click one if it, modify “elementname”and “Remark”,and choose elementType 5. click”ok”, then it can be added selected resources and related information to the systems Figures in the list shows that the resource and its information has been added to the system . Click "Modify" and "Delete" button on the top right to carry out further revision, or be deleted. Modify the operation of resources and add similar resources, no longer repeat them. If adding a number of resources, click on the list title "element type" on the right of the drop-down box can show a 10 certain type of filter information resources. Process 4:Custom player template Template management modules for the display screen of set up playing background screen, dividing player region and adding system clock Specific opperations are as follows 1.quick key system. to enter template manage interface.List one of the template already in the 2. Click” add” key to appear edit template dialog 11 Clock choosing. In OutMode,you can choose HD, SD and VGA Signal for display.When you choose one,you need to change the TV output signal. Back choosing Video choosing 12 Click "Video" button to specify the background of a video playback area. Note that a template can specify a video area, and video resources can only be added to this area. In addition, due to hardware limitations, the video area of the left and right edges of the x coordinate (X1 and X2) must be a multiple of 16. 5.Click “Pic/Txt” to draw areas to the images and text. 6.Click ”Save” key Choose the newly-built template, click ”modify” or”delete”on the right to change information. The same operation as “add” Note:A template can specify to 12 regions, including the video area, drawing area, custom area.By default, the player can not stack or cover between regions, if the need for regional overlay or cover can check the bottom right of the window "to allow regional overlay" option." 13 Process 5:Custom player content Specific operations is as follows: 1.Click quick key to enter the content interface and”add” the content 2. Enter the name and play time, choose template. 3.Choose one of the play area,click”txt”,”audio”,”picture” to add relevent information. Chossing “Video” by click video area. Chooing “image”,Normal means the image is not move,vertical means the image is morve rollingly. 14 Choosing “txt” The txt setting, you can set front color and back color 15 in the “Area Resource” to change play order or delete them, Click Notes: Txt or picture resource need to choose view and add timelength (show in the following figure) If Txt is in Roll view,STB play the txt rolling If Picture is in Roll view,STB play the picture rolling. Note:the sizes must be matched to the added area.If not,it won’t display all pictures. 3.1.1 Process 6:Custom schedule(playorder) 1.quick key to enter scheduling interface. Lists are one of the existed player task. 1.The left part of the interface of the "STB group" to be listed in the system tree currently registered in all the set-top boxes and set-top box group 2.Select a STB (or group): group tree from the left to select a set-top box group or set-top box MAC. Operation is 16 complete, the right of the "Task List" in the group to see the set-top box or set-top boxes already in the broadcast table information 3. Click”addtask” on the correspondence stb group to appear Task Edit dialog. Enter taskname, startdate,enddate,starttime,endtime and description.You can choose”Insert” to play .And then add publishcontent. Note: On "the date of setting" In accordance with the player's priority, to provide three types of options Date: "normal" "weekend" and "Holiday" (level from low to high). In other words, if in a custom broadcast table a number of tasks, and dates of these three types of tasks exist, it will give priority to play "holidays" task, followed by "weekend" task, and finally the "ordinary task". In particular, if you choose "holidays" type, but also need to set the date range specified in some specific date as the date holidays. For example, suppose the date range is set to "2008-01-01 (start date) to 2009-01-01 (end date)", it can be set 2008-01-01 (New Year's Day) ,2008-02-06 ( Spring Festival) ,2008-05-01 (51), such as holidays. Specific settings are as follows: First of all, in the "holiday " the date of election to choose a date box, such as 2008-01-01, and then click the "Add" button. That date will appear in the "holiday period" following list box. Followed by the operation continue to add other dates, such as 2008-02-06 and 2008-05-01. On the "insert" If you do not check the "insert" option, then if the task and have the task in time of conflict, and is not allowed to add. 17 Conversely, if the check, then the task is a "spots" task. In that case, "non-insert" of the time the task will not affect the spots add tasks, but the spots of the spots have the mandate and tasks in time there is a conflict are not allowed to add. 3.Click”Save” Choose the newly-added task,click”modify” or “delete” on the top right to change information. The same operation as “add”. Note: Users can custom and generate order for a group of stb or a single stb. If stb customized order, when start stb to connect to the server will automatically download and play their corresponding broadcast table. If the stb did not find the corresponding table will be broadcast to find and download broadcast-owned division of the stb corresponding broadcast table. 3.1.2 Process7:Custom and generate playlist The STB player content, time and area are all depend on the list of the server setting. So there is need to arrange one or more player task for STB(group) and download and play its lists. Notes: If add normal task(not insert task) have a conflict time to the existed task,it will not allow to add task If added is the insert task,then the normal task time will not interfer adding task.If the insert task have a conflict time to the existed task, it will not allow to add task Click” Gen Order ” ,after choosing the play tast 18 If need, you can delete the task or delete the order by clicking”Deltask” or “Delorder” Note:Client can custom and generate order for one group STB or one single STB.If customed,the logged STB will connect to the server and download and play its relevent order.If STB didn’t find the related order,it will research and download and play the subgroup STB order. Process 8:STB update order Click quick key 19 1.Choose the Group or STB(MAC) which needed modify,right click the mouse to appear as shown below in order menu 2. Choose updategrouporder Functions of the order shown as below: Stop / Replay:use respectively to stop the current playing task and start the order. softupdate : download the latest adClient process from the server.(the player file from adClient)replace the old process and after update it the STB will reboot. But there must have latest adClient process file can update soft sucessfully. Real-Time News:used to send current message to the STB. updategrouporder:doing this can re-download and play the STB order. On-Off Time set the play order time(no use) Synctime make the same time with the stb and the server Volume : control the sound by the server. Reboot restart the stb Close STB: Tips: If need operate one STB group,right click the mouse on the tree form of relevent STB group to show the releted menu. If need operate just one single STB, right click the mouse on the STB status to show the releted menu. 4.USER MANUAL OF CLIENT 4.1Function Description of STB System Client(Network Ad System of STB,short for“STB”) main function include: Play function Setting function 20 Network function System maintanance 4.1.1 Play function STB Systems on the list of players set the task of media player, which include ordinary play task and insert task. Support player way video+rolling OSD; video+picture(rolling up and down)+test+rolling OSD; picture+audio+rolling OSD。 Support video and audio format Video files:.ts、.mpg Video decording format:MPEG-2、H.264 Audio format:.mp3、.aac、.ac3 Picture format: 24 bite of bmp and jpeg format 4.1.2 Setting function Set ads STB network information by remote control. After update the information, you need reboot the STB. 4.1.3Network function STB Systems has always been in the process of running the ad-server management to maintain order interaction, time and time synchronization to the server, and respond to the server with the following orders: Player status enquiries, CF card status and content of enquiries, real-time rolling messages, updates orders, software upgrades, close and restart. Note: this is the play task close and restart, not the STB. 4.1.4System maintanance STB system can release the server software of upgrade order to upgrade STB on the ads-client of executable file (adClient procedures); can release the updated server list order to update the local hard drive or CF card of the media file. At the same time, regularly set time through the network and server synchronely 4.2.1 User manual of remote control 21 Remote control button include<SETUP>button <POWER>button:close the STB 4.2.2 Network setting (IP setting) Enter<SETUP>button of the remote control 1.The passwd is 111111 ,which protect the settings and then press “enter” 2.start the network setting of information in interface, includeIP address,subnet mask,gateway,and server(IP、Mask、 Gway 、 Server). .That is to say,when use wire LAN,you must write the first four lines 22 23 Based on the different ways of STB network connection (wired or wireless),that supports four IP settings are as follows: (1)through a cable network (LAN) by manually settings IP, MASK, GWAY, SERVER four required, at the same time select "LAN". (2)through a cable network (LAN) by Dynamic settings MASK, GWAY, SERVER three required, at the same time select "LAN" and "DHCP". (3)through a wireless network (WIFI) by manually settings IP, MASK, GWAY, SERVER, SSID five required, at the same time choose "WIFI". (4) through a wireless network (WIFI) by Dynamic settings MASK, GWAY, SERVER, SSID four required, at the same time choose "WIFI" and "DHCP". If it goes through the wireless network connection, may also require the correct settings Wep key (WEP PASS). In the process of setting, click<SETUP>button to close the network setting UI interface and cancel it. After finish setting, click<ENTER>button to work in force the new setting, and the STB will reboot automatically. Notes: If STB haven’t registed from the server, it will appear “The STB has not been registered to server! Please register it.” You need regist in the server and reboot the STB. If STB cannot connect the server for network reason,it will appear“Failed to connect the server! Please check the network configuration and then reboot the STB.”You need check the net status and IP address of STB network settings. 4.3 CF card format tools Normally CF card is seldom to format. But if CF card need to format.please use CF card format tools. 1.Firstly close STB as follows: 24 2.Secondly,take out the CF card and use card reader to format it.Make sure you will use format tools to do the opearation. 3.The exact steps please do as the instruction (first read all the user information from the floder EXT3 formatted tool.) 4.After the CF card has formated,please open the floder Client,put the six files to the CF card,make sure there is a file of lost+found. Notes:You can change IP from the cf card in adnet.cfg file as txt format. If STB haven’t registed from the server, it will appear “The STB has not been registered to server! Please register it.” You need regist in the server and reboot the STB. If STB cannot connect the server for network reason,it will appear“Failed to connect the server! Please check the network configuration and then reboot the STB.”You need check the net status and IP address of STB network settings. 25