1
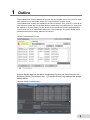
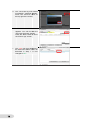
Programmable Terminal NA-series
Practices Guide
NJ/NX Troubleshooter
For the Elementary Level
NA5-15W□□□□
NA5-12W□□□□
NA5-9W□□□□
NA5-7W□□□□
V423-E1-01
■ Introduction
This guide provides reference information on editing pages of the NA. It does not provide safety
information.
Be sure to obtain the NA-series Programmable Terminal User's Manuals, read and understand the safety
points and other information required for use, and test sufficiently before actually using the equipment.
(1) All rights reserved. No part of this publication may be reproduced, stored in a retrieval system, or
transmitted, in any form, or by any means, mechanical, electronic, photocopying, recording, or
otherwise, without the prior written permission of OMRON.
(2) No patent liability is assumed with respect to the use of the information contained herein. Moreover,
because OMRON is constantly striving to improve its high-quality products, the information contained
in this manual is subject to change without notice. Every precaution has been taken in the preparation
of this manual. Nevertheless, OMRON assumes no responsibility for errors or omissions. Neither is
any liability assumed for damages resulting from the use of the information contained in this
publication.
(3) Trademarks
• Sysmac and SYSMAC are trademarks or registered trademarks of OMRON Corporation in Japan
and other countries for OMRON factory automation products.
• Windows, Visual Basic, and Excel are either registered trademarks or trademarks of Microsoft
Corporation in the United States, Japan, and other countries.
• Other company names and product names in this document are the trademarks or registered
trademarks of their respective companies.
• Microsoft product screen shots reprinted with permission from Microsoft Corporation.
• The product pictures and drawings contained in this document are the graphical images, which may
be different from the actual articles.
2
Terms and Conditions Agreement
Warranty, Limitations of Liability
Warranties
Exclusive Warranty
Omron’s exclusive warranty is that the Products will be free from defects in materials and
workmanship for a period of twelve months from the date of sale by Omron (or such other period
expressed in writing by Omron). Omron disclaims all other warranties, express or implied.
Limitations
OMRON MAKES NO WARRANTY OR REPRESENTATION, EXPRESS OR IMPLIED,
ABOUT NON-INFRINGEMENT, MERCHANTABILITY OR FITNESS FOR A PARTICULAR
PURPOSE OF THE PRODUCTS. BUYER ACKNOWLEDGES THAT IT ALONE HAS
DETERMINED THAT THE PRODUCTS WILL SUITABLY MEET THE REQUIREMENTS OF
THEIR INTENDED USE.
Omron further disclaims all warranties and responsibility of any type for claims or expenses
based on infringement by the Products or otherwise of any intellectual property right.
Buyer Remedy
Omron’s sole obligation hereunder shall be, at Omron’s election, to (i) replace (in the form
originally shipped with Buyer responsible for labor charges for removal or replacement
thereof) the non-complying Product, (ii) repair the non-complying Product, or (iii) repay or
credit Buyer an amount equal to the purchase price of the non-complying Product; provided
that in no event shall Omron be responsible for warranty, repair, indemnity or any other
claims or expenses regarding the Products unless Omron’s analysis confirms that the
Products were properly handled, stored, installed and maintained and not subject to
contamination, abuse, misuse or inappropriate modification. Return of any Products by
Buyer must be approved in writing by Omron before shipment. Omron Companies shall not
be liable for the suitability or unsuitability or the results from the use of Products in
combination with any electrical or electronic components, circuits, system assemblies or any
other materials or substances or environments. Any advice, recommendations or
information given orally or in writing, are not to be construed as an amendment or addition to
the above warranty.
See http://www.omron.com/global/ or contact your Omron representative for published
information.
Limitation on Liability; Etc
OMRON COMPANIES SHALL NOT BE LIABLE FOR SPECIAL, INDIRECT, INCIDENTAL,
OR CONSEQUENTIAL DAMAGES, LOSS OF PROFITS OR PRODUCTION OR
COMMERCIAL LOSS IN ANY WAY CONNECTED WITH THE PRODUCTS, WHETHER
SUCH CLAIM IS BASED IN CONTRACT, WARRANTY, NEGLIGENCE OR STRICT
LIABILITY.
Further, in no event shall liability of Omron Companies exceed the individual price of the
Product on which liability is asserted.
3
Application Considerations
Suitability of Use
Omron Companies shall not be responsible for conformity with any standards, codes or
regulations which apply to the combination of the Product in the Buyer’s application or use
of the Product. At Buyer’s request, Omron will provide applicable third party certification
documents identifying ratings and limitations of use which apply to the Product. This
information by itself is not sufficient for a complete determination of the suitability of the
Product in combination with the end product, machine, system, or other application or use.
Buyer shall be solely responsible for determining appropriateness of the particular Product
with respect to Buyer’s application, product or system. Buyer shall take application
responsibility in all cases.
NEVER USE THE PRODUCT FOR AN APPLICATION INVOLVING SERIOUS RISK TO
LIFE OR PROPERTY WITHOUT ENSURING THAT THE SYSTEM AS A WHOLE HAS
BEEN DESIGNED TO ADDRESS THE RISKS, AND THAT THE OMRON PRODUCT(S) IS
PROPERLY RATED AND INSTALLED FOR THE INTENDED USE WITHIN THE OVERALL
EQUIPMENT OR SYSTEM.
Programmable Products
Omron Companies shall not be responsible for the user’s programming of a programmable
Product, or any consequence thereof.
Disclaimers
Performance Data
Data presented in Omron Company websites, catalogs and other materials is provided as a
guide for the user in determining suitability and does not constitute a warranty. It may
represent the result of Omron’s test conditions, and the user must correlate it to actual
application requirements. Actual performance is subject to the Omron’s Warranty and
Limitations of Liability.
Change in Specifications
Product specifications and accessories may be changed at any time based on
improvements and other reasons. It is our practice to change part numbers when published
ratings or features are changed, or when significant construction changes are made.
However, some specifications of the Product may be changed without any notice. When in
doubt, special part numbers may be assigned to fix or establish key specifications for your
application. Please consult with your Omron’s representative at any time to confirm actual
specifications of purchased Product.
Errors and Omissions
Information presented by Omron Companies has been checked and is believed to be
accurate; however, no responsibility is assumed for clerical, typographical or proofreading
errors or omissions.
4
Contents
Terms and Conditions Agreement ........................................................................ 3
Warranty, Limitations of Liability ............................................................................................. 3
Application Considerations ..................................................................................................... 4
Disclaimers ............................................................................................................................. 4
Related Manuals ..................................................................................................... 6
1
Outline ............................................................................................................. 7
2
NJ/NX-series Troubleshooter Functions ..................................................... 8
3
4
2-1
Controller Events and User Events .......................................................................... 8
2-2
Active Events and Event Logs ................................................................................. 8
2-3
Registering User Events .......................................................................................... 9
Description on Event Screens .................................................................... 11
3-1
Active Events.......................................................................................................... 11
3-2
Event Logs ............................................................................................................. 15
Procedure to Start Up the NJ/NX Troubleshooter .................................... 19
Revision History ................................................................................................... 20
5
Related Manuals
The following manuals are related to this manual.
Cat.No.
SBCA-362
SBSA-545
SBSA-546
SBSA-547
SBSA-548
Model
SYSMAC-SE2□□□
NA5-15W□□□□
NA5-12W□□□□
NA5-9W□□□□
NA5-7W□□□□
NA5-15W□□□□
NA5-12W□□□□
NA5-9W□□□□
Sysmac Studio Version 1 Operation Manual
NA-series Programmable Terminal Hardware User’s
Manual
NA-series Programmable Terminal Software User’s
Manual
NA5-7W□□□□
NA5-15W□□□□
NA5-12W□□□□
NA5-9W□□□□
NA-series Programmable Terminal Device Connection
NA5-7W□□□□
NA5-15W□□□□
NA5-12W□□□□
NA5-9W□□□□
NA-series Programmable Terminal Startup Guide
NA5-7W□□□□
6
Manual Name
User’s Manual
1
Outline
The troubleshooter function displays on the NA unit the controller errors of the CPU or other
units, with the use of the NJ/NX-series CPU unit’s function to monitor errors.
The troubleshooter screens are installed in the NA unit system. Thus, there is no need at all
for the users to create the conventional alarm screens using the graphic tool (i.e. to perform
the settings on Sysmac Studio) for NA. Moreover, the contents that are to be displayed as
“User Events” are to be registered in advance in “Event Settings” in Sysmac Studio, which
eliminates the need for setting alarms in the NA tool.
<NJ/NX Troubleshooter for NA>
Sysmac Studio also has the same troubleshoot function as that of the NA unit.
Selecting [Tools]-[Troubleshooting…]-[Controller Event Log] displays the screen
shown below.
<Sysmac Studio Troubleshooter>
7
2
NJ/NX-series Troubleshooter
Functions
The troubleshooter function allows you to confirm the “user-defined errors” and
“errors occurred in the controller or anywhere in the internal devices”, the
contents of the event logs, and the countermeasures against the errors. This
function is only available when connected to the NJ/NX-series controllers.
2-1 Controller Events and User Events
On the Troubleshooter screen, you can confirm the active events and event logs
for the “Controller Events” as well as “User Events”.
1.User Events/User Event Logs
These are the errors and event logs that can be defined by the users with Sysmac Studio.
The users can also specify detailed information such as countermeasures against
troubles.
The errors caused by “instruction to cause a user error (SetAlarm)” or “instruction to
generate user information (Setinfo)” are displayed on the NA unit.
Register the errors (events) to display in Sysmac Studio. (See next page.)
In and after NARuntime Ver.1.03, only for the user events, the detailed display can be
switched to a previously prepared screen (the function equivalent to NS).
2.Controller Events/Controller Event Logs
These are the fixed errors and event logs included in the NJ/NX-series controllers.
The users therefore cannot edit them.
The errors that occurred in the CPU units, NX-series slave terminals, EtherCAT slaves,
CJ units, or other devices are to be reported from the controller to the NA.
2-2 Active Events and Event Logs
When you start up the NJ/NX Troubleshooter, the following screen appears.
You can switch the display between “Active Events” and “Event Logs” by the
tabs enclosed in the
red dashed-line rectangle as shown below.
8
“Error” ap
ppears if th
here is an e
error. If the
ere is no errror, “Norm
mal” appears.
2-3 R
Registering User Events
Register the conten
nts of the e
errors that are
a display
yed on the User Even
nts screen
in the Syssmac Stud
dio for the N
NJ/NX con
ntroller.
1.
Sele
ect and doub
ble-click
[Configurations and Setup]-[[Event
Setttings]. Otherrwise, right-click on
it an
nd select [Ed
dit]. The “Eve
ent
Setttings” tab pa
age opens.
2.
Clicck the
ico
on at the left bottom
of th
he tab page.
Reg
gister the following data in the
cellss for “Event Code/Event
Nam
me/Event Levvel/Group/De
etails”.
・Evvent Code: 1
・Evvent Name: Emergency
E
Stop
S
Buttton Pressed
・Evvent Level: Emergency Sttop
・Grroup: Safety
・De
etails: The em
mergency sto
op
buttton equipped
d on the conttrol
pan
nel was presssed.
3.
If yo
ou create an Excel file like the
one shown on th
he right, you can
directly copy and
d paste the contents
c
to re
egister them in “Event Se
ettings”.
Notte: Do not copy the heade
er of
eacch column (i.e
e. Event Cod
de,
Eve
ent Name, etc.).
Refference: Exce
el “event.xlsx
x”
4.
Cop
py the conten
nts of the Exc
cel file
and paste them in “Event Se
ettings”.
9
5.
The contents of the Excel file are
now pasted in “Event Settings”.
6.
Activate “the instruction to cause a
user error (SetAlarm)” or “the
instruction to generate user
information (SetInfo)” to cause a
user event.
Reference project:
NA_Trouble.smc2
7.
10
Enter the “Event Code” number that
is set in “Event Settings” in
“AlarmNumber” or “InfoNumber”,
and set “AlarmSetTrigger” or
“InfoSetTrigger” to True. The
corresponding error appears on the
NA.
3
Description on Event Screens
3-1 Active Events
Displays the currently raised “Controller Events” and “User
Events”.
“Error” appears when an error has occurred.
“Normal” is displayed in the normal status.
To confirm the contents of the currently raised errors, select the controller (to highlight it
light blue) and press either “Show Controller Events” or “Show User Events”.
11
Active Even
nts – Contro
oller Eventts
W
When “Error” appears in the Controlle
er Event Sta
atus column on the “Acttive Events” tab, it
means that an
n error has occurred
o
in tthe controlle
er. Check for the currenttly occurring
g errors
ollowing the procedure
p
below.
b
fo
1.
When ““Error” is displayed in the
e
Controller Event Sttatus column on
the “Acctive Events”” tab, press th
he
“Show Controller Events” button
n at
the botttom of the sccreen.
2.
The scrreen is switcched to
“Contro
oller Events”.. A list of the
currenttly occurring controller
events is displayed. Select an
event frrom the list and
a press
“Show Detail” at the
e right bottom
m of
the scre
een.
3.
The details of the event
e
that is
selecte
ed in Step 2 appear.
a
You can recover fro
om the proble
em
by referring to whatt is displayed
d in
“Detaile
ed Informatio
on”.
4.
In Step
ps 2 and 3, if you press th
he
“Screen
n Shot” butto
on, the curren
ntly
displayyed screen ca
an be capturred
and savved in an SD
D Memory Ca
ard.
You can attach the saved image
e to
defect rreports.
When n
no SD Memo
ory Card is
inserted
d in NA, if yo
ou press “Yes
s”
in the d
dialog box sh
hown on the
right, th
he following message
m
appearrs.
“Failed to capture screenshot
s
–
Could n
not find the storage
s
media
‘SDCarrd’.”
12
1
Active Evvents – Use
er Events
When “Errror” appears in the Userr Event Statu
us column on the “Activee Events” ta
ab, it means
that at leasst one of the
e errors crea
ated in Step 5 in Section
n 2-3 has occcurred. Che
eck for the
currently occurring
o
errrors following
g the proced
dure below.
1.
Whe
en “Error” is displayed in the
Use
er Event Stattus column on
o the
“Acttive Events” tab, press th
he
“Show User Eve
ents” button at
a the
botttom of the sccreen.
各異
2.
The
e screen is sw
witched to “U
User
Eve
ents”. A list off the currentlly
occu
urring user events
e
is disp
played.
Sele
ect an event from the list and
presss “Show De
etail” at the rig
ght
botttom of the sccreen.
3.
The
e details of th
he event that is
sele
ected in Step
p 2 appear.
You
u can recoverr from the problem
by rreferring to what
w
is displayed in
“Dettailed Inform
mation”.
Presssing the “Sh
how Specifie
ed
Pag
ge” button allows you to ju
ump to
the page that is created with
h
Sysmac Studio and
a related to
t the
trouble. For morre details, reffer to
Step
ps 7 to 9 on Page 14.
4.
In ca
ases of Userr Events, you
u can
clea
ar the currenttly occurring event
by p
pressing the “Error Resett”
buttton on the Trroubleshoote
er
scre
een.
Whe
en you presss the “Error Reset”
R
buttton, the “Do you
y want to really
r
rese
et the error?”” message
appears. Press “Yes”.
13
3
5.
The
e “The error was
w reset
succcessfully.” Message
M
appe
ears.
Presss “OK” and then “Back” at the
top right of the screen.
s
6.
On tthe “Active Events”
E
scree
en, you
will find that the event you ju
ust
clea
ared has bee
en deleted.
7.
As d
described in Step 3, if you
presss the “ Show
w Specified Page
P
”
buttton in the Details screen of the
user event, the page
p
created
d with
Sysmac Studio can
c be displa
ayed.
You
u can specifyy the page fro
om
[HM
MI]-[Controller Events]-[Us
ser
Eve
ents] on Sysm
mac Studio, as
a
desccribed in Ste
ep 8 below.
8.
Spe
ecify the page
e related to the
t
Trou
ubleshooter as below.
Sele
ect [HMI]-[Co
ontroller
Eve
ents]-[User Evvents], and
right-click on the
e edit pane of “User
Eve
ents” and sele
ect [Add].
9.
Add
d in [Event Co
ode] the code of
the event for wh
hich to display the
related page, an
nd enter in
[Tro
oubleshooter Associated Page]
the name of the page to disp
play.
The
e [Event Code
e] represents
s the
code
e that is assiigned in [Eve
ent
Setttings] in Step
p 5 on Page 10.
With
h the settingss shown on the
t
right, when you press [ Show
w
Spe
ecified Page ] on the User
Eve
ents Details screen
s
of
Trou
ubleshooter, the [Emerstop]
page appears.
14
1
In
n [Event Nam
me/Commentt], the ones sset in [Event Name]
in
n Step 5 on Page
P
10 are automaticallly displayed.
3-2 Event Logs
Displays the “Controller Events” and “User Events” that have
been raised so far.
“Yes” appears when the event log is not cleared.
“No” appears when it is cleared.
To confirm the contents of the errors that have been raised so far, select the controller (to
highlight it light blue) and press either “Show Controller Events” or “Show User Events”.
15
Evvent Logs – Controlle
er Events
W
When “Yes” appears
a
in th
he Controlle
er Event Stattus column on
o the “Evennt Logs” tab, it
means that th
here is a log of the errors
rs that have occurred so
o far in the coontroller. Ch
heck for
w.
the log followiing the procedure below
1.
When ““Yes” is disp
played in the
Controller Event Sttatus column on
the “Evvent Logs” ta
ab, press the
“Show Controller Events” button
n at
the botttom of the sccreen.
2.
The sccreen is switcched to
“Contro
oller Events”. A list of the
e
controller events th
hat have
occurre
ed so far is displayed.
d
Se
elect
an event from the liist and press
s
“Show Detail” at the
e right bottom
m of
the scrreen.
3.
The details of the event
e
that is
selecte
ed in Step 2 appear.
a
You ca
an recover fro
om the problem
by refe
erring to whatt is displayed
d in
“Detaile
ed Informatio
on”.
16
1
Event Log
gs – User Events
When “Yess” appears in the User E
Event Status
s column on the “Event LLogs” tab, itt means thatt
there is a log of the errors created
d in Step 5 in
n Section 2-3 (on Page 10). Check for the log
he procedurre below.
following th
1.
W
When “Yes” is displayed in
i the
U
User Event Status
S
column
n on the
“E
Event Logs” tab, press th
he
“S
Show User Events”
E
butto
on at
th
he bottom off the screen.
2.
The screen iss switched to “User
E
Events”. A list of the userr events
th
hat have occurred
o
so far is
displayed. Se
elect an eve
ent from
th
he list and press
p
“Show
w Detail”
att the right bo
ottom of the screen.
s
3.
T
The details off the event th
hat is
sselected in Sttep 2 appearr.
Y
You can reco
over from the
p
problem by re
eferring to wh
hat is
d
displayed in “Detailed
“
In
nformation”.
4.
Y
You can clearr the event lo
og by
p
pressing the “Log
“
Clear” button
b
in
n the screen that shows the
t list
o
of the user evvents describ
bed in
S
Step 2.
P
Pressing the button displa
ays the
“D
Do you reallyy want to clear the
event log?” message.
m
Pre
ess
“Y
Yes”.
17
7
18
1
5.
T
The “The eve
ent log was cleared
successfully.”” message appears.
a
P
Press “OK” and
a
then “B
Back” at
th
he top right of
o the screen.
6.
T
The “User Events” screen
a
appears. You
u will find that
t
the
u
user event ha
as been cleared.
P
Press the “Ba
ack” button to
t show
th
he “Event Lo
ogs” screen.
7.
T
The “Yes” sig
gn that appe
eared in
th
he User Event Status collumn as
described in
n Step 1 is now
changed to “N
No”.
4
Proc
cedure to Startt Up the
t N
NJ/NX
X
Trou
ubles
shootter
There
e are th
hree metthods to
o start up
u the NJ/NX
N
T
Troubles
shooterr
as de
escribed
d below..
1.
Sele
ect “NJ/NX Troubleshoot
T
ter”
from
m “Project Syystem Menu””.
2.
Press the Button
n for which to
o have
set “ShowTroub
bleshooter” as the
action under [Evvents and Ac
ctions].
3.
The
e troubleshoo
oter can also
o be
starrted if you ha
ave selected either
“Lau
unch on System Event” or
o
“Lau
unch on Use
er Event” and
d when
a co
orresponding
g event occurs.
19
9
Revision History
Revision code
01
20
Date
October 2015
Revised content
Original production
Note: Do not use this document to operate the Unit.
2015
V423-E1-01
1015 (1015)