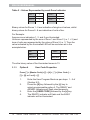
1
IDS
S
EC
Y
I NH
AL
IT
DIG
EP
URIT
IDS816
IDS816
User Manual
MANUAL NO. 700-283-01C ISSUED FEB 2005 VERSION 2.00
IDS816 USER MANUAL
C ontents
1.
Introduction to the IDS816 ...................................... 4
2.
Understanding the Keypad Indicators .................. 4
3.
Programmable Functions ........................................ 5
4.
4.1
4.2
4.3
4.4
4.5
4.6
4.7
4.8
Arming the Control Panel ........................................ 5
How To Away Arm ......................................................... 5
How To Quick Away Arm ............................................... 6
Stay Arming .................................................................. 6
How To Stay Arm ........................................................... 7
How To Quick Stay Arm - Recommended Method ....... 7
How To Stay Arm and Go ............................................. 7
Key-Switch or Remote Arming ..................................... 8
Auto Arming .................................................................. 8
5.
5.1
5.2
Disarming the Control Panel ................................... 8
How To Disarm with a User Code ................................. 8
How To Disarm using a Key-Switch or Remote ............ 9
6.
6.1
6.2
Bypassing Zones ....................................................... 9
How To Bypass a Zone ................................................. 9
How To Un-Bypass a Zone ......................................... 10
7.
7.1
7.2
7.3
7.4
Emergency Alarms .................................................. 10
Fire Alarms ................................................................. 10
Panic Alarms ............................................................... 10
Medical Alarms ........................................................... 11
Duress Alarms ............................................................ 11
8.
Alarm Memory ......................................................... 11
9.
9.1
9.2
9.3.1
9.3.2
9.3.3
User Codes .............................................................. 12
Adding, Deleting and Editing User Codes ................. 12
How to Enter the User Program Mode ....................... 13
Option 0. Add a New User Code ................................ 13
Option 1. Edit a User Name ....................................... 14
Option 2. Edit a Selected User Code ......................... 14
2
IDS816
USER
MANUAL
NO.
700-283-01C
ISSUED
FEB
2005
VER
2.00
IDS816 USER MANUAL
9.3.4
9.3.5
9.3.5.1
9.3.5.2
9.3.5.3
9.3.6
9.3.7
9.3.8
Option 3. View a User Clode Slot Number ................. 14
Option 4. User Code Properties ................................ 15
Duress Code. Explanation of User Code Properties . 16
Maids Code ................................................................ 16
Global Arm / Disarm ................................................... 17
Option 5. Assign User Code to Partition .................... 17
Option 9. Deleted User Code (Code known) ............. 17
Option 10. Delete a User Code (Slot known) ............ 18
10.
10.1
10.2
10.3
Stay Zones ................................................................ 18
How To Select a Stay Profile ...................................... 19
How To Program Stay Zones ...................................... 19
How To Cancel Stay Zones ........................................ 19
11.
11.1
11.2
Buzz Zones ............................................................... 20
How To Program Buzz Zones ..................................... 20
How To Cancel Buzz Zones ........................................ 21
12.
12.1
12.2
Chime Zones ............................................................ 21
How To Program Chime Zones .................................. 21
How To Cancel Chime Zones ..................................... 22
13.
Viewing Trouble Conditions .................................. 22
14.
Remote Telephone Access .................................... 23
Tables
Table 1.
Table 2.
Table 3.
Table 4.
Table 5.
Table 6.
User Progamming Options ..................................... 12
Value Represented by each Zone Indicator ............ 15
Binary Representation ............................................ 15
User Code Properties ............................................. 16
Trouble Conditions .................................................. 23
Remote Telephone Operation ................................. 25
IDS816 USER MANUAL NO. 700-283-01 C ISSUED FEB 2005 VER 2.00
3
IDS816 USER MANUAL
1.
Introduction to the IDS 816
The IDS816 is a versatile microprocessor based, eight zone alarm
panel. It has two partitions and can be expanded to sixteen zones.
Most features are programmable and may be programmed using the
IDS download software and a modem, either directly through the
keypad or via the telephone line. There are eight programmable
burglary zones, a monitored siren output, auxiliary power outputs and
five programmable outputs which may be programmed to perform
various trigger/switching functions.
For correct operation the IDS816 must be used with the specified
transformer/battery combination and appropriate peripheral sensors
and signalling devices.
2.
Understanding the Keypad Indicators
Refer to the illustration on the inside front cover of this manual.
1.
ARMED Indicator (Red)
Illuminated
System Armed
Extinguished
System Disarmed
Flashing
Alarm Condition or Memory
2.
AWAY Indicator (Red)
Illuminated
System Armed in Away Mode
Extinguished
System Disarmed / Armed in Stay Mode
3.
POWER Indicator (Red)
Illuminated
Mains Power is present
Flashing
Trouble Condition
4
IDS816
USER
MANUAL
NO.
700-283-01C
ISSUED
FEB
2005
VER
2.00
IDS816 USER MANUAL
4.
READY Indicator (Green)
Illuminated
5.
System is ready to be armed
ZONE Indicators (Yellow )
Illumi nated
Zone bypassed
Exti ngui shed
Zone clear
Flashi ng
Zone vi olated or tampered
3.
Programmable Functions
Functions include:
Quick Away Arm
Quick Stay Arm
Arm with Entry/Exit or Follower Zones Violated
Stay Arm
Stay Arm and Go
Forced Arm
Push to Arm
Siren Sound on Arm/Disarm (single toot - arm / double toot - disarm)
Panic Alarm
Fire Alarm
Chime Zones
Buzz Zones
Zone Tamper
Arm with Key-Switch or Remote Control
4.
4.1
Arming the Control Panel
How to Aw ay Arm
[#] + [USER CODE]
(Leave via Entry Exit Zone)
1.
Ensure that the READY indicator is illuminated. If not check
that all protected doors and windows are closed and that motion
has ceased in areas covered by motion detectors. If necessary,
close the front door.
IDS816 USER MANUAL NO. 700-283-01 C ISSUED FEB 2005 VER 2.00
5
IDS816 USER MANUAL
2.
3.
4.
5.
Press the [#] key.
Enter a valid [USER CODE]. If an incorrect code is entered the
keypad buzzer will beep three times. Press the [#] key and reenter the code.
The ARMED indicator will illuminate and the keypad buzzer will
sound for the duration of the exit delay. Any bypassed zones will
be shown by a steady illuminated zone indicator.
Leave only via a designated exit route.The panel will arm at the
end of the exit delay.
Quick Away Arm - Shortcut Key
(Hold down the [1] key until the keypad buzzer sounds)
If this function is enabled, it is possible to AWAY arm by simply
holding down the [1] key until the keypad buzzer sounds and the
arming process begins.
Note:
If the partition is already STAY armed this key will initialise
AWAY arming. It is therefore possible to change directly from
STAY armed to AWAY armed.
4.2
Stay Arming
Stay arming allows the user to monitor selected perimeter zones and
bypass interior zones. The user can remain within the premises with
access to designated areas during the STAY ARM cycle. Any zone
which may be violated accidentally should be programmed as a buzz
zone. When violated a buzz zone will cause the keypad buzzer to
sound for thirty (30) seconds before sounding the siren. Entering a valid
User Code before the siren sounds will STOP the keypad buzzing and
prevent the siren from sounding.
To provide greater flexibility the panel caters for the programming of two
(2) different STAY PROFILES. Each STAY PROFILE contains a unique
combination of STAY and BUZZ zones which cater for a particular
STAY ARM requirement.
For example, PROFILE 1 might be used when the family goes to bed
in the evening whereas PROFILE 2 is utilized while they watch
television. [See 10.1 How to Select a Stay Profile]
6
IDS816
USER
MANUAL
NO.
700-283-01C
ISSUED
FEB
2005
VER
2.00
IDS816 USER MANUAL
How to Stay Arm
[#] + [USER CODE]
(Do not leave premises)
1.
Select the required STAY PROFILE. (See Section 10.1 on
page19)
Ensure that the READY indicator is illuminated; if not, check
that all protected doors and windows are closed and that motion
has ceased in the areas covered by motion detectors.
Press the [#] key.
Enter a valid [USER CODE]. If an invalid code is entered the
keypad will give an error beep. Press the [ # ] key and re-enter
the [USER CODE].
DO NOT open the front door. If the front door is opened the
system will arm in the AWAY mode.
The ARMED indicator will illuminate and the keypad buzzer
will sound for the duration of the exit delay.
The AWAY indicator will remain extinguished.
Any STAY zones (shown by a steadily illuminated indicator)
will be automatically bypassed.
Ensure that you enter only those areas that are bypassed.
2.
3.
4.
5.
6.
7.
8.
9.
How to Quick Stay Arm - Shortcut Key
(Hold down the key [5] for two seconds until the keypad buzzer sounds)
It is possible to STAY arm by holding down the [5] key until the keypad
buzzer sound. The panel will immediately arm into the stay mode
without any exit delay.
4.3
How to Stay Arm and Go
(Hold down the key [6] for two seconds until the keypad buzzer sounds)
This is a single key arm function which allows the user to STAY arm
and leave the premises.
If a partition is already stay armed, holding down the 6 key initiates an
exit delay, thus allowing the user to leave the premises without
disarming. At the end of the exit delay the partition will rearm in the
same stay profile it was armed in before the 6 key was held down.
1. Hold down the [6] key until the keypad buzzer sounds. The
IDS816 USER MANUAL NO. 700-283-01 C ISSUED FEB 2005 VER 2.00
7
IDS816 USER MANUAL
2.
keypad buzzer will sound for the duration of the exit delay. Only
leave via designated exit route.
At the end of the exit delay the ARMED indicator will
illuminate and the AWAY indicator will remain extinguished.
All stay zones will be bypassed.
4.4
1.
2.
3.
4.
Key-Sw itch or Remote Arming (If fitted)
Ensure that the READY indicator is illuminated before leaving.
Leave and close the door (remembering to lock!)
Activate the remote or the key-switch.
The alarm will arm in the away mode.
Note:
If a remote control is used, it is advisable to have the siren toot
on arm function enabled.
4.5
Auto Arming
The panel can be programmed to automatically arm itself at a preprogrammed time. Should the premises be occupied at the time of
auto-arming, a valid [USER CODE] entered during the pre-arm delay
will cancel arming. The pre-arm delay is signalled by an exit beep.
5.
5.1
Disarming the Control Panel
How to Disarm w ith a User Code
[#] + [USER CODE]
To disarm the system, enter [#] followed by a valid [USER CODE]
before the expiry of the entry delay.
1.
2.
3.
4.
5.
8
Enter the premises through a designated entry route. Entering via
any other route will cause an alarm.
As soon as the entry/exit zone is violated the entry delay will
begin. The keypad buzzer will sound for the duration of the entry
period.
Press the [#] key and enter a valid [USER CODE].
Once the system disarms, the ARMED indicator will extinguish
and the keypad buzzer will stop sounding.
If no valid user code has been entered by the end of the entry
delay period an alarm condition will be registered.
IDS816
USER
MANUAL
NO.
700-283-01C
ISSUED
FEB
2005
VER
2.00
IDS816 USER MANUAL
6.
If the entry period is too short, have your installer change the
entry delay period.
Note: If a strobe (or flashing light) has been installed and an
alarm condition is registered, the strobe will continue flashing
after the siren has stopped sounding. Entering a valid [USER
CODE] will cancel the strobe.
5.2 How to Disarm using a Key-Sw itch or Remote
1. Activate the remote or keyswitch.
2. The system will disarm and the remote indicator (if installed) will
extinguish. If siren toot on disarm option is enabled, the siren will
give a double toot.
6.
Bypassing Zones
The term BYPASS is used to describe a zone that has been deactivated; i.e. violation of a bypassed zone is ignored and will not
cause an alarm condition.
Once the system is armed it is not possible to bypass zones.
All bypassed zones will be automatically cancelled each time the
panel is disarmed and must be re-bypassed before the next
arming.
6.1
How to Bypass a Zone
Hold down [9] + [ZONE NUMBER] + [(] + [#]
1.
2.
3.
4.
5.
To enter bypass mode, hold down the [9] key for two seconds
until the keypad buzzer sounds. The Away LED will flash, and all
other LEDís will be extinguished.
Press the number corresponding to the zone you need to bypass
e.g. the [2] key if you wish to bypass zone 2, then press the [(]
key.
The relevant zone indicator will illuminate to indicate that the zone
is now bypassed.
Repeat step 2 to bypass other zones.
Press the [#] key to exit the bypass mode.
Note:
Panic Zones cannot be bypassed
IDS816 USER MANUAL NO. 700-283-01 C ISSUED FEB 2005 VER 2.00
9
IDS816 USER MANUAL
6.2
How to Un-Bypass a Zone
Hold down [9] + [ZONE NUMBER] + [(] + [#]
1.
2.
3.
4.
5.
Bypassed zones are shown by (constantly) illuminated zone
LEDs.
Enter bypass mode by holding down the [9] key until the keypad
buzzer sounds. The away indicator will flash and the other LED
will be extinguished.
Press the number corresponding to the currently bypassed zone,
then press the [(] key.
The zone indicator will extinguish - the zone is now active.
Press the [#] key to exit the bypass mode.
7.
Emergency Alarms
7.1
Fire Alarms
[F]
(Hold down the [F] key for two seconds until the keypad buzzer sounds)
7.2
If the [F] key is pressed until the keypad beeps (approximately 2
seconds) a FIRE ALARM condition will be activated.
The FIRE ALARM CONDITION can also be triggered by a smoke
detector connected to an appropriately programmed zone.
The siren will sound on and off repeatedly if programmed and the
FIRE REPORTING CODE will be transmitted to the monitoring
company.
To silence the siren enter a valid [USER CODE].
Panic Alarms
[P]
(Hold down the [P] key for two seconds until the keypad buzzer sounds)
If the [P] key is pressed until the keypad beeps (approximately 2
seconds) a PANIC ALARM condition will be activated.
A PANIC ALARM can also be activated by any FIXED PANIC
10
IDS816 USER MANUAL NO. 700-283-01C ISSUED FEB 2005 VER 2.00
IDS816 USER MANUAL
button or REMOTE PANIC buttons.
If the audible panic option has been selected, the siren will sound.
A PANIC ALARM will be transmitted to the monitoring company.
To silence the siren, enter a valid [USER CODE].
Press the [P] key only in an emergency situation that requires
response by emergency personnel.
7.3
Medical Alarms
[M]
(Hold down the [M] key for two seconds until the keypad buzzer
sounds)
7.4
If the [M] key is pressed until the keypad beeps (approximately 2
seconds) a MEDICAL ALARM condition will be activated.
The keypad buzzer will beep 5 times.
A medical reporting code will be reported to the monitoring
company.
Duress Alarms
[#] + [DURESS CODE]
8.
This is a special user code which should only be used in the
unique situation where an intruder forces one to disarm the
system ìunder duressî.
When a [DURESS CODE] is entered, the control panel disarms
normally. A Duress Alarm Code (if programmed) will be reported
to the monitoring company.
It is advisable to choose a Duress code that can be easily
remembered by all family (or staff) members.
Alarm Memory
The Alarm Memory displays any zones which were violated or
bypassed during the last arm cycle. A flashing ARMED indicator
notifies the user of an alarm memory condition. To view the alarm
memory disarm the panel and continue as indicated as follows:
IDS816 USER MANUAL NO. 700-283-01 C ISSUED FEB 2005 VER 2.00
11
IDS816 USER MANUAL
To Display Alarm Memory:
[0]
(Hold down the [0] key for two seconds until the keypad buzzer
sounds)
1.
2.
Hold down [0] until the keypad buzzer sounds.
The READY and POWER indicator will extinguish and the
keypad buzzer will sound briefly.
Illuminated zone indicators show which zones were violated
during the last armed period.
Press 2 to display zones which were bypassed.
Press 3 to display which zones were tampered.
Press 1 to return to violated zones.
The alarm memory is erased at the beginning of each arm cycle.
3.
4.
5.
6.
7.
9.
U ser C o d es
The IDS 816 Alarm Panel has 32 programmable user codes. By default
code (1) is the Master User Code.
This alarm panel may have 1 or 2 partitions. A partition is an
independant group of zones that can be armed and disarmed without
affecting other zones or users.
* Note : User codes may be 4 (default) or 6 digits long. As this is a
programmable feature, please check this with your installer.
9.1
Adding, Deleting and Editing User codes
Hold [(] + [MASTER USER CODE] + [(] + [PROGRAMMABLE OPTION]
The IDS 816 utilizes a user friendly driven programmable interface
which allows the user to add, modify or delete user codes. See Table 1
for a summary of programmable options. The programmable interface
is accessed by entering USER PROGRAMMING MODE. Once in user
programming mode it is a simple matter to add, view, edit or delete
user codes. When a new user code is added, it is stored in the first
available user slot.
12
IDS816 USER MANUAL NO. 700-283-01C ISSUED FEB 2005 VER 2.00
IDS816 USER MANUAL
Table 1.
User Programming Options
Options Summary of Programmable Options
Option 0 Allows for the addition of new user codes.
Option 1
Option 2
Option 3
Option 4
Option 5
Allows editing of the user name displayed by LCD keypads.
This menu is only applicable if LCD keypads are installed.
Allows editing of a selected user code. Note that the user code
properties are not edited, only the user code itself.
Allows viewing of the user code slot number for a selected code.
There are 32 available user code slots.
Allows editing of the user code properties for a selected user
code. This is a bit mapped menu.
Allows the allocation of a selected user code to a designated
partition(s). This is a bitmapped menu.
Option 6 Allows a user remote to be added.
Allows the deletion of a selected user code. For this menu the
user code must be known.
Allows the deletion of a user code using the user code slot
Option 8
number.
Option 7
9.2
1.
2.
3.
4.
6.
7.
How to Enter the User Program Mode
Ensure that the panel is not armed.
Hold down the [(] key until the keypad buzzer sounds.
The ARMED and READY indicators will flash alternately.
Enter a [MASTER USER CODE]. The factory default is [1234].
Should the [MASTER USER CODE] be defaulted to six digits, it
will be [123456]. Press the [(] key. A valid entry will be
confirmed by a long beep.
If steps 2 - 5 are performed correctly, the READY indicator will
flash. If an invalid code was entered the keypad buzzer will give an
error beep. (3 short beeps). If the error beep occurs, press the #
key (this clears all previous entries) and repeat steps 2 - 5.
Select a menu option from Table 1 above.
For example:
To add a new user code, enter User Program Mode by
completing steps 2 - 6 as listed above. To access
menu 0 enter a value of [0] (See table 1) followed
by [*]. Enter a [NEW USER CODE] followed by the [(]
key. Once the user code is programmed enter the
IDS816 USER MANUAL NO. 700-283-01 C ISSUED FEB 2005 VER 2.00
13
IDS816 USER MANUAL
next code followed by [(]. To exit the program mode
press the [#] key.
For a full list of programmable user code options refer
to Table 1. Programing of these options is explained
below.
9.3
Explanation of Programmable Options
9.3.1
Option 0
Add a New User Code
Hold [*] + [Master Code] +[*] + [0] + [*] + [New Code] + [*]
1.
2.
3.
4.
5.
9.3.2
Enter the User Program Mode as per steps 1 - 5 of
(9.2) .
Press the [0] key followed by the [(] key to select
the programmable option 0. The Ready and Armed
indicators will flash simultaneously.
Enter the [NEW USER CODE] followed by the [(] key.
Further codes may be added by repeating step 3
above.
After entering the last code press the [#] key
to exit the user program mode.
Option 1
Edit a User Name (LCD Keypads only)
Hold [*] + [Master Code] +[*] + [1] + [New User Name] + [*]
1.
2.
3.
4.
14
Enter the User Program Mode as per steps 1 - 5 of
(9.2) .
Press the [1] key followed by the [(] key to select
programmable option 1. The Ready and Armed
indicators will flash simultaneously.
User Names are displayed as the Zone Number by
default. Edit the [ZONE NUMBER] so that it reads
the correct User Name. To confirm the entry press
[*]. The [MODE] key can be used to move the cursor
to the right, whilst the [F] key can be used to move
from right to left.
Further codes may be added by repeating step 3
above.
IDS816 USER MANUAL NO. 700-283-01C ISSUED FEB 2005 VER 2.00
IDS816 USER MANUAL
9.3.3
Option 2
Edit a Selected User Code
Hold [*] + [Master Code] +[*] + [2] + [*]+ [Old Code] + [*] +
[New Code] + [*]
1.
2.
3.
4.
5.
6.
7.
8.
9.3.4
Enter the User Program Mode as per steps 1 - 5 of
(9.2) .
Press the [2] key followed by the [(] key to select
programmable option 2. The READY and
Armed indicators will flash simultaneously.
Enter the [USER CODE] which is to be edited
followed by the [(] key.
The READY indicator will flash and the AWAY
indicator will be illuminated.
Enter the [NEW CODE] followed by the [(] key.
The READY and ARMED indicators will flash
simultaneously.
To edit other codes repeat steps 3-5.
Press the [#] key to exit the User Program
Mode.
Option 3
View a User Code Slot Number
Hold [*] + [Master Code] +[*] + [3] + [*] + [User Code ] + [*]
View the Slot number via the zone LED's.
1.
2.
3.
4.
5.
6.
Enter the User Program Mode as per steps 1 - 5 of
(9.2).
Press the [3] key followed by the [(] key to select
programmable option 3. The READY and ARMED
indicators will flash simultaneously.
Enter the [User Code] followed by the [(] key.
The READY indicator will flash and the AWAY
indicator will be iluminated.
The [USER CODE] slot number will be displayed
by the Zone indicators in binary format. [See table 2]
Press the [#] key to exit the User Program Mode.
Reading Binary Numbers:
All values will be displayed by the zone indicators in binary format.
Only binary values to the value of 8 are used. See table 2 :
IDS816 USER MANUAL NO. 700-283-01 C ISSUED FEB 2005 VER 2.00
15
IDS816 USER MANUAL
Table 2 : Values Represented by each Zone Indicator.
Zone 1
1
Zone 5
1
Zone 2
2
Zone 6
2
Zone 3
4
Zone 7
4
Zone 4
8
Zone 8
8
Binary values for Zones 1 - 4 are indicative of single unit values, whilst
binary values for Zones 5 - 8 are indicative of units of ten.
For Example:
Assume zone indicators 1, 2 and 5 are illuminated.
Units are represented by the sum of Zone 1 and Zone 2 (i.e. 1 + 2) and
tens of units are represented by the value of Zone 5 (i.e. 1) Thus the
value indicated by the illuminated LED will be as shown as in the
example below.
Zone 1
1
Zone 2
2
Binary Value
3
Zone 5
1
Binary Value
1
Thus the binary value of the illuminated zones is 13.
9.3.5
Option 4
User Code Properties
Press [*] + [Master Code] +[*] + [4] + [ *] + [User Code ] +
[*] + [2] or 3 or 4] + [*]
1.
2.
3.
4.
16
Enter the User Program Mode as per steps 1 - 5 of
(Section 9.2)
Press the [4] key followed by the [(] key to
select programmable option 4. The READY and
ARMED indicators will flash simultaneously.
Enter the [USER CODE] followed by the [(] key.
The READY indicator will flash and the AWAY
indicator will be illuminated.
IDS816 USER MANUAL NO. 700-283-01C ISSUED FEB 2005 VER 2.00
IDS816 USER MANUAL
5.
6.
For example:
7.
8.
Table 4.
The properties assigned to the [USER CODE] are
displayed by the Zone indicators. An illuminated LED
indicates that a property is active for the USER
CODE. Refer to Table 4 for a list of USER CODE
properties.
To select a user code property, press the key which
corresponds to that property followed by the [(] key.
The appropriate zone LED will illuminate.To deselect a
property, press the corresponding key followed by the
[(] key and the LED will be extinguished.
To enable a User Code to function as a duress code
press the [2] key followed by the [(] key. The zone 2
LED will illuminate to confirm the selection.
Repeat step 5 until the desired properties have been
programmed.
Press the [#] key to exit the User Program Mode.
User Code Properties
Zone LED
Property
2
Duress Code
Arm to Disarm Code
[Maids Code]
Global Arm / Disarm Code
3
4
Explanation of User Code Properties
9.3.5.1 Duress Code
This is a special 4 (default) or 6 digit user code (check your code
length with your installer) which should only be used in the
unique situation where an intruder forces one to disarm the
system ìunder duressî.
When the [DURESS CODE] is entered, the control panel disarms
normally - however a DURESS REPORTING CODE is transmitted to the monitoring company to inform them that you have
been forced to disarm the control panel by an intruder.
It is advisable to choose a code that can be easily remembered
by all family (or staff) members.
9.3.5.2 Maids Code
The maids code may be used to limit access to the premises. The
IDS816 USER MANUAL NO. 700-283-01 C ISSUED FEB 2005 VER 2.00
17
IDS816 USER MANUAL
maids code will only disarm the system if the same code was used for
arming. If armed with a code other than a maids code, the system will
view an attempt to disarm with the maids code as an invalid entry. Any
valid user code will disarm the system if it has been armed with the
maids code.
9.3.5.3 Global Arm / Disarm Code
The code when entered will either arm or disarm the partitions
assigned to that user depending on their status. If both partitions are
disarmed, entering a global code will arm both partitions. If both
partitions are armed, entering a global code will disarm them. In the
case where one partition is armed and the other disarmed entering a
global code at the keypad of the armed partition will disarm that
partition and entering a global code at the keypad of the disarmed
partition will arm that partition.
9.3.6
Option 5
Assign User Code to Partitions
1.
Enter the User Program Mode as per steps 1 - 5 of
(9.2).
2.
Press the [5] key followed by the [(] key to select
programmable option 5. The READY and ARMED
LEDs will flash simultaneously.
3.
Enter the [USER CODE] followed by the [(] key.
4.
The READY indicator will flash and the AWAY
indicator will be illuminated.
5.
The partitions to which the [USER CODE] is assigned
are displayed by the by the zone LEDs. If zone LED 1
is illuminated the User Code can arm or disarm
partition 1. If zone LED 2 is illuminated, the User
Code can arm or disarm partition 2. It is possible to
program codes to arm / disarm both partitions.
6.
To select which partitions the [USER CODE] may arm
or disarm, toggle zone LEDs by entering the [ZONE
LED NUMBER] followed by the [(] key.
7.
Repeat step 6 until all User Codes have been
assigned to the correct partition/s.
8.
Press the [#] key to exit User Program Mode.
9.3.7
Option 8
Adding User Remotes
1.
Enter the User Program Mode as per steps 1 - 5 of
(9.2).
2.
Press the [8] key followed by the [*] key to select
programmable option 8. The READY and ARMED
18
IDS816 USER MANUAL NO. 700-283-01C ISSUED FEB 2005 VER 2.00
IDS816 USER MANUAL
3.
4.
5.
6.
LEDís will flash simultaneously.
Enter the [USER CODE] followed by the [*] key.
The READY indicator will flash and the AWAY
indicator will be illuminated.
Press any button on the new remote. This will assign
the new remote to the user code as entered in Step 3.
Press the [#] key to exit User Program Mode.
9.3.8
Option 9
Delete User Code (Code known)
1.
Enter the User Program Mode as per steps 1 - 5 of
(9.2).
2.
Press the [9] key followed by the [(] key to select
Menu option 9. The READY and ARMED indicators
will flash simultaneously.
3.
Enter the [USER CODE] to be deleted followed by the
[(] key.
4.
Further codes may be deleted by repeating Step 3
above.
5.
After deleting the final code press the [#] key to exit
User Program Mode.
9.3.9
Option 10
Delete a User Code (“Slot” known)
1.
Enter the User Program Mode as per steps 1 - 5 of
(9.2).
2.
Press the [1] key then the [0] key followed by the [(]
key. The ARMED and READY indicators will flash
simultaneously.
3.
Enter the [SLOT NUMBER] for the User Code you
wish to delete followed by the [(] key. You can
determine the slot number of a particular code by
using programmable option 3.
4.
Further User Codes may be deleted by repeating Step
3.
5.
After deleting the final code, press the [#] key to exit
User Program Mode.
IDS816 USER MANUAL NO. 700-283-01 C ISSUED FEB 2005 VER 2.00
19
IDS816 USER MANUAL
10.
"Stay Zones"
Stay zones are those zones which are bypassed automatically when
the system is ìSTAY ARMEDî. To avoid triggering the alarm, zones
such as bedrooms which are protected by Passive Infra-Red (PIR)
detectors, must be bypassed when ìstaying at homeî. Stay zones
need only be programmed once. Each time the system is armed in the
Stay Mode the preselected stay zones will be bypassed automatically.
The panel allows for two unique STAY PROFILES to be stored. A STAY
PROFILE stores a pre-selected combination of STAY and BUZZ zones
to suit a specific STAY ARM requirement. If a partition is stay armed
using Profile one, it is possible to toggle the panel arm status directly
to stay arm profile 2 by holding the [5] key for two seconds. STAY and
BUZZ zones can be programmed for each profile once the profile has
been selected. See section 10 and 11.
10.1
How to Select a Stay Profile
[#] + [MODE] + [2] + [(]+[PROFILE NUMBER] + [(]
1.
2.
3.
4.
5.
6.
Press the [#] key to clear any previous entries.
Hold [MODE] down for one second until the keypad beeps.
Press the [2] key followed by the [(] key.
Press [1] or [2] for the required profile.
Press [(] to enter. The buzzer will give a long beep.
Program STAY and BUZZ zones for the profile or ARM the
profile (See sections 10 and 11).
10.2
How to Program Stay Zones
[3] + [ZONE NUMBER] + [(] + [#]
1.
2.
4.
Select the required stay profile (See 10.1)
Hold down the [3] key until the keypad buzzer sounds. The
AWAY indicator will flash to show that the panel is in the Stay
Zone programming mode.
Press the [NUMBER] corresponding to the zone you wish to be a
STAY zone followed by the [(] key.
The relevant zone indicator will illuminate.
20
IDS816 USER MANUAL NO. 700-283-01C ISSUED FEB 2005 VER 2.00
3.
IDS816 USER MANUAL
Note:
5.
6.
Buzz zones will be shown by flashing indicators. See Section
11. A Buzz zone cannot be selected as a Stay zone; the
Buzz status must be cleared first.
Repeat step 3 until the selection of stay zones is completed.
Press the [#] key to exit the stay zone programming mode.
10.3
How to Cancel Stay Zones
[3] + [ZONE NUMBER] + [(]+ [#]
1.
2.
3.
4.
5.
11.
Select the required Stay Profile (See 10.1)
Hold down the [3] key until the keypad buzzer sounds. The
AWAY indicator will flash to show that the panel is in the Stay
Zone programming mode.
Press the [NUMBER] corresponding to the STAY zone you wish to
cancel followed by the [(] key.
The relevant zone indicator will extinguish.
Press the [#] key to exit the stay zone programming mode.
Buz z Zones
Violation of a buzz zone during Stay Armed will cause the keypad
buzzer to sound for a period of 30 seconds during which time a valid
user code must be entered. If a valid user code is not entered during
this period the system will register an alarm condition. This feature
helps prevent unnecessary false alarms.
Note: If an entry / exit zone is programmed as a buzz zone, violation
of the entry / exit zone ( when the panel is Stay Armed) will cause the
keypad buzzer to sound for the duration for the entry delay time. This
allows the User to re-enter the premises and disarm the panel after a
Stay Arm and go.
If the panel is Stay Armed and an entry exit zone that is also
programmed as a buzz zone is triggered, an entry delay will begin. If
it is not programmed as a buzz zone, the alarm will be triggered
immediately. If the panel was armed using the [6] key (Stay Arm and
Go) violation of the entry / exit zone will always start the entry / exit
delay.
IDS816 USER MANUAL NO. 700-283-01 C ISSUED FEB 2005 VER 2.00
21
IDS816 USER MANUAL
11.1
How to Program a Buz z Zone
[4] + [ZONE NUMBER] + [(] + [#]
1.
2.
3.
4.
5.
6.
Select the required Stay Profile. (See 10.1)
Hold down the [4] key until the keypad buzzer sounds. The
AWAY indicator will flash to show that the panel is ready to
program buzz zones.
Press the [NUMBER] corresponding to the zone you wish to be a
Buzz zone followed by the [(] key.
The relevant Buzz zone will be shown by the illuminated zone
indicator. Stay zones will be shown by flashing indicators. A Stay
zone cannot be selected as a Buzz zone; the Stay status must
be cleared first.
Repeat step 3 until all the required Buzz zones are
programmed.
Press the [#] key to exit the buzz programming mode.
11.2
How to Cancel a Buz z Zone
[4] + [ZONE NUMBER] + [(] + [#]
1.
2.
3.
4.
5.
12.
Select the required Stay Profile. (See 10.1)
Hold down the [4] key until the keypad buzzer sounds. The
AWAY indicator will flash.
Press the [NUMBER] corresponding to the BUZZ zone you wish
to cancel followed by the [(] key.
The relevant zone indicator will extinguish.
Press the [#] key to exit the buzz zone programming mode.
Chime Zones
The chime mode allows the user to monitor nominated zones while the
system is disarmed. The keypad buzzer will sound briefly when the
nominated zone is violated - the siren will NOT sound and no alarm
condition will be reported.
EXAMPLE:
You wish to know each time someone enters and exits the front door.
If a zone is programmed as a chime zone, the keypad will beep each
22
IDS816 USER MANUAL NO. 700-283-01C ISSUED FEB 2005 VER 2.00
IDS816 USER MANUAL
time someone enters and exits the front door.
12.1
How to Program Chime Zones
[2] + [ZONE NUMBER] + [(] + [#]
1.
2.
3.
4.
5.
Hold down the [2] key until the keypad buzzer sounds.
The AWAY indicator will flash.
To program a zone as a chime zone, press the key corresponding
to that zone followed by the [(] key. The zone indicator will
illuminate.
Program any other zones you wish to select as chime zones as
per step 3.
Press the [#] key to exit the chime programming mode.
12.2
How to Cancel Chime Zones
[2] + [ZONE NUMBER] + [(] + [#]
1.
2.
3.
4.
13.
Hold down the [2] key until the keypad buzzer sounds.
The AWAY indicator will flash.
To cancel any chime zones, press the key corresponding to that
zone followed by the [(] key. The zone indicator will extinguish.
Press the [#] key to exit the chime programming mode.
View ing Trouble Conditions
(Hold down the [7] key for two seconds until the keypad buzzer sounds)
The user is alerted to a trouble condition via a flashing power LED.It is
also possible to enable a trouble beep. If the trouble beep has been
enabled, the keypad buzzer will sound to alert the user that a trouble
condition has occured. Press the [#] key to silence the buzzer. Hold
down the [7] key for two seconds. The ARMED, AWAY and READY
indicators will start flashing to show that the keypad is in the
TROUBLE VIEW MODE. Refer to the table 5 below to find the
significance of each illuminated zone LED. The system will
automatically exit the TROUBLE VIEWING MODE after one minute.
To exit this mode press [#].
IDS816 USER MANUAL NO. 700-283-01 C ISSUED FEB 2005 VER 2.00
23
IDS816 USER MANUAL
Note: Certain trouble conditions will only clear once the trouble
condition has restored. To simply cancel the beeping without viewing
the trouble conditions, press [#] key.
Table 5.
Trouble Conditions
Indicator Trouble Condition
14.
1
AC Mains Failure
2
Failure to communicate successfully to monitoring company
3
Phone line trouble
4
Siren tamper
5
Low battery
6
Loss of Clock Timer
7
Engineer Reset
8
Box tamper
9
n/a
10
Tamper on peripheral device
11
Communication loss to peripheral device
12
Loss of power to peripheral devices
Changing a Partition
To change partitions the keypad must be a global keypad.
1.
2.
24
Hold [MODE] until the keypad beeps.
Press [1][*] followed by the [partition number][*].
IDS816 USER MANUAL NO. 700-283-01C ISSUED FEB 2005 VER 2.00
IDS816 USER MANUAL
If the keypad is left for 20 seconds, it will beep and default back to the
default
15.
Remote Telephone Access
The IDS 816 Alarm Panel has a secure, remote telephone interface
which allows a user to arm/disarm, to bypass/unbypass zones and to
set programmable outputs via a phone line. A user accesses the
remote dial-in interface by dialling the alarm panel with a DTMF
enabled phone.
To access the remote dial-in interface, dial the alarm panel and wait
the number of rings programmed (the default number of rings being 15)
or use the fax defeat function. The panel will answer and transmit
handshake tones consisting of a high pitch tone for two seconds
followed by a lower pitch tone for one second.
Within twenty seconds of the panel transmitting the handshake tones,
enter a valid user code on the DTMF enabled phone. If a user code is
not entered or if the user code is invalid - the panel will release the
line. If the user code is valid and telephone access has been enabled,
the panel will give a single confirmation beep indicating that the user
has gained access to the remote interface. If no key-presses are
detected for twenty seconds once access has been gained to the
remote interface the panel will release the line.
Should the panel be programmed to report to your cellular telephone,
entering the user code in the delay between beeps will also allow
access to the remote telephone interface.
If the phone in access has been setup to arm/disarm only, pressing
the number of the partition allows the user to toggle the panels arm
status.
A single beep indicates that the partition has armed, a double beep
IDS816 USER MANUAL NO. 700-283-01 C ISSUED FEB 2005 VER 2.00
25
IDS816
MANUAL
Table
6. USER
Remote
Telephone Operation
indicates that the partion has disarmed. 3 beeps indicates that the
partition is not ready to disarm.
If the phone in access has been set up to access the full menu,
Please refer to the table 6 and select the required operation.
Operation
K ey Entry
P an el R esp o n se
A Si ngle C onfi rmati on Beep i ndi cates
Parti ti on armed successfully
Arm a Parti ti on
[1] [1] [PARTITION] [*] Three Error Beeps i ndi cates Parti ti on cannot
be armed by user code or Parti ti on not ready
to be armed or a key entry error has occured
A Si ngle C onfi rmati on Beep i ndi cates
Parti ti on di sarmed successfully
D i sarm a Parti ti on [1] [2] [PARTITION] [*] Three Error Beeps i ndi cates Parti ti on cannot
be di sarmed by user code or a key entry
error has occured
A Si ngle Beep i ndi cates Parti ti on i s Armed
C heck Arm Status
A D ouble Beep i ndi cates parti ti on i s
[1] [3] [PARTITION] [*]
(By Parti ti on)
D i sarmed
Three Error Beeps i ndi cates a key entry error
A Si ngle C onfi rmati on Beep i ndi cates that
the zone was successfully bypassed
Bypass a Zone
[2] [1] [ZONE] [*]
Un-Bypass a Zone [2] [2] [ZONE] [*]
Three Error Beeps i ndi cates that the zone
cannot by bypassed or a key entry error has
occured
A Si ngle C onfi rmati on Beep i ndi cates that
the zone was successfully unbypassed
Three Error Beeps i ndi cates that a key entry
error has occured
A Si ngle Beep i ndi cates that the zone i s
bypassed
C heck Zone
Bypass Status
[2] [3] [ZONE] [*]
A D ouble Beep i ndi cates that the zone i s unbypassed
Three Error Beeps i ndi cates that a key entry
error has occured
Set Programmable
[3] [1] [OUTPUT] [*]
Output
C lear
Programmable
Output
[3] [1] [OUTPUT] [*]
A Si ngle C onfi rmati on Beep i ndi cates that
the programmable output was set
Three Error Beeps i ndi cates that a key entry
error has occures
A Si ngle C onfi rmati on Beep i ndi cates that
the programmable output i s clear
Three Error Beeps i ndi cates that a key entry
error has occured
A si ngle Beep i ndi cates that the
programmable output i s set
Test
Programmable
Output Status
[3] [1] [OUTPUT] [*]
A D ouble Beep i ndi cates that the
programmable output i s clear
Three Error Beeps i ndi cates that a key entry
error has occured
Telephone Li ne Released
Hang-Up
26
[0]
Three Error Beeps i ndi cates that a key entry
error has occured
IDS816 USER MANUAL NO. 700-283-01C ISSUED FEB 2005 VER 2.00
IDS816 USER MANUAL
IDS816 USER MANUAL NO. 700-283-01 C ISSUED FEB 2005 VER 2.00
27
IDS816 USER MANUAL
User Guide Quick Reference
D escription
Programming
Add a User C ode
[*] + [Master C ode] +[*] + [0] + [*] + [New C ode] + [*]
C hange a User C ode
[*] + [Master C ode] +[*] + [2] + [*]+ [Old C ode] + [*] +
[New C ode] + [*]
Vi ew a Slot Number
[*] + [Master C ode] +[*] + [3] + [*] + [User C ode ] + [*]
Vi ew the Slot number vi a the zone LED 's.
Edi t User C ode
Properti es
[*] + [Master C ode] +[*] + [4] + [ *] + [User C ode ] + [ *] +
[2 or 3 or 4] + [*]
2 = D uress 3 = Arm to D i sarm C ode
4 = Global Arm/D i sarm C ode
Allocate a User C ode
to a Parti ti on
[*] + [Master C ode] +[5] + [*] + [User C ode] + [*] +
[Parti ti on Number] + [*] + [#]
Teach a Remote to a
User C ode
[*] + [Master C ode] +[*] + [8] + [*] + [User C ode] + [*]
Press Tx Button
D elete User C ode by
C ode
[*] + [Master C ode] +[*] + [9] + [*] + [User C ode] + [*]
D elete User C ode by
Slot Number
[*] + [Master C ode] +[*] + [10] + [*] + [Slot Number] + [*]
C hange Parti ti ons
[Mode] + [1] +[*] + [Parti ti on Number] + [*]
Select a Stay Profi le
[Mode] + [2] +[*] + [ 10] + [ * ] + [Profi le Number] + [*]
Program / C ancel
Stay Zone
[3] + [Zone Number] +[*] + [#]
Program / C ancel
Buzz Zone
[4] + [ Zone Number ] +[*] + [#]
Program / C ancel
C hi me Zone
[2] + [Zone Number ] +[*] + [#]
Qui ck Arm
[1]
Qui ck Stay
[5]
Stay Arm and Go
[6] Entry / Exi t zone must be made a buzz zone.
Bypassi ng / UnBypassi ng a Zone
[9] + [Zone Number] +[*] + [#]
Alarm Memory
[0] D i splays zones vi olated, [03] + [02] D i splays zones
bypassed
Vi ew Trouble
C ondti ons
[7]
28
1 = AC Mai ns fai l
2 = No C ommuni cati on
3 = Phone Li ne
4 = Si ren Tamper
5 = Low Battery
6 = Loss of clock ti mer
7 = Engi neer Reset 8 = Box Tamper
10 = Tamper on Peri pheral
11 = C omms fai lure to peri pheral devi ce
12 = Loss of power to peri pheral devi ce
IDS816 USER MANUAL NO. 700-283-01C ISSUED FEB 2005 VER 2.00