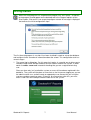
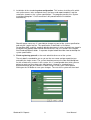
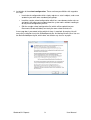
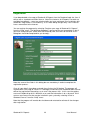
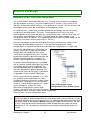
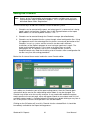
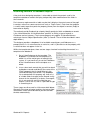
1
A* Reports Personal
User Manual
Contents
INTRODUCTION ............................................................................................................................................ 4
TEMPLATES ..................................................................................................................................................... 5
INSTALLATION ............................................................................................................................................. 6
PREREQUISITES ............................................................................................................................................... 6
DATABASE ...................................................................................................................................................... 6
SETUP ............................................................................................................................................................. 6
GETTING STARTED...................................................................................................................................... 7
REGISTRATION .............................................................................................................................................. 10
I JUST WANT TO CREATE MY OWN CLASS AND START WRITING REPORTS!...................................................... 11
STRUCTURE AND DESIGN........................................................................................................................ 12
ACADEMIC YEARS, TERMS AND YEAR-GROUPS ............................................................................................. 12
TEACHING GROUPS, TEACHERS AND PUPILS .................................................................................................. 13
SUBJECTS AND TEMPLATES ........................................................................................................................... 14
REPORTS ....................................................................................................................................................... 15
The report life cycle ................................................................................................................................. 15
Planning which reports are due to be written each term ......................................................................... 16
NORMAL USE ............................................................................................................................................... 17
THE OPENING SCREEN - MY REPORTS TODAY .............................................................................................. 17
THE NAVIGATION AREA ............................................................................................................................... 18
My Classes ............................................................................................................................................... 18
School ...................................................................................................................................................... 18
Find Pupil ................................................................................................................................................ 19
CONTEXT MENUS .......................................................................................................................................... 19
THE WORKSPACE .......................................................................................................................................... 20
The Browser ............................................................................................................................................. 20
The Editor ................................................................................................................................................ 21
The Print Preview Panel .......................................................................................................................... 23
EDITING RECORDS USING FORMS................................................................................................................... 24
STARTING A NEW ACADEMIC YEAR ................................................................................................... 25
CREATE A NEW ACADEMIC YEAR RECORD..................................................................................................... 25
STRATEGIES FOR NAMING TEACHING GROUPS ............................................................................................... 26
PUTTING PUPILS INTO CLASSES ..................................................................................................................... 26
STARTING A NEW TERM................................................................................................................................. 27
IMPORTING AND EXPORTING RECORDS ........................................................................................... 27
EXPORTING RECORDS ................................................................................................................................... 27
IMPORTING RECORDS .................................................................................................................................... 28
CHEETAHS .................................................................................................................................................... 29
AVAILABILITY .............................................................................................................................................. 29
USING CHEETAHS ......................................................................................................................................... 29
ADDING NEW CHEETAHS .............................................................................................................................. 31
THE CHEETAH MANAGER ............................................................................................................................. 32
THE TEMPLATE DESIGNER .................................................................................................................... 33
CONTROL SELECTION ................................................................................................................................... 34
DESIGNER WINDOW ...................................................................................................................................... 35
PROPERTIES WINDOW ................................................................................................................................... 35
ATTACHING CONTROLS TO DATABASE OBJECTS ............................................................................................ 36
1. Set the template’s ValueReference to select a “context” for it ............................................................ 37
2. Select fields from that context for each control. .................................................................................. 37
Gradesoft A* Reports
2
User Manual
BORDERS ...................................................................................................................................................... 38
LAYOUT ........................................................................................................................................................ 39
The dialog vs PDF layout ........................................................................................................................ 39
Fixed layouts............................................................................................................................................ 40
Docking and anchoring controls ............................................................................................................. 40
Layout expressions................................................................................................................................... 40
EXTENDING THE PUPIL RECORD JOURNAL OBJECT SPECIFICATIONS .................................. 43
MAINTENANCE ........................................................................................................................................... 44
SECURITY...................................................................................................................................................... 44
BACKUP ........................................................................................................................................................ 44
APPENDIX A THE STRUCTURE AND SYNTAX OF SCHOOL CONFIGURATION FILES ........... 45
APPENDIX B THE BASIC SCHOOL CONFIGURATION FILE ........................................................... 48
APPENDIX C OBJECTS AND FIELDS...................................................................................................... 50
AppVar ..................................................................................................................................................... 50
Command ................................................................................................................................................. 50
StaffRole................................................................................................................................................... 51
School ...................................................................................................................................................... 51
Staff .......................................................................................................................................................... 51
StaffOptions ............................................................................................................................................. 52
AcademicYear .......................................................................................................................................... 52
Yeargroup ................................................................................................................................................ 53
SubjectType .............................................................................................................................................. 53
Term ......................................................................................................................................................... 53
Pupil......................................................................................................................................................... 53
TeachingGroup ........................................................................................................................................ 54
Subject ..................................................................................................................................................... 55
YearRegistration ...................................................................................................................................... 55
Report ...................................................................................................................................................... 55
ReportPage .............................................................................................................................................. 56
Journal ..................................................................................................................................................... 57
JournalEntry ............................................................................................................................................ 57
Gradesoft A* Reports
3
User Manual
Introduction
Welcome to Gradesoft A* Reports.
A* Reports provides a powerful and flexible way for individual teachers or schools to
design and manage the reports that they need to write about their pupils. The system
allows reports to be written by many different teachers for each class of pupils, according
to the different subjects being taught.
When a teacher logs in to the system, they are first presented with a list of “My Classes”.
These are those classes that they teach at least one subject to. Pupil records may be
examined by clicking on the pupils name in each class, and it is also possible to
immediately write the reports for each of the relevant subjects.
The report authoring environment
Cheetahs™ which are context sensitive stock phrases that make the process of writing
reports quicker and easier, whilst retaining the ability to create individual reports for each
pupil. In the image above a list of Cheetahs has been displayed in yellow below the line
where the author is writing. Cheetahs are described in a separate chapter below.
Reports are published as PDF (Portable Document Format) files. This is a standard format
for publishing documents, used worldwide, which may be viewed through the freely
available “Adobe Acrobat” viewing program. This seamlessly integrates with Internet
Explorer providing the opportunity to publish the reports on the Internet so that parents can
view their child’s report from home. Gradesoft A* Reports Campus enables this in an
intuitive and secure fashion.
Gradesoft A* Reports
4
User Manual
The PDF view of the same report
Templates
A* Reports are based on templates that provide a framework and layout for the form
during data entry and also for the page when it is printed. A single template provides
information for both. The intention is that the template provides a method of designing the
layout of the report in a “WYSIWYG” (what you see is what you get) fashion.
Templates are created through a custom designer that is an integral part of the system.
The template designer is launched from the Tools menu. By default access to it is
restricted to administrative users.
The template designer provides an intuitive visual way of arranging the components of a
report on the page to meet a particular set of requirements. It gives a school complete
control over the content and appearance of its own reports.
The template designer
Gradesoft A* Reports
5
User Manual
Installation
Prerequisites
Gradesoft A* Reports runs on Microsoft Windows 2000 or later.
Before installing Gradesoft A* reports it is worth ensuring that the programs that it relies on
are in place. These include:
Microsoft Internet Explorer v5 or later.
Adobe Acrobat reader v5 or later – or Foxit reader version 3 or later.
Microsoft dot net environment v2.0 or later.
Each of these is freely downloadable from the respective company’s web sites. Shortcuts
to these downloads are available through the Gradesoft web site.
Database
Gradesoft A* Reports Personal is a single user system operating on a built in local
database. No further installation or setup is required.
The database file used in these circumstances is known as GDSReports.gds and stored in
a folder named “Gradesoft” under the users Documents folder. Since this file contains all
of your work in the A* Reports system, it is important to back it up (make copies of it) on a
regular basis, as discussed below under “Backup”.
Gradesoft A* Reports Campus is designed to work with most of the major commercial
and free database management systems available. Amongst commercial systems,
Gradesoft recommend the use of Microsoft SQL Server, or MySQL or Firebird amongst
free systems. Gradesoft is unable to guarantee compatibility with other systems, but is
willing to discuss the issue.
Setup
Gradesoft A* Reports Personal is supplied as a standard installation file named
“GDSSetupPersonalFull.exe” which may be downloaded from the Gradesoft web site. On
completion a new shortcut to start the program should be available on the desktop and in
the Start menu.
Note that the full setup comes with the Gradesoft Cheetah™ database in place. An
alternative setup is also available which excludes this database. This is quicker to
download and set up, and uses less disk space. It is possible to download the Gradesoft
Cheetah database on it’s own at a later date, or to develop your own.
Gradesoft A* Reports
6
User Manual
Getting started
When the setup program has completed the program files are in place. A shortcut
to the program should appear on the desktop and in the Program options off the
‘Start’ button. Click on this icon to get the program started. A message is displayed
that outlines the initial configuration steps:
The first time the program is run after it has been installed it needs to set up the database
and configure it with some basic information about the school. This configuration task has
several stages:
1. The normal log in dialog box. On this occasion it works in a special way to allow you to
record the login name and password of the main administrator of the system. In other
words it creates a new user instead of checking that you are a registered existing
user.
Since you have only just installed the system no users will have been registered in the
database. The system will therefore assume that as the first person logging on, you are
the administrative user, and will create an appropriate user account for you using the
username and password you enter. Of course, on all occasions after this, you must
enter a valid user name and password in order to use the system.
Gradesoft A* Reports
7
User Manual
2. Installation of the standard system configuration. This involves installing a file which
sets up the menus, roles and permissions, the forms and report templates, and the
summaries, known as the “system specification”. The program presents the “System
installation dialog box”. On this occasion it will proceed with the installation
automatically.
Should it prove necessary, it is possible to change any part of the system specification
and reinstall it again later on. The specification is declared in a file called
SystemSpec.XML, and this, together with the documents it refers to (which are stored in
a compressed (zipped) folder named GDSResources.zip) are stored in the Program
files/Gradesoft/Reports folder. A separate chapter below describes how to develop the
system specification.
3. Finish registering yourself as the main administrative user of the system.
The only details recorded for you as yet are the user name and password that you
entered at the Login screen. The system therefore presents the New Staff dialog box.
As with all data entry screens in the system, this is a configurable form which you can
design to meet your own data entry requirements. However a standard form is
presented here to get you started. It is worth filling in at least your names before
clicking on the OK button to save your changes. The rest of the system will then load.
Gradesoft A* Reports
8
User Manual
4. Installation of the school configuration. There are three possibilities with regard to
this step:
•
Load a basic configuration which simply registers a set of subjects, and a new
academic year with some standard year-groups.
•
Load the sample school configuration which has some demonstration classes
and pupils that allow you to explore how the system works without needing to
do any more configuration yourself.
•
Edit the sample school configuration file (which will be copied into your
Documents/Gradesoft folder) to match your own school and classes.
A message box is presented asking which of these is required. Answering Yes will
cause the installation to use the SchoolSpec.cfg file. Answering No will cause it to use
the BasicSchoolSpec.cfg file, which does not contain any classes or pupils.
Gradesoft A* Reports
9
User Manual
Registration
If you downloaded a free copy of Gradesoft A*Reports from the Gradesoft web site, then it
comes with a standard evaluation license. Not all the features of A*Reports Personal are
available immediately – some are unlocked after you have registered your installation with
Gradesoft. Registration is free and easy, so it’s worth doing straight away. You’ll need to
have a connection to the Internet.
You can register the program by selecting “Register your copy of Gradesoft A* Reports”
from the “Help” menu. The following dialog box is presented for you to complete (in fact if
you have configured your school and staff record by now, then most of the fields in this
dialog box should be completed for you already):
Note that some of the fields in this dialog box are mandatory in order to complete the
registration process.
Once all your details have been entered, then click on the OK button. The program will
respond with a message of success if it manages to connect to the Gradesoft web site and
deliver the registration information, or an error if the process fails. In this case the options
are to call Gradesoft on 0121 4454423, or to send the information in to us by email. We’ll
return a new license file that may be installed in your system by selecting “Install a
Gradeosft license” from the “Help” menu.
Note that the program will need to be shut down and restarted to activate all the changes
after registration.
Gradesoft A* Reports
10
User Manual
I just want to create my own class and start writing reports!
The program has to be installed before it is possible to start writing reports as described
above. If the demonstration data is not required select “No” when asked about installing
the school configuration. A basic configuration will be installed instead.
When the main A* Reports screen is visible a new teaching group may be created
by selecting New Teaching group from the File / New menu, or clicking on the
New Teaching group button on the toolbar.
The New Teaching group form is presented which enables all the main properties of the
teaching group to be set up from one place. These include:
•
The name of the teaching group – in the sample below the group has been given
the foolish name “My new teaching group”. A more useful name may be Form 4JB,
or English Set 4A.
•
The yeargroup that the teaching group is a part of.
•
The type of teaching group – registration group, streaming set etc
•
The Teacher(s) responsible for the group (and who teach all the subjects not
assigned to another teacher).
•
The subjects taught in the group
•
The pupils taught – which may be either new or existing pupils.
Enter the required information into each of these lists. If you are going to be writing the
reports yourself make sure that you include yourself as one of the group’s teachers. Click
the OK button and the new group should appear in the list of “My Classes” on the left of
the screen.
Select one of the pupils that have been added to the class, click on the Report editor tab at
the bottom, and start writing!
Gradesoft A* Reports
11
User Manual
Structure and design
Academic years, terms and year-groups
The system records information about the class structure of the school on an academic
year by academic year basis. Only one academic year is “current” in the system at any
one time, and one term within that year is also identified as “current”. The current year and
term appear on the status bar at the bottom of the programs screen.
An academic year is made up of a number of different year groups, each of which may
include many teaching groups. The terms “Teaching group” and “Class” are used
interchangeably in the system but given the variety of other terms such as “form” and “set”
also used for teaching groups, the term “Teaching group” has been adopted as the
standard term within A* Reports. (It is suggested that where necessary other words can be
used within the names of each group such as “Set 1A”.)
All of this information can be entered through the menus and data entry screens in the
normal way described below. However it is also possible to describe the school
configuration in a separate text document and import the configuration as a single step.
This has the advantage that it will probably be
quicker, and since it is likely that the school
configuration next (academic) year will be
similar to the configuration this year, it should
be possible to edit this document and make the
changes required, and then re-import it, to
create a fully configured new academic year.
A sample school configuration file is included
with this release named schoolspec.cfg, stored
in the folder My Documents\Gradesoft. This
may be imported directly or modified to meet
your own requirements before importing, The
structure and syntax of these files is described
in Appendix A at the end of this document.
The first occasion that the program is run, after
the standard system specification has been
installed, the option to install the sample school
configuration is provided. If you are new to the
system it is worth doing this because it is much
View of the sample school
easier to explore a system with some
configuration in the “School” panel
information already present, than a blank
system. If you don’t install it here the file can be
imported later on by selecting “Import school configuration”
from the Tools / System maintenance menu.
Warning Importing school configuration files that contain errors can create errors in your
Gradesoft database that are very difficult to fix. It is recommended that once established
you always back up the database before attempting to import one of these files. As well
as this, it may well be worth importing any school configuration you create into a test
database first. This will allow you to check the results before committing it to your live
system.
Gradesoft A* Reports
12
User Manual
Teaching groups, teachers and pupils
Pupils are enrolled into a number of different teaching groups of the year group in which
they are registered for any given academic year. A new report is created for each pupil for
each new term that is set as “Current” for the current academic year. Extra reports may be
created for any individual pupil through the Pupil menu, which appears whenever a pupil is
selected from the pupil navigation bars on the left of the screen.
It is possible to restrict the required reports in any one term to just a number of yeargroups
– and a selection of subjects for each of those yeargroups. Click on the “Plan this term’s
reports” icon on the toolbar – or select it from the File menu (see below).
Each teaching group is led by one or more teachers, and teaches one or more subjects
(each of which may be taught by different teachers again). The way in which teaching
groups are designed, including the number of subjects associated with each teaching
group, is under the control of the school. It may be preferred to have fewer teaching
groups, each of which is associated with more subjects, or more teaching groups
associated with fewer subjects.
Pupils Year
Registration
Year group
Teacher C
Teacher B
Teaching
group
Subject
Teaching
group
Subject
Subject
Teacher A
Subject
Teacher D
Pupils Report
Report page
(to be written
by Teacher A)
Report page
(to be written
by Teacher B)
Report page
(to be written
by Teacher C)
Report page
(to be written
by Teacher D)
By default the system allows anyone to write any reports. This level of access can be
restricted through the Tools / System Maintenance / Roles and permissions dialog box,
which allows you to specify those roles which can view and edit reports. The commands
whose permissions need to be edited are:
edit.myclass.reportpages, view.myclass.reportpages,
edit.otherclass.reportpages, view.otherclass.reportpages,
view.publishedreports
Gradesoft A* Reports
13
User Manual
Subjects and templates
This area of the information system contains records which are commonly referred to
using the same or similar names, which may result in some confusion. For instance a
system may have a subject type called “Art” and a template used to report on this subject
– called “Art”. It is therefore important to be clear about the nature of the different types of
record.
For the purposes of the Gradesoft system:
•
A “Subject type” is a type of subject – such as Maths, English and Science.
•
A “Subject” refers to the situation when a subject type is taught in a particular
teaching group.
•
A “Report template” defines the format of a page for a particular subject in a report,
that is to say its appearance and the arrangement of different fields in it (exam
grades, written report and so on). Report templates may be written specially for
each subject, in which case the templates name is likely to be based on the
subject’s name, or a small set of templates can be re-used for many subjects.
•
A “Cheetah bank” is a set of Cheetahs (a comment bank) that can be used in a
particular place in a given report template. Text fields in report templates may be
set to use any Cheetah bank, but typically they are set to use a Cheetah bank with
the same name as the subject being written about, and so inevitably the name of
Cheetah banks also follows the name of the subject.
Cheetah
bank
Report
template A
(default)
Subject type
Subject
Teaching
group A
Subject
Report
template B
Teaching
group B
The subject type can be given a default template, which will be used if no other is chosen
for a teaching group (TG). It is taught in both TG A and B, but the subject record for TGB is
given a different template. In this case both report templates still happen to use the same
Cheetah bryank – that does not necessarily have to be the case.
Note that it is not uncommon for all of these different records to be given the same name –
or at least have a common base. For instance, if the Subject type is “Art”, then it will be
known as “Art” in the teaching group, and the teaching group may itself be called “Art” or
“Year 7 Art”. If the report template is specific for Art, it too may be called “Art”, and the
Cheetah bank used for writing reports also known as “Art”. Clearly there is some potential
for confusion amongst all this, so it is important to be clear which type of record is being
referred to at any given time.
Gradesoft A* Reports
14
User Manual
Reports
In many information systems the word “Report” most frequently refers to the results of an
analysis of the information stored – such as “a list of the female pupils in Year 4”.
However, since the Gradesoft system is focussing on the pupil’s school report – that is
what the word “report” is used to refer to here. In the Gradesoft system, Information
analysis reports are called “Summaries”.
A school report is a collection of report pages – one for each subject that a pupil is taught.
The data collected for each report page is determined by the template used to collect it –
this may be different for each subject, or the same – according to the needs of the school.
It is possible to create new fields to appear on report templates when required fields do not
already appear in the system.
The report pages that will appear on any individual pupil’s report are determined by the
subjects that are taught in the teaching groups in which he /she is enrolled. That list of
subjects may be reduced if a plan has been made for this term’s reports, and only certain
subjects have been selected to be reported on. The staff members responsible for each
report page will be either the staff member assigned to that subject, or the form teacher
(teacher associated with the teaching group) if no subject teacher is assigned.
The report life cycle
The Gradesoft system supports a number of distinct phases in the generation of reports.
The phases are mostly optional and primarily there to give some indication of progress.
The phases are:
Not started – this is a blank report and is not represented by an icon.
Underway – this status is set automatically when work starts on a report page.
Submitted: finished and ready for checking
Needs revision
Ready for publishing
Published – this is set when the report is officially finished and a PDF document
has been prepared for it. It therefore implies that it has been printed and sent to the child’s
parents or guardian’s. At this stage the report becomes read-only, and the PDF version will
be used whenever it is viewed.
The other status values are available on the Report editor toolbar and can be set at will by
the user.
Gradesoft A* Reports
15
User Manual
Planning which reports are due to be written each term
By default the system assumes that every pupil will have a report for every subject, every
term. However that is not normally the case in practice. Each term a number of yeargroups
are selected to receive reports, and they may not have reports for all subjects taught.
In order to plan which yeargroups and which subjects should be reported on, click on the
“Plan this term’s reports” button on the toolbar:
which will launch the following
dialog box:
A list of available yeargroups is presented on the left. When one of these is selected the
list of subjects taught to that yeargroup is presented on the right. If the check box by any
yeargroup is checked, then only those yeargroups will receive reports this term, and
similarly only the subjects checked on the right will be reported on.
Note that where a subject is needed for some pupils, but not all who are taught in the
same groups – then that subject can be excluded from reports on a pupil by pupil basis.
(This is an option in the Report menu when the report editor is open.)
Gradesoft A* Reports
16
User Manual
Normal Use
The Opening Screen - My Reports Today
Once the system is up and running then the opening screen should present a
summary of the status of your reports today. You can return to this screen at any time
by clicking on the home icon on the browser status bar, or by selecting My Reports
Summary from the View menu.
This screen presents a table of the numbers of reports you are responsible for,
categorised by the status of those reports. There is a further subdivision of those reports
that carry comments. (These are also included in the full counts above). Clicking on any of
the counts in this table will display a list of those reports below the table. Clicking on the
subject name of any of the items in that list will open the report editor for that report.
Navigation
Panel selection tabs
Workspace
Status bar
Contents
Comments
The screen is divided into 3 principle areas – Navigator, Workspace and Contents
sections. It is possible to re-arrange the position of the windows either by clicking on the
title bars, or on the panel selection tabs, and dragging them to another part of the screen.
Sometimes this happens inadvertently, or leads to unwanted results, in which case the
original layout can be returned by selecting Reset window positions from the View
menu.
Gradesoft A* Reports
17
User Manual
The Navigation Area
The Navigation area allows you to find and select different types of record in the database.
Most commonly these will be teaching groups and pupils. Selecting any record in the
Navigation area loads a page describing it in the workspace. In most cases this will appear
in the browser, but if the report editor is open then selecting a succession of pupils will
leave the focus in the report editor, but will move on to the new pupils report. The currently
selected subject will be preserved, if that subject appears in the new pupils report.
Using the right mouse button in the navigation area will reveal a popup menu that has
options relevant to the selected record. This popup menu should reflect a context sensitive
menu that also appears on the main menu bar. For instance, if an academic year is
selected, then an “Academic year” menu appears on the main menu bar.
My Classes
The first panel in the navigation area presents a list of the
classes or teaching groups that you as the logged in user are
registered as teaching. As each class name is clicked with the
mouse, the button with the class name moves to the top and the
list of pupils in that class appear below it. At the same time a
page describing that class appears in the Browser panel.
A little icon may appear beside each pupil in the list. This is used
to indicate the status of that pupil’s current report. The
handwriting icon that is shown in the image here indicates that
the report has been started but not yet submitted (see Report
Status’).
School
The school panel presents the school configuration in the form of
a hierarchical tree. Double clicking the mouse button over any
heading, or clicking on the “+” symbol beside it will open it to
display the contents of that heading. It is possible to “drill” down
to reveal records related to the one selected. As each is selected
a page appears in the browser with its details.
Gradesoft A* Reports
18
User Manual
Find Pupil
The Find Pupil panel allows the selection of pupils based
on variety of criteria which may be mixed as necessary.
Enter the desired search criteria into the different text
boxes and lists, and then click on the “Go” button to
perform the search. Pupils may be selected from the
resulting list in the same way as from the other navigation
panels.
Note that the criteria entered do not have to be complete.
Entering just a P for the pupils last name will return all
pupils whose last name begins with P. Similarly entering
just the year in the date of birth field will return all pupils
recorded as being born in that year.
It is possible to select several pupils at a time in this list by
holding down the Control “Ctrl” key on the keyboard as
each required name is clicked with the mouse button. This
may be useful in order to print the current reports of a
particular group of pupils (select the Print a group of
reports from the File menu).
Note: If recently registered pupils don’t appear in the Find Pupil window, it may be
because the academic year is set to the current year (the default when the window
opens) and the new pupils have not yet been enrolled in this year. In order to find those
new pupils first clear the academic year box (the top option in the list is empty).
Context menus
In the navigation and browser
views, using the right mouse button
when pointing to an object pops up
a menu by the mouse cursor that is
specific to the type of the object that
is being pointed to. This is known
as a context menu. Most records
in the system support such a menu,
and this is one of the quickest ways
of performing actions on them.
Gradesoft A* Reports
19
User Manual
The Workspace
The workspace also has three panels. The browser displays details of the record selected
in the navigation area. The report editor and the preview screen are only used when a
pupil has been selected (in which case the current report will be displayed), or when an old
report has been selected.
Note that each of the panels in this area has its own little toolbar.
The Browser
The browser presents detail about
the selected record. It is possible to
navigate from record to record within
this window by clicking on the text
that identifies it. The browser will
either change to display the detail of
that item, or display another window
such as a data entry screen (dialog),
depending on the nature of the item.
For instance clicking on “4GH” in the
example here will link to the display
page for teaching group 4GH.
Clicking on the “2007-8” year will
display a window to edit Henrys
2007-8 year registration.
Note that A* Reports is able to store photographs of the people registered in the system. To
record a persons photo select “Photograph” from the Staff or Pupil menu, or the popup menus
that appear when the right mouse button is clicked on when the mouse is pointing at an object.
Where photographs have been supplied, they will appear in this view when that person is
selected, instead of the blue blob that acts as a placeholder. It is possible to load a large number
of photographs all at once through the Tools / Import data / Import Pupil Photographs menu.
Gradesoft A* Reports
20
User Manual
The Editor
The editor window only appears when a pupil has been selected in the Navigation area. It
is used for writing reports, and also for managing the information in the “Pupil record” data
pathway. The Gradesoft system can only do one of these at a time and will persist in its
current state until explicitly changed. The title of the Editor’s tab at the bottom of the
screen indicates which this is at any one time - either “Report editor”, or the name of the
data pathway (ie “Pupil Record”).
The two buttons at the end of the main toolbar are used to switch the system from one
state to another.
To start editing a report when the system is in Data pathway mode, either click on
the Report editor button, or click on the reports title in the Pupil view in the browser.
To enter the Pupil record when the system is in Report editor mode, either click on
the Pupil record button, or select Pupil Record from the Pupil menu.
In considering the editor, it is important to consider the other two panels – the contents list,
and the comments.
Contents
The contents window list of report pages that appears on the right are those that are due
to be reported on for this pupil, this term. If no specific plan has been made for reports this
term then it will be all subjects in all the teaching groups that pupil is taught in; otherwise it
will be the subjects included in the plan.
The format of the report page in the report editor is determined by the Report Template
property associated with the subject (or subject type) in question. This names a report
template that has been created using the template designer. If you wish to change this
format then you have several options.
You may:
•
change the template associated with the subject (if the change only applies to one
class) or subject type (to change the template for all classes that teach the subject)
to a different report template. Do this by selecting the subject type in the school
navigation tab, and editing its properties through the Edit context menu.
•
edit the existing template in the template designer (although this will affect all other
subjects that also use that template too).
•
create a new template all together. The easiest way to create a new template is to
open an existing one (that most closely matches the new requirements) and then
saving it with a new name – File/Save As. Note that once the template has been
created the record of the subject that is in going to use it must be changed to show
this, as in the first option above.
Gradesoft A* Reports
21
User Manual
A page of a report that has been worked on is automatically saved as soon as it is
unloaded – as soon as the focus switches to a different subject, or a different pupil. It may
optionally be saved at any other time by selecting “Save” from the “File“ menu, or clicking
on the Save button on the main toolbar.
Comments
The comments box allows comments to be entered for any report page. These are saved
at the time the rest of the page is saved. The comments may be made by the author, or
may be made by someone else checking the report page, for the authors benefit. This may
be especially relevant if the checker returns the report page to the author by setting its
status to “For revision” (the warning triangle symbol) at which point extra comments
indicating the reasons may be worthwhile.
Text entered into the comments box is never printed.
The Report Editor Toolbar
The Report Editor Toolbar is comprised of four sections. The first two are standard
clipboard and formatting sections that are enabled as and when appropriate data entry
controls are in focus in the editor.
The third section enables the status of the report being worked on to be set. With the
exception of the “Published” status, there is nothing special about the statuses – they just
act as a visual clue as to the stage the report is at.
The Cheetah editor appears in the final section on the right. It only appears once the
product has been registered. The button allows the sentence currently being written to be
added to the Cheetah bank in use, so that it can be used again for other pupils. This is
described in more detail below under “Adding new Cheetahs”.
Gradesoft A* Reports
22
User Manual
The Print Preview Panel
The print preview panel uses the Adobe Acrobat reader (or the Foxit reader if you have it
installed in preference) to present the PDF version of the report or report page in question.
To work properly Acrobat must be properly integrated with Microsoft Internet Explorer.
Otherwise Internet Explorer will launch the PDF document in Acrobat as a separate
program.
Once a report has been published a PDF file is created from the report templates and
stored in the database. From this point it may no longer be changed unless it is first
unpublished. If the report is opened the Print Preview panel will be selected immediately
to display the report.
Prior to publishing, individual pages may be reviewed in the Print Preview panel at any
time to see what they will look like when published.
Pages may be printed from this screen either by clicking on the Print button on the toolbar,
or selecting Print from the File menu. Groups of many reports may be printed together
through the File / Print a group of reports menu.
Gradesoft A* Reports
23
User Manual
Editing records using forms
Records can be selected from either the Navigation area, or the browser. When any record
is selected its properties may be modified by selecting the Edit option of its context menu.
For instance, in the image below the current academic year (2008-9) has been selected
and the Academic Year menu opened:
Selecting “Edit” from this menu will load an appropriate dialog box – relevant to the type of
the object selected, in this case:
This form, just as all the other similar
forms in the system, is based on a
“worksheet” template that may be
modified in the template designer so that
it can meet the local requirements of any
given school. Data items may be
removed or added and new data items
can be created.
Note the “Current term” field on the
Academic Year template, which sets the
current term for reports in the system.
Gradesoft A* Reports
24
User Manual
Starting a new academic year
A student’s Gradesoft record is made up of a number of registration records – one for each
of a sequence of academic years.
A large proportion of the Gradesoft system is specific to a single academic year. Each year
a new academic year record will have to be created along with it’s components – most
notably the yeargroups and teaching groups. There are several ways to do this:
1. Manually through the system – use the various commands available through the
menus to create each of the records required.
2. Through a configuration file – create a new version of the “SchoolSpec.cfg” file,
possibly by copying an existing one. This describes the arrangement of yeargroups
and teaching groups to be used in the new year. Install this configuration into the
system through the Import school configuration menu option. The structure and
format of a school configuration file is described in the relevant section below.
3. From another school information system, by importing a data transfer file (such as
an Excel spreadsheet) containing student data, including their yeargroups and
teaching groups. It is possible to configure the system so that yeargroup and
teaching group records will automatically be created as they are encountered
through such a process. This is further described under “Importing and exporting
records” below.
Create a new academic year record
To create a new academic year record manually within the
system, select New academic year from the File / New menu or
from the “New” button on the toolbar.
The following dialog box will be displayed:
Enter the details of the new academic year into
the various fields of the box.
A list of terms will appear under the “Current
term” – but it is possible to type any text into this
field in order to create a new term.
The list of yeargroups supports the creation of
new yeargroups, by simply typing a yeargroup
name into the next available box. Press “Enter”
once this is done, and a new box will be opened
ready for another new yeargroup to be created.
This is a simple way to quickly create a number
of yeargroups as a single operation.
The new academic year may immediately be set
as current, but often, if the new year is being
created before it has begun, this step will be
saved until later.
Gradesoft A* Reports
25
User Manual
Strategies for naming teaching groups
The way in which teaching groups are arranged and pupils are assigned to them varies
between primary and secondary schools – and even within schools serving the same age
groups. Ideally this arrangement of teaching groups will be reflected in the Gradesoft
system. However different strategies can be adopted to make it easier for teachers to see
and report on their own subjects.
Normally pupils are members of a registration group – which some schools refer to as their
“form”. They may receive more or less teaching within this group – typically more teaching
in primary schools, and less in secondary schools. They may also be taught in separately
named groups for specific subjects, such as maths sets, language options and so on.
Gradesoft supports both the scenario where many subjects are taught to one teaching
group by one or more different teachers, and the scenario where each subject is taught to
a separate teaching group. However it is our experience that whilst the former situation
may reflect the school view of the structure of teaching groups, some aspects of reporting
become more difficult. The most significant of these is if a teacher wants to take a set of
reports out to work on at home, then the class that the reports come from must be “locked”
in the school system so that concurrent changes cannot take place. If several other
teachers are also teaching the same class then this can cause conflicts.
A third approach that may be used within the Gradesoft system, is to break down a class
in which many subjects are taught into several subject specific groups, each taught by a
single teacher. The teaching group is named after the original form it is derived from, and
also the subject taught. This means that students appear to belong to more teaching
groups than may be expected, but it does have the advantage that the subjects they are
taught is immediately obvious from the list of teaching groups they are members of.
Putting pupils into classes
There are three manual ways (and several automatic ways) to put a pupil into a class:
1. Right click on the class name and select
either Add new pupil or Add exiting pupil
from the context menu.
2. Right click on the class name and select
Edit, and then use the right hand side of the
Edit Teaching group dialog box to either
create new pupils or add existing one.
3. Select the pupil to add to the group,
click on the year registration record in
the pupil screen (that shows the name
of the academic year) and then add
the required teaching group to the list
at the bottom.
Gradesoft A* Reports
26
User Manual
Starting a new term
An academic year may be divided into many terms. Each term a new set of reports can be
created on every pupil. (In fact it is possible to configure the system so that extra reports
can be created on individual pupils between terms as well).
In order to create a new term in an academic year, edit the year record (find the Academic
year in question in the school navigation tab and then right click on it and select the Edit
menu option).
The same “Academic year” dialog box should be presented as is shown in “Creating a new
academic year” above. In the middle of this box is a field that allows the selection of the
Current term. In order to create a new term, type a new name into this field – one that
doesn’t yet exist in the list. Click on the OK button, and that term will be created and will
become the current term for that academic year – which will be the current term for the
school if this is the current academic year.
Importing and exporting records
The Gradesoft system supports the process of importing and exporting records to and
from other systems and formats. The recommended format to use is the Microsoft Excel
spreadsheet format – although to work with this format Microsoft Excel must be installed
on the computer in use.
Exporting Records
The Export dialog box available from the File menu supports the export of Gradesoft
records into the following formats:
•
Microsoft Word
•
Microsoft Excel
•
The export of pupil reports as PDF files
•
The export of pupils records including their current reports as PDF files onto a web
site running the Gradesoft PRIDE (Pupil reports Internet delivery environment) web
portal.
In the case of the first two of these options, fields may be selected from a large set of
available pupil and report fields.
Gradesoft A* Reports
27
User Manual
Importing records
Records may be imported from
•
•
Excel spreadsheets
Gradesoft configuration files
The first of these is recommended for transferring records from other systems, which are
often able to export data in this format.
Gradesoft only supports the import of data from the first sheet of a spreadsheet containing
many worksheets. The cell in the first row of each column in the datasheet to be imported
must contain the field name for the rest of the data in that column.
In order for data from an external system to be imported, the fields in the import file must
be mapped onto the corresponding fields in the Gradesoft system. There are 2 ways to do
this:
1. Ensure that the fieldnames in the file match those used in the Gradesoft system.
Each field should begin with either “Pupil.” or “Staff.” to indicate whether this file
refers to pupil or staff records (it is not possible to combine these in a single file).
The list of available fields is included in Appendix B at the end of this document –
though the process does support the import of data into “User defined fields” that
can be created in the template editor.
2. Create a “System Interface” to manage the data import programmatically. This is a
more complex step and should first be discussed with Gradesoft. Either call us or
email [email protected].
To import either Pupil or Staff data from an Excel spreadsheet, select Import pupils and
staff from the Tools / Import data menu. A “File open dialog box” is presented which
enables the identification of the file to be imported. You will note that there is also an
option to import pupil photographs through this menu. The system is able to import images
stored in most of the common formats. In order to identify the pupil that the photograph
belongs to, the image file must be labelled either with their name, or, more preferably, with
their unique pupil code that is stored in the PupilCode field of the pupils Gradesoft record.
Gradesoft A* Reports
28
User Manual
Cheetahs
Cheetahs are context sensitive stock phrases that make the process of writing reports
quicker and easier, whilst retaining the ability to create individualised reports for each
pupil. If Cheetahs are enabled then each time something new is typed into either a Word
processor field, or a simple text field, a list of Cheetahs is assembled that matches the text
that has been typed in. Cheetahs are also “context sensitive” in two other ways:
The text of the Cheetah is examined and modified for the name, sex and yeargroup
of the pupil being reported on.
Cheetahs are selected from specific Cheetah banks that are normally assembled
along subject specific lines, and so the Cheetahs presented should be subject
specific. In fact a Cheetah bank can be made up of many component Cheetah
banks, some of which could be shared between many subjects.
The use of Cheetahs is entirely optional. They are present by default for any new user of
the system, but can easily be turned off through a setting visible in the Options dialog box
found on the Tools menu.
Availability
The Cheetah Manager is only enabled once an installation of A*Reports has been
registered with Gradesoft. Note that registration is free, quick and easy.
A* Reports is delivered with a standard Cheetah database consisting of a large number of
standard Cheetahs. Installed systems that have been registered with Gradesoft have an
additional option visible in their menus to add to and maintain their own Cheetah banks.
Using Cheetahs
Assuming a system is configured to use them; Cheetahs appear automatically as text is
typed into a report. Each time a key is pressed on the keyboard the list of visible Cheetahs
is reviewed and if the new list isn’t empty it is presented just below the position where text
is being entered.
The appearance or disappearance of the Cheetah list shouldn’t interfere with the business
of typing the report, but if it does then hitting the Escape key will banish the list for the
duration of the current sentence.
If a Cheetah appears which matches the requirements of the report being written then it
may be selected using the up and down arrow keys on the keyboard and then pressing
the Enter key, or by double clicking on it using the left mouse button. When selected in
this manner the Cheetah replaces all the text of the current sentence in the report editor.
The text cursor (the caret) is moved to the end of the report ready for a new sentence.
However the inserted sentence can be modified easily at this point if it doesn’t exactly
match what was required.
Some Cheetahs are too long to fully display in the width available to the Cheetah list. If
you need to see the whole text, click once on the Cheetah with the left mouse button. The
Gradesoft A* Reports
29
User Manual
full text should appear as a tool tip. You’ll need to click back on the editor to start typing
again though.
A maximum of 50 Cheetahs are displayed at any one time, so in certain circumstances a
Cheetah that you’re expecting to see may not appear in the list – when too many other
Cheetahs were ranked equally or higher according to the text in the current sentence. The
best way to fetch the Cheetah required is to type a keyword into the current sentence that
is likely to be more specific for it. This will “leap frog” the others which are in the way.
Hint
If you’re searching for a Cheetah you don’t need to type all the words for
that Cheetah from the start, or even in the correct order (though both of
these will tend to rank matching Cheetahs more highly). For instance if you
are writing a report about adding attachments to emails in Outlook Express
then typing the words “Outlook” and “attach” into the report should be
sufficient to select some relevant Cheetahs:
Gradesoft A* Reports
30
User Manual
Adding new Cheetahs
Note
Access to the Cheetah editor and manager are only available once you have
registered your copy of Gradesoft A*Reports. This is a quick and free process,
described above under “Registration”.
There are three ways to add new Cheetahs into the Gradesoft system:
1. Cheetahs can be created while reports are being typed. If a sentence that is being
typed is worth turning into a Cheetah, then hit the Cheetah button on the report
editor toolbar, or use the keyboard shortcut – Ctrl + T.
2. Cheetahs can be created through the Cheetah manager (described below).
3. Cheetahs can be imported into the system through school configuration files. Using
this approach carries the advantage that it maintains an external declaration of the
Cheetahs in use in a system, and the same file can be used in different
installations of the Reports program to save having to type them in again. The
layout and installation process is the same as for other types of school
configuration file. A sample of such a file is included with the system as
SampleCheetahs.cfg. Note that installing a lot of Cheetahs from a configuration file
can be a very time consuming procedure!
Both of the first two of these routes lead to the same Cheetah editor:
If this editor was invoked as part of the report writing process then the Cheetah bank
selected will be the one for the subject being written about. It may be changed. The
Cheetah text will be set to the current sentence. It may need to be modified to replace
words specific to the current pupil, either with general words or an autotext code. A list of
available autotext codes is available below the Cheetah text: double clicking on any item in
this list will paste it into the current position in the text box above.
Clicking on the OK button will insert this Cheetah into the selected Bank. It should be
immediately available to the Report writing process.
Gradesoft A* Reports
31
User Manual
The Cheetah Manager
The Cheetah manager supports the addition and deletion of Cheetahs, and allows
Cheetahs to be modified through the Cheetah Editor.
To launch the Cheetah Manger select “
presents the following dialog box:
Cheetah Manager” from the Tools menu. This
Selecting one of the Cheetah banks from the pick list at the top will load all the Cheetahs
in that bank into the list in the middle, as is evident in the figure above. Once a Cheetah is
selected in the list it may be modified or deleted by clicking on the appropriate buttons.
Clicking on the “New” button will launch the Cheetah editor ready to create a new one.
Gradesoft A* Reports
32
User Manual
The template designer
The template designer is loaded from the Tools menu. Once loaded a new window
appears with a new toolbar and menu. You may move between this and the main
A*Reports window as necessary, for instance to test a template while it is being designed.
The template designer is intended to work along the same lines as the form editor in
Microsoft Visual Basic™, and so if you have used that before then this designer should be
quite familiar. However even if you haven’t used a program like this before, the basic
operation is quite intuitive and it should be possible to build quite sophisticated templates
without too much difficulty.
The template designer window is made up of four main areas
“Control” selector
Designer window
Properties window
Object selector
Selecting “New” from the “File” menu will create a new blank template.
The name of a template appears in the “General” section of the properties window on the
right. Along with the template type (whether this is a worksheet or report template). By
default the type of template is “Report”.
Existing templates may be opened by selecting “Open” from the “File” menu. This
launches the template selection dialog box which allows you to select either report or
worksheet templates.
Once your modifications are finished select “Save” from the “File” menu.
Hint It may be worth exporting an existing version of the template to an external file
through the File/Export menu before you start working on it so that you can revert to
the original if things go wrong!
Gradesoft A* Reports
33
User Manual
Control Selection
A “Control” is an item or element that appears on a form or worksheet and interacts with
the user in some way. A*Reports provides a number of different types of control that may
be used in templates, listed in this part of the window. These include:
Label
A piece of text that appears in the window but may not be
changed by the user. This text may be set by you, or could be
drawn from the school and pupil records (such as the pupils
name) when the template is used
Text field
This is the normal control used to allow users to type new
information into the system.
Picklist
A dropdown list of options for the user to select from. A picklist
can be configured to be strict or flexible to allow different values.
Listbox
An open list of options for the user to select from
Grid
A table with rows and columns that can show many properties of
a set of objects (such as the name and birthdate of pupils in a
teaching group).
Editable list
An open list that the user can add to or remove values from
Rich text field
A text box that allows formatting of fonts – such as the selection
of different type faces and the use of bold, italic and underline.
Button
A button that may be clicked. The attachment of “Event handlers”
to buttons is an advanced topic and beyond the scope of this
manual. Samples exist within the system to copy if required.
Checkbox
A control representing a value which may be true or false
Panel
A container that is used to hold other controls together. By
default the panel does not draw a border around the controls that
it contains. Panels are very useful in managing the layout of
controls, and drawing borders around groups of controls.
Groupbox
A control container that does draw a border around its contents.
One advantage of using containers for a group of related controls
is that once carefully positioned in the container they can be
moved “en bloc” by moving the container.
Picture box
A control that allows you to load an image from a file to appear in
the template.
Tab control
A container with many pages, so that it is possible to put groups
of controls separately onto each page
Date time
picker
A drop down box that reveals a calendar to select dates and
times from
Splitter
Needs to be used in conjunction with panels to create separately
sizable sections of the template
Gradesoft A* Reports
34
User Manual
Some of these controls are more appropriate to worksheets and others do equally well in
report templates. Remember that report templates are used for printing reports as well the same set of controls is used though, as they are not interactive on paper, only their text
is extracted and displayed at the appropriate location.
Designer Window
The designer window contains the template that is being designed. The task is to select objects
from the Control selector and “paint” them onto the template to create the desired layout.
In order to add a control to a form, click on the controls name in the Control selector, and
then click on the form in the designer window at the position that you wish the control to
appear. Holding down the mouse, drag it over the form to mark out the required size for
the control and let go. The new control should appear on the form, marked out by a border
with sizing “handles” at each corner. These can be used to resize the control. They appear
whenever the control is selected with a mouse click.
Properties Window
Controls added to a template in the designer window have a number of different
“properties” such as their size, their location on the page, and the text that they display.
These may be viewed and modified in the properties window. The window divides the
properties into different categories. All of these are available for viewing and editing; most
are standard Windows groups of properties.
In order to modify a particular property, use the mouse to click on the text by the property
name. The method presented for entering a new value will depend on the type of
property. Numeric properties will only allow numbers; some present a drop down list of
options, and others allow text entry or have special dialog boxes (such as colour selection
visible in the image above).
Gradesoft A* Reports
35
User Manual
Attaching controls to database objects
A key task when designing templates is to be able to attach the controls used in the
template to database records to display and possibly allow modification of the fields in
those records.
For instance a requirement for a label may be that it displays the actual name of the pupil
in context, rather than some constant text such as “Pupils name”. Each time the template
is used it needs to get that particular property (Name) from the object in context (Pupil) to
know what to display.
The method used by Gradesoft to uniquely identify particular fields and database records
is the ValueReference. A ValueReference specifies an Entity (a type of record), a
Fieldname and an Instance. (The Instance property only applies to ValueReferences
referring to Journal Object Specification (Jobs™) records. These will be described in more
depth below.)
The designer provides a dropdown list of available record types and fieldnames as a
prompt, but this list is not exhaustive or exclusive, and it is possible to set the property with
a value that does not appear in the list.
Within the template designer, there are two stages involved in attaching the controls in a
template to the database:
1. Set a ValueReference for the template. The
dropdown list available for the template as a
whole lists all the major types of record in the
system. It is not necessary to set the FieldName
of the ValueReference for the template as a
whole.
2. In turn select each control that you wish to attach
to database records and identify the name of the
“Field” (property) that it should refer to in the
ValueReference of that control. The dropdown
list associated with this property will show a list
of suitable fields that apply to the Record / entity
chosen for the template as a whole. Once again,
this is not exclusive and if the field that you
require is not in the list, then it is possible to type
in something else.
These stages are discussed in a little more detail below.
Generally if the type of control matches the type of field
selected for it then should be able to present and edit
the data automatically.
Gradesoft A* Reports
36
User Manual
1. Set the template’s ValueReference to select a “context” for it
A context refers to a group of objects that are “current” at any point during the operation of
the Gradesoft system. The ValueReference property of the template identifies one of these
objects as being the main one that will be used, and the default for all controls on the
template. It is however possible for individual controls to refer to different objects within the
context.
The main record type that will be used when writing reports is the ReportPage. This
therefore forms the default Entity for all new templates. (Note that worksheet templates
tend to use different types of record). In order to set a new ValueReference for a given
template, click on the template at a point where there are no controls, or select the
template from the drop down list of objects at the top of the Properties window (identified
by it’s name). This will select the template background itself and allow you to edit its own
properties in the properties editor.
Click on the ValueReference property in the “Data” section of the properties window. A
dropdown arrow indicating the availability of a list of context options should appear on the
right. Click on this and select the required record type. The chosen record type
determines the fields that will be available to link the templates controls to. It is possible to
override this for any one control by setting a local record type for that control. (Note that
this isn’t supported by a picking list so the context name must be typed in).
2. Select fields from that context for each control.
When a control in the template is selected in the designer window, the properties of that
control are visible in the properties window. One of these is the ValueReference and a
component of this is the Fieldname.
Gradesoft A* Reports
37
User Manual
The ValueReference property presents a drop down list of field names that are available
from the type of record (entity) chosen for the template as a whole. Any user defined fields
created for the record type should appear here too.
Note that as well as the FieldName property the control has a ControlName property. A
default value is provided for the ControlName, but it may not reflect the purpose of the
control, and so it is advisable to change this to something more useful. This is particularly
important if you are going to refer to the control from within expressions in the template –
such as the OnStartup and OnSaved expressions visible in the image at the start of this
section. The ControlName must be just one word.
Borders
The consideration of borders applies to 3 different types of body on a report page:
The page
A single control
A group of controls
The setting of borders in the report editor is managed slightly differently from the PDF
published output.
Page borders only apply to the PDF output and are set through the PageBorderWidth
property of the template (in the Page category).
For all controls on the page – the BorderStyle property of the control governs how it
appears within the Report editor. The BoxStyle property governs how it appears in the
PDF document (and on paper).
Borders around groups of controls are best created by enclosing the group in a container
such as a GroupBox control or a Panel. These also have the advantage of making the
layout of the template easier to control. It is easiest to add the containing control first and
then add each of the component controls into it – although it is possible to move controls
into a container if it is added later. It is possible to draw a container around a set of
controls and the controls are automatically moved into it.
Remember that panels and group boxes can be given “BoxStyle” properties, which will
result in a border around the
Gradesoft A* Reports
38
User Manual
Layout
Most properties of the templates are quite straight forward. Use the sample templates as a
method of exploring how things can be done. However layout is a reasonably complicated
affair. Layout describes how the controls on the page are arranged, and how they are
repositioned when the size of their container (the form or page) changes. Normally report
templates are designed for a specific size of paper, but the size of the report editor window
may be different to this, and may change if the programs window is resized.
Note there are several properties of a template that only apply when a report is
published (printed). These include the page size, page border, orientation, margins, and
the box style (borders as they appear on paper) of any items on it. When the page size
is changed then the form size in the template designer is changed to match the new
size. It may however vary on the screen in live use, depending on the size and
resolution of the users monitor and the window state of the Gradesoft window.
There are four approaches to managing the layout of controls:
Stick with a fixed layout
Use docking and anchoring
Use a layout expression
Use a combination of these.
The on-screen vs printed layout
The objective of the Gradesoft templates is that the appearance of the template in the
editor – when new reports are being written, should be the same or similar to the
appearance of the template in the final printed document. (There is no compulsion for this
to be the case and sometimes it is not desired – but normally it is). It is nearly always
possible to design templates so that this can be achieved, but sometimes it requires a little
trial and error to achieve the correct result.
The mechanism that Gradesoft uses to translate the items in the editor dialog into a
document ready to be printed is to create a table in the document, arrange the size of the
rows and columns, and then place the component items into the appropriate cells in that
table so that they appear in the correct place on the paper. A significant feature of this is
that when a Panel item or Groupbox is encountered, then a new table is created in the
cell in which the panel appears, to hold the items inside the panel or group box. A set of
nested tables is therefore the result. The borders of the tables do not appear in the final
output – unless the relevant debugging switch in the tools / options dialog box is set to
cause them to do so.
The process of getting the layout to appear correctly on paper (in the preview screen)
often consists of using several panels – sometimes one inside the other (inside another).
Where it proves difficult to get particular components to appear in just the right place, this
is often a useful technique to employ. It is also often worth introducing empty “spacer”
labels to secure space down the page between rows of components that need to be
separated. Use the normal Label control, and locate it in the area of the page that needs to
be empty. Delete any text in the label, and set its borderstyle and box style to none.
Gradesoft A* Reports
39
User Manual
Fixed layouts
A fixed layout is straight forward to use. Select a page size and orientation and then paint
the controls on the template where you want them to be. When the template is used the
controls should appear at those locations.
The downside of this approach is that in real life screen sizes and page sizes change, and
it’s quite difficult to set the size and position of controls so that they appear just right, all of
the time. Often some part of the template may be hidden, or there may be a lot of empty
space.
Docking and anchoring controls
The most straight forward approach to dynamically
moving and resizing controls is to set their Dock and
Anchor properties.
These two properties appear in the Layout section of
the properties window. Clicking on either will reveal a
little editing dialog appropriate to the property being
modified.
Docking and anchoring work best when used with the
grouping controls such as the Panel and the group
box. The panels are positioned relative to one another,
and the contents of each panel is positioned relative to
the other controls in that panel. This is the approach
that has been used in the standard templates supplied
with the system.
The Dock property either connects a control to one of the sides of the template, or causes
the control to fill the entire space available (ie the space not occupied by other docked
controls. Note that when a control is docked it may expand either horizontally or vertically
to match the available length of the side it has been docked against.
Anchoring fixes the position of a control in a box (either the template or a panel in it),
relative to either a side or a corner of it. Since resizing templates occurs from the bottom
right, controls anchored to the top or left will remain still as the template is resized, but
controls anchored to the bottom or right will move.
Layout expressions
Fine tuning of the layout of a template is achieved through its LayoutExpression. This is
a way of passing the instructions on how to resize and reposition the controls so that they
appear correctly. A layout expression may be particularly valuable when the layout on the
printed page needs to be different to the form layout on the screen (see the “Display
context” below).
Layout expressions are little bits of program written in the C# programming language. It is
beyond the scope of this document to describe how to program in C#, but it is not
necessary to fully understand all of C# in order to develop these expressions, and so it is
worth stepping though one layout expression as an example.
Gradesoft A* Reports
40
User Manual
The layout expression chosen for this example is the one used in the simple report
template provided with the installation of A*Reports personal. To load this expression click
button
on the words “String[] Array” in the LayoutExpression property and then on the
that appears beside. The “String collection” editor is launched. You can type into this just
as in notepad.
The contents of the expression should appear:
int padding = T["ReportEditor"].Left ;
// System.Windows.Forms.MessageBox.Show (padding.ToString()) ;
T["ReportEditor"].Width = width - (2 * padding) ;
T["lblWrittenByLbl"].Top = height - T["lblWrittenByLbl"].Height - padding ;
T["lblWrittenBy"].Top = T["lblWrittenByLbl"].Top ;
T["lblDateWritten"].Top = T["lblWrittenByLbl"].Top ;
T["lblDateWritten"].Left =
width - T["lblWrittenByLbl"].Width ;
T["ReportEditor"].Height = T["lblWrittenByLbl"].Top - T["ReportEditor"].Top - padding ;
T["GDSIcon"].Left = width -
T["GDSIcon"].Width - padding ;
The purpose of the expression is to set the size and position of any controls in the
template that would be affected by a change in the size of the page they were appearing
on. This will not necessarily be all of them. Generally controls near the top or left hand
sides don’t move very much.
General comments about the expression:
Note that every line ends with a semi colon ;
Lines that begin // are comments and are not used.
The commented line here is just hiding a call the the windows messagebox
function. If the comments are removed then when this template is used a message
box will pop up to display the value of the padding. This technique can be useful
when trying to find problems with an expression (debugging).
The syntax T[“controlname”] is the way provided to access and manipulate the
controls in the template. In order to use this syntax you should first carefully set the
ControlName properties of the controls in your template.
Two special values are available when writing layout expressions named “height”
and “width”, which represent the width and height of the surface (paper or
worksheet) that the controls are appearing on.
Taking each line in turn:
int padding = T["ReportEditor"].Left ;
This stores the position of the left border of the control named ReportEditor and
gives it the name padding. This is being used to give a general idea of suitable
spacing between controls. It could alternatively be given a fixed value.
// System.Windows.Forms.MessageBox.Show (padding.ToString()) ;
The call to display the value of padding – commented out in order to stop it
displaying now we have finished the expression.
T["ReportEditor"].Width = width - (2 * padding) ;
Gradesoft A* Reports
41
User Manual
The width of the report editor is set to the total width of the page, but reduced
enough to allow a margin of padding on either side of it.
T["lblWrittenByLbl"].Top = height - T["lblWrittenByLbl"].Height - padding ;
The top of the label with the text “Written by” is set to put it at the bottom of the
page, allowing for the height of the label and some padding.
T["lblWrittenBy"].Top = T["lblWrittenByLbl"].Top ;
T["lblDateWritten"].Top = T["lblWrittenByLbl"].Top ;
These two other labels need to be at the same level at the bottom of the page.
T["lblDateWritten"].Left =
width - T["lblWrittenByLbl"].Width ;
The label containing the date the report was written is moved over to appear on the
right hand side of the page by setting it’s left position to be the width of the page
minus it’s own width.
T["ReportEditor"].Height = T["lblWrittenByLbl"].Top - T["ReportEditor"].Top - padding ;
The height of the ReportEditor control is set to fill the page, but leaving a little room
at the bottom for the height of the “WrittenBy” labels, and some padding.
T["GDSIcon"].Left = width -
T["GDSIcon"].Width - padding ;
The icon control which is showing the school crest is moved over to the right hand
side.
Display context
In order to determine whether a template is being used as a form, or to construct a printed
report, when expressions are called they are provided with a DisplayContext. There are
two contexts:
•
DisplayContext.Document
•
DisplayContext.Form
The controls of the template can be laid out differently according to the context using the
“if” statement like this (remember that all text in c# is case sensitive):
if (displayContext == DisplayContext.Document)
{
T["TargetPanel"].Height = 110 ;
}
else
{
T["TargetPanel"].Height = T["ReportPanel"].Height / 3 ;
}
The == operator in the first line means “is equal to”. This statement is saying “if the
displayContext for this template is a document (printout) then set the height of the target
panel to 110, otherwise make it a third the height of the report panel”.
Gradesoft A* Reports
42
User Manual
Extending the Pupil Record
Journal Object Specifications
Gradesoft A* Reports
43
User Manual
Maintenance
Once the Gradesoft A* Reports system is being used, there are several maintenance tasks
that are crucial to ensuring that it remains robust and secure.
Security
The reports that Gradesoft A*Reports handles are confidential documents applying to
individual pupils that should not be made available to unauthorised people. It is therefore
important to ensure that the user accounts in the system are covered by adequate
passwords and that those passwords are kept secret. This applies to all passwords, but
especially the system administrators password (the account set up when the system was
first installed), since that provides access to the widest number of functions.
Backup
The process of “backup” means copying your data to another location. It’s important for all
your work, and certainly to all the data in the Gradesoft database.
Within A*Reports it applies at two levels:
1. It is possible to export items from the database as new files in the file system. This
is most useful to do from the template designer. If you don’t and to accidentally
select “Install” from the Tools menu then you may lose all of the changes that you
have made to the standard templates. If you export your changes regularly then
you have the option to re-import your changes back into the database.
2. Make a copy of the whole database. The A*Reports personal database is known as
gdsreports.db and held in the Gradesoft folder in “My Documents”. If you have a
regular method of backing up all of your documents then this should be included
too.
Gradesoft recommend creating a backup copy of the gradesoft database on a daily
basis.
You should not be logged in to the system when backing up.
Gradesoft A* Reports
44
User Manual
Appendix A
The structure and syntax of school configuration files
Note It is possible to modify the system specification in two places – either by
modifying these specification documents, or, within the program itself, through the
various forms that edit the objects in the database. If you modify the installed
versions and then reinstall the system from the external files you will
overwrite your changes.
School configuration files provide a means of describing the configuration of your school in
a text file and importing it into the A*Reports system as a single process. Some people
may find this quicker and easier than adding the subject types, yeargroups and teaching
group etc individually. It also means that in subsequent academic years the previous years
configuration file can be simply “tweaked” to provide the new years configuration.
The easiest way to get started is to use the example school configuration file enclosed with
the A*Reports installation. This is stored in the folder
My Documents\Gradesoft\Specification and named SchoolSpec.cfg. It may be worth
making a copy of this file as a backup before changing it in case you make a mistake.
Warning Importing school configuration files that contain errors can create errors in
your Gradesoft database that are very difficult to fix. It is recommended that you always
back up the database before attempting to import one of these files.
Since the files are simple text files they may be written either using Notepad or a similar
text editor. The files do not support any special characters or type formatting.
The files are arranged as a series of blocks of objects. Each block begins with the name of
the type of object and ends with the word “End” followed by the type name again. Between
these two lines all the items of that type are listed. Any line in the file that begins with an
Apostraphe is treated as a comment and not processed.
For instance, the following block of text defines a list of Staff members. It begins with the
keyword Staff, because these will all form staff records within the database, and then lists
3 members of staff – James Hardy, Gladys Wood and Phylis Rheinholt, before closing with
the command End Staff:
Staff
Hardy, James
Role: Admin
Description: "Headmaster"
EmailAddress: "[email protected]"
Woods, Gladys
Rheinholt, Phylis
End Staff
Gradesoft A* Reports
45
User Manual
Note that in the case of James Hardy more information has been entered as well. If the
first word on a line ends with a colon, then that line is determined as containing a property
of the preceding item. In the case of James Hardy, his role, description and email address
have been entered in this way.
This technique is also used to link a number of related objects that will be described in
more detail later on in the file, to the current one. An example from the sample file
provided is the linkage between AcademicYears and Terms (and also Yeargroups). All the
linked objects appear on a single line and are separated by semicolons. Note that the
name of the property remains in the singular (Term or Yeargroup) even though many items
are linked in each case.
AcademicYear
2007-8
Start: "1/9/2007"
End:
"31/7/2008"
Term:
Spring; Summer; Autumn
' The final term in the list will be set as the current term
Yeargroup: Year 1; Year 2; Year 3; Year 4; Year 5; Year 6; Year 7
End AcademicYear
Term
Autumn
Start: "1/9/2007"
End:
"31/12/2007"
Spring
Start: "1/1/2008"
End:
"31/3/2008"
Summer
Start: "1/5/2008"
End:
"31/7/2008"
End Term
In order for linkages like this to work it is vital that all objects in this file are uniquely
named. If two instances of the same type of object have the same name then they will be
treated as a single instance. This may be especially problematic when naming staff, when
it is quite common to have two teachers with the same name. For the purposes of the
system they must somehow be named differently.
Gradesoft A* Reports
46
User Manual
There are a wide variety of types of object that are supported in this way, the commonest
of which are:
School
Generally only one school is listed, but this also provides a means
of declaring the school name and address, and the name of the
headteacher.
Staff
As described above
Pupil
Pupils listed in this section are added to the full register of pupils,
but are not at this point enrolled for any year or classes. Since
several pupils may have the same name it is best to use a unique
pupil code or number as the main ID. When importing the file
Gradesoft assumes that if there is any numeric digits in the name
it is a code, otherwise it is the pupils name (Lastname, Firstname
– as with staff).
SubjectType
Subject types are the term used to describe an area of study. The
term subject is used to describe the teaching of a subject type in
a given class by a given member of staff.
AcademicYear
The parameters of a new school year can be entered in this way
as is sensible if this is to be used to configure each subsequent
academic year. It is recommended that only a single academic
year is listed in each configuration file.
Term
Terms can be added to academic years as the year proceeds, but
optionally can be listed here, “ready” for when they are needed
later on.
Yeargroup
May include links to teaching groups
TeachingGroup May include links to SubjectTypes and Staff.
Gradesoft A* Reports
47
User Manual
Appendix B
The Basic School Configuration File
'School specification file
'==========================
' In this file, instances of an object are listed within a section;
' properties of the object have the property name followed by a colon, then the
property value.
' Objects may have many instaces of each property, separated by semi colons.
'
'
'
'
The
The
The
and
basic school contact information can be declared here.
address fields are separated by commas.
head teacher is declared as one of the teachers named below
written in an identical way.
' Note that this file does not contain pupils, but it is possible to declare
pupil lists
' in a file following the format of this file and import them into the Gradesoft
A* Reports database
JournalEntryType
Award
Achievement
Comment
Discipline
End JournalEntryType
SubjectType
Art
ReportType: Art
PageOrderRank: "50"
Design and Technology
ReportType: DAndT
PageOrderRank: "50"
Drama
ReportType: Drama
PageOrderRank: "50"
English
ReportType: English
PageOrderRank: "50"
French
ReportType: French
PageOrderRank: "50"
Form Teacher Report
ReportType: Form Teacher
PageOrderRank: "10"
Games
ReportType: Games
PageOrderRank: "50"
Geography
ReportType: Geography
PageOrderRank: "50"
German
ReportType: German
PageOrderRank: "50"
Headmaster
ReportType: Headmaster
PageOrderRank: "100"
History
ReportType: History
PageOrderRank: "50"
ICT
ReportType: ICT
Gradesoft A* Reports
48
User Manual
PageOrderRank: "50"
Maths
ReportType: Maths
PageOrderRank: "50"
Music
ReportType: Music
PageOrderRank: "50"
Physical education
ReportType: PE
PageOrderRank: "50"
PE
ReportType: PE
PageOrderRank: "50"
PHSE
ReportType: PHSE
PageOrderRank: "50"
Religious education
ReportType: RE
PageOrderRank: "50"
Science
ReportType: Science
PageOrderRank: "50"
Spanish
ReportType: Spanish
PageOrderRank: "50"
Tutor
ReportType: Tutor
PageOrderRank: "10"
End SubjectType
' Staff roles are first defined in the System configuration file
StaffRole
Administrator
Teacher
Checker
End StaffRole
' Within this file the yeargroup names must be unique for each academic year.
' It is recommended that this file only defines a single academic year, so that
' all the year and teaching groups are naturally associated with it.
' Note that it is permissible for the same yeargroup name to already exist in the
system,
' associated with a preceding academic year - the ones defined here will be new
ones.
AcademicYear
2008-9
Start: "1/9/2007"
End:
"31/7/2008"
Term:
Spring 2009; Summer 2009; Autumn 2008
' The final term in the list will be set as the current term
Yeargroup: Year 1; Year 2; Year 3; Year 4; Year 5; Year 6; Year 7; Year
8; Year 9; Year 10; Year 11; Year 12; Year 13
End AcademicYear
Term
Autumn 2008
Start: "1/9/2008"
End:
"31/12/2008"
Spring 2009
Start: "1/1/2009"
End:
"31/3/2009"
Summer 2009
Start: "1/5/2009"
End:
"31/7/2009"
End Term
Gradesoft A* Reports
49
User Manual
Appendix C Objects and fields
The tables used in the database are reflected by objects that are used in the system
(although the object type is given a preceeding 'C' – so the Pupil table, appears as the
CPupil object within the Gradesoft system.)
The tables nearly all follow a standard format: they have an ID field, which provides a
number that uniquely identifies each record in the table, and often a name field – which
provides a text identification for each record, and is often unique too.
The fields in the tables appear as properties of the objects. Many objects have additional
properties as well. Sometimes these give you access to another, related object, whose ID
appears as a field in the table. These additional properties appear in italics.
For instance, the Yeargroup table has an AcademicYearID field, and also an
AcademicYear property. This latter property provides access to the object that represents
the AcademicYear record with the given AcademicYearID.
The purpose of listing these tables here is as a guide to the fields that may be refereneced
in the ValueReference property of a control in the template designer, and also from within
Expressions in the templates.
Remember that the selection of objects available to a template on any occasion depends
on the context in which that template is used, and so only a selection of the objects
described below will be available.
AppVar
Application variables – a scratchpad for storing odd values
AppVarID
AppVarName
AppVarValue
Command
The list of commands and permissions available
CommandID
Flags
ImageID
Permission
Caption
Shortcut
CommandName
Description
Gradesoft A* Reports
50
User Manual
StaffRole
A role that may be given permissions to perform commands
StaffRoleID
StaffRoleName
Description
School
The school record
SchoolID
SchoolType
Status
SchoolName
Address1
Address2
Address3
Address4
Postcode
Telephone
HeadID
AcademicYearID
Head
AcademicYear
ReportCountPerPageSchoolCode
Staff
A member of staff
StaffID
SchoolID
StaffType
Status
Title
FirstName
MiddleName
LastName
StaffCode
ReportName
Gradesoft A* Reports
51
User Manual
Description
UserID
Pword
EmailAddress
StaffRole
Name
Password
Roles
TeachingGroups
StaffOptions
Values from the Tools / Options dialog box
StaffOptionsID
StaffID
FontName
FontSize
ShowGridlinesInPDF
ShowCheetahs
CustomConfig
ReportCountPerPage
AlwaysUsePageBreaks
AcademicYear
Provides a collection of terms and yeargroups
AcademicYearID
SchoolID
AcademicYearName
StartDate
EndDate
CurrentTermID
Start
End
Term
CurrentTerm
Yeargroups
IsCurrent
Gradesoft A* Reports
52
User Manual
Yeargroup
Provides a collection of teaching groups
YeargroupID
AcademicYearID
YeargroupName
ReportDefinitionID
AcademicYear
TeachingGroups
ReportDefinition
SubjectType
A type of subject – such as Maths and Geography
SubjectTypeID
SubjectTypeName
ReportTypeID
PageOrderRank
ReportType
Term
The basic period that a school report is linked to
TermID
AcademicYearID
TermName
StartDate
EndDate
AcademicYear
YeargroupsDueReports
Pupil
PupilID
SchoolID
PupilType
Status
Gradesoft A* Reports
53
User Manual
PupilCode
FirstName
SecondName
LastName
PreferredName
Address1
Address2
Address3
Address4
Postcode
Telephone
Guardians
GuardiansContact
Birthdate
Sex
AcademicHouse
BoardingHouse
Category1
Category2
Name
Age
RegisteredYears
TeachingGroup
A class, registration form or set
TeachingGroupID
YeargroupID
TGType
Status
CheckedOutBy
TGName
ReportDefinitionID
Subjects
Staff
Pupils
Gradesoft A* Reports
54
User Manual
Yeargroup
AcademicYear
TeachingGroupType
Subject
Records that a subject type is taught in a teaching group
SubjectID
TeachingGroupID
SubjectTypeID
StaffID
Status
Description
ReportTypeID
CheetahBankName
SubjectType
ReportType
Teacher
CheetahBank
YearRegistration
Records that a pupil was enrolled in an academic year
YearRegistrationID
Status
PupilID
YeargroupID
TGFormID
AcademicYear
Yeargroup
TeachingGroups
CurrentReport
Report
A collection of report pages for a pupils school report
Gradesoft A* Reports
55
User Manual
ReportID
YearRegistrationID
ReportName
TermID
Status
CreatedBy
DateCreated
CheckedBy
DateChecked
PublishedBy
DatePublished
Comments
PublishedReport
DateUpdated
ReportPage
One subject page of a pupils school report
ReportPageID
ReportID
SubjectID
PageType
Status
WrittenBy
DateWritten
CheckedBy
DateChecked
EffortPercent
EffortGrade
AttainmentPercent
AttainmentGrade
ExamPercent
ExamGrade
MedianPercent
MedianGrade
Report
Comments
DateUpdated
Gradesoft A* Reports
56
User Manual
Author
SubjectType
SubjectName
TeachingGroup
Journal
The container for the notes in a Pupil Record
JournalID
OwnerTable
OwnerID
JournalEntry
One entry in a Pupil Record
JournalEntryID
JournalID
NValue
ConceptID
AuthorID
AuthorInitials
TValue
Event_ID
EntryType
Flags
Gradesoft A* Reports
57
User Manual