1
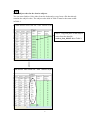
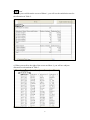
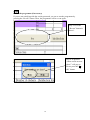
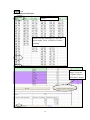
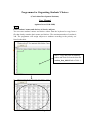
Programme for Organising Students’ Choices
(Curriculum Development Institute)
User Manual
(updated as at 11-04-2008)
Step 1
Enter students’ names and choices of elective subjects
You can enter students’ names and choices either from the keyboard or copy from a
file that already contains their names and choices. The maximum number of student is
244. The programme will assign subjects to students according to the priority set/
listed in the table.
Step 1: Copy and paste all students’
names and choices from the data file
student_data_080411.xls to Table 1.
1
Step 2
Enter subject codes for the elective subjects
You can enter Subject Code either from the keyboard or copy from a file that already
contains the subject codes. The subject codes used in Table 2 must be the same as that
in Table 1.
Step 2: Copy and paste all the subject
codes from the data file
student_data_080411.xls to Table 2.
2
Step 3
Decide number of groups required for each elective subject
By default, number of groups required will be assigned. You may adjust the number
of groups for each elective subject in Table 2 according to school’s resources. The
maximum number of each group is 3.
Step 3: Adjust the number of
group required for Physics in
Table 2 from 2 to 1.
3
Step 4
Decide maximum number of students per group
By default, maximum number of students per group will be 40. You may adjust the
maximum number for each group in Table 2 according to school’s resources.
Step 4: Adjust the
maximum number per
group for Biology in
Table 2 from 40 to 35.
4
Step 5
Decide the number of groups per elective
By default, the number of subjects per elective in Table 3 is 6 (with a maximum of 8
groups). The total number of subjects of the three electives in Table 3 should be equal
to the total number of groups decided to offer in Table 2.
Step 5: Change no. of
subjects in Elective 1 of
Table 3 from 6 to 5.
5
Step 6
Decide the programme run time
By default, the programme run time is 300 second in Table 4. The programme will
stop before or when the programme is run for 300 second.
Step 6: Change the
programme run time
in Table 4 from 300
to 200 second.
6
Step 7
Start running the programme
After enter all the information, then click the “Run” button. The programme will start
running.
Step 7: Press the
“Run” button.
a) View the elective subjects in each elective group in Table 1
A new sheet is generated
showing the elective subjects
in each elective group in
Table 1 of Sheet 1.
7
Step 7 cont’
b) When you scroll down the screen of Sheet 1, you will see the satisfaction rate for
the allocation in Table 2.
c) When you scroll to the right of the screen on Sheet 1, you will see subjects
allocated to each student in Table 3.
8
Step 7 cont’
d) When you continue scroll to the right of the screen on Sheet 1, you will see the
choices of elective subjects allocated to the students in Table 4.
e) When you scroll further to the right of the screen on Sheet 1, you will see the name
of students assigned to each subject in Table 5.
9
Step 8
Re-run the programme (if necessary)
If you are not satisfying with the results generated, you can re-run the programme by
pressing the “Re-run” button. Then, the programme will be re-run again.
Step 8: Press the
“Re-run” button in
sheet 1.
Step 8: A question
“Show results on new
sheet?” will pop up.
Please press the “是
(Y)” button.
10
Step 8 cont’
A new set of results will be generated on Sheet 2.
11
Step 9
Manual assign subjects to students
If you are satisfied with the results generated in Sheet1, you may fine tune the results
in Table 1.
Step 9: On Sheet 1 Table 1, only 2 elective subjects were allocated to student 4B_22
(No subject has been allocated in Elective 2). Please add “1” to the box for choosing
‘Econ’ in Elective 2 for student 4B_22.
12
Step 10
Update subjects allocation
After manual allocate subjects to students in Table 1, you need to update the subjects
allocated to students in Table 3, Table 4 and Table 5 by pressing the “Update Subject
Allocation” button.
Table 3
Table 4
13
Step 10 cont’
Update subjects allocation
Table 5
Please note that student 4B_22 does not
appear under ‘Econ’ of Elective 2 before
updating.
Step 9: Press the
“Update Subjects
Allocation” button.
14
Step 10 cont’
Update subjects allocation
Table 3
In Table 3, ‘Econ” is added to
Elective 2 of the Student 4B_22.
Table 4
In Table 4, since ‘Econ’ is not one of the
six choices of the Student 4B_22,
therefore it will not be shown on this table.
Table 5
Student 4B_22 appears in
Table 5 after updating.
15