1
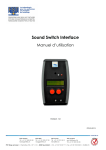
Sound Switch Interface
User manual
Version 1.0
FST/April 2013
Table of Contents
1.
Foreword .................................................................................................. 3
2.
Starting Operations ................................................................................. 4
2.1.
2.2.
3.
Settings ...................................................................................................... 5
3.1.
3.2.
4.
Device power supply .......................................................................................... 4
Battery replacement .......................................................................................... 4
Menu tree ............................................................................................................. 5
Operations ............................................................................................................ 5
Menus........................................................................................................ 6
4.1.
4.2.
Languages ............................................................................................................ 6
Mode ..................................................................................................................... 6
5.
Sensitivity ................................................................................................... 7
6.
Visual calibration ..................................................................................... 8
7.
Outputs ..................................................................................................... 9
8.
Power supply alarm ................................................................................ 9
9.
Standard menu ....................................................................................... 9
10.
Default parameters reset ....................................................................... 9
11.
External switch ....................................................................................... 10
12.
Setting the external microphone level .............................................. 10
13.
Internal settings ...................................................................................... 10
14.
Extension for advanced mode ........................................................... 12
14.1.
14.2.
14.3.
14.4.
Menu tree ........................................................................................................... 12
Bistable mode .................................................................................................... 12
Sensitivity ............................................................................................................. 13
Outputs ................................................................................................................ 14
FONDATION SUISSE POUR LES TELETHESES
Sound Switch Interface (SSI) – User manual – May 2013
page 2/14
Sound Switch Interface FST
User Manual
Item code : PPC/SOUND SWITCH FST
1.
Foreword
Thank you for choosing the FST’s “Sound Switch Interface”!
This device allows a user to activate one or two relay outputs by creating sound.
It includes an internal microphone, but it is also possible to plug in an external
microphone for a greater freedom of positionning. The sensitivity setting allows
for detecting very faint sounds, like a simple whiff, without accounting for
environmental interferences.
Figure 1 - Sound Switch Interface
a. Micro Interne
b. Témoin
appareil
ON
j.
Logement
Pile 9V
k. Témoin Pile
déchargée
c. Interrupteur
ON/OFF
l.
d. Boutons
poussoirs
Ecran LCD
m. Témoin
détection son
n. LED Sorties
actives
e. Prise pour
micro
externe ou
contacteur
f.
Réglage gain
micro
g. Prise alim.
secteur 9-12
VDC
FONDATION SUISSE POUR LES TELETHESES
h. Sortie 1
i. Sortie 2
Jack 3,5mm mono, contact NO par défaut
Sound Switch Interface (SSI) – User manual – May 2013
page 3/14
The Sound Switch Interface works either with a 9V battery or with a 9-12V power
supply adapter.
The device features 2 standard 3.5mm mono jack outputs, each with its own LED
(blue) indicating when they are active. These outputsw are simple contacts (No
default), free potential, max. charge 1A/24VDC or 0.5A/125VAC
To set the different parameters, a 2 line x 16-character LCD screen and two red
push buttons are provided.
The internal microphone is active by default. However it is possible to plug in an
external microphone (not provided, 3.5mm mono jack output), which will
automatically deactivate the internal microphone. A screw (potentiometer)
allows for adjusting the level of the microphones, internal or external.
A switch can also be connected to the external microphone port. The system
automatically detects if a contactor or a microphone is plugged in. No specific
configuration is necessary when the user wants to use a switch.
2.
Starting operations
2.1. Device power supply
To start using the Sound Switch Interface, it only needs to be connected to
a 9-12VDC power supply adapter or a 9V battery. A red LED turns on when
the battery needs to be replaced.
Slide the power switch to the ON position and control that the bicolor LED
turns on
green: power supply adapter / yellow: 9V battery.
CAUTION: It is strongly recommended to supply permanently the
Soundswitch FST on the 230V mains, 9V battery only serves to compensate
for a brief failure of the 230V mains.
The Sound Switch Interface has different modes of operation along with
different sensitivity and delay settings that can all be configured using the
two red push buttons and the LCD screen. It is also possible to perform a
visual calibration of the device in order to ease the sound detection
threshold parameter.
2.2. Battery replacement
A red LED turns on when the 9V battery runs low. An acoustic signal is also
produced at 10 seconds intervals.
FONDATION SUISSE POUR LES TELETHESES
Sound Switch Interface (SSI) – User manual – May 2013
page 4/14
3.
Settings
3.1. Menu tree
Level 1
Level 2
Language
French
German
English
Italian
Mode
Direct
Fixed time
Settings
Default
French
0.0 to 50.0 sec
0.0 to 50.0 sec
Direct
0.0 sec
0.0 sec
Calibration
Manual
With 00 screwdriver
Sound length:
0.0 to 50.0 sec
Detection threshold:
0-15 levels
Upper threshold:
ON-OFF
Delta threshold (up. Threshold = ON): 0-15 levels
Time-out:
0.0 to 50.0 sec
0.5 sec
8
OFF
0.0 sec
Acoustic signal
ON-OFF
OFF
Power
supply
alarm
ON-OFF
OFF
Standard
menu
ON-OFF
ON
Sensitivity
Outputs
Delay before execution:
Activation span:
3.2. Operation
To access the settings menu, press both red push buttons simultaneously for
about 5 seconds. The screen turns on and the « language » menu appears.
To scroll through the different menus, press on either one of the push
buttons (left = up, right = down). To enter a menu or validate a selection,
press both red buttons simultaneously.
Keeping a continuous pressure on a button will increase scrolling speed.
Once settings are performed, the user just needs to wait about 10 seconds
without pressing a button to exit the settings menu (the screen will turn off).
Warning: For this to occur, the device must be set at the level 1
Choice of
4 menus (languages, mode, sensitivity or outputs) or the screen will not turn
off.
Notes:
• Every time the user validates a mode or a parameter value, this choice
will be automatically saved in memory.
• While is settings mode, the outputs are in standby mode.
FONDATION SUISSE POUR LES TELETHESES
Sound Switch Interface (SSI) – User manual – May 2013
page 5/14
4.
Menus
4.1. Languages
This menu allows the user to configure the languages used on the screen.
Basic languages are: French, German, English and Italian.
4.2. Mode
This menu allows the user to set the device’s modes of operation:
Mode
Direct
Fixed time
Operation
Parameter
The output is active once sound is
registered and inactive when no
sound is detected
The output is active during the
detection of a valid sound (see
Sensitivity). It deactivates after a set
time frame.
No parameter for this mode
a) before execution:
defines a certain delay between
detection and the modification of
output state.
b) active lapse:
set time for output activation.
a) Direct Mode
Sound length (see Sensitivity)
Output
Detection threshold
Sound
Time
b) Fixed time Mode
Sound length (see Sensitivity)
Before
execution
Length
active
Before
execution
Length
active
Output
Detection threshold
Sound
Time
For all modes of operation, the output is activated only when the detected
sound is validated. For that, the sound must be above the sensitivity
FONDATION SUISSE POUR LES TELETHESES
Sound Switch Interface (SSI) – User manual – May 2013
page 6/14
threshold during the time frame defined by the sound length parameter
(see Sensitivity). An audible signal indicates that the sound is validated. To
activate the output instantaneously, simply set that parameter to 0 (default
value).
5.
Sensitivity
This menu defines the sensitivity parameters to which the device will react. To
ease this setting, there is a calibration function allowing the user to visualize the
sound level being recorded by the microphone in use. The user can then set the
detection threshold at the right level. The rest of this menu’s parameters are
manually tuned.
By selecting the „manual“ parameter the user has access to each setting
parameter. The values are modified and validated with the buttons. After each
validation the next parameter is accessed. The list of parameters for this
category is as follows:
•
Sound length: defines the time interval during which the sound level must be
maintained in the detection zone before it is validated.
•
Detection threshold: defines the sound level necessary so that the sound is
detected on a 16-level scale (0-15). Ambient noise is indicated during the
calibration.
•
Upper threshold: defines the maximum sound intensity accepted (if
activated).
•
Delta threshold: defines the gap between the two detection thresholds in a
leveled scale. This parameter is visible only when the upper threshold
parameter is activated. If the latter is maintained between the two
thresholds during the time frame defined by the sound length parameter, it
is then registered. This parameter is also adjustable in the visual calibration
(only when he upper threshold is activated).
Sound length
Sound length
Sound length
Delta
threshold
Upper threshold
Detection treshold
Sound
Time
On the above figure, only the 3rd sound was validated because it fulfills all
validation prerequisites. The first sound is too short and the second exceeds the
upper threshold.
•
Time-out: to prevent unwanted repetitions, this parameter defines the timeout (interlocking) between two sounds.
FONDATION SUISSE POUR LES TELETHESES
Sound Switch Interface (SSI) – User manual – May 2013
page 7/14
Sound length
Time-out
Output
Detection threshold
Sound
Time
On the above figure, the second sound is ignored (no output signal)
because it starts in the time-out <<forbidden zone>>. The time-out
countdown starts when the output is deactivated.
6.
Visual calibration
Figure 2 – Visual calibration
Line 1 : Levels
setting
Line 2 :
Calibration
To perform a visual calibration, simply select the calibration mode. The user then
accesses the « visualisation » of the sound level being picked up by the
microphone. The user will see that when a noise is produced, a string of rightfacing arrows will appear proportionally to the intensity of the noise produced.
When there is none, no arrow should appear. The desired sensitivity is adjusted
with the calibration screw.
On the first line of the screen appear one or two arrows representing the upper
(when activated) and lower noise detection thresholds. According to the user’s
needs it is then possible to move these thresholds using the left and right buttons.
Validate the setting by pressing both buttons simultaneously. If the upper
threshold is also activated, the user can then move its corresponding arrow and
validate again using the two buttons. The device then returns to the top menu
(menus
languages) and the thresholds are saved in memory.
FONDATION SUISSE POUR LES TELETHESES
Sound Switch Interface (SSI) – User manual – May 2013
page 8/14
7.
Outputs
This menu allows the user to configure the output’s modes of operation. In
standard mode, both outputs operate in parallel. It is possible to plug in a system
to each output.
A parameter lets the user define the presence of a sound signal (buzzer) when
the outputs are activated ( « sound signal » on/off).
8.
Power supply alarm
This menu allows the user to activate or deactivate the power supply alarm. This
alarm turns on when the power supply is unplugged and the devices runs off the
9V battery. When solely using a 9V battery, this alarm should be deactivated.
The alarm appears as a sound signal and the activation of the orange LED at
approximately 10-second intervals.
9.
Standard menu
This menu allows the user to activate or deactivate the standard menu (ON by
default).
By deactivating the standard menu, the FST Sound Switch Interface can be used
in advanced mode (i.e. output commutation). This mode does require adapted
knowledge. The possibilities offered by this extended mode are described at the
end of this manual.
10. Default parameters reset
If the user is lost, it is easily possible to return to default parameters:
• Completely turn the device off using the main power switch
• Turn it back on again while pressing one of the two red push buttons
• The following message appears on the screen: « Default para? YES NO »
• Choose « YES » to return to default parameters, « NO » if not.
• A confirmation message appears for approximately 4 seconds.
FONDATION SUISSE POUR LES TELETHESES
Sound Switch Interface (SSI) – User manual – May 2013
page 9/14
11. External switch
If a switch is used instead of a microphone, all menus/parameters previously
mentioned a valid, except those dealing with sound level thresholds. The visual
calibration is not needed.
12. Setting the external microphone level
When using an external microphone, the device’s level must be adjusted in order
to optimise its performances. For that, the « detection threshold » parameter must
be set to its minimal value (0). Furthermore, the « upper threshold » must be
deactivated. « Direct » mode must also be chosen (
see parameter
configuration chapter). Wait for the device to exit the settings menu. It is then
possible to plug the external microphone in if not already done.
With a size 00 screwdriver, access the potentiometer’s adjusting screw. If the
outputs are active (blue LEDs ON), turn it clockwise until they turn off. Then,
slightly invert the rotation to reach an instable point when the outputs change
state irregularly ( in this case this is the detection threshold), the level is then set.
Now the « detection threshold » must simply be increased so that the device
reacts to the desired sound level.
13. Internal settings
By opening the device (4 screws on the back panel), the user now has access to
multiple internal settings detailed in this chapter (see figure 3). If the default
parameters must be changed, note that it is at the user’s full responsibility; all
damages resulting from internal modifications is none of FST’s responsibility.
a) External microphone polarization (by default: unpowered): Electret
microphones need a continuous polarizing power supply. Power is provided
by an internal battery on the microphone itself or by an external source to
which the microphone is plugged into. Based on the type of microphone
used, the jumper must be placed in the corresponding slot (microphone with
internal battery
unpowered / microphone with external power source
powered).
Warning: When using a external switch instead of a microphone, place the
jumper on powered!
If no jumper is present, the internal microphone will not be polarized and will
not function correctly!
FONDATION SUISSE POUR LES TELETHESES
Sound Switch Interface (SSI) – User manual – May 2013
page 10/14
b) Type of contact (by default : NO) : the outputs are driven by a relay’s contacts.
Not activated, the output contact can be « NO » (normally open) or « NC »
(normally closed). This choice is configurable with the jumpers corresponding to
each output.
Note: If there’s no jumper, the output stays open independently of the relay’s
state.
c) Output connectors : If the system to be connected does not feature a standard
jack plug, it is still possible to connect two wires directly into the internal
connector corresponding to each output. For that, press the small spring, insert
the wire in the terminal and release. The jack connector’s output can be used
to let the wires out of the device.
Figure 3 - réglages internes
Microphone
polarization
Powered
Unpowered
Type of contact
NO
NC
Output
connectors
FONDATION SUISSE POUR LES TELETHESES
Sound Switch Interface (SSI) – User manual – May 2013
page 11/14
14. Extension for advanced mode
14.1. Hiérarchie des menus
In red: advanced mode parameters
Level 1
Level 2
Settings
Default
French
German
English
Italian
Others (TBD)
Language
Mode
Direct
Fixed time
Bistable
(step by step)
Sensitivity
French
Delay before execution :
Activation span :
Delay before execution
0.0 to 50.0 sec.
0.0 to 50.0 sec.
0.0 to 50.0 sec.
Sound lenght :
0.0 to 50.0 sec.
Detection threshold :
0-15 levels
Upper threshold :
ON-OFF
Delta threshold (up. threshold = ON) :
0-15 levels
Time-out:
0.0 to 50.0 sec.
Number of repetitions :
0 to 9
Repetition gap :
0.0-50.0sec
Calibration
Manual
Only if number of repetitions > 0
Valid area :
Direct
0.0 sec.
0.0 sec.
0.0 sec.
0.5 sec.
8
OFF
0.0 sec.
0
0.0-50.0sec
Only if number of repetitions > 0
Outputs
State
Acoustic signal
Parallels/commuted
ON-OFF
Parallels
OFF
Power supply
alarm
ON-OFF
OFF
Standard
menu
ON-OFF (OFF position to access advanced
mode parameters in red)
ON
14.2.
Bistable mode (step by step) :
Bistable (step by step)
The output is commuted (state inversion)
when a valid sound (see Sensitivity) is
detected
a) Before execution: same
as above
Sound length (see Sensitivity)
Before execution
Before execution
Output
Detection thershold
Sound
Time
Warning: when the outputs are in commuted mode, their functioning is
different ; see « outputs » (14.4).
FONDATION SUISSE POUR LES TELETHESES
Sound Switch Interface (SSI) – User manual – May 2013
page 12/14
14.3. Sensitivity
• Number of repetitions : defines the number of times a sound must be
repeated before it can be validated. This
parameter allows the user to define a sequence
to perform so that uncontrollable sounds (i.e.
snoring) are not taken into account.
• Repetition gap :
defines the time frame between two sound
repetitions, only when the <<number of
repetitions>> is not 0.
• Valid area :
defines the length of the „time frame“ in which
the sound must start and stop for each repetition
to be accepted. This parameter is only
configurable when the number of repetitions is
greater than 0.
Sound Valid
length
area
Repetition gap
Valid
area
Number of repetitions = 1
Output
Detection thershold
Sound
BIP
BIP
BIP
Time
On the above figure, the number of repetitions parameter was set to 1. This
means that the sound must be repeated once to act on the output. The first
sound is detected when its length is superior to the « sound length »
parameter. An audible signal is emitted. The sound must then end within
the valid time frame. In case it extends beyond the time frame, it is not
accepted (error signal
beep-beep) and the entire sequence must be
repeated. However, if it is accepted, the user must wait the length of the
repetition gap parameter before emitting the sequence’s next sound. If,
within that time frame, a sound is detected, then the sequence is
cancelled (error signal
beep-beep) and all must be repeated.
An audible signal indicates that the repetition gap’s time is over and the
next sound can be emitted. From this instant the following sound must start
within the valid time frame and its length must be greater than the « sound
length » parameter otherwise the sequence will be cancelled (error
beep-beep). This series must be executed as many times as there are
repetitions to perform (based on the number of repetitions parameter).
Once the correct number of repetitions has been performed, the detection
of the last sound will act upon the output based on the function of the
configured mode (for example on the above figure is the direct mode).
FONDATION SUISSE POUR LES TELETHESES
Sound Switch Interface (SSI) – User manual – May 2013
page 13/14
14.4. Outputs
• Commuted mode :
this mode allows the user to use both outputs
independently. Only one output is active at a time.
To switch to the other output, a valid sound must be
produced during the time frame set by the « sound
length » parameter configurable when this mode is
chosen. An audible signal (long « beep » followed
by one or two « beep » based on the active output)
indicates that the switch was made (1 beep
output 1 active / 2 beeps
output 2 active).
In commuted outputs mode (only for the modes « bistable » and « fixed
time »), the outputs only react when the sound stops. The length of the
sound must evidently be superior to the sound length parameter from the
sensitivity menu.
If the sound length has reached the sound length parameter of commuted
outputs mode, then the devices switches to the other output, but none of
the outputs are activated !
FST/05.2013/DB-JT-IP
FONDATION SUISSE POUR LES TELETHESES
Sound Switch Interface (SSI) – User manual – May 2013
page 14/14