1
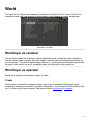
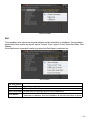
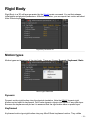
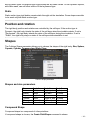
Toy Bricks
A 3D physics simulation plugin
for Adobe After Effects®
User Manual
Copyright ©ß 2013 CROSSPHERE
Contents
Over View
Working process
4
4
Create
Set
Bake
4
4
5
Reference
5
Demo movie
Bullet Physics
Setup
Platform
Install
Uninstall
Setup
Settings
Turn off Disk Cache
Don't use OpenGL Preview
World
World layer as renderer
World layer as operator
Create
Set
Bake
Simulation parameter
5
5
7
7
7
7
7
7
7
7
9
9
9
9
10
11
12
Gravity
12
Rigid Body
13
Motion types
13
Dynamic
Keyframed
Static
13
13
14
Position and rotation
Shapes
Shapes and size parameters
Compound Shape
14
14
14
14
Rigid Body Parameters
15
Mass
Friction/Restitution
Velocity/Spin Damping
15
15
15
Constraint
Constraint Mode
Binded Mode
Free Mode
Constraint Type
Point2Point
16
16
16
16
16
16
-2-
Hinge
Cone Twist
Gen6Dof
Other Parameters
A B Collision
16
17
17
17
17
-3-
Over View
Toy Bricks is a plugin for Adobe After Effects®.
This plugin simulates physical motion and collision of rigid bodies and constraints
in 3D space.
It can export the physical simulation as After Effects keyframes (bake).
Working process
Toy Bricks has three modes: Create, Set, Bake.
Create
Creates rigid bodies or constraints as 3D null layers. You set their initial position, rotation,
and parameters.
Set
Sets the situation as physical situation and setup simulation world. User can check the
simulated motion by scrubbing timeline.
-4-
Bake
Bakes the simulation as position and orientation keyframes to null layers.
Reference
Demo movie
Quick start demo movie can be refered:
http://www.youtube.com/watch?v=VJOoziBmgsw
Bullet Physics
-5-
This plugin uses the Bullet Physics library. The user manual helps to explain and learn how the
plugin and physical simulation work.
-6-
Setup
Platform
Adobe After Effects (Windows, Mac OS X) CS4 or later.
OpenGL version 2.0 or later
(see Edit(Windows)/After Effects(Mac OS) > Preferences > Previews, click "GPU
Information..." button).
Install
Place the plugin in the 'Plugins' folder inside the After Effects folder. Default directory is:
(win CS6)
C:\Program Files\Adobe\Adobe After Effects CS6\Support Files\Plug-ins
(mac CS6)
/Applications/Adobe After Effects CS6/Plug-ins
Uninstall
Remove the plugin from the 'Plug-ins' folder.
Setup
Create a layer that is the same size and pixel aspect ratio as the Composition.
Apply the effect (Effect > CROSSPHERE > Toy Bricks) to the layer.
Settings
Turn off Disk Cache
The disk cache in AE CS6 replays old simulation data. To prevent this, turn off disk cache
(in Edit(win)/After Effects(mac) > Preferences > General > Media & Disk Cache, switch off
"Enable Disk Cache").
Don't use OpenGL Preview
This plugin does not respond to OpenGL Preview. If the platform is CS5.5 or older, turn off
OpenGL preview.
-7-
Don't use OpenGL-Interactive or OpenGL-Always On.
Or, user may get next error.
-8-
World
The layer first Toy Brick effect applied is Simulation World (just "World" below). World is the
simulation scene itself, the renderer of the simulation, and operations create, set and bake.
Parameter UI of World
World layer as renderer
The world layer draws the simulation objects: rigid bodies and constraints in the composition.
For the object to draw correctly, this layer needs to be the same size and pixel aspect ratio as
the composition. The objects that this layer draws are 1. set objects (not simulated objects) with
the layer's video switch on and 2, simulated objects with the layer's effect switch on.
World layer as operator
World has 3 operation commands: create, set, bake.
Create
This operation creates the simulation objects: rigid body or constraint. Running the create
command, a new layer is created in the same composition. The new layer is a 3D null layer with
the Toy Bricks rigid body/constraint. See also the section rigid body or constraint.
-9-
Create command
Set
This operation sets objects as physical objects and the simulation is initialized. The simulation
starts at the time chosen by the set option: Current Time, Layer In Point, Work Area Start, First
Marker.
Note that the set command is valid only when the World layer is switched on.
Set command
Set from option
Current Time Current time in timeline
Layer In Point In Point of the World layer
Work Area Start The start time of the work area of the composition
The first marker of the World layer (not composition)
First Marker
If there are no markers, then the simulation is set from the layer in point.
- 10 -
Simulation starts
Bake
This operation bakes the simulation position and orientation as keyframes. Baked objects are
Dynamic Rigid Body null layers only. Keyframes are baked from the time simulation starts, to
the time the bake option is chosen. Fps of the baked keyframes are chosen from Bake fps
parameter with the following options: 120, 60, 30, 20, 15, 12, 10 and 6fps.
Bake command
Bake to option
Current Time Current time in timeline
Layer Out Point Out Point of the World layer
Work Area End The end time of the work area of the composition
The last marker of the World layer (not composition)
Last Marker
If there are no markers, the bake command is canceled.
- 11 -
Simulation parameter
Gravity
Gravity of the simulation.
- 12 -
Rigid Body
Rigid Body is a 3D null layer generated by the World create command. You set their shapes,
initial states and physical parameters. After the simulation, you can export their motion as baked
After Effects keyframes.
Rigid Body Parameter UI
Motion types
Motion types are behaviors of the rigid body. There are 3 types: Dynamic, Keyframed, Static.
Motion types Parameter
Dynamic
Dynamic motion rigid bodies obey the physical simulation. Note that ONLY dynamic rigid
bodies can be baked to keyframes. Don't make dynamic objects child layers of any other layer.
Because the keyframes are plot as it is assumed that the rigid bodies have no parent layer.
Keyframed
Keyframed motion type rigid bodies obey any After Effects keyframed motion. They collide
- 13 -
with Dynamic types. Keyframed type rigid bodies are set mass infinite. So the dynamic objects,
with finite mass, can not affect motion of the keyframed type.
Static
Static motion type rigid bodies remain static throught out the simulation. Some shapes are able
to be used only with static motion type.
Position and rotation
The rigid body position and rotation are controlled by the null layer. If the motion type is
Dynamic, the rigid body inherits the state of the null layer when the simulation starts. If set to
"Keyframed", the rigid body inherits the state of the null layer during the simulation. If set to
"Static", the rigid body stays on state of the null layer when simulation is set.
Shapes
The Collision Shape parameter allows you to choose the shape of the rigid body: Box, Sphere,
Capsule, Cylinder, Compound and Static Plane.
Collision Shape parameter.
Shapes and size parameters
Shape
Scale 1
Scale 2
Scale 3
Box
width (x size) height (y size) depth (z size)
Sphere
radius
not used
not used
Capsule
length of axis radius
not used
Cylinder
radius
length of axis not used
Compound not used
not used
not used
Static Plane not used
not used
not used
Compound Shape
Compound shape is a compound of other primitives.
If compound shape is chosen, the Create Child Shape command is shown.
- 14 -
Create Child Shape command
This command generates a 3D null layer with the child shape. This child shape is valid as the
child of the compound shape only if this null layer remains a child layer of the 3D null layer with
the compound shape rigid body.
Rigid Body Parameters
You can control the physical property of the rigid body with the Rigid Body Parameters.
Mass
Mass of the rigid body. Valid only for Dynamic motion type. Keyframed and Static types have
infinite mass.
Friction/Restitution
Friction/Restitution of the rigid body. Note that friction/restitution is interactive, so the effect is
propotional to the multiple of the two rigid bodies: If you make friction/restitution effects
between rigid bodies, let BOTH of the rigid bodies have the friction/restitution value not zero.
Velocity/Spin Damping
Damping factors. The higher value brakes the motion more effectively.
- 15 -
Constraint
Constraint is a 3D null layer generated by World.
Set rigid bodies, connection state and constraint parameters.
Constraint Parameter UI
Constraint Mode
There two constraint modes: Binded, Free.
Binded Mode
If both Rigid Body A and Ridig Body B are set to valid rigid bodies, then constraint is mode
"Binded". The Binded mode constraint connects two rigid bodies, and the connection position is
set as position of the 3D null layer when the simulation starts.
Free Mode
If Rigid Body B is not set or invalid and Rigid Body A is set to a valid rigid body, then constraint
is mode "Free". The rigid body A is constrainted by the null layer of the chose constraint type.
You can control the 3D constraint null layer during the simulation.
Constraint Type
Point2Point
Point2Point type constraint keeps the distance between constraint and rigid body. The
connection can rotate freely.
Hinge
Keeps the distance, and limits rotation around the Z axis of the constraint 3D null layer. The
rotation angle (the direction of X axis) is also limited by the parameters.
- 16 -
The limit is valid only if the parameters are in -180 < (Min Z Ang) < (Max Z Ang) < 180.
Otherwise, there is no rotation limit.
Cone Twist
Keeps the distance between the bodies and limits the X direction in a Cone and also limits twist.
Cone is constructed by Max Y Ang and Max Z Ang parameters. Twist is limited by Max X Ang
parameter.
Gen6Dof
Generaly 6 Degrees of freedom
Controls all distance and rotation limits. Each limit is valid if Min is less than Max. If Min is equal
to Max then the control is fixed to that value, and if Min is greater than Max then the control is
not limited.
Other Parameters
A B Collision
- 17 -
Switch an activation the collision between Rigid Body A and Rigid Body B. If you connect
overlapped rigid bodies, switch off this.
- 18 -
Toy Bricks User's Manual
version 1.0
Author: Koizumi
Supports, bug reports and request ... mail to:[email protected]
- 19 -