1
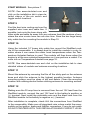
Operations Manual Model SS1000YAM Two-way LCD Remote Start System Table of Contents SAFETY AND CARBON MONOXIDE WARNING .......................................... 1 INTRODUCTION .......................................................................... 3 PACKAGE CONTENTS ................................................................. 5 INSTALLATION ........................................................................... 6 CODE MATCHING BETWEEN REMOTE CONTROLS AND MODULE ...... 12 SAFETY TESTING THE SYSTEM .................................................. 14 PROGRAMMING MODE .............................................................. 14 OPERATION ............................................................................ 19 STORAGE .............................................................................. 21 TROUBLESHOOTING ................................................................. 22 REFERENCE ........................................................................... 23 Copyright 2010 SledStart LLC All Rights Reserved Operations Manual Model SS1000YAM R1 Two-way LCD Remote Start System SAFETY AND CARBON MONOXIDE WARNING!!! The following warnings MUST be observed at all times: Once SledStart is installed on your snowmobile, it will start the snowmobile with a command signal from the 2-way LCD remote control transmitter. LCD remote will confirm a successful start with a three note music tone and the exhaust cloud icon will appear. SledStart should NEVER be operated in an area that does not have adequate ventilation. The following precautions are the sole responsibility of the user: however, the following recommendations should be made to all users of the SledStart system. a) Never operate in an enclosed or partially enclosed area that does not have adequate ventilation such as a garage. b) When parking in an enclosed or partially enclosed area or when servicing the snowmobile, SledStart must be disabled using the bypass toggle switch 1 - see picture 7 page 11. c) It is the users sole responsibility that any time SledStart is active the parking brake must be set. d) It is the users sole responsibility to properly store all remote transmitters out of the reach from children to assure that SledStart does not unintentionally remote start the snowmobile. e) The user must install a carbon monoxide detector in or about the living area adjacent to the snowmobile. All doors and windows leading from adjacent living areas to the enclosed or partially enclosed snowmobile storage area must at all times remain closed. f) Use of this product in a manner contrary to its intended mode of operation may result in property damage, personal injury, or death. 1) Never remotely start the snowmobile with the clutch guard, clutch cover, or clutch body panels removed. 2) Never remotely start the snowmobile with the keys in the ignition. 3) The user will be responsible for making sure the safety pin switch is installed, adjusted, and operating correctly at all times wherein the snowmobile will not start with the clutch cover or body panels removed. g) After the SledStart module has been installed, test the toggle switch and safety pin switch for correct adjustment and operation by perform1 ing the safety check on page 14 of this user manual. If the snowmobile starts when performing the pin switch or toggle switch test, the module, pin switch, or toggle switch has not been installed properly. The module must be removed or properly installed so that the snowmobile will not start with the toggle bypass in the off position or the clutch cover removed from the snowmobile. OPERATION OF THE SLEDSTART MODULE IF THE PIN SWITCH OR TOGGLE SWITCH IS NOT INSTALLED, BYPASSED OR MALFUNCTIONING IS CONTRARY TO ITS INTENDED MODE OF OPERATION. OPERATING THE SLEDSTART SNOWMOBILE REMOTE START SYSTEM UNDER THESE CONDITIONS MAY RESULT IN PROPERTY DAMAGE OR PERSONAL INJURY. IMMEDIATELY CEASE THE USE OF THE UNIT AND REPAIR OR DISCONNECT THE INSTALLED MODULE. SLEDSTART WILL NOT BE HELD RESPONSIBLE FOR ANY AND ALL INJURIES OR PROPERTY DAMAGE. 2 I NTRODUCTION Thank you for purchasing The SledStartTM Remote Starter System. This system features state-of-the-art 2-way technology designed to give you maximum satisfaction and performance, and was specifically designed for use in extremely cold temperatures. Please use caution when operating this system. SledStart can be set for run times up to 15 minutes. Only in extreme subzero temperatures should longer run time settings be used. In most cases the 5 or 10 minute setting will be enough to warm up the engine. SledStart should NEVER be used on a warm or hot engine as engine overheating or damage could occur. Many snowmobiles have overheat protection built into the Engine Control Module or ECM. This feature will stop the engine at a preset temperature if it has been idling too long. SledStart has a unique feature that will work along with the ECM to help protect from overheating. This is explained in more detail later in this user manual. Please use common sense! Don't leave your snowmobile idling unattended for any length of time. Know your snowmobile and the conditions around it. Example: Don't set the run time for 15 minutes on a warm day. Please read this entire manual prior to installing and operating the system. Take a moment to become familiar with all of the built-in features that are exceptionally useful in cold weather riding. SledStart is designed to operate in temperatures ranging from -40oF to 185oF or -40oC to 85oC. When mounting the module always try to mount in a location that will not receive extreme heat or water. The electronics in the SledStart module have been specially coated to help reduce damage due to wet weather. It is always best to mount the module in an area that will remain dry. Depending on the obstacles, SledStart is designed to operate with a communication range of up to 1 mile or 1500 meters but will vary with surrounding conditions. Mount the antenna at the highest possible point inside the snowmobile being careful not to mount where it can become damaged from water, extreme heat or any moving parts. Powering the SledStart Remote Starter System LCD transmitter is one 1.5 volt AAA alkaline battery. We recommend replacing the battery when LCD battery indicator icon cific maintenance. is down to 1 bar. The unit itself requires no spe- The SledStart Remote Starter System complies with part 15 of the FCC rules. Operation is subject to the two following conditions: 3 1) This device may not cause harmful interference 2) This device must accept any interference received, including interference that may cause undesired operation. Changes or modifications not expressly approved by the party responsible for compliance could void the user's authority to operate the device. 4 P ACKAGE C ONTENTS Once you open the package you will find the following contents: • • • • • • • • • • • • • • SledStart module with the pre-wired harness One 2-way LCD Remote transmitter One 1-way transmitter One AAA 1.5V battery One 3V coin battery (pre-installed in the one-way remote) One pre-wired bypass toggle switch One pin switch One pin switch mount bracket Two ½" # 10 screws Two nylock nuts Two heavy duty long cable ties Six small cable ties Split loom One 10-amp fuse 5 I NSTALLATION CAUTION: Prior to installation, please be certain that the 30-amp fuse in the red 12-volt wire from the SledStart module is removed and the snowmobile battery is disconnected!!!!! The SledStart Remote Starter System was designed to be a true plugand-play system, making it easy for the user to install. Installation will consist of plugging the pre-wired piggybacked connectors from the SledStart module into the snowmobile's ignition switch connector, brake switch connector, and one of the fuel injectors. There is also a positive and negative battery hookup along with mounting a pin switch for the clutch side body panel and a bypass toggle switch. The mounting of the SledStart module itself will vary model to model. The best location for the Apex is inside the steering gate on the clutch side of the snowmobile. Please visit our website www.sledstart.com for detailed pictures of this location. It is important to note the direction the module will face to avoid damage to the antenna wire. At the time this manual went to print, not all mount locations for all models have been tested. Please see our website as we will have updates on there as they become available. Any location that will not see excessive amounts of heat, snow pack or water is suitable. Be careful of mounting module near any steering components as these parts need to move free and clear of any obstacle. It is suggested that you inspect the module after your first ride especially for deep powder riding. The SledStart module is specially coated internally to prevent damage from moisture, but excessive snow pack can cause moisture issues. Snow pack could also cause overheating of the internal relays if the module does not have ample ventilation. If you ride EXTREMELY hard it may be a good idea to insert a piece of foam between the module and the mounting surface to help reduce shock. We saw no failure due to this in testing, but it may not be a bad idea. NOTE 1: You will notice the gray/black wire with the bypass toggle switch bundled together after removing from the package. Leave this bundled until step 5 as it will make installation easier and reduce risk of breaking the wires from the toggle switch. NOTE 2: The violet wire from the SledStart module is only used if you are running Rock's Warm Hands Controller or "YamaHeater". If you plug the Violet wire with the male spade connector from the SledStart Module to the Violet wire with the female spade connector from the Yamaheater, your Yamaheater will now turn on when you remote start your snowmobile. This will provide nice toasty hand grips before you go riding! 6 CAUTION: Supplied pin switch for the clutch side body panel cover and bypass toggle switch must be installed for proper operation. These are very important safety features and without them properly installed serious injury can occur. If either of these switches are not installed or they are bypassed, it is at the user's own risk. When the clutch cover pin switch is closed (grounded) it will disable the SledStart system. It should be mounted and adjusted so that when the body panel is mounted to the snowmobile the pin switch is pushed in (open) and will allow SledStart to operate normally. The pin switch mounting bracket and pin switch itself have plenty of adjustment for any application. Our website shows various mounting locations on different models of snowmobiles. Installation is simple so please be sure this switch is mounted. The bypass toggle switch will perform the same cutoff function disabling SledStart from operation when the switch is in the off position. This switch should always be in the off position along with disconnecting the snowmobile battery when any service is being performed on the snowmobile. A surprise start at the wrong time can make for a very bad day. Please install both of these switches. STEP 1 Remove necessary body panels to locate the battery of the snowmobile. With a Phillips screwdriver, remove the negative and positive leads to the battery being careful not to lose the square nuts in the battery terminal housings. It is a good idea to insert the bolts back into the battery and be sure the positive and negative leads are pushed out away from the battery. You will be adding the appropriate connectors from the SledStart module to these terminals later in this section. Visit www.sledstart.com and click on the installation tab to view detailed preparation and installation videos online. STEP 2 Locate your main fuse block on your snowmobile. This is typically found on the chain case side of the sled right in front of where your right knee would be when you are sitting on your sled. Open the plastic lid to the fuse block and find the “SIG” fuse. If your Yamaha Snowmobile has a 3amp or 7½-amp fuse for the “SIG” in your main fuse block, you must replace this fuse to the 10-amp fuse supplied in your kit before installing the SledStart module. This is your taillight fuse. Since the taillights are all switching over to LED’s, the fuse value has decreased with some of the new model snowmobiles. Depending on your model, you will find anywhere form a 3-amp to a 20-amp fuse in this location. 7 Please check your “SIG” fuse before you attempt the SledStart installation. The wire in this circuit is rated at 20 amps so installing the 10-amp fuse is safe and will cause no harm to your snowmobile. If you do not upgrade this fuse if it is needed, you will immediately blow the 3-amp fuse and eventually the 7½-amp as well. A 10-amp fuse is included in your SledStart kit. If your snowmobile has a 10-amp or higher in this location from the factory, please move on to Step 3. See picture 1. STEP 3 Picture 1 Remove the necessary body panels to locate (depending on the model) the 4 or 6-pin connector from the key switch. This connector should have a red/white wire, a brown/white wire, a brown wire, and a red wire on the key side of the connector and a blue/white wire, a black wire, a brown wire and a red/yellow wire on the harness side of the connector. Unplug the connector and locate the blue/white wire and the brown wire from the SledStart harness with the matching male/female piggyback attached. Insert the male connector from SledStart into the female connector on the key switch side of the snowmobile harness. Next plug the female connector from SledStart into the male connector on the snowmobile harness side. Secure all connectors and the piggyback so they will not bounce excessively. See picture 2. CAUTION: MAKE SURE THE BLUE/WHITE WIRE FROM THE SledStart MODULE MATCHES UP TO THE BLUE/WHITE WIRE ON THE HARNESS SIDE AND TO THE RED/WHITE WIRE ON THE KEY SIDE OF THE SNOWMOBILE Picture 2 IGNITION CONNECTOR. ALSO BE SURE THAT ALL BROWN WIRES ARE MATCHED UP IN ALL CONNECTORS. IF ANY OF THE ABOVE DO NOT MATCH, DO NOT PROCEED WITH INSTALLATION. PLEASE CONTACT US FOR FURTHER ASSISTANCE. STEP 4 Remove necessary body panels to locate the 2-pin brake connector. This connector should have a blue/red wire and a green wire. This connector 8 will be located in a rubber boot along with many other connectors. Unplug the connector and locate the blue/red wire and green wire on the SledStart harness with the matching male/female piggyback attached. Insert the male connector from SledStart into the female connector from the snowmobile. Next insert the female connector from SledStart into the male connector from the snowmobile. Insert all the connectors back into the rubber boot and reseal. See picture 3. CAUTION: MAKE SURE ALL BLUE/RED WIRES AND ALL GREEN WIRES MATCH UP IN ALL CONNECTORS. IF ANY OF THE ABOVE DO NOT MATCH, DO NOT PROCEED WITH INSTALLATION. PLEASE CONTACT US FOR FURTHER ASSISTANCE. Picture 3 STEP 5 NOTE: In this step please make sure you are locating the fuel injector connector on the top of the fuel injector at the throttle bodies and NOT the coil pack connectors on the cylinder head of the engine. This is a common mistake we have addressed on our tech line. The injector connectors and the coil connectors are noticeably different. See picture 4 below. Locate the easiest accessible fuel injector on your snowmobile. Unplug the connector on the top of the injector by squeezing the tab on the connector and pulling up. These are watertight connectors and will be snug. Wiggle carefully if necessary as you pull up to release watertight gasket and remove the connector. Locate the orange/black wire from the SledStart harness with the matching fuel injector piggyback connector. Plug the piggyback onto the injector then plug the injector connector from the snowmobile harness into the piggyback. Cable tie the fuel injector piggyback to a location that will be out of the way and secure. This will help reduce wire fatigue caused by vibration leading to wire breakage, causing the injector not to function. If at any time the injector stops firing, remove the piggyback and reinstall the direct connection again. See picture 4. Please contact us for further assistance if necessary. Picture 4 9 STEP 6 Install the pin switch bracket on the clutch side of the snowmobile. The bracket must be mounted to aluminum allowing the pin switch to ground out. This will stop the engine if the clutch cover is removed during remote start operation. Use the pin switch bracket to mark the location of the two holes to be drilled. The bracket should have the threaded end facing toward the outside of the snowmobile. Be sure NOT to mount bracket flush with edge of the aluminum. There needs to be room for the pin switch itself. Both the pin switch and the bracket have ample adjustment to bring the movement of the switch to the appropriate position so it is best to back the bracket off about 5/8" from the edge. For further detailed mounting information and detailed pictures for various models please visit our website at www.sledstart.com. Drill holes using a 3/16" drill bit. Using the two supplied #10 screws and matching Nylock nuts, attach the pin bracket to the snowmobile. Slide bracket back a little less than half the total distance of the slots in the bracket and tighten the Nylock nuts. See pictures 5 & 6. Picture 6 Picture 5 STEP 7 Thread the pin switch into the pin switch bracket. Check the adjustment by installing the side body panel making sure the switch will push in from the grounded position. Lock the pin switch to the bracket using the two lock nuts. Attach the two gray/black wires (one from the SledStart module and one from the bypass toggle switch) with the female connector to the rear of the pin switch. STEP 8 Find a suitable location for the toggle switch and ground it with the black wire attached to the toggle switch. The switch should be mounted or ziptied in a location that will stay dry but has easy access. WARNING: THE TOGGLE SWITCH MUST ALWAYS BE IN THE OFF POSITION WHEN WORKING ON THE SNOWMOBILE. THIS WILL DISABLE THE SLED10 START MODULE. See picture 7. NOTE: See www.sledstart.com and click on the installation tab to view detailed videos of the pin switch and toggle switch locations. STEP 9 Find the best wire routing and use the supplied wire loom and cable ties. If Picture 7 possible, just route the loom along with other wires and cable tie away from any extreme heat. Be cautious of anywhere the wire or wire loom can rub over time. Save the two large heavy duty cable ties for mounting the module in Step 10. STEP 10 Using the included 14" heavy duty cable ties, mount the SledStart module to the snowmobile. It is always best to install the module in a dry location where it can sense the under hood temperatures when the Temperature Autostart feature is used. The module will then know when the engine is at the user-selected temperature so it can perform a restart. For more info on Temperature Autostart see page 15. NOTE: See www.sledstart.com and click on the installation tab to view detailed videos of module and antenna mounting locations. STEP 11 Mount the antenna by removing the film off the sticky pad on the antenna base and stick the antenna to the highest possible location. Antenna mounting surface must be clean of dirt and debris. Clean the mounting location with rubbing alcohol before sticking antenna to mounting surface. STEP 12 Making sure the 30 amp fuse is removed from the red 12V lead from the SledStart module, connect the red 12V lead to the battery's positive or (+) terminal. Next install the pink/white wire and the black wire from the SledStart module to the battery's negative or (-) terminal. After installation is complete, check ALL the connections from SledStart to the snowmobile. Make sure all piggyback wire colors match the snowmobile on the ignition, brake and injector connectors. If any do not match DO NOT PROCEED WITH THIS INSTALLATION AND CONTACT US IM11 MEDIATELY. Check to make sure all wires are routed clean and are inserted thoroughly into the provided split loom. Check for any possible areas where the wires or split loom can rub or chafe over time causing a short. Next install the 30 amp fuse in the red 12V wire from the SledStart module to the positive terminal of the battery. STEP 13 Install the AAA battery into the LCD remote be unlocking the battery door with the slide lock on the back of the remote. Once the battery is installed a self-test of all the icons will be performed along with a single beep from the remote. Reinstall the battery cover and lock it with the slide lock. NOTE: The violet wire on the SledStart Module is only to be used with the Yamaheater Hot Hands Controller. For more information or to order the Yamaheater, please visit our website www.sledstart.com or e-mail us at [email protected]. For a user manual on how to operate SledStart and Yamaheater together please e-mail us at [email protected]. C ODE MATCHING B ETWEEN REMOTE C ONTROLS A ND M ODULE Code matching between remote control and SledStart module may be necessary prior to use. To test, press the "X" button on the LCD remote. If the remote and SledStart module are matched you will hear a 3-note music tone along with the module temperature in Celsius on the LCD display. If the module and remote are not matched you will hear 2 beeps and you will not see the temperature show up on the LCD display. If code matching is necessary, follow the steps below to code match the remote controls to the SledStart module. If code matching is not necessary please proceed to page 14 "SAFETY TESTING THE SYSTEM". STEP 1 Quickly cycle the ignition on/off five times. The module should enter codematching mode. The headlight will flash along with audible clicking from the module. STEP 2 As the module is clicking and the headlights are flashing, press and release the "T" button, then press and release the "S" button on the remote 12 you want to code match. The headlight should flash quickly five times indicating a successful match. For additional remotes please visit our website at www.sledstart.com NOTE: To add an additional remote control, repeat Steps 1 and 2. Maximum of two remote controls can be programmed at one time. If a third is programmed, the first remote that was programmed will be disabled. NOTE: To view a video of the code matching process, go to www.sledstart.com and click on the installation tab. View the video titled "quick plug and play installation video" The One-Way Remote All programming of the SledStart's features and functions can only be performed with the LCD two-way remote. A second one-way remote is included in your in your kit that will operate the basic functions as described in this section. NOTE: The one-way remote cannot be locked. Please use caution when this remote is in your pocket as squatting, sitting or pushing on the pocket the remote is in can cause the system to be activated. When servicing your snowmobile ALWAYS be sure that the bypass toggle switch is in the off position (see picture 7) and you have disconnected your battery terminals. You can also remove the main 30-amp fuse from the red 12-volt wire leading from the SledStart module. Please be safe. It is always good practice to disconnect your battery terminals when working your snowmobile. The one-way remote will only operate the Manual Remote Start Mode, the Timer Start Mode and the Turbo Mode. No programming can be performed with the one-way remote. The one-way remote will operate the basic functions as described below: • Pressing the "T" button will activate the Timer Start Mode. Press "T" again to deactivate Timer Start mode. • Pressing "S" will activate Manual Remote Start mode. Press "S" again to deactivate Manual Remote Start mode. • Press to activate the Turbo Mode. Press to deactivate Turbo Mode. • The blank button on the one way remote is not in use. 13 S AFETY T ESTING T HE S YSTEM After steps 1 through 13 in the installation section have been completed and you have confirmed the LCD remote is code matched to the SledStart module, the system can now be tested. Start by making sure the parking brake on the snowmobile is set and the clutch guards and covers are in place. Be sure the bypass toggle switch is set to ON (see picture 7) and the snowmobile handlebar kill switch is not on. A flash from the headlight should follow confirming the command. You will hear the ignition and fuel pump kick in followed by the starter cranking and starting the engine. The LCD remote will confirm a successful start by a three-note music tone and the exhaust cloud will appear. Press "S" again to shut the engine off. Next the ignition and the SledStart module will shut down along with three shut down tones from the LCD transmitter. Once the engine is off turn the bypass toggle switch to the OFF position - see picture 7. Press the "S" button on the LCD remote. The snowmobile should NOT start. Next remove the clutch cover that operates the pin switch. DO NOT REMOVE TOP CLUTCH GUARD! Turn the toggle switch back to the ON position. Be sure all body parts are clear of the clutch area. Stand away from the clutch area and press the "S" button on the LCD remote. The snowmobile should NOT start. If the snowmobile starts in either the toggle or pin switch test CEASE USE IMMEDIATELY and review the installation pages. Be sure these two switches function properly. Before each ride check the safety system to insure proper operation. If the clutch pin safety switch becomes rusty over time, it may not make proper ground causing it not to work properly. If needed please replace this switch so your safety system is fully functioning. Replacement switches can be found at www.sledstart.com. P ROGRAMMING M ODE This section will be divided into two parts and will guide you through the various settings the SledStart Remote Starter System offers. Part 1 will describe how to select either Sound or Vibrate for the LCD remote, LCD Backlight ON/OFF, using the Temperature/Auto Start feature, setting the engine crank time, selecting Fahrenheit or Celsius modes, and adjusting the clock. Part 2 will describe the Features and Options section of the Programming Mode. 14 NOTES ABOUT PROGRAMMING MODE ALL programming must be done with the 2-way LCD remote. The one way remote can not be used for programming. If no buttons are pressed for thirty seconds during programming mode, the system will exit programming. After selecting and confirming any setting with the "S" button, you will automatically exit programming. To re-enter programming mode, press the button for two seconds, and programming will resume at the point where you last exited. The button will also scroll to the desired feature. At any time to exit programming without saving changes, press the "X" button, or to move to next selection. Changes will only be confirmed with the "S" button. Replacing the AAA battery within 3 second of removal will retain all of your previous custom settings. PART ONE To enter programming mode, press for two seconds. You will hear a single beep to confirm activation of programming mode. Remember…once you confirm any setting with the "S" button you will exit programming. You must Press the button again for 2 seconds to re-enter the programming mode. Once in programming, press repeatedly until the icon for your desired function is flashing. When your desired icon is flashing, follow the steps for each of the following sections: Sound - Press "S" to activate LCD sound. The when sound is selected. icon will remain lit Vibrate - Press "S" to activate LCD vibration instead of sound. The icon will remain lit when this option is selected. Backlight - Press "S" to activate LCD backlight. The icon will remain lit when this option is selected. To deactivate, re-enter programming mode, if necessary scroll with the button until the is flashing and press "X". icon Temperature Auto-Start - Press "T" to scroll to the desired temperature at which the system starts the snowmobile. Selections are from -40OF to 15 35OF and -40OC to 2OC. Press "S" to confirm and activate Temperature Auto-Start mode. Temperature Auto-Start will run the snowmobile for the selected run time in Feature 1 of the Features and Options section, see chart page 17. The engine will restart each time the under-hood temperature reaches the userselected temperature. This feature remains engaged until it is deactivated, which is done by simply pressing for 2 seconds to re-enter programming mode. With the icon flashing, press the "X" button to cancel Temperature Auto-Start mode. Engine Starter Crank Time - Press "T" to scroll to the desired engine starter crank time. Selections are: 0.7, 1.0, 1.3, 1.6, 1.9, 2.2, 2.5, 2.8, 3.1, 3.4, 3.7, 4.0, 4.3, 4.6, 4.9, and 5.2 seconds. Once desired time is selected, press "S" to confirm and activate the desired engine starter crank time. NOTES ABOUT ENGINE STARTER CRANK TIME In most climates, 0.7 - 1.3 seconds are adequate engine crank times. In extreme cold, the engine crank time may need to be extended. Selecting Fahrenheit or Celsius Mode Pressing the "S" button when heit mode. icon is flashing will activate the Fahren- Pressing the "S" button when mode. icon is flashing will activate the Celsius SETTING THE LCD CLOCK Pressing the "T" button when the HOUR icon is flashing will scroll to the desired hour. Next, toggle to MINUTES by pressing the button. Press the "T" button repeatedly to set the desired minutes. Press the "X" button to exit programming or press the button to continue to the FEATURES AND OPTIONS menu. PART TWO FEATURES AND OPTIONS Press for two seconds to enter programming mode. If necessary, press until the icon is flashing. Once the 16 icon is flashing, press- ing "T" will cycle through features 1 - 5. Pressing will toggle over to the options of that feature. Pressing "T" will adjust the option numbers. Once the desired option for the feature you want is selected, you must confirm it by pressing "S". You will see the snowmobile headlights flash the number of times for the option number selected along with the same number of clicks from the module. This tells the user that you have confirmed the setting. Example: If you want to have a run time of 10 minutes you would set Feature 1 - Engine Run Time, to Option 2, followed by pressing "S" to confirm. You will see the headlights flash two times along with two clicks from the module. See the chart below for the available Features and Options: Feature 1) Engine Run Time 2) Timer Mode Interval 3) Turbo Mode Run Time 4) RPM Cutoff 5) Light Circuit Option 1 5 min 1 hour 30 sec Very Low Flashing Option 2 10 min 2 hours 1 min Low Constant Option 3 15 min 3 hours 3 min Medium N/A Option 4 N/A N/A N/A High N/A Option 5 N/A N/A N/A Very High N/A FEATURES OVERVIEW Feature 1 - Engine Run Time This feature sets how long the engine will run during any mode of remote start (manual, timer, temperature mode). Option settings are option 1 = 5 minutes, 2 = 10 minutes, and 3 = 15 minutes. Press "S" to run the Manual Start Mode. CAUTION!!! During the first minute after activating any mode of remote starting (manual, temperature, timer) and the engine fails to start, or loses ignition, SledStart will make two more attempts to start the engine. If the snowmobile fails to start after 3 attempts SledStart shuts down. If the engine shuts down after the one-minute window, SledStart will not attempt to restart regardless of the number of attempts made during initial start up. This feature is designed to protect the engine from overheating. On many models, if the engine has idled to a critical temperature the snowmobile’s ECM will shut down the engine. If this happens within the one-minute window of any remote start activation, ENGINE DAMAGE CAN OCCUR as SledStart will attempt to restart engine during that first one minute. Please use caution and only use remote start modes on a cold engine! 17 Feature 2 - Timer Mode Interval This feature sets the interval between Timer Mode starts. Option settings are 1 = every hour, 2 = every two hours, and 3 = every three hours. To activate Timer Mode, press "T". The icon will appear on LCD screen and the snowmobile will start and run its first cycle. To deactivate Timer icon will disappear from the LCD Mode, press "T" again and the screen canceling Timer Mode. Timer Mode will run for a total of 24 hours. Option 1 = 24 cycles, 2 = 12 cycles, and 3 = 8 cycles. Engine run time will be determined by the option selected in Feature 1, see chart on page 17. Feature 3 - Turbo Mode Run Time/Valet Mode This feature will allow cool down for turbo units or can be used as a valet mode. To activate Turbo Mode, press twice. To deactivate Turbo Mode, press twice again. Wait five seconds for icon to expire from LCD screen. To use Turbo Mode, with engine running and key in the run position, apply hand brake and remove key from snowmobile. Engine will shut off when selected time expires. Option 1 = 30 seconds, 2 = 1 minute, and 3 = 3 minutes, see chart on page 17. Note: RPM cutoff is active during Turbo Mode but brake cutoff is not. For Valet Mode, insert the key back into the ignition before the timer expires and turn to run position. (Do not turn to start position as starter damage could occur) Apply the hand brake - now Turbo Mode is deactivated and snowmobile can be driven again. Feature 4 - RPM Cutoff This feature will adjust the RPM cutoff during remote start operation. This feature should be left on the default setting. (Option #1 Very Low) Options 2 through 5 can be used if you are running a fuel controller. If your running a fuel controller and the RPM cutoff is too low or too high, you can try options 2 through 5. Contact us at [email protected] for further assistance. Feature 5 - Lights Flashing/Constant This feature will adjust whether the lights will flash or remain constant during remote start. This feature should be left on Option 1 as the headlight is always on when the snowmobile is running, not allowing for flashing to occur. When Option 1 is selected, the user can hear the click from the 18 module relay in flashing mode to know if module is still active but ignition has been lost. CAUTION!!! During the first minute after activating any mode of remote starting (manual, temperature, timer) and the engine fails to start, or loses ignition, SledStart will make two more attempts to start the engine. If the snowmobile fails to start after 3 attempts SledStart shuts down. If the engine shuts down after the one-minute window, SledStart will not attempt to restart regardless of the number of attempts made during initial start up. This feature is designed to protect the engine from overheating. On many models, if the engine has idled to a critical temperature the snowmobile’s ECM will shut down the engine. If this happens within the one-minute window of any remote start activation, ENGINE DAMAGE CAN OCCUR as SledStart will attempt to restart engine during that first one minute. Please use caution and only use remote start modes on a cold engine! O PERATION Key Lock To lock the buttons on your LCD remote control, press and release , then press and release "T", and the icon will appear. To un- lock the Key Lock, repeat these steps and the icon will disappear. This is helpful in preventing unintentional starts if your LCD remote is in your pocket. Inquiry At any time, pressing the X button will display real-time temperature in or depending on which mode you have selected. If you have either two LCD remotes programmed to one snowmobile and any changes are made on one LCD, the second LCD will not update with those changes until you press its Inquiry "X" button. Manual Remote Start ALWAYS SET THE PARKING BRAKE WHEN USING ANY MODE OF REMOTE START 19 To manually remote start, press the "S" button on LCD remote. User will be notified of a successful start by a three-note music tone and the exhaust cloud icon will appear on the LCD screen. An unsuccessful start will result in three short beeps of the same tone and no exhaust cloud appears on the LCD screen. With a successful start, the enicon gine will run for the programmed time in feature 1 of the features and options. See chart page 17. During any mode of Remote Start, SledStart will cut the ignition of the snowmobile if either the brake is applied or if the RPM's rise above preset threshold, not allowing the snowmobile to be driven. To operate the snowmobile from remote start mode, insert key in ignition, turn one click to "RUN" position, and apply brake. Remote start mode is now deactivated and snowmobile can be driven normally. CAUTION: Do not turn key to "START" position, as starter damage may occur. To Cancel Manual Remote Start during operation, push "S" button again. Timer Remote Start ALWAYS SET THE PARKING BRAKE WHEN USING ANY MODE OF REMOTE START To engage Timer Remote Start, press the "T" button. At this time, the icon will appear, followed by remotely starting the snowmobile and confirming with a three-note music tone and the exhaust cloud icon will run. With a successful start, the engine will run for the programmed time in feature 1 of the features and options. See chart on page 17. Timer Mode will function for a period of 24 hours from activation and will operate based on the options selected on Feature 2 of the Features and Options Menu. See chart on page 17. To cancel the Timer Mode, push "T" button again and the icon will expire. Temperature Auto-Start ALWAYS SET THE PARKING BRAKE WHEN USING ANY MODE OF REMOTE START Unlike Turbo and Timer modes, Temperature Auto Start must be engaged from the programming menu. To operate Temperature Auto Start, see page 15. With a successful start, the engine will run for the programmed time in feature 1 of the features and options. See chart page 17. 20 Turbo Mode Run Time/Valet Mode ALWAYS SET THE PARKING BRAKE WHEN USING ANY MODE OF REMOTE START This feature will allow cool down for turbo units or can be used as a valet mode. To activate Turbo Mode, press twice. To deactivate Turbo Mode, press twice again. Wait five seconds for the icon to expire from LCD screen. Option 1 = 30 seconds, 2 = 1 minute, 3 = 3 minutes - see chart on page 17. To use Turbo Mode, with engine running set the parking brake. Apply hand brake, remove key from snowmobile. The engine will shut off when selected time expires. Note: RPM cutoff is active during Turbo Mode but brake cutoff is not. For Valet Mode, insert the key back into the ignition and turn to run position. Apply the hand brake - now Turbo Mode is deactivated and snowmobile can be driven again. CAUTION!!! During the first minute after activating any mode of remote starting (manual, temperature, timer) and the engine fails to start, or loses ignition, SledStart will make two more attempts to start the engine. If the snowmobile fails to start after 3 attempts SledStart shuts down. If the engine shuts down after the one-minute window, SledStart will not attempt to restart regardless of the number of attempts made during initial start up. This feature is designed to protect the engine from overheating. On many models, if the engine has idled to a critical temperature the snowmobile’s ECM will shut down the engine. If this happens within the one-minute window of any remote start activation, ENGINE DAMAGE CAN OCCUR as SledStart will attempt to restart engine during that first one minute. Please use caution and only use remote start modes on a cold engine! S TORAGE The SledStart module and LCD continuously communicate with each other. Like a car alarm, there is a constant small draw on the battery. If you do not ride your snowmobile regularly, this can result in a dead battery. It is recommend for any storage over seven days that either the main 30-amp fuse in the red 12-volt wire be removed or disconnect your battery. If you store your snowmobile on a battery tender, fuse removal is not neces21 sary. A battery tender will also greatly improve the life of your battery and is STRONGLY recommended. For long-term storage (longer than 30 days) remove the AAA battery from the LCD remote to avoid draining the AAA battery. The LCD and Module will retain memory and should not have to be code matched again. If you find that the LCD and Module no longer communicate, please refer to page 12 for Code Matching. T ROUBLESHOOTING The remote start will not activate. • • • Check to make sure snowmobile handlebar kill switch is not on • • • Check clutch side pin switch for proper operation • • Check for a weak or dead battery in the LCD remote Check to make sure the snowmobile ignition is not on Check the toggle bypass switch and be sure it is set to ON See picture 7 page 10 Check the connector that plugs into the ignition (key switch) Check that the LCD Remote is code matched to the SledStart module. See page 12 Check for a weak or dead battery in the snowmobile SledStart starts the snowmobile but dies within a few seconds. This means the system is not seeing the injector signal and it thinks the sled has not started even though it has. It will repeat this process 2 times and then shut down completely. Usually you will also notice the snowmobile may be running on one less cylinder as well. Follow the steps below to check your connections to the injector: • Check the Injector Connector for a pushed out pin/wire in the connector housing caused from attempting to plug it in. If the pins were not fully inserted into the connector housing in the manufacturing process, this can happen. Push the pin into the connector housing until you hear it "click" or "lock" into the housing. Make sure the rubber gasket is properly seated into the housing as well. You can use a small flat blade screwdriver to seat the gasket properly. • Check the injector connectors from the snowmobile harness to the injector for correct seating and that all male pins and female sockets are "clicked" into place. DO NOT FORCE THESE CONNECTORS WHEN PLUGGING THEM IN! They should click right it if they are properly aligned before pushing. If forced it is possible to get the male "pin" behind the female "socket" causing no connection. 22 My snowmobile has a different connector for the injector than the connector on the SledStart kit. Be sure you are plugging the SledStart injector connector (orange wire) into the snowmobile’s injector. The injectors are located on the top of the throttle bodies. The connectors found on the top of the cylinder head are NOT the injectors. Those are the coils and although they look similar they are not the same connector and will not plug into the SledStart connector. ALL Yamaha snowmobiles use the same injector connector. The connector on SledStart will fit your snowmobile - see picture 4 page 9. For further assistance please contact us by email at [email protected] or visit www.sledstart.com for updated info on troubleshooting. R EFERENCE 23