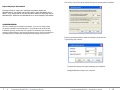
1
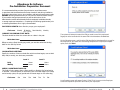
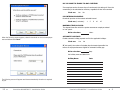
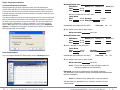
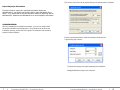
FIREWALL INFORMATION
Attention Microsoft Windows XP and Windows 2003 Users!
Microsoft Windows Firewall:
Microsoft has included firewall protection on Windows XP with Service Pack
2 and on Windows 2003 Server with Service Pack 1. If you will be installing
your timeQplus BIOMETRIC server on either of these two operating
systems you will need to grant access on the firewall to the following
applications and services after your installation is complete.
BIOMETRIC FINGERPRINT TECHNOLOGY
• Attendance Rx Note: You will be prompted to unblock this
application after the installation is complete, or you can grant
access via the firewall.
• arxsvc.exe
• ARXTQ100N.exe
• File and Printer Sharing
Other Firewalls:
Some firewalls block ports, and authorized applications can be granted
access to use specific ports. If you have this type of firewall you should
open the following ports:
• TCP
• UDP
Open ports 49183 to 49188
Open ports 49211 to 49212
NOTE: This equipment has been tested and found to comply with the limits for a Class B digital
device, pursuant to Part 15 of the FCC Rules. These limits are designed to provide reasonable
protection against harmful interference in a residential installation. This equipment generates,
uses and can radiate radio frequency energy and, if not installed and used in accordance with
the instructions, may cause harmful interference to radio communications. However, there is
no guarantee that interference will not occur in a particular installation. If this equipment does
cause harmful interference to radio or television reception, which can be determined by turning
the equipment off and on, the user is encouraged to try to correct the interference by one or
more of the following measures: Reorient or relocate the receiving antenna; Increase the
separation between the equipment and receiver; Connect the equipment into an outlet on a
circuit different from that to which the receiver is connected; Consult the dealer or an
experienced radio/TV technician for help.
PN: 06-0349-000 Rev C.
44
timeQplus BIOMETRIC™ Terminal User Manual
Installation Guide
timeQplus BiometricTM Installation Guide
Thank you for purchasing the timeQplus Biometric Time and Attendance
System. This installation guide will provide guidance and instructions for
installing and configuring your new system.
Included in the timeQplus Biometric box you should find:
timeQplus BiometricTM software
TQ100 Biometric Terminal
Fingerprint Identification Unit (FIU) Optical Overlay
(NOTE: This is taped to the front page of the Installation Guide)
Terminal Mounting Plate and screws
After completing the above enrollment process, click on the ‘timeQplus’ button on the
Attendance Rx main screen [below]. Now you can assign employees to any or all
TQ100 terminal devices. Highlight the employee name from the ‘Unassigned
Employees’ area, then click the ‘>’ button to assign that employee to the selected
(highlighted) TQ100 terminal. Repeat this process for all those employees you want
to assign to the selected TQ100 terminal.
Power Adapter
30 ft. (9m) RS232 Cable
6 ft. (2m) Ethernet (CAT5) Cable
Hardware User Manual
21
timeQplus BIOMETRIC™ Installation Guide
timeQplus BIOMETRIC™ Installation Guide
2
Attendance Rx Software
Pre-Installation Preparation Document
It is recommended that you take a few minutes to record the answers
to questions that the Attendance Rx Setup wizard will ask during installation.
By thinking about how you run your company and having these answers ready
BEFORE launching Attendance Rx you will insure a fast and smooth startup.
If you need to change these answers you will be able to do so in the
Administration module after Attendance Rx is completely installed and ready
to accept employee transactions. Completing the following questionnaire prior
to installing Attendance Rx is highly recommended.
PAY PERIOD LENGTH: How often do you pay your employees?
Circle one:
Weekly
Bi-Weekly
(Every 2 Weeks)
Semi-Monthly
Monthly
CURRENT PAY PERIOD START DATE:
This date should be either the current date or a date in the past.
The system will attempt to match the PIN you used to enroll this employee’s
fingerprint at the terminal with the same PIN in the Attendance Rx database.
Write date here:
If you are using a Semi-Monthly pay period, you must also select the starting
date for the next Pay Period.
On the following screen, verify that the PIN identified by Attendance Rx is correct for
this employee. If yes, select the ‘Use existing template as the employee template’
option, then click ‘Next’.
Write date here:
CALCULATING OVERTIME:
Specify the number of hours worked after which overtime begins; can set both
daily and/or weekly; two levels are permissible.
Level 1
Daily
Weekly
Level 2
Hours
Hours
Hours
Hours
WEEKLY OVERTIME STARTS ON:
This field will only appear when a Semi-monthly or Monthly Pay Period option
is selected. You must specify on which day your work week begins (for weekly
and bi-weekly cycles, the pay period and work week begin on the same day).
Circle one:
Sun
Mon
Tue
Wed
Thu
Fri
Sat
A confirmation screen will appear [below]. Click ‘Finish’ to return to the Employee
screen and repeat the process to enroll all of your employees.
3
timeQplus BIOMETRIC™ Installation Guide
timeQplus BIOMETRIC™ Installation Guide
20
DO YOU WANT TO ENABLE 7th DAY OVERTIME:
If an employee works all seven days of a workweek, this setting will force the
seventh day to be calculated as overtime, regardless of total hours worked.
Circle one:
Yes
No
PAY INTERVAL ROUNDING:
Rounds all punches to the nearest selected interval.
Circle one (in minutes):
1
5
6
10
15
MAXIMUM TIME ON CLOCK:
The elapsed time after which the system assumes an employee missed
an ‘out’ punch.
Write value here:
When the following screen appears, select the terminal on which the employee
was enrolled and click ‘Next’.
Hours
AUTOMATIC HOLIDAYS:
Enable automatic holiday payment and list the applicable holidays.
Circle one:
Yes
No
If ‘Yes’ specify the number of calendar days that must elapse after hire
before an employee becomes eligible for automatic holiday pay.
Write value here:
days
List holiday name and date here:
Holiday Name
Date
The following screen will appear and close automatically. No action is required
by you.
19
timeQplus BIOMETRIC™ Installation Guide
timeQplus BIOMETRIC™ Installation Guide
4
Enter your employee data. After the employee records are entered into the software,
print the Employee Profile Report for all employees. Use the report to enroll the
employees on the TQ100 terminal using the PIN numbers from the report as ID
numbers in the TQ100.
SALARIED EMPLOYEES:
Information required to pay salaried employees appropriately.
Time required to work per pay period.
Write value here:
Hours
Refer to the TQ100 Terminal User Manual, Chapter Five: Fingerprint
Registration/Enrollment for details on enrolling on the TQ100 terminal.
Automatically pay salaried employees for Holidays.
Circle one: Yes No
After an employee is enrolled on the TQ100 terminal, the employee’s template must
be linked to the employee using the Enroll Template function in the software.
If ‘Yes’ specify time paid for each holiday.
Write value here:
Hours
TIME CARD APPROVALS:
You may optionally choose to prevent exporting Salaried or Hourly Time Cards
that have not been approved.
Export unapproved Hourly Employee’s Time Cards.
Circle one:
Yes
No
Export unapproved Salaried Employee’s Time Cards.
Circle one:
Yes
No
DEFINE SHIFTS:
Specify a set of rules for shift times and lunch schedules. Note that
Lunch Rules may be enabled without enabling the corresponding
Shift Rules.
Note: If some terms are unfamiliar, please review the Glossary
found in the TQ100 Terminal User Manual.
Select the Employee you wish to Enroll and click the ‘Enroll Template’ button. Click
‘Next’ to continue the fingerprint enrollment process.
Write shift name here:
Shift Rules:
Start
Stop
AM PM
AM PM
Round (min)
Grace (min)
Dock (min)
If lunch is enabled for this shift, then:
Lunch Rules:
Start
AM PM Duration:
End
AM PM Auto After:
Automatically pay Holidays for this shift?
minutes
hours
Circle one:
If ‘Yes’ specify time to pay for each holiday.
Write value here:
5
hours:min
timeQplus BIOMETRIC™ Installation Guide
Yes
No
The following screen will appear. Select the appropriate option for the TQ100
terminal in use and click ‘Next’.
timeQplus BIOMETRIC™ Installation Guide
18
Step 3: Employee Enrollment
Overview of Employee Enrollment
Employee data such as name, employee number, personal identification
number (PIN) and date of hire will be entered into the Attendance Rx software.
The employee PIN will be used in both the software and the TQ100 terminal to
link each transaction entered at the terminal back to the specific employee in the
Attendance Rx database.
The recommended process for enrolling employees is to first enter the employee
data via the Attendance Rx software. The software can automatically generate
the PINs or you may choose to input your own PINs. The ‘Auto-Increment New
Employee PIN’ is defaulted to ‘on’ during installation. To turn off this function,
click on ‘File’ [upper left on the Attendance Rx main screen], then ‘Employee
Options’…to display the screen below. Uncheck the box next to ‘Auto-Increment
New Employee PINs’, and click ‘OK’.
Write shift name here:
Shift Rules:
Start
Stop
AM PM
AM PM
Round (min)
Grace (min)
Dock (min)
If lunch is enabled for this shift, then:
Lunch Rules:
Start
AM PM Duration:
End
AM PM Auto After:
Automatically pay Holidays for this shift?
minutes
hours
Circle one:
Yes
No
If ‘Yes’ specify time to pay for each holiday.
Write value here:
hours:min
Write shift name here:
Shift Rules:
Start
Stop
AM PM
AM PM
Round (min)
Grace (min)
Dock (min)
If lunch is enabled for this shift, then:
Enter Employee Data
Log in to timeQplus BIOMETRIC Administrator, click on ‘Employee’ button.
Lunch Rules:
Start
AM PM
End
AM PM
Duration:
Auto After:
Automatically pay Holidays for this shift?
Circle one:
minutes
hours
Yes
No
If ‘Yes’ specify time to pay for each holiday.
Write value here:
hours:min
Note: If more than three shifts, copy this page to allow for
recording of additional shift information.
Password: You must set a password for the default Supervisor.
This password will be required to access the Attendance Rx Administrator
following installation.
Note: For password rules, please refer to the User Manual.
You may write your password here or choose to record it in a more
secure location:
17
timeQplus BIOMETRIC™ Installation Guide
timeQplus BIOMETRIC™ Terminal User Manual
6
Click on the ‘Comm Port’ tab to activate this type of communication if needed.
Import Employee Information
You may be able to import your employee information directly into
Attendance Rx if you already use Acroprint HRx or Intuit QuickBooks Pro or
above. If so, please refer to the User Manual for details on importing data to
Attendance Rx. Otherwise use Attendance Rx to record employee information.
CONGRATULATIONS!
With this completed pre-installation document, you are now ready to start
the system installation and configuration. If any questions arise during the
installation process, please refer to this guide, the hardware User Manual or
contact Customer Support.
.
Enter the appropriate data to match the settings entered into the
TQ100 during step 1 above.
The wizard will step you through completing the installation.
timeQplus Biometric setup is now complete.
7
timeQplus BIOMETRIC™ Installation Guide
timeQplus BIOMETRIC™ Installation Guide
16
When you are done click “Next” and select the option to “Add terminal”.
See picture below:
Installation Overview
Step One:
TQ100 Terminal Installation
Installing the TQ100 Biometric terminal(s) includes: configuring the terminal
through its built in keypad, mounting the terminal securely, connecting the
terminal to the computer system.
Step Two:
Enter the appropriate data to match the settings entered into the TQ100 terminal
during step 1 above.
Software Installation and Terminal Connection
Installing the software is as simple as inserting the timeQplus Biometric CD in
your computer and answering some questions. The same timeQplus Biometric
CD will be used to install either the Server or Client configuration. The Server
computer will host the database and the Clients will access the Server data
over your Ethernet network. If you plan to install the software on multiple
computers you must install the timeQplus Biometric server first, after
which the client software can be installed on any number of client computers
on the network. After the install is complete you will be prompted to restart
the computer. Then the Setup Wizard will prompt you to enter the rules your
Time and Attendance system will use to accurately track your employees’
time. The Setup Wizard will also assist connecting the terminal(s) to the
software application.
Step Three: Employee Enrollment
Enrolling the employees is a flexible process and can be adapted to your
environment and your setup preferences. Each employee will be entered
into the Attendance Rx application and assigned a Personal Identification
Number (PIN). The PIN is used for enrolling that employee on a TQ100
terminal. When you add additional terminals the Administrator can simply
add enrolled employees to the new terminal.
NOTE: The leading zeroes
can be left off.
15
timeQplus BIOMETRIC™ Installation Guide
timeQplus BIOMETRIC™ Installation Guide
8
If the Ethernet option is selected you will need to setup the parameters for the
Polling and Update cycle:
TQ100 Installation
Display Screen
Setup and
Data Entry
(0 - 9)
Exit/Cancel/Ignore
Biometric Reader
Scroll Up/Down in Menu
Displays the Menu
Power
On/Off
Confirm
and Save
timeQplus Biometric - TQ100 Terminal
NOTE: It may be advantageous to consult a computer technical resource for
some of this effort.
Your TQ100 Biometric Terminal can be configured for a network via an Ethernet or
Communication Port (RS232 or RS485) connection. It is not likely you will use an
RS485 connection therefore an RS232/RS485 Data Converter device is not included
in the box. If you choose this option the converter can be purchased locally or
directly from the manufacturer/dealer.
Polling cycle: The default value of 60 minutes will trigger the application to poll
the terminals every 60 minutes. This value can be adjusted to meet your
requirements. The polling cycle normally takes less than 30 seconds per
terminal.
Update cycle: Attendance Rx will update each terminal with changes to
employee names, employee In/Out status and total hours worked for the current
pay period. You may adjust the time and frequency based on your specific
needs.
NOTE 1: Because terminals are not available for punching In/Out during
a Polling or Update cycle, select times that avoid being within +/- 15
minutes of a shift START or STOP time.
NOTE 2: For installations with both Comm Port and Ethernet port
connections, specify different update times to avoid system
communication conflicts. A difference of 15 to 30 minutes is normally
sufficient.
9
timeQplus BIOMETRIC™ Installation Guide
timeQplus BIOMETRIC™ Installation Guide
14
Step 2: Software Installation and Terminal Connection
•
Insert the timeQplus Biometric CD into the CD-ROM drive and the
Attendance Rx install program should automatically start. Input the
appropriate information when requested. You will be asked to verify
the directory [location] for storing the application files; it is highly
recommended that you accept the default locations.
•
After all the files are loaded onto your computer, choose to ‘Restart’
your computer.
On restart, the Setup Wizard will automatically start and lead you through
entering the setup parameters you recorded in the pre-install document.
If you exit the Setup Wizard prior to completion, none of your data will
be saved.
NOTE: You will have the option to change the setup parameters later
if necessary. You also have the option to Initialize the Database which
will reset all of the parameters to the default values and restart the
Setup Wizard from the beginning. Instructions for this operation are
in the online Help.
When you get to the timeQplus Settings screen, press timeQplus
Settings button to get the screen below:
Then check the appropriate box (es) to enable timeQplus Biometric
Ethernet, Comm Port or both types of communication (terminals)
according to your network configuration on this computer.
Then click Next.
Step 1: TQ100 Terminal Configuration and Setup
The Fingerprint Identification Unit (FIU) Optical Overlay which is taped
to the front page enhances the ability of the FIU to read fingerprints
where the skin is very dry or for employees with fingerprints that are
marginal. Please note that the overlay is optional and not required.
If you choose to use the overlay, remove it from the plastic bag.
Remove the protective paper covers from the front and back side of
the Overlay, and press the Overlay onto the glass cover of the
fingerprint reader. Care should be taken to cover only the glass,
and remove any air bubbles from underneath the Overlay.
NOTE: The overlay can be removed and cleaned with a wet wipe as
necessary and reapplied to the glass. The sensitivity of the FIU can
also be adjusted at the employee level if necessary.
Connect the power cord to the TQ100 and to the electrical outlet.
DO NOT connect the TQ100 terminal to the computer at this time.
Ethernet TQ100 Terminal Configuration
From your Network Administrator obtain an IP address to be used
for the terminal.
To use the Ethernet connection, follow these instructions:
Press the Power On button
Press ‘Menu’
Using the “Down” scroll button, highlight –Setup-, then press ‘OK’
Scroll and highlight –Communication-, then press ‘OK’
Press ‘OK’ again and using the 0 thru 9 buttons on the keypad,
enter the -Device ID- number (must be a value from 1 to 10),
then press ‘OK’.
NOTE: The factory default is set to 1. If you plan to use only one
terminal, leave it at 1. If you will have more than one terminal,
each will need a unique ID number.
Scroll and highlight -Port No-, press ‘OK’ to change the number if
required, then press ‘OK’ again.
NOTE: The factory default is set to 5005 which is normally safe to
use. It is best to confirm this setting with your network
administrator who will provide you with another number if
necessary.
13
timeQplus BIOMETRIC™ Installation Guide
timeQplus BIOMETRIC™ Installation Guide
10
Scroll and highlight –IP Address -, press ‘OK’ and input the number provided
by your network administrator, and then press ‘OK’. Press ‘ESC’ to exit.
Scroll and highlight –Default gateway-, press ‘OK’ and input the number
provided by your network administrator, and then press ‘OK’. Press ‘ESC’ to
exit.
Scroll and highlight –RS485-. If it reads ‘NO’, no action is required. If it reads
‘YES’, press ‘OK’, then press a scroll button to change it to ‘NO’, then press
‘OK’.
Scroll and highlight –Ethernet-. If it reads ‘YES’ no action is required. If it
reads ‘NO’, press ‘OK’, then press a scroll button to change it to ‘YES’, then
press ‘OK’.
Now press ‘ESC’. If the terminal displays the ‘Save?’ message, press ‘OK’.
Then press ‘ESC’ several times until the terminal displays the ‘Welcome’
message screen.
NOTE: It is a good idea to record the following values for use during
step 2:
Device ID _____________________
IP Address ____________________
Terminal Configuration for Communication Port (RS232 or RS485)
Proceed to the TQ100 terminal setup procedure below:
Press the ‘Power On’ button
Press ‘Menu’
Using the ‘Scroll Down’ button, highlight the –Setup-, and then press ‘OK’
Scroll and highlight –Communication-, then press ‘OK’
Press ‘OK’ again and using the 0 thru 9 buttons on the keypad, enter the –
Device ID- number (must be a value from 1 to 10), then press ‘OK’
NOTE: The factory default is set to 1. If you plan to use only one terminal,
leave it at 1. If you will have more than one terminal, each will need a
unique ID number.
Scroll and highlight –Baud rate-, press ‘OK’ then use buttons to change the
number if required, then press ‘OK’ again.
NOTE: The factory default is set to 38400 which may not be correct for your
computer. This number must be the same as the value you determined in the
process you performed immediately above.
Scroll and highlight –RS485If you are configuring for RS232 this value should be set to ‘NO’
If you are configuring for RS485 this value should be set to ‘YES’
Press ‘OK’, then press a scroll button to change it to ‘YES’, or ‘NO’,
based on your configuration, then press ‘OK’.
BEFORE configuring the TQ100 terminal, it is important to know what the
‘Baud Rate’ is for the COM port that will be used to attach the TQ100 to your
computer. You can determine this value by doing the following:
Scroll and highlight –Ethernet-. If it reads ‘NO’, no action is required. If is
reads ‘YES’, press ‘OK’, then press a scroll button to change it to ‘NO’, then
press ‘OK’.
Right click on ‘Start’ button, and then click on ‘Explore’
Now press ‘ESC’. If the terminal displays the ‘Save?’ message, press ‘OK’.
Then press ‘ESC’ several times until the terminal displays the ‘Welcome’
message screen.
Locate the ‘My Computer’ folder or icon, right click on it, and then click on
‘Properties’
Click on the ‘Hardware’ tab, and then click on the ‘Device Manager’ button.
Click on the ‘+’ next to ‘Ports (COM&LPT)’
Double click on the Communications Port that the TQ100 is attached to
(normally COM1… you can verify with your computer support person)
Click on ‘Port Settings’ and write down the value in the ‘Bits per second’
field. This is the ‘Baud rate’ number you will input into the TQ100 terminal
during the following setup process. Close out all screens.
11
timeQplus BIOMETRIC™ Installation Guide
NOTE: It is a good idea to record the following values for use during step 2:
Device ID ___________________
Baud Rate ___________________
Before proceeding to the next step “Power-off” your PC.
Now CONNECT the TQ100 Terminal to your PC based on the type of
network connection you will be using. Now, “Power-on’ your PC.
timeQplus BIOMETRIC™ Installation Guide
12
Step 2: Software Installation and Terminal Connection
•
Insert the timeQplus Biometric CD into the CD-ROM drive and the
Attendance Rx install program should automatically start. Input the
appropriate information when requested. You will be asked to verify
the directory [location] for storing the application files; it is highly
recommended that you accept the default locations.
•
After all the files are loaded onto your computer, choose to ‘Restart’
your computer.
On restart, the Setup Wizard will automatically start and lead you through
entering the setup parameters you recorded in the pre-install document.
If you exit the Setup Wizard prior to completion, none of your data will
be saved.
NOTE: You will have the option to change the setup parameters later
if necessary. You also have the option to Initialize the Database which
will reset all of the parameters to the default values and restart the
Setup Wizard from the beginning. Instructions for this operation are
in the online Help.
When you get to the timeQplus Settings screen, press timeQplus
Settings button to get the screen below:
Then check the appropriate box (es) to enable timeQplus Biometric
Ethernet, Comm Port or both types of communication (terminals)
according to your network configuration on this computer.
Then click Next.
Step 1: TQ100 Terminal Configuration and Setup
The Fingerprint Identification Unit (FIU) Optical Overlay which is taped
to the front page enhances the ability of the FIU to read fingerprints
where the skin is very dry or for employees with fingerprints that are
marginal. Please note that the overlay is optional and not required.
If you choose to use the overlay, remove it from the plastic bag.
Remove the protective paper covers from the front and back side of
the Overlay, and press the Overlay onto the glass cover of the
fingerprint reader. Care should be taken to cover only the glass,
and remove any air bubbles from underneath the Overlay.
NOTE: The overlay can be removed and cleaned with a wet wipe as
necessary and reapplied to the glass. The sensitivity of the FIU can
also be adjusted at the employee level if necessary.
Connect the power cord to the TQ100 and to the electrical outlet.
DO NOT connect the TQ100 terminal to the computer at this time.
Ethernet TQ100 Terminal Configuration
From your Network Administrator obtain an IP address to be used
for the terminal.
To use the Ethernet connection, follow these instructions:
Press the Power On button
Press ‘Menu’
Using the “Down” scroll button, highlight –Setup-, then press ‘OK’
Scroll and highlight –Communication-, then press ‘OK’
Press ‘OK’ again and using the 0 thru 9 buttons on the keypad,
enter the -Device ID- number (must be a value from 1 to 10),
then press ‘OK’.
NOTE: The factory default is set to 1. If you plan to use only one
terminal, leave it at 1. If you will have more than one terminal,
each will need a unique ID number.
Scroll and highlight -Port No-, press ‘OK’ to change the number if
required, then press ‘OK’ again.
NOTE: The factory default is set to 5005 which is normally safe to
use. It is best to confirm this setting with your network
administrator who will provide you with another number if
necessary.
13
timeQplus BIOMETRIC™ Installation Guide
timeQplus BIOMETRIC™ Installation Guide
10
If the Ethernet option is selected you will need to setup the parameters for the
Polling and Update cycle:
TQ100 Installation
Display Screen
Setup and
Data Entry
(0 - 9)
Exit/Cancel/Ignore
Biometric Reader
Scroll Up/Down in Menu
Displays the Menu
Power
On/Off
Confirm
and Save
timeQplus Biometric - TQ100 Terminal
NOTE: It may be advantageous to consult a computer technical resource for
some of this effort.
Your TQ100 Biometric Terminal can be configured for a network via an Ethernet or
Communication Port (RS232 or RS485) connection. It is not likely you will use an
RS485 connection therefore an RS232/RS485 Data Converter device is not included
in the box. If you choose this option the converter can be purchased locally or
directly from the manufacturer/dealer.
Polling cycle: The default value of 60 minutes will trigger the application to poll
the terminals every 60 minutes. This value can be adjusted to meet your
requirements. The polling cycle normally takes less than 30 seconds per
terminal.
Update cycle: Attendance Rx will update each terminal with changes to
employee names, employee In/Out status and total hours worked for the current
pay period. You may adjust the time and frequency based on your specific
needs.
NOTE 1: Because terminals are not available for punching In/Out during
a Polling or Update cycle, select times that avoid being within +/- 15
minutes of a shift START or STOP time.
NOTE 2: For installations with both Comm Port and Ethernet port
connections, specify different update times to avoid system
communication conflicts. A difference of 15 to 30 minutes is normally
sufficient.
9
timeQplus BIOMETRIC™ Installation Guide
timeQplus BIOMETRIC™ Installation Guide
14
When you are done click “Next” and select the option to “Add terminal”.
See picture below:
Installation Overview
Step One:
TQ100 Terminal Installation
Installing the TQ100 Biometric terminal(s) includes: configuring the terminal
through its built in keypad, mounting the terminal securely, connecting the
terminal to the computer system.
Step Two:
Enter the appropriate data to match the settings entered into the TQ100 terminal
during step 1 above.
Software Installation and Terminal Connection
Installing the software is as simple as inserting the timeQplus Biometric CD in
your computer and answering some questions. The same timeQplus Biometric
CD will be used to install either the Server or Client configuration. The Server
computer will host the database and the Clients will access the Server data
over your Ethernet network. If you plan to install the software on multiple
computers you must install the timeQplus Biometric server first, after
which the client software can be installed on any number of client computers
on the network. After the install is complete you will be prompted to restart
the computer. Then the Setup Wizard will prompt you to enter the rules your
Time and Attendance system will use to accurately track your employees’
time. The Setup Wizard will also assist connecting the terminal(s) to the
software application.
Step Three: Employee Enrollment
Enrolling the employees is a flexible process and can be adapted to your
environment and your setup preferences. Each employee will be entered
into the Attendance Rx application and assigned a Personal Identification
Number (PIN). The PIN is used for enrolling that employee on a TQ100
terminal. When you add additional terminals the Administrator can simply
add enrolled employees to the new terminal.
NOTE: The leading zeroes
can be left off.
15
timeQplus BIOMETRIC™ Installation Guide
timeQplus BIOMETRIC™ Installation Guide
8
Click on the ‘Comm Port’ tab to activate this type of communication if needed.
Import Employee Information
You may be able to import your employee information directly into
Attendance Rx if you already use Acroprint HRx or Intuit QuickBooks Pro or
above. If so, please refer to the User Manual for details on importing data to
Attendance Rx. Otherwise use Attendance Rx to record employee information.
CONGRATULATIONS!
With this completed pre-installation document, you are now ready to start
the system installation and configuration. If any questions arise during the
installation process, please refer to this guide, the hardware User Manual or
contact Customer Support. We strongly encourage you to visit the manufacturer
knowledge base for Frequently Asked Questions at support.acroprint.com.
Enter the appropriate data to match the settings entered into the
TQ100 during step 1 above.
The wizard will step you through completing the installation.
timeQplus Biometric setup is now complete.
7
timeQplus BIOMETRIC™ Installation Guide
timeQplus BIOMETRIC™ Installation Guide
16
Step 3: Employee Enrollment
Overview of Employee Enrollment
Employee data such as name, employee number, personal identification
number (PIN) and date of hire will be entered into the Attendance Rx software.
The employee PIN will be used in both the software and the TQ100 terminal to
link each transaction entered at the terminal back to the specific employee in the
Attendance Rx database.
The recommended process for enrolling employees is to first enter the employee
data via the Attendance Rx software. The software can automatically generate
the PINs or you may choose to input your own PINs. The ‘Auto-Increment New
Employee PIN’ is defaulted to ‘on’ during installation. To turn off this function,
click on ‘File’ [upper left on the Attendance Rx main screen], then ‘Employee
Options’…to display the screen below. Uncheck the box next to ‘Auto-Increment
New Employee PINs’, and click ‘OK’.
Write shift name here:
Shift Rules:
Start
Stop
AM PM
AM PM
Round (min)
Grace (min)
Dock (min)
If lunch is enabled for this shift, then:
Lunch Rules:
Start
AM PM Duration:
End
AM PM Auto After:
Automatically pay Holidays for this shift?
minutes
hours
Circle one:
Yes
No
If ‘Yes’ specify time to pay for each holiday.
Write value here:
hours:min
Write shift name here:
Shift Rules:
Start
Stop
AM PM
AM PM
Round (min)
Grace (min)
Dock (min)
If lunch is enabled for this shift, then:
Enter Employee Data
Log in to timeQplus BIOMETRIC Administrator, click on ‘Employee’ button.
Lunch Rules:
Start
AM PM
End
AM PM
Duration:
Auto After:
Automatically pay Holidays for this shift?
Circle one:
minutes
hours
Yes
No
If ‘Yes’ specify time to pay for each holiday.
Write value here:
hours:min
Note: If more than three shifts, copy this page to allow for
recording of additional shift information.
Password: You must set a password for the default Supervisor.
This password will be required to access the Attendance Rx Administrator
following installation.
Note: For password rules, please refer to the User Manual.
You may write your password here or choose to record it in a more
secure location:
17
timeQplus BIOMETRIC™ Installation Guide
timeQplus BIOMETRIC™ Terminal User Manual
6
Enter your employee data. After the employee records are entered into the software,
print the Employee Profile Report for all employees. Use the report to enroll the
employees on the TQ100 terminal using the PIN numbers from the report as ID
numbers in the TQ100.
SALARIED EMPLOYEES:
Information required to pay salaried employees appropriately.
Time required to work per pay period.
Write value here:
Hours
Refer to the TQ100 Terminal User Manual, Chapter Five: Fingerprint
Registration/Enrollment for details on enrolling on the TQ100 terminal.
Automatically pay salaried employees for Holidays.
Circle one: Yes No
After an employee is enrolled on the TQ100 terminal, the employee’s template must
be linked to the employee using the Enroll Template function in the software.
If ‘Yes’ specify time paid for each holiday.
Write value here:
Hours
TIME CARD APPROVALS:
You may optionally choose to prevent exporting Salaried or Hourly Time Cards
that have not been approved.
Export unapproved Hourly Employee’s Time Cards.
Circle one:
Yes
No
Export unapproved Salaried Employee’s Time Cards.
Circle one:
Yes
No
DEFINE SHIFTS:
Specify a set of rules for shift times and lunch schedules. Note that
Lunch Rules may be enabled without enabling the corresponding
Shift Rules.
Note: If some terms are unfamiliar, please review the Glossary
found in the TQ100 Terminal User Manual.
Select the Employee you wish to Enroll and click the ‘Enroll Template’ button. Click
‘Next’ to continue the fingerprint enrollment process.
Write shift name here:
Shift Rules:
Start
Stop
AM PM
AM PM
Round (min)
Grace (min)
Dock (min)
If lunch is enabled for this shift, then:
Lunch Rules:
Start
AM PM Duration:
End
AM PM Auto After:
Automatically pay Holidays for this shift?
minutes
hours
Circle one:
If ‘Yes’ specify time to pay for each holiday.
Write value here:
5
hours:min
timeQplus BIOMETRIC™ Installation Guide
Yes
No
The following screen will appear. Select the appropriate option for the TQ100
terminal in use and click ‘Next’.
timeQplus BIOMETRIC™ Installation Guide
18
DO YOU WANT TO ENABLE 7th DAY OVERTIME:
If an employee works all seven days of a workweek, this setting will force the
seventh day to be calculated as overtime, regardless of total hours worked.
Circle one:
Yes
No
PAY INTERVAL ROUNDING:
Rounds all punches to the nearest selected interval.
Circle one (in minutes):
1
5
6
10
15
MAXIMUM TIME ON CLOCK:
The elapsed time after which the system assumes an employee missed
an ‘out’ punch.
Write value here:
When the following screen appears, select the terminal on which the employee
was enrolled and click ‘Next’.
Hours
AUTOMATIC HOLIDAYS:
Enable automatic holiday payment and list the applicable holidays.
Circle one:
Yes
No
If ‘Yes’ specify the number of calendar days that must elapse after hire
before an employee becomes eligible for automatic holiday pay.
Write value here:
days
List holiday name and date here:
Holiday Name
Date
The following screen will appear and close automatically. No action is required
by you.
19
timeQplus BIOMETRIC™ Installation Guide
timeQplus BIOMETRIC™ Installation Guide
4
Attendance Rx Software
Pre-Installation Preparation Document
It is recommended that you take a few minutes to record the answers
to questions that the Attendance Rx Setup wizard will ask during installation.
By thinking about how you run your company and having these answers ready
BEFORE launching Attendance Rx you will insure a fast and smooth startup.
If you need to change these answers you will be able to do so in the
Administration module after Attendance Rx is completely installed and ready
to accept employee transactions. Completing the following questionnaire prior
to installing Attendance Rx is highly recommended.
PAY PERIOD LENGTH: How often do you pay your employees?
Circle one:
Weekly
Bi-Weekly
(Every 2 Weeks)
Semi-Monthly
Monthly
CURRENT PAY PERIOD START DATE:
This date should be either the current date or a date in the past.
The system will attempt to match the PIN you used to enroll this employee’s
fingerprint at the terminal with the same PIN in the Attendance Rx database.
Write date here:
If you are using a Semi-Monthly pay period, you must also select the starting
date for the next Pay Period.
On the following screen, verify that the PIN identified by Attendance Rx is correct for
this employee. If yes, select the ‘Use existing template as the employee template’
option, then click ‘Next’.
Write date here:
CALCULATING OVERTIME:
Specify the number of hours worked after which overtime begins; can set both
daily and/or weekly; two levels are permissible.
Level 1
Daily
Weekly
Level 2
Hours
Hours
Hours
Hours
WEEKLY OVERTIME STARTS ON:
This field will only appear when a Semi-monthly or Monthly Pay Period option
is selected. You must specify on which day your work week begins (for weekly
and bi-weekly cycles, the pay period and work week begin on the same day).
Circle one:
Sun
Mon
Tue
Wed
Thu
Fri
Sat
A confirmation screen will appear [below]. Click ‘Finish’ to return to the Employee
screen and repeat the process to enroll all of your employees.
3
timeQplus BIOMETRIC™ Installation Guide
timeQplus BIOMETRIC™ Installation Guide
20
timeQplus BiometricTM Installation Guide
Thank you for purchasing the timeQplus Biometric Time and Attendance
System. This installation guide will provide guidance and instructions for
installing and configuring your new system.
Included in the timeQplus Biometric box you should find:
timeQplus BiometricTM software
TQ100 Biometric Terminal
Fingerprint Identification Unit (FIU) Optical Overlay
(NOTE: This is taped to the front page of the Installation Guide)
Terminal Mounting Plate and screws
After completing the above enrollment process, click on the ‘timeQplus’ button on the
Attendance Rx main screen [below]. Now you can assign employees to any or all
TQ100 terminal devices. Highlight the employee name from the ‘Unassigned
Employees’ area, then click the ‘>’ button to assign that employee to the selected
(highlighted) TQ100 terminal. Repeat this process for all those employees you want
to assign to the selected TQ100 terminal.
Power Adapter
30 ft. (9m) RS232 Cable
6 ft. (2m) Ethernet (CAT5) Cable
Hardware User Manual
21
timeQplus BIOMETRIC™ Installation Guide
timeQplus BIOMETRIC™ Installation Guide
2
To assign an employee to another TQ100 terminal, simply select (click to highlight)
a different TQ100 terminal from the list, then repeat the employee assignment
process as previously described.
Whenever an employee(s) has been assigned to a TQ100 terminal, it is highly
recommended that the ‘Update Statuses’ button be clicked. This will ensure that all
employees’ names will be shown on the TQ100 display screen when punching IN/
OUT on the assigned TQ100 terminals(s).
Congratulations! Your employees are now ready to begin using your new
timeQplus Biometric system.
timeQplus BIOMETRIC™ Installation Guide
22
BIOMETRIC FINGERPRINT TECHNOLOGY
NOTE: This equipment has been tested and found to comply with the limits for a Class B digital
device, pursuant to Part 15 of the FCC Rules. These limits are designed to provide reasonable
protection against harmful interference in a residential installation. This equipment generates,
uses and can radiate radio frequency energy and, if not installed and used in accordance with
the instructions, may cause harmful interference to radio communications. However, there is
no guarantee that interference will not occur in a particular installation. If this equipment does
cause harmful interference to radio or television reception, which can be determined by turning
the equipment off and on, the user is encouraged to try to correct the interference by one or
more of the following measures: Reorient or relocate the receiving antenna; Increase the
separation between the equipment and receiver; Connect the equipment into an outlet on a
circuit different from that to which the receiver is connected; Consult the dealer or an
experienced radio/TV technician for help.
PN: 06-0350-000 Rev. D
23
timeQplus BIOMETRIC™ Installation Guide
Installation Guide