1
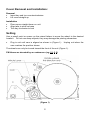
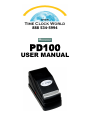
888 534-5994 PD100 USER MANUAL Easy to Use: The PD100 was designed as a time clock or time stamp, tracking day, hours and minutes. Simply align your time card and press down to stamp the day and time. CAUTION: Read and understand all instructions in the PD100 Time Clock User Manual before installing and operating the time clock. Do not install the PD100 in areas where it may be exposed to direct sunlight or high temperatures, such as near a heater. Do not install the PD100 where it may be exposed to excessive dust or to high humidity, resulting in condensation. Do not use this product near water or when you are wet. If the product comes in contact with any liquids, unplug the electric cord immediately. Do not plug the product back in until it has thoroughly dried. Securely install the PD100 on a stable, level surface. Place the PD100 where no one can step or trip over the cord. Do not place objects on the power cord that can cause damage or abrasion. 1 Cover Removal and Installation: Removal Insert key and turn counterclockwise Lift cover straight up Installation Place cover straight down on unit Align tabs in slots on base Turn key clockwise to lock Setting Use a pencil point or eraser on the raised letters to move the wheel to the desired location. Do not use sharp objects; they may damage the printing characters. Plug in unit until cam is aligned as shown in (Figure 1). Unplug unit when the cam reaches the position shown. The wheels can only be turned toward the front of the unit (Figure 1). PM Hours are denoted by an underscore (eg. 12, 5, 3) (Figure 1) 2 Day Setting Set hour wheel (center wheel) to 4 (4 AM) by moving the hour wheel toward the front of the unit and align 4 to Red Notch (Figure 2) Take a test print to check the day printed Adjust the day wheel by moving wheel toward the front of the unit Take a test print to confirm correct day is printing (Figure 2) Hour Setting Note: PM Hours are denoted by an underscore (eg. 12, 5, 3) Adjust hour wheel by moving the center wheel toward the front of the unit Align the correct hour with the Red Notch Minute Setting Hold down the minute lever (Figure 1) Adjust the minute wheel to One Minute Before the current time by moving the wheel toward the front of the unit and aligning the Red Notch Release the minute lever The correct minute should now line up with the Red Notch Completion Take test print and verify correct time Confirm ribbon is properly seated as shown in (Figure 3) Plug in PD100 Replace cover 3 Ribbon Replacement An Acroprint PD122 Replacement Ribbon will provide the best, trouble free performance of your PD100. Warning: Ribbon ink can stain your hands and clothes. Please use extra care when handling ribbon spools (your pants will thank you). Remove cover Grasp both ribbon spools Pull spools straight out from the side of the unit The new empty ribbon spool must be placed on the forward post (Figure 3) Pull new ribbon spools apart about 3-4 inches Push new spools straight onto posts, while aligning the tab on the spool with the slot on the PD100 Remove ribbon slack by turning rear spool tabs clockwise Verify proper printing Install cover (Figure 3) 4