1
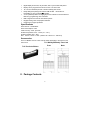
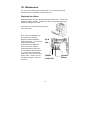
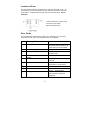
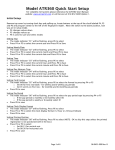
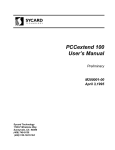
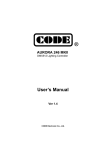
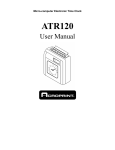
T100 USER MANUAL
WARNING
This equipment has been tested and found to comply with the limits for a Class A
digital device, pursuant to Part 15 of the FCC Rules. These limits are designed to
provide reasonable protection against harmful interference when the equipment is
operated in a commercial environment. This equipment generates, uses, and can
radiate radio frequency energy and, if not installed and used in accordance with the
instruction manual, may cause harmful interference to radio communications.
Operation of this equipment in a residential area is likely to cause harmful interference
in which case the user will be required to correct the interference at his or her own
expense.
Caution:
Changes or modifications not expressly approved by the party responsible
for compliance could void the user’s authority to operate the equipment.
For Repair or Service
Time Clocks
Division of Acroprint
5640 Departure Drive
Raleigh, NC 27616-1841
In USA 800-283-0594
www.timextimeclocks.com
is a registered trademark of TIMEX Corporation.
Manufactured under license.
Table of Contents
I.
Introduction.................................................................................1
Overview ................................................................................1
Features .................................................................................2
Specifications .........................................................................2
Accessories............................................................................2
II.
Package Contents ......................................................................3
III. Location of Components ............................................................4
IV. Setting the T100 .........................................................................5
Programming Hints ................................................................5
Programming Outline .............................................................6
Enter Programming Mode ......................................................6
Setting Pay Period and Current Print Line .............................7
Setting the Time .....................................................................8
Setting the Year, Month, and Date .........................................8
Selecting 12 or 24 Hour Print/Display Format........................8
Setting the Minute Printing Format.........................................8
Setting the Day Change Time ................................................9
Daylight Saving Time (DST)...................................................9
Setting Daylight Saving Time (DST) Start Date......................9
Setting Daylight Saving Time (DST) End Date.....................10
Setting DST Change Time ...................................................10
Inputting the Default Password ............................................10
Setting Two-color Printing .................................................... 11
Setting the Signal Tone Times..............................................13
Setting Signal Duration ........................................................14
Changing the Default Password ..........................................15
Exiting Program Mode..........................................................15
V.
Operating the T100...................................................................16
Punching Time Card ............................................................16
VI. Installing the T100: Wall-Mounting ...........................................17
VII. Maintenance.............................................................................19
Replacing the Ribbon...........................................................19
VIII. Troubleshooting........................................................................20
Location of Fuses.................................................................21
Error Codes..........................................................................21
I. Introduction
Caution:
•
Read and understand all instructions in the T100 User Manual before
installing and operating this time clock.
•
Do not install the T100 in areas where it may be exposed to direct sunlight or
high temperatures, such as near a heater.
•
Do not install the T100 where it may be exposed to excessive dust or to high
humidity, resulting in condensation.
•
Do not use this product near water or when you are wet. If the product
comes in contact with any liquids, unplug the electric cord immediately. Do
not plug the product back in until it has thoroughly dried.
•
Securely install the time clock on a stable, level surface, or if wall mounting
the T100, follow the wall mounting instructions to install it securely to the wall.
Place the time clock where no one can step or trip over the cord. Do not
place objects on the power cord that can cause damage or abrasion.
•
If this product does not operate normally, consult the “Troubleshooting”
section of this manual.
Overview
The Timex T100 is an electronic time clock that can be used for a weekly or a
bi-weekly pay period. The unique Timex T111 Time Card offers a weekly time
card on the front and a biweekly time card on the back. IN/OUT punches are
recorded across the card in six columns by using the buttons to select the
appropriate column. The T111 Time Card was made specifically to work in the
T100 Time Clock. Using the T111 Time Card will ensure optimal performance.
The T100 offers Two-color Printing, so punches outside normal times will print in
RED, allowing for quick and easy auditing of exception punches. The built-in
signal can be programmed to audibly denote start and stop work times.
With a built-in battery back-up, auto daylight saving adjustments and a perpetual
calendar, the T100 Time Clock will always print the correct time.
Features
•
•
Compact design for desktop or wall mounting.
Weekly or bi-weekly pay periods.
1
•
•
•
•
•
•
•
•
Digital display shows time, day and date, and is synchronized with printer.
Display can be programmed to show 12 Hour or 24 Hour Time.
12 or 24-hour & 60/100 (minute or decimal 100ths) print format.
Easily distinguish printing time between AM and PM. PM minutes or
hundredths are over scored 8:00 (8:00 PM).
2-color (red/black) ribbon can highlight punches outside of normal schedule in
Red ink by programming clock schedules.
Built-in signal tone to denote start and stop times.
Daylight Saving Time and perpetual calendar.
Password for program protection.
Specifications
Power Source: 115VAC/60Hz
Power Consumption: 0.3W
Clock Accuracy: ±3sec. per week
Ambient Temperature: 23°F~104ºF (-5℃~40℃)
Ambient Humidity: 20%~80%
Size: 8.0"W × 10.5"H × 5.6"D (203mm W × 267mm H × 142mm D)
Accessories:
The T112 Ribbon and T111 Time Card are made specifically to work in the T100
Time Clock.
T111 Weekly/Bi-Weekly Time Card
Front
T112 Two-Color Ribbon
II. Package Contents
2
Back
User
Manual
T100
Wall Mounting
Bracket
T100 User Manual
Wall Mounting
Template
Screw & Anchor
4 pcs Each
(2) Keys
M4x10 Screw
2 pcs
3
III. Location of Components
Front
Front
1)
2)
3)
4)
5)
6)
7)
8)
9)
Back
Time Card Receiver
Key Hole
<AM IN> Button
<AM OUT> Button
<PM IN> Button
<PM OUT> Button
<OT IN> Button
<OT OUT> Button
Digital Clock Display
Back
10) Program/Normal Mode Switch
11) Reset “A” (return to original factory settings)
12) Wall-mounting Keyholes
13) Fuse Access Door
4
IV. Setting the T100
Programming Hints
It is recommended that you program all functions in one sequence. However,
you may set functions independently by following the directions in parenthesis that
refer “to just entering the program mode”. Note: The time clock will not
function unless you exit Programming Mode by sliding the Programming
Switch to “Normal”.
The <AM IN> button functions as the feature selection button and advances you
through the program mode. Pressing the <AM IN> button allows you to skip over
programming steps or scroll to the setting you would like to change.
<OT OUT> saves the program changes to memory. IMPORTANT: If
is flashing the programming changes are not saved.
“OUT3”
Time is displayed in 24-hour format when the clock is in program mode
(i.e. 3:00 PM will be 15:00).
PM hours are indicated on Time Card by minutes being over scored. Example:
Two fifteen in the afternoon would print as 02:15 in 12-hour format or 14:15 in
24-hour format.
To return to the original factory settings press the <RESET> button with the end of
a pen with the programming switch in “NORMAL” mode. The <RESET> button
is within the hole marked “A” to the left of the PROGRAM switch. Warning:
Resetting will erase your current programming.
5
Programming Outline
The following is a reference list of the programming order and defaults.
Reminder: Pressing <AM IN> allows you to skip unnecessary steps.
numbers below match the numbers of the detail programming steps:
The
Enter programming mode
1.
Set pay period and current print line (Default: Weekly)
2.
Set time (Default: Eastern Standard Time)
3.
Set year, month and date (Default: Eastern Standard Time)
4.
Set 12 or 24 hour print format (Default: 12 hour)
5.
Set minutes to 60 minute or decimal hundredths (Default: 60 minute)
6.
Set the day change time (Default: Midnight)
7.
st
Set Daylight Saving Time start date (Default: 1 Sunday in April)
8.
Set Daylight Saving Time end date (Default: Last Sunday in October)
9.
Set Daylight Saving Time change time (Default: 2:00 AM)
10. Input default password (Default: 1234)
11. Set 2 color (red/black) printing (Default: N/A, set as desired)
12. Set signal tone times (Default: N/A, set as desired)
13. Set signal tone duration time (Default: 5 seconds)
14. Change default password (Default: 1234, change as desired)
Exit programming mode
If you do not need to change any of the default settings you may proceed to
Operating the T100.
Enter Programming Mode
•
Set Program switch on the back to “PROGRAM” position.
The buttons <AM IN>, <AM OUT>, <PM IN>, <PM OUT>, <OT IN>, <OT
OUT> will now function to program the clock.
6
1.
Setting Pay Period and Current Print Line
The T100 can be programmed for weekly or bi-weekly pay periods.
To Set Weekly Pay Periods
•
Press <OT IN> to advance the current day of week. The “2” indicates
a weekly pay period.
Note:
Set the clock to the current day of week.
2-1 = Monday
2-2 = Tuesday
2-3 = Wednesday
2-4 = Thursday
2-5 = Friday
2-6 = Saturday
2-7 = Sunday
•
Press <OT OUT> to save.
To Set Bi-weekly Pay Periods
•
Press <PM OUT> once. The “3” indicates a bi-weekly pay period.
Note:
•
Set the clock to the current day of your pay period.
Press <OT IN> to advance the current day of the bi-weekly pay period.
3-1
3-2
3-3
3-4
3-5
3-6
3-7
3-8
3-9
3-10
3-11
3-12
3-13
3-14
•
= first Monday of pay period
= first Tuesday of pay period
= first Wednesday of pay period
= first Thursday of pay period
= first Friday of pay period
= first Saturday of pay period
= first Sunday of pay period
= second Monday of pay period
= second Tuesday of pay period
= second Wednesday of pay period
= second Thursday of pay period
= second Friday of pay period
= second Saturday of pay period
= second Sunday of pay period
Press <OT OUT> to save.
7
2.
Setting Time
•
Press <AM IN> once to set the time.
•
Press <PM OUT> to advance the hours (note that the time is displayed in
24-hour format; 0-23 with 0 = midnight).
•
Press <OT IN> to advance the minutes.
•
Press <OT OUT> to save.
3.
Setting Year, Month, and Date
•
Press <AM IN> once to set the year, month and date (press <AM IN> 2 times
if just entering the programming mode).
•
Press <PM IN> to advance the year.
•
Press <PM OUT> to advance the month.
•
Press <OT IN> to advance the date.
•
Press <OT OUT> to save.
4.
Setting 12- or 24- Hour Print Format
The default setting is 12-Hour.
•
Press <AM IN> once to set the hour print format (press <AM IN> 3 times if
just entering programming mode).
•
Press <PM OUT> to toggle between 12- and 24-hour printing format.
•
Press <OT OUT> to save.
5.
Setting the Minute Printing Format
The T100 will print in standard minutes (60) or in decimal hundredths (100) of an
hour. Decimal hundredths allow time calculations without having to convert
minutes to decimal hours. 12:45 will be printed 12:45 in the standard minute
format or as 12.75 if hundredths is chosen.
•
Press <AM IN> once to set the minute printing format (60 min or Decimal
100ths) (press<AM IN> 4 times if just entering programming mode).
•
Press <OT IN> to change between “Cd 60” (Min) and “Cd 100” (Decimal
100ths).
•
Press <OT OUT> to save.
Note:
The clock will only display in the Minute format.
8
6.
Setting the Day Change Time
0:00 (Midnight) is the default time for the day change. The T100 will begin printing
on the next line of the time card (for the next workday) at this time.
•
Press <AM IN> once to set the day change time (press <AM IN> 5 times if
just entering programming mode).
•
Press <PM OUT> to advance the hour (00~23h) of the day change.
•
Press <OT OUT> to save.
If you use standard Daylight Saving Time and don’t desire
Two-Color Printing or Signal Tones you should exit
programming mode by sliding the programming switch to
“Normal”.
Daylight Saving Time (DST)
The default setting is as follows: The starting time is 2:00 AM on the first Sunday
in April. The ending time is 2:00 AM on the last Sunday in October.
Note: Once the Year has been set the default DST beginning and ending
dates and times will be set for Standard Time. If you do not observe
Daylight Saving you will need to disable this feature, by setting the month to
0.
7.
Setting Daylight Saving Time (DST) Start Date
•
Press <AM IN> once to set the DST start date (press <AM IN> 6 times if just
entering programming mode). The display reads “51 X-X” with 51 indicating
the start of DST & X-X indicates Month-Day.
•
Press <PM OUT> to advance the month DST begins.
(0-12, with 0=Disable DST, 1= Jan, 2 = Feb, etc.)
•
Press <OT IN> to advance the day DST begins.
•
Press <OT OUT> to save.
9
8.
Setting Daylight Saving Time (DST) End Date
•
Press <AM IN> once to set DST end date (press <AM IN> 7 times if just
entering programming mode). The display reads “52 X-X” with 52 indicating
the end of DST & X-X indicates Month-Day.
•
Press <PM OUT> to advance the month DST ends.
(0-12, with 0=Disable DST, 1= Jan, 2 = Feb, etc.)
•
Press <OT IN> to advance the day DST ends.
•
Press <OT OUT> to save.
9.
Setting the DST Change Time
•
Press <AM IN> once to set DST change time (press <AM IN> 8 times if just
entering programming mode). The display reads “53 X:XX” with 53 indicating
the time change of DST & X:XX indicates hour and minute.
•
Press <PM OUT> to advance the hour (0-23 hours) DST changes.
•
Press <OT OUT> to save.
If you do not desire Two-Color Printing or Signal Tones you
should exit programming mode by sliding the programming
switch to “Normal”.
10.
Inputting the Default Password
Input the default password to set Two-Color Printing or the Signal Tone.
•
•
Press <AM IN> once (press <AM IN> 9 times if just entering programming
mode). The display reads “00 00”.
The default password is “1234”.
Press <AM OUT> to advance the first digit.
Press <PM IN> to advance the second digit.
Press <PM OUT> to advance the third digit.
Press <OT IN> to advance the fourth digit.
•
Press <OT OUT> to input the password and enter into Two-color Printing
set-up.
Note:
An “E-40” error code means the password was incorrect. It was
either entered incorrectly or the default password (“1234”) has
already been changed (see pg 15 for resetting the password). Once
you enter the password, it remains in effect until exiting
programming mode.
10
11.
Setting Two-Color Printing
Time cards can be audited more easily by highlighting punches outside the normal
work schedule in Red. The T100 allows 18 red/black color changes. If you set
a color change it will occur every day.
Note: The default color is black. The clock has to be programmed to print red at
specific times. Once a color change occurs the clock will continue to print in that
color until another color change event occurs.
The following is a sample schedule of events for an 8:00 AM to 5:00 PM workday
with an hour lunch from 12:00 Noon to 1:00 PM (13:00). During this schedule the
clock prints RED from 8:01 AM until 12 Noon. The clock prints BLACK during
lunch. The clock prints RED from 1:01 PM (13:01) until 5:00 PM (17:00). At
5:00 PM the clock prints BLACK for exit punches. At 5:30 (17:30) the clock prints
RED to note OT punches. The clock returns to BLACK print at 07:30 in the
morning for IN punches.
On the chart below, the IN/OUT under each event denotes the event selection
shown on the bottom of the display while programming.
Event
(Max 18)
1
2
3
4
5
6
Print in
Red
”IN1”
08:01
Print in
Black
”OUT1”
Begins Printing
12:00
13:01
17:00
17:30
07:30
Red
Black
Red
Black
Red
Black
Note: A color change cannot be set at 0:00. Setting an existing color
change event to 0:00 can be used to remove an individual event within a
schedule.
•
Press <AM OUT> to toggle the color change between “IN1”(RED Print) or
“OUT1”(BLACK Print) (If entering programming mode begin at “Inputting the
Default Password” section & continue to this step).
(“IN1” / “OUT1” shown on the lower left of the Display)
•
Press <PM OUT> to advance the hour of the event.
•
Press <OT IN> to advance the minute of the event.
•
Press <OT OUT> to save and advance to the next scheduled event (example
“02 12:00”).
•
Repeat as necessary until all desired events are set.
11
Use the following chart to create a schedule to assist in programming
Two-Color Printing.
Event
1
2
3
4
5
6
7
8
9
10
11
12
13
14
15
16
17
18
Print in
Red
”IN1”
12
Print in
Black
”OUT1”
12.
Setting the Signal Tone Times
The T100 allows for 32 scheduled audible signals. If you set a signal it will occur
every day and sound for the set signal duration.
Following is a sample schedule of events for an 8:00 AM to 5:00 PM work
schedule with one hour lunch from 12:00 Noon to 1:00 PM (13:00). This
schedule has four signals.
Event (Max 32)
1
2
3
4
Signal Tone
08:00
12:00
13:00
17:00
Description
Start of Work
Start of Lunch
End of Lunch
End of Work
Note: A signal cannot be set at 0:00. Setting an existing color change
event to 0:00 can be used to remove an individual event within a schedule.
•
Press <AM IN> once to set the audible schedule (If entering programming
mode begin at “Inputting the Default Password” section & continue to this
step). The display shows “01 00:00”.
•
Press <PM OUT> to advance the hour of the event.
•
Press <OT IN> to advance the minute of the event.
•
Press <OT OUT> to save and advance to the next scheduled event,
(example “02 12:00”).
•
Repeat as necessary until all desired events are set.
13
Use this chart to create a
schedule to assist in programming
Signal Tones.
13.
Setting Signal Duration
The T100 can produce a signal for 0 to 30 seconds
(Default is 5 seconds).
•
Press <AM IN> once (If entering programming
mode begin at “Inputting the Default
Password” section & continue to this step).
•
Press <OT IN> to advance the seconds of
duration.
•
Press <OT OUT> to save.
14
Event
1
2
3
4
5
6
7
8
9
10
11
12
13
14
15
16
17
18
19
20
21
22
23
24
25
26
27
28
29
30
31
32
Signal
Tone
14.
Changing the Default Password
The T100 uses a four-digit password to protect programmed settings. Note:
once the password is set you will be asked to enter it each time you enter
the programming mode. If you set a new password you should write it down
and store it in a safe place.
Note: If a new password is lost it can be reset to the default”1234” by
simultaneously pressing and holding <AM IN> & <AM OUT> buttons for 10
seconds. This will allow access to the clock’s functions without resetting the
current programming. If you wish to reset the programming and password to
factory defaults press the <RESET> button on back of clock with the programming
switch set to “NORMAL” mode.
•
Press <AM IN> once. “12 34” is displayed. (If entering programming mode
begin at “Inputting the Default Password” section & continue to this step).
Press <AM OUT> to advance the first digit.
Press <PM IN> to advance the second digit.
Press <PM OUT> to advance the third digit.
Press <OT IN> to advance the fourth digit.
•
Press <OT OUT> to save the password.
Important: Write the new password here
Once the password has been set the T100 will display “0000” each time you enter
the programming mode. The password must be entered and
<OT OUT>
pressed to enter program mode. If the password is incorrect, the T100 will beep
and Error Message “E-40” is displayed. You will not be allowed to enter the
programming mode until the correct password is entered.
Exiting Program Mode
When finished programming the T100, slide the program switch to the “NORMAL”
position. Note: The clock will not function unless you exit Programming
Mode by sliding the Programming Switch to “NORMAL”.
15
V. Operating the T100
The print on the time card progresses to the right through out the day as the
IN/OUT buttons are pressed. The T100 prints in the column of the time card
indicated on the lower line of the Time Clock Display. The column is selected
with the corresponding button shown in the table below:
MORNING
AFTERNOON
OVERTIME
Time
Card
IN
OUT
IN
OUT
IN
OUT
Display
IN1
OUT1
IN2
OUT2
IN3
OUT3
Button
<AM IN>
<AM OUT>
<PM IN>
<PM OUT>
<OT IN>
<OT OUT>
The print column will not change until another column button is pressed.
A typical schedule would use the buttons as shown below:
•
Arrive for the day - <AM IN>
•
Out for Lunch - <AM OUT>
•
In from Lunch - <PM IN>
•
Leave for the day - <PM OUT>
Punching Time Card
•
Press appropriate <IN> or <OUT> button to choose print column.
•
Insert time card into slot with your pay period type (Weekly or Bi-Weekly) on
the time card facing you. Note: The clock cannot differentiate the pay period
and will print on either side of the time card.
•
The card is automatically pulled in and printed. Do not
attempt to pull the card out during the printing
operation or insert any objects other than time cards.
Doing so can result in damage.
•
Remove time card when it is returned and the motor
stops.
16
VI. Installing the T100
The T100 may be installed on a flat surface or wall-mounted. No special wiring is
needed. However, we recommend installing the T100 on a separate power
circuit. We do not recommend using a power strip. Always follow basic safety
precautions when using this product to reduce the risk of injury, fire, or electric
shock.
Wall-mounting
1. Using Wall Mounting Template install screw (included) in wall at position A,
37” to 49” above floor. Leave a 1/8” gap between the screw head and wall.
Use a screw anchor (included) if necessary.
Wall Mounting
Template
2.
Install screws (included) at positions B and C with 1/8” gap between the
screw head and wall. Install screw anchors (included) if necessary.
3.
Use two M4X10 screws
(included) to attach the
wall-mounting bracket to the
bottom of the T100.
17
4.
Line up the keyholes on the back of the T100
with the mounting screws. Slide the T100
downward to secure it to the wall.
5. Secure mounting bracket to
wall with screw (included) or
mark hole and install screw
anchor (included) if necessary.
18
VII. Maintenance
The case may be cleaned with a mild detergent. Do not use any chemical
cleaners as they could damage or discolor the case.
Replacing the ribbon
Replace the ribbon when the print becomes light or hard to read. Use the T112
replacement ribbon cassette. Attempting to “re-ink” the cassette could cause
permanent damage to the printer.
Unlock front cover and pull forward on the blue
“face” of the clock.
Next, remove and discard the pin
and clip (first time removal).
Remove the ribbon cassette by
pulling it straight up. Turn the feed
knob on the new ribbon
counterclockwise to tighten the
ribbon so that it can easily be
inserted between the print head
and the stainless steel print shield.
It is not necessary to replace the
pin and clip. Place the new ribbon
into the T100. Check to be sure
the ribbon is still tight. Close the
front cover.
Pin &
Clip
Ribbon
Feed Knob
19
Cassette
Ribbon
VIII. Troubleshooting
Problem
Clock does not
accept time cards
Possible Cause
AC power is OFF
Check
Restore power
Power cord is
disconnected
Plug cord into outlet
AC fuse blown
Replace AC240V 1A fuse
DC fuse blown
Replace DC 12V 2A fuse
T100 in “Program” mode
Return switch to “Normal”
position
Replace ribbon cassette
Printing light
Worn ribbon
Reinstall ribbon cassette
Printing in wrong
position
Ribbon cassette not
seated correctly
Incorrect pay period
starting day
Insert card correctly
Not printing
Time card inserted
incorrectly
Printing head fuse blown
Reinstall ribbon cassette
Clock stopped
Ribbon cassette not
seated correctly
AC power is off
Power cord is
disconnected
Plug cord into outlet
AC fuse blown
Replace AC240V 1A fuse
20
Set correct day
Replace DC 12V 1.5 Amp
fuse
Restore power
Location of fuses
The fuse panel is located on the back of the T100 in the lower left corner. To
access fuses, disconnect the power from the clock and remove the screw that
secures door. Replace blown fuse with only the same rated fuse. Do not
substitute.
1. Printer Head Fuse (1.5A DC 12V)
2. AC Fuse (1A AC 240V)
3. DC Fuse (2A DC 12V)
Error Codes
The T100 has built-in diagnostics to guide you in maintaining your time clock.
These Error Codes, when occurring, will be seen on the display.
Code
Meaning of Error
Check
E-01
Clock motor or sensor failure
E-03
E-05
Card positioning
Card does not feed correctly
E-30
E-33
Printer head fails to return to home
position
Can’t change color
Unplug and reconnect power cord
or turn the program switch on-off
twice, letting the clock readjust.
Verify correct card (T111)
Verify correct card (T111)
Re-insert card.
Contact dealer or Service Center
E-35
The card can’t be returned
E-37
E-38
Sensor cannot locate card
Printer head jammed
E-40
Wrong password entered
21
Check that the ribbon is installed
correctly.
Make sure there are no
obstructions in card receiver
Contact dealer or Service Center
Remove ribbon and check for
binding. Reinstall ribbon.
Enter the correct password or
refer to section “Setting the
Password”.
Cycling the power to the T100 may also correct certain error conditions.
If any of these measures fail to correct the error condition, contact the dealer or
Service Center at: 1-800-283-0594 or go to: www.timextimeclocks.com
To return to the original factory settings press the <RESET> button with the end of
a pen with the programming switch in “NORMAL” mode. The <RESET> button
is within the hole marked “A” to the left of the PROGRAM switch. Warning:
Resetting will erase your current programming.
22
Time Clocks
Division of Acroprint
5640 Departure Drive
Raleigh, NC 27616-1841
In USA 800-283-0594
www.timextimeclocks.com
is a registered trademark of TIMEX Corporation.
Manufactured under license.
1
Product Registration Card
Fax to 919.850.0720 or Drop in envelope to:
Departure Dr. Raleigh, NC 27616
5640
T100
Model No.
Serial No.
First Name
Last Name
Title
Company Name
Address
City
State
Daytime Phone with Area Code
Zip
Email Address
Fax#
Cut Here
Purchased From
Purchase Date
So that we may serve you better, please indicate your primary business activity.
(01) Manufacturing
(07) Hotel/Motel
(02) Wholesale
(08) Banking/Financial
(03) Retail
(09) Medical/Dental
(04) Government
(10) Construction
(05) University/School
(11) Other
(06) Restaurant
Number of Employees using this product
(20) 1-10
(23) 50-75
(21) 11-25
(24) 76-100
(22) 26-49
(25) 100+
Annual Sales in dollars
(30) Under $100,000
(31) $100,000 – 250,000
(32) $250,000 – 500,000
(33) $500,000 – 1,000,000
(34) $1 million – 5 million
(35) $over 5 million
Do you use Microsoft Windows?
(40) Yes
(41) No
Are you interested in receiving additional product information?
(50) Yes
(51) No
www.timextimeclocks.com
2
Time Clocks
Division of Acroprint
5640 Departure Drive
Raleigh, NC 27616-1841
In USA 800-283-0594
www.timextimeclocks.com
is a registered trademark of TIMEX Corporation.
Manufactured under license.
P/N 06-0337-000 Rev. B