1
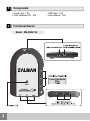
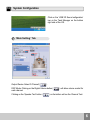
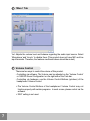
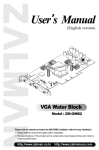
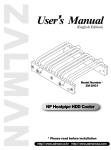
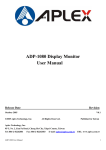
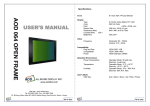
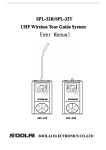
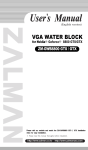
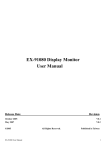
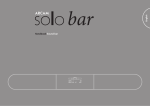
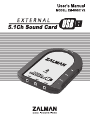
1
Safety Notes
Please read these "Safety Notes" carefully before using the product.
After reading, please keep this manual in a safe place.
Marks
The following marks indicate proper use of the product, and how to avoid injury to
yourself or the product.
Please understand the meaning of each mark before you read the main part of the
manual.
Warning
This mark indicates that improper use may result in serious injury or death.
•If the following accidents occur, please stop using the product.
When accidents arise, please contact the customer service center.
•Smoke or strange smell comes from the product.
•The product is spilled with water, or pierced by a sharp metallic object.
•The product is dropped or a part is broken.
•Please do not disassemble the product by yourself.
•Please do not disassemble or modify the product.
•Please do not connect plugs if they are not appropriate for use with this product.
Notice
This mark indicates that improper use may result in damage to the product.
•Please note that keeping the product at high temperatures or near a heat source,
such as a stove, or exposed to sunlight, may cause deformation or deterioration of
the product.
•When the product becomes dirty after use, please clean with a soft cloth. Do not
use benzene or solvents.
Please set the volume level of the sound card to a minimum when you start the
program then gradually adjust the volume level to prevent possible hearing damage.
Prolonged exposure to excessive noise can cause hearing loss. Make sure that the
volume level is kept at a proper level.
Disclaimer) Zalman Tech Co., Ltd. is not responsible for any damages due to
external causes, including but not limited to, improper use, problems
with electrical power, accident, neglect, alteration, repair, improper
installation, or improper testing.
1
2
Specifications
• Input: 1 USB Connection Port(USB 1.1 / 2.0 Compatible)
• Output: 3.5mm Stereo Jack x3(Front, Rear, Center/Subwoofer) 0.6W per channel,
1 Digital Port (Both Optical & Coaxial, capable of outputting 5.1 channels)
• Chipset: C-Media CM6206 5.1 Sound
• Sampling Rate: 16bit 44.1kHz, 48kHz Compatible
• Size(WxHxD): 80x15x108mm
• Power Consumption: Minimum 3.3V, 150mA (Standard 5V, 500mA)
3
Product warranty
1) Please make sure that the product certificate is included in the product package.
- This product includes a limited warranty certificate.
Please fill in the warranty form and keep it in a safe place.
2) Warranty Period
- The warranty period is one year from the date of purchase. You may contact the
customer service center based on the status of the certificate of the warranty. For request
for repair, please refer to the warranty certificate.
3) Repair after the warranty period has expired
- Please contact our customer service center for a repair after the warranty period has
expired. Repair services may be provided at the customer's expense.
4) Request for repair services
- Please carefully read the above "Troubleshooting Guide" before issuing a request for
repair.
When requesting repair service, please provide following information.
• Model name: ZM-RSSC V2
• Your Telephone number, mailing address and e-mail address.
• Condition of the broken part (in detail)
4
System Requirements
SOFTWARE
Operating System
Window 98 SE, Window 98 ME, Windows 2000, Windows XP, Vista
HARDWARE
Notebook : Pentium III 700MHz or greater (1GHz or greater recommended)
Desktop : Pentium III 800MHz or greater (1GHz or greater recommended),
Celeron 1.3GHz or greater
Memory : 256MB or greater
USB Port : USB 1.1 / 2.0 compatible
2
5
Components
•Sound Card : 1 EA
•Utility Installation CD : 1EA
6
Functional Diaram
Model : ZM-RSSC V2
3
•USB Cable : 1 EA
•User's Manual : 1 EA
7
Connecting Speakers or Headphones to the Sound Card
Multi-Channel Headphones
Channel Speaker System
※A 3.5mm stereo cable is a speaker accessory or a separately purchased item.
Speakers are not included with the sound card. Either a speaker system or
headphones must be purchased separately from this card.
Stereo-3.5mm cables must also be purchased separately.
4
8
Installation
Connect the headphones' USB Connector to the PC's USB port.
The OS will automatically detect the headphones, and the "Found New Hardware"
message will pop up.
※This product could generate a slight pop-up noise during connection to or removal
from one of the PC’s USB ports.
Therefore, it is recommended that the headphones be connected or removed from
the PC while not wearing the headphones.
9
Software Installation
Inserting the provided Driver & Utility CD into the PC's CD-ROM/DVD-ROM drive will
generate an auto run of the installation program.
(If auto run is not executed, then run the setup.exe file from the CD)
Proceed with the installation according to the directions. Once installation is
complete, restart the system.
5
10
System Configuration
Click on the ‘USB 3D Sound onfiguration’
icon in the Task Manager on the bottom
right side of the OS.
‘Main Setting’ Tab
Output Device: Select '6 Channel'(
)
DSP Mode: Clicking on the Digital Volume button(
each channel.
Clicking on the ‘Speaker Test’ button (
) will allow volume control for
) on the bottom will run the Channel Test.
6
‘Mixer’ Tab
Vol: Adjusts the volume level and balance regarding the audio input source. Select
'Microphone' and 'Line In' to disable them (This product does not have MIC and line
input terminals. Therefore, the features mentioned above should be muted).
Volume Control
There are two ways to control the volume of this product.
- Controlling via software: The Volume can be adjusted on the ‘Volume Control’
or ‘USB 3D Sound Configuration’ on the right side of the Task bar.
- Controlling via hardware: use the Volume Control Buttons (up/down) of the
headphones' Volume Control.
※The Volume Control Buttons of the headphones’ Volume Control may not
function properly with certain programs. In such a case, please control via the
software.
※‘REC’ setting is not used.
7
‘Effect’ Tab
Environment: Produces various sound field effects of concert halls, living rooms,
assembly halls, etc.
Environment Size: Select the size of the listening room (small, normal, large). It is set
to normal by default.
Equalizer: Volume can be controlled by frequency, and a preset mode can also be
used.
Note
C-Media 3D 106 Configuration program is a general-purpose software
provided for all soundcards using C-Media chipsets. Therefore, certain
features related to MIC Input, Recording, and S/PDIF Output are not
applicable to ZM-RSSC V2.
8
11
Operational Guide
1) Headphones
Once the sound card is installed on the computer and multi-channel headphones
are ready (See
and
), put on the headphones and adjust the sound volume
to a suitable level.
※CAUTION: The Soundcard’s Volume levels should initially be set low and raised
gradually to prevent loudness related auditory discomfort and possible hearing
damage.
※Please wear headphones only after the sound card has been installed
completely and is ready to use. When increasing the volume level of the sound
card, please adjust the volume level within a range where the sound quality is
not distorted for optimal results.
2) Speaker system
Once the sound card is installed on the computer and a multi-channel speaker
system is ready (See and ), turn on the speaker system and adjust volume of
the sound card to a suitable level.
※CAUTION: The Soundcard’s Volume levels should initially be set low and raised
gradually to prevent loudness related auditory discomfort and possible hearing
damage.
※Please turn on the power of the speaker system only after the speaker system
has been connected to the sound card correctly. When increasing the volume
level of the sound card, please adjust the volume level within a range where the
sound quality is not distorted for optimal results.
Volume Control
If the volume dial is turned clockwise, the volume INCREASES.
If the dial is turned counterclockwise, the volume DECREASES.
•Front: Volume control for Front Left and Front Right channel
•Rear: Volume control for Rear Left and Rear Right channel
•C/SW: Volume control for Center and Sub Woofer channel
9
If you want to listen to DVD 5.1 channel sound using this sound card,
additional settings are required on the DVD player software.
Up Power DVD 4.0 Settings
1) Audio Output
Right click > ‘configuration’ > ‘Audio’ tab > Audio Output’
- Select “6 Speaker”.
The Power DVD software, which
comes bundled with the DVDROM Drive, may not support '6
Speaker' mode.
Digital Output
※You can output 5.1 channel digital
signals to an external device, e.g., an
external decoder, speaker system with
internal decoder etc. using the digital
(“Coaxial/Optical”) output located next
to the USB Port. In this case, analog
output is automatically turned off.
10
2) Miscellaneous Settings
Click the Sound Card's icon in the Windows System Tray to open the sound card's
control panel.
Go to Settings > Audio > Advanced > Miscellaneous.
If you are not satisfied with the volume level,
select 'Noisy Environment.'
In general, however, select 'Quiet
Environment.'
※Recommended DVD Player Software: Power DVD 4.0 or WinDVD 4.0
12
Troubleshooting Guide
1) When there is no sound signal, please check the following.
•The USB controller is activated in the CMOS/BIOS settings of the PC.
• Both the sound card and the speakers/headphones are turned on.
• The play button of the audio output device, e.g. CD player, is working properly.
•The volume level of the audio output device is turned up enough to be heard.
•The PC and headphones or speaker system are properly connecte to the sound
card.
•The volume level of the Media Player is set properly.
- The volume level may be different for each title of movie, music or game CDs.
- The surround quality may not be high enough if the title being played does not
support 5.1 channels.
11
2) If sound plays in only two channels
•Check the Windows version of your PC. The sound card requires at least Windows
98 SE to operate in multi channels.
•Go to the “Start” menu. Select “Settings” > “Control Panel” > “Sounds and
Multimedia”. A dialog box titled “Sounds and Multimedia Properties” should appear.
Click the “Audio” tab. Check to see that the Preferred Device in the “Sound
Playback” section is set to “USB Audio”.
•Go to the Control Panel and check whether the Speaker has been set to ‘Surround
Sound Speaker’ or ‘5.1 Surround Sound Speaker’.
•For the DVD player, check whether the audio output has been set to ‘6 Speakers’.
3) When the sound is distorted, or noise is generated, please check the following.
•The tone control and volume of the audio device is set properly.
•The volume of the sound card is set properly.
•All cables are properly connected and free of damage or defects.
•Access terminals of the headphones or the speaker system are properly connected
for each channel.
•Your media, e.g. CD or DVD, is not damaged.
Note : Some PCs with VIA 693 or Intel 440 BX mother boards, or low power
consumption (less than 150 Watts) may not work properly. This is because
these devices were released while USB technology was still immature,
hence sufficient transmission quality may be insufficient.
13
Manufacturer & Customer Service Center
Customer Service Center (For North / South American Consumers)
Zalman USA, Inc.
1565 Harmony Circle, Anaheim, CA 92807, USA
Tel: +1-714-693-8880 / Fax: +1-714-693-8890
http://www.zalmanusa.com / e-mail: [email protected]
Manufacturer
Zalman Tech Co., Ltd.
#1007 Daeryung Techno Town III, 448 Gasan-dong,
Gumchun-gu, Seoul, Korea
Tel: 82-2-2107-3232 / Fax: 82-2-2107-3322 /
http://www.zalman.co.kr / e-mail: [email protected]
12
FCC Warning Statements
FCC Warning Statements Interference with Other Devices
Note: This equipment has been tested and found to comply with the limits for a Class B
digital device, pursuant to part 15 of the FCC Rules. These limits are designed to
provide reasonable protection against harmful interference in a residential
installation. This equipment generates, uses and can radiate radio frequency
energy and, if not installed and used in accordance with the instructions, may
cause harmful interference to radio communications. However, there is no
guarantee that interference will not occur in a particular installation.
If this equipment does cause harmful interference to radio or television reception,
which can be determined by turning the equipment off and on, the user is
encouraged to try to correct the interference by one or more of the following
measures:
- Reorient or relocate the receiving antenna.
- Increase the separation between the equipment and receiver.
- Connect the equipment into an outlet on a circuit different from that to which the
receiver is connected.
- Consult the dealer or an experienced radio/TV technician for help.
Note: You are cautioned that any change or modifications to the equipment not
expressly approved by the party responsible for compliance could void your to
operate such equipment.
In case that shielded cables were used on the test, operation manuals shall contain
the following statements or their equivalent :
Note: This unit was tested with shielded cables on the peripheral devices. Shielded
cables must be used with the unit to insure compliance.
This device complies with part 15 of the FCC Rules.
Operation is subject to the following two conditions. :
(1) This device may not cause harmful interference, and (2) this device must
accept any interence received, including interference that may cause undesired
operation.
13
MEMO
14