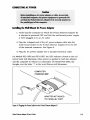
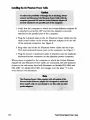
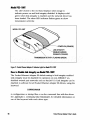
1
POCKET ITHERNET ADAPTER Ill
USER'S GUIDE
XIRCOM CORF'ORNE
26025 M
u
mRoad
Colob, Colifomio 91302
(818)8787600
(818)8787630FAX
XlRCOM EUROPE Nv
Eisctqpnhoffaon 8284
2100 Antwerp, Belgium
32 3 32634-94
32 3 3263150FAX
XlRCOM ASIA LTD
1604Cmiwy S~IHIIE
1-1 3 D'Aguilor St
(852)5252078
(852)525-8955FAX
Hong Kong
June 1993
This equipment has been tested and found to comply with the limits for Class A digital devices
pursuant to Part 15 of the FCC Rules. These l i t s are designed to provide reasonable protection
against harmful interference when the equipment is operated in a commercial environment. This
equipment generates, uses, and can radiate radio frequency energy and, if not installed and used
in accordance with the instruction manual, may cause interference to radio communications.
operation of this equipment in a residential area is likely to cause interference in which case the
user will be required to correct the interference at his own expense.
The user is cautioned that changes and modiications made to the equipment without the
approval of the manufacturer could void the user's authority to operate this equipment.
It is suggested that only shielded and grounded cables be used with the equipment to ensure
compIiance with FCC rules.
Xircom reserves the right to make improvements and/or changes in the products and programs
described in this User's Guide at any time without notice.
The software described in this User's Guide is furnished under a license and may be used or
copied only in a m d a n c e with such license.
01993 Xlrcom, Iac AU nghts reserved. Neither this publication nor any part of this
publication may be copied, photocopied, reproduced, translated or reduced to any electronic
medium or machine readable form without the prior written permission of Xircom.
Xircom is a registered trademark and Pocket Ethernet Adapter is a trademark of Xircom, Inc
All other product, brand, or trade names used in h s publication are the trademarks of their
respeaive trademark owners.
IMPORTANT REFERENCE INFORMATION
Fill in tbe blanks below and make copies of tbis page for easy
access wben caaSng Technical Support.
Support Telephone Number (see page vi):
Model Number:
(from the Adapter label)
Serial Number:
(from the Adapter label)
2002287-0018 6/93
ii
Pocket EthernetAdapter 111 user'sGuide
CONTENTS
PREFACE ..............................................................................................
Technical Support ...................................................................................
Bulletin Board System ...........................................................................
Limited Warranty. Disclaimer. and Limitation of liability ............................
INTRODUCTION ....................................................................................
Model Numbers .......................................................................................
S h r e ................................................................................................
local Parallel Printer Access ......................................................................
..
Spechations ..........................................................................................
AC Power ................................................................................................
HARDWARE INSTAUATlON .....................................................................
Unpacking and Inspection ........................................................................
Package Contents ....................................................................................
Other Required Equipment ........................................................................
Pocket Ethernet Adapter 111 Instollation ......................................................
Instollation of Model PE3-1OB2 ................................................................
Instollation of Model PE3-1OBT .............................................................
Instollation of Model PE3-1O K .............................................................
Connecting the Pocket Ethernet Adapter to the Computer .............
Parallel Port Performance ......................................................................
Connecting AC Power ............................................................................
CONFIGURATION AND DlAGNOSTlCS......................................................
Diagnostic Indicator Lights .....................................................................
Enhanced Parallel Port Utility .................................................................
Diagnostic Self Test ..............................................................................
Executing the Self Test .........................................................................
v
vi
vii
...
viii
1
2
2
3
3
5
7
7
8
8
9
9
10
10
11
12
13
17
17
20
22
22
.
111
SOFTWARE SETUP AND OPERATION .......................................................
25
3Com 3 4 p e n ..................................................................................... 25
Artisoft LANtostic/Al .............................................................................
28
ATgT/NCR StorGROUP ..................................................................
..... 29
Banyan VINES DOS Workstotion ............................................................
DEC PATHWORKS .................................................................................
DEC PCSA and DECnet-DOS ....................................................................
FTP Software LANWatch ........................................................................
FTP Software P
CPCP ...........................................................................
HP LAN Manager ..................................................................................
IBM local Area Network Support Program ...............................................
IBM PC LAN and IBM DOS LAN Requester ...............................................
IBM OS/2 Version 2.0 Extended Sewices ...............................................
IBM OS/2 LAN Sewer Version 2.0 .........................................................
IBM OS/2 Extended EditimVersions 1.2~or 1 . 3 ..................................
~
Microsoft LAN Manager .........................................................................
Microsoft Windows for Workgroups ........................................................
NCSA Telnet .........................................................................................
Novell NetWare ....................................................................................
Novell NetWare lite ..............................................................................
Sun Microsystems PC-NFS .....................................................................
Tenset Technologies TensetPCP ............................................................
Ungermann-Bass Net/One LAN Manager ................................................
Wollongong Pathway Access for DOS .....................................................
APPENDIX A. ERROR MESSAGES ..........................................................
APPENDIX B. SOFTWARE SUPPLIED ......................................................
APPENDIX C. COMMAND LINE PARAMETERS ..........................................
INDEX ...............................................................................................
iv
31
32
33
35
37
41
42
44
44
45
46
48
49
49
50
53
54
55
56
58
61
63
67
77
P
d
e
tEthemetAdapter 111 User's b d e
This User's Guide is intended to introduce the Xircom Pocket Ethernet
Adapter III. It includes complete instructionsfor hardware and software
installation, configuration,and diagnostic procedures.
The contents of the User's Guide are as follows:
preface contains information on Xircom Technical Support, bulletin
board access, and product warranty.
Intraduction describes the features, functions, and specifications of
the Pocket Ethernet Adapter III.
Harctware Iastallatfon contains instructions for unpacking and
installing Pocket Ethernet Adapter 111 hardware.
Configmtion and Diagnostics provides information on Adapter
configuration and diagnostics,with instructionsfor running the
Adapter self test and interpreting test results.
Software Setup and Operation explains how to install networking
software supported by the Pocket Ethernet Adapter III.
Appendix A. Error Messages lists error messages displayed during
setup of the Adapter.
Appendix B. Software Supplied contains a list of software files
provided with the Adapter.
Appendix C. Command Wne Parameterslists instructionsfor
using drivers with parameters other than those listed in the
Software Setup and Openation section.
Index is an alphabetical list of topics covered in this guide and the
page number where each topic is found.
Pocket Wemet Adapter 111 Ws Guide
V
TECHNICAL SUPPORT
Product RegMdon Card suppliedwith the
Please run the self test program included on your Xircom Pocket Ethemet
Adapter III diskette (see instructions in the Configuration and Diagnasticssection) before placing a call to Xircom Technical Support.
U.UL
Xircom, Inc.
26025 Mureau Road
Calabasas, California 91302
(so01 874-4428 Toll Free (6 a.m. to 430 p.m. Pacific time)
(818) 878-7175 Fax to Technical Support
(818) 878-7618 Bulletin Board System (24hour access)
(SOO) 4384526 Toll free sales and product information
bnada
Keating Technologies Inc.
25 Royal Crest Court,Suite 200
Markham, Ontario, Canada L3R 9x4
(416) 479-0230
(416) 479-0232 Fax
Euope, M i i East, and Africa
Xircom Europe N.V.
Bisschoppenhoflaan 82-84
2100 Antwerp, Belgium
32 3 326-34-94
32 3 326-31-50 Fax
32 3 326-23-68 Bulletin Board System (24-hour access)
8:30 a.m. to 530 p.m. Monday-Thursday,430 p.m. Friday.
1-818-878-6280 International access to U.S. Technical Support
(6:oO a.m. to 4:30 p.m. U.S. Pacific time).
Packet Ethemet Adopter 111 User's Guide
AskPadfic
Xircom Asia Ltd.
1604 Century Square
1-13 D’Aguilar St.
Hong Kong
(852) 525-2078
(852) 525-8955 Fax
(852) 537-6048 Bulletin Board System (24-hour access)
1-818-878-6280 International access to US.Technical Support
(6:OO a.m. to 430 p.m. U.S. Pacific time)
olherlnmnahd
Contact your local reseller or distributor
1-818-878-6280 International access to U.S. Technical Support
(6:OO a.m. to 430 p.m. U.S. Pacific time).
BUUEIN BOARD SYSTEM
Xircom maintains an electronic bulletin board system (BBS) containing
product information and the latest versions of network drivers.
To use the BBS, set up your modem to xxxxx,N,B,l (where xxxxx is your
modem’s maximum speed, N is no parity, 8 is data bits, and 1 is stop bit).
Dial 1-818-878-7618 (USA.), 32 3 326-23-68 (Belgium), or (852) 537-6048
(Hong Kong) to connect at up to 14,400 bps. Xircom modems will
automatically fall back to accommodate lower speeds.
To download drivers, go to the BBS Main Menu, then type F (for File
Directories) and press Enter. Follow the instructionsto select and
download current versions of Xircom released drivers (subject to the
terms of your Xircom Software License Agreement).
Pocket EthernetAdapter 111 User’s Gude
LIMITED WARRANTY, DlSaAlMER, AND LIMITATION OF UABlLlTY
(a) Xircom warrants to the original purchaser that:
1.When purchased, the Pocket Ethernet Adapter III (the “Adapter”),
including the Xircom AC power adapter, is free from defects in
material and workmanship; and
2. For two years from the purchase date, the s o h a r e accompanying
the Adapter (the “Software”)and the Adapter itself will perform as
stated in the User’sGuide.
(b) Xircom will honor claims under this Warranty only if the user
completes all the following steps before making the claim and makes the
claim acarding to the procedure below:
1. Read the User‘s Guide and follow its installation, setup, software
setup, and operation instructions;
2. Run the self test provided on the Pocket Ethernet Adapter IIJ
software diskette;
3. Use the Adapter and Software only in the environments described
in the User‘s Guide.
(c) Xircom will not honor this Warranty (and this Warranty will be
automatically void) if there has been any (1) tampering with the
Adapter’s external label containing the Adapter’s serial number; (2)
attempt to remove the label or to open the Adapter‘s case;(3) repair or
attempt to repair made by anyone other than a Xircom-authorized
technician; or (4) installation or use with any AC power adapter other
than the origmal Xircom AC power adapter supplied in the product
package.
(d) This Warranty does not cover, and Xircom will not be liable for, any
damage or failure caused by misuse, abuse, acts of God, accidents (such
as dropping the Adapter or the diskette containing the Software),
electrical irregularity, or other c a w s beyond Xircom’s control, or claim
by other than the original purchaser.
(e) If, after inspection, Xircom determines there is a defect or failure
covered by this Warranty, Xircom will elect to repair or replace the
Adapter or Software or refund the purchase price (if replacement is not
possible or repair is not practical). The replacement may be a new or
refurbished product.
vii
Pocket EhmetAdapt# 111 User‘s Guide
(0 To report a problem or to request warranty service
In the U.S.A.
Contact Xircom's Technical Support department at (800) 874-4428
and obtain a Return Material Authorization (RMA) number.
Outside the U.S.A.
Contact your local Xircom supplier or Xircom regional center.
(9, Products returned for any reason must be complete and must include
the Adapters, cabling, connectors, all software diskettes, User's Guide, AC
cables and adapters, and all other components from the original package,
as well as a copy of the receipt of purchase, and must be shipFd
prepaid, with the RMA number clearly visible on the outsideof the
shipp3ng container, as follows:
From the U.S.A., ship to
Xircom Service Department
5717 Corsa Avenue
Westlake Village, CA 91362
From outside the U.S.A.
Contact your local Xircom supplier or Xircom regional center for
shipping instructions.
(h) The statements in this Warranty are the only warranty made by
Xircom for the Adapter and Software.
(i) XLRCOM DISCLrLIMSSAM)FEl NOTBE W L E FOR ANYNCDENTAL, CONSEQlBVUL, OR OTHER DAMAGES (SUCH AS PERSONAL
OR DAMAGE To ANY COMPUTER OR DATA).
(j) (The following paragraph applies to the countries of the European
Community only.) In any case of damage to which the European
Community Directive of 25th July 1985 is applicable and which does not
result from neglecting the instructions set out under paragraph (b) of this
Warranty or from the occurrence of any circumstances as mentioned
under paragraphs (c) and (d), the liability of Xircom will be extended
according to the provisions of this Directive without prejudice to the right
of Xircom to refer to the limitations of liability as provided by the
Directive or the applicable national law.
Pocket EthemetAdopter 111 User's Guide
ix
0Except for the Warranty explicitly stated herein, Xircom makes no
warranties for the Adapter, express or implied, either in fact or by
operation of law. Xircom specifically disclaims any implied warranty of
merchantability, fimess for a particular purpose, or noninfringement.
0) Some states or countries do not allow exclusion or limitation of
incidental or consequential damages, so the above limitations or exclusions may not apply.
(m) This Warranty gives you specific legal rights and you may also have
other rights which vary from state to state or country to country.
Inquiries under this Warranty should be directed to Xircom at the
appropriate office listed under the heading “Technical Support’’earlier in
this Preface.
X
Wet Ethemet Adopter 111 Ws Clm‘de
INTRODUCnON
The Xircom Pocket Ethernet Adapter III,shown in Figure 1, allows you to
connect an IBM or compatible PC to an Ethernet or EEE 802.3 local area
network (LAN). The Adapter connects externally to a standard parallel
printer port, which eliminates the need to open the computer case to
install an internal card.
Xircom Adapters are ideal for notebook, laptop, and desktop computer
users who need a flexible LAN connectivity solution. Xircom Adapters
contain no contigurationswitches, and are not subject to the address and
interrupt conflicts common with internal adapters.
MODEL PEB10B2
MODEL PESIOBT
M D E L PEBIOBC
I
Figure 1. Xm
i m Pocket ElhemetAdopter 111
Pocket Ethemet ndopter 111 User's Guide
1
MODEL NUMBERS
Model pE3-10B2
IOBASE-2 thin coax with BNC
connector
Model PE31OwT
1OBASE-T and StarLAN 10
unshielded twisted pair with
an RJ-45 connector
Model PE310BC
Combination unit supporting
both unshielded twisted pair
mJ-45 connector) and thin
coax (BNC connector)
SOFTWARE
Drivers and diagnostic programs are supplied on a 3.5-inch diskette. (If
you need a 5.25-inch diskette, call Xircom sales at (800)438-4526 in
North America or contact your local Xircom supplier or Xircom regional
center.) Novell NetWare (using the OD1 driver), Artisoft LANtastidAI
version 4.1, DECnet-DOS, DEC PCSA and PATHWORKS, NDIS, ODI, and
packet drivers are included. See Appendix B for a complete list of files
and subdirectories.
AT&T StarLAN 10 is supported on Models PEIlOBT and PEIlOBC by
disabling link integrity. See Appendix C.
Contact Xircom for information regarding the use of Xircom’s Pocket
Ethemet Adapter 111 in other networking environments.
2
Pocket EthemetAdoptw 111 User‘s Gide
LOCAL PARALLEL PRINTER ACCESS
The Xircom Parallel Port Multiplexor (available as a separate product)
can be used with the Pocket Ethernet Adapter III to provide simultaneous access to the LAN and a local parallel printer. Software support for
the Parallel Port Multiplexor is programmed into the DOS drivers
provided on the current version of the Xircom Network Drivers diskette.
POwEgED ON FORTBEDRIVER To LOAD.
Model PE310B2
For thin Ethernet and IEEE 802.3 (1OBASE-2) with BNC
connector. BNC “T” connector also supplied.
Model PE310BT
For IEEE 802.3 (1OBASE-T) and StarLAN 10 twisted pair
Ethernet with RJ-45 connector.
Model PEQ-1OBCCOmMnation
For IEEE 802.3 (IOBASE-T) twisted pair Ethernet and StarLAN
10 with RJ45 connector and for thin Ethernet and IEEE 802.3
(IOBASE-2) with BNC connector (BNC “T”connector supplied).
3
Models PEIlOBT and pE3-10B2 3.22 in x 2.27 in x 0.81 in
(81.8 mm x 57.7 mm x
20.6 mm) overall, including
connector
Model PE3lOBC
4.19 in x 2.38 in x 0.97 in
(107mmx61mmx
25 mm) overall, including
connector
Weight:
Mode& PE3-10BT and PE31OB2 2.2 oz (62 @
Model PFi310BC
2.9 oz (82.2 @
Opemthg Temperatwe Range: 32OF to 122OF (0°C to 50°C)
Storage Temperatme Range:
&OF
to 176OF
(-4OOC to SOOC)
4
Memory S k
32K x 8 network buffer
256-bit EEPROM
configurationstorage
TransferRak
10 megabits per second
Diagtlosdcs:
Self test capability
Fcc cbtmatioa
Part 15, Subpart J, Class A
PhmtomAC Power (able
The Phantom Power Cable supplied with the Pocket Ethernet Adapter III
allows you to power the Adapter directly from a PS/2-style (&pin miniDIN) mouse or keyboard port on your computer. The cable includes a
passthrough connector that allows a mouse or keyboard to be plugged in
on top of the Phantom Power Cable connection. The coiled cable is
extensible to a length of 33 inches (0.84m). See the Hardware Ins~aUation section for details.
Wd-Marmt AC Power Adapter
The wall-mount AC power adapter is a standard "power block" unit with
the specificationslisted below for the U.S.A. and Canada (AC adapters
approved by appropriate regulatory agencies are also available for the
U.K., Europe,Japan, Australia/New Zealand, Korea, and the Philippines)
Input V o l t a p
120 VACI60 Hz
ontpntvo-
12 VDC unregulated
Siae:
2.76 in x 1.98 in x 1.59in
(70.1mm x 50.3mm x
--
Weighk
40.4 mm) overall including
connector and cord exit
6 ft (1.8m)
lo 02 (284 g,
5
HARDWARE INSTAUATlON
Follow the insauctions in this section to unpack and install the Xircom
Pocket Ethernet Adapter IlI hardware. Also included in this section is a
discussion of parallel port performance issues, including bidirectional/
non-bidirectionaland Enhanced Parallel Port (EPP) modes of operation.
UNPACKING AND INSPECION
After opening the Pocket Ethernet Adapter IlI box, remove the contents
and make certain that all parts are included and that none has been
damaged during transportation. See Figure 2. Retain the packing materials in case you have to return the unit for service.
POCKET ETHERNET
ADAPTER 111
USERS GUIDE
REGISTRATIONCARD
AC POWER
ADAPTER
BNC T CONNECTOR
(MODELS PE3-10B2
AND PE3-1OBC)
SOFWARE ENVELOPE
AND DISKETTE
Figure 2. Contents of the Pocket Ethemet Adopter 111 pockoge
7
PACKAGE CONTENTS
Use this as a checklist of the contents of the package.
Xircom Pocket Ethernet Adapter 111 (Model PEIlOBT, PE3-10B2,
or PE3-1OBC)
AC wall-mount power adapter
AC Phantom Power Cable
BNC T connector (Models PE310B2 and PEIlOBC only)
Xircom Pocket Ethernet Adapter 111 User’s Guide
Product Registration Card
License Agreement envelope containing 3.5-inch Network Drivers
diskette. If you need a 5.25-inch diskette, call Xircom sales at (800)
438-4526 in North America or contact your local Xircom supplier or
Xircom regional center.
and rctmn it immediately.
when calling Techntcal Support
OTHER REQUIRED EQUIPMENT
To installthe Pocket Ethernet Adapter III, you need the following:
1. A supported local area network operating system. See the section
on Software Setup and @emtion for information about networks
for which Xircom supplies drivers.
2. For connection to a 1OBASE-2 thin Ethernet cable, a BNC T
connector (supplied); if the T connection is at the end of a cable
segment, you will also need a 5CLohm terminator (not supplied).
3. For connection to a 1OBASE-T twisted pair Ethernet cable, a dual
twisted pair cable terminated with RJ-45 modular jacks (AT&T or
DEW, or similar).
8
Wet wemet Adapter 111 User’s Guide
POCKET mERNET ADAPTER 111 INSTAUATION
INSTAUATIONOF MODEL PE3-1062 (THIN ETHERNm
1. Attach the T connector (and thin Ethernet network cabling) to the
BNC connector on the Pocket Ethernet Adapter III as shown in
Figure 3. If the Adapter is located at the end of a cable segment,
attach a 5 h h m terminator to the open end of the T connector, as
shown in the Figure.
Fgure 3. Aiiuchii the Thin Ethemet Cable to Model PE3-1082 (end of network segment)
Wet wemet Adoper 111 User's Guide
9
mustbeattachcdtonetwor%
at the end of a networjr
INSTAUATION OF MODEL PE3-1OBT (TWISTED PAIR)
1. Plug one end of the modular data cable into the mating connector
on the Pocket Ethernet Adapter 111, as shown in Figure 4.
2. Plug the other end of the modular data cable into a network
access port (usually a wall connection).
Figure 4. AWi Twisted Poir Cobling to Model pE51OBT
INSTANATION OF MOML PE3-1 OBC (COMBINATION)
Follow the installation instructions for Model PE3-10B2 if you are
connecting to a thin Ethernet network (see Figure 31, or the
instructionsfor Model PEIlOBT for connection to a 1OBASE-T
network (see Figure 4).
10
CONNECTING THE POCKET EMRNET ADAPTER TO THE COMPWER
1. Verifythat the computer is turned OFF and no power cord is
connected before attaching the Pocket Ethernet Adapter III.
2. Plug the 25-pin male D-type connector on the Pocket Ethernet
Adapter III into the parallel port on the back of your computer,
holding the Adapter with the Xircom logo and indicator lights on
the top. The two parallel port attachment screws on the Adapter
align with the holes on each side of the parallel port connector.
3. Rotate the red band (‘‘tractor grip”) on the Adapter clockwise until
the screws are firmly secured. Refer to Figure 5. When the screws
are tight, the red band will “click“as you rotate it. (To unscrew
the screws, rotate the band countercl&.)
POWERED OFF
CONNECTOR
PINS
Figure 5. Conneclingthe Adapter to the Pomllel port on
Parketwamet~lllwsw
the Computer
11
PAfMUEL PORT PERFORMANCE
The type of parallel port on your computer can significantly affect the
performance of the Pocket Ethernet Adapter III. If your Pc's parallel port
supports bidirectional mode, you can expect an improvement of up to
50% in the input transfer rate over a standard non-bidirectional parallel
port. If your computer supports Enhanced Pardlel Pott (EPP) technology, data will be transmitted through the Adapter at three to four times
the rate of a standard parallel port. All Xirmm LAN Adapters are compatible with Enhanced Parallel Port technology. A utility program is supplied
with the Pocket Ethernet Adapter 111to enable EPP mode. See the
Confsgurutionand Diugnsection for detailed instructions on its use.
Some PC designs allow the parallel printer port to be switched between
bidire-ctional and non-bidirectional modes of operation,while others
support only one mode. To find out if your parallel port is switchable, or
if it is EPP-compliant, refer to the user documentation for your computer
or contact the computer manufacturer.
12
Wet EthernetAdam 111 user's Guide
CONNECTING AC POWER
l d h g the Wd-Maunt AC Power Adapter
1. Venfy that the computer to which the Pocket Ethernet Adapter III
is attached is powered OFF and that the wall-mount power supply
is NOT plugged in to an AC outlet.
2. Plug the Lshaped end of the AC power adapter cable into the
small round socket on the Pocket Ethernet Adapter III to the left
of the network connector. See Figure 6.
3. Plug the AC power adapter into a standard electrical outlet.
On Models PE3-10B2 and PESlOBT, the LED indicator closest to the red
tractor band will illuminate when power is applied to both the Adapter
and the computer to which it is connected. On Model PE3-lOBC, the
triangle over the letter "i" in the word Xirmm will illuminate.
POWERED OFF
ADAPTER AlTACH
TO PARALLEL PORT
Figure 6. plvggmg the Power C
o
binto the Pocket EihemetAdopter 111
Met Wemet Adopter 111 User's Guide
13
lnstdhgthe AC phmtoln Power Cable
md~thewnntompona~le~
OFFmdthePOC%CZEthennet
1. Verify that the computer to which the Pocket Ethernet Adapter HI
is attached is powered OFF and that the Adapter is securely
attached to the parallel port of the computer.
2. Plug the L-shaped plug on the AC Phantom Power Cable into the
s&
round socket on the Pocket Ethernet Adapter HI to the left
of the network connector. See Figure 6.
3. Plug other end of the AC Phantom Power Cable into the &pin
PS/2-style keyboadmouse port on the computer. See Figure 7.
4. Plug the mouse or keyboard cable, if required,into the duplicate
keybodmouse connector on the phantom power connector.
When power is applied to the computer to which the Pocket Ethernet
Adapter III and Phantom Power Cable are connected, the LED indicator
closest to the red tractor band will illuminate on Models PE3-1OB2 and
PEIlOBT. On Model PEIlOBC, the triangle over the letter "i" in the
word Xircom will illuminate.
14
COMPUTER
POWERED OFF
I
ADAPTER ATTACHED
TO PARALLEL PORT
'
Fgte 7. Connectingthe AC phantom Power Cable to 11# Computer
15
CONFIGURATION AND DlAGNOSllCS
This section contains a detailed description of the Pocket Ethernet
Adapter III's diagnostic features, both hardware (diagnostic indicator
lights) and software (PE3TEST diagnostic program). It also includes an
explanation of how to disable link integrity on Model PE3-1OBT, for
operation with non-IOBASE-T unshielded twisted pair networks. For
additional diagnostic information,see the error messages in Appendix A.
DIAGNOSTIC INDICATOR LIGHTS
The indicator lights on the top of the Pocket Ethernet Adapter III case
function differently according to the model being used.
COLLISION (FLASHING
RED) OR CABLE FAULT
TRANSMISSION ACTIVITY (FLASHINGGREEN)
Fgure 8. Pocket Ethemet Mapter 111 Indiir Lights for Model R3-1082
Modd pE3-1OB2
The LED closest to the red band on this model displays solid
green to indicate power on, flashes red to indicate a collision,
and displays solid red to indicate a cable fault. The other LED
indicator flashes green to show transmission activity.
17
Model pE3-1OBT
The LED closest to the red band displays solid orange to
indicate power on and link integrity disabled. It displays solid
green when link integrity is enabled and the network driver has
been loaded. The other LED indicator flashes green to show
transmission activivity.
TRANSMISSIONACTIVITY (FLASHING GREEN)
Figure 9. Pocket EihetnetAdopter 111 Indicator lightsfor Model P E N 061
How to Disable LinklntegrityOnModel PE3-10BT
The Pocket Ethernet Adapter III default setting is link integrity enabled.
Link integrity must be disabled for operation on non-1OBASE-Tunshielded twisted pair networks such as StarLAN 10. Link integrity can be
disabled in software for all Pocket Ethernet Adapter 111 drivers, using the
keyword
LINKDISABLE
in configuration or startup files or on the command line with the driver.
See Appendix C, Command Line Pammeten, for detailed information on
use of this keyword with each driver type.
\
(SOLIDRED)
TRANSMISSIONACTIVITY (FLASHING GREEN)
Figure 10. Pocket EihemetAdapter 111 l n d i i r hghisfor Model PE31OBC
Model PE3-1 OBC
The power-on indicator is the triangle over the letter 'i" in the
Xircom logo.
The LED closest to the red band displays solid green to indicate
link integrity enabled (for unshielded twisted pair networks
only> otherwise it is off.
network driver must be loaded
before the "linkintegrity" indicator becomes active.)
me
The other LED indicator flashes green to show transmission
activity, flashes red to indicate a collision, and displays solid red
to indicate a cable fault.
19
ENHANCED PARALLEL PORT UTlllTY
Use the Enhanced Parallel Port (EPP) utility to enable EPP mode on an
EPP-capable computer. There are three versions of the EPP utility on the
Network Drivers diskette, two for DOS and one for OS/2. All three
versions require that the EPP utility be run before the Pocket Ethernet
Adapter III driver is loaded for your network.
If you're not sure whether your computer is EPP-capable, try running the
EPP utility. A message will indicate whether EPP hadware has been
identified on your machine.
EPP.COM
Run this version from the DOS command line or add
it to an AUT0EXEC.BAT or network starcup '.BAT file.
E
P
P
m
Add to the DOS CONFIGSYS file to implement EPP
support at boot time.
EPP.os2
Add to the OS/2 CONFIGSYS file to implement EPP
support at boot time.
U*theEPPuti(ityWithDOS
To use EPP.COM as part of your DOS AUT0EXEC.BAT (or other *.BAT)
file:
1. Copy EPP.COM from the Xircom Network Drivers diskette to your
hard disk or boot diskette.
2. Use an ASCII text editor to add the followingline to your
AUTOJXEC.BAT or other '.BAT fie:
[path]EPP
where [ p h l is the drive and directory to which you copied
EPP.COM.
3. Save the modified *.BATfile.
4. Run the *.BATfile.
To use EPP.SYS in your DOS CONFIGSYS file:
1. Copy EPPSYS from the Xircom Network Drivers diskette to your
hard disk or boot diskeae.
2. Use an ASCII text editor to add the following line to your
CONFIG.SYS file:
DEVICE- [path]EPP. SYS
where [path1 is the drive and directory to which you copied
EPP.sYS.
3. Save the modified C0NFIG.SY.S file.
4. Reboot the PC.
usingtheEPPutilitywith(K/2
To use EPP.OS2 in your OS/2 CONFIG.SYS file:
1. Copy EPP.OS2 from the Xircom Network Drivers diskette to your
hard disk.
2. Use an ASCII text editor to add the following line to your
C0NFIG.SYS file:
DEVICE= [path]EPP.OS2
where [@I
EPP.OS2.
is the drive and directory to which you copied
3. Save the modified CONFIGSYS fde.
4. Reboot the PC.
Rxket Ethemet Adaprer 111 user'sGuide
21
DIAGNOSTICSELF TEST
In addition to the diagnostic and power-on indicators described at the
beginning of this section, Xircom provides a self test diagnostics program
called PJi3"EST. This program, located on the Network Drivers diskette,
tests the Pocket Ethernet Adapter III configuration,setup, checksum, and
memory. It also reports test results,the serial number of the unit, and the
node nddress.
EXECUTINGTHE SELF TEST
Use the following steps to execute the self test.
1. Installthe Pocket Ethernet Adapter III hardware according to the
iristructions contained in the InskaUation and Setup section of this
User's Guide.
2. Boot your computer from DOS, without loading a network driver.
A network driver must not be loaded for PE3TEST to run.
3. Insert the Xircom Network Drivers diskette in the diskette drive
on your computer and change to that drive.
4. At the diskette drive DOS prompt run the diagnosticsby typing
PE3TEST and then p i n g Enter.
The diagnostic program displays the following windows on your
computer’sscreen showing test parameters and results:
Press any key to exit
I
Harduare: Pass
EEPROM:
Pass
Init:
Pass
Memory:
Pass
PE3-16BT
726945469
Mfr Date: 1/13/93 9:17:49
Clddress: 80 88 C7 54 4E BD
I
I
Model:
S/N:
LPTL:, IR07, Bidirectional
I
I
An explanation of the self test results follows.
Hadwae, EEPROM, Init, ad Memory Tests
The Hardware test verifies that the Adapter is powered on and properly
connected to the parallel port. The EEPROM test reads the EEPROM and
verifies EEPROM data (this is where the Adapter‘s serial number and
node address are stored). The Init test initializes the Adapter memory and
Ethernet controller. The Memory test tests the 32K x 8 RAM on the
Pocket Ethernet Adapter III.
A failure in any of these tests may indicate that service is required for the
Pocket Ethernet Adapter III. Contact Xircom Technical Support.
23
Adapterh
This section displays the model number, serial number, manufacturing
date of the unit, and the network node address. This data has been
preprogrammed at the factory and cannot be altered.
Technical Support will ask you to supply the model and serial numbers
when requesting technical assistance or warranty service from Xircom.
configuatkn
This portion of the diagnostic screen describes interrupt settings, port
settings, and parallel port transfer modes. Some computers allow the
parallel port to be switched between bidirectional,non-bidirectional,and
Enhanced Parallel Port (EPP) modes.For an optimal transfer rate, the unit
should be in EPP or bidirectional mode. E 3 l " reports the mode of
your parallel port, including Enhanced Parallel Port mode if the EPP
utility EPP.COM or EPPSYS has been run prior to testing.
To find out if you can switch modes on your parallel port, consult the
documentation for your computer or contact the computer manufacturer.
Trmsmit Test
This test transmits a packet every 112 second. A failure indicates that the
Adapter is not accepting packets for transmission. Contact Xircom
Technical Support.
Netwo~kTmfficGmph
This graph provides a visual representation of the volume of traffic on the
network. If there is no &ic (or if the Adapter is not connected to the
network), a line of dots will display at the bottom of the chart.
24
SOWARE SETUP AND OPERATION
This section provides installation information for the network drivers
supplied on the Pocket Ethernet Adapter 111Network Drivers diskette. It
is organized in alphabetical order by network operating System.
These instructions are designed to take advantage of the Pocket Ethernet
Adapter's self-configuring and default features. For more detailed
information on the drivers, see Appendix C, Command Line Parameten.
Why a Badnrp Copy of the S o h
Before beginning driver installation, use DOS DISKCOPY to make a copy
of the Network Drivers diskette supplied with your Pocket Ethernet
Adapter III. Use the copy to install the software.
3COM M P E N
36m 3+Open versions 1s for DOS (NDlS driver)
1. Install your 3+0pen workstation softwareaccording to the
manufacturer's instructions,selecting the EtherLink II3C503
adapter. After completingthe installation, and before rebooting
your system, continue with the following instructions.
2. Copy the file PE3NDIS.EXE from the \NDIS directory on the
Xircom Network Drivers diskette to the directory
\30PEN\DOSWKSTA\LA"\DRIVERS on your hard disk or
boot diskette.
3. Using an ASCII text editor, replace the reference to the EtherLink
11 3C503 device driver in your CONFIG.SYS file with a reference
to the Xircom device driver, as follows:
Change the line
to read
4. Change to the \3OPEN\DOSWK!3TA\LA"\DRIVERS
directory.
Wet EthernetAdapter 111 User's Guide
25
5. Use an ASCII text editor to edit your PROTOCOL.INI file:
Add the following fragment to the ADAPTERS section:
;XIRCOM AMPTER
[XIRCOMNBT]
DRTVERNAME = XIRCOM$
In the PROTOCOLS section of the PROTOC0L.INI file, replace all
references to the 3COm 32503 binding "ETI-IERUNKII" with
mcom.
For example, in the definition
;XNS
protocol
[XNS-l"SPORT]
DRIVERNAME = XNSTP$
BINDINGS = ETHKRtINKII
the statement
BINDINGS = ETHERLINKII
should be changed to
BINDINGS = XIRCOMNET
6. Save the file and reboot the PC.
3Cm 3+open venklls la for OS/2 (NDIS driver)
1. Install your 3+0pen workstation software according to the
manufacturer's instructions,selecting the EtherLink II 3C503
adapter. After completing the installation and before rebooting
your system, continue with the following instructions,
2. Copy the file PE3NDIS.OS2 from the \NDIS directory on the
Xircom Network Drivers diskette to the directory
\3OPEN\OS2WKSTA\LANMAN\DRlVERS
on your hard disk or
boot diskette.
3. Using an ASCII text editor, replace the reference to the EtherLink
26
II 3C503 device driver in your CONFIG.SYSfile with a reference
to the Xircom device driver, as follows:
Change the line
to read
4. Change to the \30PEN\OS2WKSTA\LANMAN\DRlVERS
directory.
5. Use an ASCII text editor to edit your PROTOC0L.INI file:
0 Add the following fragment to the ADAPTERS section:
0
In the PROTOCOLS section of the PROT0COL.INI file, replace all
references to the 3Com 3C503 binding"-"
with
mcohI_nJET".
For trample, in the defhition
ims
grOtOC01
[XNS-TRANSPORT]
DRIVERNAME = mSTP$
BINDINGS = ETHERLINXII
the statement
BINDINGS = ETHERLINK11
should be changed to
BINDINGS = XIRCOEWET
6. Save the file and reboot the PC.
27
ARTISOFT LANTASTIC/AI (VERSION 4.1) ARTISOFT DRIVER
These instructions are for use with Artisoft LANtastidAI version 4.1. If
you have version 4.0, you must upgrade to version 4.1 to use this driver.
1. Run the LANtastidAI INSTALL program. At the heading "Network
Adapter Installed" press the Space Bar to display a list of adapters.
Use the arrow keys to select "XircomPElOB2 Ethernet Adapter"
and press Enter.
2. Complete the installation and exit the INSTALL program.
3. Copy the file PE3AILAN.COM from the \ARTISOFT directory on
the Xircom Network Drivers diskette to C:\LANTASTI.
4. Using an ASCII text editor, edit the file STARTNJT.BAT in the
cI\LANTm directory as follows:
Change the line
PE.EXE IRQ=x LPT-y
VERBOSE
(where x is an interrupt setting and y a parallel port setting)
to read
PE3AILAN.CCM
5. Reboot the computer and type STARTNJT to start the LANtastic
network.
This driver is self configuring. See Appendix C, Command Line Parameters, for more detailed information.
2a
AT&T/NCR STARGROUP LAN MANAGER VERSION 2.1A (NDIS
DRIVER)
3. Regin installation of LAN Manager 2.la using "nasetup."
2. When prompted to select the available network adapter driver,
choose "Other Driver" at the bottom of the screen.
3. When prompted, insen the Xircom Network Drivers diskette.
4.Select "XircomPocket Ethernet Adapter III" from the menu.
5. Continue with the installation until it is completed.
6. Reboot the PC.
AT&T/NCR STARGROUPVERSION 3.5 (LAN MANAGER VERSION
2.0) NDIS DRIVER
1. Make working copies of the StarGROUP Client install diskettds)
using the DOS DISKCOPY program.
2. Copy the file XIRAlT35.NIF from the \ A m 5 directory of the
Xircom Network Drivers diskette into the \DOS\DRIVERS2
directory of the StarGROUP Client install diskette.
3. Create a XIRAlT35 directory on the StarGROUP Client install
diskette as follows:
A:
\>MD \DoS\DRIvERS2\XIRA!lT35
4.Copy the file PROTOC0L.INI from the \ A n 3 5 directory on the
Xircom Network Drivers diskette to the directory
\ D O S \ D R I V E R S 2 \ X 5 on the StarGROUP Client diskette.
5. Copy the PE3NDIS.EXE file from the \NDIS directory on the
Xircom Network Drivers diskette to the directory
\DOS\DRIVERS2\X5 of the StarGROUP Client install
diskette.
29
6. You may now use the modified StarGROUP Client install diskette
to install StarGROUP on the client computer. Refer to the
StarGROUP documentation for further information.
AT&T/NCR STARGROUP VERSIONS 3 3 AND 3.4 (NDIS DRIVER)
1. Make working copies of the StarGROUP Client'install diskette($
using the DOS DISKCOPY program.
2. Copy the file XIRAlT34.W from the \ATE34 directory of the
Xircom Network Drivers diskette into the \DOS\DRIVERS
directory of the StarGROUP Client install diskette.
3. Create a XlRAlT34 directory on the StarGROUP Client install
&kette as follows:
4. Copy the PROTOCOL.INI fde from the \ A n 3 4 directory on the
Xircom Network Drivers diskette to the directory
\DOS\DRIVERS\XIRA"lT34on the StarGROUP Client diskette.
5. Copy the PE3NDIS.EXE file from the \NDIS directory on the
Xircom Network Driven diskette to the directory
\DOS\DRIVERS\XIRAll34 on the StarGROUP Client diskette.
6. You may now use the modified StarGROUP Client install diskette
to install StarGROUP on the client computer. Refer to the
StarGROUP documentation for further information.
30
BANYAN VINES DOS WORKSTATION (VERSIONS4.X AND LATER)
NDIS DRIVER
1. Create a Banyan directory on your workstation hard disk or VINES
boot diskette. For example:
c:>m \VINES
2. At the DOS prompt, copy the files PE3NDIS.EXE and
PROTOC0L.INI from the \NDIS directory on the Xircom Network Drivers diskette to the \VINES directory just created.
3. Copy the files from the VINES Master diskette into the \VINES
directory.
4. Copy the NDIS driver files from \NDIS directory on the VINES
LAN Drivers diskette into the \VINES directory.
5. Using an ASCII text editor, edit the CONFIG.SYSfile to include
the following lines:
DEVICE=C:\VINES\PRO".DOS
/I:C:\VINES
DEVICE=C:\VINES\PE3NDIS.EXE
6. change to the \VINES directory.
7. Type PCCONFIG and select Network Card Settings, followed by
NDIS Ethemet.
8. Select interrupt level 7 if your Xircom Pocket Ethemet Adapter Ill
is using LPTl or LPT3, or interrupt level 5 if the Adapter is using
LPT2.
9. At the PROTOCOL.INI bindings prompt type XIRCOMNET.
10. Press F10 to save and Esc to return to the main menu.
11. Select Login Environment Settings, followed by Default Communications Driver, followed by NDIS Ethernet.
12. Press Esc to return to the Main Menu and press F10 to save.
13. Reboot the PC.
Refer to your Banyan VINES documentation for additional information.
31
DEC PATHWORKS (VERSION 4.1) NMS DRIVER
1. Run NETSETUP.
2. Choose Ethernet controller type and select "Other NDIS."
3. Choose "Other NDIS Information."
4. Insert the Xircom Network Drivers diskette into the A: drive.
5. When prompted for the path to the driver file, type
6. When prompted for the path to the PROTOC0L.INI file, type:
A: \DEC
7 . Complete NETSETUP and return to the DOS prompt.
8. Reboot the PC.
DEC PATHWORKS (VERSION 4.0) NMS DRMR
1. Run NETSETUP.
2. Select "Ethernet board."
3. Select "Other."
4. Select NDIS driver.
5. Insert the Xircom Network Drivers diskette into the A drive.
6. Enter the path to the driver file as follows:
7 . Select Protocol.ini.
8. Enter the path to the PROTOC0L.INI file as follows:
A: \DEC
9. Complete NETSJ3" and return to the DOS prompt.
10. Reboot the PC.
32
DEC PCSA AND DECN€FDOS (VERSIONS 3 4 DEC DRIVER
1. Install Digital Equipment Corporation’s DECnet-DOS or PCSA
product according to the instructions provided by DEC (select any
datalink controller and local boot).
2. Copy the file PE3DLL.EXE from the \DEC directory on your
m o m Network Drivers diskette to your DECNET directory
(typically C\DECNET).
3. Using an ASCII text editor, edit the C:\STARTNET.BAT file.
Replace each Occurrence of D U with PE3DLL, as in the following
example.
Replace
DLL /IRQ:2 /T:2
with
PE3DLL
Xircom’s PE3DLL.EXE is a selfanfiguring driver that searches for
and uses the appropriate LPT and interrupt settings. See Appenarjc
C, Command Line Pammeters, for more detailed information.
4. Also in the C:\STARTNET.BAT file, edit the LAD line so that the
/R: and /w: values are both 4. For example:
LAD /R:4 /#:4
See the Notes below for additional details.
5. Save the file.
6. Reboot the PC.
33
LAD /R:l2 /t9:15
IA:D
nhaetk/R:sssitrhspcdfksthetrrmsadion~of~
dhkrcadoptratIonsand the /W: switchspedaesthe
heren isa miaimmn of&
34
Wet EthemetAdapter 111 User's Guide
FTP SOFTWARE LANWATCH (PACKEl AND NMS DRIVERS)
FIT Software’s W a t c h network monitor software (versions 2.01 or
later) can be installed using Xircom’s packet or NDIS drivers. For
information on which driver is appropriate for your network environment, refer to the ETP W a t c h documentation.
FrPSoftwaelANWurdlPdetDr’nerlmtdktkn
1. Install W a t c h according to the instructions in your FI’P
W a t c h manual.
2. Copy the file PE3PD.COM from the \PKTDRV directory on the
Xircom Network Drivers diskette to the directory where your
W a t c h fdes are stored.
3. (This step not required for W a t c h versions 3.0 and later.)
Using an ASCII text editor, add the following line to your
CONFIG.!XS file:
DEVICE = [gath]IFCIJST.SYS
where M b l is the drive and directory where your W a t c h files
are stored.
4. Reboot the PC.
5. Change to the directoqr where your W a t c h files are stored and
run PE3PD.COM.
6. Run LW.EXE.
You may have to reboot your PC after running W a t c h to deactivate
promiscuous mode, which is needed to monitor all packets.
)Tp Wtwm W a t c h NDlS Driver Imt$ktkn
1. InstallW a t c h according to the instructions in your FTP
W a t c h manual.
2. Using an ASCII text editor, add the following lines to your
CONFIG.SYS file:
DEVICE = C : \ N D I S \ P R ~ . S Y S /I:C:\NDZS
DEVICE = C:\NDIS\PE3NDIS.EW
DEVICE = C:\NDIS\DIS-PKT.GUP
(Include the following line for LANWatch versions earlier than 3.0
only)
DEVICE = C:\LW\IFCUST.SYS
3. Create a directory called \NDIS on your hard disk, as follows:
MD \NDIS
4. Copy the files PE3NDIS.EXE and PROTOC0L.FTP from the \NDIS
directory on the morn Network Drivers diskette to the \NDIS
directory you created in step 3.
5. Rename the PROTOC0L.FI" file PROTOC0L.INI.
6. Copy all the files from the \NDB directory on the FTP Unsup
ported Software Diskette A to the \NDIS directory you created in
step 3.
7. Reboot the PC.
8. Change to the \NDIS directory and run NETBIND.EXE.
9. Run LW.EXE.
36
FTP SOFTWARE K/TB (PACKET, NDIS, AND OD1 DRIVERS)
Fl'P Software's P W P Generic Ethernet Kernel ETHDRV.EXE can be
installed using Xircom's Packet, ODI, or NDIS drivers. For information on
which driver is appropriate for your network environment, see the Fl'P
P W C P documentation.
FTP saftwae K/T@P d e t D
t h lnstdktkn
I. install P W C P software according to the directions given in the
PC/TCP documentation.
2. When the installationis complete, copy the file PE3PD.COM from
the \PKTDRV directory on the Xircom Network Drivers diskette to
the P C / T B directory specified in the PCflCP install procedures.
3. (This step not required for P W C P versions 2.10 and later.) Using
an ASCII text editor, add the following lines to your CONFIGSYS
file:
DEVICE= [path]IPCUST. SYS
DEVICE= [path]IEUST. SYS
where 4&1 is the drive and directory specified at the P m C P
installation.
4. Reboot the PC.
5. Change to the directory where your P m C P files are stored and
run PE3PD.COM.
6. Run the ETHDRVEXE kernel program supplied with P W C P . This
loads the PCflCP kernel into memory. The packet driver must
always load before the kernel.
7. Continue your server or workstation startup as instructed in the
P W C P documentation.
Pocket Hhemet Adaprer 111 WSGuide
37
F F saftwae K/TCP NDlS Dr'nar Instalhh
1. Install PC/TCP software according to the directionsgiven in the
PQTCP documentation.
2. Use an ASCII text editor to add the following lines to your
CONFIG.SYS file:
DEVICE = C:\NDIS\PROTMAN.SYS /I:C:\NDIS
DEVICE = C:\NDIS\PE3NDIS.EW
DEVICE = C:\NDIS\DIS-PKT.GUP
(Include the following lines for P W C P versions earlier than 2.10
only)
DEVICE = C:\pcpCP\IFCUST.SYS
DEVICE = c:\PcTcP\IpcoST.SYs
3. Create a directory called \NDIS on your hard disk, as follows:
4. Copy the files PE3NDIS.EXE and PROTOCOL.FTP from the \NDIS
directory on the Xircom Network Drivers diskette to the \NDIS
directory you created in Step 3.
5. Rename the PROTOC0L.FI'P file PROTOC0L.INI.
6. Copy all the files from the \NDIS directory on the FTP Unsup
ported Software Diskette A to the \NDIS directory you created in
step 3.
7. Reboot the PC.
8. Change to the \NDIS directory and run " D . E X E .
9. Run the ETHDRV.EXE program supplied with PCflCP to complete
the installation.
311
FlPsoftwae K/TCPODI hiverlmtdktkn
1. Install PC/TCP according to the instructions in your FTP PCDCP
manual.
2. (This step not required for PC/TCP versions 2.10 and later.) Using
an ASCII text editor, add the following lines to your CONFIG.SYS
file
DEVICE= [path] IPCUST. SYS
DEVICE= [path] 1FCUST.SYS
where WhI is the drive and directory specified at the PCDCP
installation.
3. Copy the following files from the \OD1 directory on the Xircom
Network Drivers diskette to the PC/TCP directory created in the
PC/TCP install procedure:
m.m
PE30DI.
.
ODIPKT COM
NET. CFG
4. To start the workstation, load the drivers in the following order:
LSL
PDODI
ODIPKT
E
m
5. Continue your server or workstation startup as instructed in the
PQTCP documentation.
39
OD1 with FPsoftwae K/TCPd WWm
If you need to run Novell NetWare concurrentlywith FI'P PWCP,
proceed as follows
1. Install PCRCP according to the instructions in your FI'P P W C P
manual.
2. (This step not required for PC/TCP versions 2.10 and later.) Using
an ASCII text editor, add the following lines to your CONFIGSYS
file:
DEVICE- [path]IPCUsT.sYs
DEVICE= [path]IFCUST.SYS
where [ p h l is the drive and directory specified in the PC/TCP
installation.
3. Copy the following files from the \OD1 directory on the Xiram
Network Drivers diskette to the P c / T B directory created in the
P W C P install procedure:
IIsL.CoM
PE30DI. COM
.
IPXODI COM
.
ODIPlpT CoM
NETx.Ew
I9ET.CFG
40
4. To start the workstation, load the drivers in the following order:
LSL
PE30DI
IPXODI
ODIPKT
FmaDRV
mTX
5. Change to the network drive (usually F:\LOGIN)
6. Log in to the network.
HP LAN MANAGER (VERSIONS 1.X) NMS DRIVER
1. Install your HP LAN Manager workstation software according to
the instructions in your HP LAN Manager manuals, selecting a
3Com Ethernet network adapter. Before rebooting your system,
continue with these instructions.
2. Copy PE3NDIS.EXE (for DOS) or PE3NDIS.OS2 (for OS/2) from
the \NDIS directory on the Xircom Network Drivers diskette to
the drive and directory you are using for your HP LAN Manager
workstation files.
3. Using an ASCII text editor, replace all references to the 3Com
Ethernet device driver in your CONFIG.SYS file with references to
the Xircom device driver. For example:
DEVICE=C:\LA"\PE3NDIS.EW
(or PE3NDIS.OS2)
4. Using an ASCII text editor, edit the PROTOCOL.INI file as follows:
In the section that references the LAN adapters add the following
fragment:
;fircam Adapter
[XIRC(IMNET]
DRIVERNA%E=XIRm$
In the protocol bindings definition area of the PROTOC0L.INI
replace all references to the 3Com Ethernet adapter with:
BINDINGS=XIRCOMNET
41
For example, in the series:
Protocol
[XNS-TRANSPORT]
DRIVERNAME=XNSTP$
BINDINGS=ETHBRLINK
;XNS
replace
with
BINDINGS=XIRCOMNET
5.
Save the file and reboot the PC.
IBM LOCAL AREA NETWORK SUPPORT PROGRAM (VERSION 1.2)
NDlS DRIVER
1. Install the IBM Local Area Network Support Program according to
the instructionsin the IBM Local Area Network Support Program
User's Guide. The following instructions refer to the prompts and
messages displayed with the Configuration Aid automated install
software provided with the LAN Support Program.
2. If a message appears during the LAN Support Program installation
indicating there are no IBM LAN adapters installed in the workstation, bypass the message by pressing Enter.
3. Answer "lo to program support for the PC Network Adapter.
4. Answer Mes to use of programs needing the NETBIOS interface.
5. When prompted, select the Etherand Network family of network
cards.
6. Continue with the installation until finished.
42
Podat EthernetAdapter 111 Ws Guide
7. Use an ASCII text editor to replace the line in your CONFIGSYS
fie that reads:
device=\=. WS
with the line
device=\PDNDIS.gXE
8. Still in the CONFIG.SYS file, add the parameter O=N (where 0 is
a letter, not zero) to the line
device=\DXMTOMOD.SYS
as follows
device=\DXMTOMOD.SYS O=N
9. Copy the file PE3NDIS.EXE from the \MIIS directory on the
Xircom Network Drivers diskette to the root directory of your
hard disk or boot diskette.
10. Change to the \LA"
directory on your hard disk or boot
diskette.
11,Use an ASCII text editor to edit the PROTOC0L.INI file as follows:
Under the ElM3AND section, the line that reads
Bindings = TCMAC2
should be changed to read
Bindings = XIRCOMNET
Underneath that section insert a new section that reads as follows:
[XIRCOMNE?I"l'
DriverName = XIRCoW$
12. Save the file and reboot the PC.
Pocket Ehnetbdopter 111 User's Guide
43
IBM PC LAN and IBM DOS LAN Reqrrester
1. Install the IBM LAN Support Program for use with the Xircom
Pocket Ethernet Adapter 111 according to the insvuctions under the
heading "IBM Local Area Network Support Program,"which
immediately precedes this one.
2. Reboot the PC.
3. Install IBM PC LAN or IBM DOS LAN Requester according to the
insauctions in the IBM documentation.
4. Reboot the PC.
IBM 05/2 VERSION 20 EXTENDED SERVICES (NDlS DRIVER)
1. Follow the instructions for an Extended Services installation. If
your options require you to choose a Network Adapter card,
choose a 3Com EtherLink 11 Network Adapter, complete the
installation,and reboot.
When you reboot, you will receive messages indicating that you
do not have a 3Com EtherLink II adapter installed. Ignore these
messages and continue with the steps below.
2. From an OS/2 Full Screen command prompt, copy two files from
your Xircom Network Drivers diskette to the \IBMCOM\MACS
directory,using the COPY co&d,
as follows:
COPY A:\#DIS\PE3OS2Va.NIF C:\IBMCOM\MACS
COPY A:\NDIS\PE3X?DIS.OS2 C:\IBm3oM\mCS
3. Use an ASCII text editor to modify the CONFIG.SYS fie, replacing
the 3Com EtherLink II driver name with the Pocket Ethernet
Adapter III driver name, as follows:
Change the line
DEVICE = C:\IBMCOM\MACS\FMKII.OS2
to read
DEVICE = C:\IBMCoM\MACS\PE3NDIS.O52
4. Save the fie.
44
Wet EthernetAdopter 111 Ws Guide
5. Change to the \IBMCOM directory.
6. Use an ASCII text editor to open and edit the PROTOC0L.INI file
as follows:
In the [IBMLXCFGI section, add the line
= PE30S2M .NIF
In the LANDD-nifI section, modify the BINDINGS statement so
PE30S2V2-df
that it reads
BINDINGS = PE30S2V2-df
At the end of the PROTOC0L.INI file, add the following lines:
[PE3OS2V2-df ]
DriverName = XIRCoW$
7. Save the file and reboot the PC.
IBM OS/2 LAN SERVER VERSION 2.0
IAN Recpester lnstdlatkn (for B
I M OS/2 LAN Server version 2.0)
NDlS Driver
1. Follow the instructionsin your OS/2 documentation for an
Advanced LAN Requester installation.
2. When installing and configuring the Requester component, under
Select Requester Services,choose "Neither of the above" for
messaging services, unless you h o w you need them and have the
information requrred for configuring these services.
3. When you reach the Configure window, select LAN Adapter and
Protocol Support, then under the Options window choose Copy
additional network adapter drivers.
4. On the Copy Additional Network Drivers window, type in the
path A\NDIS, then insert the Xircom Network Drivers diskette in
drive A and follow the prompts.
5. When the Options window is displayed again, select Configure
Workstation and choose the Xircom Pocket Ethernet Adapter III
with IBM OS/2 NETBIOS protocol.
6. Follow the prompts to complete the installation.
7. Shut down OS/2 and reboot the PC.
LAN Sewer- I
(for IBM 05/2 LAN h e r version 2.0) NDlS
Driver
Installation of OS/2 LAN Server automatically includes the installation of
OS/2 LAN Requester. For requester-only installation,see the preceding
section.
1. Follow the instructions in your 0% documentationfor an
Advanced LAN Server installation.
2. m e n you reach the Configure window, select LAN Adapter and
Protocol support.
3. On the Options window choose Copy additional network adapter
drivers, then OK.
4. On the Copy Additional Network Drivers window, type in the
path A\NDIS, then insert the Xircom Network Drivers diskette in
drive A and follow the prompts.
5. On the Options window again, select Configure workstation and
choose Select Default PROTOCOL.INI,Xircom Pocket Ethernet 111
Adapter, and the appropriate proto&, then OK.
6. Choose Adapter 0 if the correct adapter is displayed, then OK.
7. Choose Apply the Changes then follow the prompts to complete
the installation.
8. Shut down OS/2 and reboot the PC.
IBM OS/2 MTENDED EDITION VERSIONS 1.2X OR 13X
LAN Requester (for IBM 05/2 Exteded Edition Verskm 1 . 2 ~or 13x)
NDlS Driver
1. Configure OS/2 Extended Edition versions 1 . 2 ~or 1.3~on your
machine using the instructions for a 3Com EtherLink network
adapter.
46
Pocket EthernetAdoDter 111 User's Guide
If for any reason you have to reboot at this point, you will receive
messages indicating that you do not have a 3Com EtherLink
adapter installed. Press Enter to override these messages arid
continue with the steps below.
2. Open an OS/2 box and use an ASCII text editor to modify the
CONFIGSYS file. Replace the 3Com EtherLink driver name with
the Pocket Ethemet Adapter III driver name, as follows:
Change the line
DEVICE = \CMLIB\EMlWC.OS2
to read
DEVICE = \CMLIB\PE3NDIS.OS2
3. Save the fde.
4. Change to the \cMLIB directory.
5. Use an ASCII text editor to open and edit the PROTOC0L.INI file
as follows:
In the [ETHERAND] section, modify the BINDINGS statement so
that it reads
BINDINGS = XIRCOMNET
At the end of the PROTOC0L.INI file, add the following lines:
[XIRCOMNET]
DRIvmRAm = XIRCoM$
6. Save the fie.
7. Copy the file PE3NDIS.OS2 from the \NDIS directory on the
Xircom Network Drivers diskette to the \CMLIB directory on your
hard disk.
8. Shut down OS/2.
9. Reboot the PC.
47
LAN sewer 1.3 (for IBM OS/2 Extended EMOnverrkm 1.2x or
1.3x)
To install LAN Server version 1.3 you must have previously installed OS/2
Extended Edition version 1.3 and two of its component programs:
Communications Manager and LAN Requester. Instructionsfor installing
LAN Requester with the Xircom network driver are contained in the
preceding section. Once the required components are installed,install
LAN Server using the SRVINST program, according to the instructions in
the LAN Server documentation.
MICROSOFT LAN MANAGER
Mkosoft LAN Mamger(versibns 2.1
(NDIS Diver)
and her) for DOSmdOS/2
1. Begin installation of LAN Manager using "setup."
2. When prompted to select the available network adapter driver,
choose "Other Driver" at the bottom of the screen.
3. When prompted, insert the Xircom Network Drivers diskette.
4. Select "Xircom Pocket Ethernet Adapter III" from the menu.
5. Continue with the installationuntil it is completed.
6. Reboot the PC.
Mkosoft LAN Mmmger (version 2.0) for DOS md OS/2 (NDIS
Diver)
1. Begin installation of LAN Manager 2.0 using "setup." At the
"Import Network Drivers" screen choose YES.
2. Insert the Xircom Network Drivers diskette.
3. Select "xircomPocket Ethernet Adapter ID"from the list of drivers
to import.
4. Continue with the installation.
5. At the Network Drivers menu, select "XircomPocket Ethernet
Adapter 111" from the list of drivers to install.
6. Continue with the installation until it is completed.
7. Reboot the PC.
4a
MICROSOFTWINDOWS FOR WORKGROUPS (NMS DRIVER)
1. Run the Windows for Workgroups “setup”program.
2. When prompted to select the available network adapter driver,
choose ”Unlisted or Updated Network Adapter“ at the bottom of
the screen.
3. When prompted, insert the Xircom Network Drivers diskette.
4. Select “Xirmm Pocket Ethernet Adapter III” from the menu.
5. Complete the Windows for Workgroups setup, inserting the
Xircom Network Drivers diskette as required.
6. Reboot the computer.
NCR STARGROUP
See the heading “AT&T/NCRStarGROUP.”
NCSA TEWET (PACKET DRIVER)
NCSA Telnet is a public domain Telnet implementationfrom the National
Center for Supercomputing Applications (NCSA). It can be used with
PE3PD.COM, Xircom’s Packet Driver, which can be found in the
\PKTDRV directory on the Xircom Network Drivers diskette. After
installing the packet driver in accordance with your NCSA Telnet
documentation, assign the following options in the CONFIG.TEL file:
hardwareqacket
ioaddr=60
where 60 is the default software interrupt for the Xircom Packet Driver.
NDIS DRIVER
The Xircom NDIS driver conforms to the Microsoft Network Driver
Interface Specification (NDIS). It can be found in the \NDIS directory on
the Xircom Network Drivers diskette. A sample PROTOCOL.IM segment
is also included. For installation instructions,see the alphabetical listing
for your network operating system in this section. See Appendix C,
CommandLine Parameten, for more detailed information.
49
NOVEU N W A R E (VERSIONS 2.1 X AND LATER) OD1 DRIVER
The Xircom OD1 driver allows for the concurrent use of Novel1 NetWare
and other protocols that support Novell's Open Data-Link Interface (ODI)
specification.
NetwaKl OM Driver I*
1. Copy the following files from the \OD1 directory on the Xircom
Network Drivers diskette to the appropriate directory of your hard
disk or network boot disk:
IlsL.COM
PE30DI. COM
.
IPXODI COM
NETx.ExE
NET.CFG
2. To start the workstation, change to the appropriate directory and
load the drivers in the following order:
LSL
PDODI
IPXODI
NEm
3. Change to the network drive (usually F:\LOGIN>).
4. Log in to the network.
50
Met EthwnetAdopter 111 User's Guide
NetWm OD1 anl Pocket Dr’m#s
If you have a need to run Novell NetWare concurrentlywith the Xircom
packet driver, copy the file ODIPKT.COMfrom the \OD1 directory of the
Xircom Network Drivers diskette to the same directory to which you
copied the NetWare OD1 drivers. From the same directory, load the
drivers in the following order:
LSL
PE30DI
IPXODI
ODIPKT
NEm
NetWm with the N o d SNA Gateway
If you are running Novell NetWare and communicate to your host
computer through a Novell SNA Gateway, configure your Novell SNA
workstation software to print to a LAN printer. For additional information,
refer to your Novell documentation.
NetWm Reqrmter for 05/2 (vanions 2.x)
These instructionsexplain how to load the Xircom network driver as part
of the NetWare Requester installation process.
1. Run the Netware Requester INSTALL program as instructed in the
NetWare Requester documentation and choose Requester on
workstation from the Installation menu.
2. After verifying your target directory and source drive for NetWare
Requester fdes, choose Edit CONFIG.SYS and Copy Files at the
Requester Installationdialog box.
3. When prompted for the Network Interface Card driver, type in the
name of the Xircom driver: PE30DI.OS2. After completing the
other options in the dialog box, click on Save.
4. When asked if the driver you specified is the one you want to
install,choose Yes, then type in the path to the Xircom driver:
A:\ODI\PE30DI,OS2
51
5. Remove the NetWare Requester install diskette and insert the
Xircom Network Drivers diskette.
6. At the dialog box "Requester fdes will copy to:", click on Copy.
7. Complete the installation and exit the Netware Requester installation utility.
8. Shut down OS/2 and reboot the computer.
Netware Requester for 05/2 (version 1.3)
the
tlle
1. Install Netware Requester for OS/2 and choose any Ethernet
adapter (for example, NE2).
2. Using an ASCII text editor, edit the CONFIG.SYSfde as follows:
Replace the line specifying the Ethernet adapter driver you
installed in Step 1,for example: .
devicerc :tpathIlQE2.SYS
with a line specifying the Xircom driver:
device=c :[path]PE30DI.OS2
3. Copy the fdes PE30DI.OS2 and NET.CFG from the \OD1 directory
on the Xircom Network Drivers diskette into the subdirectory
containing the file NE2.SYS.
4. Shut down OS/2 and reboot the computer.
52
NOVEU N€lWARE UTE (VERSIONS 14 OD1 DRIVER
1. Install NetWare Lite according to the instructionsin the NetWare
Lite manual.
2. When prompted for type of network adapter, choose "3Com
EtherLink II" and complete the installation.
3. Copy the files PE30DI.COM and NET.CFG from the \OD1
directory of your Xircom Network Drivers diskette to the
\"E
directory on your hard disk or boot diskette.
4. Use an ASCII text editor to replace the line in your
STARTNET.BATfile that reads
3C503
with
PE30DI
5. Save the file.
6. Reboot the PC.
7. Change to the \"E
directory and type STARTNET to start the
network on that station.
0512
See entries under "IBM OS/2."
OD1 D R M R
See the alphabetical listing of network operating systems for those that
can use the OD1 driver. See Appendix C, Command Line Pariametem, for
more detailed information.
PACKET DRIVER
Xircom's packet driver is based on FIT Software's public domain
spedfication. The driver file PE3PD.COM is located in the \PKTDRV
directory of the Xircom Network Drivers diskette. To determine whether
you should use the packet driver, refer to the instructions for your
network operating system, listed alphabeticallyin this section. See
Appendix C, Command Line Pariamers, for more detailed information.
SUN MICROSYSTEMS K-NFS (VERSIONS3.5 AND LATER) NDIS
DRIVER
1. Install PC-NFS for Ethernet according to instructions in the PC-NFS
documentation. Choose NDIS setup, and follow the instructions to
complete the setup. Note the prompt that tells you that further
manual modifications will have to be made.
2. Reboot. You will see some error messages. Disregard them and
continue with these instructions.
3. Rename the frle PROTOC0L.NFS in the C\LANMAN directory tr
PROTOCOL.INI. Use an ASCII text editor to edit the
PR0TOCOL.IM file as follows:
Replace the items
[your-mac-module1
drivername YOuRwAC$
option1 = value1 etc.
[NFS-NDIS]
drivemame = NFSLlNK1
bindings = your-mac-module
with
[XIRCOlQlET]
drivername = X I R W $
[NFS-NDIS]
drivername = NFSLlNK$
bindings = XIRCOwjBT
4.Copy the file PE3NDIS.m from the \NDIS directory on the
Xircom Network Drivers diskette to the C : \ L A " directory.
5. Use an ASCII text editor to insertthe following line in your
C0NFIG.SY.Sfie:
DEVICE=C:\LA"\PDNDIS.EXE
54
between the two lines that read
DEVICE=C:\LA”\PRO!L”.SYS
DEVICE=C:\LA”\NFS-NDIS.SYS
6. Venfy that your AUT0EXEC.BATfile contains a line that reads
C :\LA”\NETBIND
before the line that reads
NET INIT
7. Configure PGNFS options according to your PC-NFS documentation, and reboot the PC.
TENSET TECHNOLOGIES TENSET/TCP (PACKET DRIVER)
1. Run the TenseflCP INSTALL Program as instructed in the Tenset/
TCP User Guide. Select the destination drive and directory into
which you want to install the TenseflCP programs.
2. If your copy of TenseflCP does not include the packet driver for
the Xircom Pocket Ethernet Adapter 111, select the Proprietary
driver. Then, after INSTALL completes, copy the Xircom packet
driver, PE3PD.COM, fromthe \PKTDRV directory of the Xircom
Network Drivers diskette to the directory in which you installed
TenseflCP.
3. INSTALL causes the following line to be added to your
CONFIG.SYSfile:
DEVICE=[path]NETDEV. SYS
where 42&1 is the drive and directory in which you installed
TensetlTCP.
INSTALL also adds SET RESOURCES and SET HOSTS lines to
AUT0EEC.BAT. Before rebooting, ensure that both your
CONFIG.SYS and AUT0EXEC.BAT files include these lines by
executing TYPE AUT0EXEC.BATand TYPE CONFIGSYS at the
DOS prompt. Then, reboot the PC to load NETDEV.SYS.
4. Run CUSTOM NETDEV according to your own needs. At the very
least, select a unique Local Site Ip Address.
5. Before you can run TenseflCP, you must execute the Xircom
packet driver, PE3PD, as follows:
PE3PD
The Xircom packet driver is self-configuring and finds its own LFT
port and interrupt under most circumstances. To override the selfconfigured choices, see the command line options described in
Appendix C, or type:
PE3PD ?
UNGERMANN-BASS NET/ONE LAN MANAGER VERSION 2.1
MK AND 05/2 (NDIS DRIVER)
FOR
The Xircom Pocket Ethernet Adapter III is supported on Ungermann-Bass
Netlone LAN Manager and MSNET networks. There are two NDIS driver
packages available from UB: XNS B N S m I S and TCP BNS/NDIS. These
packages, used with a Xircom NDIS driver, provide fdes that support
both DOS and OS/2 workstations.They are available from UB or an
authorized UB representative.
Ugemnm-Bass Net/One LAN Manager versioll2.1 lnrMAatkn
1. Begin installation of LAN Manager 2.1 using "setup."
2. When prompted to select the available network adapter driver,
choose "Other Driver" at the bottom of the screen.
3. When prompted, insert the Xircom Network Drivers diskette.
4. Select "Xircom Pocket Ethernet Adapter III" from the menu.
5. Continue with the installation until it is completed.
6. Following the UB instructions,modify your CONFIG.SYS file by
adding the following line:
For DOS:
DEVICE = [path]PE3NDIS.EXE
56
For OS/2:
DEVICE = [path]PE3NDIS.OS2
where [pthl is the drive and directory in which you installed your
network operating system.
7. Use an ASCII text editor to modify your PROTOC0L.N file as
follows:
For each protocol that you want to bind, set the protocol definition
area of the PR0TOCOL.INI file to:
BINDINGS
WLOOP
At the end of the file, add the following fragments
[WLOOPI
DRIvERNAm = WLOOP$
BINDINGS = XIRCOMNET
;XIRCOM ADAPTER
[XIRCOMNET]
DRIVERNAME = XIRCOMS
8. Reboot the PC.
57
WOUONGONG PATHWAY ACCESS FOR DOS (VERSIONS 1.1 AND
LATER) NDlS AND OD1 DRIVERS
Wollongong Pathway Access for DOS can be installed using Xircom NDIS
or OD1 drivers. Installation instructions for both types of driver are
provided below. For information on which driver is appropriate for your
network environment, refer to the Wollongong Pathway Access for DOS
documentation.
Wolkngong Pathway NDlS lmtdatkn
1. Install Pathway Access for DOS Kernel and Drivers programs
according to the instructionsin the Pathway Access for DOS
manual. Before rebooting the PC, continue with the following
steps.
2. Use an ASCII text editor to modify the CONFIG.SYSfile. After the
statement that reads
DEVICE=C:\PATHPQAY\POQTCP.SYS
add the lines
DEVICE=\PATEWAY\[PROTMAN FILE] /I:C: \PATHWAY
where [PRO"
FILE1 is equal to the PROTMAN2.EXE or
PROTMAN.EXE file that is located in your \PATHWAY directory.
(Refer to the Wollongong Pathway Access for DOS manual for
information regardmg the differencesbetween these two fdes.)
3. Copy the files PE3NDIS.EXE and PROTOCOL.INI from the \NDIS
subdirectory on the Xircom Network Drivers diskette to the
\PATHWAY directory on your hard disk or boot disk.
4. Continue with the "custom" instructions in the Pathway Access for
DOS manual.
5. Reboot the PC.
5a
Wdkngbng PdWay OD1 ImtaAatkn
1. Install Pathway Access for DOS Kernel and Drivers programs
according to the instructions in the Pathway Access for DOS
manual. Before rebooting the PC, perform the following steps.
2. Copy the following files from the \OD1 directory on the Xircom
Network Drivers diskette to the \PATHWAY directory on your
hard disk or boot diskette:
.
LSL COM
PE30DI. COM
IPXODI COM
NBTx.ExE
NET.cFG
.
Foradditkdpmmekrsthat
mOD1 driver, telertodppedk
3. Change to the \PATHWAY directory and load the drivers in the
following order:
LSL
PE30DI
IPXODI (only if using Novell NetWare)
"It
(only if using Novell NetWare)
4.Load the Wollongong file 0DI.EXE.
5. Continue with the instructions in the Pathway Access for DOS
ffKUlUal.
6. Reboot the PC.
59
APPENDIX A ERROR MESSAGES
The Xircom network drivers report the following problems if they occur
during the initialization of a network session. For error messages related
to network operation, see your network operating system documentation.
A Pocket Ethernet Adapter could not be found
Ensure that AC power connections are secure (whether from a wall
outlet or through the Phantom Power Cable) and that the power
cable is connected properly to the power input socket on the rear of
the Pocket Ethernet Adapter III.
Ensure that the Pocket Ethernet Adapter 111 is securely connected to
the parallel port (LPT1, LPT2, LPT3) specified during installation.
You may have specified a nonexistent parallel port during installation, or a Pocket Ethernet Adapter III device driver is already loaded.
Repeat the installation procedure.
pocLetEthemetAdapterIIIlddnssEEPROMann?dabk
The Pocket Ethernet Adapter III had an internal failure. Run the self
test program described in the section on Configurarion andDiagmcics before calling Xircom Technical Support.
The Pocket LAN Adapter hardware connected to the parallel port is
not compatible with the type of driver software being used.
TheselestedIntermptislulavawle
TheselestedUO address is Mavlilable
The selected LPT Port is atllvailable
These messages indicate that values for the parameters listed have
been changed in the NET.CFG or PROTOC0L.INI file, or on the
command line with packet, Artisoft, or DEC PCSA drivers, and that
the system cannot implement the changes.
Pocket wemet Adopter 111 User's We
61
APPENDIX B. SOWARE SUPPUED
The files and directories contained on the Xircom Network Drivers
diskette are listed below. For installation instructions,see the section
Softwarn Setup and @eration, where supported network operating
systems are listed in alphabetical order. Contact Xircom Technical
Support for information about networking environmentsnot covered in
this User's Guide.
README.-
The latest information about the software.
To view, type
MORE CfkRJWDM
E
m
.
at the DOS prompt.
m==
EI'P.COM
Self test diagnostic program
DOS command line utility that enables
Enhanced Parallel Port (EPP) mode on EPPcapable computers
DOS configuration program that enables
Enhanced Parallel Port (EPP) mode from the
CONFIG.SYS file on EPP-capable computers
OS/2 confguration program that enables
Enhanced Parallel Port (EPP) mode from the
C0NFIG.M file on EPP-capable computers
pE3NDLs.Ex.E
NDIS driver for Windows for Workgroups
PRrnOLJNI
Protocol initialization segment
OEMSETUPJNF
Windows for Workgroup configuration file
\ARmoFrdirectoig
PE3AILAN.COM
Driver for Artisoft LANtastidAI version 4.1
63
\ A m directory
xIRATr34.m
PROTOCOLINI
AT&T/NCRStarGROUP 3.3 and 3.4
configuration file
Protocol initialization segment
\ATE35 directory
xIRAn35.NI.F
PROTOCOLINI
AT&T/NCRStarGROUP 3.5 configuration file
Protocol initialization segment
\DEC directory
PE3DLLEXE
Datalink driver for use with DECnet-DOS or
PCSA 3.x
PROTOCOLINI
Protocol initialization segment
\MSLA".DOS\DRIVWS\~XIRCOM
PE3NDISXXE
NDIS driver for DOS
PROTOCOLINI
Protocol initialization segment
\MSLA".DOS\DRIVWS\NIFdiiectorg
PE3Dos.NIF
LAN Manager DOS configuration file
\MSA".OS2\DRIVWS\mXIRCOM
PE3NDIS.OS2
NDIS driver for OS/2
PROTOCOLINI
Protocol initialization segment
directory
\MSLA".OSZ\DRIVWS\NIF directory
PE3os2.NI.F
LAN Manager OS/2 configuration file
NDIS driver for DOS
NDIS driver for OS/2
Protocol initialization segment
Protocol initialization segment for FTP Software’s
PC/TCP and W a t c h
Configuration file for OS/2 version 2.0
\OD1 directory
IPXODLCOM
IPX protocol stack
PE3ODLCOM
OD1 driver for DOS workstations
PE30DLOS2
OD1 driver for Novell NetWare Requester for
os/2
ISLCOM
Link support module
NmXExE
NetWare shell for use with DOS 3.x or higher
rn.CFG
OD1 confiption file (DOS only)
ODIPKT.COM
Allows operation of Novell NetWare
concurrentlywith a packet driver
\PKTDRVdirectorg
PE3PD.COM
Packet driver file conforming to FIT Software’s
public domain driver specifcation
See the alphabetical listing of network opetating systems in the Softwae
Setup and Operution section for instructionson how to use the files
required for your network. Contact Xircom Technical Support for
information about other networking environments.
65
APPENDIX C. COMMAND UNE PARAMHERS
This appendix contains instructions for using driver parameter settings
other than those described in the Sofrware Setup and 0pet.atiOnsection.
The driver types are listed in alphabetical order: Artisoft, DECnet, NDIS,
ODI, and packet. In most cases the Xircom driver will be able to automatically configure for the correct parallel pon, interrupt value, and EPP,
bidirectional, or non-bidirectionalmode.
ARTISOFT LANTASTIC/AI 4.1 D R M R PARAMITERS
The Xircom Artisoft driver PE3AILAN.COM is self-configuring and
therefore finds its own LPT and interrupt values and correctly selects
bidirectional or non-bidirectionalmode under most circumstances.
Should it be necessary to override the self-configured parameters, use
one or more of the following options on the command line with
PE3ATLAN:
Keyword
Dehult
Valid Settine
?
REM
"
XgROX
LPT=
IRQ=
MPX=
PACKET-SIZE=
IOADDMSS=
LINKDISABLE
AUTO
802.3
AUTO
AUTO
c7
1500
AUTO
(1 to 3)
(3 to 15)
(CO-FF)
(574 to 1500)
(0x240 to 0x380)
LINK
where
? displays a summary of command line options.
REM unloads the driver from memory.
Pocket Ethemet Adapter 111 User's Guide
67
NON forces the driver to run in non-bidirectionalmode. Without the
"NON" keyword, the driver autocodigures to bidirectional or nonbidirectional mode.
XEROX sets the packet type to Xerox Ethemet. Without the "XEROX"
keyword, the driver defaults to 802.3.
LPT- requires a number from 1 to 3 which designates the physical
parallel port to which the Adapter is connected: LPTl, LPT2, or LPT3.
Default (if parameter not specified) is autoconfiguration.
IRQ- requires a number designating the parallel port hardware interrupt
(for example, IRQ3 or IRQ=7). Default (if parameter not specified) is
autocoofiguration.
MPX= requires the multiplexed interrupt ID in hexadecimal notation (C@
FF, default is 0.
PACKET_SIZE=requires the maximum packet size in decimal notation
(574-1500, default is 1500).
IOADDRESS= r e q u h s an VO address in hexadecimal notation (0x240 to
0x380). Default (if parameter not specified) is autoconfiguration.
LINKDISABLE disables link integrity for operation with non-lOBASE-T
networks such as StarLAN 10. Without the "KDISAl3I.E" keyword in
the PE3AJLAN command line, the driver defaults to link integrity ENABLED.
Instructions for loading the Artisoft driver are provided in the Sofhuare
Setup and Instahtion section listing network operating system in
alphabetical order by vendor.
DECNET-DOS AND PCSA PESMLEXE PARAMETERS
PE3DLL.W is the Datalink Driver for Digital Equipment Corporation's
DECnet-DOS and PCSA products.
If the PE3DI.L command is executed with no parameters, the Adapter will
automatically select EPP, bidirectional, or non-bidirectionalmodes and
configure an appropriate parallel port and interrupt value. Should it be
61
Met EthemetAdoptw 111 User's We
necessary to ovemde the self-configured values, any combination of the
following command options can be used:
Keyword
Dedkult
Validsettings
?
Ncm
AUTO
LPT=
AUTO
(1 to 3 )
m=
AUTO
( 3 to 15)
IOADMZESS=
AUTO
(0x240 to 0x380)
LINKDISABLE
LINK
INTEGRITY
ENABLED
where
? displays a summary of command options.
NON forces the driver into non-bidirectionalmode. Without the "NON"
keyword, the driver autoconfigures to bidirectional or non-bidirectional
mode.
LPT= requires a number from 1to 3 which designates the physical
parallel port to which the Adapter is connected: LPT1, LF'T2, or LFT3.
Default (if parameter not specified) is autoconfiguration.
I"=requires a number designating the parallel port hardware interrupt
(for example, INT=5 or INT=7). Default (if parameter not specified) is
autoconfiguration.
IOADDRFSS= requires an I/O address in hexadecimal notation (0x240 to
0x380). Default (if parameter not specified) is autoconfiguration.
LlNKDISABLE disables link integrity for operation with non-1OBASE-T
networks such as S t a r M 10. Without the "KDISABLE" keyword in
the PE3DLL command line, the driver defaults to link integrity ENABLED.
Insmctions for loading the appropriate DECnet-DOS and PCSA files and
drivers are provided in the Software Setup and Installation section listing
network operating systems in alphabetical order by vendor.
69
NMS DRMR PARAMETERS
See the alphabetical listing of network operating systems in the Softwarn
Setup and Installation section to determine whether your network uses
an NDIS driver.
PE3NDIS.EXE and PE3NDIS.OS2 are NDIS drivers that support the Pocket
Ethernet Adapter III.The PROTOCOL.INI file used with these drivers
must contain the module name and DRIVERNAME as follows:
[XIRCOEDJET]
DRIVERNAME = XIRCOMS
When the PE3NDIS command is executed, the Adapter will automatically
find and use an appropriate parallel port and interrupt value and select
bidirectional or non-bidirectional mode. Should it be necessary to
override the self-configured values, use an ASCII text editor to add the
appropriate combination of the parameters listed below to the
PROTOCOLINI file (keywords are not case sensitive):
KeJlword
"
DeEault
AUTO
(1 to 3 )
( 3 t o 15)
(0x240 to 0x380)
LpT=
AUTO
m=
AUTO
IOADM(ESS=
AUTO
LINKDISABLE
LINK
mGRITY
KNABLED
70
valid-
where
NON forces the driver to run in non-bidirectionalmode. Without the
"NON" keyword, the driver autoconfiguresto bidirectional or nonbidirectional mode.
LIT= requires a number from 1 to 3 which designates the physical
parallel port to which the Adapter is connected: LPT1, LPT2, or LpT3.
Default (if parameter not specified) is autocodguntion.
INT- requires a number designating the parallel port hardware interrupt
(for example, INT-5 or INT=7). Default (if parameter not specified) is
autoconfiguration.Use 0 (zero) to force the Adapter into a polled mode.
IOADDRES= requires an VO address in hexadecimal notation (0x240 to
0x380). Default (if parameter not specified) is autoconfiguration.
LINKDISABLE disables link integrity for operation with non-1OBASE-T
networks such as StarLAN 10. Without the "KD1SABI.E" keyword in
the PROTOCOL.INI file, the driver defaults to link integrity ENABLED.
Instructionsfor loading the appropriate NDIS files and drivers are
provided in the Sofrware Setup and Instalhtion section listing network
operating systems in alphabetical order by vendor.
Wet EthernetAdapter 111 User's Gll;de
71
ODI D
R
M
R PARAMmRS
See the alphabetical listing of network operating systems in the Softwclw
Setup and Instalkation section to determine whether your network uses
an OD1 driver.
The OD1 driver PE30DI.COM uses its default settings unless other
options are specified in the NET.CFG file. This file is supplied on the
Xircom Network Drivers diskette and must be present in the same
directory as the OD1 driver.
While the Xircom OD1 driver defaults to Ethernet frame type 802.2, the
NET.CFG file supplied on the Xircom diskette sets both 802.2 and 802.3.
Therefore the Xircom NET.CFG file must be used if your network frame
type is 802.3.
To change any parameters, use an ASCII text editor to open and modify
the NET.CFG file and insert the appropriate keywords and values after
the line
LINK DRIVER PE30DI
Keyword syntax for NET.CFG is as follows (keywords are not case
sensitive):
De!fa&
validsetdn$5
FRAME
FZIWWET-802.2
"
ETHBRNET-I1
ETHERNET-802.2
ETHERNET-802.3
ETHERNET-SNAP
AUTO
LPT
AUTO
INT
AUTO
IOADMCESS
LINKDISABLE
AUTO
Keyword
LINK
INTEGRITY
ENABLED
72
(1 t o 3)
( 3 to 15)
(240 to 380)
where
FRAME designates support for multiple Ethernet frame types. One or
more types can be used. Refer to your NetWare documentation for more
information. The Xircom OD1 driver's default frame type is 802.2, but the
NET.CFG file supplied with the OD1 driver on the Xircom Drivers
diskette sets both 802.2 and 802.3. Therefore if your networks frame type
is 802.3, you must use Xircom's NET.CFG with the OD1 driver.
NON forces the driver to run in non-bidirectionalmode. Without the
"NON" keyword, the driver autoconfiguresto bidirectional or nonbidirectionalmode.
LFI' requires a space followed by a number from 1 to 3 which designates
the physical parallel port to which the Adapter is connected: LPT1, LFT2,
or LFT3. Default (if parameter not spedied) is autoconfiguration.
INT requires a space followed by a number designating the parallel port
hadware interrupt (for example, INT=5 or INT=7).Default (if parameter
not specified) is autoconfiguration.Use 0 (zero) to force the Adapter into
a polled mode.
IOADDRFSS requires a space followed by an VO address in hexadecimal notation (0x240 to 0x380). Default (if parameter not spedied) is
autoconfiguration.
LINKDISABLE disables link integrity for operation with non-1OBASE-T
networks such as StarLAN 10. Without the "LINKDISABLE"keyword in
the NET.CFG fie, the driver defaults to link integrity ENABLED.
Instructionsfor loading the appropriate OD1 files and drivers are provided in the Soflwam Setup and Installation section listing network
operating systems in alphabetical order by vendor.
73
PACKET DRIVER PARAMETERS
Packet driver parameters must be stated on the command line with the
PE3PD.COM packet driver.
See the alphabetical listing of network operating systems in the Software
Setup andInstalkalion section to determine whether your network uses a
packet driver.
The packet driver supplied on the Xircom Network Drivers diskette is
based on FIP Software's public domain specification.The driver file
PE3PD.COM is located in the \PKTDRV directory on the Drivers diskette.
Refer to your network documentation for instructions on how to install
the packet driver with your network Most installations should be able to
use the default settings listed below. To change the default settings, use
the appropriate keywords and settings on the PE3PD.COM command line
when loading the packet driver.
The Xircom packet driver PE3PD.COM is self-configuring and therefore
finds its own LPT and interrupt values and correctly selects bidirectional
or non-bidirectional mode under most drcumstances. Should it be
necessary to ovemde the self-configured parameters, use the following
command line options (keywords are not case sensitive):
KeYwd
Dehllt
valid-gs
?
74
"
AUTO
S m =
60
(60-80)
LPT=
AUTO
(1 t o 3 )
m=
AUTO
(3 t o 15)
IOADDRESS=
LINKDISABLE
AUTO
(240 t o 380)
LINK
INTEGRITY
ENABLED
where
? displays a summary of command line options.
NON forces the driver to run in non-bidirectionalmode. Without the
“NOW keyword, the driver autoconfiguresto bidirectional or nonbidirectional mode.
SINT= is a number from hex 60 to 80 designating a software interrupt.
The default is 60.
UPIZ requires a number from 1 to 3 which designates the physical
parallel port to which the Adapter is connected: LpT1,LFT2, or LpT3.
Default (if parameter not specified) is autoconfiguration.
INT= requires a number designating the p a d e l port hardware interrupt
(for example, INT=5 or INT=7). Default (if parameter not specified) is
autoconfiguration.Use 0 (zero) to force the Adapter into a polled mode.
IOADDRESS= requires an VO address in hexadecimal notation (0x240 to
0x380). Default (if parameter not specified) is autoconfiguration.
LlNKDISABIE disables link integrity for operation with non-1OBASE-T
networks such as StarLAN 10. Without the “LINKDISABLE”keyword in
the PE3PD command line, the driver defaults to link integrity ENABLED.
hmctions for running the packet driver are provided in the Software
Setup and Imtulkation section hting network operating systems in
alphabetical order by vendor.
Wet EthernetAdapter 111 User’s GI&
75
INDEX
3COm 3+0pen
DOS 25
OS/2 26
10BASE-2 2, 3, 8
installation 9, 10
10BASE-T 2, 3, 8
installation 10
A
AC Phantom Power Cable
specifcations 5
installation 14
power cautions 9,14, 15
AC power adapter
specifications 5
installation 13
voltage requirements 5
Adapter, Pocket Ethernet III
connection to parallel port
11
data display 23, 24
installation 9
model numbers 2 , 3
power cautions 9, 11, 13,
14,15
ArtisoftLANtastic/AI 28
AT&T StarLAN 10 2,3, 18
AT&T/NCR StarGROUP 29
Attachment screws, parallel
port 11
Automatic shut off 15, 19
B
Banyan VINES 31
Bidirectional mode, parallel
port 12, 23, 24
BNC connector 2, 3, 9
T-connector 2, 3, 7, 8, 9
Bulletin Board System vii
Wet Ethemet Adopter 111 User's M
e
C
Cable fault indicator 17, 19
Cabling, network 3, 8, 9, 10
Clicking sound, parallel port
installation 11
Collision indicator 17, 19
Combination card (Model
PE31OBC) 2,3, 10
Configuration display 23
Connection to parallel port
11
Contents, Adapter package 7,
8
Customer service vi
D
DEC PATHWORKS 32
DEC PCSA driver 33
DECnet-DOS driver 33
Diagnostics
hardware 17,22,61
indicators 17, 18, 19
self test 22
Diskette contents, network
drivers 63
DOS LAN Requester 44
Downloading network drivers
Vii
Drivers
3Com3+0pen 25
ArtisoftLANtastidAI 28
AT&T/NCR StarGROUP 29
BanyanVINES 31
DECPATHWORKS 32
DECPCSA 33
DECnet-DOS 33
downloading vii
fdes, Xircom diskette 63
FTP W a t c h 35
FTPPC/TCP 37
77
Drivers (continued)
HPLANManager 41
IBM DOS LAN Requester
44
IBM LAN Support Program
42
IBM OS/2 Extended
Edition 46
IBM OW2 Extended
Services 44
IBM OS/2 LAN Server
Version 2.0 45
IBM PC LAN and DOS LAN
Requester 44
Microsoft LAN Manager 48
Microsoft Windows for
Workgroups 49
NCSA Telnet 49
N D I S 49
Novell NetWare 50 see ako
NetWare main heading
Novell NetWare Lite 53
Novell NetWare Requester
for OS/2 51
OS/2 seeIBM OS/2
packet 53 see ako Packet
driver
Parallel Port Multiplexor 3
Sun Microsystems PC-NFS
54
TenseVTCP 55
Ungermann-Bass Net/One
56
Wollongong Pathway
Access for DOS 58
E
EEPROM test 23
Enhanced Parallel Port (EPP)
mode 12, 20, 24
utility 12,2O, 63
Equipment required 8
Error messages 61
Ethernet frame type
Ethernet I1 68, 72, 73
IEEE 802.3 68,72, 73
IEEE 802.2 39, 40, 50, 59,
72
NET.CFG fde 39, 40, 50,
59,73
SNAP 72
Extended Edition, OS/2 46
Extended Services, OS/2 44
F
FCC
certification 4
warning ii
FIT Software W a t c h
NDIS driver 36
packet driver 35
FTP Software PC/TCP
NDISdriver 38
OD1 driver 39,40
packet driver 37
G
Gateway, Novell SNA 51
H
Hardware diagnostics 17, 21
HPLANManager 41
78
Pocket EthemetAdapter 111 User's Wde
I
M
Indicator lights
diagnostic 17, 18, 19
power on 13, 14, 17, 18,
Media interface 2, 3
Memory size 4
Memory test 23
Messages, error 61
Microsoft LAN Manager 48
Mini-DIN connector, 6-pin
14, 15
Models, Adapter 2
specifications 3, 4
Modes, parallel port 12
Mouse connector, PS/2 14,
19
Init test 23
Installation
AC phantom cable 14
AC power adapter 13
Drivers see Drivers
thin Ethernet 9, 10
twisted pair 10
Integrity, link 18
15
K
N
Keyboard connector, PS/2
14, 15
NCR StarGROUP seeAT&T/
NCR StarGROUP
NCSATelnet 49
NDIS driver 49
command parameters 70
3Com 3+0pen 25
AT&T/NCR StarGROUP 29
BanyanVINES 31
DECPATHWORKS 29
FTP W a t c h 36
FTPPC/TCP 38
HP LAN Manager 41
IBM DOS LAN Requester
44
IBM LAN Support Program
42
IBM OS/2 Extended
Edition 46
IBM OS/2 Extended
Services 44
IBMOS/2 LAN Server
Version 2.0 45
IBM PC LAN and DOS LAN
Requester 44
1
LAN Manager
3Com 225
AT&T/NCR StarGROUP 29
H p 41
Microsoft 48
Ungermann-Bass 56
LAN Requester 44, 45, 46
LAN Server 45,48
LAN Support Program, IBM
42
LANtastidAI, Artisoft 28
W a t c h 35
LED indicators 17, 18, 19
Link integrity
indicator 18, 19
enable/disable 18
Local printer access 3
Pocket Ethernet Adam 111 user's Gvide
79
NDIS driver (continued)
Microsoft LAN Manager 48
PROTOC0L.INI parameters
70
SunPC-NFS 54
Ungermann-Bass Netlone
56
Wollongong Pathway 58
NET.CFG parameters 72
NetWare 38,44
Lite 53
OD1 driver 50
OD1 with packet driver 40,
51
PC/TCP and OD1 40
Requester for OS/2 51
NetWareLite 53
Network Drivers see Drivers
Node address, determining
23
Non-bidirectional mode 12,
23,24
Novell NetWare see NetWare
Numbers, model 2
0
OD1 drivers
FTP PC/TCP 39,40
NET.CFG parameters 72
NetWare 50
with packet driver 40, 51
Wollongong Pathway 59
Operating temperature 4
OS/2 drivers seeIBM OS/2
P
Package contents 7 , 8
80
Packet driver 53
command parameters 74
FlT W a t c h 35
rnPC/TCP 37
NCSA Telnet 49
OD1 and 40, 51
Tenset/TCP 55
Parallel port
attachmentscrews 11
connection to 11
enhanced 12, 20, 24
modes 12, 23,24
multiplexor (PPX) 3
performance 12
pins 9,11
power cautions 9, 11
Passthrough mousebeyboard
connector 14, 15
PATHWORKS,DEC 32
PC-NFS, Sun 54
PC/TCP, FTP
. NDISdriver 38
ODIdriver 39,40
packet driver 37
with OD1 and NetWare 40,
51
PCSA, DEC driver 33
PE3TEST.EXE 22,63
Performance, parallel port 12
Phantom cable, AC see AC
Phantom Power Cable
Pins, parallel port 9,11
Power adapter, AC WAC
power adapter
Power management 15
Power-on indicator 17, 18, 19
Printer, local 3
Product Registration Card vi,
798
(RMA) ix
RJ-45 connector 3, 4, 8, 10
Telnet, NCSA 49
Tenset/TCP 55
Terminator, 50-ohm 8, 9, 10
Test results, diagnostic 23, 24
Tests, diagnostic 22
Thin Ethernet, installation 9
Tractor grip 11
Traffic, network 23, 24
Transfer rate 4, 12
Transmission activity indicator
17, 18, 19
Transmit test 23, 24
Twisted pair Ethernet 2, 3
installation 10
S
U
Screws, attachment 11
Self test 22
Serial number display 23
Service information vi
Service, warranty viii
Shut off, automatic 15, 19
Size, Adapter 4
Specifications
AC Phantom Power Cable
5
AC power adapter 5
Pocket Adapter I11 3, 4
StarGROUP, AT&T/NCR 29
StarLAN 10 2,3, 18
Storage temperature 4
Sun Microsystems PC-NFS 54
Support, technical vi
Ungermann-Bass Netlone
IAN Manager 56
Utilities
diagnostic 22
Enhanced Parallel Port 20,
21, 24
PROTOCOL.INI parameters
70
PS/2 mouse/keyboard
connector 14, 15
R
README fde, viewing 63
Requester
LAN 44
NetWare 51
Required equipment 8
Return Material Authorization
T
T connector, BNC 2, 3 , 7
Technical support vi
Telephone numbers, Xircom
vi
Wet EthemetAdapter 111 User's Guide
V
VINES, Banyan 31
Voltage requirements, AC
adapter 5
W
Warranty viii
service viii, ix
Weight, Adapter 4
Windows for Workgroups 49
Wollongong Pathway driver
58
X
Xircom phone numbers vi
81
XIRCOM CORPORATE
26025 Mureau Road
Calabasas, California 91 302
(81 8) 878-7600
(81 8) 878-7630 FAX
XIRCOM EUROPE NV
Bisschoppenhoflaan 82-84
21 00 Antwerp, Belgium
32 3 326-34-94
32 3 326-31-50 FAX
XIRCOM ASIA LTD
1604 Century Square
1-13 DAguilar St
(852) 525-2078
(852) 525-8955 FAX
Hong Kong
xircom”
2002288-001 B
RECYCLABLE