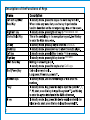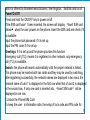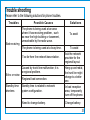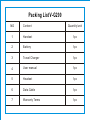
1
V-G200 Dual Card GSM
Mobile Phone
Thank you for using our V-G200 Mobile Phone.
To guarantee the best performance, please read this manual carefully and
keep it for further use.
Olive Telecommunication Pvt. Ltd. reserves the right to make modifications
on print errors and update specifications without prior notice.
Copyright 2009 Olive Telecommunication.
All rights reserved.
Olive Telecommunication Private Ltd, Design and technology for the
connected World. The Mobile Original Logos are registered trademarks of
olive Telecommunication.
The information contained in this user's guide is written for Olive V-G200.
Olive Telecommunication reserves the right to make changes to any of the
products described in this document and also reserves the right to revise
this guide at any time without any prior notice.
This device may contain accessories, technology or software subjected to
export laws.
Safety Precautions
Please read these simple guidelines. Not following them may be dangerous or
Do not switch the phone on when Mobile Phone use is prohibited or
when it may cause interference or danger.
Do not place your phone and its accessories in containers with strong
electromagnetic field.
Obey all local laws. Always keep your hands free to operate the vehicle
while driving. Your first consideration while driving should be road safety.
Hospitals or health care facilities may be using equipment that could be
Sensitive to external radio frequency energy. Follow any regulations or
rules in force.
Do not use the phone at a refueling point. Do not use near fuel or
chemicals.
Follow any restrictions. Wireless devices can cause interference in aircraft.
Keep the phone and all its parts, including accessories, out of the reach
of small children.
Use only approved batteries and chargers. Disconnect the charger from
the power source when it is not in use. Do not leave the battery connected
to a charger for more than a week, since overcharging may shorten its lift.
Only qualified personnel should service the phone or install the phone
in a vehicle. Faulty installation or service may be dangerous and may
invalidate any warranty applicable to the device.
Table of Contents
About the Phone....................................................................................................1
Quick Operating Guide..........................................................................................6
Message................................................................................................................8
Contacts..............................................................................................................13
Logs.....................................................................................................................16
Settings................................................................................................................17
Media...................................................................................................................23
Apps....................................................................................................................29
Services...............................................................................................................30
Tools....................................................................................................................32
Bluetooth.............................................................................................................33
Trouble shooting..................................................................................................35
About the Phone
Appearance
Note: the pictures are only for reference, the actual product may vary
from the pictures.
1
Description of the Functions of Keys
Phonebook list.
Shotcuts.
W
FM radio.
Call Logs.
2
Battery
Remove and install the battery
Dismantle by following procedures:
Remove cover of battery of the mobile phone.
Lift the bottom of battery upward and remove it from battery box.
Warning: power off before removing the battery. When the phone is power on or
connected to external power supply, it is forbidden to remove the battery.
Install by following procedures:
Align the metal contact point of battery with that of battery box, and snap the
battery in the box and press the battery downward until it is installed well.
Charge
Insert the charger on the supply.
Connect the right end of charger to the side port of mobile phone.
After connection, the screen of mobile phone displays Charger Connected ,
and it is charging, the battery icon shows the process of charge; if the phone is
power off, the screen will show the process of charge dynamically.
In low battery state, overusing the mobile phone will cause low voltage, and
the phone enter low voltage lock mode and can't power on normally. Charge the
battery, and the battery enters pre-charge mode process (about ten minutes);
3
after the voltage rises, the phone can be powered on normally.
In the power on state, when the power indicator in the icon area is full and
doesn't flash, the battery is fully charged. In the power off state, the complete
charge will be displayed on the screen if the battery is fully charged.
Insert and Remove the SIM Card
The function of dual card and one in using is provided, two SIM card slots are
available.
Power off, and then move away the external power supply and battery.
Insert SIM card into the box correctly.
Power off before removing the SIM card. Firstly remove the external
power supply and battery, and then remove to take out the SIM card.
Insert and Remove the Memory Card
Power off, and move away the external power supply.
Insert the memory card correctly.
Power off before removing the memory card, and move away the external power
supply, and then remove the card.
Note: Please carry your phone along with you during purchase of T-Flash card
to buy a compatible card. As a wide range of T-Flash cards are available in the
market, In order to ensure your data safety, we advice usage of T-Flash card
4
which is offered by Branded manufacturers, like Kingston SanDisk and so on.
Power On/Off
Press and hold the ON/OFF key to power on/off.
If the SIM card hasn t been inserted, the screen will display Insert SIM card
please when the user powers on the phone. Insert the SIM card and check if it
is available.
Input the phone lock password: if it is set up.
Input the PIN code: if it is set up.
Greetings: if it is set up and the phone provides this function.
Emergency call (112): means it is registered in other network, only emergency
call (112) is available.
Search: the phone will search automatically until the proper network is linked.
This phone may be inserted with two cards and they may be used by switching,
after registering successfully, the network names are displayed in two rows, the
network name of card 1 is displayed in the first row while that of card 2 is displayed
in the second row. If only one card is inserted into, Insert SIM card will be
displayed in one row.
1.Unlock the Phone/SIM Card
To keep the user s information safe, the setup of lock code and PIN code for
5
phone and SIM card is provided. The default lock code is 0000.
Note: if the user inputs the PIN code of SIM card wrongly for three times, the SIM
card will be locked by network, and the PUK code is required after that.
2.Camping to Network
After the SIM is unlocked, the phone will search available networks automatically
(the process is displayed on the screen). Once the available network is found, the
name of the network provider will be displayed on the middle of the text and picture
area, and the phone is camped to the service network successfully.
Note: Emergency displayed on the screen means the user is out of the
service area, but the user can dial emergency number according to the strength
of signal.
Connect Phone with USB Data Line
Three modes are provided when the phone is connected to computer with USB
data line: Mass Storage , Web Cam and COM prot .
Quick Operating Guide
Make a Call
Click the numbers to input the designated phone number, and then select a card
6
to make the call. The dialing picture is displayed on the screen during the call
duration. And the information of receiving will be displayed on the screen when
the call is received.
Emergency Call
If the phone is out of the service area (view the signal indicating bar on the top
left corner), the user can make an emergency call. If the roaming service isn't
provided in this place, the screen will display Emergency , thus the user can
only make emergency call. If the phone is in the service area, the user can make
emergency call even though SIM card isn't inserted.
Answer a Call
Press the SEND KEY to receive a call, if pressing any key answer feature
is activated, the user can answer a call by pressing any key except the right soft
key and hang-up key.
End a Call
Use the END key to Reject an incoming call or End a call.
Call Options
1.Hold/Retrieve Single Call
Hold a conversation.
2.End Single Call
7
Press this to end single call.
3.New Call
Enters the digital dialing contact surface.
4.Phonebook
Click on the "phonebook", to view the contents of the telephone and you may carry
out the instructions in the phonebook menu.
5.Message
Click message center to enter the messages view.
6.Sound recorder
Click sound recorder to record the call sound.
7.Mute
Click Mute , the present telephone sound which will cause opposite party not
to hear the handset telephone conversation.
8.DTMF
Setting to call extension.
Message
SMS
8
Write message
Set up information center number before writing message.
Enter Write message menu to edit short message, and press OK key to enter
Option menu.
SIM1/SIM2 done: Select this function after message is written to send only, Save
and send, Save, Send to many, Send to group.
Use templates: the user can insert the preset words in the position of cursor.
Insert object: the phone supports EMS, the user can insert Picture, My picture,
Predefined animation, My animation, Melody, My melody, Predefined sound into
the message.
Insert number: insert number from phonebook to short message.
Insert contact: insert name from phonebook to short message.
Insert bookmark: insert bookmark to short message.
Input method: select different input methods to write message according to
requirements.
Note: Only the phone supporting EMS can send and receive static picture,
animation picture and music.
Inbox
9
Enter the Inbox menu, view received messages and multimedia message on SIM
card 1 and SIM card 2.
Press OK key to enter Option menu:
Reply: write back to the sender.
Delete: delete current message.
Delete Many Select: delete massages selected.
Delete same number: delete the messages sent by same number.
Edit: edit the current message.
Forward: select send the current message from SIM card 1/2 to one, multiple or all.
Copy to SIM/Phone: copy the short message to the memory of SIM/phone.
Move to SIM/Phone: move the short message to the memory of SIM/phone.
Chat: the user can chat with the sender after relevant settings are completed.
Copy all: copy all short messages from SIM card to the phone.
Move all: move all short messages from SIM card or the phone.
Use number: save the numbers with three or more figures stated in the message
and select one to can make a call, to store in phonebook or send a message.
Use URL: Use the URL defined in the message body.
Outbox
Sent messages are stored in Outbox.
10
Select a message, press OK to operate:
Send from SIM1: To Resend the message using SIM1.
Send from SIM2: To Resend the message from SIM2.
Edit: go back to the composing interface; edit the content of the message.
Delete: delete the selected message.
Delete Many Select: delete messages selected.
Delete same number: delete the messages sent to same number.
Copy to phone: copy the short message to the memory of phone
Move to phone: move the short message to the memory of phone.
Copy all
Move all
Use number: save the numbers with three or more figures stated in the message
and select one to can make a call, to store in phonebook or send a message
Use URL
Delete:Delete all messages from Inbox, Outbox, or Delete all.
Templates
1.text message
Press Ok key to enter common phrases list, and select one mode to edit, delete
and write new.
SMS settings
View the SIM1 or SIM2 Message Settings: Profile settings, Common settings,
11
Memory status, Preferred storage.
MMS
Write Message
Choose the Write Message option in messages menu. Editing MMS and select a
destination number , edit subject, insert picture or audio, video, attachment, slide
before slide after bookmark, then Press Done on the Right soft key to enter the
send options, Send only, Save and send, Save to Drafts, Save as template, Send
options, Exit.
Inbox
Store the MMS you received.
Outbox
Store the MMS you sent but failed.
Drafts
You can read the messages saved in draft.
Templates
It contains User defined and Default. You can view and send the templates.
MMS Settings
It provides six options, for example: Compose, Send, Retrieve, Filter, Server
profile, Memory status.
Voice Mail Server
12
Network operator's support is needed; the voice mail number of SIM card 1&2
must be set up to receive voice mail.
Edit: input or change voice mail number.
Connect to voice: use to listen to the messages in voice mail.
Contacts
This phone provides three memory devices: SIM card , the phone and memory
card. The phone can store 500 records while the capacity of SIM card is divided
by its type.
Use the phonebook, the user can store information of name card in the phone,
and the following information can be stored in the phone: name, phone number,
family phone number, and name of company, Email, phone number of company,
fax number, birthday, picture photo, ring and incoming group. The SIM can store
information of name and phone number.
Quick search
Input the first letter of the name of the name to search.
Search contact
Input the name to search the designated record.
13
Add new contact
Add a new phone to SIM 1, SIM 2 , the phone or Card memory.
Copy all
Copy all the information from SIM card to phone, or copy all information
from phone to SIM card, or copy all information from SIM card to another SIM
card.
Delete
Input code before deleting information stored in SIM card or the phone, the default
number is 0000. It is unnecessary to input code to delete the information one by one.
Edit the information of each group.
Caller groups
My number
Own number of SIM card 1/2: the user can set up own number and name (the
user can define two own numbers).
Settings
Memory status: view the storage capacity of phonebook of SIM card and phone.
Preferred storage: can set up the phone as the default saving position or the
user can select saving path during storing.
Fields: selected the designated items to set up (this function is only available to
14
the records stored on the phone).
My vCard: edit or send my name card.
vCard version: select version of name card.
Caller picture
Select displayed picture for stored numbers and incoming group.
Caller ring tone
Select played ring for stored numbers and incoming group when there is an
incoming call.
View phone number list, press Up/down directional key or click scroll bar to select
a record. And press Ok key to select ringtone.
Phonebook Export
Export the Phonebook Entries to the Memory Card.
Phonebook Import
Import the memory card Phonebook to the phone memory.
T card Phonebook
View the phonebook entries in the memory card.
15
Logs
Use this function to view the call history of SIM 1/SIM 2.
Missed calls
Use this function to view the latest missed calls
Select a group of phone numbers, and press Ok key, and then select following
options:
Delete: delete this number.
Save to phonebook: store the number to the phonebook.
Put Into Call Black List
Put Into SMS Black List
Call: use SIM card to call this phone number.
Edit: edit the receiving phone number and store.
Send SMS: send short message to this phone number.
Send MMS: send multimedia message to this phone number.
Dialed calls
Use this function to view the latest dialed calls. See Missed call for more
details.
Received calls
Use this function to view the latest answered calls. See Missed call for more
details.
16
Delete Call log
Use this function to delete Missed calls, Dialed calls and Received calls, or Delete
all.
Call time
Use this function to view the time of call up to now.
Last call time: view the time of last call.
Total dialed: view the total time of dialed calls.
Total received: view the total time of answered calls.
Reset all time: clear all records to zero.
Settings
Dual SIM Settings
The menu is used to set SIM card application, including Dual SIM open, Only SIM
1 Open, Only SIM 2 Open and Flight mode.
User profiles
The phone provides various profiles for you to customize ringtone according to
different occasions. The earphone mode is activated only when the earphone is
connected; when earphone mode is on, other modes are deactivated
General
17
It's suitable for normal circumstances.
Meeting
Suitable for conference occasions, needs to be preset (e.g. set up Vibration ).
Outdoor
Suitable for outdoor occasions, needs to be preset (you may set up a high
volume ringtone).
Indoor
Suitable for indoor occasions, needs to be preset.
Headset
Usable when earphone is connected, needs to be preset (e.g. decrease ringtone
volume).
Bluetooth
Applicable to Bluetooth function, needs to be preset.
Phone Setup
Enter the submenu Phone Settings to operate:
Time and date
Set Date and Time in this menu. Three submenus are:
Set home city: various international cities of your choice.
Set time/date: set date and time of the phone.
Set format: select 12 hour clock or 24 hour clock, or set date format.
Schedule power on/off
18
Four timing points are available. You may set status and time of each one;
however you may not set same time in different items, to avoid conflict.
Language
Select display language. The phone provides one language: English.
Preferred input mothods
Select one of the three input methods provided by the phone as the default initial
input method.
Display characteristic
Wallpaper
Screen saver
Power on display
Power off display
Greeting text
Setup greeting text.
Dedicated key
Setup direction key shortcut
Handwriting
Setup handwriting speed and color.
Misc. Settings
Setup LCD Backlight
Pen calibration
19
Calibration of the touch panel
Setting Firewall
Firewall incoming call
SMS Firewall
Privacy Protection
General call settings
SIM1 call settings
SIM2 call settings
Auto redial
Speed dial
More
Network setup
Set network of SIM 1 & 2 with this function.
Network Selection
Enter submenu Network Selection , you may choose New search, Select
network or Selection mode to acquire current network service operator. In Selection
mode, you may press OK key to Switch Automatic and Manual mode.
Security setup
SIM1 security setup
20
SIM1 lock: the SIM card is protected by PIN code to prevent illegal use.
Note: if PIN code is wrongly input for three times, the SIM card will be locked.
Then you need the PUK code to unlock the SIM card. PIN code and PUK code
might be provided to you with the SIM card, if not, please contact your network
provider.
Fixed dial: turn on/off fixed dial mode and set fixed dial number.
Note: to turn on/off the fixed dial mode, you need to input PIN2 code. Please
contact the network provider to acquire PIN2 code. When fixed dial is on, the
phone book shows the number stored or blank (when no number is stored in the
phone).
Barred dial: if your SIM card supports the function, you may set restricted dialing
number. When the function is on, it forbids the phone to call the restricted number.
Note: to turn on/off the restricted number function, you need to input PIN2 code.
Please contact the network provider to get PIN2 code. When the function is on,
the phone book will not show the restricted number.
Change password: you may change PIN code and PIN2 code of SIM card 1.
SIM2 security Settings
SIM2 lock: the SIM card is protected by PIN code to prevent illegal use.
Note: if PIN code is wrongly input for three times, the SIM card will be locked.
21
Then you need the PUK code to unlock the SIM card. PIN code and PUK code
might be provided to you with the SIM card, if not, please contact your network
provider.
Fixed dial: turn on/off fixed dial mode and set fixed dial number.
Note: to turn on/off the fixed dial mode, you need to input PIN2 code. Please
contact the network provider to acquire PIN2 code. When fixed dial is on, the
phone book shows the number stored or blank (when no number is stored in the
phone).
Change password: you may change PIN code and PIN2 code of SIM card 2.
Phone lock
The phone lock protects your phone from unauthorized use.
When the phone lock is activated, you need to input the phone password when
switching on or resetting the phone.
Note: the default phone password normally is 0000; please change it to your own
password as soon as possible.
Auto keypad lock
Set auto-locking function of the Keypad. Press OK key to enter Keypad lock
interface, select None (Keypad lock deactivated), 5 seconds, 30 seconds,1 minute,
5 minute. During the selected period if no operation is done on the phone, the
22
Keypad will be locked.
Change Password
To prevent unauthorized operation and usage. Enter submenu Change Password
to change phone password.
Note: the new password must be longer than four digits but shorter than eight
digits. The default password is 0000.
Shortcuts
Setup shortcuts list
Restore factory settings
Input the phone password in this menu, when the password is confirmed the phone
restarts and all settings are reset to the default. The default password is 0000.
Media
Camera
Photos
The phone supports photo shooting, and viewing etc. Adjust the focal length.
Photos are to be saved into the memory card (ensure inserted); the photo format
is JPG. You may send the photos with the provided MMS option, transmit the
23
photos through USB wire and view them on a computer screen or set a photo as
standby image.
Camera Settings
Settings for light balance, shutter sound, exposure compensation, and shooting
time lag.
Image Settings
Set up photo size (support80*60/160*120/176*220/320*240/640*480pixel) and
photo quality (high/normal/low).
White Balance
Select automatic, Daylight, Tungsten, Fluorescent, cloud, incandescent light.
Effect settings
The following options are available including normal, grayscale, sepia, sepia green,
sepia blue or color invert etc.
Add frame
The following options are available including OFF, frame1,frame2.
Storage
Select saving path for the photos.
Restore default
Restore default setup
24
Image viewer
Press OK key to select Option and operate:
View: view the photo
Browse style: select list mode or matrix mode.
Forward: send to wallpaper, power-on/off display,screen saver,phonebook, MMS,
or Bluetooth.
Rename: rename the photo.
Delete: delete the selected photo.
Delete all files: delete all photos
Sort by: sort by name, type, time, size or unsorted.
Storage: select saving path of the photo.
Video Recorder
In video recording interface, enter Option to set up the camera and save the setting.
Press OK key to start recording, press it again to pause, press Stop to
end and save.
Camcorder settings: set relevant parameters of the video recorder.
Video settings: set relevant parameters of the video.
Effect settings: set special effects.
Storaje: select saving path of video.
25
Restore default: return the settings to default setting.
Video Player
View or process the video files saved in the player, including clips, 3GP, MP4 etc.
Note: the file must be saved in file management/T-Flash card/videos to be
viewed and played in the player.
Press trackball key to pause/continue play. Click * key to play in full screen; press
right soft key to quit full screen. Press # key to capture a frame in the video. The
captured image is saved into Photos in the memory card.
Audio Player
In music player interface, press List key to enter the current play list.
Select a music file to play, view detailed information, Add to rings (as alternative
ringtone), Refresh list or set music player. Slide trackball to select menu.
In setting option of music file:
Setting
Pre. play list: select to play music in the memory card or phone.
. : select on and it will show update play list ; select off
List Auto
and it will show menus such as add (when add appears, you may add
any song in file management/memory card to the play list).
Repeat: select off, single song repeat or all songs repeat.
26
Shuffle: select on to play the songs randomly; select off to play the
songs in order.
Background play: select on to activate background playing function in standby
mode; select off to deactivate background playing function in standby mode.
BT Stereo Output: Turn the feature on or off.
BT Stereo headset: Select the Bluetooth Handsfree device.
Spectrum Display: Select the skin for the player.
Lyrics Display: select on to display lyrics in playing interface; select off
to not display lyrics.
Sound Recorder
A simple sound recording tool provides functions for the user to manage sound files.
Press OK key to enter Option, items in the menu are:
Record: record new sound file.
Play: play the selected sound file.
Append: for AMR and AWB files, you may add recording and merge it into the
current file.
Note: the function is not available for WAV files.
Rename: rename the selected file.
Note: if the sound file is set up as ringtone, once renamed, the ringtone will return
27
to the default one.
Delete: delete the selected sound file.
Delete all files: delete all sound files.
Settings: set the sound file format as AMR, WAV or AWB.
Forward: send the selected sound file to User profiles as an alternative ringtone,
to MMS or to Bluetooth.
FM Radio
This phone supports radio function.
Channel list: view all stored channels.
Manual input: manually input the frequency number and search.
Preset Auto search: automatically search channels and update the list.
Settings: Background playing (on/off)
Loud speaker (on/off).
Melody compose
Use this function, you can edit the melody which you like (such as you can edit
vibration and light twinkle effect).
Play play the melody compose you select.
Edit carries on the action of editing melody again.
Add edits a new melody.
28
Rename Rename the melody you select
Note: If you have set the melody compose as electric bell sound and so on, once
you rename the self ringtone, will make the electric bell sound to restore for the
default setting .
Delete delete the melody compose you select.
Deletes all files delete all melody document.
Forward
the melody compose that has been edited ,you can select and
forward to profile; Or can be transmitted by MMS, e-mail, SMS, Bluetooth way.
File Manager
You can manage the memory space of your Phone and Memory card memory.
Three options are provided for each memory location viz. Open, New Folder and
Format.
Apps
Games
The phone provides puzzle game. See Game Help in the game interface for
operation details.
29
Services
SIM Tool Kit(SIM1/SIM2)
The function is provided by the network provider. It might have different menu
items with different SIM card service. If the SIM card or network provider does not
support the service, the function is unavailable. Please contact the network provider
for more information.
WAP
The phone supports WAP. You may obtain multiple services such as news, weather
forecast, sports and other internet services. The services are designed and
maintained by WAP service operator. WAP service uses wireless markup language
(WML), so you will not be able to view internet pages on the phone.
Note: to start WAP service, please set up the relevant network configuration.
Home Page
Select a home page, connect and start the browser. When connected, it shows the
home page of the WAP site. The content of the page depends on the service operator.
Bookmark
You may save the WAP address in the bookmark to quickly re-visit the page.
Click Option to operate Move to, Edit, Send, Delete, Delete all or Add new
bookmark.
30
Recent pages
Records the page visited, for the next visit.
Offline pages
You may store some offline pages, to use conveniently.
Input address
Input the site address to visit the page.
Service Inbox
You may receive service messages.
Settings
Select SIM: select SIM 1 or SIM2 or Always ask to connect to WAP.
Edit Profile: select the network provider or customize.
Browser options: set the wait time (30-300) and image display on/off.
Service message settings: select on/off.
Clear cache: erase cache.
Clear cookies: erase cookies
Data Account
Set up WAP configuration.
31
Tools
Alarm
The phone supports five alarm clocks (usable while power-off); the default status
of them is off. Select an alarm clock, press OK key to edit and set up.
Calendar
Enter the submenu Calendar to view task, Add tasks, Jump to date, Go to weekly
view or Print.
World clock
Enter submenu World Time, the world time zone image appears; move the
coordinate by the direction key, the interface will show the time of located city.
To do
It shows the whole agenda; in Option menu, you may View, Add, Edit, Delete,
Delete all or Send vCalendar etc.
Calculator
The phone provides a calculator which can perform simple calculation. Use the
Keypad to input and calculate.
Currency converter
Convert different currencies.
Stopwatch
Typical Stopwatch: time separately, time by circle or view records.
nWay stopwatch: press direction keys to time.
32
Bluetooth
You may connect the phone to other devices through Bluetooth. The phone is
able to build a wireless connection within the range of ten meters. Since the
signal is transmitted by radio wave, you phone does not need to face the other
devices. However, wireless Bluetooth connections could be interfered by walls
or other electronic devices.
In certain areas, Bluetooth might be restricted. Please contact the
supervising department or service provider for more information.
Note: using the Bluetooth (or running it in back stage) will consume more battery
power and shorten battery life.
In the Bluetooth submenu including the following submenus, you may set
up relevant Bluetooth service.
Power: press OK key to start/close the Bluetooth function;
Inquiry audio device: press OK key to search the handsfree device such as
Bluetooth earphone etc.; if an activated Bluetooth device is nearby, the phone
will find the device, press OK key to connect, input Bluetooth code to match and
connect.
Remote Control: Use your phone as remote control by connecting with the
remote Human Interface Device Host.
33
My device: press OK key to enter My device, view the linked devices history list;
Select a record, press OK key to operate:
Connect: connect the device, you may choose a service in service record to connect.
Disconnect: disconnect the device.
Set as handsfree earphone: set the earphone as current default earphone.
Device name: rename the device.
Delete: delete the selected record.
Delete all: delete all records.
Service list: view the service record of the device.
Search new device: search for new Bluetooth devices.
Active device: view connected devices and their services, press OK key to
disconnect the device.
Settings
Visibility: press OK key to turn on/off the function.
Change device name: select an input method to rename the devices.
Authentication: press OK key to turn on/off the function; turn on to allow the
phone to be connected with other devices.
Audio path: select to save in the phone or transmit to handsfree devices.
FTP settings: select shared folder of file transmission and set the access right
(free or read only)
34
Trouble shooting
Please refer to the following solutions for phone troubles.
Troubles
Bad receiving
Possible Causes
The phone is being used at an area
where it has receiving problem , such
as near the high building or basement,
unreachable by the radio wave.
The phone is being used at a busy time.
Too far from the network base station.
Echo or noise
Caused by trunk line malfunction; it is
a regional problem.
Regional bad connection.
Standby time
shortens
Standby time is related to network
system configuration.
Need to change battery.
Solutions
To avoid
To avoid
Ask the network
provider for the
regional layout.
Hang up and redial,
the trunk line might
change to a better
one.
In bad reception
area, temporarily
turn off the phone.
Change battery.
35
Troubles
Possible Causes
When there is no signal received, the
phone will keep searching for the base
station can shorten standby time.
Unable to
switch on
Battery out.
SIM card
problem
SIM card damaged.
SIM card unfixed.
Stain on SIM card surface.
Unable to
connect to
network
36
SIM card invalid.
Solutions
Move to areas with
strong signal or
temporarily turn
off the phone.
Check battery
status or charge.
Contact the network
service provider.
Make sure SIM card
has been inserted
and fixed properly.
Wipe the metal
contact of SIM card
with clean cloth.
Contact the
network provider.
Troubles
Unable to call
PIN error
Unable to
charge
Possible Causes
Solutions
Out of GSM service range.
Contact the network
provider to check
service range.
Weak signal.
Move to areas with
strong signal.
Call restriction function is on.
Cancel call restriction
function.
Cancel Fixed dial.
Contact the network
provider.
Fixed dial is on.
Wrongly input PIN code for three times.
Battery or charger broken.
Change battery or
charger.
Charge in environment with temperature
lower than -10 or higher than 45 .
Change environment.
Bad contact.
Check if connected
properly.
37
Troubles
Possible Causes
Solutions
Unable to add
entries in
phone book
Phone book space full.
Delete part of the
entries.
Unable to set
certain
functions.
Network provider does not support the
function or you did not apply for it.
Contact the network
provider.
Note: if the functions in this manual have any non-conformity with the functions
of actual product, please refer to the product.
The company reserves the right to change any contents in this manual without any
further notice.
38
Packing List V-G200
NO
Content
Quantity/unit
1
Handset
1pc
2
Battery
1pc
3
Travel Charger
1pc
4
User manual
1pc
5
Headset
1pc
6
Data Cable
1pc
7
Warranty Terms
1pc