1
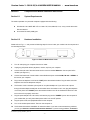
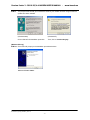
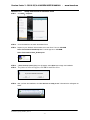
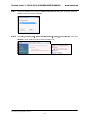
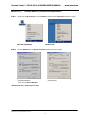
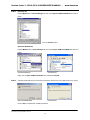
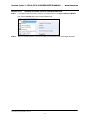
Proxima Junior 2 - 56K V.92/V.44 MODEM USER’S MANUAL - www.bausch.eu
Installation - & configuration manual
Proxima V.92 Junior 2
56K modem
PV92Junior2_DTR_20090827_Rev.1.0
-1-
Proxima Junior 2 - 56K V.92/V.44 MODEM USER’S MANUAL - www.bausch.eu
Bausch Datacom NV/SA
Tiensesteenweg 54-56
3360 Korbeek-Lo
Belgium
Tel. (0032)16.461288
Fax. (0032)16.463151
www.bausch.eu
www.bauschdatacom.be
www.bauschnetworking.be
[email protected]
PV92Junior2_DTR_20090827_Rev.1.0
-2-
Proxima Junior 2 - 56K V.92/V.44 MODEM USER’S MANUAL - www.bausch.eu
TABLE OF CONTENT
1. Contents of Package .................................................................. 4
2. Comprehensive Modem Installation Instructions .................. .5
2.1 System Requirements ............................................................ 5
2.2 Hardware Installation .............................................................. 5
2.3 System Setup ......................................................................... 7
2.3.1 Setup Instructions for Windows 98/Me/2000/XP.......................7
2.3.2 Setup Instructions for Windows Vista........................................9
2.3.3 Uninstall Modem from Windows 98/Me/2000/XP.................... 11
2.3.4 Uninstall Modem from Windows Vista.....................................13
2.4 Testing your modem ............................................................. 14
2.5 Install Communication Software........................................... 14
3. Troubleshooting........................................................................ 15
Appendix 1: Modem Specifications ............................................ 17
Appendix 2: Government Compliance ....................................... 18
PV92Junior2_DTR_20090827_Rev.1.0
-3-
Proxima Junior 2 - 56K V.92/V.44 MODEM USER’S MANUAL - www.bausch.eu
Section 1
Contents of Package
z
One Proxima V.92 Junior 2 V.92/V.44 External modem
z
One RS-232C cable
z
One telephone cable
z
One Belgian telephone plug
z
One 9V AC 1000mA Adapter
z
One CD-ROM disk comprises Communication software, Modem Driver & User's Manual
z
Quick installation guide
Please contact Bausch Datacom, Tiensesteenweg 54-56, B-3360 Korbeek-Lo, Belgium, Tel.
(0032)16.461288 if any of the above listed items are missing.
PV92Junior2_DTR_20090827_Rev.1.0
-4-
Proxima Junior 2 - 56K V.92/V.44 MODEM USER’S MANUAL - www.bausch.eu
Section 2
Comprehensive Modem Installation Instructions
Section 2.1
System Requirements
The modem operates on a personal computer equipped with the following:
z
Windows 95 / 98 / 98SE / ME / NT 4.0 / 2000 / XP, Vista, MacOS, Linux, or any control device with
RS-232 interface
z
One vacant RS-232C (COM) port
Section 2.2
Hardware Installation
Please refer to Fig. 2 - 1 and proceed to following steps for how to insert your modem into the computer and
connect telephone wire.
Figure 2-1 External Modem Rear Panel
1.
Turn off and unplug your computer from the AC outlet.
2.
Unplug any peripheral devices (keyboard, monitor, etc) from your computer.
3.
Connect the male end of the serial cable into the connector marked RS-232 on the rear panel of the
modem. (see Figure 2-1)
4.
Connect the female end of serial cable to the available serial port marked COMx, RS-232 or SERIAL on
the back of your computer.
5.
Plug one end of telephone cord into the "LINE" jack at the modem's bracket. Plug the other end of the
telephone cord into the telephone wall jack
6.
The Proxima Junior 2 includes a phone jack for an optional telephone. If you wish to use a phone
through the same telephone wall jack as the modem when the modem is not in use, plug the telephone
cord of the phone into "PHONE" jack at the modem's bracket now. Lift the handset and listen for a dial
tone to check for a properly connection.
7.
Plug the power adapter into a AC outlet, and insert its plug into the "POWER" jack on the rear panel of
your modem after you verify the modem power switch is in the OFF position.
8.
Plug the power cords, and peripherals back into the computer.
9.
Turn on the modem power switch. Then turn the computer on.
10. This finishes the hardware installation for external modem. If you have not encountered any problems,
you can go to Section 2.5 Install Communication Software. If you are having problems, see Section
PV92Junior2_DTR_20090827_Rev.1.0
-5-
Proxima Junior 2 - 56K V.92/V.44 MODEM USER’S MANUAL - www.bausch.eu
3 Troubleshooting.
NOTE: The telephone wall jack you use must be for an ANALOG phone line (the type found in most homes).
Many offices are equipped with digital phone lines. Please be sure you know which type of line you
have.
The modem will be damaged if you use a digital phone line.
Indicator Lights
Your external modem features LED indicators on the front panel that report modem status :
MR Modem Ready Lights when the modem is turned on.
TR Terminal Ready Lights when the computer is ready to send or receive data. Indicates the status of
the DTR signal from the terminal or computer.
SD Transmit Data (Send Data) flashes whenever data or commands are transmitted from the serial port of
your computer or other device to the modem.
RD Receive Data Light flashes when data is sent from the modem to your computer or other serial device.
At high speeds light may appear continuously on.
OH Off Hook Lights when the modem is off hook.
CD Carrier Detect Lights when the Data Carrier Detect (DCD) signal from the modem to the computer is on.
RS
Request to Send Lights when the computer can accept data from the modem. The light will turn off
when the modem is set for hardware flow control and the computer is not ready, preventing data flow
from the modem
CS Clear to Send Lights when the modem can accept data from the computer.
The light will turn off when the modem is set for hardware flow control and the modem data buffer is full,
pre-venting data flow from the computer.
PV92Junior2_DTR_20090827_Rev.1.0
-6-
Proxima Junior 2 - 56K V.92/V.44 MODEM USER’S MANUAL - www.bausch.eu
Section 2.3
System Setup
Section 2.3.1
Setup instructions for Windows 98 / ME / 2000 / XP
[Windows 98 / ME / 2000 / XP]
STEP 1.
Insert the Modem Driver CD-ROM disk attached with your modem into the CD-ROM drive device,
Then run <CD-ROM letter>:\Drivers\32-bit\98_Me_2000_XP\Setup.exe as shown in figure. For
64-bit type of WinXP is run <CD-ROM letter>:\Drivers\64-bit\Vista_XP\Setup.exe.
Then click on OK
STEP 2.
And then, a prompt screen will ask you to ensure to install the modem driver.
Then click OK.
The setup utility will copy the needed files into windows system.
[Windows XP only]
STEP 2-1. Choose “Install the software automatically (Recommended)” and click “NEXT>” button.
[ Windows 2000 & XP only ]
PV92Junior2_DTR_20090827_Rev.1.0
-7-
Proxima Junior 2 - 56K V.92/V.44 MODEM USER’S MANUAL - www.bausch.eu
STEP 3.
The prompt screen will ask you to ensure the driver for your modem as shown in figure when the
system have been restarted.
(Windows 2000)
(Windows XP)
Click on Yes to finish installation procedure.
Then, click on Continue Anyway.
[Windows XP only]
STEP 3-1. The screen will prompt you the installation procedures be done.
Click on “Finish” button.
PV92Junior2_DTR_20090827_Rev.1.0
-8-
Proxima Junior 2 - 56K V.92/V.44 MODEM USER’S MANUAL - www.bausch.eu
Section 2.3.2
Setup instructions for Windows Vista
STEP 1.
Click Start│ Computer
STEP 2.
Click CD-ROM Drive to search the Modem Driver
STEP 3. Depend on your Windows Vista to select x32 or x64 driver. Then run <CD-ROM
letter>:\Drivers\32-bit\Vista\Setup.exe. For 64-bit type is run <CD-ROM
letter>:\Drivers\64-bit\Vista_XP\Setup.exe.
STEP 4.
A User Account Control dialog box will appear, select Allow item to begin the installation.
STEP 5.
The picture as below will appear, click OK to install the driver.
STEP 6. After you finish the installation, the “Your devices are ready to use” information box will appear as
below:
PV92Junior2_DTR_20090827_Rev.1.0
-9-
Proxima Junior 2 - 56K V.92/V.44 MODEM USER’S MANUAL - www.bausch.eu
STEP 7. During the installation, there will be an OCM Country Selection dialog box will appear. Select the
suitable country item and then click OK.
STEP 8. Click Start│ Control Panel│ System and Maintenance│ System│ Device Manager. Then, click
Modems to check whether the device driver’s installing is ok.
PV92Junior2_DTR_20090827_Rev.1.0
- 10 -
Proxima Junior 2 - 56K V.92/V.44 MODEM USER’S MANUAL - www.bausch.eu
Section 2.3.3
STEP 1.
Uninstall Modem from Windows 98/Me/2000/XP
Right click on My Computer icon on Desktop and then choose Properties as shown in figure.
(Windows 98/Me/2000)
STEP 2.
(Windows XP)
Choose Hardware tab in System Properties window as shown in figure.
(Windows Me/2000)
(Windows XP)
Then, click on Device Manager.
* Windows 98 users, please skip this step!
PV92Junior2_DTR_20090827_Rev.1.0
- 11 -
Proxima Junior 2 - 56K V.92/V.44 MODEM USER’S MANUAL - www.bausch.eu
STEP 3.
(Windows 98)
Expand Modem item in Device Manager tab and choose Agere OCM Serial Modem as shown in
figure.
Click on Remove button.
(Windows Me/2000/XP)
Expand Modem item in Device Manager tab and choose Agere OCM Serial Modem as shown in
figure.
(Windows Me/2000)
(Windows XP)
Right click on Agere OCM Serial Modem item and select Uninstall.
STEP 4.
A prompt screen will ask you to ensure to remove this device from your system as shown in figure.
(Windows 98/Me/2000)
(Windows XP)
Click on OK to complete the uninstall procedures.
PV92Junior2_DTR_20090827_Rev.1.0
- 12 -
Proxima Junior 2 - 56K V.92/V.44 MODEM USER’S MANUAL - www.bausch.eu
Section 2.3.4
STEP 1.
Uninstall Proxoma Junior 2 from Windows Vista
If your want to remove the driver, just click your right mouse on the Agere OCM Serial Modem
item. Select Uninstall item to remove the installed driver.
STEP 2.
After you remove the driver, you have to restart your computer to take the changes effectively.
PV92Junior2_DTR_20090827_Rev.1.0
- 13 -
Proxima Junior 2 - 56K V.92/V.44 MODEM USER’S MANUAL - www.bausch.eu
Section 2.4
Testing Your Modem
Before you setup your software, start with a quick test to check that your modem is working. Once you have
determined that your modem is setup properly, go on to Section 2.5 Install Communication Software to
install your communications software. If you are having problems, see Section 3 Troubleshooting.
Click on Start and point to Setting. Then click on Control Panel. When the Control Panel window opens.
Scroll down to the Modem icon and double click on it. Click on the Diagnostics tab and highlight the COM
port for your modem. Then click on More Info, your computer will automatically communicate with your new
modem using AT commands and receiving responses from your modem. A list of response means the modem
is setup properly.
Section 2.5
Install Communication Software
You can install the communication software from the CD-ROM disc attached with your new modem. Please
consult the software manual in the CD-ROM disc for the detail of software installation.
You do not have to use the communication software attached with your new modem. The modem was
designed for and tested using a wide range of communications software packages. Many communication
applications identify the modem automatically and configure themselves for the correct operating settings.
Some of the communication applications will ask you to select the type of modem you are using. Select a
Generic Fax class 1 modem will let you use basic communication and fax functions.
PV92Junior2_DTR_20090827_Rev.1.0
- 14 -
Proxima Junior 2 - 56K V.92/V.44 MODEM USER’S MANUAL - www.bausch.eu
Section 3
Troubleshooting
Your modem is designed to provide reliable and trouble-free functionality, however, should you experience
any difficulty, the information contained in this section will assist you in determining and resolving the source
of the problem.
Problem: Modem does not respond to AT commands
Possible solutions:
1.
Make sure the modem is not configured with a conflicting COM port and IRQ setting. Make sure the
communication software is configured with the correct COM and IRQ settings (the same COM port
and IRQ as the modem). Your communications software will not be able to send or receive any data if it
is not configured to match the COM port and IRQ settings for the modem.
DOS based communication program is not working with this modem neither can you operate the
modem in MS-DOS prompt screen.
2.
Make sure the modem is properly initialized using the driver software. The software may improperly
Initialize your modem because you have selected an incorrect modem type. You may also be prompted
to enter an initialization string by the software. Use AT&F as your initialization string.
Problem: Modem dials but does not connect
Possible solutions:
1.
Be sure the IRQ setting is identical on the modem and the software.
2.
Make sure that the phone line is working properly. A noisy line will prevent proper modem operation.
Problem: Modem makes a connection but no data appears on screen
Possible solutions:
3.
Make sure all communication parameters (baud rate, data, stop, and parity bits) are properly configured
and are identical on both sides. Be certain hardware flow control (RTS/CTS - default) is enabled in both
the modem and the communication software.
4.
Press the ENTER key several times. The remote system may be waiting to receive your data before it
begins.
5.
Make sure the correct terminal emulation mode is being used in the software (refer to software manual).
Problem: Modem displays errors while on-line with a remote modem
Possible solutions:
6.
Make sure Call Waiting is turned off.
7.
Make sure RTS/CTS hardware flow control is enabled (do not use XON/XOFF software flow control
when transferring binary files).
PV92Junior2_DTR_20090827_Rev.1.0
- 15 -
Proxima Junior 2 - 56K V.92/V.44 MODEM USER’S MANUAL - www.bausch.eu
8.
Make sure the data speed is not faster than your computer capability. Operating too many applications
at the same time may cause communication problem. Close unnecessary application in your system.
Problem: Modem exhibits poor voice recording or playback
Possible solutions:
9.
Make sure the correct modem type is selected in the Voice/FAX software. Volume adjustment is
available in control panel.
10. Make sure your computer is fast enough to handle voice operations (38.4 Kbps). Voice operations are
CPU intensive and require a better CPU sharing when running under Windows.
Problem: No dial tone
Possible solutions:
11.
Ensure that the telephone cord it securely connected at both modem and wall outlet.
12.
Unplug the telephone cord from the computer and connect it directly to a telephone from the wall outlet.
Check for a dial tone. If there is none, the problem is in the telephone cord or system. Call your
telephone service provider.
13.
Double-check your country setting. Different country setting will cause different modem performance.
Please select the correct country as you located.
14.
Check modem performance with a direct line from your telephone company. Some PBXs may cause the
telephone line condition change and affect modem performance.
Problem: The modem does not answer incoming calls
Possible solutions:
15. Ensure that the automatic answer parameter is set to one of the enabled options, using the ATS0
command (ATS0=1 to answer after one ring, and so on).
16. Ensure that no other devices, such as fax or answering machines, are answering calls before the
modem does.
If you cannot resolve your situation after reading this section, contact your dealer or vendor for assistance.
PV92Junior2_DTR_20090827_Rev.1.0
- 16 -
Proxima Junior 2 - 56K V.92/V.44 MODEM USER’S MANUAL - www.bausch.eu
Appendix 1
Modem Specifications
Modulation standards: V.92, V.90, V.34, V.32bis, V.32, V.29, V.27ter, V.23, V.22bis, V.21, V.17,
Bell212/103
Compression
: V.44, V.42bis, MNP Class 5
Error Correction
: V.42, MNP Class 2-4
Interface
: RS-232C
FAX Group
: ITU-T T.31 class1
FAX Command
: EIA/TIA 578 class 1
VOICE Command
: ITU-T V.250 AT Command Set
Transmit level
: -10 dBm +/- 1 dB
Sensitivity
: -43 dBm
Temperature
: 0℃ to 45℃, operating; -20℃ to 80℃, non-operating
PV92Junior2_DTR_20090827_Rev.1.0
- 17 -
Proxima Junior 2 - 56K V.92/V.44 MODEM USER’S MANUAL - www.bausch.eu
Appendix 2
Government compliance notices
FCC compliance
The Proxima Junior 2 complies with Part 68 of the FCC Rules. On this equipment is a label that contains,
among other information, the FCC registration number and Ringer Equivalence Number (REN) for this
equipment. You must, upon request, provide this information to your telephone company.
If your telephone equipment causes harm to the telephone network, the Telephone Company may discontinue
your service temporarily. If possible, they will notify in advance. But, if advance notice isn’t practical, you will
be notified as soon as possible. You will be informed of your right to file a complaint with the FCC.
Your telephone company may make changes in its facilities, equipment, operations, or procedures that could
affect proper operation of your equipment. If they do, you will be notified in advance to give you an opportunity
to maintain uninterrupted telephone service.
The FCC prohibits this equipment to be connected to party lines or coin-telephone service.
In the event that this equipment should fail to operate properly, disconnect the equipment from the phone line
to determine if it is causing the problem. If the problem is with the equipment, discontinue use and contact
your dealer or vendor.
FCC Class B statement
This Proxima Junior 2 has been tested and found to comply with the limits for a Class B digital device,
pursuant to Part 15 of the FCC Rules. These limits are designed to provide reasonable protection against
harmful interference in a residential installation. This equipment generates, uses and can radiate radio
frequency energy, and if not installed and used in accordance with the instructions, may cause harmful
interference to radio communications. However, there is no guarantee that interference will not occur in a
particular installation. If this equipment does cause harmful interference to radio or television reception, which
can be determined by turning the equipment off and on, the user is encouraged to try to correct the
interference by one or more of the following measures:
Reorient or relocate the receiving antenna.
Increase the separation between the equipment and the receiver.
Connect the equipment into an outlet on a circuit different from that to which the receiver is connected.
Consult the dealer or an experienced radio/TV technician for help.
Notice: 1) Shielded cables, if any, must be used in order to comply with the emission limits.
2) Any change or modification not expressly approved by the Grantee of the equipment
authorization could void the user s authority to operate the equipment.
PV92Junior2_DTR_20090827_Rev.1.0
- 18 -
Proxima Junior 2 - 56K V.92/V.44 MODEM USER’S MANUAL - www.bausch.eu
DOC compliance information
NOTICE: The Canadian Department of Communications label identifies certified equipment. This certification
means that the equipment meets certain telecommunications network protective, operational and safety
requirements. The Department does not guarantee the equipment will operate to the user’s satisfaction.
Before installing this equipment, users ensure that it is permissible to be connected to the facilities of the local
Telecommunications Company. The equipment must also be installed using an acceptable method of
connection. The customer should be aware that compliance with the above conditions might not prevent
degradation of service in some situations.
Repairs to certified equipment should be made by an authorized Canadian maintenance facility designated by
the supplier. Any repairs or alterations made by the user to this equipment, or equipment malfunctions, may
give the telecommunications company cause to request the user to disconnect the equipment.
Users should ensure for their own protection that the electrical ground connections of the power utility,
telephone lines and internal metallic water pipe system, if present, are connected together. This precaution
may be particularly important in rural areas.
CAUTION: Users should not attempt to make such connections themselves, but should contact the
appropriate electric inspection authority, or electrician, as appropriate.
NOTICE: The Load Number (LN) assigned to each terminal device denotes the percentage of the total load to
be connected to a telephone loop which is used by the device, to prevent overloading. The termination on a
loop may consist of any combination of devices subject only to the requirement that the sum of the Load
Numbers of all the devices does not exceed 100.
European CTR 21 compliance
The equipment has been approved in accordance with Council Decision 98/482/EC for pan-European single
terminal connection to the public switched telephone network (PSTN). However, due to differences between
the individual PSTNs provided in different countries, the approval does not, of itself, give an unconditional
assurance of successful operation on every PSTN network termination point. In the event of problem, you
should contact Bausch Datacom in the first instance.
Note: The manufacturer should ensure that the vendor and user of the equipment is clearly informed of the
above information by means of package and /or user manuals of the forms of user instructions.
PV92Junior2_DTR_20090827_Rev.1.0
- 19 -