
1
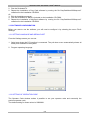
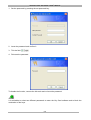
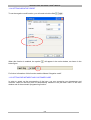
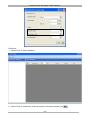
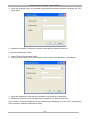
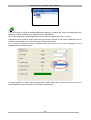
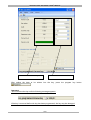
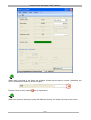
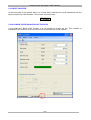
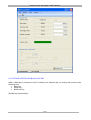
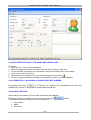
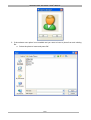
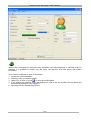
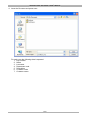
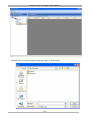
NEW KEY CARD SOFTWARE: USER’S MANUAL
New Key Card Software
USER’S MANUAL
Release 1.7 – July 2007
1/39
NEW KEY CARD SOFTWARE: USER’S MANUAL
Il costruttore si riserva il diritto di modificare, senza preavviso, le caratteristiche delle
apparecchiature presentate in questa pubblicazione; declina inoltre ogni responsabilità per le
eventuali inesattezze imputabili ad errori di stampa e/o trascrizione contenute nella stessa.
Le istruzioni, i disegni, le tabelle e le informazioni in genere contenute nel presente fascicolo sono
di natura riservata e non possono essere riprodotte né completamente né parzialmente od essere
comunicate a terzi senza l’autorizzazione scritta del Costruttore che ne ha la proprietà esclusiva.
The manufacturer reserves the right to modify, without prior notice, the characteristics of the
equipment described in this publication; and further declines to accept any responsibility for any
inaccuracies contained in this publication which can be ascribed to printing and /or transcription
errors. All instructions, drawings, tables and information contained in this publication are
confidential and can neither be reproduced, completely or in part, nor be transmitted to third parties
without the written permit of the Manufacturer, who has the sole ownership.
Der Hersteller behält sich das Recht vor, die Eigenschaften der hier beschriebenen Geräte ohne
Voranzeige zu ändern und lehnt gleichzeitig jede Verantwortung für mögliche Unrichtigkeiten ab,
die auf Druckfehler oder Abschreibfehler zurückzuführen sind.
Alle Anweisungen, Zeichnungen, Tabellen und Informationen, die im allgemeinen im vorliegenden
Band enthalten sind, müssen als vertraulich betrachtet werden und können weder teilweise noch
vollständig reproduziert bzw. an Dritte ohne die schriftliche Ermächtigung des Herstellers
weitergegeben werden, der das Alleineigentum besitzt.
Le fabricant se réserve le droit de modifier, sans préavis, les caractéristiques des appareils
présentes dans cette publication; en outre, elle décline toute responsabilité pour d’éventuelles
inexactitudes imputables à des erreurs d’impression et/ou de transcription.
Tous droits de reproduction, complet ou partielle, des instructions, des dessin, des tableaux et de
toutes les informations contenues dans cette publication sont réserves. Aucune communication à
un tiers ne peut être faite sans une autorisation par écrit du Constructeur qui en a la propriété
exclusive.
El Constructor se reserva el derecho de modificar, sin previo aviso, las características de los
aparatos presentados en esta
publicacíon; además, declina todaresponsabilidad por los eventuales inexactitudes imputables a
errores de imprenta y/o
transcripcíon contenida en la misma. Las instrucciones, los dibujos, las tablas y las informaciones
en general contenidos en este fascículo son de tipo reservado y no se pueden reproducir,
completamente o en parte, ni comunicar a terceros si la autorizacíon escrita del Fabricante, el cual
tiene la propriedad exclusiva.
O construtor reserva-se o direito de modificar, sem prévio aviso, as características dos aparelhos
apresentados nesta publicação;e declina qualquer tipo de responsabilidade por eventuais
inexactidões causadas por erros de impressão e/ou transcrições nela contidas.
As instruções, os desenhos, as tabelas e as informações em geral contidas no presente fascículo
são de natureza reservada, e não podem ser reproduzidas nem total nem parcialmente ou ser
comunicadas a terceiros sem a autorização escrita do Construtor que tem a propriedade
exclusiva.
2/39
NEW KEY CARD SOFTWARE: USER’S MANUAL
INDEX
1. FUNCTIONS OF THE KEYCARD SOFTWARE ______________________________ 4
1.1 REQUIREMENTS FOR USING THE SOFTWARE _______________________________ 4
1.2 SOFTWARE INSTALLATION _______________________________________________ 4
1.3 SOFTWARE CONFIGURATION _____________________________________________ 6
1.3.1 SETTING LANGUAGE AND SERIAL PORT _________________________________________ 6
1.3.2 SETTING OF OPERATOR CODE_________________________________________________ 6
1.3.3 SETTING PROTECTIONS ______________________________________________________ 7
1.3.4 SETTING NEGATIVE CREDIT ___________________________________________________ 9
1.3.5 SETTING DEPARTMENT AND CUSTOMER CODE __________________________________ 9
2. PROGRAMMING THE KEYS ___________________________________________ 14
2.1 DESCRIPTION OF THE FIELDS WHICH CAN BE VIEWED IN THE KEY ____________ 16
2.2 CREDIT COUNTER ______________________________________________________ 18
2.3 BLOCKING THE REVALUATION OF THE KEYS_______________________________ 18
2.4 SPECIAL KEYS _________________________________________________________ 19
2.4.1 FREE SALE KEY_____________________________________________________________ 19
2.4.2 PROGRAMMING KEY_________________________________________________________ 19
2.4.3 KEY TO RESET HISTORICAL DATA _____________________________________________ 20
2.4.4 KEY TO TURN THE MACHINE ON FREE VEND (AUTO FREE KEY) ____________________ 20
2.4.5 KEY TO DELIVER TOKENS (TOKEN KEY) ________________________________________ 20
2.4.6 CHARGE KEY _______________________________________________________________ 20
2.4.7 DATA KEY/SETUP KEY/BLACK LIST KEY ________________________________________ 21
3. AUTOMATIC PROGRAMMING OF THE KEYS _____________________________ 22
4. USERS DATABASE __________________________________________________ 24
4.1 SAVE USER DATA IN THE DATABASE, THEN ASSIGN A KEY AT A LATER TIME __ 26
4.2 SAVE USER DATA AND AT THE SAME TIME ASSIGN A KEY ___________________ 27
4.3 AUTOMATICALLY ASSIGNING A PROGRESSIVE KEY NUMBER ________________ 27
4.4 SEARCH FUNCTION _____________________________________________________ 27
4.5 WITHDRAW A KEY ______________________________________________________ 28
4.6 USER’S PHOTO ID ______________________________________________________ 28
4.6.1 USING A WEBCAM __________________________________________________________ 28
4.6.2 INSERTING A PHOTO ID ______________________________________________________ 29
4.7 DISPLAY USER DATA IN THE MAIN WINDOW________________________________ 32
4.8 EXPORTING USER DATA IN CSV FORMAT __________________________________ 34
4.9 IMPORTING USER DATA FROM AN EXCEL FILE _____________________________ 36
4.10 BACKUP OF DATA _____________________________________________________ 39
4.10.1 RESTORING DATA__________________________________________________________ 39
3/39
NEW KEY CARD SOFTWARE: USER’S MANUAL
1. FUNCTIONS OF THE KEYCARD SOFTWARE
The Key Card software makes it possible to:
•
•
•
Program keys so that they may subsequently be used in Zip systems.
Create special keys: key to reset historical data, programming key and free sale key.
Match each key with user's personal information (name, last name, photo-id, etc.).
Important
1. If you are connecting the Pc Interface using a USB port, you must select the serial port
available in your pc. Procedure:
- Enter in Start/Control Panel/System/Hardware/Device Manager/Port (COM &LPT)
and check the serial port available;
- Select the above serial port in the menu System Configuration of the Key Card
software.
2. If you are connecting the Pc Interface using a standard serial port, you must select the serial
port connected to the Pc Interface in the Key Card software
3. Before launching the Key Card software it is necessary to close all softwares that are using the
chosen port (also the Box32 software).
1.1 REQUIREMENTS FOR USING THE SOFTWARE
•
•
PC interface with firmware PSCP 1.2.0 or higher.
PC with the following minimum characteristics:
- Processor 400MHz
- Ram 96 MB
- 280MB space on the hard disk
- Operating system
o Microsoft® Windows® 98
o Windows 98 Second Edition
o Microsoft Windows 2000 Professional with SP4
o Windows 2000 Server with SP4
o Microsoft Windows XP Professional with SP2
o Windows XP Home Edition with SP2
o Microsoft Windows Millennium Edition
- Serial port or certified serial port/USB converter
1.2 SOFTWARE INSTALLATION
A prerequisite for software installation is the presence of Microsoft “.NET Framework ver 2.0
redistributable package (x86)”. This is a Windows additional component which can be downloaded
free of charge from the Microsoft website.
To install the software Key Card, you just need to run the file “KeyCardNew100Setup.msi”
contained in the installation CD-ROM.
The installation program for the Key Card software checks that the component “.NET Framework
vers 2.0 redistributable package (x86)” has been installed on the PC. If it has not, a message to
this effect appears, indicating that the component is not present.
4/39
NEW KEY CARD SOFTWARE: USER’S MANUAL
In this case you have the following options:
1. Select Yes and download the component “.NET Framework vers 2.0 redistributable package
(x86)” from Microsoft website
(http://msdn.microsoft.com/netframework/downloads/updates/default.aspx).
5/39
NEW KEY CARD SOFTWARE: USER’S MANUAL
2. Run the file dotnetFX .
2. Repeat the installation of Key Card software by running the file “KeyCardNew100Setup.msi”
contained in the installation CD-ROM.
Or:
3. Exit the installation program.
4. Run the file dotnetFX which is included on the installation CD-ROM.
5. Repeat the installation of KeyCard software by running the file “KeyCardNew100Setup.msi”
contained in the installation CD-ROM.
1.3 SOFTWARE CONFIGURATION
Before you start to use the software, you will need to configure it by selecting the menu FileÆ
Settings.
1.3.1 SETTING LANGUAGE AND SERIAL PORT
From the Settings screen you can set:
1. Serial port where the PC interface is connected. The pull-down menu automatically shows all
serial ports available in the system.
2. Program operating language.
1.3.2 SETTING OF OPERATOR CODE
The Operator Code window makes it possible to set your operator code and eventually the
previous operator code.
The default setting for these values is 00000001.
6/39
NEW KEY CARD SOFTWARE: USER’S MANUAL
Important
Do not leave the operator code set to the default value of 0000001.
1.3.3 SETTING PROTECTIONS
From the Security window you can:
1. Insert a password to enter the Key Card software.
2. Block the revaluation of the keys.
To enable each of these functions, the following is necessary:
7/39
NEW KEY CARD SOFTWARE: USER’S MANUAL
1. Set the password by pressing the set password key.
2. Insert the password and confirm it.
3. Tick the field
.
4. Re-insert the password.
To disable the function, remove the tick mark and re-insert the password.
It is advisable to select two different passwords to enter the Key Card software and to block the
revaluation of the keys.
8/39
NEW KEY CARD SOFTWARE: USER’S MANUAL
1.3.4 SETTING NEGATIVE CREDIT
To set the negative credit function, you will need to tick the field
When this function is enabled, the symbol
below figure.
.
will appear in the main window, as shown in the
For further information of this function read the Manual “Negative credit”.
1.3.5 SETTING DEPARTMENT AND CUSTOMER CODE
In order to speed up the programming of the keys, you may memorize your department and
customer codes so that they can be automatically recalled in the pull-down menu of the main
window and of the automatic programming function.
9/39
NEW KEY CARD SOFTWARE: USER’S MANUAL
Procedure:
1. Select Tools Æ Users database.
2. Select Tools Æ Customers Æ Add or press the key add customer code
10/39
.
NEW KEY CARD SOFTWARE: USER’S MANUAL
3. Insert the customer code, the customer name and the address (optional) and press the "OK"
key to save.
4. Repeat the operation to insert all customer codes that you want to memorize.
To store the department codes:
1. Select ToolsÆ DepartmentsÆ Add
2. In the pull-down menu, select the customer code to which the department code belongs.
3. Insert the department code and the description, and press OK to memorize,
4. Repeat the operation for all the department codes that you want to memorize.
In the section “Customers database” in the window “Users Database” you can view a tree diagram
of the customer codes and department codes.
11/39
NEW KEY CARD SOFTWARE: USER’S MANUAL
You can modify or delete customer/department codes by choosing the code to modify/delete and
selecting ToolsÆ Customers (or Departments)Æ Edit/Delete.
Or you can select the customer/department code with the right button of your mouse.
Department and customer codes which were previously inserted in the Users Database can be
recalled automatically in the pull-down menu of the main window.
It is, however, possible to insert a different code (not stored in the Users database) for the
department and customer code.
It is also possible to recall customer/department codes which were previously memorized in the
Users database using the function “Automatic Programming”:
12/39
NEW KEY CARD SOFTWARE: USER’S MANUAL
The option of recalling customer/department codes which were previously memorized in the Users
Database is available only when you are using sale keys.
13/39
NEW KEY CARD SOFTWARE: USER’S MANUAL
2. PROGRAMMING THE KEYS
When the PC interface is properly connected, the message
appears.
In the event of problems in the communication, the message
appears.
The window is divided into two sections:
1. Information key: this shows the key number, credit and codes belonging to the key inserted in
the PC Interface.
2. Information bonus and reward: this shows bonus and reward points for the key inserted in the
PC Interface. By default, this data is not read. To enable this function, activate the option
"Bonus information" by entering the menu DisplayÆ Bonus information.
When a key is inserted into the PC interface, the main window shows the data stored in the key
and enables the editing of other fields.
14/39
NEW KEY CARD SOFTWARE: USER’S MANUAL
Values stored in the key
Values that can be modified
After setting the data to be written into the key, press the program key button
.
Important
Do not remove the key until the following message appears:
If the key is removed before the key has been programmed, the key may be damaged.
15/39
NEW KEY CARD SOFTWARE: USER’S MANUAL
2.1 DESCRIPTION OF THE FIELDS WHICH CAN BE VIEWED IN THE KEY
•
•
•
•
•
•
•
Function Code: lets you programme:
o Sale key
o Free sale key
o Programming key
o Key to reset historical data
o Key to turn the machine on free vend (auto free key)
o Key to deliver tokens (token key)
Key number: it is advisable to assign a different number to each key.
Credit
Customer code
Department code
Discount level
Operator code: the colours have the following meanings:
o Green: the operator code programmed in the key is the same one set in the Key Card
software. Therefore, it is possible to read and write the key.
o Yellow: the operator code in the key is at the default value of 00000001. It is possible to
read and write the key. When the key is written, the operator code in the key will be
updated to the one set in the Key Card software.
o Blue: the operator code in the key is the same as the previous operator code set in the
Key Card software. It is possible to read and write the key. When the key is written, the
operator code in the key will be updated to the one set in the Key Card software.
o Red: the operator code in the key does not match any of the above requirements. It is
not possible to read or modify the key.
When you programme the function code of the key, the Key Card software enables only the fields
as shown in the below figure:
16/39
NEW KEY CARD SOFTWARE: USER’S MANUAL
When data is inserted in the fields, the software checks that the data is correct. Otherwise, the
error is indicated as shown in the below figure.
Roll the cursor over the symbol
for an explanation.
When you convert a sale key to a key with different function, the credit in the key is set to zero.
.
17/39
NEW KEY CARD SOFTWARE: USER’S MANUAL
2.2 CREDIT COUNTER
In the lower part of the window there is a counter which indicates the credit transferred into the
keys using the Key Card software. This counter cannot be reset.
2.3 BLOCKING THE REVALUATION OF THE KEYS
If you enable the “Block credit” function, it is not possible to revalue the key. This condition is
indicated by the presence of an icon with a lock in the lower part of the window.
18/39
NEW KEY CARD SOFTWARE: USER’S MANUAL
2.4 SPECIAL KEYS
2.4.1 FREE SALE KEY
The free sale key is a sale key which is transformed using the Key Card New software into a key
that allows you to make purchases free of charge.
When a sale key is transformed in a free sale key, the software disables the field of the credit and
writes on the key a fictitious credit (5,00€).
This fictitious credit (5,00€) is visualized in the display of the machine when the free sale key is
used.
2.4.2 PROGRAMMING KEY
The programming key is a sale key which is transformed using the Key Card software into a key to
be used to fill the tubes of a coin mech MDB, when using the MDB Plus module (959885 or
959886).
19/39
NEW KEY CARD SOFTWARE: USER’S MANUAL
2.4.3 KEY TO RESET HISTORICAL DATA
The key to reset historical data is a sale key which is transformed via the Key Card software into a
key that resets the historical data of a Zip system.
This may be useful when you decide to transfer a payment system from one machine to another
and you want to start with brand new statistics.
2.4.4 KEY TO TURN THE MACHINE ON FREE VEND (AUTO FREE KEY)
The auto free key is a sale key which is transformed using the Key Card New software into a key
that allows you to turn the machine on free vend.
When a sale key is transformed in auto free key, the software disables the field of the credit and
writes on the key a fictitious credit (10,00€/10.00$).
The machine stays on free vend till you disable this function by re-inserting the auto free key in the
reader.
2.4.5 KEY TO DELIVER TOKENS (TOKEN KEY)
The token key is a sale key which is transformed using the Key Card New software into a key that
when you insert into the reader, can transfer tokens into the sale keys (maximum 7 tokens).
2.4.6 CHARGE KEY
The charge key is a special key that makes it possible to transfer into the sale keys charges
previously programmed with the Key Card software.
When a recharge key is inserted in the PC interface, the main window shows the following data:
•
•
•
•
•
•
Function code: Charge key
Key number
Customer code
Recharging value
Number recharges
Operator code
20/39
NEW KEY CARD SOFTWARE: USER’S MANUAL
2.4.7 DATA KEY/SETUP KEY/BLACK LIST KEY
When a Data Key is inserted in the PC interface, the software lets you change the function code,
selecting from:
• Data Key
• Setup Key
• Black List Key
See Manual “Special Keys”.
21/39
NEW KEY CARD SOFTWARE: USER’S MANUAL
3. AUTOMATIC PROGRAMMING OF THE KEYS
This function lets you program quickly and easily the keys.
Select the menu ToolsÆ Automatic programming.
Procedure:
1. Set the starting key number. This number will be automatically increased by the system each
time a key is programmed.
2. Set the credit, the Customer code, the Department code and the discount level.
3. Press the Start
Key. From now on, all the keys inserted into the PC interface will
be programmed with the values previously set.
4. Insert the key in the PC interface. The key will be programmed automatically.
5. Remove the key only when you see the message:
6. Insert a new key.
7. To end, close the Automatic programming window.
It is possible to set the key number to be reached by ticking the box “To” and inserting the desired
number.
22/39
NEW KEY CARD SOFTWARE: USER’S MANUAL
When you reach the desired number, the following message will be shown:
Automatic programming can be used only to program sale keys and free sale keys.
23/39
NEW KEY CARD SOFTWARE: USER’S MANUAL
4. USERS DATABASE
This allows you to:
• Memorize department and customer code, as described in the previous section.
• Match each key with user's personal information (name, last name, photo id, etc.).
Select from the main window: Tools Æ Users database.
After inserting at least a customer code and a department code, select a customer of department
and click ToolsÆ UsersÆ Add.
24/39
NEW KEY CARD SOFTWARE: USER’S MANUAL
A window will appear where the information of the user can be inserted:
25/39
NEW KEY CARD SOFTWARE: USER’S MANUAL
4.1 SAVE USER DATA IN THE DATABASE, THEN ASSIGN A KEY AT A LATER TIME
Fill out the fields Information key, Information user and Information bonus and reward, and save
the data by selecting File Æ Save or pressing the key
When the user data is saved, the key status will be “Key not assigned”:
The data is not saved if the “Information key” section has not been filled out.
To programme a key assigning data previously saved:
1. Double click on the user's name to recall, or select the user and with the right button of the
mouse select “Edit”.
2. Insert a key in the PC interface.
3. Select ActionsÆ Programme key (or press the programme key button
).
4. When a key is assigned, the key status will change to “Key Assigned”, as shown in the figure
below.
This procedure is very useful if keys are assigned to a large number of users.
If you need to deliver the keys personally to each user, here is the simplest way of doing so:
1. Insert all users in the database.
2. When a user come to pick up his/her key, recall the user data from the Users database, insert
a key in the PC interface and press the programme key button
to program the key.
26/39
NEW KEY CARD SOFTWARE: USER’S MANUAL
4.2 SAVE USER DATA AND AT THE SAME TIME ASSIGN A KEY
Procedure:
1. Open the user: Tools Æ Users database.
2. Select the department and/or customer code and click on the key “Add user”.
3. Fill out the fields: Information key, Information user and Information bonus and reward.
4. Insert a key in the PC interface.
5. Select ActionsÆ Programme key (or press the programme key button ).
6. The key is programmed and user data is automatically saved in the Users database.
4.3 AUTOMATICALLY ASSIGNING A PROGRESSIVE KEY NUMBER
(or CTRL+N), the software will automatically insert the first
By pressing the button
available key number for the customer and department selected.
4.4 SEARCH FUNCTION
With the Key Card software you can make searches in the database.
Parameters to help you search can be chosen by pressing the
The parameters that can be utilised for your search are:
• Key number
• Name
• Last name
27/39
button.
NEW KEY CARD SOFTWARE: USER’S MANUAL
4.5 WITHDRAW A KEY
To reset key status to “Not assigned” (for example if the user has returned the key) select Actions
Æ Withdraw key.
4.6 USER’S PHOTO ID
In the Users database, it is possible to match each user with a photo id. The photo can be captured
directly by a webcam (only if you use Windows XP) or it can be inserted from a pre-existing file.
4.6.1 USING A WEBCAM
1. Install the webcam correctly.
2. Select File ÆSettings.
28/39
NEW KEY CARD SOFTWARE: USER’S MANUAL
3. Press the button “Webcam settings”
4. Select the device you plan to use and press OK.
5. Enable use of the webcam by ticking the enable field
.
Important
In order to use a webcam to take photo, the Windows XP operating system is required.
4.6.2 INSERTING A PHOTO ID
To insert a photo in the Users database:
1. Press the Image key:
a. If the webcam use option is enabled:
• Focus on the subject and press OK.
29/39
NEW KEY CARD SOFTWARE: USER’S MANUAL
2. If the webcam use option is not enabled and you want to insert a photo from and existing
file:
a. Select the photo to insert and press OK.
30/39
NEW KEY CARD SOFTWARE: USER’S MANUAL
3. The photo will appear in the assigned space.
It is possible to insert a photo from an existing file. Select the menu Actions Æ Insert Image file. By
means of this file, the photo will be loaded regardless of whether the webcam is enabled.
31/39
NEW KEY CARD SOFTWARE: USER’S MANUAL
4.7 DISPLAY USER DATA IN THE MAIN WINDOW
To display the user data in the main window of the software select Display Æ Information user.
When a key, belonging to a user previously recorded in the Users database, is inserted in the PC
Interface, the message
the key will be displayed as shown in below figure.
32/39
will appear and the data of
NEW KEY CARD SOFTWARE: USER’S MANUAL
When a key, belonging to a user previously inserted in the Users database, is inserted in the Pc
Interface, it is possible to modify only the credit, the discount level and bonus and reward
information.
If you need to modify other data, do as follows:
1. Access the “Users database”.
2. Select the user you want to modify.
3. Select File Æ Save (or press ) to save the modifications.
4. If you modify the customer code, the department code or the key number, the key status will
automatically change to “Not assigned”.
5. Re-assign the key as described before.
33/39
NEW KEY CARD SOFTWARE: USER’S MANUAL
4.8 EXPORTING USER DATA IN CSV FORMAT
It is possible to export data in CSV format, viewable with Excel or any text editor.
Procedure:
1. Access the window “Users database ”
2. Select the customer or department to be exported (if you select a customer with several
departments, all departments belonging to the selected customer will be exported).
3. Select FileÆExport Data
34/39
NEW KEY CARD SOFTWARE: USER’S MANUAL
4. Insert the file name and press save:
For each user the following data is exported
1. Key number
2. Name
3. Last name
4. Department code
5. Description
6. Customer code
7. Customer name
35/39
NEW KEY CARD SOFTWARE: USER’S MANUAL
4.9 IMPORTING USER DATA FROM AN EXCEL FILE
If you want to import users from an Excel file, do as follows:
1. Create an Excel file with data ordered as follows:
a. Key number
b. Name
c. Last name
d. Telephone number
e. Email
f. Discount level
g. Black List: “0” key not in the Black List, “1” key in the Black List.
Important
The key number is mandatory, while the other fields can be left empty.
It is not possible to assign the same key number to different users.
2. SelectÆ Save As.
3. Select Save as type “CSV(MS-DOS)(*.csv)” and press the key Save.
36/39
NEW KEY CARD SOFTWARE: USER’S MANUAL
4. Open the Key Card software and enter the Users database (Tools Æ Users database)
5. Save customer code and department code where you want to import the users.
6. With the right button of the mouse select the department code where you want to import the
users and select “Import users”.
37/39
NEW KEY CARD SOFTWARE: USER’S MANUAL
7. Select the file you want to import and press “Open” to import users.
38/39
NEW KEY CARD SOFTWARE: USER’S MANUAL
If you try to assign the same key number to two different users, the operation of importing the
users will be cancelled. An error message will show you the key number where you have the
problem.
It will take several minutes to import a large number of users.
4.10 BACKUP OF DATA
It is advisable to make a backup of the Users database at least once a week.
To do so, follow this procedure:
1. Exit the Key Card software
2. Access
the
directory
where
the
Key
Card
software
[C:\Programs\ADE\KeyCardNew].
3. Copy the following folders into a CD-ROM or into a different folder.
a. Database
b. IMG
is
installed
4.10.1 RESTORING DATA
If necessary, you can restore your database as follows:
1. Re-install the Key Card software.
2. Access the directory where the software is installed [C:\ProgramsADE\KeyCardNew].
3. Replace the Database and IMG directories with those saved during the backup operation.
39/39


![Mercedes C navigation upgrade solution[5inch screen] Installation](http://vs1.manualzilla.com/store/data/006913336_1-fed0fc0219a7297290fc644c2eb0119f-150x150.png)