1
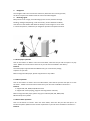
User Manual
NOTICE
USING YOUR NAVIGATOR at the first time
1. Charge completely.
2. Install into your vain/car.
3. Initialize software as described in the manual.
4. Make sure the car is outside the garage and it is not covered by
anything (treed, bridges, etc).
5. Normally it takes a bit longer to receive the GPS signal at the first time
you turn on the unit. Your device has to locate 3 satellites to function.
Next time to find the satellites is significantly shorter after the first time
you use the device. Once you move your unit over 300km without being
used, it may need a little more time to locate the satellites again.
Introduction
This manual is a complete instruction for the device. Please ready this manual carefully before
using.
Contents
Safety and Regulatory Information
1.0 Getting Started
1.1 Unpacking
1.2 Using Your Device in a Vain/car
1.2.1 Using the Car bracket
1.2.2 Connecting the Car Charger
1.2.3 Connecting to AC Power supply and Charging the Battery
1.2.4 Power on/off
1.3 Reset system
1.4 Micro SD Card
1.5 Connect with computer
2.0 Main Menu Selection
2.1 Navigation functions and features
2.2 Audio player operation
2.3 Video operation
2.4 Photo viewer operation
2.5 E-book reader operation
2.6 System setting and operation
3.0 Frequently asked questions
4.0 Maintenance of GPS navigator
Safety and Regulatory Information
Important Safety Notices and Warnings
Global Positioning System
The Global Positioning System (GPS) is a satellite-based system that provides location and timing
information around the Globe.
GPS is operated and controlled under the sole responsibility of the Government of the United
States of America, who are responsible for its availability and accuracy. Any changes in GPS
availability and accuracy, or in environmental conditions, may impact the operation of your
dervice .We cannot accept any liability for the availability and accuracy of GPS.
Precautions and Notices
For your safety, do not operate the device while driving.
Use this product prudently. The product is intended to be used only as a navigation aid. It is not
for precise measurement of direction, distance, location or topography.
The calculated route is for references only. It is the user's responsibility to follow the traffic signs
and local regulations along the roads When you get off the car, do not leave your device on the
dashboard or the car glass that is subject to direct sunlight. The overheating of the battery can
cause malfunction and /or danger.
GPS is operated by the United States government, which is solely responsible for the
performance of GPS. Any change to the GPS system can affect the accuracy of all GPS
equipments.
GPS satellite signals can not pass through solid materials (except glass).When you are inside a
tunnel or building, GPS positioning is not available.
A minimum of 3 GPS satellite signals is needed to determine current GPS position. Signal
reception can be affected by situations such as bad weather or dense overhead obstacles (e.g.
trees and tall buildings)
The wireless devices might interfere the reception of satellite signals and cause the reception of
the signal to be unstable. For better signal reception, it is recommended that you use a car
antenna (option)
Aircraft and Hospitals
Use of devices with an antenna is prohibited on most aircraft, in many hospitals and in many
other locations. The device must not be used in these environments.
1. Getting Started
1.1Unpacking
Unpack your device box and identify the contents. You should have:
(1) Unit. Details see the photo below.
(2) Holder, to hold the device.
(3) Bracket, its main features is to fix the device on a car .
(4) Car Charger. This is the normal way of power supply to your device when use in the car/vain.
(5) AC adapter(optional), included for you to charge and work with your device even when It's
not in your vehicle. When you use the adapter, please make sure it is cooled by placing in a
ventilated area.
(6) USB data cable for connecting your device to a Windows PC
(7) Micro SD card(optional), containing map data.
(8) User Manual.
Do not expose the device to high temperatures. We recommend that you do not leave
the device in direct sunlight for long periods or in an unattended car on sunny days.
High temperatures can cause permanent damage.
Do not attempt to service the device yourself! Do not open, puncture or disassemble it.
Doing so may be dangerous and will invalidate your warranty.
1.2 Using Your Device in a Vain/car.
A stand and a car charger are supplied with your device.
1.2.1 Using the Car Bracket
Caution:
Select an appropriate location for the stand. Never place the stand where the
driver's field of vision is blocked.
If the car's windshield is tinted with a reflective coating, an external antenna
(optional) maybe be needed to route the. Antenna to the top of the car through a
window.
When closing the car window, be careful not to pinch the antenna cable (Cars with
an anti-jam window design may automatically leave adequate space as needed.).
1.2.2 Connecting the Car Charger
The car charger supplies power to your device when you are using the device in a car.
Caution: To protect your device against sudden surges in current, connect the car
charger only after the car engine has been started. Connect one end of the car
charger to the power connector of your device. Connect the other end to the
cigarette lighter in the car to power and charge your device.
1.2.3 Connecting to AC Power supply and Charging the Battery
1. Fully charge the battery before using your device for the first time
2. Connect the adapter cable to the bottom of your device.
3. Plug the AC adapter into a wall outlet.
The charge indicator glows amber when charging is in progress. Do not
disconnect your device from AC power until the battery is fully charged, when
the charge indicator turns green. This will take a couple of hours.
1.2.4 Power on/off
1.2.4.1 Power on:
Please check:The battery is enough, or it is connected to external power
source;
Please press the button on the top of the unit to boot.
Note: If bring the unit form one place to another place, please boot until it
adapts to the environment. Big humidity fluctuation will make the mainframe
short circuited.
1.2.4.2 Power off
Press the button on the top of the unit to turn off, the unit will enter the power
saving mode and maintain the last operation status when boot next time.
1.3 Reset system
If the system cannot work, you can reset the system by the following way:
Click the reset key on the right part of the machine to reset the system by using
the stylus.
【relative information】:it can be no response in the following condition:
1. The shift between pictures is delayed or stopped.
2. The program select function cannot work normally, such as long time to carry
out or cannot be activated.
3. The power button can not work
Note: The unsaved data will be lost as you reset the system when the system
has no response. Please copy the data every other time.
1.4 Micro SD Card
The Micro SD Card contains the navigation software, map data and media file.
Please insert the card correctly when use it.
Note: Please do not take out the Micro SD Card when the system is navigating
or playing.
1. Don't stress or curve the Micro SD Card, avoid loss and bulge.
2. Avoid high temperature or high humidity when use and store the card, don't
expose the card directly to sun light, let the card far away from liquid and
corrosive material.
3. Please pay attention to the heading when insert the Micro SD Card. If you
insert the card improperly, you will damage the card.
1.5 Connect with computer
The device can be connected with the computer through the MINI USB on its left
part. You can copy the document between navigator and computer or copy the
data from GPS navigator to computer so as to recover the data in GPS when
you are in need of them.
1. Please confirm the GPS navigator is power on;
2. Connect the MINI end of USB cable with the USB port on the left part
of GPS device and the normal end with the Host port on computer.
3. Please pull out the MINI USB cable after you finished your operation, the GPS
navigator will return to the pre-operation interface.
Note: Data security: Please copy the data to the outer storage device every time
before you update your system data. Our company takes no responsibility
to any loss of data.
【Remark】The GPS navigator will stop the operation when it is connected with
computer.
Note: In the process of communication, the following operations will break off
the connection with computer, the unfinished data will be lost.
1. Pull out the MINI USB cable;
2. Power off
3. Reset the system by using reset button or electric switch
2.Main Menu Selection
Welcome to use the GPS navigator, device functions will be introduced in this chapter.
2.1 Navigation functions and features
According to your choice of navigation system, the GPS navigator can make
position by GPS satellite signal receiver and display on the navigation map. The
system can calculate a best route after setting the destination, which can help
users to arrive the destination safely and rapidly.
The system can let you enjoy the individual charm and enjoy your trip by many
different ways such as vision map, vivid animation, voice indication, and words
indication.
The specific navigation functions are depended on your choice of navigating
software. Please refer to the Navigation Software Instruction.
Notes:
1. Map information
It is probably that the electronic navigation data is not consistent with the real
traffic instructions because of the traffic construction development. Please do
comply with the highway condition and the actual traffic rules.
2. Navigation
The navigator offers the route for the reference; determine the route by yourself,
the driver may be more familiar with the route than GPS navigator.
3. Receiving signal
Many factors such as high, dense buildings (in the tunnel, between the high
building, underground parking, under the trestle), various weather condition,
and closure of the satellite will affect the ability to receive signal so as to result
in inaccurate position, inefficiency of navigation operation and system function.
2.2 Audio player operation
Click on the button of “Music” then into music folder, select the file you like and open it to play
music. (Make sure the format of music file in your SD card is available in the device)
Features
The audio player supports MP3 and WAV format, you could set the playing
sequence as you wish.
Before using the audio player, please copy the files to any folder.
2.3 Video operation
Click on the button of ”Video” then into video folder, select the file you like and open it to start
the video.(Make sure the format of video file in your SD card is available in the device)
Features
1. Support ASF, AVI, WMV, 3GP, MP4 and FLV
2. Support full-screen playing, progress choosing and file selection;
Before using the Video player, please copy your video file (ASF, AVI, WMV, 3GP,
MP4 and FLV) to any folder.
2.4 Photo viewer operation
Click on the button of ”Photo” then into video folder, select the file you like and open it to
browse the photo. (Make sure the format of photo file in your SD card is available in the device)
Features
1. Supports JPG、BMP and PNG
2. Support picture rotate, picture enlarge/shrink and automatic play.
Before using the photo viewer, please copy your photos to any folder.
2.5 E-book reader operation
Click on the button of ”E-Book” then into video folder, select the file you like and open it to look
into the E-book.(Make sure the format of videl file in your SD card is available in the device)
Features:
1. Support TXT
2. Support turning over page, page browse, and file choosing.
Before using e-book function, please copy your TXT file and save it to any folder.
2.6 System setting operation
Click “Setting” menu, then you can set the relevant functions.
2.6.1 Backlight setting
Click on the “backlight” button then into the setup screen.
Click to decrease backlight gradually to the lowest level
Single click and it will shift left, and it will show last column. This display is in circle.
System backlight will be closed automatically when no operation for a period time
to save power. There are several time interval choice for you: never, 3 min, 2min,
1min, 30second later, 10second later.
Single click and it will shift right and it will show last column. This display is in circle.
Click to increase backlight gradually to the highest level
2.6.2 Volume adjust
“Volume adjustment” includes:
1. Speaker volume adjustment
2. “Screen click tone” setting
2.6.3 Navigation path
Set navigation path
To make sure the map software is completed with right roadmap.
2.6.4 Date and time setting:
Date and time include:
1.
System time set;
2.
System date set;
3.
System time zone set.
Single click button“ ∧ ” or“ ∨ ” to set time and date.
Single “ < ” or“ > ”to choose time area。
Click to
exit current interface after setting. Choose “YES ” or “NO ” to exit current
interface.
2.6.5 Screen Calibration
Click the screen calibration,then Click “YES ”it will move from in the sequence of the center,
left up, left down, right down and right up till the calibration succeed, then click any where on
the screen to save the calibration and exit to the main interface automatically. If not save the
information, please wait 30 seconds and it will exit from current interface automatically.
2.6.6 Language setting
Select the language you want, the system will be autimatically adjusted.
2.6.7 Default set
Single click the default setting,then Single click “YES ” to restore the default settings,single
click “NO ” to exit the default settings.
2.6.8 GPS Information
Single click the GPS information interface,the screen will show the data of current GPS status,
while click on “Reset” button the system will research the satellite signal again.
2.6.9 System information
System information includes:
1. Firmware version;
2. APP version;
3. System ID.
3.0 Frequently asked questions
3.1 I can't find an address.
Please make sure you have correctly spelled your entry. If you do not know how
an address is spelled correctly, simply enter the parts of the address, you know
for sure (e.g. "Lond", "Leic" for Leicester Square in London). Then browse in the
result listand look for the address. Also make sure that the city in which you are
looking for an address is correct.
Sometimes the official postal address differs from the address you are looking for.
In that case, search for an address nearby that you know of and browse on the map.
If you find the address on the map but you can not find it while searching for it,
please contact the manufacturer or your retail know of and browse on the map.
Store for information about software updates.
3.2 There is a failure in the map / POIs are missing.
If you detect an error in the map data (e.g. a street is missing completely), we
would like to inform our map data provider.
Please contact the manufacturer or your retail store for information about software
updates.
3.3 Voice instructions are unclear in a specific situation:
If you could not fully understand the voice command for a maneuver, either hit the
repeat command button or ask your companion to take a look at the map.
3.4 I have problems to get a GPS fix.
If you have problems getting a satellite fix with the GPS (you can see how many
satellites are being received on the main menu at the bottom left) please make
sure, that you are outside and the GPS antenna has a good visibility to the open
sky.
Some models also do support an additional external active antenna. Please also
consult with the hardware manual of your device to get further information of how
to obtain a GPS fix.
3.5 Where can I get technical support?
Please contact the manufacturer or your retail store.
3.6 Where can I get software updates?
Please contact the manufacturer or your retail store for information about software
updates.
3.7 Where can I get additional maps and guides?
Please contact the manufacturer or your retail store for information about software
updates.
3.8 What Kind of Formats Does The Device Support?
Support Music Format: MP3、WAV
Support Movie Format: ASF、AVI、WMV、3GP、MP4 and FLV
Support Picture Format: JPEG、BMP、PNG
Support E-Book Format: TXT
4.0 Maintenance of GPS navigator
GPS navigator will be a reliable navigation and entertainment companion if
protected by right methods. Please follow the instructions below to ensure your
GPS run smoothly for a long time.
Protect screen: Don't press the screen with strength or you will destroy it. Please
use the stylus to operate the navigator and spray a little glass cleaner on the soft
cloth to clean the screen, don't spray on the screen directly.
【Note】 Be sure to turn off the GPS navigator before cleaning.
√ Drop or strike will cause damage to high-precision components.
【Note】Accidental damage is beyond our responsibilities.
√ Don't use it under such environment: Temperature change abruptly (high
temperature above 60°, low temperature under-10°), high voltage, dusty,
electrostatic interference, avoid any corrosive liquid and dip into any liquid.
√ Avoid radiated interference: The radiated interference from other electronic
products will affect the display and it will be normal after suppressing the
interference source.
【Note】If you carry the unit by air, please put the GPS together with your
luggage to pass the X-ray detection system. Avoid scanning by the magnetic
head detector (at the passage used for passing) or the magnetic bar (held by
the security checker), or it will destroy the system date in the unit. We will take
no responsibility for it.
√ Avoid direct, intense light: Don't use the GPS navigator in high light and
ultraviolet radiation in order to increase the using life.