1
QualColor™ 12” LEDArray
User Manual
Important Information
Please read through these notes and the remaining instructions before installing this
device.
1. Refer to local and state codes to ensure compliance when installing this
device. Consult an Electrical Inspector if you have any questions.
2. Use only with a Giulio Lighting LED Controller powered by a listed Class 2
or Limited Power Source external power supply.
3. LEDdrive cables should be rated CL2 or better with 24 AWG conductors.
4. Do not interconnect ethernet and LEDdrive devices even though they use
the same RJ45 connector. Damage may result.
5. Do not more than ten (10) of these devices in series to one LED Controller.
6. Do not exceed the maximum LEDdrive cable length.
7. Use only insulated staples or plastic ties to secure cords.
8. Make sure that power is disconnected before connecting or disconnecting
any LEDdrive devices.
9. Make sure this device is located in a dry environment.
10. Clean the fixture according to the instructions in this manual. Never use
abrasive cleansers, pads or gritty cloths. Never use window cleaning fluids
or other strong solvents.
11. Be sure to plan the installation before beginning.
1
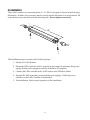
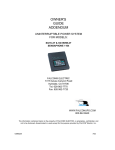
Model LA-001
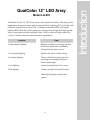
The Model LA-001 12” LED Array is part of the QualColor family. This high quality
luminaire is designed to work with an external Giulio Lighting LED Controller with
LEDdrive output such as the LC-001. Combing warm white LEDs with singlepackage RGB LEDs the LA-001 generates a rich spectrum of light with high quality
white, warm hues and fully saturated colors. With a wide even light output, the
LA-001 is ideally suited for many decorative applications.
Location
Uses
Under-cabinet lighting
Enhance a kitchen by turning a boring
white backsplash into an infinitely
changeable decorative accent.
Over-cabinet lighting
Splash color off of a white ceiling.
In-cabinet lighting
Turn a collection of glassware into a
stunning ever-changing display of
multi-faceted light.
Cove lighting
Create a beautiful mood in a room.
Back lighting
Outline an object in beautiful colors.
Shine light through a translucent
surface.
2
Introduction
QualColor 12” LED Array
Installation
Pre-installation
It can be helpful to plan an installation prior to starting to physically install
components.
The following items should be considered when creating the plan.
Locating the LA-001
The LA-001 is designed to provide indirect illumination. Locations where the
individual LEDs in the LA-001 are visible may be visually distracting. The LA-001
should be located so the LEDs are not visible but their light is reflected off another
surface or otherwise diffused.
The LA-001 may be installed in any position or orientation. It must be installed in a
dry location.
The LA-001 fixture generates a wide, approximately 120°, beam width. Typically it
should be centered before any surface it is to illuminate. It may be helpful to locate it
toward the front of a cabinet when located in an under-cabinet position so that the
cabinet lip can hide the fixture. The effectiveness of this position may be tested by
temporarily connecting a LA-001 to a LED controller and power supply, making the
device operational and holding it in place to observe the result.
The distance between fixtures must be considered when multiple LA-001 fixtures are
to be installed and a continuous illumination pattern is desired. The distance between
fixtures depends on the distance to the surface being illuminated. The following table
can assist in determining the distance between fixtures in a linear array (as measured
from the mounting hole of one fixture to the mounting hole of the next fixture). Cable
length between fixtures should be approximately 2” (5 cm) longer.
Distance to Surface
Maximum Distance Between Fixtures
12” / 30.5 cm
approx 5” / 12.7 cm
24” / 61 cm
approx 14” / 35.6 cm
36” / 91.5 cm
approx 30” /76.2 cm
3
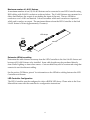
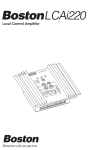
Maximum number of LA-001 fixtures
A maximum number of ten (10) LA-001 fixtures can be connected to one LED Controller using
RJ45 cabling with 24 AWG conductors as shown below. The LA-001 fixtures are connected in a
daisy chain fashion, the output of one feeding the input of the next. The two LEDdrive
connectors on a LA-001 are identical. It does not matter which end is used as an input and
which end is used as an output. The maximum distance from the LED Controller to the final
LA-001 fixture is 50 feet (approximately 15 meters).
LED Arrays
PSU
max 50'
LC-001
Determine LEDdrive cabling
Determine the cable distance necessary from the LED Controller to the first LA-001 fixture and
between all LA-001 fixtures to be installed. Some cable lengths may be purchased directly
from Giulio Lighting or from other sources. Custom cables may also be constructed using that
same tools used for ethernet cabling.
See the section “LEDdrive pinout” for information on the LEDdrive cabling between the LED
Controller and fixtures.
LED Controller Configuration
The LED Controller must be configured to drive a RGBW LED Array. Please refer to the User
Manual that came with the controller for configuration instructions.
4
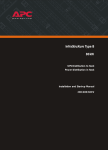
LEDdrive Pinout
LEDdrive cables are based around ethernet cabling technology to simplify building custom
cables in the field. LEDdrive cables have the following requirements.
1. Minimum conductor size of 24 AWG.
2. Cable type of CL2 or better. A higher rated cable may be substituted (CMP, CL3P,
CL2P, CMR, CL3R, CL2R, CMG, CM, PLTC, CL3).
3. Cable wiring is identical to ethernet “straight-through” wiring as shown by the
following illustrations.
1
8
RJ45 connector pinout (front view)
1
8
8
1
Wiring Diagram
Pin
1
2
3
4
5
6
7
8
Color (both sides identical)
White with orange
Orange
White with green
Blue
White with blue
Green
White with brown
Brown
Cable wire assignment
5
Installation
The LA-001 contains two mounting holes 11 1/8” (28.25 cm) apart as shown in the following
illustration. Number 4 wood screws may be used to mount the fixture to a wood surface. Be
sure that the screws are flush with the mounting tab. Do not tighten excessively.
11 1/8"
The installation process consists of the following steps.
1. Mount all LA-001 fixtures.
2. Mount the LED Controller and it’s external power supply if necessary (the power
supply should not be energized until the installation is complete).
3. Connect the LED Controller and LA-001 fixtures with LEDdrive cables.
4. Energize the LED Controller (or associated power supply). Verify the power
indicator on the LED Controller is illuminated.
5. Test installation. Verify correct operation of the installation.
6
Cleaning Instructions
The polycarbonate lens is susceptible to scratches and abrasions, as well as to damage by
certain solvents. To avoid damaging the LA-001 fixture please adhere to the following
cleaning instructions.
“DO’S”
1. Use only a mild soap or detergent (such as Formula 409 cleaner) and lukewarm
water applied to a clean sponge or soft cloth to clean the fixture. Other cleaners
such as Joy, Fantastic, Top Job and Mr Clean may also be used.
2. Do not allow liquids to enter the connector areas. Apply the cleaner and water to
the sponge or soft cloth and then clean the fixture. Do not directly apply liquids to
the fixture.
3. Dry thoroughly with a chamois or moist cellulose sponge to prevent water spots.
4. Grease can be removed before drying by rubbing lightly with a good grade of
naphtha or isopropyl alcohol. Follow the alcohol rub with the mild cleaning
described above.
“DON’TS”
1. Never use abrasive cleansers, abrasive pads or gritty cloths.
2. Never scrape the fixture with a sharp tool such as a razor blade.
3. Never use highly alkaline cleansers, benzene, gasoline, acetone or carbon
tetrachloride as a cleanser.
4. Don’t clean the fixture in hot sun or very hot days.
Troubleshooting
Please refer to the following table for help troubleshooting an installation.
Problem
Fixture does not operate
Possible Cause
LED Controller is not powered.
LEDdrive cable is too long.
Fixture colors are not as expected
The LED Controller configuration has not
been set to RGBW.
A custom LEDdrive cable has been wired
incorrectly.
7
To obtain service, obtain a return authorization (RMA) from the Manufacturer
website and then follow the instructions for return of the unit you receive with the
RMA.
THIS WARRANTY IS PURCHASER’S SOLE AND EXCLUSIVE REMEDY AND IN
IS IN LIEU OF ALL OTHER WARRANTIES, EXPRESSED OR IMPLIED,
INCLUDING, BUT NOT LIMITED TO, ANY IMPLIED WARRANTY OF
MERCHANTABILITY OR FITNESS FOR A PARTICULAR PURPOSE.
MANUFACTURER SHALL NOT BE LIABLE FOR ANY SPECIAL, INDIRECT,
INCIDENTAL OR CONSEQUENTIAL DAMAGES OR LOSSES, INCLUDING
LOSS OF DATA, WHETHER ARISING FROM BREACH OF WARRANTY OR
BASED ON CONTRACT, TORT, RELIANCE OR ANY OTHER THEORY.
Since some countries and states do not allow limitation of the term of an implied
warranty, or exclusion or limitation of incidental or consequential damages, the
limitations and exclusions of this warranty may not apply to every buyer. If any
provision of this warranty is held invalid or unenforceable by a court of competent
jurisdiction, such holding will not affect the validity or enforceability of any other
provision of this warranty.
8
Warranty Information
Manufacturer warrants this product to be free from defects in material and
workmanship under normal use and conditions ("manufacturing defect") for a
period of one (1) year from date of original purchase (the invoice date). This
warranty extends to the original buyer (Purchaser) or end-user customer of
Manufacturer authorized reseller, and does not apply to fuses, batteries,
equipment attached to product or any product, which, in Manufacturer's opinion,
has been misused, altered, neglected or damaged by accident or abnormal
conditions of operation or handling. Manufacturer will, at its option, repair or
replace the Product, or reimburse Purchaser or end user for the full purchase price.
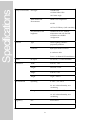
Specifications
Array Characteristics
LED Type
12 RGB LEDs
12 Warm White LEDs
120° Beam Angle
Warm White LED
characteristics
3000K Color temperature
65 CRI
18.7 Lm/W Efficacy (with controller)
Interface
LED Lifetime to half
brightness
70,000 hours at 25°C ambient
temperature and with the LED
Controller set to RGBW
configuration.
Type
Giulio Lighting LEDdrive
proprietary interface
Connector
RJ45 8-pin female connector
8 conductor cable
Power + 4 channels LED modulation
Power
DC Input
24 volts DC, 3.5 watts maximum
Dimensions
Width
2.62 cm / 1.03”
Length
30.33 cm / 11.94”
Height
2.06 cm / 0.81”
Weight
73 gm / 2.58 oz
Operating
0 - 50º C / 32 - 122º F
Environmental
20 - 90% relative humidity, noncondensing
Storage
-20 - 60º C / -4 - 140º F
10 - 95% relative humidity, noncondensing
Regulatory
FCC
FCC Class B
UL
UL2108 and UL8750
9
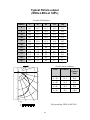
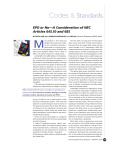
Typical Fixture output
(White LEDs at 100%)
Candela Distribution
ANGLE
0
45
90
135
180
0
16.7
16.7
16.7
16.7
16.7
5
16.5
16.6
16.6
16.7
16.9
15
16.0
16.1
16.0
16.2
16.4
25
14.9
15.1
14.8
15.0
15.2
35
13.3
13.3
13.3
13.4
13.5
45
11.3
11.2
11.1
11.1
11.1
55
8.9
8.7
8.4
8.2
7.9
65
6.0
6.0
5.4
4.6
4.4
75
1.5
2.4
2.3
1.6
0.4
85
0.2
0.2
0.2
0.3
0.1
90
0.1
0.1
0.0
0.1
0.1
0°
Zonal Lumen Summary
Zone
LUMENS
%
Fixture
Total
0 - 30°
13.1
29.0
0 - 40°
21.4
47.6
0 - 60°
37.6
83.4
0 - 90°
45.0
100.0
90°
75°
6
60°
12
45°
18
0°
15°
30°
LEGEND
0°:
90°:
180°:
Test procedure: IESNA LM-79-08
10
Copyright © 2010 Giulio Lighting
All rights reserved
Neither the whole nor any part of the
information contained in, or the product
described in this manual, may be adapted or
reproduced in any material or electronic form
without the prior consent of the copyright
holder.
QualColor is a trademark of Giulio Lighting.
All other brand or product names are
trademarks or registered trademarks of their
respective owners.
Contact
www.giuliolighting.com
[email protected]
This document and the functionality of the
product may be subject to change without
11
notice.
Publication 24-00011-01