1
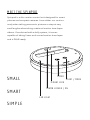
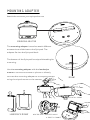
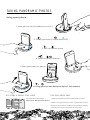
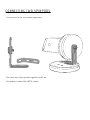
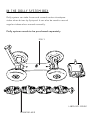
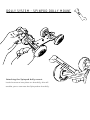
SPINPOD
USER MANUAL
Y O U R G U I D E T O M A K I N G N E W M E M O R I ES
THESPINPOD.COM | [email protected] | #THESPINPOD | @SPINPOD
M E E T T H E S PI N P O D
Spinpod is a slim motion control unit designed for smart
phones and compact cameras. It can either run continuously when taking panoramic pictures or step at very
small angles when taking rotational motion time-lapse
videos. If combined with a dolly system, it is even
capable of taking linear and curved motion time-lapse
and is DSLR ready.
TIME R
SMALL
SMART
M OU NT LOC K
TH U MB LOC K E R / ON
L E D LIG H T
SIMPLE
START / MODE
IN THE S PI N P O D B O X
SPINPOD + BA G
MICRO U SB C A BL E
KIC KST AR T ER B ACK E R S H A V E R E CE I V E D CU S TOM BO X O F P RODUC T S
MOUN T
UN D E R S T A N D T H E T O UCH CO NT RO L & LED
MO DE/STAR T
- SHOR T PR ESS CHAN GES M ODE
TI ME R
- S HOR T P R ESS T O S E T CO UN T D O W N T I ME R
- SH ORT P RESS TUR NS MOTOR OF F WHEN R U N N ING
- L ONG P RES S ON THE MOD E B UTT ON ST A R T S T HE M OT OR
PANORAMIC
Short press
Set countdown timer
DELAY
( S E CO N D S)
0 |
5
|
10
| 15
ROTATIONAL TIME-LAPSE
SP EED
Short press
Set rotation speed
( HO UR/REV )
.5 | 1 | 2 | 5 | 10
LINEAR TIME-LAPSE (DOLLY SYSTEM)
SP EED
Simultaneous
Long Press
Set linear speed
SWEEP
=
C HANG E DIR ECTION
( FE E T /HOUR)
100 | 60 | 45 | 25 | 15
BLINKING LED
=
SPEE D
CHARGING
Use the included microUSB cable to charge the Spinpod via your
computer, wall adapter or any other USB port.
Make sure the main Spinpod switch (thumb wheel) is in the off
position (position locker fully retracted) during charging.
The right LED will turn solid red while charging and solid purple
when charging has completed.
It will take approximately 2.5 hours to fully charge a depleted
battery and should provide enough power last a few months of
typical use.
PL U G T H E C A B L E I N S I D E T H E S P I N P O D D O C K P O R T
C HAR GE V I A YOUR C OMPUT ER , WA L L A D A PTE R OR A N Y U S B POR T
MICROUSB CABLE
MOUNTING ADAPTER
Attach the mount to your spinpod to use
M O U N T I N G A D A PT ER
The mounting adapter is used to attach different
accessories and devices to the Spinpod. The
adapter fits into the Spinpod dock.
The bottom of the Spinpod has tripod threading for
mounting.
Use the mounting adapter with the landscape
mount to connect a camera or phone or directly
connect the mounting adapter to a compact camera
using the tripod mount on the camera.
M O UNT
US E W I TH A P HO N E
LA ND S CAPE MOU N T
ADAPTER WITH LANDSCAPE MOUNT
or DIRECTLY CONNECT
T AK I N G PA N O R AMIC PH O T O S
Using smart phone
1. Lock phone into slot (device turns on)
2. Select panoramic mode (blue LED)
3. Set countdown timer
4. Swipe to select direction
5. Start panorama on phone
6. Long press to start Spinpod (Spins 1 full rotation)
AP P S T O R E & GOOGLE PLAY ST OR E
Top 3 iOS Panorama Apps:
TI PS FO R A G R E A T SH OT :
1. Keep spinpod leveled will create better pictures.
Photosynth, 360 Panorama & Pano
2. When using the iPhone's build-in panorama function,
the scene where the blue LED points to before starting
a shot will be close to the center of the image.
Note: you can use the landscape mount for
T A KI N G T I ME -L A P SE VIDE O S
phones & the mount for cameras
Using iPhone, Andriods & compact cameras
1. If using phone put landscape mount on
2. Attach mount (for phones & cameras)
3. Lock phone in slot (device turns on)
4. Select time-lapse mode (red LED)
5. Select rotation speed
6. Swipe to select direction
7. Long press to start Spinpod (Spins until stopped)
8. Start time-lapse app on phone or Start intervalometer on camera
AP P S T O R E & GOOGLE PLAY ST OR E
TI P S FOR A G R E A T SH OT :
Top 3 iOS time-lapse apps are:
1. Use the pano mode to quickly adjust the initial position
OSnap!, Timelapse & Lapse it
2. At a given speed on Spinpod, the longer the time
interval between each shot, the faster the scene will
rotate in the final video.
3. Lock the focus, exposure and white balance
before recording
C O N N ECT I N G T W O SPINPO DS
L-bracket must be purchased separately
Connect two Spinpods together with an
L-bracket to take Pan &Tilt video.
DOLLY SYSTEM
USER MANUAL
YOUR GUIDE TO TAKING VIDEOS IN MOTION
P U R C H AS E D S E PA R A T E L Y
IN TH E DO L L Y S YST E M B O X
Dolly system can take linear and curved motion timelapse
video when driven by Spinpod. It can also be used to record
regular videos when moved manually.
Dolly system needs to be purchased separately
DOLLY
LAND SCAP E M O UNT
M O U N T I N G AR M
D O LL Y S Y S T E M - SPINPO D DO LLY MOUNT
Attaching the Spinpod dolly mount
Lock the mount into place on the dolly, this will
enable you to connect the Spinpod to the dolly.
DO LL Y S Y S T E M - MO U NT ING
Attaching the Spinpod to dolly
Turn the thumb lock to connect the Spinpod to the dolly
Warning: Do not over tighten thumb lock
Attaching ball head mount to dolly (not included)
Screw mount onto dolly
Attaching snake mount to the dolly
Screw mount onto dolly
D O LL Y S Y S T E M - O PE RA T IO N
1. Lock Spinpod on dolly mount (device turns on)
Warning: Do not over tighten thumb lock
2. Select linear time-lapse mode (purple LED)
3. Swipe to select direction
4. Select rotation speed
5. Long press to start Spinpod (spins until stopped by the user)
6. Start time-lapse app on phone or start intervalometer on camera
A P P S T O R E & GOOGLE PLAY STOR E
TI PS FO R D O L L Y
Top 3 iOS time-lapse apps are:
1. Try to put the weight of the camera toward the
OSnap!, Timelapse & Lapse it
side where the Spinpod is mounted. This will make
sure the driving wheel always touches the ground
2. Do not use Spinpod to drive the dolly on ramp.
Even the moderate inclination (10 degrees) may
damage the internal gear of Spinpod.
3. Use Spinpod dolly mount as a handle to move the
dolly when taking regular videos.
4. Put the included rubber band around Spinpod to
keep it clean.
D I M E N S I O N & T ECH SPE CS
3 .7 5 I N .
Weight and Dimensions
Diameter: 3.75 inches (95 mm)
Depth: 0.7 inches (18mm)
0 . 7 IN .
Weight: 3.3 ounces (92 grams)
Dock
2.5 IN.
0 .5 I N .
2.5 inches x 0.5 inches (64mm x 13mm)
Fits iPhone 4s, 5 and most android phones
DOCK
Mounting adapter
Mounting adapter (included) for cameras and landscape mounts
MOUNT I N G ADAP T ER
Power source
Built-in rechargeable battery
Battery Life
Panoramic mode: 10 hours (~2000 panoramic photos)
Time-lapse mode: 100 hours
UI
Capacitive touch buttons and multicolor LEDs
Mounting
Tripod threading on bottom for mounting
T RI P OD T H READI N G
WAR N I N G S
• Do not over tighten thumb-wheel.
• Do not over tighten the mounting adapter.
• Do not leave the Spinpod charging overnight.
• Do not manually rotate the Spinpod disk.
• Avoid water entering internal structure of Spinpod. If it does, turn off immediately
and let sit for 48 hours.
T R O U B L ES H O O T I N G
• Ball-head mount is not fitting on dolly:
o Make sure the ball-head mount has a ¼” thread adapter installed and remove the
left and right ¼”-20 bolts from the dolly body.
• Dolly loses contact with ground and stops moving:
o Make sure the center of mass of the Dolly System and camera is centered over
the wheel being driven by the Spinpod. You can also wrap a rubber band
around the driving wheel to increase grip with the ground.
• Smart phone does not fit into Spinpod dock:
o Use a Landscape Mount (sold separately through www.thespinpod.com or
Amazon) with the included mounting adapter to mount larger phones and devices.
FAQ
• Where can I buy Spinpod Accessories?
o www.thespinpod.com
• What dollies does the Spinpod Dolly Mount work with?
o Currently the Dolly Mount only works with the dolly sold in our shop and the
dolly from iStabilizer. Contact us for tips on mounting Spinpod on other dollies.
• How do I pan and tilt with Spinpod?
o Using the Spinpod L-Bracket (sold separately) you can attach 2 Spinpods to
produce pan + tilt time-lapse photography.