1
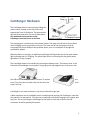
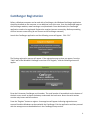
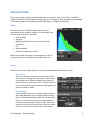
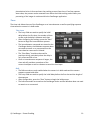
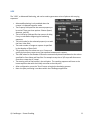
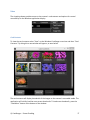
Windows User’s Manual Supports Windows 7 and 8 Computers 1 Table of Contents CamRanger Hardware ......................................................................................................................... 3 CamRanger Registration .................................................................................................................... 4 CamRanger Setup .................................................................................................................................. 5 CamRanger Windows Application .................................................................................................. 6 Status Bar ........................................................................................................................................................... 6 Recent Thumbnails .............................................................................................................................. 7 Main Image View ............................................................................................................................................. 7 Live View Images ............................................................................................................................................................. 7 Captured Images .............................................................................................................................................................. 8 Advanced Tabs ................................................................................................................................................. 9 Data ....................................................................................................................................................................................... 9 Focus ..................................................................................................................................................................................... 9 Timer ................................................................................................................................................................................. 10 HDR ..................................................................................................................................................................................... 11 Tripod Tab ....................................................................................................................................................................... 12 StackShot .......................................................................................................................................................................... 12 Camera Properties ....................................................................................................................................... 13 Exposure Compensation & Bracketing ............................................................................................................... 13 Camera Actions ............................................................................................................................................. 14 Capture .............................................................................................................................................................................. 14 Live View .......................................................................................................................................................................... 14 Movie Mode ..................................................................................................................................................................... 14 Auto / Manual Focus Toggle .................................................................................................................................... 15 Windows CamRanger Menu Bar .............................................................................................................. 15 Quitting, maximizing, and minimizing application ........................................................................................ 15 File ...................................................................................................................................................................................... 16 Connection ...................................................................................................................................................................... 16 View .................................................................................................................................................................................... 17 Help .................................................................................................................................................................................... 19 Incorporation with Lightroom or Capture One ....................................................................... 20 CamRanger Share .............................................................................................................................. 21 CamRanger Share Users ............................................................................................................................. 22 Tips & Troubleshooting ................................................................................................................... 23 Registration ................................................................................................................................................... 23 Connection ...................................................................................................................................................... 23 Speed ................................................................................................................................................................ 23 Commands ...................................................................................................................................................... 24 Images .............................................................................................................................................................. 24 CamRanger PT Hub and Tripod ............................................................................................................... 24 © CamRanger – Patent Pending 2 CamRanger Hardware The CamRanger device is turned on by sliding the power switch, located on the side of the unit, towards the front of the device. The green power light will illuminate when the unit is powered on. Any additional switch present on the CamRanger currently serves no function. The charging port is located next to the power switch. The male micro B end of the provided white charging cord is connected to this port. The other end of the charging cord can be connected to a female USB port that provides power, such as a computer or through the provided AC adapter. When the device is charging, an additional yellow light will illuminate next to the green power light indicating that it is charging. The yellow light will turn off leaving only the green power light when it is fully charged. The CamRanger battery is accessible by removing the bottom cover. The bottom cover is the side with the CamRanger serial number. Simply grasp the side edge/corner of the cover near the USB connector and pull back to remove. To replace the cover, first place the two lower tabs into the slots and then snap in the top. CamRanger is not water-‐resistant in any way and should not get wet. A black neoprene case is provided to assist in attaching and securing the CamRanger, note that this pouch is not waterproof. The case has a carabineer to facilitate hanging from a tripod, belt loop, etc. Do not just hang the CamRanger by the cable as it will put strain on the USB connectors as well as possibly disconnect. 3 CamRanger Registration Before a Windows computer can be used with a CamRanger, the Windows CamRanger application should be installed on the computer, at no additional cost to the user, from the downloads page on the CamRanger website, www.camranger.com/downloads. Once downloaded, the CamRanger application needs to be registered. Registration requires Internet connectivity. Before proceeding, confirm Internet connectivity (do not connect to the CamRanger network). Launch the CamRanger application and the following screen will appear. Click “OK.” The flowing registration pop-‐up will appear. If the registration pop-‐up does not appear, from the “Help” tab on the Windows CamRanger menu bar click “Register,” and the following screen will appear. Enter the 8-‐character CamRanger serial number. The serial number is located both on the bottom of the back cover as well as above the battery underneath the back cover. Note: the serial number contains only letters and NO numbers. Press the “Register” button to register. A message box will appear indicating registration was successful and the Windows can be used with the CamRanger. Exit the application and then proceed with the setup process as detailed below in the CamRanger Setup section. 4 If registration fails, confirm Internet connectivity and the CamRanger serial number before contacting [email protected] for assistance. CamRanger Setup Power on the CamRanger and confirm all four lights briefly appear. The CamRanger will take approximately 30 seconds until it is fully initialized. The first time the user connects to the CamRanger from a Windows computer, the computer needs to be registered. See the CamRanger Registration section above. Once registered, connect to the CamRanger WiFi network on the computer. The network name will be CamRanger-‐###, with the last three characters matching the last 3 characters of the CamRanger’s serial number. Enter the network password, which is the full 8 characters of the CamRanger’s serial number. The password MUST BE ENTERED IN ALL CAPS. Connect the CamRanger to the camera with the provided black USB cable. (Note: units purchased through retailers will have a USB mini cable, which will work with most cameras. A few select Nikons use a different cable, which may be purchased separately or the cable that came with the camera will also work) The male A end is inserted into the USB port at the end of the CamRanger, and the other end is connected to the USB port of the camera. Then ensure the camera is turned on. When the camera is connected and turned on, the green light closest to the edge of the CamRanger device will light. Launch the CamRanger Windows application. The application will connect to the CamRanger and the user will be able to control the camera. To attempt to manually initiate a connection, on the Windows CamRanger menu bar, click “Connection” and then “Connect.” For common problems with setup and connection refer to the Troubleshooting section at the end of the manual. © CamRanger – Patent Pending 5 CamRanger Windows Application Status Bar The Status Bar is located at the top of the application screen, below the CamRanger Menu Bar, and provides the user with a number of elements. From left to right: • • • Camera Model Name Lens Model Name (Note: not all cameras or lenses are supported) Shots Remaining: Indicates the number of shots currently remaining on the camera’s removable media using the current settings © CamRanger – Patent Pending 6 Recent Thumbnails • As images are captured, the thumbnails are automatically downloaded and displayed along the top of the screen. The thumbnails may be scrolled left and right when more are downloaded than can fit. • A thumbnail may be selected to view the corresponding image. The image is downloaded and displayed in the main image view. The currently selected thumbnail is indicated with a light grey box. • When both a JPG and RAW file format is captured, only the JPG thumbnail is displayed. • A small red “R” icon on the upper right of the thumbnail indicates that it is a RAW image. A small green “T” indicates TIFF, while no icon is used to indicate JPG formatted images. • Note: only thumbnails for images captured within the current CamRanger session will be displayed. Main Image View Live view and captured images are displayed within the main image view. Live View Images To initiate live view, click on the “eye” button located within the camera action controls on the bottom right of the application screen. In live view, the image on the screen is automatically updated as live view images stream in. The exact frame per second rate is very much dependent on CamRanger WiFi signal strength, the camera, and the Windows specs. However, assuming a good connection, live view frame rate will be about 7 – 18 fps. When in live view, the main image view may be clicked once to focus at that point. Note that for Canon cameras, the outer edges of the image cannot be focused upon. Double clicking will zoom in the viewing window and double clicking again returns to regular size. Canon cameras can display the live view image on the camera and Windows and allow the user to trigger images with the camera by activating the camera’s live view button after starting live on the CamRanger application. Nikon cameras do not allow any control of the physical camera while live view is active. © CamRanger – Patent Pending 7 Captured Images Captured images can be displayed in the main image view in one of two ways, by selecting a thumbnail in the thumbnails section of the application or through the Auto-‐View Images feature. The Auto-‐View Image feature is useful when capturing images from the camera and using the Windows application for image display. When this feature is selected, pictures will automatically display in the main image view screen. This feature can be turned on or off by selecting “View” on the Windows CamRanger menu bar and then “CamRanger Preferences.” For more information about this feature, refer to the Windows CamRanger Menu Bar: Setting-‐ Preferences section found on page 19. When a thumbnail is selected for viewing, the image will displayed on the main image view and can zoomed in at 50%, 100%, 200%, or fit to screen by selecting the magnification of interest below the image. The image can then be panned using the mouse. A histogram of the image may be viewed from the “Data” tab as described in the Advanced Tab-‐ Data section found on page 9. Turning on the histogram will generate a histogram for captures images. Images displayed in the main view are saved by default to the photo directory on the computer. For further saving options, including the ability to automatically save all pictures, refer to the Windows CamRanger Menu Bar: Settings-‐ Preferences section found on page 19. To view the images on the camera’s memory card select “View” on the Windows CamRanger Menu Bar and then “Card Contents.” A new window will appear displaying thumbnails of the images on the camera’s removable media. Double-‐clicking a thumbnail will download and display the image within the main image view. Additional features for downloading or deleting images are also available. For further information about the card contents, refer to the Windows CamRanger Menu Bar-‐ Card Contents section found on page 17. © CamRanger – Patent Pending 8 Advanced Tabs There are four tabs providing advanced information or controls: Data, Focus, Timer, and HDR. A Tripod or StackShot tab will appear as a fifth tap if the CamRanger is being used with the CamRanger PT Hub and a supported tripod head (the MP-‐360, Bescor, or Hague) or StackShot. Data The data tab shows an RGB histogram and meta-‐data associated with the captured image in the main image view. The following meta-‐data is provided: • Shutter Speed • Aperture • MegaPixels (Note this is not file size, but image resolution) • ISO • Metering Mode • Exposure Compensation Value Within live view the histogram can be toggled on or off. Of note, the histogram will reduce the live view frame rate. Focus The focus tab is only enabled during live view and provides advanced focusing controls. Focus Adjust There are two sets of buttons to move the lens’ focal plane nearer or further from the camera. Each set has three buttons with different sized arrows to specify a large, medium, or small step in focus. Tap the button to move the focus by a single increment, holding down the button will have no affect. Focus Stacking Focus stacking is a process of taking multiple captures with slight changes in focus and then post processing them to enhance the depth of field. This control allows the user to set the focus step size to take between in each shot and the number of shots to take. Each focus step will move the focal plane further from the camera. So the user will want to set the focus to the nearest © CamRanger – Patent Pending 9 plane desired to be in focus and start the stacking process from there. If too few captures were taken, the process can be restarted from where the initial stacking ended. Note: post processing of the images is not done within the CamRanger application. Timer The timer tab allows the use of the CamRanger as an intervalometer as well as specifying exposure times when the camera is in bulb mode. Time Lapse • The entry fields are used to specify the initial delay before the first shot, the number of shots to take, and the delay in between each shot. • After configuring the settings, press the “Start” button to begin the intervalometer process. • The intervalometer commands are stored on the CamRanger device, the Windows computer does not need to remain on or connected once the intervalomiter command is initiated. • The “Shot Delay” should not be used for precision timing, particularly when the delay is only a few seconds or less. • Once an intervalometer sequence is begun, the timer tab will provide a countdown of the current timelapse as well as a button to cancel the time lapse. Bulb • The Bulb controls are only enabled when the camera is in bulb mode and the camera supports remote bulb shots. • The entry fields are used to specify the initial delay before the first shot and the length of the exposure. • After configuration, press the “Start” button to begin the bulb process. • The bulb commands are stored on the CamRanger device and the Windows does not need to remain on or connected. © CamRanger – Patent Pending 10 HDR The “HDR”, or Advanced Bracketing, tab can be used to generate a series of photos with varying exposures. • Advanced Bracketing is only enabled when the camera is in Manual exposure mode. • The Property field specifies the camera property to be varied. There are three options: Shutter Speed, Aperture, and ISO. • The Initial Delay field specifies the amount of delay, if any, to take before beginning the bracketing sequence. • The initial value for the selected property is set with the Start Value field. • The total number of images to capture is specified by the Number of Shots field. • The possible Step Size values are up to 3 stops and specify by how many stops to vary the exposure between each capture. • The valid values for the Number of Shots are automatically determined based on the values specified for Start Value and Step Size. For example a step size of 1/3 stops will allow more shots than a step size of 3 stops. • The starting point of the bracket is the mid-‐point. The resulting sequence will start at the lowest exposure but with the initially set value as the mid-‐point. • After configuration, press the “Start” button to begin the bracketing process. • Note: the post processing is not done within the CamRanger application. © CamRanger – Patent Pending 11 Tripod Tab When the CamRanger PT Hub and MP-‐360 (or MP 101, Bescor, or Hague Tripod) are used with the CamRanger, a “Tripod” tab will appear including the following display. However, this tab will only be present with CamRanger firmware 6 and up. To update one’s CamRanger firmware, visit http://camranger.com/firmware-‐upgrade/ for further instructions on update. Within the app one can adjust the speed of the tripod movement, the direction of the movement. The direction arrow will highlight red when activated. StackShot Refer to the CamRanger StackShot user manual found at www.CamRanger.com/downloads for more information about using the CamRanger, CamRanger PT Hub, and StackShot macro rail system 12 Camera Properties The below image and bullet list indicates the camera properties that can be set using the application: • Auto Exposure • Shutter Seed Mode • Aperture • ISO • Metering Mode • Capture Mode • White Balance • Image Format • Focus Mode • Exposure Compensation and Bracketing Not all properties can be set for all cameras or in all modes. For example, for most Canon’s the auto exposure mode and focus mode cannot be set. Disabled properties are indicated with a darker button background. Exposure Compensation & Bracketing Clicking the exposure compensation and bracketing button will display the following control: Clicking the exterior arrows pointing to the left and right will adjust the exposure compensation. Holding down the arrow will move the exposure compensation to its respective limit. The two buttons at the middle control the bracketing amount. Clicking the arrows pointing in will reduce the bracketing amount, while pressing the arrows point outward will increase the bracketing amount. The bracketing is not set until the “Set” button is pressed. The “Close” button will dismiss the dialog. Pressing “Close” without pressing “Set” will effectively cancel any adjustments made. 13 Camera Actions Capture o The “Capture” button initiates the camera trigger. The exact camera behavior is dependent on the camera and camera properties, most importantly the capture mode. o For most capture modes, such as single, timer, or quiet, the button performs the image capture as expected. It should be noted that for some cameras, advanced modes such as remote or timer will behave as single capture mode. o Continuous capture mode differs between Nikon and Canon. § Nikon: After selecting a continuous drive mode a dialog is displayed allowing the user to select the number of images to capture. When the “Capture” button is pressed, that number of images will be captured. § Canon: When in a continuous mode, pressing and holding the “Capture” button behaves in the same way as pushing the physical trigger on the camera. o It is noted that there can be a very slight lag between the pressing of the “Capture” button and the image capture. The delay can be more pronounced while live view is active. For time critical applications, a remote trigger, such as an RF trigger, can be used in combination with the CamRanger. Live View o The live view toggle button is used to turn live view on and off. o When live view is on, the main image view is updated with live view images. o Note: running live view is relatively intensive and there may be slight performance lags in other areas. Movie Mode o The movie toggle button is used to turn live view on and off, but within movie mode. o When movie mode is on, the main image view is updated with the live images. o The “Capture” button changes to “Record” and pressing the “Record” button will start and then stop the recording of a movie. 14 o Note: movies cannot be downloaded to the Windows computer using the CamRanger. Auto / Manual Focus Toggle o The AF/MF Focus toggle button allows the user to change the focusing between auto and manual without having to physically adjust the camera. o This AF/MF adjustment is not possible for all cameras in all modes. For example, some Nikon cameras are required to be connected in “PC” mode, which is accessible by selecting “Connection” on the Windows CamRanger menu bar followed by clicking “PC”. o After any touch or incremental focusing while in live view, the focus mode will automatically attempt to switch to manual focus such that the user specified focus is not overridden by auto focus upon capture. Windows CamRanger Menu Bar The CamRanger menu bar located at the top of the Windows display contains many useful functions allowing the user to save and delete images, manage the connection, set preferences, view images, and get help. The following options are found within this toolbar. Quitting, maximizing, and minimizing application § § § Dash: Used to minimize the application window Rectangle: Used to maximize the application window X: Closes the application. © CamRanger – Patent Pending 15 File Individual images being viewed on the main viewing screen can be saved, shared to other devices which are using the CamRanger Share app, or deleted from the file dropdown menu. Connection • • CamRanger Connection: A state dependent “Connect” or “Disconnect” button is available to the user as a troubleshooting option to avoid closing the application in the case of connection problems. Nikon Connection Mode o PC: PC mode allows more control over properties within the CamRanger; however, certain properties changed are not maintained when the CamRanger is disconnected, and changing settings on the physical camera are not recognized. Additionally, the camera cannot be physically controlled such as triggering images with the camera’s shutter. o Camera: Allows the camera to be physically used as normal; however, not all properties will be enabled within the CamRanger. The CamRanger application must be set to Camera mode to allow physically triggering from the camera. o It should also be noted that the connection mode cannot be changed while live view is active. 16 View The view drop down provides access to the camera’s card contents and options for control accessibility for the Windows application display. Card Contents To view the card contents select “View” on the Windows CamRanger menu bar and then “Card Contents.” By doing this a new window will appear, as seen below. The card contents will display thumbnails of the images on the camera’s removable media. The application will initially load the most recent thumbnails. To load more thumbnails, press the “Load More” button at the bottom of the window. © CamRanger – Patent Pending 17 Any number of thumbnails can be selected by pressing a thumbnail, or all may be selected by pressing “Select All” at the bottom of the window. Selected thumbnails will have a grey border around them (as seen above, 2 images are selected). After selecting thumbnails they may either be deleted or saved. The “Delete” button at the lower left will delete the associated images of the selected thumbnails from the camera’s removable media when selected. The “Save” button at the lower right will save all associated images of the selected thumbnails to the image directory specified in the preferences. Images are saved regardless of format. Images within the card contents view can be viewed by double clicking on the image. The image will then appear in the main image view window. Note that the thumbnails are presented in chronological order beginning with the most recent. However, for Nikon they are grouped first by format, such that all JPG’s will be listed, then TIFF’s, and finally RAW images. Controls When the “Control” view is turned on, the camera settings and image capturing options are on the right hand side of the application. Turning the Controls view off, will hide these options. Thumbnails of the images captured within the CamRanger session will continue to appear on the upper portion of the screen, the main image view will show live view or captured images. Image Only When “Image Only” is selected, the advanced controls tab, camera properties, and camera actions on the right hand side of the application are hidden. The thumbnails of images taken within the CamRanger session will not appear on the upper portion of the screen. When “Image Only” is not selected, the advanced controls tab, camera properties, camera actions, and thumbnails are visible within the CamRanger application. © CamRanger – Patent Pending 18 Help The “Help” dropdown found on the Windows CamRanger menu bar is used to access user settings, registering CamRanger devices, and to access this help manual. Settings-‐ CamRanger Preferences The CamRanger preferences configure various user options related to saving, viewing, and sharing images, and setting view options. The preferences are accessed by clicking “Help” on the Windows menu bar and then selecting “Settings” on the dropdown. • • • Saved Image Directory: As images are captured they can be saved into a specified directory. If pictures from the camera’s memory card are downloaded to the Windows computer they will be stored in this folder. Note that all images displayed in the main view are saved by default to the photo directory on the computer. Custom Prefix: This will give the images taken during the session a unique title preceding the image number when saved to the card. Auto-‐Download Images: When this feature is selected, the images will automatically be saved to the directory during the CamRanger session regardless if the images are 19 • • captured from the computer or the camera. This does NOT result in the images being displayed within the CamRanger app. If shooting JPEG+RAW, only the JPEG files will be saved in the image directory. To save the RAW files on the computer, select the RAW images within the card content and select the download option. If shooting RAW only with Auto-‐download selected, the RAW files will be saved into the directory; note that this will slow down the performance of the CamRanger. Auto-‐View Images: This feature is useful when capturing images with camera and only using the application for image display. When this feature is selected, pictures will automatically pop-‐up in the main image view screen when captured. By default, the images will be saved as they popup in the main image view. If shooting JPEG+RAW, only the JPEG files will be saved in the image directory. To save the RAW files on the computer, select the RAW images within the card content and select the download option. File Name Overlay: When the file name overlay feature is selected, the associated image file name will be present when viewing images in the main viewing screen. Saving and Viewing Options Refer to the CamRanger Share section of this manual on page 21 for more information about the sharing features. Register By selecting “Register” within the “Help” dropdown the user can register a CamRanger. The user must be connected to the Internet to complete the registration. User Manual This user manual appears when the User Manual tab is selected. About The “About” tab is useful to determine what version of the CamRanger Windows application is on the computer. The first digits represent the CamRanger application version and the last digit represents the CamRanger unit’s firmware version. Incorporation with Lightroom or Capture One While camera control the CamRanger from within Lightroom or Capture One is not possible with the CamRanger, it is possible to have images automatically import into these third party programs. First, specify a folder to automatically download images to, refer to the Windows CamRanger Menu Bar: Setting-‐ Preferences section, on page 19, for saving options. This folder can then be set to as a “watch” folder within Lightroom or Capture One and set to automatically imported. © CamRanger – Patent Pending 20 CamRanger Share In order for the CamRanger Share feature to work, the CamRanger firmware must be updated to version 6 and up and the CamRanger software must be updated to the most recent version. When the photographer is in a CamRanger session, others can view images and live view on their personal iOS devices, Android devices, and/or Mac or Windows computer using the CamRanger Share application. The CamRanger Share application is free and can be downloaded from www.CamRanger.com/downloads. Individuals using the CamRanger Share app can only view images and live view when the CamRanger is connected and the main CamRanger user has enabled sharing from within the settings. The Windows Share settings, as seen below, can be accessed by selecting “Help” from the Windows menu bar followed by “Settings.” • • • • • Enable Sharing: This option turns sharing on or off. When sharing is disabled, no other devices with the CamRanger Share app will be able to connect. Sharing must be enabled in order for the Auto Sharing, Auto Share Thumbnails, and Share Live View settings to work. Auto Share Images: Any images viewed on the main screen by the CamRanger user will be shared with CamRanger Share users. Auto Share Thumbnails: All images captured will display as thumbnails on CamRanger Share devices when Auto Share Thumbnails is enabled. The CamRanger Share user can scroll through the pictures at his or her own pace. Share Live View: The CamRanger share user will be able to see the camera’s live view on their personal device when Share Live View is enabled and the main application is streaming live view.. Show Clients: The CamRanger user can see what devices are using the CamRanger Share application during the CamRanger session. Assuming that all devices have a good connection with the CamRanger, as the number of users increase, the performance decreases slightly; adding 1 second per shared device for each small JPG that is distributed is a good rule of thumb. Similarly, sharing live view with an additional 1 or 2 devices will not significantly degrade performance, but as more devices are added the frame rate will reduce. Additionally, a device with a very poor/slow connection can degrade the performance for everyone. The photographer using the CamRanger app can always temporarily turn off sharing to kick off all shared devices. As the number of users increases the there are © CamRanger – Patent Pending 21 practical performance limits. Depending on the scenario, practical maximums of 5-‐15 clients are typical. The amount of data being shared as well as the network strength to all of the clients dictates the practical maximum. If the CamRanger is only connected to the CamRanger network, the CamRanger Share app users will also need to connect to the CamRanger network, using the same password, however no registration is required. If the CamRanger is bridged to an existing Internet network, the Share app user can connect to the same Internet network that the CamRanger is connected to, and still use the Share app. Those using the share app should stay within range of the CamRanger or bridged network when using the app For more information about the CamRanger Share Application, refer to the CamRanger Share App User Guide Video (Note: this video is demonstrating the setup with an iPad, but the general concept and use with the Windows computer is the same). CamRanger Share Users The CamRanger Share app is free and available for download for the Windows on the CamRanger website, http://camranger.com/downloads/. Once the photographer has started the CamRanger session, the CamRanger Share user must connect to the CamRanger network from within the Windows computer network settings. Once connected to the network, the user can access the app and view the images that the photographer choses to share. Those using the share app should consult the photographer about the network connection and should stay within range of the CamRanger when using the app. © CamRanger – Patent Pending 22 Tips & Troubleshooting Below are some tips and troubleshooting for common questions or issues arranged by category: Registration • • • If the CamRanger Windows application is re-‐installed, the computer may need to be re-‐ registered. Most registration issues are due to not having Internet connectivity or entering the serial number incorrectly. If you still have issues, please email [email protected] for assistance. Connection • • • • • • • • • • Make sure CamRanger is fully powered on and initialized (it should take approximately 30 seconds). The power light and WiFi light should both be on. The password to connect to the CamRanger WiFi is the CamRanger serial number in all CAPS. If there are still issues connecting, turning the WiFi off on the Windows may help. If the CamRanger application is connected to the CamRanger device, but no camera is connected, it will attempt to connect to a camera approximately every 5 seconds. If the computer is outside of or near the edge of the range of the CamRanger hardware there will be connection problems. Disconnect and reconnect the CamRanger by selecting “Connection” on the Windows CamRanger menu bar then “Connect” to force a new session/connection. Power cycling the camera and CamRanger as well as restarting the application will completely refresh the connection. When the camera battery begins to get low, certain commands may start to fail or a connection may be refused. The CamRanger hardware can only be connected to a single Windows computer at a time. A second network connection, such as with an Ethernet cable, can cause connection failures. If there is an inconsistent or intermittent connection, the issue is often related to the USB connection. A different USB cable will often fix the problem. Speed • • The CamRanger has all the same distance and interference limitations as normal WiFi. Long distances and solid objects will slow the connection speed. The CamRanger application can handle very large image files. However, waiting for those files to transfer from the camera and then over WiFi can be time consuming. A common operating mode is to shoot RAW along with a small or medium sized JPG. 23 • Newer and faster Windows computers do perform better overall, particularly for intensive tasks such as showing the 100% resolution images. Commands • • • • • • Depending on the camera and the mode, capture can fail if the camera fails to acquire focus. Intervalometer and Bulb commands are stored on the CamRanger hardware such that the Windows computer does not need to remain on and connected. When an operation, command, or setting is not available or not working the issue is often related to the camera setup. For example: o Toggling to AF is disabled if the camera lens switch is set to MF. o Live view will fail on Canon cameras if Live View Shooting is disabled in the camera’s menu. o Capture fails because the removable media on the camera is full. For Canon cameras, the Live View focus mode within the camera’s menu must be set to “Live View”. Adjusting or viewing the number of bracketing shots is not currently supported. The display assumes three shots. However, if the number of shots is actually 2, 5, 7, 9, etc. the bracket amount is still correct it will just incorrectly display 3 shots. Some features are simply not supported by some cameras. For example continuous capture mode is not supported on the Canon 40D and many older Nikons do not support bulb shots. See the camera capability matrix at www.CamRanger.com for more detailed information. Images • • The thumbnails are not downloaded until after the image has been recorded to the camera’s card. On most cameras this is relatively quick. However, depending on the camera, speed of removable media and number of shots taken in succession, there can be a lag. CamRanger can be used to view and download pictures captured through other means. So a photographer could be capturing images, or a RF or light trigger could capture images and the CamRanger application would automatically download the thumbnails. CamRanger PT Hub and Tripod • • • • The CamRanger Tripod tab will only be present with CamRanger firmware 6 and up. To update one’s CamRanger firmware, visit http://camranger.com/firmware-‐upgrade/ for further instructions on update. If the tripod head becomes unresponsive, securely reconnect the serial connector to the tripod head. The speed of the tripod may vary depending on the weight of the camera and battery life of the tripod head. When using the CamRanger PT Hub, the CamRanger battery will drain more quickly. © CamRanger – Patent Pending 24