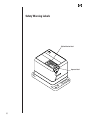
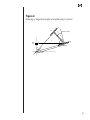
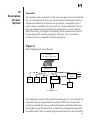
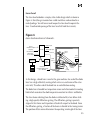
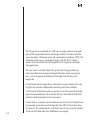
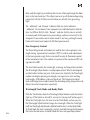
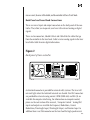
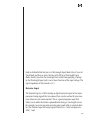
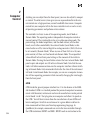
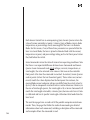
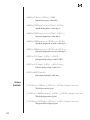
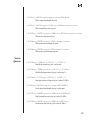
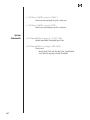
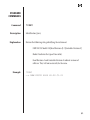
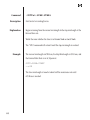
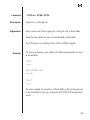
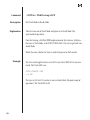
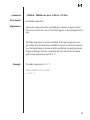
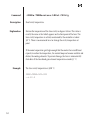
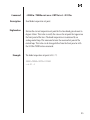
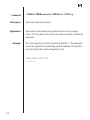
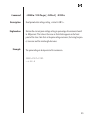
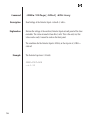
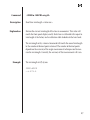
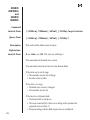
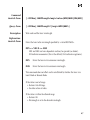
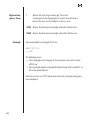
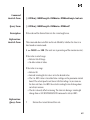
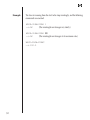
1
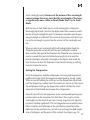
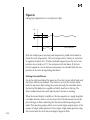
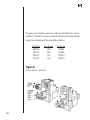
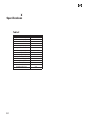
Model 6265 User’s Manual
The External-Cavity
Tunable Diode Laser
Patent No. 5,319,668
CAUTION: Use of controls or adjustments, or performance
of procedures other than those specified herein,
may result in hazardous radiation exposure.
Contents
620221 Rev. D-NFI
2
I
User Safety
3
II
Introduction
5
III
Description of Laser System
11
IV
Manual Operation
15
V
Computer Control
26
VI
Command Summary
34
VII
Error Codes
78
VIII AC Operating Voltages
79
IX
Service and Support
81
X
Specifications
82
Is a registered trademark of
New Focus Inc.
I
User
Safety
Your safe and effective use of this product is of utmost importance to us at
Focused Research. Please read the “Laser Safety Warnings” before attempting
to operate the laser.
Note: To completely shut-off power to the unit, unplug it from the wall.
Table 1
Model
Max Power
Wavelength Range
6265
10mW
2005–2060 nm
Table of maximum internal power and possible wavelength range.
Laser Safety
Warnings
Note: The user will NEVER need to open the laser head. Contact Focused
Research if, for some reason, you want to open the laser head.
Unauthorized opening of the laser head will void the warranty,
and may result in misalignment of the laser cavity and/or irreparable damage
to the internal components. Diode laser power at the wavelengths shown in
the table above could be accessible in the interior of the laser head.
The laser radiation emitted from this unit may be harmful. Avoid direct exposure to the laser beam. The safety labels shown on the following page are
attached to this product.
3
Safety Warning Labels
ID/Certification Label
RE
SU
PO
ID
EX
N
O
IATI
AD
R R THIS
SE
LA OM
LE FR RE
ISIB TED
INV EMIT PERTU
A
O
AV
4
Aperture Label
II
Introduction
The Focused Research 6265 series External-Cavity Tunable Diode Laser is a
stable, narrow-linewidth source of tunable light. The 6265 series laser can be
operated manually from the front panel of the controller or remotely using
computer control.
In this section we’ll describe the key features of the 6265 series and explain
some of the theory of external-cavity diode laser design. In Section III (page
11) we give a thorough description of each part of the 6265 system. Section IV
(page 15) covers manual operation, while Section V (page 26) goes over
computer control of the laser system. Section VI (page 34) has detailed explanations of the computer-control commands, and error codes are listed in
Section VII (page 78). The AC operating voltages of the controller are detailed
in Section VIII (page 79), and service and support are described in Section IX
(page 81). Finally, a table of specifications is given in Section X (page 82).
Features
The 6265 series laser incorporates a simple, stable mechanical design with a
minimum number of optical components. Low-noise analog circuits precisely set critical operating parameters, such as diode temperature and current.
Digital control facilitates remote operation and computer interfacing.
The 6265 is a modular system. The same control unit will work with any
6265 series laser head. The control units work in both manual and remotely
programmed modes and are compatible with RS-232 and GPIB addressing.
We’ve incorporated Picomotor technology in the laser head to bring you
hands-free wavelength scanning capability. You set the start and stop wavelengths and scanning speed and the microprocessor-controlled Picomotor
takes care of the rest. The unique cavity design assures continuous tuning
with minimal mode hopping.
5
Five LED digital readouts display important operating parameters including
wavelength and diode temperature. Inputs are available for low-speed (1-MHz)
and high-speed (100-MHz) diode current modulation.
Theory of Design
The 6265 series tunable lasers take advantage of the broad gain bandwidths
available in semiconductor-diode lasers. Most tunable lasers use liquid organic dyes for gain. These dyes are notoriously messy, toxic, and difficult to use.
The all solid-state diode laser design, by comparasion, is compact, clean, and
efficient.
In addition to being widely tunable, the 6265 series lasers offer narrowlinewidths. This is accomplished by using a laser-cavity design that began at
the Massachusetts Institute of Technology [see refs. 1-6]. The original inventors had dye lasers in mind when they worked out their cavity; we have adapted the design to diode laser gain media.
Our version of the laser cavity is shown in Figure 1. A high-reflection coating
on one end of the diode laser forms one end of the cavity and a high-reflecting
tuning mirror forms the other. Starting from the diode the beam in the cavity
passes through a collimating lens and then strikes a diffraction grating at
near grazing incidence. The beam is diffracted toward the tuning mirror
which reflects the light back on itself for the reverse path. Part of the light
6
Figure 1.
Photograph of the laser head with cover removed.
End Mirror
PZT
Diode Laser
Grating
Collimating Lens
Picomotor
Angle Sensor
from the diode is reflected, not diffracted, by the grating. This portion forms
the output beam.
The grating functions as a narrow spectral filter. Its passband is only a few
gigahertz wide. The high wavelength selectivity results because many lines of
the grating are illuminated by the grazing-incidence beam and because the
beam is diffracted by the grating twice in each round trip through the cavity.
The grating spectral filter is narrow enough to force the laser to operate in a
single longitudinal mode.
7
Different wavelengths diffract off the grating at different angles. However, only
one wavelength leaves the grating in a direction that is exactly perpendicular
to the surface of the tuning mirror forming the resonant laser cavity. This is
the lasing wavelength, because it’s the only one that will survive for many cavity round trips. It follows then, that we can tune the laser by changing the angle
of the tuning mirror.
There is one very important innovation that gives us true continuous tuning
with a minimum of mode hops. In order to stay in one mode as we tune the
laser, the number of waves in the cavity must be kept constant (even though
the wavelength of the light in the cavity is changing).
The number of waves in the cavity is maintained by having the tuning mirror
rotate around a specific pivot point. The pivot point creates a relationship
between the cavity length and the laser wavelength. The laser wavelength is
set by the standard law for diffraction of light off a grating:
λ = Λ( sinθ i + sinθ d ) .
Λ is the spacing between grooves in the grating while θ i and θ d refer to the
incident and diffracted angles of the laser beam measured from a line normal
to the surface of the grating.
The length, D, of the cavity can be broken into two parts l1 and l2 . (See
Figure 2). If we call the distance from the pivot point to the place where the
beam strikes the grating L, we can see from the figure that:
l1 = L sinθ i and, l2 = L sinθ d .
Therefore, the total cavity length is L( sinθ i + sinθ d ). Dividing the total cavity
length by the wavelength, shows that the total number of waves in the cavity
is L/Λ which is a constant. This translates into a tunable laser with no mode
hops. That’s the basic theory behind the cavity design. In the next section
we’ll show how the theory is put into practice by describing the components of
the 6265 series laser system.
8
Figure 2.
Drawing of important angles and optimum pivot point.
HR
Normal to grating
θd
l2
θi
l1
Diode
laser
θi
Grating
θd
L
Pivot Point
9
References
[1] M. G. Littman and H. J. Metcalf, “Spectrally narrow pulsed dye laser without beam expander,” Applied Optics, vol. 17, p. 2224–2227, 1978.
[2] M. G. Littman, “Single-mode operation of grazing-incidence pulsed dye
laser,” Optics Letters, vol. 3, p. 138–140, 1978.
[3] K. Liu and M. G. Littman, “Novel geometry for single mode scanning of
tunable lasers,” Optics Letters, vol. 6, p. 117–118, 1981.
[4] M. G. Littman, “Single-mode pulsed tunable dye laser,” Applied Optics,
vol. 23, p. 4465–4468, 1984.
[5] K. C. Harvey and C. J. Myatt, “External-cavity diode laser using a grazingincidence diffraction grating,” Optics Letters, vol. 16, p. 910–912, 1991.
[6] T. Day, F. Luecke, and M. Brownell, “Continuously tunable diode lasers,”
Lasers and Optronics, p. 15–17, June 1993.
10
III
Description
of Laser
System
Controller
The controller’s job is to provide a stable, low-noise power source for the diode
laser, set the temperature in the laser head, command wavelength scanning,
and provide readouts of all relevant laser parameters. Conceptually, the circuitry inside the controller is built in two layers: analog and digital. The analog layer incorporates low-noise design for temperature, current, and wavelength fine tuning. The digital layer includes all the readouts and circuits to
set operating points and scan parameters. This layer acts as an interface
between you (or your computer) and the analog layer.
Figure 3.
Block diagram of circuit boards.
User Inputs
Local Control / Panel / LEDs
Mother Board
RS-232
I
Board
T
Board
PZT
Board
Laser Head
Microprocessor
Board
GPIB
Pico
Board
Laser Radiation Out
The analog layer consists of four printed circuit boards: the current board, the
temperature board, the piezoelectric-transducer (PZT) driver board which
controls wavelength fine tuning, and the Picomotor control board for coarse
wavelength tuning. The digital layer includes the microprocessor board and
the mother board. There is another digital circuit board in the laser head that
11
contains information specific to each laser head such as a wavelength-calibration table and the laser-head serial numbers.
The current board is a low-noise, analog, DC-current supply which provides
up to 150 mA of current of either positive or negative polarity to the diode
laser. The AC ripple in the output is less than 0.4 µA RMS. If desired, the current supply can be modulated up to 1 MHz through a BNC jack on the rear
panel of the controller. For proper operation, use only with a cable shorter
than three meters.
The temperature board controls the laser temperature by supplying current to
thermoelectric (Peltier) elements in the laser head. Precise temperature control is achieved through the use of a two-stage system. One thermoelectric element maintains the overall temperature of the laser cavity while another is
specifically dedicated to the diode temperature within the cavity. In this way
the laser temperature is stabilized to within plus or minus one millikelvin,
while the temperature of the surrounding environment stays constant to within plus or minus 10 millikelvin.
The PZT driver board supplies 0–120 Volts to a piezoelectric fine-tuning element in the laser head. Using the PZT system you can tune the wavelength
smoothly with sub-angstrom precision.
The Picomotor board controls the Picomotor which provides coarse wavelength control and scanning. A Picomotor is a patented design that uses a
piezo to turn a screw. In this case the screw controls the tilt of the tuning mirror in the laser head. Picomotor driven screws are available from New Focus
for a variety of other applications as well.
The microprocessor board tells all the other boards what to do, runs the digital displays, and provides RS-232 and GPIB interfacing capability. It also
communicates with the circuit board in the laser head to determine what
kind of laser head it is and to upload the wavelength-calibration table.
Finally, the mother board is the interface backplane for all the boards and
also drives the LED displays.
12
Laser head
The laser head embodies a simple, ultra-stable design which is shown in
Figure 4. Everything is mounted on a solid metal base and enclosed in a
sealed package. You will never need to open the laser head to operate the
laser. Unauthorized opening of the laser head will void the warranty.
Figure 4.
Laser head mechanical schematic.
Detector Input
Current
Modulation Input
Frequency
Modulation Input
Controller
Wavelength Input
Picomotor
Wavelength
Sensor Output
,
,
Tuning
Mirror
Power
Monitor
PZT
GPIB/RS-232
Remote
Local
Front
Panel
Controls
High-Speed
Current Modulation Input
(up to 100 MHz)
Angle
Sensor
HR
Diode
Laser
Temp.
Co
Curren nt.
t Cont.
Control In
Lens
AR
Coating
Diffraction
Grating
Output
Beam
In this design, a diode laser is used as the gain medium. One end of the diode
laser has a high reflectivity coating which acts as an end mirror of the external-cavity. The other end of the diode has an antireflection coating.
The diode laser is bonded to a temperature sensor and a thermoelectric-cooling
block which maintains the diode temperature constant to within 1 millikelvin.
The laser beam radiating from the diode is collimated by a lens before striking a high-quality diffraction grating. The diffraction grating is precisely
aligned at New Focus and its position is fixed with respect to the diode. From
the diffraction grating, a fraction of the beam is directed to the tuning mirror.
The position of this mirror determines the operating wavelength of the laser.
13
The tuning mirror is mounted on a stiff arm. An angle sensor near the pivot
point of the arm provides data for wavelength readout. The other end of the
arm is moved by a Picomotor screw and a piezoelectric transducer (PZT). The
Picomotor makes coarse wavelength changes while the PZT is used for
micron scale movements which corresponds to sub-angstrom wavelength
tuning precision.
The laser cavity is carefully adjusted to give the best tuning performance
when tuned from short to long wavelength. Therefore, when scanning the
laser it is best to approach the desired wavelength from the short wavelength side.
A small fraction of the output beam is directed to a power monitor. The reading from this monitor is displayed on the front panel of the controller.
On the outside of the head enclosure you will see an SMA connector for highspeed current modulation. The use of this feature is described in Back Panel
and Laser Head Connections in the next section.
Finally, there is a monitor strip that indicates how many hours the diode laser
has operated. A new laser head will typically show 100-15O hours due to factory burn-in. The red monitor bar will slowly make its way across the window.
It will reach the other side when 5000 hours have elapsed.
14
IV
Manual
Operation
Using the Front Panel
Before you start, make sure the controller is plugged into a wall socket and
your laser head cable is plugged into the back of the controller. The cable has
two plugs on it which fit into the sockets marked “Cable A” and “Cable B.”
Make sure you have the head pointed in a safe direction, and check that the
AC power input connector is configured for the correct line voltage. (See
Section VIII , page 79 for information about the AC power input to the controller.)
Turn on the AC power with the key switch on the left-hand side of the front
panel. The calibration table, GPIB address, baud rate, laser-head serial numbers, and other pertinent operating information stored in an EEPROM in the
laser head are uploaded to the controller. The LED displays will show the
model number, head software revision number, and controller software revision number. After a few seconds the display will become active.
Figure 5.
Front panel of laser controller.
External-Cavity Tunable Diode Laser
6200
Made in USA
Addressed
Remote
Piezo Voltage
Laser Power
Wavelength
Temperature (°C)
Start
λ
I
Stop
Local
AC PowerC Power
Scan Speed
Wavelength
Adjust
Current (mA)
Scan
Track
0
Power (mW)
Temp
°C
Cavity
Trigger
Temperature
Adjust
NEW FOCUS, Inc.
Current
Adjust
The top half of the front panel contains all the indicators and readouts while
the lower half has control knobs to adjust operating parameters.
The AC Power key switch is the “on-off” for the whole unit including the laser
head. When you push the Laser Power button, it flashes for a 5-second safety
15
delay and then lights up to indicate that current is flowing through the diode
laser in the laser-head unit. This allows you to set up all the desired operating
parameters with the AC Power on but before you actually start generating
light.
The “Addressed” and “Remote” indicator LEDs are status indicators.
“Addressed” lets you know if your computer has established contact with the
laser via GPIB or RS-232 while “Remote” indicates that the laser is actually
in remote mode with temperature, piezo voltage, and laser current set by the
computer. If you need to cancel remote mode at any time, pushing the Local
button will restore local mode with full front panel control.
Fine Frequency Control
The Piezo Voltage knob and readout are used for fine (sub-angstrom) wavelength tuning. A piezoelectric transducer (PZT) is used to make adjustments
in the tuning mirror angle that are too small to make by Picomotor control
of the micrometer screw. The readout is in percent of the maximum PZT voltage from 0 to 100%.
The next block contains the wavelength, scanning, and temperature controls.
The Wavelength Adjust knob is a multipurpose control. What it does depends
on which other buttons you press at the same time. Similarly, the Wavelength
readout can display operating wavelength, scan speed, scan start and stop
wavelengths, GPIB address, and serial baud rate. The Temperature Adjust
knob and Temperature readout control the desired operating temperature and
display the actual temperature respectively.
Wavelength Track Mode and Ready Mode
16
Push the Track button above the Wavelength Adjust knob to make the button
light up. (If the button is already lit, you can try turning it off and on again.)
When the Track light is on, the laser is in the Track Mode, and you can use
the Wavelength Adjust knob to change the wavelength. When the Track light
is off, the Wavelength Adjust knob is disabled and the laser is in the Ready Mode.
In Track Mode the laser wavelength is actively controlled using the Picomotor
that turns the end mirror. In Ready Mode the laser runs open loop without
active wavelength control. Because of the nature of the wavelength
control scheme however, note that the wavelength of the laser
is significantly more stable in Ready Mode than it is in Track
Mode.
With the laser in Track Mode you can set the wavelength by rotating the
Wavelength Adjust knob. Note that the display shows 0.01 nanometer resolution for setting wavelength but only 0.1 nanometer resolution once the operating wavelength is established. This is because the precision with which you
can set the wavelength is greater than the accuracy of the wavelength readout.
When you select a new wavelength with the Wavelength Adjust knob, the
Picomotor moves the end mirror until the new wavelength is reached.
Because of the slow speed of the Picomotor, the Picomotor may continue to
scan for a period after you have finished scanning the laser to reach the
desired wavelength, setting the wavelength on the display. From inside the
laser head you can hear the Picomotor’s characteristic whining or clicking
sound as it moves the mirror.
Setting the Temperature
To set the temperature, hold the multipurpose (scanning and temperature)
paddle switch to the left of the Temperature Adjust knob up, toward “Diode.”
While you are still holding the switch up, turn the Temperature Adjust knob
until the Temperature readout shows the number you want to set. After you let
the multipurpose switch go, the Temperature readout will show the actual
temperature which should soon become the set temperature.
Normally you will leave the temperature at the recommended operating temperature shown on the Acceptance Test Data Sheet. There may be certain
wavelengths near the limits of your laser’s tuning range where the light output power will drop significantly. This can happen because of residual etalon
effects caused by small reflections at the antireflection coated facet of the
diode laser. In this particular case, you will want to change the diode temperature a few degrees, and the power will be restored. (See Figure 6, pg. 18)
17
Figure 6.
Changing temperature to avoid power dips.
POUT
2-20%
~2 °C
Diode Temperature
Press the multipurpose (scanning and temperature) paddle switch down to
check the cavity temperature. The cavity temperature is factory set and actively regulated to about 30°C. If either the diode temperature or the cavity temperature rises as high as 35°C, the instrument will shut down. If the laser
head is exposed to a severe thermal environment, you should check the temperatures to be aware of impending shut-down.
Setting Current/Power
On the far right hand side of the panel you’ll see the Current Adjust knob and
the Power and Current readouts. The current is set with the Current Adjust
knob. Do not worry about setting the current too high; the controller knows
the limits of the diode laser regardless of which head you’re driving. The
Power readout shows how much optical power the laser is emitting.
When the current display is solidly on, the laser operates in a single longitudinal mode. However, above a certain current level, the front panel current display will begin to flash, indicating that the laser could be operating multimode. This operating regime allows you to access higher output powers at the
expense of single-mode operation. If you require single mode operation, keep
the current below the level where the display begins to flash.
18
At this point you have a basic knowledge of how to use the laser. You know
how to turn it on, change its wavelength and temperature, and adjust the
power output.
If you have a way to monitor the laser wavelength with sub-angstrom precision, you will be able to see the effect of the varying the Piezo Voltage control.
Try turning it while the laser is in Ready Mode. You should be able to see the
wavelength change smoothly over as much as a few angstroms. If you adjust
the Piezo Voltage control when the laser is in Track Mode, the Picomotor will
counter the piezo motion and try to keep the laser wavelength constant.
Scanning
Once you have had a chance to test out the basic operation of the laser, you
are ready for wavelength scanning.
The laser cavity is carefully adjusted to give the best tuning performance
when tuned from short to long wavelength. Therefore, when scanning the
laser it is best to approach the desired wavelength from the short wavelength
side.
Coarse wavelength scanning is performed with the Picomotor inside the laser
head that controls the angle of the end mirror. Please note that the
Picomotor lifetime is finite. A Picomotor has a total integrated lifetime
of approximately 200 hours, if operated at its maximum speed. This means
that a Picomotor can run at its maximum speed for a total of 200 hours. (If
operated at a lower speed, the lifetime is proportionately longer.) Therefore, to
prolong the life of the Picomotor inside the laser head, it’s a good idea to
avoid unnecessary wavelength scans.
Setting the start and stop wavelengths
Press the multipurpose (scanning and temperature) paddle switch up toward
Start and hold it there. The Wavelength readout changes when you do this to
show you the starting wavelength for scanning. You can now change the
start-of-scan wavelength by turning the Wavelength Adjust knob (Note: keep
holding the multipurpose switch up.)
19
Setting the end-of-scan wavelength is just as easy as setting the starting wavelength. This time you hold the multipurpose switch down toward Stop while
you use the Wavelength Adjust knob to change the stop wavelength. The laser
will scan in whichever direction you set it. The stop wavelength can be larger
or smaller than the start wavelength.
Setting the scan speed
The next step is to set the scanning speed. If you hold the Scan Speed switch
up you will see a number between 1 and 100 on the Wavelength readout. This
number is the scanning speed from the start wavelength to the stop wavelength. The units are relative; 100 means the fastest possible speed while 1 is
the slowest. Experiment to find the best number. To set the scan speed, turn
the Wavelength Adjust knob while holding the Scan Speed switch up. The
return scan (stop to start) speed can also be set, while holding down the Scan
Speed switch.
Performing a scan
To start a scan, push the Scan button. If the laser was in Track Mode the
Track LED will turn off. If the laser is at the start wavelength, it will begin
scanning at the scan speed. Otherwise it will go to the Start wavelength at the
return scan speed and wait. Push the Scan button again and the laser will
begin scanning. When the laser arrives at the Stop wavelength it will stop and
wait there. If you push the Scan button again, the laser will reset to the Start
wavelength.
There is a Trigger jack (SMB-type connector; an SMB to BNC adapter is supplied with the laser) under the Scan Start/Stop switch. Voltage at this input
rising above 3 V and returning to zero is equivalent to depressing and releasing the Scan button.
Stopping a scan
If you push the Scan button in the middle of a scan or a reset, it will stop,
leaving you in Ready Mode. If you push the Track button in the middle of a
20
scan or a reset, the scan will be halted, and the controller will be in Track Mode.
Back Panel and Laser Head Connections
There are several input and output connectors on the back panel of the controller. They allow you to operate your laser with external analog or digital
signals.
There are two connectors, labeled Cable A and Cable B for the cables that go
from the controller to the laser head. Cable A carries analog signals to the laser
head while Cable B carries digital information.
Figure 7.
Back panel of laser controller.
An Interlock connector is provided for external safety systems. The laser will
not emit light unless the Interlock terminals are shorted. Five BNC connectors
are provided for external analog control. GPIB (IEEE-488) and RS-232 are
available for computer interfacing. For information on computer control,
please see the next section of the manual, “Computer Control.” Analog BNC
inputs and outputs are available for Frequency Modulation, Current
Modulation, Wavelength Input, Wavelength Output, and Detector Input. In
addition there is an SMA connector on the laser head for high-speed current
21
modulation. In the rest of this section we’ll describe how each of these inputs
and outputs works in detail.
Frequency Modulation Input
The Frequency Modulation input is for external analog control of the PZT
voltage. It is useful for making fine-frequency adjustments and for FM spectroscopy. Sweeping the Frequency Modulation input from -3 V to +3 V corresponds to changing the laser frequency by a laser specific amount on the
order of -30 GHz to +30 GHz. This fine-frequency range varies from laser to
laser; see the technical specifications of your particular laser for the actual
tuning range. The Frequency Modulation input will accept signals from DC to
2 kHz (3-dB rolloff point).
Increasing voltage at the Frequency Modulation input corresponds to a
decrease in piezo voltage and an increase in laser frequency (or a decrease in
laser wavelength). This decrease in piezo voltage is effectively subtracted from
the front-panel knob setting, and the front-panel display reads the result.
Current Modulation Input
The Current Modulation input allows you to modulate the diode current as
fast as 1 MHz. This input accepts -10 to +10 volts into a DC-coupled 5 kΩ
resistive load and provides 0.2 mA/V modulation. This input is summed with
the front-panel setting. Note that the front panel current read-out does not
reflect the modulation input.
High-Speed Current Modulation
For high-speed current modulation up to 100 MHz, an SMA jack on the laser
head is provided. This input is AC coupled; the low- and high-frequency rolloff points are 50 kHz and about 100 MHz. The current modulation provided
by this input is approximately 20 mA/V. To prevent damage to the diode laser,
the voltage swing on this input must be less than 1 Vp-p.
22
WARNING: THIS IS A DIRECT RF CONNECTION TO THE DIODE
LASER, AND IMPROPER USE COULD DESTROY THE DIODE
LASER. DO NOT EXCEED 1 VOLT PEAK-TO-PEAK INPUT. AVOID
STATIC DISCHARGE.
Since this is a direct connection to the diode laser, there is no current limiter
that prevents too much current from passing through the diode. Thus, there
is a danger of destroying the diode laser if the maximum current is exceeded.
Be sure that the current modulation applied to the diode laser will not result
in driving the diode laser above its maximum current. (See included Data
Sheet.)
The high-speed input has a protective shorting cap which should remain in
place in normal operation. When removing the shorting cap to connect an
high-frequency driver, be sure to wear a ground strap to prevent static discharge. Please contact New Focus if you have any questions on how to use the
high-speed modulation input.
Wavelength Output
The Wavelength Output BNC jack provides a signal from 0 to 10 V that corresponds linearly to the laser output wavelength. This connection has 3-kΩ
output impedance. Zero volts are output at the minimum operating wavelength for the laser head connected to the controller. The voltage increases
with wavelength according to the equation:
V = f ⋅∆λ ,
where ∆λ is in nanometers and the parameter f depends on the particular
laser center wavelength. Typically, f is between 0.2 and 1 V/nm. See the
Acceptance Test Data Sheet for the particular Wavelength Output characteristics of your laser.
Wavelength Input
The Wavelength Input jack is for coarse analog control of the wavelength. For
example, you could use it for your own analog wavelength scanning control.
The DC signal that you apply to the Wavelength Input is injected directly into
23
the wavelength control loop. You can scan it as fast as the fastest internally
controlled scan. If your analog control signal is not too noisy you should be
able to control the wavelength in angstrom or even sub-angstrom increments. Note however, that if you don’t have a quiet analog control voltage,
this mode of operation has less wavelength stability than Track Mode.
If you want to use the Wavelength Input jack you must first place the laser in
Wavelength Input Mode. To do this you must first be in the Track Mode. Then
push both front-panel paddle switches (scan speed and wavelength-temperature multifunction) up at the same time. The wavelength display will show
all ones (111111) and the Track light will begin to flash on and off. The laser
will immediately begin changing to the wavelength which corresponds to the
voltage at the input. Note that an unconnected wavelength input corresponds
to zero volts and a mid-range wavelength. The Wavelength Input jack accepts
DC signals between -15 and +15 V. However, the voltages that correspond to
the maximum and minimum wavelength vary from laser to laser. That is, the
voltage corresponding to the maximum wavelength is less than +15 V, and
the voltage corresponding to the minimum wavelength is greater than -15 V.
If, for example, the maximum voltage is exceeded, the diode laser will tune to
its maximum wavelength and stop. Then, the wavelength readout will flash,
indicating you have exceeded the maximum input voltage. The laser will
then be kicked out of Wavelength Input Mode into Track Mode. The same
thing happens if you input a voltage less than the voltage corresponding to
the minimum wavelength. To stop the flashing, either hit the local button or
use the wavelength control knob to shift the wavelength a few angstroms off
the edge.
To exit Wavelength Input Mode, push the two paddle switches down at the
same time. The LED will stop flashing, the wavelength will remain where it is,
and the controller will return to Track Mode. Note that the wavelength control
24
knob is disabled while the laser is in Wavelength Input Mode. Also, if you exit
Track Mode and then re-enter, the laser will still be in Wavelength Input
Mode. Finally, note that the wavelength that results from applying a voltage
to the Wavelength Input jack is not a linear function of the input voltage. The
input impedance of this control is 5 kΩ.
Detector Input
The Detector Input is a 10-bit analog-to-digital converter input to the microprocessor. Analog signals that you connect here can be read out by your computer when you use remote control. This is a general-purpose input that
allows you to collect data from a photodetector during a wavelength scan or
for example, to create your own constant-power mode with an external detector. The Detector Input will accept signals from 0 to +5 volts and presents a
10-kΩ load.
25
V
Computer
Control
Anything you can adjust from the front panel, you can also adjust by computer control. The 6265 series system gives you an unprecedented level of external control over a high precision, narrow bandwidth laser source. Computer
control lets your computer talk to the laser controller to set or read a variety
of operating parameters and perform certain actions.
The controller is always in one of two operating modes, Local Mode or
Remote Mode. The operating mode is independent of computer control or
manual control. The wavelength can be set in either operating mode. The
piezo voltage, the diode temperature, and the diode current, on the other
hand, are all either controlled by the external knobs (Local Mode) as discussed earlier or all by internal digital-to-analog converters (DACs) that can
be set remotely (Remote Mode). When any one of these DACs is set by computer control, all three are then forced into Remote Mode. The unspecified
values default to their front-panel settings at the moment of the switch to
Remote Mode. Pressing the Local button returns the laser to Local Mode. Back
panel inputs and outputs are still active in Remote Mode. Note that the controller will allow communication over the computer interface without switching to Remote Mode. Only commands which alter the state of the instrument
will send it into Remote Mode. For example, you can use a computer to monitor all laser operating parameters while manually changing the wavelength
from the front panel.
GPIB
GPIB stands for general purpose interface bus. It is also known as the IEEE488 standard. GPIB is a standard protocol for personal computers to communicate with laboratory instruments and several manufacturers make printed
circuit board “cards” that plug into your computer and allow it to speak on
the GPIB. You will have to learn from the manufacturer of your GPIB card
how to configure it to talk to an instrument at a given address and how to
issue commands to it from your favorite programming language. In
QuickBasic, for example, commands are sent to the laser controller through
the GPIB instructions IBWRT and IBRD. IBWRT sends an instruction to the
26
controller; IBRD reads the controller’s response to the command. Examples of
controller responses are “OK” or “772.3”.
Setting the GPIB address
To set the laser controller’s GPIB address, the controller must be in Ready
Mode. Press (and hold) the Local button while holding up the Scan Speed
paddle switch on the front panel. Then turn the Wavelength Adjust knob until
the number of the address you want appears in the Wavelength readout display. You can set the address to be anything from 1 to 31. In the examples
that follow we assume that you set your laser controller to address 1. Note also
that the GPIB address is stored in the laser head. If you switch heads, you
should check to make sure that the second head has the same GPIB address
as the first.
RS-232
RS-232 is a widely available standard for communication via your computer’s
serial port. You might want to use RS-232 to save yourself the expense of a
GPIB card. The one drawback is you can only talk to one instrument at a
time with serial communication. You will need to know how to send commands to your computer’s RS-232 serial port. Any terminal emulation program will let you send and receive via the serial port interactively.
RS-232 ports can be configured for operation in DTE or DCE mode. The laser
controller is configured as a DCE port. This means that the laser controller
receives data on pin 2 and transmits data on pin 3.
For RS-232 operations use @ to get attention before starting command entry,
and end the command with a carriage return (<cr>). “@” is the attention
signal which must be the first character of each command string. RS-232
commands are identical to the GPIB commands. RS-232 commands are sent
as a continuous string. For example: “@WAVE 671.84 <cr>”.
The controller does not echo the command. If you send an action command
(such as change the current or tune the wavelength), the controller will
27
return one of the following responses: “OK” if the command was properly
executed, “Out of Range” if a source value is outside the allowed range, or
“Unknown Command” if the command was not recognized. If the command
is a Source Query or a Sense Command, the controller will return a value or
“Unknown Command” if the command was not recognized. For example:
you send “@WAVELENGTH? <cr>”, and you get back “671.8”.
RS-232 communications may be performed at 300, 1200, 2400, 4800, 9600,
or 19200 baud. The data format is 8 bits, no parity with 1 stop bit. The laser
must be in Ready Mode to change the controller’s baud rate. Press the Local
button and hold the Scan Speed paddle switch down at the same time. The
wavelength control knob then steps you through the baud rates.
Programming examples
Next, we present three elementary programs written in QuickBasic. These
example programs demonstrate the basics of talking to your controller
through GPIB or RS-232.
The section that follows these programming examples details the entire command set and describes the use and syntax of all the commands.
28
Example 1
This simple QuickBasic program asks the user for a wavelength and then tells the laser to tune to that
wavelength. If you are using a National Instruments GPIB card in your computer, be sure to read the
file GPIBPC\QBASIC\README.QB for instructions on using the QuickBasic interactive environment
with GPIB. Other manufacturer’s cards will have similar instructions.
'The next line must be included for QuickBasic to work with a
'National Instruments GPIB card:
'$INCLUDE:'qbdecl.bas'
'Clear screen; allocate 32 spaces to the string variable buff$
CLS
buff$ = SPACE$(32)
'Find the laser controller at GPIB address #1
CALL IBDEV(0, 1, 0, T10s, 1, 0, nflaser%)
'
| | |
|
| | |
'
| | |
|
| | used to specify device in IB
'
| | |
|
| | function calls
'
| | |
|
| EOS character and modes
'
| | |
|
EOI mode of the device
'
| | |
I/O timeout value (10 sec)
'
| | secondary GPIB address
'
| primary GPIB address, change if laser is at a
'
| different address
'
GPIB board number
'Clear the controller's GPIB port. nflaser% is an integer that
'identifies the laser. It was set by IBDEV above; we never need
'to know its value, except that it is set to -1 if IBDEV fails
'to find the device.
CALL IBCLR(nflaser%)
'Ask user for a wavelength in nanometers. wavelength! is a
'single precision, floating point number; 775.1, for example.
INPUT "What wavelength would you like [nm] ? ", wavelength!
29
'Use IBWRT to send the :WAVELENGTH command to the controller.
'Example: IBWRT(nflaser%, ":WAVELENGTH 772.0")
'The STR$() function converts numbers to strings
CALL IBWRT(nflaser%, ":WAVELENGTH " + STR$(wavelength!))
'Read the output buffer
CALL IBRD(nflaser%, buff$)
'Print the contents of the output buffer: "OK" if the operation
'was successful, "Out of Range" if wavelength is not valid, etc.
PRINT
PRINT buff$
'Return to local control
CALL IBONL(nflaser%, 0)
END
30
Example 2
This is the same as the last program except that this time we use RS-232 communications instead of
GPIB.
'Ask user for a wavelength in nanometers. wavelength! is a
'single precision, floating point number; 775.1, for example.
INPUT "What wavelength would you like [nm] ? ", wavelength!
'RS-232 commands should be preceded by "@"
MESSAGE$ = "@:WAVE" + STR$(wavelength!)
'Open the serial communications (RS-232) port (with baud rate
'9600, 8 data bits, no parity, and 1 stop bit).
OPEN "COM2:9600,N,8,1,ASC,CD0,CS0,DS0,OP500,RS,TB512,RB512" FOR
RANDOM AS #1
'Send the message to the controller
PRINT #1, MESSAGE$
'Read and print the response from the controller
LINE INPUT #1, RESPONSE$
PRINT RESPONSE$
'Close the port
CLOSE #1
END
31
Example 3
This program sets up and executes a wavelength scan using GPIB. Be sure to look at Example 1 before
reading this program.
'$INCLUDE: 'qbdecl.bas'
CLS
buff$ = SPACE$(32)
'Find the laser controller at GPIB address #1
CALL IBDEV(0, 1, 0, T10s, 1, 0, nflaser%)
CALL IBCLR(nflaser%)
'Set up start and stop wavelengths
INPUT "What start wavelength would you like [nm] ? ", wavelength!
CALL IBWRT(nflaser%, ":WAVELENGTH:START " + STR$(wavelength!))
INPUT "What stop wavelength would you like [nm] ? ", wavelength!
CALL IBWRT(nflaser%, ":WAVELENGTH:STOP " + STR$(wavelength!))
'Set forward and return scan speeds to their maximum values
CALL IBWRT(nflaser%, ":WAVELENGTH:SLEW:FORW 100")
CALL IBWRT(nflaser%, ":WAVELENGTH:SLEW:RET 100")
'Get ready to scan
CALL IBWRT(nflaser%, "OUTPUT:SCAN:RESET")
PRINT "Tuning to the start wavelength...."
'Wait until laser gets to start wavelength. Here we use the
'*OPC? (operation complete ?) query to see if :OUTPUT:SCAN:RESET
'has finished
ready% = 0
32
WHILE ready% = 0
CALL IBWRT(nflaser%, "*OPC?")
CALL IBRD(nflaser%, buff$)
ready% = VAL(buff$)
WEND
'Start scan
PRINT “Push any key to begin the scan.”
WHILE INKEY$ = “”: WEND
CALL IBWRT(nflaser%, “:OUTPUT:SCAN:START”)
END
33
VI
Command
Summary
With GPIB and for programs written in QuickBAsic, all commands are issued
using the IBWRT function call in a program. To read the controller’s
response to a command, use the IBRD function call.
For RS-232 operation, use @ to get the attention of the controller before
starting command entry, and end each command with a carriage return
(<cr>). The controller’s response is automatically sent.
The portions of commands in square brackets [ ] are optional and can be
omitted without affecting the command. Also, the lower case parts of commands may be omitted.
<wsp>
<value>
OFF|ON|0|1
means white space; either a tab or a space
is a floating point number
means OFF or ON or 1 or 0 is legal
Multiple commands on a line are not allowed. For instance, if the controller
receives: “WAVE 670.22;*IDN?”, it will change the wavelength to 670.22, but
the Identification Query will be ignored.
Numbers may contain at most 15 characters. In most cases, however, this
constraint will not be an issue. The number 670.22 will be read correctly, but
the number 0000000000000670.22 will be read as 67.
The examples given on the following pages show the text to be included in
the command and the response from the controller. With RS-232 serial communications the response is sent immediately and the user may process or
ignore the data. With GPIB communications, the response is loaded into the
output buffer, and the user may read it with a GPIB read or else ignore it. For
instance, the example for *IDN? appears as follows:
34
*IDN?
—> NEW FOCUS 6265 H1.00 C1.01
The *IDN? is the command that is sent to the controller either over GPIB or
RS-232. The arrow symbol (—>) indicates the response from the controller,
which in this example is NEW FOCUS 6265 H1.00 C1.01.
Types of Commands
There are six general types of commands: Standard Commands, Output
Commands, Sense Commands, Source Controls, Source Queries, and System
Commands.
Standard Commands allow you to get information about the laser head and
to query whether an operation has been completed. Output Commands tell
the laser to start some action such as starting or stopping a scan or reset.
System Commands set the operating mode of the controller.
Source Controls set laser operating parameters. These parameters fall into two
categories. Those that use the internal digital-to-analog converters (DACs)
and those that do not. The piezo voltage, the diode temperature and the laserdiode current can be controlled either from the front panel with potentiometers or from voltages generated by internal DACs. The other parameters, wavelength, scan speeds, and scan start and stop wavelengths, are independent of
whether the potentiometers or the DACs have control.
When the front-panel potentiometers have control, the laser is considered to
be in Local Mode. When the internal DACs have control, the laser is considered to be in Remote Mode. Setting any one of the three DAC parameters
forces the other two under DAC control as well, and the controller will be
placed into Remote Mode. The encoder, Track and Scan buttons are locked
out when the laser is in Remote Mode.
35
Each Source Control has an accompanying Query. Source Queries return the
value of various controller set points. A Source Query of diode current, diode
temperature, or piezo voltage is only meaningful if the laser is in Remote
Mode. For this reason, if any of those three parameters are queried while the
laser is in Local Mode, the laser is placed in Remote Mode with the current,
temperature set point, and piezo voltage taking on the last front-panel values
they had before the switch.
Sense Commands return the value of various laser operating conditions. Note
that there is an important difference between Sense Commands and Source
Queries. Sense Commands read actual voltages, currents, temperatures, or
wavelengths; the value returned is the same as that seen on the controller
front panel at the time the command is executed. In contrast, Source Queries
read set points (values that are theoretical goals). These values may not necessarily match the values displayed on the front panel. For instance, the
queried diode current and piezo voltages can differ from the actual values by
up to 3% due to component variations such as resistor tolerances. However, in
the case of wavelength queries, the wavelength set by a Source Command will
match the wavelength returned by a Source Query because each laser is factory calibrated and has its specific wavelength-calibration table loaded into the
laser head.
The next four pages have an index of all the possible computer control commands. Then, the pages that follow the index of commands give detailed
information about each command, including a description of the command
and examples of how the command is used.
36
Index of
Commands
Standard
Commands
*IDN?
Identification Query
*OPC?
Operation Complete Query <value>
Output
Commands
:OUTPut:SCAN:RESEt
Stop and return to start wavelength
:OUTPut:SCAN:STARt
Start/Restart scan
:OUTPut:SCAN:STOP
Stop/Pause scan
:OUTPut:TRACk<wsp>OFF
Exit Track Mode to Ready Mode
:OUTPut[:STATe]<wsp><OFF|ON|0|1>
Turn laser on/off
:OUTPut[:STATe]?
Read laser on/off <value 0 = Off, 1 = On>
Sense
Commands
:SENSe:CURRent[:LEVel]:DIODe
Read current level <value mA>
:SENSe:POWer[:LEVel]:FRONt
Read front facet power <value mW>
37
:SENSe:POWer[:LEVel]:REAR
Read rear facet power <value mW>
:SENSe:TEMPerature[:LEVel]:DIODe
Read diode temperature <value deg C>
:SENSe:TEMPerature[:LEVel]:CAVity
Read cavity temperature <value deg C>
:SENSe:TEMPerature:SETPoint:DIODe
Read diode-temperature set point <value deg C>
:SENSe:TEMPerature:SETPoint:CAVity
Read cavity-temperature set point <value deg C>
:SENSe:VOLTage[:LEVel]:PIEZo
Read piezoelectric voltage <value 0–100%>
:SENSe:VOLTage[:LEVel]:AUXiliary
Read user analog voltage <value 0–5 V>
:SENSe:WAVElength
Read output wavelength <value nm>
Source
Controls
[:SOURce]:CURRent[:LEVel][:DIODe]<wsp><value>
Write diode-current set point
[:SOURce]:TEMPerature[:LEVel][:DIODe]<wsp><value>
Write diode-temperature set point
[:SOURce]:VOLTage[:LEVel][:PIEZo]<wsp><value>
Write piezoelectric-voltage set point
38
[:SOURce]:WAVElength<wsp><value|MIN|MAX>
Write output-wavelength set point
[:SOURce]:WAVElength:SLEWrate:FORWard<wsp><value>
Write forward slew-rate set point
[:SOURce]:WAVElength:SLEWrate:RETurn<wsp><value>
Write return slew-rate set point
[:SOURce]:WAVElength:STARt<wsp><value>
Write scan start-wavelength set point
[:SOURce]:WAVElength:STOP<wsp><value>
Write scan stop-wavelength set point
Source
Queries
[:SOURce]:CURRent[:LEVel][:DIODe]?
Read diode-current set point <value mA>
[:SOURce]:TEMPerature[:LEVel][:DIODe]?
Read diode-temperature set point <value deg C>
[:SOURce]:VOLTage[:LEVel][:PIEZo]?
Read piezoelectric-voltage set point <value 0–100%>
[:SOURce]:WAVElength?[<wsp><MIN|MAX>]
Read output-wavelength set point <value nm>
[:SOURce]:WAVElength:SLEWrate:FORWard?
Read forward slew-rate set point <value 0–100%>
[:SOURce]:WAVElength:SLEWrate:RETurn?
Read return slew-rate set point <value 0–100%>
39
[:SOURce]:WAVElength:STARt?
Read scan start-wavelength set point <value nm>
[:SOURce]:WAVElength:STOP?
Read scan stop-wavelength set point <value nm>
System
Commands
:SYSTem:WINPut<wsp><0|1|OFF|ON>
Enables and disables Wavelength Input Mode
:SYSTem:MCONtrol<wsp><INT|EXT>
Mode control:
Remote Mode (DACs with Encoder, Track, Scan disabled)
Local Mode (Front panel pots with all enabled)
40
STANDARD
COMMANDS
Command
*IDN?
Description
Identification Query.
Explanation
Returns the following string identifying the instrument:
NEW FOCUS Model # H[Head Revision #] C[Controller Revision #]
Model # indicates the type of laser 6265.
Head Revision # and Controller Revision # indicate versions of
software. They will not necessarily be the same.
Example
*IDN?
—> NEW FOCUS 6265 H1.00 C1.01
41
Command
*OPC?
Description
Operation Complete Query.
Explanation
Returns 0 if a long-term operation is ongoing.
Returns 1 if no long-term operation is ongoing.
The laser has three long-term operations:
Scanning
(see OUTPut:SCAN:STARt)
Resetting
(see OUTPut:SCAN:RESEt)
Wavelength Set (see [SOURce]:WAVElength)
Starting any of the above three operations clears the OPC status bit. When
the laser reaches the target wavelength, the OPC status bit is set to 1. The bit
is also set to 1 if the movement is interrupted, either with SCAN:STOP, which
interrupts a SCAN or RESEt, or OUTPut:TRACk OFF, which interrupts a
Wavelength Set.
Example
During a wavelength scan:
*OPC?
—> 0
and when the scan is completed:
*OPC?
—> 1
42
OUTPUT
COMMANDS
Command
:OUTPut:SCAN:RESEt
Description
Return to start wavelength.
Explanation
The wavelength is reset to the start wavelength at the return slew rate. If a
scan is in progress it will be interrupted and the wavelength reset to the start
wavelength.
Works the same whether laser is in Remote Mode or Local Mode.
The *OPC? command will return 0 until the start wavelength is reached.
Example
The current wavelength is 672 nm, the Start Wavelength is 670.0 nm, and the
Return Slew Rate is 100 percent.
OUTP:SCAN:RESET
—> OK
The laser wavelength is changed at the maximum rate until the wavelength
670.0 nm is reached.
43
Command
:OUTPut:SCAN:STARt
Description
Start/restart a wavelength scan.
Explanation
Begins scanning from the current wavelength to the stop wavelength at the
forward slew rate.
Works the same whether the laser is in Remote Mode or Local Mode.
The *OPC? command will return 0 until the stop wavelength is reached.
Example
The current wavelength is 670.0 nm, the Stop Wavelength is 672.0 nm, and
the Forward Slew Rate is set at 50 percent.
OUTP:SCAN:START
—> OK
The laser wavelength is tuned at about half the maximum rate until
672.0 nm is reached.
44
Command
:OUTPut:SCAN:STOP
Description
Stop/pause a wavelength scan.
Explanation
Stops a scan or reset (if one is going on), leaving the laser in Ready Mode.
Works the same whether the laser is in Remote Mode or Local Mode.
The OPC flag is set to 1 showing that the SCAN or RESET is stopped.
Example
The laser is performing a scan, and then the following commands are issued
to the controller:
*OPC?
—> 0
OUTP:SCAN:STOP
—> OK
*OPC?
—> 1
The scan is stopped, the controller is in Ready Mode, and the wavelength is set
to the wavelength the laser was at when the OUTP:SCAN:STOP command was
issued.
45
Command
:OUTPut:TRACk<wsp>OFF
Description
Exit Track Mode to Ready Mode.
Explanation
Takes the laser out of Track Mode and places it in Ready Mode (the
quiet mode of operation).
Note that issuing a SOURce:WAVElength command, for instance, will place
the laser in Track Mode, and OUTPut:TRACk OFF is the way to get back into
Ready Mode.
Works the same whether the laser is under front panel or DAC control.
Example
The laser wavelength has been set to 672.4 nm with a WAVE 672.4 nm command. The Track LED is on.
OUTP:TRACK OFF
—> OK
The laser is still at 672.4 nm but is now in Ready Mode (the quiet mode of
operation). The Track LED is off.
46
Command
:OUTPut[:STATe]<wsp><OFF|ON|0|1>
:OUTPut[:STATe]?
Description
Turns the laser on and off; reads whether the laser is on or off.
Explanation
ON or 1
If the laser is ON, no action is taken.
If the laser is OFF, the Laser Power switch LED blinks, and after
5 seconds, the laser is turned on, and the LED is steadily on.
OFF or 0 If the laser is ON, or in the intermediate blinking state, the laser
turns off, and the Laser Power switch LED turns off.
If the laser is already OFF, no action is taken.
?
Returns 1 if the laser is on; and 0 if it is off.
Works the same whether the laser is in Remote Mode or Local Mode.
Example
The front panel Laser Power switch is off.
OUTP?
—> 0
OUTP ON
—> OK
(The Laser Power switch LED begins to blink.)
OUTP?
—> 0
After 5 seconds have elapsed, the LED is solidly on, and the laser is on.
OUTP?
—> 1
47
SENSE
COMMANDS
Command
:SENSe:CURRent[:LEVel]:DIODe
Description
Read diode-laser current level.
Explanation
Returns the magnitude of the laser-diode current in milliamps. The value
returned is the same as that seen on the front panel of the controller at the
time the command is executed.
Example
Front-panel current reading is -59.2.
SENSE:CURR:DIOD
—> 59.2
48
Command
:SENSe:POWer[:LEVel]:FRONt
Description
Read front-facet power.
Explanation
Returns the laser-output power in milliwatts. The value returned is exactly the
same as that seen on the front panel of the controller at the time the command is executed.
Note that there are two power readings. One is derived from a front-facet measurement and the other from a back-facet measurement. The front-facet
power measurement looks at light sampled with a beam splitter at the laser
head output. The back-facet measurement is merely proportional to the optical power emitted from the rear facet of the laser-gain element.
Example
The output-power indicator on the front panel reads 2.6 mW.
SENS:POW:FRON
—> 2.6
49
Command
Description
Read rear-facet power.
Explanation
Returns a number proportional to the power emitted from the rear facet of
the laser-gain element. Use the front-facet power measurement to determine
the actual optical power output from the laser.
Example
50
:SENSe:POWer[:LEVel]:REAR
SENS:POW:REAR
—> 2.9
Command
:SENSe:TEMPerature:LEVel:DIODe
Description
Read diode temperature.
Explanation
Returns the temperature of the laser-diode gain element in degrees Celsius.
This value is exactly the same as that which appears on the front panel of the
laser.
The diode temperature is actively controlled. If the room temperature ever
gets so high that the coolers have insufficient capacity to reduce the temperature, the control loop can become unstable and destroy the cooling elements.
To prevent damage, the laser is automatically shut down if the laser-diode
gain element temperature exceeds 35 °C.
Example
The diode temperature is 21.1 °C.
SENS:TEMP:LEV:DIODE
—> 21.1
51
Command
:SENSe:TEMPerature:LEVel:CAVity
Description
Read cavity temperature.
Explanation
Returns the temperature of the laser cavity in degrees Celsius. This value is
exactly the same as that which appears on the front panel of the laser. The
laser-cavity temperature is actively maintained by the controller at about
30 °C. There is no command to set or change the cavity temperature set
point.
If the room temperature gets high enough that the coolers have insufficient
capacity to reduce the temperature, the control loop can become unstable and
destroy the cooling elements. To prevent damage, the laser is automatically
shut down if the laser-diode gain element temperature exceeds 35 °C.
Example
The laser cavity temperature is 30.0 °C.
SENS:TEMP:LEV:CAV
—> 30.0
52
Command
:SENSe:TEMPerature:SETPoint:DIODe
Description
Read diode-temperature set point.
Explanation
Returns the current temperature set point for the laser-diode gain element in
degrees Celsius. This value is exactly the same as the set point that appears on
the front panel of the laser. The diode temperature is maintained by an
analog control loop. This command returns the measured set point of the
control loop. This value can be changed either from the front panel or with
the SOURce:TEMPerature command.
Example
The diode temperature set point is 21.1 °C.
SENS:TEMP:SETP:DIODE
—> 21.1
53
Command
:SENSe:TEMPerature:SETPoint:CAVity
Description
Read cavity-temperature set point.
Explanation
Returns the current temperature set point for the laser cavity in degrees
Celsius. This is the only way this value can be read; it cannot be read from the
front panel.
Example
The cavity temperature is actively controlled at about 30 °C. This command
returns the set point for the control loop inside the controller. This quantity is
set at the factory and cannot be changed by the user.
SENS:TEMP:SETP:CAV
—> 30.0
54
Command
:SENSe:VOLTage[:LEVel]:PIEZo
Description
Read piezoelectric voltage setting <value 0–100%>.
Explanation
Returns the current piezo voltage setting in percentage of maximum from 0
to 100 percent. This value is the same as that which appears on the front
panel of the laser. Note that as the piezo voltage increases, the lasing frequency increases and the wavelength decreases.
Example
The piezo voltage is 66.8 percent of its maximum.
SENS:VOLT:PIEZ
—> 66.8
55
Command
:SENSe:VOLTage[:LEVel]:AUXiliary
Description
Read voltage at the Detector Input <value 0–5 volts>.
Explanation
Returns the voltage at the auxiliary Detector Input on back panel of the laser
controller. The value returned is from 0 to 5 volts. This is the only way this
value can be read; it cannot be read on the front panel.
The resolution for the Detector Input is 10 bits, so the step size is 5/1024 =
4.88 mV.
Example
The Detector Input sees 1.22 volts.
SENS:VOLT:AUX
—> 1.22
56
Command
:SENSe:WAVElength
Description
Read laser wavelength <value nm>.
Explanation
Returns the current wavelength of the laser in nanometers. This value will
match the front-panel display exactly. Each laser is calibrated with respect to
wavelength at the factory and a calibration table loaded into the laser head.
The wavelength set by a Source Command will match the sensed wavelength
to the number of decimal points returned. The number of decimal points
depends on the accuracy of the angle-measurement technique used to measure the wavelength. Currently, the accuracy of this measurement is 0.1 nm.
Example
The wavelength is 679.63 nm.
SENS:WAVE
—> 679.6
57
SOURCE
CONTROLS
and
SOURCE
QUERIES
Command
Control Form
[:SOURce]:CURRent[:LEVel][:DIODe]<wsp><value>
Query Form
[:SOURce]:CURRent[:LEVel][:DIODe]?
Description
Write and read the diode current set point.
Explanation:
Control Form
0 <= value <= 152 (The units are milliamps.)
This command sets the diode laser current.
This command always forces the laser into Remote Mode.
If the value sent is out of range:
• The controller returns Out of Range.
• No other action is taken.
If the value is in range:
• The diode laser current is changed.
• The controller returns OK.
If the laser was in Remote Mode:
• The Remote LED is already on.
• The current control DAC is driven to a voltage which produces the
requested current within 3%.
• The piezo voltage and the diode temperature are unaffected.
58
If the laser was in Local Mode:
• The Remote LED comes on.
• Control of the laser is given to the DACs.
• The current control DAC is driven to a voltage which produces the
requested current within 3%.
• The temperature control DAC and the piezo control DAC are driven to
voltages which produce values within 3% of the value they had under
front-panel potentiometer control. The laser is now in Remote Mode.
Explanation:
Query Form
?
If the laser was in Remote Mode:
• Remote LED is already on.
• The current, piezo voltage and diode temperature are unaffected.
• Returns the the last current sourced.
If the laser was in Local Mode:
• Remote LED comes on.
• Control of the laser is given to the DACs.
• The current control DAC is driven to a voltage which produces a current
within 3% of the value it had under front panel control.
• The temperature control DAC and the piezo control DAC are driven to
voltages which produce values within 3% of the value they had under
front panel potentiometer control. The laser is now in Remote Mode.
• Returns the target current which is the front panel current at the
moment the query occurred.
59
Example
Front panel shows the following:
• Remote LED off (Local Mode).
• Piezo Voltage reads 30.1.
• Diode temp set point reads 20.0.
• Diode current reads -59.2.
CURR 26.4
—> OK
Front panel now shows:
• Remote LED on (Remote Mode).
• Piezo voltage reads 29.6.
• Diode temperature set point reads 19.7.
• Diode current reads -26.1.
SENSE:CURR:DIODE
—> 26.1
(returns the actual current)
CURR?
—> 26.4
60
(returns the target current)
Command
Control Form
[:SOURce]:TEMPerature[:LEVel][:DIODe]<wsp><value>
Query Form
[:SOURce]:TEMPerature[:LEVel][:DIODe]?
Description
Write and read the temperature set point of the diode.
Explanation:
Control Form
16 <= VALUE <= 26 (The units are in °C.)
This command forces the laser into Remote Mode.
If the value is out of range:
• Returns Out of Range.
• No other action is taken.
If the value is in range:
• Returns OK.
If the laser was in Remote Mode:
• Remote LED is already on.
• The diode temperature set point control DAC is driven to a voltage which
produces the requested set point within 3%.
• The piezo voltage and the diode current are unaffected.
If the laser was in Local Mode:
• Remote LED comes on.
• Control of the laser is given to the DACs.
• The diode temperature set point control DAC is driven to a voltage
which produces the requested set point within 3%.
• The current control DAC and the piezo control DAC are driven to voltages
61
which produce values within 3% of the value they had under front panel
potentiometer control.
• The laser is now in Remote Mode.
Explanation:
Query Form
?
If the laser was in Remote Mode:
• Remote LED is already on.
• The current, piezo voltage and diode temperature are unaffected.
• Returns the last diode temperature set point Sourced.
If the laser was in Local Mode:
• Remote LED comes on.
• Control of the laser is given to the DACs.
• The diode temperature set point control DAC is driven to a voltage which
produces a current within 3% of the value it had under front-panel
control.
• The current control DAC and the piezo control DAC are driven to
voltages which produce values within 3% of the value they had under
front panel potentiometer control. The laser is now in Remote Mode.
• Returns the target diode temperature set point, which is the front panel
temperature set point at the moment the query occurred.
Example
62
Front panel shows the following:
• Remote LED off (Local Mode).
• Piezo voltage reads 30.1.
• Diode temperature set point reads 20.0.
• Diode current reads -59.2.
TEMP 22.1
—> OK
Front panel now shows:
• Remote LED on (Remote Mode).
• Piezo Voltage reads 29.6.
• Diode Temp set point reads 21.8.
• Diode Current reads -58.4.
SENSE:TEMP:SETP:DIODE
—> 21.8
(returns the actual temperature set point)
TEMP?
—> 22.1
(returns the target set point)
The diode temperature is changed until it becomes 21.8 °C.
63
Command
Control Form
[:SOURce]:VOLTage[:LEVel][:PIEZo]<wsp><value>
Query Form
[:SOURce]:VOLTage[:LEVel][:PIEZo]?
Description
Write and read the voltage level of the piezoelectric transducer.
Explanation:
Control Form
0 <= value <= 100 (units are in percentage of full scale).
This command forces the laser into Remote Mode.
If the value is out of range:
• Returns Out of Range.
• No other action is taken.
If the value is in range:
• Returns OK.
• Piezo voltage is changed.
If the laser is in Remote Mode:
• Remote LED is already on.
• The piezo control DAC is driven to a voltage which produces the requested
percentage to within 3%.
• The diode current and the diode temperature are unaffected.
If the laser is in Local Mode:
• Remote LED comes on.
• Control of the laser is given to the DACs.
• The piezo control DAC is driven to a voltage which produces the requested
percentage to within 3%.
64
• The diode current control DAC and the temperature control DAC are
driven to voltages which produce values within 3% of the value they had
under front-panel potentiometer control.
• The laser is now in Remote Mode.
Explanation:
Query Form
?
If the laser was in Remote Mode:
• Remote LED is already on.
• The current, piezo voltage, and diode temperature are unaffected.
• Returns the the last piezo control percentage sourced.
If the laser was in Local Mode:
• Remote LED comes on.
• Control of the laser is given to the DACs.
• The Piezo control DAC is driven to a voltage which produces a
percentage within 3% of the value it had under front panel control.
• The current control DAC and the temperature control DAC are driven to
voltages which produce values within 3% of the value they had under
front-panel potentiometer control. The laser is now in Remote Mode.
• Returns the target piezo control percentage which is the front panel
percentage at the moment the query occurred.
Example
Front panel shows the following:
• Remote LED off (Local Mode).
• Piezo voltage reads 30.1.
• Diode temperature set point reads 20.0.
• Diode current reads -59.2.
65
VOLT 66.8
—> OK
Front panel now shows:
• Remote LED on (Remote Mode).
• Piezo Voltage reads 64.9.
• Diode temp set point reads 19.7.
• Diode current reads -58.1.
SENSE:VOLT:PIEZO
—> 64.9
(returns the actual percentage)
VOLT?
—> 66.8
66
(returns the target percentage)
Command
Control Form
[:SOURce]:WAVElength<wsp><value|MIN|MAX>[NM|ANG]
Query Form
[:SOURce]:WAVElength?[<wsp><MIN|MAX>]
Description
Write and read the laser wavelength.
Explanation:
Control Form
Drives the laser to the wavelength specified by <value|MIN|MAX>.
MIN <= VALUE <= MAX
MIN and MAX are laser dependent and may be queried (see below).
NM indicates nanometers (this is the default; ANG indicates angstroms).
MIN
Drives the laser to its minimum wavelength.
MAX
Drives the laser to its maximum wavelength.
This command does not affect and is not affected by whether the laser is in
Local Mode or Remote Mode.
If the value is out of range:
• Returns Out of Range.
• No other action is taken.
If the value is within the allowed range:
• Returns OK.
• Wavelength is set to the desired wavelength.
67
Explanation:
Query Form
?
Returns the latest target wavelength. The actual
wavelength may be changing due to a newly sourced value or
because the laser is in the midst of a reset or a scan.
? MIN Returns the Minimum wavelength achievable with the laser.
? MAX Returns the Maximum wavelength achievable with the laser.
Example
Front panel displays wavelength 679.6 nm.
WAVE 670.25
—> OK
The following occurs:
• The wavelength starts changing at the maximum rate until it reaches
670.25 nm.
• The wavelength display will probably flicker between 670.2 and 670.3, as
this is the round off point.
Note that you can use *OPC? to determine when the wavelength change has
been completed.
68
Command
Control Form
[:SOURce]:WAVElength:SLEWrate:FORWard<wsp><value>
Query Form
[:SOURce]:WAVElength:SLEWrate:FORWard?
Description
Write and read the forward slew rate for a wavelength scan.
Explanation:
Control Form
This command does not affect and is not affected by whether the laser is in
local mode or remote mode.
1 <= VALUE <= 100 (The units are in percentage of the maximum rate.)
If the value is out of range:
• Returns Out of Range.
• No other action is taken.
If the value is in range:
• Returns OK.
• Forward wavelength slew rate is set to the desired value.
• The 1 to 100% value is translated into a voltage on the picomotor control
board. The actual speed is not linear with this voltage. As you increase
the slew rate from 1 to 100% the actual wavelength rate of change does
not always increase.
• The slew rate only affects scanning. The slew rate during a wavelength
change from a SOURCE:WAVELENGTH command is always 100%.
Explanation:
Query Form
?
Returns the current forward slew rate.
69
Example
The laser is scanning from the start to the stop wavelength, and the following
commands are executed:
WAVE:SLEW:FORW 1
—> OK
(The wavelength now changes very slowly.)
WAVE:SLEW:FORW 100
(The wavelength now changes at its maximum rate.)
—> OK
WAVE:SLEW:FORW?
—> 100.0
70
Command
Control Form
[:SOURce]:WAVElength:SLEWrate:RETurn<wsp><value>
Query Form
[:SOURce]:WAVElength:SLEWrate:RETurn?
Description
Writes and reads the return slew rate for wavelength scans.
Explanation:
Control Form
1 <= VALUE <= 100 (The units are in percentage of maximum rate.)
This command does not affect and is not affected by whether the laser is in
local mode or remote mode.
If the value is out of range:
• Returns Out of Range.
• No other action is taken.
If the value is in range:
• Returns OK.
• The return wavelength slew rate is set to the desired value.
• The 1 to 100% value is translated into a voltage on the Picomotor control
board. The actual speed is not linear with this voltage. As you increase
the slew rate from 1 to 100% the actual wavelength rate of change does
not always increase.
• The slew rate only affects scanning. The slew rate during a wavelength
change from a SOURCE:WAVELENGTH command is always 100%.
Explanation:
Query Form
?
Returns the current return slew rate.
71
Example
The laser is resetting from the stop to the start wavelength, and the following
commands are executed:
WAVE:SLEW:RET 1
—> OK
(The wavelength now changes slowly.)
WAVE:SLEW:RET 100
—> OK
(The wavelength now changes at its maximum rate.)
WAVE:SLEW:RET?
—> 100.0
72
Command
Control Form
[:SOURce]:WAVElength:STARt<wsp><value>[NM|ANG]
Query Form
[:SOURce]:WAVElength:STARt?
Description
Read and write the start wavelength for a scan.
Explanation:
Control Form
This command does not affect and is not affected by whether the laser is in
Local Mode or Remote Mode.
MIN <= VALUE <= MAX
• MIN and MAX are laser dependent (See
SOURCE:WAVELENGTH?MIN|MAX for details.)
• The default units are nanometers (NM); ANG indicates angstroms.
If the value is out of range:
• Returns Out of Range.
• No other action is taken.
If the value is in range:
• Returns OK.
• Start wavelength is given a new value.
Explanation:
Query Form
Example
?
Returns the current start wavelength.
The start wavelength is 772 nm, and the following commands are executed:
WAVE:START 770
—> OK
(The start wavelength is now 770 nm.)
WAVE:START?
—> 770.0
73
Command
Control Form
[:SOURce]:WAVElength:STOP<wsp><value>[NM|ANG]
Query Form
[:SOURce]:WAVElength:STOP?
Description
Writes and reads the stop wavelength set point for wavelength scans.
Explanation:
Control Form
This command does not affect and is not affected by whether the laser is in
Local Mode or Remote Mode.
MIN <= VALUE <= MAX
• The MIN and MAX values are laser dependent (See
SOURCE:WAVELENGTH?MIN|MAX for details.)
• The default units are nanometers (NM); ANG indicates angstroms.
If the value is out of range:
• Returns Out of Range.
• No other action is taken.
If the value is in range:
• Returns OK.
• Stop wavelength is set to the new value.
Explanation:
Query Form
Example
?
Returns the current stop wavelength.
The stop wavelength is 776 nm, and the following commands are executed:
WAVE:STOP 774
—> OK
(The stop wavelength is now 774 nm.)
WAVE:STOP?
—> 774.0
74
SYSTEM
COMMANDS
Command
:WINPut<wsp><0|1|OFF|ON>
Description
Enables and disables Wavelength Input Mode.
Explanation
This command works the same in both Local Mode and Remote Mode.
ON or 1
• All wavelength activity such as scanning or even moving to a newly
sourced wavelength is halted.
• The laser will immediately begin moving to the wavelength corresponding to the voltage at the Wavelength Input jack.
• The controller does not have to be in Track Mode to execute this command.
• Track Mode is entered on execution of this command.
• The Track LED will flash on and off signifying that the Wavelength Input
is active.
• Encoder and Scan button are disabled.
OFF or 0
• The laser remains in Track Mode with the encoder active.
• Wavelength motion stops.
• Track LED stops flashing and remains on, signifying Track Mode.
• Encoder can now change wavelength.
• The Scan button is active again.
75
Example
WINP ON
—> OK
• Track LED flashes.
• Wavelength changes to voltage specified by value at Wavelength Input
jack on back panel of controller.
• Encoder and Scan button are disabled.
WINP OFF
—> OK
• Track LED stops flashing.
• Wavelength movement stops at current value.
• Encoder can now change wavelength.
• Scan button is active.
76
Command
:SYSTem:MCONtrol<wsp><INT|EXT>
Description
Puts controller into Local Mode (internal) or Remote Mode (external).
Explanation
Forces the laser to use internal DACs or front-panel potentiometers for control
of piezo voltage, diode temperature set point, and diode current.
EXT
If the laser is already in Local Mode:
• Command has no effect.
If the laser is not in Local Mode:
• Control of diode-temperature set point, diode current and piezo voltage is
returned to the front-panel potentiometers.
• NOTE: The pots are absolute, not relative, so if they have changed the
values will reflect that change.
INT
If the laser is already in Remote Mode:
• Command has no effect.
If the laser is not in Remote Mode:
• Diode temperature set point, diode current and piezo voltage are sensed
and used as targets for the DACs.
• Front-panel displays will change as sensed and target values can differ by
up to 3% due to component variations (such as resistor tolerances).
• Note that in Remote Mode the front-panel potentiometers are ignored,
but they are still active. If a potentiometer is changed to an extreme
setting and the controller is then switched back to external control, the
corresponding parameter will then move to the extreme setting.
77
VII
Error Codes
The laser controller will indicate an error code in the wavelength display if it
is unable to perform its proper functions. Some of these errors can be cleared
by switching the laser controller off and then back on. If the errors persist,
please contact Focused Research for assistance.
Errors 1 through 7 could indicate a broken or stuck switch. Check the appropriate switch, and if the errors persist, contact Focused Research.
Error 1
Error 2
Error 3
Error 4
Error 5
Error 6
Error 7
Laser Power switch depressed during power up.
Scan button depressed during power up.
Track button depressed during power up.
Multifunction switch depressed during power up.
Scan Speed switch depressed during power up.
Local button depressed during power up.
Multiple stuck buttons during power up.
Error 8
Error 9
No head is connected to the controller.
Cavity temperature at or greater than 35 °C. Make sure
the laser head is heat sinked.
Diode temperature at or greater than 35 °C. Make sure
the laser head is heat sinked.
Error 10
These errors indicate a hardware problem. If these errors persist, contact
Focused Research:
Error 11 Microprocessor RAM error.
Error 12 EPROM revision number mismatch.
Error 13 Current board revision wrong.
Error 14 Temperature board revision wrong.
Error 15 Laser head EEPROM stability error, or there is a compatibility conflict between controller and laser head.
78
VIII
AC Operating
Voltages
The Model 6265 Controller can operate at 100, 120 , 220, or 240 V AC at AC
frequencies of 47-63 Hz. The unit is configured at the factory for the standard
AC voltage in the owner’s country. To select a different operating voltage,
please refer to Fig. 8 (pg. 80) and follow the directions below:
1. Disconnect the power cord.
2. Open the cover of the power entry module on the rear panel with a smallblade screwdriver or similar tool.
3. Insert the tool into the voltage selection slot and remove the wheel from
the unit.
4. Turn the wheel and re-insert into the module so the desired voltage is
shown. Do not attempt to rotate the wheel while it is still in the power
entry module; the wheel must be removed, turned, and then re-inserted.
5. Close the cover.
6. Verify the proper voltage is showing through the module’s window.
79
The power entry module requires two 5x20 mm, slow-blow fuses, such as
Littlefuse’s® Slo-Blo® 239 series: one for the hot line and the other for the
neutral line. Replacement fuses should be as follows:
AC Voltage
100 V AC
120 V AC
220 V AC
240 V AC
Fuse Rating
2.0 A
2.0 A
1.6 A
1.6 A
Figure 8.
AC line power connector.
80
Little Fuse
239 002
239 002
239 01.6
239 01.6
IX Service
and Support
Service and Calibration
Your 6265 series laser has been designed to provide hours of trouble-free operation. Virtually no maintenance is required except for ensuring that the unit
is not damaged, contaminated, or used in an unsafe manner. Any questions
regarding the operation or performance of the laser will be gladly answered
by Focused Research engineers.
FOCUSED RESEARCH
2630 Walsh Avenue
Santa Clara, CA 95051-0905 USA
Phone: (408) 980-8088
Fax:
(408) 980-8883
Email: [email protected]
81
X
Specifications
Table 2
82
Model #
6265
Typical Center Wavelengths
1.8–2.4 nm
Minimum Tuning Range
50 nm
Minimum Power
0.1 mW
Minimum Mid-Band Power
1.5 mW
Fine Freq. Tuning Range
20 GHz (0.16 nm)
Fine Freq. Modulation Bandwidth
2 kHz
Wavelength Stability
<0.01 nm/day
Coarse Tuning Resolution
0.01 nm
Tuning Repeatability
0.1 nm
Displayed Wavelength Accuracy
0.1 nm
Max. Coarse Tuning Speed
8 nm/min
Repeatability
0.01 nm
Linewidth (50 ms)
<300 kHz
Linewidth (5 s)
<5 MHz
Side Mode Suppression
40 dB