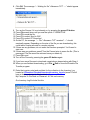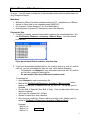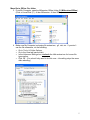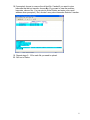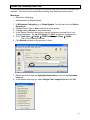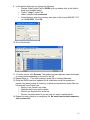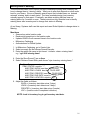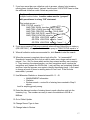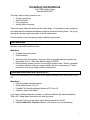
1
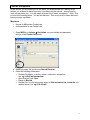
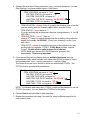
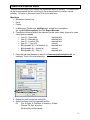
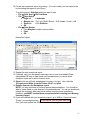
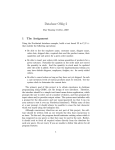
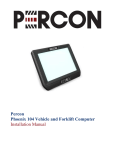
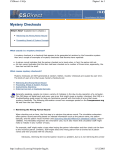
Inventory Instructions
Fort Collins Public Library
Revised 02/03/2007
The major parts of doing inventory are –
• Create a good plan
• Scan barcodes
• Find exceptions
• Identify what is missing
There are many details but these are the major steps. It’s important to stay organized
and understand the difference between exception items and missing items. As you go
through the process again and again, it will all make sense!
This document covers everything except creating the good plan.
Scan barcodes
Start your inventory with a good plan. Once you have your plan, start scanning
sections, one location code at a time.
Must have
• Portable barcode scanner
• Good batteries
1. Scan barcodes into scanner. We use a Percon portable barcode scanner we
purchased from III. (See User Manual Page # 102530)
2. Each scanning session must be from a single location code. While it’s possible
to combine location codes in a single session, we don’t recommend it. These
instructions only cover single location code/session.
Download barcodes from Percon to PC
This section describes how to transfer your scanned barcodes from the Percon to your
PC.
Must have
• Percon portable barcode scanner
• Serial cable Percon
PC
• Portable File Transfer software loaded on PC (from III)
• Inventory log file (see below)
If you have a different barcode scanner you will have different file transfer software.
That’s OK. Adapt these instructions for what you have.
1. Plug the Percon into the black serial cable connected to the PC.
2. Open Portable File Transfer software. We have an icon on the desktop.
1
Software settings – the very first time you use the software, check the settings
and make sure they are correct for your setup. Go to Options
Settings…
Our serial cable is plugged into COM1 so our settings look like this:
3. Go to Options
Connect. The message “--- Communications port opened. ---”
should appear immediately.
4. Go to File
Receive.
5. Navigate to the folder you wish to download the file to (we use CircDesk on
Fileserver > Inventory > Main or Hrmy). Use the Folders and Drives section on
the right side of the window to navigate.
6. Once you are pointing to the correct folder, enter the filename for the inventory
section you are downloading. The filename should always be the location code
you scanned (ex. “mjf.txt” for Main Juvenile Fiction).
7. If you are downloading part of a large collection (Adult Nonfiction, for example),
you should number each file for that section (ex. mx1.txt, mx2.txt, mx3.txt, etc).
2
8. Click OK. The message “--- Waiting for file "<filename>.TXT". ---” should appear
immediately.
9. Turn on the Percon, if it is not already on, by pressing the green I/O button.
10. Press F4 several times until you see the option: F3-SEND FILE.
11. Press F3 to send the file.
12. Press F1 to select Send to PAC.
13. Press F1 to select PC Download.
14. On the PC, the message “--- File "<filename>.TXT" received”. ---” should
eventually appear. Depending on the size of the file you are downloading, this
could take a couple seconds to a couple minutes.
15. If there are any problems, do not erase the file when prompted. You’ll need to
start over.
16. If there were no problems, press F1 on the Percon twice to erase the file. (This is
permanent! The file cannot be retrieved once you delete it!)
17. Press F4 to end.
18. Turn off the Percon by pressing the green I/O button again.
19. If you have more Percons to download, repeat above steps starting with Step 4.
20. When you are finished downloading, go to File
Exit to close the Portable File
Transfer program.
21. Enter the inventory start and end date for the collection in the Inventory Log
located at \\Fileserver\Circdesk\Inventory\Inventory_log.xls (some PCs will
have a desktop shortcut to this location).
My Computer
CircDesk on Fileserver
Click on Inventory.
Our Inventory Log file looks like this:
3
Upload File from PC to III server
This section describes how to upload your file of scanned barcodes from your PC to the
III server. You will create a review file of the barcodes which will serve as the basis for
your Exceptions Report.
Must have
• Millennium Offline Circulation software loaded on PC – available from CSDirect
• Access to Dalva (this is our character-based INNOPAC)
• III’s Inventory Control module (C-A-P from Main Menu)
• Authorizations to process PC transactions (see User Manual)
Prepare the files
1. From My Computer, open the folder which contains your downloaded files. We
use CircDesk on Fileserver > Inventory > Main or Hrmy. Your files should
look like this:
If you do not have files to combine, skip this step.
2. If you have downloaded multiple files for one location code (e.g. mx1.txt, mx2.txt,
mx3.txt), you can consolidate the files into one .txt file before uploading.
For example, use Notepad to copy all the barcodes from mx1.txt, mx2.txt,
mx3.txt into a single file called mx.txt.
Do not combine files from difference location codes.
To combine file:
• Open Notepad to open a new empty file.
• Back at the CircDesk on Fileserver > Inventory > Main or Hrmy folder
window, double click to open the first file, e.g. mx1.txt. The file will open in
Notepad.
• Choose Edit
Select All, then Edit
Copy. (You can also right-click to see
the same options.)
Paste.
• In the new file, choose Edit
• Repeat for each file in that collection.
• Save the new combo file. Name it with the location code. (Make sure it is
saved in CircDesk on Fileserver > Inventory > Main or Hrmy).
Example:
Mx1.txt
Mx2.txt
Mx3.txt
mx.txt
4
Move file to Offline Circ folder
3. From My Computer, open the Millennium Offline folder (C:\Millennium\Offline).
(Click on Local Disk (C:)
then Millennium
then Offline)
4. Make sure My Computer is showing file extensions, .gif, .dat, etc. If you don’t
see the file extensions, do the following:
• Go to Tools
Folder Options.
• Go to the View tab (second tab).
• In the Advanced Settings box, uncheck the Hide extensions for known file
types option.
• Click OK. (You should only need to do this once – the setting stays the same
after rebooting.)
5
5. Copy inventory file from CircDesk on Fileserver > Inventory > Main or Hrmy to
c:\Millennium\Offline.
• In the CircDesk on Fileserver > Inventory > Main or Hrmy folder window,
right click on the first file you wish to upload and choose Copy.
Paste. (Or you can also right click
• In the Offline folder window, go to Edit
on the white space in the folder and choose Paste.)
6. You need to rename your transferred file circ.dat:
• If there is an old circ.dat file in the Offline folder, delete it.
• Right click on the newly pasted file and choose Rename. Change the name
to circ.dat. (That’s the file you just deleted.) Click Yes to confirm the name
change.
Upload file to III server
7. Start Millennium Offline Circulation program.
8. Go to File
Upload circulation and patron data…
9. Click Yes to upload the files and then OK to confirm. (Make a note of the number
of items sent!)
10. Click Yes to erase the circulation file then OK to finish.
6
11. Close Millennium Offline Circulation, File
Exit.
Copy file to review file
12. Open Dalva (character-based INNOPAC) and open III’s Inventory control
module.
From Main Menu, go to
C (Circulation subsystem)
A (Additional circulation functions)
P (Process PC transactions).
13. Enter your Millennium initials and password.
14. Go to C (Compare inventory to shelf list)
T (Transfer file of barcodes to Review file).
15. Choose an empty file to load the text file into. Make sure the empty files “Max
Records” is big enough to fit all the barcodes from the text file you are
transferring or you will get an error.
16. Enter the review file name in the following format: <initials> <date> <location
code> (ex. cg 9-19-05 mjf).
17. Choose the correct text file to transfer (check the number of items for a clue).
The filename will be something like rdi0806111913 (the number represents the
month-day-time).
7
18. If prompted, choose to remove the old text file. If asked if you want to view
barcodes that did not transfer, choose No. (If you want to view the problem
barcodes, choose Yes. You can print to Email Printer and enter your e-mail
address when prompted.) But, we don’t worry about barcodes that don’t transfer.
19. Repeat steps 5 - 18 for each file you need to upload.
20. Quit out of Dalva.
8
Find the Exceptions
In this section you are looking for all the items you scanned that don’t belong in the
section you scanned or have some sort of problem with the record – wrong location
code, wrong status, etc. You will create a review file of these “exceptions”. Note: This
is not a list of missing items. You will do that later. This is only a list of items that don’t
belong or have a problem.
Must have
• Access to Millennium Create Lists
• Authorizations to use Create Lists
1. Open MilCirc, in Admin
Set Initials, set your initials and password,
and go to the Create Lists mode.
2. Select an empty list and choose Search Records.
3. Enter the following information:
• Review File Name: <initials> <date> <collection> exceptions
(ex. cg 9-19-05 mjf exceptions)
• Store Record Type: Item
• Range to Review
• Review File: Use the drop-down menu to find and select the review file you
created above. (ex. cg 9-19-05 mjf)
9
4. Choose Retrieve Saved Query and select "mjm - inventory exceptions” (or see
Step 5 below if you have multiple itypes). Click Select.
The Saved Query we use is :
ITEM LOCATION not equal to "mjf "
OR ITEM STATUS not equal to "-"
OR (ITEM DUE DATE not equal to " - - "
AND ITEM DUE DATE less than "04-06-2005")
OR ITEM ITYPE not equal to "1"
•
•
•
•
•
ITEM LOCATION - change Value A to match the location code of the file
you are working with (for example, mjf for Main Juvenile Fiction).
ITEM STATUS – leave status as “-“
If you are working with a reference collection, change status to “o” for LIB
USE ONLY.
ITEM DUE DATE – leave 1st date as “ - - “
change 2nd Value A to match the date that the inventory of the collection
began (for example, 04-25-2006). Check your Inventory Log file if you
aren’t sure.
ITEM ITYPE - change to match the item type of the collection you are
working with (for example, IYTPE=1 21 Day Book for Main Juvenile
Fiction). Double-click on value to open list of choices.
NOTE: Make sure the two DUE DATE lines are “grouped” with
parentheses. This is very important.
5. If you are working with a collection that has multiple item types (such as
entertainment video which includes both videos and DVDs), go back to Step 4
and instead select “mjm – inventory exceptions – multiple i-types.”
The Saved Query we use is similar to above but with multiple ITYPEs. The
ITYPEs must be grouped with parentheses.
The Saved Query we use –
ITEM LOCATION not equal to "mjf "
OR ITEM STATUS not equal to "-"
OR (ITEM DUE DATE not equal to " - - "
AND ITEM DUE DATE less than "04-25-2006")
OR (ITEM I TYPE not equal to "22"
AND ITEM I TYPE not equal to "8")
NOTE: For libraries with many more ITYPEs, it might not be practical to use the
ITYPE in the query. You can delete the ITYPE line of the query.
6. Choose Search and click Yes to start searching.
7. Repeat this procedure from step 2 for each file, using a different empty list for
each location code.
10
Create the Exceptions Report
This section describes how to create the exceptions report for printing. This report lists
all the items scanned that do not belong in the scanned section or have a record
problem. All items on this report need to be found and fixed.
Must have
• Millennium Create Lists
• Excel
• Printer
1. In Millennium Create Lists, highlight your review file of exceptions
(ex. cg 9-19-05 exceptions) and click Export Records.
2. Choose the following fields to be exported (in this exact order). Append or insert
extra fields as needed:
• Item (i) – Status (88)
required field
• Item (i) – Barcode (b)
required field
• Item (i) – Location (79)
required field
• Item (i) – I Type (61)
optional
• Bibliographic (b) - Call Number (c)
required field
• Bibliographic (b) – Author (a)
optional
• Bibliographic (b) – Title (t)
required field
3. Enter the path and filename to save to (c:\inventory\mjf exceptions.txt, for
example). Click OK to start exporting.
4. Repeat for each exceptions review file.
5. Open Excel and open the exported text file.
Ex.
File
Open
CircDesk
Inventory
Choose “All files” at bottom.
Double-click on file wanted.
Main
11
6. In the first screen of the Text Import Wizard, choose Delimited and click Next.
7. In the second screen, unselect Tab (if necessary) and select Comma. Click Next.
8. In the third screen, highlight the second column (barcode) and select Text. Click
Finish.
9. Repeat for each exported text file.
12
10. Format the exceptions report for printing. (You can create your own report style
by formatting the report to your liking.)
To print the report, Highlight what you want to print.
• File
Print Area
Set Print Area.
• File
Page Setup
Page tab
Landscape
Margins tab Top, Left, Right, Bottom – 0.5, Header, Footer – 0.0
Sheet tab
Print Gridlines
OK
• File
Print Review
Click Margins to adjust column widths
Print
OK
Example of report:
11. Repeat for each exceptions report.
12. If desired, copy (cut and paste) each report into a new consolidated Excel
spreadsheet. Be sure to label each set of exceptions so you know which
exception items are for which location code.
13. Save the file as an Excel spreadsheet, choose a .xls type. Use a title like
“Exceptions for Main Juvenile Fiction 4-5-06” and print.
14. Resolve items on the Exceptions report.
NOTE: It is very important to find and resolve these exceptions. You should be
able to locate these on your shelves in the scanned area. You can go ahead and
change the inventory date (see below) before resolving these exceptions.
However, you MUST resolve these exceptions before creating your Missing
Inventory report.
15. If you are satisfied with your exceptions report, go to MilCirc, Create Lists and
“Empty” your exceptions lists. Do not delete your original lists yet.
First, you must update the INVDA field. See next page.
13
Update the Inventory Date Field
This sections describes how to change the inventory date field (INVDA) for all items you
scanned. This step must be done before creating your Missing Inventory report.
Must have
• Millennium Cataloging
• Authorizations for Global Update
1. In Millennium Cataloging, go to Global Update. You will start out in the Select
Records tab.
2. Change Record Type to Item (uncheck all other options).
3. Change Index to Review in drop-down menu.
4. In the Review File drop-down menu, choose the inventory review file of your
scanned barcodes. (ex. cg 9-19-05 mjf) Do NOT choose the exceptions file.
5. Go to Tools menu
Toggle
ITEM Fixed-Length Fields
INVDA.
This is the inventory date field.
6. Click Search and wait for the process to finish.
7. Make sure all item lines are highlighted/selected then click on the Command
Input tab.
8. In the window that pops up, select Change Fixed Length Field and click OK.
14
9. In the window that pops up, change the following:
• Change Fixed Length Field to INVDA (you can double click on the field to
bring up a clickable menu).
• Type in "<any>" under Find.
• Leave Validate Field unchecked.
• Under Replace, enter the inventory start date in this format: MM-DD-YYYY
(ex. 09-19-2005). Click OK.
10. Go to Preview tab.
11. If it looks correct, click Process. The update may take between several seconds
to a few minutes depending on the size of the file.
12. Repeat Steps 4 - 11 for each inventory review file of scanned barcodes.
13. Once the INVDA has been updated for all collections and all the exceptions
reports have been printed, all inventory (original and exceptions) review files can
be removed from Create Lists.
• Return to the Create Lists mode.
• Highlight the file you wish to delete.
• Click on the Empty button at the top.
• Choose Yes when asked if you are sure you want to delete the file.
14. Repeat for each collection or exceptions file. Be careful not to delete someone
else’s review file!
15
Identify what is Missing
This section describes how to identify all items considered missing after inventory and
how to change them to “missing” status. What you do after that depends on what works
best for your library. We run a biweekly search report that includes items on claimed
returned, missing, and in transit status. The items marked missing from inventory
naturally appear on that report. Eventually, we delete anything that has been on
missing status for 6 months or more. These instructions only describe how to identify
missing items after inventory and to change their status to Missing.
At our library, Systems staff runs this report and uses Global Update to change status to
Missing.
Must have
• Scanned an entire location code
• Resolved all exceptions in the location code
• Updated INVDA for all scanned items in the location code
• Millennium Cataloging
• Authorizations for Global Update
1. In Millennium Cataloging, go to Create Lists.
2. Select an empty file and choose Search Records.
3. Enter the review file name in this format: “<initials> <date> missing items”.
e.g. “cg 8.6.06 missing items”
4. Enter the Store Record Type as Item.
5. Select Retrieve Saved Query and choose "mjm inventory missing items."
The Save Query we use is –
ITEM STATUS equal to "-"
AND ITEM INVDA less than "09-23-2005"
AND ITEM LCHKIN less than "09-23-2005"
AND ITEM CREATED less than "09-05-2005"
AND ITEM DUE DATE equal to " - - "
AND ITEM LOCATION equal to "mjf "
6. Adjust the fields as follows:
INVDA < (inventory start date minus 3 days)
LCKIN < (inventory start date minus 3 days)
CREATED < (inventory start date minus 3 weeks)
LOC = (location code of completed collection)
NOTE: Look in Inventory Log to get inventory start date.
16
7. If you have more than one collection code to process, choose “mjm inventory
missing items (multiple items)” instead. Use the extra “LOCATION” lines to enter
the additional collection codes. Delete any extra lines.
The Saved Query is similar to above but can accommodate
multiple location codes. Location codes must be “grouped”
with parentheses in a long “OR” statement.
This is what we use –
ITEM STATUS equal to "-"
AND ITEM INVDA less than "09-23-2005"
AND ITEM LCHKIN less than "09-23-2005"
AND ITEM CREATED less than "09-05-2005"
AND ITEM DUE DATE equal to " - - "
AND (ITEM LOCATION equal to "mef "
OR ITEM LOCATION equal to "mesf "
OR ITEM LOCATION equal to "mesx "
OR ITEM LOCATION equal to "meve "…)
8. If you are processing Reference materials where all items should be on status=o
(LIB USE ONLY), change the first line of the query to ITEM STATUS equal to “o”.
9. When all collection codes are accounted for, click Search to start the search.
10. When the process is complete, take a look at the file. “Is it reasonable?”
Sometimes I export the file to look at call# to make sure a huge section wasn’t
missed. If so, I let Circ know which section they missed and they can inventory
it. They inventory the missed section, run their exceptions report, resolve the
exceptions and I update the INVDA field. I wait until they are completely finished
and then I start the process over again to identify the missing items. I don’t want
to change a bunch of items to missing status if it isn’t true! If the file looks
reasonable, I proceed.
11. Use Millennium Statistics or character-based M – S – B
• MANAGEMENT Information
• Statistics
• Boolean search – review file of missing items created in Step 9
above.
Look for anything grossly wrong.
12. Enter the date and number of missing items in each collection code into the
Inventory Log. The numbers are easy to see in the statistics in M-S-B or
MilStats.
13. Go to Global Update.
14. Change Record Type to Item.
15. Change Index to Review.
17
16. Choose the missing items file under Review File.
e.g. “cg 8.6.06 missing items”
17. Right click on the title bar (usually displays Barcode),
go to Toggle
Item Fixed Length Fields
Status.
18. Click Search and wait for the process to finish.
19. Make sure all item lines are highlighted then go to Command Input tab.
20. Select Change Fixed Length Field and click OK.
21. Change parameters Fixed Length Field to Status (you can also double click on the field to bring
up a clickable menu).
Enter "<any>" under Find.
Under Replace, enter “m” for Missing status.
22. Go to Preview and select Process.
23. Sometimes Circulation wants a printed report of the Missing Items. If so, follow
the instruction for exporting a report (under Creating Exceptions Report) and print
the list to Circ printer.
Most of the time Circ does not want a list of just these missing items. These will
appear on our next biweekly Missing/In Transit/Claimed Returned report.
18