1
IBM Tealeaf CX Passive Capture Application
3680 and 3730
September 18, 2015
PCA Manual
IBM
Note
Before using this information and the product it supports, read the information in “Notices” on page 287.
This edition applies to build 3680 and 3730 of IBM Tealeaf CX Passive Capture Application and to all subsequent
releases and modifications until otherwise indicated in new editions.
© Copyright IBM Corporation 1999, 2015.
US Government Users Restricted Rights – Use, duplication or disclosure restricted by GSA ADP Schedule Contract
with IBM Corp.
Contents
Passive Capture Application Manual ..
vii
Chapter 1. Passive Capture Overview ..
1
Enhanced International Character Support (EICS) for
CX Passive Capture Application version 3730 . ..
Security and Administration . . . . . . . ..
SSL Support . . . . . . . . . . . . ..
Integration with HSMs . . . . . . . . ..
Deployment architecture overview . . . . . ..
On-premises deployment . . . . . . . ..
Deployment in the Cloud . . . . . . . ..
PCA Throughput . . . . . . . . . . ..
Packet Forwarder Overview . . . . . . . ..
Software architecture . . . . . . . . . ..
Capture Process . . . . . . . . . . ..
Captured . . . . . . . . . . . . ..
Listend . . . . . . . . . . . . . ..
Reassd . . . . . . . . . . . . . ..
Pipelined . . . . . . . . . . . . ..
Routerd . . . . . . . . . . . . . ..
Tcld . . . . . . . . . . . . . . ..
Deliverd . . . . . . . . . . . . ..
Failoverd . . . . . . . . . . . . ..
Memcached . . . . . . . . . . . ..
Multiple Instances . . . . . . . . . . ..
Multi-Instance Pipeline Processes . . . . ..
CX PCA Transparent Load Balancing Overview ..
Multiple Listend-Routerd Pairs . . . . . ..
Maintenance program . . . . . . . . . ..
3rd party software . . . . . . . . . . ..
Formatted commands for readability . . . . ..
Tealeaf PCA Network Capture Traffic Requirements
Basic traffic requirements . . . . . . . . ..
Diffie-Hellman Cipher . . . . . . . . ..
TLS SessionTicket Extension . . . . . . ..
TCP Connections . . . . . . . . . . ..
Duplicate Data . . . . . . . . . . ..
Sources of network traffic quality issues . . . ..
Measuring dropped packets . . . . . . . ..
Chapter 2. Installing the CX Passive
Capture Application . . . . . . . ..
CX PCA installation requirements . . . . .
Hard disk mount point recommendations .
Supported Accelerator Cards . . . . .
VMware support . . . . . . . . .
Operating system requirements . . . . .
Multiple instances of PCA . . . . . .
Changes to the PCA server . . . . . .
PCA and packet forwarder requirements for
cloud-based deployments. . . . . . .
Package Installation . . . . . . . . .
Pre-installation steps . . . . . . . .
Copying the installation package from the
CD-ROM disc . . . . . . . . . .
© Copyright IBM Corp. 1999, 2015
1
1
1
2
2
3
4
5
6
7
8
9
9
9
9
9
9
10
10
10
10
10
11
11
12
12
12
13
13
14
14
14
15
16
17
19
..
..
..
..
..
..
..
19
21
21
21
21
26
27
..
..
..
28
29
30
..
30
Installing the PCA software . . . . . . ..
Installing the Packet Forwarder. . . . . ..
Installing the PCA in the Softlayer Cloud . ..
Installing the PCA in the Microsoft Azure Cloud
Installing the PCA to a VMware virtual machine
Post-installation checklist . . . . . . . . ..
Validate PCA Install . . . . . . . . ..
Generate SSL Keys . . . . . . . . . ..
Start PCA . . . . . . . . . . . . ..
Initial PCA Configuration. . . . . . . ..
Check permitted connections settings . . . ..
Configure PCA for Capture of Rich Internet
Applications . . . . . . . . . . . ..
Tealeaf passive capture software service . . ..
CX PCA Patches . . . . . . . . . . ..
Troubleshooting tips . . . . . . . . . ..
Uninstall or Rollback of the CX Passive Capture
Application . . . . . . . . . . . . ..
Uninstall the Packet Forwarder . . . . . . ..
Chapter 3. Upgrading the CX PCA
Software . . . . . . . . . . . . ..
Before you upgrade . . . . . . . . . ..
Validate current SSL keys . . . . . . . ..
Basic upgrade . . . . . . . . . . . ..
If your installation meets the above requirements,
to upgrade . . . . . . . . . . . ..
Upgrading PCA with user authentication . . ..
Configuring new data types . . . . . . . ..
Chapter 4. Configuring the CX PCA ..
Configuration via Web Console . . . .
CX PCA configuration files . . . . .
Configuration via ctc-conf.xml . . .
Configuration using runtime.conf . . .
Files . . . . . . . . . . . .
SSL Decryption . . . . . . . . .
A. Web UI: . . . . . . . . .
B. Command Line: . . . . . . .
C. Restart Services: . . . . . . .
PCA Tealeaf Command Line Reference .
Initial PCA Configuration. . . . . .
Pre-Requisites . . . . . . . . .
Example Configuration . . . . . .
Complicating Factors . . . . . .
Configuration Steps . . . . . . .
Start Apache . . . . . . . . .
Open PCA Web Console . . . . . .
Configuring the CX PCA Interface . .
Configure Hit Delivery . . . . .
Configure the PCA Pipeline . . . .
Configure Privacy . . . . . . .
Enable Capture . . . . . . . .
Testing Your Configuration . . . . .
Supported Browsers for PCA Web Console
.
.
.
.
.
.
.
.
.
.
.
.
.
.
.
.
.
.
.
.
.
.
.
.
.
.
.
.
.
.
.
.
.
.
.
.
.
.
.
.
.
.
.
.
.
.
.
.
..
..
..
..
..
..
..
..
..
..
..
..
..
..
..
..
..
..
..
..
..
..
..
..
31
31
34
38
42
42
42
43
43
43
44
44
45
46
46
48
49
51
51
51
52
52
52
53
55
55
55
56
56
56
56
56
56
57
57
59
60
60
60
61
61
61
61
63
65
66
66
66
67
iii
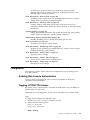
PCA Web Console Login . . . . . . . . ..
67
PCA Web Console Logout . . . . . . . ..
68
Web Console Tabs . . . . . . . . . . ..
68
Configuration . . . . . . . . . . . ..
69
Enabling Web Console Authentication . . ..
69
Toggling HTTP/HTTPS Access . . . . . ..
69
Deploying an SSL Certificate for the Web Console 70
Changing Web Console Listening Ports . . ..
70
IPv6 Support in the PCA Web Console . . ..
70
SysInfo Page . . . . . . . . . . . ..
71
System . . . . . . . . . . . . . ..
71
dmesg . . . . . . . . . . . . . ..
72
PCA Web Console - Summary Tab . . . . ..
73
Web console security . . . . . . . . ..
73
Instance Compound Statistics . . . . . . ..
75
The percentage of alien packets. . . . . ..
76
If true, reassd cannot keep up with listend . ..
77
The percentage of dropped packet connections
77
The percentage becoming unidirectional traffic . 77
The rate reassd is currently reassembling non-SSL
hits . . . . . . . . . . . . . . ..
77
If true, encountered Diffie Hellman SSL . . ..
78
The percentage of aged connections . . . ..
78
Missing SSL keys/sec . . . . . . . . ..
78
Filtered traffic kbytes/sec. . . . . . . ..
79
If non-zero, hits are being dropped due to an
overloaded pipelined. . . . . . . . . ..
79
If non-zero, packets are being dropped because
they exceed the max size limit. . . . . . ..
80
TCP Connections . . . . . . . . . . ..
81
Machine Health . . . . . . . . . . . ..
82
Mount Stats . . . . . . . . . . . ..
82
Peers . . . . . . . . . . . . . . ..
82
Current Per Second Stats . . . . . . . . ..
83
Additional PCA Web Console Debugging
Information . . . . . . . . . . . . ..
84
PCA web Console - Console Tab . . . . ..
84
PCA Web Console - Interface Tab . . . . ..
86
Use Tealeaf Transport Service as Time Source. ..
108
Deliver Statistics to Tealeaf Transport Service . ..
109
PCA Web Console - SSL Keys Tab . . . . ..
110
Loaded Keys . . . . . . . . . . ..
110
Missing Keys . . . . . . . . . . ..
111
Capture Keys . . . . . . . . . . ..
113
Pipeline Settings . . . . . . . . . . ..
113
Pipeline instances . . . . . . . . . ..
114
Data Sessioning. . . . . . . . . . ..
115
X-Forwarding . . . . . . . . . . ..
115
Session Sampling . . . . . . . . . ..
117
Capture Mode . . . . . . . . . . ..
117
Capture Request Methods . . . . . . ..
118
Time Grading . . . . . . . . . . ..
118
Hit processing . . . . . . . . . . ..
118
Capture Type Lists . . . . . . . . . ..
122
How the PCA evaluates capture types . . ..
125
Default Captured Content Types . . . . ..
126
Excluded File Extensions . . . . . . ..
126
Included File Extensions. . . . . . . ..
127
Capture All Mimetypes . . . . . . . ..
127
Capture All POST Types. . . . . . . ..
127
XML POST Types . . . . . . . . . ..
127
iv
IBM Tealeaf CX Passive Capture Application: PCA Manual
Binary POST Types . . . . . . . . ..
Capture All Content-Encoding Types . . ..
Content Types and Indexing . . . . . ..
Downloading Privacy Configuration. . . ..
Rule Manipulation . . . . . . . . . ..
Test Manipulation . . . . . . . . . . ..
Action Manipulation . . . . . . . . . ..
Key Manipulation . . . . . . . . . . ..
Add/Edit Rules . . . . . . . . . . ..
Add/Edit Tests . . . . . . . . . . . ..
Add/Edit Actions . . . . . . . . . . ..
Add/Edit Keys . . . . . . . . . . . ..
Privacy.cfg Reference . . . . . . . . ..
Rules . . . . . . . . . . . . . ..
Tests . . . . . . . . . . . . . ..
Actions . . . . . . . . . . . . ..
Logging Changes . . . . . . . . . . ..
Privacy changes . . . . . . . . . ..
Diff logging . . . . . . . . . . . ..
Reference. . . . . . . . . . . . . ..
Stats per Instance . . . . . . . . . . ..
Checking on System Health through stats.xml ..
Capture Software Processes. . . . . . . ..
Passive Capture Statistics . . . . . . . ..
General section . . . . . . . . . . ..
Time Section. . . . . . . . . . . ..
Memory section . . . . . . . . . ..
TCP section . . . . . . . . . . . ..
SSL section . . . . . . . . . . . ..
Hits section . . . . . . . . . . . ..
Capture section. . . . . . . . . . ..
Target Recipients section . . . . . . ..
Failover section. . . . . . . . . . ..
PCA Web Console - Backup-Logs Tab . . ..
PCA Web Console - Failover Tab . . . . ..
Heartbeat. . . . . . . . . . . . . ..
Auto Settings . . . . . . . . . . . ..
Remote Monitors . . . . . . . . . . ..
PCA Web Console - Utilities Tab . . . . ..
Network Interfaces . . . . . . . . . ..
Details Page . . . . . . . . . . . ..
bwMon . . . . . . . . . . . . ..
System Utilities. . . . . . . . . . . ..
PCA Web Console - Debug Page . . . . ..
Accessing Debug page . . . . . . . . ..
Page Overview . . . . . . . . . . . ..
Debug Output . . . . . . . . . . . ..
Providing PCA ZIP to Support . . . . . ..
ZIP file contents . . . . . . . . . ..
Passive Capture Configuration File ctc-conf.xml
Configuring Multiple Listend-Routerd Pairs . ..
Configuring SSL Pools . . . . . . . . ..
Removing a PCA Server from an SSL Pool ..
Chapter 5. Packet Forwarder
Configuration . . . . . . . . . ..
Configuring a Packet Forwarder to Communicate
with the CX PCA . . . . . . . . . . ..
Configuring a Packet Forwarder Receiver and the
CX PCA to Receive Forwarded Packets . . . ..
127
128
128
128
129
129
129
130
131
133
134
138
138
139
140
141
145
145
145
145
145
146
147
147
147
148
148
151
152
155
161
163
163
164
166
167
167
167
168
168
169
170
171
173
173
173
174
175
175
176
191
191
192
193
193
195
Chapter 6. SSL Keys . . . . . . ..
197
Encrypted SSL Key Setup . . . . . . . ..
Overview. . . . . . . . . . . . . ..
Automatic Conversion of SSL Keys . . . . ..
Auto-Converting PEM to PTL on CX PCA
Server . . . . . . . . . . . . . ..
Converting PFX SSL Private Key to PTL . ..
Steps to Manually Convert SSL Keys . . . ..
Loading CX PCA with SSL Keys . . . . ..
Automatically Loaded PTL Files . . . . ..
Exporting the SSL private key . . . . . . ..
Microsoft IIS 5 and 6 . . . . . . . . . ..
Microsoft IIS 3.0 and 4.0 . . . . . . . . ..
SunOne (iPlanet) 6.0 . . . . . . . . . ..
Troubleshooting iPlanet 6.0 Issues . . . . ..
Sun iPlanet 4.x . . . . . . . . . . . ..
Apache 1.3.x, 2.0.x. . . . . . . . . . ..
IBM HTTP Server . . . . . . . . . . ..
Exporting from a Java Keystore (JKS) . . . ..
Java Keytool Workaround . . . . . . ..
Generating a Self-Signed Certificate . . . . ..
Using SHA-2 algorithm to generate the
self-signed certificate . . . . . . . . ..
Generating a Signed Certificate Request for Internal
CA Use . . . . . . . . . . . . . ..
Utility Scripts . . . . . . . . . . . ..
Deploying SSL Certificates for Use by the PCA
Web Console . . . . . . . . . . . ..
Setting up the Tealeaf Transport Service for SSL
Encryption . . . . . . . . . . . . ..
Testing the SSL certificate used by the Transport
Service . . . . . . . . . . . . ..
Enabling PCA Stats in Tealeaf Status . . . ..
Remove or View Certificate. . . . . . . ..
Validating PEM keys . . . . . . . . . ..
nCipher SSL Key Management System . . . ..
nCipher Considerations . . . . . . . ..
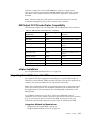
IBM Tealeaf CX PCA and nCipher Compatibility
nCipher Installation . . . . . . . . ..
Integrating Tealeaf SSL keys with HSM. . . ..
Integration with nCipher HSM . . . . ..
Assumptions . . . . . . . . . . ..
Pre-Requisites . . . . . . . . . . ..
PCA Setup . . . . . . . . . . . ..
HSM Configuration and Integration . . . ..
Installation Instructions . . . . . . . ..
nCipher HSM Installation for PCA . . . ..
Requirements . . . . . . . . . . ..
nCipher installation and build steps . . . ..
Creating nCipher Security World for PCA . ..
Disabling nCipher startup at Passive Capture
boot time . . . . . . . . . . . . ..
197
197
198
198
198
199
199
201
202
202
203
204
205
206
207
208
208
209
210
211
211
212
212
213
215
215
216
216
216
216
217
217
217
218
218
218
218
218
219
219
219
220
225
228
Chapter 7. Performance Measurement 229
Timestamp overview . . . . . . . . .
Assumptions . . . . . . . . . .
Example timestamps in the request . . . .
Timestamp Definitions and Values in the
Request . . . . . . . . . . . .
Calculating Times from Timestamps . . .
Factors Affecting Timestamp Values . . . .
..
..
..
229
229
230
..
..
..
230
232
233
Timestamps in ReqCancelled Hits . .
Hits without Timestamps . . . . .
Reporting of timestamps in portal and RTV
Testing Tealeaf Processing Performance . .
Reporting . . . . . . . . . . .
.
.
.
.
.
..
..
..
..
..
Chapter 8. Configuring Passive
Capture on Red Hat Enterprise Linux
(RHEL) . . . . . . . . . . . . ..
233
234
235
235
236
237
Passive Capture on RHEL - Configuring DNS ..
Disable DNS . . . . . . . . . . . ..
Enable DNS . . . . . . . . . . . . ..
/etc/resolv.conf . . . . . . . . . ..
Passive Capture on RHEL - Configuring Network
Interfaces . . . . . . . . . . . . . ..
DHCP Example . . . . . . . . . . ..
ETHTOOL_OPTS Example . . . . . . . ..
Listening Interface Example . . . . . ..
Static IP example . . . . . . . . . . ..
Further Reading . . . . . . . . . . ..
Configuring NTP for Passive Capture on RHEL
Install NTP package and select NTP servers ..
Create Configuration Files . . . . . . ..
Enable and Start the Service . . . . . ..
237
237
237
237
238
238
238
239
239
240
240
242
242
243
Chapter 9. Passive capture monitoring 245
Checklist for diagnosing CX Passive Capture
Application issues . . . . . . . . . . ..
Main checklist . . . . . . . . . . ..
Additional PCA configuration checklist. . ..
Additional tips for diagnosing issues . . . ..
Passive capture monitoring using Tealeaf status
Logging for the CX Passive Capture Application
Chapter 10. Overview of passive
capture maintenance . . . . . . ..
Capture health check .
Capture restart . . .
Log file location . .
Statistics logging . .
Time synchronization.
Manual configuration.
.
.
.
.
.
.
.
.
.
.
.
.
.
.
.
.
.
.
.
.
.
.
.
.
.
.
.
.
.
.
.
.
.
.
.
.
.
.
.
.
.
.
.
.
.
.
.
.
Appendix A. Passive capture
frequently asked questions (FAQ)
Operating System . . . . . . . . .
Upgrading the operating system . . .
Install . . . . . . . . . . . . .
Web Server Configuration . . . . . .
PCA Configuration . . . . . . . .
Console . . . . . . . . . . . .
Logs . . . . . . . . . . . . .
Other . . . . . . . . . . . . .
Troubleshooting . . . . . . . . .
Does Passive Capture support 64-bit Linux
Does Passive Capture Support FreeBSD .
How do I automate PCA installation and
configuration . . . . . . . . . .
245
245
246
246
246
247
249
..
..
..
..
..
..
..
249
249
249
250
250
251
255
.
.
.
.
.
.
.
.
.
.
.
..
..
..
..
..
..
..
..
..
..
..
255
255
255
255
255
255
255
256
256
256
256
.
..
257
Contents
v
What packages are required by the tealeaf-pca
RPM . . . . . . . . . . . . . . ..
What changes does the tealeaf-pca RPM make to
the PCA server . . . . . . . . . . . ..
How do I specify the directory for the tealeaf
symbolic link . . . . . . . . . . . ..
How do I disable creation of the tealeaf symbolic
link. . . . . . . . . . . . . . . ..
How do I install into a directory other than the
default one . . . . . . . . . . . . ..
What directories and files are not located under the
installation directory . . . . . . . . . ..
How do I remove Diffie Hellman cipher from web
server SSL cipher list . . . . . . . . . ..
Locating Servers Using Diffie-Hellman . . . ..
Disabling . . . . . . . . . . . . . ..
Disabling Diffie-Hellman on IIS Servers . ..
Disabling Diffie-Hellman on Apache Servers ..
Some SSL hits missing from Firefox browser
sessions . . . . . . . . . . . . . ..
SSL Pool Troubleshooting . . . . . . . ..
Symptoms . . . . . . . . . . . . ..
To Test . . . . . . . . . . . . . ..
To Fix . . . . . . . . . . . . . . ..
Firefox Browser . . . . . . . . . ..
Web Proxy . . . . . . . . . . . ..
Apache Web Servers . . . . . . . . ..
Non-Apache Web Servers . . . . . . ..
How do I specify alternate configuration files ..
Question . . . . . . . . . . . . ..
Answer . . . . . . . . . . . . ..
Why are my saved changes ignored by the PCA
web console . . . . . . . . . . . . ..
Why can I not stop the web console processes ..
Where is the ctccap logs directory . . . . ..
vi
257
258
259
260
260
261
262
263
263
263
263
264
265
265
266
266
266
266
266
267
267
267
267
268
268
269
IBM Tealeaf CX Passive Capture Application: PCA Manual
How do I manually change the logfile directory
Question . . . . . . . . . . . . ..
Answer . . . . . . . . . . . . ..
How do I make the PCA automatically clear its
statistics . . . . . . . . . . . . . ..
What is the default port number for failover . ..
How does the PCA handle duplicate TCP packets
How does the PCA identify ReqCanceled pages
Server-side values . . . . . . . . . . ..
PCA-calculated values . . . . . . . . ..
Analyzing content size values . . . . . . ..
Chunked Transfer Encoding . . . . . . ..
Identifying ReqCancelled Hits in Tealeaf . . ..
Recorded Data . . . . . . . . . . ..
Creating Event . . . . . . . . . . ..
Searching for Sessions with ReqCancelled Type
How does the PCA manage the capture of IPv6
addresses. . . . . . . . . . . . . ..
Overview of IPv6 . . . . . . . . . . ..
IPv4 Format . . . . . . . . . . . ..
IPv6 Format . . . . . . . . . . . ..
Enabling IPv6 Capture . . . . . . . . ..
Capture . . . . . . . . . . . . . ..
Methods for Capturing and Translating IP
Addresses . . . . . . . . . . . ..
PCA Support for IPv6 . . . . . . . ..
Appendix B. IBM Tealeaf
documentation and help. . . . . ..
.
.
.
.
.
.
.
.
.
.
271
271
271
272
272
273
273
273
274
274
275
276
278
278
279
279
280
280
280
281
285
Notices . . . . . . . . . . . . ..
Trademarks . . . . . . .
Privacy Policy Considerations .
269
269
269
287
..
..
288
289
Passive Capture Application Manual
The IBM Tealeaf CX Passive Capture Application Manual details how to configure
and use the IBM Tealeaf CX Passive Capture Application. It captures all requests
and responses of the web application and assembles them for use in the Tealeaf®
system. Use the following links to access specific topics in the manual.
© Copyright IBM Corp. 1999, 2015
vii
viii
IBM Tealeaf CX Passive Capture Application: PCA Manual
Chapter 1. Passive Capture Overview
Passive Capture from Tealeaf captures and records the complete interaction
between the visitor and the web application environment by using a network tap
or network switch spanning port. The Passive Capture software features the
following benefits:
v Introduces zero overhead, page latency, or CPU utilization to the web server
v Introduces zero risk of failure to the web application - monitored/captured
traffic is not part of the active traffic
v Supports any web application environment: homogenous or mixed, packaged, or
custom
v Supports encrypted (HTTPS) and non-encrypted (HTTP) traffic
v Supports deployment into the Amazon Web Services (AWS) cloud-based
environment
v Reconstructs the HTTP traffic of the user experience for downstream processing
of user sessions and events
To capture requests and responses of your website's traffic, the IBM Tealeaf CX
Passive Capture Application requires high-quality data source that is provided
over a reliable network. See “Tealeaf PCA Network Capture Traffic Requirements”
on page 13.
Enhanced International Character Support (EICS) for CX Passive
Capture Application version 3730
Make sure that you are using the correct version of the CX Passive Capture
Application to support IBM Tealeaf with Enhanced International Character Support
(EICS).
The IBM Tealeaf PCA version 3730 supports capturing data that is encoded using
enhanced international characters. PCA version 3730 is used to capture web traffic
for processing by Tealeaf CX version 9.0.2A.
Security and Administration
The CX Passive Capture Application software is highly controlled and secured. It is
bound to the capture host workstation and can operate without a public interface.
All administration functions can be conducted by a Secure Shell (SSH) client
program.
A secured web console interface is available to administer and managed your CX
Passive Capture Application.
SSL Support
The CX Passive Capture Application software provides full support for SSL
(HTTPS) transactions.
Note: To support SSL, a copy of the SSL private key(s) must be provided to the CX
Passive Capture Application software. If there are multiple SSL Certificates, a copy
© Copyright IBM Corp. 1999, 2015
1
of each private key is required. This enables the CX Passive Capture Application
software to decrypt SSL traffic for HTTP hit content processing.
Integration with HSMs
n some environments, security restrictions at the operating system level are
insufficient for management of encrypted private keys. In these environments,
Tealeaf supports integrations with Hardware Security Modules.
IA® Hardware Security Module (HSM) provides both logical and physical
protection of sensitive SSL private keys from non-authorized use and potential
adversaries.
While the implementation of importing/exporting SSL private keys to the IBM
Tealeaf CX Passive Capture Application server with the HSM varies from
environment to environment, the design goal of these transfers is an automated
process whereby the private keys are securely on the HSM. HSM vendors provide
solutions that address the requirements of this transfer process, usually including
several supported methods for installing keys on the HSMs. There are typically
implementation-specific aspects to designing the automated installation process.
In an HSM environment, the keys that are used by the Tealeaf run time inherit the
protective measures that are offered by the HSM. The key file is stored on the
HSM and retains an additional layer of access control to prevent its movement.
v For more information about HSM integration, see Appendix - Integrating Tealeaf
SSL Keys with HSM.
v Without an HSM, SSL private key are converted to an encrypted Tealeaf.ptl file
format and stored in an operating system directory in a form that is usable on
the same workstation only; the key is hashed in a machine-specific way. For
more information about this method, see “Encrypted SSL Key Setup” on page
197.
Deployment architecture overview
Passive Capture consists of software that is running on a host, which directly
connects to the collection device, a network tap, or switch spanning port. The data
flow from the collection device to the host workstation is unidirectional; the host
only receives data passively.
From the host, the Passive Capture software transports the data in real time to the
Tealeaf CX Server environment. Data can be transported over TCP/IP or through a
network crossover cable that is connected directly between the Passive Capture
host and the receiver workstation in the Tealeaf CX environment. Passive Capture
performs the following functions:
v Reconstruct the HTTP(S) request and response bodies from the captured TCP/IP
packet data
v Decrypt SSL (if applicable)
v (optional) Sessionize (or sequence) the HTTP request and response pages by a
session ID into visitor sessions
v (optional) Privacy blocking can be defined for sensitive data
v Transport the data to the Tealeaf CX Server environment
2
IBM Tealeaf CX Passive Capture Application: PCA Manual
On-premises deployment
The on-premises deployment architecture represents a common IBM Tealeaf
environment that is deployed within your local network infrastructure. In this
scenario, the CX Passive Capture Application can be hosted on a physical server or
it can be hosted from a compatible virtual server within the same network
environment.
The capture device must have access to all traffic sent to the load balancing router
or a network segment that is containing the group of application/web servers that
are supported by the IBM Tealeaf CX solution.
Because the Tealeaf Passive Capture host is connected directly to the collection
device, opening firewall ports is not required to collect data.
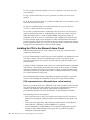
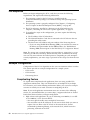
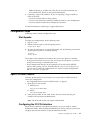
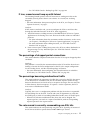
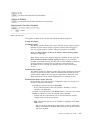
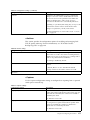
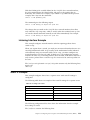
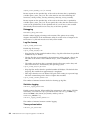
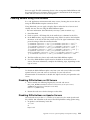
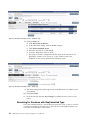
The following diagrams illustrate typical deployment architectures for switch
spanning or network tap methods. From the Passive Capture host, data is
transported (through TCP/IP or SSL) to the IBM Tealeaf CX Server environment
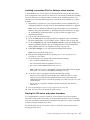
where it is analyzed, aggregated, and archived.
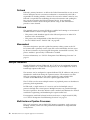
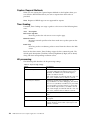
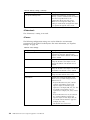
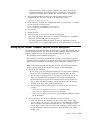
Figure 1. Deployment Architecture Scenario - Port Mirror from Switch (or Load Balancer)
Chapter 1. Passive Capture Overview
3
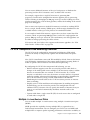
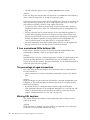
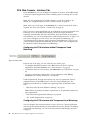
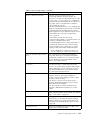
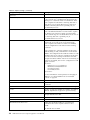
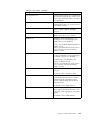
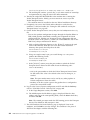
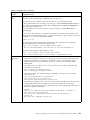
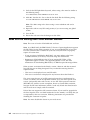
Figure 2. Deployment Architecture Scenario - Network Tap
Deployment in the Cloud
The cloud deployment architecture represents a common IBM Tealeaf environment
that is deployed within a supported cloud-based infrastructure.
IBM Tealeaf can be deployed to one of the following cloud-based infrastructures:
v IBM® SoftLayer®
v Amazon Web Services (AWS)
v Microsoft Azure
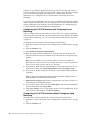
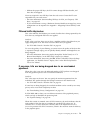
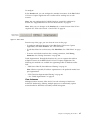
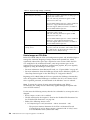
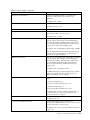
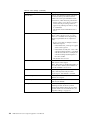
The following diagram illustrates the deployment architecture for cloud-based
installations using a reverse proxy server that also has a packet forwarder installed
on it. In this deployment, the packet forwarder captures web traffic from the
virtual network to the reverse proxy server and sends the captured data to the
PCA which is hosted on a separate virtual machine.
4
IBM Tealeaf CX Passive Capture Application: PCA Manual
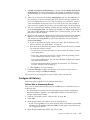
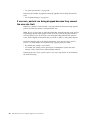
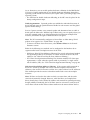
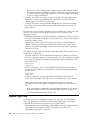
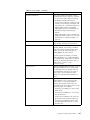
The following diagram illustrates the deployment architecture for cloud-based
installations where the packet forwarder is deployed on the web server. In this
scenario, each web server instance has a packet forwarder instance that is deployed
to the web server. Each packet forwarder instance captures the web traffic between
the web server and the client. The packet forwarder sends the captured web traffic
to the packet forwarder which is hosted on a separate virtual machine.
For information about installing the IBM Tealeaf packet forwarder, see “Packet
Forwarder Overview” on page 6.
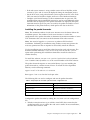
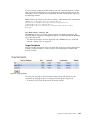
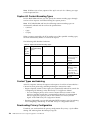
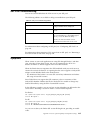
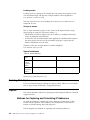
PCA Throughput
The following components can affect how IBM TealeafCX Passive Capture
Application processes hit data that is forwarded to the CX PCA.
Chapter 1. Passive Capture Overview
5
Note: Review the recommended CX PCA requirements to optimize the
performance of the CX PCA.
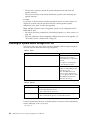
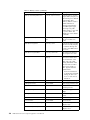
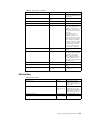
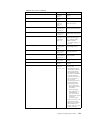
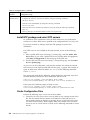
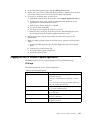
Table 1. CX PCA components and how each component affects performance
Component
Affect on performance
Network interface cards (NICs)
The network interface card represents the upper limit
of what a specific instance of the CX PCA server can
capture and process. For example, using NICs that
are only capable of 100 megabits per second, limits
the maximum throughput for a CX PCA server. If 1
gigabit per second NICs are used, you can achieve up
to 10 times more throughput.
CPU cores
The CX PCA benefits when installed on a server with
eight or more CPUs. With extra available cores, you
can install more instances of the IBM TealeafCX
Passive Capture Application.
RAM
More RAM on the CX PCA server enables more
resources for processing of captured data.
SSL
Secure traffic is CPU-intensive and can have a large
impact on overall throughput. For example, if a CX
PCA can handle 700 megabits per second of non-SSL
traffic throughput, processing the same traffic over
SSL might result in achieving only 70 megabits per
second throughput.
Virtual environments
Your VMware virtual machine settings must be
configured to meet the same operating system and
hardware requirements as a physical server that is
hosting IBM Tealeaf CX PCA. If the virtual machine
does not meet the same requirements as a physical
server, you might experience performance-related
issues.
Limit throughput to no more than 500 Mbps. The CX
Passive Capture Application supports throughput for
up to 500 Mbps. Environments with throughput rates
greater than 500 Mbps can experience packet loss at
the CX Passive Capture Application.
Packet Forwarder Overview
The Packet Forwarder is used to capture and forward hits to a cloud-based CX
PCA that is operating on a virtual machine.
The CX PCA processes the hits that are forwarded by the Packet Forwarder.
The Packet Forwarder software is included with the CX PCA and consists of a
transmitter and a receiver component. The transmitter captures TCP packets and
forwards them to the designated receiver. The receiver can be configured to
capture data that is submitted from a specified transmitter. You can configure
multiple transmitter instances to send data to a centralized CX PCA. Each
transmitter instance must connect to an individual receiver instance on the CX
PCA.
Note: Transmitter instances and a receiver instances cannot share the same
listening port.
6
IBM Tealeaf CX Passive Capture Application: PCA Manual
The Packet Forwarder provides the following functionality:
v Replaces the default TCP packet sniffer component of the PCA with a network
socket listener
v Directs traffic into an internal PCA instance. The transmitter points to a
centralized PCA instance in the cloud and delivers packets to the receiver
through a network connection.
v TCP packets are captured by sniffing the designated port.
The Packet Forwarder components can be deployed in a public or private cloud to
manage capture and forwarding of TCP packets for processing by a cloud-based
IBM Tealeaf installation.
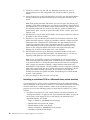
Software architecture
The CX Passive Capture Application uses the following services to perform the
capture process.
The core capture processes captures, reassembles, post-processes, and delivers the
reassembled HTTP/HTTPS hits to the Tealeaf Transport Service, which is hosted
on another server. The five core processes in order of processing during capture are
named captured, listend, reassd, pipelined, and deliverd.
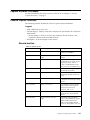
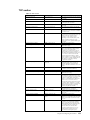
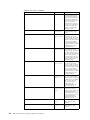
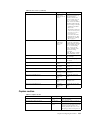
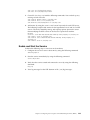
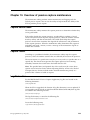
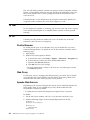
Table 2. CX PCA process descriptions
Process
Description
Captured
Captured is the top-level capture process. It is the
parent of several children processes, which include
listend, reassd, pipelined, and deliverd. Its two
main roles are to create capture instances and create
and manage its children processes. A capture instance
is a pair of listend and reassd processes that capture
and reassemble network traffic. Upon starting,
Captured creates all configured capture instances as
child processes. It then creates the pipelined and
deliverd processes as child processes. Captured
restarts their children processes when they terminate
unexpectedly or when its maintenance script
determines an unhealthy condition.
Listend
Captures network traffic packets from the configured
primary and secondary interfaces and send them to
the reassembly process, Reassd. Listend is essentially
a packet sniffer. It uses the configured and ignored
traffic to determine the packets to capture. Listend
buffers the packets that it sends to Reassd in memory
to accommodate small delays in the ability of Reassd
to read the packets. Listend additionally provides
packet archiving to record the captured packets to
files on the local hard disk.
Reassd
Reassembles TCP packets, decrypt SSL traffic, and
initially parse the resulting HTTP requests and
responses. Reassd retrieves packets for reassembly
from its communication pipe with the listend
process. After it parses an HTTP request and
response pair, reassd sends the reassembled hit to
pipelined. Reassd is the core process of Passive
Capture and is usually the most CPU-intensive
process because of its HTTP and SSL processing.
Chapter 1. Passive Capture Overview
7
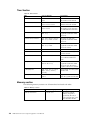
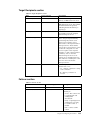
Table 2. CX PCA process descriptions (continued)
Process
Description
Pipelined
Retrieves the reassembled HTTP request and
response from reassd, format them into a Tealeaf hit,
and perform any configured post processing. The
post-processing can include dropping hits that are
based on configurable options, data
compression/decompression, privacy block and
filtering, and instructing deliverd to send the hit to a
workstation. The workstation runs the Tealeaf
Transport Service, which is typically the IBM Tealeaf
CX server.
Note: The CX PCA supports the creation of multiple
instances of the pipelined process.
Routerd
Transparently load balances (TLB) incoming network
packets and connections to the multiple Reassd
process instances. By distributing network traffic
more evenly across all Reassd instances, it increases
the efficiency of the system's cpu cores to improve
overall performance. This process module is present
only if TLB mode is enabled.
Tcld
Provides TCL-based script processing to handle the
management of the Tealeaf hits for specialized
delivery with the deliverd process. This process can
accept Tealeaf hits from one or more pipelined
source processes.
Deliverd
Delivers the Tealeaf formatted hits to one or more
Tealeaf Transport Services on remote workstations as
instructed by tcld. Tcld is responsible for deciding
whether a hit must be sent and to whom it must be
sent. Establishes the network connection and sending
the hits over the network to the Tealeaf Transport
Service. It can optionally communicate with the
Tealeaf Transport Service using an SSL connection to
provide a secure channel.
Failoverd
This optional process is present if failover is enabled
and running on an instance of the IBM Tealeaf CX
Passive Capture Application.
v This process sends heartbeat signals to the
failoverd processes on other PCA instances in the
environment.
v This process runs independently of the other PCA
processes.
Memcached
The Memcached process provides a global in-memory
caching system to the CX PCA. Memcached is
primarily used to store SSL session information for
later access by all Reassd instances in processing SSL
decryption (resumed SSL sessions). This process
module is present only if TLB mode is enabled.
Capture Process
The core capture processes capture, reassemble, post-process, and deliver the
reassembled HTTP/HTTPS hits to the Tealeaf Transport Service running on
another workstation. The five processes in order of processing during capture are
named captured, listend, reassd, pipelined, and deliverd.
8
IBM Tealeaf CX Passive Capture Application: PCA Manual
v The tcld process can or cannot present in your PCA.
Captured
Captured is the top-level capture process. It is the parent of several children
processes: listend, reassd, pipelined, and deliverd. Its two main roles are to create
capture instances and create and manage its children processes. A capture instance
is a pair of listend and reassd processes that capture and reassemble network
traffic. Upon starting, captured creates all configured capture instances as child
processes. It then creates the pipelined and deliverd processes as child processes.
Captured restarts their children processes when they terminate unexpectedly or
when its maintenance script determines an unhealthy condition.
Listend
The primary function of Listend is to capture network traffic packets from the
configured primary and secondary interfaces and send them to the reassembly
process, Reassd. Listend is essentially a packet sniffer. It uses the configured and
ignored traffic to determine the packets to capture. Listend buffers the packets that
it sends to Reassd in memory to accommodate small delays in the ability of Reassd
to read the packets. Listend additionally provides packet archiving to record the
captured packets to files on the local hard disk.
Reassd
Reassd's primary function is to reassemble TCP packets, decrypt SSL traffic, and
initially parse the resulting HTTP requests and responses. Reassd retrieves packets
for reassembly from its communication pipe with the listend process. After it
parses an HTTP request and response pair, reassd sends the reassembled hit to
pipelined. Reassd is the core process of Passive Capture and is usually the most
CPU-intensive process because of its HTTP and SSL processing.
Pipelined
Pipelined's primary function is to retrieve the reassembled HTTP request and
response from reassd, format them into a Tealeaf hit, and perform any configured
post processing. The post-processing can include dropping hits that are based on
configurable options, data compression/decompression, privacy block and filtering,
and instructing deliverd to send the hit to a workstation. The workstation runs the
Tealeaf Transport Service, which is typically the IBM Tealeaf CX server.
v PCA supports the creation of multiple instances of the pipelined process. See
“Multi-Instance Pipeline Processes” on page 10.
Routerd
The primary function of Routerd is to transparently load balance (TLB) incoming
network packets and connections to the multiple Reassd process instances. By
distributing network traffic more evenly across all Reassd instances, it increases the
efficiency of the system's cpu cores enabling better overall performance. This
process module is present only if TLB mode is enabled. For more information, see
“CX PCA Transparent Load Balancing Overview” on page 11.
Tcld
Tcld's primary function is to provide TCL-based script processing to handle the
management of the Tealeaf hits for specialized delivery with the deliverd process.
This process can accept Tealeaf hits from one or more pipelined source processes.
Chapter 1. Passive Capture Overview
9
Deliverd
Deliverd's primary function is to deliver the Tealeaf formatted hits to one or more
Tealeaf Transport Services on remote workstations as instructed by tcld. Tcld is
responsible for deciding whether a hit must be sent and to whom it must be sent.
Deliverd is responsible for establishing the network connection and sending the
hits over the network to the Tealeaf Transport Service. It can optionally
communicate with the Tealeaf Transport Service using an SSL connection to
provide a secure channel.
Failoverd
This optional process is present if failover is enabled and running on an instance of
the IBM Tealeaf CX Passive Capture Application.
v This process sends heartbeat signals to the failoverd processes on other PCA
instances in the environment.
v This process runs independently of the other PCA processes.
v See “PCA Web Console - Failover Tab” on page 166.
Memcached
The Memcached process provides a global in-memory caching system to the CX
PCA. Memcached is primarily used to store SSL session information for later access
by all Reassd instances in processing SSL decryption (resumed SSL sessions). This
process module is present only if TLB mode is enabled.
For more information, see “CX PCA Transparent Load Balancing Overview” on
page 11.
Multiple Instances
In both TLB mode and non-TLB mode, the CX PCA can be configured to initiate
multiple instances of listend and reassd processes to use multiple CPU cores to
handle high capture traffic loads.
The instances can be configured to capture different TCP/IP addresses and ports to
distribute the traffic load among the capture instances. The instances can share
NICs for capturing packets or can capture packets by using multiple NICs
available on the IBM Tealeaf CX Passive Capture Application server.
The CX PCA can also create multiple instances of pipelined process to distribute its
processing load requirements.
In TLB mode, a single instance of listend is used to feed multiple reassd
processes through the routerd process. Multiple instances are provided through
the reassd processes where the effective work is needed and eliminates the manual
workload of segmenting and distributing the capture traffic load.
For integration with load balanced web servers that use a single virtual IP (VIP),
see “CX PCA Transparent Load Balancing Overview” on page 11.
Multi-Instance Pipeline Processes
The pipelined process runs multiple CPU-intensive operations, such as privacy
blocking activities, which can cause performance bottlenecks in single-threaded
configurations.
10
IBM Tealeaf CX Passive Capture Application: PCA Manual
You can create additional instances of the pipelined process to distribute the
processing load for all PCA instances across available CPU resources.
For example, suppose that a single PCA instance is generating 500
pageviews/second and is configured for intensive pipeline privacy processing,
which is limiting its throughput to 200 page views per second. Adding two more
pipeline instances (for a total of three pipelines) enables the handling of the overall
page-view throughput.
One or more reassd processes (multi-PCA instances) can feed its resulting HTTP
hits to a single, shared memory (SHM) queue, which manages distribution to the
available instances of the pipelined processes in round-robin fashion.
In an example of multi-PCA instances, suppose that you have created four PCA
instances, which are generating 1000 pageviews/second. If a single pipeline can
process 400 page views per second in your environment, two more pipelines can
be added to manage processing the entire volume.
PCA master and slave failover also supports multi-instance pipelines. See “PCA
Web Console - Failover Tab” on page 166.
CX PCA Transparent Load Balancing Overview
The CX PCA can be configured for transparent load balancing (TLB) which
provides the ability to transparently segment and distribute network capture
traffic.
New CX PCA installations come with TLB enabled by default. Prior to this feature
(non-TLB mode), segmentation of the capture traffic required assigning blocks of
traffic to specific CX PCA instances for load balanced processing.
By configuring the CX PCA for transparent load balancing, you can:
v Reduce customer support issues that are caused by uneven traffic loads or
changes to the traffic profile across multiple CX PCA instances where a sudden
increase in network traffic can overload a CX PCA instance. If a CX PCA
instance is overloaded, it can cause the instance to restart and lose of captured
traffic. By enabling transparent load balancing, network traffic is distributed to
the CX PCA instances by using a round robin method of distribution.
Distributing the network traffic to the CX PCA instances prevents an instance
from overloading.
v Simplify your CX PCA installation and configuration. By enabling transparent
load balancing, you do not need to provide extra configuration for each
additional CX PCA instance. You can specify the number of instances that you
want to use and Tealeaf automatically distributes network traffic to the
instances.
v Capture traffic from a single virtual IP (VIP) for web servers that are configured
to work under a single VIP.
Multiple Listend-Routerd Pairs
You can enable multiple listend instances using multiple Listend-Routerd pairs
(MLRP).
MLRP provides the capability of using multiple NICs to capture data in a
load-balanced environment. You can configure your CX PCA to use MLRP with
multiple NICs to improve packet capturing performance and increase scalability to
Chapter 1. Passive Capture Overview
11
meet the demands of your network traffic. MLRP takes advantage of multiple
NICs by creating multiple instances of the routerd process. Each routerd process
requires one CPU core to operate. Each routerd process actively routes the flow of
incoming network traffic from a listend process to the reassd processes. Each
listend process is paired to one routerd process and can process 1 Gigabit per
second of traffic. The ability to route the network traffic to multiple reassd
processes removes the need to manually segment and distribute the captured
traffic to prevent queuing. Balancing the network traffic to multiple reassd
processors enables the CX PCA to take advantage of using multiple NICs to
receive and process large amounts of network traffic.
For information on how to configure MLRP, see “Configuring Multiple
Listend-Routerd Pairs” on page 191.
Maintenance program
The Passive Capture software includes a maintenance program that runs as the
root user through the workstation's cron service.
The maintenance program performs various tasks, including checking the health of
the passive capture processes, logging, statistics, sending diagnostic statistics to
another workstation, and managing various log files created by the Passive
Capture software programs.
3rd party software
The CX Passive Capture Application software installation packages include the
following third-party packages:
Apache HTTPD 2.2.19
Expat 1.2
LibNet 1.1.1
LibPCAP 1.1.1
OpenSSL 1.0.0d
PHP 5.2.9
TCL 8.4.x
Tcpdump 4.1.1
Tcpslice 2004.05.10
Some of these packages are directly used by the Tealeaf software and some are
provided as tools for managing the system.
Formatted commands for readability
Linux commands are formatted specially for display purposes. The following
examples explain how some of the commands might be formatted to improve the
readability of the content.
For example, the following is a command that is entered on the screen:
# tcpdump -Xnr tst1.dmp |more
For display purposes, the command can be displayed in manual in the following
manner:
# tcpdump -Xnr \
tst1.dmp |more
Note the backslash, which is used as the line continuation indicator.
12
IBM Tealeaf CX Passive Capture Application: PCA Manual
Commands that are displayed back on the screen can be formatted as follows:
# tcpdump -Xnr \
> tst1.dmp |more
Note the caret (>) at the beginning of the second line to indicate continuation.
Note: Be careful copying and pasting Linux commands from manual. Some
commands can require modification.
Tealeaf PCA Network Capture Traffic Requirements
The following requirements are needed for mirroring network traffic and
forwarding it to the CX PCA for capture.
Network devices such as switch span ports, network taps, and load balancers are
just a few of the network traffic capture points that can provide a copy of live
network traffic to the IBM Tealeaf CX Passive Capture Application. Typically, the
mirrored traffic consists of the customer website's web server traffic.
v Mirrored network traffic is considered passive in nature, as the capture NIC(s)
that are used by the CX PCA do not interact with the live network traffic.
Note: The IBM Tealeaf CX Passive Capture Application supports the capture of
128-bit SSL traffic. Encryption methods by using a fewer numbers of encryption
bits are not supported.
Basic traffic requirements
For proper operation, the PCA requires that the mirrored network traffic is of high
integrity and quality.
Any loss of critical network TCP packets can prevent the PCA from reassembling
the TCP traffic into HTTP hits. Lost TCP packets can result in Tealeaf sessions with
missing pages, partial pages, or both. In a worst-case scenario, the entire session
can be unusable.
Confirm the following basic requirements with your network administrator:
v Traffic stream: The PCA requires bidirectional traffic stream or two unidirectional
traffic streams containing all HTTP requests and responses traffic between your
web application and the visitor browsers that are interacting with it.
v No errors or dropped packets: No errors, dropped packets, or overrun packets at
operating system network interface card and network level.
– An ifconfig ethX command on the capture NIC must display a constant
number of dropped packets or errors.
– If the number is increasing at a high rate, there can be problems with the
fidelity of the traffic sent to the PCA. There can be inadequate sizing of your
PCA hardware for your traffic volume, or both.
v Real visitor IPs: The capture point can see the real visitor IPs or host address of
visitor's IP.
Access to the real IP address of your visitors is a valuable resource for
troubleshooting purposes. For customers who use load balancers, this
requirement cannot be possible.
v Filtered traffic: Spanned traffic is filtered down to the essential traffic only.
Chapter 1. Passive Capture Overview
13
Tealeaf recommends filtering out as much unnecessary traffic as possible at the
network level before it is delivered to the PCA. This filtering offloads processing
resources that the PCA must use to filter out traffic.
v TCP persistent connections issues:
To capture traffic, the PCA must see the start of all TCP connections.
Diffie-Hellman Cipher
Diffie-Hellman is a type of SSL encryption cipher.
It is designed so that third parties, which are systems other than the two parties at
the two endpoints of a conversation, cannot decrypt the communications traffic. A
user session that was established with a web server by using this cipher cannot be
captured by using the IBM Tealeaf CX Passive Capture Application.
Note: IBM Tealeaf does not support the use of the Diffie-Hellman cryptographic
protocol and recommends configuring your web servers to not use it.
TLS SessionTicket Extension
This SSL protocol extension is used by some web servers to transmit encrypted
traffic to the browsers that support it. In the OpenSSL modules of the latest
Apache web servers and possibly other web servers, the new SSL TLS protocol
extension (RFC-5077) for stateless session resumption, which is known as
SessionTicket extension, encrypts the SSL state information, which is used only if
both the client browser and the web server comply with the standard.
Note: The IBM Tealeaf CX Passive Capture Application supports the SSL Session
Ticket extension in recent builds. If you enable this extension on your web server,
verify that you installed or upgraded to build TLSv1.x in Build 3327 or later. For
more information on downloading IBM Tealeaf, see IBM Passport Advantage®
Online.
See “Some SSL hits missing from Firefox browser sessions” on page 264.
TCP Connections
The IBM TealeafCX Passive Capture Application requires to monitor the start of all
TCP connections. If TCP persistent connections are enabled, then the PCA is able to
reassemble hits from in-progress connections.
Please check with your IT team to see whether TCP persistent connections is
enabled in the IT infrastructure. Individual TCP persistent connections can be used
by multiple visitors to your web application. It can also be deployed by a load
balancer such as an F5 network device, a front-end proxy such as an Akamai
server, or the web server itself.
For SSL sessions, pooling SSL transactions is considered an optimization. However,
SSL pooling transactions to a set of TCP persistent connections can cause issues,
which prevent these sessions from being decrypted. If a new SSL session is not
seen to allow the PCA to cache the SSL session ID information, then any
subsequent SSL sessions that reuse the session ID cannot be decrypted.
In such an environment, connections can persist up to 24 hours, which introduces
a latency in the capture of sessions when the PCA is installed, upgraded, or
14
IBM Tealeaf CX Passive Capture Application: PCA Manual
rebooted. There can be possible workarounds or compromise configuration settings
on the source network devices which can mitigate the latency period.
v For more information, contact your IT team.
Duplicate Data
Each instance of the IBM TealeafCX Passive Capture Application must feed data
that is unique within IBM Tealeaf.
Note: Duplicated data must not be intentionally passed to IBM Tealeaf. While CX
PCA is designed to filter out duplicated data, unnecessary duplicate packets in a
high-volume environment can impede processing. IBM Tealeaf supports passive
failover across multiple instances of the IBM Tealeaf CX Passive Capture
Application. See “PCA Web Console - Failover Tab” on page 166.
Chapter 1. Passive Capture Overview
15
Sources of network traffic quality issues
If you are having network traffic issues, review the following issues to help isolate
the problem.
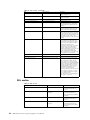
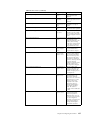
Table 3. Sources of network traffic quality issues
Issue
Source
Dropped network TCP packets
Network TCP packets can be dropped in
any of the following conditions occur:
v
Over-subscribed span port: Dropped
network packets can be caused by an
over-subscribed network switch span port.
In this configuration, one or more selected
network traffic streams are configured to a
share a single port where the total of all
selected traffic exceeds the port's
bandwidth. For example, three 500
megabits/s traffic streams with aggregate
bandwidth of 1.5 gigabits/second is
mirrored to a switch span port that can
handle only 1.0 gigabits/second. During
peak traffic periods, this span port is
unable to handle the load, and packets are
dropped.
v Inadequate CPU resources on the switch:
The span port can be dependent on the
switch's CPU for available cycles to
aggregate and/or filter the required traffic
for mirroring.
Contemporary switches typically allocate
available CPU cycles for span port
mirroring where the CPU priority is to
handle switching operations. If the CPU is
busy with switching operations, there
cannot be sufficient cycles to manage the
mirroring, in which case span port
operations "starve," and network packets
are dropped in the mirrored traffic.
Note: The mirrored traffic bandwidth
cannot be close to the practical limits of
the span port. A network switch's
utilization curve becomes an important
factor in providing high-integrity mirrored
traffic.
v Other network devices: In a more
complex network infrastructure, more
network devices can be used with a
mirrored network traffic source, such as
network traffic aggregators, and network
port replicators. These types of devices
can cause network packet loss, especially
if any active devices are altering the
network traffic as part of their processing.
16
IBM Tealeaf CX Passive Capture Application: PCA Manual
Table 3. Sources of network traffic quality issues (continued)
Issue
Source
Unidirectional traffic
A simple misconfiguration error can result in
the CX PCA receiving network traffic for one
direction only. In these instances, HTTP
requests or responses are forwarded to the
CX PCA, but not both.
For the CX PCA to correctly reassemble
HTTP hits, the TCP traffic must be provided
for both directions. In most cases, this
situation is a relatively easy to identify and
usually is caused by misconfiguration of the
source network device.
Measuring dropped packets
The PCA provides several metrics to help identify dropped network packet
conditions. These metrics are only data points to help to assess likely causes for
dropped packets.
Unfortunately, few network switch metrics can indicate when a switch has overrun
its internal buffers, causing dropped network packets. Indirect metrics such as port
bandwidth and CPU utilization can indicate a possible issue. These metrics
samples the state of the network switch at some pre-determined time interval. If a
peak condition occurs between sampling periods, however, no indication would be
available at all.
The best indicator is to evaluate captured Tealeaf sessions for missing pages,
partial pages, or both missing pages and partial pages. Static validation of test
Tealeaf sessions can provide another data point in analyzing the cause of sessions
with missing pages. Real time tracking of Tealeaf sessions with compound events
that are trigger for missing pages can help to determine whether a solution
resolves the issue.
Chapter 1. Passive Capture Overview
17
18
IBM Tealeaf CX Passive Capture Application: PCA Manual
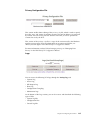
Chapter 2. Installing the CX Passive Capture Application
The following instructions can be used to assist the installation of your CX Passive
Capture Application software.
The deployment architectures that are used in Chapter 1, “Passive Capture
Overview,” on page 1 represent common on-premises and cloud-based IBM Tealeaf
environments that are supported.
Note: If you are upgrading from a previous version of CX PCA, see Chapter 3,
“Upgrading the CX PCA Software,” on page 51.
To begin installing the CX PCA software in your IBM Tealeaf environment:
1. Configure and install the hardware and operating system for your CX PCA
server (see Hardware Setup and Operating System Installation).
2. Perform the pre-installation check (see Pre-installation Checklist).
3. Install the CX PCA software to your designated CX PCA server (see “Package
Installation” on page 29).
4. Configure the CX PCA server (see Chapter 4, “Configuring the CX PCA,” on
page 55).
5. If your IBM Tealeaf environment is cloud-based, deploy the packet forwarders
for your CX PCA environment (see “Installing the Packet Forwarder” on page
31).
6. Perform the post-installation tasks (see “Post-installation checklist” on page 42).
CX PCA installation requirements
The following requirements must be met before you install the IBM Tealeaf CX
Passive Capture Application and Packet Forwarder.
v IPv6 addresses must be captured. Processing of IPv6 addresses throughout the
Tealeaf solution is available for Release 8.4 and later only.
v Your Apache servers are handling SSL compression traffic to and from Chrome
browsers.
v For HTTP_X_FORWARDING support, you must use PCA 3502 or later.
For additional requirements, see:
v “Changes to the PCA server” on page 27
v Hardware requirements
v “Hard disk mount point recommendations” on page 21
v “Multiple instances of PCA” on page 26
v Network traffic requirements
v “Operating system requirements” on page 21
v “Supported Accelerator Cards” on page 21
Network traffic requirements
Network devices such as switch span ports, network taps, and load balancers are
just a few of the network traffic capture points that can provide a copy of live
network traffic to the IBM Tealeaf CX Passive Capture Application. Typically, the
© Copyright IBM Corp. 1999, 2015
19
mirrored traffic consists of the customer website's web server traffic. Mirrored
network traffic is considered passive in nature, as the PCA's capture NIC(s) do not
interact with the live network traffic.
Note: The IBM Tealeaf CX Passive Capture Application supports the capture of
128-bit SSL traffic. Encryption methods by using a fewer numbers of encryption
bits are not supported
Before you begin to capture network traffic, you must review the requirements for
network traffic that PCA expects to receive. This information must be shared with
the IT infrastructure team.
Note: Tealeaf does not support the use of the Diffie-Hellman cryptographic
protocol and recommends configuring your web servers to not use it.
Note: The IBM Tealeaf CX Passive Capture Application supports the SSL Session
Ticket extension. If you enable this extension on your web server, upgrade to one
of the supporting builds:
v TLSv1.1 in Build 3611 or later
v TLSv1.2 in Build 3611 or later
For more information on downloading IBM Tealeaf, see IBM Passport Advantage
Online.
Note: The IBM Tealeaf CX Passive Capture Application expects to see the start of
all TCP connections. If TCP persistent connections are used by any server that is
feeding data to the PCA, then latency can be introduced in the capture of sessions,
and data can be lost.
CX PCA hardware requirements
The following table lists the minimum and the recommended hardware
requirements to run the CX Passive Capture Application.
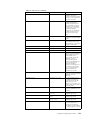
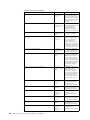
Table 4. CX PCA hardware requirements
Minimum requirements
Recommended requirements
Note: These are the minimum requirements
for operation of the CX Passive Capture
Application software. They cannot
accurately support the volume of data and
processing requirements for your
environment. For more information about
sizing for your environment, contact Tealeaf
Professional Services.
v Dual processor, quad core: Intel quad-core
Xeon processor at 2.8 GHz or better for
total of eight cores minimum
v Dual processor, dual core: Intel dual-core
Xeon processor at 2.8 GHz or better for
total of four cores minimum
v 8 GB of RAM minimum
v 3 NICs, 1 Gigabit each
v 100 GB or better SAS or SCSI hard disk
– 15-ms access time
– 7200-rpm drive speed
20
IBM Tealeaf CX Passive Capture Application: PCA Manual
v 16 GB of RAM minimum
v 3 NICs, 1 Gigabit each
v 100 GB or better SAS or SCSI hard disk
drive
– 15-ms access time
– 7200-rpm drive speed
The following hardware is recommended for
general software installation and machine
recovery:
v CD-ROM drive
v 1.44-MB diskette drive
v Secondary drive for capturing and storing
network traffic to archives: 200 GB - 800
GB
Hard disk mount point recommendations
Following are the recommended mount points and sizes for a 100-GB drive for the
Passive Capture software.
Table 5. Recommended PCA mount point sizes
Mount point
Size
/
4 GB
/archive
42 GB (Remaining disk)
/tmp
4 GB
/usr
40 GB
/var
8 GB
swap
2 GB
The /archive partition is used for storing raw packet archives, if enabled. By
default, the feature is off and must be used for troubleshooting problems only.
The /usr partition contains the Passive Capture software. The Tealeaf Passive
Capture software RPM installs files into /usr/local.
Supported Accelerator Cards
See Appendix - Supported Hardware Accelerator Cards.
Integration with Hardware Security Modules
Tealeaf PCA can be integrating with private keys retained on hardware security
modules. See Appendix - Integrating Tealeaf SSL Keys with HSM.
VMware support
The IBM Tealeaf CX Passive Capture Application supports being installed to a
VMware vSphere 5.5 virtual machine.
Your VMware virtual machine settings must be configured to meet the same
operating system and hardware requirements as a physical server that is hosting
IBM Tealeaf CX PCA. If the virtual machine does not meet the same requirements
as a physical server, you might experience performance-related issues.
Note: The following limitations apply to IBM Tealeaf deployed within a VMware
environment:
v Limit throughput for up to 500 Mbps. The CX Passive Capture Application
supports throughput for up to 500 Mbps. Environments with throughput rates
greater than 500 Mbps can experience packet loss at the CX Passive Capture
Application.
v You must disable multi-queue support in the VMware virtual network driver.
Multi-queue support is automatically enabled by default when VMware is
installed. If multi-queue support is not disabled, the packets that are sent to the
CX Passive Capture Application might become out of order and cause the
packets to be dropped.
Operating system requirements
The following operating system requirements must be met before installing the
IBM Tealeaf CX Passive Capture Application.
Chapter 2. Installing the CX Passive Capture Application
21
The IBM Tealeaf CX Passive Capture Application (PCA) is considered a network
appliance software, like a network switch, that can be installed on a supported
Linux platform. The software is designed to run in a dedicated environment to
capture and process a high volume of network packets. As such, it is the only
application software that must own the Linux server. It is not meant to be shared
with any other general applications.
Red Hat Enterprise Linux or SUSE Linux Enterprise Server must be installed
before you begin installing IBM Tealeaf CX Passive Capture Application.
Supported operating system distributions for CX PCA Builds
Note: If your CX PCA server is running a build that is earlier than build 3502, it is
recommended to upgrade to build 3502 or later. Before you upgrade to CX PCA
build 3502 or later, you must upgrade the operating system on your CX PCA
server to a distribution of Linux that is supported by the CX PCA.
At the time of this publication, the following distributions of Red Hat Enterprise
Linux and SUSE Linux Enterprise Server are compatible with the CX PCA.
v Red Hat Enterprise Linux (RHEL) versions 5, 6, and 7
Note: Red Hat Enterprise Linux (RHEL) 7 uses the same installation package
and process as Red Hat Enterprise Linux (RHEL) 6.
v SUSE Linux Enterprise Server (SLES) version 11
Depending on the type of operating system, more installation might be required.
Review all of the following requirements.
Supported operating system distributions for Packet Forwarder
The Packet Forwarder software can be installed to systems with the following
operating systems:
v Red Hat Enterprise Linux (RHEL) versions 6 and 7
v SUSE Linux Enterprise Server (SLES) version 11
Note: Red Hat Enterprise Linux (RHEL) 7 uses the same packet-forwarder
installation package and process as Red Hat Enterprise Linux (RHEL) 6. In this
scenario, use tealeaf-pca-<nnnn>-<rrr>.RHEL6.i386.rpm for the installation
package.
Depending on the type of operating system, more installation might be required.
Review all of the following requirements.
Disable SELinux
Before you begin, SELinux must be disabled through the operating system for all
versions of Red Hat Linux. See Hardware Setup and Operating System Installation.
Disable iptables
On the Linux server hosting the IBM Tealeaf CX Passive Capture Application,
please disable use of iptables. For more information, see Hardware Setup and
Operating System Installation.
22
IBM Tealeaf CX Passive Capture Application: PCA Manual
Hyperthreading
Note: If the CX PCA is hosted on a server that supports hyperthreading, do not
disable it. It is enabled on most servers that support it and must be enabled for the
IBM Tealeaf CX Passive Capture Application.
If you are using multiple instances of the CX PCA, do not count the hyperthreaded
virtual processors as available CPU cores. To calculate the maximum number of CX
PCA instances, count only the real CPU cores. See “Multiple instances of PCA” on
page 26.
32-bit Multi-Core O/S
For a multi-core system with a 32-bit operating system, the installation process
automatically detects the additional processors and installs an SMP kernel to
enable multi-core support. Physical Address Extension (PAE) support is included
as part of the SMP kernel and supports up to 16 GB of RAM on a 32-bit operating
system.
64-bit Multi-Core O/S
In a multi-core system with a 64-bit operating system, the installation process
requires no additional kernels.
Note: The 32-bit versions of the required libraries must be installed from the
installation disk of your 64-bit version of Linux. See “Required Packages” on page
24.
Disable SELinux
The security enhancement features of Red Hat Linux are not compatible with the
IBM TealeafCX Passive Capture Application. Multiple system settings are not
allowed in SELinux mode, and the syslog system is not available, which prevents
the PCA capture.log from working.
v If SELinux is enabled and the tealeaf script is used to start capture, a warning is
printed.
v A warning message is also displayed in the PCA Web Console when SELinux is
enabled.
Before you install the IBM Tealeaf CX Passive Capture Application, SELinux must
be disabled through the operating system. For more information, see the
documentation for your Linux distribution.
Disable iptables
You can disable the Linux firewall by disabling iptables.
On the Linux server that is hosting the IBM Tealeaf CX Passive Capture
Application, disable use of iptables.
Note: If iptables are enabled and cannot be disabled, you can disable the firewall
through Linux to access the PCA Web Console. For more information, review the
documentation that came with your Linux release.
To disable iptables, run the following commands in the listed order.
Note: For more information about iptables, review the documentation that came
with your Linux release.
Chapter 2. Installing the CX Passive Capture Application
23
1. Commands:
service iptables save
service iptables stop
chkconfig iptables off
2. Restart the PCA.
Required Packages
The CX Passive Capture Application software RPM requires the following
packages, which are included with a minimal installation of RHEL and SLES.
As part of a 32-bit operating system installation, these packages must be installed
already.
v You must manually install them for 64-bit installations. While the 64-bit versions
of these libraries are automatically installed, the 32-bit versions are required by
PCA and must available on the installation media.
Note: A minimal installation of Red Hat Enterprise Linux is required for Tealeaf
installation. If more configuration or software is required because of local policies
that are concerning firewalls or monitoring software, those components must be
installed and configured. It is done after the minimal Tealeaf installation is
completed and Passive Capture is up and running.
Red hat Enterprise Linux Server release 5.6
Required Packages:
v bash-3.1-16.1
v coreutils-5.97-12.1.el5
v expat-1.95.8-8.2.1
v gawk-3.1.5-14.el5
v glibc-2.5-18
v libgcc-4.1.2-14.el5
v libgdbm-1.8.0-26.2.1
v libicudata.so.38
– Provided with the Tealeaf rpm
v libicuuc.so.38
v
v
v
v
– Provided with the Tealeaf rpm
libstdc++-4.1.2-14.el5
libxml2-2.6.26-2.1.2
perl-5.8.8-10
zlib-1.2.3-3
Red Hat Enterprise Linux Server release 6.1
Required Packages:
v bash-4.1.2-3.el6.i686
v coreutils-8.4-9.el6.i686
v gawk-3.1.7-6.el6.i686
v glibc-2.12-1.7.el6.i686
v libgcc-4.4.4-13.el6.i686
v libstdc++-4.4.4-13.el6.i686
24
IBM Tealeaf CX Passive Capture Application: PCA Manual
v libxml2-2.7.6-1.el6.i686
v libicudata.so.38
– Provided with the Tealeaf rpm
v libicuuc.so.38
– Provided with the Tealeaf rpm
v openssl-1.0.0-4.el6.i686
v perl-5.10.1-115.el6.i686
v zlib-1.2.3-25.el6.i686
Red Hat Enterprise Linux Server release 6.5
Required Packages:
v glibc-2.12-1.132.el6_5.2.i686.rpm
v keyutils-libs-1.4-4.el6.i686.rpm
v krb5-libs-1.10.3-15.el6_5.1.i686.rpm
v libcom_err-1.41.12-18.el6.i686.rpm
v libgcc-4.4.7-4.el6.i686.rpm
v libselinux-2.0.94-5.3.el6_4.1.i686.rpm
v libstdc++-4.4.7-4.el6.i686.rpm
v libxml2-2.7.6-14.el6_5.2.i686.rpm
v nss-softokn-freebl-3.14.3-10.el6_5.i686.rpm
v openssl-1.0.1e-16.el6_5.14.i686.rpm
v zlib-1.2.3-29.el6.i686.rpm
Red Hat Enterprise Linux Server release 7
Required Packages:
v glibc-2.12-1.132.el6_5.2.i686.rpm
v
v
v
v
keyutils-libs-1.4-4.el6.i686.rpm
krb5-libs-1.10.3-15.el6_5.1.i686.rpm
libcom_err-1.41.12-18.el6.i686.rpm
libgcc-4.4.7-4.el6.i686.rpm
v
v
v
v
v
v
libselinux-2.0.94-5.3.el6_4.1.i686.rpm
libstdc++-4.4.7-4.el6.i686.rpm
libxml2-2.7.6-14.el6_5.2.i686.rpm
nss-softokn-freebl-3.14.3-10.el6_5.i686.rpm
openssl-1.0.1e-16.el6_5.14.i686.rpm
zlib-1.2.3-29.el6.i686.rpm
SUSE Linux Enterprise Server 11
Required Packages:
v bash-3.2-147.3
v coreutils-6.12-32.17
v gawk-3.1.6-1.22
v glibc-2.9-13.2
v libgcc43-4.3.3_20081022-11.18
Chapter 2. Installing the CX Passive Capture Application
25
v libstdc++6-4.7.2
v libxml2-2.7.1-10.8
v zlib-1.2.3-106.34
Installing required packages
The required packages must be installed for the tealeaf-pca rpm to install correctly.
Note: The installation must run as root. See Hardware Setup and Operating
System Installation.
To view the required packages for your specific machine, run the following:
rpm -q --requires -p tealeaf-pca-XXXX-1.YYYY.ZZZZ.rpm | fgrep -v rpmlib | \
sort -u | while read x; do rpm -q --whatprovides ${x}; done | sort -u
Where:
v XXXX is the PCA build number
v YYYY is the Linux distribution
v ZZZZ is the architecture
Note: Red Hat Enterprise Linux (RHEL) 7 uses the same PCA installation package
and process as Red Hat Enterprise Linux (RHEL) 6.x. In this scenario, use
tealeaf-pca-<xxxx>-1.RHEL6.<zzzz>.rpm for the installation package.
If the RPMs cannot be found on the installation disk/iso, contact your Linux
administrator.
Note: Most versions of Linux include an automated RPM repository system that
can find and update the missing RPMs. RHEL uses the YUM repository system.
SUSE uses the YAST repository system. Tealeaf does not provide these RPMs.
Multiple instances of PCA
You can install multiple instances of the IBM TealeafCX Passive Capture
Application.
Note: The following formula and associated notes must be used as a guideline
when configuring multiple instances of the PCA. Use them to estimate your
requirements and be prepared to make adjustments based on traffic patterns and
CPU usage.
To compute the recommended maximum number of PCA instances in your Tealeaf
environment, use the following formula:
# of PCA instances = # of physical cores - # of PCA pipelines - 1.
For example, if your environment has 16 physical cores, you can expect to have as
many as 15 PCA instances to use.
Note: For each additional PCA pipeline within a PCA application instance, you
must deduct one from the maximum number of PCA instances, as indicated in the
previous formula.
Note: Do not count hyperthreaded virtual processors as available cores.
Hyperthreaded processing provides little performance enhancement to highly
CPU-intensive PCA processing and is not be counted in the expected usage.
26
IBM Tealeaf CX Passive Capture Application: PCA Manual
The above limit assumes that each PCA core is using over 60% capacity. If the
cores are using significantly less than this capacity, you can increase the number of
PCA instances over this limit.
If you are using an accelerator card, you can increase this maximum number, as
the impact is offloaded to the card's hardware.
Note: When offloading encryption to an SSL accelerator card, you can need a
larger number of instances to effectively capture and process the traffic load.
Segmenting traffic across multiple PCA instances
You can add PCA instances through the PCA web console. The PCA supports
multiple methods of traffic segmentation:
For non-TLB PCA instances:
v Web Server Host IP/Port Addresses Filtering: The typical and preferred method
for segmenting traffic by PCA instance is to filter on web server host IP/Port
addresses.
v TCP Client Port Segmentation Filtering: TCP client port segmentation can be
used when the capture traffic is presented as a single virtual web IP address
(VIP).
Note: PCA instances are IP/Port sensitive. Do not add PCA instances if you lack
the IP addresses or ports to segregate your capture traffic.
Note: If you do not have IP/port segregation enabled in your environment with
multiple CPUs, at least you can create two PCA instances. The first instance
handles non-SSL traffic on port 80, while the second handles SSL transactions on
port 443. This arrangement does not take much advantage of any SSL accelerator
cards.
Some options:
v Move the point of capture after any load balancers.
v Use client-side IP addresses to segregate traffic in multiple instances. If you have
a reasonable number of NAT IP addresses, you can group incoming addresses in
netmask blocks or discretely based on IP addresses to deliver to the appropriate
handler.
For TLB PCA instances:
When TLB mode is enabled, the process of determining how to segment the
network capture traffic is no longer needed. Network capture traffic is
automatically segmented and distributed to create a transparent load balanced
environment. TLB mode does not require as much configuration to your network
interface as non-TLB mode.
For more information about adding PCA instances, see “PCA Web Console Interface Tab” on page 86.
Changes to the PCA server
When the rpm package is installed, by default the PCA is installed in
/usr/local/ctccap. In addition to the installation directory, other changes are
made to the system.
Chapter 2. Installing the CX Passive Capture Application
27
The package creates the log file directory in /var/log/tealeaf by default, if it does
not exist.
v In earlier versions of the PCA, the log directory was /usr/local/ctccap/logs.
v When you upgrade from an old installation with a non-empty
/usr/local/ctccap/logs directory, the package uses the existing directory
instead of the newer /var/log/tealeaf directory. This behavior is intended to
avoid surprising the user by leaving old log files in the old directory
(/usr/local/ctccap/logs) and writing new log files to the new default
(/var/log/tealeaf).
Note: This check for /usr/local/ctccap/logs is independent of the installation
prefix that is chosen for installation for upgrade. If you install Passive Capture
into /opt/tealeaf, the package still looks for a non-empty directory
/usr/local/ctccap/logs.
The tealeaf-pca files are currently unused and are reserved for future use. The
tealeaf-web files are used by the default httpd.conf for the web console. The
tealeaf-tts files are provided for convenience in configuring SSL connections with
the TeaLeaf Transport Service. The /usr/local/ctccap/etc directory is normally
writable by root and the capture user, ctccap.
v Install crontab file: /etc/cron.d/tealeaf. The crontab file schedules the
execution of "tealeaf cron" as user root.
v Install the following initialization scripts in /etc/init.d:
– tealeaf-pca
– tealeaf-startup
v Create the capture.log file in the log file directory, if the file does not exist.
The package performs the following actions that modify directories and files
outside of the installation prefix.
v Create group ctccap if it does not exist.
v Create user ctccap if it does not exist.
v Set /usr/local/ctccap/bin/listend and /usr/local/ctccap/bin-debug/listend
as setuid root (required for listend to open eth devices for packet sniffing; drops
down to user ctccap after you open the eth devices).
v Remove PHP session files in /tmp; they are assumed to be PHP session files for
the Passive Capture web console.
v Update /etc/syslog.conf (if needed) to ensure that it contains an entry for
facility local0 to file capture.log in the log file directory.
v Restart syslogd to force it to reload its configuration and use any changes that
are made to /etc/syslog.conf.
v Add the file /etc/ld.so.conf.d/tealeaf.conf or modify /etc/ld.so.conf to
point to /usr/local/ctccap/lib to ensure that shared libraries are linked
correctly at runtime.
PCA and packet forwarder requirements for cloud-based
deployments
The CX PCA Packet Forwarder captures web traffic between a customer and your
web server and forwards the data to a centralized virtual PCA instance.
Each packet forwarder service that is running on the web server connects to a
listener service that is running on the PCA server. For more information, see
“Packet Forwarder Overview” on page 6.
28
IBM Tealeaf CX Passive Capture Application: PCA Manual
The following requirements must be met to operate a PCA in a cloud-based web
server environment that is hosted by Softlayer.
Each packet forwarder requires the following resources:
v One processor core that is dedicated to the service. The CPU core speed requires
a minimum processor speed of 2.0 GHz.
v The packet forwarder requires a minimum version of Red Hat Linux (RHEL) 6.4
to operate.
Note: If a packet forwarder is deployed to a 64-bit operating environment, you
must install the 32-bit versions of the yum install glibc.i686 yum and install
zlib.i686 libraries.
v In environments that use a large amount of bandwidth, configure the packet
forwarder probes for your web and application servers for dynamic instance
spawning. Dynamic instance spawning gives the packet forwarder the ability to
use a pool of network socket connections to locate an available packet listener.
v Each paired packet forwarder and packet listener instance require a dedicated
port. The first packet forwarder and packet listener pair uses port 1888 to
communicate. Each additional pair would use an incremental port number. For
example, if you have 10 pairs of packet forwarders and packet listeners, you
need to make sure that ports 1888 - 1898 are open in the firewall settings for the
operating system and your network firewall settings.
Each packet listener service requires the following resources:
v A minimum of four processor cores with each core operating at a minimum
speed of 2.0 GHz and a minimum of 8 GB of memory must be allocated to the
processor core.
v A minimum version of Red Hat Linux (RHEL) 6.4 to operate.
v Each paired packet forwarder and packet listener instance require a dedicated
port. The first packet forwarder and packet listener pair uses port 1888. Each
additional pair would use an extra port. For example, if you have 10 packet
forwarders and packet listeners, you need to make sure that ports 1888 - 1898
are open in the firewall settings for the operating system and your network
firewall settings.
Package Installation
The following information describes the IBM TealeafCX Passive Capture
Application installation package.
The Tealeaf Passive Capture software package file name looks like:
tealeaf-pca-<nnnn>-<rrr>.<distro>.i386.rpm
Where:
v <nnnn> is the build version number; for example, 3650.
v <rrr> is the RPM revision number. This is usually a single digit number.
v <distro> is an identifier for the Linux distribution, such as "RHELn" for Red Hat
Enterprise Linux release n.
Note: Red Hat Enterprise Linux (RHEL) 7 uses the same PCA installation package
and process as Red Hat Enterprise Linux (RHEL) 6.x. In this scenario, use
tealeaf-pca-<nnnn>-<rrr>.RHEL6.i386.rpm for the installation package.
Chapter 2. Installing the CX Passive Capture Application
29
You can access the IBM TealeafCX Passive Capture Application installation package
through IBM Passport Advantage Online.
Pre-installation steps
Before you begin the installation process, do the following steps:
1. Plug one live network cable from your LAN into the LAN network port. Do
not plug any other network cables into the other network ports.
2. Insert the bootable Red Hat Enterprise Linux Install CD-ROM disc 1 into the
CD-ROM drive.
3. Turn on the power to the machine.
4. Enter the BIOS setup and set the CMOS clock to Greenwich Mean Time (GMT).
5. Exit the BIOS. The machine boots up and the Red Hat Enterprise Linux
installation splash screen is displayed.
6. Press SPACEBAR to prevent automatic booting.
7. Proceed to the section Red Hat Enterprise Linux Installation.
Note: The Passive Capture time zone is typically configured to the local time
zone. Step 4 allows the Passive Capture time zone to be configured and
modified without having to change the CMOS clock.
Operating system users
The PCA must be installed by using the root user account. During the installation
process, the PCA user ctccap is created. During execution, the ctccap user runs the
PCA processes, regardless of the user that started them.
Note: Do not use the sudo root user for installation. Although it can display that
the installation was completed, several capture errors indicate that the installation
failed. These errors can include "restarting too rapidly" errors, failures to start
interfaces, permissions issues, and more. Please be sure to use a true root user
login.
It is not required that you log in to the system by using the root user. However,
the ctccap user must have the permissions to run the tealeaf start and tealeaf
stop commands. It is necessary to run with limited root permissions as described.
As a passive network traffic that is capturing application running under a stock
Linux operating system, the PCA requires specific system permissions to passively
capture network packets. Through the operating system, the PCA must be able to
place system network NICs into promiscuous capture mode. It allows the PCA to
passively listen to all network traffic presented to the designated NICs. It is
necessary to run the specific application process as root permission.
To minimize security issues, only one specific PCA application module requires
this permission for traffic that is capturing. All other PCA application modules are
run with non-root user permissions.
The capturing module only listens to a copy of the supplied network traffic. The
module cannot inject any traffic whatsoever between your web server and the
client browser.
Copying the installation package from the CD-ROM disc
Use the following procedure to copy the installation package from the CD-ROM to
the local drive.
1. Insert the CD-ROM disc into the CD-ROM drive.
30
IBM Tealeaf CX Passive Capture Application: PCA Manual
2. Enter the following commands, replacing <nnnn>, <rrr>, and <distro> with the
appropriate numbers for the package file:
mount /mnt/cdrom
cp /mnt/cdrom/tealeaf-pca-<nnnn>-<rrr>.<distro>.i386.rpm /root
umount /mnt/cdrom
3. Eject the CD-ROM disc and remove it.
Installing the PCA software
Use the following information to install the PCA software to your physical server
or virtual machine. If you are deploying your CX Passive Capture Application to a
cloud-based environment, refer to the installation procedures for those
environments.
1. Log in to the server by using the root account.
Note: The installation must be run as root. See Hardware Setup and Operating
System Installation.
2. Open a command prompt.
3. Enter rpm -ivh tealeaf-pca-<nnnn>-<rrr>.<distro>.i386.rpm to install the
PCA software.
Where:
v <nnnn> is the build version number; for example, 3650.
v <rrr> is the RPM revision number. The revision numbers is usually a single
digit number.
v <distro> is an identifier for the Linux distribution, such as "RHEL n" for Red
Hat Enterprise Linux release n.
Note: Red Hat Enterprise Linux (RHEL) 7 uses the same PCA installation
package and process as Red Hat Enterprise Linux (RHEL) 6.x. In this scenario,
use tealeaf-pca-<nnnn>-<rrr>.RHEL6.i386.rpm for the installation package.
You can also use the Yum Package Manager to install the tealeaf-pca package
by running the following command:
yum install tealeaf-pca-<nnnn>-<rrr>.<distro>.i386.rpm
By default, the CX PCA software is installed in /usr/local/ctccap. You specify
the alternate directory by using the rpm command's --prefix option along
with the installation and upgrade commands.
The following are some sample rpm invocations.
rpm -i --prefix=/opt/tealeaf tealeaf-pca-<nnnn>-<rrr>.<distro>.i386.rpm
rpm -U --prefix=/home/tealeaf tealeaf-pca-<nnnn>-<rrr>.<distro>.i386.rpm
When you do not use the --prefix option during an install or upgrade, RPM
uses the default installation directory that is specified in the PCA package file,
which is /usr/local/ctccap. Once you relocate a package, you must specify the
alternate directory when you apply upgrades so that the package correctly
checks for and updates previous installations.
When the files are extracted from the rpm package, follow the post-installation
checklist to validate the installation and begin the configuration process.
Installing the Packet Forwarder
The Tealeaf packet forwarder is used to forward web traffic that is transmitted
between a client and a cloud-based web server to a cloud-based PCA.
Chapter 2. Installing the CX Passive Capture Application
31
The Tealeaf packet forwarder is packaged with the Tealeaf PCA software and
shares the same requirements as the Tealeaf PCA software.
Cloud-based installation with a reverse proxy server
If your cloud-based web solution includes a reverse proxy server, you can install
the packet forwarder software to the reverse proxy server and to the PCA server.
After the packet forwarder software is installed, you must configure packet
forwarder transmitter instance on the reverse proxy server and the packet
forwarder receiver instances on the PCA.
Cloud-based installation with no reverse proxy server
If your cloud-based web solution does not include a reverse proxy server, you can
install the packet forwarder software to each web server in your cloud-based
environment and to the PCA server. After the packet forwarder software is
installed, you must configure the packet forwarder transmitter instances on your
web servers and the packet forwarder receiver instances on the PCA. Each
transmitter instance requires a dedicated receiver instance.
Run the following command to install the tealeaf-pktfwdr package.
v If you are using Red Hat Package Manager, enter the following:
rpm -ivh tealeaf-pktfwdr-<nnnn>-<rrr>.<distro>.i686.rpm
rpm -ivh --prefix=/opt/tealeaf tealeaf-pktfwdr-<nnnn>-<rrr>.<distro>.i686.rpm
Where:
– <nnnn> is the build version number; for example, 3650.
– <rrr> is the RPM revision number. This is usually a single digit number.
– <distro> is an identifier for the Linux distribution, such as "RHELn" for Red
Hat Enterprise Linux release n.
Note: Red Hat Enterprise Linux (RHEL) 7 uses the same packet-forwarder
installation package and process as Red Hat Enterprise Linux (RHEL) 6.x. In this
scenario, use tealeaf-pca-<nnnn>-<rrr>.RHEL6.i386.rpm for the installation
package.
v If you are using Yellowdog Updater Modified (Yum), enter the following:
yum install tealeaf-pktfwdr-<nnnn>-<rrr>.<distro>.i686.rpm
yum install --prefix=/opt/tealeaf tealeaf-pktfwdr-<nnnn>-<rrr>.<distro>.i686.rpm
Where:
– <nnnn> is the build version number; for example, 3650.
– <rrr> is the RPM revision number. This is usually a single digit number.
– <distro> is an identifier for the Linux distribution, such as "RHELn" for Red
Hat Enterprise Linux release n.
By default, the PCA software is installed in /usr/local/ctccap.
You can relocate the package to a directory other than the default
/usr/local/ctccap. You specify the alternate directory by using the rpm
command's --prefix option along with the installation and upgrade commands.
The following are some sample rpm invocations.
rpm -i --prefix=/opt/tealeaf tealeaf-pktfwdr-<nnnn>-<rrr>.<distro>.i686.rpm
rpm -U --prefix=/home/tealeaf tealeaf-pktfwdr-<nnnn>-<rrr>.<distro>.i686.rpm
Where:
32
IBM Tealeaf CX Passive Capture Application: PCA Manual
v <nnnn> is the build version number; for example, 3650.
v <rrr> is the RPM revision number. This is usually a single digit number.
v <distro> is an identifier for the Linux distribution, such as "RHELn" for Red Hat
Enterprise Linux release n.
When you do not use the --prefix option during an install or upgrade, RPM uses
the default installation directory that is specified in the package file, which is
/usr/local/ctccap. If you relocate a package, you must make sure that you always
specify the alternative directory so that the package can accurately check for and
update any previous installations.
If a custom installation directory is not used, the following directory structure is
created.
/opt/tealeaf/
/bin/pktfwdr
/bin/ctcstats
/etc/fwdr-conf.xml
/etc/fwdr-conf-defaults.xml
/sbin/
The following core files are installed:
Note: This is not a complete list of every file that the installer copies to the disk.
Table 6. Installed file components
File name
Description
pktfwdr
Packet forwarder daemon
To start a packet forwarder instance, run /user/local/ctccap/bin/pktfwdr -t as
a root user.
ctcstats
Operational statistics/metrics
fwdr-conf.xml
Packet forwarder configuration file
fwdr-conf-defaults.xml
Default configuration file
Note: If you are using a 64-bit version of Red Hat Enterprise Linux, run one of the
following commands to install the required 32-bit compatibility libraries:
yum install glibc.i686
yum install zlib.i686
or
yum install rpm -ivh --prefix=/opt/tealeaf tealeaf-pktfwdr-<nnnn>-<rrr>.<distro>.i686_24thApr14.rpm
After the installation is complete, you must configure the packet forwarder
instances.
Packet Forwarder Commands
You can run the Packet Forwarder utility with command options.
The Packet Forwarder can be run with options to start an instance, stop an
instance, and more. For example, to start the Packet Forwarder, run
/user/local/ctccap/bin/pktfwdr -t where -t is the option that tells the Packet
Forwarder to start the service.
The following options are available when you run the Packet Forwarder.
Chapter 2. Installing the CX Passive Capture Application
33
Table 7. Packet Forwarder commands
Option
Description
-c <configuration file>
Overrides the default configuration file and gives you the
ability to use of a custom configuration file, where
<configuration file> is the name of the configuration file.
-D
Delete transmitter SHM.
-d
Debug option.
-e
Encapsulate packet mode.
-f <filter rule>
Override the filter rules that are specified in the configuration
file.
-h
Version and option list.
-i <NIC interface>
Override the NIC settings that are specified in the
configuration file.
-I <instances#>
Specifies the number of transmitter instances to load, where
<instances#> is the number of instances that you want to run.
-k
Stop the service and its instances.
-l
Reports if the service is running.
-n
Debugging option for a stand-alone environment.
-t
Start the service.
Installing the PCA in the Softlayer Cloud
The following instructions are used to deploy the PCA into a Softlayer cloud-based
environment.
It is also recommended to verify that your virtual machines can communicate with
each other. Contact your network administrator to make sure that all of the
necessary network ports are open for the PCA software, packet forwarders, and
packet listeners.
Common website installations in the cloud use a virtual load balancer to distribute
web traffic to a dynamically provisioned web server tier that consists of multiple
web server instances. Each web server instance requires a packet forwarder to be
installed to forward the captured web traffic to a centralized PCA that is running
on a virtual machine for processing.
The installation process consists of installing the packet forwarders to your web
instances and installing the centralized PCA on your hosted virtual machine.
PCA requirements for a Softlayer virtual machine
Before you install the PCA into a Softlayer virtual machine, make sure that the
virtual machine meets the hardware and software requirements for the PCA
software. The hardware and software requirements are identified in a
pre-installation checklist. For more information, see Pre-installation Checklist.
The following items are also required:
v Softlayer provisions both dedicated physical machines or virtual servers to
provide maximum network infrastructure flexibility. The servers can be
configured with dynamic or static network settings. It may be necessary to
provide static internal IP addresses to allow for instance-to-instance
34
IBM Tealeaf CX Passive Capture Application: PCA Manual
intra-communication where the assigned IP addresses are maintained if instances
are stopped or spun up or down. This is necessary to re-establish network
connections between the PCA listener instance and its packet forwarder probe
instances.
v Each server that hosts a web server instance, must have one CPU core that is
dedicated to running the packet forwarder service. Minimum core speed is 2.0
GHz.
v If the web server application and packet forwarder instances are installed on
Linux Red Hat, a minimum version of RHEL 6.4 is required.
v It is recommended to disable SELinux. If it is enabled, configure the firewall
settings to allow communication on the ports that are used by the packet
forwarders and packet listeners.
v If the web server instance is using a 64-bit version of Linux Red Hat, 32-bit
versions of glibc and zlib must be deployed during the installation process.
v On the PCA server, each packet listener service requires four CPU cores. Each
CPU core must be 2.0 GHz or higher and have 8 GB of dedicated memory.
v Configure your firewall settings to allow communication on port 1888. The
communication ports incrementally increase by one for each additional packet
forwarder that is deployed. If five packet forwarders are deployed, then ports
1888-1892 must be open. The ports are used by the packet forwarders to send
information to the packet listeners, which process the data at the PCA.
Installing the packet forwarder
Note: The maximum number of web server instances must be known before the
installation process. The number of web server instances is used in the
configuration of the packet forwarder to determine the maximum number of active
TCP connections that can connect to the destination PCA socket receiver.
Note: You must be logged in as a root user to perform all PCA-related
installations. Performing an installation using another account may prevent the
necessary permissions that are required to successfully install the software.
Use the installation rpm to install the packet forward on each web instance. The
default installation directory is /usr/local/ctccap. You can use the --prefix
option when performing the installation command to install the software to
another directory.
To install the software, run rpm -ivh --prefix=/opt/tealeaf tealeaf-pktfwdrxxxx-1.RHEL6.i686.rpm where xxxx is the version number of the PCA software.
The packet forwarder requires some additional 32-bit libraries if you are installing
the packet forwarder to a 64-bit version of Linux. To install all of the dependent
libraries, run the following command:
yum -y install tealeaf-pktfwdr-3650-1.RHEL6.i686.rpm
Note: If you are not installing the packet forwarder into the default directory, you
must install the glibc and zlib libraries manually using the following commands:
1. yum install glibc.i686
2. yum install zlib.i686
Use the --prefix option to specify the installation path.
Chapter 2. Installing the CX Passive Capture Application
35
The following files are used to configure and run the packet forwarder.
Table 8. Required packet forwarder operational and configuration files
File name
Description
/bin/pktfwdr
Packet forwarder daemon
/bin/ctcstats
Operational statistics and metrics
/etc/fwdr-conf.xml
Packet forwarder configuration file
/etc/fwdr-conf-defaults.xml
Default configuration file
Configure the packet forwarder by editing the /etc/fwdr-conf.xml configuration
file.
1. Edit the PrimaryInterface tag to add the virtual NIC device name that the
packet forwarder uses to capture the web server's traffic. In most installations,
the NIC device name is eth0.
2. Locate the ListenTos tag and add any additional ports that you want to
capture traffic from to the configuration file. Port 80 and 443 are listed by
default.
3. Locate the Delivery tag and edit the Address and Port tags with the IP address
and port number of the virtual machine that is hosting the centralized PCA
server.
Note: Each packet forwarder and listener pair uses one port. The default port
number is 1888. When multiple pairs are used, the port address defines the first
port number that is used to define a block of port numbers. For example, if you
are capturing traffic from five web servers, then five packet forwarder and
packet listener pairs are used to capture the traffic. In this scenario, ports 1888 1892 are used.
4. Edit the Port tag to define the port number for the network connection. Each
packet forwarder requires a unique port number to identify a unique network
connection to the centralized PCA VM instance. The port numbers must be
assigned in sequential order. This is required by the PCA's socket receiver
when configuring it for the packet forwarders' network connections. If you
decide to start with port number 1888 for the first packet forwarder, then
defining five of them would be ports 1888 - 1892 explicitly.
5. Edit the MaxRotatePeers tag to define the maximum number of web server
instances that are dynamically provisioned. The default value is 1. If you are
capturing traffic from five web servers, then set this value to 5.
Note: If you are statically assigning a fixed number of web server instances
with associated packet forwarders, then the MaxRotatePeers would remain set
to the default value of 1. Each packet forwarder would need to configured with
a unique Port number to identify a unique network connection to the
centralized PCA VM instance. The port numbers must be assigned in sequential
order. This is required by the PCA's socket receiver when configuring it for the
packet forwarders' network connections. If you decide to start with port
number 1888 for the first packet forwarder, then defining five of them should
be 1888 through 1892 explicitly.
6. Save you changes to the /etc/fwdr-conf.xml file.
36
IBM Tealeaf CX Passive Capture Application: PCA Manual
Installing a centralized PCA in a Softlayer virtual machine
A centralized PCA is used to receive communication from the packet forwarders
that are deployed to the web server instances in your cloud environment. Installing
the PCA software to a virtual machine is similar to the installation process on a
physical server. Use the following process to install the PCA software to a virtual
machine.
1. Install the PCA software to your virtual machine. For more information, see
“Package Installation” on page 29 and “Post-installation checklist” on page 42.
2.
3.
4.
5.
Note: You have already installed the packet forwarders to your web server
instances using the instructions in “Installing the packet forwarder” on page
35. “Installing the Packet Forwarder” on page 31 does not apply to this
installation procedure.
Log on to the PCA web console.
Go to the Delivery tab and edit the delivery settings for your environment.
For more information, see “PCA Web Console - Delivery Tab” on page 105.
Go to the Pipeline tab and edit the Pipeline Instances setting to configure the
number of pipeline instances for your configuration. For more information
about pipeline instances, see “Pipeline instances” on page 114.
Select Save Changes to save your updated configuration settings.
Note: Do not restart the PCA server.
6. Edit the PCA configuration file by opening /usr/local/ctccap/etc/ctcconf.xml in a text editor.
7. Go to the Capture tag settings and edit the following settings.
v Set ListenerSocketEnabled to true
v Set TransparentLoadBalancingEnabled to false
v Set SslSessionInfoOnMemcachedServer to false
Note: If the PCA server is configured to decrypt SSL traffic from the packet
forwarders, set SslSessionInfoOnMemcachedServer to true.
8. Go to the Listener tag settings and edit the following settings.
v Set BasePort to match the port number that is defined in the ListenTos
settings of the packet forward configuration file. The packet forwarder
configuration file can be accessed by opening /etc/fwdr-conf.xml on a web
server instance.
v Set Instances to equal the number of packet forwarders that the PCA
connects to.
9. Save your changes to /usr/local/ctccap/etc/ctc-conf.xml.
10. Run tealeaf restart to restart the PCA services.
Starting the PCA server and packet forwarders
It is recommended to start the central PCA server before you start the packet
forwarders. If the packet forwarders are started before the PCA server is running,
they can experience network timeout conditions that and cause a delay in the time
it takes to connect with the PCA server.
To start the PCA server, run tealeaf start all from the virtual machine that is
hosting the PCA server.
Chapter 2. Installing the CX Passive Capture Application
37
To start a packet forwarder instance, run service pktfwdr start from each web
server instance.
To stop a packet forwarder, run service pktfwdr stop from each web server
instance.
To check the operational status of a packet forwarder, run service pktfwdr status
from each web server instance.
To view the available metrics of a packet forwarder, run /opt/tealeaf/bin/
ctcstats -p from each web server instance.
To test that a packet forwarder is connecting to the PCA server, use the netstat
utility. If the port connection is configured for port 1888, run netstat -an|grep
1888. The output returns a status of ESTABLISHED if the packet forwarder is
connected to the PCA server. If a connection is not established, the firewall rules
for your network might not be configured to allow communication between the
packet forwarders and the PCA server. Check your network configuration settings
for the packet forwarders and your PCA server, then make sure that your firewall
settings allow communication on those network settings.
Installing the PCA in the Microsoft Azure Cloud
The following instructions are used to deploy the PCA into a Microsoft Azure
cloud-based environment.
It is also recommended to verify that your virtual machines can communicate with
each other. Contact your network administrator to make sure that all of the
necessary network ports are open for the PCA software, packet forwarders, and
packet listeners.
Common website installations in the cloud use a virtual load balancer to distribute
web traffic to a dynamically provisioned web server tier that consists of multiple
web server instances. Each web server instance requires a packet forwarder to be
installed to forward the captured web traffic to a centralized PCA that is running
on a virtual machine for processing.
The installation process consists of installing the packet forwarders to your web
instances and installing the centralized PCA on your hosted virtual machine.
PCA requirements for a Microsoft Azure virtual machine
Before you install the PCA into a Microsoft Azure virtual machine, make sure that
the virtual machine meets the hardware and software requirements for the PCA
software. The hardware and software requirements are identified in a
pre-installation checklist. For more information, see Pre-installation Checklist.
The following items are also required:
v Each server that hosts a web server instance, must have one CPU core that is
dedicated to running the packet forwarder service. Minimum core speed is 2.0
GHz.
v If the web server application and packet forwarder instances are installed on
Linux Red Hat, a minimum version of RHEL 6.4 is required.
v It is recommended to disable SELinux. If it is enabled, configure the firewall
settings to allow communication on the ports that are used by the packet
forwarders and packet listeners.
38
IBM Tealeaf CX Passive Capture Application: PCA Manual
v If the web server instance is using a 64-bit version of Linux Red Hat, 32-bit
versions of glibc and zlib must be deployed during the installation process.
v On the PCA server, each packet listener service requires four CPU cores. Each
CPU core must be 2.0 GHz or higher and have 8 GB of dedicated memory.
v Configure your firewall settings to allow communication on port 1888. The
communication ports incrementally increase by one for each additional packet
forwarder that is deployed. If five packet forwarders are deployed, then ports
1888-1892 must be open. The ports are used by the packet forwarders to send
information to the packet listeners, which process the data at the PCA.
Installing the packet forwarder
Note: The maximum number of web server instances must be known before the
installation process. The number of web server instances is used in the
configuration of the packet forwarder to determine the maximum number of active
TCP connections that can connect to the destination PCA socket receiver.
Note: You must be logged in as a root user to perform all PCA-related
installations. Performing an installation using another account may prevent the
necessary permissions that are required to successfully install the software.
Use the installation rpm to install the packet forward on each web instance. The
default installation directory is /usr/local/ctccap. You can use the --prefix
option when performing the installation command to install the software to
another directory.
To install the software, run rpm -ivh --prefix=/opt/tealeaf tealeaf-pktfwdrxxxx-1.SUSE11.i586.rpm where xxxx is the version number of the PCA software.
The packet forwarder requires an extra 32-bit library if you are installing the
packet forwarder to a 64-bit version of Linux. To install all of the dependent
libraries, run the following command:
zypper install zlib-32bit-1.2.7-0.10.128
Run zypper clean -a to clear the local rpm cache.
The following files are used to configure and run the packet forwarder.
Table 9. Required packet forwarder operational and configuration files
File name
Description
/bin/pktfwdr
Packet forwarder daemon
/bin/ctcstats
Operational statistics and metrics
/etc/fwdr-conf.xml
Packet forwarder configuration file
/etc/fwdr-conf-defaults.xml
Default configuration file
Configure the packet forwarder by editing the /etc/fwdr-conf.xml configuration
file.
1. Edit the PrimaryInterface tag to add the virtual NIC device name that the
packet forwarder uses to capture the web server's traffic. In most installations,
the NIC device name is eth0.
Chapter 2. Installing the CX Passive Capture Application
39
2. Locate the ListenTos tag and add any additional ports that you want to
capture traffic from to the configuration file. Port 80 and 443 are listed by
default.
3. Locate the Delivery tag and edit the Address and Port tags with the IP address
and port number of the virtual machine that is hosting the centralized PCA
server.
Note: Each packet forwarder and listener pair uses one port. The default port
number is 1888. When multiple pairs are used, the port address defines the first
port number that is used to define a block of port numbers. For example, if you
are capturing traffic from five web servers, then five packet forwarder and
packet listener pairs are used to capture the traffic. In this scenario, ports 1888 1892 are used.
4. Edit the Address tag to define the IP address or host name of the PCA. This the
IP address of the virtual machine.
5. Edit the Port tag to define the port number for the network connection. Each
packet forwarder requires a unique port number to identify a unique network
connection to the centralized PCA VM instance. The port numbers must be
assigned in sequential order. This is required by the PCA's socket receiver
when configuring it for the packet forwarders' network connections. If you
decide to start with port number 1888 for the first packet forwarder, then
defining five of them would be ports 1888 - 1892 explicitly.
6. Edit the MaxRotatePeers tag to define the maximum number of web server
instances that are dynamically provisioned. The default value is 1. If you are
capturing traffic from five web servers, then set this value to 5.
Note: If you are statically assigning a fixed number of web server instances
with associated packet forwarders, then the MaxRotatePeers would remain set
to the default value of 1. Each packet forwarder would needs to be configured
with a unique Port number to identify a unique network connection to the
centralized PCA VM instance. The port numbers must be assigned in sequential
order. This is required by the PCA's socket receiver when configuring it for the
packet forwarders' network connections. If you decide to start with port
number 1888 for the first packet forwarder, then defining five of them should
be 1888 - 1892 explicitly.
7. Save you changes to the /etc/fwdr-conf.xml file.
Installing a centralized PCA in a Microsoft Azure virtual machine
A centralized PCA is used to receive communication from the packet forwarders
that are deployed to the web server instances in your cloud environment. Installing
the PCA software to a virtual machine is similar to the installation process on a
physical server. Use the following process to install the PCA software to a virtual
machine.
1. Install the PCA software to your virtual machine. For more information, see
“Package Installation” on page 29 and “Post-installation checklist” on page 42.
In the native Azure image for Suse 11 SP3 (64 bit), the following 32-bit
dependent libraries are needed:
v libgcc_s1-32bit-4.7.2_20130108-0.17.2.x86_64.rpm
v libuuid1-32bit-2.19.1-6.54.1.x86_64.rpm
v libxml2-32bit-2.7.6-0.25.1.x86_64.rpm
v libstdc++6-32bit-4.7.2_20130108-0.17.2.x86_64.rpm
v zlib-32bit-1.2.7-0.10.128.x86_64.rpm
40
IBM Tealeaf CX Passive Capture Application: PCA Manual
To install the 32-bit libraries, run zypper install zlib-32bit-1.2.7-0.10.128.
After the libraries are extracted to the disk, run zypper clean -a to clear the
local rpm cache.
2.
3.
4.
5.
Note: You have already installed the packet forwarders to your web server
instances using the instructions in “Installing the packet forwarder” on page
39. “Installing the Packet Forwarder” on page 31 does not apply to this
installation procedure.
Log on to the PCA web console.
Go to the Delivery tab and edit the delivery settings for your environment.
For more information, see “PCA Web Console - Delivery Tab” on page 105.
Go to the Pipeline tab and edit the Pipeline Instances setting to configure the
number of pipeline instances for your configuration. For more information
about pipeline instances, see “Pipeline instances” on page 114.
Select Save Changes to save your updated configuration settings.
Note: Do not restart the PCA server.
6. Edit the PCA configuration file by opening /usr/local/ctccap/etc/ctcconf.xml in a text editor.
7. Go to the Capture tag settings and edit the following settings.
v Set ListenerSocketEnabled to true
v Set TransparentLoadBalancingEnabled to false
v Set SslSessionInfoOnMemcachedServer to false
Note: If the PCA server is configured to decrypt SSL traffic from the packet
forwarders, set SslSessionInfoOnMemcachedServer to true.
8. Go to the Listener tag settings and edit the following settings.
v Set BasePort to match the port number that is defined in the ListenTos
settings of the packet forward configuration file. The packet forwarder
configuration file can be accessed by opening /etc/fwdr-conf.xml on a web
server instance.
v Set Instances to equal the number of packet forwarders that the PCA
connects to.
9. Save your changes to /usr/local/ctccap/etc/ctc-conf.xml.
10. Run tealeaf restart to restart the PCA services.
Starting the PCA server and packet forwarders
It is recommended to start the central PCA server before you start the packet
forwarders. If the packet forwarders are started before the PCA server is running,
they can experience network timeout conditions that and cause a delay in the time
it takes to connect with the PCA server.
To start the PCA server, run /usr/local/bin/tealeaf start all from the virtual
machine that is hosting the PCA server.
To start a packet forwarder instance, run service pktfwdr start from each web
server instance.
To stop a packet forwarder, run service pktfwdr stop from each web server
instance.
Chapter 2. Installing the CX Passive Capture Application
41
To check the operational status of a packet forwarder, run service pktfwdr status
from each web server instance.
To view the available metrics of a packet forwarder, run /opt/tealeaf/bin/
ctcstats -p from each web server instance.
To test that a packet forwarder is connecting to the PCA server, use the netstat
utility. If the port connection is configured for port 1888, run netstat -an|grep
1888. The output returns a status of ESTABLISHED if the packet forwarder is
connected to the PCA server. If a connection is not established, the firewall rules
for your network might not be configured to allow communication between the
packet forwarders and the PCA server. Check your network configuration settings
for the packet forwarders and your PCA server, then make sure that your firewall
settings allow communication on those network settings.
Installing the PCA to a VMware virtual machine
You can install and run the CX Passive Capture Application in a VMware virtual
machine.
Before you install the PCA to a VMware virtual machine, make sure that the
virtual machine meets the same hardware and software requirements that are
defined for a physical server. The virtual machine requires virtual hardware that is
defined for a deployment to a physical server.
1. Review the hardware and software requirements. The virtual machine requires
the same software and hardware resources as a physical server.
2. Perform the installation. The installation process for a virtual machine is the
same as if you are installing to a physical server.
3. Disable multi-queue support for the VMware virtual network driver.
Note: You must disable multi-queue support in the VMware virtual network
driver. If multi-queue support is not disabled, the packets that are sent to the
PCA might become out of order and result in the CX PCA dropping the
packets.
4. Review the post installation checklist.
5. Configure the PCA for your environment.
After completing the installation steps and configuring the PCA, you can start
capturing network traffic from your VMware virtual machine.
Post-installation checklist
Use the post-installation checklist to complete the PCA installation process.
Validate PCA Install
After you complete the Tealeaf installation, you can validate the installation.
The following command reads a list of files with the expected user, group, and
permission settings and compares the list to what was installed. If the matching
fails, an error message is printed with the actual and expected values.
tealeaf ps
If the validation is successful, output similar to the following is displayed:
42
IBM Tealeaf CX Passive Capture Application: PCA Manual
[root@venus ~]# tealeaf
PID TTY
TIME
29939 ?
00:00:00
29940 ?
00:00:00
29941 ?
00:00:00
29942 ?
00:00:00
29943 ?
00:00:00
29945 ?
00:00:00
29964 ?
00:00:00
29969 ?
00:00:00
29970 ?
00:00:00
29971 ?
00:00:00
29972 ?
00:00:00
29973 ?
00:00:00
ps
CMD
captured
listend
reassd
tcld
deliverd
pipelined
httpd
httpd
httpd
httpd
httpd
httpd
Generate SSL Keys
For secure transport, you can apply a signed or self-signed certificate for PCA use.
Start PCA
After the PCA rpm installation is completed, the first start of the PCA must be
completed as root user. Using this user allows the PCA to set several system
kernel variables by using the sysctl cmd, which is available as root only.
Note: The ctccap user is created without a password that is assigned to it, so you
cannot log in with that account by default. Security risks are minimal; the ctccap
user can start and own the Tealeaf processes. Depending on your enterprise
security requirements, you can assign a password to the ctccap user from the root
user.
sysctl cmd is run in the main tealeaf script. After you log in as root user, the
following command starts the IBM Tealeaf CX Passive Capture Application:
tealeaf start
After the PCA is started for the first time, you can then run the script as a non-root
user ctccap each successive time. To run as ctccap user:
1. Stop the PCA, run cmd:
tealeaf stop
2. Change to ctccap user:
su ctccap
3. Start the PCA as ctccap user:
tealeaf start
Note: After you start the PCA as root, you can also restart the PCA machineto run
as ctccap user.
Initial PCA Configuration
Note: This section provides a framework for performing the initial configuration of
one component of the IBM Tealeaf CX system in a simplified deployment model.
Depending on your Tealeaf solution's deployment, more configuration can be
required. If you have any questions about configuration, contact
http://support.tealeaf.com.
Chapter 2. Installing the CX Passive Capture Application
43
After you complete installation of the PCA software, you can follow the steps to
configure the PCA to capture web application traffic and forward to one or more
the Processing Servers.
Check permitted connections settings
At installation time, the PCA sets the maximum permitted connections for each
PCA instance.
By default, these values are set as:
v Current connections max: 5000
v SYN/WAIT connections max: 1000
Note: The settings define the maximum permitted connections for each PCA
instance. If the actual number of connections exceeds these values, data can be lost.
Any analysis of PCA performance that is based on the current state can be skewed
depending on the volume of the non-captured data. You must review these settings
as soon as possible.
You can check the current state of these settings in the Statistics tab of the PCA
web console. For each PCA instance, the statistics to compare are:
Current
Maximum
Current connections
Current connections max
SYN/WAIT connections
SYN/WAIT connections max
If either of the current metrics is near the corresponding maximum, you must
consider raising the maximum for all affected PCA instances. It ensures that data is
effectively captured.
Configure PCA for Capture of Rich Internet Applications
If your deployed rich internet application (RIA) is submitting data for capture, you
must verify that the PCA is configured to capture all submitted data types.
Note: If the PCA is not configured to capture POST and Mimetypes that are
submitted by your rich internet application (RIA), those hits are not captured and
data in them is lost to Tealeaf. Verify that you have a list of all required types that
must be captured by PCA for RIA replay and reporting. It includes includes any
custom types that are deployed.
Capturing JavaScripts
By default, the PCA excludes the capture of JavaScript files. Capture of static
JavaScript by the PCA is rarely required for accurate replay of rich internet
applications. In most situations, these files can be stored in a static database or
re-referenced through replay rules.
Note: If your web application generates dynamic JavaScript, the PCA must be
manually configured to capture these files.
44
IBM Tealeaf CX Passive Capture Application: PCA Manual
Capturing XML
By default, the PCA captures the following content types without any additional
configuration.
v application/xml
v text/xml
Contents of these types submitted to the web server are inserted into the request
buffer in the [xml1] section for processing by the Tealeaf system.
Typical RIA capture types
The following capture types must be added to PCA capture types, depending on
the monitored application. These types can be specified in the XML post types list.
v See “To configure.”
v application/json
v application/x-json
v text/json
v text/x-json
In the following sections, you can review example sets of types for various kinds
of rich internet applications.
Example RIA: Ajax
Default captured types:
v application/xml
v text/xml
v application/json
v text/json
The following custom types can be present and must be configured:
v ajax/xml
v Dynamically generated JavaScripts
To configure
If you are submitting other XML post types that Tealeaf must capture, more
configuration is required, depending on the build number of your IBM Tealeaf CX
Passive Capture Application:
v Build 3326 or later: You must add the XML post type to the whitelist in the
Pipeline tab of the PCA Web Console. See “Pipeline Settings” on page 113.
v Build 3325 or earlier: Contact http://support.tealeaf.com.
Tealeaf passive capture software service
Once the Tealeaf passive capture software package is installed, you can use the
service command to restart, start, and stop the Tealeaf passive capture software.
The following commands can be used to restart, start, and stop the Tealeaf passive
capture software.
Chapter 2. Installing the CX Passive Capture Application
45
tealeaf restart
tealeaf start
tealeaf stop
If some components of Passive Capture do not stop in a timely manner, the
tealeaf restart command cannot successfully start them after you attempt to stop
them. Instead, use the tealeaf stop command to confirm Tealeaf Passive Capture
software was terminated.
Use the following command to determine whether any Tealeaf processes are still
running: ps Uctccap
CX PCA Patches
Patches are released to improve performance and reliability of the CX PCA
software.
After your CX PCA server is installed and configured, you can apply any patches
that might be available for your version of the CX PCA software. Patches for the
CX PCA can be downloaded from IBM Fix Central at http://www.ibm.com/
support/fixcentral/. To locate patches from the Fix Central page:
1. Using your web browser, go to http://www.ibm.com/support/fixcentral/.
2. Locate Product Group; then, select Enterprise Marketing Management.
3. Locate Select from Enterprise Marketing Management; then, select Tealeaf
Customer Experience.
4. Click Continue.
5. From the "Identify fixes" menu, select Browse for fixes, and click Continue to
display all of the available Tealeaf fixes. You can use the "Filter your content"
section to filter the list of available fixes.
Make sure that you download the correct patch for your operating system.
Troubleshooting tips
Use the following troubleshooting tips to diagnose problems with your PCA
installation.
Table 10. Troubleshooting tips
46
Troubleshooting tip
Description
Core files
The presence of core.* files in the /usr/local/ctccap
directory is a sign that the capture failed and wrote a
core dump file.
IBM Tealeaf CX Passive Capture Application: PCA Manual
Table 10. Troubleshooting tips (continued)
Troubleshooting tip
Description
Bootup delays
You can notice delays during the bootup procedure
and when running various network-related
commands if the /etc/resolv.conf file contains the
wrong information for the local network. The delays
can take the form of a long SSH login attempt when
the SSH daemon on the Passive Capture host
workstation times out while you use the incorrect
DNS resolution information from the
/etc/resolv.conf file.
This file can contain incorrect information if it was
left over from a static IP configuration on a different
network. It can also be left over from when the
workstation was shut down while using DHCP,
although booting up with DHCP normally creates
/etc/resolv.conf file. Fixing the file depends on
whether the host workstation is configured for DHCP
or static IP information.
DHCP
If the Passive Capture software is configured for
DHCP, then do the following steps:
1. Log in as user root.
2. Delete the file /etc/resolv.conf.
3. Run shutdown now to enter single-user mode.
4. Use the exit command to leave single-user mode
and allow the system to generate a new
/etc/resolv.conf file.
Static IP
If the Passive Capture software is configured with a
static IP address, then do the following steps:
1. Log in as user root.
2. Delete the file /etc/resolv.conf.
3. Run tealeaf ipconfig to reenter the DNS
information and exit.
4. The program generates a new /etc/resolv.conf
file, which takes effect immediately.
Single-user mode
If you just rebooted the Passive Capture host machine
or powered it on and you must enter single-user
mode, then do the following while you use use the
GRUB boot loader:
1. When the GRUB boot menu is displayed, press
SPACEBAR to prevent any automatic boot.
2. Use the arrow keys to select the Red Hat
Enterprise Linux kernel and version you want to
boot.
3. Press the A key to append kernel options.
4. At the grub append prompt, append the word
single. Press SPACEBAR and then enter single.
5. Press ENTER to accept the new value and boot.
6. For more information, see Basic System Recovery
chapter of the Red Hat Enterprise Linux System
Administration Guide.
Chapter 2. Installing the CX Passive Capture Application
47
Table 10. Troubleshooting tips (continued)
Troubleshooting tip
Description
Viewing capture logs
Examining the passive capture logs can help you
locate a possible problem.
If Capture is not starting, capture.log typically
shows the reason for failing to start, such as bad
entry syntax or invalid entry in the configuration file.
Another troubleshooting log,
maintenance_200xxxxx.log, shows unhealthy
conditions that are forcing the restart/shutdown of
the Passive Capture software.
Both of these logs can be viewed by the web console
or by a Linux text editor in the Passive Capture
default logs directory. Depending on the version of
the Passive Capture software, they are located in
/usr/local/ctccap/logs or /var/log/tealeaf.
Uninstall or Rollback of the CX Passive Capture Application
Complete the following instructions to uninstall the PCA software.
Uninstall the CX Passive Capture Application
To uninstall:
Stop the Tealeaf PCA. At the command line, enter:
tealeaf stop
From the UNIX command prompt, check for any running processes. While logged
in to root, enter the following command:
PS Tealeaf
If any process is running, enter the following command:
killall <processname>
where <processname> is the name of the running process.
Back up the existing ctccap/etc folder. This folder contains your custom
configuration files such as ctc-conf.xml, stored PTL keys, and more.To uninstall
the software, run the following command:
Note: The following command removes the PCA software from the Linux server.
rpm -e tealeaf-pca
The PCA software is uninstalled. To complete a clean uninstall, delete the
/usr/local/ctccap folder.
Rollback the CX Passive Capture Application
To roll back to a previous version:
1. Complete the uninstall steps.
48
IBM Tealeaf CX Passive Capture Application: PCA Manual
Note: Verify that the /usr/local/ctccap folder does not exist before the
installation.
2. Install the rpm package for the older version. See “Installing the PCA software”
on page 31.
3. Restore your backup version of saved configuration files to the ctccap/etc
folder.
Uninstall the Packet Forwarder
If needed, you can complete the following instructions to uninstall the Packet
Forwarder software.
You can use Red Hat Package Manager (RPM) to uninstall the Packet Forwarder.
To uninstall the Packet Forwarder, enter the following from a command line:
rpm -ev tealeaf-pktfwdr-<nnnn>-<rrr>.<distro>.i686
where:
v <nnnn> is the build version number; for example, 3650
v <rrr> is the RPM revision number; for exmaple, 1
v <distro> is the an identifier for the Linux distribution, such as "RHEL6" for Red
Hat Enterprise Linux 6
Chapter 2. Installing the CX Passive Capture Application
49
50
IBM Tealeaf CX Passive Capture Application: PCA Manual
Chapter 3. Upgrading the CX PCA Software
You can learn about various considerations that are necessary to know before you
upgrade the version.
Before you upgrade
In this section, you can learn about things you must do before upgrade.
If upgrading to 64-bit operating system
If you are upgrading from a 32-bit to 64-bit version of a supported operating
system, you must install a set of 32-bit libraries to support the PCA, a 32-bit
application.
v See “Required Packages” on page 24.
Before enabling Transparent Load Balancing (TLB) mode
The transparent load balancing feature is available in PCA Build 3620 or later. If
you are upgrading from a PCA build before 3620, you can enable TLB on your
PCA.
Note: If you enable TLB for your network communication, the previous network
interface settings are overwritten. Before you enable TLB, make sure that you copy
the existing network interface settings if you disable TLB mode.
For more information about transparent load balancing, see “CX PCA Transparent
Load Balancing Overview” on page 11.
Validate current SSL keys
Before you upgrade, you want to test to see whether your current SSL keys are still
valid in the new PCA build. The following steps show how to extract the reassd
process from the new PCA distribution and how the appropriate command to run
it.
1. Acquire the latest PCA build. For more information on downloading IBM
Tealeaf, see IBM Passport Advantage Online.
2. Copy the rpm over to the PCA to /tmp.
3. Run the following command to extract the reassd process from the provided
rpm and place it in the current directory:
rpm2cpio tealeaf-pca-<nnnn>-<rrr>.<distro>.i686.rpm | cpio \
-ivd./usr/local/ctccap/bin-debug/reassd ; \
mv usr/local/ctccap/bin-debug/reassd .
Where:
v <nnnn> is the build version number; for example, 3650.
v <rrr> is the RPM revision number. This is usually a single digit number.
v <distro> is an identifier for the Linux distribution, such as "RHELn" for Red
Hat Enterprise Linux release n.
4. reassd must be in the /tmp directory.
5. To test your current SSL keys, run the following command from the /tmp
directory:
© Copyright IBM Corp. 1999, 2015
51
./reassd -j
a. If the current SSL keys are successfully loaded, the following message is
displayed:
Success loading configuration and SSL keys.
b. If the current SSL keys cannot be loaded, the following message is
displayed:
Failed loading configuration (1), likely due to:
* Loading bad SSL keys
* Error in configuration file
* Other unknown error
If the load fails, the PCA capture.log also reports the following error message for
loading bad SSL keys:
Couldn’t create reveal object: 1
For more information about the process for re-creating the SSL keys, see
"Troubleshooting - Capture" in the IBM Tealeaf Troubleshooting Guide.
Basic upgrade
Use the following information to perform a basic upgrade.
Note: The upgrade must be executed as root. See Hardware Setup and Operating
System Installation.
You can use a single Linux command to execute the upgrade if your PCA
installation meets the following requirements:
v PCA Configuration settings are stored in the default directory:
/usr/local/ctccap/etc.
v If you are upgrading from Release 31xx and user authentication is in use, see
“Upgrading PCA with user authentication.” Otherwise, proceed with the
following steps.
If your installation meets the above requirements, to upgrade
1. Make a backup copy of /usr/local/ctccap/etc:
mkdir /root/tmp
cp -r /usr/local/ctccap/etc /root/tmp
2. A basic upgrade can be executed by using the following command:
rpm -Uvh tealeaf-pca-XXXX-1.RHEL6.i686.rpm
where XXXX equals the CX PCA version number. For example, if you are
upgrading to CX PCA version 3620, run
rpm -Uvh tealeaf-pca-3620-1.RHEL6.i686.rpm
.
Upgrading PCA with user authentication
If your PCA is operating in a Tealeaf environment where user authentication is
enabled, more steps in the upgrade process might be required.
52
IBM Tealeaf CX Passive Capture Application: PCA Manual
Before PCA version 3200, major changes were implemented to the way user
authentication is configured. Upgrading from PCA 31xx to a 32xx or 33xx build is
more complex if user authentication is enabled. The following steps are required to
upgrade:
1. Make a copy of /usr/local/ctccap/etc:
mkdir /root/tmp
cp -r /usr/local/ctccap/etc /root/tmp
2. Remove the existing tealeaf-pca package. Remove the remaining files in
/usr/local/ctccap:
rpm -e tealeaf-pca
cd /usr/local/ctccap
rm -rf *
Note: Verify that you are in the correct directory before you run the rm
command.
3. Install the new PCA package:
rpm -ivh tealeaf-pca-3315.rpm
4. Copy the original ctc-conf.xml, privacy.cfg and any *.ptl files to
/usr/local/ctccap/etc. If prompted, overwrite the current files:
cd /root/tmp/etc
cp ctc-conf.xml privacy.cfg *.ptl /usr/local/ctccap/etc
5. Copy httpd.users file to /usr/local/ctccap/etc and to tealeaf-web.users:
cp httpd.users /usr/local/ctccap/etc
cd /usr/local/ctccap/etc
cp httpd.users tealeaf-web.users
6. Edit /usr/local/ctccap/etc/runtime.conf, and add the following lines to the
end of the file:
httpd_userauth_enable="YES"
httpd_userauth_realm="Tealeaf PCAv2"
httpd_userauth_require="valid-user"
httpd_userauth_type="Basic"
7. Start httpd.
tealeaf start all
8. Verify that the web console is running and that user authentication is still
enabled. Verify that capture is running.
9. The upgrade is complete.
Configuring new data types
If you upgraded from a build before PCA Build 3324, you must review and
configure the data types that are captured by the IBM TealeafCX Passive Capture
Application to verify that the required types are being captured.
Before Build 3324, some of these types were not available for capture or were not
configured for capture by default.
Note: If you upgrade your PCA and are including a Rich Internet Application, you
must configure the XML post types. See “Configure PCA for Capture of Rich
Internet Applications” on page 44.
For more information about configuring XML post types, see “Pipeline Settings” on
page 113.
Chapter 3. Upgrading the CX PCA Software
53
54
IBM Tealeaf CX Passive Capture Application: PCA Manual
Chapter 4. Configuring the CX PCA
The IBM Tealeaf CX Passive Capture Application can be configured through a
web-based console or through the configuration files that are stored on the PCA
server. The following information guides you on how to configure the CX PCA.
You can configure the CX Passive Capture Application through one of the
following methods:
v CX PCA web console
v Editing CX PCA configuration files ctc-conf.xml and runtime.conf with the vi
editor.
Note: For most activities, the web console is the primary location for configuring
the CX PCA. You can edit the configuration files when a parameter needs to be
changed and is not available through the web console.
Configuration via Web Console
The PCA web console provides a convenient graphical interface for monitoring and
configuring the IBM Tealeaf CX Passive Capture Application and its connections.
Note: All configuration settings that are required to initialize the IBM Tealeaf CX
Passive Capture Application are available through the Web Console.
Note: The CX Passive Capture Application web console does not support entering
multibyte characters into a field. If you want to configure a setting with multibyte
characters, you must edit the configuration. For more information about editing the
configuration file, see “Configuration via ctc-conf.xml” on page 56.
v See “Supported Browsers for PCA Web Console” on page 67.
CX PCA configuration files
Configuration settings that are related to the IBM TealeafCX Passive Capture
Application are available through the PCA Web Console or, if needed you can use
the vi editor to edit the configuration files that are located in /usr/local/ctccap/
etc/.
v ctc-conf.xml: This configuration file contains passive capture configuration
settings.
v runtime.conf: This configuration file contains custom settings and values for
operating system-level configuration. This file can be used to override any of the
default setting values that are listed in the tealeaf.conf file.
v tealeaf.conf: This configuration file contains the default settings and values for
operating system-level configuration.
Note: tealeaf.conf must be assigned read-only permissions for all users. It
must never be edited.
Note: When you make configuration changes to your Linux installation, apply the
changes to the runtime.conf file. runtime.conf supersedes the default
tealeaf.conf file. tealeaf.conf can be used to revert changes to the default
settings if necessary, and it must be configured to be a read-only file.
© Copyright IBM Corp. 1999, 2015
55
To
1.
2.
3.
change a runtime setting:
Copy the entry from tealeaf.conf.
Paste it into runtime.conf and edit the setting value.
Save runtime.conf and restart the PCA.
Configuration via ctc-conf.xml
While all required configuration options are available through the web console, vi
must be used to view and edit the complete set of configuration fields, if wanted.
v See “Passive Capture Configuration File ctc-conf.xml” on page 176.
Configuration using runtime.conf
Configuration settings that are related to the IBM TealeafCX Passive Capture
Application are available through the PCA Web Console or, if needed, the
ctc-conf.xml.
Configuration settings that apply to how the PCA interacts with the operating
system are specified in two files. These files are located in the following directory:
/usr/local/ctccap/etc/
Files
v tealeaf.conf - This file contains the default settings and values for operating
system-level configuration.
Note: tealeaf.conf must be assigned read-only permissions for all users. It
must never be edited.
v runtime.conf - This file must be used to override any of the setting values listed
in the tealeaf.conf.
To change a runtime setting:
1. Copy the entry from tealeaf.conf.
2. Paste it into runtime.conf and edit the setting value.
3. Save runtime.conf and restart the PCA.
SSL Decryption
If SSL decryption of your web data is required, load it by using the Web UI or
through the command line.
A. Web UI:
1. Go to https://<machineIP>:8443/ and click SSL Keys.
2. Click Loaded at the top of the page to view the loaded SSL keys and add new
SSL keys.
3. Click Save when done.
v For more information about using the Passive Capture software web console,
“Supported Browsers for PCA Web Console” on page 67.
B. Command Line:
1. Edit the file /usr/local/ctccap/etc/ctc-conf.xml.
2. Edit the XML node CaptureKeys.
56
IBM Tealeaf CX Passive Capture Application: PCA Manual
3. Modify any remaining options by using either the web UI or by editing the
/usr/local/ctccap/etc/ctc-conf.xml file.
C. Restart Services:
v If any changes are made by using the web console, services are automatically
restarted to apply the changes.
v If you edited the ctc-conf.xml file, restart the capture services manually by
using the following commands:
tealeaf stop capture
tealeaf start capture
v If you are not using the Tealeaf Cookie Injector for sessionization, sessionization
parameters must be configured in the TLSessioning session agent in the
TealeafCaptureSocket.cfg file on the IBM Tealeaf CX Server. See "Sessioning
Session Agent" in the IBM Tealeaf CX Configuration Manual.
PCA Tealeaf Command Line Reference
This section contains a reference of commands, actions, and options that can be run
by using the tealeaf script command. This command is used primarily for
post-installation of following tasks :
v Some administration and maintenance functions
v Some access to web console functions when the interface is not available
v Debugging operations
Basic Command
tealeaf [options] action [service ...]
See
v “Options”
v “Actions”
v “Services” on page 59
Options
Option Description
-h
Show this help.
-n
Show the commands without running them.
-v
Show more messages (verbose mode).
Options are passed along to the service except when you specify service all. See
“Services” on page 59.
Actions
Action Description
allselfsignedcerts
Generate all self-signed certificates if missing.
bwmon
Run the bwMon utility.
capturekeys2ptl
Convert all PEM files in the capturekeys directory.
Chapter 4. Configuring the CX PCA
57
clearstats
Clear statistics for all instances.
configdiffs
Show differences for current and default configuration files.
deletestats
Delete statistics for all instances.
disable
Prevent one or all services from starting.
enable Allow one or all services to start.
env
Display the "tealeaf environment".
genselfsignedcert
Generate a self-signed certificate.
ifdetails
Show detailed information about the specified network device.
ifstat Show statistics about the specified network device.
ifsummary
Show summary information about network devices.
ifup
Start all network devices.
ipconfig
Configure network devices.
maint
Run maintenance script.
man
Show provided manual pages.
no
Set a runtime configuration variable to "NO".
openssl
Run provided OpenSSL.
pem2ptl
Encrypt PEM files into PTL format.
ps
Show capture processes by using /bin/ps.
restart
Stop and then start the specified service.
rolllog
Roll all log files or the specified one.
showstats
Show capture statistics.
showstatsxml
Show capture statistics in XML.
start
Start all or the specified service.
stats
Run statistics utility.
status Show status of capture and HTTPd.
stop
Stop all or the specified service.
tcpdump
Run provided tcpdump.
58
IBM Tealeaf CX Passive Capture Application: PCA Manual
testconn
Run TeaLeaf Transport Service connection test program.
top
Show capture processes using /usr/bin/top.
tzconfig
Configure time zone.
Note: Time zone settings must comply with the time zones that are
supported by PHP. For a list of supported time zones, see
http://www.php.net/manual/en/timezones.php .
userauthpw
Add or update a web console user password.
validate
Validate the user, owner, and permissions of PCA files.
yes
Set a runtime configuration variable to "YES".
Services
For the actions disable, enable, start, status, and stop, the following Services can
be specified:
v all
v capture - through captured
v httpd - through httpd
Example commands
tealeaf ifdetails em0
tealeaf showstats
tealeaf start
v Using start as root causes this script to bring up the primary and secondary
capture interfaces.
tealeaf start all
v Using start as root causes this script to bring up the primary and secondary
capture interfaces.
tealeaf stop
tealeaf start capture
tealeaf start capture -r
Initial PCA Configuration
Note: This section provides a framework for performing the initial configuration of
one component of the IBM Tealeaf CX system in a simplified deployment model.
Depending on your Tealeaf solution's deployment, more configuration can be
required. If you have any questions about configuration, contact
http://support.tealeaf.com.
After you complete installation of the PCA software, you can follow the steps to
configure the PCA to capture web application traffic and forward to one or more
the Processing Servers.
Chapter 4. Configuring the CX PCA
59
Pre-Requisites
Before you begin configuring the PCA, verify that you meet the following
requirements and acquired the following information:
1. The operating system for the PCA server is installed with the
Tealeaf-recommended packages. See Hardware Setup and Operating System
Installation.
2. The operating system is properly configured. See Chapter 8, “Configuring
Passive Capture on Red Hat Enterprise Linux (RHEL),” on page 237.
3. The PCA software is installed in a directory on the PCA hardware. See
Chapter 2, “Installing the CX Passive Capture Application,” on page 19.
4. To complete the steps in this configuration, you must acquire the following
information:
a. The IP address of the PCA hardware
b. The Network Interface Cards that is connected to the PCA device that are
providing the traffic source
c. The host name or IP address and port number of the Processing Server
v If you are using Health-Based Routing (HBR), you need the host name or
IP address and port number for the HBR machine. See "Health-Based
Routing (HBR) Session Agent" in the IBM Tealeaf CX Configuration Manual.
Note: The ctccap user is created without a password that is assigned to it, so you
cannot log in with that account by default. Security risks are minimal; the ctccap
user can only start and own the Tealeaf processes. Depending on your enterprise
security requirements, you must assign a password to the ctccap user from the root
user.
Example Configuration
Configuration of the PCA is dependent on the server environment where it resides.
This section provides an example configuration for a simple system:
v 1 PCA server
v 1 PCA instance
v 1 Processing Server
Complicating Factors
To capture more complicated web applications, there are many possible PCA
deployment architectures. They can include the use of multiple PCAs, multiple
PCA instances, and various filtering mechanisms. Below, you can review example
scenarios in which you can need assistance in configuring the PCA.
Note: If your web application environment meets one or more of the following
criteria, it is recommended that you contact http://support.tealeaf.com or Tealeaf
Professional Services before you begin configuration.
1. High-volume web applications. If you are delivering over 200 hits/s over SSL
or over 400 hits/s over clear-text HTTP:
v You must split the traffic across multiple PCA instances.
v You must filter out the IP addresses of web servers from which you want to
capture. You can filter at the PCA level or the network level. Tealeaf
recommends performing filtering at the network level, which lowers the
processing overhead on the PCA.
60
IBM Tealeaf CX Passive Capture Application: PCA Manual
Note: IP filtering is possible only if the IPs are not NAT'd internally. For
more information, contact your network administrator.
2. Capturing a range of IP addresses. If you are capturing a range of 25 IPs or
more on the PCA:
v You must create IP filters to drop content.
v You must use netmasks to limit the number of entries in your configuration.
v You must split the traffic across multiple PCA instances.
For more information, contact http://support.tealeaf.com.
Configuration Steps
Following section contains configuration steps.
Start Apache
To begin your configuration, do the following steps:
1. Log in as root.
2. Run the Tealeaf script to start the Apache process:
tealeaf start httpd
3. To verify that the process is successfully started, use the following to return the
Apache processes that are currently running.
tealeaf ps
tealeaf status
The output of the command must indicate that at least one process is running.
v If any process failed to start, review the /var/log/tealeaf/capture.log for any
startup error messages to determine the issue.
v If any configuration changes are preventing the PCA web console (HTTPd
process) from starting, you can manually edit the /usr/local/ctccap/etc/ctcconf.xml file to correct the configuration. See “Passive Capture Configuration
File ctc-conf.xml” on page 176.
Open PCA Web Console
After the Apache processes are started, you can open the PCA Web Console to
review the configuration.
v See “Supported Browsers for PCA Web Console” on page 67.
1. Open the PCA web console:
a. HTTP Secure:
https://<servername>:8443
b. HTTP:
http://<servername>:8080
2. If the previous URLs do not work, review the server name and the port
number with your network administrator.
Note: The PCA web console can require authentication.
Configuring the CX PCA Interface
When the PCA software is installed and started, it is not yet ready to capture
bidirectional traffic. After installing the IBM Tealeaf CX PCA software, you need to
configure the network interface to capture bidirectional traffic.
Chapter 4. Configuring the CX PCA
61
If there is a load balancer deployed between the CX PCA and the web server or
you have multiple web servers operating under a single virtual IP (VIP), configure
your CX PCA network interface for transparent load balancing. For more
information, see “Configuring the CX PCA Interface with Transparent Load
Balancing.”
If your web server deployment does not use a load balancer and does not operate
under a single virtual IP (VIP), you can configure your CX PCA network interface
without transparent load balancing. For more information, see “Configuring the
CX PCA Interface without Transparent Load Balancing.”
Configuring the CX PCA Interface with Transparent Load
Balancing
You can configure the network interface of your CX Passive Capture Application
with transparent load balancing. For more information on the benefits of enabling
transparent load balancing, see “CX PCA Transparent Load Balancing Overview”
on page 11.
To configure the PCA interface with transparent load balancing:
1. Open the CX PCA web console. See “Configuration via Web Console” on page
55.
2. Click the Interface tab.
3. Select Enable Transparent Load Balancing.
4. Enter the number of Reassd instances that you want to run. Increasing the
Reassd instances increases the number of PCA instances that can process TCP
packets.
Note: You can enable up to N-1 packets where N is the total number of
processor cores on your server. For example, if you have a total of 8 processor
cores on your server, you can run up to 7 instances.
5. If you want to flush the SSL session information from memcache when the CX
PCA service restarts, select Restart Memcached server on Capture restart.
6. If you want to disable TCP packet checksum, select Disable Packet checksum
validation.
Note: If your network interface card has packet checksum enabled, then it is
recommended to disable the packet checksum.
7. Multi-instance Capture should not be selected unless you want to return to a
non-transparent load balancing mode.
8. If you want to enter a filter rule, locate Filter Rules and enter the information
for your filter; then, click Create Filter.
9. Click Save Changes to save your changes to the CX PCA configuration. If you
want to cancel your changes, click Revert Changes.
Configuring the CX PCA Interface without Transparent Load
Balancing
To configure the CX PCA interface in a non-load balanced environment:
1. Open the CX PCA web console. See “Configuration via Web Console” on page
55.
2. Click the Interface tab.
62
IBM Tealeaf CX Passive Capture Application: PCA Manual
3. If Enable Transparent Load Balancing is selected, deselect Enable Transparent
Load Balancing. For more information on the benefits of enabling transparent
load balancing, see “CX PCA Transparent Load Balancing Overview” on page
11.
4. Add a CX PCA instance by clicking Add Instance. You can add additional CX
PCA instances to capture network traffic. Each CX PCA instances requires the
use of an additional processor core. You can add up to N-1 instances, where N
is the total number of processor cores in your CX PCA server. For example, if
your system has eight processor cores, you can enable seven CX PCA instances.
5. You can use default port numbers to define the port numbers in the filter rules
by clicking Populate Ports. The default port numbers are 1024 through 65535. If
you want to filter different port numbers for a CX PCA instance, you can add a
filter rule or edit the instance.
6. If you want to change the settings for an instance, locate Instance List and click
Edit next to the instance to begin making your changes. You can also delete
and instance by clicking Delete or remove the filter rules for an instance by
clicking Clear Filters.
a. If you are installing the CX PCA for the first time, edit the filters for each
CX PCA instance. See “Edit Filters” on page 99.
b. From the Primary Interface drop-down, select the network device on which
you want this instance to listen.
v In most cases, you must not listen to a device whose IP address is listed
in the drop-down.
v If you see a down status message for a device, then the operating system
is not configured to activate it. This is rare.
v For a simple configuration, you can leave the other configuration options
with their default values.
v For more information about specifying PCA instances, see “PCA Web
Console - Interface Tab” on page 86.
c. Click Update to save your changes.
7. Click Save Changes to apply your changes to the CX PCA. If you want to
cancel your changes, click Revert Changes.
The CX PCA is now configured to capture traffic on the selected NIC.
Configure Hit Delivery
Following section explains how to configure hit delivery.
Deliver Hits to Processing Server
Now, you can specify the Processing Server or HBR server to which the PCA is to
deliver hit data.
v The destination port number on the receiving Processing Server is defined for
individual Windows pipelines. See "TMS Pipeline Editor" in the IBM Tealeaf
cxImpact Administration Manual.
1. Click the “PCA Web Console - Delivery Tab” on page 105.
2. Click Add.
3. Enter the host name or IP address of the Processing Server.
v If you are using HBR, you can enter the host name or IP address for the HBR
machine. See "Health-Based Routing (HBR) Session Agent" in the IBM Tealeaf
CX Configuration Manual.
4. Enter the port number. By default, this value is 1966.
Chapter 4. Configuring the CX PCA
63
5. Click OK.
6. Click Save Changes.
7. To test your delivery connection, click the Ping and Speed links for your newly
added host in the Delivery tab.
v If the tests fail or your Speed tests results in low throughput, review your
network and PCA configuration.
Note: If you have more than one Delivery Target Recipient, it is important that
select the correct Delivery Mode. See “PCA Web Console - Delivery Tab” on page
105.
The configuration is set to deliver traffic to the referenced Processing Server.
v See “PCA Web Console - Delivery Tab” on page 105.
PCA Time Source
If needed, you can configure the IBM Tealeaf CX Passive Capture Application to
rely on the Tealeaf Transport Service as the local time source. When enabled, the
PCA queries the Transport Service at periodic intervals for the current time. To
resolve discrepancies, the PCA speeds up or slows down its time incrementing to
"drift" toward the value of the local time source.
Note: Unless you are synchronizing time through another mechanism, you must
configure the PCA to synchronize by using one of the delivery peers as the source.
Complete the following steps to do so.
1. Click the “PCA Web Console - Delivery Tab” on page 105.
2. In the Use Tealeaf Transport Service as Time Source panel, enter the Host or
Address name and port number of the Tealeaf Transport Service that is the
master time source.
v These values must be set to one of the delivery peers that are previously
configured.
v If it is not provided, the port number defaults to 1966.
v See “PCA Web Console - Delivery Tab” on page 105.
Deliver Statistics Hits
Optionally, the PCA can be configured to deliver statistical information to the
Processing Server for insertion into the TL_STATISTICS database for reporting
through the Portal.
v Along with statistics from the Canister and the Extended Decoupler session
agent, the PCA statistics hits are reported in the System Statistics page. See
"System Statistics" in the IBM Tealeaf cxImpact Administration Manual.
1. Click the “PCA Web Console - Delivery Tab” on page 105.
2. In the Deliver Statistics to Tealeaf Transport Service area, configure the
following options:
a. To enable delivery, click the Enabled check box.
b. Enter the host name or Address of the delivery peer that is to receive the
statistics hits.
Note: Typically, statistics hits are sent to the same delivery peer that
receives captured hits, as defined.
c. Specify an interval in seconds at which to send hits.
d. Enter a Port number to which the delivery peer listens. By default, this
value is 1966.
64
IBM Tealeaf CX Passive Capture Application: PCA Manual
e. To use secure transport, click the Use SSL check box.
v See “PCA Web Console - Delivery Tab” on page 105.
Configure the PCA Pipeline
In this section, you can step through the basic configuration options for the IBM
Tealeaf CX Passive Capture Application processing pipeline.
v The PCA pipeline is configured through the Pipeline tab in the PCA web
console. See “Pipeline Settings” on page 113.
Note: The PCA pipeline has a different configuration from the session
agent-based configuration for the Windows pipeline. For more information about
the Windows pipeline configuration, see "Initial Pipeline Configuration" in the
IBM Tealeaf CX Configuration Manual.
Data Sessioning
If cookies are being inserted into the request to uniquely identify visitors, the PCA
can be configured to sessionize based on these cookies. Tealeaf supports multiple
mechanisms for sessioning Tealeaf sessions.
v The preferred method for sessioning is to use the Tealeaf Cookie Injector, a
lightweight server-side method for injecting unique identifiers as cookies in the
request data. See "Installing and Configuring the Tealeaf Cookie Injector" in the
IBM Tealeaf Cookie Injector Manual.
v For a general overview of the supported methods of sessionization, see
"Managing Data Sessionization in Tealeaf CX" in the IBM Tealeaf CX Installation
Manual.
v See “Pipeline Settings” on page 113.
Capture Mode
The IBM Tealeaf CX Passive Capture Application can be configured to capture the
recommended text-based types of request and response data (Business mode), or
you can configure the Business mode data and binary types, such as images
(BusinessIT mode).
v BusinessIT mode requires more system storage.
v See “Pipeline Settings” on page 113.
Capture Request Methods
You can specify the request methods that are captured to be any of the following
combination:
v GET
v POST
v PUT
v See “Pipeline Settings” on page 113.
Time Grading
Grades can be assigned to times measured by the PCA based upon interpolating
between timestamps observed in network packets. You can assign threshold values
and grades for Web Server Page Generation, Network Transit, and Round Trip
times.
v For more information about time grading in general, see Chapter 7,
“Performance Measurement,” on page 229.
v For more information about the reporting of time grades, see "Analyzing
Performance" in the IBM Tealeaf Reporting Guide.
Chapter 4. Configuring the CX PCA
65
v For more information about configuring time grading, see “Pipeline Settings” on
page 113.
Hit Processing
You must review all available options for how hits are processed by the PCA
before you forward it to the delivery peer. These settings can affect storage
requirements and PCA performance.
v See “Pipeline Settings” on page 113.
Other capture inclusions and exclusions
You can also configure the PCA to capture or drop from capture specified file
types, Mimetypes, and all POST types.
v See “Pipeline Settings” on page 113.
Configure Privacy
Note: Before you enable capture, you must configure privacy rules to prevent the
unwanted capture of sensitive information, such as customer credit card numbers.
If capture is enabled without appropriate privacy rules, unfiltered customer data
can be forwarded to the Windows pipeline and stored in the Tealeaf databases,
where it can be searched by any Tealeaf user with the appropriate permissions.
Tealeaf privacy enables the manipulation, masking, or removal of sensitive
information in the request or response traffic. Based upon privacy rules that you
configure, this data can be hidden in the traffic that is stored in the Tealeaf
database.
1. Getting started with Tealeaf Privacy: See "Managing Data Privacy in Tealeaf
CX" in the IBM Tealeaf CX Installation Manual.
2. Privacy in the PCA: Privacy can be deployed in the PCA through the PCA Web
Console. See “Downloading Privacy Configuration” on page 128.
Enable Capture
Note: The following steps enable the PCA to begin capturing network traffic that
is provided through the specified NIC and forwarding the captured data to the
selected Processing Server. If the Processing Server is not yet configured to capture
and process the forwarded data, then data is lost when the PCA is unable to
establish a connection. However, you can use these steps and the subsequent ones
to verify PCA operations.
When capture is enabled, the Processing Server must also be capturing in order for
the hits to be captured.
1. Click the “PCA web Console - Console Tab” on page 84.
2. Click Start.
The PCA begins capturing and forwarding to the specified Processing Server.
v See “PCA web Console - Console Tab” on page 84.
Testing Your Configuration
After you complete initial configuration, you can perform the following steps to
verify the configuration.
66
IBM Tealeaf CX Passive Capture Application: PCA Manual
The output of the IBM Tealeaf CX Passive Capture Application is not easily
reviewable until the remainder of the IBM Tealeaf CX system is configured. If you
only configure the PCA, you can review the following steps to verify that the PCA
is functioning properly.
1. Enable capture through the PCA Web Console, if not done already. Verify that
capture is on. See “Enable Capture” on page 66.
2. When capture is running, check the Machine Health section of the Summary
tab to verify that all processes are running.
v In the Peers section, you must have the delivery peers listed. The value of
the Status column must be connected. If you do not configure a Tealeaf
Processing Server to receive data from the PCA, errors can be reported here.
v In the Peers section, the Hits Delivered statistics must be non-zero and
increasing, which indicates that the PCA is delivering hits to the targets
specified in the Delivery tab.
v See “PCA Web Console - Summary Tab” on page 73.
3. Check the log files for any errors. See “PCA Web Console - Backup-Logs Tab”
on page 164.
v In the log files, you can notice errors that the PCA is unable to contact a peer
if you do not configured a Tealeaf Processing Server to receive data from the
PCA.
When all Tealeaf components are configured, you must complete an end-to-end
test.
Supported Browsers for PCA Web Console
The following browsers are supported for accessing the PCA web console:
v Microsoft Internet Explorer 7, 8, and 9
v Firefox 4 or later
Note: The browsers supported for accessing the web console differ from the ones
that are supported for accessing the Tealeaf Portal. Using an unsupported browser
can result in unexpected behaviors.
v See "Logging in to the Tealeaf Portal" in the IBM Tealeaf cxImpact User Manual.
PCA Web Console Login
To monitor and configure the IBM Tealeaf CX Passive Capture Application server,
you can use the web Console, a web-based administration tool.
To open the web Console, enter the following address into your browser's Address
field.
HTTP Secure:
https://<servername>:<portnumber>
HTTP
http://<servername>:<portnumber>
where:
v <servername> corresponds to the host name of the PCA server.
Chapter 4. Configuring the CX PCA
67
v <portnumber> corresponds to the port number used to communicate with the
web Console.
– For HTTP, the default port number is 8080.
– For HTTPS, the default port number is 8443.
The ports to which the PCA web Console listens can be configured. See “Changing
Web Console Listening Ports” on page 70.
Note: If you enable Windows Enhanced Security features, you can experience
issues when you use Internet Explorer to access the PCA web Console. See
"Troubleshooting - Portal" in the IBM Tealeaf Troubleshooting Guide.
PCA Web Console Logout
To log out of the PCA, close the browser window.
Note: Beginning in PCA Build 3500, the web console enforces a default timeout
setting of 30 minutes. If the PCA causes your session to time out, you must log in,
whether authentication is enabled or not.
v If you are timed out of your session, reenter your authentication credentials to
log in again.
v If authentication is disabled, leave the textboxes empty and click Login.
v For more information about configuring the timeout setting, see “PCA web
Console - Console Tab” on page 84.
Web Console Tabs
At the top of the web console, you can review status information. It includes the
Tealeaf build number, host and port information, and current version of Linux, as
well as the time at which the page was last loaded.
v In the upper-right corner of the console, you can access the SysInfo page. See
“SysInfo Page” on page 71.
v When the page is loaded, the web console checks the available disk space in the
partition that is containing the PCA software. If there is insufficient free disk
space, a red status message is displayed, and steps must be taken immediately
to free up space in the partition (/usr/local/ctccap by default).
The following configuration pages are available in the web console:
Tab Label
Used for...
“PCA Web Console - Summary Tab” on page 73
Status of running Capture processes; Viewing hits, rejected hits; TCP
connections/packets/errors; SSL connections/handshakes; and listener
bytes read and written. Viewing status and configuration information for
the primary and secondary network interfaces
“PCA web Console - Console Tab” on page 84
Starting/stopping capture of live packets from the network, Enable/disable
capture at startup
“PCA Web Console - Interface Tab” on page 86
Defining network interfaces (NICs), configuring Passive Capture for a
68
IBM Tealeaf CX Passive Capture Application: PCA Manual
network tap or spanned switch port, configuring capture instances,
defining web servers to monitor and ignore, defining traffic filters, and
defining capture tuning parameters
“PCA Web Console - Delivery Tab” on page 105
Specifying Tealeaf servers to receive packaged hits from Passive Capture,
setting delivery parameters, synchronizing time
“PCA Web Console - SSL Keys Tab” on page 110
Loading, editing, and deleting private keys for web servers that are
monitored; obtaining more information about, ignoring, or deleting missing
private keys
“Pipeline Settings” on page 113
Editing configuration parameters that control hit processing; time-grading,
capture mode, sessionization, include/exclude extensions.
“Downloading Privacy Configuration” on page 128
Enabling/disabling privacy, creating and editing privacy rules
“Stats per Instance” on page 145
Viewing Passive Capture activity metrics
“PCA Web Console - Backup-Logs Tab” on page 164
Backing up and uploading the configuration file; viewing various log files;
enabling/disabling packet archiving.
“PCA Web Console - Failover Tab” on page 166
Managing failover settings
“PCA Web Console - Utilities Tab” on page 168
Access various utilities for PCA administrators
“PCA Web Console - Debug Page” on page 173
Managing PCA core dumps
Configuration
The following sections contain some basic configuration steps for setting up the
PCA Web Console.
Enabling Web Console Authentication
Access to the PCA web console can be restricted. See Hardware Setup and
Operating System Installation.
Toggling HTTP/HTTPS Access
By default, the PCA web console is accessible in HTTP mode over port 8080 or in
HTTPS mode over port 8443.
Optionally, you can configure the PCA to not be accessible in one of these modes.
Steps:
To toggle access, complete the following steps.
1. Edit the /usr/local/ctccap/etc/runtime.conf file.
2. Add or edit the following lines:
httpd_port_enable="NO"
httpd_portssl_enable="YES"
Mode Settings
Chapter 4. Configuring the CX PCA
69
HTTP only
httpd_port_enable="YES"
httpd_portssl_enable="NO"
HTTPS only
httpd_port_enable="NO"
httpd_portssl_enable="YES"
both HTTP and HTTPS
httpd_port_enable="YES"
httpd_portssl_enable="YES"
3. Save the file.
4. Restart the PCA.
If needed, you can change the ports to which the PCA web console listens. See
“Changing Web Console Listening Ports.”
For more information about logging in, see “PCA Web Console Login” on page 67.
Deploying an SSL Certificate for the Web Console
You can deploy a custom SSL certificate. See “Generating a Self-Signed Certificate”
on page 210.
Changing Web Console Listening Ports
By default, the PCA web console listens to the ports listed at the top of this
section. Optionally, you can change the listening ports by adding the following
lines to the runtime.conf file.
The runtime.conf file is used to override the default settings that are stored in the
tealeaf.conf file.
Note: tealeaf.conf must be configured to be read-only and must never be edited.
1. Edit runtime.conf, which is stored in the following location:
/usr/local/ctccap/etc/runtime.conf
2. HTTP port (unencrypted): Add the following lines:
httpd_listen="X"
httpd_port="X"
where X is the port number to which the web Console must listen for
unencrypted traffic.
3. HTTPS port (encrypted): Add the following lines:
httpd_listenssl="X"
httpd_portssl="X"
where X is the port number to which the web Console must listen for encrypted
traffic.
4. Save the file.
5. Restart the PCA.
IPv6 Support in the PCA Web Console
For new installs of PCA Build 3600, the web Console is configured to accept IP
addresses in IPv6 format by default.
70
IBM Tealeaf CX Passive Capture Application: PCA Manual
v Before PCA Build 3502, IPv6 addresses cannot be entered through the PCA web
Console.
If you are upgrading from a previous version, you must manually insert the
following attribute in the Conf section of ctc-conf.xml file:
<IPv6ConsoleEnabled>1</IPv6ConsoleEnabled>
The previous change can also be applied to PCA Build 3502 to configure the PCA
web Console to accept IPv6 addresses by default.
v See “Passive Capture Configuration File ctc-conf.xml” on page 176.
When the value is set to 1, the PCA web console validates data entry assuming
that IP addresses are entered in IPv6 format.
v This change primarily affects the addresses that you can enter in the Interface
tab. See “PCA Web Console - Interface Tab” on page 86.
SysInfo Page
When you click the sysinfo link above the PCA Console menu bar, the SysInfo
page is displayed. This page is generated by running a set of Linux commands at
the command line and displaying the results in a single page.
You can review the individual commands that generate the SysInfo page and
example outputs of each command.
System
The following command can be used for either SLES and RHEL distributions,
which have different filenames.
Command
cat /etc/*-release
Output
System
release info
: LSB_VERSION="1.3"
Red Hat Enterprise Linux ES release 3 (Taroon Update 5)
Command
uname-a
Output
kernel info
: Linux venus.tealeaf.com 2.4.21-32.EL #1 Fri \
> Apr 15 21:29:19 EDT 2005 i686 i686 i386 GNU/Linux
Command
cat /proc/cpuinfo
Output
processor
vendor_id
cpu family
: 0
: GenuineIntel
: 6
Chapter 4. Configuring the CX PCA
71
model
: 8
model name
: Pentium III (Coppermine)
stepping : 3
cpu MHz
: 664.526
cache size
: 256 KB
fdiv_bug : no
hlt_bug
: no
f00f_bug : no
coma_bug
: no
fpu
: yes
fpu_exception
: yes
cpuid level
: 2
wp
: yes
flags
: fpu vme de pse tsc msr pae mce cx8 sep \
> mtrr pge mca cmov pat pse36 mmx fxsr sse
bogomips
: 1327.10
Command
cat /proc/meminfo
Output
total:
used:
free: shared: buffers: cached:
Mem: 258945024 250028032 8916992
0 110923776 90759168
Swap: 534601728 5242880 529358848
MemTotal:
252876 kB
MemFree:
8708 kB
MemShared:
0 kB
Buffers:
108324 kB
Cached:
85572 kB
SwapCached:
3060 kB
Active:
183328 kB
ActiveAnon:
37496 kB
ActiveCache:
145832 kB
Inact_dirty:
35704 kB
Inact_laundry:
7588 kB
Inact_clean:
3436 kB
Inact_target:
46008 kB
HighTotal:
0 kB
HighFree:
0 kB
LowTotal:
252876 kB
LowFree:
8708 kB
SwapTotal:
522072 kB
SwapFree:
516952 kB
CommitLimit:
648508 kB
Committed_AS: 285972 kB
HugePages_Total:
0
HugePages_Free:
0
Hugepagesize:
4096 kB
dmesg
Command
dmesg
Output
dmesg
device
device
device
device
device
72
eth2
eth0
eth4
eth1
eth2
entered promiscuous mode
left promiscuous mode
left promiscuous mode
left promiscuous mode
left promiscuous mode
IBM Tealeaf CX Passive Capture Application: PCA Manual
device eth0 entered promiscuous
eth4: Promiscuous mode enabled.
device eth4 entered promiscuous
device eth1 entered promiscuous
eth2: Setting promiscuous mode.
device eth2 entered promiscuous
mode
mode
mode
mode
PCA Web Console - Summary Tab
When you connect to the Web Console, the Summary tab is displayed. The
Summary tab provides a quick snapshot of the system's state. Statistics displayed
on this page include device health, connections, current TCP and SSL stats, HTTP
connections, and partition metrics.
v Compound statistics are also provided to provide an easy-to-understand
overview of the health of the PCA. See “Instance Compound Statistics” on page
75.
v If a core dump is generated by the PCA, a link to the Debug page is provided in
the Summary tab. See “PCA Web Console - Debug Page” on page 173.
v Additional operating system information is available through the Utilities Tab.
See “PCA Web Console - Utilities Tab” on page 168.
Web console security
The following topics describe how to secure the web console.
Disabling web server for the web console
You can disable the web server for the PCA web console. Disabling the web server
prevents users from accessing the PCA web console.
To disable the web Server for the web Console:
1. Run the following command.
tealeaf disable httpd
2. If the web console is running, stop it using the following command.
tealeaf stop httpd
v If the previous command does not stop the HTTPd process, verify that no
user has the web console open in a browser window.
v If you run the previous command without success, you can use the following
command to stop any orphaned HTTPd processes:
a. Log in as root.
b. Run the following command:
killall httpd
3. PortalStatus needs the web server to retrieve status information. If you disable
the web server, PortalStatus is no longer able to retrieve the status information
for the PCA.
Disabling web console access through port 8080
You can configure the PCA to disable the port for the PCA web console. By
disabling the port, remote users cannot access the web console.
To turn off web console access via port 8080:
1. Edit file /usr/local/ctccap/etc/runtime.conf.
2. Search for the following line:
httpd_port_enable=
Chapter 4. Configuring the CX PCA
73
3. If the line does not exist, add it.
4. Set the value after the equals sign to "NO". For example:
httpd_port_enable="NO"
5. Save the file.
6. The updated configuration file takes effect the next time the web server starts.
Enabling web console access through a single IP address
You can specify a single IP address which can access the web console. Limiting
access to a single IP address helps to prevent unauthorized access through an
unknown system.
To allow access to the web Console from one IP address:
1. Edit the file /usr/local/ctccap/etc/runtime.conf.
2. Search for the following line:
httpd_console_allow_from=
3. If the line does not exist, add it.
4. Set the value after the equals sign to the IP address from which you would to
access the web console. For example:
httpd_console_allow_from=1.2.3.4
5. The updated configuration file takes effect the next time the web server starts.
Applying authentication when accessing the web console
You can improve security by enabling authentication to the web console.
When you use the following procedure to restrict access to the Web Console, you
must use the file name index.php when you access the web console's default page.
For example, after you apply the following steps, the following URL is not
displayed as the default web console page for the PCA 1.2.3.4.
http://1.2.3.4:8080/
You must specify the index.php page as follows.
http://1.2.3.4:8080/index.php
This restriction also applies to following HTTPS access:
https://1.2.3.4:8443/index.php
To require username/password when you access the web console:
Create the Web Server user database file by using the following commands:
1. Edit the file /usr/local/ctccap/etc/runtime.conf.
2. Search the file for:
httpd_userauth_
3. If the string is not present, add the following parameters to the end of the file.
If these entries exist, edit them to the following values:
httpd_userauth_enable="YES"
httpd_userauth_realm="PCAv2"
httpd_userauth_require="valid-user"
httpd_userauth_type="Basic"
Note: Values for httpd_userauth_enable must be in all capital letters, as in the
previous example (YES).
74
IBM Tealeaf CX Passive Capture Application: PCA Manual
4. To add a user or change their password, use one of the following commands,
replacing johndoe with the name of the new or existing user:
With the following command, you are prompted to enter the new password
when the command is run:
Note: Tealeaf recommends using this method for creating passwords. If this
method is not used, passwords cannot be longer than 8 characters.
/usr/local/ctccap/bin/htpasswd -m \
/usr/local/ctccap/etc/tealeaf-web.users johndoe
When the -b option is added, the password (mypassword) can be specified as
part of the command:
/usr/local/ctccap/bin/htpasswd -mb \
/usr/local/ctccap/etc/tealeaf-web.users johndoe mypassword
5. The changes mentioned in the previous command do not affect PortalStatus's
use of the web server to retrieve status information.
6. The updated configuration file takes effect the next time the Web Server starts.
Applying configuration changes immediately
You can apply configuration changes to your PCA by restarting the service.
To apply changes to the configuration file /usr/local/ctccap/etc/runtime.conf
immediately, run the following commands to stop the web server and then start it.
1. Run tealeaf stop httpd to stop the service.
2. Run tealeaf start httpd to start the service.
Instance Compound Statistics
Figure 3. Summary tab - Instance Compound Statistics
By default, the Summary page refreshes automatically about once every 20
seconds.
Chapter 4. Configuring the CX PCA
75
v To disable the auto-refresh function, click Disable auto-refresh in the upper
right corner of the page. When disabled, the page does not auto-refresh until a
user leaves the page and then returns to it or auto-refresh is enabled again.
v To manually refresh the data, click Refresh.
When the PCA is experiencing issues with capture or processing of hit data, a
message can be displayed on the Summary tab with some information about the
issue.
v Items that are listed in red must be addressed immediately.
v For more information about evaluating these messages, see “Additional PCA
Web Console Debugging Information” on page 84.
The percentage of alien packets
The percentage of packets that are encountered in the capture stream that the PCA
cannot associate with an existing connection. When capture is first started, this
number is expected to be a high percentage. But as capture continues to associate
and process hits, this figure must drop.
Analysis:
If this metric is marked in red, the quality of the data that is sent to the PCA or the
TCP connections must be improved. Here are some suggested approaches.
1. Apply traffic filters: If you not done already, you can apply filters to remove
unwanted traffic that is being forwarded to the PCA. Traffic filters can be
applied to port ranges or IP addresses.
v See “PCA Web Console - Interface Tab” on page 86.
2. Capture Mode: If the PCA is configured to be in BusinessIT mode, more data is
captured, which cannot be important. Alien packet counts can drop if you
switch the PCA to capture in Business mode. See “Pipeline Settings” on page
113.
3. After you make changes to the above, you must restart the PCA. See Chapter 2,
“Installing the CX Passive Capture Application,” on page 19.
4. Check hardware: The SPAN port that is used to deliver hits to the PCA can be
dropping some, due to oversubscription. Verify with your IT department that
data is not being lost by the SPAN port.
v High alien packet counts and missing pages can be associated with
improperly functioning NIC card on the machine hosting the PCA. You must
also review and update, if needed, the driver for the NIC card.
5. Bad checksums: If there are a significant number of bad checksums, you must
check with your IT staff to verify that the source of the traffic that is forwarded
to the PCA is generating valid checksums.
v To test the validity of the checksums in the packet data, you can enable
checksum validation through the Interface tab. Validation is enabled by
default. See “PCA Web Console - Interface Tab” on page 86.
6. Additional information can be available in the statistics log, which you can
download from the PCA web console. See “PCA Web Console - Backup-Logs
Tab” on page 164.
7. You can enable archiving in the PCA, which delivers raw network packets to
the designated archive and can be useful for debugging issues in session data.
Note: Use of the PCA archiving features must be conducted under the
guidance of Tealeaf personnel. For more information, contact Tealeaf Customer
Support .
76
IBM Tealeaf CX Passive Capture Application: PCA Manual
v See “PCA Web Console - Backup-Logs Tab” on page 164.
If true, reassd cannot keep up with listend
The listening (listend) process in the PCA instance is sending more hits to the
reassembly (reassd) process than it can evaluate. As a result, hits are being
dropped.
v For more information about processing flow in the PCA, see Chapter 1, “Passive
Capture Overview,” on page 1.
Analysis:
If this metric is marked in red, you must configure the PCA to send fewer hits
through the individual instance of the PCA. Some suggestions:
1. Add PCA Instances: Adding instances of the IBM Tealeaf CX Passive Capture
Application to the hosting server can alleviate the traffic volume to individual
processes.
v For more information about the maximum number of instances on the server,
see Chapter 2, “Installing the CX Passive Capture Application,” on page 19.
v For more information about adding instances, see “PCA Web Console Interface Tab” on page 86.
2. Listen on more ports: Adding listen ports to the PCA can reduce bottlenecks in
the processing over any individual port. See “PCA Web Console - Interface
Tab” on page 86.
The percentage of dropped packet connections
This metric identifies completed connections that the PCA suspects dropped packet
conditions.
Analysis:
This problem is caused by the connection between the PCA and the device that is
feeding it. Review the listen configuration for the PCA, the output configuration
for the sending device, and the network topology in between.
v For more information about configuring the network interfaces to which the
PCA listens, see “PCA Web Console - Utilities Tab” on page 168.
The percentage becoming unidirectional traffic
This metric indicates the percentage of traffic that is passed to the PCA that moves
in one direction. To reassemble a hit, the PCA matches requests (traffic moving
between client browser and web server) to responses (messages that are sent back
to client browser based on requests). To capture a visitor's experience, the PCA
must receive all bidirectional traffic.
Analysis:
Typically, this issue is a configuration problem with the device that is responsible
for forwarding data to the PCA. Consult with your IT department to verify that
the SPAN port or switch is forwarding bidirectional traffic across all Tealeaf ports.
v When the PCA detects unidirectional hits, those hits can be dropped. For
request-type hits, can result in a request cancelled hit, with no corresponding
response present in the capture stream.
The rate reassd is currently reassembling non-SSL hits
This metric indicates the core processing rate of the PCA. Typically, an instance of
the PCA must be able to process between 400®-600 hits per second.
Chapter 4. Configuring the CX PCA
77
v For SSL traffic, the process rate is typically 200-300 hits per second.
Analysis:
If this rate drops too low, then the reassd process is overburdened. The following
items can be investigated to try to improve processing rates:
Check privacy rules: Privacy rules that are applied in the PCA can be expensive in
terms of processing, especially if you are using regular expressions to assess the
data. Wherever possible, avoid by using regular expressions.
v Use privacy rules to block or encrypt only the most sensitive data. For more
information about privacy rules, see “Downloading Privacy Configuration” on
page 128.
v Privacy evaluation can be moved from the PCA to the Windows pipeline, as
needed. While applying privacy in the PCA ensures that sensitive data never
displayed in the Tealeaf system, non-critical privacy processing can be applied
through the Windows pipeline, by using identical rules configuration. See
"Privacy Session Agent" in the IBM Tealeaf CX Configuration Manual.
v For more information about how Tealeaf deploys privacy, see "Managing Data
Privacy in Tealeaf CX" in the IBM Tealeaf CX Installation Manual.
If true, encountered Diffie Hellman SSL
If this metric is marked in red, the PCA encountered the Diffie Hellman SSL
cryptographic algorithm, which is not supported by the PCA.
Analysis:
The IBM Tealeaf CX Passive Capture Application is unable to capture traffic in the
presence of Diffie Hellman. It is recommended that you reconfigure your web
servers to not use this protocol. For more information, see the documentation that
came with your web server product.
The percentage of aged connections
This value indicates the percentage of TCP connections that are captured by the
PCA that timed out.
v Aged connections can result in abnormally terminated sessions in the Tealeaf
data.
Analysis:
High percentages of aged connections can indicate a network configuration issue.
It happens as the connection timeout indicates that the PCA is waiting for data
that is never delivered.
v By default, the PCA is configured with a timeout setting of 60 minutes.
v PCA connection timeouts can be configured through the ctc-conf.xml file. The
setting is <AgedTcpConnectionsTimeout> in the capture section. See “Passive
Capture Configuration File ctc-conf.xml” on page 176.
Missing SSL keys/sec
This metric indicates the number of missing SSL keys that are detected in the
traffic each second.
Analysis:
When this metric is marked in red, the SSL keys are updated on the web server,
yet the PCA is not provided with the new keys.
78
IBM Tealeaf CX Passive Capture Application: PCA Manual
v Without the proper SSL keys, the PCA cannot decrypt SSL-based traffic, and
those hits are dropped.
You must acquire the new SSL keys from the web server. Contact the IT team
responsible for your web servers.
v For more information about installing SSL keys for PCA, see Chapter 6, “SSL
Keys,” on page 197.
v If your environment is using a Hardware Security Module to manage keys, more
configuration can be required. See Appendix - Integrating Tealeaf SSL Keys with
HSM.
Filtered traffic kbytes/sec
This value indicates the kilobytes per second of traffic that is being captured by the
PCA after any configured filter rules are applied.
Analysis:
If this value is too low, then you can have a problem with the data filters that you
apply through the PCA. You must review the filters that you applied.
v See “PCA Web Console - Interface Tab” on page 86.
To assess the quality of your filtering, you must review the quality of the data that
is captured. Through replay, you can quickly identify whether meaningful hits are
being dropped.
v For more information about using replay through the Tealeaf Portal, see "CX
Browser Based Replay" in the IBM Tealeaf cxImpact User Manual.
v For more information about using the IBM Tealeaf CX RealiTea Viewer desktop
application, see "RealiTea Viewer - Replay View" in the IBM Tealeaf RealiTea
Viewer User Manual.
If non-zero, hits are being dropped due to an overloaded
pipelined.
When this value is not zero, the indicated number of TCP packets were dropped
from the pipelined process due to overloaded conditions.
Analysis:
This value must not be zero. You can specify the maximum permitted size for
individual TCP packets through the Tuning Parameters in the Interface tab.
v See “PCA Web Console - Interface Tab” on page 86.
If some hits are being dropped, the overload condition can be caused by too many
privacy rules or too much complexity in them.
v See “Downloading Privacy Configuration” on page 128.
In PCA Build 3403 or later, you can add more instances of the pipelined process,
which can help to distribute the processing load.
v See “Pipeline Settings” on page 113.
When this statistic is summed across all PCA instances, the result indicates that the
total number of hits lost due to exceeding the specified TCP packet size. To
calculate the % of total, divide this value by sum of the Captured before hit
processing statistics for all PCA instances, which is the total hits count for delivery
to the pipeline queue.
Chapter 4. Configuring the CX PCA
79
v See “Stats per Instance” on page 145.
Increasing the number of pipelines under the pipeline tab can help alleviate this
issue.
v See “Pipeline Settings” on page 113.
If non-zero, packets are being dropped because they exceed
the max size limit.
Whenever a packet is received with a size larger than the maximum large capture
packet size limit, this metric is incremented by one.
Note: If you are using one or more 10-gigabit fiber network interface cards and are
experiencing capture traffic quality issues, it can be caused by the fiber interface
card and driver issues. If the PCA is not using Intel chipset-based NIC interface
cards, Tealeaf highly recommends that you switch to NICs by using Intel chipsets.
Under the Interface tab in the Tuning Parameters view, the Max large capture
packet size field defines the maximum large capture packet size limit.
v By default, this setting is set to 8 KB.
v As needed, this setting can be increased to accommodate systems that have
features such as large receive offload (LRO) enabled.
Increasing the Max large capture packet size must stop metric on the Summary
tab from increasing.
80
IBM Tealeaf CX Passive Capture Application: PCA Manual
Figure 4. Max Large Packet Size
See “PCA Web Console - Interface Tab” on page 86.
TCP Connections
Figure 5. Summary tab - TCP Connections
Note: The TCP Connections table is displayed in PCA Build 3500 or later, in which
IPv6 traffic can be detected. Capture and processing of IPv6 is not supported as of
PCA Build 3500.
In the TCP Connections table, you can review the types of IP addresses that are
detected by the IBM Tealeaf CX Passive Capture Application. An entry of TRUE
indicates that the connection type is detected.
Chapter 4. Configuring the CX PCA
81
Machine Health
The Machine Health panel indicates current metrics on the counts and general
health of each process that is running on the PCA server.
Figure 6. Summary tab - Machine Health
Setting Description
Name
Name of PCA pipeline process
Running
Count of processes running on the PCA server
KB Size High
Maximum size in kilobytes used by all instances of the process since the
PCA last restarted.
CPU % High
Maximum RAM consumption as a percentage of the available memory on
the CPU since the PCA last restarted.
Mount Stats
You can review stats on the configured mount points on the PCA server.
Setting Description
Mount Point
Path from root of the specified mount point
Usage
Percent of available RAM used by the mount point
Available
Available RAM used by the mount point
Peers
The Peers panel indicates the connectivity between the PCA server and the
Transport Service servers, which process data captured by the PCA.
82
IBM Tealeaf CX Passive Capture Application: PCA Manual
Figure 7. Summary tab - Peers
Setting Description
Delivery Host or Address
Host name or static IP address of the peer
Port
Port that is used to communicate with the Transport Service peer
v Typically, port 1966 or 1967 is used.
Status
Current status: disconnected or connected
Hits Delivered
Count of hits that are sent from delivered to the peer since the PCA last
restarted
Hits Dropped
Count of hits since the PCA last restarted that were not acknowledged by
the peer and therefore dropped.
Note: Non-zero values must be investigated with the administrators of the
Transport Service server, as they can be indicative of connectivity issues or
issues in the processing of hits in the Windows pipeline.
Current Per Second Stats
For each instance of the PCA, this panel indicates the flow of hits through each
process of the application on a per-second basis. This refreshes every 20 seconds by
default
Figure 8. Summary tab - Current Per Second Stats
Setting Description
ID
Identifier of the instance
Listend Packets In
Count of packets that are entering the listend process. This metric indicates
the rate of packets that are received by the PCA from the network.
Chapter 4. Configuring the CX PCA
83
Listend Out
Volume of data that is leaving the listend process per second.
Reassd In
Volume of data that is expected to enter the reassd process per second.
This metric must match the volume leaving the listend process.
v Differences between the values of Listend Out and Reassd In can
indicate problems with the PCA processing hits fast enough to match the
current flow of traffic.
TCP Connections
Count of TCP connections between the PCA and the switch or span
submitting data to it
SSL Missing Keys
Count of missing SSL keys per second.
Note: This value must be zero. Non-zero values can indicate issues to
investigate. See “PCA Web Console - SSL Keys Tab” on page 110.
SSL New Handshakes
Count of new SSL handshakes detected in the capture stream per second.
Typically, this metric indicates the count of new sessions.
Note: Consistently abnormal values can indicate that the web server is
initializing new SSL handshakes when it must not, which can indicate a
server-side configuration issue.
Reassd Hits Non-SSL
Count of non-SSL hits that are entering the reassd process per second
Reassd Hits SSL
Count of SSL hits that are entering the reassd process per second
Reassd Out
Count of hits that are leaving the reassd process per second
Additional PCA Web Console Debugging Information
v Get tcpdumps of the network traffic that is delivered to the PCA. This data can
be useful in assessing whether issues are occurring within the PCA or elsewhere
in the enterprise network infrastructure.
v Statistical information can be downloaded in the Statistics log. See “Stats per
Instance” on page 145.
v If the PCA has generated a core dump due to a major error, you can download
the core dump and other data through the Debug page, which is accessible from
a link on the Summary tab. See “PCA Web Console - Debug Page” on page 173.
v More information is available in the PCA logs. See “PCA Web Console Backup-Logs Tab” on page 164.
PCA web Console - Console Tab
The following figure displays the functions available in the Console tab, including
the default settings of the four configuration options:
84
IBM Tealeaf CX Passive Capture Application: PCA Manual
Figure 9. Console tab
The options available in the Console tab include the following options.
Setting Description
Start/Stop Capture
This button controls whether the Passive Capture device captures packets
from the network. When started, it captures packets. When stopped, it
does not capture packets. Capture cannot be started if it is disabled.
When you Stop Capture, the Reset all statistics before starting capture
checkbox is displayed.
Note: If PCA master/slave machine failover is enabled, do not check the
Reset all statistics before starting capture checkbox to clear statistics.
Clearing or resetting statistics prevents failover from working correctly. If
clearing statistics is needed, first stop failover in the Failover tab.
Restarting the PCA correctly sets machine failover state with statistics
cleared.
Enable/Disable Capture
This button controls the behavior of the main capture application when the
service is started at boot time, from the command line, or from the web
console. When enabled, the main capture application is allowed to start.
When disabled, the main capture application is not allowed to start.
Enable/Disable Web Console Time Out
By default, the PCA web Console is configured to time out sessions if no
activity is detected in 30 minutes.
v To disable the console timeout, click Disable.
– If user authentication for the web Console is disabled, a console
timeout is not applicable.
v To enable a console timeout, click Enable. Enter a non-zero value for the
number of minutes to set for the timeout. Then, click Set.
– Console tabs that auto-refresh, such as the Summary tab and the
Console tab do not reset the timeout.
Note: The console timeout can be enabled or disabled in PCA Build
3600 or later.
- You can configure the length of the console timeout in PCA Build
3500 or later. Before PCA Build 3600, however, the console timeout
cannot be disabled.
Chapter 4. Configuring the CX PCA
85
PCA Web Console - Interface Tab
In the Interface tab, you can configure the number of instances of the IBM Tealeaf
CX Passive Capture Application and the trafficking rules for sending data to each
instance.
Note: You can configure the PCA Web Console to accept IPv6 addresses by
default. See “Supported Browsers for PCA Web Console” on page 67.
Note: After you save changes in the Interface tab, a manual restart of the PCA is
required. See “PCA web Console - Console Tab” on page 84.
The CX Passive Capture Application can be configured to support transparent load
balancing or you can disable load balancing and use the legacy method of
capturing network traffic. For more information about the benefits of transparent
load balancing, see “CX PCA Transparent Load Balancing Overview” on page 11. If
you want to configure your CX PCA to use transparent load balancing, see
“Configuring the PCA Interface with Transparent Load Balancing.” If you do not
want to enable transparent load balancing on your CX PCA, see “Configuring the
PCA Interface without Transparent Load Balancing.”
Configuring the PCA Interface without Transparent Load
Balancing
Figure 10. Select View
From the top of the page, you can select the view for the page.
v To configure individual instances of the IBM Tealeaf CX Passive Capture
Application, click View Instances. See “View Instances” on page 87.
v To edit data filters for each instance, click Edit Filters. See “Edit Filters” on page
99.
v To review and edit the interface that is tuning parameters, click Tuning
Parameters. See “Tuning Parameters” on page 101.
Traffic Segmentation: Through the Interface tab, you can segment the traffic to
multiple instances of the IBM Tealeaf CX Passive Capture Application. The
following two methods are available for segmenting traffic to distribute traffic
load:
v “Web Server Host IP/Port Addresses Filtering” on page 89
Note: Wherever possible, IP address segmentation is the preferred method over
port segmentation.
v “TCP Client Port Segmentation Filtering” on page 90
– See “Traffic Segmentation” on page 89.
Configuring the PCA Interface with Transparent Load Balancing
You can configure the network interface of your CX Passive Capture Application
with transparent load balancing. For more information on the benefits of enabling
transparent load balancing, see “CX PCA Transparent Load Balancing Overview”
on page 11.
86
IBM Tealeaf CX Passive Capture Application: PCA Manual
To configure
In the Interface tab, you can configure the number of instances of the IBM Tealeaf
CX Passive Capture Application and a traffic rule for sending data to each
instance.
Note: You can configure the PCA Web Console to accept IPv6 addresses by
default. See “Supported Browsers for PCA Web Console” on page 67.
Note: After you save changes in the Interface tab, a manual restart of the PCA is
required. See “PCA web Console - Console Tab” on page 84.
Figure 11. Select View
From the top of the page, you can select the view for the page.
v To configure individual instances of the IBM Tealeaf CX Passive Capture
Application, click View Instances. See “View Instances.”
v To edit data filters for each instance, click Edit Filters. See “Edit Filters” on page
99.
v To review and edit the interface that is tuning parameters, click Tuning
Parameters. See “Tuning Parameters” on page 101.
Traffic Segmentation: Through the Interface tab, you can segment the traffic to
multiple instances of the IBM Tealeaf CX Passive Capture Application. The
following two methods are available for segmenting traffic to distribute traffic
load:
v “Web Server Host IP/Port Addresses Filtering” on page 89
Note: Wherever possible, IP address segmentation is the preferred method over
port segmentation.
v
“TCP Client Port Segmentation Filtering” on page 90
– See “Traffic Segmentation” on page 89.
View Instances
Multiple interface instances allow the PCA to take advantage of multi-core
multi-CPU hardware by allowing multiple processes to concurrently capture
network traffic for HTTP hit reassembly and SSL decryption.
Chapter 4. Configuring the CX PCA
87
Figure 12. Instances
Note: The number of PCA instances must not exceed:
(the number of available cores) - 1
See Chapter 2, “Installing the CX Passive Capture Application,” on page 19.
v To enable multi-instance capture, click the check box.
v To disable the checksum validation of captured packets, click the check box. See
“Disabling Packet Checksum Validation.”
v To add an instance of the PCA, click Add Instance. Another instance is added to
the Instance List. See “Instance List” on page 97.
v To automatically populate port numbers across all current instances of the PCA,
click Populate Ports. See “Populating Ports” on page 91.
v To remove all current filters from all instances, click Remove Filters.
Disabling Packet Checksum Validation: By default, the PCA performs a
checksum validation for each packet that is forwarded to it. In environments with
network interface cards (NICs) that use large receive option (LRO) or checksum
offloading (rx-checksumming) or both, checksum validation of captured network
packets is managed in the hardware of the card. Since the checksum validation is
performed on individual packets in the hardware, there is no reasonable must
perform another checksum of the aggregated, larger packets.
When either or both of these options are enabled, the resulting packets that are
forwarded to the PCA do not contain a recomputed packet checksum, which
causes the PCA checksum to fail and the packet to be discarded. Other effects:
v The counts of missing or partial pages rise in session data.
v The PCA stats must show a significant increase in Total checksum errors. See
“Stats per Instance” on page 145.
Note: If the NIC used by the IBM Tealeaf CX Passive Capture Application uses
large receive option and/or checksum offloading, you must disable checksum
validation in the PCA Web Console. To disable, select the Disable Packet checksum
validation check box in the Interface tab.
88
IBM Tealeaf CX Passive Capture Application: PCA Manual
As an alternative, you can enable packet checksum validation for the IBM Tealeaf
CX Passive Capture Application if you disable checksum offloading through the
operating system driver level. However, this option adds a processing usage to the
operating system.
v The command to disable checksum offloading to the NIC must be placed in the
bootup configuration script.
Traffic Segmentation: Captured packets are trafficked to individual instances of
the PCA based upon the specified Desired Traffic for each instance and the global
Ignored Traffic settings.
Passive Capture examines every network packet and determines how to traffic it
based upon the filter rules. With the help of filter rules, you can specify where you
want the required traffic to go, help balancing the load between multiple PCA
instances, and define the types of traffic that PCA can ignore.
Note: The PCA automatically configures its listen filters to allow 802.1q VLAN
packets in for capture. See “VLAN Filters” on page 104.
v To remove all filters from all instances, select Remove Filters in the General
Functions section.
Either of the following two methods can be configured in the Interface tab to
segment traffic loads to multiple instances of the PCA:
v Web Server Host IP/Port Addresses Filtering: The typical and preferred method
for segmenting traffic by PCA instance is to filter on web server host IP/Port
addresses. See “Web Server Host IP/Port Addresses Filtering.”
v TCP Client Port Segmentation Filtering: The alternate method, TCP client port
segmentation, is used when the capture traffic is presented as a single virtual
web IP address (VIP). See “TCP Client Port Segmentation Filtering” on page 90.
Web Server Host IP/Port Addresses Filtering: If the capture traffic presented to
the PCA is served by multiple web servers via their respective host IP/Port
addresses, then each PCA instance can filter for a subset of those host IP addresses.
This method provides the means to distribute traffic loads across the multiple
instances.
Note: IP filters are listed in the order in which you enter them, and the order
cannot be dynamically changed. However, when the filters are compiled into
binary format, they can be collated by address and netmask for optimal processing,
though unlikely. Periodically, the list of filters must be reviewed to verify that all
active filters contain traffic. Filters without traffic must be removed from the list.
Chapter 4. Configuring the CX PCA
89
Figure 13. Filter Rules (PCA Build 35xx or later)
For each instance of the PCA, the Instance List and Ignored Traffic sections identify
the network packets to include and exclude. If the packet matches the required
traffic and does not match the traffic to ignore, then capture it for further
processing.
v See “Ignored traffic filter rules” on page 95.
In the Filter Rules section, you can specify the IP addresses/ports that are
submitted data to the PCA. You can add and delete specific IP addresses or a
range of IP addresses. You can also specify specific hosts whose traffic you do not
want the device to capture.
v For more information about best practices in managing IP addresses, see “Best
practices for filter rules” on page 96.
v For more information about creating rules for this method of traffic
segmentation, see “Filter rules for a host” on page 92.
v For more information about creating rules to ignore traffic, see “Ignored traffic
filter rules” on page 95.
TCP Client Port Segmentation Filtering: When traffic is served from a single
virtual web IP (VIP) address, you can use the TCP client port segmentation method
to segment the traffic based on TCP client port ranges.
Note: Wherever possible, IP address segmentation is the preferred method over
port segmentation. See “Web Server Host IP/Port Addresses Filtering” on page 89.
Since there are not multiple web server host IP addresses to distribute, the
segmentation is done by TCP client port ranges. Each PCA instance filters on a
range of client TCP ports. The aggregate of all port ranges across all PCA instances
spans the entire spectrum of client TCP ports and thus ensures complete capture.
The following are the requirements to use this method:
v The virtual IP address (VIP) traffic must contain reqiured capture traffic only. All
traffic on this VIP is used.
Note: Verify that the VIP does not have any undesired traffic. Only one VIP can
be specified for this type of filtering.
v Web servers host TCP port numbers must be less than 1024. For example, host
ports 8443, 4443, and 1443 are not valid.
v Ignored filter rules cannot be used.
v For more information about creating filter rules for this method of traffic
segmentation, see “Filter rules for a port range” on page 93.
90
IBM Tealeaf CX Passive Capture Application: PCA Manual
v For more information about custom filter support, contact Tealeaf
http://support.tealeaf.com.
Populating Ports:
Note: The use of port ranges to segment your captured traffic is considered an
advanced feature and must be specified only during initial configuration of the
IBM Tealeaf CX Passive Capture Application. If you have any questions, contact
Tealeaf http://support.tealeaf.com.
To begin, you can auto-populate the port ranges that are directed to each instance
of the PCA. All port ranges from 1024 and above are evenly split between the PCA
instances. For example, if you have three PCA instances, each PCA receives traffic
from an equal number of ports, which equates to the following ports:
(65,536 - 1024) / 3 = 21,504 ports/instance
Note: Valid port numbers range from 1024 to 65,535. Port numbers below 1024 are
reserved.
v For more information, see http://www.iana.org/assignments/port-numbers.
Note: Populating the ports removes all other listen filters from each instance of the
PCA.
1. To populate the port ranges, click Populate Ports.
2. Port ranges are populated across all available instances of the PCA. Save your
changes.
3. A restart of the PCA is required.
After you populated the ports, you must monitor the traffic loading that is sent to
each instance. For example, suppose your web server is delivering HTTP responses
on port 8080. Then the PCA instance that is receiving this traffic can be running
hot, while others are lightly used.
Current Hits Per Second statistics are reported on the Summary tab, with each
PCA instance reported under a separate ID value.
v SSL Hits/sec rate is reported in the Reassd Hits SSL column.
v Non-SSL Hits/sec rate is reported in the Reassd Hits Non-SSL column.
See “PCA Web Console - Summary Tab” on page 73.
Adjustments:
v If you see imbalances, you must consider applying more filter rules.
v On multi-core IBM Tealeaf CX Passive Capture Application servers, you can
create multiple instances of the PCA and distribute the load across configurable
port ranges. See “Load balancing between PCA instances using port ranges.”
v After auto-populating ports, you can configure a virtual IP address. See “Editing
existing port range filter rules” on page 94.
Load balancing between PCA instances using port ranges:
When you populate the port ranges across all available PCA instances, the PCA
assigns the same number of ports to each available PCA instance. Typically,
however, the enterprise network infrastructure does not evenly distribute the traffic
load across the entire range of available ports. After you populate port ranges, you
can discover that the traffic load is not evenly distributed between the instances.
Chapter 4. Configuring the CX PCA
91
For example, PCA Instance 0 can be processing 75% of the forwarded data, while
PCA Instance 1 is processing only 25%, even though each instance is listening on
the same number of ports.
Using the steps below, you can adjust the port ranges assigned to each PCA
instance to balance the load between available instances. This process can require
iterative tuning and tweaking and should factor peak traffic periods.
1. Instantiate the required number of PCA instances. See “View Instances” on
page 87.
2. In the Interface tab, click Populate Ports.
3. Save your changes.
4. The previous step distributes the load traffic evenly across all ports. The
following steps must be repeated until the data load is distributed evenly
across all available ports to the PCA instances:
a. Check the number of SSL hits/sec processed by each instance. SSL hit
processing is the most CPU-intensive operation and a good indicator for
load balancing. If SSL hits are not the primary traffic volume, then use the
non-SSL hits/sec rates to gauge the load. You can use a combination of the
two, if required.
v Current Hits Per Second statistics are reported on the Summary tab, with
each PCA instance reported under a separate ID value.
v SSL Hits/sec rate is reported in the Reassd Hits SSL column.
v Non-SSL Hits/sec rate is reported in the Reassd Hits Non-SSL column.
v See “PCA Web Console - Summary Tab” on page 73.
b. Using the specific hit rates per second on each PCA instance, you must
review and tweak the port ranges, expanding or contracting as needed, to
more closely approximate even load distribution.
c. Adjust and then review the results in the Summary tab.
Note: The PCA Web Console does not validate the specified port ranges.
With each adjustment, verify that no gaps or overlaps are created in the
port ranges and that the entire range of available ports is not specified.
d. It is unlikely that any set of adjustments produces a even distribution.
Getting the hits/sec rates for each range to within 25% of each other must
suffice, as load rates can vary over time.
e. Save your changes. The PCA is automatically restarted, and the changes are
applied.
f. Repeat the preceding steps until the load is balanced to your satisfaction.
5. When your adjustments are complete, verify that the entire range of available
ports (1024 - 65535) is covered by your set of port ranges. Gaps and overlaps
must be eliminated.
Filter Rules: You can use filter rules to filter the incoming data packets and traffic
them to specific PCA instances. Rules can be defined to filter based on the host
name, netmask, and port range of incoming traffic.
Note: The Filter Rules pane is useful for adding a single filter rule to be applied to
multiple hosts across multiple PCA instances. For initial creation and debugging,
the Edit Filters view provides easier methods of verifying that all ports are covered
by your filter rules for all instances. See “Edit Filters” on page 99.
Filter rules for a host:
92
IBM Tealeaf CX Passive Capture Application: PCA Manual
Host-based filter rules can be used to traffic wanted or ignored traffic according to
the host that is sending the traffic.
v To specify trafficking that is based on ports, use a port range filter. See “Filter
rules for a port range.”
To specify a filter rule for a host:
Note: Do not mix filter rules from the two traffic segmentation methods. You can
only use the specified filter rules for the chosen method.
1. Enter the IP address of the host.
v If this value is left blank, all host IPs are captured based on the specified port
number. However, the netmask size setting cannot be used without a valid
host value.
v To add a host, click the Add More.
– In PCA Build 34xx and earlier, click the Add a Host link.
2. If host traffic is coming from a specific netmask, enter the value here.
3. If the Port1 and Port2 check box are unspecified, all traffic from the
host/netmask is filtered based on the rule. For a host-based rule, do not specify
specific ports.
4. From the Add to drop down, select the PCA instance to which to apply the
rule.
5. Then, you can select the type of filter rule:
v Desired - Specified traffic is directed to the selected instance.
v Ignored - Specified traffic is ignored and dropped from further processing.
See “Ignored traffic filter rules” on page 95.
6. Click Add.
7. The filter rule is added to the specified instance and is immediately applied to
incoming traffic.
Filter rules for a port range: A port range filter rule can be used to direct required
traffic across a specific set of ports to a PCA instance. The following methods for
specifying port range filters are supported:
Note: Valid port numbers range from 1024 to 65,535.
Note: Do not mix filter rules from the two traffic segmentation methods. You can
only use the specified filter rules for the chosen method.
v Automatic: The preferred method for specifying port range filters is to populate
the ports automatically. It creates the correct port range filter rule for each
instance for you. Populating ports assumes that all required instances are
already created. See “Populating Ports” on page 91.
– After auto-populating port ranges, you can edit them if needed. See “Editing
existing port range filter rules” on page 94.
v Manual: If you are manually entering port ranges (not auto-populated), only one
IP address entry is allowed for VIP (Virtual IP) filtering. Any additional IP
addresses added to the port ranges are ignored.
– The workaround is to use a subnet mask with a single IP address.
– The following steps enable manual specification of a port range filter rule for
the specified instance.
– If you must edit existing rules, click Edit Filters in the Interface tab.
Chapter 4. Configuring the CX PCA
93
Port range filter rules can filter on a required VIP address, which allows filtering
out other unwanted traffic with the VIP address traffic.
v If the capture traffic only contains required traffic, then an IP address is not
needed here.
Manually adding or specifying a filter rule for a range of ports:
Figure 14. Manually adding port range filter rules (PCA Build 35xx or later)
1. If needed, under the Filter Rules enter the IP address of the VIP in the Host
field.
2. For the type of filter rule, select Port Range, which sends the specified traffic to
the selected instance.
3. Use the same IP address for each port range filter rule.
v If multiple IP addresses are needed and are grouped into a subnet, then a
subnet mask can be applied to the base IP address. For example, an entry of
66.211.169.0/24 matches the first 24 bits of the IP address (the first three
octets) and allows wildcard matching on any value in the fourth octet, which
is specified as 0. Any port range that is specified for this virtual IP matches
across all 254 IP addresses of the VIP.
4. If VIP traffic is coming from a specific netmask, enter the mask value here.
5. Enter the start port value in the Start Port field and the end port value in the
End Port field.
6. From the Instance drop-down, select the PCA instance to which to apply the
rule.
7. Click Create Filter.
v In PCA 34xx and earlier, click Add.
8. The filter rule is added to the specified instance and is immediately applied to
incoming traffic.
Note: Only one port range filter rule should be added to each instance. Any
additional port range rules for the instance are ignored.
Note: After you save changes in the Interface tab, a manual restart of the PCA
is required. See “PCA web Console - Console Tab” on page 84.
Editing existing port range filter rules:
94
IBM Tealeaf CX Passive Capture Application: PCA Manual
Figure 15. Editing existing port range filter rules with a VIP address
Note: This mode can be used to add a VIP address if the Auto-populate ports
option was done (Populate Ports button).
1. If needed, in the Edit Filters screen, click the Port Range check box.
2. Enter the IP address of the VIP under the Address field.
3. Use and apply the same IP address for each port range filter rule.
4. Change any of the filter rule fields as needed.
5. To apply your changes, click Save Changes.
Note: After you save changes in the Interface tab, a manual restart of the PCA
is required. See “PCA web Console - Console Tab” on page 84.
6. The configuration changes are applied to incoming traffic.
Ignored traffic filter rules:
You can specify filter rules for ignoring traffic. These rules are applied to across all
instances of the PCA.
Figure 16. Specifying an ignored traffic filter rule
1. Specify the rule in the Filter Rules box.
a. Enter the host the traffic from which you want to ignore. To ignore all
traffic from a specific port value, leave this value blank.
b. Specify the port to ignore, if required. To ignore all traffic from the host,
leave netmask and port values empty.
Note: You cannot specify port ranges for ignored traffic rules.
Chapter 4. Configuring the CX PCA
95
2. Click the Ignored check box.
3. Click Create Filter.
v In PCA 34xx and earlier, click Add.
4. The rule is populated in the Ignored Traffic (Global) box at the bottom of the
screen.
Figure 17. Ignored Traffic (Global)
All traffic that is submitted from addresses that are matching the ignored traffic
rules is dropped from the PCA.
Best practices for filter rules: It is recommended that you limit the number of filter
rules to no more than 20 for each instance of the PCA.
Note: Performance of the IP filters is known to degrade as more entries are added.
It is a best practice to avoid having more than 20 entries in an instance.
To address this issue, you can:
v Reduce the number of filter rules by using subnet masks. For example, if you
are using individual filter rules for each port in a range of ports, you can use a
subnet mask to create a single filter rule for all ports in the range.
v Create multiple instances of the PCA application. See Chapter 2, “Installing the
CX Passive Capture Application,” on page 19.
Mixing filters for specific IP addresses and port ranges: It is possible to use
combinations of specific IP addresses and port ranges to filter traffic.
Note: Filter configuration method is for advanced PCA users only. It is not
supported in the PCA web Console interface and can be implemented only by
manually editing the configuration file. After this method is implemented, you can
no longer use the web console to edit your filters.
Note: If these methods are mixed, you are likely to generate duplicate traffic if
manually implementing this change.
To mix filtering modes in the same configuration, you must insert entries similar to
the following in ctc-conf.xml:
Note: Manually edited entries can be lost if the PCA web console is used and
causes a rewrite of its configuration.
<Instance>
<ListenTos>
<ListenTo>
<Address>10.10.100.200</Address>
96
IBM Tealeaf CX Passive Capture Application: PCA Manual
<PortRange>33280-65535</PortRange>
</ListenTo>
</ListenTos>
</Instance>
See “Passive Capture Configuration File ctc-conf.xml” on page 176.
Instance List:
Figure 18. Instances
In the Instance List, you can configure, enable, disable, and delete instances of the
IBM Tealeaf CX Passive Capture Application on the server.
v To delete a created instance, click the delete link next to the listing in the
Instance List.
– The primary instance cannot be deleted.
v To toggle use of a secondary instance, click the Enabled or Disabled link next to
its name
v To remove all filters for a specific instance, click clear filters.
v To edit an instance, click the edit link next to its listing. See “Capture Network
Interfaces.”
Capture Network Interfaces:
Figure 19. Capture Network Interfaces
Chapter 4. Configuring the CX PCA
97
The options that are displayed in the figure include the following descriptions.
Note: If you are using multiple instances, all instances must be set within the
primary instance listing. Else, the PCA fails to start.
Setting Description
Primary Interface
This drop-down designates a particular hardware network interface as the
primary interface for capture. The drop-down menu is a dynamically built
list of the important interfaces.
Secondary Interface
This drop-down designates a particular hardware network interface as the
secondary interface for capture. The drop-down menu is a dynamically
built list of the important interfaces.
Listen Interfaces
Selects the interfaces on which the selected instance listens:
v Both Interfaces - Both interfaces listen to traffic.
v
v
Primary Interface only - Only the primary interface listens to traffic.
Inherited from Primary - Listen interfaces are inherited from the
primary instance.
Listen Direction
Selects the directions in which the selected interfaces listen to traffic:
v Bidirectional - Selected interfaces listen for both incoming and
outgoing packets.
v Unidirectional - The primary interface listens for incoming packets,
and the secondary interface listens for outgoing packets.
v Inherited from Primary - Listen directions are inherited from the
primary instance.
Examples: Following are some examples of interfaces.
Primary Interface only Bidirectional
This option listens on the primary interface for both incoming and outgoing
packets. Use it when connected to a single network segment through a switch with
port mirroring or a hub.
Primary and Secondary Interface Bidirectional
This option listens on both interfaces for both incoming and outgoing packets. Use
it when connected to two separate network segments through switches with port
mirroring or hubs.
Primary and Secondary Interface Unidirectional
This option listens on the primary interface for incoming packets and the
secondary interface for outgoing packets. Use it when connected to a single
network segment through a tap.
Traffic to Ignore: This section specifies traffic that the device must explicitly
ignore. Even if a host-port pair in this list meets the criterion in the Desired Traffic
section, the device does not capture it. To ignore all traffic for a host, enter * or All
as the port.
98
IBM Tealeaf CX Passive Capture Application: PCA Manual
When you specify host and port combinations to ignore, you are adding
restrictions that matched packets must not be one of the host and port
combinations. For example, suppose you wanted to capture all traffic to and from
hosts that are communicating on ports 1, 2, and 3 except for the following host and
port combinations:
Host
Port
1.2.3.4 4
5.6.7.8 5
The description of that traffic is the same as running the following single
command:
tcpdump -n -i eth0 "((port 1) or (port 2) or (port 3)) and not \
((host 1.2.3.4 and port 4) or (host 5.6.7.8 and port 5))"
In the ctc-conf.xml, the example translates into the following XML:
<Ignores>
<Ignore>
<Address>1.2.3.4</Address>
<Port>4</Port>
</Ignore>
<Ignore>
<Address>5.6.7.8</Address>
<Port>5</Port>
</Ignore>
</Ignores>
<ListenTos>
<ListenTo>
<Port>1</Port>
</ListenTo>
<ListenTo>
<Port>2</Port>
</ListenTo>
<ListenTo>
<Port>3</Port>
</ListenTo>
</ListenTos>
Edit Filters
In Edit Filters view, you can edit ports and port ranges to filter the data sent to
each instance of the PCA. You can use this view to verify that all required port
ranges are properly specified across all instances of the IBM Tealeaf CX Passive
Capture Application.
v You can also specify data filters in the View Instances view. See “Filter Rules” on
page 92.
Chapter 4. Configuring the CX PCA
99
Figure 20. Edit Filters
By default, the Edit Filters view enables specification of up to two individual ports
for which to send data to an individual PCA.
v To specify a range of ports, click the Port Range check box. The data that is
displayed in the port check box becomes a starting and ending range for capture
and forwarding.
v To add a row, click the Add Row link. The new row is inserted.
v To remove a data filter row, click the Delete Row link.
To specify a data filter:
1. From the Instance column, select the PCA instance identifier to which the filter
applies. All data that is captured from the specified server and ports is
forwarded to the selected instance.
v See “Instance List” on page 97.
2. In the Address column, enter the IP address of the server that is providing the
data.
Note: Host names are not accepted.
3. In the Netmask column, you can enter a netmask, if applicable.
4. Enter the ports to capture:
v If Port Range is not selected, you can specify up to two ports to capture from
the specified address.
v If Port Range is selected, you can specify a Start Port and End Port in the
two textboxes. These entries indicate a range of ports, inclusive, that are
forwarded to the selected PCA instance for capture.
CIDR Format: To configure a block of allowable IP addresses, use the CIDR
format. CIDR specifies an IP address range by the combination of an IP address
and its associated network mask. CIDR notation uses the following format:
192.30.250.00/18
v The 192.30.250.00 in this example is the network address itself. The 18 indicates
that the first 18 bits are the network part of the address, leaving the last 14 bits
for specific host addresses.
The following table contains more examples:
CIDR Format
Equivalent Netmask
10.10.0.0/16
255.255.0.0
100
IBM Tealeaf CX Passive Capture Application: PCA Manual
10.10.10.0/24
255.255.255.0
10.10.10.0/28
255.255.255.240
SPAN Port Traffic: If you are capturing a subnet from a SPAN port, you must
determine if the SPAN port is sending you only that subnet or other traffic.
If you are receiving just that subnet, then select Specific Ports on All Hosts to
capture specific ports. For example, to capture all port 80 and 443 traffic on all
hosts, select Specific Ports on All Hosts and enter ports 80 and 443.
If your SPAN port is mirroring additional traffic, then select Specific Host-Port
Combinations. For the hosts, use CIDR syntax to match the subnet. In our port 80
and 443 example, if you wanted all the traffic for network 1.2.3.0 netmask
255.255.255.0, then specify the following Specific Host-Port Combinations:
Host
Port
1.2.3.0/24
80
1.2.3.0/24
443
Tuning Parameters
The Tuning Parameters section specifies the performance characteristics of the
system.
Figure 21. Tuning Parameters (Capture Settings)
The options that are displayed in the previous figure include the following options:
Setting Description
Chapter 4. Configuring the CX PCA
101
Max input buffer size
Defines the size of the buffer between the packet sniffer and the hit
assembler. If the hit assembler becomes too slow, packets are queued in
this buffer for processing. When the hit assembler has available resources,
it begins pulling packets from the queue and processing them.
v When the buffer fills, the PCA begins dropping hits. By enforcing a limit
on the buffer, the system prevents a crash. However, data is dropped.
Note: Tealeaf recommends that you keep this setting at the default
value. It is used for debugging issues that are related to spiking traffic
conditions that are overwhelming the buffer. Do not change this setting
without guidance from Tealeaf.
Max memory consumption
Defines the maximum amount of system memory (in MB) allocated to the
capture process. The default value is 1300 (about 1.3 GB).
v The IBM Tealeaf CX Passive Capture Application is a 32-bit application,
which means each PCA process can address a maximum of 2 GB of
RAM.
Note: Tealeaf recommends that you keep this setting at the default
value. It is used for debugging issues that are related to increased traffic
volumes that are overwhelming the PCA. Do not change this setting
without guidance from Tealeaf.
Max simultaneous connections
Sets the maximum number of TCP connections over which the system can
simultaneously capture. If there are more connections than this number of
connections, the capture system replaces the oldest connections with the
new ones. After an old one closes, the system begins capturing the next
new connection. By enforcing this limit, the system prevents a spike in the
number of connections overloading system resources from causing a crash.
Note: This setting is applied per PCA instance. As part of an initial
installation or upgrade of the PCA, this setting must be reviewed against
current traffic volume. See Chapter 2, “Installing the CX Passive Capture
Application,” on page 19.
Max simultaneous connections in SYN State
Sets the maximum number of TCP connections that can be in the SYN state
at one time. If there are more than this number of connections in this state,
the system replaces the oldest connections with the new ones. Once an old
one closes or transitions from this state, the system begins capturing the
next new connection. By enforcing this limit, the system prevents SYN
flood attacks from causing a crash.
Note: This setting is applied per PCA instance. As part of an initial
installation or upgrade of the PCA, this setting must be reviewed against
current traffic volume. See Chapter 2, “Installing the CX Passive Capture
Application,” on page 19.
Max SSL sessions to cache
Sets the maximum number of SSL sessions the system can cache
concurrently. After the system reaches this limit, it discards old entries first.
If a session corresponding to a discarded entry resumes, the system cannot
decode it. By enforcing this limit, the system prevents a spike of
improperly terminated sessions from causing a crash.
102
IBM Tealeaf CX Passive Capture Application: PCA Manual
v This setting can be raised with some constraints. For more information,
see "Troubleshooting - Capture" in the IBM Tealeaf Troubleshooting Guide.
Max wait time for hit responses
Sets the duration of the timer that is used to determine whether a server is
stalled on an HTTP request. After the system receives the last packet for a
request, it starts this timer. If the timer expires before receiving the first
packet of the response, the system identifies the request as stalled and
packages it up as a stalled hit. If the response eventually arrives, the
system ignores it. By enforcing this timer, the system prevents stalled
requests from using resources.
Max wait time for hit transmissions
Sets the duration of the timer that is used to determine whether a TCP
connection is hanging. After the system receives a packet for a connection,
it starts this timer. If the timer expires before receiving another packet, the
system identifies the connection as hanging and discards it. If the
connection corresponds to an HTTP request, the system ignores it
completely. If the connection corresponds to an HTTP response, the system
packages the partial response data in a hit. By enforcing this timer, the
system prevents hanging connections from using resources.
Max large capture packet size
Specifies the maximum TCP packet capture size. The default value is 8 KB.
Manual Changes to Interface Configuration
In most cases, you can specify any interface configuration in the PCA Web
Console. IN rare cases, you must make manual changes to interface configuration
through the ctc-conf.xml file.
Setting Description
All Traffic
This option captures all packets to or from any host on the network
segment. When you select to capture all required traffic, the description is
an empty statement that matches all possible TCP/IP packets. It is the
same as running the command:
tcpdump -n -i eth0
In the ctc-conf.xml file, the choice to capture all traffic translates into the
following XML:
<ListenTos>
<ListenTo>*</ListenTo>
</ListenTos>
Specific Ports on All Hosts
This option captures packets to or from any host but only on specific ports.
When selected, you must specify one or more TCP/IP port numbers. The
resulting description matches any packet that is destined for or sent to at
least one of the ports you specify. For example, suppose you specified
ports 99, 199, and 200. The resulting description of the packets to match
would be the same as running the following command:
tcpdump -n -i eth0 "((port 99) or (port 199) or (port 200))"
In the ctc-conf.xml file, the previous example would translate into the
following XML:
Chapter 4. Configuring the CX PCA
103
<ListenTos>
<ListenTo>
<Port>99</Port>
</ListenTo>
<ListenTo>
<Port>199</Port>
</ListenTo>
<ListenTo>
<Port>200</Port>
</ListenTo>
</ListenTos>
Specific Host-Port Combinations
This option captures only those packets to or from specific host-port
combinations. When selected, you can specify the host and corresponding
ports for that host that must be captured. The resulting description
matches at least one of the combinations where the source or destination
host matches the host that is specified, and the source or destination port
matches the specified port.
Suppose you specified the following host and port combinations.
Host
Port
127.0.0.1
80
172.16.0.1
1
172.16.0.2
2
The corresponding command to record the same traffic would be the following
single command:
tcpdump -n -i eth0 "((host 127.0.0.1 and port 80) or \
(host 172.16.0.1 and port 1) or (host 172.16.0.2 and port 2))"
In the ctc-conf.xml file, the previous example would translate into the following
XML:
<ListenTos>
<ListenTo>
<Address>127.0.0.1</Address>
<Port>80</Port>
</ListenTo>
<ListenTo>
<Address>172.16.0.1</Address>
<Port>1</Port>
</ListenTo>
<ListenTo>
<Address>172.16.0.2</Address>
<Port>2</Port>
</ListenTo>
</ListenTos>
VLAN Filters: The PCA automatically configures its listen filters to allow 802.1q
VLAN packets to be captured without explicit configuration.
Note: Exception: When you use port range filters, VLAN traffic is not captured.
104
IBM Tealeaf CX Passive Capture Application: PCA Manual
If you are using tcpdump for traffic analysis, you must manually apply the VLAN
filter tags at the command line to see VLAN packets. In the previous section, the
command to start tcpdump must be augmented to enable VLAN packet capture in
the following manner:
Note: Remove the slashes at the end of each line, which indicate line continuation.
tcpdump -n -i eth0 "((host 127.0.0.1 and port 80) or \
(host 172.16.0.1 and port 1) or (host 172.16.0.2 and port 2) or \
(vlan and host 127.0.0.1 and port 80) or \
(vlan and host 172.16.0.1 and port 1) or (vlan and host 172.16.0.2 and \
port 2))"
PCA Web Console - Delivery Tab:
The Delivery tab lets you specify target recipients and tuning parameters. The
following figures display the configuration options available through the Delivery
tab of the web console.
v The Network interfaces are now displayed in the Utilities tab. See “PCA Web
Console - Utilities Tab” on page 168.
Target Recipients
This list specifies the Tealeaf servers to which the device must send packaged hits.
Adding a recipient initiates a series of screens for configuring the address and
delivery security.
Figure 22. Target Recipients
For each peer, the links in the Connection column (Ping and Speed) test the
connection by pinging the peer or testing connection speed, respectively.
v To remove a peer, click the X icon in the Delete column.
Chapter 4. Configuring the CX PCA
105
Figure 23. Add Recipient
Setting Description
Host Address
Host name or IP address of the target recipient.
Host Port
Port number on which the target recipient listens.
Enable Secure Delivery
Determines whether to use secure delivery or not.
v When this option is enabled, you must import an SSL certificate for use
by the PCA. See “Generating a Self-Signed Certificate” on page 210.
Maximum Number of Recipients: Depending on your PCA build, you can add
up to the following number of recipients:
v PCA Build 34xx and earlier: 20
v PCA Build 35xx and later: 40
Note: Avoid using many peer connections, if possible. The default delivery queue
buffer for each peer (Max Queue Length) is 50 MB. Based on the default setting, to
enable 20 peers, 20 * 50 MB = 1 GB of process memory for delivery buffers is
required. If you use 40 peers, 2 GB of process memory is required, exceeding the
32-bit process memory limit.
If you want to use that many peers, then you must reduce the default delivery
queue memory to 25 MB, keeping the total queue memory usage to 1 GB. For
more information, see the Max Queue Length setting in “Tuning Parameters” on
page 107.
Example: Add Recipient:
To add a recipient, perform the following steps:
1. Click Add. The Add Recipient for Hit Delivery page starts
2. Enter the domain or IP address of the target recipient in the Host Address
field.
106
IBM Tealeaf CX Passive Capture Application: PCA Manual
3.
4.
5.
6.
Note: If the operating system on the IBM Tealeaf CX Passive Capture
Application server is configured to connect to a DNS server, you can enter the
domain name. Otherwise, enter the IP address. Tealeaf recommends using a
static IP address to eliminate potential DNS issues in the future.
In the Host Port field, enter the port on which the target recipient listens for
packaged hits.
The Enable Secure Delivery option determines whether to use secure delivery
or not.
To use secure delivery, select the Secure check box, then click OK. The Add
Certificate for Secure Delivery page launches. Enter the certificate to use when
authenticating the target recipient for delivery by pasting the target recipient's
certificate into the Certificate for New Recipient textbox on this screen. Click
OK.
If secure delivery is not used, leave the Secure check box cleared, then click
OK.
Tuning Parameters
With the Tuning Parameters you can set maximum delivery characteristics.
Figure 24. Tuning parameters(Delivery)
Setting Description
Delivery Mode
The delivery mode feature allows the IBM Tealeaf CX Passive Capture
Application to deliver traffic through different methods to its delivery
peers (css boxes). Traffic can be delivered by the following methods:
v Even Distribution - Traffic is distributed evenly among peers. For
example, if four peers are configured, then each receives approximately
25% of total traffic.
Note: In PCA Build 3500 or later, when one or more delivery peers
become available, traffic is automatically redistributed to the remaining
active peers. If an inactive peer becomes available, traffic fails back to
the peer and is rebalanced to ensure even distribution. This method
guarantees delivery traffic to always evenly distribute 100% of its traffic
to all active delivery peers.
v
Failover - This method requires two peers, a primary and secondary.
Primary receives 100% of the total traffic while the secondary idles. If
connection to the primary peer is lost or too many hits are being
dropped, the PCA closes the connection to the primary peer and fails
Chapter 4. Configuring the CX PCA
107
over to the secondary. If the secondary peer fails, the PCA attempts to
fail back to the primary peer. If the PCA is unable to establish a healthy
connection to both the primary and secondary peer, it switches between
the two until a healthy connection can be established.
Note: This delivery mode is likely to be deprecated in a future release.
v Clone - This option was the previous default behavior. Every peer gets
100% of the total traffic.
v None - This option replaces the 'deliver to null' option. If this option is
selected, traffic is dropped before being sent to any delivery peers,
which are useful for debugging purposes only.
Max Delivery Wait
Sets the duration of the timer that is used to send packaged hits. When
this timer expires, the device attempts to send all packaged hits to the
target recipients.
Polling Interval
This setting is not currently used.
Watchdog Timer
The maximum time (in seconds) allowed to make a connection to the IBM
Tealeaf CX Server. If the timeout is exceeded, the connection is marked as
disconnected. The default value is 30 seconds.
Max Queue Length
Sets the maximum length of the delivery queue. If the queue reaches this
length, the system begins discarding newly packaged hits until the queue
shortens. By enforcing this limit, the system prevents the backlog from
causing a crash.
Saving Changes
Note: After you save changes through the web console's Interface tab, a manual
restart of the PCA is required. Changes that are made in other tabs of the web
console do not require manual restarts.
v For changes made through the ctc-conf.xml file, a restart is required.
See “PCA web Console - Console Tab” on page 84.
Use Tealeaf Transport Service as Time Source
You can learn how to configure a host that is running the Tealeaf Transport Service
as a time source in this section. When enabled, the specified Tealeaf Transport
Service is contacted every 15 minutes and queried for its current time. The system
clock is then drifted to the time of the Transport Service. "Drifting" means that the
local time of the Passive Capture software is not forced to the exact remote time of
the Transport Service machine. Instead, if the local time is behind the remote time,
the system clock increments by a small amount. If the local time is ahead of the
remote time, the system clock advances more slowly so that it eventually slows
down to match the remote time.
108
IBM Tealeaf CX Passive Capture Application: PCA Manual
Figure 25. Use Tealeaf Transport Service as Time Source
Setting Description
Host or Address
Designates the domain name or IP address of the host that is running the
Tealeaf Transport Service to be used as a time source. If you do not want
to synchronize to a time source, leave this field empty.
Port
Designates the port on which the time source host listens for time source
queries. If you do not want to synchronize to a time source, leave this field
empty.
Deliver Statistics to Tealeaf Transport Service
This section enables configuration of the statistics hit. You can control the following
five settings for the statistics hit:
Figure 26. Deliver Statistics to Tealeaf Transport Service
Setting Description
Enabled
If this check box is selected, then statistics hits are enabled as a feature. If
cleared, the feature is disabled.
Host or Address
This field contains either the host name or IP address of the machine that
is running the Tealeaf Transport Service that must receive statistics hits.
Interval
This setting, a positive number, is the minimum number of seconds to
lapse between attempts to send statistics hits. If zero, statistics hits are not
sent.
Port
Enter the TCP/IP port number to use when you connect to the Tealeaf
Transport Service on the host.
Chapter 4. Configuring the CX PCA
109
Use SSL
Indicates whether the connection to the Tealeaf Transport Service must use
SSL.
PCA Web Console - SSL Keys Tab
You can use this tab to review and edit the Loaded keys list and Missing keys list.
To toggle between the lists, use the appropriate radio button:
v The Loaded private keys view lets you add, edit, and delete private keys for
secure servers.
v The Missing private keys view lets you see information about, ignore, or clear
missing private keys.
v You can also upload SSL certificates in multiple formats. See “Capture Keys” on
page 113.
Loaded Keys
In the SSL tab, you can review the loaded private keys and the missing private
keys.
Loaded keys can be displayed in IPv6 format. See “How does the PCA manage the
capture of IPv6 addresses” on page 278. For more information about Missing Keys
view, see “Missing Keys” on page 111.
Figure 27. SSL Keys Tab - Loaded Keys view
Column
Description
checkbox
Click the check box to select a certificate.
110
IBM Tealeaf CX Passive Capture Application: PCA Manual
Label
Display label for the certificate.
v For more information about changing the display label, see “Editing a
Private Key.”
File
Path and file name of the .pem file.
v For more information about changing the display file name, see “Editing
a Private Key.”
Timestamp for first occurrence when the PCA encountered a packet by
using the key.
v For more information about loading a private key, see “Adding a Private Key.”
v To edit a loaded key, click the check box next to it. Then, click Edit. See “Editing
a Private Key.”
Date
v To delete a loaded key, click the check box next to it. Then, click Delete.
v To save your changes, click Save Changes.
v To revert unsaved changes to the saved version, click Revert to Saved. The
previously saved set of keys is reloaded.
Editing a Private Key
You can edit a private key to load a key, assign it a more meaningful label name,
and enter the fully qualified path to the key file.
v To save changes, click OK.
Adding a Private Key
Figure 28. Add Private Key To add a private key, perform the following steps:
Note: Only private keys (.pem and .pfx) converted to .ptl formats are supported.
1. Select the Loaded radio button.
2. Enter the domain name or IP address of the recipient in the Label field. The
value entered in this field designates the label used to identify the key for
display.
3. In the File field, enter the name of the file that is containing the private key
that the device must attempt to use to decode SSL sessions. This field must
contain an absolute, fully qualified file name.
4. Click Add.
5. Click Save Changes at the bottom of the page.
6. You can then edit, view, or delete the key by clicking the corresponding
buttons.
Missing Keys
To review and edit the list of missing private keys, click the Missing radio button
at the top of the SSL Keys tab.
v Beginning in PCA Build 3500, missing keys can be displayed in IPv6 format. See
“How does the PCA manage the capture of IPv6 addresses” on page 278.
Chapter 4. Configuring the CX PCA
111
Figure 29. SSL Keys Tab - Missing Keys view
Column
Description
checkbox
Click the check box to select a key.
Host:Port
Host IP address and port number for the SSL certificate.
Date
112
Timestamp for the first occurrence since last PCA restart when an SSL
packet was detected for which a unique SSL key is missing.
v Each subsequent SSL packet for the same missing key does not update
the Date field.
IBM Tealeaf CX Passive Capture Application: PCA Manual
v To clear the date, select the check box and click Clear Selected. When
the next packet instance that is missing the cleared SSL key is detected,
the timestamp is updated.
To select an SSL key, click the check box next to the host and port for the
certificate.
v To select all missing certificates, select Select All.
v To ignore the selected certificates, select Ignore Selected.
v To delete the selected certificates, select Clear Selected.
v To save any changes, click Save Changes.
Capture Keys
Through the SSL tab, you can upload SSL certificates in clear text .pem format or
password-protected .pfx format for conversion to .ptl for PCA use.
If you have access to the PCA software on the Linux server, you can drop SSL
certificates into a specified directory for automatic conversion to .ptl format.
v See “Exporting the SSL private key” on page 202.
v See “Exporting the SSL private key” on page 202.
Pipeline Settings
The Pipeline tab allows users to edit configuration parameters such as capture,
limits, and cookie IDs.
v If the fields are left blank, the device attempts to read default values from the
ctc-conf-defaults.xml file.
You can select either of the two views to display pipeline settings:
v Pipeline Settings - Define data sessioning, time grading, capture mode, and
more. See Pipeline Settings.
v Edit Type List - Specify the data types and file extensions to include or exclude
from capture. See “Capture Type Lists” on page 122.
Note: PCA capture types must be reviewed during any installation of the IBM
Tealeaf CX Passive Capture Application or if the monitored web application is
updated. See “Capture Type Lists” on page 122.
For more information about the Pipeline settings, see:
v “Pipeline instances” on page 114
v “Data Sessioning” on page 115
v
v
v
v
v
v
“X-Forwarding” on page 115
“Session Sampling” on page 117
“Capture Mode” on page 117
“Capture Request Methods” on page 118
“Time Grading” on page 118
“Hit processing” on page 118
Chapter 4. Configuring the CX PCA
113
Pipeline instances
By default, the PCA is configured to create a single instance of the PCA pipelined
process for use by all instances of the PCA application. If needed, more instances
of the pipelined process can be created to more efficiently distribute the work
across available resources.
Note: Multiple instances of the PCA pipeline are available in PCA Build 3403 or
later.
When multiple instances of the pipelined process are created, each instance of the
PCA application submits the TCP packets. These packets are assembled by its
reassd process to the pipeline queue. This queue then distributes the packets for
processing to the configured pipelined instances in a round-robin fashion.
v The PCA pipelined process takes the individual HTTP hits and performs
processing on them, such as dropping hits, applying privacy, data compression,
and more. See Chapter 1, “Passive Capture Overview,” on page 1.
The effectiveness of multiple pipelines depends on the number of available CPU
cores. The general rule of thumb is to allocate one available CPU core for each
pipeline instance. If four idle CPU cores are available, you must configure no more
than four pipeline instances if you expect a full CPU load.
Note: You must always leave at least one CPU core in the machine for
system-based processes.
v The theoretical maximum limit on the number of pipelines is 128. It is not likely
you must approach this limit.
Note: All pipelines operate on the same set of configuration rules. There must be
no differences between privacy rules or other configuration options between
multiple pipelines.
Setting Description
Instances
Number of instances of the pipelined process.
v To create a different number of instances, enter a value in the textbox
and click Save Changes.
Note: Be conservative when creating new instances of the pipelined.
Increment instances by one and then assess the results and impact on
available resources on the PCA server.
To retrieve statistics on an individual pipeline instance, run the following
commands.
Instance #0 stats:
ctcstats instdata
Instance #N stats
ctcstats -I<#N> instdata
where
v <#N> is the instance identifier.
114
IBM Tealeaf CX Passive Capture Application: PCA Manual
Data Sessioning
The PCA can be configured to create a session id for each hit that is based on
cookies injected into the request. When enabled, you can configure the request
section and field information that is containing the session identifier.
v The cookie on which to session must be unique and persist for each hit in a
session.
When data sessioning is enabled, the session id/cookie specified by the Field Name
value is hashed to create the Tealeaf session identifier (TLTSID). If the Tealeaf
Cookie Injector is in use, it creates this value.
Note: If you are using the Tealeaf Cookie Injector, do not enable this feature. The
Tealeaf Cookie Injector provides guaranteed unique identifiers for session data that
is captured by Tealeaf. See "Installing and Configuring theTealeaf Cookie Injector"
in the IBM Tealeaf Cookie Injector Manual. If there is no session cookie, you can be
able to sessionize off other hit data by deploying the Sessioning session agent in
the Windows pipeline on the Processing Server. See "Sessioning Session Agent" in
the IBM Tealeaf CX Configuration Manual.
Property
Description
Field Name
The name of the cookie on which you want to sessionize. Accepted values
include jsessionid and aspsessionid.
v To sessionize on multiple cookies, you can insert multiple delimited
values in this field. Accepted delimiters are comma (,) or semi-colon (;)
Field Section
You can use this field to specify the section of the request in which to look
for the Field Name. If this value is not specified, then the entire request is
searched for the field, and the first occurrence is used.
Field Offsets
You to sessionize on a specific part of the session cookie, as specified by
Field Name. For example, if your cookie value is 32 characters long, setting
the value to 0 15 sessionizes on the first 16 characters.
This feature is useful if the session cookie is appended with a static string:
. jsessionid=<unique keystuff here>mycookie;
X-Forwarding
A common standard, X-forwarding enables the tracking of the originating IP
address of a client that is connecting to a server through multiple servers, such as
proxy servers or load balancers.
v When enabled, the HTTP_X_FORWARDING field can be populated with the IP
addresses of each server that is reviewed and forwarded the request.
v When content is returned from the origin web server, it is passed through each
server that is listed in the HTTP_X_FORWARDING field. Each server removes the
reference to it in the field and then passes it to the next server in the chain.
v In this manner, content can be passed through multiple servers between the
requesting client and the supplying origin server.
v Use of port numbers in the IP address (for example, <ip_address>:XXXX) is not
supported.
Note: This feature is available in PCA Build 3501 or later.
Chapter 4. Configuring the CX PCA
115
v If a CLIENT_IP header is available, it can be preferable to use this for the
X-Forwarding source, as it typically contains only one IP address.
Depending on how your web application is configured, you can define through the
PCA the header field that is used to specify the HTTP_X_FORWARDING field. This field
then points to the field that is the source of the IP address, in either IPv4 or IPv6
format.
Note: Although not required, the X-forwarding feature can be used to manage
forwarding for both IPv4 and IPv6 addresses.
Beginning in PCA Build 3501, you can configure the source of the REMOTE_ADDR
address value that is inserted into the PCA.
1. To enable X-forwarding, click the Enable check box.
2. Enter the field Name value the HTTP request header variable name that
contains the X-Forwarding IP address.
v For PCA Builds 3501 and 3502, you must insert the actual, formatted name of
the HTTP header, which is not easily available. The values that are inserted
into the [env] section of the request do not work.
v Beginning in PCA Build 3600, you can use underscores, dashes, and the
HTTP_ prefix in the field value entry, as well as the entries supported in
Builds 3501 and 3502. For example, for the field value X-FORWARDED-FOR, the
following variants are accepted:
HTTP_X_FORWARDED_FOR
X_FORWARDED_FOR
X-FORWARDED-FOR
Note: The field name is case-sensitive.
Note: If the X-forwarding source field can contain multiple IP addresses,
each IP address must be separated by a comma. Semi-colon or other field
delimiters are not supported; in a multi-entry line, the first address is used if
it is properly demarcated. Otherwise, the entire line is used and is not
processed properly.
3. Click Save Changes.
When X-forwarding is enabled through the Pipeline tab, the specified header field
is scanned for the name of the field in the request to use for REMOTE_ADDR. This
field is then scanned for the value to insert into REMOTE_ADDR.
v The search is case-sensitive.
v The identified field is scanned for correct formatting. If no matching value is
found, no action is taken, and REMOTE_ADDR is populated normally.
Note: Before PCA Build 3501, HTTP_X_FORWARDING identification was managed
through Privacy rules in the PCA pipeline. Before you deploy this new method,
which is processed before content is passed into the PCA pipeline, verify that
any PCA privacy rules to manage HTTP_X_FORWARDING is disabled. See
“Downloading Privacy Configuration” on page 128.
If a match is found, the value is inserted into REMOTE_ADDR, and the previous value
is inserted into the request variable REMOTE_ADDR_ORIG.
116
IBM Tealeaf CX Passive Capture Application: PCA Manual
Example (IPv4)
REMOTE_ADDR=10.20.30.40
IPV6_REMOTE_ADDR=0000:0000:0000:0000:0000:FFFF:0A14:1E28
REMOTE_ADDR_ORIG=10.10.28.82
Example (IPv6)
REMOTE_ADDR=abcd::100:B200:CD10:10
IPV6_REMOTE_ADDR=ABCD:0000:0000:0000:0100:B200:CD10:0010
REMOTE_ADDR_ORIG=10.10.28.82
Beginning in Release 8.4, the values that are detected in REMOTE_ADDR after
X-forwarding are converted to IPv6 format and inserted into the IPV6_REMOTE_ADDR
variable. These values are indexed for search. See “How does the PCA manage the
capture of IPv6 addresses” on page 278.
Session Sampling
If enabled, session sampling specifies a percentage of sessions to forward to the
delivery peer. The remaining sessions are deleted from the capture. Session
sampling allows for statistically significant volumes of data capture without
burdening the system with production volumes.
Note: This feature eliminates session data from the capture stream and is intended
as a debugging feature. Enabling it is not recommended.
Capture Mode
The Capture Mode setting specified the types of data that the PCA captures and
drops from the capture stream. The following settings are available:
Capture Mode
Description
Business
Configures the Passive Capture software to capture only HTTP(S) request
and response objects for .business. page requests (for example, HTML, ASP,
JSP). Static objects such as style sheets, JavaScript, and image files are not
captured by the PCA.
v Tealeaf replay clients can acquire and load these items on an as-needed
basis during replay.
Note: Business capture mode is the default setting. Tealeaf recommends
using Business mode.
BusinessIT
Configures Passive Capture to capture HTTP(S) requests and responses, as
well as file objects associated with each hit. These static objects, such as
image files, are captured by the PCA and passed to the Windows pipeline
for further evaluation.
Note: In BusinessIT mode, the response object payload body is not saved.
Only the image file and the request are captured and processed.
Note: Changing the capture mode from Business to BusinessIT
significantly increases the volume of traffic that is captured, processed, and
stored by Tealeaf. Before you change, review your entire Tealeaf solution to
verify that you have the system resources to manage the payload increase.
For more information, please contact Tealeaf Professional Services.
Chapter 4. Configuring the CX PCA
117
Capture Request Methods
When you are viewing the Capture Request Methods in the Pipeline editor, you
can select the HTTP methods that you want to capture from the list that is
provided.
Note: Requests of HEAD type are not supported for capture.
Time Grading
If enabled, Time Grading can assign a grade to a hit in one of the following three
areas:
Area
Description
Web Server Page Gen
How long it takes the web server to serve up the page.
Network Transit
Measures network speed based on how much time a packet spent on the
network.
Round Trip
How long it takes an arbitrary packet to travel from the client to the Web
server.
Based on the three criteria, Time Grading assigns the hit a numerical grade. The
default grade descriptions (Excellent, Normal, HighNormal, High) can be edited,
along with their corresponding maximum values.
Hit processing
The following table describes the hit processing settings.
Table 11. Hit processing settings
118
Setting
Description
Include Raw Request
Determines whether RawRequest is on. RawRequest
is an aid in debugging. The default value is False
(disabled). If enabled (True), the HTTP Request
headers are added to the hit.
Note: Tealeaf highly recommends that this value can
set to False; otherwise data is added to each hit.
Include Response Headers
Determines whether ResponseHeaders are on.
ResponseHeaders are aids in debugging. The default
value is False (disabled). If enabled (True), the HTTP
Response headers (in Tealeaf format, not necessarily
the exact HTTP representation) are added to the hit.
Note: Tealeaf highly recommends that this value stay
set to False; otherwise data is added to each hit.
Decode URL fields
This option determines whether to URL-decode URL
fields.
Cookie Parser
If this option is selected, a cookies section is added to
the request.
Enable UnReq Cancelled
If enabled, this option checks the last 100 bytes of the
response body for </html when capturetype=1 and
marked as canceled.
IBM Tealeaf CX Passive Capture Application: PCA Manual
Table 11. Hit processing settings (continued)
Setting
Description
Inflate compressed response
When this option is selected, responses are
automatically inflated in the PCA pipeline. If a
response has a content-encoding header whose value
is deflate, gzip, or x-gzip, then it is a candidate for
having the body that is inflated from its compressed
state. If this option is selected, then an attempt is
made to inflate the response.
Note: This setting must be set to false. Enabling this
feature can significantly increase the data volume that
is transmitted between the IBM Tealeaf CX Passive
Capture Application server and the Transport Service.
v If the inflate fails, a message is logged at the
notice log level.
v If the inflate succeeds, the value of the
content-encoding header is overwritten with X's; for
example, Content-Encoding: XXXX.
v In PCA Build 3502 or later, compressed POSTs are
automatically inflated for the content-encoding
types, regardless of the content type, to support
capture of data from Tealeaf client frameworks.
– In PCA Build 3501 or earlier, this option was
Inflate compressed requests and responses.
Preserve responses when inflate
fails
When a hit response is inflated and the inflate
process fails, the response is replaced with HTML
reporting that an inflate error is occurred. Select this
option to disable the replacement HTML, which
preserves the original response.
Deflate hits sent to target
recipients
Selecting this option to hit responses that are deflated
before they are sent to a target recipient. The hit
responses are compressed by using the HTTP deflate
method. Enable this option to reduce the amount of
network bandwidth that is used to deliver Tealeaf
hits to the Tealeaf Transport Service.
Enable I18N
When selected, internationalization support is
enabled on the PCA. The request urlfields are
encoded to UTF-8, and an attempt is made to detect
the response body encoding.
Note: There is a known issue in which special
characters submitted in JSON data from a Tealeaf
client framework are mangled.
Note: This setting can only be enabled in PCAs
connected to IBM Tealeaf CX Release 7.0 or later
systems.
Delete Images on PCA side
When enabled, this option deletes image hits in the
capture stream that meet specific criteria. See “Delete
Images on PCA Side” on page 120.
Enable TLI
If you deploy a TLI server in your Tealeaf
environment, you can enable the capture of image
content for purposes of storing it in the TLI server
downstream. See “Enabling Image Capture for TLI”
on page 121.
Max Response Size
The largest acceptable response size (in bytes). The
default value is 1572864 (1.5 MB).
Chapter 4. Configuring the CX PCA
119
Table 11. Hit processing settings (continued)
Setting
Description
Default Response Encoding
If the PCA is not able to detect the encoding type of a
response, this value is used.
Note: The following information applies to IBM
Tealeaf version 9.0A only.
CX PCA Build 3700 through 37xx contains additional
selections to support Enhanced International
Character Support (EICS) from what is available in
CX PCA Build 3650 through 36xx.
Default Request Encoding
If the PCA is not able to detect the encoding type of a
request, this value is used.
Note: The following information applies to IBM
Tealeaf version 9.0A only.
CX PCA Build 3700 through 37xx contains additional
selections to support Enhanced International
Character Support (EICS) from what is available in
CX PCA Build 3650 through 36xx.
Total dropped due to ICU
encoding errors
This statistic reports each time a hit (either Request or
Response) cannot be encoded to UTF-8 which causes
the complete hit to be dropped. This scenario also
generates an error (ERR) in the log.
Delete Images on PCA Side
Before PCA Build 3502, the PCA used configuration options and embedded logic to
manage the automatic dropping of image content from captured hits, which
significantly reduced the space that is required to store sessions. When the PCA
was configured to be in BusinessIT mode, some image content types can be
captured and passed to the Windows pipeline.In the pipeline, they were typically
dropped by using the DelImages session agent.
v For more information about BusinessIT mode, see “Capture Mode” on page 117.
v For more information about the DelImages feature for the Windows pipeline, see
"Data Drop Session Agent" in the IBM Tealeaf CX Configuration Manual.
Beginning in PCA Build 3502, the PCA now provides the DelImages functionality
in the PCA pipeline. When DelImages is enabled in the PCA, the volume of data
that is captured, processed, and transferred to the Windows server is reduced.
Note: To ensure the capture of image content throughout your Tealeaf
environment, this setting must be consistently applied through the Pipeline tabs
across all PCA instances.
If a hit meets the following criteria, then the hit is identified as an image hit and is
dropped:
v Delete Images on PCA side is enabled.
v The file extension for the response is listed on the Excluded File Extensions list.
See “Excluded File Extensions” on page 126.
v Either of the following criteria is met:
1. PCA CaptureType=3 and (StatusCode = 200 or StatusCode = 304)
– The previous criterion determines if the PCA is in BusinessIT mode
(CaptureType=3) and an image request is returned with an "okay" status
or a Not Modified status (StatusCode =304).
120
IBM Tealeaf CX Passive Capture Application: PCA Manual
2. HTTP_USER_AGENT contains "RealiTeaViewer" or HTTP_USER_AGENT contains
"TeaLeafFileGetter"
– The previous criterion determines if the request is being made by Tealeaf's
IBM Tealeaf CX RealiTea Viewer desktop application for image content
from the origin server during replay. These requests should not be
captured.
If the previous criteria are met, then the image hit is dropped.
v When this feature is enabled, if CaptureType=1 and the response content type is
listed in the Include Extension list, then both the request and the response are
captured.
In the Statistics tab, the total count of dropped image hits is displayed in the Total
dropped due to businessIT mode and DelImages feature set metric. See “Stats
per Instance” on page 145.
Workaround for mangled JSON characters
In some situations, special characters that are submitted in JSON data (UTF-8) from
one of the Tealeaf client frameworks can be mangled during processing by Tealeaf.
Through the PCA, you can configure settings to ensure that these characters are
properly consumed.
If you have enable I18N translation in the Pipeline tab, complete the following
steps.
1. In the Pipeline tab of the PCA Web Console, set the Default request encoding
to UTF-8. The request urlfields are defined as being encoded in UTF-8. The PCA
uses UTF-8 encoding if it is not able to detect an encoding type.
Note: The previous change to flag the request urlfields as encoded in UTF-8
can cause translation issues if the fields are not encoded in ISO 8859 or UTF-8.
2. Click Save Changes.
Based on the previous configuration changes, the submitted JSON data in UTF-8 is
not translated to a different encoding. Since the JSON is submitted in the
[RequestBody] section, which is included in the [urlfield] section, setting the
default encoding to UTF-8 results in no translation of the data. As a result, it is
properly represented inside Tealeaf.
Enabling Image Capture for TLI
In Tealeaf, a TLI server can be deployed to capture static content, including
images, JavaScripts, and Style sheets, to permanent archives. During replay,
requests for this static content reference the static archives, which prevents
unnecessary and sometimes forbidden requests to the origin server. Through a TLI
server, you can retain a copy of the static content of each session, as it was
experienced by the original visitor, for replay and auditing purposes.
v For more information about TLI servers, see "Managing Static Archives" in the
IBM Tealeaf cxImpact Administration Manual.
When this option is enabled, the PCA captures image hits with the following
content type associated with them:
Content-Type=image
Note:
v Other static content, such as Style sheets and JavaScripts, are in text formats that
are automatically captured by the IBM Tealeaf CX Passive Capture Application.
Chapter 4. Configuring the CX PCA
121
– When a TLI server is deployed, these objects are forwarded from the PCA to
the Windows pipeline. In Windows pipeline, TLI session agent forwards them
to the TLI server for appropriate storage. See "TLI Session Agent" in the IBM
Tealeaf CX Configuration Manual.
v If Enable TLI and Delete Images on PCA Side options are both enabled, then
Enable TLI overrides and determines the capture behavior of the PCA. See
“Delete Images on PCA Side” on page 120.
v To ensure the capture of image content throughout your Tealeaf environment,
this setting must be consistently applied through the Pipeline tabs across all
PCA instances.
When the hit is received by the Windows server, it examines the TLIHit value and,
since it is set to True, forwards the hit to the TLI server for storage in the
appropriate archive.
v Timestamp information is retained with the hit. It enables the TLI server to later
serve the version of the image that was experienced by a visitor and recorded to
match the visitor's session.
v Hits sent to the TLI server are not stored in the Canister. The session data is
altered to reference the TLI server-based content, from which a single stored
entity can be queried by multiple sessions. This method provides a significant
storage cost savings.
This feature must be reviewed with the include and exclude file extensions list. If
the feature is enabled AND:
v If the file extension is on the Included File Extensions list, then the PCA treats
the hit as a standard capture type accepted by the PCA. The application captures
the request and response and marks the image object with the following values
for the TLI server:
CaptureType=1
TLIHit=False
v If the file extension is not on the Included File Extensions list, then the PCA
captures the image object only. PCA marks it with the following properties for
the TLI server:
CaptureType=3
TLIHit=True
v If the file extension is on the Excluded File Extensions list, then the PCA
captures the image object only and marks it as mentioned in previous section..
Note: When this feature is enabled, image objects are always captured,
regardless of whether the object is included or excluded on the file extensions
list.
– If the file extension is displayed on the Included File Extensions list, the hit is
treated normally by the PCA. See “Included File Extensions” on page 127.
– See “Excluded File Extensions” on page 126.
Capture Type Lists
By default, the PCA is configured to capture data types that are interesting for
most web applications. Particularly for rich internet applications, custom data
types and file extensions can be present in the capture stream.
v Additionally, the PCA automatically inflates POSTs with some content encoding
types and can be configured to inflate other types. See “Capture All
Content-Encoding Types” on page 128.
122
IBM Tealeaf CX Passive Capture Application: PCA Manual
Note: Whenever you upgrade your PCA, you must review the all capture type
lists to verify that all required data types are being captured and processed
appropriately.
Note: For all web applications, the set of PCA capture types must be reviewed so
that all meaningful data is captured and processed by Tealeaf. Data that is not
defined to be captured by the IBM Tealeaf CX Passive Capture Application is
dropped in and results dropped hits that are displayed in session data.
Chapter 4. Configuring the CX PCA
123
Figure 30. Capture Type Lists
In the Capture Type Lists sections, you can configure inclusions and exclusions
that are applied to requests and responses. For example, if you remove the
text/json content type from the XML POST panel, the content type is still
124
IBM Tealeaf CX Passive Capture Application: PCA Manual
captured as part of the internal default captured content types, but the content is
no longer inserted into the [xml1] section. See “JSON Examples.”
Note: After you add new content types for capture, you must also add them
through TMS if you want to index the HTTPS responses of the captured type. See
"Configuring CX Indexing" in the IBM Tealeaf CX Configuration Manual.
How the PCA evaluates capture types
When hits are identified in the Pipeline tab, the PCA performs the evaluation of
the hit in the following order to determine if it must be captured:
1. Request:
a. Checks Request for content encoding type. If the type matches the specified
set of types to inflate, the request is inflated for processing. See “Capture
All Content-Encoding Types” on page 128.
b. Checks Request for the following internally known content types. See
“Default Captured Content Types” on page 126.
c. Set the request content and body types:
1) Checks the XML POST Type list for POSTs of XML type to capture. See
“XML POST Types” on page 127.
2) Checks the Binary POST Type list for POSTs of binary type to capture.
See “Binary POST Types” on page 127.
d. Check file extension types list for included and excluded types:
v See “Included File Extensions” on page 127.
v See “Excluded File Extensions” on page 126.
2. Response:
a. Check the following content types lists for values:
v “Capture All POST Types” on page 127
v “Binary POST Types” on page 127
v “Capture All Mimetypes” on page 127
b. If no values are found in the lists, the PCA checks its internal default list for
response types. See “Internal default response types” on page 126.
c. If there are values in the lists, check the following lists in the order that is
mentioned .
3. Request Body: If the Request and Response pass the previous tests to be
included, then the Request body is processed.
a. If Request content type is defined in one of the previous, then the PCA
processes its type accordingly.
b. If the content type for the request body is still unknown after the previous
checks, it checks the Capture All Post Types list.
1) If the content type is found in list, the PCA then processes the body as
text in [RequestBody] section of the generated request.
2) See “Capture All POST Types” on page 127.
JSON Examples
JSON is an emerging standard in use in many web applications. Some Tealeaf
modules, such as the Tealeaf Logging Frameworks of IBM Tealeaf CX Mobile, use
JSON POSTs for submitting data from the client to Tealeaf for capture. The
following example content types can be displayed in Tealeaf- or
application-sourced data.
Chapter 4. Configuring the CX PCA
125
Request Type
PCA Content Type Evaluation
text/json
Request is considered a known text content type. When the request body
processing is complete, it is a known content type and is processed
accordingly.
application/json
If the request content type is application/json and is not defined in the
Capture All POST types list, then it is an unknown type for the PCA. No
processing of the request body is performed, and the hit is dropped.
application/json
If the request content type is application/json and is defined in the
Capture All POST types list, then it is a known type for the PCA. If it is
not listed on the XML or Binary type lists, it is considered a text type and
is processed as text.
For more information about the Tealeaf JSON schema, which is used to capture
content from Tealeaf client frameworks, see "Tealeaf JSON Object Schema
Reference" in the IBM Tealeaf Client Framework Data Integration Guide.
Default Captured Content Types
By default, PCA captures the following content types.
Note: These content types are internal defaults of the PCA and require no
configuration to capture.
Internal default request types
v application/x-www-form-urlencoded
v application/xml
v multipart/form-data
v text/*
v text/xml
Internal default response types
Note: This list applies to response content types. Request content types are
evaluated as per the order defined. See “How the PCA evaluates capture types” on
page 125.
v text/*
v application/text/*
Excluded File Extensions
Specifies the files extensions to exclude from the captured DataStream. This setting
can be used to refine the behavior that is specified by CaptureMode.
Note: By default, the PCA does not capture JavaScript files. If your web
application is generating dynamic JavaScript files, those files must be manually
added to the set of captured types, if you want to capture them.
126
IBM Tealeaf CX Passive Capture Application: PCA Manual
Included File Extensions
Specifies files extensions that are fully captured. Binary files such as PDFs can be
included in capture.
Note: If you deploy a TLI server to capture static content, you must insert the file
extensions of the static content types in this area to capture them for insertion into
the TLI server. See "Managing Static Archives" in the IBM Tealeaf cxImpact
Administration Manual.
Capture All Mimetypes
Specifies response content types (MIME types) for which to capture a full hit.
Capture All POST Types
Specifies content types in the request data that is not part of the standard XML or
form data.
XML POST Types
In this section, you can specify the types of XML posts to add to the request. When
specified XML content type is matched, the [xml1] section is added to the request
buffer, and the content is inserted in it.
Note: New installations of the PCA from Build 3324 are automatically configured
to capture the XML post types that are listed. These XML post types were added in
PCA Build 3324. If you are using an earlier build or upgraded from an earlier
build, you must manually configure these capture types.
By default, some content types are automatically checked and captured. They do
not must be added. See “Default Captured Content Types” on page 126.
Depending on the type of JSON toolkit, the following content types can be
displayed in the capture stream. If present, these types must be added.
v application/x-javascript
v text/javascript
v text/x-javascript
v text/x-json
Binary POST Types
The PCA can be configured to capture binary POST types. For example,
AMF-based applications submit binary requests to the web server. To capture
AMF-based request data, add the type application/x-amf to this list.
v By default, the PCA does not capture binary responses.
v Decoding of AMF data must be enabled in the Windows pipeline. See "Inflate
Session Agent" in the IBM Tealeaf CX Configuration Manual.
When the application/x-tlt-ld is enabled for capture, the requests of all captured
hits of this type have the following request variable that is inserted into the [env]
section:
PostRequestBodyEncoding=Base64
For other hits, this value is set to None.
Chapter 4. Configuring the CX PCA
127
Note: In Release 8.4 or later, capture of the application/x-tlt-d binary post type
can be deprecated. See .
Capture All Content-Encoding Types
In PCA Build 3502 and later, you can specify the content encoding types through
text box whose requests are inflated during the capture process.
Note: In PCA Build 3502 and later, the following content encoding types are
automatically inflated and do not must be specified here:
v */deflate
v */gzip
v */x-gzip
When a request received by the PCA matches one of the specified encoding types,
the PCA automatically inflates or extracts the request.
The following table describes behaviors:
Table 12. Capture All Content-Encoding Types
In other In Capture All
capture Content-Encoding
type
Types?
lists for
capture?
Captured?
Inflated?
Notes
Y
Y
Y
Y
*/deflate, */gzip,
and */x-gzip are
automatically
inflated.
N
Y
N
N
dropped
Y
N
Y
N*
captured; not
inflated (* unless
one of the
content-encoding
types that are
inflated by default)
N
N
N
N
dropped
Content Types and Indexing
After PCA captures content, the request and response of each hit is forwarded to a
Canister for more processing, including indexing the content for search.
v Request: Specific sections of the request are automatically indexed for search. See
"Configuring CX Indexing" in the IBM Tealeaf CX Configuration Manual.
– You can configure privacy rules to move content from one section of the
request to another section that is automatically indexed. It is recommended
that you apply these privacy rules in the Canister. See "Privacy Session
Agent" in the IBM Tealeaf CX Configuration Manual.
v Response: Optionally, you can add individual HTTP response types for indexing.
See "Configuring CX Indexing" in the IBM Tealeaf CX Configuration Manual.
Downloading Privacy Configuration
If needed, you can download the privacy configuration file privacy.cfg for offline
editing and archiving from the Backups/Logs tab.
128
IBM Tealeaf CX Passive Capture Application: PCA Manual
Note: privacy.cfg must be formatted in a UTF-8 compatible format.
In the Backups/Logs tab, there are two locations:
Note: The PCA Web Console does retain up to five previous versions of
privacy.cfg. See “Privacy changes” on page 145.
v In the Privacy Configuration File section, click Download Selected.
v In theLogs section, click the configuration files link.
v See “PCA Web Console - Backup-Logs Tab” on page 164.
Rule Manipulation
Command
Description
Insert Rule 1
Inserts a new rule that is applied first and loads the Edit rule page.
Enable/Disable
Toggles the rule in that row to either enabled (active) or disabled.
Delete Deletes the rule in that row from the session. Changes must be saved for
the privacy.cfg file to be changed.
Edit
Loads the Edit page for that rule.
Insert Below
Inserts a new rule below this row and loads the Edit Rule page.
arrows Moves the rule up or down, depending on the arrow clicked. Rules are
applied in order and must be changed. Changes that are made by clicking
the arrows are made in the session. To save any changes, click Save
Changes.
Test Manipulation
Command
Description
Add
Loads the Add Test page.
Edit
Loads the Edit page for that test.
Action Manipulation
Command
Description
Add
Loads the Add Action page.
Delete/In Use
If the action can be deleted, a Delete link is available in the Actions to Take
column.
v If the action is flagged as in use, then a rule is referencing the action and
it cannot be deleted. To delete an in-use action, all references to it must
be removed from all rules. You can see which actions are being used in
the Actions to Take column in the Rules table.
Edit
Loads the Edit page for that Action.
Chapter 4. Configuring the CX PCA
129
Key Manipulation
Command
Description
Add
Loads the Add Key page.
Delete Deletes the key.
Edit
Loads the Edit page for that Key.
Adding a key is optional and can be used to explicitly define privacy keys along
with their (encrypted) value. This is normally only used when the Privacy Filter is
running on a machine other than the IBM Tealeaf CX server (on a Web server, for
example) where the defined privacy keys are not directly accessible. Entries in this
section should be in the following format:
keyID=keydata
where:
v keyID is the name (ID) of the key
v keydata is the encrypted key value string
130
IBM Tealeaf CX Passive Capture Application: PCA Manual
Add/Edit Rules
Figure 31. Add/Edit Rules page
To define a single condition (test), you can specify ReqField, ReqOp, and ReqVal in
a Rule. For more complex conditions, use the Tests option and define the test
conditions separately.
Setting Description
Name
Name of the rule
Description
User-readable description of the rule, which also displayed in privacy.cfg.
ReqField
This option specifies the name of a field, the name portion of a name-value
pair, in the request file. The value of this field is used for comparison. You
can also apply one of following special field names:
v TL_URLEXT - The file extension portion of the URL
v TL_URLTAIL - The tail of the URL, which includes the last / in the URL
and everything that is following it
Chapter 4. Configuring the CX PCA
131
v
ReqOp
TL_VIRTUALDIR - The virtual directory portion of the URL
ReqOp defines the comparison operation that is performed by this rule
between ReqField and ReqVal. Following are the valid values for this
option:
v EQ or = - True if the field value equals ReqVal. String comparison is
case-insensitive
v NE or != - True if the field value does not equal ReqVal. String
comparison is case-insensitive
v GT or > - True if the field value is greater than ReqVal
v LT or < - True if the field value is less than ReqVal
v CONTAINS - True if ReqVal is contained in the field value
v
v
PARTOF - True if the field value is part of (contained in) ReqVal
PARTOFLIST - True if the field value matches one of the values in ReqVal.
– The list of values in ReqVal can be delimited by semicolons or other
delimiter specified by the ListDelimiter property.
ReqVal
Literal value or field name (set ReqValIsField=True for field name). When
ReqOp=PARTOFLIST, this setting must specify a list of values that are
separated either by a semicolon or another delimiter (specified by using
ListDelimiter).
v If ReqField is set to TL_URLEXT, this field contains the extensions that are
including periods.
TestOp
Logical operator to use when multiple tests are specified. Possible values
are AND and OR. If no value is specified, AND is applied as the default value.
v When TestOp=AND, all tests must return True for the actions to be
processed.
v If TestOp=OR, the actions are processed if any of the tests return True.
List Delimiter
The character used to separate list items in ReqVal when using the
ReqOp=PARTOFLIST. The default is a semicolon (;).
Case Sensitive
True or False value that is indicating whether the searches for field names
must be case-sensitive. Default is False. Setting this to True speeds up
searches.
ReqValIsField
True or False indicating whether ReqVal contains a field name.
Not
True or False value. If True, then the result of the test evaluation is
inverted (logical NOT).
Stop Processing
True or False value that is indicating whether to stop processing further
rules if this rule evaluates to True.
Enabled
True or False Value which specifies whether this rule is active.
Actions
One or more action names which correspond to the names of action
sections to process if this rule returns True.
Tests
132
One or more test names which correspond to the names of test sections.
IBM Tealeaf CX Passive Capture Application: PCA Manual
The specified tests are evaluated to determine whether the actions is ran
for the rule. If no test is specified (and no embedded test specified as
described below), then the actions are run for every hit.
Add/Edit Tests
Figure 32. Add/Edit Test page
Setting Description
Name
The name of the test.
Description
User-readable description of the test, which also appears in privacy.cfg.
ReqField
Name portion of a name/value pair. This may also be one of the following
reserved names:
v TL_URLEXT
v TL_URLTAIL
v TL_VIRTUALDIR
ReqOp
Operation to perform - options are:
v EQ or =
v NE or != or <>
v GT or >
v LT or <
v
v
v
CONTAINS
PARTOF
PARTOFLIST
ReqVal
Literal value or field name (set ReqValIsField=True for field name). When
ReqOp=PARTOFLIST, this value should specify a list of values separated
either by a semicolon or another delimiter (specified using ListDelimiter).
Chapter 4. Configuring the CX PCA
133
ListDelimiter
The character used to separate list items in ReqVal when using
ReqOp=PARTOFLIST. The default is a semicolon ( ; ).
ReqValIsField
True or False indicating whether ReqVal contains a field name.
CaseSensitive
True or False value indicating whether the searches for field names should
be case-sensitive. Default is False. Setting this to True speeds up searches.
Not
True or False value. If True, then the result of the test evaluation is
inverted (logical NOT).
Add/Edit Actions
Figure 33. Add/Edit Action page
At the top of the Action Details page, you can review the name of the action and
the rules in which it is referenced, as well as the currently configured properties.
Setting Description
Name
The name of the action.
Description
User-readable description of the action, which also displayed in
privacy.cfg.
134
IBM Tealeaf CX Passive Capture Application: PCA Manual
Invert Action
True or False value that is indicating whether to invert the action (perform
the action on all fields or Value Names EXCEPT the ones specified).
v If Value Name is specified, then all except the name(s) specified in Value
Name are processed.
v If Value Name is not specified, then the name(s) specified for Field
is/are excepted from the action.
Note: This can only be used with Block, Encrypt, and Replace actions.
Start Pattern and Start Pattern RE cannot be used with an Invert
action.
Action
The action to take. This can be one of the following value:
v Block - Blocks the matched data using the specified strike character.
v Encrypt - Encrypts the matched data and masks it with the specified
strike character.
v Replace - Replaces the matched data with a specified text string.
v DropHit - Drops the current hit (no further action is taken).
DropResponse - Drops the response from the current hit.
ReqSet - Sets or replaces the value for the specified name/value pair in
the request. Creates the name/value pair if it doesn't exist. Also creates
the specified section if is doesn't exist.
v ReqAppend - Appends to the value of the specified name/value pair in
the request. Creates the name/value pair if it doesn't exist. Also creates
the specified section if it doesn't exist.
v ReqDelete - Removes the specified name/value pair completely from
the request. This does not remove the section, even if empty.
v
v
Key
key ID to use for encryption if Action=Encrypt.
Section
The section name of the data to act upon. If this is set to response, then the
response is processed. This can also be one of the following reserved
names:
v
urlfield - Performs the action for the specified Value Name(s) (or all if
Value Name is omitted) for values in the urlfield section, QUERY_STRING,
query string in RawRequest (if present) and the query string in
HTTP_REFERER and the Referer request header and request body in
RawRequest (if present).
v
cookies - Performs the action for the specified Value Name(s) (or all if
Value Name is omitted) for values in the [cookies] section, HTTP_COOKIE
and HTTP_SET_COOKIE name-value pairs, Set-Cookies headers in the
ResponseHeader section (if present), Set-Cookie headers in the response,
and the [cookies] header in the RawRequest section (if present).
Note: If a Section is not specified in an action, then the entire request
buffer (REQ) is used.
Field
One or more optional field names (name portion of the name-value pair).
If both Field and Value Name are omitted, then the entire section is
blocked/encrypted. This can also be one of the following reserved names:
v
body - If Section=response. then this specifies the response body as the
target. If Section=RawRequest. then the request body (if present) is
processed.
Chapter 4. Configuring the CX PCA
135
Value Name
One or more names of values (in multi-value name-value pairs, such as
HTTP_COOKIE) or the names of items when Section=urlfield or
Section=cookies.
Start Pattern
The starting string pattern to search for within the specified data. The data
immediately following the matching pattern is processed. If Start Pattern
is used, then you must also specify either End Pattern or Strike Length,
unless you set Inclusive=True. If set, then the Start Pattern and optional
End Pattern are blocked/encrypted as well. This is useful for blocking or
encrypting a constant data string.
Start Pattern RE
Regular expression version of Start Pattern. This can be used to specify a
standard regular expression to define the starting pattern to find. You can
use either Start Pattern or Start Pattern RE, but not both.
End Pattern
The string pattern which signals the end of the data that is matched by a
Start Pattern. The data up to, but not including, the End Pattern is
processed (unless Inclusive=True).
End Pattern RE
Regular expression version of End Pattern. This can be used to specify a
standard regular expression to define the ending pattern to find. You can
use either End Pattern or End Pattern RE, but not both.
Strike Character
The character that is used to replace the original data that is blocked or
encrypted. This can be any alphanumeric character or symbol not included
in the following list:
v . (period)
v , (comma)
v / (forward slash)
v \ (backslash)
v
v
v
v
[(left square bracket)
] (right square bracket)
| (pipe)
' (single quote)
v " (double quote)
Strike Length
Optional length (in bytes) of strike data. This is the number of Strike
Character characters that are used to replace the original data (if
Action=Block or Action=Encrypt).
v If Strike Length is longer than the original data length, then more strike
characters are added.
v If Strike Length is shorter than the original data length, then Strike
Length characters are replaced with the Strike Character and the
remaining data is removed.
v If Strike Length is a negative number, then the number of characters
represented by the absolute value of Strike Length is left as-is. For
example, to leave the last four characters or a value untouched, set
Strike Length=-4. (see Blocking Mask for more flexible blocking
options.)
136
IBM Tealeaf CX Passive Capture Application: PCA Manual
Inclusive
True or False value that is indicating whether the Start Pattern (or Start
Pattern RE) and (optional) End Pattern (or End Pattern RE) are blocked or
encrypted. Default is False.
Repeat Count
This can be used for actions that have a Start Pattern or Start Pattern
RE to specify how many instances of data that is matching the pattern are
processed.
Blocking Mask
An optional regular expression that specifies which characters in the found
data are replaced with the strike character (does not apply to Replace
action). All character within a group (defined by parentheses) in the
regular expression is replaced with the strike character.
v Characters that match part of the pattern outside of a group are not
replaced. For example, the following mask would block just the numbers
in a Social Security Number, leaving the dashes visible:
BlockingMask=([0-9]{3})-([0-9]{2})-([0-9]{4})
This example would leave the first four digits of a credit card number
visible:
BlockingMask=[0-9]{4}([0-9]*)
Blocking Mask is used in lieu of Strike Length. You can use one or the
other, but not both.
Note: Be careful when you use Blocking Mask. If the data does not
match the regular expression that is specified for Blocking Mask, then
the data is not blocked or encrypted.
Replace String
The string that is used to replace the original data when Action=Replace.
Length (bytes)
Used in lieu of an End Pattern or End Pattern RE, this value specifies the
length of the data (in bytes) to process following a matched Start Pattern
(or Start Pattern RE).
Case Sensitive
True or False value that is indicating whether the searches for field names
and/or patterns must be case-sensitive. Default is False. Setting this to
True speeds up searches.
Ignore Special
True or False value that is indicating whether to ignore special handling
when urlfield or cookies is specified for the Section. Setting to True
allows Start Pattern or Start Pattern RE to be used in the urlfield or
cookies sections. Default is False.
ReqSetSection
Specifies the section for the name-value pair for a ReqSet, ReqAppend, or
ReqDelete action. ReqSetSection is required for these three actions.
ReqSetField
Specifies the name of a name-value pair for a ReqSet, ReqAppend, or
ReqDelete action. ReqSetField is required for these three actions.
ReqSetResult
This option is used with Start Pattern RE to produce a formatted value
for a ReqSet or ReqAppend action. The Start Pattern RE expression must
Chapter 4. Configuring the CX PCA
137
contain one or more "groups", defined by parentheses within the regular
expression. ReqSetResult is a string that is containing literal text and
placeholders for the data that is captured by Start Pattern RE. For
example:
StartPatternRE=name="(.*?)" value="(.*?)"
ReqSetResult=Field
{g1} value: {g2}
The code might give following result:
Field name value: Bob
The first placeholder, {g1}, is replaced with the value from the first group
in the regular expression. {g2} gets the second value, and so on. The result
string is then used as the value for the ReqSet or ReqAppend action.
Add/Edit Keys
Privacy keys can be generated within Tealeaf for use in the encryption and
decryption of sensitive data as needed throughout the system. Encryption and
decryption is managed by the Privacy Filter, which is available in the PCA and in
the Windows pipeline.
v For more information about pipeline privacy, see "Extended Privacy Session
Agent" in the IBM Tealeaf CX Configuration Manual.
v For more information about pipeline rules creation, see "Privacy Session Agent"
in the IBM Tealeaf CX Configuration Manual.
v For a general overview of how Tealeaf manages privacy, see "Managing Data
Privacy in Tealeaf CX" in the IBM Tealeaf CX Installation Manual.
Privacy keys that are used for encryption and decryption of sensitive data for use
throughout Tealeaf must be added to the PCA Web Console.
Note: Any encryption key that is used by the PCA to encrypt and by Search
Server to decrypt must be defined in Search Server configuration and provided to
the PCA. For more information about defining these keys, see "Configuring the
Search Server" in the IBM Tealeaf CX Configuration Manual.
You can add privacy keys for the PCA to use during encryption operations by the
Privacy filter in the PCA. To make a privacy key available for PCA use, enter the
key name and the generated key in this section.
v You can copy a key value that is generated from Search Server configuration and
paste it into the listed Key Details fields.
Setting Description
Name
Name of the key.
Key
The key itself.
Privacy.cfg Reference
This section provides a reference overview of the Privacy.cfg file, which is used to
configure privacy rules that are applied to the capture stream in the IBM Tealeaf
CX Passive Capture Application.
Note: Avoid making direct changes to this configuration file. It is recommended
that you change your privacy configuration through the Rules tab in the web
138
IBM Tealeaf CX Passive Capture Application: PCA Manual
console, which provides a user interface onto this configuration file. For more
information, see “Supported Browsers for PCA Web Console” on page 67.
Privacy enables the removal or encryption of sensitive information in the capture
stream. Privacy can be applied at the following points during the capture and
processing of session data.
1. UI Capture
2. PCA
3. Windows Pipeline
see "Managing Data Privacy in Tealeaf CX" in the IBM Tealeaf CX Installation
Manual.
You can use the Windows-based privacy tester utility to develop and test your
privacy rules. Tested rules can then be pasted back into this configuration file for
application to the PCA.
v See "Privacy Tester Utility" in the IBM Tealeaf CX Configuration Manual.
Additional documentation is provided in the notes in the Privacy.cfg
configuration file. This file is in the /usr/local/ctccap/etc directory. It can be
edited with the vi editor.
Rules
Property
Description
Enabled
True or False value which specifies whether this rule is active.
Tests
One or more test names which correspond to the names of test sections.
The specified tests are evaluated to determine whether the actions is run
for the rule. If no test is specified (and no embedded test specified as
described below), then the actions are run for every hit.
TestOp Logical operator to use when multiple tests are specified. Possible values
are AND and OR.
v If TestOp=AND, then all tests must return True for the actions to be
processed.
v If TestOp=OR, then the actions are processed if any of the tests return
True.
Not
True or False value. If True, then the result of the test evaluation is
inverted (logical NOT).
StopProcessing
True or False value that is indicating whether to stop processing further
rules if this rule evaluates to True.
Actions
One or more action names which correspond to the names of action
sections to process if this rule returns True.
ReqField
Name portion of a name-value pair. This can also be one of the following
reserved names:
v TL_URLEXT
v TL_URLTAIL
Chapter 4. Configuring the CX PCA
139
v TL_VIRTUALDIR
ReqOp
Operation to perform - options are:
v EQ or =
v
v
v
v
v
v
NE or != or <>
GT or >
LT or <
CONTAINS
PARTOF
PARTOFLIST
ReqVal Literal value or field name (set ReqValIsField=True for field name). When
ReqOp=PARTOFLIST, this value must specify a list of values separated either
by a semicolon or another delimiter (specified using ListDelimiter).
ReqValIsField
True or False indicating whether ReqVal contains a fieldname.
ListDelimiter
The character that is used to separate list items in ReqVal when you use
ReqOp=PARTOFLIST. The default is a semicolon, ;.
CaseSensitive
True or False value indicating whether the searches for field names must
be case-sensitive. Default is False. Setting this to True speeds up searches.
Tests
Property
Description
ReqField
Name portion of a name-value pair. This can also be one of the following
reserved names:
v TL_URLEXT
v TL_URLTAIL
v TL_VIRTUALDIR
ReqOp
Operation to perform - options are:
v EQ or =
v
v
v
v
v
v
NE or != or <>
GT or >
LT or <
CONTAINS
PARTOF
PARTOFLIST
ReqVal Literal value or field name (set ReqValIsField=True for field name). If
ReqOp=PARTOFLIST, this value must specify a list of values that are
separated either by a semicolon or another delimiter (specified by using
ListDelimiter).
ReqValIsField
True or False indicating whether ReqVal contains a field name.
140
IBM Tealeaf CX Passive Capture Application: PCA Manual
ListDelimiter
The character that is used to separate list items in ReqVal when
ReqOp=PARTOFLIST. The default is a semicolon, ;.
CaseSensitive
True or False value that is indicating whether the searches for field names
must be case-sensitive. Default is False. Setting this to True speeds up
searches.
Not
True or False value. If set to True, then the result of the test evaluation is
inverted (logical NOT).
Actions
Property
Description
Action The action to take. Following are the values :
v Block - Blocks the matched data using the specified strike character.
v Encrypt - Encrypts the matched data and masks it with the specified
strike character.
v Replace - Replaces the matched data with a specified text string.
v DropHit - Drops the current hit (no further action is taken). Any rule
may have a drop hit action.
v DropResponse - Drops the response from the current hit.
v ReqSet - Sets or replaces the value for the specified name/value pair in
the request. Creates the name/value pair if it doesn't exist. Also creates
the specified section if is doesn't exist.
v ReqAppend - Appends to the value of the specified name/value pair in
the request. Creates the name/value pair if it doesn't exist. Also creates
the specified section if it doesn't exist.
v ReqDelete - Removes the specified name/value pair completely from the
request. This does not remove the section, even if empty.
Key
key ID to use for encryption if Action=Encrypt.
Group
Group name (in the format domain\groupname) to use for encryption if
Action=Encrypt.
Note: Use either Key or Group to specify the encryption key, not both.
Section
The section name of the data to act upon. If this is value that is set to
response, then the response is processed. This can also be one of the
following reserved names:
v urlfield - Performs the action for the specified ValueName (or all if
ValueName is omitted) for values in the urlfield section,
QUERY_STRING, query string in RawRequest (if present) and the query
string in HTTP_REFERER and the Referer request header and request
body in RawRequest (if present).
v cookies - Performs the action for the specified ValueName (or all if
ValueName is omitted) for values in the [cookies] section,
HTTP_COOKIE and HTTP_SET_COOKIE name-value pairs, Set-Cookies
headers in the ResponseHeader section (if present), Set-Cookie headers
in the response, and the [cookies] header in the RawRequest section (if
present).
Chapter 4. Configuring the CX PCA
141
Note: If a Section is not specified in an action, then the entire request
buffer (REQ) is used.
IgnoreSpecial
True or False value that is indicating whether to ignore special handling
when urlfield or cookies is specified for the Section. Setting this to True
allows StartPattern or StartPatternRE to be used in the urlfield or
cookies sections. Default is False.
Field
One or more optional field names (name portion of the name-value pair).
If both Field and ValueName are omitted, then the entire section is
blocked/encrypted. This can also be one of the following reserved names:
v body - If Section=response then, this value specifies the response body
as the target. If Section=RawRequest, then the request body (if present) is
processed.
ValueName
One or more names of values (in multi-value name-value pairs, such as
HTTP_COOKIE) or the names of items when Section=urlfield or
Section=cookies.
Invert True or False value that is indicating whether to invert the action (perform
on all fields or ValueNames EXCEPT the ones specified).
v If ValueName is specified, then all except the name(s) specified in
ValueName are processed.
v If ValueName is not specified, then the name(s) specified for Field is/are
excepted from the action.
Note: This can only be used with Block, Encrypt, and Replace actions.
StartPattern and StartPatternRE cannot be used with an invert action.
StartPattern
The starting string pattern to search for within the specified data. The data
immediately following the matching pattern is processed. If StartPattern
is used, then you must also specify either EndPattern or Length, unless
you set Inclusive to True. When Inclusive=True, the StartPattern (and
optional EndPattern) are blocked/encrypted as well. This is useful for
blocking or encrypting a constant data string.
StartPatternRE
Regular expression version of StartPattern. This can be used to specify a
standard regular expression to define the starting pattern to find. You can
use either StartPattern or StartPatternRE, but not both.
EndPattern
The string pattern which signals the end of the data that is matched by a
StartPattern. The data up to, but not including, the EndPattern is processed
(unless Inclusive=True).
EndPatternRE
Regular expression version of EndPattern. This can be used to specify a
standard regular expression to define the ending pattern to find. You can
use either EndPattern or EndPatternRE, but not both.
Length Used in lieu of an EndPattern or EndPatternRE, this value specifies the
length of the data (in bytes) to process following a matched StartPattern
(or StartPatternRE).
142
IBM Tealeaf CX Passive Capture Application: PCA Manual
Inclusive
True or False value that is indicating whether the StartPattern (or
StartPatternRE) and (optional) EndPattern (or EndPatternRE) are blocked
or encrypted. Default is False.
RepeatCount
This can be used for actions that have a StartPattern or StartPatternRE to
specify how many instances of data that is matching the pattern is
processed.
ReplaceString
The string that is used to replace the original data when Action=Replace.
CaseSensitive
True or False value that is indicating whether the searches for field names
and/or patterns must be case-sensitive. Default is False. Setting this to
True speeds up searches.
StrikeChar
The character that is used to replace the original data that is blocked or
encrypted. This can be any alphanumeric character or symbol not included
in the following list:
v . (period)
v , (comma)
v / (forward slash)
v \ (backslash)
v [(left square bracket)
v ] (right square bracket)
v | (pipe)
v '(single quotation mark)
v " (double quotation mark)
StrikeLen
Optional length (in bytes) of strike data. This is the number of StrikeChar
characters that are used to replace the original data (if Action=Block or
Action=Encrypt).
v If StrikeLen is longer than the original data length, then more strike
characters are added.
v If StrikeLen is shorter than the original data length, then StrikeLen
characters are replaced with the StrikeChar and the remaining data is
removed.
v If StrikeLen is a negative number, then the number of characters
represented by the absolute value of StrikeLen is left as-is. For example,
to leave the last four characters or a value untouched, set StrikeLen=-4.
v For more flexible options, see BlockingMask.
BlockingMask
An optional regular expression that specifies which characters in the found
data are replaced with the strike character (does not apply to Replace
action). All characters within a group (defined by parentheses) in the
regular expression are replaced with the strike character. Characters that
match part of the pattern outside of a group are not replaced. Examples:
The following mask would block just the numbers in a Social Security
Number, leaving the dashes visible:
BlockingMask=([0-9]{3})-([0-9]{2})-([0-9]{4})
Chapter 4. Configuring the CX PCA
143
This example would leave the first four digits of a credit card number
visible:
BlockingMask=[0-9]{4}([0-9]*)
BlockingMask is used in lieu of StrikeLen. You can use one or the other,
but not both.
Note: Be careful when you use BlockingMask. If the data does not match
the regular expression that is specified for BlockingMask, then the data is
not blocked or encrypted.
ReqSetSection
Specifies the section for the name-value pair for a ReqSet, ReqAppend, or
ReqDelete action. ReqSetSection is required for these three actions.
ReqSetField
Specifies the name of a name-value pair for a ReqSet, ReqAppend, or
ReqDelete action. ReqSetField is required for these three actions.
ReqSetResult
This option is used in conjunction with StartPatternRE to produce a
formatted value for a ReqSet or ReqAppend action. The StartPatternRE
expression should contain one or more "groups", defined by parentheses
within the regular expression. ReqSetResult is a string containing literal
text and placeholders for the data captured by StartPatternRE. Examples:
StartPatternRE=name="(.*?)" value="(.*?)"
ReqSetResult=Field
{g1} value: {g2}
Would result in a following value like:
Field name value: Bob
The first placeholder, {g1}, is replaced with the value from the first group
in
the regular expression. {g2} gets the second value, and so on. The result
string
is then used as the value for the ReqSet or ReqAppend action.
Action notes
v For ReqSet and ReqAppend the value to set or append can be specified a couple
different ways. You can either use a literal string by setting ReplaceString to the
required text, or you can pull data from the request or response by using
Section, Field, ValueName, StartPattern, StartPatternRE, EndPattern and/or
EndPatternRE.
v When you useg StartPattern or StartPatternRE with one of these actions the
RepeatCount is always set to 1 (the first match is always used).
v IgnoreSpecial is always True for these actions when Section is specified. There
is no special handling for the urlfield or cookies sections with these actions.
v The value for a field (name/value pair) can be cleared without removing the
entire field by using ReplaceString with no value:
ReplaceString=
v All carriage-returns and linefeeds in the value string are replaced with \r and
\n.
v Privacy changes are queued and applied after all actions are complete. This
means that actions normally see the original data. ReqSet, ReqAppend and
ReqDelete keep track of field additions, changes, and deletions, so multiple
144
IBM Tealeaf CX Passive Capture Application: PCA Manual
changes to a single field (such adding a field then concatenating addition data to
the value) can be done safely. Since the Replace action can affect any arbitrary
piece of data in the request or response, it is not included in this change
tracking. Changes that are made to field values are best done by using ReqSet
and ReqAppend.
v When you use use Field or ValueName with ReqSet or ReqAppend you must
specify a single field or value name. If there are multiple names the value for the
last item that found is used.
v Similar to the note above, you must avoid specifying only a section to retrieve
the value for a ReqSet or ReqAppend. Doing so results in the value from the last
field (name/value pair) in the section that is used for the ReqSet or ReqAppend.
Logging Changes
Following section contains information about logging changes.
Privacy changes
When changes are made in the Rules tab that apply to privacy.cfg, a backup
version of the old file is saved in the following format: privacy.cfg.X, where X is a
version number.
v By default, a maximum of five versions are retained at any time.
Diff logging
In addition to logging privacy changes, differences in all web console changes are
logged in the conf_changelog.cfg file.
Reference
v For general information about Tealeaf privacy, see "Managing Data Privacy in
Tealeaf CX" in the IBM Tealeaf CX Installation Manual.
v For more information about privacy configuration, see "Privacy Session Agent"
in the IBM Tealeaf CX Configuration Manual.
– Tealeaf provides a number of pre-configured privacy filters, which can be
enabled and modified to meet the requirements of your web application. See
"Pre-configured Filters" in the IBM Tealeaf CX Configuration Manual.
– For more information about the enhanced version of the Windows session
agent, see "Extended Privacy Session Agent" in the IBM Tealeaf CX
Configuration Manual.
v For more information about the privacy tester utility, see "Privacy Tester Utility"
in the IBM Tealeaf CX Configuration Manual.
Stats per Instance
When you select a view that displays statistics across multiple instances, the data
for each instance is displayed in a separate column: ID#0, ID#1, and so on.
v The number of displayed data columns indicates the number of configured
instances of the IBM Tealeaf CX Passive Capture Application and the number of
configured additional instances of the pipelined process.
Example
If you have three PCA instances and five pipeline instances, five data columns are
displayed, which is the larger of the two sets of instances.
Chapter 4. Configuring the CX PCA
145
v The first three instances contain all specific information for both PCA and
pipeline instances.
v The last two instances only contain information specific to the remaining two
pipeline instances.
Example:
If you have six PCA instances and three pipeline instances, six data columns are
displayed, of which only the first three instances contain pipeline-specific
information, since there are only three pipelines.
Note: Multiple instances of the PCA pipeline process can be configured in PCA
Build 3403 or later.
v For metrics about the performance of individual pipelines, see “Hits section” on
page 155.
v For more information about configuring additional instances of the pipeline, see
“PCA Web Console - Interface Tab” on page 86.
Checking on System Health through stats.xml
You can use the stats.xml output to monitor whether traffic is being received by
the PCA and then delivered to the target recipients.
Table 13. Traffic:
Setting
Description and Expected Value
<CaptureCurrentFilteredKbytesPerSec>
This value indicates the number
of kilobytes per second of
filtered data that is captured by
the PCA.
v If capture is working, this
value must be positive.
<SslTotalDhCipherConnections>
This value indicates the total
number of Diffie-Hellman SSL
connections in use.
Note: The IBM Tealeaf CX
Passive Capture Application
does not support the use of the
Diffie-Hellman cipher. This
value must be zero (0).
Table 14. Delivery:
Setting
Description and Expected Value
<StateText>
This value indicates the state of the connection between the PCA
and the target Windows server.
v This value must be connected.
<TotalHitsQueued>
Total count of hits queued for delivery to IBM Tealeaf CX server.
v This value must be equal to <TotalHitsDelivered>.
For more information about the available options for ctcstats at the command line,
run the following as the ctccap user:
./ctcstats -h
146
IBM Tealeaf CX Passive Capture Application: PCA Manual
Capture Software Processes
For more information about the processes of the PCA, see Chapter 1, “Passive
Capture Overview,” on page 1.
Passive Capture Statistics
The following sections describe the Passive Capture statistics definitions.
Legend
v XML - XML node in stats.xml
v Console Display - Display value that is displayed in the Statistics tab of the PCA
Web Console
– In this column, a value of not available indicates that the statistic is not
reported by default in the PCA Web Console.
v Description - A text description of the statistic.
General section
Table 15. General section
XML
Console Display
Description
<CaptureVersion>
Capture version
The Passive Capture software
build version number.
<CapturedPctCpu>
Captured CPU usage percent
(high)
The current CPU usage for the
process.
<CoreDumpCount>
Number of coredumps
Number of coredumps that
occurred from any of the Passive
Capture processes. This is a
count of coredump files in the
/usr/local/ctccap subdirectory.
<CpuLoadPct>
CPU load percentage
The total CPU load percentage
reported by the system.
<InstanceCount>
Number of instances
Number of instances that
arerunning (listend and reassd
pairs).
<PeerCount>
Number of delivery peers
Number of Deliverd socket
connections to Tealeaf processing
servers.
<ProcessCount>
Number of processes
Total number of processes that
make up the Passive Capture
software, Apache server
processes, and so on.
<ProcessClassCount
Number of process classes
Total number of Tealeaf specific
processes that are grouped in
classes.
<ReassdPctCpu>
Reassd CPU usage percent
(high)
The highest CPU percentage
usage as reported by the system
within all Reassd processes.
There can be multiple Reassd
processes, but typically only one.
Chapter 4. Configuring the CX PCA
147
Time Section
Table 16. Time Section
XML
Console Display
Description
<LastReset>
Last time statistics were
reset
The time and date of when
the statistics were cleared.
<LastResetSecondsUtc>
Last time statistics were
reset in UTC seconds
The UTC seconds since the
statistics were last cleared.
<LastResetUtc>
Last time statistics were
reset in UTC
The time and date of when
the statistics were cleared in
Coordinated Universal Time.
<LastRestart>
Last time capture entered
main loop
The time and date of when
Captured restarted its child
processes.
<LastRestartSecondsUtc>
Last time capture entered
main loop in UTC seconds
The UTC seconds since
Captured restarted its child
processes.
<LastRestartUtc>
Last time capture entered
main loop in UTC
The time and date of when
Captured restarted its child
processes in UTC.
<LocalTime>
Local time
The local time of the system.
<LocalTimeSecondsUtc>
Local time in UTC seconds
The local time of the system
in UTC seconds.
<LocalTimeUtc>
Local time in UTC
The local time of the system
in Coordinated Universal
Time.
<NumSystemRestarts>
Number of times capture
entered main loop
Total number of times
Captured restarted its child
processes since the Passive
Capture software was started.
<TimeCpuUptime>
Time since last OS reboot
(days, hours, minutes,
seconds)
Elapsed time since the system
OS rebooted.
<TimeCpuUptimeSeconds>
Seconds since last OS
reboot
Elapsed number of seconds
since the system OS rebooted.
Memory section
The following memory statistics are all interrelated and track each other.
Table 17. Memory section
148
XML
Console Display
Description
<MemoryListendSize>
Listend size
The process current
memory footprint as
reported by the OS, in
bytes. Typically this value
must be under 20 MB.
IBM Tealeaf CX Passive Capture Application: PCA Manual
Table 17. Memory section (continued)
XML
Console Display
Description
<MemoryListendMaxSize>
Listend max size
The process max memory
footprint size as reported
by the OS, in bytes. This
value fluctuates
depending on various
internal requirements.
Typically, it tracks the
current size with little
deviation and is the high
water mark indicator for
it.
<MemoryListendMemoryIn_use>
Listend memory in use
The process current
memory usage size, in
bytes, based on its
dynamically allocated
memory requirements.
This value grows,
depending on its needs, to
as much as 100 MB for
internal packet buffers.
<MemoryListendMaxMemoryIn_use>
Listend max memory in
use
The high water mark
indicator for the above in
use value.
<MemoryReassdSize>
Reassd size
The process current
memory footprint size, in
bytes, as reported by the
OS. This value is the
current memory that is
allocated to it, including
its footprint. It typically
can range from a few
megabytes to 1 GB or
more.
<MemoryReassdMaxSize>
Reassd max size
The high water mark for
the current memory size
above.
<MemoryReassdMemoryIn_use>
Reassd memory in use
The process current
memory usage size that is
based on dynamically
allocated memory
demands from it. This
value can also vary from a
few megabytes to over 1
GB depending on its
processing requirements
for the current network
traffic activity. There is no
typical value, but it is
usually less than 500 MB.
<MemoryReassdMaxMemoryIn_use>
Reassd max memory in use The high water mark for
the current memory size
above.
Chapter 4. Configuring the CX PCA
149
Table 17. Memory section (continued)
XML
Console Display
Description
<MemoryListendOutputBuffers>
Listend output buffers
Current memory used in
output buffer, in bytes, for
the listend process filtered
packet traffic. This
memory buffer is used to
buffer traffic that is
flowing from listend to
reassdthrough its pipe.
Reassd process pulls
traffic packets as it is able
to process them. The
default size of this buffer
is 100 MB.
<MemoryListendOutputBuffersMax> Listend output buffers
max
The high water mark for
the above buffers size
value.
<MemoryDeliveryQueue>
Delivery queue
Current hit delivery buffer
size that is used, in bytes,
to send hits through the
socket to the IBM Tealeaf
CX server.
<MemoryDeliveryQueueMax>
Delivery queue max
The high water mark for
above queue size value.
<MemorySslSessionCacheEntries>
SSL session cache
entries
The current number of
SSL session entries that
are stored in the cache
table. The conf config
setting determines what
the max limit of entries
that can be stored at a
time. Typical default is
10,000 entries.
v For more information
on tuning the max limit
setting, see SSL Total
session cache misses
stat below.
150
<CpuUsagePctHigh>
not available
CPU usage percent (high)
<CpuUsagePctTotal>
not available
CPU usage percent (total)
<Id>
not available
process ID in the context
of PCA processes
<MemUsagePctHigh>
not available
Memory usage percent
(high)
<MemUsagePctTotal>
not available
Memory usage percent
(total)
<Name>
not available
name of the process
<ProcessCount>
not available
ProcessCount
<VirtualMemorySizeKbytesHigh>
not available
Virtual memory size
(kbytes) high
<VirtualMemorySizeKbytesTotal>
not available
Virtual memory size
(kbytes) total
IBM Tealeaf CX Passive Capture Application: PCA Manual
TCP section
Table 18. TCP section
XML
Console Display
Description
<TcpTotalPacketsRcvd>
Total packets rcvd
The count of TCP packets received by the TCP
reassembler.
<TcpTotalPacketsRcvdPerSec>
Total packets rcvd per second
Rate of TCP packets received per second
<TcpTotalConnections>
Total connections
The count of new TCP connections that are
formed by the TCP reassembler.
<TcpTotalConnectionsPerSec>
Total connections per second
Rate of new TCP connections that are formed
per second
<TcpTotalClosedConnections>
Total closed connections
The count of TCP connections closed by the
TCP reassembler
<TcpTotalRstConnections>
Total reset connections
The count of TCP connections that are reset. A
high number of reset connections can indicate
a connection issue.
<TcpSyn_waitConnections>
SYN/WAIT connections
Current® count of TCP connections that only
received the first SYN handshake packet. This
number must track with the "Current
connections" value, under 50 percent,
depending on network traffic activity. If the
value consistently exceeds it by a large
margin, there can be a problem with the span
port traffic.
<TcpSyn_waitConnectionsMax>
SYN/WAIT connections max
The high water mark for above.
<TcpTotalSyn_waitConnectionsAged>
Total SYN/WAIT connections aged
Shows how many SYN/WAIT connections are
deleted due to aging.
<TcpTotalSyn_waitConnectionsDestroyed>
Total SYN/WAIT connections destroyed
Count of SYN/WAIT connections destroyed
due to the max limit that is being reached.
This occurs to allow room for new
connections to be created. If this count rises
rapidly within a short period (5 minutes), it
can indicate that the default max limits are set
too low for the volume of network traffic
captured. Adjust the max limit to a higher
value to minimize loss. A rapidly rising count
can also indicate a problem with the network
infrastructure not providing relatively
complete network traffic.
<TcpTotalOutsyncSyn_waitConnections>
Total out-of-sync SYN/WAIT
connections
Total count of connections where the SYN
handshake packets, SYN1 and SYN2, are
reversed. Received the SYN packet from
server to client before the client to server SYN
packet.
<TcpCurrentConnections>
Current connections
Current count of completed SYN handshake
connections (connections established).
<TcpCurrentConnectionsMax>
Current connections max
The high water mark for above.
<TcpTotalCurrentConnectionsAged>
Total Current connections aged
Shows how many current connections are
deleted because of aging.
<TcpTotalCurrentConnectionsDestroyed>
Total Current connections destroyed
Count of connections destroyed because of the
max limit being reached. This occurs to allow
room for new connections to be created. If this
count rises rapidly within a short time (5
minutes), it can indicate that the default max
limits are set too low for the volume of
network traffic captured. Adjust the max limit
to a higher value to minimize loss. A rapidly
rising count can also indicate a problem with
the network infrastructure not providing
relatively complete network traffic.
<TcpTotalConnectionsReaped>
Total Connections reaped
Connections per second that cannot be
decrypted because of a missing key
<TcpTime_waitConnections>
TIME_WAIT connections
Current count of connections that is in a
closed/wait state but not closed, received the
FIN packets.
<TcpTime_waitConnectionsMax>
TIME_WAIT connections max
The high water mark for above.
<TcpTotalOooConnectionsDeleted>
Total out-of-order connections
deleted
Indicates how many out-of-order connection
deletions are occurred. The count value of this
statistic automatically resets when it exceeds
5,000,000.
<TcpTotalOooConnections>
Total out-of-order connections
Indicates how many total out of order packet
connections are occurring. If this number is
high or approaching the "Total connections"
number, then the network infrastructure that
is providing traffic to the Capture ports
cannot be clean, and some hits cannot
properly reassemble because of excessive
packet reordering required. This can be
CPU-intensive for the Capture process.
Chapter 4. Configuring the CX PCA
151
Table 18. TCP section (continued)
XML
Console Display
Description
<TcpTotalRolloverConnections>
Total rollover connections
Total connections where the TCP sequence
number is rolled over to 0
<TcpTotalMissingPktConnections>
Total missing packet connections
Total connections where a missing packet
condition are detected
<TcpCurrentStreamingConnections>
Current streaming connections
Not implemented or used
<TcpTotalStreamingConnections>
Total streaming connections
Not implemented or used
<TcpTotalAckedButUnseenPackets>
Total ACKed but unseen packets
A count of TCP ACK packets that were
received but did not have a corresponding
TCP data packet that it ACKed for the TCP
connection.
<TcpTotalAckRollbacks>
Total ACK rollbacks
A count of ACK packet sequence numbers
that are less than the expected ACK packet
sequence number in the TCP reassembler.
<TcpAlienPacketsRcvd>
Alien packets rcvd
A count of any TCP packet where a
corresponding TCP connection is not found in
the TCP reassembler's table of current known
TCP connections. The alien packet count must
be measured against the Total packets
captured value. Expect to see this count below
10 percent.
<TcpTotalChecksumErrors>
Total checksum errors
Count of bad TCP packet checksum errors. If
you are getting error counts for this value,
then your network infrastructure is spanning
traffic to the Passive Capture host machine
with bad packet checksum values.
Note: If you are encountering a high number
of checksum errors, the problem can be
caused by a number of factors. It includs
checksum offloading that are performed at the
NIC. To verify, you must contact your
network IT department to identify if this
feature is enabled and, if so, to disable it and
then recheck the value of this statistic.
<TcpErrors>
Errors
Not implemented or used.
<TcpErrorsperSec>
TCP Errors per Second
Not implemented or used.
<TcpTotalDuplicatePackets>
Total back-to-back duplicate packets
Indicates how many back-to-back duplicate
packets are occurring in the filtered capture
traffic. A high number indicates that the
network switch span ports are not properly
configured and are providing duplicate traffic.
In this case, the stat approaches one half the
value that is specified in the Total packets
rcvd value. While the Capture processes can
handle duplicate traffic packets, it is an
unnecessary usage that can impact
performance when the system is already close
to its maximum level. This also is an issue
where available bandwidth for the Capture
NICs is needlessly wasted.
v See “How does the PCA handle duplicate
TCP packets” on page 271.
SSL section
Table 19. SSL section
152
XML
Console Display
Description
<SslTotalTIs11Sessions>
Total TLS1.1 sessions
This is a total count of SSL
sessions that use the TLS1.1
protocol.
<SslTotalTIs11SessionsDecrypted>
Total TLS1.1 sessions
decrypted
This is a total count of SSL
sessions that use the TLS1.1
protocol and were successfully
decrypted.
SslTotalTls12Sessions
Total TLS1.2 sessions
This is a total count of SSL
sessions that use the TLS1.2
protocol.
SslTotalTls12SessionsDecrypted
Total TLS1.2 sessions
decrypted
This is a total count of SSL
sessions that use the TLS2.1
protocol and were successfully
decrypted.
IBM Tealeaf CX Passive Capture Application: PCA Manual
Table 19. SSL section (continued)
XML
Console Display
Description
<SslTotalNewHandshakes>
Total new handshakes
This is a count of new SSL
handshake sessions that
occurred. New indicates that the
SSL session wasn't found in the
SSL session cache table.
<SslTotalResumedHandshakes>
Total resumed handshakes
Provides a running total of SSL
resumed handshakes that
occurred. This statistic shows
how well websites are taking
advantage of SSL performance
by its use. If the count is zero,
this indicates that high
overhead SSL new handshakes
are being transacted on sites
that may have performance
issues.
<SslRecordsRcvd>
Records rcvd
This is a count of captured SSL
records that could span multiple
packets.
<SslTotalHandshakes>
Total handshakes
A count of properly negotiated
SSL handshake sessions. This
count is reflective of successful
decryption of SSL traffic.
<SslHangingConnections>
Hanging connections
Not implemented or used.
<SslCurrentConnections>
Current connections
Not implemented or used.
<SslHitCount>
Hit Count
Not implemented or used.
<SslCurrentHitsPerSec>
Current hits per second
This statistic is an important
indicator of system performance
and availability. It shows the
current number of SSL
hits-per-second rate that the
Capture processes are
generating. The expected
number of new handshake SSL
hits is approximately 150
without SSL hardware
acceleration. SSL decryption is a
CPU-intensive operation that
uses a lot of Capture system
capacity. These stats are
updated every 5 seconds.
<SslMaxHitsPerSec>
Maximum hits per second
Shows the maximum number of
SSL hits-per-second rate that the
Capture processes are
generating.
<SslAvgHitsPerSec>
Average hits per second
Provides a running average of
the number of SSL hits per
second being processed. This
statistic gives an overall
indicator of SSL operations over
a long running period instead of
just snapshot rates.
<SslNewHandshakesPerSec>
New handshake hits per second
Provides a snapshot of the rate
of SSL new handshakes that are
occurring.
<SslNewHandshakesPerSecMax>
Maximum new handshake hits
per second
Maximum rate of new SSL
handshakes per second
<SslResumedHandshakesPerSec>
Resumed handshake hits per
second
Maxiumum rate of resumed SSL
handshakes per second
<SslResumedHandshakesPerSecMax>
Maximum resumed handshake
hits per second
Maxiumum rate of resumed SSL
handshakes per second
<SslConnectionDataLen>
Connection data length
The average data length in bytes
of a SSL connection over a
5-second period (sampling).
This statistic is used to compute
the average length of an SSL hit.
Chapter 4. Configuring the CX PCA
153
Table 19. SSL section (continued)
XML
Console Display
Description
<SslHitDataLen>
Hit data length
The computed value of the
average SSL hit data length in
bytes.
<SslTotalNewSessionTicketSessions>
Total new SessionTicket
sessions
This value provides a count of
new SSL sessions using the TLS
SessionTicket extension. Both
client and server must support
the extension for a valid count.
For example, if a client requests
using the SessionTicket
extension and the server rejects
it due to non-support, the
session is not counted.
<SslTotalResumedSessionTicketSessions>
Total resumed SessionTicket
sessions
This value is the count of the
number of TLS SessionTicket
sessions that were resumed after
they had been stopped.
<SslTotalDecryptedSessionTicketSessions>
Total decrypted SessionTicket
sessions
This value is the count of new
and resumed SSL sessions that
the PCA decrypted.
<SslTotalSessionTicketSessionCacheMisses>
Total SessionTicket session
cache misses
This value is the count of the
resumed SSL sessions that the
PCA was unable to decrypt,
usually due to failing to see the
initial, new SSL session.
<SslTotalEphemeralRsaConnections>
Total ephemeral RSA
connections
Shows the number of SSL
connections that used "transient"
ciphers, such as 40-bit weak
RSA encryption. These typically
are used by browsers
internationally that aren't
allowed to use 128-bit strong
encryption browsers.
Note: Pheromonal ciphers
cannot be decrypted at a later
time. An error log message is
also generated to provide client
IP information.
<SslTotalDhCipherConnections>
Total Diffie-Hellman cipher
connections
Counts the number of SSL
connections using the
Diffie-Hellman cipher.
v This ephemeral cipher cannot
be decrypted at a later time.
It can only be initiated by the
Web server, not by the client
browser. Having a non-zero
count value indicates that one
or more Web server has set
up its SSL cipher suite
preferences to use this
particular cipher.
v To allow post decryption, the
Web server needs to change
its SSL cipher preferences to
remove this cipher and
replace it with another, such
as 256bit AES RSA cipher.
154
<SslTotalNullCipherConnections>
Total Null Cipher Connections
Count of SSL connections that
do not contain a cipher.
<SslTotalHsmKeysLoaded>
Total HSM keys loaded
Reports the number of SSL keys
loaded from the Sun HSM
keystore by the PCA at startup
for each PCA instance.
<SslMissingKeys>
Missing keys
Count of SSL keys used that
didn't have a corresponding SSL
key pem file.
IBM Tealeaf CX Passive Capture Application: PCA Manual
Table 19. SSL section (continued)
XML
Console Display
Description
<SslMissingKeysPerSec>
Missing keys per second
Connections per second that
cannot be decrypted because of
a missing key
<SslTotalBadHandshakeSeqErrors>
Total Bad Handshake Sequence
Errors
Not implemented or used.
<SslTotalUnknownCipherErrors>
Total Unknown Cipher Errors
Not implemented or used.
<SslErrors>
Errors
Not implemented or used.
<SslTotalSessionCacheMisses>
Total session cache misses
When an SSL session record
comes in for decryption, it is
checked to see if decryption
cipher info for that session is in
the cache. If not, it is counted as
a cache miss.
Because this is a record, it's
assumed that the SSL
handshake occurred and its
decryption cipher info is sitting
in the cache. This can happen if
Passive Capture was restarted
and began capturing in-progress
SSL sessions or it has exceeded
the default 10,000 concurrent
SSL session cache entries and
the LRU entries were deleted.
<SslSessionCacheMissesPerSec>
Session cache misses per
second
Rate of session cache misses per
second.
<SslOldestSessionCacheEntry>
Oldest session cache entry
Provides the oldest residing SSL
cache entry in minutes from the
current time. This statistic is
helpful in gauging whether
there is sufficient cache entries
in sizing its table to handle a
large volume site with minimal
performance impact.
SslHitCount>
SSL hit count
Count of SSL hits.
<SslTotalCaptureType1>
SSL Total Capture Type 1
Count capture type 1 ssl hits
(pages).
<SslPageViewPct>
Percent of ssl page views to
page views
The percentage page views that
are over ssl.
Hits section
Table 20. Hits section
XML
Console Display
Description
<HitsCaptured>
Captured
Count of hits where the
HTTP parser was able to
form a complete request and
response hit.
<HitsCapturedPerSec>
Captured before
hit processing per
second
Provide current rate of
captured hits (above). This
statistic provides an indicator
of the number of hits before
hit processing, rejection, etc.
<HitsRejectedResponse>
Rejected response
Not implemented or used.
<HitsRejectedResponseBody>
Rejected response
body
Not implemented or used.
Chapter 4. Configuring the CX PCA
155
Table 20. Hits section (continued)
156
XML
Console Display
Description
<HitsRejectedHits>
Rejected hits
When in Tealeaf's capture
mode type BusinessIT, the
count of hits that had their
response rejected where their
URL extension matches the
extension exclusion list. The
hit is still formed and
delivered but the response is
missing, i.e. just the request
record. For example, URL
extensions excluded, GIF,
BMP, CSS, JS, etc.
<HitsUndeliveredHitsWhilePassive>
Undelivered hits
while passive
Displays hits dropped while
Passive Capture is passive
node.
<HitsCurrentNonSslHitsPerSec>
Current non-SSL
hits per second
Provide current rates of
non-SSL hits per second
being processed. This statistic
provides an indicator of the
amount of hits processed that
are not SSL decrypted by
Passive Capture. Some sites
may have all their SSL traffic
terminated before Passive
Capture receiving it.
<HitsMaxNonSslHitsPerSec>
Maximum non-SSL
hits per second
Provide maximum rates of
non-SSL hits per second
being processed. This statistic
provides an indicator of the
amount of hits processed that
are not SSL decrypted by
Passive Capture. Some sites
may have all their SSL traffic
terminated before Passive
Capture receiving it.
<HitsAvgNonSslHitsPerSec>
Average non-SSL
hits per second
Provide average rates of
non-SSL hits per second
being processed. This statistic
provides an indicator of the
amount of hits processed that
are not SSL decrypted by
Passive Capture. Some sites
may have all their SSL traffic
terminated before Passive
Capture receiving it.
<HitsCurrentToDeliveryHitspersec>
Current to
delivery hits per
second
Provide current rates of hits
sent to the Passive Capture
delivery system. The delivery
system may be overwhelmed
due to various network
socket issues, such as
saturating the NIC
bandwidth, which could
cause it to drop hits.
<HitsMaxToDeliveryHitspersec>
Maximum to
delivery hits per
second
Provide maximum rates of
hits sent to the Passive
Capture delivery system. The
delivery system may be
overwhelmed due to various
network socket issues, such
as saturating the NIC
bandwidth, which could
cause it to drop hits.
<HitsTotalCaptureType1>
Total Capture Type
1 Hits
Counts of hits of Capture
Type 1 that have been
captured.
<HitsTotalCaptureType2>
Total Capture Type
2 Hits
Counts of hits of Capture
Type 2 that have been
captured.
IBM Tealeaf CX Passive Capture Application: PCA Manual
Table 20. Hits section (continued)
XML
Console Display
Description
<HitsTotalCaptureType3>
Total Capture Type
3 Hits
Counts of hits of Capture
Type 3 that have been
captured.
<HitsTotalCaptureTypeOther>
Total Capture Type
Other Hits
Counts of hits of unidentified
capture type that have been
captured.
<HitsTotalLargeHits>
Total Hits
Identified as Too
Large
Counts of hits that have been
identified as too large to
capture.
<HitsTotalStreamingHits>
Total Streaming
Hits
Counts of total streaming
hits that have been captured.
<HitsTotalNonHttpTypeErrors>
Total non-Http
type errors
Counts the number of hits
that fail to have the "HTTP"
protocol string in its header.
The hit is dropped when this
occurs.
<HitsTotalBogusHttpErrors>
Total invalid HTTP
errors
Counts hits that don't follow
specific HTTP protocol
format requirements for the
headers, such as missing
header chars, extraneous CR
or LF chars, etc. The hit is
dropped when this occurs.
<HitsTotalClientSpeaksFirstErrors>
Total responses
before requests
errors
Indicates that an HTTP hit
was reassembled with a
response before a request.
<HitsTotalMoreRespThanReqErrors>
Total more
responses than
requests errors
Indicates within a TCP
connection where multiple
hits are being formed that
there were more responses
than requests. This means
that there were insufficient
requests to match up with hit
responses. After this
condition is detected within
the TCP connection, all
following hits are dropped.
<HitsTotalUnansweredReqErrors>
Total unanswered
requests errors
Indicates within a TCP
connection that there were
missing responses for the
number of requests present
for multiple hits.
<HitsTotalUnfinishedReqErrors>
Total unfinished
request errors
Total count of HTTP requests
that finished before its
reported size indicated.
These errors can occur if the
request header for content
length was incorrectly
computed for the actual
request body data. For
example, stated length is
greater than actual data.
Note: This statistic is
available in PCA Build 3500
or later.
<HitsTotalUnfinishedRespErrors>
Total unfinished
response errors
Total count of HTTP
responses that finished
before its reported size
indicated. These errors can
occur if the response header
for content length was
incorrectly computed for the
actual response data. For
example, stated length is
greater than actual data.
Chapter 4. Configuring the CX PCA
157
Table 20. Hits section (continued)
158
XML
Console Display
Description
<HitsTotalRespTimerExpiredErrors>
Total response
timer expired
errors
Indicates within a TCP
connection that a response
did not occur after a request
within this TCP transmission
timeout configuration setting.
The default value is 120
seconds.
<HitsTotalXmitTimerExpiredErrors>
Total packet
transmission timer
expired errors
Indicates within a TCP
connection that packets must
occur within this TCP
transmission timeout
configuration setting. The
default value is 120 seconds.
<HitsTotalTlapiReparseRespNullErrors>
Total TLAPI
invalid response
errors
Counts hits in TLapi where
no response is present.
<HitsTotalTlapiReqStartExtraBytes>
Total TLAPI
request start
extra bytes
Flags hits in TLapi that have
extraneous CR, LF, or Null
chars at the start of the
request. This is just a
warning condition count.
Though it's not conforming,
the extra chars are ignored,
and checking continues if the
rest of the request is valid.
<HitsTotalTlapiInvalidReqErrors>
Total TLAPI
invalid request
errors
Counts hits in TLapi where
no request is present. The hit
is dropped when this occurs.
<HitsTotalTlapiReqCorruptErrors>
Total TLAPI
request corrupt
errors
Counts hits in TLapi if the
request unexpectedly ends.
Typically, there can be some
extraneous chars that are
filtered out leaving nothing
left for a request. Or if after a
request method, GET, POST,
etc., nothing follows in the
line. The hit is dropped
when this occurs.
<HitsTotalTlapiReparseRespCorruptErrors>
Total TLAPI
response corrupt
errors
Counts hits in TLapi that
were found without a
response. This can occur
when a TCP connection
closes unexpectedly before a
hit response was captured.
The incomplete hit is still
sent to TLapi to confirm if a
complete hit does exist or
not.
<HitsTotalInflateRequestCandidates>
Total candidates
for inflate
request
Total number of hits with a
compressed request body
(POST data) where
decompression is attempted.
<HitsTotalInflateRequestsCompleted>
Total requests
inflated
Total number of hits where a
compressed request body is
successfully decompressed.
<HitsTotalInflateRequestsFailed>
Total failed
attempts to
inflate the
request
Total number of hits where
decompression of a
compressed request body
failed.
<HitsTotalInflateResponseCandidates>
Total candidates
for inflate
response
Total number of hits with a
compressed response where
decompression is attempted.
<HitsTotalInflateResponsesCompleted>
Total responses
inflated
Total number of hits where a
compressed response is
successfully decompressed.
<HitsTotalInflateResponsesFailed>
Total failed
attempts to
inflate the
response
Total number of hits where
decompression of a
compressed response failed.
IBM Tealeaf CX Passive Capture Application: PCA Manual
Table 20. Hits section (continued)
XML
Console Display
Description
<HitsTotalDeflateResponseCandidates
Total candidates
for deflate
response
Total candidates for deflate
response
<HitsTotalDeflateResponsesCompleted>
Total responses
deflated
Total responses deflated
<HitsTotalDeflateResponsesFailed>
Total failed
attempts to
deflate the
response
Total failed attempts to
deflate the response
<HitsTotalDroppedBusinessModeExtension>
Total dropped due
to business mode
and extension
Total dropped due to
business mode and extension
<HitsTotalDroppedBusinessModeResponse>
Total dropped due
to business mode
and response
Total dropped due to
business mode and response
<HitsTotalDroppedByDelimagesFeature>
Total dropped due
to businessIT mode
and DelImages
feature set
Total image hits meeting
specified criteria dropped
due to DelImages being
enabled in the PCA
v See “Pipeline Settings” on
page 113.
<HitsTotalDroppedInvalidMethod>
Total dropped due
to invalid HTTP
method
Total hits dropped because of
an invalid http method
<HitsTotalDroppedByParseRequest>
Total dropped due
to HTTP request
parsing errors
Total hits dropped by
parserequest function
<HitsTotalDroppedByParseResponse>
Total dropped due
to HTTP response
parsing errors
Total hits dropped by parse
response function
<HitsTotalDroppedByPrivacy>
Total dropped by
privacy rules
Total hits dropped by
privacy
<HitsTotalDroppedBySampling>
Total dropped by
sampling
Total hits dropped by
sampling
<HitsTotalDroppedHitArrivedTooLate>
Total dropped
because hit
arrived too late
Total dropped because hit
arrived too late
v If the difference between
the timestamp of the first
request packet and the
arrival timestamp when
the entire hit is submitted
to the PCA pipeline is
more than one hour, then
the hit is marked as "too
late" for normal
processing. These hits are
dropped from further
processing by the PCA.
– The one hour limit is
hard-coded and cannot
be modified.
– All hits entering the
PCA pipeline have an
arrival timestamp
(TLapiArrivalTimeEx)
inserted into the request
record in the
[timestamp] section.
v Delays in the arrival of the
entire hit into the PCA
pipeline can be caused by
many different issues,
most of which are sourced
outside of the PCA.
Chapter 4. Configuring the CX PCA
159
Table 20. Hits section (continued)
160
XML
Console Display
Description
<HitsTotalDroppedMaxDataSize>
Total dropped
because hit
exceeds max data
size
Total hits dropped due to the
hit exceeding the max size
<HitsTotalDroppedReqHeaderExceedsMaxReqSize>
Total dropped due
to HTTP request
hdr too large
Total hits dropped due to the
request header exceeding the
max size
<HitsTotalDroppedTcldHitError>
Total dropped tcld
hits error
Total hits dropped for the
tcld process due to some
error condition
Note: This item is available
in PCA Build 3403 or later.
<HitsAssembledHitsProcessedPerSecAvg>
Average assembled
hits processed per
second
Average number of hits
processed/sec
<HitsAssembledHitsProcessedPerSecCurrent>
Current assembled
hits processed per
second
Current number of hits
processed/sec
<HitsAssembledHitsProcessedPerSecMax>
Maximum assembled
hits processed per
second
Max number of hits
processed/sec
<HitsAssembledHitQueueBlocksUsedAvg>
Average
assembled-hit
queue blocks used
Average assembled-hit queue
blocks used
<HitsAssembledHitQueueBlocksUsedCurrent>
Current
assembled-hit
queue blocks used
Current assembled-hit queue
blocks used
<HitsAssembledHitQueueBlocksUsedMax>
Maximum
assembled-hit
queue blocks used
Maximum assembled-hit
queue blocks used
<HitsAssembledHitQueueCurrentBlocksUsedPct>
Current
assembled-hit
queue blocks used
percent
Current assembled-hit queue
blocks used percent
<HitsAssembledHitQueueCurrentEntriesUsedPct>
Current
assembled-hit
queue entries used
percent
Current assembled-hit queue
entries used percent
<HitsAssembledHitQueueEntriesUsedAvg>
Average
assembled-hit
queue entries used
Average assembled-hit queue
entries used
<HitsAssembledHitQueueEntriesUsedCurrent>
Current
assembled-hit
queue entries used
Current assembled-hit queue
entries used
<HitsAssembledHitQueueEntriesUsedMax>
Maximum
assembled-hit
queue entries used
Maximum assembled-hit
queue entries used
<HitsAssembledHitQueueTotalAllocation
Failures>
Total
assembled-hit
queue allocation
failures
Total assembled-hit queue
allocation failures
<HitsAssembledHitQueueTotalMisses>
Total
assembled-hit
queue misses
Total assembled-hit queue
misses
<HitsAssembledHitQueueTotalPushFailures>
Total
assembled-hit
queue push
failures
Total assembled-hit queue
push failures
IBM Tealeaf CX Passive Capture Application: PCA Manual
v This statistic is displayed
as the If non-zero, hits
are being lost due to
pipelined being
overloaded value in the
Summary tab. See “PCA
Web Console - Summary
Tab” on page 73.
Table 20. Hits section (continued)
XML
Console Display
Description
<HitsAssembledHitQueue2TotalAllocationFailures>
Total
assembled-hit
queue2 allocation
failures
Total count of hits that were
unable to allocate space on
the queue between
pipeline(s) and the tcld
process. Normal values are
zero or a non-increasing
count. You can use metric to
determine whether the tcld
process is being overloaded.
v Available in PCA Build
3403 or later.
v This statistic is displayed
as the If non-zero, hits
are being lost due to
pipelined being
overloaded value in the
Summary tab. See “PCA
Web Console - Summary
Tab” on page 73.
<HitsAssembledHitQueue2TotalPushFailures>
Total
assembled-hit
queue 2 push
failures
Total count of hits that failed
to queue up on the queue
between pipeline(s) and tcld
process. Normal values are
zero or a non-increasing
count. You can use this
metric to determine if the
tcld process is being
overloaded.
Note: This item is available
in PCA Build 3403 or later.
<AveragePageSize>
Average page size
Average page size (capture
type 1) in bytes.
<TotalPageSize>
Total page size
Used to calculate page views
per second
<PageViewsPerSecMax>
Max page views per
second
Maximum page views per
second.
<PageViewsPerSecCur>
Current page views
per second
Current page views per
second.
<PageViewsPerSecAvg>
Average page views
per second
Average page views per
second.
<PageViewPct>
Page view
percentage of hits
The percentage of hits that is
page views.
<HitsTotalTlapiReqNullErrors>
Total TLAPI
request null
errors
Total TLAPI request null
errors
<HitsTotalTlapiRespCorruptErrors>
Total TLAPI
response corrupt
errors
Total TLAPI response
corrupted errors
<HitsTotalTlapiRespNullErrors>
Total TLAPI
response null
errors
Total TLAPI response null
errors
Capture section
Table 21. Capture section
XML
Console Display
Description
<CaptureBytesWrittenByListener>
Bytes written by
listener
Total number of packet bytes written to
reassd's pipe by listend.
<CaptureBytesWrittenByListenerPerSec>
Bytes written by
listener per second
Rate of packet bytes written to reassd's pipe
by listend per second.
<CaptureBytesReadFromListener>
Bytes read from
listener
Total number of packet bytes read by reassd
from reassd's pipe. This number should match
with the above written by listener value,
indicating that listend and reassd are in sync
and keeping up with the incoming traffic rate.
Chapter 4. Configuring the CX PCA
161
Table 21. Capture section (continued)
XML
Console Display
Description
<CaptureBytesReadFromListenerPerSec>
Bytes read from
listener per second
Rate of packet bytes read by reassd from
reassd's pipe per second.
<CaptureFilteredKbytesFromPrimaryInterface>
Current filtered KB
from primary
interface
Total filtered kbytes from primary interface
<CaptureFilteredKbytesFromPrimaryInterfacePerSec>
Current filtered
KB/sec from primary
interface
Curent filtered kbytes/sec from primary
interface
<CaptureFilteredKbytesFromPrimaryInterfacePerSecMax>
Maximum filtered
KB/sec from primary
interface
Maximum filtered kbytes/sec from primary
interface
<CaptureFilteredKbytesFromSecondaryInterface>
Current filtered KB
from secondary
interface
Total filtered kbytes from secondary interface
<CaptureFilteredKbytesFromSecondaryInterfacePerSec>
Current filtered
KB/sec from secondary
interface
Current filtered kbytes/sec from secondary
interface
<CaptureFilteredKbytesFromSecondaryInterfacePerSecMax>
Maximum filtered
KB/sec from secondary
interface
Maximum filtered kbytes/sec from secondary
interface
<CaptureTotalPacketsRcvd>
Total packets rcvd
Total packet count received by pcap as
reported by its stats.
<CapturePacketsDroppedByPcap>
Total packets dropped
by pcap
Total packet count dropped by pcap as
reported by its stats. This value should be
zero, indicating that the OS is keeping up with
the NIC interface receiving network traffic.
<CapturePacketsDroppedInOutput>
Packets dropped in
output
Total packets dropped by listend due to its
output buffer being full. This value should be
zero, indicating listend is keeping up with the
filtered network traffic and reassd is able to
pull packets from the listend output buffer
without overrunning it.
<CaptureTotalPacketsCaptured>
Total packets
captured
Total packet count on filtered packets received
from pcap to listend.
<CaptureTotalPacketsCapturedPerSec>
Total packets
captured per second
Rate of filtered packets received from pcap by
listend per second.
<CaptureTotalIpChecksumErrors>
Total IP checksum
errors
Total error count of IP header checksum
errors.
<CaptureTotalLargePacketsExceeded>
Total large packets
exceeded
Total number of TCP packets whose size
exceeded the configured limit.
v The TCP packet size limit is configured in
the Tuning Parameters section of the
Interface tab. See “PCA Web Console Interface Tab” on page 86.
162
<CaptureCurrentFilteredKbytesPerSec>
Current filtered
kbytes per second
Shows the current kilobytes per second traffic
rate based on the filtered capture traffic from
the span ports. This statistic provides an
indication of any traffic after filtering is
present and how much traffic is being
processed by the Capture processes. If the
span port's NIC setting is 100 mbits per
second, then the maximum traffic rate that can
be filtered through is about 10,000 KB per
second. These stats are updated every 5
seconds.
<CaptureMaxFilteredKbytesPerSec>
Maximum filtered
kbytes per second
Shows the maximum kilobytes per second
traffic rate based on the filtered capture traffic
from the span ports. This statistic provides an
indication of any traffic after filtering is
present and how much traffic is being
processed by the Capture processes. If the
span port's NIC setting is 100 mbits per
second, then the maximum traffic rate that can
be filtered through is about 10,000 KB per
second. These stats are updated every 5
seconds.
<DeliveryMode>
Delivery Mode
Current delivery mode
<CoreDumps Count="0" /?>
not available
Number of core dumps
IBM Tealeaf CX Passive Capture Application: PCA Manual
Target Recipients section
Table 22. Target Recipients section
XML
Console Display
Description
<TotalHitsQueued>
Total hits queued
Total count of hits queued for
delivery to IBM Tealeaf CX server.
<TotalHitsDelivered>
Total hits delivered
Total count of hits delivered to the
IBM Tealeaf CX server. This number
should match the hits queued,
indicating that the hit delivery is
keeping up.
<TotalBytesDelivered>
Total bytes delivered
The total number of bytes
successfully sent to the recipient
Tealeaf Transport Service.
<TotalHitsDropped>
Total hits dropped
The total number of hits dropped
due to the per-recipient delivery
queue being full, which occurs
when Passive Capture cannot
deliver hits to the recipient Tealeaf
Transport Service. These failures
may be due to network errors (such
as network configuration on the
Passive Capture or the recipient
machine) or other software-related
conditions, such as when the
Tealeaf Transport Service is not
running for an extended period of
time. The hits counted by this value
were not sent to the Tealeaf
Transport Service.
<UseSslText>
Use SSL
The delivery connection state
whether SSL or not.
v Yes - delivery connection is using
a SSL connection
v No - delivery connection is
non-SSL
Failover section
Table 23. Failover section
XML
Console Display
Description
<FailoverNodeRole>
Node role
Either master or slave.
<FailoverNodeState>
Node state
The state the node is
currently in.
v Active - Has control and
is capturing hits and
sending them
downstream.
v Ready - Capturing but not
sending hits. It is ready
to assume control as
needed.
v Down - Cannot assume
control.
Chapter 4. Configuring the CX PCA
163
Table 23. Failover section (continued)
XML
Console Display
Description
<FailoverCaptureState>
Capture state
Identifies whether the
capture services are running
on the node.
v Running - Indicates that
the capture services are
running.
v Stopped - The capture
services are not running
when the state is stopped.
v Restarting - Indicates
that the capture services
are in the process of
restarting.
<FailoverActive>
Failover active
Indicates whether a failover
has taken place and the
slave node currently has
control.
PCA Web Console - Backup-Logs Tab
Through the Backup/Logs tab, you can perform configuration modifications,
manage logs, and enable archiving of raw packet data captured by the PCA. When
you save changes to a configuration file, a copy of the old one is written to a
backup file. An error message displays in the event that the copy did not complete
successfully.
Capture Configuration File
The Capture Configuration File section provides a way to edit the configuration
file (ctc-conf.xml) via a Web interface rather than using a text editor. Users can
restore, download the current, or upload a new configuration file by clicking the
corresponding buttons in the Capture Configuration File section of the page.
164
IBM Tealeaf CX Passive Capture Application: PCA Manual
Privacy Configuration File
This section enables direct editing of the privacy.cfg file, which is used to specify
the rules, tests, and actions for making sensitive data private before it is processed
by Tealeaf. You can review previous versions of the file, as well as upload new
versions for use by the PCA.
This version of the privacy.cfg file is a copy of the version used by the Windows
pipeline session agent. For more information on its content and format, see
"Privacy Session Agent" in the IBM Tealeaf CX Configuration Manual.
For more information on how Tealeaf manages privacy, see "Managing Data
Privacy" in the IBM Tealeaf CX Configuration Manual.
Logs
You can access the following PCA logs through the Backup/Logs tab:
v Capture Log
v Access Log
v SSL Request Log
v Error Log
v Configuration Changelog
v Maintenance logs
At the bottom of the Logs section, you can also access and download the following
types of files:
v Capture log files
v Configuration files
v Console log files
Chapter 4. Configuring the CX PCA
165
Archive Recording
In the Archive Recording section, you can enable archive recording, which delivers
raw captured packets that have been forwarded to the PCA Server into the
specified directory.
Note: This feature is intended for debugging purposes. Enable only if you are
detecting problems with basic capture functionality.
Table 24. Archive settings
Setting
Description
Directory
If this field is left blank, it defaults to
/usr/local/ctccap/archive. The <RecordingDirectory>
and </RecordingDirectory> tags are removed from
ctc-conf.xml.
Max archive size
Specifies the maximum cumulative size of the tcpdump
archive files. The default value is 500 MB. When the disk
usage reaches this value, older archive files are removed
to make room for new ones.
To enable archive recording, click Archive.
PCA Web Console - Failover Tab
In the Failover tab, you can enable and configure failover between multiple IBM
Tealeaf CX Passive Capture Application servers.
v When enabled, PCA failover is managed by the failoverd process in the IBM
Tealeaf CX Passive Capture Application.
v For more information about troubleshooting PCA failover, see "Troubleshooting Capture" in the IBM Tealeaf Troubleshooting Guide.
166
IBM Tealeaf CX Passive Capture Application: PCA Manual
Heartbeat
Figure 34. Failover Heartbeat
The subordinate checks the health of the Master by sending heartbeats to the
Master. Technically these health checks are requests to the Master for its current
state.
The heartbeat is a request that is sent through a UDP socket. When the Master sees
the heartbeat, it responds to the sender with its current state. The Master also
sends heartbeats to the subordinate Passive Capture host machine to keep track of
its state to determine whether it can failover to the subordinate.
Setting Description
Heartbeat Interval
How long to wait between heartbeats
Heartbeat Timeout
The amount of time Passive Capture waits for a response to a heartbeat
before you call it a timeout
Timeout Limit
The number of consecutive heartbeat timeouts that are allowed before a
failover is forced
Auto Settings
Setting Description
Auto Failback
This option passes control (active state) from the Slave Passive Capture
host machine back to the Master Passive Capture host machine once the
Master machine indicates that it is ready to take control again.
Failover on SVC Restart
This option determines whether a failover is triggered when the capture
services are restarted on the active PCA server.
Failback Delay
The minimum number of seconds to wait before you do automatic failback
Remote Monitors
In the Remote Monitor configuration, you can specify a list of authorized servers
that are permitted PCA access to monitor failover state information, control the
failover mode, or both.
Chapter 4. Configuring the CX PCA
167
Figure 35. Remote Monitors
A Remote Monitor is a Linux computer that is identified by host name or IP
address that is allowed to receive failover state information and/or control a
Passive Capture host machine that is configured for failover.
Note: This remote workstation must not be a PCA server.
A Remote Monitor may also optionally be allowed to control failover on a Passive
Capture host machine, including forcing failover and failback. A IBM Tealeaf CX
Passive Capture Application configured for failover responds to heartbeats or
control requests from a machine that is properly configured as a Remote Monitor.
v After a host is authorized, the failstat utility that is installed on the host can be
used to help debug failover issues.
PCA Web Console - Utilities Tab
The Utilities tab provides access to operating system diagnostic information, which
is useful if you do not have access to PUTTY. When a command button is clicked,
the output is generated and displayed on the screen.
v When verbose mode is enabled, some additional information can be included in
the generated output.
Network Interfaces
The Network Interfaces section of the Utilities tab displays the network interfaces,
flags, status, and IP addresses.
168
IBM Tealeaf CX Passive Capture Application: PCA Manual
Figure 36. Web Console - Utilities Tab - Network Interfaces
This section lists all important network interfaces that includes the primary and
secondary interface and the LAN interface that is used to connect to the Tealeaf
Transport Service on the IBM Tealeaf CX server.
v In earlier builds, this section was displayed on the Summary tab or Delivery
tab.
This section also displays information about the NICs, such as supported media
and packet statistics.
v To reveal these statistics, click (details) next to the interface name. See “Details
Page.”
Setting Description
Interface
Interface identifier
Flags
Any specific issues are listed here.
v up indicates that the interface is functioning properly.
Status
Status as reported from the interface.
IP Address
IP address for the interface
Details Page
In the Details page, you can run Linux command-line and Tealeaf commands
against individual interfaces to retrieve diagnostic information.
Note: Depending on the interface and your traffic load, these commands can
require some time to execute.
Chapter 4. Configuring the CX PCA
169
Figure 37. Utilities Tab - Details page
In the previous image, you can see the results of an Ifconfig command. To run
one of the available Linux commands, click the appropriate button.
v To generate a more verbose output, select the check box.
The following buttons run Linux commands against the selected interface:
v Ethtool
v Ifconfig
v Tcpdump
For more information about the commands, use man at the Linux command line to
display the available documentation.
v You can also search Tealeaf Online Help for other documented uses of these
commands regarding the IBM Tealeaf CX Passive Capture Application.
bwMon
Provided by Tealeaf, the bwMon tool generates a set of monitoring statistics for the
selected interface. This command queries the interface over a period of 10-seconds
and returns results for 1-second intervals from the interface.
This tool can be used with activities that you initiate on the monitored web
application for diagnosing connection and transfer issues. For example, you can
perform actions on the web application and then verify whether the action resulted
in activities through the appropriate interface.
v The Enable verbose output check box generates the same set of statistics.
An example output is displayed. Each row corresponds to a 1-second interval
during the 10-second query period.
v If no traffic is being passed to the instance, then the output contains only the list
of field names.
170
IBM Tealeaf CX Passive Capture Application: PCA Manual
Figure 38. Example bwMon output
Field
Description
Time
Timestamp for the selected 1-second interval
Dev
The queried device
Mbs
Megabits per second transfer rate between the device and the IBM Tealeaf
CX Passive Capture Application.
v A value of 0 can indicate an inactive device or a configuration problem.
rxbytes
Bytes transferred from the device to the PCA
rxpkts
Packets that are transferred from the device to the PCA
rxerrs
Number of errors in transfer from device to the PCA
rxdrop
Number of packets dropped from device
System Utilities
The system utilities that are provided at the bottom of the Utilities tab enable the
generation of important diagnostic information about the PCA, the operating
system hosting it, and the statistics generated by the PCA.
Chapter 4. Configuring the CX PCA
171
Figure 39. Web Console - Utilities Tab - System Utilities
Utility Description
Miscellaneous
Bootlog
Review the Linux bootlog for the system that is hosting the PCA.
Config Diffs
Review the differences between the default configuration file
(ctc-conf-defaults.xml) and the current configuration in use
(ctc-conf.xml).
Dmesg
Execute Linux dmesg command, which displays the kernel ring buffer
information.
Ifconfig
Execute Ifconfig command on each of the network interfaces.
Tealeafenv
The Tealeafenv command generates information specific to the Tealeaf PCA
installation.
Processes
These commands generate statistical information about the Linux processes
in use.
All
Review all system processes for all users.
Capture
Review all processes in use by the IBM Tealeaf CX Passive Capture
Application user (typically ctccap).
Top
Run the top program for Linux. top provides a real-time view of system
summary information and a list of tasks that are currently managed by the
Linux kernel.
Statistics
These commands generate statistics about the IBM Tealeaf CX Passive
Capture Application.
Raw Format
View statistics in raw format.
Summary
Review statistics on individual instances of the PCA.
172
IBM Tealeaf CX Passive Capture Application: PCA Manual
XML Format
View PCA statistics as generated XML. For more information about these
stats, see “Stats per Instance” on page 145.
PCA Web Console - Debug Page
You can manage core dump files by using the Debug page in the PCA Web
Console. Through this page, you can download, delete, or debug core dumps that
occur during PCA operations.
v Through Debug page, you can also download a compressed files for forwarding
to Tealeaf Customer Support. See “Providing PCA ZIP to Support” on page 175.
Accessing Debug page
Note: For security purposes, to download any of the files, you must be connected
to the web console through ssl, and user authentication must be enabled.
When core dumps are created, a message and link is displayed on the Summary
tab. To open the Debug page, click the View link.
v See “PCA Web Console - Summary Tab” on page 73.
To access Debug page of the PCA Web Console directly:
https://<host_name>:8443/debug.php
where:
v <host_name> is the host of the PCA.
Page Overview
Figure 40. PCA Web Console - debug page
Note: If you are not connected through SSL and using authentication, some of the
following actions are disabled.
Field
Description
file
Name of the core dump file
date
Date the core dump was created (and when the crash occurred)
Chapter 4. Configuring the CX PCA
173
process
The process that crashed, creating the core dump
core+process zip
A link to download the core and process in a single compressed file
delete
Click this link to delete the core file.
Note: This command is useful if the partition on the hard disk drive that
is containing the PCA is full.
debug
Perform a simple debug of the dump. See “Debug Output.”
Debug Output
The following is an example output of the debug command:
174
IBM Tealeaf CX Passive Capture Application: PCA Manual
Figure 41. Debug command output
Providing PCA ZIP to Support
When you work with Customer Support and Tealeaf Engineering to resolve issues
at a customer site, provide the support.zip file on the debug.php site to help
troubleshooting the issue.
Note: When you provide coredumps, provide the type and version of Linux on
which the PCA is installed.
ZIP file contents
1. Core dump file
2. Binary file that created the dump
Chapter 4. Configuring the CX PCA
175
3. ctc-conf.xml
4. privacy.cfg
5. Maintenance and stats logs from the current and previous days.
Passive Capture Configuration File ctc-conf.xml
If you cannot login to the web console, you can edit ctc-conf.xml to configure the
IBM Tealeaf CX Passive Capture Application.
Note: Avoid making direct changes to this configuration file. It is recommended
that you make changes to your PCA configuration through the web Console, which
provides a user interface onto this configuration file. For more information, see
“Supported Browsers for PCA Web Console” on page 67.
This file is in the /usr/local/ctccap/etc directory. It can be edited with the vi
editor.
Note: Some of the settings are not displayed in the default configuration file.
These settings can be inserted based on configuration changes that are made
through the web console. All configuration settings that are required for general
use of the PCA are available in the default file.
Note: SSH is run over the standard port 22.
Note: Always make a backup copy of the configuration file before you make
changes to it.
Note: Do not edit this configuration file or any PCA configuration file by using an
editor on a Windows machine. The Windows end-of-line (EOL) characters are
different from the UNIX EOLs used by Linux. So, configuration errors can occur
when the file is reapplied in the PCA's Linux environment.
The following tables explain each configuration option in the default configuration
file.
<Conf>
Table 25. Configuration settings
Configuration Option
Description
<IPv6ConsoleEnabled>
Beginning in PCA Build 3600, you may configure the
PCA web Console to accept IPv6 addresses by default. To
enable, set this value to 1.
Note: For systems that have been upgraded, you must
insert this setting and its value manually in the
configuration file. This configuration change may also be
applied to PCA Build 3502.
176
IBM Tealeaf CX Passive Capture Application: PCA Manual
Table 25. Configuration settings (continued)
Configuration Option
Description
<Timeout>
Beginning in PCA Build 3600, you may configure this
setting to a non-zero value to enable timeouts of PCA
web Console sessions. The specified value defines the
number of minutes that a web Console session is
allowed to be idle before it is automatically timed out.
Depending on your build, this setting may or may not be
present in this location. Please search the file. If the
setting is not present in your file, insert it here.
For more information, see “PCA web Console - Console
Tab” on page 84.
<Archive>
This section specifies the configuration options for enabling and managing local
TCP/IP packet archiving. For more information, see “PCA Web Console Backup-Logs Tab” on page 164.
Table 26. Archive setting
Configuration Option
Description
<RecordingEnabled>
Enables local TCP/IP packet archiving. When enabled,
archive files are saved to the archive recording directory
(default /usr/local/ctccap/archive) in a rolling archive.
Archives are partitioned into 50 MB files.
This setting is disabled by default.
Specifies the maximum size of the TCP/IP packet
archives.
<MaxSize>
By default, MaxSize is set to 500 MB. The default
directory size that is allocated to archives is 18 GB.
</Archive>
<Capture>
Use the capture configuration settings to configure data capturing from a spanned
switch port or network tap.
Table 27. Capture settings
Configuration Option
Description
<HangingResponseTimeout>
Specifies the timeout setting (in seconds) between the last
packet of the request and the first packet of the response.
If the timeout is exceeded, the connection is marked as
canceled by the client.
The default is 120 seconds.
<HangingTransmissionTimeout>
<Specifies the timeout setting (in seconds) that defines
how long Passive Capture waits between packets. If the
timeout is exceeded, the connection is marked as a
request that was canceled by the client.
The default is 120 seconds.
Chapter 4. Configuring the CX PCA
177
Table 27. Capture settings (continued)
Configuration Option
Description
<Ignores/>
<ListenFullDuplex>
Defines if Passive Capture is receiving bidirectional data
from a network tap or unidirectional directional from a
SPAN port on a network switch or load balancer. If the
Passive Capture host machine is receiving data from a
network tap, set ListenFullDuplex=False. If the host
machine is receiving data from a spanned port, set
ListenFullDuplex=True.
<ListenOnBothInterfaces>
Indicates whether Passive Capture is listening on one or
both of its Ethernet interfaces. It can be used to capture
two SPAN ports. If Passive Capture is receiving data
from a network tap, set ListenOnBothInterfaces=True. If
it is receiving data from a spanned port, set
ListenOnBothInterfaces=False.
<ListenTo>
Nested within the <Capture> section, this subsection
specifies the set of web servers to be monitored by
Passive Capture. The <Address> and <Port> attributes
must be configured for each web server that is being
monitored.
Passive Capture also supports netmasks. In the event a
netmask setting is used, a <NetmaskSize> node must be
added to the configuration file under the <Address> node
and before the <Port> node. For example, if the IP range
for web servers that are being monitored is 10.10.10.0
through 10.10.10.255 and the web servers are listening on
both ports 80 and 443, the ListenTo configuration would
appear as follows:
<ListenTo>
<Address>10.10.10.0</Address>
<NetmaskSize>24</NetmaskSize>
<Port>80</Port>
<Port2>443</Port2>
</ListenTo>
For more information on best practices in managing IP
addresses, see “Supported Browsers for PCA Web
Console” on page 67.
<ListenTos>
<Address>
Specifies the IP address of the web server that is being
monitored.
<Port>
Specifies the port number the web server is listening on.
<Port2>
Specifies an extra port number associated to the Address
attribute. Optimized for typical two-port monitoring.
<NetMaskSize>
Specifies the range of IP addresses to be monitored,
through netmask size in bits.
</ListenTo>
</ListenTos>
<MaxSimultaneousConnections>
Defines the maximum number of concurrent TCP
connections the Passive Capture software is set to
handle.
The default value is 10000.
178
IBM Tealeaf CX Passive Capture Application: PCA Manual
Table 27. Capture settings (continued)
Configuration Option
Description
<MaxConnectionsInSynState>
Defines the maximum number of concurrent TCP
connections where partial TCP connections are
established.
The default value is 4000.
<PrimaryInterface>
Specifies the name of the primary Ethernet interface.
The default setting is eth0.
<SecondaryInterface>
Specifies the name of the secondary Ethernet interface.
<MaxSessionCacheSize>
Defines the number of maximum number of concurrent
SSL connections that can be processed.
The default value is 10,000.
<MaxInputBufferSize>
Note: Do not change this setting without first contacting
technical support. This setting is used for debugging
issues that are related to spiking traffic conditions that
are overwhelming the buffer.Defines the maximum size
(in bytes) of the TCP packet handling queue.
The default value is 100,000,000 (approximately 100 MB).
When the buffer fills, the PCA begins dropping hits. By
enforcing a limit on the buffer, the system prevents a
crash. However, data is dropped.
<MaxMemoryConsumption>
Note: Do not change this setting without first contacting
technical support. This setting is used for debugging
issues that are related to spiking traffic conditions that
are overwhelming the buffer.Defines the maximum
amount of system memory (in MB) allocated to the
capture process.
The default value is 1300 MB (1.3 GB).
The IBM Tealeaf Passive Capture Application is a 32-bit
application, which means each CX PCA process can
address a maximum of 2 GB of RAM.
<TransparentLoadBalancingEnabled>
Enables or disables the transparent load balancing (TLB)
feature.
To enable load balancing, set
TransparentLoadBalancingEnabled to True.
To disable load balancing, set
TransparentLoadBalancingEnabled to False.
The default value is True to enable load balancing. For
more information, see “CX PCA Transparent Load
Balancing Overview” on page 11.
<ReassInstances>
Configures the number of reassd instances to be created.
The default value is 1.
<SslSessionInfoOnMemcachedServer>
If transparent load balancing is enabled and
SslSessionInfoOnMemcachedServer is set to True, then the
PCA uses memcache to cache SSL data.
The default value for SslSessionInfoOnMemcachedServer
is set to True.
Chapter 4. Configuring the CX PCA
179
Table 27. Capture settings (continued)
Configuration Option
Description
<MaxConnectionsRoutingInfo>
Defines how much TCP connection routing information
can be store in the local routerd hash table. Once the
limit is reached, the oldest data is removed from the
table so that a new value can be written to the table.
The default value is 100000.
<MaxInputRouterdBufferSize>
Defines the buffer size, in MB, for the routered service.
The default value is 50 MB.
<DeleteTcpLargeConnDisabled>
This setting is a Boolean flag, set to either True or False.
If unspecified, it is treated as though set to False. If set to
True, this setting prevents TCP connections that have
individual request or response sizes exceeding from
being closed. Special cases, such as, large pdf files or
streaming traffic connections, may need to disable this
feature to maintain the connection.
The maximum size of individual request or responses is
defined by the MaxTcpConnSize parameter.
<MaxTcpConnSize>
Maximum permitted size of an individual request or
response in a TCP connection. A single TCP connection
can have multiple requests or responses, and each one is
checked against this limit.
The default value is 2097152.
If this limit is exceeded, the TCP connection is
automatically closed when the
DeleteTcpLargeConnDisabled setting is set to False.
<CaptureKeys/>
<CaptureKey>
This optional section is used to define the SSL keys
necessary to support capture of HTTPS traffic from web
servers.
v For each private key, a CaptureKey section including
the <CertificateFile> (optional), <Label> and
<PrivateKeyFile> nodes need to be defined.
v The <CertificateFile> and <PrivateKeyFile> entries
are the fully qualified domain names of the files that
contain the certificate and private keys.
v The private key must be in the Tealeaf converted .PTL
format for it to be usable.
<Certificate>
Specifies the location in which the Public key is to be
pasted.
<Label>
Specifies the text name of private key.
<PrivateKey>
Defines the location where the Private Key is to be
pasted.
</CaptureKey>
</CaptureKeys/>
180
IBM Tealeaf CX Passive Capture Application: PCA Manual
Table 27. Capture settings (continued)
Configuration Option
Description
<InstancesEnabled>
This setting provides a global setting to enable/disable
multiple instances. This setting is a Boolean flag, set to
either True or False.
v If unspecified, it is treated as though set to False.
v If set to True, then the following nested <Instances> is
used for multiple instance instantiation. Otherwise,
only a single instance is created.
<Instances>
Top-level node for nested multiple instance definitions.
<Instance>
Instance node for defining the attributes of an instance.
<InstanceDisabled>
This setting is a Boolean flag, set to either True or False.
v If unspecified, it is treated as though set to False.
v If set to True, then the local instance node is disabled.
By disabling the instance node, you can disable
individual instances for debugging or testing.
<ListenFullDuplex>
If defined within the instance node, it has the same
meaning as the previous primary instance, but this
setting applies to this specific instance.
If it is not defined, then the instance inherits the value
from the primary instance.
Set <ListenFullDuplex> to True or False.
<ListenOnBothInterfaces>
If defined within the Instance node, it has the same
meaning as the previous primary instance, but this
setting applies to this specific instance.
If it is not defined, then the instance inherits the value
from the primary instance.
Set <ListenOnBothInterfaces> to True or False.
<TcpChecksumDisabled>
By default, the CX PCA runs a checksum validation of
the TCP packets that are submitted to it. Environments
where a large receive option (LRO) or checksum
offloading is enabled, PCA checksum validation fails. Set
the value to True to disable it.
If this setting is not in the default XML, the CX PCA
assumes that checksum validation is wanted and
enabled. This setting appears in the XML after packet
checksum validation is disabled through the PCA Web
Console Interface tab by selecting the Disable Packet
checksum validation check box. For more information,
see “PCA Web Console - Interface Tab” on page 86.
<PipelineInstances>
Indicates the number of pipeline processes (pipelined) to
create a system capable of having multiple pipelines. You
can add one extra pipelined process for each additional
processor core that is idle.
By default, this value is set to 1.
For more information on creating multiple pipelines, see
“Pipeline Settings” on page 113.
Chapter 4. Configuring the CX PCA
181
Table 27. Capture settings (continued)
Configuration Option
Description
<SslHwCheckDisabled>
When set to true, the CX PCA disables the scanning for
and use of SSL hardware accelerator cards.
The default value is False.
<MaxPipelineSHMQueueSize>
Defines the size in megabytes of the queue that feeds
hits to instances of the pipeline.
By default, this value is set to 100 MB. Maximum
allowed value is 200 MB.
<MaxPipelineSHMQueue2Size>
Defines the size in megabytes of the queue that feeds
hits from the instances of the pipeline to the Tcl engine
module.
By default, this value is set to 100 MB. Maximum
allowed value is 200 MB.
For more information on creating multiple pipelines, see
“Pipeline Settings” on page 113.
</Capture>
<Delivery>
This section includes the attributes for configuring real-time data transportation
from the Passive Capture host machine to the IBM Tealeaf CX Server environment.
Table 28. Delivery setting
Configuration Option
Description
<DeliveryMode>
Configures the delivery mode for the PCA
delivering to its peers. For more information,
see “PCA Web Console - Delivery Tab” on
page 105.
<DeliveryMode>2</DeliveryMode>
<BatchInterval>
This setting is not used.
<MaxQueueDepth>
Defines the maximum size (in bytes) of the
queue for sending data to the IBM Tealeaf
CX Server. The default value is 0, which sets
the queue depth to 50MB.
<MyCertificate>
This setting is not used.
<MyPrivateKey>
This setting is not used.
<StatisticsHitEnabled>
This setting is a Boolean flag, set to either
True or False.
v If set to True, then statistics hits are
enabled as a feature.
v If set to False, the feature is disabled. If
no value is set, it is treated as False.
<StatisticsHitHost>
182
IBM Tealeaf CX Passive Capture Application: PCA Manual
This setting is either the host name or IP
address of the machine that runs the Tealeaf
Transport Service that receives statistics hits.
Table 28. Delivery setting (continued)
Configuration Option
Description
<StatisticsHitIntervalSeconds>
This setting, a positive number, is the
minimum number of seconds to lapse
between attempts to send statistics hits.
If set to 0 (zero), statistics hits are not sent.
<StatisticsHitPort>
This setting, a positive port number, is the
TCP/IP port number to use while
connecting to the Tealeaf Transport Service
on the host.
<StatisticsHitSecure>
This setting, a Boolean flag, indicates if the
connection to the Tealeaf Transport Service is
enabled for SSL. It can be set to either True
or False.
If unspecified, it is treated as though set to
False.
<TimeSourceHost>
Designates the domain name or IP address
of the host running the Tealeaf Transport
Service to be used as a time source. If you
do not want to synchronize to a time source,
leave this field empty.
<TimeSourcePort>
Designates the port on which the time
source host listens for time source queries. If
you do not want to synchronize to a time
source, leave this field empty.
<Peers>
<Peer>
Defines the IP address and port of the
receiving IBM Tealeaf CX Server
environment. A <Peer> section must be
defined for each receiving IBM TealeafCX
Server machine.
<Host>
Specifies the IP address or host name of the
IBM TealeafCX Server receiving data from
the Passive Capture host machine.
<Port>
Specifies the IP port number on the IBM
TealeafCX Server to which the data is being
sent.
The default value is 1966.
</Peers>
<PollingInterval>
This setting is not currently being used.
<WatchdogTimer>
Specifies the maximum time (in seconds)
allowed to make a connection to the IBM
Tealeaf CX Server. If the timeout is
exceeded, the connection is marked as
disconnected.
The default value is 30 seconds.
</Delivery>
Chapter 4. Configuring the CX PCA
183
Table 28. Delivery setting (continued)
Configuration Option
Description
<ConfigurationChangeTime>
Specifies the UNIX time (seconds since
January 1, 1970 Coordinated Universal Time)
since the last update made to the
configuration file by the web console.
Note: Do not change this setting. This
setting is automatically changed when there
is an update through the web console.
<Extension/>
The <Extension/> setting is not used.
<Parse>
The following configuration settings are used to define the sessionization
parameters for the Tealeaf Cookie Injector. For more information, see “Pipeline
Settings” on page 113.
Table 29. Parse settings
Configuration Option
Description
<UserIDName>
(Optional) Specifies the HTTP(S) header
value that is set by the Tealeaf Cookie
Injector as the user ID attribute. The default
value is TLTUID.
<SessionIDName>
Specifies the HTTP(S) header value that is
set by the Tealeaf Cookie Injector as the
Session ID attribute. The default value is
TLTUID.
<HitIDName>
Specifies the HTTP(S) header value that is
set by the Tealeaf Cookie Injector as the Hit
ID attribute. The default value is TLTUID.
<TealeafCookies>
Specifies whether Tealeaf Cookie Injector is
being used. The default value is True.
<CaptureMode>
Specifies the capture mode being used.
There are two possible settings: Business
and BusinessIT.
v If CaptureMode=Business, the software
captures only HTTP(S) request and
response objects for 'business' page
requests (for example, HTML, ASP, JSP). The
associated non-text objects are not
captured (for example, GIF, JPEG) on that
page.
v If CaptureMode=BusinessIT, the software
also captures HTTP(S) request and
response objects for file objects that are
associated with the 'business' page (for
example, GIF, JPEG).
v The default value is Business.
184
IBM Tealeaf CX Passive Capture Application: PCA Manual
Table 29. Parse settings (continued)
Configuration Option
Description
<ExcludeExtensions>
Specifies the files extensions to exclude from
the captured DataStream. This setting can be
used to refine the behavior that is specified
by CaptureMode.
<IncludeExtensions>
Specifies files extensions that are fully
captured. Binary files such as PDFs can now
be included in capture.
<CaptureAllTypes>
Specifies Content-Types (MIME types) for
which to capture a full hit (including
response).
<IncludeMethods>
Specifies the HTTP methods to include. The
default values are Get, Post, and Put.
<RawRequest>
Determines whether RawRequest is on.
RawRequest is an aid in debugging. The
default value is False (disabled).
If set to True, the HTTP Request headers are
added to the hit.
Note: It is recommended to set the value to
False to prevent extra data from being
added to each hit.
<ResponseHeaders>
Determines whether ResponseHeaders are
on. ResponseHeaders are aids in debugging.
The default value is False (disabled).
If enabled (True), the HTTP Response
headers are added to the hit.
Note: It is recommended to set the value to
False to prevent extra data from being
added to each hit.
<MaxResponseSize>
Specifies the largest acceptable response size
(in bytes).
The default value is 1572864 (1.5 MB).
<MaxDataSizeBytes>
The maximum number of bytes allowed for
communication between Passive Capture
and the binary hit representation that is
used for communicating with the Tealeaf
Transport Service.
The default value is 2 MB (2097152).
<MaxRequestSizeBytes>
The maximum number of bytes allowed for
HTTP requests. Exceeding this value causes
a dropping of the request body or the entire
request.
The default value is 2 MB (2097152).
Chapter 4. Configuring the CX PCA
185
Table 29. Parse settings (continued)
Configuration Option
Description
<ShrinkToFit>
If set to True, the hit processing code does
not allocate extra space when it resizes
buffers. The extra space minimizes future
reallocations, which increases performance.
v Set this value to True only if you want to
exercise the hit processing code more
aggressively and keep its memory usage
to a minimum.
v The default and recommended value is
False.
<InflateEnabled>
If a response has a content-encoding header
whose value is deflate, gzip, or x-gzip,
then it is a candidate for having the body
inflated (expanded from its compressed
state).
v If set to True, then an attempt is made to
inflate the response.
– If the inflate fails, a message is logged
at the notice log level.
– If the inflate succeeds, the value of the
content-encoding header is overwritten
with the character X. For example, the
content-encoding header might have
the value of XXXX.
v The default value is False.
186
<MoveXMLToREQ>
Relocates the XML from the response to an
XML section in the request.
Note: This feature is disabled. Regardless of
the value that is defined, the PCA behaves
as if this attribute is set to False.
<UnReqCancelled>
If enabled, this option checks the last 100
bytes of the response body for when
capturetype=1 and marked as canceled.
<CookieParsingEnabled>
If this option is selected, a cookies section is
added to the request.
<URLDecodingEnabled>
This option determines whether to
URL-decode urlfields.
<DelImagesEnabled>
When selected, this option enables the
DelImages feature in the PCA, which
automatically deletes image hits that meet
specific criteria. For more information, see
“Pipeline Settings” on page 113.
IBM Tealeaf CX Passive Capture Application: PCA Manual
Table 29. Parse settings (continued)
Configuration Option
Description
<TLISupportEnabled>
This option enables the capture of static
content by the PCA for purposes of storing
it in a TLI server that is deployed among
your Windows based Tealeaf servers.
v A TLI server enables the capture of static
content, such as images, JavaScripts, and
style sheets, into a permanent archive for
highest fidelity replay and auditing
requirements. For more information, see
IBM Tealeaf cxImpact Administration
Manual.
v When enabled, this option overrides the
DelImages feature in the PCA. Fore more
information, see “Pipeline Settings” on
page 113.
<SessioningEnabled>
If this option is set, hits are grouped in
sessions that are based on <SessField/>.
<SessField>
The primary field on which to sessionize. It
must be defined, if sessioning is enabled.
This value can be any field in the request
buffer, [urlfield] name-value pair, or
REMOTE_ADDR in the [env] section.
You may specify the primary sessioning
field and alternates as a comma-delimited
list of field names. Field names in separate
sections can be prefaced with the section
name, such as cookies:field1,
urlfield:field2.
<SessSection>
Optional field that indicates which section of
the request buffer the SessField is found.
Use this field only if an explicit section is
not referenced in the SessField value or
values. If it is not specified, the entire
request is searched and the first match is
used.
<SessFieldMaskOff>
Specifies a substring of the SessField
request field to use for sessioning. This
value can be two zero-based offsets or a
starting offset and the word end to use
everything from the starting position to the
end of the value. For example:
v PrimarySessFieldMaskOff=0 end uses the
entire string
v PrimarySessFieldMaskOff=0 19 uses the
first 20 characters
v PrimarySessFieldMaskOff=14 end-4 uses
the 15th character to 4th from the end
v PrimarySessFieldMaskOff=end-9 end-2
uses the ninth from the end to second
from the end
Chapter 4. Configuring the CX PCA
187
Table 29. Parse settings (continued)
Configuration Option
Description
<SessCaseInsensitive>
When set to True, the SessField and
SessSection (if specified) can have
mixed-case values.
Note: This option should be avoided, as
case-insensitive matching uses more system
resources than case-sensitive matching.
This setting applies only to the parameter
name and not the parameter value.
<TimeGradesEnabled>
If enabled, time Grading can assign a grade
to a hit in one of the following three areas:
v Web Server Page Gen: How long it takes
the web server to serve the page.
v Network Transit: Measures network speed
by how much time a packet spent on the
network.
v Round Trip: How long it takes an
arbitrary packet to travel from the client
to the web server.
<WSGenBreaks>
How long it takes the web server to serve
up the page. Comma-delimited name-value
pairs (name:value, name:value).
<NetworkTransitBreaks>
Measures network speed by how much time
a packet spent on the network.
Comma-delimited name-value pairs
(name:value, name:value)).
<RoundTripBreaks>
How long it takes an arbitrary packet to
travel from the client to the web server.
Comma-delimited name-value pairs
(name:value, name:value).
<SamplingEnabled>
Session sampling, if enabled, specifies a
percentage of sessions to delete from the
capture.
<SamplePercentage>
The percentage of traffic to save, if sampling
is enabled.
<PrivacyEnabled>
Determines if privacy is enabled.
<InflatePreserveResponseOnErr>
Selecting this option turns on the inflate
feature. If a response has a content-encoding
header whose value is deflate, gzip, or
x-gzip, then it is a candidate for having the
body inflated and expanded from its
compressed state.
If the inflate fails, a message is logged at the
notice log level.
If the inflate succeeds, the value of the
content-encoding header is overwritten with
the character X. For example, the value of
content-encoding might be XXXX.
188
IBM Tealeaf CX Passive Capture Application: PCA Manual
Table 29. Parse settings (continued)
Configuration Option
Description
<XforwardingEnable>
When set to True, the PCA is configured to
parse a specified HTTP-X-FORWARDING field.
Note: This entry is not created until
X-forwarding is enabled.
For more information, see “Pipeline
Settings” on page 113.
<XforwardingField>
When XforwardingEnable is set to True, this
field identifies the HTTP-X-FORWARDING field.
This entry is not created until X-forwarding
is enabled.
For more information, see “Pipeline
Settings” on page 113.
</Parse>
<LastWSDescription>
When TimeGrades is enabled, the description
to use for WSGen times that exceed the last
time that is defined by WSGenBreaks.
<LastNTDescription>
When TimeGrades is enabled, the
description to use for Network Transit times
that exceed the last time that is defined by
NetworkTransitBreaks.
<LastRTDescription>
When TimeGrades is enabled, the description
to use for Round Trip times that exceed the
last time that is defined by RoundTripBreaks.
<DeflateEnabled>
If set to True, the response of each hit is
compressed (if not already) before it is sent
to the delivery peer.
The default value is False.
<HitArchiveEnabled>
If set to True, all captured hits are also
written to an archive file (TLA) on the local
drive. This is primarily for troubleshooting
and is not for use normal circumstances.
The default value is False.
<HitArchiveDirectory>
Directory where hit archives are written
when HitArchiveEnabled=True.
<HitArchiveRollSizeMBytes>
Specify the roll file size in megabytes,
default value is 100 MB.
<Failover>
You can configure failover settings through the “PCA Web Console - Failover Tab”
on page 166.
Table 30. Failover settings
Configuration Option
Description
<Enabled>
If failover is enabled, a backup Passive
Capture host machine (subordinate) takes
over if the main one (Master) fails.
<MasterAddress>
Address of the master failover machine.
Chapter 4. Configuring the CX PCA
189
Table 30. Failover settings (continued)
Configuration Option
Description
<MasterPort>
Port of the master failover machine.
<SlaveAddress>
Address of the subordinate failover machine.
<SlavePort>
Port of the subordinate failover machine.
<HeartbeatInterval>
How long to wait between heartbeats.
<HeartbeatTimeout>
The amount of time Passive Capture waits
for a response to a heartbeat before calling it
a timeout.
<TimeoutLimit>
The number of consecutive heartbeat
timeouts that are allowed before failover is
forced.
<AutoFailback>
Passes control (active state) from the
subordinate Passive Capture host machine
back to the Master Passive Capture host
machine once the master machine is ready
to take control again.
<FailbackDelay>
The minimum number of seconds to wait
before doing automatic failback.
<FailoverOnSvcRestart>
This option determines whether a failover is
triggered when the capture services are
restarted on the active IBM Tealeaf Passive
Capture Application server.
<RemoteMonitors>
<RemoteMonitor>
A Remote Monitor is a computer
(represented by a host name or IP address)
that is allowed to receive failover state
information by sending heartbeats to a
Passive Capture host machine configured for
failover.
<Host>
Host name of the remote monitor.
<CanControl>
If this option is enabled, the remote monitor
can force a failover or failback.
</RemoteMonitor/>
</Failover>
</Conf>
<Pool>
You can configure SSL pool settings through the SSL tab in the PCA web console.
Table 31. SSL pool settings
Configuration Option
Description
<PoolPeer>
Contains the SSL pool configuration settings
for the local PCA server.
The default value is .
<IPv6>
Defines if the IP address uses IPv6.
The default value is false.
190
IBM Tealeaf CX Passive Capture Application: PCA Manual
Table 31. SSL pool settings (continued)
Configuration Option
Description
<Address>
IP address for the PCA server
The default value is 9.19.145.49.
<Port>
Port number for the PCA server
The default value is 11211.
<CacheSize>
Defines the size in MB of the memory cache
that contains the SSL session information.
The default value is 256.
<Secure>
Enables or disables secure communication
between PCA servers in the SSL pool.
The default value is false.
Configuring Multiple Listend-Routerd Pairs
Configure Multiple Listend-Routerd Pairs (MLRP) to use multiple NICs to capture
network traffic in an environment that produces a high volume of network traffic.
To configure MLRP on your CX PCA server:
1. Log on to the PCA web console.
2. Go to the Interface tab. MLRP is only supported when transparent load
balancing (TLB) is enabled. For more information about TLB, see “CX PCA
Transparent Load Balancing Overview” on page 11.
3. Select Enable Transparent Load Balancing.
4. Select Multi-instance Capture to enable MLRP.
5. Select Add Instance to configure how many pairs you want to enable.
6. Go to Instance List and configure the interface settings for each instance.
7. Go to Filter Rules and apply your filtering rules to each instance. For more
information about filter rules, see “PCA Web Console - Interface Tab” on page
86.
You can view the reassd instance and statistics for each MLRP pair by selecting
Statistics, select an instance, then select Capture.
Configuring SSL Pools
You can create SSL pools to group a set of PCA servers together so that the PCA
servers can share SSL session information.
If you configure a group of PCA servers into an SSL pool, an SSL session that was
started on one PCA server can be resumed on another PCA server within the pool.
This capability gives you that ability to configure multiple PCA servers in your
Tealeaf environment. Additionally, SSL pooling can be used to prevent queueing
and potential data loss if an originating PCA server cannot continue to process the
SSL session.
Use the following procedure to add a PCA server in to an SSL pool.
Chapter 4. Configuring the CX PCA
191
Note: Each PCA server in the SSL pool must contain an identical SSL pool
configuration.
1. Go to the PCA web console.
2. Select the SSL tab and scroll down to the SSL Pool Configuration. The PCA
server that you are logged in to is automatically listed in the pool
configuration.
3. Select Add to enter the network information for any additional PCA servers in
the SSL pool.
4. Enter the IP address for the additional PCA server into the Host Address
field.
5. Enter the port number for the additional PCA server into the Host Port field.
6. Select OK to continue.
7. After the PCA server is added to the pool configuration, a confirmation
message is displayed. Select OK to return to the SSL Pool Configuration.
8. If you have an additional PCA server to add to the pool configuration, repeat
step 3.
9. In the Tuning Parameters For Local Host field, enter the size of the memory
cache. The memory cache contains the SSL session information for the local
server. The default value is 256 MB.
10. Click Save Pool Changes to save and apply your SSL pool configuration.
The pool configuration for each PCA server in the SSL pool must be added to each
PCA server. Log in to the web console for each PCA server that belongs to the SSL
pool and repeat this procedure.
For information about removing a PCA server from the SSL pool, see “Removing a
PCA Server from an SSL Pool.”
For information about the SSL pool troubleshooting utilities, see “SSL Pool
Troubleshooting” on page 265.
Removing a PCA Server from an SSL Pool
Use the following steps to remove a PCA server from an SSL pool.
Go to the PCA web console.
Select the SSL tab and scroll down to the SSL Pool Configuration.
Locate the PCA server that you want to remove from the SSL pool.
Select X under the Delete column to remove the PCA server from the pool
configuration.
5. Click Save Pool Changes to save and apply your SSL pool configuration.
1.
2.
3.
4.
For information about adding a PCA server from the SSL pool, see “Configuring
SSL Pools” on page 191.
For information about the SSL pool troubleshooting utilities, see “SSL Pool
Troubleshooting” on page 265.
192
IBM Tealeaf CX Passive Capture Application: PCA Manual
Chapter 5. Packet Forwarder Configuration
The IBM Tealeaf Packet Forwarder can be configured through the configuration
files that are stored in the installation directory.
The typical scenario of a Cloud website would include an elastic load balancer
(ELB) to distribute web traffic to a dynamically provisioned web server tier that
consists of multiple web-server instances. Each web-server instance would have a
Packet Forwarder installed to forward the captured web traffic to a centralized CX
PCA. The CX PCA runs on a virtual machine instance and processes the web
traffic. After the web-server instance is properly configured, an Amazon machine
instance (AMI) is created for the instance. The AMI is then dynamically
provisioned to provide as many instances as needed.
Note: At the time of this publication, the maximum number of web-server
instances needs to be known. The number of web-server instances is used in the
configuration of the packet forwarder to determine the maximum number of active
TCP connections that can connect to the destination PCA socket receiver.
Configuring a Packet Forwarder to Communicate with the CX PCA
To process web traffic in a cloud-based environment, a packet forwarder must be
configured to transmit data to a central CX PCA that is operating on a virtual
machine.
The following prerequisites must be completed before you configure the packet
forwarder software.
v All installation and configuration operations must be completed using the root
user account. Using the sudo command may not provide sufficient permissions
to allow system parameter modifications and might cause an incomplete or
incorrect installation.
v Install the packet forwarder software. For more information, see “Installing the
Packet Forwarder” on page 31.
Use the following steps to configure the packet forwarder and CX PCA for
communication in your cloud-based environment.
1. Locate /usr/local/ctccap/etc/fwdr-conf.xml on the reverse proxy server or
on the virtual web server that is hosting the packet forwarder transmitter.
2. Back up the existing configuration file by copying /usr/local/ctccap/etc/
fwdr-conf.xml to a backup directory. If your configuration file becomes
corrupted or invalid, you can restore from your backup or create a new
configuration file from fwdr-conf-defaults.xml. fwdr-conf-defaults.xml
contains the default configuration settings for the packet forwarder.
3. Edit the /usr/local/ctccap/etc/fwdr-conf.xml. You can use the vi editor or
another text editor to edit the configuration file.
4. Locate the <PrimaryInterface> tag and edit the virtual NIC device name for
the packet forwarder. The packet forwarder captures the traffic from the web
server. For most installations, eth0 is used as the device name.
5. Edit the port numbers to reflect the traffic ports that are used for your server.
The default capture traffic filter rule is defined to listen to port 80 and 443
traffic.
© Copyright IBM Corp. 1999, 2015
193
Example port settings:
<ListenTos>
<ListenTo>
<Port>80</Port>
<Port>443</Port>
</ListenTo>
</ListenTos>
6. Locate the Delivery tag and edit the delivery network connection for the
packet forwarder. This connects the packet forwarder to the centralized CX
PCA VM instance.
Example delivery network connection settings:
<Peers>
<Peer>
<Address>127.0.0.1</Address>>
<Port>1888</Port>
</Peer>
</Peers>
7. Locate and edit the <Address> and <Port> tag match the assigned internal IP
address and port of the CX PCA that is installed on the virtual machine.
Example setting for the CX PCA VM internal IP address:
Note: The <Port> tag defines the port number of the base network connection.
This is a base port number where it defines the block of port numbers that
can be used for the number of web server instances that can be provisioned.
For example, if you know that there will be a maximum of five web-server
instances that can be dynamically provisioned, then the block of ports that are
used start with 1888. In this example, port numbers 1888 - 1892 would be
used based on the maximum of five instances.
<Peers>
<Peer>
<Address>127.0.0.1</Address>
<Port>1888</Port>
</Peer>
</Peers>
8. Locate and edit the <MaxRotatePeers> tag to define the maximum number of
web server instances that can be dynamically provisioned. The default is set to
1 for just one web-server instance where there are no other instances of the
packet forwarder used in the web server tier.
Note: If you are statically assigning a fixed number of web server instances
with associated packet forwarders, then the <MaxRotatePeers> would remain
set to the default value of 1. Each packet forwarder has to configured with a
unique port number to identify a unique network connection to the
centralized CX PCA VM instance. The port numbers must be assigned in
sequential order. This is required by the socket receiver for the CX PCA when
it is configured for the packet forwarder's network connections. If you decide
to start with port number 1888 for the first packet forwarder, then defining
five of them would be 1888 through 1892.
9. Save your changes to the configuration file.
10. You must configure a packet forwarder receiver instance for each Packet
Forwarder transmitter instance that you have deployed. For more information,
see “Configuring a Packet Forwarder Receiver and the CX PCA to Receive
Forwarded Packets” on page 195.
Once the packet forwarder is running, you can also perform the following actions:
v Check the status of a packet forwarder, by running service pktfwdr status.
194
IBM Tealeaf CX Passive Capture Application: PCA Manual
v Stop a packet forwarder, by running service pktfwdr stop.
v View the statistics for a packet forwarder, by running ctcstats -p.
Configuring a Packet Forwarder Receiver and the CX PCA to Receive
Forwarded Packets
To process web traffic in a cloud-based environment, Packet Forwarder receiver
instances must be deployed to the central cloud-based CX PCA that is operating on
a virtual machine.
For each packet forwarder transmitter instance that is deployed, you must also
deploy a Packet Forwarder receiver instance on the CX PCA server. For more
information about installing a packet forwarder, see “Installing the Packet
Forwarder” on page 31.
Complete the following steps to configure the settings for a packet receiver.
1. Log in to CX PCA web console. See “PCA Web Console Login” on page 67 for
more information.
2. Change the number of pipelined instances in the Pipeline tab as desired.
Depending on whether CX PCA privacy rules have been applied, the default
number of CX PCA pipelined processes is set to one. This might be insufficient
and can be increased to handle the processing load. This assumes that the VM
instance has sufficient resources such as enough processor cores to support the
increase.
3. Save the changes to the CX PCA but do not restart the CX PCA at this time.
4. Edit the CX PCA configuration file ctc-conf.xml. For more information, see
“Passive Capture Configuration File ctc-conf.xml” on page 176.
5. Locate the Capture tag section in the configuration file and change the content
of this section to:
<ListenerSocketEnabled>true</ListenerSocketEnabled>
<TransparentLoadBalancingEnabled>false</TransparentLoadBalancingEnabled>
<SslSessionInfoOnMemcachedServer>false</SslSessionInfoOnMemcachedServer>
Note: If the CX PCA is configured to decrypt SSL traffic from the packet
forwarder, then set <SslSessionInfoOnMemcachedServer> to true.
6. Locate the socket receiver settings and edit the settings for your network
environment.
The following example displays the default socket receiver settings:
<Listener>
<Module>pktr</Module>
<Logfile>/var/log/tealeaf/listener.log</Logfile>
<BasePort>1888</BasePort>
<Instances>1</Instances>
<Options>
<Option>
<Value>-p</Value>
</Option></Options>
</Listener>
The BasePort tag defines the base port number that is used by the packet
forwarders. This must be the same port number for the CX PCA to correctly
capture traffic from the packetforwarder or packet forwarders. The default
setting is to use a base port of 1888 and only receive from one packet
forwarder.
Chapter 5. Packet Forwarder Configuration
195
The Instances tag defines the maximum number of packet forwarders that the
CX PCA will connect to. Set this value according to the total or maximum
number as determined by the number of deployed packet forwarders.
7. Save your changes to ctc-conf.xml.
8. Start the CX PCA. For more information, see “Start PCA” on page 43.
9. After the CX PCA has restarted, you can start your web server tier and any
deployed packet forwarder. Run service pktfwdr start to start the packet
forwarder daemon.
Once the packet forwarder receiver is running, you can also perform the following
actions:
v Check the status of a packet forwader, by running service pktfwdr status.
v Stop a packet forwarder, by running service pktfwdr stop.
v View the statistics for a packet forwarder, by running ctcstats -p.
196
IBM Tealeaf CX Passive Capture Application: PCA Manual
Chapter 6. SSL Keys
For decrypting transmissions by using the SSL protocol, the IBM Tealeaf CX
Passive Capture Application must be provided the SSL keys in use in the
transaction stream.
Review and complete the instructions in this section to generate and export the
private key for use by the IBM Tealeaf CX Passive Capture Application.
1. “Encrypted SSL Key Setup”
2. “Exporting the SSL private key” on page 202
3. “Generating a Self-Signed Certificate” on page 210
Encrypted SSL Key Setup
To decrypt SSL connections, customers must provide the Passive Capture software
with their valid SSL keys.
Note: Typically, SSL private keys are provided in PEM format and are converted
for use in the PCA. Before you begin, verify that any PEM file that you are
planning to convert contains the RSA private key and nothing else. For example, it
must not contain the certificate and the Bad Attribute information.
v PEM files that are containing extra data can still be converted and added to the
PCA. However, SSL key traffic fails to be properly decrypted by the PCA by
using these keys, and no errors or warnings are issued by the application.
This section describes how to prepare your valid SSL keys for use and then to load
them into the PCA.
v Auto-convert: You can allow the PCA to automatically convert clear-text PEM
files to encrypted PTL keys on the PCA server. These keys are then
automatically loaded into the PCA for use. There are some limitations on
configuration of this process see “Automatic Conversion of SSL Keys” on page
198.
v Manual conversion: If you want to control each step of the conversion process,
you can follow the manual conversion steps. See “Steps to Manually Convert
SSL Keys” on page 199.
Overview
The software does not directly load the SSL key. Instead, it loads an encrypted file
that is containing the SSL key and a machine-specific hash ID.
v The encryption protects the contents of the SSL key from unauthorized access.
The file is encrypted by using the 3DES algorithm.
v The machine-specific hash prevents the encrypted file from use with another
Passive Capture installation.
Note: As part of the process of generating the encrypted PTL key, some data
unique to the Network Interface Cards installed on the PCA host machine are
embedded in the key. If you add or remove NICs or move the PCA to a new
machine with different cards, you must regenerate the PTL keys by using the
master key PEM files and the instructions that are provided .
© Copyright IBM Corp. 1999, 2015
197
This file is stored on the Passive Capture server in the proprietary PTL format.
After the file is loaded and configured, the original SSL key files can be deleted.
Automatic Conversion of SSL Keys
You can use an automatic conversion process to assist with converting SSL keys
into PTL keys that can be imported into the CX PCA.
Note: Automatic conversion requires that SSL keys are stored in the capturekeys
directory on the PCA server. If you want to store them in a different directory or to
make other configuration changes to the process, you must manually convert them.
See “Steps to Manually Convert SSL Keys” on page 199.
Auto-Converting PEM to PTL on CX PCA Server
The CX PCA can automatically generate a PTL file from a PEM file during startup.
After you have a PEM file, CX PCA can generate the PTL for you.
Note: This process only works for PEM files without password protection.
1. Copy the PEM file to the following directory:
/usr/local/ctccap/etc/capturekeys
Note: This process deletes the PEM file in this directory. Make sure that you
retain a copy of it in another location.
2. Restart the IBM Tealeaf CX Passive Capture Application software.
3. On startup, the CX PCA auto-converts the PEM to a PTL key. For example, if
the file myprivatekey.pem generates a PTL key named myprivatekey.ptl.
v The PEM file (myprivatekey.pem) is deleted from the directory.
4. To verify that the PTL key was properly loaded, review the capture log file
(var/log/tealeaf/capture.log). If the PTL is properly loaded, a message
similar to the following must in the log:
reassd[4681]: Autoloaded key file:
/usr/local/ctccap/etc/capturekeys/myprivatekey.ptl
Note: After you verify successful conversion, remove the PEM files from the
capturekeys directory. Whenever the CX PCA starts or restarts, this directory is
polled for files, and the files are reconverted.
Converting PFX SSL Private Key to PTL
If you have a PFX private key from an unknown source, you can use the following
commands to turn it into a PTL key for use by Tealeaf:
1. Decrypt the file and rename it as a PEM file by running the following
command on the Passive Capture host machine:
openssl pkcs12 -nodes -nocerts -in key1.pfx -out key1.pem
2. When prompted for the import password, enter the password that you used
when you export the certificate to a PFX file. You must receive the following
message:
MAC verified OK.
3. To validate the resulting file from the pkcs12 command:
openssl rsa -check -noout -in <private_key_filename>
198
IBM Tealeaf CX Passive Capture Application: PCA Manual
Steps to Manually Convert SSL Keys
The following sections describe how to perform manual steps to convert
certificates into keys that the PCA can use.
Loading CX PCA with SSL Keys
You can learn to load PCA with SSL keys in this section.
To load the CX PCAwith SSL keys, you must:
1. Load the CX PCA with the required SSL keys.
2. Go to the CX PCA web console and navigate to the SSL Keys tab.
3. Edit the configuration to add the required .PTL files.
Loading CX PCA with SSL Key Files
Use the following steps to load the CX PCA with one or more SSL keys.
To load Passive Capture with one or more SSL keys:
1. Obtain a PEM file for each SSL key. You normally run this step on the web
server that is containing the SSL keys. The Passive Capture software needs the
SSL key to be in PEM format and the file name to end with a .pem extension.
The PEM file is an ASCII text file that is containing the SSL key in an encoded
form. Following is the example of an SSL key in PEM format:
-----BEGIN RSA PRIVATE KEY----MII ... (many lines of encoding here)
....
-----END RSA PRIVATE KEY-----
If the web server does not store its private keys in PEM format, then you must
export the keys and possibly convert them to PEM format. For exporting
procedures, see the section “Exporting the SSL private key” on page 202.
2. Transfer the PEM files to directory /usr/local/ctccap/etc on the Passive
Capture host machine.
3. Log on to the Passive Capture host machine as user root and change to
directory /usr/local/ctccap/etc.
4. Encrypt the PEM files to produce a PTL file.
a. Use the tealeaf pem2ptl command to generate the PTL files for one or
more PEM files. For example, if you have two PEM files named
server1.pem and server2.pem, you can generate PTL files for both using the
following command:
tealeaf pem2ptl server1.pem server2.pem
The previous command creates files named server1.ptl and server2.ptl in
the same directory as the PEM files.
v The tealeaf pem2ptl command does not create PTL files if they exist. The
command sets the ownership and permissions of the resulting PTL files
to allow only the user ctccap to access the files.
b. If you have an older release of the Tealeaf-pca package that does not
provide the tealeaf pem2ptl command, use the following commands for
each PEM file you want to encrypt, replacing server1.pem with the name of
your PEM file:
/usr/local/ctccap/bin/tltenc -in server1.pem
chmod u=rw,go= server1.ptl
chown ctccap server1.ptl
To convert many PEM files, use the ls and xargs commands to encrypt
them. The following command line must be typed on one line. It uses the
Chapter 6. SSL Keys
199
ls command to generate a list of file names. The vertical bar allows the
xargs command to use this list and run the tltenc utility by using each file
name in the list.
ls -1 server1.pem server2.pem server3.pem | xargs -L 1 -t \
/usr/local/ctccap/bin/tltenc -in
After you run the previous command, use the following commands to set
the ownership and permissions of all PTL files. It is safe to use wildcards
because the ownership and permissions are the ones that are needed by the
PCA to access any PTL file.
chmod u=rw,go= *.ptl
chown ctccap *.ptl
5. Remove the PEM files from the Passive Capture host machine. Wait until you
confirm that Passive Capture is successfully decoded SSL connections before
you delete the PEM files.
After the SSL keys are loaded onto the Passive Capture host machine and
encrypted into PTL files, configure Passive Capture to use the PTL files. When you
must configure a few PTL files, use the SSL Keys tab in the web console. When
you configure PTL files, you can find it easier to use a text editor like nano or vi to
edit the configuration file directly.
Loading PCA with Web Console
To
1.
2.
3.
use the web console SSL Keys tab:
Log on to the Passive Capture web console with a web browser.
Click the SSL Keys tab.
Click Loaded at the top of the page to view the loaded SSL keys.
4. Enter a descriptive HTTPS key label in the Label field.
5. Enter the full path name for the PTL file in the Keyfile file name field. For
example: /usr/local/ctccap/etc/server1.ptl.
6. Click Add. The newly added entry for the PTL file is displayed on the updated
page.
7. Repeat steps 4 through 6 for each PTL file you want to be used by Passive
Capture.
8. Click Save Changes to save the added PTL files to the configuration file. The
capture programs restarts and uses the new PTL files that you added.
9. If capture fails to start, view capture.log to determine the reason.
Adding PTL Files
You can manually add PTL files to your CX PCA configuration by editing the
ctc-conf.xml file.
To edit the configuration file to add PTL files:
1. Log on to the Passive Capture host machine as user root and change to
directory /usr/local/ctccap/etc.
2. Edit the Passive Capture configuration file ctc-conf.xml.
3. Look for the following line:
<CaptureKeys></CaptureKeys>
4. If Passive Capture is already configured with PTL files, the <CaptureKeys> and
</CaptureKeys> tags are on separate lines.
5. Add a <CaptureKey> entry for each PTL file between <CaptureKeys> and
</CaptureKeys>. Each entry requires a label and the full pathname of the PTL
200
IBM Tealeaf CX Passive Capture Application: PCA Manual
file. For example, the <CaptureKey> entry for a hypothetical PTL file named
/usr/local/ctccap/etc/web1.ptl would look like the following:
<CaptureKey>
<Label>Web1 Key </Label>
<PrivateKeyFile>/usr/local/ctccap/etc/web1.ptl</PrivateKeyFile>
</CaptureKey>
Below is an example of two <CaptureKey> entries configured on a Passive
Capture host machine:
<CaptureKeys>
<CaptureKey>
<Label>Web1 Key </Label>
<PrivateKeyFile>/usr/local/ctccap/etc/web1.ptl</PrivateKeyFile>
</CaptureKey>
<CaptureKey>
<Label>Web2 Key </Label>
<PrivateKeyFile>/usr/local/ctccap/etc/web2.ptl</PrivateKeyFile>
</CaptureKey>
</CaptureKeys>
6. Save changes to the configuration file and exit the editor.
7. Restart the capture programs using the following commands:
Tealeaf stop capture
Tealeaf start capture
8. If capture fails to start, view capture.log to determine the reason.
9. Log on to the Passive Capture Web console with a Web browser and click the
SSL Keys tab to view the PTL files you've configured.
Automatically Loaded PTL Files
Through the web Console, you can automatically upload SSL certificates in clear
text .pem or password-protected .pfx format.
Note: For security purposes, this functionality is only accessible through SSL with
an authenticated user. If you do not access this page over https, you can only view
the existing PTL keys.
1. Open the web console.
2. Click the SSL Keys tab.
3. Click the Capture Keys link at the top of the page.
4. The following page is displayed:
Figure 42. Uploading Keys
5. To select a file, click Browse....
Chapter 6. SSL Keys
201
6. If the .pem key is a password-protected .pfx file, enter the password in the
Password field.
v If the file is a clear text .pem file, leave the Password field blank.
7. To convert the certificate to a key, click Upload.
General
v Converted keys are stored in /usr/local/ctccap/etc/capturekeys.
v Uploaded pem or pfx files that are valid keys are converted to ptl.
v Uploaded compressed files that contain valid pem files have their contents that
are converted to ptl.
v Upon completion of a conversion, all non-ptl files are removed from
/usr/local/ctccap/etc/capturekeys.
v After the required files are uploaded, the PCA must be restarted on the Console
tab.
pfx
v Password protected keys (pfx) are only converted if the correct password is
provided.
v Password protected keys are converted directly to ptl files.
pem
v Compressed files must be flat (no directories).
v Compressed files can onlycontain pem files.
Exporting the SSL private key
In cases where web application traffic is transmitted over HTTPS, the Passive
Capture software must be configured to decrypt the SSL connections. This
configuration requires exporting a copy of the private key from an existing web
server to the Passive Capture software.
Note: These instructions are provided for exporting private keys from third-party
systems of which Tealeaf is not component. This information is provided for
reference purposes only and is not supported by Tealeaf. Tealeaf assumes no
responsibility for these instructions. Consult the documentation that is provided
with your web server product.
For more information about converting SSL keys for use in the PCA, see
“Encrypted SSL Key Setup” on page 197.
Microsoft IIS 5 and 6
The following instructions provide the steps to export the private key from IIS in
PKCS #12 format (*.PFX), using the Microsoft IIS certificate export wizard.
v For information on converting a PFX from a source other than IIS, see
“Encrypted SSL Key Setup” on page 197.
1. Start the Internet Information Service Manager.
2. On the left side pane, under the local machine name, click on the Web Sites
folder.
3. On right side pane, right-click Default Web Site and select Properties.
4. Click the Directory Security tab.
5. Click View Certificate to display the certificate.
202
IBM Tealeaf CX Passive Capture Application: PCA Manual
Click the Details tab.
Click Copy to File.... The Certificate Export Wizard launches.
Click Next. The Export Private Key window appears.
Select the Yes, export the private key radio button, and then click Next.
The Export File Format window appears.
10. Select the Personal Information Exchange - PKCS #12 (.PFX) radio button.
Select Enable strong protection and Include all certificates in the
certificate path if possible. Click Next. The Password window appears.
11. Enter the password, if necessary. This password provides protected access to
the file if the system is configured to require a password.
6.
7.
8.
9.
12. Click Next. The File to Export window appears.
13. Enter or browse to the file name, and then click the Next button. The
Completing the Certificate Export Wizard window appears.
14. Click the Finish button. The certificate is exported to the file and a success
message is displayed.
15. Copy the file to the Tealeaf Passive Capture host machine. Make sure that it is
named descriptively for the web server from which it was exported.
16. Decrypt the file and rename it as a PEM file by executing the following
command on the Passive Capture host machine:
openssl pkcs12 -nodes -nocerts -in key1.pfx -out key1.pem
17. When prompted for the import password, enter the password you used when
exporting the certificate to a PFX file. You should receive the following
message:
MAC verified OK.
18. To validate the resulting file from the pkcs12 command:
openssl rsa -check -noout -in <private_key_filename>
Microsoft IIS 3.0 and 4.0
The following instructions provide the steps to export the private key from
Microsoft IIS 3.0 or 4.0.
1. Export a backup file of the Certificate from the Key Manager.
2. From the Key menu in Key Manager, select Export Key and then select
Backup File.
3. After you read the warning about downloading sensitive information to your
hard disk, click OK.
4. Type the key name in the File Name box, and click Save. The file is given a
*.KEY extension and is saved to a 3 1/2 -inch disk on the A: drive or your
hard disk drive.
5. Transfer the key file to the /usr/local/ctccap/etc directory on the Passive
Capture host machine.
6. Log in to the Passive Capture host machine as user root.
7. Run the following commands to generate a PEM file from the IIS key file. You
can be prompted for a password whether the private key is
password-protected. The following commands use several file names as
examples:
cd /usr/local/ctccap/etc
./sbin/iis-extract-net-key.pl iis.key > iis-net.key
./bin/openssl rsa -inform NET -in iis-net.key -out iis.pem
iis.key: The IIS key file that is exported from the IIS web server and
transferred to the Passive Capture host machine
Chapter 6. SSL Keys
203
iis-net.key: The portion of iis.key in the NET format
iis.pem: The resulting key in PEM format
8. Validate the file by using OpenSSL:
../bin/openssl rsa -check -noout -in iis.pem
9. Validate the result:
If the result is RSA key OK, then the key is successfully converted.
If the result is Enter pass phrase for iis.pem, then the key is encrypted.
If the result is another message or an error message, then the file is either in
the wrong format or is not a key.
10. With a valid PEM file, you can now delete the IIS key files.
SunOne (iPlanet) 6.0
The following instructions provide the steps to export the private key from
SunOne 6.0:
Note: This procedure requires OpenSSL to be installed on the web server from
which the key is being extracted.
1. Collect both certificate db and key db for the instance for which you extract the
key. Normally it is available in SERVER_ROOT/alias.
2. Add the following to the PATH variable:
SERVER_ROOT/bin/https/admin/bin
3. Add the following to the LD_LIBRARY_PATH variable:
SERVER_ROOT/bin/https/lib:$\{LD_LIBRARY_PATH\}
4. Export PATH; LD_LIBRARY_PATH
5. This pk12util utility is used to export the certificate from the database to the
key format. While exporting the key, you are prompted to enter the key
password. Run the pk12util with the following option:
pk12util -o <export filename> -n <cert filename> -d <certdir> -P <db \
filename prefix for Sun DS>
Note:
-o - The name of the file to which the certificate is exported.
-d - Option that is used to specify the location of certificate directory (path to
cert8.db/key3.db)
-P - Option that is used to specify the db prefix name (optional)
Examples:
pk12util -o myCert.pk12 -n webServer.cert -d /sun/alias
pk12util -o myCert.pk12 -n webServer.cert -d /sun/alias -P "https-hostname-"
6. Using Open SSL, convert this file to the required PEM format by using the
following option:
openssl pkcs12 -nodes -nocerts -in {Certname} -out https-{webinstance}.pem
Note:
-in - Option is used to specify the binary input file and is the file that you
specified as the out file with the -d in step 4.
-out - Option is used to specify the ASCII output file.
204
IBM Tealeaf CX Passive Capture Application: PCA Manual
Troubleshooting iPlanet 6.0 Issues
If you encounter the following DLL error that states pk12util: find cert by
nickname failed: Failure to load dynamic library, then do the following steps:
1. Run the following command:
wib@<servername>$ ldd pk12util
2. Copy the following files to the /usr/lib directory:
File
Source Location
libssl3.so
/opt/netsite/SunOne6.1/bin/https/lib/libssl3.so
libsmime3.so
/opt/netsite/SunOne6.1/bin/https/lib/libsmime3.so
libnss3.so
/opt/netsite/SunOne6.1/bin/https/lib/libnss3.so
libplc4.so
/opt/netsite/SunOne6.1/bin/https/lib/libplc4.so
libplds4.so
/opt/netsite/SunOne6.1/bin/https/lib/libplds4.so
libnspr4.so
/opt/netsite/SunOne6.1/bin/https/lib/libnspr4.so
libthread.so.1
/usr/lib/libthread.so.1
libnsl.so.1
/usr/lib/libnsl.so.1
libsocket.so.1
/usr/lib/libsocket.so.1
librt.so.1
/usr/lib/librt.so.1
libdl.so.1
/usr/lib/libdl.so.1
libc.so.1
/usr/lib/libc.so.1
libpthread.so.1
/usr/lib/libpthread.so.1
libmp.so.2
/usr/lib/libmp.so.2
libaio.so.1
/usr/lib/libaio.so.1
libnspr_flt4.so
/opt/netsite/SunOne6.1/bin/https/lib/cpu/sparcv8plus/
libnspr_flt4.so
libc_psr.so.1
/usr/platform/SUNW,Sun-Fire-480R/lib/libc_psr.so.1
3. Copy the cert and key dbs to any directory. Then, do the following on that
directory to verify its name:
Chapter 6. SSL Keys
205
ls -la
/opt/netsite/SunOne6.1/alias
v Following is the Output:
drwxr-xr-x 3 wib webmaster 1024 Feb 15 11:26 .
drwxr-xr-x 15 wib webmaster 1024 Nov 26 23:25 ..
drwxr-xr-x 7 wib webmaster 1024 Dec 7 12:53 certs
-rwxr-xr-x 1 wib webmaster 2481 Feb 15 07:40 gte.pem
-rwxr-xr-x 1 wib webmaster 212992 Feb 15 12:52
https-<www.company.com>-<servername>-cert8.db
-rwxr-xr-x 1 wib webmaster 65536 Feb 15 12:52
https-<www.company.com>-<servername>-key3.db
-rwxr-xr-x 1 wib webmaster 32768 Feb 15 07:40 secmod.db
4. Run the pk12util command. Include the full cert name on the -P option,
including the servername and trailing dash (-) in the name of the file (anything
before the cert8 or key3):
pk12util -o https-sunone.<URL> -n Server-Cert \
-d /opt/netsite/SunOne6.1/alias -P https-<www.company.com>-<servername>\-
5. A new file is created in the directory that is specified in the -d option that has
the domain name with no extension.
Sun iPlanet 4.x
The following instructions provide the steps to export the private key from version
4 of Sun iPlanet.
1. Log in to the web server as root.
2. Copy the iPlanet key and certificate.
a. The iPlanet instance files are in /apps/netscape/server4/alias/.
b. Copy iPlanet instance https-name**Key3.db file to /.netscape/key3.db.
c. Copy iPlanet instance https-name-*cert7.db file to /.netscape/cert7.db.
3. Copy iPlanet instance secmod.db to /.netscape/secmodule.db.
4.
5.
6.
7.
206
Configure X-display to desktop.
Start the Netscape browser from the web server (/opt/netscape/netscape).
Click the Security lock icon.
In the dialog, click Certificates, and then click Yours (as shown in the
following figure ).
IBM Tealeaf CX Passive Capture Application: PCA Manual
Figure 43. - Your Certificates
8.
9.
10.
11.
12.
Click your certificate and then click Export. The default name is Server-Cert.
Type the password for the private key DB file.
Type a password to protect the exported file.
Save the exported file in /.netscape/xxxxx.p12, where xxxxx is name of file.
Close the Netscape browser.
Apache 1.3.x, 2.0.x
The following instructions provide the steps to export the private key from Apache
versions 1.3.x and 2.0.x.
Note: This procedure requires OpenSSL to be installed on the web server from
which the key is being extracted.
1. If the key is encrypted, convert it to an unencrypted key. The basic command
would be:
openssl rsa -in <old_private_key_filename> -out <new_private_key_filename>
Note: You need the password to perform this conversion.
2. Extract the key from the /etc/httpd/conf/ssl.key directory.
3. Rename the file to have a .PEM extension.
4. Validate the file by using OpenSSL:
Chapter 6. SSL Keys
207
openssl rsa -check -noout -in <private_key_filename>
5. Validate the result: If the result is RSA key ok, then the key is successfully
exported. If the result is Enter pass phrase for <private_key_filename>, then
it is a key, but it is encrypted. If the result is another message or an error
message, then it is either in the wrong format, or not a key.
IBM HTTP Server
The following instructions provide the steps to export the private key from the
IBM HTTP Server.
1. Select the certificate in iKeyMan, and then select File > Export.
2. Save the file with the extension PFX, set a password on it, and select weak
encryption.
3. Transfer the file (in binary mode) to the Passive Capture host machine.
4. Log on to the Passive Capture host machine as root. Run the following
command:
openssl pkcs12 -nodes -nocerts -in x.pfx -out x.pem
5. Enter the password that you set when you exported the file.
6. Validate the file by using OpenSSL:
openssl rsa -check -noout -in key1.pem
7. Validate the result:
If the result is RSA key ok, then the key is successfully exported.
If the result is Enter pass phrase for <private_key_filename>, then it is a key,
but it is encrypted.
If the result is another message or an error message, then it is either in the
wrong format, or not a key.
Exporting from a Java Keystore (JKS)
Java™ Keystore (JKS) is the default implementation for certificates and key
management in Java applications. For security reasons, no simple method is
provided for extracting the private key from the keystore.
A common export scenario is to use the key in an Apache web server by using the
PEM standard.
v If the keystore is configured to use openssl to create your digital certificate, then
the private key is available transparently.
v However, if you are using ikeyman (IHS) or the Java based Keytool, private key
export functions are not provided for security reasons.
– There is a known workaround for exporting from Keytool. See “Java Keytool
Workaround” on page 209.
The private key is required to convert a signed DER-format certificate that is
received from a certificate authority into PKC12 format, which can be use by
Tealeaf. Using ikeyman to generate the original certificate, you can receive the
signed certificate from a certificate authority.
v ikeyman can receive a certificate in binary DER or base-64 encoded format.
v ikeyman can import from CMS, JKS, JCEKS or PKCS12 formats.
Note: Extraction from IBM HTTP Server environments requires an extra step of
saving the CMS database as JKS through ikeyman. After conversion, extraction
works as if the database was in native JKS format.
208
IBM Tealeaf CX Passive Capture Application: PCA Manual
PEM keys can then be exported to DER format, which can be consumed by
Apache. To export the private key from JKS, you must find and compile Java
source solution.
v For one example, visit http://se9.blogspot.com/2008/10/extracting-privatekey-from-java.html.
v Several other methods are described in detail on the Internet.
To review a PEM key in DER format, use the following commands:
v For a certificate received from a certificate authority:
openssl x509 -noout -text -in CRT.der
v For an RSA private key:
openssl rsa -noout -text -in rsa.key
Java Keytool Workaround
By default, Java Keytool does not provide direct means for exporting the private
key. However, if your version of the utility supports the export of a JKS type
keystore to a different keystore format, then you can be able to apply the following
workaround.
Note: If your keytool does not support this keystore export, the methods in the
preceding section can be applied.
To export by using Java Keytool:
In the following example, the JKS keystore is exported to pkcs12, which can be
consumed by Tealeaf.
1. Export the keystore to a different keystore. In the following example, the
keystore is exported to pkcs12 type with a single command:
keytool -importkeystore -srckeystore test-app.keystore
-destkeystore mystore.p12 -srcstoretype JKS -deststoretype PKCS12
-srcstorepass test-app-pwd -deststorepass test-app-pwd
-srcalias test-app -destalias test-app -srckeypass test-app-pwd
-destkeypass test-app-pwd -noprompt
where:
v test-app.keystore = path to the application keystore
v mystore.p12 = path to destination pkcs12 keystore
v JKS = source keystore type. Must be set to JKS.
v PKCS12 = destination keystore type. Must be set to PKCS12 when exporting to
pkcs12.
v test-app-pwd = the password to the keystore can be used for both source
keystore and key passwords and the same for the destination one.
v test-app = the alias for the keystore can be the same for source and
destination.
2. When the keystore is exported to PKCS12, you use openssl to export the
private key from a pkcs12 formatted key file :
openssl pkcs12 -in mystore.p12 -out mystore.pem \
-passin pass:test-app-pwd -passout pass:test-app-pwd
3. The password-protected private key is now contained in mystore.pem.
4. This private key can be consumed by Tealeaf.
Chapter 6. SSL Keys
209
v For more information about validating PEM keys, see “Generating a
Self-Signed Certificate.”
v For more information about importing the key, see “Encrypted SSL Key
Setup” on page 197.
Generating a Self-Signed Certificate
To generate a self-signed certificate, you must use the openssl utility to generate a
private key and a self-signed certificate for that key.
The Tealeaf-pca package provides the openssl utility in the directory
/usr/local/ctccap/bin.
The following steps assume that you logged in to the Passive Capture host
machine as user root. To generate a self-signed certificate:
1. Generate the private key. The following example generates a 2048-bit RSA key
file named example.key:
/usr/local/ctccap/bin/openssl genrsa -out example.key 2048
2. Generate the self-signed certificate. The following example generates a
self-signed certificate file named example.crt by using the private-key file
example.key generated in step 1. With option -days 365, the certificate is valid
for the next 365 days (one year):
/usr/local/ctccap/bin/openssl req -x509 -days 365 -newkey rsa:2048 -key \
example.key -out example.crt
The openssl req command interactively prompts for various values. The
following table displays the prompts and sample replies:
Prompt
Sample Reply
Country Name (2 letter code)
US
State or Province Name (full name)
California
Locality Name (for example, city)
San Francisco
Organization Name (for example, company)
Tealeaf, an IBM Company
Organizational Unit Name (for example, section)
Release Engineering
Common Name (for example, YOUR name)
pca.Tealeaf.com
Email Address
[email protected]
The common name must be the fully qualified DNS name of the Passive
Capture host machine. If the host machine does not have a DNS name that is
assigned to it, then use the IP address of the machine.
3. Now, set the appropriate file ownership and permissions:
a. All private key files must be readable only by the user account that needs
read access to the file. The following chmod and chown commands set the
ownership and permissions so that only the capture processes running as
user ctccap can access file example.key:
210
IBM Tealeaf CX Passive Capture Application: PCA Manual
chmod go= example.key
chown ctccap example.key
b. Place the files in a directory accessible by the user account. For certificate
and key files that are used by the Passive Capture software, place the files
in directory /usr/local/ctccap/etc.
Using SHA-2 algorithm to generate the self-signed certificate
By default, the openssl command uses the SHA-1 algorithm to generate the
self-signed certificate on the PCA.
Optionally, you can use SHA-2 for the digital signature hash by adding the
-sha256 option, as in the following command:
Note: The following command is supported in PCA Build 3500 or later.
/usr/local/ctccap/bin/openssl req -x509 -sha256 -days 365 -newkey rsa:2048 \
-key example.key -out example.crt
If you are not PCA Build 3500 or later, you can be able to generate the SHA-2 key
on another Linux system. To determine whether it is possible, run the following
command in a non-PCA environment:
openssl dgst ?h
The following line can be displayed in the generated output:
-sha256
to use the sha256 message digest algorithm
If the previous command is displayed, then the Linux installation accepts the
SHA-2 option. You can run the following command without providing the
PCA-specific path:
openssl req -x509 -sha256 -days 365 -newkey rsa:2048 -key example.key -out \
example.crt
Generating a Signed Certificate Request for Internal CA Use
If you want to use your own internal Certificate Authority (CA) to generate a
signed certificate, complete the following steps.
The following steps use the openssl utility as the example utility, although other
utilities can be used.
1. Acquire a 2048-bit RSA private key. This key can be self-generated as in the
following example, which uses the default PCA install path to access PCA's
openssl cmd:
/usr/local/ctccap/bin/openssl genrsa -out example.key 2048
2. Use the RSA private key to create the signed certificate request (CSR). If the key
file is example.key, then the following cmd generates a CSR file cert_req.csr:
/usr/local/ctccap/bin/openssl req -new -key example.key -out cert_req.csr
If the previous command generates an error message that references
openssl.cnf, then the PCA installation path to correctly locate the openssl.cnf
file must be configured. In this case, you can apply the -config option to
define the new, non-default installation path. In the following example, this
path is /opt/tealeaf.
Chapter 6. SSL Keys
211
/opt/tealeaf/bin/openssl req -new -config /opt/tealeaf/ssl/openssl.cnf -key \
example.key -out cert_req.csr
3. During generation of the CSR by using either of the previous commands, you
are prompted for public certificate values. For more information about the
values to insert, see “Generating a Self-Signed Certificate” on page 210.
4. When the CSR file is successfully generated, it can be used by the internal CA
to complete the process to create the signed certificate.
5. The signed certificate file can now be applied in the same way as a self-signed
certificate for PCA use.
Utility Scripts
The Tealeaf-pca package provides a script to simplify the steps for creating
self-signed certificates.
The full path to the script file is /usr/local/ctccap/sbin/gen-self-signedcert.sh. Specify the names of the new private key and certificate files as
arguments to gen-self-signed-cert.sh.
The script creates a 2048-bit RSA key file and a self-signed certificate that is valid
for 10 years (3,650 days). The resulting files are owned by user ctccap, and the
private key is readable only by that user. Following is a sample invocation of this
script:
/usr/local/ctccap/sbin/gen-self-signed-cert.sh example.key example.crt
The Tealeaf-pca package creates several self-signed certificates as needed when
you install the package. If you change the host name of the Passive Capture host
machine, you can regenerate these certificates. Use the following command to
regenerate all of these certificates:
env FORCE=YES /usr/local/ctccap/sbin/all-self-signed-certs.sh
The previous command deletes and re-creates the following files:
/usr/local/ctccap/etc/tealeaf-pca.crt
/usr/local/ctccap/etc/tealeaf-pca.key
/usr/local/ctccap/etc/tealeaf-tts.crt
/usr/local/ctccap/etc/tealeaf-tts.key
/usr/local/ctccap/etc/tealeaf-tts.pem
/usr/local/ctccap/etc/tealeaf-web.crt
/usr/local/ctccap/etc/tealeaf-web.key
Deploying SSL Certificates for Use by the PCA Web Console
As needed, you can deploy custom SSL certificates for use by the PCA Web
Console to ensure secure access to the console.
Note: The encryption strength and other characteristics of the certificate must be
defined to meet your enterprise requirements.
1. Acquire or generate the SSL certificate.
v The PCA uses the default self-signed certificate and key provided. For more
information about creating a self-signed certificate, see “Generating a
Self-Signed Certificate” on page 210.
212
IBM Tealeaf CX Passive Capture Application: PCA Manual
v Tealeaf provides a utility script that simplifies the process of creating a
self-signed certificate. This script produces a certificate by using with a
reduced set of configuration options. See “Utility Scripts” on page 212.
2. The generated certificate and key file must be added to the Apache
configuration file. This file is stored in the following location:
/usr/local/ctccap/etc/httpd.conf
3. In the following example, the certificate file name is tealeaf-web.crt, and the
key file name is tealeaf-web.key:
Define SSLCERTFILE ${SYSCONFDIR}/tealeaf-web.crt
Define SSLKEYFILE ${SYSCONFDIR}/tealeaf-web.key
4. Save the file.
5. Restart the PCA.
6. All web console users must now connect by using SSL.
v For more information about how to connect by using SSL, see “Supported
Browsers for PCA Web Console” on page 67.
v For more information about changing the ports to which the PCA web
console listens, see “Supported Browsers for PCA Web Console” on page 67.
Setting up the Tealeaf Transport Service for SSL Encryption
To encrypt the communication between the Passive Capture host machine and the
Tealeaf Transport Service, you must obtain an SSL certificate. Then configure the
Passive Capture software and the Tealeaf Transport Service to use it.
v The certificate must be 2048-bit private key.
v The certificate is installed on both the PCA and the Tealeaf Transport Service
machine. The PCA requires the certificate for startup, and the Tealeaf Transport
Service uses the certificate for managing secure connections with the PCA.
Note: Transmitting through SSL between the PCA and the Tealeaf Transport
Service requires more processing and can impact overall throughput.
1. Obtain the SSL certificate.
v If you create your own self-signed certificate, you must create a 2048-bit
private key. See “Generating a Self-Signed Certificate” on page 210.
a. The Tealeaf-pca package creates a self-signed certificate for you to use
when you configure SSL encryption of the network communication
between the Passive Capture host machine and the Tealeaf Transport
Service. This self-signed certificate contains the host name of the host
machine at the time of the package installation.
b. The following certificate and key files are created by the Tealeaf-pca
package:
v /usr/local/ctccap/etc/tealeaf-tts.crt (certificate file)
v /usr/local/ctccap/etc/tealeaf-tts.key (key file)
v /usr/local/ctccap/etc/tealeaf-tts.pem (combined certificate and key
file in DOS EOL)
2. You can choose to use the above PEM file or create your own.
a. After you generate the certificate and private key files, use the script
/usr/local/ctccap/bin/crlf.sh to generate a single DOS-EOL ASCII file
that is needed by the Tealeaf Transport Service. : For example, if your
private key is in file example.key and your certificate is in file example.crt,
use the following command to generate a single DOS EOL file named
example.pem
Chapter 6. SSL Keys
213
/usr/local/ctccap/bin/crlf.sh example.key example.crt > example.pem
b. The resulting file contains a private key, so you must restrict its ownership
and permissions by using the chmod and chown commands.
3. Transfer the single DOS EOL PEM file to the machine that is running the
Tealeaf Transport Service. Ideally, you must restrict its access to just the
Tealeaf Transport Service.
v The certificate must be installed on the root Tealeaf installation directory.
4. If required, you can use the Tealeaf Archive Reader to verify that the
certificate is valid and usable. See “Testing the SSL certificate used by the
Transport Service” on page 215.
5. On the Tealeaf Transport Service server, edit your TealeafCaptureSocket.cfg
file.
v You can also perform configuration changes through the Pipeline Editor in
TMS, which provides centralized versioning and assignment of Tealeaf
configuration files. Edit the raw Transport Service configuration file and
insert the values in the [Globals] section. See "TMS WorldView Tab" in the
IBM Tealeaf cxImpact Administration Manual.
a. Add or edit the following directives in the [Globals] section to the path
name of the PEM file. If the files are not in the Tealeaf installation
directory, then specify the full path to the files.
CertificateFile=css-cert.pem
PrivateKeyFile=css-cert.pem
b. Using our sample example.pem, you would change css-cert.pem to
produce the following results:
CertificateFile=example.pem
PrivateKeyFile=example.pem
c. In the [Globals] section, insert the port number to which the Tealeaf
Transport Service listens for SSL traffic. Insert the following code :
SSLPort=1967:DataDrop
v 1967 is the port number to which the Tealeaf Transport Service listens
for SSL traffic. This value is the default value. You can change it, as
needed.
Note: This port number must not be used by any other pipeline or
Tealeaf component to listen for traffic.
v DataDrop is the first session agent in the pipeline that is configured to
process the received SSL traffic.
6. Log in to the Passive Capture configuration web UI and click the Delivery
tab. See “PCA Web Console - Delivery Tab” on page 105.
a. In the Target Recipients section, click Add.
b. The Add Recipient for Hit Delivery page is displayed. Enter the host
address and port in the corresponding fields, select the Secure check box,
and then click OK.
Note: The entered port must match the SSL listening port on the Transport
Service. The default for SSL transport is 1967.
7. The Add Certificate for Secure Delivery page is displayed. Paste in the
certificate, and click OK to save the changes. The certificate is the piece of
ASCII text that begins with the following line:
214
IBM Tealeaf CX Passive Capture Application: PCA Manual
-----BEGIN CERTIFICATE-----
and extends up to and including the following line:
-----END CERTIFICATE-----
8. Copy and paste everything from (and including) the BEGIN line up to (and
including) the END line.
9. Restart the PCA.
10. Restart the Transport Service.
Testing the SSL certificate used by the Transport Service
Before you deploy the SSL certificate to the machine that is hosting the Tealeaf
Transport Service, verify that the certificate is valid and usable using the Tealeaf
Archive Reader.
1. Leave the SSL certificate installed on the PCA.
2. In the ArchiveReader.cfg file in the Tealeaf installation directory on the
machine that is hosting the Tealeaf Transport Service, locate the [Socket]
section.
3. To configure the socket to use SSL, enter or set the following code:
USESSL=True
4. Set the Server to be localhost.
5. Configure the following values to file name of the certificate that is installed
in the root Tealeaf installation directory. Remove the hash mark (#) before the
configuration line to enable it.
CertificateFile=css-cert.pem
PrivateKeyFile=css-cert.pem
6. Save the file.
7. Use the ArchiveReader to submit hits to the Transport Service.
v See "TeaLeaf Archive Reader - Run Archived Sessions" in the IBM Tealeaf CX
Configuration Manual.
8. In the TMS Pipeline Status tab, verify that hits are being captured and
processed by the appropriate pipeline.
v See "TMS Pipeline Status Tab" in the IBM Tealeaf cxImpact Administration
Manual.
9. If hits are being captured and processed, the SSL certificate is working
properly.
10. You can now apply the configuration changes to the [Globals] section of the
TealeafCaptureSocket.cfg. See “Setting up the Tealeaf Transport Service for
SSL Encryption” on page 213.
Enabling PCA Stats in Tealeaf Status
To enable PCA statistics information to display in the Tealeaf Status report, you
must create a reference to the Capture Application Server in the Portal
Management page.
v In the Portal menu, select Tealeaf > Portal Management.
v See "Managing Tealeaf Servers" in the IBM Tealeaf cxImpact Administration
Manual.
Chapter 6. SSL Keys
215
Remove or View Certificate
If you want to remove or view the certificate, use the following procedure:
1. Start Internet Explorer on the workstation that is running PortalStatus.
2. Select Tools > Internet Options.
3. Click the Content tab.
4. Click Certificates.
5. The Certificates window is displayed. Click the Trusted Root Certification
Authorities tab.
6. You can now select the certificate for removal or viewing.
Validating PEM keys
To Validate the file by using OpenSSL, use the following command:
/usr/local/ctccap/bin/openssl rsa -check -noout -in <filename>
Following is the expected format:
-----BEGIN RSA PRIVATE KEY----.... (many lines of encoding here)
....
-----END RSA PRIVATE KEY-----
nCipher SSL Key Management System
Some Tealeaf installations use an nCipher card to offload the processing of SSL
from the main processors. The following section explains how to set up this type of
configuration.
Although nCipher cards can be used for SSL acceleration by offloading SSL
operations to the card, its primary focus is to provide a highly secure keystore
vault for SSL keys. It is also known as a Hardware Security Module (HSM) or the
nCipher Key Management system.
Note: Not all nCipher cards provide HSM support.
nCipher Considerations
The number of instances that an nCipher card can handle depends on the card
series you have and the number of CPUs.
Note: nCipher can change the standards of their SSL accelerator cards. To work
properly with Tealeaf PCA, the drivers that are provided with the nCipher card
must be OpenSSL-aware and must provide transparent access.
nCipher has several models of their SSL accelerator and key management cards,
each supporting different maximum number of SSL transactions/second. For
example, a 4000-series nCipher SSL accelerator card can handle approximately 4000
transactions at a maximum. Overhead in card operations is likely to reduce the
rate of throughput, and multiple PCA instances can also decrease this figure.
v For more information about multi-instance PCA, see “Pipeline Settings” on page
113.
216
IBM Tealeaf CX Passive Capture Application: PCA Manual
With the example above, the nCipher 4000 series card has a single instance
capacity maximum of approximately 300-400 (1024-bit SSL) transactions/second.
This figure varies with the number of PCA instances, typically in a downward
direction.
Note: Avoid providing more SSL traffic to each instance of the PCA when the
maximum throughput capacity of the accelerator card is reached.
IBM Tealeaf CX PCA and nCipher Compatibility
The following nCipher keys are compatible with this IBM Tealeaf CX PCA release:
Table 32. IBM TealeafCX PCA nCipher key compatibility
nCipher key
Encryption strength (in
bits)
Protocol
DES-CBC-SHA
56-bit
SSL3, TLS1.0
RC4-MD5
128-bit
SSL3, TLS1.0, TLS1.1, TSL1.2
RC4-SHA
128-bit
SSL3, TLS1.0, TLS1.2
AES128-SHA
128-bit
SSL3, TLS1.0, DTLS1, TLS1.1,
TLS1.2
AES256-SHA
256-bit
SSL3, TLS1.0, DTLS1, TLS1.1,
TLS1.2
DES-CBC3-SHA
192-bit
SSL3, TLS1.0, DTLS1, TLS1.1,
TLS1.2
AES128-SHA256
128-bit
TLS1.2
AES256-SHA256
256-bit
TLS1.2
AES128-GCM-SHA256
128-bit
TLS1.2
AES256-GCM-SHA384
256-bit
TLS1.2
nCipher Installation
See “nCipher HSM Installation for PCA” on page 219.
Integrating Tealeaf SSL keys with HSM
This appendix describes integration methodologies for specific HSM vendors. A
Hardware Security Module (HSM) provides both logical and physical protection of
sensitive data from non-authorized use and potential adversaries.
Note: These integration methods are generalized approaches to integrating Tealeaf
with each vendor's products. The described method must be customized to meet
the requirements of your environment by a knowledgeable administrator of the
HSM product.
In an HSM environment, the key file is stored on the HSM and retains an
additional layer of access control to prevent its movement. Tealeaf creates reference
keys to access the keys that are stored on the HSM. So, the keys used by the
Tealeaf run time inherit the protective measures that are offered by the HSM.
Integration Methods by Manufacturer
v “Integration with nCipher HSM” on page 218
v “nCipher HSM Installation for PCA” on page 219
Chapter 6. SSL Keys
217
Integration with nCipher HSM
Following section describes a general method for integrating Tealeaf with SSL keys
stored on a Hardware Security Module (HSM) for nCipher nShield products.
v This method must be customized for your HSM solution.
v This method applies to the nCipher nShield, payShield, and payShield Ultra
modules.
Assumptions
Following are the assumptions of this method:
v You installed the HSM in your environment.
v You created and configured the nCipher security world.
v You have admin-level access to the security world environment and are
comfortable using it.
Pre-Requisites
To provide the best possible support for the HSM in use, the HSM must meet the
following requirements:
v The drivers that are provided with the card must be OpenSSL-aware.
v The card must be configured to provide not apparent access at startup.
v Verify that the key installation works on system reboot.
For more information about meeting these prerequisites, see nCipher application
interfaces in the nShield/payShield User Guide provided with your nCipher
product.
When the above mentioned requirements are met, Tealeaf can transparently access
the true private keys by creating an alias. It can also reference keys that are
generated by the SSL keys provided to Tealeaf.
PCA Setup
See “Generating a Self-Signed Certificate” on page 210.
HSM Configuration and Integration
To integrate Tealeaf with the nCipher nShield key management system, apply these
general instructions to your specific environment.
Note: These steps are only a general reference and are not a step-by-step
procedure for installation. The following optional steps assume that you are
familiar with the installed key management software. For more information, please
review the nShield/payShield User Guide provided with your nCipher product.
Note: To store private SSL keys, the clear text PEM format of the keys can be
required. The nCipher utility generatekey creates equivalent reference PEM key
files. These reference key files are used by Passive Capture for conversion to its
encrypted PTL format by using the Tealeaf script option, PEM2PTL. For more
information, see Generating and importing keys in the nShield/payShield User
Guide.
Integration
To integrate:
218
IBM Tealeaf CX Passive Capture Application: PCA Manual
1. Confirm that Linux and the Passive Capture software is installed and that the
IBM Tealeaf CX Passive Capture Application server boots up successfully.
2. Verify that nCipher card and software is properly installed, including the
smart card reader. For more information, see Testing the installation in the
nShield/payShield User Guide.
3. Install the nCipher software on the PCA server.
4. Add the nCipher CHIL library directory (/opt/nfast/toolkits/hwcrhk) to the
load library path to the /etc/ld.so.conf file, if it is not present.
5. Reboot the PCA server to confirm it boots up successfully.
6. Run the kernel module list cmd to confirm that the nCipher kernel module
(lsmod) is loaded.
7. On the HSM, create the security world for key import.
8. Generate and/or import the PEM key files to the HSM.
v For more information, see Generating and importing keys in the
nShield/payShield User Guide.
9. Verify that the keys are listed in KeySafe.
10. On the PCA server, run the nCipher utility to list the keys in the nCipher
security world:
/opt/nfast/bin/nfkminfo -l
11. Confirm that Passive Capture is running and decrypting SSL traffic.
Disable HSM
To disable HSM integration from starting at Passive Capture boot time:
1. Create a DISABLED directory in /etc/init.d.
2. Move the nCipher scripts from the previous directory to the DISABLED directory.
3. Restart Passive Capture.
Note: This procedure must be done before removal of the hardware to allow
Passive Capture to boot without the Hardware Security Module (HSM).
Installation Instructions
For more information about installation, see “nCipher HSM Installation for PCA.”
nCipher HSM Installation for PCA
These installation instructions apply to the nCipher Key Management series of
boards to work with the IBM Tealeaf CX Passive Capture Application.
Requirements
Following are the installation instructions:
v nShield 6000e HSM
v nCipher software version 11.40
v Validated Linux platforms, see “Requirements” for a list of supported platforms.
Note: If you are using a 64-bit operating system, 32-bit libraries must be
installed.
Although these instructions are not validated, as stated in the Requirements
section, on nCipher software and Linux platforms, they must also work for the
following cards:
v Older nForce/nFast/nShield 4000 series cards
Chapter 6. SSL Keys
219
Additional requirements
v These boards can be used for SSL acceleration only, but SSL keys are still
required for proper operation.
v You can use other nCipher boards that support only SSL acceleration (no Key
Management). The drivers must work transparently with OpenSSL (such as the
CHIL library driver) and must be configured to auto-recognize OpenSSL upon
startup. Verify that the installation works on system reboot, too.
v If the nCipher card is to be used as an HSM keystore, then an nCipher Security
World must be created. See “Creating nCipher Security World for PCA” on page
225.
Note: The following optional steps assume that you are familiar with nCipher key
management software. These steps are only a general reference and are not a
step-by-step procedure for installation. When possible, enlist nCipher Support help
with the software installation as it typically requires compiling their drivers on the
host system.
Pre-requisites
Before you begin, verify or complete the following.
1. The nCipher kernel driver requires building on the required Linux platform, so
you must perform this build on an installed Linux development environment
for the platform. Try building on the expected production machine first to
determine if it is sufficient for driver creation.
Note: For the Redhat RHEL 5.6 64-bit platform, the nCipher kernel driver must
be built for 64-bit operating systems. The PCA software is a 32-bit application.
The nCipher intercommunication library (libnfhwcrhk.so) must be 32-bit, too.
To verify that libnfhwcrhk.so is 32-bit or 64-bit, run file libnfhwcrhk.so from
a command prompt.
2. After the driver (nfp.ko) built, you can apply the built
nfp.ko driver and the corresponding nCipher start script software to
production computer for installation and deployment.
v For more information, see the nCipher/Thales documentation.
3. These instructions assume that you don't have PCA installed the IBM Tealeaf
CX Passive Capture Application.
v If you have the PCA installed already, you must stop the PCA during the
time you install and integrate the nCipher software.
4. See “Importing SSL keys into nCipher keystore” on page 227.
nCipher installation and build steps
Details about how to build and install the nCipher kernel driver, confirm
installation, and configure nCipher startup scripts to boot before PCA.
Build kernel driver
1. Retrieve the following from the version 11.40 Linux DVD (64-bit). The
following commands assume that the DVD drive is mounted as /mnt/cdrom:
cd /
tar xvf /mnt/cdrom/linux/libc6_3/amd64/nfast/hwsp/agg.tar
tar xvf /mnt/cdrom/linux/libc6_3/amd64/nfast/ctls/agg.tar
2. Retrieve the following files:
a. For 32-bit PCA application, acquire a 32-bit version of libnfhwcrhk.so:
220
IBM Tealeaf CX Passive Capture Application: PCA Manual
Note: libnfhwcrhk.so is supplied as a binary file only without local
compiling. This version is not an openSSL-specific version.
1) Retrieve the 32-bit version of the following file:
tar xvf /mnt/cdrom/linux/libc6_3/nfast/hwcrhk/user.tar
2) When the previous tar file is extracted, it contains a file with the
relative path name to the libnfhwcrhk.so:
opt/nfast/toolkits/hwcrhk/libnfhwcrhk.so
3) Copy libnfhwcrhk.so to the following directory:
opt/nfast/toolkits/hwcrhk
b. You can also extract the same tar files that are stored on the DVD from iso's
available from the nCipher download site. Retrieve the following iso's
containing nCipher nCSS software:
nCSS_linux64_user_11_40.iso
nCSS_linux_user_11_40.iso
3. Based on the previous commands, the untarred software must be in the
following directory:
/opt/nfast
4. To build the nCipher kernel driver (nfp.ko):
a. For instructions, see nShield_Quick_Start_Guide.pdf in the v11.40 DVD
document directory. In Chapter 2, find the Installing on Linux section on
page 11.
b. The configuration script looks for the kernel headers in the default directory
(/lib/modules/current_kernel_version/build/include).
1) If your kernel headers are in a different directory, set the KERNEL_HEADERS
environment variable so that they are in $KERNAL_HEADERS/include/. For
more information, see Setting the environment variables on page 46 of
the document.
2) Historically, the headers are in /usr/src/linux/include/. If the headers
for your kernel are not already installed, install them from your
distribution disk, or contact your kernel supplier.
5. Build commands:
cd /opt/nfast/driver
./configure
make
6. If user is not added, run the following command:
useradd -r nfast
7. Validate the kernel by running the following command:
groups nfast
Install nCipher kernel driver
Note: Before you begin, verify that the nCipher board is installed on the PCA
server.
1. The following command installs nfp driver.ko and its startup scripts.
a. Command:
Chapter 6. SSL Keys
221
/opt/nfast/sbin/install
b. Select option 4. This option can be necessary to add user:group.
2. Add the OpenSSL CHIL library path to ld.so.conf file, which is required for
reboot. Options:
a. Option 1:
1) Add the line /opt/nfast/toolkits/hwcrhk to the following file through
vi:
vi /etc/ld.so.conf
2) Run ldconfig -v to store new entry to /etc/ld.so.cache file
b. Option 2: Export LD_LIBRARY_PATH=/opt/nfast/toolkits/hwcrhk
c. Option 3: copy the 32-bit /opt/nfast/toolkits/hwcrhk/libnfhwcrhk.so to
/usr/lib.
Note: Option 3 is the recommended approach, but it cannot be preferred
because of to system administration policy.
3. If Option 1 was selected above, you can verify current ld.so.cache entries for
hwcrhk, by running the following code:
ldconfig -p |grep hwcrhk
Confirm software installed
Depending on the option you followed to install the software, verify its location in
either of the following directories:
/opt/nfast/toolkits/hwcrhk/libnfhwcrhk.so
/usr/lib/libnfhwcrhk.so
Note: These steps assume that the kernel driver installation is completed. See
“Install nCipher kernel driver” on page 221.
1. Run following command to verify that the nfp kernel driver loaded:
lsmod |grep nfp
2. The expected output is something like:
nfp
42116
2
Startup workaround:
If you do not see the expected output, try stopping and starting the nCipher
driver:
/opt/nfast/sbin/init.d-ncipher stop
/opt/nfast/sbin/init.d-ncipher start
To manually start/stop nCipher server, use the following command that is
provided with the nCipher 11.40 software:
/opt/nfast/sbin/init.d-ncipher start
/opt/nfast/sbin/init.d-ncipher stop
Two new startup scripts for the v11.40 software that is placed in /etc/init.d:
222
IBM Tealeaf CX Passive Capture Application: PCA Manual
1. Start drivers:
nc_drivers start
where:
nc_drivers -> /opt/nfast/scripts/init.d/drivers
2. Start hardserver:
nc_hardserver start
where:
nc_hardserver -> /opt/nfast/scripts/init.d/hardserver
Verify that the previous scripts work for valid nCipher driver operation.
Note: The previous startup scripts might not work for reboot. The nCipher
card's driver and hardserver startup scripts must be started first for the PCA
to recognize them.
Install the PCA software
If you do not install the PCA software, you can do so now.
v See Chapter 2, “Installing the CX Passive Capture Application,” on page 19.
Configure nCipher startup scripts to boot before PCA
The following steps configure the nCipher startup scripts to boot or reboot before
the PCA startup scripts are run. The nCipher card must be initialized before the
PCA can be started.
Depending on the operating system in use, complete the following sets of
instructions:
1. “Configuring startup scripts for RedHat”
2. “Configuring startup scripts for SLES” on page 224
Configuring startup scripts for RedHat: For servers using RedHat, complete the
following set of instructions:
1. Test configuration:
1. Run the runlevel startup list command:
chkconfig --list |grep nc_
2. If a list is returned, the default nCipher startup scripts were correctly
configured. To test, reboot the PCA and validate that it is the nCipher kernel
driver. See “3. Validate PCA access to nCipher kernel driver” on page 224.
3. If nothing is listed, the default nCipher startup scripts are not correctly
configured. See “2. Manual configuration.”
2. Manual configuration:
1. The following startup scripts must have the correct runlevel
headers in the script file to be recognized:
nc_drivers
nc_hardserver
2. The nCipher startup scripts are symlinked to the following :
/opt/nfast/scripts/init.d/drivers
/opt/nfast/scripts/init.d/hardserver
Chapter 6. SSL Keys
223
3. Edit the nCipher startup scripts:
a. Edit /opt/nfast/scripts/init.d/drivers. Add following lines:
# chkconfig: 2345 45 55
# description: nCipher drivers
b. Edit /opt/nfast/scripts/init.d/hardserver. Add following lines:
# chkconfig: 2345 50 50
# description: nCipher hardserver
c.
For example:
#!/bin/sh
# generated by inst-def.sh
# chkconfig: 2345 45 55
# description: nCipher drivers
4. It can take a few minutes for the system to automatically add the scripts to
the chkconfig --list. If the scripts are not displayed, then enable runlevels
manually, as shown in following step:
a. Use chkconfig to turn on runlevel 2,3,4,5 for nc_drivers and
nc_hardserver.
chkconfig --level 2345 nc_drivers on
chkcofnig --level 2345 nc_hardserver on
5. Validate that the PCA can access the kernel driver. See “3. Validate PCA access
to nCipher kernel driver.”
3. Validate PCA access to nCipher kernel driver:
1. Restart the PCA.
2. After bootup, run the following command:
# lsmod |grep nfp
3. The output is as following. The code 2 indicates that it is 'used by':
nfp
42116
2
4. To confirm the PCA and nCipher startup scripts have the right startup
priorities, the following examples show nCipher starts first, followed by PCA
starts:
/etc/rc.d/rc2.d/S45nc_drivers
/etc/rc.d/rc2.d/S50nc_hardserver
/etc/rc.d/rc2.d/S60tealeaf-pca
/etc/rc.d/rc2.d/S55tealeaf-startup
5. After you complete the previous instructions, you must validate that the PCA
sees the nCipher kernel driver. See “Verifying use of private SSL keys” on page
228.
Configuring startup scripts for SLES:
Note: These instructions apply to nCipher v11.40 and later, unless otherwise noted.
Verify that nCipher starts up correctly with the Passive Capture application. As of
nCipher v11.40, two startup scripts (symlinks) are provided in the following
directories. For proper startup, these scripts must be run in the following order
that is listed:
224
IBM Tealeaf CX Passive Capture Application: PCA Manual
1. /etc/init.d/nc_drivers
2. /etc/init.d/nc_hardserver
Note: For nCipher to be properly recognized, these nCipher startup scripts
must be run before the Passive Capture's startup scripts.
1. Startup workaround:
Note: There can be issues with the startup sequence not working properly with
Suse SLES.
Steps:
For SLES, the suggested workaround is the following sequence.
1. Disable runlevels for nc_drivers and nc_hardserver:
chkconfig -s nc_drivers off
chkcofnig -s nc_hardserver off
2. Turn them back on with runlevels 3 and 5:
chkconfig -s nc_drivers on 3 5
chkcofnig -s nc_hardserver on 3 5
3. By default, the priority for both scripts in each runlevel is set to S01. Change
startup runlevel priority of each of these scripts in the rc3.d and rc5.d
directories by using the following commands:
mv /etc/rc.d/rc3.d/S01nc_drivers /etc/rc.d/rc3.d/S09nc_drivers
mv /etc/rc.d/rc5.d/S01nc_hardserver /etc/rc.d/rc5.d/S10nc_hardserver
2. Validating the nCipher driver:
1. After bootup, to validate nCipher driver is loaded properly, use the following
cmd:
lsmod |grep nfp
2. The expected output must be similar as:
nfp
42116
2
(where ’2’ is expected)
After you complete the previous instructions, you must validate that the PCA is
seen the nCipher kernel driver. See “Verifying use of private SSL keys” on page
228.
Creating nCipher Security World for PCA
Note: If the nCipher card is to be used as an HSM keystore, then an nCipher
Security World must be created. The following instructions apply to the creation of
a nCipher Security World with some modifications specific to the IBM Tealeaf CX
Passive Capture Application. These instructions work for:
v nCipher nShield 4000
v nCipher nShield 6000e
If your network environment requires a different set of policies or more
configuration, refer to the nShield_Quick_Start_Guide.pdf for further instructions.
1. Plug in the smart card reader and insert a card. A green light on reader
indicates a good connection.
Chapter 6. SSL Keys
225
Note: To create a Security World keystore, the smart card reader must be
plugged in with a card for writing the AES smart card group.
2.
3.
4.
5.
a. Importing of SSL keys does not require the card reader to be plugged in for
the default FIPS140-2 level2.
b. The card reader must be installed to run the PCA by using the Security
World keystore for its SSL keys.
Create a Security World. For more information, see page 13 of
nShield_Quick_Start_Guide.pdf.
Log in to the host computer as a user in the nfast group.
Set the module switch on the back panel of the nShield to the I position, which
is the pre-initialization mode.
To clear the module, run the following command:
/opt/nfast/bin/nopclearfail ca
6. Run the following command:
/opt/nfast/bin/new-world -m 1 -s 0 -Q 1/2 -k rijndael
7. The previous command creates a FIPS Level two-compliant Security World,
with OCS recovery and replacement that is enabled, and a 1/2 ACS. The
Security World is protected by an AES key.
a. The previous command generates 2 ACS smart cards, but only one is
required for security access.
b. During the smart card generation process, you must enter passphrase. For
example:
ACS smartcard test passphrase: testcard123
c. This process takes 1-2 minutes per card.
d. When the Security World is generated, a message similar to the following
must be displayed:
Security World generated on module #1;
hknso = 26b0b0fed1e2753c665b34af15523ebbb2a995a3
8. Set the module switch on the back of nShield to the O position, for Operational
mode.
Validate Security World
To validate that the security world environment is properly created, complete the
following steps.
1. Run the following command:
/opt/nfast/bin/nfkminfo
2. The expected output must be the following, with Usable indicating proper
validation:
World
generation
state
...
Module #1
generation
state
#
0x17270000 Initialised Usable ...
#
0x2 Usable
3. For more information about adding SSL keys to the nCipher Security World
keystore, review the instructions for using the following command:
226
IBM Tealeaf CX Passive Capture Application: PCA Manual
/opt/nfast/bin/generatekey
v See “Importing SSL keys into nCipher keystore.”
4. The output of the previous command is a .pem reference SSL key. This key
must be converted to the .ptl format that is used by the PCA. To convert the
reference key file to .ptl key, use the following command:
tealeaf pem2ptl <nCipherReference>.pem
5. The newly created PCA .ptl keys can now be explicitly loaded into the PCA:
a. Manually: See “Encrypted SSL Key Setup” on page 197.
b. Automatic: Load the keys into the default directory:
/usr/local/ctccap/etc/capturekeys
Note: You must create the directory and enable the proper access
permissions. See “Encrypted SSL Key Setup” on page 197.
6. After you complete either of the methods, the .ptl keys are loaded for use by
the PCA.
Importing SSL keys into nCipher keystore
To store private SSL keys for use by the PCA, the clear text PEM format of the
keys is required. The nCipher utility, generatekey, creates equivalent reference
PEM key files, which can then be converted for use by the PCA.
The following describes the general procedure for importing SSL keys into the
nCipher
keystore.
To install nCipher SSL Key Management System:
1. Confirm that Linux is installed.
2. Install the nCipher hardware card.
3. Install the nCipher software, which installs the /opt/nfast/... directories,
nfast scripts, and so on.
4. Add the nCipher CHIL library directory to the load library path,
/opt/nfast/toolkits/hwcrhk, to the /etc/ld.so.conf file, if it is not present.
5. Confirm that the Passive Capture software is installed.
6. Restart the IBM Tealeaf CX Passive Capture Application server to confirm it
boots up successfully.
7. Run the kernel module list cmd to confirm nfp nCipher kernel module is
loaded, lsmod.
8. Create the required security world environment for key import.
9. Import the RSA PEM key files to the nCipher security world by using the
nCipher utility, /opt/nfast/bin/generatekey.
For example:
/opt/nfast/bin/generatekey -i embed
a. This example assumes that keys are stored on disk in encrypted format.
1) Run the following command:
[root@tstsys]# /opt/nfast/bin/generatekey -i embed
2) The following prompt is displayed:
Chapter 6. SSL Keys
227
protect: Protected by? (token, softcard, module) [module] >
3) Press RETURN to accept the default. Next, prompt:
pemreadfile: PEM file containing RSA key? []
4) Enter the private key file: tealeaf-web.pem. Next, prompt:
embedsavefile: Filename to write key to? []
5) Enter the name of the ref file to write: tealeaf-web_ref.pem. Next,
prompt:
plainname: Key name? []
6) Enter the key name alias: tealeaf-web.
7) Enter RETURN for the remaining prompts to accept the default values.
10. Interactive prompting for remaining information can be needed.
11. Run nCipher utility to list keys in security world:
/opt/nfast/bin/nfkminfo \-l
Verifying use of private SSL keys
Through the PCA capture log, you can verify that the PCA is able to see and use
the nCipher card. In the PCA capture.log file, you must see following message
during startup:
May 26 15:30:11 mammoth reassd[22722]: OpenSSL hw engine(1): CHIL hardware
engine support
The number of keys must also be indicated in the log:
Aug 20 16:53:37 mammoth reassd[10889]: Loaded 1 keys from Capture.CaptureKeys.
A message like the following indicates an error in accessing the nCipher card:
hw engine(0)
Disabling nCipher startup at Passive Capture boot time
Note: This procedure must be done before removal of the nCipher hardware to
allow Passive Capture to boot without the hardware.
1. Create a DISABLED directory in /etc/init.d.
2. If present, move the nfast script from /etc/init.d directory to the DISABLED
directory.
3. If you are using v11.40 or later software, move the two scripts, nc_drivers and
nc_hardserver, from /etc/init.d directory to the DISABLED directory.
4. In /usr/lib, rename the libnfhwcrhk.so to add .disabled extension
mv libnfhwcrhk.so libnfhwcrhk.so.disabled
5. Restart Passive Capture.
228
IBM Tealeaf CX Passive Capture Application: PCA Manual
Chapter 7. Performance Measurement
Performance measurement provides details on the Passive Capture software
performance and timestamp measurements.
Timestamps are not part of the HTTP DataStream, so PCA must insert the
timestamps as part of its capture process.
Timestamp overview
You can use timestamp values to analyze performance of the CX PCA.
Passive Capture provides a rich set of time values available for analysis.
Note: This timestamp information is relevant only to data captured with Passive
Capture. It does not reflect any time stamping or processing that is done by other
Tealeaf software.
Assumptions
The following assumptions apply to timestamps.
v All timestamps are created by the Passive Capture software at the point of
capture. When the software sees data at its capture point, it then assigns a
timestamp.
v The Passive Capture host machine is a short, negligible distance from the HTTP
generating source. However, this factor must not impact the timestamps, since
data typically flows unimpeded from the web server to the client.
v Data is sent as fast as the end-to-end network path permits. There are potential
issues that can affect the timestamp accuracy of the traffic that is arriving at the
PCA. If the capture point is a switch span port, the internal buffers that are used
to aggregate the span traffic can change its real-time data arrival. Buffers can
hold and burst the span port traffic at any time that impacts the accuracy. Other
network devices can also change the data arrival times if it's part of the capture
traffic path but not in the live traffic path.
v All timestamps are specified in GMT with microsecond granularity. A
microsecond is one-millionth of a second.
Note: Timestamps recorded by the Tealeaf CX Passive Capture Application are best
estimates. In the default Tealeaf cxImpact installation, these timestamps do not
include rendering information from the client browser. When Tealeaf UI Capture is
installed and enabled in your web application, that information is captured and
reported through the Portal.
v For more information about client-side reporting, see "Analyzing Performance"
in the IBM Tealeaf Reporting Guide.
v The Tealeaf CX UI Capture for AJAX is a separately licensable component of the
Tealeaf CX platform.
v See "UI Capture for Ajax Guide" in the IBM Tealeaf UI Capture for Ajax Guide.
© Copyright IBM Corp. 1999, 2015
229
Example timestamps in the request
The following example values is displayed in the request after the PCA generates
its timestamps.
RequestTimeEx=2009-02-26T15:33:58.347692Z
RequestEndTimeEx=2009-02-26T15:33:58.347836Z
ResponseStartTimeEx=2009-02-26T15:33:58.352928Z
ResponseTimeEx=2009-02-26T15:33:58.552479Z
ResponseAckTimeEx=2009-02-26T15:33:58.693390Z
TLapiArrivalTimeEx=2009-02-26T15:33:58.676361Z
ReqTTLB=144
RspTTFB=5092
RspTTLB=199551
RspTTLA=140911
ConnSpeed=628604
ConnType=DSL
WS_Generation=5092
WS_Grade=ExcellentWS
WS_GradeEx=0
NT_Total=340462
NT_Grade=ExcellentNT
NT_GradeEx=0
RT_Total=345554
RT_Grade=ExcellentRT
RT_GradeEx=0
Items
Usage*
RequestEndTimeEx=2009-02-26T15:33:58.
ResponseStartTimeEx=2009-02-26T15:33:58.
ResponseAckTimeEx=2009-02-26T15:33:58.
WS_Generation=5092
NT_Total=340462
RT_Total=345554
Used in calculating timestamps and network behavior
347836
352928
693390 Timestamp values that are used for later calculations
Timestamp Definitions and Values in the Request
The following table provides an explanation for each of the values in the
[timestamp] section of the request:
Table 33. Timestamp values and definitions
230
Value
Description
RequestTimeEx
Start of the request. The timestamp when the PCA
saw the first packet of the request.
RequestEndTimeEx
End of the request. The timestamp when the PCA
saw the last packet of the request.
ResponseStartTimeEx
Start of the response. The timestamp when the PCA
saw the first packet of the response. If no response
packets were seen, then the RequestEndTimeEx value
will be used.
IBM Tealeaf CX Passive Capture Application: PCA Manual
Table 33. Timestamp values and definitions (continued)
Value
Description
ResponseTimeEx
End of the response. The timestamp when the PCA
saw the last packet of the response. If no response
packets were seen, then the RequestEndTimeEx value
will be used.
ResponseAckTimeEx
Timestamp when the PCA saw that client/browser
acknowledged the last TCP packet of the response. If
no response packets were seen, then the
RequestEndTimeEx value will be used.
TLapiArrivalTimeEx
This timestamp indicates when the hit arrives within
the PCA's pipelined process. The completed
reassembled hit time may be much later if an
incomplete hit was reassembled or was delayed due
to a very late last data packet. In an otherwise
normal case, this timestamp should be roughly the
same as the ResponseTimeEx. A large difference could
indicate a network issue.
ReqTTLB
Time in microseconds from the first packet of the
request to the last packet of the request
(RequestEndTimeEx minus RequestTimeEx). This value
does not include network time.
RspTTFB
Time (in microseconds) from the start of the request
to the first of the response page
(ResponseTimeStartEx minus RequestTimeEx). This
value is usually an accurate approximation of the
time that the Web server required to generate the
response page. In particular, if the entire page is
buffered (the default for ASP .NET and many J2EE
environments), then this measurement is an exact
predictor of how long the server-side infrastructure
took to respond.
This value may not be accurate if the Web server
served the data in chunks.
RspTTLB
Time in microseconds from the first packet of the
response to the last packet of the response
(ResponseTimeEx minus ResponseStartTimeEx). This
value does not include network time.
RspTTLA
Client/browser acknowledgement time of the last
data packet (ResponseACKTimeEx minus
ResponseTimeEx). This value is an indication of
network round trip.
To compute one-way time, divide this value by 2.
ConnSpeed
Connection speed, specified in bits per second (bps).
This value is calculated by dividing the average size
of the response by the average time it took to deliver.
When determining connection speed, any detected
client user interface events are ignored.
ConnType
Based on the ConnSpeed setting, this value is set to
Dialup, ISDN, DSL, or T1.
WS_Generation
Time in microseconds for the web server to generate
the response. This value is computed as:
ResponseStartTimeEx - RequestEndTimeEx
Chapter 7. Performance Measurement
231
Table 33. Timestamp values and definitions (continued)
Value
Description
WS_Grade
The grade assigned to the web server page
generation time (WS_Generation). Possible values are
the following:
ExcellentWS, Very GoodWS, GoodWS, FairWS, PoorWS, or
IncompleteWS.
This value is indexed by default.
WS_GradeEx
A number representing the TimeGrades time range
grouping between 0 and 4 for web server page
generation time. See “Pipeline Settings” on page 113.
NT_Total
Time in microseconds for the network travel time.
NT_Grade
The grade assigned to the network travel time
(NT_Total). Possible values are the following:
ExcellentNT, Very GoodNT, GoodNT, FairNT, PoorNT, or
IncompleteNT.
This value is indexed by default.
NT_GradeEx
A number representing the TimeGrades time range
grouping between 0 and 4 for network travel time.
RT_Total
The total round trip travel time in microseconds.
RT_Grade
The overall grade for network performance. Possible
values are the following:
ExcellentRT, Very GoodRT, GoodRT, FairRT, PoorRT, or
IncompleteRT.
This value is indexed by default.
RT_GradeEx
A number representing the TimeGrades time range
grouping between 0 and 4 for round trip travel time.
See “Pipeline Settings” on page 113.
Calculating Times from Timestamps
You can measure the performance by calculating the times from the timestamp
values.
The following timestamps are the most important timestamps to help determine
performance.
v RequestTimeEx
v ResponseStartTimeEx
v ResponseAckTimeEx
1. The first time value in microseconds is the difference between when the PCA
sees the end of the request and the start of the response: RspTTFB =
ResponseStartTimeEx - RequestTimeEx
2. The second time value in microseconds is the difference between when the
PCA sees the start of the request to the end of the response: RspTTLB =
ResponseTimeEx - ResponseStartTimeEx
3. The third time value in microseconds is the time for the last response to travel
from the PCA to the visitor. Time that is required for the initial request to go
from the user to PCA, which is a measurement of network round-trip time:
RspTTLA = ResponseACKTimeEx minus ResponseTimeEx
232
IBM Tealeaf CX Passive Capture Application: PCA Manual
Factors Affecting Timestamp Values
The following factors must be considered when evaluating timestamps.
v In a multitier networked environment, there is usually no storage on the
network. However, large and sophisticated server farms can employ a load
balancer (for example, F5), so some data storage of the HTTP request can affect
timestamp values. Since these dedicated devices are highly customized for
speed, this impact is hardly noticeable.
v Content-caching devices in the environment can distort time values. When
content is cached, the time values are reduced.
v For large average page sizes, it is more efficient to compress data for faster
transfer.
v If the HTTP/1.1 Keep-Alive option is enabled, it can affect the rate at which
multiple HTTP requests can be made.
v Application Delivery settings impact performance measurement. Is buffering
turned on? I.e., does the application start transmitting when the first byte is
ready, or does it wait for the entire page to first be ready?
v Chunking affects timestamp values. The answer can be delivered in one chunk,
or it can be chunked and delivered on demand, such as a PDF file with byte
serving.
v Client-side browser settings can affect performance and time values. For
example, if caching is enabled, transfer times of pages that are containing cached
content are reduced. The size of the cache is a factor.
Timestamps in ReqCancelled Hits
When a request is cancelled either by the visitor or the server, timestamps may not
be inserted as normal based upon the time of cancellation.
Tealeaf inserts timestamps according to the following table.
Table 34. Timestamps in ReqCancelled Hits
Current
action at
time of
cancel
Request Timestamp
Response Timestamp
Request
submitted,
Response
not started
(Response
Size = 0)
request timestamp
Use RequestEndTimeEx value
Request
submitted,
Response
started
(Response
Size > 0)
request timestamp
response timestamp
The reason for a response not starting can include any of the following:
1. Visitor cancellation
2. Server cancellation
3. Network issue
Chapter 7. Performance Measurement
233
4. Server took too long to response and PCA packet timeout was exceeded
5. PCA unable to match request to response
Note: When reporting using the Req Cancelled Count event, you can tabulate the
counts of all occurrences by specifying the data type for the event to be a [Sum],
instead of a [Count].
Hits without Timestamps
If a hit is received with improperly formatted or incomplete timestamp
information, the PCA does not generate these associated timestamps.
When the hit is passed to the Processing Server for evaluation, the Processing
Server applies a timestamp value of 01/01/1970 to the hit. The hit is then written
to a session file with the same timestamp.
Each hour, the Processing Server deletes session archive files that are older than
the number of days of data that is configured to be retained in the Processing
Server. So, the hit is automatically deleted every hour.
The number of days of data that is retained by the Processing Server is defined in
the Canister Services tab of Canister configuration in the Tealeaf Management
System. See "Configuring the CX Canister" in the IBM Tealeaf CX Configuration
Manual.
In addition to malformed or missing timestamps, the following types of hits cannot
have timestamps:
1. Tealeaf system statistics hits submitted by various Tealeaf components to report
on their status cannot be filtered out of the Canister capture stream by the
Session Router session agent.
v For more information about these hits, see "System Statistics" in the IBM
Tealeaf cxImpact Administration Manual.
v See "Session Router Session Agent" in the IBM Tealeaf CX Configuration
Manual.
2. If the IBM Tealeaf cxReveal search database is deployed, there can be references
to these hits in the data that is inserted into the database. When a IBM Tealeaf
cxReveal search is executed, the hits can already be purged. While the database
indicates that the hits exist, they do not exist in the Canister data.
Note: The IBM Tealeaf cxReveal search database requires separate installation
and configuration. See "Configuring Session Attribute Search" in the IBM Tealeaf
cxReveal Administration Manual.
234
IBM Tealeaf CX Passive Capture Application: PCA Manual
Reporting of timestamps in portal and RTV
The portal and RTV provides the following timestamp values.
Table 35. Timestamp values and descriptions
Timestamp value
Description
Page Generation Time
Page Generation Time is the time that is required, after the
request is received, for the web infrastructure (WS/AS/DB) to
process the response and to begin transmitting it to the client
browser. This time value in microseconds is the time between
the PCA saw the last packet of the request to the time when
the first packet of the response is received by PCA. This value
is calculated and inserted into the request as WS_Generation :
WS_Generation = ResponseStartTimeEx - RequestEndTimeEx
In the example request that is displayed above, the
WS_Generation time value is 352928-347836 = 5092
microseconds.
Network Time
Network Time is the time difference between when the web
server starts sending the response to when the PCA receives
the acknowledgment from the visitor. This value is calculated
and inserted into the request as NT_Total:
NT_Total = ResponseAckTimeEx - ResponseStartTimeEx
In the example request that is displayed, the NT_Total time
value is 693390 - 352928 = 340462 microseconds.
Round-Trip Time
Round-Trip Time is the time difference between when the final
packet of the request is received by the PCA and when the
PCA receives the acknowledgment from the visitor that the
entire response is received.
This value is calculated and inserted into the request as
RT_Total:
RT_Total = ResponseAckTimeEx - RequestEndTimeEx
In the example request that is displayed above, the RT_Total
time value is:
693390 - 347836 = 345554 microseconds
Reviewing the two previous sections:
RT_Total = WS_Generation + NT_Total
Render Time
Tealeaf UI Capture can be deployed to capture user interface
events in the client browser and to monitor client-side metrics,
such as the time required to render the page in the browser.
If UI Capture is deployed, render time is reported to Tealeaf in
milliseconds.
Testing Tealeaf Processing Performance
You can use the following test to check how quickly Tealeaf is processing hits. In
an ideal system, the length of time between the PCA capturing a hit and it
appearing in the Short Term Canister is a few seconds.
Note: If the Short Term Canister is spooling hits to disk, processing is delayed
even more, and this test is not a reliable indicator of normal system performance.
1. Login to the Tealeaf Portal.
Chapter 7. Performance Measurement
235
2. To display the currently active sessions, select Active > Portal. Sort the display
order by Time.
3.
4.
5.
6.
Note: These operations may take up to five seconds to complete and may
introduce a lag factor in the performance measurement.
Open a clock tool in your computer, which displays the seconds hand.
Record the start time of a new session.
v Continue refreshing the Active Sessions page until a new session begins.
v Start a new session by browsing to the web application through a new
browser window.
As soon as a new session appears, note the current value of the seconds hand.
Open the same session in the Reali-Tea Viewer application or Browser-Based
Replay.
7. In the first hit of the session, open the request.
8. In the [timestamp] section, review the value for ResponseTimeEx.
9. The difference in seconds between the above value and the time when the
session begun provides a close approximation of the time Tealeaf currently
requires to process a new hit into the Short Term Canister.
Reporting
Reports that are based on timestamp information that is captured and computed
by Tealeaf can be configured and reviewed through the Tealeaf Portal.
Reports that are based on timestamp information that is captured and computed
by Tealeaf can be configured and reviewed through the Tealeaf Portal.
If you deploy the IBM Tealeaf CX UI Capture for AJAX library, more client-side
timing information is available in Portal-based reports.
236
IBM Tealeaf CX Passive Capture Application: PCA Manual
Chapter 8. Configuring Passive Capture on Red Hat
Enterprise Linux (RHEL)
The following sections contain important information for configuring Passive
Capture in a Red Hat Enterprise Linux environment:
v “Passive Capture on RHEL - Configuring DNS”
v “Passive Capture on RHEL - Configuring Network Interfaces” on page 238
v “Configuring NTP for Passive Capture on RHEL” on page 240
v Passive Capture on RHEL - Configuring Serial-Port Access
Passive Capture on RHEL - Configuring DNS
This section provides a brief description of the configuration files for Domain
Name Service (DNS), the service that is used to convert between host names and
IP addresses. The file /etc/nsswitch.conf controls the use of various system
database files and name services. When DNS is enabled by the nsswitch.conf file,
the file /etc/resolv.conf controls how the lookups are performed. The changes
that you make to these system files take after effect you save your changes to the
files.
You can also use the redhat-config-network graphical utility to configure DNS. It is
available when the redhat-config-network package is installed. This package and
the commands it provides are not available with a minimal RHEL installation.
Disable DNS
To disable DNS lookups:
1. Edit file /etc/nsswitch.conf.
2. Place a pound sign (#) at the beginning of the line that reads hosts: files dns.
3. After editing, that line must look like the following code:
#hosts: files dns
Enable DNS
To enable DNS lookups:
1. Edit /etc/nsswitch.conf.
2. Remove any pound signs (#) at the beginning of the line that reads hosts:
files dns. After editing, that line looks like:
hosts: files dns
/etc/resolv.conf
To specify the DNS domain and servers:
1. Edit the file /etc/resolv.conf.
2. When DHCP is enabled for a network interface, the file /etc/resolv.conf is
automatically generated by the DHCP client program with the DNS servers
specified by the DHCP server.
v You normally edit /etc/resolv.conf only when using fixed (static) IP
addresses.
© Copyright IBM Corp. 1999, 2015
237
3. The /etc/resolv.conf file should specify the domain name suffix to use when
a hostname is not fully qualified.
4. You must also specify the name of at least one DNS server to use for hostname
and IP resolution. Below is an example of /etc/resolv.conf for the domain
machines Tealeaf.com with two DNS servers:
search machines.tealeaf.com
nameserver 172.16.0.5
nameserver 172.16.0.6
Passive Capture on RHEL - Configuring Network Interfaces
The network configuration files in the /etc/sysconfig directory are read and
processed during system initialization. To apply changes, eboot the machine by
using the command shutdown -r now.
v Instead of rebooting the machine, you can also bring the machine into
single-user mode by using the command shutdown now. At the command
prompt, enter the command exit to leave single-user mode and reenter
multi-user mode, which enables networking and starts the network interfaces.
DHCP Example
This example configures a machine named capture.my.domain that retrieves its
network information through DHCP on interface eth0.
File /etc/hosts contains the following line to ensure a hostname/IP-address
mapping for the machine:
127.0.0.1 capture.my.domain capture localhost.localdomain localhost
File /etc/sysconfig/network contains the following line:
HOSTNAME=capture.my.domain
File /etc/sysconfig/network-scripts/ifcfg-eth0 contains only the following lines:
BOOTPROTO=dhcp
DEVICE=eth0
ONBOOT=yes
ETHTOOL_OPTS Example
All the network interfaces used with Passive Capture must be configured for full
duplex mode. Full duplex mode ensures maximum usage of the network interfaces
for capturing packets and delivering Tealeaf hits to the Tealeaf Transport Service.
You can add a variable named ETHTOOL_OPTS to the ifcfg file for a network
interface to force its duplex mode. You usually must do it if the device
auto-negotiates itself into half duplex. Following is the sample line that sets the
ETHTOOL_OPTS variable to force the network interface into full duplex at 1 gigabit.
ETHTOOL_OPTS="autoneg off duplex full speed 1000"
You must specify the duplex and speed together and in the order that is listed.
Auto-negotiation must be disabled first, and then the duplex and speed can be set.
The duplex and speed must be set together to ensure the network interface's
device driver does not reset either the duplex or the speed when it is changed.
238
IBM Tealeaf CX Passive Capture Application: PCA Manual
With the ETHTOOL_OPTS variable defined in the ifcfg file for a network interface,
the ifup command runs the ethtool utility and passes it the options that are
defined by the variable. For example, if you edited ifcfg-eth0 with the previous
example, then ifup runs the command:
ethtool -s eth0 ${ETHTOOL_OPTS}
The command gives the following output:
ethtool -s eth0 autoneg off duplex full speed 1000
The changes that you make to the ifcfg file for a network interface takes effect
only when the ifup script runs, which is usually when the machine boots up. You
can run the ethtool command manually to take effect immediately. For example:
ethtool -s eth0 autoneg off duplex full speed 1000
Listening Interface Example
This example configures network interface eth2 for capturing packets from a
switch or tap.
When you capture from a switch, you need just one network interface because it is
receiving bidirectional traffic. A tap usually sends unidirectional traffic (inbound
and outbound) using two network cables. So for a tap, you must configure two
network interfaces, one for each cable. In both cases, you configure the network
interface the same way. A listening interface does not need an IP address because it
only receives packets from a switch or tap. It is never used to send out packets on
the wire.
File /etc/sysconfig/network-scripts/ifcfg-eth2 contains only the following lines:
DEVICE=eth2
ONBOOT=yes
Static IP example
This example configures shows how a capture server with static IP settings is
configured.
The following table shows an example of the static IP settings for a capture server.
Table 36. IP settings and values
Setting
Value
DNS
my.domain
Hostname
capture
IP address
172.16.1.100
Netmask
255.255.255.0
Gateway
172.16.1.1
The following configuration files show where the information from the example
host settings is stored.
File /etc/hosts contains the following lines:
Chapter 8. Configuring Passive Capture on Red Hat Enterprise Linux (RHEL)
239
127.0.0.1 localhost.localdomain localhost
172.16.1.100 capture.my.domain capture
File /etc/sysconfig/network contains the following line:
HOSTNAME=capture.my.domain
File /etc/sysconfig/network-scripts/ifcfg-eth0 contains the following lines:
BOOTPROTO=static
IPADDR=172.16.1.100
NETMASK=255.255.255.0
GATEWAY=172.16.1.1
DEVICE=eth0
ONBOOT=yes
Further Reading
For more information, see the
Red Hat Enterprise Linux Reference Guide: The sysconfig Directory:
http://www.redhat.com/docs/manuals/enterprise/RHEL-3-Manual/ref-guide/chsysconfig.html
Red Hat Enterprise Linux Reference Guide: Network Interfaces:
http://www.redhat.com/docs/manuals/enterprise/RHEL-3-Manual/ref-guide/chnetworkscripts.html
Configuring NTP for Passive Capture on RHEL
You can configure an NTP daemon to synchronize the time of the machine with
one or more NTP servers.
First, install the NTP package, which is not included with a minimal installation.
After you install the NTP package, select NTP servers, create configuration files,
and then enable and start the service.
Table 37. Configuring NTP
Configuration
overview
Install the NTP
package
240
Configuration steps
If you have not done so already, install the NTP package from your Linux distribution.
IBM Tealeaf CX Passive Capture Application: PCA Manual
Table 37. Configuring NTP (continued)
Configuration
overview
Configuration steps
Select NTP
servers
To synchronize your workstation's time, the NTP daemon on your workstation contacts one or
more NTP servers specified in the configuration file /etc/ntp.conf.
If an NTP server is not available on the local network, do one of the following steps:
v Select a public NTP server (visit http://www.ntp.org/ and click Public Time Server Lists). If
you select a public NTP server, read the Rules of Engagement (click Rules of Engagement on
the main page of the NTP site).
v Use the NTP time server pool (visit http://www.pool.ntp.org/ and click How do I use
pool.ntp.org).
As user root on the workstation, verify that the machine can contact the selected NTP servers.
Use the ntpdate command with the query -q option. For example, to query an NTP server whose
IP address is 1.2.3.4, use the following command:
ntpdate -q 1.2.3.4
The output must look like the following, which displays the contacted server and the time
difference between the local workstation and the server.
server 1.2.3.4, stratum 2, offset 150.695779, delay 0.03366
17 Nov 10:27:09 ntpdate[21597]: step time server 1.2.3.4 offset 150.695779 sec
If the query fails, following output is likely to come:
server 1.2.3.4, stratum 0, offset 0.000000, delay 0.00000
17 Nov 10:29:04 ntpdate[21599]: no server suitable for synchronization found
Create
configuration
files
Perform the following steps as user root on the machine:
1. Create file /etc/ntp/step-tickers. You can back up any existing version of the file. The file
contains the host names or IP addresses of the NTP servers to contact during startup to
initially set the time. If you use the NTP server pool, you must use host names, which
requires DNS.
For example, if the two NTP servers to use are 1.2.3.4 and 5.6.7.8, then use the following
commands to create the file:
echo 1.2.3.4 > /etc/ntp/step-tickers
echo 5.6.7.8 >> /etc/ntp/step-tickers
2. Create file /etc/ntp.conf with the following commands. You can back up any existing
version of the file.
echo restrict default ignore > /etc/ntp.conf
echo restrict 127.0.0.1 >> /etc/ntp.conf
echo driftfile /var/lib/ntp/drift >> /etc/ntp.conf
3. Add entries by using the restrict and server keywords for each NTP server. The following
example adds entries for the hypothetical 1.2.3.4 and 5.6.7.8 NTP servers. The mask,
nomodify, notrap, and noquery options prevent the server from modifying the NTP service on
the Passive Capture host machine.
nullecho
restrict 1.2.3.4 mask 255.255.255.255 nomodify notrap noquery >> /etc/ntp.con
echo server 1.2.3.4 >> /etc/ntp.conf
echo restrict 5.6.7.8 mask 255.255.255.255 nomodify notrap noquery >> \
/etc/ntp.con
echo server 5.6.7.8 >> /etc/ntp.conf
Chapter 8. Configuring Passive Capture on Red Hat Enterprise Linux (RHEL)
241
Table 37. Configuring NTP (continued)
Configuration
overview
Enable and start
the NTP service
Configuration steps
Perform the following steps as user root on the machine:
1. Configure the service to start at boot time by using the following command:
chkconfig ntpd on
2. Start the service immediately by using the following command:
service ntpd start
3. Verify that the service started and contacted a server by using the following command:
ntpq -np
4. View log messages for the NTP daemon in file /var/log/messages.
Install NTP package and select NTP servers
To synchronize your workstation's time, the NTP daemon on your workstation
contacts one or more NTP servers specified in the configuration file /etc/ntp.conf.
If you have not done so already, install the NTP package for your Linux
distribution.
If an NTP server is not available on the local network, do one of the following
steps:
1. Select a public NTP server (visit http://www.ntp.org/ and click Public Time
Server Lists). If you select a public NTP server, read the Rules of Engagement
(click Rules of Engagement on the main page of the NTP site).
2. Use the NTP time server pool (visit http://www.pool.ntp.org/ and click How
do I use pool.ntp.org).
As user root on the workstation, verify that the machine can contact the selected
NTP servers. Use the ntpdate command with the query -q option. For example, to
query an NTP server whose IP address is 1.2.3.4, use the following command:
ntpdate -q 1.2.3.4
The output must look like the following, which displays the contacted server and
the time difference between the local workstation and the server.
server 1.2.3.4, stratum 2, offset 150.695779, delay 0.03366
17 Nov 10:27:09 ntpdate[21597]: step time server 1.2.3.4 offset 150.695779 sec
If the query fails, following output is likely to come:
server 1.2.3.4, stratum 0, offset 0.000000, delay 0.00000
17 Nov 10:29:04 ntpdate[21599]: no server suitable for synchronization found
Create Configuration Files
Perform the following steps as user root on the machine:
1. Create file /etc/ntp/step-tickers. You can back up any existing version of the
file. The file contains the host names or IP addresses of the NTP servers to
contact during startup to initially set the time. If you use the NTP server pool,
you must use host names, which requires DNS. For example, if the two NTP
servers to use are 1.2.3.4 and 5.6.7.8, then use the following commands to create
the file:
242
IBM Tealeaf CX Passive Capture Application: PCA Manual
echo 1.2.3.4 > /etc/ntp/step-tickers
echo 5.6.7.8 >> /etc/ntp/step-tickers
2. Create file /etc/ntp.conf with the following commands. You can back up any
existing version of the file.
echo restrict default ignore > /etc/ntp.conf
echo restrict 127.0.0.1 >> /etc/ntp.conf
echo driftfile /var/lib/ntp/drift >> /etc/ntp.conf
3. Add entries by using the restrict and server keywords for each NTP server.
The following example adds entries for the hypothetical 1.2.3.4 and 5.6.7.8 NTP
servers. The mask, nomodify, notrap, and noquery options prevent the server
from modifying the NTP service on the Passive Capture host machine.
nullecho
restrict 1.2.3.4 mask 255.255.255.255 nomodify notrap noquery >> /etc/ntp.con
echo server 1.2.3.4 >> /etc/ntp.conf
echo restrict 5.6.7.8 mask 255.255.255.255 nomodify notrap noquery >> \
/etc/ntp.con
echo server 5.6.7.8 >> /etc/ntp.conf
Enable and Start the Service
Perform the following steps as user root on the machine:
1. Configure the service to start at boot time by using the following command:
chkconfig ntpd on
2. Start the service immediately by using the following command:
service ntpd start
3. Verify that the service started and contacted a server by using the following
command:
ntpq -np
4. View log messages for the NTP daemon in file /var/log/messages.
Chapter 8. Configuring Passive Capture on Red Hat Enterprise Linux (RHEL)
243
244
IBM Tealeaf CX Passive Capture Application: PCA Manual
Chapter 9. Passive capture monitoring
You can monitor the passive capturing to diagnose performance issues.
This section provides information about how to monitor the IBM Tealeaf CX
Passive Capture Application.
Checklist for diagnosing CX Passive Capture Application issues
The PCA web console provides detailed information about how to diagnose issues
with the IBM TealeafCX Passive Capture Application.
You can use the following checklist to verify PCA operations through the tabs of
the PCA Web Console.
Main checklist
The following checklist can be used to verify that the status of your passive
capture environment.
1. “PCA web Console - Console Tab” on page 84 - Enable/disable passive
capture.
a. Verify that passive capture is enabled.
2. “PCA Web Console - Summary Tab” on page 73 - Contains metrics and status
information about individual PCA processes, peers, and network interfaces.
Warning and error messages are displayed here. Verify:
a. All capture processes are up and running.
b. Delivery peers are defined and connected and are delivering hits
c. Network interfaces are up.
v For statistics on a network interface, click (details).
v For more diagnostics, click the Utilities link.
v For more information about messages that are displayed in the Summary
tab, see “PCA Web Console - Summary Tab” on page 73.
3. “PCA Web Console - Interface Tab” on page 86 - Configuration of multiple
PCA instances, network interfaces, data segmentation, and data filters. Contains
performance tuning parameters. Verify:
a. Primary interface is up and is listening to both directions of traffic.
b. Directions of each interface are properly configured. See “PCA Web Console
- Interface Tab” on page 86.
c. Required Traffic port numbers are correctly set.
d. Ignored Traffic filters are not filtering wanted data.
e. If you are using multiple PCA instances, verify that any data segmentation
configuration is directing traffic to the appropriate instance.
f. Any defined filter rules are properly including or excluding port traffic.
g. Tuning parameter settings are not impacting system performance.
4. “PCA Web Console - Delivery Tab” on page 105 - Define and test connections
to target recipients of PCA data. Enable and configure delivery of PCA statistics
to the Windows pipeline. Verify:
a. Target host names and port numbers are properly specified
© Copyright IBM Corp. 1999, 2015
245
b. For diagnosing issues, delivering PCA statistics hits to the Windows
pipeline enables better tracking of system performance. For more
information about the statistics hit, see “Stats per Instance” on page 145.
Additional PCA configuration checklist
In addition to the main checklist, you can perform some additional checks based
on the following issues:
1. SSL issues- If the PCA is not properly capturing HTTPS traffic, review the SSL
keys configuration.
v Verify that no private keys are missing.
v Verify on the web server that the current SSL key is exported and provided
to the PCA.
v PCA requires the web server private key to be exported, converted, and then
imported into the PCA.
2. Sensitive data - If sensitive data is being passed through the PCA to the
Windows pipeline and the databases, you can configure privacy rules to block
or mask this data as soon as it arrives at the PCA.
v Verify that privacy rules are properly configured.
v Review use of regular expressions in privacy rules, which can significantly
affect PCA performance.
3. Failover issues- The PCA can be configured to fail over from the primary PCA
instance to a secondary one as needed.
Additional tips for diagnosing issues
If the main checklist did not help to diagnose the issue, you can review the
following items to verify performance of the IBM TealeafCX Passive Capture
Application server.
In some situations, issues that appear in the IBM Tealeaf CX Passive Capture
Application are sourced at the operating system or network level. The following
tips are useful validation steps prior to contacting Tealeaf Customer Support.
v Check disk space on the volume where PCA is hosted
v Check operating system processes
v Verify recent history of PCA Web Console modifications, which are logged in the
following file:
/var/log/tealeaf/confxxx.log
v Verify status of NICs using external tools such as ifconfig and ethtool
v Verify physical connections between server, NICs, and network
Passive capture monitoring using Tealeaf status
The Tealeaf status report polls each active Tealeaf server that is configured in the
Portal Management page for status information and produces a summary report
within the Portal. It provides a dashboard view into the health of your system.
To include reporting on the PCA in the Tealeaf Status report, complete the
following steps to enable the Portal application. It communicates with the server or
servers that are hosting the PCA.
1. Log in to the Portal as a Tealeaf administrator.
2. From the Portal menu, select Tealeaf > Portal Management.
246
IBM Tealeaf CX Passive Capture Application: PCA Manual
3. In the Portal Management page, click the Manage Servers link.
4. Review the list of servers. Verify that the list contains a reference for each PCA
server from which you want to receive Tealeaf Status information.
5. If a server is not listed, create an entry for it:
a. Click New. From the drop-down menu, select Capture Application Server.
b. At the bottom of the page, specify the properties that enable the Portal
application to connect to the PCA server.
c. Verify that the Active check box is selected.
d. To save the entry, click Save.
e. The entry must be displayed in the list of servers.
f. Select the entry. At the top of the list of servers, click the Ping tool to test
the connection between the Portal application and the server.
6. Repeat the previous steps to create entries for other PCA servers in the
environment.
7. When you finish creating entries for all PCA servers, generate a Tealeaf Status
report:
a. In the Portal Management page, click the Logs link in the left navigation
panel.
b. Click the View Tealeaf Status link.
c. The Tealeaf Status report is displayed.
d. Search the report for PCA.
Logging for the CX Passive Capture Application
The IBM Tealeaf CX Passive Capture Application uses the following logs.
PCA logs
The following log files can be used to troubleshoot.
Table 38. CX PCA log descriptions
Log file name
Description
capture.log
CX PCA core software message log, including error
and startup messages.
v This log is rolled regularly, depending on its file
size.
v syslog is used for message generation. Other logs
use native generation methods.
conf_changelog.log
CX PCA configuration change log. Changes to
ctc-conf.xml configuration file.
statistics_YYYYMMDD.log
Minute-by-minute snapshot of CX PCA statistics. This
log is rolled daily.
maintenance_YYYYMMDD.log
CX PCA health monitoring and time-sync messages.
This log is rolled daily.
privacy_changelog.log
Change logon privacy configuration that is applied
through the CX PCA.
Chapter 9. Passive capture monitoring
247
Apache server logs
The following log files can be used to troubleshoot the PCA web console that is
hosted by Apache server.
Table 39. Apache server log descriptions
248
Log file name
Description
access_log
Apache operation error messages.
ssl_engine_log
Apache SSL operation messages.
ssl_request_log
Apache SSL request URLs.
IBM Tealeaf CX Passive Capture Application: PCA Manual
Chapter 10. Overview of passive capture maintenance
The maintenance utility performs routine maintenance and logging tasks for
Tealeaf passive capture. You can use the utility to help maintain the ability of the
PCA to perform passive capture.
Capture health check
The maintenance utility monitors the capture processes to determine whether they
are in good health.
If the utility decides the capture processes are unhealthy, it performs a forced
restart. The forced restart stops the capture processes, clears the runtime statistics
that they collect, and then restarts them. The health check helps the capture
processes recover from situations that degrade the effectiveness and performance
of the capture processes. When the maintenance utility determines that capture is
unhealthy and needs a restart, it writes a message to the maintenance log file to
indicate this situation.
Capture restart
According to a predefined schedule, the maintenance utility stops the capture
processes, clears the runtime statistics that are collected, then restarts the processes.
The restart occurs at a specific time every day or every week at a specific time on a
specific day. The forced restart prevents the capture processes from entering
unhealthy situations that would cause the health check to fail.
Note: The specified time (and optional day of the week) must be a time when
capture can be forced to restart without impacting delivery of hits to the Tealeaf
Transport Service. Services include routine network maintenance period, or a
period of low volumes of traffic to capture.
Log file location
For the IBM TealeafCX Passive Capture Application, log files are located in the
following directories:
/var/log/tealeaf
When the PCA is upgraded, the location of log file directories is never updated. If
you upgrade your PCA from an initial installation before build 3206, then log files
are stored in the following location:
/usr/local/ctccap/logs
The log file directory is stored in the following file:
/usr/local/ctccap/etc/tealeaf.conf
Locate the following entry:
logfiledir="/var/log/tealeaf"
© Copyright IBM Corp. 1999, 2015
249
Log file cleanup
The log files that are monitored by the utility are in the directory /var/log/tealeaf
and include the date in the filename, such as statistics_20050602.log.
The utility monitors that age and size of specific log files. It also deletes them if
they are older than a specified number of days or larger than a specified size.
Statistics logging
Statistics log files are generated in the PCA log directory.
The maintenance utility generates a file that contains various runtime statistics
over time. This file is intended for debugging and diagnosis of various capture and
hit delivery problems.
Statistics log files are generated in the PCA log directory, which is the following
location by default:
/var/log/tealeaf/
Log files have the following file name format: statistics_yyyymmdd.log.
v Newer logs are in plaintext format.
v Older logs are compressed into compress files.
Converting statistics log files to output format
If needed, you can use a script that is provided by Tealeaf to convert a PCA
statslog file into .csv or .xml format for more analysis. The script is in the
following location:
/usr/local/ctccap/sbin/stat2csv
Note: This script assumes that the PCA software is installed in /usr/local/ctccap.
If the PCA software is installed in another location, the shebang at line 1 of the
script must be changed to point to the correct location of the php binary: <pca
install location>/bin/php.
Usage:
./stat2csv -t type -f infile -w outfile
where:
v infile - the statistics log file in plain text or compress format.
v outfile - the name of the .csv or .xml file to output.
v type - the type of file to output: csv or xml
Examples:
./stat2csv -t csv -f statistics_20090406.log -w statistics_20090406.csv
./stat2csv -t xml -f statistics_20090406.log.gz -w statistics_20090406.xml
Time synchronization
The utility synchronizes the current date and time with the current date and time
of a IBM TealeafCX server that is running the Tealeaf Transport Service. The
maintenance log file contains the output of the time synchronization task if it is
enabled.
250
IBM Tealeaf CX Passive Capture Application: PCA Manual
Manual configuration
You can manually configure the maintenance utility by editing the configuration
file for the utility.
To configure the maintenance utility, you edit the file /usr/local/ctccap/etc/
runtime.conf, and add lines that assign values to variables.
Lines that contain a pound sign ("#") at the beginning of the line are comments and
are ignored by the maintenance utility.
A variable assignment must be a single line in the following format:
variable_name="value"
Note: Do not include spaces at the beginning or end of the line and before or after
the equal sign. Enclose the value in quotation marks.
The following list documents the configuration variables, their default values (if
unspecified in file runtime.conf), and their meanings.
Several are Boolean values that must either be YES or NO.
Capture health check
capture_health_capture_packets_dropped_in_output_high_threshold="50000"
If the capture statistics Packets dropped in output is above this value, capture is
unhealthy. This value is high when capture cannot reassemble hits as fast as they
are captured off the network interfaces.
capture_health_enable="YES"
Enables capture health checks. This check is enabled by default to monitor the
health of the capture processes.
capture_health_reassd_pct_cpu_high_threshold="90"
If the hit reassembly process uses more than 90% of the CPU, capture is unhealthy.
capture_health_reassd_virtual_size_high_threshold="1024000"
If the hit reassembly process uses more than the specified number of kilobytes
(1,024,000 kilobytes is approximately 1 gigabyte), capture is unhealthy.
capture_health_schedule_minutes="5"
The number of minutes between health checks.
Capture restart
capture_restart_enable="NO"
Forces capture to restart at a specific time each day or weekly, on a specified day
of the week. This check is disabled by default because the utility does not know a
safe or low traffic volume time to force a restart. To enable it, assign it a value of
YES and set the capture restart time in the following property.
capture_restart_time_local="00:30"
Restart capture at the specified local time (by using a 24-hour clock). If you want
to restart capture at 11:30 PM, use value "23:40". Do not include the leading zero if
the hours is less than 10. For example, to specify 6:30 AM, use value "6:30".
Chapter 10. Overview of passive capture maintenance
251
capture_restart_weekday_local (no default)
Restart capture on the specified day of the week at the time that is specified by
variable capture_restart_time_local. The value must be one of the following (all
lowercase): sunday, monday, tuesday, wednesday, thursday, friday, Saturday.
Restart capture on the specified day of the week at the time that is specified by
variable capture_restart_time_local. If you specify this value, then the forced restart
occurs on the specified day at the specified time. If you do not set this variable
(the default), forced restarts occurs every day at the time specified.
Debugging
maintenance_debug_enable="NO"
Enables verbose logging of settings and execution. This option exists to help
diagnose the behavior of the maintenance utility. It results in lots of output in the
maintenance.log file and must be used only when needed.
Log file cleanup
logfile_cleanup_enable="YES"
Enables log file cleanup.
logfile_cleanup_keepdays="14"
v Keep log files for the specified number of days. Log files older than the specified
number of days is deleted.
v The log files that are monitored by the maintenance utility contain a date in the
file name in the format <Year><Month><Day>, such as 20050601 for June 1,
2005.
v The utility uses the date that is extracted from the file name, not the date, and
time of the file that is maintained by the operating system.
logfile_cleanup_keepsize_kb="5120"
v Keep log files smaller than the specified number of kilobytes. The default value
keeps log files smaller than approximately 5 megabytes.
v Files larger than this size are deleted. The goal of this setting is to prevent large
files from accumulating on the Passive Capture host machine.
logfile_cleanup_schedule_minutes="30"
The number of minutes between checks for cleaning up log files.
Statistics logging
statistics_logging_enable="YES"
Enables statistics logging. When enabled, the maintenance utility creates CSV files
in directory /usr/local/ctccap/logs with the name statistics_YYYYMMDD.log,
where YYYYMMDD is the current year, month, and day, such as
statistics_20050602.log.
statistics_logging_schedule_minutes="1"
The number of minutes between statistics logging.
Time synchronization
timesource_sync_enable="NO"
252
IBM Tealeaf CX Passive Capture Application: PCA Manual
v Enables time synchronization with a IBM Tealeaf CX server that is running the
Tealeaf Transport Service.
v The configuration values for the host and port of the Tealeaf Transport Service in
file /usr/local/ctccap/etc/ctc-conf.xml and are normally assigned through the
Delivery tab on the web console.
v When the configuration values for the host and port are specified, the
maintenance utility enables this feature by default. Otherwise, the maintenance
utility disables time synchronization.
timesource_sync_schedule_minutes="15"
The number of minutes between time synchronizations.
Chapter 10. Overview of passive capture maintenance
253
254
IBM Tealeaf CX Passive Capture Application: PCA Manual
Appendix A. Passive capture frequently asked questions
(FAQ)
The following content contains frequently asked questions or scenarios that can be
used to help isolate or fix an issue with your CX Passive Capture Application.
Operating System
v “Does Passive Capture support 64-bit Linux” on page 256
v “Does Passive Capture Support FreeBSD” on page 256
Upgrading the operating system
If you are performing a major version upgrade of the operating system, uninstall
the PCA first and then run the upgrade.
After the upgrade is complete, install the new version of the PCA. For example, if
you are upgrading from SLES9 to SLES10, you must uninstall the PCA software for
SLES9. Then, upgrade the operating system, verify that the O/S upgrade is
successful, and then install the SLES10 version of the PCA.
Install
v “How do I automate PCA installation and configuration” on page 257
v
v
v
v
“What packages are required by the tealeaf-pca RPM” on page 257
“What changes does the tealeaf-pca RPM make to the PCA server” on page 258
“How do I specify the directory for the tealeaf symbolic link” on page 259
“How do I disable creation of the tealeaf symbolic link” on page 260
v “How do I install into a directory other than the default one” on page 260
v “What directories and files are not located under the installation directory” on
page 261
Web Server Configuration
v “How do I remove Diffie Hellman cipher from web server SSL cipher list” on
page 262
v “Some SSL hits missing from Firefox browser sessions” on page 264
PCA Configuration
v “How do I specify alternate configuration files” on page 267
Console
v “Why are my saved changes ignored by the PCA web console” on page 268
v “Why can I not stop the web console processes” on page 268
Logs
v “Where is the ctccap logs directory” on page 269
v “How do I manually change the logfile directory” on page 269
© Copyright IBM Corp. 1999, 2015
255
Other
v
v
v
v
v
“How does the PCA identify ReqCanceled pages” on page 272
“How does the PCA handle duplicate TCP packets” on page 271
“How do I make the PCA automatically clear its statistics” on page 271
“What is the default port number for failover” on page 271
“How does the PCA manage the capture of IPv6 addresses” on page 278
Troubleshooting
For more information about troubleshooting, see "Troubleshooting - Capture" in the
IBM Tealeaf Troubleshooting Guide.
Does Passive Capture support 64-bit Linux
Question
Does Passive Capture support 64-bit Linux?
Answer
Tealeaf does not provide a 64-bit version of the IBM Tealeaf CX Passive Capture
Application for 64-bit distributions of Red Hat Enterprise Linux (RHEL) and SUSE
Linux Enterprise Server (SLES) now.
However, you can install the PCA onto a 64-bit operating system. Tealeaf provides
a 32-bit package only, which depends on 32-bit libraries. These libraries are not
included in minimal installations of 64-bit distributions of RHEL and must be
installed before the PCA is installed.
Note: To install the IBM Tealeaf CX Passive Capture Application on a 64-bit
version of Linux, you must install the 32-bit versions of the required packages for
your operating system. See Chapter 2, “Installing the CX Passive Capture
Application,” on page 19.
Does Passive Capture Support FreeBSD
Question
Does the Passive Capture application support the FreeBSD operating system?
Answer
FreeBSD is no longer supported.
Note: Customers who are using the PCA on an unsupported operating system or
unsupported version of a supported operating system cannot get support for
capture-related issues.
Several major releases in the past, Tealeaf did support FreeBSD, a UNIX like
operating system. Tealeaf did not test the IBM Tealeaf CX Passive Capture
Application on FreeBSD since Tealeaf begun supporting Linux.
The biggest potential issue is the version handshake between the PCA delivery and
the Transport Service on the Tealeaf Windows servers.
256
IBM Tealeaf CX Passive Capture Application: PCA Manual
Ideally, customers who are currently using unsupported operating systems must
switch to one of our supported versions, which are available in the “References”
links below.
References
require-text
PCA Hardware Setup and Operating System Installation
v Hardware Setup and Operating System Installation
PCA Installation
v Chapter 2, “Installing the CX Passive Capture Application,” on page 19
How do I automate PCA installation and configuration
Question
How do I automate PCA installation and configuration?
Answer
Note: This solution requires a minimum tpcinstaller.sh date and version:
2007/07/05, revision 17.
You can use the tpcinstaller.sh script to automate the installation and
configuration of the tealeaf-pca package. The script is in the bin subdirectory after
installation, or you can request it from Tealeaf.
References
v Chapter 2, “Installing the CX Passive Capture Application,” on page 19
What packages are required by the tealeaf-pca RPM
Question
What packages are required by the tealeaf-pca RPM?
Answer
Use the following command line to have RPM display the list of packages that are
required by the package file named abc.rpm:
rpm -q --requires -p abc.rpm | fgrep -v rpmlib | sort -u | while read x; \
do rpm -q --whatprovides "\${x}"; done | sort -u
Note:
v Run the command as root.
v Replace file name abc.rpm with the name of the file you want to interrogate.
v The command uses Bourne shell syntax, so you must be running /bin/sh,
/bin/bash, /bin/ksh, and so on.
Following are the results of running the previos command on the distributions
Tealeaf supports.
Appendix A. Passive capture frequently asked questions (FAQ)
257
Note: The tealeaf-pca RPM installs on a minimal installation of Red Hat Enterprise
Linux without requiring more packages. In practice, more packages can be
required.
Installing the Tealeaf 32-bit RPM on a 64-bit Linux system usually requires
installing more 32-bit libraries.
v See Chapter 2, “Installing the CX Passive Capture Application,” on page 19.
Note: The package that provides a capability that is required by the Tealeaf
package can differ between distributions and different releases and updates of the
same distribution.
For more information about the required packages for specific operating system
releases, see Chapter 2, “Installing the CX Passive Capture Application,” on page
19.
What changes does the tealeaf-pca RPM make to the PCA server
Question
What changes does the tealeaf-pca RPM make to the IBM Tealeaf CX Passive
Capture Application server?
Answer
You can install Passive Capture into a directory other than the default of
/usr/local/ctccap.
v See “How do I install into a directory other than the default one” on page 260.
The package creates the log file directory, which is /var/log/tealeaf by default, if
it does not exist. It was /usr/local/ctccap/logs in earlier versions.
v When you upgrade from an old installation that contains a nonempty
/usr/local/ctccap/logs directory, the package uses the existing
/usr/local/ctccap/logs directory instead of /var/log/tealeaf. This behavior is
intended to avoid surprising the user by leaving old log files in the old directory
(/usr/local/ctccap/logs) and writing new log files to the new default
(/var/log/tealeaf).
v This check for /usr/local/ctccap/logs is independent of the installation prefix
that is chosen for installation for upgrade. So if you install Passive Capture into
/opt/tealeaf, the package still looks for a nonempty directory
/usr/local/ctccap/logs.
The package performs the following file operations:
v Create the following SSL self-signed certificate files in /usr/local/ctccap/etc.
The package creates them automatically as a convenience for installations that
do not provide their own SSL certificates:
/usr/local/ctccap/etc/tealeaf-pca.crt
/usr/local/ctccap/etc/tealeaf-pca.key
/usr/local/ctccap/etc/tealeaf-tts.crt
/usr/local/ctccap/etc/tealeaf-tts.key
/usr/local/ctccap/etc/tealeaf-tts.pem
/usr/local/ctccap/etc/tealeaf-web.crt
/usr/local/ctccap/etc/tealeaf-web.key
Note:
258
IBM Tealeaf CX Passive Capture Application: PCA Manual
– The tealeaf-pca files are currently unused and are reserved for future use.
– The tealeaf-web files are used by the default httpd.conf for the web console.
– The tealeaf-tts files are provided for convenience in configuring SSL
connections with the TeaLeaf Transport Service.
– The /usr/local/ctccap/etc directory is normally writable by root and the
capture user, ctccap.
v Install crontab file: /etc/cron.d/tealeaf. The crontab file schedules the
execution of tealeaf cron as user root.
v Install the following initialization scripts in /etc/init.d: tealeaf-pca,
tealeaf-startup.
v Create the capture.log file in the logfile directory if the file does not exist.
The package performs the following actions that modify directories and files
outside of the installation prefix:
v Create group ctccap if it does not exist.
v Create user ctccap if it does not exist.
Note: This user is created without a password that is assigned to it, so you
cannot log in with that account by default. Security risks are minimal; the ctccap
user can only start and own the Tealeaf processes. Depending on your enterprise
security requirements, you can assign a password to the ctccap user from the
root user.
v Set /usr/local/ctccap/bin/listend and /usr/local/ctccap/bin-debug/listend
as setuid root (required for listend to open eth devices for packet sniffing; drops
down to user ctccap after you open the eth devices).
v Remove PHP session files in /tmp. These files are assumed to be PHP session
files for the Passive Capture web console.
v Update /etc/syslog.conf (if needed) to ensure that it contains an entry for
facility local0 to file capture.log in the logfile directory.
v Restart syslogd to reload its configuration and use any changes that are made to
/etc/syslog.conf.
References
v Chapter 2, “Installing the CX Passive Capture Application,” on page 19
How do I specify the directory for the tealeaf symbolic link
Question
How do I specify the directory for the tealeaf symbolic link?
Answer
By default, the tealeaf-pca package creates a symbolic link from
/usr/local/bin/tealeaf to /usr/local/ctccap/bin/tealeaf.
You can specify an alternative directory for the symbolic link instead of
/usr/local/bin by setting environment variable TEALEAFCMDDIR. It must be the
fully qualified name of a directory. You must set the environment variable before
you start the rpm installation and upgrade commands and the tpcinstaller.sh
script.
Appendix A. Passive capture frequently asked questions (FAQ)
259
Following is a sample invocation that specifies an alternate installation location for
the symbolic link:
env TEALEAFCMDDIR=/usr/bin rpm -U tealeaf-pca-3204-1.RHEL4.i386.rpm
How do I disable creation of the tealeaf symbolic link
Question
How do I disable creation of the tealeaf symbolic link?
Answer
By default, the tealeaf-pca package creates a symbolic link that points to the
/usr/local/ctccap/bin/tealeaf command.
You can disable creation of this symbolic link by setting environment variable
TEALEAFCMDENABLE to NO. You must set the environment variable before starting the
rpm installation and upgrade commands and the tpcinstaller.sh script.
Following is a sample invocation that disables creation of the symbolic link.
env TEALEAFCMDENABLE=NO rpm -U tealeaf-pca-3204-1.RHEL4.i386.rpm
How do I install into a directory other than the default one
Question
How do I install into a directory other than /usr/local/ctccap?
Answer
Note: This solution requires a minimum tpcinstaller.sh date and version:
2007/07/05, revision 17.
You can relocate the tealeaf-pca package to a directory other than the default
/usr/local/ctccap. You specify the alternate directory by using the rpm
command's --prefix option along with the installation and upgrade commands.
Following are some sample rpm invocations:
rpm -i --prefix=/opt/tealeaf tealeaf-pca-3204-1.RHEL4.i386.rpm
rpm -U --prefix=/home/tealeaf tealeaf-pca-3204-1.RHEL4.i386.rpm
When you do not use the --prefix option during an installation or upgrade, RPM
uses the default installation directory that is specified in the tealeaf-pca package
file, which is /usr/local/ctccap. Once you relocate a package, you must
consistently specify the alternate directory so that the package correctly checks for
and updates previous installations.
If you are using the installer script, tpcinstaller.sh, you can specify environment
variable TPCINSTALLPREFIX before you start the script to install the tealeaf-pca
package.
If you do not specify the environment variable TPCINSTALLPREFIX before you start
the script, it determines the current installation prefix and automatically pass it
260
IBM Tealeaf CX Passive Capture Application: PCA Manual
along to the RPM commands it runs. If the package is not currently installed or is
not a relocatable version, the default directory, /usr/local/ctccap, is used by the
tealeaf-pca package.
Following is a sample invocation of the tpcinstaller.sh script.
env TPCINSTALLPREFIX=/opt/tealeaf /etc/opt/tpcinstaller.sh \
tealeaf-pca-3204-1.RHEL3-i386.rpm
What directories and files are not located under the installation
directory
Question
What directories and files are not located under the installation directory?
Answer
Note: This solution requires a minimum tpcinstaller.sh date and version:
2007/07/05, revision 17.
The following list describes various directories and files that are associated with
Passive Capture that do not reside with the installation directory, which defaults to
/usr/local/ctccap. Some paths are directly used by the software. Some are user
configurable, and some are touch through the course of normal administration and
usage of the software.
/archive [optional]
The optional directory is documented in the procedure for performing a minimal
installation of Red Hat Enterprise Linux. It exists in case packet archiving must be
enabled to diagnose various capture issues. It is not required for normal operation
and is not used by default.
/etc/cron.d/tealeaf
The tealeaf-pca package installs the crontab for use by the package.
/etc/init.d/tealeaf-pca.sh
/etc/init.d/tealeaf-startup.sh
The tealeaf-pca package installs the tealeaf-pca.sh and tealeaf-startup.sh
scripts to control the startup and shutdown of the software.
/etc/opt/tealeaf
Passive Capture uses the directory for various configuration and installation
settings. For example, the tealeaf-pca package uses this directory to record the
installation directory in file /etc/opt/tealeaf/config/installprefix and to record
the location of the tealeaf symbolic link in file /etc/opt/tealeaf/config/
tealeafcmd. The tpcinstaller.sh script uses this directory for its configuration
files, including SSL keys that must be automatically imported.
/etc/syslog.conf
Passive Capture uses the syslog facility to log messages, which are configured in
the file.
Appendix A. Passive capture frequently asked questions (FAQ)
261
/etc/group, /etc/passwd, and other user-account related files.
The tealeaf-pca package creates a user and a group account for running the
software if they do not exist. These operations modify various system files that are
updated when user accounts are created or updated.
/tmp/tealeaf-pca-11-prein.log
/tmp/tealeaf-pca-12-postin.log
/tmp/tealeaf-pca-21-preun.log
/tmp/tealeaf-pca-22-postun.log
The tealeaf-pca package creates the log files to record various installation-related
activities.
/tmp/tealeaf-pca.log
The tealeaf-pca package, prior to build 3204, used the log file to record various
installation-related activities.
/tmp/tpcinstaller.log
The tpcinstaller.sh script uses the log file to record its activities.
/usr/local/bin/tealeaf
The above file is a symbolic link to the Tealeaf command in the bin subdirectory of
the installation directory. For example: /usr/local/ctccap/bin/tealeaf.
Environment variables TEALEAFCMDDIR and TEALEAFCMDENABLE manage location and
creation of this symbolic link.
/var/log/messages
Passive Capture uses the syslog facility to log messages, which can affect the log
file, configured in /etc/syslog.conf.
/var/log/tealeaf
Passive Capture uses the directory for its log files.
How do I remove Diffie Hellman cipher from web server SSL cipher list
Diffie-Hellman is a type of SSL encryption cipher. It is designed for third parties,
which are systems other than the two parties at the two endpoints of a
conversation, cannot decrypt the communications traffic. A user session that is
established with a web server by using this cipher cannot be captured by using the
IBM Tealeaf CX Passive Capture Application.
By default, newer Firefox browser versions attempt to negotiate for the
Diffie-Hellman cipher family. Because of the increasing popularity of Firefox,
Tealeaf provides the following instructions to our customers on how to disable the
Diffie-Hellman negotiation on their Web servers, if they choose to do so.
Note: If the web server infrastructure includes an SSL termination or acceleration
device further upstream closer to the visitor's web browser than the point at which
the Tealeaf IBM Tealeaf CX Passive Capture Application server (PCA server) is
monitoring the traffic, then the PCA server can see all the traffic as non-SSL
cleartext, even if Diffie-Hellman is applied. In this situation, the following solution
262
IBM Tealeaf CX Passive Capture Application: PCA Manual
does not apply. The SSL terminating device is free to negotiate Diffie-Hellman with
the visitor's browser. It is because the PCA server is downstream of the encrypted
traffic and does not have to do any decryption.
Locating Servers Using Diffie-Hellman
In a web application environment with many servers, locating the servers that are
using the Diffie-Hellman cipher cannot be trivial.
Using Wireshark, you can apply a display filter to refine the list of servers and
identify the ones that are using the Diffie-Hellman cipher.
v For more information about Wireshark, visit http://www.wireshark.org.
1. Start Wireshark.
2. Load or capture a TCPdump file of the traffic that is submitted to the PCA.
3. In the Filter textbox, copy the following string. Edit it to remove the backslash
characters at the end of each line, which are used to signal continuation. Then,
paste the string to filter the wireshark traffic.
ssl.handshake.ciphersuite == 0x10 || ssl.handshake.ciphersuite == 0x1a || \
ssl.handshake.ciphersuite == 0x1b || ssl.handshake.ciphersuite == 0x30 \
||ssl.handshake.ciphersuite == 0x31 || ssl.handshake.ciphersuite == 0x32 || \
ssl.handshake.ciphersuite == 0x33 || ssl.handshake.ciphersuite == 0x34 \
||ssl.handshake.ciphersuite == 0x36 || ssl.handshake.ciphersuite == 0x37 || \
ssl.handshake.ciphersuite == 0x38 || ssl.handshake.ciphersuite == \
0x39||ssl.handshake.ciphersuite == 0x3a || ssl.handshake.ciphersuite == 0x63 \
|| ssl.handshake.ciphersuite == 0x65 || ssl.handshake.ciphersuite == 0x66
4. The filter traffic now shows only traffic from Diffie-Hellman ciphers.
5. Use of the Diffie-Hellman cipher must be disabled on the listed server or
servers. For more information, complete the following steps, depending on the
type of server.
Disabling
To disable the Diffie-Hellman cipher suite from your web server, follow one of the
options below. If your web server is not listed, see your web server's
documentation for instructions to disable this cipher suite for your particular web
server.
Disabling Diffie-Hellman on IIS Servers
1. Add or modify the following Registry key on each web server:
HKEY_LOCAL_MACHINE\SYSTEM\CurrentControlSet\Control\SecurityProviders\
SCHANNEL\KeyExchangeAlgorithms\Diffie-Hellman\
Enabled = 0 (DWORD value)
2. Restart the web server for the changes to take effect.
Disabling Diffie-Hellman on Apache Servers
On each web server, in the ssl.conf file or, in some cases, the main Apache conf
file, add the !DH: identifier to the start of the SSLCipherSuite config option string.
1. In Apache's conf directory, locate file:
ssl.conf
or
httpd.conf
Appendix A. Passive capture frequently asked questions (FAQ)
263
2. Look for the SSLCipherSuite keyword, whose string value must be similar to
the following string:
"ALL:!ADH:RC4+RSA:+HIGH:+MEDIUM:+LOW:+SSLv2:+EXP"
3. Add !DH: after the ALL: list so that the line looks like the following string:
"ALL:!DH:!ADH:RC4+RSA:+HIGH:+MEDIUM:+LOW:+SSLv2:+EXP"
Note: The !ADH: string in the above string is now redundant and can be
removed.
4. Repeat this edit in every SSL config section, if you are not using one global
section.
5. Save the file.
6. Restart the web server for the changes to take effect.
Some SSL hits missing from Firefox browser sessions
Note: This issue is fixed in PCA Build 3611 and later.
Note: As of Build 3327, the IBM Tealeaf CX Passive Capture Application supports
the SSL TLSv1 Session Ticket extension. If you are using Build 3327 or later and
have this extension that is enabled on your web server, the PCA can properly
capture all session data.
v If you are using a build before Build 3327, you must update to the latest
available build for your release, instead of using this workaround.
v Beginning in PCA Build 3611, the PCA can capture SSL TLSv1.1. This
explanation applies to TLSv1.1 for supporting builds as well. For more
information on downloading IBM Tealeaf, see IBM Passport Advantage Online.
When sessions are initiated in the Firefox version 3 browser and then resumed
later, SSL hits are not being decrypted. They are therefore missing from the
captured traffic.
v This issue is not displayed over non-SSL traffic.
v This issue is not known or displayed in any browser other than Firefox 3.
This issue occurs because of an SSL extension feature that is implemented in
version 3 of Firefox and in the OpenSSL modules use in the latest Apache web
servers (and possibly other web servers). A new SSL TLSv1 protocol extension
(RFC-5077) for stateless session resumption, known as SessionTicket extension,
encrypts the SSL state information, which is used only if both the client browser
and the web server comply with the standard.
Tealeaf does not support this SSL extension feature. If you install or upgraded to
the latest Apache server v2.2 build within the last few months, it is likely that you
are impacted by this new extension. Following instructions are provided for
disabling this extension in Apache.
Note: You must disable this feature in your web servers.
264
IBM Tealeaf CX Passive Capture Application: PCA Manual
SSL Pool Troubleshooting
You can test and troubleshoot the PCA servers in your SSL pool.
The following utilities are available to help you troubleshoot your SSL pool.
Table 40. SSL pool troubleshooting utilities
Header
Header
Memping
Pings the PCA server using the IP address
and port number that is displayed.
Memstats
Displays statistics from the listed PCA
server.
Memflush
Note: Data is lost when you run this utility.
It is recommended to contact IBM support
before you use the Memflush utility.
Flushes all of the stored SSL session
information from the PCA server cache.
For information about configuring an SSL pool, see “Configuring SSL Pools” on
page 191.
For information about removing a PCA server from an SSL pool, see “Removing a
PCA Server from an SSL Pool” on page 192.
Symptoms
When visitors to your web application are using SSL through Firefox 3 and then
stop, after they resume their session, hits are not captured by the PCA. It is
because of Firefox 3's default support of this new SSL extension.
When the Firefox browser negotiates the SSL handshake with your web server to
resume the session, the browser is expecting that the server supplies a 32-byte SSL
unique session identifier back to the client browser.
v The intention of the feature is to reuse SSL session key information and reduce
SSL usage in later SSL sessions.
Since Tealeaf does not support this SSL extension, it has no awareness of this
32-byte SSL identifier. Without this ID, the Tealeaf PCA is unable to decrypt any
further SSL traffic by using the ID in resumed SSL sessions.
In the following examples, you can see how session identifiers are delivered to the
visitor who is resuming a session in Firefox 3 versus Internet Explorer.
For Firefox:
SSL cipher used: Cipher Suite: TLS_RSA_WITH_AES_256_CBC_SHA (0x0035)
Session ID Length: 0
For IE:
SSL cipher used: Cipher Suite: TLS_RSA_WITH_RC4_128_MD5 (0x0004)
Session ID Length: 32
Session ID: 2FD9AAAEE999B2EA3DEF8FA005CD0CDD3D6EAE62E05E4975...
As you can see above, the Firefox SSL session ID length is 0, providing no usable
value.
Appendix A. Passive capture frequently asked questions (FAQ)
265
This new SSL TLSv1 protocol extension for stateless session resumption, which is
known as SessionTicket extension, encrypts the SSL state information such as the
SSL session identifier into a "ticket" package that both the client browser and
server must use.
Currently, Firefox 3 is the only browser by using this extension by default. For
acceptance of this extension, the server must support it as well.
To Test
To test whether this problem is occurring, you can force your web server or proxy
to use the IE-selected cipher to see whether Firefox sessions are then captured
correctly.
To Fix
Currently, the only method to address the issue is to disable use of this SSL
extension at the web server or web proxy.
Firefox Browser
To circumvent the issue as an individual user, you can disable the use of this
extension through Firefox. To disable the use of this extension in Firefox, do the
following steps:
1. Open Firefox.
2. Disable TLS 1.0 encryption in Firefox.
a. In the Firefox menu, select Tools > Options > Advanced > Encryption tab.
b. In the Protocols section, clear the Use TLS 1.0 check box.
c. Select the Use SSL 3.0 check box.
d. Click OK and save your changes.
v For more information, see https://kb.bluecoat.com/index?page=content
&id=KB2887&actp=RSS.
Web Proxy
If your proxy server is managing the SSL processing, you can be able to disable
use of the SSL TLSv1 SessionTicket extension feature at the proxy. Refer to the
documentation that came with your proxy server product.
Apache Web Servers
Depending on the version of Apache, this feature can be enabled by default. The
latest Apache mod_ssl uses openSSL 9.8j or later, which enables this TLS
SessionTicket extension by default.
v It is likely that this feature first displayed in Apache Server version 2.2.
To disable:
1. On the web server machine, edit /usr/local/apache2/conf/httpd.conf.
2. Add the following snippet to the corresponding location in the file:
SSLEngine on
SSLOptions +StrictRequire
<Directory />
SSLRequireSSL
</Directory>
266
IBM Tealeaf CX Passive Capture Application: PCA Manual
SSLProtocol +all -TLSv1 -SSLv3
SSLCipherSuite HIGH:MEDIUM:!aNULL:+SHA1:+MD5:+HIGH:+MEDIUM:!DH
Note: In the above, the !DH reference removes the Diffie-Hellman encryption
algorithm, which is required for all Tealeaf solutions. See “How do I remove
Diffie Hellman cipher from web server SSL cipher list” on page 262.
3. Save the file.
4. Restart the Apache service.
v For more information, see http://www.securityfocus.com/infocus/1818.
Non-Apache Web Servers
Most web servers do not provide an easy method of disabling use of the extension.
You can be able to disable this extension by disabling the use of TLS 1.0 through
the web server configuration options. For specific details, consult the product
documentation.
How do I specify alternate configuration files
Question
How do I specify alternate configuration files?
Answer
You can use the tpcinstaller.sh script to automate overwriting various
configurations that are created by the tealeaf-pca package when you initially install
it.
These configuration files are normally created when they do not exist. Once they
exist, the tealeaf-pca package does not modify or update them. If the tealeaf-pca
package detects that you did not modify the files, it removes them during
uninstall.
Use the tpcinstaller.sh script's postinstall command to overwrite various
configuration files. The script is in the bin subdirectory under the installation
directory after installation.
The script automates installation and configuration, but this example only
demonstrates its postinstall command that overwrites configuration files and
then starts up the software. Following is a brief example that demonstrates the
basic flavor of this capability.
v It assumes that the tealeaf-pca package is already installed into directory
/opt/tealeaf.
v Commands to be run by root are prefixed with the pound sign (#).
1. Initialize the /etc/opt/tealeaf directory:
# sh /opt/tealeaf/bin/tpcinstaller.sh init
2. Create and/or place the custom configuration files in the /etc/opt/tealeaf
directory that is created by step 1.
a. To overwrite ctc-conf.xml, provide file ctc-conf-custom.xml. To have the
installer script automatically convert PEM to PTL files and update the
ctc-conf.xml file before you overwrite:
1) Place your PEM files in /etc/opt/tealeaf/capturekeys.
2) Replace the <CaptureKeys> section of your ctc-conf-custom.xml with:
Appendix A. Passive capture frequently asked questions (FAQ)
267
<CaptureKeys>CAPTUREKEYSCONF</CaptureKeys>
b. To overwrite httpd.conf, provide file httpd-custom.conf.
c. To overwrite privacy.cfg, provide file privacy-custom.cfg.
d. To overwrite runtime.conf, provide file runtime-custom.conf.
3. Create a configuration file that is instructing the installer script to always
overwrite configuration files instead of overwriting files only when theyare not
changed from the default files. Following are the contents of such a
configuration file, which must be named /etc/opt/tealeaf/tpcinstaller.conf:
custom_capture_conf_enable="YES"
custom_httpd_conf_enable="YES"
custom_privacy_conf_enable="YES"
custom_runtime_conf_enable="YES"
4. Overwrite the configuration files and start all services:
# sh /etc/opt/tealeaf/bin/tpcinstaller.sh postinstall
If you want to instruct the installer script to also install/update the RPM, then
you must save a copy of the installer script to /etc/opt/tealeaf and then start
it with the RPM file name. Following is the example:
# env TPCINSTALLPREFIX=/opt/tealeaf sh /etc/opt/tealeaf/tpcinstaller.sh \
/root/tealeaf-pca-3204-1.RHEL4.i386.rpm
Note: Use of TPCINSTALLPREFIX requires PCA minimum build version of 3204.
Why are my saved changes ignored by the PCA web console
Question
Why are my saved changes ignored by the web console?
Answer
Confirm that cookies are enabled. The PCA Web Console requires cookies to be
enabled in order for it to maintain the session state as you perform various tasks.
If cookies are disabled, after you click Save Changes, the page you are viewing
reverts to the state before you made your changes.
References
v “PCA Web Console - Summary Tab” on page 73
Why can I not stop the web console processes
Question
Why can't I stop the web console processes?
Answer
In build 3100, the default location of the httpd.pid file that is used by the tealeaf
script to find the web console has changed. This file used to reside in the logfile
directory yet was moved to the /usr/local/ctccap/var directory to accomodate
other feature work.
If you previously modified the httpd.conf so that it differed from the
httpd.conf.default, then your httpd.conf is preserved when the new
268
IBM Tealeaf CX Passive Capture Application: PCA Manual
httpd.conf.default is installed by a later tealeaf-pca package. This preservation
means the newer Tealeaf script in a 3100 or later package cannot find the
httpd.pid because the web console continues to write it to the old location
specified by the httpd.conf.
To resolve this issue, do the following steps:
v Stop all current web console processes by using the following command as root:
killall httpd
v Review the changes between httpd.conf and the default file from the package,
httpd.conf.default. For example, you can view the changes by using the diff
command as follows:
cd /usr/local/ctccap/etc
diff -c httpd.conf.default httpd.conf
v Isolate the changes that were made locally for the Passive Capture Application
server (for example, basic authentication, disabling the non-SSL port) from the
changes that are introduced by the package.
v Save off the existing httpd.conf, overwrite the httpd.conf with the
httpd.conf.default, and merge in the isolated changes from step 3.
Where is the ctccap logs directory
Question
Where is the /usr/local/ctccap/logs directory?
Answer
As of build 3102, the default directory for Passive Capture log files is
/var/log/tealeaf. When you install the tealeaf-pca package for the first time on a
computer, it creates and uses /var/log/tealeaf.
If you are upgrading from a prior version and the /usr/local/ctccap/logs
directory is a nonempty directory, then Passive Capture continues to use that
directory instead of /var/log/tealeaf.
The web console's Backup/Logs page is updated to display the log file directory in
use.
How do I manually change the logfile directory
Question
How do I manually change the log file directory from /var/log/tealeaf to XYZ?
Answer
As of build 3100, following is the default logfile directory that is used by new
installations:
/var/log/tealeaf
If you do not want Passive Capture to use that directory, then use the following
steps. The steps configures the logfile directory to be /var/tealeaf.
v Perform all the steps as user root.
Appendix A. Passive capture frequently asked questions (FAQ)
269
v These steps assume that Passive Capture is already installed into
/usr/local/ctccap.
1. Stop all Passive Capture daemons:
tealeaf stop
tealeaf stop failoverd
2. Create the directory, if it does not exist, and assign its ownership and
permissions.
mkdir /var/tealeaf
chmod u=rwx,go= /var/tealeaf
chown ctccap:ctccap /var/tealeaf
A long listing of just the directory must produce the following results:
# ls -ld /var/tealeaf
drwx-----2 ctccap
ctccap
4096 Sep 6 14:41 /var/tealeaf
Note: The group ctccap was introduced in build 3101.
3. Create empty logfiles. You can use tealeaf initlogs. If that command is not
available in the version you are running, you must create at least the
capture.log file by using the following commands:
touch /var/tealeaf/capture.log
chmod u=rw,go= /var/tealeaf/capture.log
chown ctccap:ctccap /var/tealeaf/capture.log
A long listing of the directory must produce the following results:
# ls -l /var/tealeaf
total 0
-rw------1 ctccap
ctccap
0 Sep 6 14:42 capture.log
You can optionally chose to copy all your existing logfiles from
/var/log/tealeaf to the new directory.
4. Edit the syslog daemon configuration file: /etc/syslog.conf. Replace the line
for local0 from :
local0.* -/var/log/tealeaf/capture.log
with this code:
local0.* -/var/tealeaf/capture.log
5. Restart the syslog daemon:
/etc/init.d/syslog stop
/etc/init.d/syslog start
On Red Hat systems, you can use:
service syslog stop
service syslog start
6. Edit file /usr/local/ctccap/etc/runtime.conf, which is used by the Passive
Capture. Remove any existing variable definition for logfiledir and add the
following line:
logfiledir="/var/tealeaf"
7. Start the Passive Capture daemons:
tealeaf start failoverd
tealeaf start
If you look at /var/tealeaf/capture.log, you must see messages from Passive
Capture starting.
270
IBM Tealeaf CX Passive Capture Application: PCA Manual
All of the above steps are based on the processing for configuration variable
logfiledir performed by the post-installation script postinstallimp.sh in the
Passive Capture distribution (in the sbin subdirectory).
How do I make the PCA automatically clear its statistics
Question
How do I make the PCA automatically clear its statistics?
Answer
Create a cron job in /etc/cron.d/tealeaf to wake up and clear the stats. Examples:
* * * * * root /usr/local/ctccap/bin/tealeaf cron > /dev/null 2>&1
# the command ’tealeaf cron’ is run every minute (already exists in
# /etc/cron.d/tealeaf
30 3 * * * root /usr/local/ctccap/bin/tealeaf clearstats > /dev/null 2>&1
# ’tealeaf clearstats’ is run at 3:30 a.m. every day.
15 4 * * 2 root /usr/local/ctccap/bin/tealeaf clearstats > /dev/null 2>&1
# ’tealeaf clearstats’ is run at 4:15 a.m. on Tuesdays.
01 0 1 * * root /usr/local/ctccap/bin/tealeaf clearstats > /dev/null 2>&1
# ’tealeaf clearstats’ is run at 12:01 a.m. on the first day of every month.
What is the default port number for failover
Question
What is the default (or recommended) port number for failover?
Answer
If you do not specify a port number when you configure a failover master or
subordinate, then failover uses port 9866.
How does the PCA handle duplicate TCP packets
Only TCP packets within the TCP connection are checked against their TCP
sequence numbers. Duplicates are determined based on TCP sequence numbers.
While PCA processes can handle duplicate traffic packets, they represent an
unnecessary usage that can impact performance when the system approaches to its
maximum performance level. The submission of duplicate packets to PCA must be
curtailed whenever possible.
Appendix A. Passive capture frequently asked questions (FAQ)
271
At the TCP packet level, the IBM Tealeaf CX Passive Capture Application checks
for the presence of duplicate packets in a TCP connection. PCA does it by
evaluating their TCP sequence numbers. When duplicates are detected, they are
handled in the following ways:
v If two packets is displayed back-to-back in the same connection, the second
packet is discarded.
v If two packets is displayed in the same connection, contain a repeated sequence
number, but do not is displayed back-to-back, the second packet is discarded.
v If sources and destinations of the packets are distinct, the packets are accepted
by the PCA and reassembled for delivery to downstream canisters.
Through the Statistics tab of the PCA Web Console, you can monitor the frequency
of duplicated TCP packets. Following is the the key statistic to monitor:
Total back-to-back duplicate packets
In the stats.xml file, this statistic is displayed as:
<TcpTotalDuplicatePackets>
A high number of duplicate packets can indicate that the network switch span
ports are not properly configured. For example, if the number of duplicate packets
approaches one half of the value specified in the Total packets rcvd value
statistic. It also indicates that ports are submitting duplicate traffic to the IBM
Tealeaf CX Passive Capture Application server.
See “Stats per Instance” on page 145.
How does the PCA identify ReqCanceled pages
This section provides a brief overview of how the PCA assesses and identifies
pages as ReqCancelled pages.
v A ReqCancelled page can be canceled by request of the client browser (visitor)
or the web server.
Server-side values
After it assembles an HTTP response or request page from the TCP packets, the
HTTP HEADER is available. In the header, the values that are calculated by the
server for HeaderSize and DataSize of the response or request are displayed. In the
following example, the raw response is displayed:
HTTP/1.1 200 OK
Server: Apache-Coyote/1.1
Content-Type: text/html;charset=UTF-8
Date: Fri, 25 Feb 2011 14:40:14 GMT
Cache-Control: private
Content-Length: 83
<html>
<body>
Response
<hr>
Read 652 bytes in 7ms.
</body>
</html>
In the previos example, the Content-Length value reported by the server is 83
bytes.
272
IBM Tealeaf CX Passive Capture Application: PCA Manual
PCA-calculated values
The PCA also calculates the actual observed size of the hit from the packets when
they are stitched together. These values are stored in the [env] section of the
request:
[env]
...
RequestHeaderSize=1741
RequestDataSize=0
RequestSize=1741
ResponseHeaderSize=418
ResponseDataSize=25151
ResponseSize=25569
...
Analyzing content size values
As a result, the PCA uses two sets of sizing values:
v The server-side values
v The values that are observed and calculated by the PCA
These numbers must match.
Note: If the actual values observed by the PCA are lower than the server-side
values inserted into the response header, the PCA marks the hit as a ReqCancelled
hit.
Chunked Transfer Encoding
There is a special case when the Content-Length value is not reported by the
server. In chunked transfer encoding, the server transfers data by using the HTTP
protocol without knowing in advance the size of the entire message body. When
chunked transfer encoding is enabled by the server, following is the response:
.HTTP/1.1 200 OK
Server: Apache-Coyote/1.1
Cache-Control: private
Pragma: no-cache
Set-Cookie: logging=CC4993FF05A9AC05B52CD9756B094B10|egapp39p|;
Domain=.example.com; Path=/
Set-Cookie: DealDetectorUser=true; Domain=.example.com; Expires=Thu,
20-Feb-2031 14:39:33 GMT; Path=/
P3P: CP="CAO DSP CURa ADMa DEVa TAIa PSAa PSDa IVAi IVDi CONi OUR DELi SAMi
OTRi BUS PHY ONL UNI PUR COM NAV INT DEM STA POL HEA PRE GOV"
Content-Type: text/html
Date: Fri, 25 Feb 2011 14:39:33 GMT
Transfer-Encoding: chunked
In the previous example, there is no reported value for Content-Length. Since the
length of the content is not known in advance, the following value is inserted:
Transfer-Encoding: chunked
When the PCA observes that the transfer is chunked, it assembles the packets into
the hit and tracks the DataSize value for the page until it reaches the final chunked
packet. This last packet is designated by a zero-length chunk (chunk size that is
coded as 0) and lacking any data section.
Appendix A. Passive capture frequently asked questions (FAQ)
273
Note: Since the server does not report a Content-Length value in chunked transfer
encoding, the header in each chunk contains an entry for the length of the chunk.
As a result, the actual total length of the chunk is calculated dynamically.
v If any chunk fails to provide all of the data as reported in its header, the PCA
marks the page where the chunk is displayed as a ReqCancelled page.
Identifying ReqCancelled Hits in Tealeaf
An overview of how to identify ReqCancelled Hits in Tealeaf.
Recorded Data
When a hit is identified as including a canceled request, the IBM Tealeaf CX
Passive Capture Application inserts the following information into the [env]
section:
v ReqCancelled by Visitor (client browser):
[env]
?
ReqCancelled=Client
?
v ReqCancelled by Server:
[env]
?
ReqCancelled=Server
?
HTTP Status Code
The HTTP Status Code is generated as part of the HTTP response. The Status Code
for a ReqCancelled hit depends on when the hit was canceled:
When ReqCancelled occurred:
Status Code value(s)
Before the server sent any response
Status Code = 0
After the server sent any response
Some value other than 200 (OK)
Other characteristics
Depending on when and how the request was canceled, some parts of the hit data
can be malformed:
v For hits submitted from IBM Tealeaf CX UI Capture for AJAX, the [xml1] section
can be malformed or incomplete, if the POST was interrupted before completion.
v If it is included for capture by the PCA, an incomplete or malformed version of
the [RawRequest] section can indicate that the request was canceled before
processing of the response began on the server.
v For hits canceled during the generation of the response, parts of the response
can be missing.
Note: Whether a hit was ReqCancelled or fulfilled, the HTTP Request header field
is always included. The PCA does not capture a hit if this request header is
missing.
274
IBM Tealeaf CX Passive Capture Application: PCA Manual
Creating Event
Tealeaf provides a building block event that detects for the presence of a
ReqCancelled hit: Req Cancelled [BB-NoDim]. As a building block event, it is not
searchable.
Following are some general steps for creating the event object to track request
canceled hits:
1. Log in to the Portal as an administrator.
2. From the Portal menu, select Configure > Event Manager.
3. The Tealeaf Event Manager is displayed. See "Tealeaf Event Manager" in the
IBM Tealeaf Event Manager Manual.
4. Click the Events tab.
5. Click New Event.... The Add Event wizard is displayed.
6. Configure the following properties:
Property
Description
Name
Suggest Req Cancelled Type.
Description
Suggest Type of canceled request: client or server.
Evaluate
Set to Every Hit
Track
Set to First Per Session, even though this is for a hit.
Value Type
Set to Text.
7. Leave the other values as their defaults. Click the Condition step.
a. In the left panel, click the Events category.
b. Click Tealeaf Standard Events.
c. Select ReqCancelled [BB-NoDim]. The event is added as a condition to your
Req Canceled Type event definition.
1) From the first drop-down in the added event condition, select Value.
2) From the condition operator drop-down, select Equals.
3) In the third textbox, enter server.
4) Leave the case-sensitive check box cleared.
d. From the left panel, select ReqCancelled [BB-NoDim] again.
1) Populate it as above, except in the third textbox enter client.
e. In the drop-down at the top of the main configuration panel, select:
Any of the following conditions must be met
f. The Condition step is configured to test for the presence of either event
condition. It must look like the following screen:
Appendix A. Passive capture frequently asked questions (FAQ)
275
Figure 44. Req Canceled Type event - Condition step
8. Click the Value tab.
a. Click Select Item to Record....
b. In the Select Item dialog, click the Events category.
c. Click Tealeaf Standard Events.
d. Select the Req Cancelled [BB-NoDim].
e. Leave the drop-down value as Value.
f. The Value to record is configured to be the value of the Req Cancelled
[BB-NoDim], which is set to server or client if either of the event
conditions is met. It must look like the following screen:
Figure 45. Req Canceled Type event - Value step
9. You must configure the other steps of the event definition as needed for your
environment.
10. Click Save Draft.
11. In the Events tab, click the Save Changes to commit the new event to your
server.
Searching for Sessions with ReqCancelled Type
The event mentioned above is now defined to record the value client or server if
a request is canceled by the visitor or by the web server. Through the Portal, you
can search for occurrences of this event.
276
IBM Tealeaf CX Passive Capture Application: PCA Manual
Note: After the event is saved to the server, it is active and being processed on
each hit. It can take some time before sessions with canceled requests are captured
and processed by Tealeaf.
To search for the ReqCancelled Type event, do the following steps:
1. In the Portal, select Search > Completed Sessions.
2. To search for the occurrence of a ReqCancelled hit in a session:
a. Clear any of the default search terms.
b. Click the Events search term.
c. Click <select an event.
d.
e.
f.
g.
In the Event Selector, clear the View by Labels check box.
In the Search box, enter Req Canceled.
Select Req Canceled Type.
Click Select.
h. Your search for the existence of the event in a session is displayed. It must
look like the following screen:
Figure 46. Req Canceled Type - Search for existence of the event
3. To search for a specific type of ReqCancelled hit in a session:
a. Clear any of the default search terms.
b. Click the Event Values search term.
c. Click <select an event>.
d. In the Event Selector, clear the View by Labels check box.
e. In the Search box, enter Req Canceled.
f. Select Req Canceled Type.
g. Click Select.
h. In the search term, verify that the search operator is set to Includes.
i. In the textbox enter one of the following values:
v server - search for server-initiated ReqCancelled hits
v client - search for client-initiated ReqCancelled hits
j. Your search for a specific type of ReqCancelled hit in a session is displayed.
It must look like the following screen:
Appendix A. Passive capture frequently asked questions (FAQ)
277
Figure 47. Req Canceled Type - Search for server ReqCancelled hits
4. To run either search, click Search.
5. From the displayed list of sessions, you can select one to review for more
information. If sessions are returned, you can locate the hit where the
ReqCancelled occurred by using the following general methods:
v Event Tester: From the session list, you can send the session to Event Tester.
In the Event Tester, select the Req Canceled Type event to display. In the test
results, you can locate the hit where the event occurred.
v See "Send to Event Tester" in the IBM Tealeaf cxImpact User Manual.
v QuickView: From the session list, you can open QuickView, which displays
event information by hit. From the Order By drop-down, select Event Name.
Locate the hit where the Req Canceled Type event occurred.
v See "QuickView" in the IBM Tealeaf cxImpact User Manual.
How does the PCA manage the capture of IPv6 addresses
Beginning in Release 3500, the IBM Tealeaf CX Passive Capture Application can be
configured to capture of IPv6 addresses.
Note: Hosting of Tealeaf servers by using IPv6 addresses is not supported now.
Note: Support for processing of IPv6 addresses for search, replay, and reporting
purposes is available in Release 8.4 and later.
Note: Enabling the capture of the PCA is available by request only. See “Enabling
IPv6 Capture” on page 280.
Overview of IPv6
Internet Protocol Version 6 (IPv6) is the next-generation method for specifying
Internet Protocol addresses. IPv4, the previous version, enabled 32-bit IP addresses,
which permitted the specification of 2 32 addresses. All IPv4 address blocks are
assigned.
IPv6 enables the specification of 128-bit IP addresses, which supports the
specification of 2 128 addresses. This expanded specification allows the use of
device-specific IP addresses for the ever-growing set of connected devices. Other
features:
v Extra flexibility in allocating addresses
278
IBM Tealeaf CX Passive Capture Application: PCA Manual
v Efficiency for routing traffic
v Eliminates the primary need for network address translation (NAT)
While IPv6 is supported on all major operating systems, IPv6 does not implement
native interoperability features with IPv4. Typically, interoperability of the two
network that is addressing schemes requires a dual network stack (a stack for
each).
Note: The IBM Tealeaf CX Passive Capture Application can be configured to
capture IPv6 only, IPv4 only, and mixed IPv6 and IPv4, and IPv6 with embedded
IPv4.
Note: IPv6 with embedded IPv4 cannot be inserted into the PCA Web Console, but
you can insert these values in the ctc-conf.xml file. The PCA is able to use these
addresses. See “Methods for Capturing and Translating IP Addresses” on page 280.
See Chapter 1, “Passive Capture Overview,” on page 1.
IPv4 Format
The Internet Protocol specification originally formatted IP addresses in the
following manner. This format was in universal use through 2009.
AAA.BBB.CCC.DDD:EEEE
In the above, each three-digit set of values is called an octet.
v The value EEEE represents a port number and is preceded by a colon (:).
IPv6 Format
An IPv6 address is represented as a sequence of eight groups of four hexadecimal
digits. The groups are separated by colons (:).
The IPv6 format is designed to succeed the IP4 format, as it provides a much
larger range of potential addresses. IPv6 is displayed more frequently on the
Internet. It is specified in the following format:
2001:0db8:85a3:0000:0000:8a2e:0370:7334(8080)
Hexadecimal digits are not case-sensitive but must be represented in lowercase for
consistency.
Port numbers
Since the specification uses the colon (:) as a separator, the colon cannot be used as
the port number marker, as in IPv4:
https://langley:19000
Instead, the parentheses notation is used, as in the following example:
2001:0db8:85a3:0000:0000:8a2e:0370:7334(8080)
Note: The port number is included in parentheses (8080). For IPv6 addresses,
searches by using port numbers are not supported.
Simplifications
The full representation of eight-4-digit groups can be simplified by several
techniques, eliminating parts of the representation.
Appendix A. Passive capture frequently asked questions (FAQ)
279
Leading zeroes
Leading zeroes in a group can be omitted, but each group must contain at least
one hexadecimal digit. The previous example address can be simplified as:
2001:db8:85a3:0:0:8a2e:370:7334
Note the removal of two sets of leading zeros and two sets of octets that are
composed of zeros.
Groups of zeroes
One or more consecutive groups of zero values can be replaced with a single
empty group by using two consecutive colons (::).
v Substitution can only be applied once in an address, as multiple occurrences
create an ambiguous representation.
v If more than one such substitution canbe applied, the substitution that replaces
the most groups must be used. If the number of groups is equal, then the
leftmost substitution must be used.
With these rules, the example address is further simplified:
2001:db8:85a3::8a2e:370:7334
Special addresses
Table 41. Special addresses
Address
Name
Raw Address
Shortened Address
The
localhost
(loopback)
address
0:0:0:0:0:0:0:1
::1
The IPv6
unspecified
address
0:0:0:0:0:0:0:0
::
Source: http://www.wikipedia.org
Enabling IPv6 Capture
For more information about enabling the capture of IPv6 addresses in PCA Build
35xx or later, contact Tealeaf http://support.tealeaf.com.
Capture
This section describes methods of capturing and translating IP addresses and PCA
support for IPv6.
Methods for Capturing and Translating IP Addresses
To make IPv6 addresses available for search, addresses of either IPv4 or IPv6
format must be captured. These addresses are normalized to a format that is
known to Tealeaf indexing and search processes.
Tealeaf supports two methods of capturing and translating addresses:
280
IBM Tealeaf CX Passive Capture Application: PCA Manual
v PCA: When PCA Build 3501 or later is deployed, capture of IPv6 addresses can
be enabled. IPv4 addresses can be translated into an IPv6 format for indexing
and search. See “PCA Support for IPv6.”
v Inflate session agent: If the PCA cannot be upgraded to a IPv6-supported build
now, you must deploy the Inflate session agent to insert the appropriate values
in the request for indexing and search of IPv6 addresses. See "Inflate Session
Agent" in the IBM Tealeaf CX Configuration Manual.
Note: This method is available in Release 8.4 or later.
Note: If you cannot upgrade to PCA Build 3501 or later now, you must deploy
the Inflate session agent in every Windows processing pipeline to support
indexing and search of IPv6 addresses.
PCA Support for IPv6
In PCA Build 3501 or later, the IBM Tealeaf CX Passive Capture Application can be
configured to capture IPv6 addresses. PCA can apply compression to those
addresses, and enable configuration by using IPv6 addresses.
Note: IPv6 cannot be enabled through the PCA Web Console. For more
information, contact Tealeaf http://support.tealeaf.com.
See How does the PCA manage the capture of IPv6 addresses.
Data insertions into the request
Data insertions into the request involve the IPv6 format and translate mode.
IPv6 format
When IPv6 capture is enabled and IPv6 addresses are detected in the capture
stream, the following variables are inserted into the [env] section of the request:
[env]
...
IPV6_XLAT=False
IPV6=True
...
REMOTE_ADDR=fe80::20b:dbff:fe93:a462
LOCAL_ADDR=fe80::213:72ff:fe67:ed26
SERVER_NAME=fe80::213:72ff:fe67:ed26
IPV6_REMOTE_ADDR=FE80:0000:0000:0000:020B:DBFF:FE93:A462
IPV6_LOCAL_ADDR=FE80:0000:0000:0000:0213:72FF:FE67:ED26
IPV6_SERVER_NAME= fe80::213:72ff:fe67:ed26
...
Field
Description
IPV6_XLAT
When IPv6 is set to True, this option, if True, indicates whether IP
addresses inserted into the request contain IPv4 addresses and must be
translated.
IPV6
Indicates if captured traffic is IPv6, if True.
REMOTE_ADDR
The raw IP address, as captured, for the remote address can be in IPv6 or
IPv4 format.
v This value can be inserted by the PCA.
Note: This value can be compressed for IPv6 format.
Appendix A. Passive capture frequently asked questions (FAQ)
281
LOCAL_ADDR
The raw IP address, as captured, for the local address can be in IPv6 or
IPv4 format.
v This value can be inserted by the PCA.
Note: This value can be compressed for IPv6 format.
SERVER_NAME
Existing field name can now accept IPv6 data.
Note: SERVER_NAME is not indexed.
IPV6_REMOTE_ADDR
The REMOTE_ADDR value that is rendered in IPv6 uncompressed format
v This value can be inserted by the PCA.
IPV6_LOCAL_ADDR
The LOCAL_ADDR value that is rendered in IPv6 uncompressed format
v This value can be inserted by the PCA.
IPV6_SERVER_NAME
New field name is used to store SERVER_NAME value in uncompressed IPv6
format.
IPv6 Translate mode
In IPv6 Translate mode, the PCA translates IPv4-native addresses into a format that
is readable by using components on the Windows Tealeaf servers. The PCA inserts
the following fields in the request. In addition to the fields, the original values for
the following are inserted:
v IPV6_REMOTE_ADDR_ORIG
v IPV6_LOCAL_ADDR_ORIG
v IPV6_SERVER_NAME_ORIG
Example:
IPV6_XLAT=True
IPV6=True
REMOTE_ADDR=254.147.164.98
LOCAL_ADDR=254.103.237.38
SERVER_NAME=254.103.237.38
?
IPV6_REMOTE_ADDR=0000:0000:0000:0000:0000:FFFF:FE93:A462
IPV6_LOCAL_ADDR=0000:0000:0000:0000:0000:FFFF:FE67:ED26
IPV6_SERVER_NAME=0000:0000:0000:0000:0000:FFFF:FE67:ED26
?
IPV6_REMOTE_ADDR_ORIG=FE80:0000:0000:0000:020B:DBFF:FE93:A462
IPV6_LOCAL_ADDR_ORIG=FE80:0000:0000:0000:0213:72FF:FE67:ED26
IPV6_SERVER_NAME_ORIG=FE80:0000:0000:0000:0213:72FF:FE67:ED26
Field
Description
IPV6_REMOTE_ADDR_ORIG
Contains the original IPv6 address for the REMOTE_ADDR before it is
translated.
IPV6_LOCAL_ADDR_ORIG
Contains the original IPv6 address for the LOCAL_ADDR before it is
translated.
282
IBM Tealeaf CX Passive Capture Application: PCA Manual
IPV6_SERVER_NAME_ORIG
Contains the original IPv6 address for the SERVER_NAME before it is
translated.
See “IPv6 format” on page 281.
Appendix A. Passive capture frequently asked questions (FAQ)
283
284
IBM Tealeaf CX Passive Capture Application: PCA Manual
Appendix B. IBM Tealeaf documentation and help
IBM Tealeaf provides documentation and help for users, developers, and
administrators.
Viewing product documentation
All IBM Tealeaf product documentation is available at the following website:
https://tealeaf.support.ibmcloud.com/
Use the information in the following table to view the product documentation for
IBM Tealeaf:
Table 42. Getting help
To view...
Do this...
Product documentation
On the IBM Tealeaf portal, go to ? > Product
Documentation.
IBM Tealeaf Knowledge Center
On the IBM Tealeaf portal, go to ? > Product
Documentation and select IBM Tealeaf
Customer Experience in the ExperienceOne
Knowledge Center.
Help for a page on the IBM Tealeaf Portal
On the IBM Tealeaf portal, go to ? > Help
for This Page.
Help for IBM Tealeaf CX PCA
On the IBM Tealeaf CX PCA web interface,
select Guide to access the IBM Tealeaf CX
PCA Manual.
Available documents for IBM Tealeaf products
The following table is a list of available documents for all IBM Tealeaf products:
Table 43. Available documentation for IBM Tealeaf products.
IBM Tealeaf products
Available documents
IBM Tealeaf CX
v IBM Tealeaf Customer Experience Overview
Guide
v IBM Tealeaf CX Client Framework Data
Integration Guide
v IBM Tealeaf CX Configuration Manual
v IBM Tealeaf CX Cookie Injector Manual
v IBM Tealeaf CX Databases Guide
v IBM Tealeaf CX Event Manager Manual
v IBM Tealeaf CX Glossary
v IBM Tealeaf CX Installation Manual
v IBM Tealeaf CX PCA Manual
v IBM Tealeaf CX PCA Release Notes
© Copyright IBM Corp. 1999, 2015
285
Table 43. Available documentation for IBM Tealeaf products (continued).
IBM Tealeaf products
Available documents
IBM Tealeaf CX
v IBM Tealeaf CX RealiTea Viewer Client Side
Capture Manual
v IBM Tealeaf CX RealiTea Viewer User
Manual
v IBM Tealeaf CX Release Notes
v IBM Tealeaf CX Release Upgrade Manual
v IBM Tealeaf CX Support Troubleshooting
FAQ
v IBM Tealeaf CX Troubleshooting Guide
v IBM Tealeaf CX UI Capture j2 Guide
v IBM Tealeaf CX UI Capture j2 Release Notes
IBM Tealeaf cxImpact
v IBM Tealeaf cxImpact Administration Manual
v IBM Tealeaf cxImpact User Manual
v IBM Tealeaf cxImpact Reporting Guide
IBM Tealeaf cxConnect
v IBM Tealeaf cxConnect for Data Analysis
Administration Manual
v IBM Tealeaf cxConnect for Voice of Customer
Administration Manual
v IBM Tealeaf cxConnect for Web Analytics
Administration Manual
IBM Tealeaf cxOverstat
IBM Tealeaf cxOverstat User Manual
IBM Tealeaf cxReveal
v IBM Tealeaf cxReveal Administration Manual
v IBM Tealeaf cxReveal API Guide
v IBM Tealeaf cxReveal User Manual
IBM Tealeaf cxVerify
v IBM Tealeaf cxVerify Installation Guide
v IBM Tealeaf cxVerify User's Guide
IBM Tealeaf cxView
IBM Tealeaf cxView User's Guide
IBM Tealeaf CX Mobile
v IBM Tealeaf CX Mobile Android Logging
Framework Guide
v IBM Tealeaf Android Logging Framework
Release Notes
v IBM Tealeaf CX Mobile Administration
Manual
v IBM Tealeaf CX Mobile User Manual
v IBM Tealeaf CX Mobile iOS Logging
Framework Guide
v IBM Tealeaf iOS Logging Framework Release
Notes
286
IBM Tealeaf CX Passive Capture Application: PCA Manual
Notices
This information was developed for products and services offered in the U.S.A.
IBM may not offer the products, services, or features discussed in this document in
other countries. Consult your local IBM representative for information on the
products and services currently available in your area. Any reference to an IBM
product, program, or service is not intended to state or imply that only that IBM
product, program, or service may be used. Any functionally equivalent product,
program, or service that does not infringe any IBM intellectual property right may
be used instead. However, it is the user's responsibility to evaluate and verify the
operation of any non-IBM product, program, or service.
IBM may have patents or pending patent applications covering subject matter
described in this document. The furnishing of this document does not grant you
any license to these patents. You can send license inquiries, in writing, to:
IBM Director of Licensing IBM Corporation North Castle Drive Armonk, NY
10504-1785 U.S.A.
For license inquiries regarding double-byte (DBCS) information, contact the IBM
Intellectual Property Department in your country or send inquiries, in writing, to:
Intellectual Property Licensing Legal and Intellectual Property Law IBM Japan, Ltd.
19-21, Nihonbashi-Hakozakicho, Chuo-ku Tokyo 103-8510, Japan
The following paragraph does not apply to the United Kingdom or any other
country where such provisions are inconsistent with local law: INTERNATIONAL
BUSINESS MACHINES CORPORATION PROVIDES THIS PUBLICATION "AS IS"
WITHOUT WARRANTY OF ANY KIND, EITHER EXPRESS OR IMPLIED,
INCLUDING, BUT NOT LIMITED TO, THE IMPLIED WARRANTIES OF
NON-INFRINGEMENT, MERCHANTABILITY OR FITNESS FOR A PARTICULAR
PURPOSE. Some states do not allow disclaimer of express or implied warranties in
certain transactions, therefore, this statement may not apply to you.
This information could include technical inaccuracies or typographical errors.
Changes are periodically made to the information herein; these changes will be
incorporated in new editions of the publication. IBM may make improvements
and/or changes in the product(s) and/or the program(s) described in this
publication at any time without notice.
Any references in this information to non-IBM Web sites are provided for
convenience only and do not in any manner serve as an endorsement of those Web
sites. The materials at those Web sites are not part of the materials for this IBM
product and use of those Web sites is at your own risk.
IBM may use or distribute any of the information you supply in any way it
believes appropriate without incurring any obligation to you.
Licensees of this program who wish to have information about it for the purpose
of enabling: (i) the exchange of information between independently created
programs and other programs (including this one) and (ii) the mutual use of the
information which has been exchanged, should contact:
© Copyright IBM Corp. 1999, 2015
287
IBM Bay Area Lab 1001 E Hillsdale Boulevard Foster City, California 94404 U.S.A.
Such information may be available, subject to appropriate terms and conditions,
including in some cases, payment of a fee.
The licensed program described in this document and all licensed material
available for it are provided by IBM under terms of the IBM Customer Agreement,
IBM International Program License Agreement or any equivalent agreement
between us.
Any performance data contained herein was determined in a controlled
environment. Therefore, the results obtained in other operating environments may
vary significantly. Some measurements may have been made on development-level
systems and there is no guarantee that these measurements will be the same on
generally available systems. Furthermore, some measurements may have been
estimated through extrapolation. Actual results may vary. Users of this document
should verify the applicable data for their specific environment.
Information concerning non-IBM products was obtained from the suppliers of
those products, their published announcements or other publicly available sources.
IBM has not tested those products and cannot confirm the accuracy of
performance, compatibility or any other claims related to non-IBM products.
Questions on the capabilities of non-IBM products should be addressed to the
suppliers of those products.
All statements regarding IBM's future direction or intent are subject to change or
withdrawal without notice, and represent goals and objectives only.
This information contains examples of data and reports used in daily business
operations. To illustrate them as completely as possible, the examples include the
names of individuals, companies, brands, and products. All of these names are
fictitious and any similarity to the names and addresses used by an actual business
enterprise is entirely coincidental.
COPYRIGHT LICENSE:
This information contains sample application programs in source language, which
illustrate programming techniques on various operating platforms. You may copy,
modify, and distribute these sample programs in any form without payment to
IBM, for the purposes of developing, using, marketing or distributing application
programs conforming to the application programming interface for the operating
platform for which the sample programs are written. These examples have not
been thoroughly tested under all conditions. IBM, therefore, cannot guarantee or
imply reliability, serviceability, or function of these programs. The sample
programs are provided "AS IS", without warranty of any kind. IBM shall not be
liable for any damages arising out of your use of the sample programs.
Trademarks
IBM, the IBM logo, and ibm.com® are trademarks or registered trademarks of
International Business Machines Corp., registered in many jurisdictions worldwide.
Other product and service names might be trademarks of IBM or other companies.
A current list of IBM trademarks is available on the Web at “Copyright and
trademark information” at www.ibm.com/legal/copytrade.shtml.
288
IBM Tealeaf CX Passive Capture Application: PCA Manual
Privacy Policy Considerations
IBM Software products, including software as a service solutions, ("Software
Offerings") may use cookies or other technologies to collect product usage
information, to help improve the end user experience, to tailor interactions with
the end user or for other purposes. A cookie is a piece of data that a web site can
send to your browser, which may then be stored on your computer as a tag that
identifies your computer. In many cases, no personal information is collected by
these cookies. If a Software Offering you are using enables you to collect personal
information through cookies and similar technologies, we inform you about the
specifics below.
Depending upon the configurations deployed, this Software Offering may use
session and persistent cookies that collect each user's user name, and other
personal information for purposes of session management, enhanced user usability,
or other usage tracking or functional purposes. These cookies can be disabled, but
disabling them will also eliminate the functionality they enable.
Various jurisdictions regulate the collection of personal information through
cookies and similar technologies. If the configurations deployed for this Software
Offering provide you as customer the ability to collect personal information from
end users via cookies and other technologies, you should seek your own legal
advice about any laws applicable to such data collection, including any
requirements for providing notice and consent where appropriate.
IBM requires that Clients (1) provide a clear and conspicuous link to Customer's
website terms of use (e.g. privacy policy) which includes a link to IBM's and
Client's data collection and use practices, (2) notify that cookies and clear gifs/web
beacons are being placed on the visitor's computer by IBM on the Client's behalf
along with an explanation of the purpose of such technology, and (3) to the extent
required by law, obtain consent from website visitors prior to the placement of
cookies and clear gifs/web beacons placed by Client or IBM on Client's behalf on
website visitor's devices
For more information about the use of various technologies, including cookies, for
these purposes, See IBM's Online Privacy Statement at: http://www.ibm.com/
privacy/details/us/en section entitled "Cookies, Web Beacons and Other
Technologies."
Notices
289
290
IBM Tealeaf CX Passive Capture Application: PCA Manual
IBM®
Printed in USA