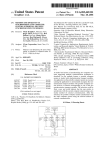
1
INTRODUCTION
The No. 7915 Field Alarm Signal Tester (FAST Tool) is a portable, battery operated RF signal receiving/analyzing device
priiarity used to identify the best possible antOnM lOCatiOnS for St&c&et
radios provided as part of an the Adam
Long
Range Rads Sgurily System. It can also be used as a salesman’s demonstration tool, and for verifying the suitability of a
customer’s site tor radio use. The FAST Tool provides direct, visual indication of real-time field strength and frequency
measurements from network radb signals, using easy-to-read LED bar graphs, and includesa built-in speakerfor lining
to
modulated data signals. Sin- the proper placement of the subscriber antenna is critical in achieving a dependable
~mmunication link with the s-r&y
nemrk. installers should use the No. f915 FAST TOOI at all Long knge &da subrr(ber
installations.
CONTROLS
POWER ON SWITCH
Thai toggle switch applies power to the NO. 7915. The FAST
tool Can operate continuously lor up to 3 hours using its
built-in battery. and includes a transformer for recharging the
battery.
ff desired. the FAST Tool can operate with
translormer pOwor. but note that the line ard limits freedom
of movement. The FAST Tool automatically turns itself off
after seven minutes. To reactivate, turn the POWER switch
Off. then on again.
BATT(ERY)
TEST BUlTON
fhk pushbaton swilch is used to display the conditiin of the
internal. rechargeable
battory.
When depressed, the
horizontal FREOUENCYIBATTERY
bar graph indkatas the
condition of the battery. The lighted segment should be
within the bracketed area marked rjooD’.
Use the supplied
transformer to charge the battey if the lighted segment is
within the %ECHAFtGE’ bracketed area
VOLUME
CONTROL
The’ FAST Tool includes a built-in speaker for listening to
modulated data signals. retorted to in this document as
‘bleeps’.
With practice, these sounds become very
diitinguishable.
thus aiding in the quick identifiiion
of
suitable antenna mounting locations. The VOLUME control
is used to adjust the speaker volume. Rotate cbckwise to
increase volume, counterclockwise to decrease the volume.
Refer to the USING THE FAST TOOL section for more
information regarding sound.
CHANNEL
DIP SWITCH
The FAST Tool can be set to receive any of the 14 Long
Range Radii communication channels vii a seven position
DIP switch. To sat the No. 7915 to the proper channel. refer
lo the ‘USING THE FAST TOOL’ section of this document.
RANGE SWITCH
This switch is used to sat the LED segments of the SfGNAL
STRENGTH bar graph in either coarse o! fine increments.
The HIGH (coarse) range posbn measures field strength in
steps of approximately 9dB per LED sagment. and is usad to
identify sites that provide strong communitation paths to the
network.
The LOW (fine) range measures in steps Of
approximately
4dB per LED segment and is used to
determine antenna mounting’ locations in weaker signal
l nvfronments. Refer to the USING THE FAST TOOL section
for additional information regardii
acceptable values when
determining antenna bcatiim.
www.PDF-Zoo.com
DISPLAYS
SIGNAL STRENGTH
DISPLAY
The vertical SIGNAL STRENGTH bar graph display provides
quick, visual indication of the strength 01 local RF activii.
albwing the installer to easily determine suitable subscriber
antenna beat&s.
The Signal Strength dii
represents
the nlative field strength of received RF signals and is
calibrated in darn. Depending on the RANGE switch satting
(see RANGE SWfTCH). each segment of the bar graph
indiatar approximately either an 9dB (HIGH po&ion) or 4dB
(LOW position) increase in signal level. Sine1 Strength ix
also measured on a numerical scale from I to 10. with 10
representing the highest signal strength in the selected
range. Due to the sensitivity of the FAST Toof. ambient radii
‘noisa’ will usually fiiht segment [l] of the bar graph. In
addition. signals on adjacent channels can also light the
display. Noie fha1 ‘on &anner sign& ~71 fight the centermosr segments of the FREOUEEJCY bar graph and that on&
these signals should be used when determining good
antenna locations (refer to the FREOUENCY OlSPLAY
paragraph for more kWm8trbn).
FREOllE~C~lBATTEtiY
DISPLAY
The horizontal bar graph display sarves two purposes:
Frequeny offsat measurement and battery condi
Normafly. this bar graph visually indicates the frequency
offset of reaived signals. and is used to distinguish ‘on
thannor signals from other spurious signals. Qn ChMr
signals will light a cluster of center segments. while spur&s
signals will liiht the segments at either end of the bar graph.
The leftmost segments represent signak that are at a bwer
frequency than the programmed channel, while the rightmost
segments represent higher frequency signals. Since an FM
transmission scheme is used by the Ademco Loq Range
Radii network. the actual number of segments fighted will
vary aocording to the data modulatbn of each transmission.
with each segment representing
about 1kHx deviation.
Typical network signals have 8pproximately
tikHz
deviation. In addition. the FAST Tool witl audiMy indiia ‘on
charmer data signals with ‘bleeps’.
The battery con&tion can also be diiplayed on this bar graph
by depressing the BAm TEST button. The fit LED segment
should be within the bracketed area marked ‘Goo(r.
II not.
the battery rho&d ba charged before using the FAST TOOL
Refer to the USING THE FAST TOOL seaion for recharging
instructions.
,-.
USING THE FAST TOOL TO SELECT AN ANTENNA SITE
Before installing a subscriber radio antenna, the installer must first verify that the mounting location aflows l strong
Communication link with the Long Range Radio Security Network Optimum locations are determined by observing the FAST
Tool bar graph displays while moving from site to site. The following steps describe the procedures to lake:
1. Prepare the Subscrfber
Radio in accordance with
its Installation Instructions. including all wiring and
programming. Wthe subscriber antenM is being mounted
remotety. the Radio chassisan be mounted at this time.
Be sure to review the GENERAL NOTES ON RADIO
INSTALLATION
section later in this document for
important installation oonsiderations.
the FAST Tool antenna to the Antenna
2. Connect
connector
by aligning the dots in the antenna’s
connector with the tabs in the receptacle, pushing
downward and rotating clockwise.
To remove the
antenna. apply slight downward pressure while twisting
counter-clockwise,
then lift the antenna off the
connector.
3. Sot the FAST Tool to the proper
operating
channel
by placing the first four switches in the
CHANNEL DIP switch to the proper position (0 or 1)
according to the following table (switchrs 5-7 can be
diiregarded):
To set channd 13, ser sdch onero the ‘~~positiuta
swftchhuotothe’0’positinn.andswkhesthree8ndfour
totho V’posit~nasshawnbebx
List ONLV
Whenthe FAST Tool is activated. the lighted segments of
the Signal Strength and Frequency bar graphs will
fluctuate as network data signals are received.
In
addition, the speaker will make a rushing ‘hiss’ sound
(representing background radii noise) with rapid bleep’
sounds (simifar to the sound of cricket chirring)
intermixed. The bleeps’ represent modulated network
data Set the VOLUME aPntrol for a aomfonable listening
level.
the .RANGE
switch
set to the HIGH
5. Wlth
position,
move the FAST Tool to various antenna
mounting locations, listening for network data signal
‘bleeps’. and observing the signal strength readings at
TO audibly distinguish network data
each location.
signals, be aware that ‘on channel’ signals will make
‘bleeping’ sounds. while ‘off ChOnner
signals, though
reducing the background noise. will have the ‘bleeps’
conspicuously missing.
Find the areas that give the
highest signal strength readings according to the
bllowiflg chat
HIGH RANGE CALIBRATION
GTR
-114to-lo6
Weak signal rearption
2-3
-96to-62
Acceptable reception
-74 to -50
Good reception
20
G.
SWKC~~-r
6. If only tow readlngs
can bo found ualng the
HIGH range, set thr RANGE switch to the LOW
position and check the signal strength readings at aa&
locatiin again. using the fofbwing dun as a guide:
LOW RANGE CALJBRATION
2.5
6-9
10
Note that once a channel has bean set, the FAST Tool will
be tuned to that channel upon power up. Should a
different channel be desired, simply reset the DIP
switches for the new channel whfle the FAST Tool is off.
4. Turn the FAST fool on by moving the POWER toggle
switch to the up ~ositbn. The unit will automaticalfy turn
&self off after seven minutes. lo turn the FAST Toof on
for another 7 minutes, aimply turn the POWER switoh off.
than on again
IMPORTANT!:
graph should be lit within the brackered area marked
www.PDF-Zoo.com
-11710-105
-101 to -69
-65
. Weak signal reception
AeceptaMe reception
PrefetaMe reception
Instalbr judgment should be used when determining the
best l menna Iocatbm. Since these readings are foaltime measurements. a high reading does not necessarify
moan communication will always be good at any one
particubr slte. To got a better indition
of radii l aivity.
allow an appropriate amount of time for vfewii at each
bcatii
(20-30 seconds for Private Systems and up to
two minutes for AlarmNet men).
7. Mount the antenna at the bcation that consistently gives
the highrst readings.
..-.
GENERAL
NOTES ON RADIO INSTALLATION
me following information is orovided lo helo ensure the deoendabilii
Network
’
Unlrss otherwisr staled. the Radio must be mounted
indoors. in an area where it will be undiiturbed.
TO
locilitale testing, the Radio should also be bcalod in an
easily aocessble area
l
Avoid mounting the Radio in areas where
Refer to
l xtremes will be encountered.
Installation
InstfucGons for permissible
Preferably, the mounting she
rangos.
should be climate controlled.
l
’
temperaluro
the Radio’s
temperature
environment
l
Cable Length
s leer
DO NOT
/
IMPORTANT!:
Many Ademco Radios leprure antenna
supervihn cimrftry, which trigpen an rlonn if tampenkg
of the antenna or antenna cable occvm. Noto that while
cabs? lengths of up lo 50 leer are acceptable for
communication purposes. cable lengths over 20 feet can
pose problems for the antenna supenrision cifwiuy. and
possib& pfovide false indication that an antenna is
wnrwcted. when in facf it has been removed or tampered
&with.
l
wilh the Long Range Radio
To avoid inlrrferena. the antenna should be mounlod as
as far 8s possible from sources 01 RFI inlrrterence and
other l leclronic l quipmonl, who80 operation might be
alleued by the RF energy ndiied by the Radio. Vertical
separation is more important than horizontal separalion.
as signal radiation is strongest in the horizontal plane.
The ldbwing minimum dislances are suggested:
EOUIPMENT
No. S6005700 Receivers
Passive lnlrared Devices
ControVCommunkalor
FM 6 N Antenna
Other Eouioment
Though the Radii mat be mounted indoors. the antenna
Un usudy be mounted indoors or outdoors by the Use Of
50 ohm coaxial cable available from Ademso. To avoid
signal bss through attenuation when mounting the
l nlenna remolely. cable lengths should be SO feel or
ktss. Use on& the cables listed in the following table:
[~~b!kintt~~/!$~.system,
of radio aimmunicalion
DlSTANCE
20
-- feet
--_
.
.l 0 feet
25 feel
25 feet
Never less than 10 feet
Sttong signal slrenglh indications al the anlenna bcation
are vital for dependable communication with the Long
Range Radio Network.
In lhe event that acceptable
signal s:renglh readings cannot be achieved using the
standard No. 7625 antenna the optional No. 7625.318
high gain or No. 7674 YAGI anlenna can be used. The
No. 7625448
antenna adds about 3dB gain when
wmparad to the standard No. 7625 antenna, andcan be
mounted in exactly the same manner as the No. 7625.
The
No. 7674
antenna
provides
directional
characleristics and mounts remotely.
The No. 7674 antenna must be aimed in the dire&on
which gives the strongest signal strength indkations and
mounts wilh screws through ils main seclion. Connect
the antenna lo the Radio using the shorlest of the
available cab&s.
When mounting the antenna. avoidobstructions
such as
metal duns. pipes. loil backed insulation. l lc. as these
wii adversely aflea transmission.
RECHARGING
SPECIFICATIONS
THE BATTERY
Size:
Power:
The battery condition should be checked before using the
FAST 1001 (by depressing the BAll TEST pushbutlon and
observing the BAlTERY diiplay). ff the lighted LED segmem
is in the bracketed ‘RECHARGE’ area, the battery must be
recharged.
Recharge Rate:
Weight:
RF Frequeny:
Sensftlviiy:
Operating Tamp:
Storage Temp:
To recharge the batlery. simply plug the supplied transformer
into a 12OVAC. 6OHz wall receptacle. Allow at least four (4)
hours 01 recharging time. or at least until the LED segment
iiihts in the ‘GOOD’ bracketed l raa. Note that the FAST.
Tool an be used while the transformor b plugged in, but that
installor movement is limited to the length of the tine cord.
3
www.PDF-Zoo.com
lO’X7~X?12VDC. O.BAH sealed lead acid baftery. 3
houn continuous use from fufl charge.
il;urs
for fully oepietea oanory
952.0t25MHz 10 9523375MHr
-116dBm minimum for 12dB sinad
32’FtolzCrF(0%toSO%)
d*F to 14O’F (-20% TV60%)
1
-.
.-.
ADEMCO
LIMITED
WARRANTY
umr
*vlcC
Vandaclwmg
cornpry.
8 OWLS- cl Pmway &r~ornon.
l nC IIS btmlon~. SUDS~OJ~~ ana l flhaies t%eUer”t. 166 Edeen Way.
SYmsel. NCW*Ork 11791. werrenu es PrMuc~
lo 0e m wntorfnence
wm ns own @arts ma soe:d~catmsana
lo oe tree IrDm C&cl5
In nUIerUl5
l a ~nSW
unoer rrcnna~ w ana w
Ior 16 rnont~& lrom me Care 5~rnD comroi on lnc ~rwuci or. for ~roCucls MI havrng en Aaemco
Qm rum.
Iof 12 montnslrom
OIla 01 oflg8luI pncfuw
unless me mst8llall0n rnstruntons or catalog sets ronh a 5norIer PnoC. a when u5e InC
mane: WmC shall IDLY. &lkr’r
WAIT
mu m tuneea IO repimrmg or reotaong. a1 us aman. free of aurge 101malerr8bs or Llbor. any pm tilch
rs 3rO*M WI m ComoIunce rmh ws
~rfisairon5
01 proves Celeclwe n maleMls or workm8PJN
unaer normal use l nC 5enmce Sder shall
m*
W ODl~awn undu 01s Lrrnfia Warranty Q otnerwrse rt me ~r0Cuc11s l nereC or rrnoroDeriy rezalrea or serwceo Dy rnyDne other INn ADemco
‘OaOfY WWIW. For lnrranty mce.
relum D~DCUC~lransponrhon
DreDaro. 10 Aoemco Facrory krvtce.
165 E&en W8y. Syossel. New York 11791.
THERE ARE NO WARRANTIES. EXPRESS OR IMPLIED. OF MERCHANTABILITY.
OR FITNESS FOK A PARXULAR
PURPOSE OR OTHERWISE.
WHICH EXTEWD BEYOND THE DESCRIPTION
ON THE FACE HEREOF IN NO CASE SHAE Sk51
3E LIASLE TO ANYONE FOR ANY
CONS~OUENTIAL
OR INCIDENTAL
DAMAGES FOR BREACH OF THIS OR ANY OTHER WARRAWm. WPRESS OR IMPLIED. OR UPON ANY
,‘IERS
OWN NEGLIGENCE OR FAULT.
O%ER
6ASlS OF LIABILITY w~.~ATSOEVER. ,m?~ IF THE LOSS OR DAMAGE IS CAUSED BY THE SC
Setter 00es not rear&
WI m prwal
my na 00 compromdea
or crrcumveniea:
tMI Ihe PmCirCl ml1 orcvrnl any 0ers0nal qury or 0ro0eny loss
by Durglary. roooefy. Ineor otherwi5e: or:lldIthe
DroouC: wrll ir: all cases Drovae abee-ale warnrng or~orecf~on.
Suyer unCerslanaslrui
a ~r0~erty
r~s;atlet anc rrarn:am
abrrrr may only reCuce lhe rrsk of a DurgIafy. rOODCry Or fire m:noul warning. DuI rI 15 not insurance or a guarsnlee I&l such
w& nOI oc:ur or IMI lwre wit 0e no ~e?somi qury or proDeny loss es a resun CONSEOUE%sLy.
SEILE’ SHALL HAVE NO LIAEIL!N
FOR ANY
FAILED 70 GIVE WARNING. However. ii SeUer
PERSONAL INJURY. PROPERTY DAMAGE OR OTHER LOSS 3ASED ON A CLAIM 7% PRODUG
0 %I: 1uD)t. wne1Mr &WIIY or inguectly. tor any 10s5 or oamage arlsmg mOer 1% ‘,:mnet Warramy 0’ otnfnmse. regardless or cause or orign.
giE;RS fMxrnkrm lialilay snail not IP.eny ‘dse excee0 me ;Jrchase
0nce 0! :nC :rwu 2 wnlcn SpaI! 32 :be CJmDYie an3 exctusnfe remeoy agarns:
TfbS wrmnty
the ODkgallon
replaces any pr*s
wanrnlies8nC
of ttns LrmieC Warrar.q r5 8dhorueC.
0 the only warranty
maoe Oy SeUe- MlhrS Droouc:
ho ar,fease
oraneratron.
wrrneI: or veroal. 01
1
.
.
DEVICE MANUFACTURING CO.
AOMsmN
w MAT m1Dw
165 Eileen Way, Syosset, New York 11791
ALARM
www.PDF-Zoo.com