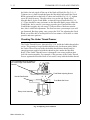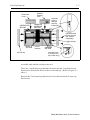
1
EMC6 (With Melco Head)
Embroidery Peripheral
Technical Manual
Part Number: 110041-01
A Technical Guide To Performing Service
Maintenance And Repairs On The 6 Needle,
Single Head Embroidery Peripheral With The
Melco Head. Various Options Included Are,
Trimmer, Large Bobbin, And Bobbin Detect.
1575 West 124th Ave.
Denver, Colorado 80234
United States of America
© Copyright 1992 by Melco Industries, Incorporated
ALL RIGHTS RESERVED No part of this publication may be reproduced,
stored in a retrieval system, or transmitted by any means (electronic,
mechanical, photocopying, recording, or otherwise) without prior written
approval of Melco Industries. Melco reserves the right to revise this
publication and to make changes in it at any time without obligation of Melco
to notify any person or organization of such revisions or changes.
Printed in the United States of America.
First Printing: April, 1992
Table of Contents
1. Introduction
Scope of Manual
1-1
Warranty Registration
1-1
General
1-2
Standard Conventions Used In Manual
1-2
Glossary Of Terms
1-4
Maintenance Philosophy
1-5
Warranty Considerations
1-5
Configuring the EMC6 (With Melco Head)
1-6
2. Service Adjustments
GENERAL
2-1
ADJUSTMENT PROCEDURES
2-1
CONTROLLER SECTION
2-2
MOTOR AND DRIVE BELT TENSIONS
2-2
OPERATOR INTERFACE (KEYBOARD SECTION)
2-2
Display Screen Intensity
2-2
Power Supply (5 Volt Setting)
2-3
SEWING HEAD
2-5
Z Encoder System Introduction
2-5
Z Encoder Inspection
2-6
i
Jump Stitch Solenoid
2-7
TRIMMER SET UP AND ADJUSTMENTS
Adjusting the Fixed Blade
2-8
2-9
Checking The Under Thread Presser
2-12
Setting The Movable Blade Home Position.
2-14
Setting The Movable Blade
2-16
Check the Home Position
2-17
Picker Adjustments
2-17
Grabber Adjustments
2-19
3. MECHANICAL DISASSEMBLY
GENERAL
3-1
Static Electricity / Grounding Strap Use
3-1
Removing The Covers
3-3
SEWING PERIPHERAL
3-4
End Cap Removal
3-4
CONTROLLER SECTION
3-6
CPU PCB Replacement
3-6
Replacing the 000493-01 CPU EMC6 M
3-6
X - Y Motor Control PCB Replacement (000493-01 CPU)
3-8
Z Motor Controller (000493-01 CPU only)
3-9
Replacing The 004862-01 And 004973-01 CPUs
3-12
XYZ Controller PCB Replacement
3-13
ii
OPERATOR INTERFACE SECTION
3-14
Keyboard/Display Replacement
3-14
Power Supply Replacement
3-15
Y Drive Motor Replacement
3-16
CARRIAGE SECTION
3-19
Carriage Assembly/Beam Replacement
SEWING HEAD SECTION
3-19
3-22
General
3-22
Arm and Bed Assembly
3-23
Z Motor Installation (EMC6 M)
3-23
Z Motor Replacement (EMC6 MTL, ML)
3-25
Z Shaft Encoder Installation (EMC6 M)
3-26
Z Encoder Installation (EMC6 MTL,ML)
3-27
Needle Case Removal
3-28
To Install the Needle Case
3-29
To Remove The Front Facia
3-30
Installing The Front Facia
3-32
Jump Stitch Solenoid Replacement
3-32
Color Change
3-33
Color Change Cam Replacement
3-33
Color Change PCB Replacement
3-34
Color Change Motor Replacement
3-34
Replacing A Needle Bar
3-35
iii
This page intentionally left blank
iv
Scope of Manual
1-1
1. Introduction
Scope of Manual
The EMC6 Embroidery Peripheral Technical Manual is designed to provide
the user with information necessary to perform repairs beyond routine
operator maintenance.
The Melco EMC6 (with Melco head) Embroidery Peripheral is one of
several embroidery peripherals in Melco’s Epicor family of products. The
EMC6 is a single head embroidery machine, which contains six needles and
automatic color change. It is designed to allow for flat goods and cap frame
embroidery, and can be equipped with several optional choices, such as, the
Trimmer, Large Bobbin, and Bobbin Detect, giving this product functional
versatility.
The Letter combination that appears after "EMC6" in the name of your unit,
indicates which options are on the machine. An EMC6 M machine is a
Melco Head unit without any additional options. An EMC6 ML machine is a
Melco head unit with a Large Bobbin. An EMC6 MTL is a Melco head
machine with Trimmer and Large Bobbin. When we refer to the product as
an EMC6 only (without any options letter designators), the information will
equally apply to those units with the various options. However, certain
sections of the manual may apply to an option only. In this situation, if the
EMC6 that you purchased does not have the particular option that is being
discussed, simply disregard that information.
This technical manual is presented in three basic sections: 1) an overview of
general information, such as, the proper configuration of the peripheral, in
this introductory section, 2) service adjustments, and 3) mechanical
disassembly/replacement of the major components of the embroidery
peripheral.
Warranty Registration
Please complete the Warranty Registration Form upon installation of the
system; and return it to Melco to validate and register the machine warranty.
If no Warranty Registration is on file at Melco when warranty service is
requested, it will be assumed that your warranty began on the 7th day after
the ship date from Melco.
EMC6 (With Melco Head) Technical Manual
1-2
INTRODUCTION
General
Throughout this manual several abbreviations and specific terms may be
used. The following explains some of this terminology:
The terms "Embroidery Peripheral" and "Sewing Peripheral" may both be
used to identify the same item. The meaning of the two terms is identical.
When referring to the Embroidery Peripheral or peripherals, the initials "EP"
or "EPs" may occasionally be used. When speaking of a "printed circuit
board," the item may quite often be referred to as a "PCB."
Standard Conventions Used In Manual
Certain procedures in the manual require actions such as pressing a certain
key, or typing some letters at the computer keyboard. The following is a list
of some of the more commonly used conventions found in this manual.
• To indicate a key on the computer keyboard, it is referred to as
simply the key in question - for example: Press the Enter key to
initiate the application.
• Square brackets around an all-caps word indicates a key on a
peripheral device. The same word without the brackets means a
function or description is intended. An example is: [ENTER]
indicates the ENTER key on the peripheral; and ENTER means to
perform the function meaning "to go into."
• To indicate typing on the computer keyboard, it is referred to in
BOLD letters - for example: Type: run and press Enter to start the
program.
• To indicate that two keys must be pressed simultaneously the
following conventions are used: with the computer keyboard, the
first key to be pressed and held down is simply referred to, then the
second key which needs to be pressed while the first key is held
down is referred to after a comma - for example: Press Shift,8 to
type an asterisk (*).
• To indicate two keys with the peripheral keyboard, the above holds
true except there is no comma between the keys - for example:
Press [ALT][⇒] to move the needle case one position to the right.
Melco Industries, Inc.
Standard Conventions Used In Manual
1-3
Occasionally in the manual, special attention by the user is required. In this
situation, "attention getters" are used to indicate the need for the user to be
aware of a situation that is above and beyond the normal or routine. Three
standard attention getters are explained below:
WARNING!
This term is used to call to the users attention that the procedure
following must be performed with care and accuracy to avoid
possible danger or harm to the operator or other persons in the area.
This term is also used to announce important regulatory information.
CAUTION!
This term is used when the procedure following it may cause damage
to the equipment if not properly performed by the user.
NOTE:
This term is used when additional information is required beyond
the normal steps for communicating the information. It may be
used to clarify certain portions of text or to call attention to other
items previously mentioned or mentioned later in the procedure.
EMC6 (With Melco Head) Technical Manual
1-4
INTRODUCTION
Glossary Of Terms
Several words or terms are used in this manual that are unique or specialized
in use with the embroidery industry or Melco embroidery equipment. The
following list of terms and definitions is by no means all inclusive, but
provides a base knowledge of these terms. Understanding them will greatly
enhance your understanding of the contents of the manual.
Hoop
A mechanical device that holds material to be sewn. "HOOP" is generic term
and can used to describe any material holding device.
Job Queue
Machine memory location (found in the RUN MENU) where the design
name, and Color Sequence information is stored while the machine is
powered up. This memory location is cleared when power is lost or the
machine is turned off.
Needle Bar
The device that holds the needle in position to travel vertically in proper
coordination with the rest of the sewing head movements.
Thread Tension
A generic term for tensions of thread or yarn used in any style of embroidery.
X Axis
The right to left movement of the Beam and Carriage.
Y Axis
The "front" to "back" movement of the Beam and Carriage.
Z Axis
The rotational movement of the horizontal drive shaft in the sewing head.
Melco Industries, Inc.
Maintenance Philosophy
1-5
Maintenance Philosophy
The maintenance philosophy used in this manual, and practiced at Melco, is
to isolate potential problems with the system to a "practical" replacement
assembly. Therefore, components are not replaced, but rather, the circuit
board "assembly" is replaced.
In the process of isolating problems in the machine, the person performing
the troubleshooting must also practice good troubleshooting techniques.
Good troubleshooting techniques include, but are not limited to , guarding
against static electricity damaging machine components.
CAUTION!
The EMC6 Embroidery Peripheral
electronics are quite sensitive to static electricity. To
avoid probable damage to the equipment, Melco
insists that steps be taken to prevent static charges
coming from personnel working on these machines.
Therefore, Melco requires that personnel utilize a
static grounding strap when performing maintenance
on the EMC6.
Warranty Considerations
Some areas of maintenance require factory trained personnel to assure
proper service. If unauthorized personnel attempt to service these areas, the
FACTORY WARRANTY MAY BE VOIDED.
Therefore, it is recommended that Melco factory trained personnel be
consulted whenever the "Factory Service Advised" statement is noted with a
procedure.
For general information, most maintenance in the Z Encoder/Motor area
includes steps that may void the factory warranty if not performed properly.
Although the above area is specifically subject to voiding the warranty, any
service that is improperly performed may cause the warranty to be voided.
EMC6 (With Melco Head) Technical Manual
1-6
INTRODUCTION
Configuring the EMC6 (With Melco Head)
There are two things that must be set in each sewing peripheral of any Melco
system before it is used for the first time.
First you must set the Peripheral Program. The CPU Printed Circuit Board
used on the EMC6 Embroidery Peripheral (With Melco Head) may also be
used for other Embroidery Peripherals produced at Melco. Therefore, you
must tell the CPU board what peripheral it is being used in. This is usually set
correctly at the factory, but if for some reason the CPU is replaced it must be
done before using the machine for the first time.
CAUTION! If the EMC6 (With Melco Head) is not
configured with the correct Peripheral Program, it will
not run properly, and may become damaged.
If for any reason the Peripheral Program is not set properly, or if you have
replaced the CPU board, you should know how to set the Peripheral Program
to avoid problems and possible damage to the unit.
The second configuration item is the network address (or Unit Number).
The Unit Number must be set and be different for each peripheral attached
to an Epicor computer or network. There may be up to 16 total embroidery
peripherals attached to any one computer, and each must have its own Unit
Number. The number is selected from the peripheral Keyboard and is
between 1 and 16.
The ‘‘configuration mode’’ in the EMC6 is accessible by pressing a certain
keystroke combination while switching on the power.
Alternate
Additionally, the "configuration mode" can be initiated any time the power
Configuration has been turned on, but the unit has not yet been "down-loaded" by the EDS
Mode
operating software. Until the unit is "down-loaded," the Display will
alternately show the 2 present configuration items (Program Number and
Unit Number) continuously until the unit becomes "down-loaded."
When the EMC6 is initially turned on, and any time you wish to change the
configuration status of the machine, refer to the following steps:
1. Before you turn on the EMC6 (or if the unit has not yet been
"down-loaded" by the EDS operating software), locate the 10-key
Keyboard (Peripheral Keyboard) and LCD (Liquid Crystal Display) in
the upper right area of the peripheral unit.
Melco Industries, Inc.
Configuring the EMC6 (With Melco Head)
1-7
Power
Switch
Also locate the power switch at the right rear of the unit. It is the rocker
switch mounted in the Power Input Module, as the figure below shows.
2. Go to the Keyboard. The display will be flashing on and off, find the 3 keys
on the Peripheral Keyboard marked: [ALT], [⇑ ], and[ ⇓ ]. Depress and
hold all three keys down at the same time.
NOTE: With the situation where the unit is already ON, but has not been
"down-loaded," you need only to depress and hold the 3 Peripheral
Keyboard keys until the unit beeps to get into the configuration
mode. Then proceed. You do not need to turn off the EMC6.
Hold these keys depressed until the unit ‘‘beeps’’ and the Display shows a
message depicting the Peripheral Program currently selected. The EMC6
will now be in the ‘‘configuration mode,’’ and you can release the 3 keys.
When the EMC6 is in the ‘‘configuration mode,’’ you can set (or change) the
Peripheral Program and then the Unit Number for the machine.
Peripheral
Program
3. To set the Peripheral Program, simply depress the [⇑ ] or [⇓ ] keys on the
Peripheral Keyboard until the correct program shows on the Display
(refer to the User Manual for your specific peripheral program). After
the desired program is showing on the Display, depress the [ENTER] key
on the Peripheral Keyboard to "set" the program.
Unit Number
4. After the [ENTER] key is depressed the configuration item will go to the
Unit Number selection. To select a Unit Number, again simply depress
the [⇑ ] or [⇓ ] keys on the Peripheral Keyboard until the desired Unit
Number shows on the Display. (Remember, you cannot have two
peripherals with the same Unit Number. If you do choose 2 peripherals
with the same number, the controller will be confused and data transfer
errors will occur.) After the desired number is showing on the Display,
depress the [ENTER] key on the Peripheral Keyboard.
EMC6 (With Melco Head) Technical Manual
1-8
INTRODUCTION
The EMC6 (With Melco Head) configuration is now complete and the
Display will alternately show the Peripheral Program and then the Unit
Number selected. Turn the peripheral off, and at the Epicor System
Controller enter the EDS program, select the Peripheral Menu F10 and
record the Unit Number following the instructions in the EDS/Epicor
Operating Manual, page 10-3.
Melco Industries, Inc.
2-1
2. Service Adjustments
GENERAL
This section of the manual provides detailed information for performing
machine adjustments that may be required during the life of the product.
The procedures are guidelines for performing service maintenance; and must
be used by personnel practicing good maintenance technique.
With certain areas in this section it is recommended that the procedure be
performed by a factory trained technician. This reference is indicated by
stating "FACTORY SERVICE ADVISED" at the start of the procedure.
ADJUSTMENT PROCEDURES
The EMC6 is functionally arranged into four sections (five sections with
Trimmer Option): the Keyboard section, the Controller section, the Sewing
Head section (with optional Trimmer), and the Carriage section .
Keyboard Section
Trimmer Control Section
(if option present)
Sewing Head Section
Controller Section
Carriage Section
Figure 2 - 1
EMC6 (With Melco Head) Technical Manual
2-2
CONTROLLER SECTION
CONTROLLER SECTION
No adjustments are performed inside the controller section of the EMC6.
MOTOR AND DRIVE BELT TENSIONS
"FACTORY SERVICE ADVISED"
CAUTION! Damage to the machine may result if belt
tensions are improperly performed.
All motor and drive belts require special procedures for setting the proper
tensions. If the tension settings are attempted without using the proper
procedures and without proper training assistance, the machine chassis and
some components may be damaged.
If adjustment of a belt tension is thought to be needed, it will be necessary to
contact Melco Service .
OPERATOR INTERFACE (KEYBOARD SECTION)
Display Screen Intensity
To adjust the intensity of the display in the keyboard/display assembly it will
require the removal of the operator interface (Keyboard) cover to gain access
to the adjusting potentiometer on the side of the keyboard printed circuit
board. During the adjustment of the display intensity the EMC6 must be on
so the result of the adjustment may be observed.
1. Remove the Keyboard Cover, using care not to allow the keyboard/display
to come in contact with any portion of the machine that will short circuit
any voltages. Also, do not touch the components on the printed circuit
board. (Refer to specific instructions Removing Covers in Section 3.) Set
the cover on the peripheral table top.
2. Install the static strap as explained in the specific instructions in Section 3.
3. Turn on the power switch to the EMC6.
Melco Industries, Inc.
Power Supply (5 Volt Setting)
2-3
4. Locate the intensity adjustment pot on the right side of the printed circuit
board as shown in the figure below.
5. Rotate the adjustment potentiometer clockwise to increase intensity on the
display screen, or counterclockwise to decrease the intensity on the
display screen.
6. After the proper intensity is obtained, reinstall the operator interface cover
using the same precautions as before.
Operator
Interface
cover
LCD display
keyboard keys
(10 each)
intensity
adjustment
potentiometer
Figure 2 - 2
Power Supply (5 Volt Setting)
The power supply for the EMC6 is located under the Keyboard Cover. This
also serves as the power input. It is a sealed unit. If the power supply fails it
must be replaced, see section 3 for removal and replacement. If a new Power
Supply is installed the five volt setting must be set before using the machine.
"FACTORY SERVICE ADVISED"
Tools: Digital voltmeter, insulated alignment tool.
EMC6 (With Melco Head) Technical Manual
2-4
OPERATOR INTERFACE (KEYBOARD SECTION)
1. Remove the Keyboard Cover, being careful not to damage the Keyboard
ribbon cable.
2. Remove the Electronics Cover. Locate the XYZ Interface Board directly in
front of the machine CPU PCB. This board has a row of test points across
the top. Choose TP4 (GND) and TP5 (+ 5v).
3. Locate the adjustment potentiometer directly next the connector block of
the power supply. See Fig. 2-3.
4. Turn the machine ON and using the alignment tool adjust the
potentiometer to 5 volts (+ 4.95 - + 5.05 volts).
Remove the Keyboard cover to set the 5 volt
setting on the Power Supply.
Power Supply
Y-Motor
Y- Drive Shaft
Adjustment
Potentiometer
Fig. 2-3
Melco Industries, Inc.
Z Encoder System Introduction
2-5
SEWING HEAD
Z Encoder System Introduction
The ability to place stitches precisely at high speed is dependent on the
accurate operation of the electronics and electro-mechanical assemblies. The
"key" to this is the Z Encoder. The information provided to the CPU by the Z
Encoder is the basis for all other actions of the Head, regardless of the style
sewing peripheral you are using.
The Z Encoder is a two channel quadrature output with index pulse. If you
send the output to an oscilloscope you will see two square wave signals, one
sightly ahead of the other. You will also see a third signal, the index pulse.
The CPU interprets these signals to determine position, speed and head up.
The CPU then uses this information to determine when to move the
X-Carriage, when to move the Y-Axis, when a color change is allowed, when
setting home position is allowed, how fast the sewing head is running, how
many stitches have been sewn.
It is important for the technician to understand that the peripherals’
operational software treats the motor control circuitry differently when the
Z-Axis is running than it does when the Z-axis is stopped. When running, the
motor control circuitry allows the X,Y, and Z-axis motors only minimal
errors in rotation. Any error greater than the allowed error and the motor is
driven to eliminate the error. When the peripheral is stopped, however, the
software that controls the Z motor allows what is called a "window"; in other
words, the peripheral will have between 1.5 and 5 degrees (rotational) error
that the software allows. The purpose of this window is to keep the motors
from oscillating about the null (hunting for absolute position), and making a
grinding noise while stopped. The green LED on the CPU, can be used by
the Technician to see if the CPU is in fact receiving a mark pulse from the
encoder (indicating that the encoder and associated cables are functional). It
should also be stated that "The head-up LED does NOT have to be lit when
the peripheral is stopped, and the LED CANNOT be used to make a
determination of the Z-encoder alignment status". If used in conjunction
with the proper head-up tool, the LED can be used to see if the mark pulse is
triggering early or late as compared to absolute mechanical head-up.
The use of the procedures described in the following pages will result in the
most proper, accurate alignment and repair of the Z-Encoder System that is
possible and or feasible for use in the field by a Technician.
EMC6 (With Melco Head) Technical Manual
2-6
SEWING HEAD
It can be seen, then, that the proper alignment of the Z encoder can result in
improved sewing quality and proper machine operation. Slight misalignment
can cause many kinds of erratic operation and/or intermittent thread breaks.
A larger misalignment can be the cause of equipment damage and
subsequent electronic/mechanical failure. The careful application of the Z
Encoder Procedures by a technician will result in a machine that will operate
correctly and reliably.
Z Encoder Inspection
"FACTORY SERVICE ADVISED"
This procedure is a guide for the technician in determining the condition of
the three channel optical encoder. If unauthorized personnel attempt to
service this area, the FACTORY WARRANTY MAY BE VOIDED if the
work is improperly performed.
Inspect the Z shaft encoder following the steps below. If the requirements of
this process are not met, replace the encoder by following the Shaft Encoder
Installation procedure in Section 3 of this manual.
1. Remove the Electrionics Cover.
2. It is important that the computer not down load a design to the peripheral.
You may disable the peripheral from the computer or, locating the
[ALT], the [UP ARROW], and the [DOWN ARROW] keys on the
Keyboard of the EMC6 Embroidery Peripheral, press and hold these
three keys while you then turn ON the EMC6 Embroidery Peripheral.
3. Hold the keys until the "configuration mode" is initiated and the peripheral
program name will appear on the display.
Do not perform any other keystrokes while in the configuration mode at this
time.
4. Locate the 4 Red LEDs and 1 Green LED on the outside end at the top of
the CPU PCB.
5. Rotate the sewing head manually in a clockwise direction from the rear of
the machine. This rotation can be performed by rotating the shaft pulley
that is driven by the motor belt.
6. While rotating the sewing head, check that the Green LED blinks once
each revolution (this is the "index" or "head-up" mark).
Melco Industries, Inc.
Jump Stitch Solenoid
2-7
7. Inspect the electrical connectors (encoder cable plug and encoder body) for
damage. Clean connections/replace components as necessary.
If the "test" above fails or is in question, replace the component(s) in question
with new ones. Refer to Section 3 of this manual for the installation
procedure.
Shaft Coupler
Z Encoder
Z Encoder Cable to XYZ
Board
Z Motor
Fig. 2-4
Jump Stitch Solenoid
Jump Stitch Solenoid Adjustment
If a Jump Stitch Solenoid has been replaced, perform the adjustment
procedure below.
NOTE: The Needle Case must be removed to make this adjustment, see
Section 3 for Needle Case Removal. The Jump Stitch Solenoid
must be positioned so that the plunger is close enough to actuate
the Needle Bar Driver Jump Lever when the solenoid is engaged
(energized).
The plunger also must be located away from contacting the jump
leverduringnormal sewing, when the solenoid is relaxed or not energized.
EMC6 (With Melco Head) Technical Manual
2-8
TRIMMER SET UP AND ADJUSTMENTS
Gap 0.015"- 0.045"
(0.4 - 1.1 mm)
Jump Stitch
Soleniod
Needle Bar Driver
Reciprocator
Drawing Not To Scale
Fig. 2-5
A typical dimension for the gap between the relaxed solenoid plunger and
Needle Bar Driver Reciprocator is approximately 0.015 to 0.045 inches (0.4
to 1.1mm).
Attach the solenoid and bracket assembly to the sewing head, and check the
alignment. Be sure that the plunger contacts the reciprocator mechanism;
and that the reciprocator mechanism does not contact other internal head
parts when the solenoid is energized.The two wires coming from the solenoid
body and connecting at the small black plastic connector, can be damaged if
they are twisted together. Twisting the wires together will reduce their length
and can put undue stress at the connections at both ends. We therefore do
not recommend twisting these wires together. If you must group these wires
together, use "cable ties" (plastic straps) these are available at most electronic
supply stores.
TRIMMER SET UP AND ADJUSTMENTS
Trim
Info
Only
The Melco Trimmer Option for the EMC6 was assembled and thoroughly
tested before the machine was shipped. Although the set up of the Trimmer
should not change during normal use, there are a few things to be aware of to
prevent problems.
Melco Industries, Inc.
Adjusting the Fixed Blade
2-9
1. Dirt and dust from thread can build up and prevent the Moveable Knife
(in the Rotary Hook Assembly) from actuating correctly. Keep the area
clean of dust and thread debris and you shouldn’t have a problem here. If
for some reason you find that the Knives are out of adjustment a
procedure for adjusting them is presented in this section.
2. Birdnesting of thread around the Rotary Hook and Picker could cause the
knives to become misadjusted, as well as the Picker.
The following procedures provide a guide for adjusting various portions of
the Trimmer System.
"FACTORY SERVICE RECOMMENDED"
NOTE: Some of the following procedures require fixtures. See your Melco
Service Representative before attempting any of these procedures.
The Movable Knife has no specific adjustment, it is necessary to adjust
attitude of the Fixed Blade so that the thread is cut square in the center of
the Movable Knife. Proper adjustment of the Fixed Blade is a crucial step in
Trimmer operation.
Follow the steps listed below carefully and in ORDER. Performing these
steps out of order can require a service call to correct.
Tools needed: Black Marking Pen,(use a non water base ink ie; Sandford
Sharpie Permanent Marker or Eberhard Faber Markette All Purpose
Marker),a Medium Screw Driver, a Small Screw Driver, a 2 mm Allen
Wrench, a 2.5 mm Allen Wrench, and a 1.5 mm Allen Wrench.
Adjusting the Fixed Blade
TURN THE MACHINE POWER OFF
1. Fig. 2-6 and 6a identifies those components that comprise the Trimmer;
the Fixed Blade, Movable Knife and the Under Thread Presser. These
components are covered by the Front Bed Cover and the Needle Plate,
see inset in Fig. 2-6, remove the screws holding these covers. Unplug the
Bobbin Detect Sensor located under the Trim Link Arm (see Fig. 2-6).
You may test the Trimmer adjustments without the covers in place, but
they must be installed to embroider.
2 . Carefully lift the Trim Link Arm from the movable knife’s Drive Pin. See
Fig. 2-6. The Trim Connecting Link should come off easily. Be careful
not to bend the Link Arm using too much pressure when you raise it up.
EMC6 (With Melco Head) Technical Manual
2 - 10
TRIMMER SET UP AND ADJUSTMENTS
3 . With the Movable Knife free of the Link Arm, pull the knife towards the
front of the Needle Plate Bracket with a small allen wrench hooked
behind the Movable Knife. See Fig. 2-7.
4 . With the Black Marking Pen mark in the area of the movable knife, shown
in Fig. 2-7. Then push the movable knife back to the rear of the Needle
Trim Link Arm
Front Bed Cover Screws
(Rear)
Bobbin Detect Harness
Bobbin Detect Flex Cable
( with Needle Plate)
Front Bed Cover
Needle Plate and
Front Bed Cover
Screws
Needle Plate
Fig. 2-6
Trim Connecting Link
Under Thread Presser
Movable Blade
Fixed Blade
Rotary Hook
Picker (engaged)
Retaining Bracket Mounting Holes
(Retaining Bracket Not Shown)
Fig. 2-6a
Melco Industries, Inc.
Adjusting the Fixed Blade
1. When the Movable Knife is
disconnected from the Trim Link
Arm it can pivot front to back as
shown.
2 - 11
Trim Link Arm removed from Movable knife Drive Arm
Pin.
2. Place a small Allen Wrench here,
and gently pull it towards you.
3. Mark these areas (shown in black) on the Movable Knife with the marking pen. Then
push the movable knife back and under the Fixed Blade and pull it out again.
Fig 2-7
Plate Bracket with your thumb or forefinger until it passes UNDER the
Fixed Blade. It should take a little force to push the Movable Knife under
the Fixed Blade, be careful not to press down on the knife, but use a
steady horizontal movement to push the knife.
5 . Using an allen wrench pull the Movable Knife out from under the Fixed
Blade and look at the "wipe off" of the marking pen ink. See step 6, to
determine how the Fixed Blade needs to be adjusted.
6 . Use Fig. 2-8 and Fig. 2-9 on the next pages, as guides to making the Fixed
Blade adjustments. Adjust the Fixed Blade with the two (2) screws,
labeled A and B shown in Fig.4-8.
NOTE: You should never have to change the height of the Fixed Blade Set
Screw, shown in Fig. 2-8 , the only time you will need to adjust the height of
the Set Screw is if it is replaced. At which time this screw should be set 1 1/2
turns above flush on the needle plate bracket. This is indicated in Fig.2-8.
• Tighten screw A until the ink wiped off looks like # 2 in Fig. 2-9.
• Then tighten screw B until it looks like # 3 in Fig. 2-9.
• If the wipe off looks like # 1, screw A is too tight. Back screw A off
just a little bit and try screw B again.
If you look directly at the Fixed Blade from the front you will see that it "tilts"
a little as you adjust the blade. It is this "tilt" that you are really adjusting. If
the Fixed Blade is adjusted too far to the left, as you look directly head on at
EMC6 (With Melco Head) Technical Manual
2 - 12
TRIMMER SET UP AND ADJUSTMENTS
the blade, the ink wiped off the top of the blade will look like Fig. 2-9, # 1.
Tighten screw A little bit and then pass the Movable Knife under the Fixed
Blade again and look at the knife if it does not look like Fig.2-9, # 3, tighten
screw B a little bit more. The object here is to get the ink wiped off the
Movable Knife, by the Fixed Blade, so that the wipe off looks like Fig. 2-9,
# 3. There should be some resistance as the Movable Knife passes under the
Fixed Blade, but be careful, you can get a good wipe off and still have the
Fixed Blade too tight, this can cause Z Timeout Errors. Make no mistake
here, this is a difficult adjustment. The first few times you attempt it you will
get frustrated. But keep going, once you get the "feel" for adjusting the Fixed
Blade you will be able to accomplish it in a few minutes. All it takes is a little
practice and some patience.
Checking The Under Thread Presser
The Under Thread Presser, shown in Fig. 2-10, holds the bobbin thread after
a trim. This permits a loop of bobbin thread ready for the next stitch. While
the Under Thread Presser holds the bobbin thread there should only be
enough pressure applied to hold the thread in place under the Movable
Knife. If the Under Thread Presser is damaged it can cause problems that
look like tension troubles. For example; if the pressure of the Under Thread
Presser against the Movable Knife is too much, it may hold the bobbin thread
The Fixed Blade should be parallel to
the outside edge of the Needle Plate
Bracket.
Fixed Blade Adjusting Screws
Needle Plate Bracket
A
B
Fixed Blade Set Screw
Rotary Hook Assembly
Fig. 2-8 Adjusting The Fixed Blade
Melco Industries, Inc.
Checking The Under Thread Presser
2 - 13
Ink Wipeoff
1. Fixed Blade
Tilted IN too far.
2. Fixed Blade NOT
Tilted IN enough.
3. Just Right.
Fig. 2-9
and not allow a loop to be formed, or it may nick or fray the thread, again
making it look like the bobbin tension is incorrect. Another example, would
be if the Under Thread Presser is "crumpled" (see insert Fig. 2-10 ), it does
not allow the Movable Knife to pass under the Fixed Blade completely to cut
the thread, causing a "no cut" condition. If the under thread presser is
damaged it can cause intermittent long tails of the upper thread.
Checking the Under Thread Presser is done in two parts. First by looking at
the part itself to see if there has been any "crumpling" , this is damage caused
by the Movable Knife hitting the Under Thread Presser.( See Fig. 2-10 ) If
you see visual evidence of any damage, replace the Under Thread Presser.
Second by checking if the Bobbin Thread is in fact being held in place.
While the machine is still turned off, and the Trim Link Arm is disconnected:
1. Pull the Movable Knife "out."
2. Leaving the Bobbin Case in the Rotary Hook, pull off some Bobbin
Thread, and drape it over the center of the Movable Knife.
3. With the bobbin thread draped over the Movable Knife from back to
front, gently hold the thread so there is some slack and then push the
cutter "back" until the thread is cut. This cut should be clean, it should not
be frayed. If the thread is frayed readjust the cutter once again.
The "top" thread should be loose and fall away, because it has no support.
The "bottom" thread should be held in place under the Movable Knife by
EMC6 (With Melco Head) Technical Manual
2 - 14
TRIMMER SET UP AND ADJUSTMENTS
the Under Thread Presser. Again look closely at the cut, it should not be
frayed, it should be CLEAN CUT.
Remember: These adjustments may take a few times to accomplish before you
become satisfied with the cut.
Under Thread Presser (Under Thread Presser Washer Not
Shown)
Fixed Blade
.002"
Movable Knife
(Shown at Home
Position)
.50"
Profile when damaged
Under Thread Presser Design Profile
Fig. 2-10
4. After you are satisfied with the movable knife’s cut, reattach the Trim
Link Arm.
5. Reinstall the Needle Plate first, connecting the Bobbin Detect harness and
sensor connector together, before placing the Needle Plate in position.
6. Reinstall the Front Bed Cover whatching that the screw heads are snug,
but not over-tight.
Setting The Movable Blade Home Position.
It should not be a common thing to have to set the Trim Cutter. Check the
Movable Blade’s Home Position by removing the Needle Plate (and
disconnecting the Bobbin Detect harness).
Melco Industries, Inc.
Setting The Movable Blade Home Position.
2 - 15
1.0 - 1.5 mm
Fig. 2-11
After the trim the cutter (movable blade) returns to its home position. At
home the blade rests under the Fixed Blade, a small portion of the movable
blades tip,(selector edge), is visible from under the Fixed Blade. See Fig.
2-11. There should be not more than 1.5mm of tip showing. With less than 1.0
mm showing the cutter can not select the proper thread to trim. With more
than 1.5 mm showing you may not cut thread at all.
This procedure when done at the factory uses a fixture to insure consitant set
ups. Off site a fixture may not be available, so the use of a small diameter
allen wrench is recommended in place of the fixture.
Prepping The Machine
1. Turn the machine ON.
2. Enter the Home Menu and Set Home.
3. Latch the Jump Stitch Solenoid.
4. Remove the Rear Bed Cover.
5. Remove the two locking screws on the rear of the Trim Connecting Link.
Place a small drop of Loctite # 222 (Red) on both threaded tips. Reinstall
the screws but do not tighten.
EMC6 (With Melco Head) Technical Manual
2 - 16
TRIMMER SET UP AND ADJUSTMENTS
6. Enter the Head Timing Menu, press the [ENTER] key. Press the [UP
ARROW]+ [RIGHT ARROW] key combination. Display now reads: Z
Position= 111.4 deg. (This is Head Up, which can be between 109.3 and
111.7 degrees.)
7. Manually rotate the Z-Axis until display reads between 280 and 300
degrees.
8. Insert the Pin Fixture lengthwise as shown in Fig. 2-12.
Push bracket in
this Direction to engage.
Cam Follower Bracket (not shown in detail)
Detect Harness and Sensor Harness
( Shown disconnected )
Pin Fixture
( in place )
Needle Plate (1)
Trim Connecting Link
Top Side, Right View
(1) Bobbin Detect Sensors are on the Needle Plate’s
underside, and are not shown.
Fig. 2-12
Setting The Movable Blade
1. With the Pin Fixture in place, engage the Cam Follower with your finger,
and rotate the Z-axis with the other hand, until the display reads 312
degrees. You can do this while facing the machine.
2. Press the [STOP] Key to lock the z-axis position.
Melco Industries, Inc.
Picker Adjustments
2 - 17
3. Slide the Trim Connecting Link forward to rotate the movable blade until
it just touches the pin of the Pin Fixture. DO NOT PRELOAD THE
CUTTER.
4. Lock the connecting link with the two locking screws.
5. Press the [UP and RIGHT ARROW] keys (Z position). Rotate Z axis until
the display reads between 105 and 115 degrees. The Cam Follower should
move freely out of the Cam at this time. If it does not, carefully loosen the
two locking screws just enough to allow the Cam Follower to move out of
the Cam. Then retighten the screws. Check to see that the cam follower
moves freely in and out of the cam.
Check the Home Position
1. Press [STOP], them press [ALT and UP ARROW] keys. Press the
[MENU] key.
2. Enter the Trim Menu and run a Trim Immediate.
3. A small portion of the selector edge of the Movable blade should be seen
protruding from under the Fixed Knife. This should be less than 1.5 mm
of protrusion. If the movable blade protrudes more than 1.5 mm or less
than 1.0 mm set the Home Position again.
Picker Adjustments
This procedure requires the use of a Picker Fixture. The fixture used will
depend on which Bobbin you have, Large or Small. The procdure is the same
regardless of the fixture used.
1. Be sure that Hook Timing and Needle Depth are correct before checking
or adjusting the Picker.
2. Check that the Picker Soleniod is not binding.
3. Remove the Bobbin Case from the Hook Assembly.
4. Insert the Picker Fixture "fat end" first with the flats facing up into the
Hook Assembly where the Bobbin would go. See Fig.2-13.
5. Push the Picker forward until the tangs touch the Fixture in the area shown
as "PICKER HEIGHT" also shown in Fig. 2-13.
EMC6 (With Melco Head) Technical Manual
2 - 18
TRIMMER SET UP AND ADJUSTMENTS
6. With the Picker at Home Position the rear surface of the Picker should
touch the area of the fixture marked "PICKER HOME POSITION"
shown in Fig.2-13. Before making any adjustments go to step 6 and check
the "PICKER HEIGHT" first.
7. Look at the picker headon when its at HOME POSITION, the tangs
should be centered on the Bobbin Shaft. See Fig.2-13. If the tangs are not
centered on the Bobbin Shaft loosening the two Pan Head screws on the
Picker Bracket will allow side to side movement to adjust. Once the tangs
are again centered on the Bobbin Shaft tighten the two Picker Bracket
Screws.
Picker Height
Picker Home Position
Bobbin End
Front End
Small Bobbin Fixture Shown Large
Bobbin Fixture has same positions, but
Bobbin End is larger dia.
Picker Height
Picker Home Position
Fig. 2-13
8. Home Position is adjusted at the wire pivot interface, shown in Fig. 2-14.
The wire should protrude a little, bewteen .010 and .060 inches through
the interface. Be careful, more than .060 inches of wire protrusion and
you run the risk of binding on the wire on the Picker Height adjustment
screws when the Picker tries to go to Home.
Melco Industries, Inc.
Grabber Adjustments
Left Side View
2 - 19
Picker Height
Adjustment Screws
Front View
Adjust Picker
Home Position
Here
C
L
The Picker should be centered on the Bobbin
Shaft.
Bottom View
Side to side adjustment is found here.
(The Large Bobbin machine has a spacer
between the Picker Bracket and the cylinder arm,
the adjustment screws are in the same location.)
Fig. 2-14
Grabber Adjustments
The grabber blade travel is adjusted at the Transiion Brackett in the rear of
the head near the Grabber Motor. See Fig. 2-15. The motor is attached to the
Actuator Arm, then to a swivel and rod. The rod is inserted into the
Transition Brackett and held in place with two set screws. To Adjust the
blade travel, follow thes steps:
1. Turn the machine off, and unplug the power cord from the power source.
2. Remove the Rear Blade Cover. This cover is held in place by the last two
screws of the Blade Top Cover.
3. Remove the Grabber Motor Cover. Manually rock the Motor limit stop
lever to move the blade all the forward and all the way back one time.
This insures that the blade is not binding somewhere in its path.
4. Look at the right side of the Transition Bracket, you will find two small set
screws in the mount.
EMC6 (With Melco Head) Technical Manual
2 - 20
TRIMMER SET UP AND ADJUSTMENTS
5. Loosen the set screws, but do not remove them. The mount and blade can
now move over the rod. Rock the switch lever toward the front of the
machine, the blade retacks into the Transition Bracket and Delron Guide.
Leave 1/2 inch of the blade showing. Adjust the blade if necessary and
tighten the set screws in the mount.
6. Replace all covers removed to make the adjustment.
Grabber Motor Cover (Trimmer Option
Only)
Remove These Two Screws To
Remove Cover
Front Blade Cover
Top Blade Cover
Transition Bracket,
Black Delron Guide
Rear Blade Cover
Remove this cover to adjust
blades extended position
Front Conduit Mount- Two screws on
the side of this mount allows for
adjusting the blade’s travel.
1.50" with Grabber at full
extention.
Fig. 2-15
Melco Industries, Inc.
Velcro
Wiper
Static Electricity / Grounding Strap Use
3-1
3. MECHANICAL DISASSEMBLY
GENERAL
This section of the manual provides detailed information for performing
parts replacements that may be required during the life of the product. The
procedures are guidelines for performing repair maintenance; and must be
used by personnel practicing good maintenance and repair technique.
With certain areas in this section it is recommended that the procedure be
performed by a factory trained technician. This reference is indicated by
stating "FACTORY SERVICE ADVISED" at the start of the procedure.
WARNING! Failure to practice good maintenance and
repair technique may result in injury to personnel
performing the work, and damage to the equipment!
NOTE: The Epicor System Warranty is exclusive of, and may be VOID if,
poor maintenance practices have caused damage to the equipment.
Static Electricity / Grounding Strap Use
As with all computerized equipment, the EMC6 Embroidery Peripheral is
extremely sensitive to static electricity. Therefore it is essential that the
following warnings and cautions be understood and followed. If there is any
contents in these statements that is not understood, please contact the Melco
technical representative in your local service area for assistance.
WARNING! It is very important that the EMC6 power
cord be plugged into a properly wired electrical outlet.
Failure to have a properly wired outlet may result in
damage to the equipment and injury to personnel. It
is recommended that a licensed electrician be
consulted to assure that the electrical outlet is
properly wired and grounded.
CAUTION! If a properly wired electrical outlet is not
used for the source supply voltage to the Epicor
System, electrical failures may be the result.
Any time work is performed inside the covered areas of the Sewing
Peripheral, the person performing the work MUST be using a static
EMC6 (With Melco Head) Technical Manual
3-2
GENERAL
grounding strap.
The grounding strap must be connected in the proper manner to insure the
static charge on the persons body is neutralized to the chassis ground level of
the Sewing Peripheral when working in the electronic areas under the covers.
WARNING! The static grounding strap in the Spare
Parts Option, has the proper resistance incorporated
into the wire for operator protection from electrical
shock. DO NOT attempt to use any grounding strap
that is not specifically designed for static use. A
"straight-wire" grounding device (one without built-in
resistance) will place the operator in extreme danger
of exposure to lethal voltages.
It is ALSO
RECOMMENDED that the static strap be checked
during daily use for proper resistance protection.
Failure to use a grounding strap, or failure to practice
other good maintenance/repair techniques can cause
damage to the machine and possible harm to
personnel.
Melco Industries, Inc.
Removing The Covers
3-3
Figure 3-1, below, shows the recommended location for attaching the
grounding strap when working inside the Controller area of the EMC6.
Figure 3 - 1
After removing the Electronics Cover (as described below), locate the
ground wire stud on the Z Drive Motor mounting bracket. This bracket is
located directly behind the rear of the sewing head. The ground stud
protrudes enough to allow the alligator clamp to attached effectively. After
placing the wristband over your wrist, attach the alligator clamp of the
grounding strap to this ground wire stud (or any other metal which is proven
to have chassis electrical ground level).
If working inside the Operator Interface (under the Keyboard and Display),
attach the grounding strap to any metal which is proven to have chassis
electrical ground level, but on that side of the machine.
Removing The Covers
There are two covers at the rear of the machine, the Electronics Cover and
the Keyboard/Operator Interface Cover. These are attached to the machine
with Cover Catches in the rear and angled tabs in front. The front angle tabs
slip into slots at the rear edge of the sewing area. The rear Cover Catches
lock the covers in place.
To remove either cover, place a small bladed screw driver under the center of
the locking tab at the rear and pry up. The cover comes off in one motion
toward the front.
EMC6 (With Melco Head) Technical Manual
3-4
SEWING PERIPHERAL
Caution: When the Electronics Cover is removed two
printed circuit boards are exposed. These are the
CPU and XYZ Controller boards. DO NOT TOUCH
EITHER BOARD WITHOUT USING ANTI-STATIC
PRECAUTIONS.
Caution: After removing the Keyboard Cover
disconnect the keyboard ribbon cable from the
Keyboard PCB. NEVER PICKUP OR MOVE THE
KEYBOARD PCB WITH THE KEYBOARD CABLE.
Caution: Never run the sewing peripheral without the
electronics cover in place. The cover forms the top of
the EMI shield around the Boards to reduce RF
interference. Running the equipment without the
shield (cover) can be a violation of FCC regulations.
Keyboard Cover/ Operator
Interface
Electronic
Cover
EMC6
Embroidery
Peripheral
Figure 3 - 2
SEWING PERIPHERAL
End Cap Removal
The 2 end caps (or side panels) of the EMC6 are removable to gain access to
the areas covered by each. The Y Drive belts and adjustments for each are
Melco Industries, Inc.
End Cap Removal
3-5
Electronics
cover
CONTROLLER
SECTION
Operator
interface
cover
cap head
screw (1
each per
end cap,
loosen only)
OPERATOR
INTERFACE
SECTION
cap head screw
(3 each per end
cap, remove
completely)
right end cap
HEAD
SECTION
left end cap
front of
machine
CARRIAGE
SECTION
cap head screw
(1 each per end
cap, loosen only)
Figure 3 - 3
accessible only with the end caps removed.
There are 3 cap head screws that must be removed, and 2 cap head screws
that must be loosened in able to remove each end cap. (Refer to Figure 3-3
above.)
Remove the 3 horizontal cap head screws first, then loosen the 2 outer cap
head screws.
EMC6 (With Melco Head) Technical Manual
3-6
CONTROLLER SECTION
CONTROLLER SECTION
CPU PCB Replacement
There are three possible CPUs in your machine:
•
The 000493-01 CPU for the EMC6 M with no options.
• The 004862-01 CPU for the first 50 EMC6 MTLs and MLs
produced.
•
The 004973-01 CPU for all EMC6 MTL and ML machines ) after
the first 50 machines.
NOTE: The 000493-01 CPU is not "upward" compatible, it does not support
the trimmer option. The 004862-01 and the 004793-01 are not "downward"
compatible, but are interchangeable, see below.
The only difference between the 004862-01 and the 004793-01 boards is the
location of the Z Encoder input connector. If your machine has the
004862-01 CPU, the Z Encoder is connected to the XYZ Controller Board
(at J366003), and then to the CPU Board using a ribbon cable. If your
machine has the 004793-01 CPU the Z Encoder connector is located directly
on the CPU (J3). The functional aspects of the two boards are identical. Both
the 004862-01 and the 004793-01 CPUs support all options currently
available for the EMC6 MTL and ML machines.
Replacing the 000493-01 CPU EMC6 M
1. Turn off the power switch to the EMC6 and remove the power cord from
the power source electrical outlet and the rear of the machine.
2. Remove the interface cable connected to the CPU PCB at the rear of the
EMC6. Also remove the "terminator" cable if one is installed. (The last
SP in a series of units will have this "terminator" installed.)
3. Remove the Electronic Cover. (Refer to specific instructions for removal.)
CAUTION! Failure to use a properly installed static
grounding strap may cause damage to the
electronics in the EMC6.
4. Install a static grounding strap between the EMC6 and the personnel
performing this procedure.
Melco Industries, Inc.
Replacing the 000493-01 CPU EMC6 M
3-7
5. Remove the screw and washer attaching the CPU PCB bracket to the
chassis near the sewing head (see figure below).
CAUTION! Use care not to drop any hardware into
the base of the Controller area.
6. Remove the Z axis encoder ribbon cable from the connector J3709 of the
CPU PCB Assembly before the CPU PCB is removed. Refer to the
figure below for location reference.
7. Grasp the CPU PCB at the top corners of the board and carefully pull the
board up and out of the harness connectors mounted in the base of the
chassis. (Use a gentle rocking motion to make it slightly easier to release
the board from the connectors.)
CAUTION! Once the CPU PCB is removed from the
EMC6, use extreme care in handling the assembly.
Portions of this board are very sensitive to static
charges. Any further handling of the CPU PCB must
be done with the continued use of the static
grounding strap still installed as instructed in
specific procedures in this manual.
8. To replace the CPU PCB, perform the previous steps in reverse order.
EMC6 (With Melco Head) Technical Manual
3-8
CONTROLLER SECTION
X - Y Motor Control PCB Replacement (000493-01 CPU)
The X-Y Motor Control PCB is "piggy-backed" onto the CPU PCB. Refer to
the figure below and identify the location of the X-Y Motor Control PCB.
1. Remove the CPU PCB. (Refer to specific instructions for removal.)
Follow all the precautions associated with the section, such as utilizing the
static grounding strap as described.
2. Place the CPU PCB (and attached X-Y Motor Control PCB) on a clean,
static-free working surface.
3. Remove the button head screw which secures the X-Y Motor Control PCB
to the CPU PCB. Refer to Figure 5-10 below.
4. Carefully hold the CPU PCB at the left 2 corners.
5. Grasp the X-Y Control PCB at the left and right card edges, approximately
1 inch (3 cm) from the bottom.
6. Pull upward on the X-Y Control PCB to disconnect it from the CPU PCB
at the connector (see figure below).
7. To replace the X-Y Control PCB, perform the previous steps in reverse
order.
X-Y Control PCB
Fig.3-4
Melco Industries, Inc.
Z Motor Controller (000493-01 CPU only)
3-9
Z Motor Controller (000493-01 CPU only)
Z Motor Controller Removal
"FACTORY SERVICE ADVISED"
If unauthorized personnel attempt to service this area, the FACTORY
WARRANTY MAY BE VOIDED if the work is improperly performed. It is
recommended that prior to removing the Z motor controller the individual
wires be tagged with masking tape and numbered to match the motor
controller terminal board markings. After marking the individual wires,
perform the following steps to remove the motor controller:
1. Use a straight-edged razor blade (or other suitable knife) and cut the
stand-off foam rubber from the Controller - NOT from the chassis. See
figure on next page.
2. Remove the four screws securing the controller to the chassis.
3. Grasp the multicolored ribbon cable plug and squeeze to unlock the
locking finger.
4. Rock the plug in its socket and gently pull to remove.
5. Gently pry the clear insulation strip from the terminal board.
CAUTION! It is advised to label the wires with
appropriate means so you will understand exactly
where the wires are to be replaced during
reinstallation.
6. Number six pieces of masking tape to match the terminal board numbers
on the motor controller that have wires connected and place the tape on
the wires for identification when reinstalling the motor controller.
7. Remove the terminal screws and disconnect the wire lugs. (You may have
to pull the controller partially out of the chassis to gain access the
terminal screws.)
8. Remove the controller.
EMC6 (With Melco Head) Technical Manual
3 - 10
CONTROLLER SECTION
000493-01 CPU/X-Y Control PCBs
Z Motor Controller
Multi-Colored
Ribbon Cable
Controller Mounting Screws
(two screws each side)
Foam Support Cut Foam Here
Wire Terminal and
lugs
Fig.3-5
Z Motor Controller Installation
"FACTORY SERVICE ADVISED"
There are two different ways to install the Z motor controller: with the wires
and multicolored ribbon cable connected, and with the wires connected after
installation of the controller proper. It is probably more conservative to
perform the wire hookup and then install the controller, in order to test the
controller prior to fastening the "box" into the machine (installing the four
screws and gluing the standoff onto the controller). The following procedure
is listed for performing the installation as "recommended":
1. Gently pry the controller terminal insulating plastic strip from the terminal
block.
2. Remove the terminal screws from terminals 1,2,3,5,8,and 10.
3. Ensure a terminal screw has a split lock washer on it, and insert the screw
into the terminal lug T-1 (or as identified in the Z Motor Controller
Removal Procedure as the terminal lug connected to terminal # 10), and
install the terminal lug to terminal 10 on the motor controller terminal
block.
Melco Industries, Inc.
Z Motor Controller (000493-01 CPU only)
3 - 11
4. Perform step (3) for the remaining terminal lugs as listed below:
a) Terminal lug T-2 to terminal 8 on the terminal block.
b) Terminal lug T-3 to terminal 5 on the terminal block.
c) Terminal lug T-4 to terminal 3 on the terminal block.
d) Terminal lug T-5 to terminal 2 on the terminal block.
e) Terminal lug T-11 to terminal 1 on the terminal block.
5. Plug the multicolored ribbon cable into the motor controller receptacle,
ensuring the locking fingers engage.
6. Place the motor controller "temporarily" into position in the "Controller
Section" cavity, ensuring the wires/cables are not touching any rotating
metal parts.
7. Plug the machine into the power source and turn the unit on.
8. "Download" the machine, and send a small design (Melco Logo).
9. Select the reset menu, and press [Enter].
10. Press [ALT] and [Left Arrow] to select "Test Mode On".
11. Press [Enter] to enable the test mode.
NOTE: The "Test Mode" will allow the unit to ignore the thread break
function; and, if the design does not have any "Needle-Up" stitches
at the end, it will run continuously until you press [STOP]. This is a
maintenance function, and can cause the customer to believe the
machine is "broken" if the technician does not disable the function.
Enter the "Reset Menu" as before, and press [ALT] and [Right
Arrow] keys to turn "test mode" off after completing the testing.
12. Perform the necessary steps per the operators’ manual to ready the
machine for sewing.
13. "Unthread" the machine.
14. Start the machine and check that all the speeds are operational.
EMC6 (With Melco Head) Technical Manual
3 - 12
CONTROLLER SECTION
NOTE: If this test of the new motor controller is successful, then continue this
procedure. Otherwise, replace the motor controller.
15. Route the motor controller cable (with wires) 9B1 between the plastic
chassis mounting bosses.
16. Place a small quantity of "Super Glue" (or other suitable type of adhesive)
on the motor controller standoff.
17. Place the motor controller into position, and insert the screws.
18. Tighten the mounting screws to 8 inch-pounds.
19. Press the controller against the standoff until adhesive sets.
20. Route the multicolored ribbon cable through the cable clamps.
Replacing The 004862-01 And 004973-01 CPUs
TURN THE MACHINE POWER OFF AND DISCONNECT FROM THE
POWER SOURCE
1. Remove the Electronics Cover.
2. Disconnect the Network Cable, and Terminator if present.
3. Disconnect the Z Motor Harness and Z Encoder Cable from the XYZ PCB.
4. Grasp the XYZ PCB at the top corners and gently rock the PCB up and out
of its card edge connectors of the bottom interface board. Disconnect the
Ribbon Cable from the center of the XYZ board.
5. Grasp the CPU board at the top corners and gently rock it out of its
connectors of the interface board.
If your are replacing the CPU with a new board of the same type reverse the
steps above to replace.
If you are replacing the 004862-01 CPU with a 004793-01 CPU board, follow
the steps below:
1. Carefully insert the CPU into the interface board. Making sure that the
CPU is pushed into the card edge connectors of the interface board
securely.
Melco Industries, Inc.
XYZ Controller PCB Replacement
004862-01 CPU
3 - 13
XYZ Controller PCB
Z Motor
Z Encoder Ribbon Cable Harness
Z Encoder
Cable
004973-01 CPU
Z Encoder Cable
XYZ Controller PCB
Z Motor Harness
Fig.3-6
2. Connect the Z Encoder Cable into connector J3 of the 004973-01 CPU.
3. Insert the XYZ Board into the card edge connectors of the interface board.
4. Connect the Z Motor Harness to the XYZ board at connector J366002.
5. Replace the Electronics Cover.
XYZ Controller PCB Replacement
The XYZ Controller PCB controls the X axis motor, the Y axis motor and
the Z axis motor, all from one printed circuit board. This board and the CPU
comprise all the electronic control required. The XYZ Controller sits in front
of the CPU in the EMI box.
1. Remove the electronics cover.
EMC6 (With Melco Head) Technical Manual
3 - 14
OPERATOR INTERFACE SECTION
Follow all the precautions associated with the section, such as utilizing the
static grounding strap as described.
2. Disconnect the Z Motor cable ( connector J366002, top right hand corner
of board) and the Z Encoder cable (J366003).
3. Remove the screw and washer attaching the PCB to the chassis.
4. Grasp the board at the top corners and gently rock to board up.
Disconnect the small blue ribbon cable at the center of the board.
5. Now carefully pull the board the rest of the way out of the EMI box.
6. Replace the board using these steps in reverse.
OPERATOR INTERFACE SECTION
Keyboard/Display Replacement
To remove the Keyboard/Display Assembly from the Operator Interface
Cover, refer to the following procedure:
1. Turn off the power switch to the EMC6 and remove the power cord from
the power source electrical outlet and the rear of the machine.
2. Remove the Operator Interface Cover. (Refer to specific instructions .)
3. Place the Operator Interface Cover (with Keyboard/Display Assembly)
onto a surface which is free of static electricity.
4. Install a static grounding strap between the working surface and the
personnel performing this procedure. Refer to the following figure to
perform the next steps.
5. Locate and loosen the two screws (indicated in the figure) that secure the
PCB at the top.
6. Locate and remove the two screws that secure the PCB near the bottom as
indicated in the figure.
NOTE: Locate the nylon insulating washer under the head of the left screw as
shown in the figure. This washer must be reinstalled with a new
PCB to avoid the possibility of causing electrical circuit damage.
Melco Industries, Inc.
Power Supply Replacement
3 - 15
Loosen Screws
Remove Screws
Nylon Washer
Fig.3-7
7. Remove the PCB from the Operator Interface Cover. Lift at the bottom
and the top will follow.
8. Transfer the key caps Stop, Start, Alt, Menu, Enter, Fast/Slow, Arrow
Horiz, Arrow Vert) from the old PCB to the new PCB by simply lifting
them off of the keys by using finger pressure only. It is recommended that
this be done one key at a time to avoid errors in key cap arrangement on
the new PCB.
9. When the key caps are transferred, reinstall the Keyboard/Display
Assembly by reversing the preceding steps. Insure that the nylon
insulating washer is installed under the left screw on the PCB.
Refer to the Adjustment Section of this manual for information in adjusting
the intensity of the Display, if required.
Power Supply Replacement
1. Turn Off the peripheral, and unplug the power cord from the source.
2. Remove the Keyboard Cover. Disconnect the Keyboard ribbon cable, and
set the cover aside.
3. Disconnect the power distribution cable from the connector on the power
supply.
4. Disconnect the ground wires from the ground post on the top of the power
supply.
EMC6 (With Melco Head) Technical Manual
3 - 16
OPERATOR INTERFACE SECTION
5. Unscrew the two cap head screws (one on either side of the power supply
at the rear).
6. Grasp the power supply and slide it out of the rear cutout in the chassis.
7. Remove the four screws attaching the power supply bezel to the power
supply.
8. Install the new power supply by reversing these steps.
Y Drive Motor Replacement
"FACTORY SERVICE ADVISED"
When replacing the Y drive motor, the drive belt tension adjustment is very
critical. Therefore, before attempting to replace and adjust the belt tension
of the Y drive motor, it suggested that you contact the Melco service
representative in your area for recommendations before proceeding
CAUTION! DO NOT attempt to adjust the tension of
the Y drive motor belt before first contacting a
factory trained Melco service representative. Over
tightening the attaching/adjustment screw will result
in damage to the chassis.
To replace the Y drive motor, refer to the following procedure:
Drive Belt Adjusting Screw
Power Supply
Rear of Sewing Head
Y Drive Pulley
Y Drive Shaft
Locking Screw Stud Locking Screw below
motor
Y Encoder
Y Motor Pulley
Motor terminals (one below not shown)
Fig. 3-8
Melco Industries, Inc.
Y Motor Mount Pivot
Y Drive Motor Replacement
3 - 17
1. Turn off the power switch to the EMC6 and remove the power cord from
the power source electrical outlet and the rear of the machine.
2. Remove the Operator Interface Cover. (Refer to specific instructions for
removal.)
3. Refer to the procedure for removing the Power Supply, if you must the Y
Motor Mounting Bracket..
4. Refer to the figure on the privous page, and disconnect the encoder harness
(the harness with the 4 small green, red, white, and black wires) from the
Y drive motor encoder.
5. Locate and remove the attaching/adjustment screw and the Y Motor
Support Bracket Locking Screw, under the Motor(see Figure 3-8).
6. The motor mounting bracket rotates upward, pivoting on the pin. Carefully
maneuver the motor (with bracket still attached) upward and out of the
chassis slot in the front; and the block at the rear.
NOTE: The bracket is slotted in the rear to allow it to detach from the pin in
the block without the need to remove the pin.
CAUTION! It is advised to label the wires with
appropriate means so you will understand exactly
where the wires are to be replaced during
reinstallation. Identify which of wires goes to which
motor terminal before removing the wires in the next
step.
7. Before the assembly can be completely removed, identify and disconnect
the two motor power harness connections (one connector wire is red and
the other one is black).
WARNING!
If the two motor power harness
connectors are reversed from the original connections,
the motor will drive the beam to the mechanical stops
EMC6 (With Melco Head) Technical Manual
3 - 18
OPERATOR INTERFACE SECTION
of the sewing field with no regard to speed control
when machine is first operated.
CAUTION! DO NOT attempt to adjust the tension of
the Y drive motor belt before first contacting a
factory trained Melco service representative. Over
tightening the attaching/adjustment screw will result
in damage to the chassis.
8. Reverse the previous steps to reinstall a new motor. Contact the Melco
factory trained service representative in your area regarding the
installation of the attaching/adjustment screw and before attempting to
adjust the tension of the Y drive motor belt.
Melco Industries, Inc.
Carriage Assembly/Beam Replacement
3 - 19
CARRIAGE SECTION
Carriage Assembly/Beam Replacement
X Beam Removal
The purpose of this procedure is to remove the X Beam as an Assembly for
field replacement and factory rebuild (or bench top repair/adjustment).
Refer to the X Motor Replacement Procedure for replacement of the motor
only.
1. Remove the following:
a) the Electronics Cover
b) the Operator Interface Cover
c) the left and right End Caps
d) the X Motor Cover
2. Disconnect the X Motor and Encoder electrical leads from the X Motor
and X Interface PCB.
3. Loosen the ground strap nut under the right side of the Beam.
4. Remove the two # 8-32 x 3/8" button head screws that fasten the RIGHT
SIDE Y Drive Belts to the Y Carriage.
CAUTION!
The Y Drive Belt clamps have four
button-head screws: two fasten the Y Belt Clamps,
and two fasten the Clamp to the carriage. LOOSEN
ONLY THE SCREWS THAT HOLD THE CLAMP TO
THE CARRIAGE!
5. Remove the two # 8-32 x 3/8" button-head screws that fasten the LEFT
SIDE Y Drive Belts to the Y Carriage.
6. CAREFULLY push the drive belt clamps to the front or rear of the
machine to clear the Y Carriages and the X Motor/Encoder wires.
7. Remove the four # 8-32 x 3/8" cap head screws that fasten the LEFT SIDE
Y Carriage to the Y Bearing Housing.
8. Repeat step 7 for the RIGHT SIDE Y Bearing Housing.
EMC6 (With Melco Head) Technical Manual
3 - 20
CARRIAGE SECTION
9. Carefully slide the beam to the front while lifting the Beam free of the
machine.
The X Beam Assembly can now be returned to the factory, or placed on the
bench top.
X Motor Replacement
1. Turn off the power switch to the EMC6 and remove the power cord from
the power source electrical outlet and the rear of the machine.
2. Remove the Electronic Cover and the Left End Cap. (Refer to specific
instructions for removal.)
3. Remove the black plastic X-Motor Cover, by removing the two (2) hex
button head screws attaching the cover to the beam.
CAUTION! The Y drive belt clamp has four button
head screws - 2 fasten the belt clamp, and 2 fasten
the clamp to the Y carriage.
LOOSEN ONLY THE SCREWS THAT HOLD THE
CLAMP TO THE CARRIAGE!
4. Remove the 2 screws that secure the Y drive belt clamp to the Y carriage.
NOTE: These screws, lock washers, and flat washers MUST NOT BE
MIXED WITH or SUBSTITUTED BY other hardware. The exact
dimensions are very critical in the smooth operation of the carriage.
5. Identify and label the X Motor positive, negative, and ground wires; and the
terminal on the X Interface PCB to which they are connected.
6. Remove each of the 3 wires, identified above, from the X interface PCB
terminals. Carefully grasp the lugs and pull them at the 45 degree angle
that they are mounted.
7. Identify the X Motor Encoder harness and carefully disconnect it from the
Encoder Body on the "rear" of the X-Motor.
8. Remove the 4 phillips screws attaching the motor to mounting bracket. Tilt
the motor to slip the belt off the pulley, then remove the motor.
Melco Industries, Inc.
Carriage Assembly/Beam Replacement
3 - 21
9. Replace the old motor in the bracket with a new motor. Install, but do not
tighten, the four phillips mounting screws.
10. With a hex driver loosen the X-Motor Drive Pulley set screw and remove
the pulley from the old motor.
11. Remove the set screw from the pulley and apply "red" LocTite (or
equivalent) screw adhesive to the set screw. Reinstall the set screw.
12. Slip the drive belt over the pulley as you install the drive pulley onto the
new motor shaft .
13. Tighten the pulley set screw leaving a gap of at least .0020" between the
back of the pulley and the motor bracket to ensure there is no bind.
14. Refer to the motor belt tensioning procedure in the Service Adjustments
section of this manual for information in tightening the mounting screws.
15. Replace the covers removed at the beginning of this procedure.
X Motor Belt Replacement
1. Turn OFF the machine power at the rear power switch, then unplug the
power cord from its outlet.
2. Remove the X-Motor cover from the beam.
3. Loosen the Drive Pulley set screw using a Hex driver or Allen Wrench.
4. Loosen the four phillips head motor mounting screws attaching the motor
to the motor bracket. Now try slipping the drive belt over the loosened
pulley. If the belt does not slip over the pulley, remove the motor
mounting screws and tilt the motor to allow the drive belt to slip off.
5. Replace the Drive Belt in the same manner that you removed the old belt,
just reverse the steps. Keeping in mind that the Motor must be flush with
the motor bracket, and that you must have at least .0020" gap between the
pulley’s rear surface and the motor bracket. It is important that the
assembly does not bind.
EMC6 (With Melco Head) Technical Manual
3 - 22
SEWING HEAD SECTION
X Drive Belt Replacement
"FACTORY SERVICE ADVISED"
If the need arises for the X drive belt to be replaced, it is suggested that the
entire X beam be overhauled at the factory. The other components in the
beam must be evaluated during X drive belt replacement, and factory trained
technicians are equipped to perform this procedure properly.
Refer to the X beam removal procedure.
Y Drive Belt Replacement
To replace the Y drive belt, refer to the following procedure:
1. Turn off the power switch to the EMC6 and remove the power cord from
the power source electrical outlet and the rear of the machine.
2. Remove the EMC6 end caps. (Refer to specific instructions for removal.)
CAUTION!
The Y Drive Belt clamps have four
button-head screws: two fasten the Y Belt Clamps,
and two fasten the Clamp to the carriage. Remove
Only The Screws That Fasten The Y Belt Clamps!
DO NOT REMOVE THE SCREWS THAT HOLD THE
CLAMPS TO THE X BEAM
3. Loosen the belt tension adjustment screw.
4. Remove the screws that hold the Y drive belt within the belt clamp on the
end of the X beam.
SEWING HEAD SECTION
General
The MELCO sewing head is made up of several physical sections.
This section of the manual describes the removal and replacement of most of
the major components of the sewing head.
Melco Industries, Inc.
Z Motor Installation (EMC6 M)
3 - 23
Arm and Bed Assembly
The Arm and Bed Assembly provides the stable platform for the
multi-needle color change embroidery system. All the other components of
the sewing head are attached to this assembly.
In the Arm and Bed Assembly are the shafts, belts, and pulleys that drive the
Needle, Color Change, Rotary Hook, and Trimmer (if present EMC6 MTL).
Z Motor Installation (EMC6 M)
"FACTORY SERVICE ADVISED"
There are two purposes that are addressed in this procedure. The first
purpose is to install the motor and pulley only. This situation can be found
when the motor replacement is the only consideration. The second purpose
is for when the technician has determined that the motor failure was caused
by improper belt tension or binding of the belt due to improperly aligned
pulleys. To install the motor and pulley only, skip to step (4). For the
purpose of replacing the Z motor, the pulley, and the bracket, perform the
following steps:
1. Ensure the motor mount bracket stand-offs are tight.
2. Place the motor mount bracket into place on the sewing head.
3. Install the motor mount mounting/adjustment screws (two places)
4. Check the motor for operation as follows:
a) Plug the Z Motor Harness connector into receptacle of the motor
controller .
b) Unplug the Z Encoder from the CPU.
WARNING! Ensure that the motor case is at chassis
ground potential. A motor windings failure during
this test could allow dangerous voltages to be present
on the motor case.
c) Jumper a machine chassis ground to the motor case.
d) Turn machine power on: the motor will drive (as the CPU looks for
EMC6 (With Melco Head) Technical Manual
3 - 24
SEWING HEAD SECTION
a feedback signal) if it is functional.
e) Turn power off and remove the power cord from the source.
f) Plug the Z Encoder back into it’s proper receptacle.
g) Unplug the motor connector from the motor controller.
5. Inspect the motor shaft for any burrs and remove any found.
6. Inspect the motor drive pulley (new or from the old motor) for uneven
wear, bent flanges, stripped set screw threads, etc. Replace if necessary.
7. Remove the set screw from the pulley and apply "red" LocTite (or
equivalent) screw adhesive to the set screw. Reinstall the set screw.
8. Orient the pulley on the motor shaft with hub containing the set screws
towards the sewing head (away from the motor). Align the end of the hub
flush with the end of the motor shaft.
NOTE: Replace the Z Motor Drive Belt at this time (if required)
9. Place the motor into position, being careful to engage the belt.
10. Insert the motor mount screws (four places) and tighten.
11. Hold the motor shaft and rotate the sewing head to align the set screws on
the pulley with the flat(s) on the motor shaft. Tighten the set screws.
12. Check the pulley alignment by rotating the sewing head clockwise (from
the rear) and reposition the motor pulley until the drive belt rides in the
center of the motor pulley and the head drive pulley/shaft assembly.
13. Route the multicolored ribbon cable through the cable clamps to the
motor controller.
14. Plug the motor connector into the motor controller receptacle.
15. The Z Drive Belt tension should be set at 6 pounds.
Z Motor Replacement (EMC6 MTL, ML)
1. Turn the main power Off, and remove from power source.
Melco Industries, Inc.
Z Shaft Encoder Installation (EMC6 M)
3 - 25
2. Remove the Rear Head Cover and the Electronics Cover.
3. Disconnect the Z Motor harness from the XYZ Board.
4. Using a 6mm bent allen wrench loosen the two motor tensioning screws.
See figure below.
5. Remove the four cap head screws attaching the motor to the standoffs.
6. Lift the motor away from the standoffs and allow the drive belt to slip off
the motor drive pulley.
7. Loosen the pulley set screws and remove the pulley from the motor shaft.
8. Place the pulley on the new motor shaft and slightly tighten one of the
pulley set screws.
9. Slide the motor mount bracket up and tignten one of the motor tensioning
screws to hold it in place.
10. Place the motor in position. Be sure that the bottom loop of the drive belt
is below the motor drive pulley, then reattach the motor to the standoffs
with the four cap head screws.
11. Loosen the motor tensioning screw and slide the motor mounting bracket
down, making sure that the bottom loop of the drive belt is in the center
of the drive pulley.
12. Loosen the drive pulley set screw and adjust the pulley so that the pulley is
directly below the main Z drive pulley.
13. Tighten both Z drive pulley set screws.
14. Adjust the belt tension to 6 pounds and tighten the motor tensioning
screws.
15. Connect the Z Motor harness to the XYZ board. And replace both the
Electronics Cover and the Rear Head Cover.
Z Shaft Encoder Installation (EMC6 M)
The Melco Sewing Head uses a "shaft" type encoder, rather than the "disk"
type used on previous Melco Embroidery Peripherals. This style of encoder
provides the same information required by the CPU, while at the same time
is easier to install, replace and to calibrate.•
EMC6 (With Melco Head) Technical Manual
3 - 26
SEWING HEAD SECTION
If you think that you may have a problem with the Z Encoder, first contact
your Melco Representative for advice, it may be that the encoder is not the
problem. If, however, your representative agrees, you can replace the
encoder following these steps:
1. Turn the machine OFF. Then disconnect the power from the power source.
2. Remove the Electronics Cover and the Operator Interface Cover.
3. Remove the Z Drive Cover from the top, rear of the sewing head.
4. Using proper anti-static precautions, disconnect the Encoder Ribbon
Cable at connector J3709 on the CPU.
5. Loosen the two set screws on the universal coupling that joins the encoder
shaft to the head Z shaft.
6. Loosen and remove the Jam Nut attaching the encoder to the mounting
plate, pull the encoder off the mounting plate, and discard the defective
encoder.
7. Before you install the new encoder, check the position of the 3 "jumpers" on
the Encoder PCB against the figure below. If they are not set the same as
shown in the figure, set them accordingly.
8. Install the "new" encoder by reversing steps 9 through 6. Then follow the
calibration procedure found in Section 2.
Z Encoder Installation (EMC6 MTL,ML)
The MTL and ML machines use a different style shaft type encoder then the
Jumpers
Open Pins
EMC6 M. The PCB and jumpers are not present. As a result installing and
calibrating the encoder is "simpler" than previous methods.
Melco Industries, Inc.
Needle Case Removal
3 - 27
1. Turn the machine off.
2. Remove the Rear Head Cover and Electronics Cover.
3. Disconnect the Encoder Cable from the XYZ or CPU board.
4. Loosen the two universal coupling set screws that joins the Z shaft to the
Encoder shaft.
5. Loosen and unthread the jam nut on the Encoder shaft.
6. Pull the encoder out of the shaft coupling and encoder mount. Capture the
jam nut and washer as the encoder shaft is removed.
7. Insert the new encoder/shaft into the hole of the encoder mount, place the
washer and then the jam nut onto the encoder shaft as you insert the shaft
through the mounting plate.
8. Insert the encoder shaft into the coupling.
9. Tighten the jam nut, and then the coupling set screws.
10. Connect the Encoder Cable to the XYZ or CPU board.
11. Calibrate the Z Encoder per section 2 of this manual.
Needle Case Removal
It may never be necessary to remove the needle case from the head.
However, to replace the Needle Bar Driver, Take Up Lever Gear, or Needle
Bar Reciprocator, you must remove the needle case. Refer to the following
Jam Nut
Universal Shaft Coupler
Z Encoder
Z Encoder Cable
EMC6 (With Melco Head) Technical Manual
3 - 28
SEWING HEAD SECTION
steps to remove the Needle Case from sewing head.
1. Turn ON the EMC6 and bring the sewing head to the HEAD UP position.
2. Turn OFF the EMC6 and disconnect the power cord from its power source.
3. Remove the Thread Saddle from the top of the sewing head.
4. Disconnect the Thread Break Harness from the Color Change PCB, at
connector J360201.
5. Remove the Right Slide Support (cap at the right end of the Needle Case
Cross Slide Shaft) by loosening the 2 screws that secure it to the Front
Facia at the top. Loosen the screws almost all the way.
CAUTION! When you remove the Needle Case, you
must be very careful not to damage the photo
sensors on the Color Change PCB with the metal
Color Position Indicator. This indicator is attached to
the Needle Case and lies within photo sensors.
The Needle Case must be moved far enough to the
right for the indicator to clear the photo sensors
before the Needle Case is pulled away at the top.
6. You must rotate the Color Change Cam to move the needle case to the
right. The Color Change Cam has a slot in the end of the cam shaft for
this purpose. Rotate the cam shaft with a single blade screw driver.
Grasp the needle case to hold it in position as you rotate the cam.
7. When the Color Position Indicator is out of the last photo sensor on the
Color Change PCB, pull the left end of the Needle Case Cross Slide Shaft
out of the Left Slide Support and simply pull the top of the Needle Case
carefully toward you. As the top rotates outward, pick the Needle Case
upward slightly to disengage the Lower Needle Case Guide Rail from the
front of the sewing head arm. As the Needle Case is pull out and away
from the sewing head arm, the needle bar driver studs and take up lever
gears easily disengage. The Needle Case should now be free.
To Install the Needle Case
1. Ensure that the Front Facia is installed if it had been removed.
Melco Industries, Inc.
To Install the Needle Case
3 - 29
CAUTION! The Head must be at Head Up. If you
removed the needle case and have not altered the
Tensioner Assembly
Needle Case
Needle Case Cover
Needle Case Cross Slide Shaft
Slide Support (Right)
Head Up position manually, the head should still be at
Head Up. If not, then you must bring the Head to that
position.
2. If the sewing head is not at Head Up, you must position it to Head Up.
CAUTION! Keep hands, fingers, and other items
away from the printed circuit boards and mechanical
areas of the sewing head as you turn ON the EMC6.
3. Turn ON the EMC6. If the Color Change Index LED at the Color Change
PCB is ON, rotate the Color Change Cam so the light goes OFF.
CAUTION! In the next steps, keep the Needle Case
positioned far enough to the right so the Color
Change Indicator will clear the photo sensors as the
Needle Case is pushed in at the top.
4. Grasp the Needle Case and set the Lower Guide Rail into position at the
bottom of the sewing head arm.
5. Insure the Take Up Levers are aligned so that the slots at the bottom of the
Take Up Lever Gears engage into the "rails" at the top of the Front Facia.
This is required to place the Take Up Lever Gears in the correct position
to engage the Take Up Lever Drive Gear.
EMC6 (With Melco Head) Technical Manual
3 - 30
SEWING HEAD SECTION
6. Insure all six needle bars are at the full needle up position.
7. Pivot the Needle Case from the bottom, into position, with the Take Up
Lever Gears onto the rails and the needle bar driver studs into the
channel in the front of the Front Facia.
8. Position the left end of the Needle Case Cross Slide Shaft into the Left
Slide Support as you hold the Needle Case solidly in place.
9. Now, as you continue to hold the Needle Case solidly in place, rotate the
Color Change Cam to move the Needle Case to the left. Stop rotating the
cam when the Needle Case is approximately centered on the Needle Case
Cross Slide Shaft.
10. Reattach the Right Slide Support by inserting the shaft into place as you
slide the screw slots under the 2 loosened screws.
CAUTION! Do not over tighten the screws in the top
of the Facia.
11. Snug the 2 screws to secure the Right Side Support to the Facia.
12. Reconnect the Thread Break Harness from the Color Change PCB, at
connector J360201.
13. Reinstall the Thread Saddle to the top of the sewing head.
To Remove The Front Facia
If it becomes necessary to remove the Front Facia (to replace the
reciprocator assembly, for example), refer to the following procedure.
1. First remove the Needle Case as described in a previous procedure.
2. Remove the four 3mm screws from the top of the Facia. (Refer to the
figure on the next page.)
3. Remove the six 4mm screws from the front of the Facia. (Refer to the
figure above.)
4. Lift off the Facia. If replacing the Facia, transfer any Slide Support that is
attached to the old Facia to the new Facia before installing the new Facia
as described on the next page.
Melco Industries, Inc.
Installing The Front Facia
3 - 31
Installing The Front Facia
CAUTION!
The following procedure MUST BE
FOLLOWED PRECISELY to avoid possible damage to
the Front Facia during installation.
DO NOT OVERTIGHTEN THE SCREWS!
1. Put the Front Facia in position on the front of the sewing head arm and
"start" all 10 screws (four 3mm screws on top and six 4mm screws on the
bottom). Refer to the figure above for screw locations.
2. After all the screws are started, continue to rotate each of them until just
before they begin to snug.
3. When all the screws are positioned to "just before snug," refer to the figure
above and "snug" the forward 2 screws (screw # s 1 & 2) on the top surface.
4. Next, "snug" the top 2 screws (screw # s 3 & 4 in the above figure) of the
front surface.
5. Now finish snugging the screws in the numbered order as shown in the
figure. Snug # s 5 & 7 on the front, then go to the top to snug # s 7 & 8,
and then to the bottom two screws numbered 9 and 10.
6. Reinstall the Needle Case and associated covers as described in previous
EMC6 (With Melco Head) Technical Manual
3 - 32
SEWING HEAD SECTION
procedures.
Jump Stitch Solenoid Replacement
If a Jump Stitch Solenoid must be replaced, follow these steps:
1. Remove the Thread Saddle from the top of the sewing head.
2. Disconnect the Jump Stitch Solenoid Harness at the connector location
J360204 on the top of the Color Change PCB.
3. Remove the Left Slide Support (cap at the left end of the Needle Case
Cross Slide Shaft) by loosening the 2 screws that secure it to the Front
Facia at the top. Loosen the screws almost all the way.
By removing the Left Slide Support, you gain access to the top screw of
the Jump Stitch Solenoid Bracket through the hole in the side of the
Front Facia.
4. Remove the top and bottom screws of the Jump Stitch Solenoid Bracket
and then remove the solenoid and the solenoid bracket as one piece.
NOTICE: Before you remove the solenoid from the
bracket, record the number of threads of the
solenoid that are showing beyond the solenoid
bracket (or measure the distance that the end of the
solenoid protrudes from the solenoid bracket). When
the new solenoid is installed into the bracket,
position the solenoid with the same number of
threads (or distance) that you recorded in this step.
5. Loosen the locking nut on the solenoid, then rotate the bracket off the
solenoid.
6. Replace with new solenoid by reversing the procedure above. Adjust the
position of the solenoid into the solenoid bracket using the "thread
counts" or measurement you obtained above (see NOTICE above).
NOTE: During installation the solenoid must be adjusted properly. If you did
not adhere to the NOTICE above, or if for some other reasone, the
adjustment for the solenoid is not correct, Rrefer to the Jump Stitch
Adjustment procedure in Section 4 for the proper adjustments.
Melco Industries, Inc.
Color Change Cam Replacement
3 - 33
Color Change
The color change function of the EMC6 (With Melco Head) is much like the
color change of other Melco embroidery peripherals offering this feature.
The Color Change PCB controls color change commands from the design
and from the keyboard, thread break information, the jump stitch solenoid,
and the color change motor. The color change PCB, motor, cam, and wire
harnesses are located under the Thread Saddle at the front of the sewing
head.
Color Change Cam Replacement
The replacement of the Color Change Cam will seldom be required. Contact
your Melco representative for advice and instructions before removing this
part.
EMC6 (With Melco Head) Technical Manual
3 - 34
SEWING HEAD SECTION
Color Change PCB Replacement
1. Remove the Thread Saddle.
CAUTION! The Color Change PCB is snapped into
place on top of the Plastic Motor Mount Box. Be
careful not to damage the LED sensors with the
Color Position Indicator when removing the PCB.
2. You must rotate the Color Change Cam to move the needle case to the
right so the LED sensors on the Color Change PCB are clear of the Color
Position Indicator. The Color Change Cam has a slot in the end of the
cam shaft for the purpose of rotating cam. Rotate the cam shaft with a
single blade screw driver.
3. Disconnect the Jump Stitch Solenoid Harness, the Thread Break Harness,
and the Color Change harness from the Color Change PCB.
4. When the Color Position Indicator is out of the last photo sensor on the
Color Change PCB, and all the harnesses are disconnected, it is safe to
remove the Color Change PCB.
5. To remove the Color Change PCB, pry the rear catch that holds the Color
Change PCB, and lift the Color Change PCB off of the Color Change
Housing.
Color Change Motor Replacement
To remove the color change motor refer to the following steps:
1. First remove the Thread Saddle and the Color Change PCB as described in
previous procedures.
2. Loosen and remove the motor mounting screws.
3. When the motor is loose, pull off the Drive Belt.
4. Loosen the pulley set screw and remove the Motor Drive Pulley.
5. The motor is now loose and can be removed.
6. Replace the Motor and reverse the preceding steps.
Melco Industries, Inc.
Replacing A Needle Bar
3 - 35
Replacing A Needle Bar
To replace a Needle Bar, refer to the steps below, then turn to the Needle
Bar height adjustment procedure in the EMC6 Operation Manual.
1. Hold the Tensioner Assembly in place while you remove the 2 screws that
secure it to the top of the Needle Case.
2. Lift the Tensioner Assembly up a few inches, then disconnect the Thread
Break harness from the bottom of the Tensioner Assembly and set the
Tensioner Assembly aside.
NOTE that there is a 180 degree twist counter-clockwise on the cable
before it is installed into the Tensioner Assembly.
3. Snap off the Needle Case Front Cover from the Needle Case and identify
which Needle Bar is to be replaced.
4. Loosen the Needle Clamp set screw and remove the needle and Needle
Clamp from the bottom of the Needle Bar.
5. Next, loosen the Needle Bar Stop Clamp (black clamp).
CAUTION! After the next step, the Needle Bar is free
to be moved out the top of the Needle Case. Use
care so the springs and other parts do not fly out of
position.
6. Loosen the Needle Bar Clamp.
7. Use care as you remove the Needle Bar upward and out the top of the
Needle Case.
8. Transfer the screw from the top of the old Needle Bar to the top of the new
Needle Bar.
EMC6 (With Melco Head) Technical Manual
3 - 36
SEWING HEAD SECTION
9. Install a new Needle Bar by inserting it from the top, through the various
pieces as listed below:
The parts that the Needle Bar engage, from top to bottom are:
Needle Bar Holding Spring
washer under spring
felt pad
upper casting piece
rubber bumper just under the upper casting piece
Needle Bar Stop Clamp (black)
Needle Bar Clamp (silver)
Presser Foot Spring
Presser Foot (top through hole)
rubber pad
nylon piece
felt pad
lower casting piece
o-ring
Presser Foot (lower through hole)
o-ring
Needle Clamp and needle
10. Insert the needle and tighten the Needle Clamp screw to secure the
needle and capture the Needle Bar.
11. Reinstall the covers and assemblies that were removed during this
procedure. Please refer to the "NOTE" in step 2 when reinstalling the
Tensioner Assembly.
After installing a new needle bar, you must adjust the needle bar height
properly. Refer to the EMC6 User Manual for the adjustment procedure for
needle bar height.
Melco Industries, Inc.