1
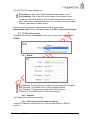
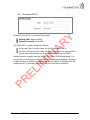
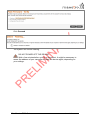
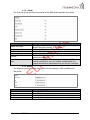
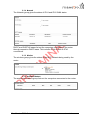
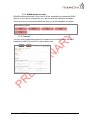
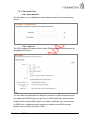
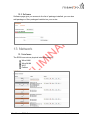
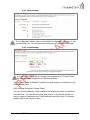
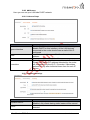
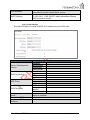
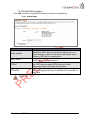
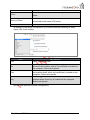
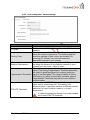
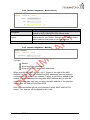
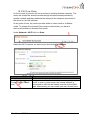
QUICK START GUIDE E200 Series – Cellular / WAN / LAN / Wi-Fi Router Version 0.5 1 Maestro E200 Series www.maestro-wireless.com Copyright Copyright© 2015 Maestro Wireless Solutions Limited. All right reserved. This document is for the use of intended recipients only and the contents may not be reproduced, redistributed, or copied in whole or in part for any purpose without Maestro prior express consent. Note: This document is subject to change without notice This manual cover the following products: Maestro E205XT02 Maestro E205XT04 Maestro E206XT DOCUMENT VERSION 2 Maestro E200 Series DATE www.maestro-wireless.com This manual is written without any warranty. Maestro Wireless Solutions Ltd. reserves the right to modify or improve the product and its accessories which can also be withdrawn without prior notice. Our company stresses the fact that the performance of the product and its accessories depends on the proper use conditions as well as the surrounding environment. Maestro Wireless Solutions Ltd. assumes no liability for damage incurred directly or indirectly from errors, omissions or discrepancies between the router and this manual. This software, solution or application is provided on an "as is" basis. No warranty whether expressed or implied is given by Maestro Wireless Solutions Ltd. in relation to this software, solution or application. User shall assume the entire risk of using or relying on this software, solution, and application. In no event will Maestro Wireless Solutions Ltd. be liable for any loss or damage including without limitation, indirect or consequential loss, damage, or any loss, damage whatsoever arising from loss of data or profit arising out of, or in connection with, the use of this router product. Every effort is made to keep the product and its software up and running smoothly. However, Maestro Wireless Solutions Ltd. takes no responsibility for, and will not be liable for, the product or its software being temporarily unavailable due to technical issues beyond our control. The above terms and conditions are subject to change without prior notice. The present use of this product solution implies that the user approves and understands all the above terms and conditions. 3 Maestro E200 Series www.maestro-wireless.com Table of Contents 2 SAFETY PRECAUTIONS 2.1 2.2 2.3 3 GENERAL PRECAUTIONS USING THE ROUTER IN VEHICLE PROTECTING YOUR ROUTER OVERVIEW 3.1 3.2 SCOPE TARGET AUDIENCE 7 7 7 7 8 8 8 4 PREREQUISITES 8 5 USER MANUAL CONVENTIONS 9 6 PRODUCT OVERVIEW 6.1 6.2 6.3 E205 SERIES AT A GLANCE E206 SERIES AT A GLANCE BUNDLE CONTENT 10 10 11 11 7 PRODUCT FEATURES 12 8 PHYSICAL DIMENSIONS AND LED 13 PHYSICAL DIMENSIONS LED INDICATORS ETHERNET PORT LED INDICATORS 13 14 15 8.1 8.2 8.3 9 HARDWARE INSTALLATION 16 9.1 9.2 9.3 9.4 9.4.1 9.4.2 INSTALL THE SIM CARD CONNECT THE CELLULAR (WWAN) ANTENNA(S) CONNECT THE POWER SUPPLY CONNECTION TO THE DEVICE CONNECTION WITH THE LAN CABLE CONNECTION VIA WI-FI 16 16 17 17 17 17 10 E205 BASIC CONFIGURATION 18 10.1 10.2 10.3 10.3.1 10.3.2 10.3.3 10.4 10.5 CONNECTING TO THE WEB INTERFACE LAN CONFIGURATION WAN CONFIGURATION MANUAL AUTOMATIC PPPOE (POINT-TO-POINT PROTOCOL OVER ETHERNET) CELLULAR SETUP WIRELESS (WI-FI) 4 Maestro E200 Series 18 19 20 20 20 20 21 22 www.maestro-wireless.com 11 E205 ADVANCED CONFIGURATION 11.1 12 FLASHING FIRMWARE AND UPDATING YOUR DEVICE STATUS PAGES EXPLAINED 12.1 12.1.1 12.1.2 12.1.3 12.1.4 12.1.5 12.1.6 12.1.7 12.2 12.3 12.4 12.5 13 OVERVIEW: SYSTEM CELLULAR MEMORY NETWORK WIRELESS ASSOCIATED STATIONS MWAN INTERFACE LIVE STATUS FIREWALL ROUTES SYSTEM LOG REALTIME GRAPHS SYSTEM 24 24 26 27 27 28 28 29 29 29 30 30 31 31 31 32 13.1 SYSTEM PROPERTIES 13.1.1 GENERAL SETTING 13.1.2 LOGGING 13.2 ADMINISTRATION 13.2.1 ROUTER PASSWORD 13.2.2 SSH ACCESS 13.3 SOFTWARE 32 32 32 34 34 34 35 14 35 NETWORK 14.1 14.2 14.2.1 14.2.2 14.2.3 14.2.4 14.2.5 14.3 14.3.1 14.3.2 14.3.3 14.3.4 14.4 14.4.1 14.4.2 14.4.3 14.5 14.5.1 14.5.2 INTERFACES LAN INTERFACE GENERAL SETUP ADVANCED SETTINGS PHYSICAL SETTINGS FIREWALL SETTINGS DHCP SERVER WIRED WAN INTERFACE GENERAL SETUP ADVANCED SETTINGS PHYSICAL SETTINGS FIREWALL SETTINGS CELLULAR INTERFACE (3G OR 4G) GENERAL SETUP ADVANCED SETTINGS FIREWALL SETTINGS ADD VPN INTERFACE PPTP OPENVPN 5 Maestro E200 Series 35 37 37 38 39 39 40 42 42 43 43 44 45 45 46 47 47 48 50 www.maestro-wireless.com 15 WI-FI 15.1 15.2 15.2.1 15.2.2 15.2.3 15.2.4 15.2.5 15.3 15.4 16 57 INTRODUCTION WI-FI AS ACCESS POINT DEVICE CONFIGURATION - GENERAL SETUP DEVICE CONFIGURATION - ADVANCED SETTINGS INTERFACE CONFIGURATION – GENERAL SETUP INTERFACE CONFIGURATION – WIRELESS SECURITY INTERFACE CONFIGURATION – MAC-FILTER WI-FI AS CLIENT CREATING MULTIPLE SSID 57 57 58 59 60 61 61 62 63 SETTING UP FAILOVER AND LOAD BALANCING 65 16.1 FAILOVER MODE CONFIGURATION 16.1.1 SETTING UP LOAD BALANCING FOR FAILOVER 16.2 LOAD BALANCING MODE CONFIGURATION 65 66 70 17 FIREWALL BASICS 72 18 SERVICES 73 18.1 18.2 18.3 18.4 18.5 19 DYNAMIC DNS SMS DIAGNOSTIC DOTA GPS EVENT APPENDIX 19.1 19.2 19.2.1 19.2.2 19.3 19.4 DEFAULT SETTINGS RESET TO FACTORY DEFAULT SETTING USING THE WEB-BASED USER INTERFACE USING THE RESET BUTTON ON THE SIDE OF THE ROUTER LIST OF ACRONYMS SUPPORT 6 Maestro E200 Series 73 75 76 77 78 79 79 79 79 79 81 83 www.maestro-wireless.com 1 Safety Precautions 1.1 General precautions The router generates radio frequency (RF) power. When using the router, care must be taken to ensure safety as well as compliance with all the regulations surrounding the use of RF equipment. Do not use the router in aircraft, hospitals and petrol stations or in places where using GSM products or other RF equipment is prohibited. Be sure that the router will not be interfering with nearby equipment such as pacemakers or medical equipment. The antenna of the router should be directed away from computers, office equipment, home appliance, etc. Always keep the router at a minimally safe distance of 26.6cm or more from a human body. Do not put the antenna inside metallic boxes or other containers 1.2 Using the router in vehicle Check for any regulation or law authorizing the use of GSM equipment in vehicles in your country before installing the router. Installation of the router should be done by qualified personnel. Consult your vehicle dealer for any possible interference concerns related to the use of the router. Be careful when the router is powered by the vehicle‟s main battery. The battery may be drained after extended period. 1.3 Protecting your router To ensure error-free usage, please install and operate your router with care and comply with the following: Do not expose the router to extreme conditions such as high humidity/rain, high temperatures, direct sunlight, caustic/harsh chemicals, dust, or water. Do not try to disassemble or modify the router as there are no user serviceable parts inside and the warranty would be void in case of tampering. Do not drop, hit or shake the router. Do not use the router under extreme vibrating conditions. Do not pull the power supply cable. Please attach or detach it by holding the connector after switching off the supply. Install and connect the router in accordance to the instruction manual. Failure to do so will void the warranty. 7 Maestro E200 Series www.maestro-wireless.com 2 Overview 2.1 Scope This document provides you all the information you need to set-up, configure and use the Maestro E200 Series router. 2.2 Target audience This document is intended for customers and integrators who understand basic telecommunications and information technology terminology and concepts. 3 Prerequisites Before continuing with the installation of your E200 Series router, make sure you have a computer equipped with the following: A computer with an Ethernet port or Wi-Fi connectivity A web browser such as Google Chrome, Mozilla Firefox or Apple Safari 8 Maestro E200 Series www.maestro-wireless.com 4 User manual conventions The following symbols are used throughout the user manual: The following symbol indicates attention must be paid The following symbol indicates a warning The following symbol provides information 9 Maestro E200 Series www.maestro-wireless.com 5 Product overview 5.1 E205 Series at a glance Dual-band HSDPA (E205XT02), tri-band HSDPA (E205XT04 GPRS/EDGE auto-fallback LAN on RJ45 port Switchable WAN/LAN on RJ45 port Built-in Wi-Fi with an external RP-SMA antenna connector Automatic WAN / 3G failover Built-in GPS supporting active antenna via an external SMA connector External SMA antenna connectors for 3G One digital inputs/outputs Six color LED‟s for displaying for Wi-Fi and network activity, signal, power and alarm Device management and configuration via a web GUI DIN rail mountable 10 Maestro E200 Series www.maestro-wireless.com 5.2 E206 Series at a glance Quad-band HSPA+ & dual-band EV-DO (E206XT) GPRS/EDGE auto-fallback LAN on RJ45 port Switchable WAN/LAN on RJ45 port Built-in Wi-Fi with an external RP-SMA antenna connector Automatic WAN / 3G failover Built-in concurrent diversity/GPS antenna supporting active antenna via an external SMA connector External SMA antenna connectors for 3G One digital inputs/outputs Six color LED‟s for displaying for Wi-Fi and network activity, signal, power and alarm Device management and configuration via a web GUI DIN rail mountable 5.3 Bundle content E200 Series router x 1 1m Ethernet cable 8P8C x 1 2G/3G/4G terminal antenna 90 degree hinged SMA x 1 5 dBi, 2.4/5.1~5.9 GHz dipole antenna RP-SMA (M) hinged 90° x 1 Industrial grade 1.2 A power supply x 1 DIN clip x 1 If any of these items are missing or damaged, please contact Maestro Support immediately. The Maestro Support website can be found at: http://support.maestro-wireless.com/ 11 Maestro E200 Series www.maestro-wireless.com 6 Product features With high-speed cellular (3G and beyond), WAN, LAN and Wi-Fi connectivity, the E200 is a highly versatile, reliable and rugged router designed for missioncritical enterprise applications requiring faultless connectivity. The E200 comes in two models; the cost-effective HSDPA ensures alwayson connectivity for 2G migration or low-latency applications such as energy and sales & payment, while the HSPA+ penta-band is ideal for deployment in vertical markets requiring high-speed data or global roaming, such as security and transportation. The E200 can be configured through an easy-to-use web interface; quick setup section will facilitate basic router configuration. Advanced configuration setting for functions such as Wi-Fi, failover, load balancing, VPN, firewall are also directly available through the web interface. Once configured, a set of 6 LED‟s on the top of the aluminum alloy casing will help the user ensure that the device is operating correctly. Users can also remotely manage the router is also available through an HTTPS connection over the LAN or WAN. 12 Maestro E200 Series www.maestro-wireless.com 7 Physical dimensions and LED 7.1 Physical dimensions E200 Series dimensions without connector Lenght 83.9mm Depth 60mm Height 25mm Weight 90g 13 Maestro E200 Series www.maestro-wireless.com 7.2 LED indicators The E200 Series features 6 LEDs on the front to display critical system information NAME COLOUR WI-FI STATE DESCRIPTION OFF Wi-Fi network is deactivated Flashing Wi-Fi network connection traffic ON Wi-Fi network is activated OFF Cellular data service is not connected ON Cellular data service is connected OFF SIM card is not inserted, or device is not registered on the cellular network Flashing Device is registered on the cellular home network ON Device is registered on the cellular roaming network OFF No signal (CSQ=0,99) Activity Network Signal Weak signal (CSQ<7) ON Flashing Strong signal (CSQ>7) OFF Power off ON Power on OFF No alert, device is running smoothly Flashing Software fault (crash, issues…) ON Hardware fault (high temperature, problem with module or SIM card) Power Alert 14 Maestro E200 Series www.maestro-wireless.com 7.3 Ethernet port LED indicators The E200 Series router features two Ethernet ports, each with with two LED. LED Green Amber STATUS On DESCRIPTION There is a valid network link. Off No valid network link detected. Flashing Off There is activity on Ethernet port There is not activity on the Ethernet port 15 Maestro E200 Series www.maestro-wireless.com 8 Hardware installation 8.1 Install the SIM card SIM card(s) should be inserted into the SIM tray as illustrated in the image below. SIM card contact should be face up. 8.2 Connect the Cellular (WWAN) Antenna(s) Connect the cellular antenna to the “Cellular” connector (SMA Female) on the unit. If the unit is equipped with a secondary cellular antenna connector “Div.”, it is highly recommended to connect an additional antenna to this connector for diversification. Dual antennas will provide improved signal strength thus better performance. Note: For most applications, the antenna(s) included with the unit will provide suitable reception, but some circumstances/environments may require a higher quality antenna or one mounted in a different location. If this is the case, Maestro has many antenna options to chose from, please contact us or visit maestro-wireless.com. 16 Maestro E200 Series www.maestro-wireless.com 8.3 Connect the power supply Connect the Micro-Fit 4-pin male connector of the power supply to the power connector located on the LAN side of the unit. 8.4 Connection to the device 8.4.1 Connection with the LAN Cable Connect one end of the Ethernet cable to the “LAN” port on the unit and the other end to a LAN port on a PC. 8.4.2 Connection via Wi-Fi Make sure Wi-Fi antenna is connected (see chapter 8.2) and Wi-Fi is ON on your computer, phone or tablette. Scan for network and select SSID “Maestro E200”. You will be prompted to enter a WPA/WPS-2 mixed-mode password. Default password is „ W1rele$$’. 17 Maestro E200 Series www.maestro-wireless.com 9 E205 Basic configuration 9.1 Connecting to the web interface Connect the LAN interface of your E200 to a computer via the RJ-45 cable and and start your web browser. Enter the device LAN IP address in the browser address field. http://192.168.1.1 Note: If you change the IP address, remember to reboot the router and enter the new IP address into your browser address bar. You will be invited to enter the admin username and password: Default login – admin Default password – admin (This is the default username and password for Maestro routers. The admin and read-only user passwords can be changed at System>Administration After successfully login the Quick Setup page will show up Figure 1: Quick Setup If you need to access advanced feature you can navigate directly in the menu. 18 Maestro E200 Series www.maestro-wireless.com If you want to follow the quick user guide click on the Next button and you will enter quick setup page. Since E200 has multiple WAN interfaces, the default priority settings for switching between various WAN interfaces is as follows and cannot be changed in Quick setup. To make any changes on the WAN priority settings, please go to the Network/Interfaces and Network/Load Balancing Tab. By default the router is configured in failover mode with WAN priorities as listed below: Priority 1 – Wired WAN Priority 2 – Wi-Fi as WAN (WWAN) (Wi-Fi in Client Mode) Priority 3 – Cellular In the quick setup page, you can perform basic configuration settings for the LAN, WAN, Cellular and Wi-Fi interfaces. All other configurations will be set to the factory default or previously saved values.. 9.2 LAN configuration The LAN configuration page is used to configure the LAN settings of the router The modem router is shipped preconfigured to use private IP addresses on the LAN side, and to act as a DHCP server. The modem router‟s default LAN IP configuration is as follows: LAN IP address: 192.168.1.1 IPv4 Netmask : 255.255.255.0 These addresses are part of the designated private address range for use in private networks, and should be suitable in most applications. If your network has a requirement to use a different IP addressing scheme, you can make those changes here and click. 19 Maestro E200 Series www.maestro-wireless.com The LAN TCP/IP Setup settings are IPv4 Address: This is the LAN IP address of the modem router. IPv4 Netmask: This is the LAN subnet mask of the modem router. Combined with the IP address, the IP subnet mask allows a device to know which other addresses are local to it, and which must be reached through a gateway or modem router. Advanced LAN configuration parameters could be found under Network/Interfaces, under LAN parameters click Edit > Advanced Settings. 9.3 WAN configuration By default the WAN is in automatic mode, you can also set it to Manual or PPPoE 9.3.1 Manual IPv4 Address: The IP address to assign to the selected WAN interface. IPv4 Netmask: The Subnet mask of the IP address above. IPv4 Gateway: The gateway to assign this WAN interface. DNS server: The DNS server for the WAN interface. 9.3.2 Automatic The WAN will be setup automatically. 9.3.3 PPPoE (Point-to-Point Protocol over Ethernet) Acquire IP Address automatically from your Provider using the PPPoE protocol. 20 Maestro E200 Series www.maestro-wireless.com Many DSL providers use PPPoE. To acquire an IP Address from the PPPoE server, a username and password are required. Ask your provider for your username and password if you don‟t know them. Advanced WAN configuration parameters could be found under Network/Interfaces, under WAN parameters click Edit > Advanced Settings. Selecting PPPoE in the quick setup will require some advance configurations. 9.4 Cellular Setup You can enter the cellular settings like APN, SIM PIN for security, Username and Password corresponding to your cellular connection (SIM Card), which you will receive from your Cellular Operator. APN: Access Point Name, enter the access point name provided by your network operator PIN: If required please enter your SIM card‟s PIN code Username and Password: If required enter login credentials provided by your network operator Advanced cellular configuration parameters could be found under Network/Interfaces, under 3G parameters click Edit > Advanced Settings. 21 Maestro E200 Series www.maestro-wireless.com 9.5 Wireless (Wi-Fi) By default, the Wi-Fi is in Access Point mode: Default SSID: Maestro E200 Default Password: W1rele$$ The E200 Wi-Fi can be configured either as An Access Point, in which case, the Wi-Fi acts as a LAN or As a Wi-Fi Client in which case, the E200 connects to an external Wi-Fi source which will be the source of Internet or WAN for the E200. Default security settings used are WPA-PSK, WPA2-PSK Mixed Mode. You can choose your encryption and change your password accordingly. Bring up on boot tick box in Wireless section by default is enabled. Ticking the box will enable the Wi-Fi (Wireless) interface every time the Router Reboots. 22 Maestro E200 Series www.maestro-wireless.com Wi-Fi section from this Quick setup page will disappear when - The default Wi-Fi interface is removed from Network / Wi-Fi page When you scan for available Wi-Fi networks and convert the Router to Client Mode. If you create multiple access point networks (Multiple SSDI‟s), the additional Wi-Fi networks created will not show up in Quick Setup. Advanced Wi-Fi configuration parameters could be found under Network/WiFi, under Wireless Overview parameters click Edit > Advanced Settings. Once the Quick Setup is done, you will have basic LAN connectivity, Internet access over WAN and/or Cellular and Wi-Fi will be configured as Access Point. To verify that your setup were succefully applied and your router is now running go to Network/Interfaces. 23 Maestro E200 Series www.maestro-wireless.com 10 E205 advanced configuration 10.1 Flashing firmware and updating your device E200 Series can be updated through the web interface. Go to System/Backup / Flash Firmware. Under Flash new firmware image, click on Choose File and locate the .bin file on your computer. Once the file located on the computer click Flash image… 24 Maestro E200 Series www.maestro-wireless.com Click Proceed The system will now be flashing. DO NOT POWER OFF THE DEVICE! Wait a few minutes before you try to reconnect. It might be necessary to renew the address of your computer to reach the device again, depending on your settings. 25 Maestro E200 Series www.maestro-wireless.com 11 Status pages explained Open your browser on your computer with the address http://192.168.1.1 Enter the default login “admin” and password “admin” By clicking on Status or Overview the page below will be displayed: The Status menu is divided in 5 sub-menus: Overview Firewall Routes System Log Real time Graphs 26 Maestro E200 Series www.maestro-wireless.com 11.1 Overview: 11.1.1 System The system tabs displays all information related to your device hardware and software version as well as basic settings: ITEM Hostname Model Firmware Version Kernel Version Local time Uptime IMEI 27 Maestro E200 Series DEFINITION The name assigned to your router Model of your router The firmware version that is currently residing and controlling the router The Linux kernel version on the router The date and time set up on the router The time in HH: MM: SS, for which the router is working since last power ON The IMEI (International Mobile Equipment Identity) of the router, a unique code for identifying devices on a GSM network. www.maestro-wireless.com 11.1.2 Cellular The Cellular group provides the status of the SIM card inserted in the router. ITEM Signal Strength Registration Status Operator Name Roaming Status Uptime Imsi DEFINITION Scale from 0 to 32. For a good cellular data connection Signal Strength must be 15 or above. Indicates if the device is registered on the cellular network Name of the cellular service provider Indicate if the device is roaming on another network The time in HH: MM: SS, for which the router is working since last power ON The International Mobile Subscriber Identity or IMSI is used to identify the user of a cellular network and is a unique identification associated with all cellular networks. 11.1.3 Memory The Memory group provides information on the memory in KB available with the router. ITEM Total available Free Cached Buffered 28 Maestro E200 Series DEFINITION Total available RAM memory Free RAM memory Memory used to cache internal router data Amount of memory used as an internal router buffer www.maestro-wireless.com 11.1.4 Network The Network group gives the status of IPV4 and IPV6 WAN status. DHCP and DHCPV6 leases list out the computers connected to the router through respective DHCP lease. This includes IPV4 as well as IPV6 connections 11.1.5 Wireless The wireless group gives the status of the Wi-Fi network being used by the router. 11.1.6 Associated Stations The associated stations group lists out the computers connected to the router. 29 Maestro E200 Series www.maestro-wireless.com 11.1.7 MWAN Interface Live status MWAN Interface provides a live view of all the available and connected WAN options. In the above screenshot, you can see that the interfaces marked in Green are live and connected while the ones in red are available but offline. 11.2 Firewall You can verify parameters related to firewall and its settings here. Status of firewalls for both IPv4 and IPv6 can be seen here. 30 Maestro E200 Series www.maestro-wireless.com 11.3 Routes The rules that are currently active on this E205 are shown here. 11.4 System Log The log of all configured events regarding this E200 is displayed here. 11.5 Realtime graphs This screen provides real time graphs of: ITEM Load Traffic Wireless Connections 31 Maestro E200 Series DEFINITION Load indicates the load on CPU Traffic indicates the WAN side incoming and outgoing traffic Wireless indicates the traffic on Wi-Fi irrespective on whether Wi-Fi is used as an access point (LAN) or Client (WAN) This page gives an overview over currently active network connections. www.maestro-wireless.com 12 System 12.1 System properties 12.1.1 General Setting This page allows you to configure the basic aspects of your device like its hostname or the time zone. 12.1.2 Logging Parameters about system log like buffer size and log output level can be set here. ITEM External system log server port Log output level DEFINITION Size of log displayed under Status page / Logs. Default is 16KiB IP address of any external TCP server where the real time log will be posted Port of any external TCP server where the real time log will be posted Debug Provides Information useful for 32 Maestro E200 Series www.maestro-wireless.com System log buffer size External system log server Info Notice Warning Error Critical Alert Emergency Debug Cron Log Level Normal Warning 33 Maestro E200 Series developers for debugging the application,not useful during operations. Normal operational messages which provide information which can be used for general purposes like reporting. Events which are unusual but not an error. Used to spot potential problems. Immediate action is not necessary. Warning messages but not error, indicating that error might occur if action is not taken Error conditions which should be relayed to developers or admins for resolution. Should be corrected immediately but indicates failure in the secondary systems. Problems which should be corrected immediately. System is Unusable. Helps you debug cron process which has failed during runtime. Normal informational messages Indicates some issues can happen or error could be generated in Cron process. www.maestro-wireless.com 12.2 Administration 12.2.1 Router Password On this page you can change the administrator password for accessing the device. 12.2.2 SSH access The E200 integrate Dropbear which offers SSH network shell access and an integrated SCP server. You can also set parameters for Dropbear Instance for SSH Access and you can paste public SSH-Keys (one per line) for SSH public-key authentication. By default the remote SSH access over WAN is disabled, you need to send an SMS from a registered admin number to enable remote SSH access. Please refer to section Services / SMS 34 Maestro E200 Series www.maestro-wireless.com 12.3 Software Software page give you access to the list of package installed, you can also add package or filter packaged installed on your router. 13 Network 13.1 Interfaces The E200 has various physical interfaces namely, Wired LAN Wired WAN Wi-Fi Cellular 35 Maestro E200 Series www.maestro-wireless.com In addition to these pre-created interfaces, you can add Virtual interfaces. You can also delete those virtual interfaces However, you cannot delete the LAN, WAN and cellular interface. When Wi-Fi is set-up as Client, interface WWAN will turn active. Next to the interfaces, there is information regarding the interfaces like connection time, Packets sent, Packets received and IP address. Connect button will connect the interface or reconnect if already connected. Stop will stop the interface. Click Edit to change the Interface Parameters. 36 Maestro E200 Series www.maestro-wireless.com 13.2 LAN interface 13.2.1 General Setup Click edit next to the LAN interface to access configurations ITEM Protocol IPv4 address IPv4 netmask IPv4 broadcast Use custom DNS server IPv6 assignment length IPv6 assignment hint 37 Maestro E200 Series DEFINITION Be absolutely sure that you choose Static address for LAN else you will end up losing access to WebInterface. Accidently if you choose any other option other than Static address for LAN and loose access to the Web Page. Please perform a Hardware factory reboot. The IPv4 address of your LAN interface The IPv4 netmask of your LAN interface Assign a part of given length of every public IPv6-prefix to this interface Assign prefix parts using this hexadecimal subprefix ID for this interface. www.maestro-wireless.com 13.2.2 Advanced Settings ITEM Bring up boot Use built-in IPv6 management Override MAC address Override MTU DEFINITION This option will enable LAN interface to start on every boot. Please be aware that un-ticking this box will not bring up the LAN interface in the next boot cycle and you will no longer be able to access the Web Interface of the Router until you perform a Factory Reboot. If ticked it enables IPv6 support in the LAN side. It is advisable to enter metric for every interface. Use gateway metric Metric indicates the priority of the interface. The lower the value the higher the priority of the interface. If no metric is added, it will assume a default value of “0” The default metric for LAN interface is “0” 38 Maestro E200 Series www.maestro-wireless.com 13.2.3 Physical Settings The configuration shown above is the default configuration. Unless you are an advanced user, we recommend not making any changes to this page. 13.2.4 Firewall Settings It is extremely critical that you assign every interface to a Firewall Zone. By default LAN is assigned to a LAN firewall Zone. You can also create a different Firewall Zone and assign your interface to the New Created Zone. Why creating a different Firewall Zone? You can create a different VLAN interface and assign the same to a different Firewall Zone. You can then set rules and policies in the firewall section on how you want to channelize the Traffic between two LAN zones. For details, please refer to the firewall section. 39 Maestro E200 Series www.maestro-wireless.com 13.2.5 DHCP server Here you can set your LAN side DHCP network. 13.2.5.1 General Setup ITEM Ignore interface Start Limit Leasetime DEFINITION Disable DHCP for this interface. Please note that if you disable DHCP for this interface, all the LAN devices connected to the router should have a static LAN IP configured Lowest leased address as offset from the network address. Maximum number of leased addresses. Expiry time of leased addresses, minimum is 2 minutes. Please note that the IP address allocated by the router will disappear from the Wi-Fi / Overview / Associates stations list only after individual lease time for each IP expires. 13.2.5.2 Advanced Settings ITEM Dynamic DHCP Force 40 Maestro E200 Series DEFINITION Dynamically allocate DHCP addresses for clients. If disabled, only clients having static leases will be served. Force DHCP on this network even if another server is detected. www.maestro-wireless.com IPv4-Netmask DHCP-Options Override the netmask sent to clients. Normally it is calculated from the subnet that is served. Define additional DHCP options, for example "6,192.168.2.1,192.168.2.2" which advertises different DNS servers to clients. 13.2.5.3 IPv6 Settings This help will help you setup a DHCP IPv6 network on your LAN side. ITEM Router AdvertisementService DHCPv6-Service NDP-Proxy DHCPv6-Mode Always announce default router Announced DNS servers Announced DNS domains 41 Maestro E200 Series DEFINITION Disabled server mode relay mode hybrid mode Disabled server mode relay mode hybrid mode Disabled relay mode hybrid mode stateless stateless + stateful Stateful only If ticked Announce as default router even if no public prefix is available. www.maestro-wireless.com 13.3 Wired WAN interface Click edit next to the wired WAN interface to access configurations 13.3.1 General Setup ITEM DEFINITION This option will enable the user the assign WAN side IP address to E200. Be sure that the IP that you enter in Static address Static address mode is in the same LAN domain as the Router or ISP that it is connected to. This will enable the Router to acquire WAN IP from the DHCP client DHCP Router it is connected to This option will enable dial-up over Ethernet network. PPPoE Your ISP should support PPPoE and you need appropriate login credentials for the same This is a specialized protocol supported by a few ISPs. PPPoATM You need appropriate login credentials from your ISP for the same Do not select any other protocol other than DHCP, Static, PPPoE or PPPoATM. 42 Maestro E200 Series www.maestro-wireless.com 13.3.2 Advanced Settings The configuration options are mostly similar to the LAN options. ITEM DEFINITION The default value is “3”. Between all the available Use Gateway metric physical WANs, this interface has the highest default priority. The Load Balancer will use these Metric Values to determine priority of a particular WAN. 13.3.3 Physical Settings Unless you are an advanced user do not change setting of this page. 43 Maestro E200 Series www.maestro-wireless.com 13.3.4 Firewall Settings It is extremely critical that you assign every interface to a Firewall Zone. By default the WAN interfaces is assigned to a „wan‟ firewall zone. In firmware version 2.0, you cannot create a WAN side firewall zone (Planned in firmware release 2.1). Hence it is advisable to keep this configuration untouched. 44 Maestro E200 Series www.maestro-wireless.com 13.4 Cellular interface (3G or 4G) Click edit next to the 3G interface to access configurations 13.4.1 General Setup ITEM Protocol Service Type APN PIN Username Password 45 Maestro E200 Series DEFINITION Be absolutely sure that you select only UMTS/GPRS incase of E205 and UMTS/GPRS or EVDO in case of E206. Please do not select any other protocol. The router will select the best service UMTS/GPRS available The router will connect only to 3G/ UMTS UMTS network The router will connect only to GPRS GPRS network Enter the APN provided by your network operator Enter the SIM PIN if any Username for your SIM card if any Password for your SIM card if any www.maestro-wireless.com 13.4.2 Advanced Settings ITEM Bring up boot Use gateway metric LCP echo failure threshold Inactivity timeout 46 Maestro E200 Series DEFINITION Keep the tick on for “Bring up on Boot” if you want the 3G Interface to be live on every reboot. Enter the gateway metric if you wish to use this WAN as a failover Enter LCP details only if you have the correct information on the same from your operator else leave them to their default value “0” value will keep the 3G connection always on. Any other value „X‟ will turn off the 3G connection after „X‟ seconds of inactivity www.maestro-wireless.com 13.4.3 Firewall Settings 13.5 Add VPN interface In addition to configuring the above-mentioned 3 basic interfaces, you can add virtual interfaces by clicking on the “Add VPN Interface” Button. You can add either PPTP or L2TP interface. For more details on adding PPTP or L2TP interface, please refer to the PPTP and L2TP configuration guides. 47 Maestro E200 Series www.maestro-wireless.com 13.5.1 PPTP 13.5.1.1 General Setup Point-to-Point Tunneling Protocol (PPTP) is used for creating VPN tunnels over the Internet between two networks. When you create a new VPN interface (refer to chapter 13.5) select PPTP Enter the IP address of the VPN server in your network, followed by the username and password for this server. Click save and apply to add the PPTP VPN interface. 48 Maestro E200 Series www.maestro-wireless.com 13.5.1.2 Advanced Settings ITEM Bring up boot DEFINITION Keep the tick on for “Bring up on Boot” if you want the 3G Interface to be live on every reboot. Use builtin IPv6management Use gateway metric Use DNS servers advertised by peer LCP echo failure threshold LCP echo interval Inactivity timeout Enter the gateway metric if you wish to use this WAN as a failover. If unchecked, no default route is configured. If unchecked, the advertised DNS server addresses are ignored Enter LCP details only if you have the correct information on the same from your operator else use 0 to ignores failures Send LCP echo requests at the given interval in seconds, only effective in conjunction with failure threshold “0” value will keep the 3G connection always on. Any other value „X‟ will turn off the 3G connection after „X‟ seconds of inactivity Override MTU Press Save and Apply to apply your settings. 49 Maestro E200 Series www.maestro-wireless.com 13.5.1.3 Firewall Settings The firewall settings tabs show you the existing firewall zone. You can choose to add the new interface to the WAN zone or create a new zone for the interface. Choose the appropriate button, and enter a name for the new zone and click on SAVE AND APPLY button. When you assign the new VPN interface to a zone it implies that the properties associated with that zone get applied to the VPN interface. The properties of a zone can be set under Network > Firewall. Please refer to the document on Firewalls and Port forwarding. Implications of the VPN Interface: Once you create a VPN interface on the router, it implies that the router is placed in the company network, even if it is located at a remote location. It can be accessed by a device in the company network for controlling it and acquiring any data associated with it. 13.5.2 OpenVPN Open VPN is an open-source software application that implements virtual private network (VPN) techniques for creating secure point-to-point or site-tosite connections. It uses the Open SSL library to provide encryption of both the data and control channels. Open VPN can run over User Datagram Protocol (UDP) or Transmission Control Protocol (TCP) transports, multiplexing created SSL tunnels on a single TCP/UDP port. Open VPN fully supports IPv6 as protocol of the virtual network inside a tunnel and the Open VPN applications can also establish connections via IPv6. It has the ability to work through most proxy servers (including HTTP) and is good at working through Network address translation (NAT) and getting out through firewalls. The server configuration has the ability to "push" certain network configuration 50 Maestro E200 Series www.maestro-wireless.com options to the clients. These include IP addresses, routing commands, and a few connection options E200 series supports Open VPN client, Server and Pass Through. 51 Maestro E200 Series www.maestro-wireless.com 13.5.2.1 OpenVPN client You can access the OpenVPN client under Services / OpenVPN. OpenVPN Client will attach itself to the configured OpenVPN server over any available WAN interface. If the auto-connect function is enables, OpenVPN will not only connect over available WAN but also switch between WANs as and when one WAN fails-over to another and also auto starts in every reboot. This can be achieved by clicking on the „enabled‟ tick box. You can either edit the sample client or create your own configuration from ground up. Click on the Edit sample_client and you will see the following menu This is the basic configuration menu, which you need to configure ITEM Verb DEFINITION Here you can set the output verbosity level. Higher the verbosity, higher will be the internal log details Tun_ipv6 Nobind Comp_lzo This will make the tunnel IPv6 capable Does not bin local address and port Uses lzo compression 52 Maestro E200 Series www.maestro-wireless.com Proto Client Allows you to choose between TCP and UDP Tick for client mode and on tick for Open VPN server Mode Client to Client Facilitates client to client communication for clients connected to the same VPN server Remote VPN server IP In addition to the above configuration, you need to add the following for basic Open VPN client creation. ITEM Port Ca Cert Key DEFINITION Open VPN server Port Authority certificate common to both Server and Client. Browse to the location where Ca certificate is located on the computer. Select and upload Client certificate generated at the server side. Browse to the location where client.cert certificate is located on the computer. Select and upload Client key generated at the server side. Browse to the location where client key is located on the computer. Select and upload (Select each and add to enter configuration) 53 Maestro E200 Series www.maestro-wireless.com Once you have the entire configuration loaded and certificates loaded, your screen should look like this: 54 Maestro E200 Series www.maestro-wireless.com Once this is configured, go to advanced option and choose configuration as per your VPN scheme. Pull – Accept options pushed from the Server – enabling this option will enable the router to accept the routes pushed from the OpenVPN server. It is recommended to keep it ticked. 55 Maestro E200 Series www.maestro-wireless.com Once you have the entire configuration in place, you can start the VPN service as follows The above screen shows that Open VPN service has started and the below screen shows OpenVPN is connected and running smoothly. 56 Maestro E200 Series www.maestro-wireless.com 14 Wi-Fi 14.1 Introduction The router can work in 2 modes: Wi-Fi as access point: It provides Internet to other host machines in its network over Wi-Fi. It can get Internet connection from WAN or cellular. If you have a cellular SIM card inserted in the router, it has a capability to switch between WAN and cellular in case either of them fails. However, at any point of time only one of the networks will be active. Wi-Fi as client mode: the router will act as a client to existing wireless networks. The router will accept the Internet access through wireless access provided by another service provider and then distribute the access to the machines connected to the router on its LAN interface. At any point of time, the router can work either in client mode or in Master mode. 14.2 Wi-Fi as Access Point It shows a Generic connection, with no network configured on the router. To enable connection click the edit button to configure the default network with the SSID Maestro E200. 57 Maestro E200 Series www.maestro-wireless.com 14.2.1 Device Configuration - General Setup You can choose the channel frequency from the drop down menu, or choose „auto‟, to select it automatically. You can also choose transmit power, the default being 20dBM or 100mW, which is the maximum value. 58 Maestro E200 Series www.maestro-wireless.com 14.2.2 Device Configuration - Advanced Settings ITEM Band HT mode Country Code Distance Optimization Fragmentation Threshold RTS/CTS Threshold DEFINITION Default value is 2.4GHz Default value is 20MHz, this can be set to 40MHz or disabled Choose the country code corresponding to the country where the router is operational. This ensures that the channels available in that country are enabled. By choosing „00‟ (World), the router will select the appropriate channel in your country. You can optimize the operation of your Wi-Fi network, if you know the distance of the farthest machine in your network from the router. Value is meter. Choose Fragmentation threshold value (in number of bytes). Fine-tuning Fragmentation Threshold parameter can result in good throughput but a wrong value can result in low throughput. The range of values is 256 to 2346 bytes. In a noisy environment, a smaller value of Fragmentation Threshold may result in more efficient communication. You can choose RTS/CTS threshold between 0 to 2347 bytes, typical value being 500. This setting is for advanced users. It prevents collision of wireless packets, particularly in case of hidden nodes or in a noisy environment. In case of access point setting, it is recommended not to use RTS/CTS threshold. 59 Maestro E200 Series www.maestro-wireless.com 14.2.3 Interface Configuration – General Setup ITEM Mode ESSID Network Hide ESSID WMM DEFINITION Should be set-up as Access Point ESSID shows the device name you have assigned to the router, by default, it is Maestro E200 In Access Point LAN must be selected, as the router will supply Wi-Fi internet to its clients on LAN Select Hide SSID, if you want your router SSID to be hidden when client machines scan for available Wi-Fi networks Wi-Fi Multimedia (WMM), is a subset of the 802.11e wireless LAN (WLAN) specification that enhances quality of service (QoS) on a network by prioritizing data packets. 802.11n spec requires devices to support 802.11e (Quality of Service [QoS] enhancements for wireless LAN) in order to use HT (High Throughput) link rates, i.e. higher than 54 Mbps. WMM's Traffic Identifier (TID) field is key to aggregation mechanisms, including block acknowledgement (block ACK), that enable 802.11n's high throughput rates. Since WMM support is required for products to be certified for 802.11n, WMM comes enabled by default in all Wi-Fi Certified n APs and wireless routers. So even if you don't have any WMM-aware devices on your network, leave WMM enabled or you may find your clients connecting only at 54 Mbps rates. 60 Maestro E200 Series www.maestro-wireless.com 14.2.4 Interface Configuration – Wireless Security ITEM Encryption Cypher Key DEFINITION Choose the type of encryption for your Wi-Fi network, default is WPA-PSK/WPA2-PSK Mixed mode Choose the cipher type from the drop down as appropriate for your router. Similarly enter the key that a client machine must enter to join this network. Enter the key corresponding to your cypher type 14.2.5 Interface Configuration – MAC-filter You can: Disable Allow listed Mac addresses Allow all EXCEPT listed MAC addresses. When entering the last 2 options, use „+‟ button to the right of the MAC Address List field. You can choose the MAC addresses that are currently connected to the router. If you choose „Custom‟ a new field is added to the screen, in which you may enter any other MAC address likely to join the network. Please take care that you enter the MAC address in the required format, else, the field will be shown RED. After you are satisfied with all your selections, press SAVE AND APPLY button. Your settings will be applied to the router. 61 Maestro E200 Series www.maestro-wireless.com 14.3 Wi-Fi as Client In Client mode, the router will act as a client to existing wireless networks. The router will accept the Internet access through wireless access provided by another network and then distribute the access to the machines connected to the router on its LAN interface. At any point of time, the router can work either in client mode or in Master mode. To change from Access Point mode to client mode, you have to remove all networks in Access Point mode. Under Network > Wi-Fi click on Scan. Select the Wi-Fi network you want to join and click Join Network. ITEM WPA passphrase Create / Assign firewallzone 62 Maestro E200 Series DEFINITION Enter the WPA pass phrase for the chosen network. Assign this network to firewall zone. Since you want your router to work in client mode, the internal network is connected on LAN so the firewall must be on the WAN side. Alternatively you can create your own firewall zone. www.maestro-wireless.com 14.4 Creating multiple SSID Though only one router is physically present to provide Internet access to any host machines in your network, it is possible to create virtual interface so that you can restrict and control access to different groups of users based on security and functionality. This is achieved by creating multiple SSIDs and assigning separate SSIDs to group of users. Please note that only one router is servicing multiple SSIDs. Click on Add button (next to Generic interface) to add another network (SSID). Follow the same procedure as given in Wi-Fi section to create ANOTHER interface in Access Point mode. Please note that the device configuration for both interfaces remain the same. However, the Interface configuration can be different. Assign a new ESSID to the interface. You can make different choices for Network, Security and MAC address filtering, so that you can differentiate between different groups of users. For example, you can choose one interface with MAC Address filtering DISABLED whereas another with „ALLOW only listed MAC Addresses‟. This way, you can provide full Internet access to only second group while restricting it for former group. After you make all the settings, click on SAVE AND APPLY button to create the new interface. Back to the Network / Wi-Fi you will see the second SSID. 63 Maestro E200 Series www.maestro-wireless.com 64 Maestro E200 Series www.maestro-wireless.com 15 Setting up Failover and Load Balancing Maestro E200 and E220 series Router can be configured in a way that it could have 3 sources of WAN: Wired Ethernet WAN Wi-Fi when configured in Client Mode (WWAN) Cellular You can setup the Load Balancing functions in two different way depending what you want to achieve: Failover – to provide connectivity persistency Load Balancing – to distribute traffic among different WAN Please note that once configured for load balancing, the router can‟t be used for failover and will assume that all available WAN are connected. The router will balance the load among WANs as per the policies and rules set. If configured for failover, the router will only use 1 WAN at a time. 15.1 Failover mode configuration By default the following is the priority assigned to each interface Priority 1 – Wired WAN Priority 2 – Wi-Fi WAN (Wi-Fi setup in Client Mode) Priority 3 – Cellular This section will guide you through the following Change the priority of WAN interfaces Setup failover policies to facilitate automatic failover between various WAN interfaces Once all the three interfaces are setup as WAN, go to Network > Load Balancing. The page will show live view of available active and available inactive WAN Interfaces. 65 Maestro E200 Series www.maestro-wireless.com 15.1.1 Setting up Load Balancing for Failover 15.1.1.1 Overview Above screenshot indicated that wired Wan is available and connected as well as 3G is available and connected while Wi-Fi WAN is offline. Above screenshot indicates all three interfaces active When all three interfaces are active, the one used for data transmission is as per the priority setup in Load Balancing / Configuration tab as shown below. Rest of the interfaces are still beings used for “tracking interface up / down” purposes. You can re-assign or change the interface priority and failover policies by clicking on the Configuration tab. 66 Maestro E200 Series www.maestro-wireless.com 15.1.1.2 Configuration Metric defines the priority. The screenshot shown above is the default configuration. You assign Rules for Policies which are associated with Members which are linked to Interfaces 67 Maestro E200 Series www.maestro-wireless.com 15.1.1.2.1 Interface Here you can see that there are 3 Interfaces: wan, wwan and 3g. ITEM DEFINITION This IP will be used to determine if the interface is active Tracking IP or inactive. You can enter more than one Tracking IP “1” determines the number of Tracking IP successes to be considered. Meaning, if there are more than one Tracking Tracking Reliability IPset, the above configuration will determine WAN active or inactive status depending on the result of any one Tracking IP. Indicates the number of PING packets sent in every Ping Ping Count Session to determine the interface availability / unavailability Ping Timeout Time to wait for PING response Ping Interval How frequently should the PING packets be sent Interface down / interface Number of iterations before declaring interface up/down up and eventually switching to another interface These are Network Interface Metrics, the default values are 1 for WAN, 2 for WWAN and 3 for 3G. It is extremely critical these values are exactly same as the values in Metrics Load Balancing / Members. If you choose to change these values, please ensure that they are same at both places. 68 Maestro E200 Series www.maestro-wireless.com The above configuration will facilitate failover between WAN, WWAN and 3G in order of priority and will facilitate roll back when connection on respective interface is back as per order of priority. Please note that Tracking IP, Ping Count and Ping Interval will consume data. High Tracking IPs, Higher Ping count and low Ping interval will result in faster switchover but will consume high amount of data and vice-eversa. Please be careful in adjusting these values as per your requirements. 15.1.1.2.2 Policies and Rules You need to note that in Failover Mode, the following is the configuration for Policies and Rules. Changing these parameters will revert the router in Load Balancing. 69 Maestro E200 Series www.maestro-wireless.com 15.2 Load balancing mode configuration Load Balancing Mode configuration will enable the router to use all three WANs simultaneously and facilitate the user to associate policies and rules for each interface. Exemples” You can bind a particular interface with a particular source or destination IP; You can bind a particular interface with a particular protocol like TCP, UDP, L2TP etc. To set the Router in Load Balancer Mode, you need to first assign Metric and Weight to all the Members and create more Members if necessary Next step would be to create Policies corresponding to each Member 70 Maestro E200 Series www.maestro-wireless.com Next would be create rules for each Policy In the above screenshot, you can see that there are 3 rules created Rule r1 is linked to policy p1 which is linked to member m1 which is linked to Interface wan Rule r2 is linked to policy p2 which is linked to member m2 which is linked to Interface wwan Rule r3 is linked to policy p3 which is linked to member m3 which is linked to Interface 3G The above configuration means UDP connections from LAN IP 192.168.1.104 will be sent via WAN All requests to WAN IP 223.30.182.58 on Port 2404 will be sent via WWAN All incoming and outgoing PING will be sent via 3G 71 Maestro E200 Series www.maestro-wireless.com 16 Firewall Basics E200 and E220 Series follows a Zone Based firewall concept. Every interface of E200 Router physical or virtual needs to be assigned to a firewall zone however one firewall zone can have multiple interfaces. By default, two zones exists namely LAN zone and WAN zone as shown in the screenshot below. You can create a new zone either from the Firewall section nuder Network / Firewall or when you create an additional network interface. For the current version of Firmware, only LAN side Firewall Zones can be created and you can associate multiple VLANs to the LAN side firewall Zones. However there will be a single WAN side firewall zone. 72 Maestro E200 Series www.maestro-wireless.com 17 Services 17.1 Dynamic DNS The E200 and E220 series router gets the internet access through WAN or 3G. The LAN interface is used for connecting to the local network. The service provider for WAN or 3G will periodically change the IP address assigned to the router, unless you ask for a static IP address. However, it is not possible for a remote client of the router to change the address in tune with the service provider. In such case, Dynamic DNS or DynDNS comes in handy. The concept is same as DNS, however, it retains the “Name” given to the router even if the underlying IP address is changed. For this, you need to register with the provider of dynamic DNS and configure the router with the details. Dynamic DNS allows that your router can be reached with a fixed hostname while having a dynamically changing IP address. The following note describes the procedure to create Dyn DNS. Click on Services / Dynamic DNS. 73 Maestro E200 Series www.maestro-wireless.com ITEM Enable Event interface Service Hostname Username Password DEFINITION Enable DynDNS service Network on which the ddns-updater scripts will be started Your DynDNS service provider Hostname received from your DynDNS service provider Username received from your DynDNS service provider Password received from your DynDNS service provider Next, you have to choose the source of IP address and the network. The source of IP address can be either Network or Interface or URL. This is the mechanism through which an IP address is assigned to the router. If you choose Network, then you have to choose the type of network namely WAN or 3G. Similarly, if you choose Interface, then you have to choose the appropriate interface from the dropdown. If you select the option URL, then a URL needs to be given which fetches IP address of the router from Internet. An example of such URL is http://checkip.dyndns.com/ and appears by default. 74 Maestro E200 Series www.maestro-wireless.com Next, choose the frequency with which you want to check, if the IP address is changed, minutes or hours. You can also force a change in IP address, after an assigned period of time. After making these entries, you can enable the new DDNS entry by checking the Enable box at the top of the page. Choose Save and Apply to effect the change. You will see the new entry with your parameters in addition to any old entries. Now, you will be able to access the router with the hostname assigned, rather than the IP address. You can add a new DynDNS by choosing a name and clicking on ADD button. 17.2 SMS diagnostic SMS diagnostic let you configure up to 4 admins to receive diagnostic information of the router after a command is send by SMS. International number format is as follow: <countrycode><phonenumber> 75 Maestro E200 Series www.maestro-wireless.com COMMAND AT+REBOOT=1 AT+CELLDIAG? AT+LANDIAG? AT+WANDIAG? AT+WANPING=<IPA> AT+LANPING=<IPA> AT+REMACC=<1/0> AT+HWI? AT+SWI? DEFINITION Reboot: reboot the modem Cell diagnostics: will give you IMEI, CREG, COP, CSIG LAN diagnostics: Will give LAN IP address, Wired WAN diagnostics: Wired WAN ping: will ping the wired WAN interface LAN ping: will ping the wired LAN interface Remote access: will enable; AT+REMACC=<1> or disable AT+REMACC=<0> remote access Hardware information: will give you hardware information such as model number Software information: will give you software information such as firmware version 17.3 DOTA DOTA (download over the air) will allow you to remotely update your firmware, enter your server IP address the filename, username and password 76 Maestro E200 Series www.maestro-wireless.com 17.4 GPS You can get GPS parameters as describes below By clicking Enable Data Send you will open a new menu where you could select the IP address, the port and the protocol format to receive the data, etheir TCP, UDP or HTTP. You can also setup a backup server by clicking on the Backup checkbox 77 Maestro E200 Series www.maestro-wireless.com 17.5 Event The Event menu let you set-up action based on preset event. Those events can be: GPIO_H GPIO_L SIM_CHANGE Available actions are: SMS REBOOT International number format is as follow: <countrycode><phonenumber> On the text box enter a text (max.160 characters) that will be send to the corresponding mobile number when a change of event occurs. Click add once your rules are set-up. Click Save and Apply to save preset events. 78 Maestro E200 Series www.maestro-wireless.com 18 Appendix 18.1 Default settings The following tables list the default settings for the E200 Series router. LAN (MANAGEMENT) Static IP Address: 192.168.1.1 Subnet Mask: 255.255.255.0 Default Gateway: 192.168.1.1 ADMIN MANAGER ACCOUNT Username: admin Password: admin 18.2 Reset to factory default setting Restoring factory defaults will reset the E200 Series router to its factory default configuration. You may encounter a situation where you need to restore the factory defaults on your E200 Series router such as: You have lost your username and password and are unable to login to the web configuration page You are asked to perform a factory reset by Maestro support staff. There are two methods you can use to restore factory default settings on your E200, using the web-based user interface or using the reset button on the side of the router. 18.2.1 Using the web-based user interface To restore your router to its factory default settings, please follow these steps: Open a browser window and navigate to the IP address of the router (default address is http://192.168.1.1). Login to the router using admin as the User Name and admin as the password. Click the System item from the top menu bar, then Backup / Flash Firmware and then under Flash operations select the Actions tabs. Under the Actions tabs, click the Perform reset button. The router asks you to confirm that you wish to reset all changes. Click OK to continue. The router will erase the configuration partition and reboot. 18.2.2 Using the reset button on the side of the router Use a pin to push the Reset button on the device for 10 seconds. The router will restore the factory default settings and reboot. 79 Maestro E200 Series www.maestro-wireless.com When you have reset your E200 Series router to its default settings you will be able to access the device‟s configuration web interface using http://192.168.1.1 with username admin or root and password admin. 80 Maestro E200 Series www.maestro-wireless.com 18.3 List of acronyms Acronym 2G 3G ADSL AES AP Client CSQ DHCP DIN DMZ DNS DynDNS, DDNS EDGE GPRS GSM HT Physical mode ICMP IGMP IP Sec ISP L2TP LAN Acronym LLTD M2M MAC address MTU NAT NTP PPPoE PPTP PSK QoS RF Rx SIM SMA SMS SPI SSID TCP TKIP Tx UDP UPnP VPN WAN Expansion / Meaning 2nd Generation 3rd Generation Asymmetric digital subscriber line, ADSL is a type of DSL broadband communications technology used for connecting to the Internet Advanced Encryption Standard Access Point Client Dynamic Host Configuration Protocol (DHCP) is a standardized networking protocol used on Internet Protocol (IP) networks for dynamically distributing network configuration parameters, such as IP addresses for interfaces and services. DIN connector is an electrical connector that was originally standardized by the Deutsches Institut für Normung (DIN) In computer security, a DMZ or Demilitarized Zone is a physical or logical sub network that contains and exposes an organization's external-facing services to a larger and un-trusted network, usually the Internet. Domain Name System (DNS) is a hierarchical distributed naming system for computers, services, or any resource connected to the Internet or a private network Dynamic DNS (DDNS) is a method of automatically updating a name server in the Domain Name System (DNS), often in real time, with the active DNS configuration of its configured hostnames, addresses or other information. Enhanced Data rates for GSM Evolution (EDGE) is a digital mobile phone technology that allows improved data transmission rates as a backward-compatible extension of GSM. General packet radio service (GPRS) is a packet oriented mobile data service on the 2G and 3G cellular communication system's global system for mobile communications Global system for mobile communications High Throughput Physical Mode Internet Control Message Protocol (ICMP) is one of the main protocols of the Internet Protocol Suite. It is used by network devices, like routers, to send error messages Internet Group Management Protocol is a communications protocol used by hosts and adjacent routers on IP networks to establish multicast group memberships Internet Protocol Security is a protocol suite for securing Internet Protocol (IP) communications by authenticating and encrypting each IP packet of a communication session Internet service provider Layer 2 Tunneling Protocol is a tunneling protocol used to support virtual private networks Local Area Network Expansion / Meaning Link Layer Topology Discovery is a proprietary Link Layer protocol for network topology discovery and quality of service diagnostics Machine to machine Media access control address is a unique identifier assigned to network interfaces for communications on the physical network segment Maximum transmission unit of a communications protocol of a layer is the size (in bytes) of the largest protocol data unit that the layer can pass onwards Network address translation is a methodology of modifying network address information in Internet Protocol (IP) datagram packet headers while they are in transit across a traffic routing device for the purpose of remapping one IP address space into another. Network Time Protocol is a networking protocol for clock synchronization between computer systems over packet-switched, variable-latency data networks Point-to-Point Protocol over Ethernet Point-to-Point Tunneling Protocol Pre-shared key Quality of Service Radio Frequency Reception Subscriber identity module SMA (Sub Miniature version A) connectors are semi-precision coaxial RF connectors Short Message Service Serial Peripheral Interface Service set identification Transmission Control Protocol Transmission Control Protocol Transmission User Datagram Protocol Universal Plug and Play Virtual private network Wide Area network 81 Maestro E200 Series www.maestro-wireless.com WCDMA WDS WEP Wi-Fi WPA Wideband Code Division Multiple Access Wireless distribution system Wired Equivalent Privacy, is a wireless network security standard Local area wireless technology that allows an electronic device to exchange data or connect to the internet using 2.4 GHz UHF and 5 GHz SHF radio waves Wi-Fi Protected Access WPA2 Wi-Fi Protected Access II 82 Maestro E200 Series www.maestro-wireless.com 18.4 Support There are several resources available to you for support and troubleshooting of your Maestro product or for resolving configuration difficulties at Maestro‟s support website, http://support.maestro-wireless.com/knowledgebase.php. Try these troubleshooting steps to eliminate your problem. After working through these steps and if your problem is not solved, please send a ticket to Maestro support team. Fill out an Online Support Request via: http://support.maestrowireless.com/index.php?a=add. You will need to create a user account if one is not already set up. When submitting a support request, please include a copy of the System Log file from the unit‟s and the configuration files. This will greatly improve the quality of the initial response you receive. Without this file, it is often very difficult for the support team to provide accurate answers to your queries. To create a copy of the system login on your router and go to Status > System Log. Select the entire log, copy it and paste it on a new document file . To generate an archive of your configuration go to System > Backup / Flash Firmware, under the Actions tabs click on Generate archive. 83 Maestro E200 Series www.maestro-wireless.com An archive file “backup-Maestro-201x-xx-xx.tar.gz will be downloaded on your default download folder, please attached the file while filling the support request online. 84 Maestro E200 Series www.maestro-wireless.com