1
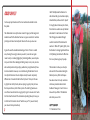
The Slammer.co.nz
the kiwi supertool
www.cerebrallc.com
Operating Manual
Good on ya!
You have just purchased one of the most useful and versatile tools on
the planet.
The slide-hammer concept has been around for ages, but the design and
materials used for the Slammer has been a 23-year evolution of countless
prototypes to make it as sturdy and robust as the one you now own.
It gives the user the mechanical advantage of a lot of force to a small
area, focusing the energy to where you want it, over and over again.
I used to carry a crowbar (digging bar), mattock/grubber, axe and spade
in my work truck. When dealing with hard ground, roots, rocks, concrete
and well-compacted soil types (clay, sedimentary, conglomerates) these
tools are standard. However, once I started using the Slammer I found
not only did it take less time to complete a task; it used a completely
different set of muscles that did not hurt my back. The key to this was
to grip the bar with my hands, but use my legs to get my body to move
the bar up and down, rather than my arms. The other big feature was
once the tool was driven into an ugly patch, to get it out was a lot of work.
So that is how the head of the tool ended up looking the way it does, you
rock the tool from side to side to “walk its way out”. If you work smart,
you can work more productively.
2
I didn’t initially make the Slammer to
sell commercially. I just wanted a simple,
indestructible, multi-use tool for myself
for tough, labour-intensive jobs. Clients,
friends and co-workers saw my Slammer
and asked if I could make one for them.
Then things just escalated through
word of mouth and The Slammer Ltd
was born. I filed a PCT patent 583181, took
the Slammer to a large Agricultural Show
in NZ (Fieldays) and started to fill orders
from a very diverse group of people.
This manual is to show you a few tips
and uses that I have learned along the
Slammer journey. Other techniques
have been shown to me by customers
who have provided comments and
feedback. Please get in touch to let us
know what you think of the Slammer
and what you use it for.
HAPPY SLAMMIN!
T.J “Slammerman” Irvin.
3
Do
Operator instructions
MALE
(UPPER
SECTION)
The Slammer has 2 pieces.
The upper section (or male part)
and the lower section (or female part).
USE EAR PROTECTION.
The Slammer produces a loud
repetitive noise.
USE EYE PROTECTION.
Objects may become airborne
when using The Slammer.
FEMALE
(LOWER
SECTION)
Wear protective footwear
and gloves.
handle
blade
4
When operating
the Slammer take
care not to trap
your fingers or
hands in between
the two parts.
Both hands should
grip the upper
section.
Use your leg
or core muscles
to raise and lower
the slide bar,
as opposed to
just your upper
body strength.
Be aware of objects
and cables underground.
Always know before you start
digging.
DoN’T
USE YOUR BACK.
Use gravity and the natural weight
of The Slammer to ‘Slam’ it down,
then walk The Slammer out
without using your back.
Tip: When walking with the
slammer, hold it in 2 separate
pieces – one in each hand.
5
Digging
Use the Slammer like you would a crow bar to
break up the soil. Use a spade to remove the
broken soil.
Tip: dig from your knees and try not to
use your back like a crane.
If digging in sod, cut around the area you are
digging, chop in two then cut under to get
perfect bits of sod just using the bottom or
female part of the Slammer (which I often use
without the bar).
When digging fence posts use the Slammer
to break up soil then lift soil with weapon of
choice. (Hand auger, post hole digger, post
hole spade. You can use female part of the
Slammer but slow.)
6
When digging, deep slam from your
knees. A helpful hint is to mark
different depths on the female part of
the tool to know when you are deep
enough or where to expect service
(sewer, power, phone).
Tamp with the male part of slammer
at the bottom of hole, then attach
rammer to tamp the rest of hole tight.
rammer
“The only time in life you
start out on top is when you
are digging a hole.”
– anonymous.
7
Planting Trees and plants
The bigger the hole the faster the tree/plant
will grow. Use the Slammer to aerate the soil
deep and wide.
Remove all existing plants, roots and rocks and
loosen the soil. It’s not necessary to lift all the
dirt out of the hole.
Mix in compost, fertilizer or blood and bone.
(Or you could use “ferralizer” – road-kill such
as a dead possum or rabbit.)
Once planted, pack well and stake
if necessary. Add water to fill in gaps.
8
9
Transplanting
Make sure the blade on the
Slammer is sharp. Use the Slammer
to cut around the root ball.
Find main roots and slam through.
Continue to slam on an angle to
form root ball.
Lift with slammer around the root
ball, place into fabric, pot, tarp or
whatever will keep the root ball
from breaking up.
Cuttings of flax, bamboo
or large grasses
• Tie or cut back plant to gain access
to main base of plant. Cut into root
base, rock blade from side to side
to walk out.
• Pry roots apart. Cut root ball around
desired cutting and keep root ball
together. Try to keep damp and
replant as soon as possible. This
cutting may need some pruning
above soil to minimize shock. In dense
bamboo roots you may have to cut
multiple times when prying out.
If Slammer bends whenprying,
next pry try to bend the opposite
way to straighten tool out again.
E
• With extended bamboo work it is
advisable to use two people with a
slammer each to work and lift together.
10
11
Splitting Firewood
As the Slammer blade is narrow it works best on
hard wood. It can get jammed on soft wood.
Choose straight grain pieces for splitting and
kindling. Save the knotty bits for the wood
splitter or as long burning, all night logs.
Instead of putting wood on a block, put wood
on a hard surface with a piece of plywood
underneath, then step up so that the Slammer
blade is level with your feet.
Split from the outside using the blade
with the grain for large rounds and in
half for small rounds.
The Slammer can be used to gain leverage
when sawing logs so that rounds fall
away from logs. It is also helpful for
turning big logs over and un-jamming
stuck saw-blades.
“Ye who works to get the
wood gets warm twice.”
Tip: Get an old tyre, put
around wood so as the wood
splits, it stays standing to be
split again.
12
13
Breaking up Concrete
The blade will take more effort than a point but
once the blade is in the crack the blade is quicker
to use.
Once cracked, follow crack and break up bits that
you can carry. Works extremely well on asphalt
to square up potholes for road repairs.
The Slammer is very good working with a
concrete cutter to remove concrete accurately.
Tip: The Slammer tool is great for
putting in pilot holes for wooden pegs
for boxing (and for getting them out
without breaking them) and also for
removing the boxing.
The Rammer attachment with foot is
great for tamping/compressing areas
in corners and tight spaces where you
cannot get a vibrator/compressor.
14
“Nothing is forever”
15
Removing stumps & woody weeds
Mandraulic Power
With the Slammer’s sharp blade, cut around the
stump and locate areas with large roots. Large roots
may have to be cut further from stump.
Cut underneath root and break off completely.
Work back to main stump to loosen soil in area.
Continue to cut and pry until the stump moves.
Once stump is moving, remove material and cut
taproot at bottom, then pry out of hole.
When dealing with woody weeds with long taproots,
sometimes the female part of the Slammer is enough
to dig down and lift the root out of the ground.
Tip: For best results do this before plants seed!
If not, use the Slammer to drive down taproot, loosen then pull.
16
As with removing bamboo – one Slammer
is great, two Slammers are fantastic!
Tip: for large roots
cut at 45° one way then
45° opposite until you
get though like an axe.
17
Removing tiles, adhesives, ice &
hard-remove surface coatings
The Slammer blade works well, but a
straight blade with a 45° angle works
much better.
The rammer attachment with a 5mm flat
piece of steel 6cm x 15cm blade at a
45° angle works well to remove both tile
and adhesive without scarring concrete.
Tip: this also works well for ice,
dried mud, effluent, linoleum and
other hard to remove surface coatings.
Custom tile-removing tools
can be made to order.
18
Contact details at
www.theslammer.co.nz
www.cerebrallc.com
19
Tip: Weigh down cable so if
Anchor point/deadman for
winching vehicles, boats
and heavy loads
it breaks it will not go through
vehicle’s windscreen.
Your Slammer is very strong, but only as strong as the ground
that it is driven into.
Remove by rocking Slammer side
to side with blade to work out of
hole. If stuck lift the male part of
Slammer out to gain more leverage.
The blade must be perpendicular to the load being pulled. Angle
the Slammer away from load and drive deep for hard soils. For
soft soils (mud, sand, loam and the like) a plate must be used.
We recommend a plate 50cm x 50cm square, 5mm thick with
a 10cm x 20cm rectangular hole in the middle to shackle though.
(This plate can also double up for cooking on over an open fire.)
With the plate you are displacing the weight with surface area. The
Slammer is used to dig out the area that the plate will be placed.
Tip: a spade will be more useful for soft soils.
Then the Slammer is slammed in behind the plate so that the
shackle/winch rope is attached to the Slammer.
20
21
Basic maintenance of your Slammer
• Brush dirt off the Slammer after use and wipe down with a penetrating oil.
The outside may show rust spots, but the metal will not structurally rust.
• There is a woollen plug at the base of the female section of the Slammer.
This is to reduce noise and shock. If the male part of the Slammer ever
gets stuck in the female part, the plug may have become worn, damp
or dislodged. Secure the blade, then twist and pull the male part out.
Remove old wool by using some number 8 wire to twist and hook out.
You can also flip female part upsidedown. Hit blade/ pipe connection
and debris will fall out.
• Replacing the woollen plug. The wool used is from a good old woollen
Kiwi blanket. Cut a 3cm x 25 cm strip then roll up and place into the
female part of the tool. Use male part to gently push plug to bottom
of female part with male part.
• Lightly grease the male shaft and wipe off excess.
• When sharpening the blade, use a grinder with a grinding disk (not a
cut off disk.) Hand files are good for removing burrs. Angles depend on
use. Standard rule – hard concrete, rock or stone use a broad angle. For
cutting roots, bone, wood use a sharp angle. The Slammer has a sharp
angle when first purchased.
• Over time, with lots of use, the bottom tip of the male part of the
Slammer may “mushroom” slightly and could start to jam. To prevent
this, grind the tip down.
• When using the Slammer as a pry bar the female part may bend and
this may cause the male part to jam. It will have to be bent back in the
opposite direction to straighten out. (Try prying in opposite direction
with a heavy object.) Or take the tool to a local engineer to straighten
with a large heavy press.
The Slammer.co.nz
the kiwi supertool www.cerebrallc.com
22
23
For more helpful tips, videos and
user comments you can visit our
website or follow us on Facebook
“The Slammer tool”
The Slammer.co.nz
the kiwi supertool
www.theslammer.co.nz
www.cerebrallc.com
email [email protected]