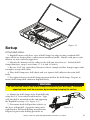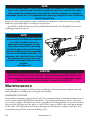
1
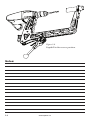
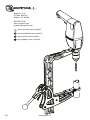
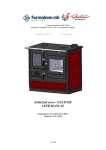
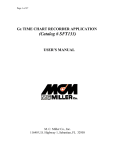
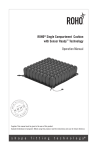
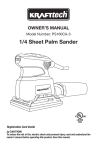
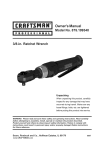
USER MANUAL
Rapidrill 303101
Thank you for choosing Rapidrill. We appreciate the
trust and confidence you have placed in Rapidrill on the
jobsite & in your shop. We have developed a quality and
dependable tool which enhances user control, productivity
and safety. Visit us online at www.rapidrill.com and let us
introduce you to a new world of drilling!
Contents
Safety Guidelines�������������� 3
Definitions ����������������������� 4
Safety ������������������������������ 6
WORK AREA SAFETY������������������������������������� 6
PERSONAL SAFETY �������������������������������������� 6
MECHANICAL SAFETY ���������������������������������� 6
END-MILL, BIT SAFETY���������������������������������� 6
Warranty �������������������������� 7
LIMITED LIFETIME WARRANTY �������������������� 7
Package Contents ����������� 8
INTENDED USE���������������������������������������������� 8
LIMITATION OF LIABILITY������������������������������� 8
APPLICABLE LAW ����������������������������������������� 8
Setup ������������������������������� 9
ATTACHING DRILL ����������������������������������������� 9
Operation������������������������ 10
GETTING TO KNOW RAPIDRILL ����������������� 10
Maintenance ����������������� 12
ANODIZED COATING����������������������������������� 12
ZINC-PHOSPHATE COATING����������������������� 13
OTHER COMPONENTS�������������������������������� 13
© 2015 Rapidrill, LLC All rights reserved.
Printed in the USA.
Made in the USA
Patent Pending
Rapidrill, and the Rapidrill Logo are trademarks of Rapidrill, LLC.
2
www.Rapidrill.com
Safety Guideline Definitions
Danger:
Indicates an imminently hazardous situation which, if not avoided, will result in
death or serious injury.
Warning:
Indicates a potentially hazardous situation which if not avoided, could result in death
or serious injury.
Caution:
Indicates a potentially hazardous situation which if not avoided, may result in minor
or moderate injury
Note:
Indicates a practice not related to personal injury which if not acknowledged, may
result in property damage.
Please contact us at 855.993.7455 if further assistance is needed.
3
Definitions
(See opposing page for numbered definitions.)
Rapidrill. Apparatus which attaches to electric drill to aid in drill bit penetration.
1. Lever. The appendage of the Rapidrill with which the user applies auxiliary force to
the drill bit.
2. Spine. The L-shaped truss structure in which the Carriage rides.
3. Carriage. The rolling assembly comprising of several sub-components with which
the Rapidrill is operated.
4. Gear Dog. The tooth portion of the Carriage which engages and actuates the gear for
travel of the carriage upon the spine.
5. Gear Dog Lever. The point at which the user engages and disengages the Gear.
6. Gear. The pinion portion mated to the rack mounted on the spine which facilitates
carriage movement.
7. Drill Clamp. The mounting portion of the Rapidrill which accepts an electric drill
body.
8. Pipe Clamp. The mounting portion of the Rapidrill carriage which accepts the pipe.
9. Pipe. The opposing portion of the Rapidrill carriage which is placed against the
opposite side of the workpiece being drilled.
10. Fastener. The screw components which a user mounts, tightens or loosens on the
clamp components of the Rapidrill.
11. Drill. An electrically powered tool which provides the rotary motion to drive a
drill bit for penetration of the workpiece.
12. Drill Collar. The mounting point on a the Drill that accepts the Rapidrill attachment.
13. Drill Body. Describes the portion on which the drill collar is positioned.
14. Drill Chuck. The portion of the drill which accepts a Drill Bit.
Auxiliary Drill Handle. The accessory a standard drill is designed to accept as an additional gripping point for drilling.
Drilling. The rotary motion of a drill bit in the act of workpiece penetration.
15. Drill Bit. The sharpened tool which is rotated during penetration of a workpiece.
Backlash. The dangerous rotation created when the drill bit motion is suddenly transferred to the drill body during binding.
Binding. The sudden stopped motion of a penetrating drill bit caused by improperly
managed force being applied to the drill bit.
4
www.Rapidrill.com
11,13
7
12
2
14
15
9
8
6
4
1
10
3
Please contact us at 855.993.7455 if further assistance is needed.
5
5
Safety
WORK AREA SAFETY
1. Keep your work area clean and well lit. Ensure floors are not slippery from wax or
dust.
2. Do not operate power tools in an explosive atmosphere, such as in the presence of
flammable liquids, gases, or dust. Power tools create sparks which may ignite the dust
or fumes. Keep bystanders, children, and visitors away while operating tools. Distractions can cause you to lose control.
PERSONAL SAFETY
3. Use safety equipment. Always wear eye protection with side shields when operating power tools. Safety glasses, dust mask, nonskid safety shoes, hard hat, or hearing
protection must be used for appropriate conditions.
4. Stay alert when operating a power tool. Do not use the tool while tired, or under
the influence of drugs, alcohol, or medication.
5. Do not wear loose clothing or jewelry. Contain long hair. Long hair, loose
clothing, jewelry, or gloves can be caught in moving parts.
6. Keep proper footing and balance at all times. Proper footing and balance enables
better control of the tool in unexpected situations.
7. Do not use while standing on ladder or unstable support.
8. For further information on the safe use of power tools, we advise you to obtain a
copy of OSHA’s hand and powertool standards, or visit https://www.osha.gov/SLTC/handpowertools/standards.html
MECHANICAL SAFETY
9. Beware of pinch points. This mechanical apparatus compounds forces applied and
can increase the risk of injury. Exercise necessary precautions during use. Keep hands,
feet and other body appendages away from pinch points.
10. During operation keep hold of the apparatus and attached power tool until the
power tool comes to a complete stop. Failure to maintain operating stance & control
can cause severe personal injury and property damage.
END-MILL, BIT SAFETY
11. Adhere to proper chip load and coolant supply to extend the life of the tool.
Failure to observe proper feed rates and speeds can result in reduced tool life and or
breakage, which can result in property damage or personal injury.
! WARNING:
Do not attempt to modify this tool or create accessories not recommended for use
with this tool. Any such alteration or modification is misuse and could result in a
hazardous condition leading to possible serious personal injury.
! WARNING:
Hearing Protection is Recommended. Hearing Protection should be used when the
noise level exposure equals or exceeds an 8 hour time-weighted average sound level
of 85dBA.
6
www.Rapidrill.com
! WARNING:
Operating any power tool can result in foreign objects being thrown into your eyes,
causing severe eye damage. Before beginning operation, always wear safety goggles,
safety glasses with side shields or a full face shield when needed. Always use eye
protection marked to comply with ANSI Z87.1.
! WARNING:
Avoid Prolonged Exposure to Vibration. Pneumatic tools can vibrate during use.
Prolonged exposure to vibration or very repetitive hand and arm movements, can
cause injury. Stop using any tool if discomfort, tingling feeling or pain occurs. You
should consult a physician before resuming use of the tool.
! WARNING:
Wear Proper Clothing. During operation of drill attachment, the resulting waste
material can be sharp and hot. It can be projected near and far from the operator
and can injure bystanders. Wear proper protective clothing such as gloves and long
sleeved shirts or jackets to avoid burns and lacerations from flying chips.
Warranty
1. IMPORTANT: By using your Rapidrill, LLC (Rapidrill) Product (the “Product”), you (Customer) are agreeing to be bound by the terms of the Rapidrill Limited Lifetime Warranty and Limitation of Liability as set out below.
2. Do not use your Product until you have read the terms of this warranty.
3. If you do not agree to the terms of this Limited Lifetime Warranty or Limitation of Liability, do not use the Product and return it within 30 days of the purchase
date for a refund.
LIMITED LIFETIME WARRANTY
4. Rapidrill warrants that this Product will be free from defects in material and manufacture for the life of the product—no registration or proof of purchase required. This
warranty does not cover failures resulting from abuse, misuse, alteration, or damage
not caused by Rapidrill, or failure to follow instructions. No warranty is given as to the
service life of the Product. Rapidrill makes no other warranties or conditions, express
or implied, including, but not limited to, any implied warranty or condition of
merchantability or fitness for a particular purpose or any implied warranty or condition arising out of a course of dealing, customer or usage of trade. In so far as such
warranties cannot be disclaimed, Rapidrill limits the duration and remedies of such
warranties to the duration of the express limited warranty. Some states (countries
and provinces) do not allow limitations on how long an implied warranty (or condition) may last, so the limitation described above may not apply to you. If the Product
fails to satisfy this Limited Lifetime Warranty during the warranty period, Rapidrill will
repair or replace the Product at its sole discretion. Customer is responsible for shipping
the Product to Rapidrill for warranty claims. Rapidrill will cover the cost of shipping the
repaired or replaced Product back to the Customer. The remedy stated in this paragraph
is Customer’s sole remedy and Rapidrill’s exclusive obligation.
5. This warranty gives you specific legal rights, and you may have other rights which
may vary from state to state, or country to country. For any warranty questions, please
Please contact us at 855.993.7455 if further assistance is needed.
7
call 855-993-7455 or mail your request to: Warranty Claims, Rapidrill, LLC, 1380 W
Uzona Ave, Ste. D, Hildale, UT 84784-2370. Please provide a complete description of
the Product, model number, and alleged defect.
INTENDED USE
6. This Rapidrill Product is intended to be used to assist in keeping a drill at a
right-angle while drilling. At all times when using the Product, Customer should take
reasonable safety precautions, such as, wearing gloves, wearing eye protection, checking surrounding areas and location of drilling, and other safety measures. The Product
should not be used from a ladder or any other unstable or unsafe position.
7. Drill Bit Precautions:
Do not exceed 3/4” auger bits.
Do not exceed 2” hole saw bits.
LIMITATION OF LIABILITY
8. Rapidrill will not be liable for any loss or damage arising from this Rapidrill
Product, whether direct, indirect, special, incidental, or consequential, regardless of
the legal theory asserted, including warranty, contract, negligence, or strict liability.
Some states and countries do not allow the exclusion or limitation of incidental or consequential damages, so the above limitation or exclusion may not apply to you.
APPLICABLE LAW
9. This Contract shall be governed by and construed under the laws of the State
of Utah, excluding its conflict of law rules. The parties agree that the United Nations
Convention on Contracts for the International Sale of Goods shall not apply to this
agreement.
Package Contents
Every Rapidrill comes fully assembled and is encased in a laser cut soft foam surrounded by a durable plastic case.
In the case you will find:
1. Rapidrill Assembly
A. Drill Clamp 1.9”
B. Pipe Clamp
a. Pipe
2. Drill Clamp 1.8’’
3. Drill Clamp 1.7’’
4. Hex Wrench 3/16’’
5. Hex Wrench 1/4’’
6. Warranty Card
7. Documentation (available also at www.rapidrill.com/support)
For Details see Figure 1.1 (Arrangement of contents may vary.)
8
www.Rapidrill.com
Figure 1.1
Setup
ATTACHING DRILL
1. Rapidrill comes with three sizes of drill clamps to adapt to most standard drill
types which are designed for a collar mount auxiliary handle. Models with pincer style
mounts are not currently supported.
2. Identify the diameter of the collar on the drill you intend to use. Included drill
clamp diameters range 3 sizes from 1.7, 1.8, and 1.9 inches.
3. Be sure 3/16’’ hex socket head fastener is loose enough to allow clamp to open wide
enough to accept drill collar.
4. Place drill clamp over drill chuck and seat against drill collar on the main drill
body.
5. Pre-tighten fastener on drill clamp to mount drill to the drill clamp. Prepare to
mount drill clamp/drill combo to Rapidrill body.
! WARNING:
Be sure that the correct size of drill clamp is adapted to your drill body. Incredible
opposing force must be overcome by maximizing clamping the surface.
6. Mount the drill clamp to the Rapidrill body
using the 1/4’’ hex socket head fasteners. Typically the drill is mounted on the end opposing
the Rapidrill carriage. (See Figure 1.2)
7. Determine final drill position relative to
the lever of Rapidrill. Operators may prefer
right hand or left hand drilling arrangements
adapted to particular drilling positions or
Figure 1.2
Please contact us at 855.993.7455 if further assistance is needed.
9
personal preference. This adjustment is
easily accomplished by rotating the drill
about the drill clamp collar and finally
Figure 1.3
tightening the hex socket head fastener.
(See Figure 1.3)
8. Attach drill bit to drill chuck. It
may be necessary to adjust the Rapidrill
carriage by releasing the spring loaded
gear dog lever and sliding the carriage to
the bottom of the spine.
9. Determine necessary pipe position to clear any obstacles that may prevent perpendicular drilling of the surface to be drilled. Use the 3/16’’ Hex wrench included. In most
cases no adjustment is necessary. (See Figure 1.4)
Figure 1.4
! WARNING:
Be sure that all clamp fasteners are tightened fully before
attempting drilling operations. Failure to adhere could
result in parting of the drill from the Rapidrill assembly
and/or misalignment of the drill to the surface to be
drilled, possibly causing damage to property or personal
injury.
NOTE:
The shaped end portion of the pipe is particularly suited for the drilling of a rounded
surface such as a pipe. The opposing pipe will self-center when applying initial force,
but it may be necessary to create a center punch dent at the point of at which you
intend to drill in order to prevent the drill bit from wandering off center point at the
beginning of rotation. If you intend to drill a flat surface then the flat of the pipe may
be best suited.”
Operation
GETTING TO KNOW RAPIDRILL
1. With the setup accomplished, Rapidrill is now only partially ready to perform drilling operations. New users must familiarize themselves with the operation of the tool.
2. Rapidrill is a unique tool which utilizes the rotary power of a cordless or corded
drill and your physical strength to rapidly perform drilling operations which otherwise
would require much greater physical prowess and skill. With some training, an operator
can safely perform drilling tasks quickly, greatly reducing operator fatigue and extending drill bit life.
3. The rotary torque of the drill will now be closely matched to the operators physical
pull power. The operator must find the balance of torque and pull power while drilling,
! WARNING:
Users must maintain grip of the drill handle and Rapidrill lever in order to control
backlash. Failure to maintain control could result in personal injury.
10
www.Rapidrill.com
as the drill’s power of rotation can be overcome
or reduced, limiting the functionality of the
operation.
Figure 2.0
4. The operator must also realize the force
applied at the lever must be regulated during
the final portion of penetration in order to
reduce the possibility of the drill bit binding.
Although, with the operator stance facilitated by the design of Rapidrill, the backlash of
a drill with a binding bit will be more fully
controlled.
5. With these precautions in mind, the new
operator may proceed by gripping the drill handle
and the Rapidrill lever.
Figure 2.1
6. By gripping the drill with the dominant hand
and slipping the hand holding the Rapidrill lever
from the ball end toward the spine and carriage
body, the back of the fingers will come in contact
with the spring loaded gear dog lever. This contact
will simultaneously release the gear dog from the
gear and allow the release and travel of the carriage
along the spine. (See Figure 2.0)
7. While in this release position, the operator
can open the Rapidrill fully and position it over
the workpiece.
8. Once positioned over the workpiece, the
gear dog should be allowed to spring back into
the gear.
Figure 2.2
9. Rotate the lever away from the operator to
begin the workpiece engagement. (See Figure
2.1)
10. While rotating the lever away, as the gear
dog is engaged, the operator must pull the carriage assembly to clamp the workpiece between
the pipe and the drill bit.
11. Upon placement of drill bit at desired
drilling location, grip the ball end of the lever
and apply initial force to initiate perpendicular
alignment of the drill bit to the workpiece.
12. Place your body at a comfortable stance for the duration of the drilling operation.
13. The user may actuate the drill and apply gentle force to begin the drilling operation. (See Figure 2.2)
14. Using judgment attained from the descriptions beforehand, the user may complete the operation safely.
15. Once the workpiece has been drilled, and maintaining grip of the drill, the hand
holding the lever may again slide down toward the spine and carriage, the back of the
Please contact us at 855.993.7455 if further assistance is needed.
11
NOTE:
One lever rotation equals 1 inch of travel through the workpiece. On materials thicker
than 1 inch, after reaching this limit, the operator must first rotate the lever back
to the beginning engagement position, pull the carriage forward to re-engage the
workpiece, assure the re-engagement of the gear dog, and pull the lever to continue
the drilling operation.
fingers thereby coming into contact with the gear dog lever and release the gear dog
from the gear, allowing the carriage to travel open.
16. Pull the drill bit back out of the drilled hole and move the Rapidrill to the next
drilling position to repeat.
NOTE:
If the desired drilling location does not
accommodate the default arrangement
of the drill attached to the spine
opposing the carriage pipe, the user
may reverse this position, mounting
the drill to oppose the end of the pipe
mounted to the spine, thus compacting
the size of the Rapidrill assembly. The
user must also familiarize their self with
the opposite motion of the lever and
actuation of the gear dog lever in this
position.
(see figure 2.3)
Figure 2.3
CAUTION:
Operating any power tool can result in foreign objects being thrown into your eyes,
which can result in severe eye damage. Before beginning operation, always wear
safety goggles, safety glasses with side shields or a full face shield when needed.
Always use eye protection marked to comply with ANSI Z87.1.
Maintenance
Rapidrill’s finish comprises of hard coat anodizing of the aluminum components and
zinc phosphate coating of the steel pipe and clamps.
ANODIZED COATING
The anodized coating is particularly suited for smooth sliding of mating components as
well as protecting Rapidrill from corrosion. According to frequency of use, it may be
necessary to apply a dry lubricant such as graphite or Teflon powder to ease the friction
between the carriage and the spine, as well as the captive rollers, axles and pivot points
of the tool. To keep unwanted surface damage to a minimum, remove sand, dirt and
residual metal particles between drilling cycles.
12
www.Rapidrill.com
ZINC-PHOSPHATE COATING
The zinc phosphate coating facilitates a rough surface to limit the possible slipping of
the drill and pipe surfaces during drilling operations. The porous coating allows oil
to penetrate thereby preventing corrosion. This surface can deteriorate by abrasion
and should be maintained as well as possible to extend productive life. Any light oil or
silicone may be used to enhance the resistance to corrosion.
OTHER COMPONENTS
The various sub-component hardware items are comprised of stainless steel, brass, and
oil embedded brass bushings to further enhance the durability of this product. With the
exception of the clamp fasteners, these components should need little attention besides
the occasional application of the dry lubricant and removal of sand, dirt and residual
metal particles between drilling cycles. The clamp fasteners are Grade 8 with a black oxide coating, which is best suited to accept the stress of repeated tightenings. These items
may be left as is until replacement is necessary from average wear and tear.
Incidental surface wear or damage may occur during the normal life of the product. In
most cases it will not alter the usability of the product. Exercise care and take reasonable precautions to avoid unnecessary repairs. Refer to warranty disclosure for further
details and information.
Please contact us at 855.993.7455 if further assistance is needed.
13
Figure 3.0
Rapidrill in the reverse position.
Notes:
14
www.Rapidrill.com
Notes:
Please contact us at 855.993.7455 if further assistance is needed.
15
Rapidrill, LLC
PO Box 842370
Hildale, UT 84784
855.993.7455
www.rapidrill.com
[email protected]
www.youtube.com/rapidrill
www.facebook.com/rapidrill
www.twitter.com/rapidrill
plus.google.com/+rapidrill
16
www.Rapidrill.com