1
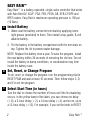
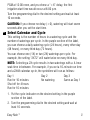
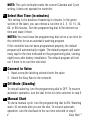
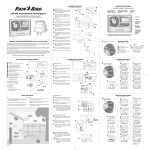
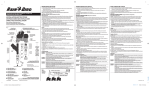
○
○
○
○
○
○
○
○
○
○
○
○
○
○
○
○
○
○
○
○
○
○
○
○
○
○
○
○
○
○
○
○
○
○
○
○
○
○
○
○
○
○
○
○
○
○
○
○
○
○
○
○
○
○
○
○
○
○
○
○
○
○
○
○
○
○
○
○
○
○
○
○
○
○
○
○
○
○
○
○
○
○
○
○
○
○
http://www.rainbird.com
○
○
○
○
○
○
○
○
○
○
This product was FCC certified under test conditions that included the use of
shielded I/O cable and connectors between system components. To be in
compliance with FCC regulations, the user must use shielded cables and
connectors and install them properly.
Rain Bird Sales, Inc.
270 West Sierra Madre
Azusa, Ca 91702 - USA
Tel. (626) 963-9311 • Fax (626) 963-4287
Technical Services, USA only, (800) 247-3782
○
P/N 635006
○
○
® Registered trademark of Rain Bird Sprinkler Mfg. Corp.
○
○
○
○
Changes or modifications not expressly approved by
Rain Bird Sales, Inc., could void the user’s authority to operate the equipment.
○
○
○
○
○
○
Consult the dealer or experienced radio / television technician for
additional suggestions.
○
•
○
Connect the equipment into an outlet on a circuit different from that to
which the receiver is connected.
○
•
○
Increase the separation between the equipment and receiver.
○
•
○
Reorient or relocate the receiving antenna.
○
•
○
○
○
If this equipment does cause interference to radio or television reception, which
can be determined by turning the equipment off and on, the user is encouraged
to try to correct the interference by one or more of the following measures:
○
○
○
○
○
○
○
○
○
○
○
○
○
○
○
EASY RAIN™
○
This equipment has been tested and found to comply with the limits for a Class
B digital device, pursuant to part 15 of the FCC Rules. These limits are
designed to provide reasonable protection against harmful interference in a
residential installation. This equipment generates, uses and can radiate radio
frequency energy and, if not installed and used in accordance with the
instructions, may cause harmful interference to radio communications.
However, there is no guarantee that interference will not occur in a particular
installation.
72h
○
○
○
48h
○
2X
○
1X
○
○
○
○
○
○
○
○
#
○
○
○
○
○
○
○
○
○
1X
○
○
2X
○
1X
○
1X
○
2X
○
2X
72h
○
24h
○
ON
○
OFF
○
1X
○
48h
○
"2X
○
○
○
○
○
○
○
○
○
○
○
○
○
○
○
!
○
+8 +10 +12
24h
○
+4
○
+6
1X
○
○
+2
ON
○
OFF
○
ON
○
"
○
OFF
○
○
○
○
○
○
○
○
○
○
○
○
○
D
○
○
○
○
○
○
○
○
○
○
○
○
○
○
○
○
○
○
○
○
○
○
2X
○
○
○
○
○
○
EA S Y R A IN
○
○
○
○
○
○
○
○
ON
○
○
○
○
○
○
○
9V
○
○
○
○
○
○
○
○
○
○
○
○
○
○
○
○
B
○
+0
EA SY RAIN
C
EASY RAIN
EA SY R AIN
A
E
G
F
OFF
"
90
60
30
15
10
5
2
$
H
○
○
○
○
○
○
EASY RAIN™
English ............................ 2
Español ...........................5
EASY RAIN™
Easy Rain™ is a battery-operated, single-valve controller that works
with Rain Bird DV, ASVF, PGA, PEB, PESB, GB, EFB-CP, BPE and
BPES valves. Easy Rain’s maximum operating pressure is 150 psi
(10 Bars).
A
Install Battery
1. Water-seal the battery connector terminals by applying some
light grease (provided) to them. Then install a top-grade, 9-volt
alkaline battery.
2. Put the battery in the battery compartment with the terminals on
top. Tighten the lid to prevent water damage.
NOTE: Replace the battery once a year. To save the program, install
the new battery within 30 seconds of removing the old one. Do not
install the battery in damp conditions, or condensation may form
inside the battery case.
B
Set, Reset, or Change Program
To set, reset, or change the program, turn the programming dial to
RESET PGM and wait at least 10 seconds. Then follow steps C, D,
and E to set the program.
C
Select Start Time (in hours)
Turn the dial to choose the number of hours until the first watering
occurs. In the yellow band of the label, you can choose no delay
(+0), a 2-hour delay (+2), a 4-hour delay (+4), and so on, up to
a 12-hour delay (+12). For example, if you set the knob to RESET
2
Easy Rain™
PGM at 12:00 noon, and you chose a “+6” delay, the first
irrigation start time would occur at 6:00 p.m.
Turn the programming dial to the desired setting and wait at least
10 seconds.
CAUTION: If you choose no delay (+0), watering will start seven
seconds after you set the start time.
D
Select Calendar and Cycle
This setting is the number of hours in a watering cycle and the
number of waterings per cycle. In the purple section of the label,
you can choose a daily watering cycle (24 hours), every other day
(48 hours), or every third day (72 hours).
You can choose one (1X) or two (2X) waterings per cycle. For
example, the setting “2X72” will water twice on every third day.
NOTE: Selecting a 2X cycle results in two waterings with a 4-hour
soak time in between. For example, if you set a 10-minute run time
and a 2X48 calendar cycle, the sprinklers will run as follows:
Day 1
Run for 10 minutes
Shut off for 4 hours
Run for 10 minutes
Day 2
No watering
Day 3
Same as Day 1
1. Put the cycle indicator on the desired setting in the purple
section of the label.
2. Turn the programming dial to the desired setting and wait at
least 10 seconds.
Easy Rain™
3
NOTE: The cycle indicator marks the current Calendar and Cycle
setting; it does not operate the controller.
E
Select Run Time (in minutes)
This setting is the duration of watering in minutes. In the green
section of the label, you can choose a run time of 2, 5, 10, 15, 30,
60, or 90 minutes. Turn the programming dial to the desired run
time and leave it there.
NOTES: You must leave the programming dial set on a run time for
the controller to run an automatic watering program.
If the controller has not been programmed properly, the default
program will automatically irrigate. The default program will water
every day for the time indicated on the programming dial, starting
eight hours after battery installation. The default program will not
run if there is no run time selected.
F
Connect to Valve
1. Hand-screw the latching solenoid onto the valve.
2. Attach the Easy Rain to the solenoid.
G
Off Mode (Standby)
To stop all watering, turn the programming dial to OFF. To resume
automatic operation, turn the dial to the run time selected in step E.
H
Manual Start
To start a manual cycle, turn the programming dial to ON. Watering
starts 10 seconds after you set the dial. To resume automatic
operation, turn the dial back to the run time selected in step E.
4
Easy Rain™
EASY RAIN™
Easy Rain es un sistema de control para válvula individual
alimentado por batería, que funciona con las válvulas DV, ASVF,
PGA, PEB, PESB, GB, EFB-CP, BPE y BPES de Rain Bird. La presión
operativa máxima del Easy Rain es de 150 psi (10 bar).
A
Instalación de la Batería
1. Sellar contra agua las terminales del conector de la batería
aplicando una minima cantidad de grasa (incluida). Después,
instale una batería de 9 volts de alta calidad.
2. Ponga la batería en el compartimento de batería con las
terminales hacia arriba. Cierre y apriete la tapa para evitar daños
por humedad.
NOTA: Reemplace la batería una vez al año. Para mantener el
programa, instale la nueva batería en los siguientes 30 segundos
después de haber quitado la batería vieja. No instale la batería si
hay señales de humedad, esto puede ocasionar condensación en
el compartimento de la batería.
B
Establecer, Borrar o Cambiar un Programa
Para establecer, borrar o cambiar un programa, gire la perilla de
programación a la posición RESET PGM y espere por lo menos 10
segundos. Después siga los pasos C, D, y E para establecer el
programa.
Easy Rain™
5
C
Seleccionar la hora de arranque (en horas)
Gire la perilla de programación para seleccionar el número de
horas a esperar antes de que empiece el primer riego. En la
sección amarilla de la etiqueta usted puede seleccionar sin retraso
(+0), 2 horas de retraso (+2), 4 horas de retraso (+4), etc., hasta
12 horas de retraso (+12) máximo.
Gire la perilla de programación a la posición deseada y espere por
lo menos 10 segundos.
Por ejemplo, si son las 12:00 del medio día cuando usted sitúa la
perilla de programación en la posición RESET PGM, y selecciona
6 horas de retraso (+6) , el primer arranque de riego ocurrirá a las
6:00 de la tarde.
PRECAUCIÓN: Si usted elige la posición sin retraso (+0), el
riego iniciará siete segundos después de haber seleccionado la
hora de arranque.
D
Seleccionar el Calendario y Ciclo
Esta posición se refiere al número de horas en un ciclo de riego y
el número de arranques de riego por cada ciclo. En la sección
púrpura de la etiqueta usted puede seleccionar un ciclo de riego
diario (24 horas), cada dos días (48 horas), o cada tercer día (72
horas).
Usted puede seleccionar uno (1x) o dos (2x) riegos por ciclo. Por
ejemplo la posición “2x72” va a regar dos veces cada tercer día.
6
Easy Rain™
1. En la sección púrpura de la etiqueta, ponga el indicador de
ciclo de riego ( pieza de plástico localizada en la parte inferior
de la perilla de programación ), en la posición deseada ( véase
nota).
2. Gire la perilla de programación a la posición deseada y espere
por lo menos 10 segundos.
NOTA: Seleccionar un ciclo de 2X dará como resultado dos riegos
con un espacio de filtración de 4 horas entre ambos. Por ejemplo,
si usted elige una duración de riego de 10 minutos y un ciclo de
riego de 2x48, los aspersores funcionarán de la siguiente manera:
Día Uno
Riego por 10 minutos
Espacio de filtración
de 4 horas
Riego por 10 minutos
Día Dos
No habrá riego
Día Tres
Ocurre lo mismo
que el primer día
NOTA: El indicador de ciclo de riego solo marca la posición actual
del Calendario y el Ciclo de riego, de ninguna manera opera el
controlador.
E
Seleccionar la Duración del Riego
Esta posición se refiere a la duración del riego en minutos. En la
sección verde de la etiqueta usted puede seleccionar una duración
de riego de 2, 5, 10, 15, 30, 60, ó 90 minutos.
Gire la perilla de programación a la posición deseada y déjelo ahí.
Easy Rain™
7
NOTAS: Es necesario dejar la perilla de programación en la
posición de duración de riego para que el controlador corra un
programa automático de riego.
El programa default (por defecto) iniciará riego automáticamente
todos los días con una duración de 10 minutos si las posiciones de
arranque de riego, ciclo de riego, o duración de riego no han sido
programadas adecuadamente. Si la perilla de programación se
encuentra en la posición OFF, ON o RESET PGM, el programa
default (por defecto no se activará).
F
Conectar la Válvula
1. Enrosque manualmente el solenoide de impulsión a la válvula.
2. Sujete el controlador Easy Rain al solenoide.
G
Modo OFF (Modo de Espera)
Para detener el riego, gire la perilla de programación a la posición
OFF. Para volver al sistema de riego automático programado,
vuelva a situar la perilla de programación en la posición de
duración de riego seleccionada en el paso E.
H
Arranque Manual
Para iniciar un ciclo manualmente, gire la perilla de programación a
la posición ON, el riego iniciará a los 10 segundos. Para volver al
sistema de riego automático programado, vuelva a situar la perilla
de programación en la posición de duración de riego seleccionada
en el paso E.
8
Easy Rain™