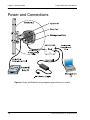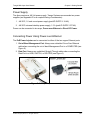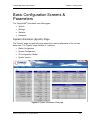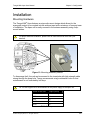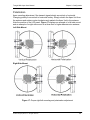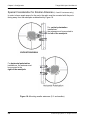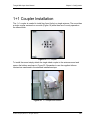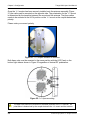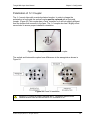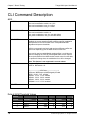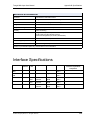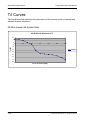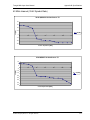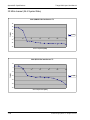
1
®
TrangoLINK Apex
11 GHz, 15 GHz, 18 GHz, 23 GHz
All-in-One High-Capacity Point-to-Point
Licensed Microwave Native Ethernet Backhaul
User Manual
September 2009 — Revision 2.1
TrangoLINK® Apex User Manual
Table of Contents
Table of Contents
Table of Contents ..................................................................................1
Figure Guide ..........................................................................................5
Table Guide ............................................................................................6
Preface ...................................................................................................7
Federal Communications Commission (FCC) Emission Designators................... 9
European Telecommunications Standards Institute (ETSI) .................................. 9
Warranty Information ............................................................................................ 9
Chapter 1: Overview............................................................................10
Introduction ................................................................................................... 10
Contents........................................................................................................ 10
Ports & Features ........................................................................................... 11
Mount Latches & Waveguide Connections.................................................... 12
Chapter 2: Getting Started..................................................................13
Power and Connections ..................................................................................... 14
Power Supply ................................................................................................ 15
Connecting Power Using Power-over-Ethernet............................................. 15
Connecting Power Using Direct DC Power ................................................... 16
Basic Configuration Concepts ............................................................................ 17
Opmode Concept .......................................................................................... 17
Mean Square Error Concept ......................................................................... 18
MSE Expected and Maximum values............................................................ 18
Max Power Input ........................................................................................... 18
ACM: Adaptive Coding & Modulation ............................................................ 19
ATPC & TargetRSSI ..................................................................................... 20
ATPC Max Power & Step Size ...................................................................... 20
Port Mapping (802.1q) & Port Priority (802.1p) ............................................. 20
Class of Service (802.1p) .............................................................................. 20
Management....................................................................................................... 21
Browser Interface .......................................................................................... 21
Command Line Interface (CLI) ...................................................................... 23
Changing Password ...................................................................................... 25
Chapter 3: Configuration ....................................................................26
Basic Configuration Screens & Parameters ....................................................... 27
System Information (Sysinfo) Page............................................................... 27
Radio Configuration ...................................................................................... 28
System Configuration .................................................................................... 28
IP Configuration and Model........................................................................... 31
System Version ............................................................................................. 31
Settings Page................................................................................................ 32
© 2009 Trango Systems, Inc. All rights reserved.
1
Table of Contents
TrangoLINK® Apex User Manual
Radio Configuration ...................................................................................... 32
IP Configuration ............................................................................................ 34
System Configuration.................................................................................... 34
Ethernet Configuration .................................................................................. 35
Statistics Page .............................................................................................. 35
System Status............................................................................................... 36
Link Status .................................................................................................... 36
Ethernet Status ............................................................................................. 37
RF Status...................................................................................................... 37
Password Web Page .................................................................................... 38
Essentials to Establish a Wireless Link .............................................................. 39
Evaluate Link Quality.......................................................................................... 39
Link Test ....................................................................................................... 39
Chapter 4: Deployment & Installation..................................................42
Installation .......................................................................................................... 43
Mounting Hardware....................................................................................... 43
Installation & Polarity Considerations............................................................ 44
Waveguide Adapter Installation ........................................................................i
SFP Installation............................................................................................. 46
Direct DC Power Connection ........................................................................ 46
Polarization ................................................................................................... 47
Special Consideration for Smaller Antennas (1 ft and 2 ft diameter only) ..... 48
1+1 Coupler Installation ..................................................................................... 49
Grounding Recommendations............................................................................ 52
Weather Proofing Cabling .................................................................................. 52
Antenna Alignment ............................................................................................. 55
Antenna Alignment Procedure ...................................................................... 55
Upgrading Firmware........................................................................................... 56
Upgrade Procedures..................................................................................... 56
Chapter 5: Management ......................................................................59
Management Options ......................................................................................... 59
SNMP – Simple Network Management Protocol .......................................... 60
Objects for Monitoring and Control ............................................................... 61
Chapter 6: Troubleshooting................................................................62
No Link ............................................................................................................... 63
High BER ........................................................................................................... 63
GigE Port............................................................................................................ 64
Fiber Port (SFP) ................................................................................................. 64
Management ...................................................................................................... 65
Chapter 7: Bench Testing ...................................................................66
Bench Test Setup............................................................................................... 67
Appendix A: Command Set Summary.................................................69
System Command Keying.................................................................................. 69
2
© 2009 Trango Systems, Inc. All rights reserved.
TrangoLINK® Apex User Manual
Table of Contents
Key Functions ............................................................................................... 69
Different Mode Levels......................................................................................... 70
View Mode .................................................................................................... 70
Config Mode.................................................................................................. 71
Debug Mode.................................................................................................. 74
CLI Command Description ................................................................................. 76
acm ............................................................................................................... 76
alignment_mode............................................................................................ 77
atpc ............................................................................................................... 78
atpc_max_power........................................................................................... 78
atpc_step_size .............................................................................................. 79
ber................................................................................................................. 79
bootimage ..................................................................................................... 80
cos ................................................................................................................ 81
config ............................................................................................................ 81
date ............................................................................................................... 82
debug ............................................................................................................ 83
default_opmode ............................................................................................ 83
exit ................................................................................................................ 83
failover .......................................................................................................... 84
freq................................................................................................................ 85
help / ? .......................................................................................................... 85
httpd .............................................................................................................. 86
ibm ................................................................................................................ 86
ipconfig.......................................................................................................... 87
datapattern .................................................................................................... 87
license ........................................................................................................... 88
linktest ........................................................................................................... 88
loglevel .......................................................................................................... 89
loopback........................................................................................................ 89
model ............................................................................................................ 90
mse ............................................................................................................... 90
opmode ......................................................................................................... 91
passwd .......................................................................................................... 91
Port (ge1 = Copper / ge2 = Fiber) ................................................................. 91
power ............................................................................................................ 92
reboot ............................................................................................................ 93
remark ........................................................................................................... 93
remove .......................................................................................................... 93
reset .............................................................................................................. 94
rps_enable .................................................................................................... 94
rssi ................................................................................................................ 95
rssiled............................................................................................................ 95
save .............................................................................................................. 96
smart_mode .................................................................................................. 96
show.............................................................................................................. 96
© 2009 Trango Systems, Inc. All rights reserved.
3
Table of Contents
TrangoLINK® Apex User Manual
snmpd ........................................................................................................... 97
snmptrap....................................................................................................... 97
speed ............................................................................................................ 98
status ............................................................................................................ 98
sysinfo........................................................................................................... 99
sync ............................................................................................................ 101
sync_state................................................................................................... 101
syslog.......................................................................................................... 102
targetrssi ..................................................................................................... 102
temp............................................................................................................ 103
telnetd ......................................................................................................... 103
tftpd............................................................................................................. 103
threshold ..................................................................................................... 104
trapip........................................................................................................... 104
uptime ......................................................................................................... 104
utype ........................................................................................................... 105
version ........................................................................................................ 105
Appendix B: Specifications ..............................................................107
Apex 18 ANSI Data Sheet................................................................................ 107
Interface Specifications .................................................................................... 109
T/I Curves......................................................................................................... 110
Supported Frequencies by Model .................................................................... 115
Appendix C: Cable Pin outs..............................................................127
Industry Standard CAT-5 Pin outs.................................................................... 127
Apex Serial Cable Pin-out ................................................................................ 128
Appendix D: MIB ................................................................................129
System OIDs............................................................................................... 129
Modem OIDs............................................................................................... 130
RF OIDs...................................................................................................... 131
GigE OIDs................................................................................................... 132
Trap OIDs ................................................................................................... 134
Appendix E: Part Numbers ...............................................................135
Glossary: Acronyms..........................................................................137
4
© 2009 Trango Systems, Inc. All rights reserved.
TrangoLINK® Apex User Manual
Figure Guide
Figure Guide
Figure 1: Contents of a TrangoLINK® Apex kit........................................................ 10
Figure 2: Apex ports and features........................................................................... 11
Figure 3: Labels, mount latches and waveguide connection................................... 12
Figure 4: Power and Ethernet wiring diagram (proportions not to scale) ................ 14
Figure 5: PoE injector power connections............................................................... 15
Figure 6: HTTP login............................................................................................... 21
Figure 7: Web browser login ................................................................................... 22
Figure 8: Browser interface..................................................................................... 22
Figure 9: System Information Web page................................................................. 27
Figure 10: Settings Web page ................................................................................ 32
Figure 11: Statistics Web page ............................................................................... 36
Figure 12: Password Web page.............................................................................. 38
Figure 13: Mounting assembly latches.................................................................... 43
Figure 15: SFP Module installation ......................................................................... 46
Figure 16: Direct DC power connection .................................................................. 46
Figure 17: Proper right/left mounting and polarization adjustment .......................... 47
Figure 18: Mounting smaller antennas (2 ft. and smaller) ....................................... 48
Figure 19: 1+1 coupler ............................................................................................ 49
Figure 20: 1+1 coupler and latches......................................................................... 49
Figure 21: 1+1 coupler installed on antenna ........................................................... 50
Figure 22: 1+1 Apex mounting................................................................................ 50
Figure 23: Installing twist transition on 1+1 coupler ................................................ 51
Figure 24: H and V transitions ................................................................................ 51
Figure 25: PoE ground screw ................................................................................. 52
Figure 26: Ethernet cap installation......................................................................... 53
Figure 27: Complete Ethernet cap installation ........................................................ 53
Figure 28: Fiber plate installation ............................................................................ 54
Figure 29: Complete fiber plate installation (conduit not shown)............................. 54
Figure 30: Windows Start & Telnet ......................................................................... 56
Figure 31: Verify Firmware Upgrade ....................................................................... 58
Figure 32: Bench Test Setup .................................................................................. 67
Figure 33: Waveguide Attenuator ........................................................................... 68
Figure 34: EIA/TIA 586-A & 586-B Pin-Outs ......................................................... 127
Figure 35: Apex Serial Cable Pin-Out ................................................................... 128
© 2009 Trango Systems, Inc. All rights reserved.
5
Table Guide
TrangoLINK® Apex User Manual
Table Guide
Table 1: TrangoLINK® Apex part numbers ................................................................ 8
Table 2: MSE values ............................................................................................... 18
Table 3: Max power input........................................................................................ 18
Table 4: ACM threshold table.................................................................................. 19
Table 5: Default login passwords ............................................................................ 21
Table 6: Torque....................................................................................................... 43
6
© 2009 Trango Systems, Inc. All rights reserved.
TrangoLINK® Apex User Manual
Preface
Preface
This manual covers the basic configuration and installation of the TrangoLINK® Apex
licensed microwave backhaul system, and applies to the following part numbers:
Part Number
TLINK-APEX11-1
Description
TrangoLINK® Apex point-to-point system, 11GHz, ANSI Band 1
APEX11-1A
TrangoLINK® Apex Outdoor Unit, 11GHz, Band 1A, ANSI
APEX11-1B
TrangoLINK® Apex Outdoor Unit, 11GHz, Band 1B, ANSI
TLINK-APEX11-2
TrangoLINK® Apex point-to-point system, 11GHz, ANSI Band 2
APEX11-2A
TrangoLINK® Apex Outdoor Unit, 11GHz, Band 2A, ANSI
APEX11-2B
TrangoLINK® Apex Outdoor Unit, 11GHz, Band 2B, ANSI
TLINK-APEX11E-1
TrangoLINK® Apex point-to-point system, 11GHz, ETSI Band 1
APEX11E-1A
TrangoLINK® Apex Outdoor Unit, 11GHz, Band 1A, ETSI
APEX11E-1B
TrangoLINK® Apex Outdoor Unit, 11GHz, Band 1B, ETSI
TLINK-APEX11E-2
TrangoLINK® Apex point-to-point system, 11GHz, ETSI Band 2
APEX11E-2A
TrangoLINK® Apex Outdoor Unit, 11GHz, Band 2A, ETSI
APEX11E-2B
TrangoLINK® Apex Outdoor Unit, 11GHz, Band 2B, ETSI
TLINK-APEX15E-1
TrangoLINK® Apex point-to-point system, 15GHz, ETSI Band 1
APEX15E-1A
TrangoLINK® Apex Outdoor Unit, 15GHz, Band 1A, ETSI
APEX15E-1B
TrangoLINK® Apex Outdoor Unit, 15GHz, Band 1B, ETSI
TLINK-APEX18-1
TrangoLINK® Apex point-to-point system, 18GHz, Band 1
APEX18-1A
TrangoLINK® Apex Outdoor Unit, 18GHz, Band 1A, ANSI
APEX18-1B
TrangoLINK® Apex Outdoor Unit, 18GHz, Band 1B, ANSI
TLINK-APEX18E-1
TrangoLINK® Apex point-to-point system, 18GHz, ETSI Band 1
APEX18E-1A
TrangoLINK® Apex Outdoor Unit, 18GHz, Band 1A, ETSI
APEX18E-1B
TrangoLINK® Apex Outdoor Unit, 18GHz, Band 1B, ETSI
TLINK-APEX18E-2
TrangoLINK® Apex point-to-point system, 18GHz, ETSI Band 2
APEX18E-2A
TrangoLINK® Apex Outdoor Unit, 18GHz, Band 2A, ETSI
APEX18E-2B
TrangoLINK® Apex Outdoor Unit, 18GHz, Band 2B, ETSI
TLINK-APEX23-2
TrangoLINK® Apex point-to-point system, 23GHz, ETSI Band 1
APEX23-1A
TrangoLINK® Apex Outdoor Unit, 23GHz, Band 2A, ANSI
APEX23-1B
TrangoLINK® Apex Outdoor Unit, 23GHz, Band 2B, ANSI
TLINK-APEX23E-2
TrangoLINK® Apex point-to-point system, 23GHz, ETSI Band 2
APEX23E-2A
TrangoLINK® Apex Outdoor Unit, 23GHz, Band 2A, ETSI
APEX23E-2B
TrangoLINK® Apex Outdoor Unit, 23GHz, Band 2B, ETSI
PSUPPLY-48
19” Rack Mount -48 Volt Power Supply
PSUPPLY-DT-48
-48 Volt Universal Power Supply, Rev A
© 2009 Trango Systems, Inc. All rights reserved.
7
TrangoLINK® Apex User Manual
Preface
PoE-APEX-48
CBLDAT-3
PoE injector for TrangoLINK® APEX
Serial Console Cable for Apex
APEX18-KEY-1
Software Key to Allow Throughputs up to 200Mbps
APEX18-KEY-2
Software Key to Allow Throughputs up to 370Mbps
APEX11-KEY-1
Software Key to Allow Throughputs up to 263Mbps
APEX15-KEY-1
Software Key to Allow Throughputs up to 167Mbps
APEX23-KEY-1
Software Key to Allow Throughputs up to 200Mbps
APEX23-KEY-2
Software Key to Allow Throughputs up to 370Mbps
Table 1: TrangoLINK® Apex part numbers
8
© 2009 Trango Systems, Inc. All rights reserved.
TrangoLINK® Apex User Manual
Preface
Federal Communications Commission
(FCC) Emission Designators
•
10M0D7W for 10 MHz BW rates and all modulations
•
20M0D7W for 20 MHz BW rates and all modulations
•
30M0D7W for 27.5/28/30 MHz BW rates and all modulations
•
40M0D7W for 40 MHz BW rates and all modulations
•
50M0D7W for 50 MHz BW rates and all modulations
•
56M0D7W for 55/56/80 MHz BW rates and all modulations
European Telecommunications
Standards Institute (ETSI)
ETSI models of the TrangoLINK® Apex product line have been tested and found to
comply with the European Telecommunications Standards:
•
EN 302 217-2-1 V1.2.1 (2007-02)
•
EN 302 217-2-2 V1.2.2 (2007-04)
•
EN 301 489-1 V1.8.1 (2008-04)
•
EN 301 489-4 V1.4.1 (2008-09)
•
EN 60950-1
These standards cover all the essential requirements of Directive 1999/5/EC.
Warranty Information
TrangoLINK® APEX units purchased from Trango Systems, Inc. are warranted for two
years from date of purchase. Please see www.trangosys.com for a complete description
of warranty coverage and limitations. Extended warranty protection can be purchased
through Trango Sales or Customer Service (+1 858-391-0010).
© 2009 Trango Systems, Inc. All rights reserved.
9
TrangoLINK® Apex User Manual
Chapter 1: Overview
Chapter 1: Overview
About this Chapter
This chapter introduces the TrangoLINK® Apex system, features, and its components.
Introduction
The TrangoLINK® Apex is a carrier grade high-performance all outdoor point-to-point
wireless microwave system designed for Carrier, Enterprise, and WISP networks using
either 11, 15, 18 or 23 GHz licensed spectrum. The TrangoLINK® Apex provides a full
duplex wireless connection over the air that is ideal for copper RJ45 Ethernet
connections as well as fiber optics through the use of SFP ports.
The TrangoLINK® Apex is a Frequency Division Duplex (FDD) radio which provides low
latency of less than 150 μs, over 1 million packets per second, and up to 730+ Mbps of
data. The TrangoLINK® Apex uses VLAN and Quality of Service (QoS) prioritization to
offer great flexibility in offering high value added services.
Contents
Each TrangoLINK® Apex kit comes equipped with two ODUs.
APEXxx-ODUxA
APEXxx-ODUxB
Antennas are sold separately, and come
with waveguide transitions:
11 GHz
15 GHz
18 GHz
23 GHz
Figure 1: Contents of a TrangoLINK® Apex kit
!
10
Additional accessories are required to complete installation of the TrangoLINK®
Apex, such as power supplies, PoE devices, fiber kits, and antennas.
See Appendix E for a complete list of accessories.
© 2009 Trango Systems, Inc. All rights reserved.
TrangoLINK® Apex User Manual
Chapter 1: Overview
Ports & Features
Figure 2: Apex ports and features
Console/1+1 Connector: Serial cable connection for 1+1 redundancy configuration.
Data Port: RJ-45 connector allows Ethernet 10/100/1000 data rates (also PoE
capable).
RSSI LED: Displays real-time RSSI value of the link in a 2-digit LED display.
Fiber Cover: Contains the SFP fiber optic port and MOLEX™ direct DC power
connector.
Management Port: Dedicated to out-of-band management (also PoE capable). No data
pass through is allowed on this port.
Protective Vent: Equalizes air pressure while keeping moisture out.
Labels: Location of serial number and MAC address.
!
DO NOT TAMPER with the Protective Vent. It should not be twisted or removed.
Tampering with or damaging the Protective Vent will void the factory warranty.
© 2009 Trango Systems, Inc. All rights reserved.
11
TrangoLINK® Apex User Manual
Chapter 1: Overview
Mount Latches & Waveguide Connections
Figure 3: Labels, mount latches and waveguide connection
Slip Mount Latches: Slip-mount installation secures the ODU to the Antenna Assembly
or mounting bracket and allows easy removal during maintenance.
Slip Mount Waveguide Transition: Connects the ODU transmit signal to the antenna
waveguide port.
Labels: Location of serial number and MAC address.
12
© 2009 Trango Systems, Inc. All rights reserved.
TrangoLINK® Apex User Manual
Chapter 2: Getting Started
Chapter 2: Getting Started
About this Chapter
This chapter discusses the basic steps to get started.
The following topics will be covered in this chapter:
•
Power and Connections
•
Basic Configuration Concepts
•
Management
It is recommended that you first test and configure the radios on the bench before
deploying them in the field. Bench testing is a particularly important exercise for the
novice user.
Please see Chapter 7 for details and the importance of bench testing.
!
Additional accessories are required to complete installation of the TrangoLINK®
Apex, such as power supplies, PoE devices, fiber kits, cables, and antennas.
Accessories are sold separately. See Appendix E for a complete list of accessories.
© 2009 Trango Systems, Inc. All rights reserved.
13
Chapter 2: Getting Started
TrangoLINK® Apex User Manual
Power and Connections
Figure 4: Power and Ethernet wiring diagram (proportions not to scale)
14
© 2009 Trango Systems, Inc. All rights reserved.
TrangoLINK® Apex User Manual
Chapter 2: Getting Started
Power Supply
The Apex requires a -48 Volt power supply. Trango Systems recommends two power
supplies (see Appendix E for a complete listing of accessories):
1. -48 VDC, 1U rack mount power supply (part# P-SUPPLY-1U-48)
2. -48 VDC universal desktop power supply, 1.5 A (part# P-SUPPLY-DT-48)
Power can be connected in two ways, Power-over-Ethernet or Direct DC Power:
Connecting Power Using Power-over-Ethernet
The PoE Power Injector can be connected to either of the two copper Ethernet ports:
1. Out-of-Band Management Port: Always use a shielded Cross-Over Ethernet
cable when connecting the out-of-band Management Port to a COMPUTER (see
Figure 6).
2. Data Port: Always use a shielded Straight-Through cable when connecting the
Data Port to a HUB, SWITCH, or ROUTER (see Figure 6).
Figure 5: PoE injector power connections
© 2009 Trango Systems, Inc. All rights reserved.
15
TrangoLINK® Apex User Manual
Chapter 2: Getting Started
Connecting Power Using Direct DC Power
Direct DC Power to the 2 pin MOLEX™ connector is located under the fiber cover.
Please note that when the pins are facing up, the -48v (White) is on the left.
16
!
If you cannot access radio management functions via the Management Port, it is
possible that your PC is not properly set up with a routable subnet. In this case you
must use the proprietary Console Programming Cable to connect to the Console
Port for management. The proprietary Console Programming Cable can be
purchased from your sales manager. Settings and connection steps are found later
in this chapter.
!
It is recommended to always use a shielded crossover cable for the Data Port.
When auto-negotiate is disabled, a crossover cable is required for the Data Port,
otherwise you will experience limited Ethernet connectivity for management. When
auto-negotiate is enabled is will auto sense the cable type.
© 2009 Trango Systems, Inc. All rights reserved.
TrangoLINK® Apex User Manual
Chapter 2: Getting Started
Basic Configuration Concepts
The TrangoLINK® Apex can be configured using either the Command Line Interface
(CLI), or the Web Browser (HTTP) interface. Although both methods are comprehensive
and powerful, the CLI method provides more functionality. Both methods of radio
configuration require an understanding of the concept of Operation Mode (Opmode).
Opmode Concept
Before logging into a radio, it is important to understand the “Opmode” concept. The
Apex can be in one of two operational modes, Opmode “On” or Opmode “Off.”
Opmode “Off”
•
Radio is NOT transmitting and is NOT attempting to make a wireless connection
•
Radio can be managed when Opmode is “Off”
Opmode “On”
Radio is transmitting and attempting to make a wireless connection
•
Radio cannot be managed when Opmode is “On”
Default Opmode Settings
There are two important related settings: Opmode and Default Opmode. The factory
default setting for Default Opmode is “Off.” The Default Opmode setting controls
whether Opmode will be turned on or off after a power up or reboot process. If Default
Opmode is “Off” and Opmode is “On” the radio will not transmit upon rebooting. The
default setting is Opmode “Off” to ensure that nothing is transmitted until the installation
is complete and so that during bench testing the risk of unintentional RF radiation is
mitigated.
Why is Opmode Important?
If Opmode is not configured correctly the radio will not transmit to establish a link.
Certain functions can only be performed while the radio is in Opmode “Off”:
•
Setting / Changing Transmit Frequency
•
Enabling Loopback
!
IMPORTANT — BEFORE YOU DEPLOY: Factory Default Opmode is “Off.” Default
Opmode should be set to “On” before radios are deployed in the field. Console
management is possible regardless of Opmode.
© 2009 Trango Systems, Inc. All rights reserved.
17
TrangoLINK® Apex User Manual
Chapter 2: Getting Started
Mean Square Error Concept
Mean Square Error (MSE) is similar to Signal-to-Noise Ratio (SNR) except that it
accounts for distortion and interference in addition to noise power.
Distortion may come from several sources such as bad Ethernet cables (poor shield,
damaged, or low quality), path degradations such as multipath, or Fresnel zone
encroachment.
Interference can come from other transmitters on the tower, as well as from sources
inside an indoor shelter. High power transmitters inside a shelter can cause interference
when near the PoE device or when located very close to the cabling.
There are maximum acceptable MSE values for each modulation which are useful in
determining the quality of the link. The MSE value reported is only relevant to one tx-rx
path, so the MSE of each tx-rx path must be evaluated to verify the link is operating
cleanly. The lower the number the better, so a -35dB is better than a -30dB. The table
below shows the maximum MSE value to expect in IF Loopback, Normal Operation, and
Absolute Maximum.
MSE Expected and Maximum values
QAM256
QAM128
QAM64
QAM32
QAM16
QPSK
Maximum Expected
value IF loopback
-36
-36
-36
-36
-36
-36
Maximum Expected
value Normal
operation
-32
-32
-32
-32
-32
-32
Absolute Maximum
for 1E-6 BER
-28
-25
-22
-19
-16
-9
Table 2: MSE values
Max Power Input
The maximum power input, measured by RSSI, is depicted in Table 3. If your RSSI
value is higher than listed for the modulation that you are running, you may incur bit
error rates as well as possible damage to the system.
256 QAM
-34 dBm
128 QAM
-32 dBm
64QAM
-30 dBm
32QAM
-28 dBm
16QAM
-26 dBm
QPSK
-24 dBm
Table 3: Max power input
18
© 2009 Trango Systems, Inc. All rights reserved.
TrangoLINK® Apex User Manual
Chapter 2: Getting Started
ACM: Adaptive Coding & Modulation
The ACM feature works in conjunction with the Mean Square Error (MSE) values. The
ACM command is an on/off setting. When ACM is enabled (on) and the link becomes
degraded, the radio will automatically shift down in modulation and speed based on the
MSE threshold setting specified of the ACM table (Table 4).
Speed Setting QAM256
Profile # Modulation Improve
0
QAM256
-32.1
1
QAM64
-29.2
2
QAM16
-26.3
3
QPSK
-23.3
Speed Setting QAM128
Profile # Modulation
Improve
0
QAM128
-32.1
1
QAM64
-29.2
2
QAM32
-26.3
3
QAM16
-23.3
4
QPSK
-20.3
Speed Setting QAM64
Profile # Modulation
Improve
0
QAM64
-29.2
1
QAM32
-26.3
2
3
QAM16
QPSK
Speed Setting QAM32
Profile # Modulation
0
QAM32
1
QAM16
2
QPSK
Speed Setting QAM16
Profile # Modulation
0
QAM16
1
QPSK
Next
0
0
1
2
Degrade
-27.2
-24.3
-21.3
-18.5
Next
1
2
3
3
Next
0
0
1
2
3
Degrade
-27.2
-24.3
- 21.3
-18.5
17.1
Next
1
2
3
4
4
Next
0
0
Degrade
-24.3
- 21.3
Next
1
2
-23.3
-20.3
1
2
-18.5
17.1
3
3
Improve
-26.3
-23.3
-20.3
Next
0
0
1
Degrade
- 21.3
-18.5
17.1
Next
1
2
2
Improve
-23.3
-20.3
Next
0
0
Degrade
-18.5
17.1
Next
1
1
Table 4: ACM threshold table
!
The ACM feature will automatically shift the modulation up or down based on the
MSE value and the above specified thresholds. If you do not want the radio to
change speed settings then disable ACM.
© 2009 Trango Systems, Inc. All rights reserved.
19
Chapter 2: Getting Started
TrangoLINK® Apex User Manual
ATPC & TargetRSSI
ATPC and TargetRSSI work together to control the remote side power output in order to
achieve optimal signal strength. ATPC is an enable/disable setting. When enabled
ATPC will adjust the power of the remote side based on the local TargetRSSI setting. If
the RSSI value is lower than the TargetRSSI setting of the local radio, the remote radio
will attempt to increase its output power to achieve the TargetRSSI setting. ATPC has
Step Size and Max Power settings to limit the output power of the unit and prevent a
violation of the license.
!
The power setting cannot be changed once ATPC is enabled. To manually change
the power setting, ATPC needs to be disabled.
ATPC Max Power & Step Size
Settings for ATPC Max Power and the ATPC Step Size control how the ATPC function
will behave when attempting to achieve the TargetRSSI. ATPC Max Power is the
maximum power setting ATPC can set the power output to when trying to reach the
TargetRSSI. ATPC Step Size is the amount of dB per attempt that ATPC can change
power output.
Port Mapping (802.1q) & Port Priority (802.1p)
The Port Mapping feature is a fixed setting and provides an additional amount of data
security since traffic on the Ethernet port is segmented and isolated from traffic on the
fiber port. The Port Priority feature allows for an individual data port to have priority over
the remaining data port. This means that you can run both copper Gig-E as well as the
fiber SFP ports simultaneously. The priority groups are 0-7 and can be applied to GigE
port as well as the fiber port.
!
Port mapping is enabled by default through the smart_mode command. Should your
network require Q in Q or other unique protocol you may need to disable
smart_mode. In-band management will not work with smart_mode disabled.
Class of Service (802.1p)
TrangoLINK® Apex has Class of Service capabilities that provide priority for different
types of traffic across the link. The traffic can be classified into 8 priorities (0-7) which
can then be assigned to 4 queues.
20
© 2009 Trango Systems, Inc. All rights reserved.
TrangoLINK® Apex User Manual
Chapter 2: Getting Started
Management
The TrangoLINK® Apex can be managed through HTTP, HTTPS, Telnet, SSH, SNMP
and console port. The default IP address and passwords for the TrangoLINK® Apex are
below:
Access mode
Username
Password
CLI View Mode
admin
trango
CLI Config Mode
N/A
trango
CLI Debug Mode
N/A
N/A
Web Interface
admin
trango
SNMP Read Community
N/A
public
SNMP Write Community
N/A
private
SNMP Trap
N/A
trapstr
Table 5: Default login passwords
!
All Trango radios are pre-configured at the factory with a default IP address of
192.168.100.100
Browser Interface
To access the browser interface simply open your Web browser and enter the IP
address of the radio (Figure 6).
Figure 6: HTTP login
© 2009 Trango Systems, Inc. All rights reserved.
21
TrangoLINK® Apex User Manual
Chapter 2: Getting Started
A login window will pop up, requiring a user name and password (Figure 7).
Enter the assigned user name and password then press OK.
Figure 7: Web browser login
A valid combination of user name and password will open the SysInfo page (Figure 8).
Figure 8: Browser interface
22
© 2009 Trango Systems, Inc. All rights reserved.
TrangoLINK® Apex User Manual
Chapter 2: Getting Started
The following describes the primary features and pages of the HTTP Browser interface:
Navigation Bar: The navigation bar is a blue bar on the top of all pages. The navigation
bar contains link to the following pages:
•
Settings: The essential parameters, such as IP address, Frequency, RF output
power, Speed, and Cable Loss are set here.
•
System Information (Sysinfo): Shows most of the basic configuration
parameters of the radio. It is the first page shown after login.
•
Statistics: Counter information on all interfaces RF, Fiber, and GigE is
displayed. These statistics are used to determine the error rate of traffic
•
Password: User can change the “config” password and enter the license
upgrade key for higher capacity.
Command Line Interface (CLI)
All typical radio functions can be managed via the browser interface, but the Command
Line Interface (CLI) has functionality that facilitates installation. The Command Line
Interface has 3 modes View, Config, and Debug. Logging into the radio via Command
Line Interface is covered here briefly, and a complete listing of all CLI commands is
provided in Appendix A - Command Line Interface.
Launch Telnet
Open a command prompt (DOS) session on your PC (Windows® Start icon and select
“Run” and type command inside the “open:” box and click “OK”). Open a Telnet session
by typing:
telnet [ip address of radio]
Example:
C:>telnet 192.168.100.100
trango login:
Password:
You will be prompted for a login and password. Type in the login and password and
press enter.
Example:
trango login: admin Å Enter username
Password: Å login password is “trango”
Trango Broadband Wireless: TrangoLink APEX Command Line Interface v1.0
(trango-view)#
© 2009 Trango Systems, Inc. All rights reserved.
23
TrangoLINK® Apex User Manual
Chapter 2: Getting Started
To terminate a CLI session (Telnet or Console) simply close the session window. There
is no exit or quit command. This is an intentional security feature.
The Command Line Interface has 3 levels of access.
•
View Mode: Read-only. For viewing current settings.
•
Config Mode: Read/Write. For changing configuration settings.
•
Debug Mode: Only available through Config mode.
Config Mode: to enter this mode, type the command “config” from View Mode. It will
prompt for a password and after successful authentication it enters Config Mode. All
configuration settings can be changed while in Config Mode.
Any command entered without parameters will return the current configured values —
similar to “view” mode.
Configuration changes are applied immediately and do not require reboot, with one
exception. The only configuration change that requires a reboot is changing the
Channel Width. If you change the channel width, save your settings and then reboot.
Changing the modulation but leaving the channel width alone does not require a reboot.
!
All configuration changes have to be saved in order to be persistent across reboot.
A single “save” command in the CLI will save all configuration changes.
Users can go back to View Mode by typing the command “exit”
Example:
trango login: admin
Password:
Trango Broadband Wireless: TrangoLink APEX Command Line Interface v1.0
(trango-view)# config
Password:
(trango-config)# exit
(trango-view)#
To terminate a telnet session, simply click on the X to close the telnet window or enter
Debug Mode and type “exit”.
The Command Line Interfaces (CLI) keeps a history of commands used, pressing the
up arrow will display previous commands used. The CLI can complete a command
being typed by pressing <tab> key. If a command is partially typed followed immediately
by a “?” it will display all related commands.
24
© 2009 Trango Systems, Inc. All rights reserved.
TrangoLINK® Apex User Manual
Chapter 2: Getting Started
Example:
(trango-config)# t?
targetrssi Displays target rssi value
temp Displays IDU and ODU temperature
tftpd Displays tftp server (tftpd) status
threshold Set the threshold for the radio parameters
trapip Displays SNMP Trap IP configuration
(trango-config)#
!
Type “?” for a listing of all CLI commands.
Changing Password
Debug and Config Modes share the same password, and View Mode has a separate
password.
To change the Config Mode password you must be in Config Mode. Use the CLI
command password to change the Config Mode password. The example below
demonstrates changing the password for the Config Mode to “control”
Syntax: passwd <newpassword> <newpassword>
Example:
(trango-config)# passwd control control
success
(trango-config)#_
If the password is lost and you have been locked out of the unit contact Trango
Systems’ Technical Support for assistance.
© 2009 Trango Systems, Inc. All rights reserved.
25
Chapter 3: Configuration
TrangoLINK® Apex User Manual
Chapter 3: Configuration
About this Chapter
This section describes how to establish a wireless link with the TrangoLINK® Apex,
using the Browser (HTTP) Interface. It addresses the basic steps to establish a link in a
controlled lab environment.
Trango strongly recommends that that you read this manual thoroughly to gain an
understanding and mastery of all important configuration parameters and procedures
prior to deploying any wireless equipment in the field.
In this section:
26
•
Basic Configuration Screens and Parameters
•
Essentials to Establish a Wireless Link
•
Evaluate Link Quality
© 2009 Trango Systems, Inc. All rights reserved.
TrangoLINK® Apex User Manual
Chapter 3: Configuration
Basic Configuration Screens &
Parameters
The TrangoLINK® Apex has 4 main Web pages:
•
Sysinfo
•
Settings
•
Statistics
•
Password
System Information (Sysinfo) Page
The “Sysinfo” page is a read-only page where the current configuration of the unit can
been seen. The “Sysinfo” page consists of 4 sections:
•
Radio Configuration
•
System Configuration
•
IP Configuration / Model
•
System Version
Figure 9: System Information Web page
© 2009 Trango Systems, Inc. All rights reserved.
27
TrangoLINK® Apex User Manual
Chapter 3: Configuration
Radio Configuration
ATPC Max Power: The maximum output power threshold (in dBm) that the Apex unit
will deliver and not exceed (as determined by the granted regulatory license.)
ATPC Step Size: This is the amount in dBm that the Transmitter will alter the output
power per command from the far end radio. ATPC Step Size is user selectable from 1-5
dBm. Larger step sizes can track faster fading events but can cause “hits” if the far end
receiver cannot track the change. A small step size is less likely to result in “hits” but
may cause outages due to fast fading driving the far end receive signal below threshold.
Channel_bw: Displays the current channel bandwidth.
Datapattern: Displays current datapattern setting. The settings could be either External
/ Internal. Normal operation mode is External. Internal traffic is used to generate random
data to measure BER, All user data from GigE and Fiber ports will be dropped when the
datapath is set to internal mode.
Frequency: Displays the Transmit and Receive Frequency of the radio in MHz
Power: Transmit power of the unit in dBm. Please note that there is no internal
checking of maximum power. Please check the datasheet for your frequency for
maximum power for a specific modulation. Setting the unit at a power higher than
allowed by your regulatory license, is strictly forbidden.
Loopback Mode: Displays the current Loopback settings.
Modulation: Displays the current modulation, from QPSK to 256QAM.
Target RSSI: This is the RSSI value programmed as the nominal receive signal level (in
dB determined during the path design). This is used by ATPC.
Temp: Internal temperature displayed in Celsius. Please Note: the temperature
displayed could be 10° C more than the outside temp. Temperature ratings listed on
product datasheets are outside ratings, not internal temperature ratings.
UTYPE: Displays the current Unit type.
System Configuration
The following settings are displayed in the “Sysinfo” page under System Configuration
as either ON or OFF.
ACM: Controls whether Adaptive Coding & Modulation (ACM) is enabled.
Alignment: Controls whether Alignment mode is
•
28
Disabled (“Off”): The RSSI LED on the ODU will update once every 4 seconds.
© 2009 Trango Systems, Inc. All rights reserved.
TrangoLINK® Apex User Manual
•
Chapter 3: Configuration
Enabled (“On”): The RSSI LED on the ODU is updated 5 times every second and
the following settings are disabled ATPC and ODU Rx AGC.
ATPC: Controls whether ATPC is
•
Disabled (“Off”): the ODU delivers the maximum transmit power as configured. (a
function of your regulatory license limitations for bandwidth and transmit power,
and equipment design limitations determined by data modulation.
•
Enabled (“On”): the ODU will vary the output power under control of the far end
radio to maintain Target RSSI. ATPC must be enabled on both sides of the link to
be functional.
Default Opmode: Default Operation Mode is
•
Disabled (“Off”): The unit will be in Opmode “Off” upon startup or reboot.
•
Enabled (“On”): The unit will go into Opmode “On” upon startup or reboot.
Failover: When the Failover setting is:
•
Disabled (“Off”): The setting has no effect.
•
Enabled (“On”): 1+1 failover is enabled and the Status LED on the IDU will start
to blink. Failover needs to be enabled on both sides of the link to be functional.
HTTPD: The Hyper-text transfer protocol daemon is
•
Disabled (“Off”): The Web browser interface will be disabled.
•
Enabled (“On”): The Web browser interface is enabled.
IBM: In-Band Management feature
•
Disabled (“Off”): Management can only be done via out-of-band management
port.
•
Enabled (“On”): Management can now be done via out-of-band management and
in-band management.
•
The default IBM port is copper. This setting can be changed to the fiber port and
requires a reboot for settings to take effect. Current IBM port settings/status is
only available via CLI and will be added to the HTML interface in a future release.
Opmode: Operation Mode is
•
Disabled (“Off”): The unit is accessible but will not transmit RF.
•
Enabled (“On”): The unit will transmit to establish a link.
© 2009 Trango Systems, Inc. All rights reserved.
29
TrangoLINK® Apex User Manual
Chapter 3: Configuration
RPS: Rapid Port Shutdown is
•
Disabled (“Off”): The unit will not shut down the GigE/SFP ports when the
wireless link is lost.
•
Enabled (“On”): The unit will shut down the GigE/SFP ports when the wireless
link is lost. The remote end will also be notified of the port shutdown.
RSSI LED: Receive Signal Strength Indicator is
•
Disabled (“Off”): The RSSI LED is off and does not display any RSSI values.
•
Enabled (“On”): The RSSI LED will display the RSSI values.
Smart Mode: Internal VLAN port mapping is
•
Disabled (“Off”): There is no internal VLAN port mapping
•
Enabled (“On”): Internal VLAN port mapping between GE1 and SFP ports keep
traffic separate. Smart Mode must be enabled to support IBM.
SNMP Trap: Simple Network Management Protocol Trap
•
Disabled (“Off”): The unit will generate no SNMP Trap messages.
•
Enabled (“On”): SNMP Trap messages will be sent the IP destination configured.
TFTPD: Trivial file transfer protocol daemon is
•
Disabled (“Off”): The unit will not accept TFTP file requests.
•
Enabled (“On”): The unit will accept TFTP file requests so that it can be
upgraded.
Telnetd: Telnet daemon is
30
•
Disabled (“Off”): The unit will not accept Telnet session requests.
•
Enabled (“On”): The unit will accept Telnet session requests so that it can be
managed via Telnet.
© 2009 Trango Systems, Inc. All rights reserved.
TrangoLINK® Apex User Manual
Chapter 3: Configuration
IP Configuration and Model
The following information is displayed in the IP configuration and model section of the
“Sysinfo page”. These settings affect the OUT-OF-BAND MANAGEMENT port only.
IP Address: Displays the current configured Internet Protocol Address of the unit.
Subnet Mask: Displays the current configured Subnet Mask the unit is using.
Default Gateway: Shows the current Default Gateway for the unit.
SNMP Trap IP 1: SNMP traps will be sent the Internet Protocol Address shown.
SNMP Trap IP 2: SNMP traps will be sent the Internet Protocol Address shown.
Model: The model of the unit is shown.
Serial ID: The unique serial ID of the unit is shown.
ETH0 MAC: The Ethernet Media Access Control Address of the management port of
the unit. (Required for license upgrade keys).
ETH1 MAC: The Ethernet Media Access Control Address of the data Ethernet port of
the unit. This is used by the IBM feature.
System Version
The Current and Previous Image information on the following settings is displayed in the
System Version section.
FPGA: Displays the current unit Field Programmable Gate Array (FPGA) version.
Firmware: The current version of firmware the unit is displayed.
OS: The current version of the operating system the unit is shown.
PIC: Displays the current version of firmware for the microcontrollers of the unit.
MODEM: Displays the current version of the modem firmware for the unit.
RFM: Displays the current RF Module (Band) of the unit.
© 2009 Trango Systems, Inc. All rights reserved.
31
TrangoLINK® Apex User Manual
Chapter 3: Configuration
Settings Page
Configuration of the unit is performed under the “Settings” page, which includes:
•
Radio Configuration
•
Ethernet Configuration
•
IP Configuration
•
System Configuration
Figure 10: Settings Web page
Radio Configuration
System Model: Displays the current system model of the unit.
TX Frequency: Set the Center Frequency in MHz in accordance with the license grant.
!
32
Radio Configurations for Center Frequency, Bandwidth, and Maximum Transmit
Power must be set in compliance with the regulatory license granted for the link.
The TrangoLINK® Apex user is responsible for configuring the radio correctly.
© 2009 Trango Systems, Inc. All rights reserved.
TrangoLINK® Apex User Manual
Chapter 3: Configuration
Power: Transmit power (dBm). Transmit power is controlled by two settings. First, the
TrangoLINK® Apex has equipment specifications (described in the Specification
Appendix) that are a function of the channel bandwidth and signal modulation. At no
time should the transmit power be set for a value greater than specified since this will
degrade the link availability (BER will increase). Second, the license grant may
constrain power below what the TrangoLINK® Apex can deliver as to ensure there is no
interference with an existing user. The Power should be set to the lower of these two
values (equipment limitations and license grant).
Target RSSI: This is the RSSI value the unit will try to achieve if ATPC is enabled on
both sides of the link. It is recommended to use the expected RSSI value calculated
during the design phase of the project.
Speed: Set the channel bandwidth (in MHz) in accordance with the license grant using
the channel_bw command and the modulation type should be selected from the pulldown menu in accordance with the Link Design.
!
The TrangoLINK® Apex is shipped with default values
•
Speed - 16 QAM and 10 MHz bandwidth which protect the user from
inadvertently violating constraints set by the regulating entity
•
ACM - Disabled
When the user enables the ACM feature, the default threshold values are used.
Please refer to Table 4 for threshold values. This setting is not user adjustable.
Loopback Mode: The settings allows for internal testing of the unit via loopback testing.
There are 5 Loopback Mode settings OFF, IF, Digital, RF gen, and RF refl.
!
Opmode must be off for digital loopback only. Opmode must be on for IF loopback
modes. rf_gen and rf_refl are not available currently and will be added in a future
release.
Data Pattern: This setting will determine the source of the signal for the Loopback
testing. There are 2 Data (loopback) patterns: FPGA which is an external signal and
Modem which is an internal signal source. Normal operation mode is External. Internal
traffic is used to generate random data to measure BER. All user data from GigE ports
will be dropped when the datapath is set to internal mode.
ATPC Max Power: This setting will limit the maximum output power to be used if ATPC
is enabled.
ATPC Step Size: This setting will limit the amount of increase or decrease in a single
“step” of power adjustment.
© 2009 Trango Systems, Inc. All rights reserved.
33
Chapter 3: Configuration
TrangoLINK® Apex User Manual
IP Configuration
IP Address: The IP address assigned to the unit.
Subnet Mask: The subnet mask assigned to the unit.
Gateway: The gateway assigned to the unit.
SNMP Trap IP 1: The IP address of the device that will receive SNMP traps.
SNMP Trap IP 2: The IP address of the device that will receive SNMP traps.
System Configuration
ACM (Adaptive Coding & Modulation): ACM will allow the unit to adjust modulation
seamlessly as the RF signal quality degrades and improves. If this feature is enabled
and modulation decreases, there will be a noticeable reduction in link throughput based
on modulation. The modulation change is hitless for this feature.
ATPC (Automatic Transmit Power Control): ATPC enabled will allow the link
elements to automatically adjust the output power of the unit to achieve the Target
RSSI. This feature mitigates the effects of flat fading across the link.
Failover: Enable or disabled 1+1 protection.
IBM: Enable or disable In-Band Management.
RPS: Enable or disable Rapid Port Shutdown.
Smart Mode: Enable or disable Smart Mode feature.
SNMP Trap: Enable or disable the sending of SNMP traps. This must be enabled to
have the unit send SNMP traps.
Tftpd: Enable or disable Trivial File Transfer Protocol Daemon. This must be enabled to
upload new firmware images.
Alignment: Enable or disable alignment mode. Increases refresh rate of LED panel.
Default Opmode: Operation mode of the radio after a power cycle or reboot. Upon
startup the unit will go into OPMODE “on” if Default Opmode is ENABLED. When the
radio enters Opmode "on" it will be transmitting. When the radio enters Opmode "off"
the radio is not transmitting, but can be accessed via the Ethernet port.
Httpd: Enable or disable the HTML daemon—must be enabled to have Web access.
Opmode: Opmode is short for operation mode. When opmode is enabled the unit will
be transmit RF. If opmode is disabled the unit can still be managed but the RF portion of
the device will be disabled.
34
© 2009 Trango Systems, Inc. All rights reserved.
TrangoLINK® Apex User Manual
!
Chapter 3: Configuration
NOTE: Do not enable Opmode until the transmit frequency has been set to the
licensed frequency.
RSSI LED: The RSSI digital display can be enabled or disabled.
Telnetd: Enable or disable the Telnet daemon. This must be enabled for telnet access.
!
NOTE: SSH access to the unit can not be enabled or disabled. This is intentional in
the product design.
Ethernet Configuration
Port Link: The option of enabling or disabling the specified port.
Auto Nego: Enable or disable auto negotiation of the specified port.
Pause Frame: Enable or disable the use of pause frames on the specified port.
Duplex: Set the duplex setting of the specified port. Auto Negotiation must be disabled
and speed setting must be specified. Only Full duplex is allowed on the Fiber port.
Priority: Set the priority of the specified port over remaining ports.
Speed: Set the negotiation speed of the specified port. Auto Negotiation must be
disabled and duplex setting must be specified. Only 1000Mbps is allowed for Fiber port.
Ingress Rate: Sets the maximum bandwidth of traffic that can pass through the
specified port.
Statistics Page
This page displays statistics and status under the following groupings (Figure 11):
•
System Status
•
Link Status
•
Ethernet Status
•
RF
© 2009 Trango Systems, Inc. All rights reserved.
35
TrangoLINK® Apex User Manual
Chapter 3: Configuration
Figure 11: Statistics Web page
System Status
System Status show which GigE and Fiber ports are active. This section also provides
the RSSI, MSE, BER, Radio Temp, Modulation, ACM Profile, and if the link has lock.
Link Status
Link Status provides Modem Lock and PLL information. This information is either Red
for off or Green for on. In order to achieve link lock, all items in this section need to be
Green.
Modem Lock
36
•
Timing: The RF signal from the far end has been detected and the symbol timing
loop is locked.
•
Preamble: Must be locked to pass traffic.
•
LDPC (Low Density Parity Check): An efficient form of forward error correction
coding. Must be locked to pass traffic.
© 2009 Trango Systems, Inc. All rights reserved.
TrangoLINK® Apex User Manual
Chapter 3: Configuration
PLL Lock (Phase Lock Loop)
•
RFM RF: Unit RF Local PLL - Normally green.
•
RFM IF: Unit RF Module Intermediate Frequency PLL - Normally green.
•
Transmit PLL: Unit transmit IF PLL - Normally green.
•
Receive PLL: Unit receive IF PLL - Normally green.
Ethernet Status
Ethernet Status provides the configuration information of each data port along with the
following counters.
GigE Status
•
Enabled: The specified port can be either ON or OFF.
•
Auto Nego: Displays either ON or OFF for setting selection.
•
Pause Frame: The Pause frame can be either ON or OFF.
•
Duplex: The Duplex setting is either Half or Full.
•
Priority: The Priority ranges between 0 and 7.
•
Speed: Displays 10, 100, or 1000.
•
Max Rate: the Max Rate can by any value between 0-1000.
Counters
•
In Octets: Total number of octets received for the port.
•
In Ucast: Total number of unicast packets received on the GigE port.
•
InNUcast: Total number of Non-unicast packets received on the GigE port.
•
Out Octets: Total number of octets transmitted.
•
OutUcast: Total number of unicast packets transmitted on the GigE port.
•
OutNUcast: Total number of Non-unicast packets transmitted on the GigE port.
•
Collisions: Total number of collisions on the port.
•
CRC Errors: Total number of CRC errors on the port.
RF Status
RF Status section displays the following counters for RF traffic in both directions (IN and
OUT).
•
Total Data Octets: The Total number of octets received and transmitted.
•
Total Data Packets: The Total number of Data packets received and
transmitted.
© 2009 Trango Systems, Inc. All rights reserved.
37
TrangoLINK® Apex User Manual
Chapter 3: Configuration
•
Ethernet Packets: The Total number of Ethernet packets received and
transmitted.
•
Ethernet Drop Packets: total number of received Ethernet packets that were
dropped.
•
Total Drop Packets: The total number of packets that were dropped.
•
Port Utilization: Current link utilization as a percentage of the total RF capacity.
Password Web Page
This page allows the user to change the Web access password. The only password that
can be changed on this page is the Web access password.
The Password page also allows you to upgrade to the radio to higher capacity by
entering the software License Key.
Figure 12: Password Web page
38
© 2009 Trango Systems, Inc. All rights reserved.
TrangoLINK® Apex User Manual
Chapter 3: Configuration
Essentials to Establish a Wireless Link
In order to establish a wireless link there are a few essential parameters that must be
configured properly. These setting must be configured correctly on both sides of the
link. If these parameters are met, and if the units are within range and properly aligned,
the wireless link will automatically establish itself and Ethernet traffic will begin to pass
between the radios. This is a list of MINIMUM requirements to establish a link.
Transmit Frequency
•
The transmit frequency in MHz is required. The receive frequency is
automatically set based on the transmit frequency.
Transmit Power
•
This is the maximum output power the unit will transmit.
Modulation and Channel_BW
•
The modulation and channel_bw are configured with the “speed” command. The
modulation and channel width need to match on both sides of the link.
Default Opmode “ON”
•
Default Opmode must be on in order for the unit to transmit after a reboot. Be
sure to enable Default Opmode before deployment in the field.
Save and Reboot
•
The save command is needed so that setting changes are persistent through a
reboot. A reboot is required for settings to take full effect.
Evaluate Link Quality
Link Test
A link test can only be performed on a link that is carrying traffic and will not impact
customers. linktest can be used without the link lock, but it’s more meaningful when
locked. The linktest can be performed from the CLI only and will display information
pertaining to link quality. Link Test only displays information for the local side of the link.
The fields displayed are LOCK, RSSI, MSE, BER (TX and RX are displayed if ACM is
enabled.)
LOCK: Once lock is achieved, the radio can pass traffic. If the lock is not “1”, there are
problems with the link setup that need to be evaluated.
© 2009 Trango Systems, Inc. All rights reserved.
39
Chapter 3: Configuration
TrangoLINK® Apex User Manual
RSSI: The Received Signal Strength Indicator level measured in dBm. This value
should be compared to the expected signal level determined during the design phase of
the project. Signal levels that are 20 dBm lower than expected are typically associated
with antenna misalignment (i.e. one antenna is aligned to a side lobe). Signal levels that
are more than a few dB lower than expected may indicate obstructions in the Fresnel
zone. Make sure that your target RSSI is set correctly when evaluating RSSI readings.
!
The RSSI should not exceed -25dB. Exceeding this for extended period of time may
cause damage to the unit
MSE: Mean Square Error is calculated and displayed in dB. MSE is similar to Signal-toNoise Ratio (SNR) except that is accounts for distortion and interference in addition to
noise power.
BER: Bit Error Rate is only used when the datapattern is set to Internal on both sides of
the link. When the datapattern is set to External the BER will always display 0.00E+00
and is not to be considered error free. BER is displayed in 0.00E+00 format and
measures the number of uncorrected bit errors divided by the number of bits
transmitted. The BER value displayed in the linktest command is the instantaneous
value of the BER for 1sec duration. Telephony circuits (T1/E1) can tolerate BER of 10-3,
but for IP traffic and reliable telephony traffic the BER should be no greater than 10-6.
Substandard BER performance is difficult to isolate and generally requires careful fault
isolation using the loopback feature of the radio.
The linktest command can be executed by typing the command “linktest” followed by the
number of times to display results.
The example below displays the linktest command and 5 lines of data. Please note that
once the command is launched the linktest cannot be interrupted.
TX/RX: If ACM is enabled, the TX/RX will display the current modulation the radio is
transmitting and receiving. From time to time, the TX/RX may change due to
interference or atmospheric conditions. If it is disabled, the TX/RX will display N/A.
Example:
(trango-view)# datapattern
Data pattern: external
(trango-view)# linktest ?
[1-99] Duration in seconds
(trango-view)# linktest 5
LOCK RSSI MSE BER
TX
RX
1> 1 -42.00 dBm -33.00 dBm 0.00E+00 QAM256 QAM256
2> 1 -42.00 dBm -33.04 dBm 0.00E+00 QAM256 QAM256
40
© 2009 Trango Systems, Inc. All rights reserved.
TrangoLINK® Apex User Manual
Chapter 3: Configuration
3> 1 -42.00 dBm -33.05 dBm 0.00E+00 QAM256 QAM256
4> 1 -42.00 dBm -32.86 dBm 0.00E+00 QAM256 QAM256
5> 1 -42.00 dBm -33.00 dBm 0.00E+00 QAM256 QAM256
(trango-view)#
If ACM is disabled, the TX and RX will not change. Therefore, it is not necessary to
demonstrate if the TX is different from the RX which results on the TX/RX value
displaying N/A.
Example:
(trango-config)# acm
ACM: on
Bandwidth = 80
<-------------------- ACM Status --------------------->
ACM mod MSE(improve) MSE(degrade) Enable
QPSK -20.30 -17.10 disabled
16QAM
-25.30 -18.50 disabled
64QAM
-29.20 -24.30 disabled
256QAM -32.10 -27.20 disabled
(trango-config)# acm enable off
ACM: off
SUCCESS
(trango-config)# linktest 5
LOCK RSSI MSE BER
TX
1> 1 -52.10 dBm -33.30 dB
2> 1 -52.10 dBm -33.30 dB
3> 1 -52.10 dBm -33.30 dB
4> 1 -52.10 dBm -33.50 dB
5> 1 -52.10 dBm -33.40 dB
(trango-config)#
© 2009 Trango Systems, Inc. All rights reserved.
RX
0.00E+00
0.00E+00
0.00E+00
0.00E+00
0.00E+00
N/A
N/A
N/A
N/A
N/A
N/A
N/A
N/A
N/A
N/A
41
Chapter 3: Configuration
TrangoLINK® Apex User Manual
Chapter 4: Deployment &
Installation
About this Chapter
Once you are familiar with the basic operation of the radios you are ready for
deployment in the field. The deployment process consists of the following steps:
!
42
•
Mounting Hardware
•
Grounding
•
Weather Proofing
•
Antenna alignment
•
Upgrading Firmware
Refer to Chapter 7 for bench testing the equipment.
© 2009 Trango Systems, Inc. All rights reserved.
TrangoLINK® Apex User Manual
Chapter 3: Configuration
Installation
Mounting Hardware
The TrangoLINK® Apex features a unique slip-mount design which allows for the
waveguide output to be coupled into the antenna input with a minimum of loss and ease
of installation. The Apex unit is easily secured to the antenna assembly using 4 slipmount latches.
!
For proper antenna installation, please refer to instructions that come with your
antenna.
Figure 13: Mounting assembly latches
To discourage theft, the unit can be secured to the tower/pole with high strength cable
strung through the clasp hole. Trango recommends using combination locks so that
maintenance is not frustrated by lost keys.
!
18 - 22 AWG type wire is recommend from the power supply to the Apex unit.
Screw or Nut Size
Torque (in-lbs)
4-40
6
6-32
12
8-32
22
10-32
37
¼-20
65
Table 6: Torque
© 2009 Trango Systems, Inc. All rights reserved.
43
Chapter 3: Configuration
TrangoLINK® Apex User Manual
Installation & Polarity Considerations
When installing the Apex unit there are 2 keys factors in determining the polarity of
radio.
1. Installation of the waveguide.
2. Mounting the Apex Unit to the antenna.
!
44
IT IS IMPORTANT that the waveguide transition and the Apex unit are installed
correctly. The results of improper installation will result in transmitting an incorrect
polarity in violation of the license and possible link failure.
© 2009 Trango Systems, Inc. All rights reserved.
TrangoLINK® Apex User Manual
Chapter 3: Configuration
Waveguide Adapter Installation
1. Remove the protective tape that covers the
waveguide port on the Apex unit.
2. Lubricate the O-Ring using the supplied
silicone lubricant, then place the O-Ring
into the grove on the radio unit.
3. Place the Waveguide Adapter into the bore
on the radio making sure to align the
waveguide opening to the same orientation
as the waveguide opening on the Apex
unit. Take care not to disturb the O-Ring
position.
4. Attach the waveguide using a Phillips
screw driver and tighten securely.
!
Installing the Waveguide Adapter requires a
small Phillips head screwdriver to reach into
the narrow hole. It needs to be 2 ½ inches
long, with a maximum diameter of .225
inches.
When placing the waveguide adapter onto the
Apex ensure that orientation matches. Figure 14
shows the placement of the waveguide adapter.
Figure 14: Waveguide adapter
installation
© 2009 Trango Systems, Inc. All rights reserved.
45
TrangoLINK® Apex User Manual
Chapter 3: Configuration
SFP Installation
Installation of the SFP module is easily accomplished by removing the Fiber plate using
a Philips screwdriver. Remove the silicone seal located directly under the Fiber plate.
Using the SFP module purchased from Trango, simply slide the module into the SFP
receptacle until it locks into place. The Apex unit will auto detect the module and allow
use of the interface. Properly install and connect the fiber optic cable (described later in
this chapter) and Gigabit Fiber interface is ready to begin passing traffic.
Figure 15: SFP Module installation
!
Note that SFP modules that are not approved by Trango Systems may not function
in this unit or may not display current link status on the Sysinfo screens of the
system.
Direct DC Power Connection
To use a direct DC connection to
power up your TrangoLINK® Apex,
remove the fiber cover and locate the 2
pin MOLEX receptacle. Terminate your
DC cable (AWG 16 or smaller) to the
MOLEX connector which is included
with your fiber kit (sold separately).
Connect the MOLEX connector to the
receptacle and properly install the DC
power cable through the Fiber plate
(described later in this chapter).
Figure 16: Direct DC power connection
46
© 2009 Trango Systems, Inc. All rights reserved.
TrangoLINK® Apex User Manual
Chapter 3: Configuration
Polarization
Apex mounting determines if the transmit signal polarity as vertical or horizontal.
Changing polarity from vertical to horizontal is easy. Simply unlatch the Apex Unit from
the antenna and rotate counter-clockwise and reattach the Apex Unit to the antenna.
Note the position of the LED panel. Figure 17 displays an example of a left side mount
and an example of a right side mount on a three feet or higher diameter size antenna.
Left Side Mount
Right Side Mount
Figure 17: Proper right/left mounting and polarization adjustment
© 2009 Trango Systems, Inc. All rights reserved.
47
Chapter 3: Configuration
TrangoLINK® Apex User Manual
Special Consideration for Smaller Antennas (1 ft and 2 ft antennas only)
In order to have ample space for the ports, the radio must be mounted with the ports
facing away from the mast/pole as described by Figure 18.
For vertical polarization
installations,
the antenna must be mounted to
the left of the mast/pole
For horizontal polarization
installations, the antenna must
be mounted to the
right of the mast/pole
Figure 18: Mounting smaller antennas (2 ft. and smaller)
48
© 2009 Trango Systems, Inc. All rights reserved.
TrangoLINK® Apex User Manual
Chapter 3: Configuration
1+1 Coupler Installation
The 1 +1 coupler is needed to install two Apex Units to a single antenna. The mount has
a single coupler centered on one side (Figure 19) while there are 2 evenly spaced on
the second side.
Figure 19: 1+1 coupler
To install the mount simply attach the single sided coupler to the antenna mount and
secure the latches as shown in Figure 20. Remember to use the supplied silicone
lubricant as mentioned in the standard installation steps.
Figure 20: 1+1 coupler and latches
© 2009 Trango Systems, Inc. All rights reserved.
49
TrangoLINK® Apex User Manual
Chapter 3: Configuration
Once the 1+1 coupler has been securely installed onto the antenna assembly (Figure
21) the radios can be mounted on the opposite side. The polarization for the 1+1 mount
is determined by the transition between the mount and the antenna. The Apex radios
needs to be mounted in the H-Pol position on the 1+1 mount as the coupler determines
polarity.
Please order your correct polarity.
Figure 21: 1+1 coupler installed on antenna
Both Apex units must be mounted in the same position with the LED Panel on the
bottom right side as shown in Figure 22 regardless of desired RF polarization.
Figure 22: 1+1 Apex mounting
!
50
The Apex units need to be mounted in the same positions to the 1+1 MOUNT, as
polarization is determined by the coupler between the 1+1 mount and the antenna.
© 2009 Trango Systems, Inc. All rights reserved.
TrangoLINK® Apex User Manual
Chapter 3: Configuration
Polarization of 1+1 Coupler
The 1+1 mount ships with a vertical polarized coupler. In order to change the
polarization to horizontal the vertical couple must be replaced with a horizontal
coupler. (Figure 23) This coupler has a “twist” transition so it will look slightly different
than the coupler that connects to the Apex. The 1+1 coupler also has 2 slightly offset
screw holes to ensure proper installation orientation.
Figure 23: Installing twist transition on 1+1 coupler
The vertical and horizontal couplers have differences in the waveguide as shown in
Figure 24.
Figure 24: H and V transitions
!
Once the 1+1 coupler is properly mounted the 12” redundancy cable must be
installed between units and set the failover CLI command to “on”.
© 2009 Trango Systems, Inc. All rights reserved.
51
TrangoLINK® Apex User Manual
Chapter 3: Configuration
Grounding Recommendations
The Apex unit does not require any additional grounding since it is attached directly to
the antenna and thus shares the antenna’s ground. Please note that if the antenna is
attached to a metal pole that is earth-grounded, no other grounding is necessary.
The PoE includes a grounding screw located on the side of the panel and should be
connected to a low resistance path to earth ground (typically through the rack frame
(Figure 25).
Figure 25: PoE ground screw
!
If the antenna support structure is not earth-grounded through a low resistance,
high current path, do not proceed with the installation.
Weather Proofing Cabling
It is important to properly seal each cable connection to protect against moisture and
corrosion. Trango LINK Apex uses special connectors which provide this protection and
is included with your purchase. Please note that proper strain relief and installation is
mandatory to prevent moisture intrusion. Damage to the unit from moisture intrusion
through the Ethernet caps or Fiber plates are not covered under warranty.
52
© 2009 Trango Systems, Inc. All rights reserved.
TrangoLINK® Apex User Manual
Chapter 3: Configuration
To properly install the Ethernet weatherized connectors first remove the cap from the
unit and pass the bare end of the CAT5/6 cable through the cap as shown in Figure 26:
Figure 26: Ethernet cap installation
Second, Terminate the Cat5/6 cable to a RJ-45 connector. To complete installation,
connect the RJ-45 connector into the Apex radio and properly adjust the Ethernet cap
over the RJ-45 connector as shown in Figure 27.
Figure 27: Complete Ethernet cap installation
!
IT IS IMPORTANT that the orientation is correct to prevent water intrusion
To properly weatherize the Fiber cable and direct DC power first remove the fiber plate
and silicone seal from the unit and pass the Fiber and power cables through the fiber
plate as shown in Figure 28: The silicone seal has a slit that will allow the cables
through. Please note that the Fiber plate must be connected to a properly installed
conduit which will prevent moisture from entering the Apex unit.
© 2009 Trango Systems, Inc. All rights reserved.
53
TrangoLINK® Apex User Manual
Chapter 3: Configuration
Figure 28: Fiber plate installation
Second, terminate fiber and DC wires and connect to the SFP module and MOLEX
connector.
Complete installation by re-seating the silicone seal into the Apex unit and screw the
Fiber plate back to the unit as shown in Figure 29.
Figure 29: Complete fiber plate installation (conduit not shown)
!
It is important that the silicone seal is properly installed to prevent moisture
intrusion. Trango also insists that the fiber plate be connected to properly installed
conduit to ensure no moisture penetration into the apex unit.
!
Make sure to remove any cable constraint from your fiber cables. Failure to do so
will result in possible moisture penetration through the silicone seal
54
© 2009 Trango Systems, Inc. All rights reserved.
TrangoLINK® Apex User Manual
Chapter 3: Configuration
Antenna Alignment
Aligning narrow beam width (< 2º) over long distances can be a difficult process without
the proper equipment, patience, and a careful process. Using a GPS compass and the
Path Analysis to establish a crude azimuth and elevation, the installation crew can
mount the Antenna Assembly (Antenna and Mounting Kit) on the supporting structures
at each end of the link. Once the antennas are installed and a rough antenna alignment
has been established, begin the fine alignment process at one end of the link (typically
the site with the smaller antenna). Once one side is aligned to achieve best RSSI, MSE,
and BER then you can adjust the other side to improve the link. Alignment can be done
using the Digital RSSI panel on the Apex Unit.
Antenna Alignment Procedure
1. Ensure that the radios on both sides of the link are configured correctly.
2. Connect to the Management Port or via the Console Port.
3. Login to config mode. Once in config mode, enable the “alignment_mode”
Example:
trango login: admin
Password:
Trango Broadband Wireless: TrangoLink APEX Command Line Interface
v1.1.0
(trango-view)# config
Password:
(trango-config)# alignment_mode on
alignment_mode: on
SUCCESS
4. Once alignment mode is enabled the digital RSSI panel will update 5 times every
second.
5. Once the desired RSSI is reached, tighten down the antenna in the optimum
position.
6. Disable the alignment mode
!
The LED display reads in negative dBm, so “80” equals to -80 dBm whereas “40”
equals -40 dBm. When aligning the antenna the closer to zero the better the RSSI
(a -40 dBm signal is more powerful than a -80 dBm).
© 2009 Trango Systems, Inc. All rights reserved.
55
TrangoLINK® Apex User Manual
Chapter 3: Configuration
Upgrading Firmware
The firmware on the TrangoLINK® Apex can be upgraded through the management
Ethernet port. A firmware release can consist of up to 5 files:
System FPGA Image Firmware File <sys_fpga_xxyy>
System OS Image Firmware File
<sys_os_xxyy>
System Firmware File
<sys_fw_xxyy>
System PIC Firmware File
<sys_pic_xxyy>
System RFM Firmware File
<sys_rfm.bin>
Before beginning the upgrade procedure, be certain that all (sometimes it will be a
subset of the above files) of these files have been downloaded and extracted to an
easily accessible directory on the local hard drive.
Upgrade Procedures
Once all files have been properly extracted and placed on an easily accessible directory
on the local hard drive, proceed with as follow:
Telnet into the radio by Clicking on Start menu, RUN. On the “open” box enter telnet
and the IP address of the unit. The example below uses the default IP address.
Figure 30: Windows Start & Telnet
1. At the login enter your username and password. Default login is
Username = “admin”
Password = “trango”
2. Enter Config mode by typing “config” and entering config password. The default
config mode password is “trango”
3. Enable tftp daemon by using the TFTPD command as shown below.
trango login: admin
56
© 2009 Trango Systems, Inc. All rights reserved.
TrangoLINK® Apex User Manual
Chapter 3: Configuration
Password:
Trango Broadband Wireless: TrangoLink APEX Command Line Interface
v1.1.0
(trango-view)# config
Password:
(trango-config)#
(trango-config)# tftpd on
tftpd: on
SUCCESS
(trango-config)#
4. Open a MS-DOS prompt window and access the directory with the extracted
firmware files.
Example:
C:\CD Firmware
C:\Firmware>
5. Using windows TFTP command line tool, upload the firmware files one at a time.
(See tftp syntax example below)
tftp -i <ip address> put <file name>
C:\firmware>tftp -i 192.168.100.100 put sys_fpga_v10.bin
Transfer successful: 1951744 bytes in 15 seconds, 130116 bytes/s
!
If upgrading multiple images at a time. Repeat Step 5 with the correct file name.
6. After successful transfer of all the files, log into the unit and apply the updates
using the “bootimage” command from the config mode. Each file requires a
separate “bootimage” upgrade command.
Example:
(trango-config)#
(trango-config)# bootimage upgrade 0
This will apply the fpga upgrade only. Please note the following
options for the “bootimage” command:
(trango-config)# bootimage upgrade ?
<0-4> <0-sys_fpga, 1-sys_os, 2-sys_fw, 3-sys_pic, 4-sys_rfm.bin
0: System’s FPGA
1: System’s OS
2: System’s Firmware
3: System’s PIC
4: System’s RFM
© 2009 Trango Systems, Inc. All rights reserved.
57
TrangoLINK® Apex User Manual
Chapter 3: Configuration
7. A reboot of the radio is required to load the new image after upgrade. If
upgrading multiple images at one time (0, 1, 2, 3 etc) it is not required to issue
reboot after each upgrade. A single reboot can be issued after all the images
have been successfully upgraded, to reduce the downtime.
(trango-config)# reboot
The upgrade time varies depending upon the images and the size of the image.
The firmware can be verified by logging into the radio via CLI and with the use of
the “version” command or Web browser sysinfo at the bottom right corner (see
Figure 31).
The “version” command has two sections, Current Image Version and Previous
Image Version.
Example:
(trango-config)# version
Current Image Version
FPGA version:
01270608
OS version:
2p6r14b3D07230801
FW version:
1p0r0D072308
PIC version: 215
Modem version: 35
RFM version: 1C
Previous Image Version:
FPGA version:
01270608
OS version:
2p6r14b3D07230801
FW version:
1p0r0D072308
PIC version: 214
RFM version: 1C
Figure 31: Verify Firmware Upgrade
58
© 2009 Trango Systems, Inc. All rights reserved.
TrangoLINK® Apex User Manual
Chapter 5: Management
Chapter 5: Management
About this Chapter
The TrangoLINK® Apex system can be managed though a number of methods.
This chapter will focus on SNMP management. Please review Chapter 3 for HTTP
configuration and Appendix A for CLI configuration commands and procedures.
Management Options
Network management can be performed by three methods
•
Browser Interface (HTTP, HTTPS) – Chapter 3 Configuration
•
CLI (Console, Telnet, SSH) – Command Set Reference Appendix A
•
SNMP Manager – Discussed in this chapter.
Understanding SNMP
Understanding and familiarization of SNMP concepts and software platforms are
required to utilize SNMP management of the TrangoLINK® Apex system. Due to the
large number of programs available for SNMP, Trango does not provide support of
SNMP software packages or NMS systems. Some common items to try while having
issues monitoring specific OIDs are:
•
Properly load the MIBs into your software
•
Try adding a “ .0 “ at the end of your OID string
If this does not resolve your issues, please contact technical support.
© 2009 Trango Systems, Inc. All rights reserved.
59
Chapter 5: Management
TrangoLINK® Apex User Manual
SNMP – Simple Network Management Protocol
TrangoLINK® Apex supports Simple Network Management Protocol (SNMP) for network
management. Network management consists of 4 categories:
1. Configuration
2. Accounting
3. Alarm
4. Monitoring/Control
These capabilities allow the network operator to provide superior services through
higher network accessibility and integrated accounting system. Use of SNMP requires
the customer to have already implemented a NMS or SNMP software package.
The Trango SNMP solution supports MIB-II (system only) and the Trango proprietary
Management Information Base (MIB).
Users interested in using the SNMP functionality should review the entire TrangoLINK®
Apex MIB for a complete understanding of its features.
The following is an overview of some of the more commonly used SNMP objects in the
TrangoLINK® Apex system.
A copy of the MIB files for the current firmware version can be obtained by contacting
Trango Technical Support.
60
© 2009 Trango Systems, Inc. All rights reserved.
TrangoLINK® Apex User Manual
Chapter 5: Management
Objects for Monitoring and Control
GigE Bandwidth Monitoring
•
gigeEth1InOctets: Number of octets of payload received on GigE port 1
(copper).
•
gigeEth2InOctets: Number of octets of payload received on GigE port 2 (fiber).
•
gigeEth1OutOctets: Number of octets of payload transmitted on GigE port 1
(copper).
•
gigeEth2OutOctets: Number of octets of payload transmitted on GigE port 2
(fiber).
RF Monitoring
•
rfInOctet: Number of octets of payload received on the RF port.
•
rfOutOctet: Number of octets of payload transmitted on the RF port.
•
rfEthernetInPackets: Number of octets of payload received from the GigE ports
to transmit on RF port.
•
rfEthernetOutPackets: Number of octets of payload transmitted to GigE ports
from RF port.
•
rfRSSI: The Receive Signal Sensitivity Indicator the unit receives from the
distance end of the link.
Link Status Traps
Various traps are defined as follows:
•
trapReboot– trap is triggered when the unit is rebooted.
•
trapStartUp: trap is triggered when the unit boots up.
•
trapBackupLink: trap triggered when the backup status changes.
•
trapBackupTakeover: The trap is triggered when the Backup unit has taken
over.
•
trapModemLock - This trap will inform you when there is a change to the link
lock.
•
trapDownShift - This trap will inform you when the modulation of the radio has
shifted downed.
Trango recommends monitoring RSSI, MSE, Ethernet Traffic (gigeEthOctets), Temp,
and modem lock as a minimum for thorough monitoring of the link. Additional objects
and traps can be added to the monitoring software as required. Please review Appendix
D MIB for a complete listing of MIB Objects and Traps.
© 2009 Trango Systems, Inc. All rights reserved.
61
Chapter 6: Troubleshooting
TrangoLINK® Apex User Manual
Chapter 6: Troubleshooting
About this Chapter
This chapter will cover some of the more common steps to take when encountering
difficulties with the TrangoLINK® Apex.
62
•
No Link
•
High BER
•
Ethernet Port
•
Fiber Port
•
Web Management Interface
© 2009 Trango Systems, Inc. All rights reserved.
TrangoLINK® Apex User Manual
Chapter 6: Troubleshooting
No Link
•
Ensure that Opmode is enabled or “ON” for both sides of the link.
•
Verify the Transmit frequency is configured correctly for each side of the link.
•
Ensure the Apex units for the link are paired correctly. The pair consists of 1A
and 1B.
•
Both sides of the link must be configured for the same speed, channel bandwidth
and modulation.
•
Reissue Speed commands to both sides of the link and ensure the settings have
been saved.
•
Incorrect configuration of the TargetRSSI can prevent a link. Ensure that the
targetrssi is set correctly so that the link doesn’t decrease power to the point of
losing the link.
•
Check the power setting on both sides of the link.
•
Check to make sure Loopback is disabled.
•
Antennas are misaligned, verify RSSI values.
•
Look at troubleshooting tips for other issues.
•
If initial installation, set the speed to QPSK modulation, channel to 10MHz and
power to 21dBm.
High BER
A high Bit Error Rate can be caused by the following extremely high receive signal
strength. This can be prevented by enabling the following.
•
Enable ATPC and ensure the TargetRSSI is set correctly or reduce the power of
the remote side manually.
•
Ensure the Apex unit is properly grounded.
•
Verify that shielded CAT5 cable is being used and the cable does not run parallel
to power lines.
© 2009 Trango Systems, Inc. All rights reserved.
63
Chapter 6: Troubleshooting
TrangoLINK® Apex User Manual
GigE Port
No traffic is passing
•
Ensure cables are connected into correct ports. Data will not pass through the
management port of the Apex system.
•
Check the Ethernet cables to ensure they work properly.
•
Ensure that the GigE port is enabled.
•
Ensure the switch or device’s port is properly working or negotiating speed
correctly.
Errors on GigE port
•
Ensure there is no duplex mismatch.
•
The TrangoLINK® Apex can be configured for Auto-negotiate, 1000 Full
duplex, 1000 Half-duplex, 100 Full duplex, 100 Half-duplex, 10 Full-duplex,
and 10 Half-duplex. The setting of the TrangoLINK® Apex should match the
setting of the connecting device.
•
Verify correct Ethernet cable type is being used for GigE setting. Once Autonegotiate is disabled, the correct cable type most by use when attaching to
the device.
•
Verify proper crimped on the Ethernet cable connector.
Fiber Port (SFP)
Not passing traffic
64
•
Ensure the SFP module is properly installed.
•
Ensure the port is enabled.
•
Verify the correct type of fiber is being used.
•
Verify the SFP module is approved by Trango.
© 2009 Trango Systems, Inc. All rights reserved.
TrangoLINK® Apex User Manual
Chapter 6: Troubleshooting
Not showing link status
•
Verify the SFP module is approved by Trango.
•
Ensure the SFP module is properly installed.
•
Ensure the port is enabled.
•
Check cable for damage and proper termination of connectors.
Management
If you cannot telnet into the radio or open an HTTP browser session,
•
Check your cable connections.
•
Ensure proper cable is being used; cross-over vs. straight-through cable
•
Check PC’s subnet to make sure it is routable to the radio’s IP address.
If there are still issues please contact Technical Support at 858-391-0010 or E-mail at
[email protected]
Before calling please make sure you have the following information.
•
Serial Number
•
Description of the problem
•
Steps taken so far to resolve the problem
The serial number can be located on the side of the Apex unit (See figure 2, Chapter 1).
© 2009 Trango Systems, Inc. All rights reserved.
65
Chapter 7: Bench Testing
TrangoLINK® Apex User Manual
Chapter 7: Bench Testing
About this Chapter
In this chapter we will cover the basic tips in setting up the equipment for bench testing
the before deployment.
66
© 2009 Trango Systems, Inc. All rights reserved.
TrangoLINK® Apex User Manual
Chapter 7: Bench Testing
Bench Test Setup
Bench testing equipment before installation is a common practice for installers to
perform before deploying the equipment. Bench testing provides the user with a
baseline of results and helps ensure that the equipment operates according to
specification before deployment. It is a preventive measure that saves time since
equipment can be preconfigured before deployment. Please refer to Chapter 3 for
configuration of the units. Below is a basic diagram of a bench test setup.
Figure 32: Bench Test Setup diagram
!
NOTE: Variable Waveguide Attenuator: at least 45 dB of attenuation at the Transmit
Frequency to ensure that the Receive level is less than -25 dBm
The following are tips to ensure the bench test setup is properly done.
1. Ensure proper connection of the DC power to the PoE injector
© 2009 Trango Systems, Inc. All rights reserved.
67
TrangoLINK® Apex User Manual
Chapter 7: Bench Testing
2. Have at least 45 db of attenuation between Apex Units.
3. Connect the attenuator directly to the unit without a waveguide adapter. (Figure
33)
Figure 33: Waveguide Attenuator
4. Configure the Apex units with the configuration that will be used in the field. More
information on the setup process can be found in Chapter 3: Configuration.
5. Adjust the amount of attenuation to ensure the RSSI is less than -25dBm ( -30 to
-35 is optimal)
6. Perform throughput testing by connecting PCs to the data ports and passing FTP
or other IP traffic across the link.
7. Confirm proper SNMP setup by enabling traps and monitoring. By turning the
opmode off or increasing attenuation, the link will lose lock and trigger a trap to
be sent to the monitoring software.
!
NOTE: If waveguide attenuators are not available for the bench test, DO NOT
connect the Apex units to the antennas. Using antennas at very close range tests
will damage the radios. Instead, lay the radios on the bench with the waveguide
pointed at the ceiling. Even though the radios are not pointed at each other, it is
usually possible to create a link “over the air” with no waveguide, transition,
antennas, or attenuators present.
For any issues during the setup or the testing process, please contact Trango
Technical Support at (858) 391-0010 for assistance.
68
© 2009 Trango Systems, Inc. All rights reserved.
TrangoLINK® Apex User Manual
Chapter 7: Bench Testing
Appendix A: Command Set Summary
System Command Keying
Key Functions
Tab
Completes a partial command name entry. When you enter a unique set of characters
and press the Tab key, the system completes the command name. If you enter a set of
characters that could indicate more than one command, the system beeps to indicate
an error. Enter a question mark (?) immediately following the partial command (no
space). The system provides a list of commands that begin with that string.
Del or BS
Erases the character to the left of the cursor.
Return
At the command line, pressing the Return key performs the function of processing a
command. At the More prompt on a terminal screen, pressing the Return key scrolls
down a line.
Space Bar
Allows you to see more output on the terminal screen. Press the space bar when you
see the More prompt on the screen to display the next screen.
Left Arrow
Moves the cursor one character to the left.
Right Arrow
Moves the cursor one character to the right.
Up Arrow
Recalls commands in the history buffer, beginning with the most recent command.
Repeat the key sequence to recall successively older commands.
DownArrow
Return to more recent commands in the history buffer after recalling commands with the
Up Arrow or Ctrl-P. Repeat the key sequence to recall successively more recent
commands.
© 2009 Trango Systems, Inc. All rights reserved.
69
TrangoLINK® Apex User Manual
Chapter 7: Bench Testing
Different Mode Levels
View Mode
View mode is the default mode after logging in. It is strictly a read-only view of the
current configuration and statistics. Configuration changes can be made while in View
Mode.
Command List in View Mode
acm
alignment_mode
atpc
atpc_max_power
atpc_step
ber
config
cos
datapattern
date
default_opmode
failover
freq
help
httpd
ibm
ipconfig
license
linktest
loglevel
loopback
model
mse
opmode
power
remark
rps_enable
rssi
rssiled
smart_mode
snmpd
snmptrap
speed
status
sync_state
sysinfo
syslog
70
Display ACM feature status
Display alignment mode status
Display ATPC feature status
Display current ATPC max power
Display ATPC power level step size
Display ber test parameters
Enable Trango configuration mode
Display current status for class of service
Display data source for data pattern
Display time of Day
Display default opmode status
Display failover mode status
Display RF Tx/Rx frequency
Display help command
Display Web server (httpd) status
Display current status of inband management
feature
Display radio management port configuration
Check if the license is enable or disable
Display link test parameters (RSSI, MSE, BER)
Display current syslog level
Display loopback Mode
Display system model and serial number
Display MSE (Mean Square Errors) value
Display operation mode status
Display Tx power in dBm
Display product remarks
Display current status of rapid port shutdown
Display RSSI value
Display rssiled status
Display current status of Smart Mode feature
Display SNMP agent daemon (snmpd) status
Display SNMP trap status TEST
Display current modulation and symbol rate(speed)
Display status for different device and ports
Display current synchronization state
Display system information
Display system event log
© 2009 Trango Systems, Inc. All rights reserved.
TrangoLINK® Apex User Manual
targetrssi
telnetd
temp
tftpd
trapip
uptime
utype
version
Chapter 7: Bench Testing
Display target rssi value
Display telnet daemon (telnetd) status
Display current system temperature
Display tftp server (tftpd) status
Display SNMP Trap IP configuration
Display system uptime
Display unit type
Display system software version
Config Mode
To enter Config Mode you must first be in View Mode. Once in View Mode, type the
command “config” and you will be prompted for a password. After successful
authentication the systems enters Config Mode, from which all configuration settings
can be changed.
•
All commands entered without parameters will return the current configured
values — this is similar to View Mode.
•
All configuration changes are applied immediately and do not require reboot
(except the command “speed” in which the settings are applied immediately, but
requires a reboot after “save”).
•
All configuration changes have to be saved in order to be persistent across
reboot. A single “save” command will save all configuration changes.
•
Users can go back to the View Mode by typing in the command “exit”.
Command List in Config Mode
CLI
Ranges
Default Value
acm
<mod>
N/A
on/off
<mse value>
<mse value>
Off
Depending on modulation
Depending on modulation
alignment_mode
on/off
Off
atpc
on/off
Off
atpc_max_power
0-20
17
atpc_step
<1-4> dB
1dB
ber
duration <1-99>
1
bootimage
<0-5>
N/A
config
< export | import | remove | view >
N/A
enable
mse_de
mse_im
© 2009 Trango Systems, Inc. All rights reserved.
71
TrangoLINK® Apex User Manual
Chapter 7: Bench Testing
cos
<pri> <queue>
<0,1,2,4,5,6,7> <0, 0, 1, 1,
2, 2, 3, 3>
date
<0-99><1-12><1-31><0-23><0-60>
Linux System Date (TBD)
debug
N/A
N/A
default_opmode
on/off
Off
exit
N/A
N/A
freq
<17705-19695>
0 (this is exception to the
valid range)
help / ?
N/A
N/A
httpd
<on/off>
On
on/off
<ip address>
<1-4090>
off
172.16.1.1
100
ipconfig
<ip address><netmask><gateway>
ip 192.168.100.100
netmask: 255.255.255.0
gateway: 192.168.100.100
datapatten
<external | internal>
External
license
Key# = 1 or 2
License Key : 20byte Hex Key
linktest
duration <1-99>
Default 1 (if duration not
entered by user)
loglevel
<0> | <0 1> | <0 1 2>
01
loopback
<dig | if | rf_gen | rf_refl | off>
Off
model
N/A
No defaults, read directly
from the system
mse
duration <1-99>
Default 1 (if duration not
entered by user)
ibm
enable
ip
vlanid
72
User needs to reenter
license keys after reset
© 2009 Trango Systems, Inc. All rights reserved.
TrangoLINK® Apex User Manual
Chapter 7: Bench Testing
opmode
<on/off>
Off
passwd
<passwd> <confirm_passwd> (8char)
trango
port
auto negotiate
duplex
<eth > <port#> <autonegotiate |
duplex | enable | pause | | maxrate |
priority |
speed >
<on | off >
<half | full>
both ports configured in the
Auto-Neg Mode
on/off
0-1000 Mbps
<on | off>
On
Full
on (for both GigE copper
and fiber)
0 (0 = 1000Mbps)
Off
0-3
<10 | 100 | 1000>
0
1000
power
0-20
10
reboot
N/A
N/A
remark
<string 1-100bytes>
Trango Broadband Wireless
remove
<license>
N/A
reset
N/A
N/A
rps
<on/off>
Off
rssi
Duration <1-99>
Default 1 (if duration not
entered by user)
rssiled
on/off
On
save
NA
No Auto Save
enable
ingress_rate
pause
priority
speed
show
CLI View Node: trango
CLI Config Node: trango
SNMP read comm.: public
SNMP write comm.: private
Web Interface: trango
snmp trap: trapstr
smart_mode
<on | off>
On
snmpd
<on | off >
On
© 2009 Trango Systems, Inc. All rights reserved.
73
TrangoLINK® Apex User Manual
Chapter 7: Bench Testing
snmptrap
<on | off >
Off
speed
channel_bw
<channel_bw> <modulation>
<5> <qpsk>
0-5 (10,20,30,40,50)
5
qpsk, qam16, qam64,qam128,qam256
Qpsk
status
<modem | fifo | pll | port | all | clear>
N/A
sysinfo
<0-6>
0 (if command executed
without any param)
syslog
<clear>
N/A
targetrssi
<-88 - 25>
-40
temp
N/A
N/A
telnetd
on/off
On
tftpd
on/off
Off
modulation
threshold
<param> <min | max> <value>
<action>
param : 0 rssi, 1 mse, 2 ber, 3 fer, 4
temp, 5 in port util, 6 out port util
min|max: param dependent
action: 0 none, 1 alaram1, 2 alarm2 ,3
snmptrap
Default action is None.
trapip
<Manger 1 | 2 > <valid ipv4 address>
0.0.0.0
Reset will change the prev
configured trapip
uptime
N/A
N/A
utype
N/A
active
version
N/A
N/A
Debug Mode
Debug Mode has additional management port related settings. Debug Mode can only
be entered while in Config Mode. Debug and Config modes share the same password.
The password can be changed from the Config mode only.
To enter Debug Mode, type the command “exit” from Config Mode. To return to View
Mode, enter the command “cli”.
74
© 2009 Trango Systems, Inc. All rights reserved.
TrangoLINK® Apex User Manual
Chapter 7: Bench Testing
Command List in Debug Mode
Cli
Exit
Help
tg_reboot
tg_powercycle
Ping
Route
ssh
Syslog
telnet
<ip address>
N/A
<ip address>
<ip address>
© 2009 Trango Systems, Inc. All rights reserved.
Used to Enter the CLI (trango-view) node
Logout of the system
Display list of commands in the debug node
Reboot the system
Power cycle the system
ping network hosts
Display the current system routing table
ssh into another host
Display current system log
telnet into another host
75
TrangoLINK® Apex User Manual
Chapter 7: Bench Testing
CLI Command Description
acm
SYNTAX
acm enable <on | off>
acm mod <modulation> enable <on | off>
acm mod <modulation> mse_de <value>
acm mod <modulation> mse_im <value>
DEFAULT VALUE
acm enable: Off
acm mod <modulation> enable: on
acm_mod <modulation> mse_de: see table below
acm_mod <modulation> mse_im: see table below
DESCRIPTION
acm is used to turn on the adaptive modulation feature. When
enabled, the current speed may shift to different profile (modulation
based) based on the current MSE value. And predefined MSE
degrade and improve thresholds
ACM is not symmetric and each end can have different profiles at a
given time depending upon the MSE values on each end.
acm mod is used to enable/disable certain profiles. It could also be
used for changing the value for mse degrade table or mse improve.
When the threshold of the MSE reaches certain value from the table,
the profile will change thus, the modulation for rx will be changed.
Note: This feature is not supported in current release
(trango-config)# acm
ACM: on Bandwidth = 80
EXAMPLE
<-------------------- ACM Status --------------------->
ACM mod MSE(improve) MSE(degrade) Enable
QPSK -20.00 -1.00 enabled
16QAM -21.00 -17.00 enabled
32QAM -22.30 -20.00 enabled
64QAM -28.20 -23.30 enabled
128QAM -31.10 -27.20 enabled
acm
RELATED
Default ACM Threshold Values
QAM256
Profile #
76
Modulation
Improve
Next
Degrade
Next
0
QAM256
-32.1
0
-27.2
1
1
QAM64
-29.2
0
-24.3
2
2
QAM16
-26.3
1
-21.3
3
© 2009 Trango Systems, Inc. All rights reserved.
TrangoLINK® Apex User Manual
3
Chapter 7: Bench Testing
QPSK
-23.3
2
-18.5
3
QAM128
Profile #
Modulation
Improve
Next
Degrade
Next
0
QAM128
-32.1
0
-27.2
1
1
QAM64
-29.2
0
-24.3
2
2
QAM32
-26.3
1
-21.3
3
3
QAM16
-23.3
2
-18.5
4
4
QPSK
-20.3
3
-17.1
4
QAM64
Profile #
Modulation
Improve
Next
Degrade
Next
0
QAM64
-29.2
0
-24.3
1
1
QAM32
-26.3
0
-21.3
2
2
QAM16
-23.3
1
-18.5
3
3
QPSK
-20.3
2
-17.1
3
QAM32
Profile #
0
Modulation
QAM32
Improve
Next
Degrade
Next
-26.3
0
-21.3
1
1
QAM16
-23.3
0
-18.5
2
2
QPSK
-20.3
1
-17.1
2
QAM16
Profile #
0
1
Modulation
QAM16
QPSK
Improve
Next
Degrade
Next
-23.3
0
-18.5
1
-20.3
0
-17.1
1
alignment_mode
SYNTAX
alignment_mode < on | off >
DEFAULT VALUE
Off
DESCRIPTION
Alignment mode is used during initial antenna alignment. When
enabled it display the RSSI on the Apex Unit Led at a higher rate
(5/sec) than during normal operation.
ATPC is disabled during alignment_mode. RSSILED should be ON
for alignment_mode
It is recommended to disable alignment_mode during normal
operation.
EXAMPLE
Turn on the alignment_mode
(trango-config)# alignment_mode on
alignment_mode: on
Check current alignment mode setting
(trango-config)# alignment_mode
© 2009 Trango Systems, Inc. All rights reserved.
77
TrangoLINK® Apex User Manual
Chapter 7: Bench Testing
alignment mode: on
RELATED
rssiled, targetrssi
atpc
SYNTAX
atpc <on | off>
DEFAULT VALUE
Off
DESCRIPTION
Used to enable/disable ATPC
ATPC is used to automatically adjust the remote end Apex transmit
power in order to maintain the desired level of RSSI (targetrssi) at the
local end.
ATPC should be configured on both the radios. If one end has ATPC
on and the other end has ATPC off, then ATPC will not work.
User cannot change the power when ATPC in turned on. The system
will adjust the power automatically based on the “maxatpcpower” and
“atpc_step_size”.
When ATPC is turned off, user entered power setting is restored
back.
EXAMPLE
Turn on ATPC
(trango-config)# atpc on
ATPC: on
Check current ATPC configuration
(trango-config)# atpc
ATPC: on
RELATED
atpc_max_power, atpc_step_size, targetrssi, power
atpc_max_power
SYNTAX
atpc_max_power <0-20>
DEFAULT VALUE
Default 17
DESCRIPTION
This command is used to set the upper limit on transmit power during
ATPC.
max atpc power setting is used only when ATPC is on.
EXAMPLE
To set max atpc power
(trango-config)# atpc_max_power 15
ATPC max power: 15.0
Check current ATPC configuration
78
© 2009 Trango Systems, Inc. All rights reserved.
TrangoLINK® Apex User Manual
Chapter 7: Bench Testing
(trango-config)# atpc_max_power
ATPC max power: 15.0
RELATED
atpc, atpc_step_size, power, targetrssi
atpc_step_size
SYNTAX
atpc_step_size <range>
where range = 1-5dB
DEFAULT VALUE
1dB
DESCRIPTION
atpc_step_size controls the Apex power change size during ATPC
operation. The transmit power is changed in step size on the Apex,
unless the maxatcpower or 0 is reached.
EXAMPLE
Set the atpc step size to 2
(trango-config)# atpc_step_size 2
ATPC step size: 2 dB
SUCCESS
RELATED
atpc, atpc_max_power
ber
SYNTAX
ber <duration>
Duration = 1-99sec
DEFAULT VALUE
Duration = 1
DESCRIPTION
ber command is similar to the ”linktest” with internal data source
ONLY. It can be used to test the current link status and can be used
to monitor the link, based on the specified duration. CLI prompt will
not be accessible while linktest is running
The ber shows the following in the output
Lock: Radio Lock Status
1: if all modem locks are locked
0: if any lock is unlocked
RSSI: The current RSSI value
MSE: The current MSE value
BER : The instantaneous BER value (1sec interval)
Txprofile: The current Tx modulation
Rx profile: The current Rx modulation
© 2009 Trango Systems, Inc. All rights reserved.
79
TrangoLINK® Apex User Manual
Chapter 7: Bench Testing
bootimage
SYNTAX
bootimage <upgrade | toggle>
bootimage upgrade <0-4>
0: fpga
1: os
2: fimware
3. pic
4. rfm
bootimage <toggle>
DEFAULT VALUE
N/A
DESCRIPTION
Bootimage is used to upgrade the required software images on the
radio, after the image is transferred on the radio via tftp.
Toggle is used to switch to the alternate software image stored in the
flash. The Apex radio is capable of storing 2 complete set of images
in the flash. See “version” command.
A reboot of the radio is required to load the new image after upgrade.
If upgrading multiple images at a time (0,1,2,3 etc) it is not required to
issue reboot after each upgrade. A single reboot can be issued after
all the images have been successfully upgraded, to reduce the
downtime.
The upgrade time varies depending upon the images and the size of
the image. The progress of the upgrade is indicated to dots …..and
the result is indicated by SUCCESS/FAILURE.
Make sure the file names of the images to be transferred (via tftp) are
in the following format.
0: fpga sys_fpga_xxx
1: os sys_os_xxx
2: firmware sys_fw_xxx
3. pic sys_pic_xxx
4. rfm sys_rfm.bin
EXAMPLE
Upgrade FPGA image
Enable tftpd on the radio
(trango-config)#tftpd on
Transfer the image from PC(windows/linux)
C:\>tftp –I <IP Address of Radio> PUT sys_fpga_xxxx
Issue the upgrade command on the radio
(trango-config)# bootimage upgrade 0
Wait for the completion and the reboot
(trango-config)# reboot
80
© 2009 Trango Systems, Inc. All rights reserved.
TrangoLINK® Apex User Manual
RELATED
Chapter 7: Bench Testing
version, tftpd, reboot
cos
SYNTAX
Cos <priority> <queue>
DEFAULT VALUE
Default Mappings are as shown below
Priority 0: COS Queue = 0
Priority 1: COS Queue = 0
Priority 2: COS Queue = 1
Priority 3: COS Queue = 1
Priority 4: COS Queue = 2
Priority 5: COS Queue = 2
Priority 6: COS Queue = 3
Priority 7: COS Queue = 3
DESCRIPTION
This command is used to map the priority of the incoming packet to
one of the 4 CoS queues. The traffic class of the incoming packet is
mapped 1:1 to the 8 priorities.
The scheduling is strict priority with
COSQ3> COSQ2> COSQ1 > COSQ0
EXAMPLE
To map priority 6 to CoS queue 1
(trango-config)# cos 6 1
COS map priority=6, queue=1
Check current CoS settings
(trango-config)# cos
COS scheduling: strict
Priority 0: COS Queue = 0
Priority 1: COS Queue = 0
Priority 2: COS Queue = 1
Priority 3: COS Queue = 1
Priority 4: COS Queue = 2
Priority 5: COS Queue = 2
Priority 6: COS Queue = 1
Priority 7: COS Queue = 3
RELATED
config
SYNTAX
Config <export | import | remove | view>
DEFAULT VALUE
N/A
DESCRIPTION
This command is used to view/remove and transfer current system
configuration file
© 2009 Trango Systems, Inc. All rights reserved.
81
TrangoLINK® Apex User Manual
Chapter 7: Bench Testing
Export: The option allows the user to create a ASCII file (config.txt) of
the current system configuration, which can then be tftp from the PC,
which the user can edit/print or import to other system
Import: This option allows the user to push a configuration file
(should be in the format as created by export) into the system through
tftp and then issue the “config import” command to apply the settings
from the config.txt file to the system.
Tftpd needs to be enabled/disabled as required.
Remove: This option allows removing the current system
configuration and the settings will be reset to factory defaults.
View: The option displays the current system configuration in ASCII
format on the console.
EXAMPLE
RELATED
To view the current system config (CHANGE THIS)
(trango-config)# config view
CONFIG_VER 20
TX_FREQ 17920
RX_FREQ 19480
RX_FREQUENCY 0.0
CABLELOSS_140 0.0
CABLELOSS_315 0.0
CABLELOSS_915 0.0
POWER 6.0
:
:
Tftpd, reboot, save
date
SYNTAX
date <year> <month> <date> <hour> <min>
year: 0-99
month: 1-12
date: 1-31
hour: 0-24
min: 0-60
DEFAULT VALUE
Linux System Date
DESCRIPTION
Date command is used to set the system date and time. The radio
has a built-in RTC.
EXAMPLE
Set the date to Aug 31st 2007, time to 11.00am
(trango-config)# date 07 08 31 11 00
Fri Aug 31 11:00:00 MDT 2007
RELATED
82
None
© 2009 Trango Systems, Inc. All rights reserved.
TrangoLINK® Apex User Manual
Chapter 7: Bench Testing
debug
SYNTAX
debug
DEFAULT VALUE
N/A
DESCRIPTION
debug command is used to logout from the current node to the debug
prompt. This is only allowed in the configuration node, not view node
EXAMPLE
To switch from “trango-config” to debug prompt
(trango-config)# debug
debug>
RELATED
cli, config, exit
default_opmode
SYNTAX
Default_opmode <on | off>
DEFAULT VALUE
Off
DESCRIPTION
Default opmode command is used to set the default operational
mode. If enabled the radio will be set to “opmode on” after power on.
Opmode settings are dependent upon “default_opmode” after power
up.
EXAMPLE
Set default_opmode on
(trango-config)# default_opmode on
Default Opmode: on
To view current default opmode:
(trango-config)# default_opmode
Default Opmode: off
RELATED
Opmode
exit
SYNTAX
exit
DEFAULT VALUE
N/A
DESCRIPTION
Exit command is used to logout from the current mode to the lower
mode. Typing exit from the debug> mode will close the current
session.
EXAMPLE
To Switch back to “trango-view” node from trango-config
(trango-config)# exit
© 2009 Trango Systems, Inc. All rights reserved.
83
TrangoLINK® Apex User Manual
Chapter 7: Bench Testing
(trango-view)#
To Switch to debug> node from “trango-view” mode
(trango-view)# exit
debug>
To logout from the system
debug>exit
RELATED
clii, config
failover
SYNTAX
failover <on | off>
DEFAULT VALUE
Off
DESCRIPTION
This command is to enable failover (1+1) feature and needs to be
enabled on both the units. After enabling failover, the 2 units will
participate in an election mechanism to elect the Active unit. The
other unit will become the Standby unit. The transmitter for the
Standby unit is muted and the GigE data ports are also disabled.
However both units can receive data from the other side of the link.
The 2 units exchange heartbeat messages between them through the
redundancy serial cable connected. The cable needs to be connected
before enabling this feature.
All set commands on the Active unit are also executed on the
Standby unit to keep the states synchronized. The 2 units have
separate IP Settings/Mgmt Channel and can be upgraded
independent of each other.
In the event of system failure or link loss the Active transfers control
to the Standby, only if the Standby is healthy. If the active unit is
powered down or if the redundancy cable is unplugged then Standby
will assume the role of the Active.
Once the Standby unit takes over, the failed active unit is powered off
and the data ports disabled.
The failed unit is not rebooted and can be used to diagnose the
problem.
Appropriate traps are sent in the case of Active failover, Standby
detection and Standby taking over as Active.
The “status modem” command on the Active unit will display the
current health of the Standby unit.
Standby Lock: 1
Standby ODU 1
Standby RSSI: -41 dBm
The standby is considered healthy when the lock indicator status is 1.
84
© 2009 Trango Systems, Inc. All rights reserved.
TrangoLINK® Apex User Manual
EXAMPLE
To Enable failover
(trango-config)# failover on
Failover mode: on
RELATED
sync, sync_state, utype,
Chapter 7: Bench Testing
freq
SYNTAX
freq <17705-19695>
DEFAULT VALUE
None
DESCRIPTION
This command is used to set the transmit freq, this CLI will also return
the corresponding receive frequency
Only frequency specific to the system model can be set.
The Apex needs to be powered ON for setting the freq.
EXAMPLE
To set tx frequency:
(trango-config)# freq 19480
TX freq: 19480
RX freq: 17920
SUCCESS
To view current frequency setting:
(trango-config)# freq
TX freq: 19480
RX freq: 17920
RELATED
opmode
help / ?
SYNTAX
?
DEFAULT VALUE
N/A
DESCRIPTION
Typing the ? command will display the list of commands in the current
node with a one line description of the commands
EXAMPLE
(trango-config)#?
<Display the List of cmds>
RELATED
N/A
© 2009 Trango Systems, Inc. All rights reserved.
85
TrangoLINK® Apex User Manual
Chapter 7: Bench Testing
httpd
SYNTAX
httpd <on | off>
DEFAULT VALUE
ON
DESCRIPTION
Turn on httpd server for Web interface access.
The Web interface supports both secure (https) and normal (http)
access.
EXAMPLE
To turn off httpd:
(trango-config)# httpd off
httpd: off
SUCCESS
To view current httpd status:
(trango-config)# httpd
httpd: off
RELATED
Ipconfig
ibm
SYNTAX
Ibm <enable | id | ip >
Ibm enable <on | off>
Ibm id <1-4090>
Ibm ip <valid ip address>
Ibm port <0:copper | 1: fiber>
DEFAULT VALUE
Enable : on
Id : 1
IP : 10.10.10.1
DESCRIPTION
This command is used to configure the In-Band Management (IBM)
channel to manage the system.
Both IBM and the Out-of-Band Management (OBM) can be used
together. The management VLAN ID can be configured based on the
user requirement from 1-4090. The IP address for the IBM channel is
independent of the OBM port on the IDU. The 2 IP address needs to
be unique.
“Ibm port” command will take effect only after reboot.
IBM only works through the GigE1 data port on the IDU.
EXAMPLE
86
To disable ibm
(trango-config)# ibm enable off
© 2009 Trango Systems, Inc. All rights reserved.
TrangoLINK® Apex User Manual
Chapter 7: Bench Testing
IBM enable: off
Check current IBM configuration
(trango-config)# ibm
IBM IP address: 10.10.10.1
Inband management: on
IBM vlan ID: 3
RELATED
Ipconfig,
ipconfig
SYNTAX
Ipconfig <IP address> <Subnet mask> <Gateway IP>
DEFAULT VALUE
IP address: 192.168.100.100
Subnet Mask: 255.255.255.0
Default Gateway: 192.168.100.100
DESCRIPTION
This command is used to set IP address, subnet mask and default
gateway for the management port of the system. All three parameter
must be present. The system MAC address can be displayed via this
command.
The change takes place effect immediately.
EXAMPLE
To set IP configuration:
(trango-config)# ipconfig 10.8.1.203 255.255.255.0 10.8.1.1
IP Address: 10.8.1.203
Subnet Mask: 255.255.255.0
Gateway IP: 10.8.1.1
ETH0 MAC: 00:01:DE:00:05:07
SUCCESS
To view current IP configuration:
(trango-config)# ipconfig
IP Address: 10.8.1.203
Subnet Mask: 255.255.255.0
Gateway IP: 10.8.1.1
ETH0 MAC: 00:01:DE:00:05:07
RELATED
trapip, license
datapattern
SYNTAX
datapattern <external | internal>
DEFAULT VALUE
external
DESCRIPTION
Sets datasource for the modem.
© 2009 Trango Systems, Inc. All rights reserved.
87
TrangoLINK® Apex User Manual
Chapter 7: Bench Testing
datapattern can be generated from external source or the internal
data
The datapattern should be set to “external” during normal mode of
operation, otherwise no user data from GigE or the T1 ports will be
transmitted.
EXAMPLE
To set data pattern source:
(trango-config)# datapattern external
Data pattern: External
SUCCESS
(trango-config)# datapattern
Data pattern: External
RELATED
Loopback, ber
license
SYNTAX
License <key#> <key>
Key# is 1 | 2
1 for Speed up to 200Mbps
2 for MAX speed
Key: 20byte hex string
DEFAULT VALUE
No key, Preconfigured for speed < 107Mbps
DESCRIPTION
License key command is used to set the license required for using
higher speed (> 100Mbps, > 200Mbps) on the radio.
The license key is specific to each unit (management port Ethernet
mac address) and is not transferable.
EXAMPLE
Set the license key for speed > 107Mbps
(trango-config)# license1 XXXXX
SUCCESS
RELATED
Speed, ipconfig
linktest
88
SYNTAX
Linktest <duration>
Duration = 1-99sec
DEFAULT VALUE
Duration = 1
© 2009 Trango Systems, Inc. All rights reserved.
TrangoLINK® Apex User Manual
DESCRIPTION
Chapter 7: Bench Testing
Linktest command is used to test the current link status and can be
used to monitor the link, based on the specified duration. CLI prompt
will not be accessible while linktest is running
The linktest shows the following in the output
Lock: Radio Lock Status
1: if all modem locks are locked
0: if any lock is unlocked
RSSI: The current RSSI value
MSE: The current MSE value
BER : The instantaneous BER value (1sec interval)
EXAMPLE
To test the link for 2 sec
(trango-config)# linktest 3
LOCK RSSI MSE BER txProfile rxProfile
1> 1 -21.20 dBm -34.10 dB 0.00E+00 128QAM 128QAM
2> 1 -21.20 dBm -34.10 dB 0.00E+00 128QAM 128QAM
3> 1 -21.20 dBm -34.20 dB 0.00E+00 128QAM 128QAM
RELATED
Mse,rssi
loglevel
SYNTAX
loglevel <0-2>
where 0: Setting
1: Event
2: Status/Statistics
DEFAULT VALUE
Default 0 1
DESCRIPTION
This command is used to set required log levels for system logging.
The log level needs to be set for each activity to be monitored. Once
the loglevels are set, the logs can be monitored through the “syslog”
command
E.g.: Setting the loglevel to 2 will only log Status/Stats.
The loglevel needs to be set to “loglevel 0 1 2” to monitor all logs
EXAMPLE
RELATED
To set the loglevel to monitor all logs
(trango-config)# loglevel 0 1 2
Syslog level = 0 1 2
syslog
loopback
SYNTAX
loopback <off | dig | if | rf_gen | rf_refl>
© 2009 Trango Systems, Inc. All rights reserved.
89
TrangoLINK® Apex User Manual
Chapter 7: Bench Testing
DEFAULT VALUE
Off
DESCRIPTION
This command is to set the loopback mode.
Digital and If loopback doesn’t require a link. It is used to isolate
problems on the RFM/IF only.
Opmode ON is required for the IF loopback mode.
In remote loopback configuration one radio of the link needs to be set
as “rf_gen” and the other radio has to be “rf_refl”.
EXAMPLE
Set loopback mode to if
(trango-config)# loopback if
Loopback Mode: if
SUCCESS
To view current loopback setting:
(trango-config)# loopback
Loopback Mode: if
RELATED
opmode, datapattern
model
SYNTAX
Model
DEFAULT VALUE
N/A
DESCRIPTION
Display system model and serial numbers
EXAMPLE
To display the current model/serial of the system
(trango-config)# model
SYS Model: Apex18-1B
SYS serial ID: 2
Version
RELATED
mse
90
SYNTAX
Mse <duration>
Duration = 1-99sec
DEFAULT VALUE
Duration = 1sec
DESCRIPTION
Mse command is used to monitor the Mean Square Error (MSE) of
the link. It is used to monitor the link, based on the specified duration.
CLI prompt will not be accessible while linktest is running
EXAMPLE
To monitor the MSE for 2sec
© 2009 Trango Systems, Inc. All rights reserved.
TrangoLINK® Apex User Manual
Chapter 7: Bench Testing
(trango-view)# mse 2
1> -33.81
2> -33.86
RELATED
Linktest, rssi
opmode
SYNTAX
opmode <on | off>
DEFAULT VALUE
Off
DESCRIPTION
Opmode command is used to enable the transmitter on the system.
Opmode settings are not persistent across reboot. See
default_opmode command
Freq needs to be set, before opmode can be turned ON
EXAMPLE
Set Opmode on
(trango-config)# opmode on
opmode: on
RELATED
Default_opmode, freq
passwd
SYNTAX
Passwd <new_passwd> <new_passwd>
DEFAULT VALUE
trango
DESCRIPTION
Passwd command is used to change the passwd for the config node.
The change is persistent across reboot.
EXAMPLE
Set the passwd of config node to “apex”
(trango-config)# passwd apex apex
SUCCESS
RELATED
Show passwords, config
Port (ge1 = Copper / ge2 = Fiber)
SYNTAX
port <eth > <port#> <settings> <value>
For Ethernet Port the following commands are valid
port eth <ge1|ge2> <autonegotiate> <on|off>
port eth <ge1|ge2> <duplex> <on|off>
port eth <ge1|ge2> <enable> <on|off>
© 2009 Trango Systems, Inc. All rights reserved.
91
TrangoLINK® Apex User Manual
Chapter 7: Bench Testing
port eth <ge1|ge2> <rate> <0-1000Mbps>
port eth <ge1|ge2> <pause> <on| off>
port eth <ge1|ge2> <priority> <0-3>
port eth <ge1|ge2> <speed> <10 | 100 |1000>
DEFAULT VALUE
For GigE copper and fiber Ports the default settings are
Autonegotiate: ON
Duplex: Full
Enable: ON
Rate: 1000Mbps
Pause: OFF
Priority: 0
Speed: 1000Mbps
For TDM ports the default settings are
Enable: ON
Loopback: OFF
DESCRIPTION
Port command is used to set the GigE copper and fiber ports
EXAMPLE
To set ge1 speed 100Mbps
(trango-config)# port eth ge1 speed 100
Port ge1 speed 100
SUCCESS
To set the ingress rate limit on ge2 to 160Mbps
(trango-config)# port eth ge2 ingress 160
Port ge2 Max rate: 160 Mbps
SUCCESS
RELATED
sysinfo 4
power
SYNTAX
Power <value>
Value = 0-20dBm
DEFAULT VALUE
10dBm
DESCRIPTION
Power command is used to set the transmit power level. The max
value is dependent upon the modulation. See datasheet.
When the user sets the power to 20 for QAM256, it is internally
adjusted to 17 (Max for QAM256).
The user cannot change power when ATPC is ON.
EXAMPLE
92
Set the transmit power to 12dBm
(trango-config)# power 12
© 2009 Trango Systems, Inc. All rights reserved.
TrangoLINK® Apex User Manual
Chapter 7: Bench Testing
Power: 12.0 dBm
SUCCESS
RELATED
atpc
reboot
SYNTAX
Reboot
DEFAULT VALUE
N/A
DESCRIPTION
Reboot command is used to soft reboot the system.
The command doesn’t ask for any confirmation.
User caution is required before reboot.
EXAMPLE
To reboot he radio
(trango-config)# reboot
(trango-config)# Restarting System
RELATED
Reset, speed, bootimage
remark
SYNTAX
Remark <string>
String = 0-100
DEFAULT VALUE
Trango Broadband Wireless
DESCRIPTION
Remark command is used to set any required name/info related with
the Radio.
EXAMPLE
Set remark to “TranoLINK Apex”
(trango-config)# remark TrangoLINK Apex
Remark: TrangoLINK Apex
SUCCESS
RELATED
N/A
remove
SYNTAX
Remove <config>
DEFAULT VALUE
N/A
DESCRIPTION
Remove config command is used to remove the current system
configuration. This might be required during image upgrade process.
© 2009 Trango Systems, Inc. All rights reserved.
93
TrangoLINK® Apex User Manual
Chapter 7: Bench Testing
A reboot is required after remove config.
The command doesn’t ask for any confirmation.
User caution is required before reboot.
EXAMPLE
Delete the current configuration
(trango-config)# remove config
SUCESS
RELATED
Reset
reset
SYNTAX
reset
DEFAULT VALUE
N/A
DESCRIPTION
Reset is used to restore factory default settings.
All currently configured settings will be lost. Reboot of the radio is
required for the new settings to take effect.
The command doesn’t ask for any confirmation.
User caution is required before reboot.
EXAMPLE
Restore factory default settings
(trango-config)# reset
Default setting restored. Issue reboot command for the default to take
effect
SUCCESS
RELATED
Reboot
rps_enable
SYNTAX
rps_enable < on | off>
DEFAULT VALUE
Default: Off
DESCRIPTION
This command is used to configure Rapid Port Shutdown (RPS)
functionality. The RPS setting needs to be the same on both side of
the link for proper operation.
If the RPS is enabled the dataports (GigE) on both side of the link are
immediately shutdown in the event of a link loss in order to provide a
fast switchover mechanism to the external routers and switches.
EXAMPLE
94
To enabled rps
(trango-config)# rps_enable on
© 2009 Trango Systems, Inc. All rights reserved.
TrangoLINK® Apex User Manual
Chapter 7: Bench Testing
Rapid port shutdown: on
RELATED
sysinfo, failover
rssi
SYNTAX
rssi <duration>
Duration = 1-99sec
DEFAULT VALUE
Duration = 1sec
DESCRIPTION
rssi command is used to monitor the received signal level. It is used
to monitor the link, based on the specified duration. CLI prompt will
not be accessible while rssi command is running.
RSSI value will display LO if below –90 and display HI if above -30
EXAMPLE
To monitor the RSSI for 2sec
(trango-view)# rssi 2
1> -48.00
2> -33.86
RELATED
Linktest, mse
rssiled
SYNTAX
rssiled < on | off>
DEFAULT VALUE
On
DESCRIPTION
Turn ON/OFF led for display RSSI value
EXAMPLE
To set rssi led status
(trango-config)# rssiled on
Rssiled: on
SUCCESS
To view rssiled status:
(trango-config)# rssiled
Rssiled: on
RELATED
Rssi, alignment_mode
© 2009 Trango Systems, Inc. All rights reserved.
95
TrangoLINK® Apex User Manual
Chapter 7: Bench Testing
save
SYNTAX
save
DEFAULT VALUE
N/A
DESCRIPTION
Save command is used to save the current system configuration to
the flash, so that system settings are persistent across reboot/power
cycles.
Save command should be used after system setting change.
Otherwise it will be lost after reboot.
Multiple changes can be saved by one save command.
EXAMPLE
Save current system settings.
(trango-config)# save
New configuration saved
SUCCESS
RELATED
N/A
smart_mode
SYNTAX
smart_mode <on/off>
DEFAULT VALUE
ON
DESCRIPTION
This command will enable/disable all port mapping and port vlan,
priority, ibm, etc from the Apex unit.
This configuration will require a reboot command to take effect.
EXAMPLE
Disable smart mode
(trango-config)# smart_mode off
smart_mode: on
SUCCESS
RELATED
ibm
show
96
SYNTAX
show <passwords>
DEFAULT VALUE
N/A
DESCRIPTION
Show passwords command is used to view the currently configured
passwords for different applications/nodes.
© 2009 Trango Systems, Inc. All rights reserved.
TrangoLINK® Apex User Manual
EXAMPLE
Chapter 7: Bench Testing
To display the currently configured passwords on the system
(trango-config)# show passwords
CLI View node: trango
CLI Config node: trango
SNMP Read community: public
SNMP Write community: private
Web interface: trango
snmp trap: trapstr
RELATED
Passwd
snmpd
SYNTAX
snmpd <on | off>
DEFAULT VALUE
ON
DESCRIPTION
Turn on/off snmpd agent on the radio. Must be on to
perform any SNMP get/set.
EXAMPLE
To turn snmpd off
(trango-config)# snmpd off
snmpd: off
SUCCESS
RELATED
Ipconfig, snmptrap, trapip
snmptrap
SYNTAX
Snmptrap <on | off>
DEFAULT VALUE
Off
DESCRIPTION
Snmptrap command is used to enable/disable sending of the traps
from the radio.
Snmpd must be ON for snmptrap to be ON and trapip should be
configured correctly.
EXAMPLE
Set snmptrap ON
(trango-config)# snmptrap on
snmptrap: on
SUCCESS
RELATED
snmpd, trapip, ipconfig
© 2009 Trango Systems, Inc. All rights reserved.
97
TrangoLINK® Apex User Manual
Chapter 7: Bench Testing
speed
SYNTAX
Speed <channel_bw> <modulation>
Channel_bw = <0-5>
0 = 10, 1 = 20, 2 = 28, 3 = 40, 4 = 50, 5 = 80
modulation: qpsk | qam16 | qam32 | qam64 | qam128
|qam256
DEFAULT VALUE
Channel_bw = 5
Modulation = qpsk
DESCRIPTION
Speed command is used to set the required modulation and channel
bandwidth on the modem. The set speed in Mbps is shown in the
output
Freq needs to be set before speed can be configured
A one time license key is required to be set for speed > 100Mbps
*After entering the speed settings, save the config by “save”
command and reboot the systems
EXAMPLE
Set speed channel_bw = 80, modulation = qam256
(trango-config)# speed 5 qam256
symrate: 46.00
modulation: 256QAM
speed: 312.20
bpf: 56
fcc_bw: 80
RELATED
SUCCESS
Freq, license
status
SYNTAX
Status <modem | pll | port | all | clear>
DEFAULT VALUE
N/A
DESCRIPTION
Status command is used to display the current status/ Statistics of
various elements in the radio.
<Status clear> clears all the counters for the ports
<status all> shows the status for modem.fifo, pll, port
EXAMPLE
98
To display the current status and statistics of the radio.
(trango-config)# status all
© 2009 Trango Systems, Inc. All rights reserved.
TrangoLINK® Apex User Manual
Chapter 7: Bench Testing
<------------ Modem Status-------------->
MSE: -34.60 dB
BER: 0.00E+00
FER: 0.00E+00
BER(cumulative): 0.00E+00
FER(cumulative): 0.00E+00
RSSI: -40.40 dBm
Acquire Lock: 1
<------------- PLL Status --------------->
RFM RF PLL: 1
RFM IF PLL: 1
Transmit PLL: 1
Receive PLL: 1
<-------------- Ethernet Port Status ------------------>
Port: ge1 ge2
Status: on on
In Octets: 3072 0
In Ucast Pkt: 0 0
In NUcast Pkt: 12 0
Out Octets: 2834 0
Out Ucast Pkt: 0 0
Out NUcast Pkt: 14 0
CRC Errors: 0 0
Collision: 0 0
<------------------ RF Status --------------------->
IN OUT
Total Data Octets: 0 0
Total Data Pkt: 0 0
Total Drop Pkt: 0 N/A
Port Rate(Mbps): 0 0
Port Util(percent): 0 0
RELATED
Sysinfo
sysinfo
SYNTAX
Sysinfo <0-6>
0=All,
1=Management,
2=Radio Config,
3=System Config,
4=Ethernet,
5= Threshold
6= ACM
DEFAULT VALUE
0
DESCRIPTION
Sysinfo command is used to display the current settings.
EXAMPLE
To display current radio settings
(trango-config)# sysinfo
© 2009 Trango Systems, Inc. All rights reserved.
99
TrangoLINK® Apex User Manual
Chapter 7: Bench Testing
<---------------1. Management-------------->
Remark: TrangoLink Apex
IP addres: 10.14.0.191
Subnet Mask: 255.255.255.0
Gateway IP: 10.14.0.1
Trap IP Address 1: 0.0.0.0
Trap IP Address 2: 0.0.0.0
ETH0 MAC: 00:01:DE:00:00:02
SYS FPGA version: 01050508
SYS OS version: 2p6r14b3D05150801
SYS FW version: 1p0r0D05150801
SYS PIC version: 198
SYS Modem version: 35
SYS RFM version: 14
SYS Model: Apex18-1B
SYS serial ID: 2
<-----------2. Radio Configuration---------->
Freq (TX): 19480.00 (MHz)
Freq (RX): 17920.00 (MHz)
Data pattern: fpga
Loopback mode: off
Power: 10.0 (dBm)
ATPC step size: 1 (dB)
ATPC max power: 17.0 (dBm)
Target RSSI: -40.00 (dBm)
Symbol Rate: 46.00
Modulation: 128QAM
Speed: 289.90 (Mbps)
FCC BW: 80
<----------3. System Configuration---------->
Alignment Mode: off
ATPC: on
ACM: on
Rssiled: on
Opmode: on
Default opmode: on
Rapid port shutdown: on
tftpd: off
httpd: on
snmpd: on
SNMP trap: on
<----------4. Ethernet Configuration---------->
Port: ge1 ge2(fiber)
Enable: enabled enabled
Status: off off
Pause Frame: off off
Auto Nego: on on
Speed(Mbps): 1000 1000
Duplex: full full
Priority: 0 0
Max Rate(Mbps): 1000 1000
<-------------5. Threshold Info------------->
100
© 2009 Trango Systems, Inc. All rights reserved.
TrangoLINK® Apex User Manual
Chapter 7: Bench Testing
min max action
RSSI (dBm): -85.00 -20.00 none
MSE (dB): -45.00 -15.00 none
BER: 0.00E+00 1.00E-04 none
FER: 0.00E+00 1.00E-04 none
Temp (Celsius): -40.0 58.0 none
IN Port util: 0.0 100.0 none
OUT Port util: 0.0 100.0 none
<------------------- 6. ACM Status --------------------->
ACM mod MSE(improve) MSE(degrade) Enable
QPSK -20.00 -1.00 enabled
16QAM -21.00 -17.00 enabled
32QAM -22.30 -20.00 enabled
64QAM -28.20 -23.30 enabled
128QAM -31.10 -27.20 enabled
RELATED
Status
sync
SYNTAX
sync
DEFAULT VALUE
N/A
DESCRIPTION
This command is allowed only on the active unit to initiate
synchronization process with the standby unit.
On detecting the Standby unit the Active unit synchronized the
current system setting with the Standby unit.
EXAMPLE
To synchronize with the standby unit
(trango-config)# sync
success
RELATED
Failover, sync_state
sync_state
SYNTAX
sync_state
DEFAULT VALUE
N/A
DESCRIPTION
This command is used to display the state of the synchronization
between the Active and the Standby unit in the failover (1+1) setup
and N/A for 1+0 setup
On detecting the Standby unit the Active unit synchronized the
© 2009 Trango Systems, Inc. All rights reserved.
101
TrangoLINK® Apex User Manual
Chapter 7: Bench Testing
current system setting with the Standby unit.
EXAMPLE
To display the current synchronization state
(trango-config)# sync_state
Sync State: Synchronized
RELATED
Failover, sync
syslog
SYNTAX
Syslog <clear>
DEFAULT VALUE
N/A
DESCRIPTION
Syslog command is used to display system event log. All the
configuration changes and errors are logged.
The system log is a circular buffer and old entries will be deleted once
the buffer becomes full. The buffer can have 1000 entries.
Syslog clear, is used to clear the log buffer.
EXAMPLE
To display the current system log
(trango-config)# syslog
Current 0:01:08:36.120
0> 0:01:08:33.440 [1] [ATTN] eth_set_port_speed: port 0
speed=1000
RELATED
N/A
targetrssi
SYNTAX
targetrssi <value>
Value = -88 to –25 dBm
DEFAULT VALUE
-40dBm
DESCRIPTION
Targetrssi command is used to set the target signal level expected
during the normal operation of the link.
ATPC tracks the tragetrssi.
EXAMPLE
Set the targetrssi at –45dBm
(trango-config)# targetrssi -45
target rssi: -45.00 dBm
SUCCESS
RELATED
102
atpc, rssi
© 2009 Trango Systems, Inc. All rights reserved.
TrangoLINK® Apex User Manual
Chapter 7: Bench Testing
temp
SYNTAX
temp
DEFAULT VALUE
N/A
DESCRIPTION
Temp command is used to display the current system temperature in
Celsius.
EXAMPLE
To display current temp
(trango-config)# temp
System temperature: 45 celsius
RELATED
N/A
telnetd
SYNTAX
telnetd <on | off>
DEFAULT VALUE
ON
DESCRIPTION
Turn on telnetd daemon. Used to enable or disable telnet access.
EXAMPLE
Enable tftp server
(trango-config)# telnetd on
Telnetd: on
SUCCESS
RELATED
tftpd
SYNTAX
tftpd <on | off>
DEFAULT VALUE
OFF
DESCRIPTION
Turn on tftp server. Used to transfer software images during upgrades
EXAMPLE
Enable tftp server
(trango-config)# tftpd on
tftpd: on
RELATED
SUCCESS
Bootimage
© 2009 Trango Systems, Inc. All rights reserved.
103
TrangoLINK® Apex User Manual
Chapter 7: Bench Testing
threshold
SYNTAX
Threshold <param> <min | max> <value> <action>
Param: <0-5>
0-rssi,
1-mse,
2-ber,
3-fer,
4-temp
5-in port util
6-out port util
action: <0-1>
0-none,
1-snmptrap
DEFAULT VALUE
No action
DESCRIPTION
Threshold command is used to set rules for monitoring the system.
Whenever the threshold exceeds the programmed values the desired
action is set.
EXAMPLE
Set RSSI min threshold to –80 and action to send a snmptrap.
(trango-config)# threshold 0 min -80 3
min = -80
SUCCESS
RELATED
Snmptrap, snmpd, trapip,
trapip
SYNTAX
Trapip < manager 1 | 2 ><ipv4 address>
DEFAULT VALUE
0.0.0.0
DESCRIPTION
Trapip is used to set the ip address of the snmptrap manager
destination. 2 trapip (snmp managers) can be configured.
EXAMPLE
Set manager 1 trapip to 10.8.1.32
(trango-config)# trapip 1 10.8.1.32
Trap IP Address: 10.8.1.32
SUCCESS
RELATED
snmptrap, snmpd
uptime
SYNTAX
104
Uptime
© 2009 Trango Systems, Inc. All rights reserved.
TrangoLINK® Apex User Manual
Chapter 7: Bench Testing
DEFAULT VALUE
N/A
DESCRIPTION
Uptime is used to display how long the system has been running,
since the last reboot/power cycle.
It shows the current time and uptime.
EXAMPLE
To display current uptime
(trango-config)# uptime
20:45:58 up 1:49, load average
RELATED
Date
utype
SYNTAX
Utype <standby>
DEFAULT VALUE
Main
DESCRIPTION
Utype command identifies the current system role.
The valid type in the current release is main. Only the active unit may
use this command to switch the role type. The command is prohibited
when the standby unit is not in a good condition.
EXAMPLE
To display current system type
(trango-config)# utype
utype: main
To switch to standby role:
(trango-config)# utype standby
utype: main
RELATED
failover, sync_state, sync
version
SYNTAX
Version
DEFAULT VALUE
N/A
DESCRIPTION
Version command is used to display the current /previous software
images on the radio. The system is capable of have multiple images.
EXAMPLE
To display the current/previous software version
FPGA version: 02150708
OS version: 2p6r14b3D07250801
FW version: 1p0r0D072508
© 2009 Trango Systems, Inc. All rights reserved.
105
TrangoLINK® Apex User Manual
Chapter 7: Bench Testing
PIC version: 215
Modem version: 35
RFM version: 1D
Previous Image Version:
FPGA version: 02150708
OS version: 2p6r14b3D07200801
FW version: 1p0r0D072108
PIC version: 215
RFM version: 1C
RELATED
106
bootimage
© 2009 Trango Systems, Inc. All rights reserved.
TrangoLINK® Apex User Manual
Appendix B: Specifications
Appendix B: Specifications
Apex 18 ANSI Data Sheet
RADIO PARAMETERS
Frequency of Operation
Band 1A Apex: 17.700 to 18.140 GHz
Band 1B Apex: 19.265 to 19.700 GHz
Channel Size
10 MHz / 20 MHz / 30 MHz / 40 MHz / 50 MHz / 80 MHz
RF Power Output
(max per modulation)
QPSK
16QAM
32QAM
64QAM
128QAM
256QAM
+20 dbm
+20 dbm
+20 dbm
+19 dbm
+18 dbm
+17 dbm
Modulation Format
Selectable from QPSK, 16QAM, 32QAM, 64QAM, 128QAM, 256QAM
Receiver Sensitivity
-64 dBm (256 QAM maximum speed); -90 dBm (QPSK minimum speed)
Compliance
FCC Part 101, Part 15 Class A Unintentional Radiator and Canada SRSP-317.8
Issue 2
Features
ATPC (Automatic Transmit Power Control), Modulation Shifting, LDPC (Low
Density Parity Check) Forward Error Correction
© 2009 Trango Systems, Inc. All rights reserved.
107
TrangoLINK® Apex User Manual
Appendix B: Specifications
Data
Data Throughput/ RSSI
(1E10-6 BER)
Speeds are uni-directional. For aggregate full duplex speeds, multiply numbers below by 2.
Channel
Size
QPSK /
RSSI
Basic Package (no License
Key) = 110 Mbps max.
10 MHz
15 Mbps / - 30 Mbps / 90
84
37 Mbps / - 45 Mbps / - 52 Mbps / - 60 Mbps / 80
78
74
72
License Key 1 = 226 Mbps
maximum *
20 MHz
30 Mbps / - 63 Mbps / 89
82
79 Mbps / - 95 Mbps / - 110 Mbps / 126 Mbps / 70
78
76
-72
License Key 2 = 366 Mbps
maximum *
30 MHz
46 Mbps / - 94 Mbps / 87
80
117 Mbps / 142 Mbps / 165 Mbps / 188 Mbps / -77
-74
-71
68
40 MHz
64 Mbps / - 128 Mbps /
-79
86
159 Mbps / 194 Mbps / 226 Mbps / 258 Mbps / -75
-73
-69
67
50 MHz
77 Mbps / - 156 Mbps /
84
-77
195 Mbps / 236 Mbps / 275 Mbps / 314 Mbps / -74
-71
-68
65
56/80
MHz
88 Mbps / - 179 Mbps /
83
-76
227 Mbps / 272 Mbps / 315 Mbps / 366 Mbps / -72
-70
-66
64
Legend
16QAM /
RSSI
32QAM /
RSSI
Packet Size
Flow Control
Security
Configuration &
Management
64-9600 bytes
Yes, via Ethernet pause frames (GigE mode only)
Authentication uses 2 level password
SSH, HTTPS, Ethernet, SNMPV2
Remote firmware update
Antenna
TFTP client in radio unit
Antenna options
64QAM /
RSSI
128QAM /
RSSI
256QAM /
RSSI
Model/Description
Gain
3 dB Beamwidth
AD18G-2 / 2-foot antenna with slip-fit mount
38.6 dBi
2.0°
AD18G-3 / 3-foot antenna with slip-fit mount
42 dBi
1.3°
AD18G-4 / 4-foot antenna with slip-fit mount
44.5 dBi
1°
Power
Input
-40.5 to –57 VDC
Power Consumption
48 Watts
108
© 2009 Trango Systems, Inc. All rights reserved.
TrangoLINK® Apex User Manual
Appendix B: Specifications
Mechanical & Environmental
Enclosure
Cast Aluminum with RSSI window
Indicators
2-digit LED “in dBm” RSSI indicator for alignment
Dimensions
12 × 12 × 6.8 inches (height × width × length)
Weight
18 lbs
Temperature Range
-40° to 122° F (-40° to +50° C)
Humidity
100% condensing
Interfaces
1 GigaEthernet port, RJ45 (10/100/1000 BaseT)
1 Fiber Optic port (SFP Module required)
1 Ethernet management port, RJ45 (10/100 BaseT)
Power connector
Power-over-Ethernet / 2 pin Molex connector
Redundancy (1+1)
6 pin circular
Antenna Connector
Optional waveguide adapter: WR42 / UBR 220
* Based on purchasable Option Key. Contact sales for more information.
Interface Specifications
Physical
Interface
Bit
rate
Impedance
Line Code
Standard
Jitter transfer and jitter
tolerance requirement
Compliance
Fiber
MM
Optical
1Gb/s
N/A
Multi Mode
IEEE
802.3
IEEE 802.3
Fiber
SM
Optical
1Gb/s
N/A
Single Mode
IEEE
802.3
IEEE 802.3
10 Base-T
Electrical
10
Mb/s
100 Ohm,
balanced
Manchester
4B/5B
IEEE
802.3
IEEE 802.3
100 Base-T
Electrical
100
Mb/s
100 Ohm,
balanced
Manchester
4B/5B
IEEE
802.3
IEEE 802.3
1000 Base-T
Electrical
1 Gb/s
100 Ohm,
balanced
Manchester
4B/5B
IEEE
802.3
IEEE 802.3
© 2009 Trango Systems, Inc. All rights reserved.
109
TrangoLINK® Apex User Manual
Appendix B: Specifications
T/I Curves
The Interference test measures the performance of the receiver under co-channel and
adjacent channel interferers.
80 MHz channel (46 Symbol Rate)
46 QPSK Like Interference T/I
10
5
0
T/I [dB]
-5 0
20
40
60
80
100
120
-10
T/I [dB]
-15
-20
-25
-30
-35
-40
Carrier Separation [MHz]
110
© 2009 Trango Systems, Inc. All rights reserved.
TrangoLINK® Apex User Manual
Appendix B: Specifications
40 MHz channel (35.42 Symbol Rate)
35.42 QAM 256 Like Interference T/I
40
30
T/I [dB]
20
10
T/I [dB]
0
0
20
40
60
80
100
120
-10
-20
-30
Carrier Separation [MHz]
35.42 QPSK Like Interference T/I
10
5
0
T/I [dB]
-5 0
20
40
60
80
100
120
-10
T/I [dB]
-15
-20
-25
-30
-35
-40
Carrier Seperation [MHz]
© 2009 Trango Systems, Inc. All rights reserved.
111
TrangoLINK® Apex User Manual
Appendix B: Specifications
30 MHz channel (24.6 Symbol Rate)
24.6 QAM 256 Like Interference T/I
40
30
T/I [dB]
20
10
T/I [dB]
0
0
20
40
60
80
100
120
100
120
-10
-20
-30
Carrier Separation[MHz]
24.6 QPSK Like Interference T/I
10
0
0
20
40
60
80
T/I [dB]
-10
T/I [dB]
-20
-30
-40
-50
Carrier Separation [MHz]
112
© 2009 Trango Systems, Inc. All rights reserved.
TrangoLINK® Apex User Manual
Appendix B: Specifications
20 MHz channel (17.42 Symbol Rate)
17.42 QAM 128 Like Interference T/I
30
20
T/I [dB]
10
0
T/I [dB]
0
20
40
60
80
100
120
100
120
-10
-20
-30
Carrier Separation [MHz]
17.42 QPSK Like Interference T/I
10
0
0
20
40
60
80
T/I [dB]
-10
T/I [dB]
-20
-30
-40
-50
Carrier Separation [MHz]
© 2009 Trango Systems, Inc. All rights reserved.
113
TrangoLINK® Apex User Manual
Appendix B: Specifications
10 MHz channel (8.32 Symbol Rate)
8.32 QAM 64 Like Interference T/I
30
20
T/I [dB]
10
T/I [dB]
0
0
20
40
60
80
100
120
100
120
-10
-20
-30
Carrier Separation [MHz]
8.32 QPSK Like Interference T/I
10
0
0
20
40
60
80
T/I [dB]
-10
T/I [dB]
-20
-30
-40
-50
Carrier Separation [MHz]
114
© 2009 Trango Systems, Inc. All rights reserved.
TrangoLINK® Apex User Manual
Appendix B: Specifications
Supported Frequencies by Model
APEX11 models:
FCC Part 101
10 MHz Channels
ODU
Channel
RF TX
freq
RF RX
freq
Duplex
ODU
Channel
RF TX
freq
RF RX
freq
Model
Number
in MHz
in MHz
in MHz
Model
Number
in MHz
in MHz
Apex11- 1A
1
10735
11225
490
Apex11-1B
1
11225
10735
Apex11- 1A
2
10745
11235
490
Apex11-1B
2
11235
10745
Apex11- 1A
3
10755
11245
490
Apex11-1B
3
11245
10755
Apex11- 1A
4
10765
11255
490
Apex11-1B
4
11255
10765
Apex11- 1A
5
10775
11265
490
Apex11-1B
5
11265
10775
Apex11- 1A
6
10785
11275
490
Apex11-1B
6
11275
10785
Apex11- 1A
7
10795
11285
490
Apex11-1B
7
11285
10795
Apex11- 1A
8
10805
11295
490
Apex11-1B
8
11295
10805
Apex11- 1A
9
10815
11305
490
Apex11-1B
9
11305
10815
Apex11- 1A
10
10825
11315
490
Apex11-1B
10
11315
10825
Apex11- 1A
11
10835
11325
490
Apex11-1B
11
11325
10835
Apex11- 1A
12
10845
11335
490
Apex11-1B
12
11335
10845
Apex11- 1A
13
10855
11345
490
Apex11-1B
13
11345
10855
Apex11- 1A
14
10865
11355
490
Apex11-1B
14
11355
10865
Apex11- 1A
15
10875
11365
490
Apex11-1B
15
11365
10875
Apex11- 1A
16
10885
11375
490
Apex11-1B
16
11375
10885
Apex11- 1A
17
10895
11385
490
Apex11-1B
17
11385
10895
Apex11- 1A
18
10905
11395
490
Apex11-1B
18
11395
10905
Apex11- 1A
19
10915
11405
490
Apex11-1B
19
11405
10915
Apex11- 1A
20
10925
11415
490
Apex11-1B
20
11415
10925
Apex11- 1A
21
10935
11425
490
Apex11-1B
21
11425
10935
Apex11- 1A
22
10945
11435
490
Apex11-1B
22
11435
10945
Apex11- 2A
23
10955
11445
490
Apex11-2B
23
11445
10955
Apex11- 2A
24
10965
11455
490
Apex11-2B
24
11455
10965
Apex11- 2A
25
10975
11465
490
Apex11-2B
25
11465
10975
Apex11- 2A
26
10985
11475
490
Apex11-2B
26
11475
10985
Apex11- 2A
27
10995
11485
490
Apex11-2B
27
11485
10995
Apex11- 2A
28
11005
11495
490
Apex11-2B
28
11495
11005
Apex11- 2A
29
11015
11505
490
Apex11-2B
29
11505
11015
Apex11- 2A
30
11025
11515
490
Apex11-2B
30
11515
11025
Apex11- 2A
31
11035
11525
490
Apex11-2B
31
11525
11035
Apex11- 2A
32
11045
11535
490
Apex11-2B
32
11535
11045
Apex11- 2A
33
11055
11545
490
Apex11-2B
33
11545
11055
Apex11- 2A
34
11065
11555
490
Apex11-2B
34
11555
11065
Apex11- 2A
35
11075
11565
490
Apex11-2B
35
11565
11075
Apex11- 2A
36
11085
11575
490
Apex11-2B
36
11575
11085
Apex11- 2A
37
11095
11585
490
Apex11-2B
37
11585
11095
Apex11- 2A
38
11105
11595
490
Apex11-2B
38
11595
11105
Apex11- 2A
39
11115
11605
490
Apex11-2B
39
11605
11115
Apex11- 2A
40
11125
11615
490
Apex11-2B
40
11615
11125
Apex11- 2A
41
11135
11625
490
Apex11-2B
41
11625
11135
© 2009 Trango Systems, Inc. All rights reserved.
115
TrangoLINK® Apex User Manual
Appendix B: Specifications
Apex11- 2A
42
11145
11635
490
Apex11-2B
42
11635
11145
Apex11- 2A
43
11155
11645
490
Apex11-2B
43
11645
11155
Apex11- 2A
44
11165
11655
490
Apex11-2B
44
11655
11165
Apex11- 2A
45
11175
11665
490
Apex11-2B
45
11665
11175
ODU
Channel
RF TX
freq
RF RX
freq
Duplex
ODU
Channel
RF TX
freq
RF RX
freq
FCC Part 101
30 MHz Channels
Model
Number
in MHz
in MHz
in MHz
Model
Number
in MHz
in MHz
Apex11- 1A
1
10755
11245
490
Apex11-1B
1
11245
10755
Apex11- 1A
2
10795
11285
490
Apex11-1B
2
11285
10795
Apex11- 1A
3
10835
11325
490
Apex11-1B
3
11325
10835
Apex11- 1A
4
10875
11365
490
Apex11-1B
4
11365
10875
Apex11- 1A
5
10915
11405
490
Apex11-1B
5
11405
10915
Apex11- 2A
6
10955
11445
490
Apex11-2B
6
11445
10955
Apex11- 2A
7
10995
11485
490
Apex11-2B
7
11485
10995
Apex11- 2A
8
11035
11525
490
Apex11-2B
8
11525
11035
Apex11- 2A
9
11075
11565
490
Apex11-2B
9
11565
11075
Apex11- 2A
10
11115
11605
490
Apex11-2B
10
11605
11115
Apex11- 2A
11
11155
11645
490
Apex11-2B
11
11645
11155
ODU
Channel
RF TX
freq
RF RX
freq
Duplex
ODU
Channel
RF TX
freq
RF RX
freq
FCC Part 101
40 MHz Channels
Model
Number
in MHz
in MHz
in MHz
Model
Number
in MHz
in MHz
Apex11- 1A
1
10735
11225
490
Apex11-1B
1
11225
10735
Apex11- 1A
2
10775
11265
490
Apex11-1B
2
11265
10775
Apex11- 1A
3
10815
11305
490
Apex11-1B
3
11305
10815
Apex11- 1A
4
10855
11345
490
Apex11-1B
4
11345
10855
Apex11- 1A
5
10895
11385
490
Apex11-1B
5
11385
10895
Apex11- 2A
6
10935
11425
490
Apex11-2B
6
11425
10935
Apex11- 2A
7
10975
11465
490
Apex11-2B
7
11465
10975
Apex11- 2A
8
11015
11505
490
Apex11-2B
8
11505
11015
Apex11- 2A
9
11055
11545
490
Apex11-2B
9
11545
11055
Apex11- 2A
10
11095
11585
490
Apex11-2B
10
11585
11095
Apex11- 2A
11
11135
11625
490
Apex11-2B
11
11625
11135
Apex11- 2A
12
11175
11665
490
Apex11-2B
12
11665
11175
ODU
Channel
RF TX
freq
RF RX
freq
Duplex
ODU
Channel
RF TX
freq
RF RX
freq
Canada SRSP-310.7
10 MHz Channels
Model
Number
in MHz
in MHz
in MHz
Model
Number
in MHz
in MHz
Apex11- 1A
1
10715
11205
490
Apex11-1B
1
11205
10715
Apex11- 1A
2
10725
11215
490
Apex11-1B
2
11215
10725
Apex11- 1A
3
10735
11225
490
Apex11-1B
3
11225
10735
Apex11- 1A
4
10745
11235
490
Apex11-1B
4
11235
10745
Apex11- 1A
5
10755
11245
490
Apex11-1B
5
11245
10755
Apex11- 2A
6
10765
11255
490
Apex11-2B
6
11255
10765
Apex11- 1A
7
10775
11265
490
Apex11-1B
7
11265
10775
116
© 2009 Trango Systems, Inc. All rights reserved.
TrangoLINK® Apex User Manual
Appendix B: Specifications
Apex11- 1A
8
10785
11275
490
Apex11-1B
8
11275
Apex11- 1A
9
10795
11285
490
Apex11-1B
9
11285
10785
10795
Apex11- 1A
10
10805
11295
490
Apex11-1B
10
11295
10805
Apex11- 1A
11
10815
11305
490
Apex11-1B
11
11305
10815
Apex11- 2A
12
10825
11315
490
Apex11-2B
12
11315
10825
Apex11- 1A
13
10835
11325
490
Apex11-1B
13
11325
10835
Apex11- 1A
14
10845
11335
490
Apex11-1B
14
11335
10845
Apex11- 1A
15
10855
11345
490
Apex11-1B
15
11345
10855
Apex11- 1A
16
10865
11355
490
Apex11-1B
16
11355
10865
Apex11- 1A
17
10875
11365
490
Apex11-1B
17
11365
10875
Apex11- 2A
18
10885
11375
490
Apex11-2B
18
11375
10885
Apex11- 1A
19
10895
11385
490
Apex11-1B
19
11385
10895
Apex11- 1A
20
10905
11395
490
Apex11-1B
20
11395
10905
Apex11- 1A
21
10915
11405
490
Apex11-1B
21
11405
10915
Apex11- 1A
22
10925
11415
490
Apex11-1B
22
11415
10925
Apex11- 1A
23
10935
11425
490
Apex11-1B
23
11425
10935
Apex11- 2A
24
10945
11435
490
Apex11-2B
24
11435
10945
Apex11- 2A
25
10955
11445
490
Apex11-2B
25
11445
10955
Apex11- 2A
26
10965
11455
490
Apex11-2B
26
11455
10965
Apex11- 2A
27
10975
11465
490
Apex11-2B
27
11465
10975
Apex11- 2A
28
10985
11475
490
Apex11-2B
28
11475
10985
Apex11- 2A
29
10995
11485
490
Apex11-2B
29
11485
10995
Apex11- 2A
30
11005
11495
490
Apex11-2B
30
11495
11005
Apex11- 2A
31
11015
11505
490
Apex11-2B
31
11505
11015
Apex11- 2A
32
11025
11515
490
Apex11-2B
32
11515
11025
Apex11- 2A
33
11035
11525
490
Apex11-2B
33
11525
11035
Apex11- 2A
34
11045
11535
490
Apex11-2B
34
11535
11045
Apex11- 2A
35
11055
11545
490
Apex11-2B
35
11545
11055
Apex11- 2A
36
11065
11555
490
Apex11-2B
36
11555
11065
Apex11- 2A
37
11075
11565
490
Apex11-2B
37
11565
11075
Apex11- 2A
38
11085
11575
490
Apex11-2B
38
11575
11085
Apex11- 2A
39
11095
11585
490
Apex11-2B
39
11585
11095
Apex11- 2A
40
11105
11595
490
Apex11-2B
40
11595
11105
Apex11- 2A
41
11115
11605
490
Apex11-2B
41
11605
11115
Apex11- 2A
42
11125
11615
490
Apex11-2B
42
11615
11125
Apex11- 2A
43
11135
11625
490
Apex11-2B
43
11625
11135
Apex11- 2A
44
11145
11635
490
Apex11-2B
44
11635
11145
Apex11- 2A
45
11155
11645
490
Apex11-2B
45
11645
11155
Apex11- 2A
46
11165
11655
490
Apex11-2B
46
11655
11165
Apex11- 2A
47
11175
11665
490
Apex11-2B
47
11665
11175
Apex11- 2A
48
11185
11675
490
Apex11-2B
48
11675
11185
Apex11- 2A
49
11195
11685
490
Apex11-2B
49
11685
11195
ODU
Channel
RF TX
freq
RF RX
freq
Duplex
ODU
Channel
RF TX
freq
RF RX
freq
Canada SRSP-310.7
20 MHz Channels
Model
Number
in MHz
in MHz
in MHz
Model
Number
in MHz
in MHz
Apex11- 1A
1
10720
11210
490
Apex11-1B
1
11210
10720
Apex11- 1A
2
10740
11230
490
Apex11-2B
2
11230
10740
Apex11- 1A
3
10760
11250
490
Apex11-1B
3
11250
10760
Apex11- 1A
4
10780
11270
490
Apex11-2B
4
11270
10780
© 2009 Trango Systems, Inc. All rights reserved.
117
TrangoLINK® Apex User Manual
Appendix B: Specifications
Apex11- 1A
5
10800
11290
490
Apex11-1B
5
11290
10800
Apex11- 1A
6
10820
11310
490
Apex11-2B
6
11310
10820
Apex11- 1A
7
10840
11330
490
Apex11-1B
7
11330
10840
Apex11- 1A
8
10860
11350
490
Apex11-2B
8
11350
10860
Apex11- 1A
9
10880
11370
490
Apex11-1B
9
11370
10880
Apex11- 1A
10
10900
11390
490
Apex11-2B
10
11390
10900
Apex11- 1A
11
10920
11410
490
Apex11-1B
11
11410
10920
Apex11- 1A
12
10940
11430
490
Apex11-2B
12
11430
10940
Apex11- 2A
13
10960
11450
490
Apex11-2B
13
11450
10960
Apex11- 2A
14
10980
11470
490
Apex11-2B
14
11470
10980
Apex11- 2A
15
11000
11490
490
Apex11-2B
15
11490
11000
Apex11- 2A
16
11020
11510
490
Apex11-2B
16
11510
11020
Apex11- 2A
17
11040
11530
490
Apex11-2B
17
11530
11040
Apex11- 2A
18
11060
11550
490
Apex11-2B
18
11550
11060
Apex11- 2A
19
11080
11570
490
Apex11-2B
19
11570
11080
Apex11- 2A
20
11100
11590
490
Apex11-2B
20
11590
11100
Apex11- 2A
21
11120
11610
490
Apex11-2B
21
11610
11120
Apex11- 2A
22
11140
11630
490
Apex11-2B
22
11630
11140
Apex11- 2A
23
11160
11650
490
Apex11-2B
23
11650
11160
Apex11- 2A
24
11180
11670
490
Apex11-2B
24
11670
11180
ODU
Channel
RF TX
freq
RF RX
freq
Duplex
ODU
Channel
RF TX
freq
RF RX
freq
Canada SRSP-310.7
30 MHz Channels
Model
Number
in MHz
in MHz
in MHz
Model
Number
in MHz
in MHz
Apex11- 1A
1
10725
11215
490
Apex11-1B
1
11215
10725
Apex11- 1A
2
10755
11245
490
Apex11-2B
2
11245
10755
Apex11- 1A
3
10785
11275
490
Apex11-1B
3
11275
10785
Apex11- 1A
4
10815
11305
490
Apex11-2B
4
11305
10815
Apex11- 1A
5
10845
11335
490
Apex11-1B
5
11335
10845
Apex11- 1A
6
10875
11365
490
Apex11-2B
6
11365
10875
Apex11- 1A
7
10905
11395
490
Apex11-1B
7
11395
10905
Apex11- 1A
8
10935
11425
490
Apex11-2B
8
11425
10935
Apex11- 2A
9
10965
11455
490
Apex11-2B
9
11455
10965
Apex11- 2A
10
10995
11485
490
Apex11-2B
10
11485
10995
Apex11- 2A
11
11025
11515
490
Apex11-2B
11
11515
11025
Apex11- 2A
12
11055
11545
490
Apex11-2B
12
11545
11055
Apex11- 2A
13
11085
11575
490
Apex11-2B
13
11575
11085
Apex11- 2A
14
11115
11605
490
Apex11-2B
14
11605
11115
Apex11- 2A
15
11145
11635
490
Apex11-2B
15
11635
11145
Apex11- 2A
16
11175
11665
490
Apex11-2B
16
11665
11175
ODU
Channel
RF TX
freq
RF RX
freq
Duplex
ODU
Channel
RF TX
freq
RF RX
freq
Canada SRSP-310.7
40 MHz Channels
Model
Number
in MHz
in MHz
in MHz
Model
Number
in MHz
in MHz
Apex11- 1A
1
10735
11225
490
Apex11-1B
1
11225
10735
Apex11- 1A
2
10775
11265
490
Apex11-2B
2
11265
10775
Apex11- 1A
3
10815
11305
490
Apex11-1B
3
11305
10815
Apex11- 1A
4
10855
11345
490
Apex11-2B
4
11345
10855
118
© 2009 Trango Systems, Inc. All rights reserved.
TrangoLINK® Apex User Manual
Appendix B: Specifications
Apex11- 1A
5
10895
11385
490
Apex11-1B
5
11385
10895
Apex11- 1A
6
10935
11425
490
Apex11-2B
6
11425
10935
Apex11- 2A
7
10975
11465
490
Apex11-2B
7
11465
10975
Apex11- 2A
8
11015
11505
490
Apex11-2B
8
11505
11015
Apex11- 2A
9
11055
11545
490
Apex11-2B
9
11545
11055
Apex11- 2A
10
11095
11585
490
Apex11-2B
10
11585
11095
Apex11- 2A
11
11135
11625
490
Apex11-2B
11
11625
11135
Apex11- 2A
12
11175
11665
490
Apex11-2B
12
11665
11175
ODU
Channel
RF TX
freq
RF RX
freq
Duplex
ODU
Channel
RF TX
freq
RF RX
freq
Model
Number
in MHz
in MHz
in MHz
Model
Number
in MHz
in MHz
Apex11E-1A
1
10735
11225
490
Apex11E-1B
1
11225
10735
Apex11E-1A
2
10775
11265
490
Apex11E-1B
2
11265
10775
Apex11E-1A
3
10815
11305
490
Apex11E-1B
3
11305
10815
Apex11E-1A
4
10855
11345
490
Apex11E-1B
4
11345
10855
Apex11E-1A
5
10895
11385
490
Apex11E-1B
5
11385
10895
Apex11E-1A
6
10935
11425
490
Apex11E-1B
6
11425
10935
Apex11E-2A
7
10975
11465
490
Apex11E-2B
7
11465
10975
Apex11E-2A
8
11015
11505
490
Apex11E-2B
8
11505
11015
Apex11E-2A
9
11055
11545
490
Apex11E-2B
9
11545
11055
Apex11E-2A
10
11095
11585
490
Apex11E-2B
10
11585
11095
Apex11E-2A
11
11135
11625
490
Apex11E-2B
11
11625
11135
ODU
Channel
RF TX
freq
RF RX
freq
Duplex
ODU
Channel
RF TX
freq
RF RX
freq
APEX11E
CEPT 12-06E
40 MHz Channels
ITU-R F.387-10
40 MHz Channels
Model
Number
in MHz
in MHz
in MHz
Model
Number
in MHz
in MHz
Apex11E-1A
1
10735
11225
490
Apex11E-1B
1
11225
10735
Apex11E-1A
2
10775
11265
490
Apex11E-1B
2
11265
10775
Apex11E-1A
3
10815
11305
490
Apex11E-1B
3
11305
10815
Apex11E-1A
4
10855
11345
490
Apex11E-1B
4
11345
10855
Apex11E-1A
5
10895
11385
490
Apex11E-1B
5
11385
10895
Apex11E-1A
6
10935
11425
490
Apex11E-1B
6
11425
10935
Apex11E-2A
7
10975
11465
490
Apex11E-2B
7
11465
10975
Apex11E-2A
8
11015
11505
490
Apex11E-2B
8
11505
11015
Apex11E-2A
9
11055
11545
490
Apex11E-2B
9
11545
11055
Apex11E-2A
10
11095
11585
490
Apex11E-2B
10
11585
11095
Apex11E-2A
11
11135
11625
490
Apex11E-2B
11
11625
11135
Apex11E-2A
12
11175
11665
490
Apex11E-2B
12
11665
11175
© 2009 Trango Systems, Inc. All rights reserved.
119
TrangoLINK® Apex User Manual
Appendix B: Specifications
APEX18 ANSI Models:
FCC
10 MHz Channels
ODU
Channel
RF TX
freq
RF RX
freq
Duplex
ODU
Channel
RF TX
freq
RF RX
freq
Model
Number
in MHz
in MHz
in MHz
Model
Number
in MHz
in MHz
Apex18-1A
1
17705
19265
1560
Apex18-1B
1
19265
17705
Apex18-1A
2
17715
19275
1560
Apex18-1B
2
19275
17715
Apex18-1A
3
17725
19285
1560
Apex18-1B
3
19285
17725
Apex18-1A
4
17735
19295
1560
Apex18-1B
4
19295
17735
Apex18-1A
5
17745
19305
1560
Apex18-1B
5
19305
17745
Apex18-1A
6
17755
19315
1560
Apex18-1B
6
19315
17755
Apex18-1A
7
17765
19325
1560
Apex18-1B
7
19325
17765
Apex18-1A
8
17775
19335
1560
Apex18-1B
8
19335
17775
Apex18-1A
9
17785
19345
1560
Apex18-1B
9
19345
17785
Apex18-1A
10
17795
19355
1560
Apex18-1B
10
19355
17795
Apex18-1A
11
17805
19365
1560
Apex18-1B
11
19365
17805
Apex18-1A
12
17815
19375
1560
Apex18-1B
12
19375
17815
Apex18-1A
13
17825
19385
1560
Apex18-1B
13
19385
17825
Apex18-1A
14
17835
19395
1560
Apex18-1B
14
19395
17835
Apex18-1A
15
17845
19405
1560
Apex18-1B
15
19405
17845
Apex18-1A
16
17855
19415
1560
Apex18-1B
16
19415
17855
Apex18-1A
17
17865
19425
1560
Apex18-1B
17
19425
17865
Apex18-1A
18
17875
19435
1560
Apex18-1B
18
19435
17875
Apex18-1A
19
17885
19445
1560
Apex18-1B
19
19445
17885
Apex18-1A
20
17895
19455
1560
Apex18-1B
20
19455
17895
Apex18-1A
21
17905
19465
1560
Apex18-1B
21
19465
17905
Apex18-1A
22
17915
19475
1560
Apex18-1B
22
19475
17915
Apex18-1A
23
17925
19485
1560
Apex18-1B
23
19485
17925
Apex18-1A
24
17935
19495
1560
Apex18-1B
24
19495
17935
Apex18-1A
25
17945
19505
1560
Apex18-1B
25
19505
17945
Apex18-1A
26
17955
19515
1560
Apex18-1B
26
19515
17955
Apex18-1A
27
17965
19525
1560
Apex18-1B
27
19525
17965
Apex18-1A
28
17975
19535
1560
Apex18-1B
28
19535
17975
Apex18-1A
29
17985
19545
1560
Apex18-1B
29
19545
17985
Apex18-1A
30
17995
19555
1560
Apex18-1B
30
19555
17995
Apex18-1A
31
18005
19565
1560
Apex18-1B
31
19565
18005
Apex18-1A
32
18015
19575
1560
Apex18-1B
32
19575
18015
Apex18-1A
33
18025
19585
1560
Apex18-1B
33
19585
18025
Apex18-1A
34
18035
19595
1560
Apex18-1B
34
19595
18035
Apex18-1A
35
18045
19605
1560
Apex18-1B
35
19605
18045
Apex18-1A
36
18055
19615
1560
Apex18-1B
36
19615
18055
Apex18-1A
37
18065
19625
1560
Apex18-1B
37
19625
18065
Apex18-1A
38
18075
19635
1560
Apex18-1B
38
19635
18075
Apex18-1A
39
18085
19645
1560
Apex18-1B
39
19645
18085
Apex18-1A
40
18095
19655
1560
Apex18-1B
40
19655
18095
Apex18-1A
41
18105
19665
1560
Apex18-1B
41
19665
18105
Apex18-1A
42
18115
19675
1560
Apex18-1B
42
19675
18115
Apex18-1A
43
18125
19685
1560
Apex18-1B
43
19685
18125
Apex18-1A
44
18135
19695
1560
Apex18-1B
44
19695
18135
120
© 2009 Trango Systems, Inc. All rights reserved.
TrangoLINK® Apex User Manual
Appendix B: Specifications
FCC
20 MHz Channels
ODU
Channel
RF TX
freq
RF RX
freq
Duplex
ODU
Channel
RF TX
freq
RF RX
freq
Model
Number
in MHz
in MHz
in MHz
Model
Number
in MHz
in MHz
Apex18-1A
1
17710
19270
1560
Apex18-1B
1
19270
17710
Apex18-1A
2
17730
19290
1560
Apex18-1B
2
19290
17730
Apex18-1A
3
17750
19310
1560
Apex18-1B
3
19310
17750
Apex18-1A
4
17770
19330
1560
Apex18-1B
4
19330
17770
Apex18-1A
5
17790
19350
1560
Apex18-1B
5
19350
17790
Apex18-1A
6
17810
19370
1560
Apex18-1B
6
19370
17810
Apex18-1A
7
17830
19390
1560
Apex18-1B
7
19390
17830
Apex18-1A
8
17850
19410
1560
Apex18-1B
8
19410
17850
Apex18-1A
9
17870
19430
1560
Apex18-1B
9
19430
17870
Apex18-1A
10
17890
19450
1560
Apex18-1B
10
19450
17890
Apex18-1A
11
17910
19470
1560
Apex18-1B
11
19470
17910
Apex18-1A
12
17930
19490
1560
Apex18-1B
12
19490
17930
Apex18-1A
13
17950
19510
1560
Apex18-1B
13
19510
17950
Apex18-1A
14
17970
19530
1560
Apex18-1B
14
19530
17970
Apex18-1A
15
17990
19550
1560
Apex18-1B
15
19550
17990
Apex18-1A
16
18010
19570
1560
Apex18-1B
16
19570
18010
Apex18-1A
17
18030
19590
1560
Apex18-1B
17
19590
18030
Apex18-1A
18
18050
19610
1560
Apex18-1B
18
19610
18050
Apex18-1A
19
18070
19630
1560
Apex18-1B
19
19630
18070
Apex18-1A
20
18090
19650
1560
Apex18-1B
20
19650
18090
Apex18-1A
21
18110
19670
1560
Apex18-1B
21
19670
18110
Apex18-1A
22
18130
19690
1560
Apex18-1B
22
19690
18130
ODU
Channel
RF TX
freq
RF RX
freq
Duplex
ODU
Channel
RF TX
freq
RF RX
freq
FCC
40 MHz Channels
Model
Number
in MHz
in MHz
in MHz
Model
Number
in MHz
in MHz
Apex18-1A
1
17720
19280
1560
Apex18-1B
1
19280
17720
Apex18-1A
2
17760
19320
1560
Apex18-1B
2
19320
17760
Apex18-1A
3
17800
19360
1560
Apex18-1B
3
19360
17800
Apex18-1A
4
17840
19400
1560
Apex18-1B
4
19400
17840
Apex18-1A
5
17880
19440
1560
Apex18-1B
5
19440
17880
Apex18-1A
6
17920
19480
1560
Apex18-1B
6
19480
17920
Apex18-1A
7
17960
19520
1560
Apex18-1B
7
19520
17960
Apex18-1A
8
18000
19560
1560
Apex18-1B
8
19560
18000
Apex18-1A
9
18040
19600
1560
Apex18-1B
9
19600
18040
Apex18-1A
10
18080
19640
1560
Apex18-1B
10
19640
18080
Apex18-1A
11
18120
19680
1560
Apex18-1B
11
19680
18120
ODU
Channel
RF TX
freq
RF RX
freq
Duplex
ODU
Channel
RF TX
freq
RF RX
freq
FCC
80 MHz Channels
Model
Number
in MHz
in MHz
in MHz
Model
Number
in MHz
in MHz
Apex18-1A
1
17740
19300
1560
Apex18-1B
1
19300
17740
Apex18-1A
2
17820
19380
1560
Apex18-1B
2
19380
17820
Apex18-1A
3
17900
19460
1560
Apex18-1B
3
19460
17900
© 2009 Trango Systems, Inc. All rights reserved.
121
TrangoLINK® Apex User Manual
Appendix B: Specifications
Apex18-1A
4
17980
19540
1560
Apex18-1B
4
19540
17980
Apex18-1A
5
18060
19620
1560
Apex18-1B
5
19620
18060
ODU
Channel
RF TX
freq
RF RX
freq
Duplex
ODU
Channel
RF TX
freq
RF RX
freq
Canada
10 MHz Channels
Model
Number
in MHz
in MHz
in MHz
Model
Number
in MHz
in MHz
Apex18-1A
1
17805
19365
1560
Apex18-1B
1
19365
17805
Apex18-1A
2
17815
19375
1560
Apex18-1B
2
19375
17815
Apex18-1A
3
17825
19385
1560
Apex18-1B
3
19385
17825
Apex18-1A
4
17835
19395
1560
Apex18-1B
4
19395
17835
Apex18-1A
5
17845
19405
1560
Apex18-1B
5
19405
17845
Apex18-1A
6
17855
19415
1560
Apex18-1B
6
19415
17855
Apex18-1A
7
17865
19425
1560
Apex18-1B
7
19425
17865
Apex18-1A
8
17875
19435
1560
Apex18-1B
8
19435
17875
Apex18-1A
9
17885
19445
1560
Apex18-1B
9
19445
17885
Apex18-1A
10
17895
19455
1560
Apex18-1B
10
19455
17895
Apex18-1A
11
17905
19465
1560
Apex18-1B
11
19465
17905
Apex18-1A
12
17915
19475
1560
Apex18-1B
12
19475
17915
Apex18-1A
13
17925
19485
1560
Apex18-1B
13
19485
17925
Apex18-1A
14
17935
19495
1560
Apex18-1B
14
19495
17935
Apex18-1A
15
17945
19505
1560
Apex18-1B
15
19505
17945
Apex18-1A
16
17955
19515
1560
Apex18-1B
16
19515
17955
Apex18-1A
17
17965
19525
1560
Apex18-1B
17
19525
17965
Apex18-1A
18
17975
19535
1560
Apex18-1B
18
19535
17975
Apex18-1A
19
17985
19545
1560
Apex18-1B
19
19545
17985
Apex18-1A
20
17995
19555
1560
Apex18-1B
20
19555
17995
Apex18-1A
21
18005
19565
1560
Apex18-1B
21
19565
18005
Apex18-1A
22
18015
19575
1560
Apex18-1B
22
19575
18015
Apex18-1A
23
18025
19585
1560
Apex18-1B
23
19585
18025
Apex18-1A
24
18035
19595
1560
Apex18-1B
24
19595
18035
Apex18-1A
25
18045
19605
1560
Apex18-1B
25
19605
18045
Apex18-1A
26
18055
19615
1560
Apex18-1B
26
19615
18055
Apex18-1A
27
18065
19625
1560
Apex18-1B
27
19625
18065
Apex18-1A
28
18075
19635
1560
Apex18-1B
28
19635
18075
Apex18-1A
29
18085
19645
1560
Apex18-1B
29
19645
18085
Apex18-1A
30
18095
19655
1560
Apex18-1B
30
19655
18095
Apex18-1A
31
18105
19665
1560
Apex18-1B
31
19665
18105
Apex18-1A
32
18115
19675
1560
Apex18-1B
32
19675
18115
Apex18-1A
33
18125
19685
1560
Apex18-1B
33
19685
18125
Apex18-1A
34
18135
19695
1560
Apex18-1B
34
19695
18135
ODU
Channel
RF TX
freq
RF RX
freq
Duplex
ODU
Channel
RF TX
freq
RF RX
freq
Canada
20 MHz Channels
Model
Number
in MHz
in MHz
in MHz
Model
Number
in MHz
in MHz
Apex18-1A
1
17810
19370
1560
Apex18-1B
1
19370
17810
Apex18-1A
2
17830
19390
1560
Apex18-1B
2
19390
17830
Apex18-1A
3
17850
19410
1560
Apex18-1B
3
19410
17850
122
© 2009 Trango Systems, Inc. All rights reserved.
TrangoLINK® Apex User Manual
Appendix B: Specifications
Apex18-1A
4
17870
19430
1560
Apex18-1B
4
19430
17870
Apex18-1A
5
17890
19450
1560
Apex18-1B
5
19450
17890
Apex18-1A
6
17910
19470
1560
Apex18-1B
6
19470
17910
Apex18-1A
7
17930
19490
1560
Apex18-1B
7
19490
17930
Apex18-1A
8
17950
19510
1560
Apex18-1B
8
19510
17950
Apex18-1A
9
17970
19530
1560
Apex18-1B
9
19530
17970
Apex18-1A
10
17990
19550
1560
Apex18-1B
10
19550
17990
Apex18-1A
11
18010
19570
1560
Apex18-1B
11
19570
18010
Apex18-1A
12
18030
19590
1560
Apex18-1B
12
19590
18030
Apex18-1A
13
18050
19610
1560
Apex18-1B
13
19610
18050
Apex18-1A
14
18070
19630
1560
Apex18-1B
14
19630
18070
Apex18-1A
15
18090
19650
1560
Apex18-1B
15
19650
18090
Apex18-1A
16
18110
19670
1560
Apex18-1B
16
19670
18110
Apex18-1A
17
18130
19690
1560
Apex18-1B
17
19690
18130
ODU
Channel
RF TX
freq
RF RX
freq
Duplex
ODU
Channel
RF TX
freq
RF RX
freq
Canada
30 MHz Channels
Model
Number
in MHz
in MHz
in MHz
Model
Number
in MHz
in MHz
Apex18-1A
1
17815
19375
1560
Apex18-1B
1
19375
17815
Apex18-1A
2
17845
19405
1560
Apex18-1B
2
19405
17845
Apex18-1A
3
17875
19435
1560
Apex18-1B
3
19435
17875
Apex18-1A
4
17905
19465
1560
Apex18-1B
4
19465
17905
Apex18-1A
5
17935
19495
1560
Apex18-1B
5
19495
17935
Apex18-1A
6
17965
19525
1560
Apex18-1B
6
19525
17965
Apex18-1A
7
17995
19555
1560
Apex18-1B
7
19555
17995
Apex18-1A
8
18025
19585
1560
Apex18-1B
8
19585
18025
Apex18-1A
9
18055
19615
1560
Apex18-1B
9
19615
18055
Apex18-1A
10
18085
19645
1560
Apex18-1B
10
19645
18085
Apex18-1A
11
18115
19675
1560
Apex18-1B
11
19675
18115
ODU
Channel
RF TX
freq
RF RX
freq
Duplex
ODU
Channel
RF TX
freq
RF RX
freq
Model
Number
in MHz
in MHz
in MHz
Model
Number
in MHz
in MHz
Apex18-1A
1
17840
19400
1560
Apex18-1B
1
19400
17840
Apex18-1A
2
17880
19440
1560
Apex18-1B
2
19440
17880
Apex18-1A
3
17920
19480
1560
Apex18-1B
3
19480
17920
Apex18-1A
4
17960
19520
1560
Apex18-1B
4
19520
17960
Apex18-1A
5
18000
19560
1560
Apex18-1B
5
19560
18000
Apex18-1A
6
18040
19600
1560
Apex18-1B
6
19600
18040
Apex18-1A
7
18080
19640
1560
Apex18-1B
7
19640
18080
Apex18-1A
8
18120
19680
1560
Apex18-1B
8
19680
18120
Canada
40 MHz Channels
© 2009 Trango Systems, Inc. All rights reserved.
123
TrangoLINK® Apex User Manual
Appendix B: Specifications
Canada
50 MHz Channels
ODU
Channel
RF TX
freq
RF RX
freq
Duplex
ODU
Channel
RF TX
freq
RF RX
freq
Model
Number
in MHz
in MHz
in MHz
Model
Number
in MHz
in MHz
Apex18-1A
1
17865
19425
1560
Apex18-1B
1
19425
17865
Apex18-1A
2
17915
19475
1560
Apex18-1B
2
19475
17915
Apex18-1A
3
17965
19525
1560
Apex18-1B
3
19525
17965
Apex18-1A
4
18015
19575
1560
Apex18-1B
4
19575
18015
Apex18-1A
5
18065
19625
1560
Apex18-1B
5
19625
18065
Apex18-1A
6
18115
19675
1560
Apex18-1B
6
19675
18115
APEX18E models:
Australia RALI FX3
55 MHz Channels
ODU
Channel
RF TX freq
RF RX
freq
Duplex
ODU
Channel
RF TX
freq
RF RX
freq
Model
Number
in MHz
in MHz
in MHz
Model
Number
in MHz
in MHz
Apex18E-2A
1
18360
19370
1010
Apex18E-2B
1
19370
18360
Apex18E-2A
2
18415
19425
1010
Apex18E-2B
2
19425
18415
Apex18E-2A
3
18470
19480
1010
Apex18E-2B
3
19480
18470
Apex18E-2A
4
18525
19535
1010
Apex18E-2B
4
19535
18525
Apex18E-2A
5
18580
19590
1010
Apex18E-2B
5
19590
18580
ODU
Channel
RF TX freq
RF RX
freq
Duplex
ODU
Channel
RF TX
freq
RF RX
freq
in MHz
Australia RALI FX3
27.5 MHz Channels
Model
Number
in MHz
in MHz
in MHz
Model
Number
in MHz
Apex18E-2A
1
18305
19315
1010
Apex18E-2B
1
19315
18305
Apex18E-2A
2
18332.5
19342.5
1010
Apex18E-2B
2
19342.5
18332.5
Apex18E-2A
3
18360
19370
1010
Apex18E-2B
3
19370
18360
Apex18E-2A
4
18387.5
19397.5
1010
Apex18E-2B
4
19397.5
18387.5
Apex18E-2A
5
18415
19425
1010
Apex18E-2B
5
19425
18415
Apex18E-2A
6
18442.5
19452.5
1010
Apex18E-2B
6
19452.5
18442.5
Apex18E-2A
7
18470
19480
1010
Apex18E-2B
7
19480
18470
Apex18E-2A
8
18497.5
19507.5
1010
Apex18E-2B
8
19507.5
18497.5
Apex18E-2A
9
18525
19535
1010
Apex18E-2B
9
19535
18525
Apex18E-2A
10
18552.5
19562.5
1010
Apex18E-2B
10
19562.5
18552.5
124
© 2009 Trango Systems, Inc. All rights reserved.
TrangoLINK® Apex User Manual
Appendix B: Specifications
ITU-R 595-6, CEPT 12-03E
55 MHz Channels
ODU
Channel
RF TX
freq
RF RX
freq
Duple
x
ODU
Chann
el
RF TX
freq
RF RX
freq
Model
Number
in MHz
in MHz
in
MHz
Model
Numbe
r
in MHz
in MHz
Apex18E-1A
1
17755
18765
1010
Apex18E-1B
1
18765
17755
Apex18E-1A
2
17810
18820
1010
Apex18E-1B
2
18820
17810
Apex18E-1A
3
17865
18875
1010
Apex18E-1B
3
18875
17865
Apex18E-1A
4
17920
18930
1010
Apex18E-1B
4
18930
17920
Apex18E-1A
5
17975
18985
1010
Apex18E-1B
5
18985
17975
Apex18E-1A
6
18030
19040
1010
Apex18E-1B
6
19040
18030
Apex18E-1A
7
18085
19095
1010
Apex18E-1B
7
19095
18085
Apex18E-1A
8
18140
19150
1010
Apex18E-1B
8
19150
18140
Apex18E-2A
9
18195
19205
1010
Apex18E-2B
9
19205
18195
Apex18E-2A
10
18250
19260
1010
Apex18E-2B
10
19260
18250
Apex18E-2A
11
18305
19315
1010
Apex18E-2B
11
19315
18305
Apex18E-2A
12
18360
19370
1010
Apex18E-2B
12
19370
18360
Apex18E-2A
13
18415
19425
1010
Apex18E-2B
13
19425
18415
Apex18E-2A
14
18470
19480
1010
Apex18E-2B
14
19480
18470
Apex18E-2A
15
18525
19535
1010
Apex18E-2B
15
19535
18525
Apex18E-2A
16
18580
19590
1010
Apex18E-2B
16
19590
18580
Apex18E-2A
17
18635
19645
1010
Apex18E-2B
17
19645
18635
ODU
Channel
RF TX
freq
RF RX
freq
Duplex
ODU
Channel
RF TX
freq
RF RX
freq
Model
Number
in MHz
in MHz
in MHz
Model
Number
in MHz
in MHz
Apex18E-1A
1
17727.5
18737.5
1010
Apex18E-1B
1
18737.5
17727.5
Apex18E-1A
2
17755
18765
1010
Apex18E-1B
2
18765
17755
Apex18E-1A
3
17782.5
18792.5
1010
Apex18E-1B
3
18792.5
17782.5
Apex18E-1A
4
17810
18820
1010
Apex18E-1B
4
18820
17810
Apex18E-1A
5
17837.5
18847.5
1010
Apex18E-1B
5
18847.5
17837.5
Apex18E-1A
6
17865
18875
1010
Apex18E-1B
6
18875
17865
Apex18E-1A
7
17892.5
18902.5
1010
Apex18E-1B
7
18902.5
17892.5
Apex18E-1A
8
17920
18930
1010
Apex18E-1B
8
18930
17920
Apex18E-1A
9
17947.5
18957.5
1010
Apex18E-1B
9
18957.5
17947.5
Apex18E-1A
10
17975
18985
1010
Apex18E-1B
10
18985
17975
Apex18E-1A
11
18002.5
19012.5
1010
Apex18E-1B
11
19012.5
18002.5
Apex18E-1A
12
18030
19040
1010
Apex18E-1B
12
19040
18030
Apex18E-1A
13
18057.5
19067.5
1010
Apex18E-1B
13
19067.5
18057.5
Apex18E-1A
14
18085
19095
1010
Apex18E-1B
14
19095
18085
Apex18E-1A
15
18112.5
19122.5
1010
Apex18E-1B
15
19122.5
18112.5
Apex18E-1A
16
18140
19150
1010
Apex18E-1B
16
19150
18140
Apex18E-1A
17
18167.5
19177.5
1010
Apex18E-1B
17
19177.5
18167.5
Apex18E-2A
18
18195
19205
1010
Apex18E-2B
18
19205
18195
Apex18E-2A
19
18222.5
19232.5
1010
Apex18E-2B
19
19232.5
18222.5
Apex18E-2A
20
18250
19260
1010
Apex18E-2B
20
19260
18250
Apex18E-2A
21
18277.5
19287.5
1010
Apex18E-2B
21
19287.5
18277.5
ITU-R 595-6
CEPT 12-03E
27.5 MHz Channels
© 2009 Trango Systems, Inc. All rights reserved.
125
TrangoLINK® Apex User Manual
Appendix B: Specifications
Apex18E-2A
22
18305
19315
1010
Apex18E-2B
22
19315
18305
Apex18E-2A
23
18332.5
19342.5
1010
Apex18E-2B
23
19342.5
18332.5
Apex18E-2A
24
18360
19370
1010
Apex18E-2B
24
19370
18360
Apex18E-2A
25
18387.5
19397.5
1010
Apex18E-2B
25
19397.5
18387.5
Apex18E-2A
26
18415
19425
1010
Apex18E-2B
26
19425
18415
Apex18E-2A
27
18442.5
19452.5
1010
Apex18E-2B
27
19452.5
18442.5
Apex18E-2A
28
18470
19480
1010
Apex18E-2B
28
19480
18470
Apex18E-2A
29
18497.5
19507.5
1010
Apex18E-2B
29
19507.5
18497.5
Apex18E-2A
30
18525
19535
1010
Apex18E-2B
30
19535
18525
Apex18E-2A
31
18552.5
19562.5
1010
Apex18E-2B
31
19562.5
18552.5
Apex18E-2A
32
18580
19590
1010
Apex18E-2B
32
19590
18580
Apex18E-2A
33
18607.5
19617.5
1010
Apex18E-2B
33
19617.5
18607.5
Apex18E-2A
34
18635
19645
1010
Apex18E-2B
34
19645
18635
Apex18E-2A
35
18662.5
19672.5
1010
Apex18E-2B
35
19672.5
18662.5
126
© 2009 Trango Systems, Inc. All rights reserved.
TrangoLINK® Apex User Manual
Appendix C: Cable Pin outs
Appendix C: Cable Pin outs
Industry Standard CAT-5 Pin outs
Below are pictures depicting the cable pin-outs for Straight-Through and Cross-Over
cables. These images conform to EIA/TIA industry standard for 568-A and 568-B.
o If the first and second pins are orange, the cable is 568-B.
o If the first and second pins are green, the cable is 568-A (Figure 35).
o If one end of the cable is A and the other end is B then it is a Cross-Over cable.
Figure 34: EIA/TIA 586-A & 586-B Pin-Outs
© 2009 Trango Systems, Inc. All rights reserved.
127
TrangoLINK® Apex User Manual
Appendix C: Cable Pin outs
Apex Serial Cable Pin-out
The diagrams below depict TrangoLINK® Apex serial cable pin outs. Please note that
Trango recommends purchasing this cable directly from Trango to ensure proper pin out
and performance of the cable.
Figure 35: Apex Serial Cable Pin-Out
128
© 2009 Trango Systems, Inc. All rights reserved.
TrangoLINK® Apex User Manual
Appendix D: MIB
Appendix D: MIB
The MIB appendix is broken down into the following sections: System, Modem, RF,
GigE, T1, and Traps.
System OIDs
Object ID
Name
Type
Access
Range Limit
Default Value
.1.3.6.1.4.1.5454.1.60.1.1
sysUnitType
DisplayString
RW
0(NO_TYPE),
1(MAIN),
2(STANDBY)
1 (MAIN)
.1.3.6.1.4.1.5454.1.60.1.2.1
sysIFMVer
DisplayString
RO
0..80
N/A
.1.3.6.1.4.1.5454.1.60.1.2.2
sysFPGAVer
DisplayString
RO
0..80
N/A
.1.3.6.1.4.1.5454.1.60.1.2.3
sysFWVer
DisplayString
RO
0..80
N/A
.1.3.6.1.4.1.5454.1.60.1.2.4
sysOSVer
DisplayString
RO
0..80
N/A
.1.3.6.1.4.1.5454.1.60.1.2.5
sysPICVer
DisplayString
RO
0..80
N/A
.1.3.6.1.4.1.5454.1.60.1.2.6
sysModemVer
DisplayString
RO
0..80
N/A
.1.3.6.1.4.1.5454.1.60.1.3.1
sysFPGAPreVer
DisplayString
RO
0..80
N/A
.1.3.6.1.4.1.5454.1.60.1.3.2
sysFWPreVer
DisplayString
RO
0..80
N/A
.1.3.6.1.4.1.5454.1.60.1.3.3
sysOSPreVer
DisplayString
RO
0..80
N/A
.1.3.6.1.4.1.5454.1.60.1.4.1
sysModel
DisplayString
RO
0..80
N/A
.1.3.6.1.4.1.5454.1.60.1.4.2
sysSerialID
INTEGER
RO
0..127
N/A
.1.3.6.1.4.1.5454.1.60.1.5.1
sysMACFPGA
DisplayString
RO
12
N/A
.1.3.6.1.4.1.5454.1.60.1.5.2
sysMACeth1
DisplayString
RO
12
N/A
.1.3.6.1.4.1.5454.1.60.1.5.3
sysMACeth2
DisplayString
RO
12
N/A
.1.3.6.1.4.1.5454.1.60.1.6
sysBackupStatus
INTEGER
RO
0(OFF),
1(READY)
1(READY)
.1.3.6.1.4.1.5454.1.60.1.7.1
sysDefaultOpmode
INTEGER
RW
0(OFF), 1(ON)
0(OFF)
.1.3.6.1.4.1.5454.1.60.1.7.2
sysOpmode
INTEGER
RW
deactivated(0),
activate(1)
deactivated(0)
.1.3.6.1.4.1.5454.1.60.1.8.1
sysReadCommStr
DisplayString
RW
1..32
public
.1.3.6.1.4.1.5454.1.60.1.8.2
sysWriteCommStr
DisplayString
RW
1..32
private
.1.3.6.1.4.1.5454.1.60.1.9
sysSave
INTEGER
RW
1(Save)
N/A
.1.3.6.1.4.1.5454.1.60.1.10
sysReboot
INTEGER
RW
1(Reboot)
N/A
.1.3.6.1.4.1.5454.1.60.1.11
sysResetFactoryDe
fault
INTEGER
RW
1(Reset)
N/A
.1.3.6.1.4.1.5454.1.60.1.12.1
sysIPAddress
IpAddr
RW
16
192.168.100.10
0
.1.3.6.1.4.1.5454.1.60.1.12.2
sysSubnetMask
IpAddr
RW
16
255.255.255.0
.1.3.6.1.4.1.5454.1.60.1.12.3
sysDefaultGateway
IpAddr
RW
16
192.168.100.10
© 2009 Trango Systems, Inc. All rights reserved.
129
TrangoLINK® Apex User Manual
Appendix D: MIB
0
.1.3.6.1.4.1.5454.1.60.1.13
sysRemarks
DisplayString
RW
0..100
TrangoLink
Apex
.1.3.6.1.4.1.5454.1.60.1.14.1
sysTFTPD
INTEGER
RW
Disable(0),
Enable(1)
Disable(0)
.1.3.6.1.4.1.5454.1.60.1.14.2
sysHTTPD
INTEGER
RW
Disable(0),
Enable(1)
Enable(1)
.1.3.6.1.4.1.5454.1.60.1.14.3
sysTelnetD
INTEGER
RW
Disable(0),
Enable(1)
Enable(1)
.1.3.6.1.4.1.5454.1.60.1.15
sysAlignmentMode
INTEGER
RW
0(OFF), 1(ON)
0(OFF)
.1.3.6.1.4.1.5454.1.60.1.16
sysFailover
INTEGER
RO
0(OFF), 1(ON)
0(OFF)
.1.3.6.1.4.1.5454.1.60.1.17.1
sysTrapIpEnable
INTEGER
RW
0(OFF), 1(ON)
0(OFF)
.1.3.6.1.4.1.5454.1.60.1.17.2
sysTrapIpAddress1
IpAddr
RW
16
0.0.0.0
.1.3.6.1.4.1.5454.1.60.1.17.3
sysTrapIpAddress2
IpAddr
RW
16
0.0.0.0
.1.3.6.1.4.1.5454.1.60.1.17.4
sysTrapCommStr
DisplayString
RW
1..32
public
.1.3.6.1.4.1.5454.1.60.1.18.1
sysImageUpgrade
INTEGER
RW
0(FPGA),
1(LINUX),
2(ROOTFS),3(P
IC), 4(RFM)
N/A
.1.3.6.1.4.1.5454.1.60.1.18.2
sysImageToggle
INTEGER
RW
0 (OFF),
1(TOGGLE)
0(OFF)
.1.3.6.1.4.1.5454.1.60.1.19
sysRPSEnable
INTEGER
RW
0(OFF), 1(ON)
0(OFF)
.1.3.6.1.4.1.5454.1.60.1.20
sysSmartMode
INTEGER
RW
0(OFF), 1(ON)
1(ON)
Modem OIDs
Object ID
Name
Access
Range Limit
Default
Value
.1.3.6.1.4.1.5454.1.60.2.1
modemLoopbackMode
INTEGER
RW
0(OFF), DIG(1), IF(2),
RFGEN(3),
RFREFL(4)
0(OFF)
.1.3.6.1.4.1.5454.1.60.2.2
modemDataPattern
INTEGER
RW
FPGA(0), MODEM(1)
0(FPGA)
.1.3.6.1.4.1.5454.1.60.2.3
modemBER
DisplayString
RO
N/A
N/A
.1.3.6.1.4.1.5454.1.60.2.4
modemMSE
INTEGER
RO
N/A
N/A
.1.3.6.1.4.1.5454.1.60.2.5
modemFER
DisplayString
RO
N/A
N/A
.1.3.6.1.4.1.5454.1.60.2.6.1
modemLockStatus
INTEGER
RO
0(NOACQUIRE),
1(INPROGRESS),
2(LOCKED)
N/A
.1.3.6.1.4.1.5454.1.60.2.6.2
modemTimingLock
INTEGER
RO
0(NORMAL),
1(LOCKED)
N/A
.1.3.6.1.4.1.5454.1.60.2.6.3
modemPreambleLock
INTEGER
RO
0(NORMAL),
1(LOCKED)
N/A
130
© 2009 Trango Systems, Inc. All rights reserved.
TrangoLINK® Apex User Manual
Appendix D: MIB
.1.3.6.1.4.1.5454.1.60.2.6.4
modemLDPCLock
INTEGER
RO
0(NORMAL),
1(LOCKED)
N/A
.1.3.6.1.4.1.5454.1.60.2.6.5
modemReserved
INTEGER
N/A
N/A
N/A
.1.3.6.1.4.1.5454.1.60.2.7.1
sysACMEnable
INTEGER
RW
0(OFF), 1(ON)
0(OFF)
.1.3.6.1.4.1.5454.1.60.2.7.2.1
sysACMProfileQPSKEnable
INTEGER
RW
0(OFF), 1(ON)
0(OFF)
.1.3.6.1.4.1.5454.1.60.2.7.2.2
sysACMProfileQAM16Enable
INTEGER
RW
0(OFF), 1(ON)
0(OFF)
.1.3.6.1.4.1.5454.1.60.2.7.2.3
sysACMProfileQAM32Enable
INTEGER
RW
0(OFF), 1(ON)
0(OFF)
.1.3.6.1.4.1.5454.1.60.2.7.2.4
sysACMProfileQAM64Enable
INTEGER
RW
0(OFF), 1(ON)
0(OFF)
.1.3.6.1.4.1.5454.1.60.2.7.2.5
sysACMProfileQAM128Enable
INTEGER
RW
0(OFF), 1(ON)
0(OFF)
.1.3.6.1.4.1.5454.1.60.2.7.2.6
sysACMProfileQAM256Enable
INTEGER
RW
0(OFF), 1(ON)
0(OFF)
.1.3.6.1.4.1.5454.1.60.2.7.3.1
sysACMQPSKMSEImprove
Opaque(Float)
RW
.1.3.6.1.4.1.5454.1.60.2.7.3.2
sysACMQAM16MSEImprove
Opaque(Float)
RW
.1.3.6.1.4.1.5454.1.60.2.7.3.3
sysACMQAM32MSEImprove
Opaque(Float)
RW
.1.3.6.1.4.1.5454.1.60.2.7.3.4
sysACMQAM64MSEImprove
Opaque(Float)
RW
.1.3.6.1.4.1.5454.1.60.2.7.3.5
sysACMQAM128MSEImprove
Opaque(Float)
RW
.1.3.6.1.4.1.5454.1.60.2.7.3.6
sysACMQAM256MSEImprove
Opaque(Float)
RW
.1.3.6.1.4.1.5454.1.60.2.7.4.1
sysACMQPSKMSEDegrade
Opaque(Float)
RW
.1.3.6.1.4.1.5454.1.60.2.7.4.2
sysACMQAM16MSEDegrade
Opaque(Float)
RW
.1.3.6.1.4.1.5454.1.60.2.7.4.3
sysACMQAM42MSEDegrade
Opaque(Float)
RW
.1.3.6.1.4.1.5454.1.60.2.7.4.4
sysACMQAM64MSEDegrade
Opaque(Float)
RW
.1.3.6.1.4.1.5454.1.60.2.7.4.5
sysACMQAM128MSEDegrade
Opaque(Float)
RW
.1.3.6.1.4.1.5454.1.60.2.7.4.6
sysACMQAM256MSEDegrade
Opaque(Float)
RW
RF OIDs
Object ID
Name
Access
Range Limit
Default Value
.1.3.6.1.4.1.5454.1.60.3.1.1
rfATPCEnable
INTEGER
RW
0 (OFF), 1(ON)
0(OFF)
.1.3.6.1.4.1.5454.1.60.3.1.2
rfATPCMaxPower
INTEGER
RW
0-17
10
.1.3.6.1.4.1.5454.1.60.3.1.3
rfATPCStepSize
INTEGER
RW
1~5
17
.1.3.6.1.4.1.5454.1.60.3.2
rfTxFrequency
Opaque(Float)
RW
17705~19695
0
.1.3.6.1.4.1.5454.1.60.3.3
rfRxFrequency
Opaque(Float)
RO
17705~19695
0
.1.3.6.1.4.1.5454.1.60.3.4.1
rfSymrate
INTEGER
RO
0(RATE8),
1(RATE17),
2(RATE26),
3(RATE35),
4(RATE43),
5(RATE49)
1
.1.3.6.1.4.1.5454.1.60.3.4.2
rfModulation
INTEGER
RW
0(QPSK),
1(16Q), 2(32Q),
3(64Q), 4(128Q),
0(QPSK)
© 2009 Trango Systems, Inc. All rights reserved.
131
TrangoLINK® Apex User Manual
Appendix D: MIB
5(256Q)
.1.3.6.1.4.1.5454.1.60.3.4.3
rfBPF
INTEGER
RO
14, 28, 56
56
.1.3.6.1.4.1.5454.1.60.3.4.4
rfChannelsWidth
INTEGER
RW
10(0), 20(1),
28(2), 40(3),
60(4), 80(5)
5(80)
.1.3.6.1.4.1.5454.1.60.3.5
rfPower
INTEGER
RW
0-17
10
.1.3.6.1.4.1.5454.1.60.3.6
rfRSSILEDEnable
INTEGER
RW
0 (OFF), 1(ON)
0(OFF)
.1.3.6.1.4.1.5454.1.60.3.7
rfTemp
INTEGER
RO
-99 - 99
N/A
.1.3.6.1.4.1.5454.1.60.3.8
rfTargetRSSI
INTEGER
RW
(-25)~(-88)
-40
.1.3.6.1.4.1.5454.1.60.3.9
rfRSSI
INTEGER
RO
0-99
N/A
.1.3.6.1.4.1.5454.1.60.3.10.1
rfRFMRFpll
INTEGER
RO
0(NOLOCK),
1(LOCK)
N/A
.1.3.6.1.4.1.5454.1.60.3.10.2
rfRFMIFpll
INTEGER
RO
0(NOLOCK),
1(LOCK)
N/A
.1.3.6.1.4.1.5454.1.60.3.10.3
rfTransmitpll
INTEGER
RO
0(NOLOCK),
1(LOCK)
N/A
.1.3.6.1.4.1.5454.1.60.3.10.4
rfReceviepll
INTEGER
RO
0(NOLOCK),
1(LOCK)
N/A
.1.3.6.1.4.1.5454.1.60.3.11.1
rfInDataOctet
Counter32
RO
0-4294967296
N/A
.1.3.6.1.4.1.5454.1.60.3.11.2
rfInDataPackets
Counter32
RO
0-4294967296
N/A
.1.3.6.1.4.1.5454.1.60.3.11.3
rfInDropPackets
Counter32
RO
0-4294967296
N/A
.1.3.6.1.4.1.5454.1.60.3.11.5
rfInPortUtil
Counter32
RO
0-100
N/A
.1.3.6.1.4.1.5454.1.60.3.12.1
rfOutDataPackets
Counter32
RO
0-4294967296
N/A
.1.3.6.1.4.1.5454.1.60.3.12.2
rfOutDataOctet
Counter32
RO
0-4294967296
N/A
.1.3.6.1.4.1.5454.1.60.3.12.3
rfOutPortUtil
Counter32
RO
0-100
N/A
GigE OIDs
Object ID
Name
Access
Range Limit
Default Value
INTEGER
RW
0(OFF), 1(ON)
1(OFF)
IpAddr
RW
16
172.168.1.1
.1.3.6.1.4.1.5454.1.60.4.1.1
gigeIBMEnable
.1.3.6.1.4.1.5454.1.60.4.1.2
gigeIBMIp
.1.3.6.1.4.1.5454.1.60.4.1.3
gigeIBMVlanID
INTEGER
RW
Jan-90
1
.1.3.6.1.4.1.5454.1.60.4.1.4
gigeIBMPort
INTEGER
RW
0(copper), 1 (fiber)
0(copper)
.1.3.6.1.4.1.5454.1.60.4.2.1
gigeEth1Enable
INTEGER
RW
0(OFF), 1(ON)
1(ON)
.1.3.6.1.4.1.5454.1.60.4.2.2
gigeEth2Enable
INTEGER
RW
0(OFF), 1(ON)
1(ON)
.1.3.6.1.4.1.5454.1.60.4.3.1
gigeEth1Status
INTEGER
RO
0(OFF), 1(ON)
N/A
.1.3.6.1.4.1.5454.1.60.4.3.2
gigeEth2Status
INTEGER
RO
0(OFF), 1(ON)
N/A
.1.3.6.1.4.1.5454.1.60.4.4.1
gigeEth1Speed
INTEGER
RW
10, 100,1000
1000
.1.3.6.1.4.1.5454.1.60.4.4.2
gigeEth2Speed
INTEGER
RO
1000
1000
132
© 2009 Trango Systems, Inc. All rights reserved.
TrangoLINK® Apex User Manual
Appendix D: MIB
.1.3.6.1.4.1.5454.1.60.4.5.1
gigeEth1Duplex
INTEGER
RW
0(HALF), 1(FULL)
1(FULL)
.1.3.6.1.4.1.5454.1.60.4.5.2
gigeEth2Duplex
INTEGER
RO
1(FULL)
1(FULL)
.1.3.6.1.4.1.5454.1.60.4.6.1
gigeEth1priority
INTEGER
RW
0-3
0
.1.3.6.1.4.1.5454.1.60.4.6.2
gigeEth2priority
INTEGER
RW
0-3
0
.1.3.6.1.4.1.5454.1.60.4.7.1
gigeEth1MaxRate
INTEGER
RW
0-1000
1000
.1.3.6.1.4.1.5454.1.60.4.7.2
gigeEth2MaxRate
INTEGER
RW
0-1000
1000
.1.3.6.1.4.1.5454.1.60.4.8.1
gigeEth1PauseFrame
INTEGER
RW
0(OFF), 1(ON)
0(OFF)
.1.3.6.1.4.1.5454.1.60.4.8.2
gigeEth2PauseFrame
INTEGER
RW
0(OFF), 1(ON)
0(OFF)
.1.3.6.1.4.1.5454.1.60.4.9.1
gigeEth1InOctets
Counter32
RO
0-4294967296
N/A
.1.3.6.1.4.1.5454.1.60.4.9.2
gigeEth2InOctets
Counter32
RO
0-4294967296
N/A
.1.3.6.1.4.1.5454.1.60.4.10.1
gigeEth1InUcastPackets
Counter32
RO
0-4294967296
N/A
.1.3.6.1.4.1.5454.1.60.4.10.2
gigeEth2InUcastPackets
Counter32
RO
0-4294967296
N/A
.1.3.6.1.4.1.5454.1.60.4.11.1
gigeEth1InNUcastPackets
Counter32
RO
0-4294967296
N/A
.1.3.6.1.4.1.5454.1.60.4.11.2
gigeEth2InNUcastPackets
Counter32
RO
0-4294967296
N/A
.1.3.6.1.4.1.5454.1.60.4.12.1
gigeEth1InTotalPackets
Counter32
RO
0-4294967296
N/A
.1.3.6.1.4.1.5454.1.60.4.12.2
gigeEth2InTotalPackets
Counter32
RO
0-4294967296
N/A
.1.3.6.1.4.1.5454.1.60.4.13.1
gigeEth1OutOctets
Counter32
RO
0-4294967296
N/A
.1.3.6.1.4.1.5454.1.60.4.13.2
gigeEth2OutOctets
Counter32
RO
0-4294967296
N/A
.1.3.6.1.4.1.5454.1.60.4.14.1
gigeEth1OutUcastPackets
Counter32
RO
0-4294967296
N/A
.1.3.6.1.4.1.5454.1.60.4.14.2
gigeEth2OutUcastPackets
Counter32
RO
0-4294967296
N/A
.1.3.6.1.4.1.5454.1.60.4.15.1
gigeEth1OutNUcastPackets
Counter32
RO
0-4294967296
N/A
.1.3.6.1.4.1.5454.1.60.4.15.2
gigeEth2OutNUcastPackets
Counter32
RO
0-4294967296
N/A
.1.3.6.1.4.1.5454.1.60.4.16.1
gigeEth1OutTotalPackets
Counter32
RO
0-4294967296
N/A
.1.3.6.1.4.1.5454.1.60.4.16.2
gigeEth2OutTotalPackets
Counter32
RO
0-4294967296
N/A
.1.3.6.1.4.1.5454.1.60.4.17.1
gigeEth1CRCErrors
Counter32
RO
0-4294967296
N/A
.1.3.6.1.4.1.5454.1.60.4.17.2
gigeEth2CRCErrors
Counter32
RO
0-4294967296
N/A
.1.3.6.1.4.1.5454.1.60.4.18.1
gigeEth1CollisionErrors
Counter32
RO
0-4294967296
N/A
.1.3.6.1.4.1.5454.1.60.4.18.2
gigeEth2CollisionErrors
Counter32
RO
0-4294967296
N/A
.1.3.6.1.4.1.5454.1.60.4.19.1
gigeEthPriority0COSQueue
INTEGER
RW
0-3
0
.1.3.6.1.4.1.5454.1.60.4.19.2
gigeEthPriority1COSQueue
INTEGER
RW
0-3
0
.1.3.6.1.4.1.5454.1.60.4.19.3
gigeEthPriority2COSQueue
INTEGER
RW
0-3
1
.1.3.6.1.4.1.5454.1.60.4.19.4
gigeEthPriority3COSQueue
INTEGER
RW
0-3
1
.1.3.6.1.4.1.5454.1.60.4.19.5
gigeEthPriority4COSQueue
INTEGER
RW
0-3
2
.1.3.6.1.4.1.5454.1.60.4.19.6
gigeEthPriority5COSQueue
INTEGER
RW
0-3
2
.1.3.6.1.4.1.5454.1.60.4.19.7
gigeEthPriority6COSQueue
INTEGER
RW
0-3
3
.1.3.6.1.4.1.5454.1.60.4.19.8
gigeEthPriority7COSQueue
INTEGER
RW
0-3
3
© 2009 Trango Systems, Inc. All rights reserved.
133
TrangoLINK® Apex User Manual
Appendix D: MIB
.1.3.6.1.4.1.5454.1.60.4.20.1
gigeEth1AutoNegotiate
INTEGER
RW
0(OFF), 1(ON)
1(ON)
.1.3.6.1.4.1.5454.1.60.4.20.2
gigeEth2AutoNegotiate
INTEGER
RW
0(OFF), 1(ON)
1(ON)
Trap OIDs
Object ID
Name
Access
Range Limit
Default Value
.1.3.6.1.4.1.5454.1.60.6.1
trapReboot
RO
N/A
N/A
.1.3.6.1.4.1.5454.1.60.6.2
trapStartUp
RO
N/A
N/A
.1.3.6.1.4.1.5454.1.60.6.3
trapModemLock
RO
0(NORMAL),
1(LOCKED)
N/A
.1.3.6.1.4.1.5454.1.60.6.4.1.1
trapMSEMinThreshold
RO
Current MSE value
N/A
.1.3.6.1.4.1.5454.1.60.6.4.1.2
trapMSEMaxThreshold
RO
Current MSE value
N/A
.1.3.6.1.4.1.5454.1.60.6.4.2.1
trapBERMinThreshold
RO
Current BER value
N/A
.1.3.6.1.4.1.5454.1.60.6.4.2.2
trapBERMaxThreshold
RO
Current BER value
N/A
.1.3.6.1.4.1.5454.1.60.6.4.3.1
trapFERMinThreshold
RO
Current FER value
N/A
.1.3.6.1.4.1.5454.1.60.6.4.3.2
trapFERMaxThreshold
RO
Current FER value
N/A
.1.3.6.1.4.1.5454.1.60.6.4.4.1
trapRSSIMinThreshold
RO
Current RSSI value
N/A
.1.3.6.1.4.1.5454.1.60.6.4.4.2
trapRSSIMaxThreshold
RO
Current RSSI value
N/A
.1.3.6.1.4.1.5454.1.60.6.4.6.1
trapODUTempMinThreshold
RO
Current ODU Temp
N/A
.1.3.6.1.4.1.5454.1.60.6.4.6.2
trapODUTempMaxThreshold
RO
Current ODU Temp
N/A
.1.3.6.1.4.1.5454.1.60.6.4.7.1
trapInPortUtilMaxThreshold
RO
Current In port
untilization
N/A
.1.3.6.1.4.1.5454.1.60.6.4.7.2
trapInPortUtilMinThreshold
RO
Current In port
untilization
N/A
.1.3.6.1.4.1.5454.1.60.6.4.8.1
trapOutPortUtilMaxThreshold
RO
Current Out port
untilization
N/A
.1.3.6.1.4.1.5454.1.60.6.4.8.2
trapOutPortUtilMinThreshold
RO
Current Out port
untilization
N/A
.1.3.6.1.4.1.5454.1.60.6.5.1
trapStandbyLinkDown
RO
N/A
N/A
.1.3.6.1.4.1.5454.1.60.6.5.2
trapStandbyLinkUp
RO
N/A
N/A
.1.3.6.1.4.1.5454.1.60.6.5.3
trapSwitchover
RO
N/A
N/A
.1.3.6.1.4.1.5454.1.60.6.6.1
trapEth1StatusUpdate
RO
0(OFF), 1(ON)
N/A
.1.3.6.1.4.1.5454.1.60.6.6.2
trapEth2StatusUpdate
RO
0(OFF), 1(ON)
N/A
.1.3.6.1.4.1.5454.1.60.6.8
trapDownShift
RO
N/A
N/A
.1.3.6.1.4.1.5454.1.60.6.9
trapRapidPortShutdown
RO
N/A
N/A
134
© 2009 Trango Systems, Inc. All rights reserved.
TrangoLINK® Apex User Manual
Appendix E: Part Numbers
Appendix E: Part Numbers
TrangoLINK Apex Radios
Part #
Description
TLINK-APEX11-1 *
TrangoLINK® Apex ANSI point-to-point system, 11GHz Band 1 *
APEX11-1A
TrangoLINK® Apex, 11GHz, Band 1A, ANSI
APEX11-1B
TrangoLINK® Apex , 11GHz, Band 1B, ANSI
TLINK-APEX11-2 *
TrangoLINK® Apex ANSI point-to-point system, 11GHz Band 2 *
APEX11-2A
TrangoLINK® Apex, 11GHz, Band 2A, ANSI
APEX11-2B
TrangoLINK® Apex , 11GHz, Band 2B, ANSI
TLINK-APEX11E-1 *
TrangoLINK® ApexETSI point-to-point system, 11GHz Band 1 *
APEX11E-1A
TrangoLINK® Apex, 11GHz, Band 1A, ETSI
APEX11E-1B
TrangoLINK® Apex , 11GHz, Band 1B, ETSI
TLINK-APEX11E-2 *
TrangoLINK® ApexETSI point-to-point system, 11GHz Band 2 *
APEX11E-2A
TrangoLINK® Apex, 11GHz, Band 2A, ETSI
APEX11E-2B
TrangoLINK® Apex , 11GHz, Band 2B, ETSI
TLINK-APEX15E-1 *
TrangoLINK® ApexETSI point-to-point system, 15GHz Band 1 *
APEX15E-1A
TrangoLINK® Apex, 15GHz, Band 1A, ETSI
APEX15E-1B
TrangoLINK® Apex , 15GHz, Band 1B, ETSI
TLINK-APEX18-1 *
TrangoLINK® ApexANSI point-to-point system, 18GHz Band 1 *
APEX18-1A
TrangoLINK® Apex, 18GHz, Band 1A, ANSI
APEX18-1B
TrangoLINK® Apex , 18GHz, Band 1B, ANSI
TLINK-APEX18E-1 *
TrangoLINK® ApexETSI point-to-point system, 18GHz Band 1 *
APEX18E-1A
TrangoLINK® Apex, 18GHz, Band 1A, ETSI
APEX18E-1B
TrangoLINK® Apex , 18GHz, Band 1B, ETSI
TLINK-APEX18E-2 *
TrangoLINK® ApexETSI point-to-point system, 18GHz Band 2 *
APEX18E-2A
TrangoLINK® Apex, 18GHz, Band 2A, ETSI
APEX18E-2B
TrangoLINK® Apex , 18GHz, Band 2B, ETSI
TLINK-APEX23-2 *
TrangoLINK® ApexANSI point-to-point system, 23GHz Band 2 *
APEX23-2A
TrangoLINK® Apex, 23GHz, Band 2A, ANSI
APEX23-2B
TrangoLINK® Apex , 23GHz, Band 2B, ANSI
TLINK-APEX23E-2 *
TrangoLINK® ApexETSI point-to-point system, 23GHz Band 2 *
APEX23E-2A
TrangoLINK® Apex, 23GHz, Band 2A, ETSI
APEX23E-2B
TrangoLINK® Apex , 23GHz, Band 2B, ETSI
* - The basic package (2 radios) excluding antennas & accessories
© 2009 Trango Systems, Inc. All rights reserved.
135
TrangoLINK® Apex User Manual
Appendix E: Part Numbers
Accessories
Part #
Description
Antennas
AD11G-2
2 ft diameter, 11 GHz Dish Antenna for TrangoLINK® Apex
AD11G-3
3 ft diameter, 11 GHz Dish Antenna for TrangoLINK® Apex
AD11G-4
4 ft diameter, 11 GHz Dish Antenna for TrangoLINK® Apex
AD11G-6
6 ft diameter, 11 GHz Dish Antenna for TrangoLINK® Apex
AD18G-2
2 ft diameter, 18 GHz Dish Antenna for TrangoLINK® Apex
AD18G-3
3 ft diameter, 18 GHz Dish Antenna for TrangoLINK® Apex
AD18G-4
4 ft diameter, 18 GHz Dish Antenna for TrangoLINK® Apex
AD18G-6
6 ft diameter, 18 GHz Dish Antenna for TrangoLINK® Apex
AD23G-2
2 ft diameter, 23 GHz Dish Antenna for TrangoLINK® Apex
AD23G-3
3 ft diameter, 23 GHz Dish Antenna for TrangoLINK® Apex
AD23G-4
4 ft diameter, 23 GHz Dish Antenna for TrangoLINK® Apex
AD23G-6
6 ft diameter, 23 GHz Dish Antenna for TrangoLINK® Apex
APEX18-Key-1
Software License Key, Upgrade to 200Mbps Full Duplex
APEX18-Key-2
Software License Key, Upgrade to 370Mbps Full Duplex
Speed Upgrade Keys
Power Supplies
P-SUPPLY-1U-48
-48 VDC, 19” 1U Rack Mount Power Supply, 7.5 Amps
P-SUPPLY-DT-48
-48 VDC Universal Desktop Power Supply, 1.5 Amps
POE-APEX-48
Power Over Ethernet Injector box, 48v, Rev A
Other Accessories
APEX18-PRT
1+1 Protection Kit, Data Cable, Vertical Polarized, for TrangoLINK® Apex 18
APEX18-VCMB
1+1 RF Combiner for TrangoLINK® Apex18 ODU, Vertical Polarized
APEX18-HCPL
Horizontal Polarization Transition for APEX18-PRT & APEX18-CPL
CBLDAT-RIU2
Data Cable for 1+ 1 Redundant TrangoLINK® Apex System
CBLDAT-3
Serial Console Cable for APEX
Giga-Srv-EW3
Service, Extended Warranty, 3 years
APEX-FIBERKIT-M
Multi-Mode SFP Fiber Module kit for APEX
APEX-FIBERKIT-S
Single-Mode SFP Fiber Module kit for APEX
APEX-ETHERKIT-1
Ethernet cable plug kit for APEX
136
© 2009 Trango Systems, Inc. All rights reserved.
TrangoLINK® Apex User Manual
Glossary: Acronyms
Glossary: Acronyms
AGC
Automatic Gain Control
ATPC
Automatic Transmit Power Control
BER
Bit Error Rate
BPF
Band Pass Filter
Cat5
Category 5 Cable
COS
Class of Service
dB
Decibel
FCC
Federal Communication Commission
FEC
Forward Error Correction
FPGA
Field Programmable Gate-Array
FTP
File Transfer Protocol
GigE
Gigabit Ethernet
HTTP
HyperText Transfer Protocol
HTTPD
HyperText Transfer Protocol Daemon
HTTPS
HyperText Transfer Protocol Secure
LB
Loopback
LED
Light-emitting Diode
LIU
Line Interface Unit
MSE
Mean Square Error
ODU
Outdoor Unit
Opmode
Operation Mode
OS
Operating System
PIC
A Series of microcontrollers a product of the Microchip Technology
PoE
Power-over-Ethernet
QAM
Quadrature Amplitude Modulation
© 2009 Trango Systems, Inc. All rights reserved.
137
Glossary: Acronyms
QoS
Quality of Service
QPSK
Quadrature Phase Shift Keying
RF
Radio Frequency
RJ-45
Registered Jack - 45
RS-232
Recommended Standard 232
RSSI
Receive Signal Strength Indicator
Rx
Receive
SNMP
Simple Network Management Protocol
SSH
Secure Shell
Sysinfo
System Information
T/I
Threshold to Interference
TFTP
Trivial File Transfer Protocol
TFTPD
Trivial File Transfer Protocol Daemon
Tx
Transmit
VLAN
Virtual Local Area Network
WISP
Wireless Internet Service Provider
138
TrangoLINK® Apex User Manual
© 2009 Trango Systems, Inc. All rights reserved.