1
8390312
V1.0
CO D:L S5 IMPAC
User IManual
Please read and understand all instructions before use.
Retaim this manual for future reference .
IV '
IL
JI
- EQUIPMENT PROTEC"nO
•
•
•
•
•
Before use, ensure that the battery is properly secured in the drill.
Do not place such loads on the drill that it ceases to turn.
Change rotational direction only when drill is not moving.
Use only genuine accessories.
Battery should be protected against impact.Do not open battery.Store
battery in a dry place where it is protected against freezing.
• Battery and charger are specifically designed for use in conjunction with
one another. Charging should be performed exclusively with a charger.
• 00 not expose battery to heater flames.
Danger or explosion! Do not place the battery on a heater or
expose. to direct sunlight for 10. ng periods. AllOW. warm battery to \\\V
cool before charging.
.
~
• When the battery is outside the drill,cover the contacts avoid
-.u.wc
short circuits(e.g. from tools).
• Avoid repeated consecutive rapid charges of the battery.Do not recharge
after using only briefly (e.g; 3 minutes).
• Never discharge the battery completely and recharge occasionally if not
[!]
g
used for a prolonged period.
3-BEFORE USE
If the machine is new, the battery must first be charged.
Battery is housed in the handle.Swing over battery retaining clips and remove
battery from handle.
A new battery or one which has not been used for an extended period
achieves full periormance only after approx.S charging and discharging
cycles.A substantial drop in operating period per charge indicates that the
baterry is worn out and must be replaced.
4- BEFORE USE
~
'.
"
•
•
...
The power voltage supply must conform to that specified on the
rating plate of the rapid charger.
Always inspect batlery charger. cord and plug before use. Always
have damage repaired by a qualified professional.
m
. ml'n
Protect battery charger against humidity and operate only in dry areas.
The supplied charger is suitable for charging batteries only
2
3
II
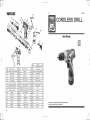
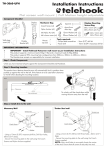
PARTS LIST
Rotation directi on
sw itch wit h lockout
Ba tt ery
reta ining clip
ON /OFF
Sw itch
~--
l
......
Battery
TECHNICAL INFORMATION
Volts
Speed
Square driver
...
If!> I
T"
10 .8V
0-2000/min
1/4"(6.35mm)
AND ACCIDENT ~REVENTIO
m~h;"" "'" 0., '" opo"'''' gf", .hM ~. 00'''''"9
Instructions and the safety instructions completely read and
Strictly adhered to.
•
Caution:The machine can begin to operate immediately when the ON/OFF
switch is aclivated.
•
When replacing drill bit or battery,as well as for transport and storage,always
set Ihe rolalion direction swilch 10 Ihe center position (lock -off).
•
Use caution when inserting long screws: Danger of slippage.
•
Always remove battery before working on machine.
•
Do not leave any tool keys in place.The chuck key should always be kept in the
holder provided on cable sleeve.
4
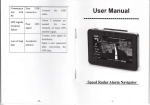
PARTS LIST
Item
Name of part
NO.
l.
sleeve
1
2.
Rataining ring
1
3.
washer
1
4.
spring
I
5.
sleeve bearing
1
6.
washer
I
7.
steel ball
1
B.
Tapping screwnail
4
9.
gear housing
1
10.
steel ball
1
II.
Anvil
1
12.
gearcase assemably
1
13.
trim strip of Enclosure(lower)
1
14.
Enclosure (lower)
1
15.
Reversing Bar
1
16.
Swi tch
1
battery pack clip
17.
1
lB.
belt
1
19.
battery pack
1
20.
Resistance
1
21.
LCD
1
22.
Enclosure (upper)
1
23.
Tapping screwnail
5
24.
LED
1
25.
LED button
1
26.
fish paper
1
27.
t rim strip of Enclosure(upper)
5
1
V1.0
8390312
CORDLESS DRILL
User Manual
/T
~~
0
\~
te
1.
Name of par t
eft-handed thread Scr ewnai
NO 17.
I
18.
34.
35.
Motor
I
Enclosure (upper)
I
Radi a t e pipe
Shaft Hous i ng
I
36.
Gearbox
I
37. trim strip of Enclosure (upper
I
38.
Resistance
I
2 39.
contraction pipe
6
I
1
2.
Drill Chuck
I
19.
Shaft
3.
Tappi ng Screw
2
20.
Runner Axl e
4.
Cover Iloard
I
21.
Lock self core
I
40.
Tapping Screw
8
5.
Plate Spr ing
I
22.
Lock self circ l e
I
4 1.
Enclosure (lower)
I
Plasti c Cover Board
I
23. Lock self star gear holder
6.
7.
Torque Setting Ring
I
24.
8.
Plast i c Pivot Ci rc l e
I
25. Powder Metal lurgical Gear
9.
Compressjon Spring
1
26.
Middle star gear holder
10.
Washer
I
27.
I !.
Runner A:A I e
8
12.
Steel Ball
13.
Circlip
14.
Washer
15.
Steel Ball
16.
Washer
8
1 42. trim strip of Enclosure(lower) I
Reversing Bar
I
3 44.
Switch
I
1 45.
batter y pack
1
Plastic Gear
3 46.
belt
I
28.
Washer
1 47.
Red Wire
2
8
29.
Serewnai l
2 48.
Black Wire
2
1
30.
Washer
2 49.
I
31.
Gearbox Cover
I
15 32.
Tapping Screw
3 51.
I
33.
I nner Gear Ring
Motor Gear
I
I
43.
50.
52.
battery pack clip
LCD
1
I
LCD button
1
LCD cover
I
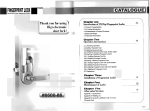
Please read and understand all instructions before use.
Retain this manual for future reference.
IL
JI
GENERAL SAFETY RULES
' " WARNING! Read all instructions. Failure to follow
~ all instructions listed below may result in electric
shock, fire and/or serious injury. The term "power
tool" in all of the warnings listed below refers to your
mains·operated (corded) power tool or battery·operated
(cordless) power tool.
SAVE THESE INSTRUCTION
1 Work area
1) Keep work area clean and welilil Cluttered or dark
areas invite accidents.
2) Do not operate powertoolsin explosive
atmospheres. such as in the presence ofDammable
liquids, gases or dust. Power tools create sparks which
may ignite the dust or fumes.
3) Keep children and bystanders awavwhile
operating apowertool. Distractions can cause you to
lose control.
2 Electrical safelY
11 Power tool plugs must match the outlet. Never
modifvthe plug in anyway. Do not use any adapter
plugs with earthed [grounded) power tools.
Unmodified plugs and matching outlets will reduce risk
of electric shock.
2) Avoid bodY contact with eanhed or grounded
surfaces, such as pipes, radiators, ranges and
refrigerators. There is an increased risk of electric
shock if your body is earthed or grounded.
31 Do not expose power tools to rain orwet
conditions. Water entering a power tool will increase
the risk of electric shock.
4) Do not abuse the cord. Never use the cord for
carrying, pulling or unplugging the power tool. Keep
cord awavfrom heat, Oil, sharp edges or moving
pans. Damaged or entangled cords increase the risk of
electric shock.
51 When operating apowertool outdoors. use an
extension cord suitable for outdoor use. Use of a cord
suitable for outdoor use reduces the risk of electric
shock.
61 If operating apower tool in adamp location is
unavoidable, use aresidual current device (RCDI
protected supplV. Use of an RCD reduces the risk of
electric shock.
3 Personal safelY
1) Stay alert, watch whatvou are doing and use
common sense when operating apower tool. Do not
use apower tool while you are tired or under the
influence of drugs, alcohol or medication. A moment
of inattention while operating power tools may result in
serious personal injury.
2) Use safety equipmenl Alwavs wear eve
protection. Safety equipment such as dust mask, non·
skid safety shoes, hard hat, or hearing protection used
for appropriate conditions will reduce personal injuries.
2
3) Avoid accidental staning. Ensure the switch is in
the on-position before plugging in. Carrying power
tools with your finger on the switch or plugging in
power tools that have the switch on invites accidents.
41 Remove any adjusting key or wrench before
turning the powertool on. A wrench or a key left
attached to a rotating part of the power tool may result
in personal injury.
5) Do not ovelTeach. Keep proper footing and
balance at all times. This enables better control of the
power tool in unexpected situations.
6) Dress properlv. Do not wear loose clothing or
jewellerv. Keep your hair, clothing and gloves away
from moving parts. Loose clothes, jewellery or long
hair can be caught in moving parts.
11 If devices are provided for the connection of dust
extraction and collection facilities, ensure these are
connected and prOperly used. Use of these devices
If'.
Tungsten carbide drill bits should alwavs be
~ used for concrete and masonry. When drilling
the variable clutch to a higher position to reach the best
result.
in metal, onlv use HSS drill bits in good condition.
When screw-driving, applv asmall quantity of
liquid soap or similarto the screw threads to ease
insertion.
3.1 CANNOT nnHE BATTERY INTO THE BATTERY
CHARGER. WHYiI
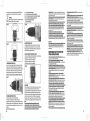
9. AUTOMATIC SPINDLE LOCK (SEE II
The automatic spindle lock allows you to use it as
a regular screwdriver. You can give an extra twist
to firmly tighten a screw, loosen a very tight screw
or continue working when the battery energy has
expired. For manual screwdriver purposes, the chuck is
automatically locked when the tool is off.
Figl
can reduce dust·related hazards.
4 Power tool use and care
11 Do not force the power tool. Use the correct power
tool for YOUr application. The correct power tool will
21 Do not use the power tool if the switch does
notturn iton and off. Any power tool that cannot be
31 Disconnectthe plug from the powersourceand/or
the battery pack from the powertool before making
any adjustments. changing accessories, or storing
powertools. Such preventive safety measures reduce
the risk of starting the power tool accidentally.
4) Store idle power tools out Of the reach of children
and do not allow persons unfamiliar with the power
tool or these instructions to operate the power tool.
Power tools are dangerous in the hands of untrained
users.
51 Maintain powertools. Check for misalignment
or binding of moving parts. breakage of parts and
any other condition that may anectthe power tool's
operation. If damaged, have the power tool repaired
before use. Many accidents are caused by poorly
maintained power tools.
61 Keep cutting tools sharp and clean. Properly
maintained cutting tools with sharp cutting edges are
less likely to bind and are easier to control.
1) Use the power tOOl. accessories and tool bits etc.
in accordance with these instructions, taking into
account the working conditions and the work to
be performed. Use of the power tool for operations
different from those intended could result in a
hazardous situation.
5 Battervtool use and care
1) Ensure the switch is in the on position before
inserting battery pack. Inserting the battery pack into
power tools that have the switch on invites accidents.
21 Recharge onlv with the charger specified bv the
4. REASONS FOR DIFFERENT BATTERY PACK WORKING
TIMES.
Charging time issues, as above, and having not used
a battery pack for a prolonged time will reduce the
working life of the battery pack. This can be corrected
after several charge and discharge operations by
charging &working with your drill. Heavy working
conditions such as large screws into hard wood will use
up the battery pack energy faster than lighter working
conditions. Do not re·charge your battery pack below
OOC and above 450 C as this will affect performance.
5. HOT BATTERY PACK PROTECnON
do the job better and safer at the rate for which it was
designed.
controlled with the switch is dangerous and must be
repaired.
The battery can be inserted into the charger only in
one direction. Turn the battery around until it can be
inserted into the slot.
10. DISPOSAL OF AN EXHAUSTED BATTERY PACK
To preserve natural resources, please recycle or
dispose of the battery pack properly. This battery pack
contains lithium batteries. Consult your local waste
authority for information regarding available recycling
and/or disposal options. Discharge your battery pack
by operating your drill, then remove the battery pack
from the drill housing and cover the battery pack
connections with heavy duty adhesive tape to prevent
short circuit and energy discharge. Do not attempt to
open or remove any of the components.
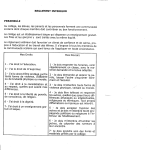
PROBLEM SOLUTION
1. WHY DOES THE DRill NOT TURN ON WHEN YOU PRESS
THESWITCHii
The forward/reverse rotation control, which is on top of
the trigger, is positioned in the lock function. Unlock the
forward/reverse rotation control by putting it into the
required rotation position. Push the trigger and the drill
will start to rotate.
2. THE DRill STOPS BEFORE THE SCREW IS COMPLETElY
TIGHTENED. WHYiI
The normal charging temperature is between OOC and
450 C. When the battery pack is too hot, it automatically
starts a HOT battery pack delay, and suspends charging
until it has reached the correct temperature. The
charging process will then automatically begin.
When the battery pack is over 700 C during operation,
the drill stops working automatically. Allow the drill to
cool down for re·operation.
6. BATTERY PACK OVERLOAD AND LOW-VOLTAGE
PROTECTION
When max. allowable battery current is exceeded
during working, the overload protection is activated to
protect the battery against overheating.
When the battery is under normal voltage during
working, the power tool will cease to operate.
MAINTENANCE
Yourtool requires no additional lubrication or
maintenance.
There are no user serviceable parts in your tool, battery
pack or charger. Never use water or chemical cleaners
to clean your tool. Wipe clean with a dry cloth. Always
store your tool in a dry place. Keep the motor ventilation
slots clean. Occasionally you may see sparks through
the ventilation slots. This is normal and will not damage
your power tool.
Verify the torque position of the variable clutch, you
can find the variable clutch between the chuck and the
drill body. Position 1 is the lowest torque (screw driving
force) and position 20 is the highest torque (screw
driving force). Position 21 is for drill operation. Regulate
1
IL
JI
to remove screws or release a jammed drill bit. When
the selector is in the center position, the switch is
locked.
!.\.
Warning:
ill Never change the direction of rotation when the
chuck is rotating. Wait until it has stopped.
1 ·4 for driving small screws
5· 8 for driving screws into soft material
9 ·12 for driving screws into soft and hard material
13· 16 for driving screws into hard wood
17 • 20 for driving larger screws
~ for heavy drilling
FigD
manufacturer. A charger that is suitable for one type
of battery pack may create a risk of fire when used with
another battery pack.
31 Use power tools only with specifically designated
battery packs. Use of any other battery packs may
create a risk of injury and fire.
41 When battery pack is not in use, keep it away from
other metal objects like paper cliPs. coins. keys.
nails, screws or other small metal objects, that can
make aconnection from one terminal to another.
to the spinning chuck or drill bit. Your hand may be
lacerated.
10. When installing adrill bit, insen the shank of the
bit well within the jaws of the chuck. If the bit is not
inserted deep enough, the grip of the jaws over the bit is
reduced and the loss of control is increased.
11. Do not use dull or damaged bits and accessories.
Dull or damaged bits have a greater tendency to bind in
the workpiece.
Shorting the battery terminals together may cause
burns or a fire.
12. When removing the bit from the tool avoid contact
with skin and use proper protective gloves when
grasping the bit or accessory. Accessories may be hot
5) Under abusive conditions, liquid may be
ejected from the battery; avoid contact. If contact
accidentally occurs. nush with water. If liquid
contacts eyes. additionally seek medical help. Liquid
13. Check to see that keys and adjusting wrenches
are removed from the drill before switching the tool
"ON". Keys or wrenches can flyaway at high velocity
ejected from the battery may cause irritation or burns.
after prolonged use.
striking you or bystander.
14. Do not run the dill while carrying it at vour side. A
FigE
6. USING THE SIGHT LIGHT
The sight light allows you to keep a clear view under
less illuminated circumstances. To turn on the light
simply press the on/off switch. When you release the
on/off switch, the light will be off.
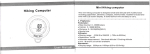
1. BATTERY CAPACITY INDICATOR [SH HI
4. CHUCK ADJUSTMENT [SEE f)
To open the chuck jaws rotate the front section of the
chuck. Insert the drill bit between the chuck jaws and
rotate the front section in the opposite direction. Ensure
the drill bit is in the center of the chuck jaws. Finally,
firmly rotate the front chuck section in the opposite
directions. Your drill bit is now clamped in the chuck.
The three LED lights (3) will indicate the current battery
capacity when pressing the switch (4).
1 LED light on: 30%±5% of capacity
2 LED light on: 60%±5% of capacity
3 LED light on: 90%±5% of capacity
FigH
6 Service
1) Have your powertool serviced by aQualified repair
person using only identical replacement pans.
This will ensure that the safety of the power tool is
maintained.
ADDITIONAl SAFETY RULES FOR
YOUR CORDLESS DRill
spinning drill bit could become entangled with clothing
and injury may result.
15. Avoid bounCing and snagging the wheels, discs
or brushes especially when working comers. sharp
edges. etc. This can cause loss of control and kickback.
16. Position the tether clear of rotating hit. Do not
wrap the tether around your arm or wrist. If you lose
control and have the tether wrapped around your arm or
wrist, it may entrap you and cause injury.
1. Wear ear protectors with cordless drills. Exposure
to noise can cause hearing loss.
2. Use auxiliarv handles supplied with the tool.
Always hold the tool with both hands. Loss of control
can cause personal injury.
3. Hold tool by insulated gripping surfaces when
performing an operation where the cutting tools may
contact hidden wiring. Contact with a "live" wire make
exposed metal parts of the tool "live" and shock the
operator.
4.Alwayswear safety goggles or eye protection
when using this tOOl. Use a dust mask or respirator for
applications which generate dust.
FigF
5. Secure the material being drilled. Never hold it in
your hand or across legs. Unstable support can cause
the drill bit to bind causing loss of control and injury.
B.DRlllING
5. TORQUE ADJUSTMENT [SEE GI
(Screw driving force of your drill driver)
The torque is adjusted by rotating the torque
adjustment ring. The torque is greater when the torque
adjustment ring is set on a higher setting. The torque is
less when the torque adjustment ring is set on a lower
setting.
Make the setting as follows:
6
When drilling into a hard smooth surface, use a center
punch to mark the desired hole location. This will
prevent the drill bit from slipping off center as the hole
is started. Hold the tool firmly and place the tip of the
bit at the point to be drilled. Depress the switch trigger
to start the tool. Move the drill bit into the workpiece,
applying only enough pressure to keep the bit cutting.
Do not force or apply side pressure to elongate a hole.
Note:
If YOurtool stops working when drilling ahole
automatically, it's normal. This is the electrical
protection for battery. Completely release the ONIOFF
switch, then depress it to start the tool again.
6. Disconnect battery pack from tool or place the
switch in the locked or off position before making any
assembly, adjustments or changing accessories.
Such preventive safety measures reduce the risk of
starting the tool accidentally.
1. Position yourself to avoid being caught between
the tool or side handle and walls or post. Should the
bit become bound or jammed in the work, the reaction
torque of the tool could crush your hand or leg.
B.1f the bit becomes bound in the workpiece, release
the trigger immediately, reverse the direction of
rotation and slowly squeeze the trigger to back out
the bit. Be ready for a strong reaction torque. The drill
body will tend to twist in the opposite direction as the
drill bit is rotating.
9. Do not grasp the tool or place your hands too close
3
2.1 I
~
. ..
D1t:Before IJsinglthe too, read the instruction
book ca'refully.
lIEBl. CllSEEBJ
Locate buttons 01"1 side ofthe .batl!ery pack. Depress
both sides to release and slide' i~ out from the'tool. After
recharge, lnsert baok into O1e tool. A simple push and
slight pressure willi be s'lifficienl.
FigB
loti'le lj·io'll battery linstalled li'n the lmachine. IDo not lise'
another Ibattery Qharger.
The U· iOn battery is protected against (feep
disc'har'lJing. When the battery is empty. the machine is
swltched off by means of a protectiVe: circuit Tlhe chuck
11'10 longer ,rotates.
In aINalrmenvilTOnment or after heavy use, the battery
,ack may become too hol AUowtTme for the battery to
cool down beforo recharging!.
Whentlhe bMtel)' is cNrged for d1e firsUime and
after pro.longedl storage, the 'battery will only ,accept
alpproximately 60% charg e. However, after several
charge and di$Charge ,cycles the battery 'Mil ac;oept a
100% chal1e.
mlM
AlIT OIISf~. ~ __~ ~
~ E .nlB'
The bat1ery in )'Olir new 1001 is not charged 'NIiIeri it
leaves the plant Therefore it ,ml:Lst be charg~ to r 3·5
!!lours beto e using thefirsttime!
tKeyless clluck
C] ~
for further debils. store personnel can assi~ you and
Plug the charg:ar plllg into a suitaJ)le mains socket, and
the indiGator tight will shQwgreen. Then in!SerUhe
Ibattery' pack into the chal'Qler baiSe" the rndicator lig!tlt
will become red to indicate tihat chall{! in9 is taking
offer advice.
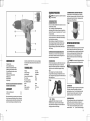
2.Torque adjustmentli'ng
3. Batle1)l capacilY indicawf lights
4. Battery capacity indieatorslNiteih
5.,ForwaRllReve:r:se rotatioll contJIol
6.Softgrip handle
1.Battery pack.release .Dutton
8.,Batte'ry pack
Vollag;e:
Charger 110 (age:
No load speee!;
Number of Ie utch positi.ons:
Mn.torque:
Max clituck capacity:
Max. d'rilling capaolty
Woad:
9.0nfoffswm:h
10.Sight night
UlIS1tJabJdarSBrl
Steel:
Battery capacity:
Charging time:
ICCESS BY
1.3Ah U··onl battery paClk
11pe
1hr Charger
1ipc
WEAl
intend to undertake. Refer to the accessory paellag ing
1I0.8V=
120V"SOHz
O·550RPM
20+1
1'0N.m
110mm
froml1he same stole tJlat sol~ you tIlle tooL Use good]
name. Choose U,e type according to tile work you
4'
W . g: Do not operate'for ong periods at low
~ speed becallse exctSs heat will be prod uced
intema1Jy.
After charg'ing 1ttour. the battery will bemlly
charged!. Wh en fulty clitarged, the light. wfll turn Ired ta,
green Un plug the charger P09 from the wa[l ~CMtt the
tool is mo,yto use..
FigA
10mm
timm
l.3AhU.ioll
Tile ORlOff switch trigger can be locked ,in OFF posifon.
This helps ~(I reduce the possi Diftty of accidental
startlng wtltm no1 il'll use. To rock the swItch pi Cle 1he
forwam aJIId reverse Irotation selectQr in the c.ent,er
positilon by push ing rt on ekther sicle of the drill,
11v
","w
~ When battery charge noms ou1 after
continu'Qusly use 'Qf ,ex:po.su re to di red ~u nlight Qr
liIeM, a[low time fOI die battery to cool down befoli8 r.
cllarging toaohieve the full C:ha~e.
&1
switc:h Ii's fitted l'tIith a bra'ke function which,sro ps your
chuck immedlate'~y When you quiclcJl.y r,e~ease the switch,.
It is also 8 variable speed swItch Uta! delivers Iligller
speed and torque willi inoreaseolbiiggel' pressure.
Speed lis ,contro lied by the amount o.f switch trtgg iF
depression.
~Iaoe.
We reoo mmend that you JU,JIrd!lars.>e yo r a~cessories
quafity accessories marked with a 'A'ell-iknown brand
Re [SHe]
Depress toO stan aml l~ease to stop you r dri 11. The onloff
a £VOL -
I(SEE \B
Tille forwant/reverse r'ota1ion control lfocatedi ,abo.ve ~he
OIlfOH'switch contJols the di~eotion offatatiO:n. For
drilO 9 and 'screw d tilling use forwa rd rotationl ma~ked "
" Oeve:!' is molled to ~he left). Only use HNerse
rotationlrnariked " ....- .. Qever is mo.ved to the 'right)
5