1
HemaTraxTM ISBT-128
Blood & Blood Component
Standalone Labeling Application
Version 6.2.1
OCTOBER 2008
by Lawrence E. Cullen
Copyright © 2008 by Digi-Trax Services, Inc.
All rights reserved.
( This page intentionaly blank. )
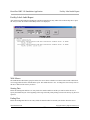
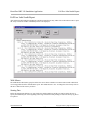
Table of Contents
Overview..........................................................................................................................................1
Version Release Notes..................................................................................................................... 3
Product Label Database...............................................................................................................3
Alternate Product Label Database Migration.............................................................................. 3
Facility Table Migration..............................................................................................................3
Printer Port Definition Migration................................................................................................3
Print Engine Updated.................................................................................................................. 4
Standalone Application Corrections and Changes...................................................................... 4
Collection Dates Now Accepted.............................................................................................4
External Files Now Populate Product Maintenance Pull Down Lists.................................... 4
Facility Maintenance Corrected and Extended.......................................................................4
HemaTrax Manual in Adobe Acrobat PDF Format............................................................... 5
Installation........................................................................................................................................6
Upgrading to a New Release....................................................................................................... 6
Patching an Existing Release...................................................................................................... 6
New Installation.......................................................................................................................... 6
Initial Logon.....................................................................................................................................9
Initial User ID & Password.............................................................................................................. 9
Set Up.............................................................................................................................................11
Software Set Up........................................................................................................................ 11
Hardware Set Up....................................................................................................................... 12
Printer Set Up....................................................................................................................... 12
Communications Settings................................................................................................ 12
Error Detection Protocol.................................................................................................. 12
Optional Hardware.................................................................................................................... 13
Setup Functions..............................................................................................................................14
Hints, Setup............................................................................................................................... 14
Label Assignment, Setup...........................................................................................................16
Options, Setup........................................................................................................................... 17
Auto log off time.................................................................................................................. 18
Security Levels Assigned to Menu Selections .....................................................................18
User Password Expiration Period......................................................................................... 18
Label Compliance Authority................................................................................................ 18
"AUTOLOGOUS DONOR" to appear on Full Face label................................................... 18
Expiration Date Format........................................................................................................ 19
Alternative RH Factor Lines.................................................................................................19
Use Alternate Rh Factor Lines.........................................................................................19
Rh Negative Text............................................................................................................. 19
Rh Positive Text.............................................................................................................. 19
Port Configuration, Setup .........................................................................................................20
Select Port Number...............................................................................................................20
i
Port Device........................................................................................................................... 21
Port Address......................................................................................................................... 21
Baud Rate............................................................................................................................. 21
COM CRC............................................................................................................................ 22
Print Image Offsets............................................................................................................... 22
Label Form Loaded in Printer...............................................................................................22
Set......................................................................................................................................... 22
Replicant Unit Id Format, Setup............................................................................................... 23
Selecting a Replicant Unit Identification Number Set Format............................................. 23
Saving the Format Selection.................................................................................................23
Maintenance................................................................................................................................... 25
Maintenance Pull-Down Menu................................................................................................. 25
Archive Activity Log..................................................................................................................... 27
Starting Date..............................................................................................................................28
Ending Date...............................................................................................................................28
Function Processing.................................................................................................................. 28
Processing Errors.......................................................................................................................28
Archive Activity Log Error Recovery....................................................................................... 29
Facility Information, Maintenance.................................................................................................31
Adding a New Facility.............................................................................................................. 31
Facility Name....................................................................................................................... 31
Facility City, State & Zip Code............................................................................................ 31
License Holder Name........................................................................................................... 32
Holder City, State & Zip Code............................................................................................. 32
Registration Number............................................................................................................ 32
License Number....................................................................................................................32
Changing Existing Facility Information.................................................................................... 32
Deleting an Existing Facility..................................................................................................... 32
Cancel........................................................................................................................................33
Facility World Code.................................................................................................................. 33
Instruction Label, Maintenance......................................................................................................35
Adding a New Instruction Label............................................................................................... 36
Instruction Label Line 1........................................................................................................36
Instruction Label Lines 2 - 10...............................................................................................36
Changing an Existing Instruction Label.................................................................................... 36
Deleting an Existing Instruction Label......................................................................................36
Licensed Products, Maintenance....................................................................................................37
Selecting a Facility.................................................................................................................... 38
Adding Licensed Products for a Specific Facility..................................................................... 38
Deleting Licensed Products for a Specific Facility................................................................... 38
Processing Legends, Maintenance................................................................................................. 39
Add............................................................................................................................................ 39
Change.......................................................................................................................................40
Remove..................................................................................................................................... 40
Ordering of Legends..................................................................................................................40
ii
Save........................................................................................................................................... 40
Product Label, Maintenance.......................................................................................................... 41
Product Code............................................................................................................................. 41
Preview......................................................................................................................................42
Save........................................................................................................................................... 42
Cancel........................................................................................................................................42
Delete........................................................................................................................................ 42
Product Search Attributes..........................................................................................................43
Product Category.................................................................................................................. 43
Product Modifier.................................................................................................................. 44
Anticoagulant....................................................................................................................... 44
Additive Solution................................................................................................................. 44
Store Temp........................................................................................................................... 44
Draw Vol.............................................................................................................................. 45
Irradiated...............................................................................................................................45
System Opened..................................................................................................................... 45
Not Used in U.S.A................................................................................................................45
Product Label Information, Maintenance..................................................................................46
Product Description.............................................................................................................. 46
Product Name....................................................................................................................... 46
Additive Solution................................................................................................................. 47
Attributes.............................................................................................................................. 47
Collection Date Required..................................................................................................... 47
Expiration Period..................................................................................................................47
Expiration Unit..................................................................................................................... 48
Intended Use......................................................................................................................... 48
Additional Attributes............................................................................................................ 48
Other Information................................................................................................................. 49
Unknown Volumes and Measures.............................................................................................49
Volume or Measure Request Prompt................................................................................... 49
Volume Type........................................................................................................................ 50
>= LOW VALUE................................................................................................................. 50
< HIGH VALUE...................................................................................................................50
Qwik-Pik Product List, Maintenance.............................................................................................51
Select Product............................................................................................................................51
Qwik-Pik List Functions........................................................................................................... 52
Add to Qwik-Pik List........................................................................................................... 52
Delete from Qwik-Pik List................................................................................................... 52
Insert in Qwik-Pik List......................................................................................................... 52
Move Highlighted Item in Qwik-Pik List.............................................................................52
Unit Id Label Format, Maintenance............................................................................................... 55
Format Name.............................................................................................................................55
Set Width...................................................................................................................................56
Set Height..................................................................................................................................56
Total Number of Labels in Set.................................................................................................. 56
iii
Prev. & Next Buttons................................................................................................................ 56
Label #.......................................................................................................................................56
Label Type.................................................................................................................................56
X-Coord.....................................................................................................................................56
Y-Coord.....................................................................................................................................57
Flags.......................................................................................................................................... 57
Save........................................................................................................................................... 57
Cancel........................................................................................................................................57
Adding a New Label Format..................................................................................................... 57
Changing an Existing Label Format..........................................................................................59
User/Password, Maintenance......................................................................................................... 61
Last Name................................................................................................................................. 62
Automatic Last Name Search....................................................................................................62
Adding a New User................................................................................................................... 63
Last Name.............................................................................................................................63
First Name............................................................................................................................ 63
Initial.....................................................................................................................................63
Unique ID Number............................................................................................................... 63
User Id.................................................................................................................................. 63
User Password...................................................................................................................... 63
Select a Security Level......................................................................................................... 64
Entries automatically maintained by the system...................................................................64
Start Date......................................................................................................................... 64
Change Date.....................................................................................................................64
Change Memo..................................................................................................................64
Adding a New User................................................................................................................... 64
Canceling the Operation............................................................................................................64
Changing User Information.......................................................................................................64
Deleting a User Record............................................................................................................. 64
Restoring a Deleted User Record.............................................................................................. 65
Find Product...................................................................................................................................67
Print Labels.................................................................................................................................... 71
ABO-Rh, Print Labels....................................................................................................................73
Blood Group/Rh Factor............................................................................................................. 73
Intended Use..............................................................................................................................74
Anti-Kell Results.......................................................................................................................75
Anti-C/Anti-c Results................................................................................................................75
Anti-E/Anti-e Results................................................................................................................75
Miltenberger (Mi-III) Results....................................................................................................75
Number of Labels......................................................................................................................76
"Print" Button............................................................................................................................ 76
"Adjust Position" Button........................................................................................................... 76
Log Memo................................................................................................................................. 76
ABO-Rh / Date & Time, Print Labels............................................................................................77
ABO-Rh.................................................................................................................................... 77
iv
Date........................................................................................................................................... 78
Number of Labels......................................................................................................................78
Log Memo................................................................................................................................. 79
"Print" Button............................................................................................................................ 79
"Adjust Position" Button........................................................................................................... 79
Date & Time, Print Labels............................................................................................................. 81
"Product" Button....................................................................................................................... 81
"Calc Exp. Data/Time" Button..................................................................................................82
Expiration Date......................................................................................................................... 82
Include Exp. Time..................................................................................................................... 82
Special Test............................................................................................................................... 82
Processing Legend.....................................................................................................................82
"Processing Facility" Button..................................................................................................... 82
Processing Facility Information................................................................................................ 82
Number of Labels......................................................................................................................82
Log Memo................................................................................................................................. 83
"Print" Button............................................................................................................................ 83
"Adjust Position" Button........................................................................................................... 83
Facility........................................................................................................................................... 85
"Select Facility" Button............................................................................................................. 85
Include License No....................................................................................................................86
Selected Facility Information.................................................................................................... 86
Number of Labels......................................................................................................................86
Log Memo................................................................................................................................. 86
"Print" Button............................................................................................................................ 87
"Adjust Position" Button........................................................................................................... 87
Facility / Product............................................................................................................................ 89
"Facility" Button........................................................................................................................89
"Product" Button....................................................................................................................... 89
Donation Type...........................................................................................................................89
Donor Type................................................................................................................................90
Divided Unit Information..........................................................................................................90
Divided Unit..............................................................................................................................90
Div. 1.........................................................................................................................................90
Div. 2.........................................................................................................................................90
Number of Labels......................................................................................................................90
Log Memo................................................................................................................................. 90
"Print" Button............................................................................................................................ 91
"Adjust Position" Button........................................................................................................... 91
Full Face.........................................................................................................................................93
Unit Id Number......................................................................................................................... 93
Include Manual Entry Check Digit............................................................................................93
"Facility" Button........................................................................................................................93
Facility Information Panel.........................................................................................................94
Donor Type................................................................................................................................94
v
"Product" Button....................................................................................................................... 94
Include License No. Check Box................................................................................................94
Product Information Panel........................................................................................................ 95
Donation Type...........................................................................................................................95
Divided Unit..............................................................................................................................95
Div. 1.........................................................................................................................................95
Div. 2.........................................................................................................................................95
ABO-Rh Donation Type / Intended Use Panel......................................................................... 95
"ABO-Rh" Button..................................................................................................................... 95
ABO-Rh Information Panel.......................................................................................................95
"Date" Button............................................................................................................................ 96
Date & Time Information Panel................................................................................................ 96
Number of Labels......................................................................................................................96
Log Memo................................................................................................................................. 96
"Print" Button............................................................................................................................ 96
"Adjust Position" Button........................................................................................................... 96
"Cancel" Button.........................................................................................................................96
Instruction...................................................................................................................................... 98
Label Title................................................................................................................................. 99
Lines 1 - 10................................................................................................................................99
Number of Labels......................................................................................................................99
Log Memo................................................................................................................................. 99
"Print" Button............................................................................................................................ 99
"Adjust Position" Button........................................................................................................... 99
"Cancel" Button.........................................................................................................................99
Intended Recipient Information................................................................................................... 100
Product.................................................................................................................................... 100
Irrad......................................................................................................................................... 100
LKORED.................................................................................................................................100
Other........................................................................................................................................100
Blood Relative.........................................................................................................................101
Patient Name........................................................................................................................... 101
ID Number...............................................................................................................................101
Hospital................................................................................................................................... 101
Birth Date................................................................................................................................ 101
Collected................................................................................................................................. 101
Intended Use............................................................................................................................101
Number of Labels....................................................................................................................102
Log Memo............................................................................................................................... 102
"Print" Button.......................................................................................................................... 102
"Adjust Position" Button......................................................................................................... 102
"Clear" Button......................................................................................................................... 102
Product......................................................................................................................................... 104
"Select Product" Button...........................................................................................................104
Product Information Panel...................................................................................................... 104
vi
Donation Type.........................................................................................................................105
Divided Unit............................................................................................................................105
Div. 1.......................................................................................................................................105
Div. 2.......................................................................................................................................105
"Preview" Button.....................................................................................................................105
"Clear All" Button................................................................................................................... 106
Number of Labels....................................................................................................................106
Log Memo............................................................................................................................... 106
"Print" Button.......................................................................................................................... 106
"Adjust Position" Button......................................................................................................... 106
Product / Date & Time................................................................................................................. 108
"Product" Button..................................................................................................................... 108
Product Information Panel...................................................................................................... 108
Donation Type.........................................................................................................................109
Divided Unit............................................................................................................................109
Div. 1.......................................................................................................................................109
Div. 2.......................................................................................................................................109
"Date" Button.......................................................................................................................... 109
Date Information Panel........................................................................................................... 109
Number of Labels....................................................................................................................109
Log Memo............................................................................................................................... 109
"Print" Button.......................................................................................................................... 110
"Adjust Position" Button......................................................................................................... 110
Replicate Unit Id Set.................................................................................................................... 112
Include manual entry check digit............................................................................................ 112
ISBT-128 Unit Id Number...................................................................................................... 112
Number of Labels....................................................................................................................112
Log Memo............................................................................................................................... 113
"Print" Button.......................................................................................................................... 113
"Adjust Position" Button......................................................................................................... 113
"Cancel" Button.......................................................................................................................113
Verification.................................................................................................................................. 114
Scan Bar Code......................................................................................................................... 114
Scanned Information............................................................................................................... 114
Unit Number....................................................................................................................... 115
Facility Name..................................................................................................................... 115
ABO-Rh Code.................................................................................................................... 115
Group/Factor.......................................................................................................................115
Intended Use....................................................................................................................... 115
Product Code...................................................................................................................... 115
Product Desc.......................................................................................................................115
Intended Use....................................................................................................................... 115
Exp. (Coll.) Date Code....................................................................................................... 115
Exp. (Coll.) Date Text........................................................................................................ 115
Test Code............................................................................................................................115
vii
Test Desc............................................................................................................................ 116
"Save" Button.......................................................................................................................... 116
"Clear" Button......................................................................................................................... 116
Adjust Position.............................................................................................................................118
Vertical Offset in mm..............................................................................................................118
Horizontal Offset in mm......................................................................................................... 118
Status Bar................................................................................................................................ 119
"Test Print" Button.................................................................................................................. 119
"OK" Button............................................................................................................................ 119
ABO-Rh Label Information Window.......................................................................................... 120
Blood Group/Rh Factor........................................................................................................... 120
Intended Use............................................................................................................................121
Anti-Kell Results.....................................................................................................................121
Anti-C/Anti-c Results..............................................................................................................122
Anti-E/Anti-e Results..............................................................................................................122
Miltenberger (Mi-III) Results..................................................................................................122
"OK" Button............................................................................................................................ 123
"Exit" Button........................................................................................................................... 123
Date & Time Label Information Window....................................................................................124
"Product" Button..................................................................................................................... 124
"Calc Exp. Data/Time" Button................................................................................................124
Expiration Date....................................................................................................................... 125
Include Exp. Time................................................................................................................... 125
Special Test............................................................................................................................. 125
Processing Legend...................................................................................................................125
"Processing Facility" Button................................................................................................... 125
Processing Facility Information.............................................................................................. 125
Facility Information Window.......................................................................................................126
Collection Date & Time Window................................................................................................ 128
Collection Date........................................................................................................................128
Collection Time.......................................................................................................................128
"Current Date" Button............................................................................................................. 128
"Current Time" Button............................................................................................................ 128
Irradiated Product Date & Time Window....................................................................................130
Scan Product Expiration Date & Time....................................................................................130
Product Exp. Date................................................................................................................... 131
Product Exp. Time.................................................................................................................. 131
Irradiation Date........................................................................................................................131
"Current Date" Button............................................................................................................. 131
"OK" Button............................................................................................................................ 131
Irradiated Product Expiration Date Calculation...................................................................... 131
Month combo boxes................................................................................................................ 131
Day edit boxes......................................................................................................................... 131
Year edit boxes........................................................................................................................132
Hour edit box...........................................................................................................................132
viii
Minute edit box....................................................................................................................... 132
Activity Log Reports....................................................................................................................134
On-Line Activity Log Report.................................................................................................. 135
Month................................................................................................................................. 135
Year.................................................................................................................................... 136
"Load Period" Button......................................................................................................... 136
"Prev" Button......................................................................................................................136
"Next" Button..................................................................................................................... 136
"Screen" Button.................................................................................................................. 136
"Period" Button...................................................................................................................136
Off-Line Activity Log Report..................................................................................................137
File...................................................................................................................................... 137
Open................................................................................................................................... 137
Close................................................................................................................................... 138
Exit..................................................................................................................................... 138
Archived Log File:..............................................................................................................138
Archived Log File Names...................................................................................................138
"Prev" Button......................................................................................................................139
"Next" Button..................................................................................................................... 139
"Screen" Button.................................................................................................................. 139
"Period" Button...................................................................................................................139
Database Reports......................................................................................................................... 140
Facility Information Database Report.......................................................................................... 142
"Print" Button.......................................................................................................................... 142
Instruction Label Database Report...............................................................................................144
"Print" Button.......................................................................................................................... 144
Licensed Products Database Report.............................................................................................146
World Facility Code................................................................................................................ 146
Reporting Range......................................................................................................................147
Starting ICCBBA Code........................................................................................................... 147
Ending ICCBBA Code............................................................................................................ 147
"OK" Button............................................................................................................................ 147
"Print" Button.......................................................................................................................... 147
Product Label Database Report....................................................................................................148
Starting.................................................................................................................................... 149
Ending..................................................................................................................................... 149
"OK" Button............................................................................................................................ 149
"Print" Button.......................................................................................................................... 149
Label Audit Reports..................................................................................................................... 150
ABO-Rh Audit Report................................................................................................................. 152
With Memos............................................................................................................................152
Starting Date............................................................................................................................152
Ending Date.............................................................................................................................153
"OK" Button............................................................................................................................ 153
"Print" Button.......................................................................................................................... 153
ix
ABO-Rh / Date & Time Audit Report......................................................................................... 154
With Memos............................................................................................................................154
Starting Date............................................................................................................................155
Ending Date.............................................................................................................................155
"OK" Button............................................................................................................................ 155
"Print" Button.......................................................................................................................... 155
Date & Time Label Audit Report................................................................................................ 156
With Memos............................................................................................................................156
Starting Date............................................................................................................................156
Ending Date.............................................................................................................................157
"OK" Button............................................................................................................................ 157
"Print" Button.......................................................................................................................... 157
Facility Label Audit Report......................................................................................................... 158
With Memos............................................................................................................................158
Starting Date............................................................................................................................158
Ending Date.............................................................................................................................158
"OK" Button............................................................................................................................ 159
"Print" Button.......................................................................................................................... 159
Facility / Product Label Audit Report.......................................................................................... 160
With Memos............................................................................................................................160
Starting Date............................................................................................................................160
Ending Date.............................................................................................................................160
"OK" Button............................................................................................................................ 161
"Print" Button.......................................................................................................................... 161
Full Face Label Audit Report.......................................................................................................162
With Memos............................................................................................................................162
Starting Date............................................................................................................................162
Ending Date.............................................................................................................................163
"OK" Button............................................................................................................................ 163
"Print" Button.......................................................................................................................... 163
Instruction Label Audit Report.................................................................................................... 164
With Memos............................................................................................................................164
Starting Date............................................................................................................................164
Ending Date.............................................................................................................................164
"OK" Button............................................................................................................................ 165
"Print" Button.......................................................................................................................... 165
Intended Recipient Information Label Audit Report................................................................... 166
With Memos............................................................................................................................166
Starting Date............................................................................................................................166
Ending Date.............................................................................................................................166
"OK" Button............................................................................................................................ 167
"Print" Button.......................................................................................................................... 167
Product Label Audit Report......................................................................................................... 168
With Memos............................................................................................................................168
Starting Date............................................................................................................................168
x
Ending Date.............................................................................................................................168
"OK" Button............................................................................................................................ 169
"Print" Button.......................................................................................................................... 169
Product / Date & Time Label Audit Report................................................................................. 170
With Memos............................................................................................................................170
Starting Date............................................................................................................................170
Ending Date.............................................................................................................................170
"OK" Button............................................................................................................................ 171
"Print" Button.......................................................................................................................... 171
Replicated Unit ID Sets Audit Report..........................................................................................172
With Memos............................................................................................................................172
Starting Date............................................................................................................................172
Ending Date.............................................................................................................................173
"OK" Button............................................................................................................................ 173
"Print" Button.......................................................................................................................... 173
Log Out........................................................................................................................................ 174
Help..............................................................................................................................................176
About.......................................................................................................................................176
HemaTrax................................................................................................................................176
Error Numbers............................................................................................................................. 178
License Agreement.......................................................................................................................188
License Conditions and Terms................................................................................................ 188
Product Warranty......................................................................................................................... 190
Limited Warranty.................................................................................................................... 190
xi
( This page intentionally blank. )
xii
HemaTrax ISBT-128 Standalone Application
Overview
Overview
The HemaTrax ISBT-128 Blood & Blood Product Labeling Application is a Windows program that runs on
Microsoft's Windows 2000 and XP platforms. The current application is the result of many man years of
development by Digi-Trax Services, Inc.. This application makes it possible for a blood bank or transfusion service
to manufacture their labels from blank stock. A facility is able to make the labels they need when they need them.
This software makes manufacturing blood and blood product labels easy and intuitive.
The HemaTrax label manufacturing application produces labels that comply with the content and format rules as
described in the United States Industry Concensus Standard for the Uniform Labeling of Blood and Blood
Components Using ISBT-128 Version 2.0.0, November 2005, and the ISBT 128 Standard Technical Specification
Version 3.0.0, June 2007. These documents are available to all registered ICCBBA licensees at the International
Council for Commonality in Blood Banking Automation website (www.iccbba.com).
HemaTrax supports printing labels on either the SATO America or Zebra Technologies thermal bar code printers
which have been specifically enhanced by Digi-Trax Services, Inc. to best support blood bank labeling and the
ISBT-128 standards. These printers provide 300 dot per inch (dpi) print resolution. They also provide for an
optional serial transmission error protocol and have been enhanced to store scaleable outline fonts and the biohazard
symbol graphic in the printer's non-volatile memory.
Beside printing labels serially from the host computer system, labels may also be printed via the local network
through the use of one or more Digi International serial terminal servers or labels may be printed directly on a
printer that has an Ethernet connection.
The HemaTrax application supports the printing of three of the 2" x 2" label quadrants ( ABO-Rh, Product, and
Expiration Date and Time ). It supports printing of the two quadrant combinations of the 4" x 2" label ( ABORh/Expiration Date and Time, Product/Expiration Date and Time ) and prints the full face label (4" x 4"). Other
label formats that are supported include: Facility Name and Location, Facility/Product, Intended Recipient, and the
generic 2" x 2" Instruction label.
The HemaTrax application enforces a user log-on security feature that prevents unauthorized individuals from using
the system.
HemaTrax tracks the activities of every user from the time they log on until they log off. This activity logging
feature allows for the reporting of all activities that have occurred over a specified period of time. The activity logs
can be archived from time to time.
HemaTrax installs with a product label database that is populated with all of the product labels that are defined in the
ICCBBA product table at the time of the HemaTrax application release. Currently the ICCBBA product table
contains definitions for over 5,800 products. The user has access to these product label definitions and may make
changes to them if that is necessary. The user may also define new products or in-process products at anytime.
HemaTrax provides a label manufacturing audit report that lists the user, the date and time, label type, and number of
labels printed. This label audit reporting feature helps reduce the time spent producing label accountability records.
HemaTrax Manual.odt
Copyright © 2007 by Digi-Trax Services, Inc.
1
HemaTrax ISBT-128 Standalone Application
Overview
( This page intentionally blank. )
HemaTrax Manual.odt
Copyright © 2007 by Digi-Trax Services, Inc.
2
HemaTrax ISBT-128 Standalone Application
Version Release Notes
Version Release Notes
This release of the HemaTrax Standalone application includes many changes. The following paragraphs detail these
changes and corrections. This release incorporates a new print engine library and product label database. Some
functionality in the Standalone application has been changed as well. The user should make a point of downloading
the latest copy of the U.S. Industry Consensus Standards document from the ICCBBA web site. The most current
document, at the time of this writing, is the Version 2.0.0, November 2005 document. Since there have been several
corrections made to this document and no change in the version number or date, it is important to download a fresh
copy and also check the errata sheet.
Product Label Database
The product label database table have been regenerated to correct a few problems and to implement an extension in
the HemaTrax product code key. The word "APHERESIS" while appearing as a modifier in the previous releases'
database, didn't have the modifier list fully populated to include compound modifiers such as "DEGYLCEROLIZED
REJUVENATED APHERESIS" nor were there codes for such compound modifiers in the HemaTrax product code
key. This situation has been rectified in this release.
The product label database has also been expanded to include additional products that had been added since the
Version 6.1 release.
The additional information wording, which includes volume, content and storage temperature, generated for several
products has been corrected in this release.
Alternate Product Label Database Migration
When upgrading from the previous version of the Standalone application (Version 6.1 Commercial) the installation
process includes an application that runs automatically during the install to update any user created product label
definitions to the most current format. This update process corrects component class names and modifiers as needed.
The update also encodes an additional character in the HemaTrax product code key.
Important Note:
If you are updating from Version 6.0 release of the Standalone application, then your product
label definitions will be dropped from the new release. The Version 6.0 application used a ten
digit product code key field that cannot be converted properly to the new twelve digit key. The
existing Version 6.0 AltPCode files located in the "Data" subdirectory are not deleted. They
are renamed and ignored by the Version 6.2 update.
Facility Table Migration
When upgrading from the previous version of the Standalone application (Version 6.1 Commercial) the installation
process includes an application that runs automatically and updates the facility information table to expand the
registration number field to ten digits and expand the license number field to eight characters. This provides space
for newer issued FDA registration numbers which have been increased in length to ten digits and allow for DoD
blood center license numbers which may be in the format "1234-123".
Printer Port Definition Migration
When upgrading from the previous versions of the Standalone application (Version 6.0 or Version 6.1 Commercial)
the installation process includes an application that runs automatically and converts any existing "Portcfg.bin" file
remaining after doing the Windows uninstall of the previous HemaTrax Standalone application. Versions prior to the
HemaTrax Manual.odt
Copyright © 2007 by Digi-Trax Services, Inc.
3
HemaTrax ISBT-128 Standalone Application
Version Release Notes
HemaTrax Standalone Version 6.0 release used a text file named "Portcfg.txt". The text file cannot be converted and
will be ignored by the new application.
Print Engine Updated
This release of the Standalone includes the very latest release (Version 6.0) of the HemaTraxLIB.dll dynamically
linked library. This library component serves as the label formating and printing engine of the application. There are
many changes in this new update. Some font sise changes have been made to accommodate additional printed
information on the product label.
The full face label text including the "Properly Identify..." and "See Circular of Information..." statements have been
moved to an optional external file.
Corrected character font width tables have been implemented to improve text centering capabilities with the Zebra
Z4M printer.
Changes have also been incorporated to implement recent changes in the label printing specifications as found in the
U.S. Industry Consensus Standards. Any occurrence of the word "BIOHAZARDOUS" has been replaced with the
word "BIOHAZARD" on all labels. The word "BIOHAZARD" now appears at the end of the intended use phrase on
the ABO-Rh label (quadrant two).
For a narrow range of products (RECOVERED PLASMA, SOURCE PLASMA and SOURCE LEUKOCYTES)
quadrant four is now used to print FDA required testing messages. When printing 2" x 2" product labels for these
products these products will yield two label sets; one label for quadrant three and one for quadrant four.
Standalone Application Corrections and Changes
Collection Dates Now Accepted
When specifying a product that takes a collection date the previous release of the Standalone application failed to
allow for input of the collection date. This release corrects that short coming.
External Files Now Populate Product Maintenance Pull Down Lists
The modifier, component class, anticoagulant, additive solution, storage temperature and volume selection tables of
the product maintenance windows are now all populated from external files and no longer hard coded in the
application program.
Facility Maintenance Corrected and Extended
In the previous Version 6.1 release, when a change was made to the primary facility name during facility
maintenance, the name change would not take effect. This has been corrected in this release.
The entry of FDA registration numbers up to ten digits and license numbers up to eight characters in length is now
permitted.
The entry of facility and licensee names each up to one hundred characters in length is now possible. By inserting a
vertical bar in the name field the point at which the line will wrap can be forced. A name cannot be wrapped to more
than two lines on a label.
HemaTrax Manual.odt
Copyright © 2007 by Digi-Trax Services, Inc.
4
HemaTrax ISBT-128 Standalone Application
Version Release Notes
HemaTrax Manual in Adobe Acrobat PDF Format
Previous releases of the HemaTrax Standalone application provided the manual as HTML files. The local browser
was used to view these files when the selection was made from the "Help" menu. The manual is now distributed in
Adobe Acrobat format as "HemaTraxManual.pdf". Your system must have a copy of the Adobe Acrobat Reader
installed in order to view the manual. The Adobe Acrobat Reader may be freely downloaded from the
www.adobe.com web site.
HemaTrax Manual.odt
Copyright © 2007 by Digi-Trax Services, Inc.
5
HemaTrax ISBT-128 Standalone Application
Installation
Installation
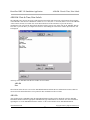
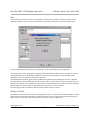
Upgrading to a New Release
If you are upgrading from a previously installed copy of HemaTrax Standalone with a new release and the new
release is NOT marked as a "PATCH", then you must remove the current application before installing the new
upgrade. The proper way to do this is to make use of the Microsoft Windows utility for adding and removing
applications. This utility is found in the "Control Panel". Do not manually delete the application directory and
files as this will destroy files that could be migrated by the installation wizard later.
IMPORTANT NOTE: After removing the application with the Microsoft Remove utility there will be directories
and files left behind. Do not delete or move these directories and files they will be used by the update program. In
fact it is a good idea to back up all of these directories and the files contained in them before proceeding with the
rest of the upgrade process.
After using the method indicated above to remove the current application, proceed to the paragraph entitled "New
Installation".
Patching an Existing Release
If you are installing a "Patch" to an existing installed application, you may do so without doing an uninstall. A patch
will add or correct files in place and may depend on files from the previous install being there. So do NOT uninstall
before running a patch. Once a patch has completed the procedure is finished and you do not have to read further
about the installation procedures here.
New Installation
The installation of HemaTrax is automated through the use of a software installation wizard.
HemaTrax is installed by inserting the supplied CD-ROM in the appropriate drive and then waiting a few seconds for
the installation wizard to automatically start.
Some systems have the autostart feature disabled. In those cases the installation process may be started by clicking
on the "My Computer" icon, then clicking the "Add or Remove Programs" icon and then following the instructions
on the screen.
An alternative manual installation procedure is to click on the "Start" button located on the task bar which causes the
pop-up menu to be displayed. The user next clicks on "Run" menu item which causes the RUN window to be
displayed. The user next enters the "<drive>:\SETUP.EXE" in the "Open" entry box, and then clicks the "OK"
button.
Where <drive> is the drive letter associated with the unit that is being used to read the CD-ROM; typically this is
"D" for a CD-ROM drive.
Important Note:
It may be necessary to disable Virus Detection services during the installation of the HemaTrax Standalone
software. Some virus detection programs, most notably "Penicillin", causes an incomplete installation of the files or
a terminal error to occur during the installation process.
After the installation wizard loads and starts, the process of installation will begin after a short and simple question
HemaTrax Manual.odt
Copyright © 2007 by Digi-Trax Services, Inc.
6
HemaTrax ISBT-128 Standalone Application
Installation
and answer exercise.
Important Note:
If you are updating from Version 6.0 release of the Standalone application, then your product
label definitions will be dropped from the new release. The Version 6.0 application used a ten
digit product code key field that cannot be converted properly to the new twelve digit key. The
existing Version 6.0 AltPCode files located in the "Data" subdirectory are not deleted. They
are renamed and ignored by the Version 6.2 update.
At the end of the installation process the user will be asked to remove the CD-ROM and to click the "Finish" button
in order to restart the computer.
HemaTrax Manual.odt
Copyright © 2007 by Digi-Trax Services, Inc.
7
HemaTrax ISBT-128 Standalone Application
Installation
( This page intentionally blank. )
HemaTrax Manual.odt
Copyright © 2007 by Digi-Trax Services, Inc.
8
HemaTrax ISBT-128 Standalone Application
Initial Logon
Initial Logon
After installation, HemaTrax may be executed by clicking on the Start button of the Task Bar, revealing the
Windows pop-up menu. From the menu, click on the Programs item to reveal a list of programs. In the list of
programs you will find HemaTrax Standalone listed, click on this item and the application will be started.
When the HemaTrax is first started, it will be necessary to log on with full administrative authority in order to enter
new users with various authorities and in order to establish various hardware configuration parameters.
Initial User ID & Password
In order to initially gain access to HemaTrax it is necessary to use the initial default User Id and User Password
which is the word "DEFAULT" in both cases.
Note: Once you have established a user with a Security Level of three (3) the user id and password of "DEFAULT"
will no longer be available.
When a user signs on to the HemaTrax program a User Id and User Password must be first entered. At the
HemaTrax log on window the cursor is initially positioned in the User Id field where the user must type at least five
characters and then press the 'Tab' key to move on to the User Password entry field. At the User Password field the
user must type at least five characters for the password and then either press the 'Enter' key or click on the 'OK'
button.
HemaTrax Manual.odt
Copyright © 2007 by Digi-Trax Services, Inc.
9
HemaTrax ISBT-128 Standalone Application
Initial Logon
( This page intentionally blank. )
HemaTrax Manual.odt
Copyright © 2007 by Digi-Trax Services, Inc.
10
HemaTrax ISBT-128 Standalone Application
Set Up
Set Up
Initially set up requires that you have administrative access to all of the HemaTrax menu functions. The process of
initially setting up includes the following tasks:
Software Set Up
Use the Options function available from the Setup menu to establish the following:
•
Auto-logoff timeout
•
(Optional) Security levels required to access the four primary menu selections
•
User Password Expiration Period
•
Establish FDA as the Labeling Compliance Authority (Default)
•
Replace "VOLUNTEER DONOR" with "AUTOLOGOUS DONOR" on the full face label for
autologous donations (Optional)
•
Establish the Expiration Date format (Defaults to USA format)
Use the Port Configuration function available from the Setup menu to establish the following parameters for each
available port:
•
The Device attached (None, SATO [CL412BB or BB8450], Zebra[ any Digi-Trax supplied 300 dpi
printer])
•
Baud Rate of attached device
•
Whether or not CRC error detection protocol is to be used (for SATO or Zebra printers only)
Use the Label Assignment function of the Setup menu to establish which port number for each of the following
label groups will be used to image the labels in that label group:
•
ABO-Rh, Product, Expiration (Collection Date) Labels (2"x2" Labels)
•
Full Face labels (4"x4" Labels)
•
ABO-Rh/Expiration (Collection) Date Label, Product/Expiration (Collection) Date Label (4"x2" Labels)
•
Facility/Product label (2"x3.25" Label)
•
Replicant Unit Id Labels
•
Intended Recipient Labels
Use the Replicant Unit Id Format function available from the Setup menu to select the label format file that defines
the label geometry to be used to image replicant unit id sets.
Use the Facility Information function found on the Maintenance pull-down menu to enter information for each
facility for which label information will be printed.
Use the Instruction Label function of the Maintenance menu to specify any instruction labels that will be printed.
Use the Licensed Products by Facility function available from the Maintenance pull-down menu to identify all of
HemaTrax Manual.odt
Copyright © 2007 by Digi-Trax Services, Inc.
11
HemaTrax ISBT-128 Standalone Application
Set Up
the licensed products for each facility for which Facility or Full Face Labels will be printed.
Use the Qwik-Pik Product List function available from the Maintenance pull-down menu to select all products
which will be routinely manufactured and labeled, in the order of highest priority for quick selection.
Use the User/Password function from the Maintenance pull-down menu to establish a user id, password and security
access level for each user intended to have access to the system.
Hardware Set Up
Hematrax software minimally requires the following hardware:
Quantity
Description
1
Personal Computer System
with:
128 Meg RAM
20 MB Available Hard Disk Storage
CD-ROM Drive
1
Digi-Trax Enhanced Blood Bank Printer
such as:
SATO BB-CL412e
Zebra BB-Z4M (300 dpi)
1
Serial Cable (Null Modem) for each printer
connected to a serial COM port.
Printer Set Up
This is a generic description of the printer settings used by the HemaTrax software. For printer specific setting
instructions, please refer to the manufacturer's user guide provided with the printer either as a paper manual or text
files on CD-ROM.
Communications Settings
When connecting serially to the bar code printer, you must match the printer communication port settings to match
those set in the HemaTrax program. It is recommended that you use the default settings established by HemaTrax.
The default serial COM port settings initially used by HemaTrax are:
•
•
•
•
•
9600 Baud
No Parity
8 Data Bits
1 Stop Bit
DSR/DTR
Error Detection Protocol
HemaTrax, by default, assumes that the error detection protocol of the printer is enabled. The Zebra Technologies
and SATO America printers each have their own unique ways of enabling this functionality. For the SATO America
printer, this is not published in their manuals, as this is a feature that has been specifically engineered for Digi-Trax
HemaTrax Manual.odt
Copyright © 2007 by Digi-Trax Services, Inc.
12
HemaTrax ISBT-128 Standalone Application
Set Up
by the SATO company.
Printer / Manufacturer
Protocol Enabling Instruction
BB-CL412e / SATO
DSW-1,7-8 On (Up)
BB-Z4M / Zebra
Enable Zebra Protocol
See the manual for instructions
Optional Hardware
Other hardware supported by HemaTrax includes the devices listed in the table below:
Manufacturer
Digi International
Hardware Device
Ether-Lite Terminal Server
TS series Terminal Servers
HemaTrax Manual.odt
Copyright © 2007 by Digi-Trax Services, Inc.
13
HemaTrax ISBT-128 Standalone Application
Setup Functions
Setup Functions
Upon initial installation or when adding or changing hardware attached to the computer it may be necessary to enter
the Setup function available from the main menu screen to change communications parameters or to redirect label
formats to different communications ports . Placing the mouse cursor on the Setup function of the main menu and
pressing the left mouse button or entering the Alt+S key combination will cause the Setup pull down menu to appear.
The pull down menu provides five functions:
1.
2.
3.
4.
5.
Hints
Label Assignment
Options
Port Configuration
Replicant Unit ID Format
To select one of these functions, left click on the desired function title. Alternatively, press the underscored letter in
the desired function title, for example type 'P' for Port Configuration or type 'L' for Label Assignment.
The order in which these set up functions should be initially performed is important. When a newly installed program
is being set up, typically the set up functions should be visited in the following order:
1.
2.
3.
4.
Options
Port Configuration
Label Assignment
Replicant Unit Id Format
(See Initial Software Set Up for more information. )
Hints, Setup
The Setup pull-down menu provides the user with a method of toggling Hints mode on or off.
HemaTrax Manual.odt
Copyright © 2007 by Digi-Trax Services, Inc.
14
HemaTrax ISBT-128 Standalone Application
Setup Functions
The Hints mode is toggled by placing the mouse cursor on the Hints title of the Setup pull-down menu and clicking
on it.
Normally the program operates with Hints OFF (not checked).
When Hints mode is ON and the user places the mouse pointer on a button, entry box or other screen control then a
box will temporarily appear on the screen with text that explains the use or actions taken by that control. Turning
Hints ON assists new users who are learning the package.
When the Setup pull-down is displayed the user can determine that Hints mode is ON by observing a check mark in
front of the Hints title.
HemaTrax Manual.odt
Copyright © 2007 by Digi-Trax Services, Inc.
15
HemaTrax ISBT-128 Standalone Application
Setup Functions
Label Assignment, Setup
When initially setting up the HemaTrax Standalone program, or when changing hardware attached to the computer it
may be necessary to enter the Setup function of the main menu screen and perform Label Assignment.
Label Assignment allows the operator to select the ports to which the various label formats will be transmitted.
The Label Assignment window is accessed by first selecting the Setup function at the main menu, this causes the
Setup pull-down menu to appear. The Label Assignment function may now be selected.
In the Label Assignment window the various label types are listed in groups, below each label group list, in a combo
box, the user may select one of up to eight possible ports to direct the label output. By clicking on the downward
pointing arrow located to the right of each combo box, a list of ports is displayed. By clicking on the desired port
description, the combo box text area is filled in with the selected entry. After making any new selection or desired
changes, the user saves the assignments by clicking the 'OK' button. To abandon any changes the user will just close
the window with the button in upper right-hand corner.
HemaTrax Manual.odt
Copyright © 2007 by Digi-Trax Services, Inc.
16
HemaTrax ISBT-128 Standalone Application
Setup Functions
Options, Setup
When initially setting up the HemaTrax Standalone program it may be desirable to change certain operational
characteristics specific to the particular site's requirements. The Options window provides some important
configuration options. To access the Options window select Options from the Setup pull-down menu available from
the HemaTrax Standalone main menu.
From the Options window the user may set Auto log off time, assign Security Levels Assigned to Menu Selections,
set the User Password Expiration Period, select the Labeling Compliance Authority, select whether or not
"AUTOLOGOUS DONOR" to appear on Full Face Label in the upper left quadrant of the full face label, and
determine the Expiration Date Format to be used.
HemaTrax Manual.odt
Copyright © 2007 by Digi-Trax Services, Inc.
17
HemaTrax ISBT-128 Standalone Application
Setup Functions
Auto log off time
The Auto log off time setting appears in the Options window which is available from the Setup pull-down menu.
The Auto log off time is set by selecting one of several times from a combo box within the panel labeled "Auto log
off time" at the top of the Options window. A time other than those in the list may be manually entered in the combo
box if the times listed are not satisfactory. The integer value selected or entered is in minutes.
A value of 0 (zero) indicates that NO Auto log off will be enforced.
A value greater than 0 (zero) indicates that number of minutes of inactivity that will pass before the HemaTrax
program automatically returns to the User Id & Password entry window.
Security Levels Assigned to Menu Selections
The Security Levels Assigned to Menu Selections settings appear in the Options window which is available from the
Setup pull-down menu.
Within the panel labeled Security Levels Assigned to Menu Selections there are four radio button groups as follows:
"Setup Security Level", "Maintenance Security Level", "Print Labels Security Level", and "Reports Security Level".
Each radio button group holds four buttons labeled 0 (zero) through 3. These numbered buttons represent the
required level of security (authority) that a user must have in order to select and use the associated menu selection. 0
(zero) represents the lowest level of authority and 3 represents the highest level.
Note: When users are defined to HemaTrax through the User/Password function available from the Maintenance
pull-down menu, they are assigned security levels in the range 0 (zero) to 3.
User Password Expiration Period
The User Password Expiration Period setting appears in the Options window which is available from the Setup pulldown menu.
Within the panel labeled "User Password Expiration Period" there is an edit box which will accept an integer value
between 0 (zero) and 999 days. If you set this value to 0 (zero) then the user's password never expires. A positive
integer value indicates the number of days that the user's password will be allowed to remain unchanged.
Label Compliance Authority
The Label Compliance Authority setting appears in the Options window which is available from the Setup pull-down
menu.
Within the panel labeled "Label Compliance Authority" these are two radio buttons, "US Food & Drug
Administration" and "None". The default selection is set to "US Food & Drug Administration". This selection affects
what label text appears on the blood product and other labels. Selecting None will drop some "US Industry
Consensus" / FDA required text from the labels.
"AUTOLOGOUS DONOR" to appear on Full Face label
The "AUTOLOGOUS DONOR" to appear on Full Face label setting appears in the Options window which is
available from the Setup pull-down menu.
With in the panel labeled "AUTOLOGOUS DONOR" to appear on Full Face label are two radio buttons, "No (Use
VOLUNTEER DONOR)" and "Yes".
While the US FDA officially recognizes only two donor types (PAID and VOLUNTEER), some sites have elected to
HemaTrax Manual.odt
Copyright © 2007 by Digi-Trax Services, Inc.
18
HemaTrax ISBT-128 Standalone Application
Setup Functions
secure a variance which allows them to further differentiate donor types to also include "AUTOLOGOUS".
The default setting is "No (Use VOLUNTEER DONOR)".
Selecting the "Yes" radio button causes HemaTrax to automatically print "AUTOLOGOUS DONOR" in lieu of
"VOLUNTEER DONOR" on full face labels in the upper left quadrant, when an autologous donation type/intended
use selection has been made.
Expiration Date Format
The Expiration Date Format setting appears in the Options window which is available from the Setup pull-down
menu.
The Expiration Date Format setting controls the format of the expiration date (collection date) as it appears on the
date (and time) label (lower right-hand quadrant). The settings are done by selecting one of two radio buttons located
inside the panel labeled "Expiration Date Format". The radio buttons are labeled, "Expiration Date & Time (U.S.)"
and "Expiration Date Only".
The default setting is "Expiration Date & Time (U.S.)", this means that the date & time bar codes and label text will
conform to that established in the "U.S. Industry Consensus Standards" document.
If "Expiration Date Only" is selected then the expiration-date-only format, as described in the ICCBBA ISBT 128
specification, will be used.
Alternative RH Factor Lines
The "Alternative RH Factor Lines" panel contains a check box and two text entries. This panel is used to change the
Rh Factor line text to something other than the standard text used by the HemaTrax application. These alternative
text lines will be used where the Rh Negative or Rh Positive lines normally appear either at the bottom of the ABORh label in the case of standard blood products. These alternate lines are also used to the right of the ABO-Rh bar
code in the case of autologous or directed labels. The standard text used in the United States is given immediately
below:
Rhesus Factor
U.S. Label Text
Negative
Rh NEGATIVE
Positive
Rh POSITIVE
Default Rh Factor lines used in the United States
Use Alternate Rh Factor Lines
The "Use Alternate Rh Factor Lines" check box is used to indicate when the two lines immediately below are to be
used instead of the standard text used in the United States.
Rh Negative Text
This edit box is used to specify the alternative text to appear on ABO-Rh labels when the unit has been determined to
be Rh Negative. This entry has been limited to twenty characters.
Rh Positive Text
This edit box is used to specify the alternative text to appear on ABO-Rh labels when the unit has been determined to
be Rh Positive. This entry has been limited to twenty characters.
HemaTrax Manual.odt
Copyright © 2007 by Digi-Trax Services, Inc.
19
HemaTrax ISBT-128 Standalone Application
Setup Functions
Port Configuration, Setup
When initially setting up the HemaTrax Standalone program, or when changing hardware attached to the computer it
may be necessary to enter the Setup function of the main menu screen and perform Port Configuration.
The Port Configuration function determines what label print devices are attached to the eight available ports of the
workstation.
Select Port Number
The Select Port Number list box allows the user to select one of eight possible ports to be used for label printing.
The selection is made by first clicking on the down-arrow located at the right of the box. When the down-arrow
button is clicked a list of eight ports (Port1 to Port8) will be displayed. The user selects the desired port by clicking
on one of the choices listed. After clicking on a selection one of two actions will occur; (1) a port definition that was
previously defined will be displayed via the buttons, boxes and lists in the window, or (2) a dialog will appear to
indicate that the selected port is not currently defined.
When a predefined port is displayed, the user can make any needed changes and then save them by clicking on the
"Set" button.
When the port has not been previously defined the dialog box, as shown below, will be displayed.
HemaTrax Manual.odt
Copyright © 2007 by Digi-Trax Services, Inc.
20
HemaTrax ISBT-128 Standalone Application
Setup Functions
The user will indicate whether or not a new definition is to be made. If making a new definition the user will fill in
the information using the various button boxes and lists available in the window. To save the new definition the
"Set" button is clicked.
Port Device
Port device selection is made by clicking one of the four mutually exclusive Port Device radio buttons. This will
establish the printer model to be associated with this port.
Port Address
The port address edit box is used to describe the connection to the port device. This entry will either define the
serial communications port or an IP address to be used to communicate with the port device (printer). If a COM port
is to be used then the user must specify it by entering COMx, where the 'x' is a serial port number. Examples of some
valid serial communications ports are (COM1, COM2, ... COM9, COM10, ... COM32).
If the port address entry is for a port device attached via Ethernet, then the dotted IP address should be used. An
example of one possible IP address is:
192.168.0.115
Baud Rate
The Baud Rate setting for each of four possible COMx ports controls the data transfer rate between the computer and
the printer attached to the port. The baud rate entry is made from the Port Configuration screen available from the
Setup menu selection. The baud rate may be selected from a list by clicking on the down pointing arrow just to the
right of the baud rate entry field. Just click on one of the available baud rates from the list in order to make a valid
selection. The baud rate must be one of the following: 1200, 2400, 4800, 9600, or 19200. Always make a baud rate
setting, even if you have designated the Port Description as an IP address.
HemaTrax Manual.odt
Copyright © 2007 by Digi-Trax Services, Inc.
21
HemaTrax ISBT-128 Standalone Application
Setup Functions
COM CRC
The cyclic redundancy check (CRC) selection determines whether or not a special serial transmission error detection
data format will be used for the blood bank printer that is being defined as the port device. The selection is made by
clicking on one of the radio buttons. Either YES or NO is clicked to determine whether CRC transmission error
checking protocol will be used on the serial COM connection between the computer and the printer. If you select
YES, then you must also make certain that the printer is configured to handle CRC checking.
Print Image Offsets
There are two entries that constitute the Print Image Offsets. These are made by making numeric entries in the
"Horizontal" and "Vertical" edit boxes. The horizontal offset moves the print image to the right and the vertical
offset moves the image down on the printed label. Each of these entries expresses the degree of movement in
millimeters. These entries allow for fractions of a millimeter to be specified, such as "2.3" (excluding the quotation
marks).
Label Form Loaded in Printer
Use this list box to select the form that is currently loaded in the printer associated with this port. By clicking on the
down-arrow button at the right of this box, a list of all the possible label forms is displayed. Click on the form
description in this list that matches the label form currently loaded in the printer. This feature prevents invalid label
formats from being inadvertently sent to the printer.
Set
After making port configuration changes or defining a new port device, the settings should be saved by clicking on
the 'Set' button. To abandon any port configuration settings that may have been made, just close the window by
clicking the button in the upper right-hand corner.
HemaTrax Manual.odt
Copyright © 2007 by Digi-Trax Services, Inc.
22
HemaTrax ISBT-128 Standalone Application
Setup Functions
Replicant Unit Id Format, Setup
The Replicant Unit Id Format setting function is available from the Setup pull-down menu. Access the Setup menu
by either clicking on the Setup title or by pressing the Alt-S key combination. With the Setup pull down menu now
displayed, either click on the Replicant Unit Id Format title line of press the 'R' key to execute this set up function.
After selecting Replicant Unit Id Format, the window illustrated immediately above will displayed at center screen.
This window includes a panel of instruction text located above an unlabeled combo box and a button labeled "OK".
Selecting a Replicant Unit Identification Number Set Format
For a newly installed system, the combo box will be empty, otherwise the currently selected replicant unit ID format
name will appear in the box. By clicking on the down-arrow button at the right side of the combo box a pull-down
list of all the current unit identification number set design files is displayed. The user may select one of these design
files from the list by placing the mouse pointer on the desired design file name and clicking on it.
Note: All of the unit identification number set design files are located in the sub-directory named "Format". All of
these design file names have a ".FMT" file name extension. When viewing the format names, as listed in the combo
box pull-down list, you will not see the ".FMT" file name extension.
Unit identification number set design files can be created or edited through the Maintenance pull-down menu "Unit
Id Label Format" selection.
Saving the Format Selection
After selecting a new or changing an existing replicant unit identification number set format you must click on the
"OK" button to save the selection and close the window.
To exit the window without making any changes click on the upper right-most button, (X), located at the top, right
corner of the window.
HemaTrax Manual.odt
Copyright © 2007 by Digi-Trax Services, Inc.
23
HemaTrax ISBT-128 Standalone Application
Setup Functions
(This page intentionally blank)
HemaTrax Manual.odt
Copyright © 2007 by Digi-Trax Services, Inc.
24
HemaTrax ISBT-128 Standalone Application
Maintenance Functions
Maintenance
Maintenance Pull-Down Menu
The Maintenance pull down menu is selected by either clicking on the Maintenance title in the menu bar or by
pressing the Alt+M key combination. Either of the afore mentioned actions causes the Maintenance pull-down menu,
shown below, to appear.
The Maintenance pull-down menu provides a list of the nine maintenance functions as follows:
1. Archive Activity Log
2. Facility Information
3. Instruction Label
4. Licensed Products by Facility
5. Processing Legends
6. Product Label
7. Qwik-Pik Product List
8. Unit ID Label Format
9. User/Password
The pull-down menu items may be selected by either placing the mouse cursor on the item title and clicking the left
mouse button, or by pressing the underlined letter in the item title.
HemaTrax Manual.odt
Copyright © 2007 by Digi-Trax Services, Inc.
25
HemaTrax ISBT-128 Standalone Application
Maintenance Functions
( This page intentionally blank. )
HemaTrax Manual.odt
Copyright © 2007 by Digi-Trax Services, Inc.
26
HemaTrax ISBT-128 Standalone Application
Archive Activity Log, Maintenance
Archive Activity Log
The Archive Activity Log maintenance function allows the user to move a portion of the Activity Log on-line records
from the (LOG.TXT) log file to an off-line file in the same LOG directory. The archived (moved) records will no
longer be available for viewing as a part of the on-line file (LOG.TXT). The archived records can still be viewed and
printed via the Off-Line Archive Report printing function. The archiving portions of the log file serves to keep the
activity log file at a manageable size so that reports that are displayed or printed do not become too lengthy and thus
require inordinate amounts of time to review or print.
The Archive Activity Log function is selected from the Maintenance menu pull-down list. You may access the
function by clicking on Maintenance pull-down menu selection and then clicking on the Archive Activity Log title
found in the pull-down list. Alternatively, you may press the Alt-M key combination, which displays the
Maintenance pull-down list, and then press the 'A' key.
The Archive Activity Log function should be run during off hours so that it doesn't interfere with normal operations.
While the function is running the activity log file is opened and locked for sustained periods of time and could be
inadvertently accessed for update for other workstations.
The frequency of this operation could be once every six months or once a month depending on the activity load on
the system. Many activities are logged, from program start-up to program termination. Each time a user logs on or
off, labels are printed, a memo is logged, or any database record is added, changed, or deleted, a log record gets
appended to the LOG.TXT file. So it doesn't take long to build up a large number of records in the file. If two or
three users use the system on a daily basis five days a week and two hundred products are labeled each day (52,000
products annually), then in one month approximately 5,500 log entries are feasible. With a monthly log file of 5,500
records, a full month's activity log report will be over 300 printed pages.
HemaTrax Manual.odt
Copyright © 2007 by Digi-Trax Services, Inc.
27
HemaTrax ISBT-128 Standalone Application
Archive Activity Log, Maintenance
When this function has been selected the Archive Activity Log window is displayed. The archive function opens the
log file and scans through all of the records checking to see if any records are out of date order and that the date
fields are not corrupted in any way. During this time the text "Checking Date Order / Finding Start Record Date" will
be displayed in the panel above the buttons at the bottom of the window.
If no activity records exist in the file then an informational dialog box will appear on the screen with the message
"The Activity Log File is empty" and an "OK" button. If the date of the first record is in the current month as
indicated by the system's clock, then an information dialog box will appear in the window stating, "No activity log
records of previous months to archive." with an "OK" button. Clicking on the "OK" button, in either of these cases,
causes the Archive Activity Log window to be closed.
Starting Date
If one or more activity log records from previous months are detected, then the Archive Activity Log window is
displayed and the starting date representing the date of the first record in the activity log file is displayed in the panel
labeled "Starting Date". The Archive Activity Log function always starts with the earliest possible record in the file.
Ending Date
Below the "Ending Date" label is a combo box and an edit box; the month prior to the current month will be
displayed in the combo box and the year associated with the previous month will be displayed in the edit box. These
entries indicate the month and year of the last records to be archived from the activity log file. These settings may be
changed by the operator before the archive function is started.
The action of archiving a portion of the activity log file is started when the "OK" button is clicked. After clicking the
"OK" button, a file name for the archive file will be generated and appear in the panel immediately below then
"Archive File Name" label and the process of producing the archive and moving the records will begin.
Function Processing
The panel just above the buttons at the bottom of the window will indicate the current process. The stages of
processing reflected in this panel are as follows:
•
Copying Range of Log Records to Archive file
•
Copying balance of LOG records to temporary LOG
•
Verifying Archived Records to Source Records of LOG file
•
Original log to Temporary log record verification
•
Archive operation completed successfully.
At the successful completion of processing the Archive Activity Log window will be closed. The Archived Log File
name is constructed automatically and takes the following form:
LOG(Starting Date)_to_(Ending Date).Txt
For example, archiving the log records from May 2, 1998 to May 30, 1998 would result in an archived log file name
of "LOG1998-05-02_to_1998-05-30.Txt".
Processing Errors
If an error is detected by the function during processing, a dialog box will be displayed in the window indicating
HemaTrax Manual.odt
Copyright © 2007 by Digi-Trax Services, Inc.
28
HemaTrax ISBT-128 Standalone Application
Archive Activity Log, Maintenance
what problem has been encountered. Depending on the level or type of error this message may make sense or may
seem cryptic. Basic errors that occur at low levels, such as reading or writing files will typically display an operating
system error number with a basic description of the activity being performed when the error occurred. Higher level
errors will typically indicate an exact problem with data read or input from the operator. Proceed to the Archive
Activity Log Error Recovery section below for more assistance.
Archive Activity Log Error Recovery
The following error dialog box messages may occur initially when the Archive Activity Log window is initially
displayed:
No activity log file found.
This message indicates that the LOG.TXT file has not been found in the LOG subdirectory. The file may have been
either deleted or the file name altered.
Log File Record: (Record Number) Date invalid (Invalid Date Fragment)
Log File Record: (Record Number) Out of date sequence
These messages are indicative of data file corruption. Since the log file is a text file, it may be possible to use a text
editor to find the records in question and correct the problems. Either the offending records can be reordered, the
dates corrected or if the records are severely damaged the records deleted.
Error: (Error Number) occurred while reading the log file
The exact cause for this type of message may be difficult to identify. Possible causes are hardware problems or in a
multi-user environment, someone else may have already gained exclusive access to the file.
The following error dialog box messages may occur after clicking on the "OK" button:
Error opening (Path)\LOG.TXT
Error opening (Path)\(Archive File Name)
Error: (I/O Error #) while reading log file
Error: (I/O Error #) occurred while creating temporary log file
Error: (I/O Error #) occurred while reading log file during temporary log file creation.
Error: (I/O Error #) occurred while writing to temporary log file during temporary log file
creation.
Error: (I/O Error #) opening archive file for verification.
Error: (I/O Error #) opening log file for verification.
Error: (I/O Error #) reading archive file for verification.
Error: (I/O Error #) occurred while reading log file during verification.
Archive-Log verification failed at record:(Record #)
Error: (I/O Error #) occurred while opening temporary log file during verification.
Error: (I/O Error #) reading temporary log for verification.
Error: (I/O Error #) reading log file for verification.
Log-TempLog verification failed at record:(Record #)
Low level errors, which are identified as "Error: (I/O Error #) ...", are typically caused by either a hardware failure
(such as a disk head crash or interface electronics failure) or a system level conflict. A system level conflict could be
the result of a file sharing access violation on a network caused when more than one user attempts to access a file
exclusively.
(Also see Error Numbers for more help.)
HemaTrax Manual.odt
Copyright © 2007 by Digi-Trax Services, Inc.
29
HemaTrax ISBT-128 Standalone Application
Archive Activity Log, Maintenance
(This page intentionally blank)
HemaTrax Manual.odt
Copyright © 2007 by Digi-Trax Services, Inc.
30
HemaTrax ISBT-128 Standalone Application
Facility Information, Maintenance
Facility Information, Maintenance
This function makes it possible to enter and maintain facility information for one or more collection/processing
facilities.
The "Facility Information" function is selected from the Maintenance menu pull-down list. You may access the
function by clicking on Maintenance menu selection (which displays the Maintenance pull-down list) and then
clicking on Facility Information in the resulting pull-down list. Alternatively, you may press the Alt-M key
combination (which displays the Maintenance pull-down list) and then press the 'F' key.
With the cursor positioned in the Facility World Code edit box, the user may enter the Facility World Code for either
a new or an existing facility. After entering the code the user advances to the next edit box by pressing the 'Tab' key.
Adding a New Facility
If the Facility World Code entered does NOT currently exist in the database and after the 'Tab' key is pressed, then
the "Add" button located at the bottom of the window will be enabled and the "Change" and "Delete" buttons
disabled. The edit boxes of the window will remain empty and the cursor will advance to the Facility Name edit box.
The user now proceeds to enter the balance of information for the following edit boxes:
Facility Name
The Facility Name is a required edit box entry with a maximum entry length of 100 characters. This name will
appear in the facility information area (middle third of the upper left hand quadrant) of full face labels. By including
a vertical bar character, "|", in the name, the point at which the line will wrap can be forced.
Facility City, State & Zip Code
The Facility City, State & Zip Code is a required edit box entry with a maximum entry length of 36 characters. This
location information will appear in the facility information area (middle third of the upper left hand quadrant) of full
face labels.
HemaTrax Manual.odt
Copyright © 2007 by Digi-Trax Services, Inc.
31
HemaTrax ISBT-128 Standalone Application
Facility Information, Maintenance
License Holder Name
The License Holder Name is an optional edit box entry with a maximum entry length of 100 characters. This is name
of the central FDA license number holder. This edit box is only used if more than one location shares a common
license number held by a central facility name. This license holder name will appear in addition to the collection and
processing facility name in the facility information area (middle third of the upper left hand quadrant) of full face
labels for all licensed products. By including a vertical bar character, "|", in the name, the point at which the line will
wrap can be forced.
Holder City, State & Zip Code
The Holder City, State & Zip Code entry is an optional edit box entry with a maximum length of 36 characters. This
is the location information of the central FDA license number holder. This edit box is only used if more than one
location shares a common license number held by a central facility name. This license holder location does not
appear in the facility information area (middle third of the upper left hand quadrant) of full face labels for all
licensed products.
Registration Number
The Registration Number is a required entry for all U.S. or FDA regulated facilities. The entry is numeric only with a
maximum entry length of 10 digits. HemaTrax Standalone determines that the facility is FDA regulated based on the
contents of the Facilty World Code entry. "W0000 - W9999" and "K0000 - K4999" facility world code ranges
indicate a U.S. facility causing the Registration Number field to become a required entry.
License Number
The License Number is a required entry for all U.S. or FDA regulated facilities that are manufacturing licensed
products. The entry accepts a combination of numerals and dash characters with a maximum entry length of 7
characters.
After completing these entries, click on the "Add" button located at the bottom of the window. If all required entries
have been made and the format of the entries is correct, the record is added to the facility information database and
the entry fields of the window cleared for the next entry.
Changing Existing Facility Information
If the Facility World Code entered currently exists in the database and after the 'Tab' key is pressed, then the
"Change" and "Delete" buttons located at the bottom of the window are enabled. The edit boxes of the window will
be filled with the entries found in the database for this facility and the cursor will advance to the Facility Name edit
box. The user now proceeds to change the displayed information. It is important to note here that the Facility World
Code entry can not be changed. To change the Facility World Code the existing facility record should be deleted and
a new record then added.
After the appropriate entries have been changed, click on the "Change" button located at the bottom of the window.
The appropriate facility record in the database will be updated. After the database is updated, all of the edit boxes in
the window will be cleared in preparation for the next operation.
Deleting an Existing Facility
If the Facility World Code entered currently exists in the database and after the 'Tab' key is pressed, then the
"Change" and "Delete" buttons located at the bottom of the window will be enabled. The edit boxes of the window
will be filled with the entries found in the database for this facility and the cursor will advance to the Facility Name
HemaTrax Manual.odt
Copyright © 2007 by Digi-Trax Services, Inc.
32
HemaTrax ISBT-128 Standalone Application
Facility Information, Maintenance
edit box. To delete the displayed record the user clicks on the "Delete" button located at the bottom of the window.
The appropriate facility record in the database will be deleted. After the database record is removed, all of the edit
boxes in the window will be cleared in preparation for the next operation.
Cancel
Clicking on the "Cancel" button causes all fields to be cleared and positions the cursor in the "Facility World Code"
entry box so that the user may specify a different facility code.
Facility World Code
This code is a five character alpha numeric entry. The first character of this entry may be in the range (A - Z, 0 - 9).
The last four characters of this entry must be in the range (0 - 9). In the United States the ranges of applicable codes
are (K0000 - K4999 and W0000 - W9999). For more information about the assignments of these codes, please
reference the ICCBBA documentation on this subject.
HemaTrax Manual.odt
Copyright © 2007 by Digi-Trax Services, Inc.
33
HemaTrax ISBT-128 Standalone Application
Facility Information, Maintenance
( This page intentionally blank. )
HemaTrax Manual.odt
Copyright © 2007 by Digi-Trax Services, Inc.
34
HemaTrax ISBT-128 Standalone Application
Instruction Label, Maintenance
Instruction Label, Maintenance
This function makes it possible to enter and maintain instruction label information for one or more instruction label
designs.
The "Instruction Label" function is selected from the Maintenance menu pull-down list. You may access the function
by clicking on Maintenance menu selection (which displays the Maintenance pull-down list) and then clicking on
Instruction Label in the resulting pull-down list. Alternatively, you may press the Alt-M key combination (which
displays the Maintenance pull-down list) and then press the 'I' key.
With the cursor positioned in the Label Title combo box, the user may either enter the name of a new instruction
label to be created or pull-down the list of currently defined instruction labels to select from. After either entering a
new Label Title or selecting one from the pull-down list, the user advances to the next edit box by pressing the 'Tab'
HemaTrax Manual.odt
Copyright © 2007 by Digi-Trax Services, Inc.
35
HemaTrax ISBT-128 Standalone Application
Instruction Label, Maintenance
key.
Clicking on the "Cancel" button clears all edit box entries, resets the radio button selection, deselects any selected
Instruction Label record and returns the cursor to the Label Title combo box. No additions, changes or deletions are
committed to the database.
Adding a New Instruction Label
If the instruction Label Title entered does NOT currently exist in the database and after the 'Tab' key is pressed, then
the "Add" button located at the bottom of the window will be enabled and the "Change" and "Delete" buttons remain
disabled. The edit boxes of the window will remain empty and the cursor will advance to the Line 1 edit box. The
user now proceeds to enter the balance of information for the edit boxes labeled Line 1 through Line 10. The user
may decide to either left justify or center lines 2 - 10 by selecting the appropriate radio button in the Text
Justification (Lines 2-10) radio button group. The new record is added by clicking on the "Add" button.
Instruction Label Line 1
Line 1 of the Instruction Label is printed in a slightly larger font and is always centered horizontally in the label. The
maximum number of characters allowed for this entry is 22.
Instruction Label Lines 2 - 10
Lines 2 through 10 of the Instruction Label are printed in a font that is slightly smaller than that of Line 1. Lines 2
through 10 may be either left justified or centered horizontally in the label. These line entries have a maximum entry
length of 26 characters.
Changing an Existing Instruction Label
If the instruction Label Title entered currently exists in the database and after the 'Tab' key is pressed, then the
"Change" and "Delete" buttons located at the bottom of the window will be enabled. The edit boxes of the window
will be filled with the entries found in the database for this instruction label and the cursor will advance to the Line 1
edit box. The user now proceeds to change the displayed information. After the appropriate entries have been
changed, click on the "Change" button located at the bottom of the window and the appropriate instruction label
record will be updated in the database. After the database is updated, all of the edit boxes in the window will be
cleared in preparation for the next operation.
Deleting an Existing Instruction Label
If the instruction Label Title entered currently exists in the database and after the 'Tab' key is pressed, then the
"Change" and "Delete" buttons located at the bottom of the window will be enabled. The edit boxes of the window
will be filled with the entries found in the database for this instruction label and the cursor will advance to the Line 1
edit box. To delete the displayed record the user clicks on the "Delete" button located at the bottom of the window.
The appropriate instruction label record will be deleted from the database. After the database record is removed, all
of the edit boxes in the window will be cleared in preparation for the next operation.
HemaTrax Manual.odt
Copyright © 2007 by Digi-Trax Services, Inc.
36
HemaTrax ISBT-128 Standalone Application
Licensed Products, Maintenance
Licensed Products, Maintenance
The Licensed Products by Facility maintenance function allows a list of products to be associated with a specific
facility world code as U.S. FDA Licensed products. This information is used when printing full face labels to include
or exclude the facility's license number under the processing facility's name and location in the upper left-hand label
quadrant based on which product is being produced. When a full face label is being specified and a product, which
has been indicated as licensed by the facility, is selected the operator will be prompted to click on an "Include
License" check box. The license number is not automatically included because other factors such as donation type,
complete of testing, etc., may preclude inclusion of the license number on the full face label.
The "Licensed Products by Facility" function is selected from the Maintenance menu pull-down list. You may access
the function by clicking on Maintenance menu selection (which displays the Maintenance pull-down list) and then
clicking on Licensed Products by Facility in the resulting pull-down list. Alternatively, you may press the Alt-M key
combination (which displays the Maintenance pull-down list) and then press the 'L' key.
If no facilities are defined when the maintenance function is executed, you will see a error message dialog window
appear in the center of the screen with the message "No facilities found; At least one must be defined.". Pressing the
'Enter' key or clicking on the "Abort" button in this dialog box will cause the error dialog window to close. You must
enter at least one facility by using the Facility Information function available from the Maintenance menu pull-down.
When the Licensed Products by Facility window is initially displayed the panel labeled Facility World Code will
appear empty. For each of the facilities that are defined in the database, a facility number and name will appear on a
line in the Facilities list box.
HemaTrax Manual.odt
Copyright © 2007 by Digi-Trax Services, Inc.
37
HemaTrax ISBT-128 Standalone Application
Licensed Products, Maintenance
Selecting a Facility
Selecting a facility for making additions and deletions in the list of licensed products is accomplished by double
clicking on the desired facility in the Facilities list box. Upon double clicking the desired facility, the number of the
selected facility will be displayed in the panel labeled Facility World Code panel and any licensed product code
already associated with the select facility, if any, will display in multiple columns in the list box labeled Licensed
Product Codes located approximately in the center of the window.
Adding Licensed Products for a Specific Facility
After selecting a facility, you may specify the product code to be added by either entering the ICCBBA product code
in the edit box labeled Code or by searching for the product code based on known product attributes by clicking on
the "Product" button located just to the left of the Code edit box. If you have manually entered a known ICCBBA
product code in the Code edit box, pressing the 'Tab' key causes the code to be looked up in the product database. If
a product is selected from the window displayed after clicking on the "Product" button or if the product code
manually entered is found after the 'Tab' key was pressed, then the product's description will be displayed in the
Description panel near the bottom of the window and the "Add" button will be enabled.
By clicking on the "Add" button the new product code will be added to the licensed products database for the
selected facility. After clicking the "Add" button the product code will appear listed in the appropriate alphanumeric
sort sequence in the Licensed Product Codes list box, the Code edit box and the product's Description panel will be
cleared and the cursor will be returned to the Code edit box for the next entry.
If instead of clicking on the "Add" button, the "Cancel" button is clicked, the Code edit box and the product's
Description panel will be cleared. When the "Cancel" button is clicked the specified product code is not added to the
licensed products database and the cursor is returned to the Code edit box for the another entry.
Deleting Licensed Products for a Specific Facility
After selecting a facility, you may specify the product code to be deleted by double clicking on the specific product
code in the Licensed Product Codes list box. After double clicking on the specific product code, the product's
ICCBBA code will appear in the Code edit box, the product's description will appear in the Description panel, and
the "Delete" button will be enabled.
By clicking on the "Delete" button the selected product code will be removed from the licensed product codes
database for the specified facility. After the "Delete" button is clicked the selected product code will be removed
from the Licensed Product Codes list box, the contents of the Code edit box and Description panel will be cleared,
the "Delete" button is disabled, and the cursor is returned to the Code edit box.
If instead of clicking on the "Delete" button, the "Cancel" button is clicked, the Code edit box and the product's
Description panel will be cleared. When the "Cancel" button is clicked the specified product code is not deleted from
the licensed products database and the cursor is returned to the Code edit box.
HemaTrax Manual.odt
Copyright © 2007 by Digi-Trax Services, Inc.
38
HemaTrax ISBT-128 Standalone Application
Processing Legends, Maintenance
Processing Legends, Maintenance
This function makes it possible to enter and maintain processing legends which appear on the date & time label.
The Processing Legends maintenance function is available under the Maintenance selection pull-down menu of the
main menu. You may access the function by clicking on Maintenance menu selection (which displays the
Maintenance pull-down list) and then clicking on Processing Legends in the resulting pull-down list. Alternatively,
you may press the Alt-M key combination (which displays the Maintenance pull-down list) and then press the 'r' key.
Add
To add a new processing legend, click on the Add button located in the lower left-hand portion of the window.
Clicking this button will cause the "Add Processing Legend" window, shown below, to appear.
Type the new processing legend text into the "Processing Legend" edit box provided and then click on the OK
button to complete the addition process. Now the new legend will appear at the end of the processing legends list. If
HemaTrax Manual.odt
Copyright © 2007 by Digi-Trax Services, Inc.
39
HemaTrax ISBT-128 Standalone Application
Processing Legends, Maintenance
instead of clicking the OK button, you click on the Cancel button, then the add process is abandoned and no addition
is made to the processing legends list.
Change
To change a processing legend, selection is made by double-clicking on the legend in the list. After the legend is
selected, the "Change Processing Legend" window, shown immediately below, will appear. The selected legend is
displayed in the "Processing Legend" edit box, ready for any changes to be made.
Make any changes that you desire to the text of the legend in the edit box. When you have finished making any
changes to the text, click on the OK button to complete the change process. After clicking the OK button, the
selected legend in the processing legends list will reflect the changes that you have made. If instead of clicking the
OK button, you click on the Cancel button then the change process is abandoned and no change is made to the
selected legend in the processing legends list.
Remove
To remove a processing legend from the list, single-click on the processing legend entry to be removed. With the
entry now selected (highlighted), click on the Remove button located below and to the right edge of the processing
legends list box. Upon clicking the Remove button the selected entry will be removed from the list.
Ordering of Legends
The order in which legends appear in the list box also reflects the order that these entries will be displayed in the
combo boxes of the Date and Time Label printing windows of the HemaTrax Standalone application program. The
legends can be organized into any order of appearance that you desire through the use of the "Down" and "Up"
button located to the right of the processing legends list box.
To move a legend up or down in the displayed list, first single-click the legend that is to be moved. With the legend
now selected (highlighted) move it by clicking on the either the "Down" button or the "Up" button. Each time one of
these buttons is clicked, the legend text is moved one line.
Save
Clicking the Save button permanently commits all of the changes to the processing legends file. Closing the window
without clicking the Save button causes all of the changes made, since the window was displayed, to be lost.
HemaTrax Manual.odt
Copyright © 2007 by Digi-Trax Services, Inc.
40
HemaTrax ISBT-128 Standalone Application
Product Label, Maintenance
Product Label, Maintenance
This function makes it possible to enter and maintain product code and label information.
The Product Label maintenance function is available under the Maintenance selection pull-down menu of the main
menu. You may access the function by clicking on Maintenance menu selection (which displays the Maintenance
pull-down list) and then clicking on Product Label in the resulting pull-down list. Alternatively, you may press the
Alt-M key combination (which displays the Maintenance pull-down list) and then press the 'P' key. When the
window is initially displayed the first tabbed page (Product Search Attributes) of the three pages is displayed as
shown above.
Above the tabbed pages is the Product Code edit box and "Find Product" button.
Product Code
The Product Code edit box accepts a five alphanumeric character entry which must conform to the ICCBBA
specification for a valid product code. The first character may be (A - Z) and the remaining four characters must each
be in the range (A-Z, a-z, 0-9). This is a required entry field and can only be supplied if you already know the
ICCBBA assigned code. (See Find Product button description for an alternative way to locate existing product codes
by searching for them based on their search attributes.)
There are three tabbed pages labeled as follows:
•
Product Search Attributes
•
Product Label Information
HemaTrax Manual.odt
Copyright © 2007 by Digi-Trax Services, Inc.
41
HemaTrax ISBT-128 Standalone Application
•
Product Label, Maintenance
Unknown Volumes and Measures
You may move to any tabbed page by clicking on the tab of the page that you wish to view.
Below the tabbed pages are four buttons: "Preview", "Save", "Cancel" and "Delete".
Preview
When the "Preview" button is clicked, a window is displayed with a representation of what the printed product label
might look like.
Save
When the "Save" button is clicked, the contents of the current Product Label window is saved in the HemaTrax
StandaloneTM product database. After the database is updated, all of the edit boxes and other windows controls are
initialized to accept the next product label definition and the cursor is returned to the Product Code edit box for the
next entry.
Cancel
Clicking on the "Cancel" button causes all of the edit boxes and other windows controls are initialized to accept the
next product label definition and the cursor is returned to the Product Code edit box for the next entry. Any entries
that have been made are ignored and the product database is not updated.
Delete
When the "Delete" button is clicked a Warning dialog box will appear at center screen with the message, "Are you
sure you want to delete this product code?" and with a "Yes" and "No" button. Clicking on the "Yes" button causes
the currently displayed product to be deleted from the database. After the product is deleted from the database, all of
the edit boxes and other windows controls are initialized to accept the next product label definition and the cursor is
returned to the Product Code edit box for the next entry. Clicking on the "No" button causes the dialog box to be
cleared and no other actions are taken.
HemaTrax Manual.odt
Copyright © 2007 by Digi-Trax Services, Inc.
42
HemaTrax ISBT-128 Standalone Application
Product Label, Maintenance
Product Search Attributes
In the illustration below, the Product Label window is depicted with the Product Search Attributes tabbed page
selected.
The Product Search Attributes notebook tab contains information that is used when a search is to be performed for a
product by specifying some or all of its known attributes.
Product Category
The Product Category is selected from the combo list box. This product category selection will be used later for
searching for a specific category of products as defined in the ICCBBA database. The list that follows includes all of
the product catagories that are currently used in the ICCBBA product database and in the United States:
Cryoprecipitate
Fresh Frozen Plasma
Granulocytes
Granulocytes/Platelets
Leukocytes
Lymphocytes
Monocytes
Plasma
Platelet-Rich Buffy Coat
Platelet-Rich Plasma
Platelets
Pooled Cryoprecipitate
Pooled Fresh Frozen Plasma
Pooled Granulocytes
Pooled Plasma
Pooled Platelet-Rich Buffy Coat
Pooled Platelets
Pooled Serum
Red Blood Cells
Serum
Whole Blood
HemaTrax Manual.odt
Copyright © 2007 by Digi-Trax Services, Inc.
43
HemaTrax ISBT-128 Standalone Application
Product Label, Maintenance
Product Modifier
The is one of a group of predefined modifiers that may be either selected from a combination list box or entered in
an edit box. These modifiers are as follows:
Apheresis
Deglycerolized
Deglycerolized Apheresis
Deglycerolized Rejuvenated
Deglycerolized Rejuvenated Apheresis
Frozen
Frozen Apheresis
Frozen Rejuvenated
Frozen Rejuvenated Apheresis
Liquid
Liquid Apheresis
Rejuvenated
Rejuvenated Apheresis
Thawed
Thawed Apheresis
Anticoagulant
The Anticoagulant combo box is used to specify the anticoagulant that will be associated with a product when it is to
be searched for. The current list of selections available are as follows:
None
0.5CPD
ACD-A
ACD-B
CP2D
CP2DA
CPD
CPD-50
CPDA-1
DMSO
Glycerol 17%
Glycerol 35%
Glycerol 40%
Heparin
NaCitrate
NaCitrate-HES
NaCitrate-HES-ACD-A
None
PAGGS-M
PASII
PASIII
SAGM
Trisodium Citrate
Additive Solution
The Additive Solution combo box is used to specify the additive solution that will be associated with a product when
it is to be searched for. The current list of selections available are as follows:
None
AS1
AS2
AS3
AS5
Store Temp.
The Store Temp. combo box list allows the storage temperature of a product to be searched for to be specified.
Currently the list of available storage temperatures that may be selected include the following:
REFG (1 to 6 C)
RT (Room Temp.)
<= -18°C
<= -20°C
HemaTrax Manual.odt
<= -30°C
<= -65°C
Copyright © 2007 by Digi-Trax Services, Inc.
44
HemaTrax ISBT-128 Standalone Application
< 37°C
20 to 24°C
Product Label, Maintenance
< -20°C
<= -25°C
<= -80°C
<= -120°C
Draw Vol.
The Draw Vol. combo box list allows the original draw volume of a product to be searched for to be specified.
Currently the list of available draw volumes that may be selected include the following:
?
200 mL
250 mL
400 mL
450 mL
500 mL
Irradiated
The Irradiated check box is used to indicate that the product to be searched for is irradiated.
System Opened
The System Opened check box is used to indicate that the product to be searched for has been opened to a non-sterile
environment.
Not Used in U.S.A.
The Not Used in U.S.A. check box is used to indicate that this product is not recognized by the U.S. Food and Drug
Administration (FDA).
HemaTrax Manual.odt
Copyright © 2007 by Digi-Trax Services, Inc.
45
HemaTrax ISBT-128 Standalone Application
Product Label, Maintenance
Product Label Information, Maintenance
In the illustration below, the Product Label window is depicted with the Product Label Information tabbed page
selected.
The Product Label Information tabbed page contains the specific information that is to be printed on the product
label.
Product Description
The Product Description edit box accepts alphanumeric text intended to supply a nut shell description of the product.
This description should use an abbreviated form of the product's proper name such as WB for Whole Blood or RBC
for Red Blood Cells, etc. The description should also indicate any modifier information such as FRZN for Frozen or
DEGLCYD for Deglycerolized. The description should also indicate the anticoagulant used. Inclusion of the volume
of the product is important. The description should indicate the storage temperature and any other descriptive
elements that differentiate this product from other products such as IRRD for Irradiated or OPN SYS for Opened
System, etc. An example of a possible product description is shown below:
RBC,FRZN,AS-3,450 ML,-65C,REJUV DGLYCD, IRRD,OPN SYS
Note: This entry is not printed on the product label.
Product Name
The Product Name is the proper product name that may entered into an edit box. The maximum length of this entry
is forty (40) characters. This product name will appear on the product label. The list that follows includes all of the
product names that are currently used in the ICCBBA product database and in the U.S.A.:
Apheresis Cryoprecipitate
Apheresis Fresh Frozen Plasma
Platelet-Rich Buffy Coat
Platelet-Rich Plasma
HemaTrax Manual.odt
Copyright © 2007 by Digi-Trax Services, Inc.
46
HemaTrax ISBT-128 Standalone Application
Product Label, Maintenance
Apheresis Granulocytes
Apheresis Granulocytes/Platelets
Apheresis Leukocytes
Apheresis Lymphocytes
Apheresis Monocytes
Apheresis Plasma
Apheresis Platelets
Apheresis Red Blood Cells
Cryoprecipitate
Fresh Frozen Plasma
Granulocytes
Leukocytes
Plasma
Platelets
Pooled Cryoprecipitate
Pooled Fresh Frozen Plasma
Pooled Granulocytes
Pooled Plasma
Pooled Platelet-Rich Buffy Coat
Pooled Platelets
Pooled Serum
Red Blood Cells
Serum
Whole Blood
Additive Solution
The Additive Solution is an edit box entry that is printed on the product label immediately below the product's
proper name. The maximum entry length for the Additive Solution edit box text is forty (40) characters. There are
currently four possible additive solution text lines that might appear on a product label. All of these additive
solutions are used exclusively with the Red Blood Cell product category and are as follows:
Adenine-Saline (AS-1) Added
Adenine-Saline (AS-2) Added
Adenine-Saline (AS-3) Added
Adenine-Saline (AS-5) Added
Attributes
The Attributes is an edit box that accepts one or more of the attributes as defined in the U.S. Industry Consensus
Standard and in the ICCBBA Product Code Database specification. The maximum entry length for this edit box is
one hundred (100) characters. Multiple Attributes may be placed in this box by separating each block of attribute
text with the vertical bar character '|'. This text is printed on the product label below the product name or below any
additive solutions. Some of these attributes are as follows:
CYROPRECIPITATE REMOVED
DIVIDED
IRRADIATED
LEUKOCYTES REDUCED
Collection Date Required
The Collection Date Required check box is found on the Product Label Information tabbed page of the Product
Label maintenance window. Checking this box indicates that this product requires that the collection date, rather than
an expiration date, must appear in the product labeling.
Expiration Period
The Expiration Period edit box accepts a numeric value that represents the number of Expiration Units that may
HemaTrax Manual.odt
Copyright © 2007 by Digi-Trax Services, Inc.
47
HemaTrax ISBT-128 Standalone Application
Product Label, Maintenance
transpire from the date of collection before the product shelf life has expired. This is an optional entry.
Expiration Unit
The Expiration Unit is a combination box list entry that indicates the units used to measure the expiration period of a
product. The current expiration units are as follows:
DAYS
HOURS
YEARS
Intended Use
The Intended Use entry may be either for an edit box or a selection from a combo box list. This entry represents
intended manufacturing use. The maximum entry length for this edit box is one hundred (100) characters. Some of
the uses that may be entered or selected are as follows:
For transfusion
For mnf:injectable
For mnf:injectable, restr use
For mnf:noninjectable
For mnf:noninjectable, restr use
Not for tx or mnf
Additional Attributes
The Additional Attributes memo box accepts entries that indicate the Original draw volume of product, the
anticoagulant used (possibly including the known volume of anticoagulant), the description and volumes of other
additives, and the storage temperature. The maximum entry size for this memo box is five hundred (500) characters.
This information is printed on the product label and its content and format are dictated by your compliance authority
(in the U.S. this is the FDA).
Inclusion of the vertical bar character '|' in the text will force a hard return at this point in the text when the label is
printed. The vertical bar character will not be printed on the label.
Inclusion of the question mark character '?' anywhere in the additional attributes text indicates that there is an
unknown volume or measure at this point. When a label is about to be printed each '?' (question mark), appearing in
the additional attributes text, needs to be replaced by the operator with the appropriate volume information before
the label is printed. If a volume or measure is not supplied then a blank line, five spaces wide (_____), will appear on
the printed label at this point.
Important Note: To embed the degree symbol ' °' in the storage temperature text, hold down the "Alt" key while
typing 248 on the numeric key pad (don't type 248 on the keys located across the top of the key board). When the
'Alt' key is released the degree symbol will appear in the text. At the time of this writing there was some confusion
as to whether or not the degree symbol and the use of the period punctuation character was acceptable in the
additional attributes text.
HemaTrax Manual.odt
Copyright © 2007 by Digi-Trax Services, Inc.
48
HemaTrax ISBT-128 Standalone Application
Product Label, Maintenance
Other Information
The Other Information memo box entry is used for test results text and other text that will appear either below the
Additional Attributes text on the product label or in quadrant four for products that take a collection date. The
maximum entry length for this memo box is five hundred (500) characters.
Unknown Volumes and Measures
The Unknown Volumes and Measures tabbed page of the Product Label window is used to define the prompts and
allowable ranges for unknown volumes and measures that are listed in the Additional Attributes portion of the
product label definition. The Product Label maintenance window with the Unknown Volumes and Measures page
displayed is shown immediately below.
For each occurrence of a question mark '?' appearing in the Additional Attributes memo text on the Product Label
Information tabbed page, a row of three edit boxes will appear on this page. The rows of edit boxes are in direct
relation to the occurrence of each question mark in the Additional Attribute memo text on the Product Label
Information page. Each of the three unknown volumes and measures edit boxes that appear in a row on the Unknown
Volumes and Measures page is defined below:
Volume or Measure Request Prompt
The Volume or Measure Request Prompt is an edit box that is used to enter the text that will prompt the user for an
unknown volume entry just before a product with an unknown volume is printed. This entry should be brief but
descriptive enough for the user.
HemaTrax Manual.odt
Copyright © 2007 by Digi-Trax Services, Inc.
49
HemaTrax ISBT-128 Standalone Application
Product Label, Maintenance
Volume Type
The Volume Type is a code number that is not directly used by the HemaTrax Standalone application. This code is
used by the HemaTrax ISBT-128 TCP/IP Print Server. The code takes the form of a single digit integer. The
meaning assigned to the numeric value is given below:
Volume Type
Volume Description
0
No unknown value
1
Original Draw Volume (mLs)
2
Unit Volume (mLs)
3
Anticoagulant Volume (mLs)
4
HES Content (mEq)
5
Number of units in pool
6
Anticoagulant (abbrev.)
7 ...
Reserved
>= LOW VALUE
The >= LOW VALUE is an edit box entry that is used to optionally specify to the program what the minimum
numeric value that may be accepted as an unknown volume. This entry may be of the form 9999.999.
< HIGH VALUE
The < HIGH VALUE is an edit box entry that is used to optionally specify to the program what the maximum
numeric value that may be accepted as an unknown volume. This entry may be of the form 9999.999.
HemaTrax Manual.odt
Copyright © 2007 by Digi-Trax Services, Inc.
50
HemaTrax ISBT-128 Standalone Application
Qwik-Pik List, Maintenance
Qwik-Pik Product List, Maintenance
The Qwik-Pik Product List maintenance function provides for the creation and maintenance of a list of up to one
hundred (100) most commonly produced products. This allows users to quickly select a product without having to go
through the more involved process of identifying a product from the ICCBBA product database.
You may access the function by clicking on Maintenance menu selection (which displays the Maintenance pull-down
list) and then clicking on Qwik-Pik Product List in the resulting pull-down list. Alternatively, you may press the AltM key combination (which displays the Maintenance pull-down list) and then press the 'Q' key. The illustration
above shows the Qwik-Pik Product List maintenance window that appears after the user has selected the function.
Select Product
The "Select Product" button works in similar fashion to the "Find Product" button of the Product Label maintenance
window. The purpose of this button is to call up the window that can be used to select a narrow range of ICCBBA
defined products from a product can be selected and then added to the current Qwik-Pik list.
The Selected Product panel displays a product that has been selected through the process mentioned above. With a
product selected, use one of the two buttons of the Qwik-Pik List Functions panel ("Add to List", "Insert in List") to
place the selected product either at the end of the current list or before the currently highlighted product item in the
list respectively.
HemaTrax Manual.odt
Copyright © 2007 by Digi-Trax Services, Inc.
51
HemaTrax ISBT-128 Standalone Application
Qwik-Pik List, Maintenance
Qwik-Pik List Functions
The Qwik-Pik List Functions panel contains the "Add to List" button, the "Delete from List" button, the "Insert in
List" button and the two Move Highlighted Item buttons.
Below the Qwik-Pik List Functions panel is the "Save" button. When this button is clicked, any changes that have
been made to the Qwik-Pik list are saved and the Qwik-Pik Product List maintenance window is closed.
The Qwik-Pik List list box displays the current list of products in the order that they will be displayed during QwikPik product selection.
At the top and to the right of the Qwik-Pik List list box is a panel that displays the current number of products that
are in the list.
Add to Qwik-Pik List
Clicking the "Add to List" button of the Qwik-Pik List Functions panel appends the currently selected product, as
displayed in the Selected Product panel, to the end of the current list as displayed in the Qwik-Pik List list box.
Note: If you click on the Add to List button without first selecting a product through the use of the Select Product
button, a Warning dialog box will appear at center screen with the message, "You must first select a product to
be inserted.". Press the 'Enter' key or click the OK button of the dialog box to clear it.
If you attempt to add a product to the Qwik-Pik list which is already in the list, a Warning dialog box will appear at
center screen with the message, "This product is already in the Qwik-Pik list.". Press the 'Enter' key or click the
"OK" button of the dialog box to clear it.
Delete from Qwik-Pik List
Clicking the "Delete from List" button of the Qwik-Pik List Functions panel deletes the product that is currently
highlighted in the Qwik-Pik List list box.
Note: If you click the "Delete from List" button without first highlighting a product in the Qwik-Pik List list box, a
Warning dialog box will appear at center screen with the message, "Qwik-Pik List item must first be highlighted.".
Press the 'Enter' key or click the "OK" button of the dialog box to clear it.
Insert in Qwik-Pik List
Clicking the "Insert in List" button of the Qwik-Pik List Functions panel inserts the currently selected product, as
displayed in the Selected Product panel, before the currently highlighted product in the Qwik-Pik List list box.
Note: If you click on the "Insert in List" button without first selecting a product through the use of the "Select
Product" button, a Warning dialog box will appear at center screen with the message, "You must first select a
product to be inserted.". Press the 'Enter' key or click the "OK" button of the dialog box to clear it.
If you try to insert a selected product without first highlighting a product in the Qwik-Pik List list box, a Warning
dialog box will appear at center screen with the message, "Qwik-Pik List item must first be highlighted.". Press the
'Enter' key or click the "OK" button of the dialog box to clear it.
If you attempt to insert a product to the Qwik-Pik list which is already in the list, a Warning dialog box will appear at
center screen with the message, "This product is already in the Qwik-Pik list.". Press the 'Enter' key or click the
"OK" button of the dialog box to clear it.
Move Highlighted Item in Qwik-Pik List
There are two buttons labeled Move Highlighted Item in the Qwik-Pik List Functions panel. One button displays an
HemaTrax Manual.odt
Copyright © 2007 by Digi-Trax Services, Inc.
52
HemaTrax ISBT-128 Standalone Application
Qwik-Pik List, Maintenance
arrow pointing up and the other shows an arrow pointing down. With a product of the Qwik-Pik List list box
highlighted pressing these buttons moves the item up or down in the displayed Qwik-Pik List list box. This allows
the user to re-order the items in the list, placing the most often accessed items to the front of the list.
Note: If you click on either of the "Move Highlighted Item" buttons without first highlighting a product in the
Qwik-Pik List list box, then a Warning dialog box will be displayed with the message, "Qwik-Pik List item must
first be highlighted.". Press the 'Enter' key or click the "OK" button of the dialog box to clear it.
HemaTrax Manual.odt
Copyright © 2007 by Digi-Trax Services, Inc.
53
HemaTrax ISBT-128 Standalone Application
Qwik-Pik List, Maintenance
( This page intentionally blank. )
HemaTrax Manual.odt
Copyright © 2007 by Digi-Trax Services, Inc.
54
HemaTrax ISBT-128 Standalone Application
Unit ID Label Format, Maintenance
Unit Id Label Format, Maintenance
This function makes it possible to enter and maintain multiple unit number identification label set format files. Each
Unit Id Label Format file describes the label geometry (physical layout) of a unit id number set.
You may access the function by clicking on Maintenance menu selection (which displays the Maintenance pull-down
list) and then clicking on Unit Id Label Format in the resulting pull-down list. Alternatively, you may press the Alt-M
key combination (which displays the Maintenance pull-down list) and then press the 'n' key. The illustration above
shows the Unit Id Label Format maintenance window that appears after the user has selected the function.
Format Name
The Format Name combo box serves two purposes:
1. It allows the user to enter the format name of a new unit id label format file to be created.
2. It allows the user to select an existing unit id label format file for change or deletion.
This combo box allows the user to specify the unit id label format file name that is to be created or edited. The
maximum length of this entry is 8 characters. All lower case alphabetic characters entered in this box (a-z) are
converted to and displayed in upper case.
While the actual format file names stored in the "Formats" subdirectory include a file name extension of ".FMT" this
extension is not specified as part of the name in this combo box entry.
Entering the name of a new format and then pressing the 'Tab' key causes the "Add" button to be enabled.
HemaTrax Manual.odt
Copyright © 2007 by Digi-Trax Services, Inc.
55
HemaTrax ISBT-128 Standalone Application
Unit ID Label Format, Maintenance
Set Width
The Set Width edit box provides the means of defining the overall width of the printable label set surface in
millimeters. This is a required entry up to six numeric only characters in length. The label set width is specified in
decimal notation such as 99.999. The value is expressed in metric units of a millimeter. The minimum label set width
that may be specified is 29.5 mm. The maximum label set width that may be given is 108 mm.
Set Height
The Set Height edit box provides the means of defining the overall length of the printable label set surface in
millimeters and is a required entry. This edit box accepts up to six numeric only characters. The label set height is
specified in decimal notation such as 999.99. The value is expressed in metric units of a millimeter. The minimum
label set height that may be specified is 6.0 mm. The maximum label set height that may be given is 190 mm.
Total Number of Labels in Set
The Total Number of Labels in Set edit box provides the means to establish the number of individual labels that
compose a unit id label set, which is a required entry. This number is expressed as an integer value of up to two
numeric characters. The acceptable range for this entry is (1 - 99).
Prev. & Next Buttons
The "Prev." and "Next" buttons allow the user to move between each label definition within the set.
Label #
The Label # panel displays the number of the current label definition being examined, added or changed.
Label Type
The Label Type radio button group provides the means of indicating which type of label is being defined for each
individual label that may appear in the label set. This may be one of three possible label types: Eye Read, Bag, or
Tube. Each one of these selections indicates a specific set of predetermined label dimensions as follows:
Eye Read indicates that the label is 29.5mm in width and 6.35mm in height.
Bag indicates that the label is 44.45mm in width and 19mm in height.
Tube indicates that the label is 29.5mm in width and 19mm in height.
Note: The default selection for Label Type is Eye Read.
X-Coord
The X-Coord edit box provides the means of specifying the upper left hand corner horizontal coordinate for each
label defined in the set in millimeters and is a required entry. The measurement is taken from the upper left most
point within the entire set of labels. This measurement is given in decimal notation in metric millimeter units. The
maximum entry length is six numeric characters.
If the entered x-coordinate plus the width of the Label Type specified falls outside the dimensions of the label set,
then a Warning dialog box will appear at center screen with the message, "The X-Coord plus the projected image
width entered exceeds the specified width boundary."; pressing the "Retry" button will return the cursor to the XCoord edit box for another try.
HemaTrax Manual.odt
Copyright © 2007 by Digi-Trax Services, Inc.
56
HemaTrax ISBT-128 Standalone Application
Unit ID Label Format, Maintenance
Y-Coord
The Y-Coord edit box provides the means of specifying the upper left hand corner vertical coordinate for each label
defined in the set in millimeters and is a required entry. The measurement is taken from the upper left most point
within the entire set of labels. This measurement is given in decimal notation in metric millimeter units. The
maximum entry length is six numeric characters.
If the entered y-coordinate plus the height of the Label Type specified falls outside the dimensions of the label set,
then a Warning dialog box will appear at center screen with the message, "The Y-Coord plus the projected image
height entered exceeds the specified height boundary."; pressing the "Retry" button will return the cursor to the YCoord edit box for another try.
Flags
The Flags edit box provides the means of specifying the flag digits to be printed on each label in the set. This is not a
required entry. The entry length is fixed at two digits when it is made. The user may make a one of two digit entry
before leaving this field. A single digit entry will be automatically expressed as a two digit entry with a leading 0
(zero).
Save
The "Save" button allows a new label entry or changes to an existing label format to be saved.
Cancel
The "Cancel" button allows the current label set format to be aborted without making any changes or additions.
Adding a New Label Format
To add a new label format perform the following steps:
(1) Type the name of a new label format into the Format Name combo box and press the 'Tab' key. If this is
a new label format name, an Information dialog box will appear prompting you with the question, "Create
this new format file?". Click on the Yes button to create this new format file. Click on the No button to clear
the Information dialog box form the window and return the cursor to the Format Name combo box for
another try.
After clicking on Yes button, the Information dialog box will disappear and the cursor will advance to
the Set Width edit box.
(2) Measure the width of the label set using a millimeter ruler. Measure from the outer edge of the left most
label to the outer edge of the right most label. Enter the measurement in the Set Width edit box. Press the
'Tab' key to move to the next entry box.
Note: All measurements can be entered in decimal notation. If a measurement is 76.2 mm then you may
enter 76.2.
If you enter a Set Width of less than 29.5 mm, then a Warning dialog will appear with the message,
"Minimum set width is 29.5 mm.". Click on the Retry button in order to retry entry of the Set Width value.
If you enter a Set Width greater than 108 mm, then a Warning dialog will appear with the message,
"Maximum set width is 108 mm.". Click on the Retry button in order to retry entry of the Set Width value.
(3) Measure the height of the label set from the top edge of the top label to the bottom edge of the label at
the bottom of the label set. Enter the measurement in the Set Height edit box. Press the 'Tab' key to move to
HemaTrax Manual.odt
Copyright © 2007 by Digi-Trax Services, Inc.
57
HemaTrax ISBT-128 Standalone Application
Unit ID Label Format, Maintenance
the next entry box.
If you enter a Set Height of less than 6 mm, then a Warning dialog will appear with the message, "Minimum
set height is 6.0 mm.". Click on the Retry button in order to retry entry of the Set Height value.
If you enter a Set Height greater than 108 mm, then a Warning dialog will appear with the message,
"Maximum set height is 190 mm.". Click on the Retry button in order to retry entry of the Set Height value.
(4) Count the number of labels in one label set. Enter this count in the Total Number of Labels in Set edit
box. Press the 'Tab' key to move to the next control.
If you enter a Total Number of Labels in Set value of 0 (zero), then a Warning dialog box with the message,
"There must be at least one label in the set.". Click on the Retry button in order to retry entry of the Total
Number of Labels in Set value.
The maximum number of 2 digits may be entered into the Total Number of Labels in Set edit box.
Therefore the maximum number of labels in a set is restricted to 99.
(5) Select the radio group button corresponding to the Label Type for the label currently being defined. Do
this by clicking on the appropriate button (Eye Read, Bag, or Tube). Press the 'Tab' key to move to the XCoord edit box.
(6) At the X-Coord edit box take a measurement from the left most edge of the label set to the left edge of
the current label being defined. Enter this measurement in millimeters; for the left-most labels this will be a
measurement of 0 mm.
(7) At the Y-Coord edit box take a measurement from the top most edge of the label set to the top edge of
the current label being defined. Enter this measurement in millimeters; for the top-most labels this will be a
measurement of 0 mm.
(8) At the Flags edit box you may optionally enter a one or two digit number that will be printed on this
label being defined. Press 'Tab' to move to the next control.
If a value is supplied for Flags and the label type is either Bag or Tube then the flag digits specified will be
bar coded as well.
Leaving the Flags edit box blank indicates that no flag digits are to be printed on the eye read (interpretation
line) portion of the label, but '00' (zero-zero) will be bar coded for any bar coded label.
If you enter a single digit Flags value, such as '1', it will be represented as '01' as soon as you exit from the
Flags edit box.
(9) The cursor moves to the Prev. button after 'Tab'ing from the Flags edit box. At this point you may either
click on the Next button or press the 'N' key to move to the next label definition. When the number in the
Label # panel is equal to the Total Number of Labels in Set entry value, the definition of the label set
geometry is complete. Other wise go back to step 5 and repeat the definition steps.
(10) After completing all of the definitions for the label set, click on the Save button to save the definitions
under the file name assigned. After clicking the Save button the information will be stored in the file, the
screen entries will be cleared and the cursor will be positioned in the Format Name combo box for the next
entry.
(11) If at anytime you wish to abort a new label definition, you may click on the Cancel button which will
not save any of the definition entries, the screen entries will be cleared and the cursor will be positioned in
the Format Name combo box for the next entry.
HemaTrax Manual.odt
Copyright © 2007 by Digi-Trax Services, Inc.
58
HemaTrax ISBT-128 Standalone Application
Unit ID Label Format, Maintenance
Changing an Existing Label Format
To change an existing label format click on the down-arrow box located at the right side of the Format Name combo
box; a pull-down list of existing format names will be displayed. Select the format that you wish to make changes to
by clicking on the name in the pull-down list. After clicking on the desired format name, all of the controls of the
Unit Id Label Format window will be set to reflect the information for the selected format name.
At this point you may make changes to Set Width, Set Height, Total Number of Labels in Set, or you may change the
values for the first label (Label # 1) in the set which is also initially displayed. You can change the Label Type, XCoord (mm), Y-Coord (mm), and Flags for each of the labels defined within the set.
To examine or change the values established for any label within the set you first must select (display) the values for
the label that you wish to change. You may select the desired label (Label #) in the set by using the "Prev." and
"Next" buttons to move through the list label definitions. Using the Alt-P and Alt-N key combinations works in the
same way as clicking on the "Prev." and "Next" buttons respectively.
After making any changes you must click on the "Save" button or press the Alt-S key combination to save them.
HemaTrax Manual.odt
Copyright © 2007 by Digi-Trax Services, Inc.
59
HemaTrax ISBT-128 Standalone Application
Unit ID Label Format, Maintenance
( This page intentionally blank. )
HemaTrax Manual.odt
Copyright © 2007 by Digi-Trax Services, Inc.
60
HemaTrax ISBT-128 Standalone Application
User/Password, Maintenance
User/Password, Maintenance
The User/Password maintenance function is available under the Maintenance selection of the main menu. This
function is available to all users, but with differing degrees of capability based on the user's assigned security level.
This function makes it possible to enter and maintain user/password information for one or more HemaTrax
StandaloneTM users.
The User/Password function is selected from the Maintenance menu pull-down list. You may access the function by
clicking on Maintenance menu selection (which displays the Maintenance pull-down list) and then clicking on
User/Password in the resulting pull-down list. Alternatively, you may press the Alt-M key combination (which
displays the Maintenance pull-down list) and then press the 's' key.
After selecting the User/Password function from the Maintenance pull-down menu the Information dialog box shown
immediately above will be displayed, if the user is not the DEFAULT user. This function is available to all users
defined in the user database, with the exception of the DEFAULT user. If the user has a security level less than 3 and
the user clicks on the "No" button, then the Information dialog box is closed and the user has access to the main
menu once again. If the user clicks the "Yes" button of the Information dialog box then the window shown
immediately below is displayed.
In order to change the current user's password, the user must first enter the current password in the Current Password
edit box and then press the 'Tab' key to move to the New Password edit box. The user must enter the new password
in the New Password edit box and then press the 'Tab' key to move to the Confirm New Password edit box. The user
must re-enter the new password in the Confirm New Password edit box and then either press the 'Enter' key or click
HemaTrax Manual.odt
Copyright © 2007 by Digi-Trax Services, Inc.
61
HemaTrax ISBT-128 Standalone Application
User/Password, Maintenance
on the "OK" button to cause the password in the database to be changed.
If the user is the DEFAULT user, or if the user has a security level of 3 assigned and has taken the steps necessary to
complete the Information dialog and Change Password window, then the User/Password window shown immediately
below will be displayed.
From the User/Password window shown above, the user with security level 3 access can add, change or delete users
in the user/password database.
Last Name
The cursor is initially positioned in the Last Name edit box. The user must enter at least one character in the Last
Name edit box before pressing the 'Tab' key to move onto the First Name edit box. If nothing is entered in the Last
Name edit box and the 'Tab' key is pressed, an Error dialog box will appear at center screen with the message, "Last
Name is required.". Pressing the 'Enter' key or clicking the "Retry" button closes this Error dialog and the cursor is
once again positioned at the Last Name edit box for another entry.
Automatic Last Name Search
After making a partial or full last name entry in the Last Name edit box and then pressing the 'Tab' key, a database
search for all records that match the last name or portion of last name is performed. All last name matches are then
listed in the Name Match List list box located in the upper right portion of the window. The first item listed in the
match list is always . By double clicking on any name listed in the Name Match List list box, the database record
associated with the selected name will be immediately read and that information displayed in the appropriate edit
boxes and controls of the User/Password window.
HemaTrax Manual.odt
Copyright © 2007 by Digi-Trax Services, Inc.
62
HemaTrax ISBT-128 Standalone Application
User/Password, Maintenance
Adding a New User
Last Name
The Last Name is a required alphabetic entry field which will accept a maximum of fourteen (14) characters. All
characters are automatically converted to uppercase as they are entered. Enter the last name of the new user in the
Last Name edit box and then press the 'Tab' key. Check to see if the user is already listed in the Name Match List list
box.
First Name
The First Name is a required alphabetic entry field which will accept a maximum of twelve (12) characters. All
characters are automatically converted to uppercase as they are entered. Enter the user's first name in the First Name
edit box and then press the 'Tab' key.
Initial
The Initial entry field is an optional alphabetic single character entry. When a character is entered into this field it is
automatically converted to uppercase. The cursor is now at the Initial edit box ready to accept a middle initial. Press
the 'Tab' key to optionally skip this entry.
Unique ID Number
The Unique ID Number entry is a required field that is up to twelve (12) alphanumeric characters in length. The
minimum permissible length is one character. This unique number is used to differentiate between users that happen
to have the same first and last name. Once this number is assigned to a user record it cannot be changed. The Unique
ID Number edit box is typically used to enter a social security number, in the United States, or may take some other
unique identifying number (employee number, civil id number, etc.). Type this entry and press the 'Tab' key to
proceed.
Allowed Range of Characters
0 through 9
a through z
A through Z
- (dash) and . (period)
User Id
The User Id entry is a required field that is up to ten (10) alphanumeric characters in length, the minimum
permissible length is five (5) characters. The User Id is established when the password record is created or edited for
a user. The User Id field and the User Password fields are used in combination when a user wishes to gain access to
the HemaTrax program. At the User Id edit box the user identification that will be used to sign onto HemaTrax is
entered and then the 'Tab' key is pressed.
User Password
The User Password entry is a required field that is up to ten (10) alphanumeric characters in length, the minimum
permissible entry length is five (5) characters. The User Password and User Id fields are used in combination to
identify a specific user when logging into the program.
HemaTrax Manual.odt
Copyright © 2007 by Digi-Trax Services, Inc.
63
HemaTrax ISBT-128 Standalone Application
User/Password, Maintenance
Select a Security Level
The security level is a required selection made when creating or editing the password record for a user. The security
level is selected by clicking on a radio button associated with a number between 0 and 3. A security level of 0 is the
lowest level. A security level of 3 is the highest (Administrative Authority). The selection is made by clicking on the
appropriate numbered radio button.
Entries automatically maintained by the system
The panel labeled "Entries automatically maintained by the system" holds the Start Date, Change Date and Change
Memo panels which are not accessible, but displayed to disclose all of the information retained in the user/password
database record.
Start Date
When a new user is being entered the Start Date field will automatically be set to the current system date.
Change Date
When a new user is being entered or when a user password record is being changed, the Change Date field will
automatically be set to the current system date.
Change Memo
When a new user is being entered or when a user password record is being changed, the Change Memo field will be
automatically set to reflect activity last performed with the user record.
Adding a New User
To add the new user to the database you now click on the "Add" button. If all of the entries you have made are
correct and acceptable then the user record will be add to the database. After the database is updated all of the edit
boxes, list boxes and controls will be initialized and the cursor returned to the Last Name edit box for the next entry.
Canceling the Operation
If you should decide to abort the current entry, then click on the "Cancel" button to clear everything and return to
entering a last name.
Changing User Information
To change an existing user record, first enter all or a portion of the user's last name in the Last Name edit box and
then press the 'Tab' key. From the list of users displayed in the Name Match List list box, select the appropriate user
by double clicking on the name. The edit fields and controls of the window will display the current user information.
Notice that the Last Name, First Name and Unique Id Number edit boxes are disabled and not accessible for editing.
You may make changes to the User Id, User Password and Security Level. After making the desired changes, you
may update the selected user record by clicking on the "Change" button. To abort any changes click on the "Cancel"
button. After clicking on either the "Change" or the "Cancel" buttons the edit boxes, list boxes and other controls in
the window will be initialized and the cursor returned to the Last Name edit box for the next entry.
Deleting a User Record
To delete an existing user record, first enter all or a portion of the user's last name in the Last Name edit box and
HemaTrax Manual.odt
Copyright © 2007 by Digi-Trax Services, Inc.
64
HemaTrax ISBT-128 Standalone Application
User/Password, Maintenance
then press the 'Tab' key. From the list of users displayed in the Name Match List list box, select the appropriate user
by double clicking on the name. The edit fields and controls of the window will display the current user information.
To delete the user displayed, click on the "Delete" button. If you do not wish to delete the displayed record, click on
the "Cancel" button which will not cause the selected user record to be deleted, but will cause the edit boxes, list
boxes and other controls in the window will be initialized and the cursor to return to the Last Name edit box for the
next entry.
Important Note: When a user/password record is deleted, it is not actually physically deleted from the file. When a
record is deleted, it is merely marked as "Deactivated" and made inaccessible by the user/password scanning
functions.
Restoring a Deleted User Record
To restore a formerly deleted user record, first enter all or a portion of the user's last name in the Last Name edit box
and then press the 'Tab' key. Next click on the check box labeled "Show deleted user/password records" located
below the "Name Match List" list box. If there are any matching reocrds that are deleted, they will now be displayed.
From the list of users displayed in the Name Match List list box, select the appropriate user record by double
clicking on the user's name. The edit fields and controls of the window will display the current user information. To
restore the user displayed, click on the "Restore" button. If you do not wish to restore the displayed record then click
on the "Cancel" button, which will not cause the selected user record to be restored, but will cause the edit boxes, list
boxes and other controls in the window will be initialized and the cursor to return to the Last Name edit box for the
next entry.
Important Note: One of the first set up activities that should be performed on a newly installed system is to
establish a user with the highest level administrative authority (Security Level 3). Establishing a high level user
will immediately disable the default password, thereby enhancing the security of the system by inhibiting access
by unauthorized users.
HemaTrax Manual.odt
Copyright © 2007 by Digi-Trax Services, Inc.
65
HemaTrax ISBT-128 Standalone Application
User/Password, Maintenance
( This page intentionally blank. )
HemaTrax Manual.odt
Copyright © 2007 by Digi-Trax Services, Inc.
66
HemaTrax ISBT-128 Standalone Application
Find Product
Find Product
By clicking on the "Find Product" or "Product" button, in a HemaTrax Standalone application window that requires
a product selection from the ICCBBA product database, a Find Product window is displayed as shown immediately
below:
In the Find Product window is a Select Product Category radio button group which let's you determine the category
of products and method to be used to search for them as follows:
•
Clicking on the ICCBBA Predefined Product radio button indicates that only ICCBBA defined
products from the ICCBBA product database will be searched.
•
Clicking on the Locally Defined Product radio button indicates that only the product codes that have
been defined for internal use in the blood bank will be searched.
•
Clicking on the Qwik-Pik List Product button indicates that you wish to select the product code by
picking the product title from the established Qwik-Pik list of products.
After clicking one of the radio buttons in the Select Product Category radio button group, either click on the "OK"
button or press the 'Enter' key to proceed.
If you chose either the ICCBBA Predefined Product radio button or the Locally Defined Product radio button then a
window will appear that looks like the one shown below:
HemaTrax Manual.odt
Copyright © 2007 by Digi-Trax Services, Inc.
67
HemaTrax ISBT-128 Standalone Application
Find Product
From this window you can either directly enter the ICCBBA product code or locally defined product code depending
on which product category you have selected or you may use the mouse pointer to pick various search criteria from
the panel labeled "Select product characteristics to search for, then click the Search button." By clicking on the
downward pointing arrow of the right edge of each of the combination boxes, a list of possible search items is
displayed for each of the following characteristics:
•
Product Category
•
Product Modifier
•
Anticoagulant
•
Additive Solution
•
Store Temp.
•
Draw Vol.
•
Aphr. Vol.
•
Intended Use
•
Irradiated
•
System Opened
After selecting the known characteristics, click on the "Search" button. Now the program searches the category of
products selected looking for matches on all of the characteristics that have been chosen. Each matching product is
then listed in the Product Matches list box located in the bottom half of the window. There is a limit of 100 matches
HemaTrax Manual.odt
Copyright © 2007 by Digi-Trax Services, Inc.
68
HemaTrax ISBT-128 Standalone Application
Find Product
established, at which time the search is terminated. Look through the list of products found for the one that describes
the product that you want to edit. Select that product by clicking on it (highlighting it) and then click on the "OK"
button located in the bottom, middle of the window. At this point the Find Product window will close.
If you have chosen the "Qwik-Pik List Product" button then the Qwik-Pik Product Selection window shown
immediately below will appear:
From the Qwik-Pik Product Selection window a product is selected by clicking on the product description in the list
(highlighting it) and then clicking on the "Select" button located at the bottom of the window.
HemaTrax Manual.odt
Copyright © 2007 by Digi-Trax Services, Inc.
69
HemaTrax ISBT-128 Standalone Application
Find Product
( This page intentionally blank. )
HemaTrax Manual.odt
Copyright © 2007 by Digi-Trax Services, Inc.
70
HemaTrax ISBT-128 Standalone Application
Print Labels
Print Labels
All of the label printing functions that are available from the Print Labels pull-down menu. This pull-down menu is
shown in the illustration below.
Selecting the Print Labels menu item causes the pull-down menu shown above to appear. From this list the user may
select one of the following label printing categories:
1. ABO-Rh
2. ABO-Rh / Date & Time
3. Date & Time
4. Facility
5. Facility / Products
6. Full face
7. Instruction
8. Intended Recipient
9. Product
10. Product / Date & Time
11. Replicate Unit ID Set
12. Verification
Each of these label manufacturing functions will be discussed in the section that follow.
HemaTrax Manual.odt
Copyright © 2007 by Digi-Trax Services, Inc.
71
HemaTrax ISBT-128 Standalone Application
Print Labels
( This page intentionally blank. )
HemaTrax Manual.odt
Copyright © 2007 by Digi-Trax Services, Inc.
72
HemaTrax ISBT-128 Standalone Application
ABO-Rh, Print Labels
ABO-Rh, Print Labels
The ABO-Rh selection of the Print Labels pull-down menu provides for the printing of ABO-Rh labels which form
the upper right hand quadrant of the ISBT 128 full face label.
You may access the function by clicking on Print Labels menu selection (which displays the Print Labels pull-down
list) and then clicking on ABO-Rh in the resulting pull-down list. Alternatively, you may press the Alt-P key
combination (which displays the Print Labels pull-down list) and then press the 'A' key. The illustration below shows
the ABO-Rh window that appears after the user has selected the function.
With the ABO-Rh window displayed, the user may begin specifying the contents of the 2 inch (25.4mm) square
upper right-hand quadrant (ABO-Rh) ISBT-128 label. The only required entry is the selection of a Blood Group/Rh
Factor. The following fields are available from this window:
Blood Group/Rh Factor
The Blood Group/Rh Factor combo box provides a pull-down list of the blood groups and associated Rh factors that
may be selected for this label. This is a required selection and one must be made before the Print button is clicked.
The pull-down list of possible blood groups and Rh factors includes the following:
O Negative
O Positive
A Negative
A Positive
B Negative
Bombay Negative
Bombay Positive
O
A
B
HemaTrax Manual.odt
POOLED ABO Rh Positive
POOLED ABO Rh Negative
POOLED ABO POOLED Rh
Autologous Collection
Biohazardous
Copyright © 2007 by Digi-Trax Services, Inc.
73
HemaTrax ISBT-128 Standalone Application
B Positive
AB Negative
AB Positive
para-Bombay Negative
para-Bombay Positive
ABO-Rh, Print Labels
AB
A POOLED Rh
AB POOLED Rh
B POOLED Rh
O POOLED Rh
Discard Unit
Quarantine
Do Not Transfuse
Fractionation Use Only
Research Use Only
Selection is made by clicking on the down-arrow located on the right side of this combo box to reveal the pull-down
list. Then select the desired Blood Group and Rh Factor by clicking on the appropriate item in the list. The list is
long so you may need to use the scroll bar located on the right edge of the pull-down list in order to find the item you
want.
Move on to the next control by either pressing the 'Tab' key or using the mouse pointer and clicking on the next
object.
Intended Use
The Intended Use combo box provides a pull-down list of the intended use (donation type) information that can be
encoded as part of the bar code for the ABO-Rh label and the bar code of the Product label. This list includes the
following:
Not Specified
Dedicated Donor
Autologous Use Only
Paid Homologous Donor
Autologous Use Only, Biohazardous
Paid Directed Collection, Eligible for
Crossover
Autologous Collection, Eligible for
Crossover
Paid Research Collection
Directed Donor Use Only
Paid Source Collection
Directed Donor Use Only,
Biohazardous
Volunteer Allogeneic Donation
Directed Donation, Eligible for
Crossover
Volunteer Research Donation
Directed Donor Use Only, Medical
Exception
Volunteer Source Donation
Directed Donor Use Only, Limited
Exposure
Volunteer Therapeutic Collection
Designated Donor
Note: Failing to make an Intended Use selection causes the default "Not Specified" selection to automatically be
made.
HemaTrax Manual.odt
Copyright © 2007 by Digi-Trax Services, Inc.
74
HemaTrax ISBT-128 Standalone Application
ABO-Rh, Print Labels
Anti-Kell Results
The Anti-Kell Results combo box is used to specify this phenotype test result. This test is currently not being
specified in the United States, but may be used in other countries. To specify this test result, click on the down-arrow
box at the right-hand side of the combo box to reveal the pull-down list. Find the desired test result statement and
click on it. Press the 'Tab' key or click on the next desired control to move on.
The current items available in the Anti-Kell Results combo box pull-down list are as follows:
Not Tested
Negative
Positive
Note: Selection of a test result for this combo box disables the Miltenberger (Mi-III) Results combo box.
Anti-C/Anti-c Results
The Anti-C/Anti-c Results combo box is used to specify this phenotype test result. This test is currently not being
specified in the United States, but may be used in other countries. To specify this test result, click on the down-arrow
box at the right-hand side of the combo box to reveal the pull-down list. Find the desired test result statement and
click on it. Press the 'Tab' key or click on the next desired control to move on.
The current items available in the Anti-C/Anti-c Results combo box pull-down list are as follows:
Not Tested
C-Neg c-Pos
C-Pos c-Neg
C-Pos c-Pos
Note: Selection of a test result for this combo box disables the Miltenberger (Mi-III) Results combo box.
Anti-E/Anti-e Results
The Anti-E/Anti-e Results combo box is used to specify this phenotype test result. This test is currently not being
specified in the United States, but may be used in other countries. To specify this test result, click on the down-arrow
box at the right-hand side of the combo box to reveal the pull-down list. Find the desired test result statement and
click on it. Press the 'Tab' key or click on the next desired control to move on.
The current items available in the Anti-E/Anti-e Results combo box pull-down list are as follows:
Not Tested
E-Neg e-Pos
E-Pos e-Neg
E-Pos e-Pos
Note: Selection of a test result for this combo box disables the Miltenberger (Mi-III) Results combo box.
Miltenberger (Mi-III) Results
The Miltenberger (Mi-III) Results combo box is used to specify a phenotype test result. This test is currently not
being specfied in the United States, but may be used in other countries. To specify this test result, click on the downHemaTrax Manual.odt
Copyright © 2007 by Digi-Trax Services, Inc.
75
HemaTrax ISBT-128 Standalone Application
ABO-Rh, Print Labels
arrow box at the right-hand side of the combo box to reveal the pull-down list. Find the desired test result statement
and click on it. Press the 'Tab' key or click on the next desired control to move on.
The current items available in the Miltenberger (Mi-III) Results combo box pull-down list are as follows:
Not Tested
Negative
Positive
Note: Selection of a test result for this combo box disables the Anti-Kell Results, Anti-C/Anti-c Results and AntiE/Anti-e Results combo boxes.
Number of Labels
The Number of Labels edit box provides a three digit numeric only entry. This entry determines the number of labels
that will be printed when the "Print" button is clicked. This numeric entry is common to all label printing windows.
A default value of 1 (one) will be automatically assumed if no entry is made in this edit box.
"Print" Button
The "Print" button is used to initiate printing of labels. This activity can be initiated by either clicking on the "Print"
button or by pressing the Alt-P key combination. If any invalid selections have been made or if there are any required
entries that have not been specified, then typically these errors will be displayed to the user at the time this button is
actuated.
"Adjust Position" Button
Clicking on the "Adjust Position" button causes the Adjust Position window to open at center screen. The purpose
and use of this window is thoroughly covered in HELP Section 8. entitled, "Adjust Position".
Log Memo
There are two window objects associated with Log Memo. The Log Memo edit box and the "Log Memo" button.
When the user wishes to insert a memo relevant to the current type of label being printed, a message entry is typed
into the Log Memo edit box and then the "Log Memo" button is clicked to record the message in the activity log file.
This message is marked so that it will be automatically associated with the specific type of labeling activity that is
currently being performed. The user's name, the time and date are a part of this recorded message. One of the
primary purposes for this facility is to allow users to place important label production notes in the activity log and
that will appear in the label audit report when it is printed.
HemaTrax Manual.odt
Copyright © 2007 by Digi-Trax Services, Inc.
76
HemaTrax ISBT-128 Standalone Application
ABO-Rh / Date & Time, Print Labels
ABO-Rh / Date & Time, Print Labels
The ABO-Rh / Date & Time selection is made from the Print Labels pull-down menu. This function allows printing
of the ABO-Rh / Date & Time combination of labels as a 4 x 2 inch (101.6 x 50.8 mm) label. To access the ABO-Rh
/ Date & Time selection, first either click on the Print Labels title of the main menu or press the Alt-P key
combination. This will cause the Print Labels pull-down menu to appear. Now either click on the ABO-Rh / Date &
Time title or press the 'B' key to complete the selection. After making the selection the window depicted below will
be displayed.
At the top of the ABO-Rh / Date & Time window are two buttons:
ABO-Rh
Date
These buttons allow the user to access the ABO-Rh Information and Date & Time Information windows which are
used to select the information that is to be printed for this combination of the two labels.
ABO-Rh
After clicking on the "ABO-Rh" button the ABO-Rh Information window will be displayed. From the ABO-Rh
Information window make the appropriate ABO-Rh blood type and Intended Use selections. For more information
regarding the use of the ABO-Rh Information window see the section that discussses ABO-Rh Information.
HemaTrax Manual.odt
Copyright © 2007 by Digi-Trax Services, Inc.
77
HemaTrax ISBT-128 Standalone Application
ABO-Rh / Date & Time, Print Labels
Date
After clicking on the "Date" button the Date Information window will be displayed with another window on top
requesting a product selection be made. An illustration of what this will look like is shown immediately below:
For more information about the product selection process, see the section that discusses Find Product.
After selecting the product, the program will display the Date Information window where if a product was selected,
the expiration date may be automatically calculated. In any case the Expiration Date may be manually entered
through the use of the combination and edit boxes provided.
The information that has been supplied will be included in the unlabeled panel immediately below the "ABO-Rh"
and "Date" buttons. This unlabeled panel lists the selections that have been made for the blood Type/Rh Factor, the
Intended Use (Donation Type), the Phenotype Test Results, the selected Product, the product's Expiration Period, the
Expiration Date and Time, any Special Test and the name of a Facility, if one was selected.
The remaining controls are common to all label printing windows and are as follows:
Number of Labels
The Number of Labels edit box provides a three digit numeric only entry. This entry determines the number of labels
that will be printed when the Print button is clicked. This numeric entry is common to all label printing windows. A
default value of 1 (one) will be automatically assumed if no entry is made in this edit box.
HemaTrax Manual.odt
Copyright © 2007 by Digi-Trax Services, Inc.
78
HemaTrax ISBT-128 Standalone Application
ABO-Rh / Date & Time, Print Labels
Log Memo
There are two window objects associated with Log Memo. The Log Memo edit box and the "Log Memo" button.
When the user wishes to insert a memo relevant to the current type of label being printed, an message entry is typed
into the Log Memo edit box and then the "Log Memo" button is clicked to record the message in the activity log file.
This message is marked so that it will be automatically associated with the specific type of labeling activity that is
currently being performed. The user's name, the time and date are a part of this recorded message. One of the
primary purposes for this facility is to allow users to place important label production notes in the activity log and
that will appear in the label audit report when it is printed.
"Print" Button
The "Print" button is used to initiate printing of labels. This activity can be initiated by either clicking on the "Print"
button or by pressing the Alt-P key combination. If any invalid selections have been made or if there are any required
entries that have not been specified, then typically these errors will be displayed to the user at the time this button is
actuated.
"Adjust Position" Button
Clicking on the "Adjust Position" button causes the Adjust Position window to open at center screen. The purpose
and use of this window is thoroughly covered in HELP Section 8. Entitled "Adjust Position".
HemaTrax Manual.odt
Copyright © 2007 by Digi-Trax Services, Inc.
79
HemaTrax ISBT-128 Standalone Application
ABO-Rh / Date & Time, Print Labels
( This page intentionally blank. )
HemaTrax Manual.odt
Copyright © 2007 by Digi-Trax Services, Inc.
80
HemaTrax ISBT-128 Standalone Application
Date & Time, Print Labels
Date & Time, Print Labels
The Date & Time selection of the Print Labels pull-down menu allows access to the Date & Time Label printing
function.
From this window the user may begin specifying the contents of the 2 inch (25.4mm) square lower right-hand
quadrant (Date & Time) ISBT-128 label. The only required entry is the Expiration Date. The following control
objects are available in this window:
"Product" Button
Clicking on this button allows the user to select a product for which the date calculations can then be automatically
made. For more information about how to select a product, see the section entitled Find Product.
Note: If a product has been selected that requires a collection date, then no date will be printed or bar coded in the
date and time quadrant. Only expiration dates are printed and bar coded in the lower right-hand quadrant.
HemaTrax Manual.odt
Copyright © 2007 by Digi-Trax Services, Inc.
81
HemaTrax ISBT-128 Standalone Application
Date & Time, Print Labels
"Calc Exp. Data/Time" Button
If a product is selected for which an expiration date is required, then this button will be enabled. If the product
selected is an irradiated product then clicking this button causes the Irradiated Product Date & Time window to be
displayed.
After entering the appropriate product dates and times and if the product takes an expiration date and time, then the
current product's expiration date will be automatically calculated. The expiration time is automatically calculated and
enabled if the product has an expiration period of 72 hours or less.
Expiration Date
At the top of the Expiration Date panel are three unlabeled entry boxes that are arranged in a horizontal row. From
left to right these boxes are the month combo box, the day of month edit box, and the year edit box.
Include Exp. Time
The Include Exp. Time check box allows the user to force the inclusion of the expiration time on the label even
though the product being labeled may not require that the time be printed. Immediately below this check box are two
unlabeled edit boxes that are arranged horizontally. From left to right these edit boxes are the hour edit box and
minutes edit box.
Special Test
The Special Test combo box allows the user to select a special test that has been performed for this product from the
pull-down list. To display the pull-down list, click on the down-arrow button located at the right-hand side of the
combo box. Select the special test by clicking on it with the mouse.
Processing Legend
The Processing Legend combo box provides a pull-down list of standard legends that can be selected from or the
user may enter legend text directly in the combo box edit line. The text in this box will appear on the Date & Time
label just above the processing facility's name and location lines located in the bottom third of the date and time label
quadrant.
"Processing Facility" Button
Clicking on the "Processing Facility" button causes the Facility Information window to be displayed. From the
Facility Information window the user may select a facility to be included as the processing facility at the bottom of
the Date & Time label.
Processing Facility Information
At the bottom of the Processing Facility Information panel is an unlabeled list box. This unlabeled list box displays
the processing facility name and location that has been selected for the bottom of the Date & Time label.
The remaining controls are common to all label printing windows and are as follows:
Number of Labels
The Number of Labels edit box provides a three digit numeric only entry. This entry determines the number of labels
that will be printed when the Print button is clicked. This numeric entry is common to all label printing windows. A
HemaTrax Manual.odt
Copyright © 2007 by Digi-Trax Services, Inc.
82
HemaTrax ISBT-128 Standalone Application
Date & Time, Print Labels
default value of 1 (one) will be automatically assumed if no entry is made in this edit box.
Log Memo
There are two window objects associated with Log Memo. The Log Memo edit box and the "Log Memo" button.
When the user wishes to insert a memo relevant to the current type of label being printed, an message entry is typed
into the Log Memo edit box and then the "Log Memo" button is clicked to record the message in the activity log file.
This message is marked so that it will be automatically associated with the specific type of labeling activity that is
currently being performed. The user's name, the time and date are a part of this recorded message. One of the
primary purposes for this facility is to allow users to place important label production notes in the activity log and
that will appear in the label audit report when it is printed.
"Print" Button
The "Print" button is used to initiate printing of labels. This activity can be initiated by either clicking on the "Print"
button or by pressing the Alt-P key combination. If any invalid selections have been made or if there are any required
entries that have not been specified, then typically these errors will be displayed to the user at the time this button is
actuated.
"Adjust Position" Button
Clicking on the "Adjust Position" button causes the Adjust Position window to open at center screen. The purpose
and use of this window is thoroughly covered in the section entitled "Adjust Position".
HemaTrax Manual.odt
Copyright © 2007 by Digi-Trax Services, Inc.
83
HemaTrax ISBT-128 Standalone Application
Date & Time, Print Labels
( This page intentionally blank. )
HemaTrax Manual.odt
Copyright © 2007 by Digi-Trax Services, Inc.
84
HemaTrax ISBT-128 Standalone Application
Facility, Print Labels
Facility
To select the Facility label printing function first select the Print Labels pull-down menu by either clicking on the
Print Labels title of the main menu or by pressing the Alt-P key combination. With the Print Labels pull-down menu
displayed either click on the Facility title or press the 'F' key. After selecting the Facility label printing function the
window shown below will be displayed.
"Select Facility" Button
When the "Select Facility" button is clicked the Facility Information window is displayed as shown immediately
below. The user then selects a facility from the Facility Information window and then returns to the Facility window
to complete the entries and print the label(s).
HemaTrax Manual.odt
Copyright © 2007 by Digi-Trax Services, Inc.
85
HemaTrax ISBT-128 Standalone Application
Facility, Print Labels
Include License No.
Checking the Include License No. check box by clicking on it causes the License Number of the selected facility to
be included immediately below the facility's location (city, state and zip code) line on the label(s) to be printed.
Selected Facility Information
The unlabeled list box immediately below the "Select Facility" button and the Include License No. check box
displays the current label printing choices that have been made.
The remaining controls of the Facility window are common to all label printing windows and are as follows:
Number of Labels
The Number of Labels edit box provides a three digit numeric only entry. This entry determines the number of labels
that will be printed when the Print button is clicked. This numeric entry is common to all label printing windows. A
default value of 1 (one) will be automatically assumed if no entry is made in this edit box.
Log Memo
There are two window objects associated with Log Memo. The Log Memo edit box and the "Log Memo" button.
When the user wishes to insert a memo relevant to the current type of label being printed, an message entry is typed
into the Log Memo edit box and then the "Log Memo" button is clicked to record the message in the activity log file.
This message is marked so that it will be automatically associated with the specific type of labeling activity that is
currently being performed. The user's name, the time and date are a part of this recorded message. One of the
primary purposes for this facility is to allow users to place important label production notes in the activity log and
that will appear in the label audit report when it is printed.
HemaTrax Manual.odt
Copyright © 2007 by Digi-Trax Services, Inc.
86
HemaTrax ISBT-128 Standalone Application
Facility, Print Labels
"Print" Button
The "Print" button is used to initiate printing of labels. This activity can be initiated by either clicking on the "Print"
button or by pressing the Alt-P key combination. If any invalid selections have been made or if there are any required
entries that have not been specified, then typically these errors will be displayed to the user at the time this button is
actuated.
"Adjust Position" Button
Clicking on the "Adjust Position" button causes the Adjust Position window to open at center screen. The purpose
and use of this window is thoroughly covered in the section entitled "Adjust Position".
HemaTrax Manual.odt
Copyright © 2007 by Digi-Trax Services, Inc.
87
HemaTrax ISBT-128 Standalone Application
Facility, Print Labels
( This page intentionally blank. )
HemaTrax Manual.odt
Copyright © 2007 by Digi-Trax Services, Inc.
88
HemaTrax ISBT-128 Standalone Application
Facility / Product, Print Labels
Facility / Product
To select the Facility & Product label printing function first select the Print Labels pull-down menu by either
clicking on the Print Labels title of the main menu or by pressing the Alt-P key combination. With the Print Labels
pull-down menu displayed either click on the Facility & Product title or press the 'c' key. After selecting the Facility
& Product label printing function the window shown below will be displayed.
"Facility" Button
Clicking on the "Facility" button causes the Facility Information window to be displayed. From the Facility
Information window the user may choose the facility that is to appear on this label. For more information about the
use of the Facility Information window see the section entitled Facility Label.
"Product" Button
Clicking on the "Product" button causes the Find Product window to be displayed. From the Find Product window
the user may proceed to identify and select the product to be labeled. For more information regarding the Find
Product window refer to the section entitled Find Product.
Donation Type
The Donation Type combo box is used to select the Donation Type (Intended Use) information that is to be also
encoded as part of the product bar code on the product quadrant portion of the print label.
HemaTrax Manual.odt
Copyright © 2007 by Digi-Trax Services, Inc.
89
HemaTrax ISBT-128 Standalone Application
Facility / Product, Print Labels
Donor Type
The Donor Type panel displays the donor type that is associated automatically with donation type/intended use
selection that was made with the Donation Type combo box. This is a display panel only; no entry can be made here.
The donor types that may be listed here are: VOLUNTEER, PAID and possibly AUTOLOGOUS.
Note: AUTOLOGOUS is only listed if this donor type was enabled from the Setup - Options function at software
set up.
Divided Unit Information
The controls contained in the Divided Unit Information panel are used to specify that the unit is divided and what the
two levels of division are. The division codes are included as part of the product bar code in the product label
quadrant.
Divided Unit
The Divided Unit check box when checked indicates that he unit is divided and enables the Div.1 and Div.2 combo
box controls.
Div. 1
The Div. 1 combo box provides a pull down list that is used to indicate the first level of division for the unit. The
user pulls down the selection list and clicks on the appropriate level code. The level codes in the list are in the range
(0, A - Z). A division code of 0 (zero) indicates that there is no division at this level.
Div. 2
The Div. 2 combo box provides a pull down list that is used to indicate the second level of division for the unit. The
user pulls down the selection list and clicks on the appropriate level code. The level codes in the list are in the range
(0, a - z). A division code of 0 (zero) indicates that there is no division at this level.
The remaining controls of the Facility & Product window are common to all label printing windows and are as
follows:
Number of Labels
The Number of Labels edit box provides a three digit numeric only entry. This entry determines the number of labels
that will be printed when the "Print" button is clicked. This numeric entry is common to all label printing windows.
A default value of 1 (one) will be automatically assumed if no entry is made in this edit box.
Log Memo
There are two window objects associated with Log Memo. The Log Memo edit box and the "Log Memo" button.
When the user wishes to insert a memo relevant to the current type of label being printed, an message entry is typed
into the Log Memo edit box and then the "Log Memo" button is clicked to record the message in the activity log file.
This message is marked so that it will be automatically associated with the specific type of labeling activity that is
currently being performed. The user's name, the time and date are a part of this recorded message. One of the
primary purposes for this facility is to allow users to place important label production notes in the activity log and
that will appear in the label audit report when it is printed.
HemaTrax Manual.odt
Copyright © 2007 by Digi-Trax Services, Inc.
90
HemaTrax ISBT-128 Standalone Application
Facility / Product, Print Labels
"Print" Button
The "Print" button is used to initiate printing of labels. This activity can be initiated by either clicking on the "Print"
button or by pressing the Alt-P key combination. If any invalid selections have been made or if there are any required
entries that have not been specified, then typically these errors will be displayed to the user at the time this button is
actuated.
"Adjust Position" Button
Clicking on the "Adjust Position" button causes the Adjust Position window to open at center screen. The purpose
and use of this window is thoroughly covered in HELP Section 8. entitled, "Adjust Position".
HemaTrax Manual.odt
Copyright © 2007 by Digi-Trax Services, Inc.
91
HemaTrax ISBT-128 Standalone Application
Facility / Product, Print Labels
( This page intentionally blank. )
HemaTrax Manual.odt
Copyright © 2007 by Digi-Trax Services, Inc.
92
HemaTrax ISBT-128 Standalone Application
Full Face, Print Labels
Full Face
To select the Full Face label printing function, first select the Print Labels pull-down menu by either clicking on the
Print Labels title of the main menu or by pressing the Alt-P key combination. With the Print Labels pull-down menu
displayed either click on the Full Face title or press the 'u' key. After selecting the Full Face label printing function
the window shown below will be displayed.
Unit Id Number
The Unit Id Number edit box allows the user to either scan in the unit number bar code from the blood container or
to manually enter the number. If the number is scanned in the user must still press the 'Tab' key to move on to the
next windows object.
Include Manual Entry Check Digit
The Include Manual Entry Check Digit check box allows the user to select whether or not the manual entry check
digit will be calculated and displayed in the square box to the right of the Unit Id Number edit box. If the Include
Manual Entry Check Digit check box is checked, it will remain checked for the remainder of time that the Full Face
label printing window is displayed or until the user removes the check mark by again clicking on the check box.
"Facility" Button
The "Facility" button allows the user to select a facility name and location if none has been supplied by either
scanning or manually entering a unit number in the Unit Id Number edit box. By clicking on the "Facility" button the
HemaTrax Manual.odt
Copyright © 2007 by Digi-Trax Services, Inc.
93
HemaTrax ISBT-128 Standalone Application
Full Face, Print Labels
Facility Information window will be displayed. The Facility Information window allows the user to select a facility
by clicking on the facility's name found in a list box. It is important to select a facility because the facility number
and product code supply important FDA License Number information that may need to be supplied on the full face
label. For a detailed description of the use of the Facility Information window refer to the section entitled Facility
Information Window.
Facility Information Panel
The large unlabeled panel immediately to the right of the "Facility" button provides the user with a description of the
facility currently selected. This panel is strictly for display purposes only and does not provide the user with any
entry capability.
Donor Type
The Donor Type panel is for display purposes only. The contents of this panel reflect the donor type as is ascertained
by the Donation Type or Intended Use selections that may be made either from the ABO-Rh Information window or
from this Full Face window Donation Type combo box. The default value placed in this display panel is
VOLUNTEER until otherwise specified.
"Product" Button
The "Product" button allows the user to select a product for the product label portion of the full face label. By
clicking on the "Product" button the Find Product window will be displayed as the first window of several that may
be presented as part of the product selection process. For more information regarding the Find Product window refer
to the section entitled Find Product.
Include License No. Check Box
The "Include License No." check box only appears when a product code has been selected for which the facility
given is licensed. Since the product code by itself doesn't fully determine whether or not the label should include the
license number, the program requires the user to make the final determination, whether or not the license number
should appear on the full face label. The image below shows the check box as it will appear in the Full Face window
after a licensed product has been selected.
HemaTrax Manual.odt
Copyright © 2007 by Digi-Trax Services, Inc.
94
HemaTrax ISBT-128 Standalone Application
Full Face, Print Labels
If the check box is not checked, then the face label will be printed without the license number. Not printing the
license number is the default taken by the program. To include the license number place the mouse on the check box
and click the left mouse button. With an 'x' in the check box the label will include the license number.
Product Information Panel
The large panel just to the right of the "Product" button provides the user with a description of the product that has
been selected. The panel is for display purposes only and does not provide the user with any entry capability.
Donation Type
The Donation Type combo box is used to select the Donation Type (Intended Use) information that is to be encoded
as part of the product bar code on the product quadrant portion of the print label.
Divided Unit
The Divided Unit check box when checked indicates that he unit is divided and enables the Div. 1 and Div. 2 combo
box controls.
Div. 1
The Div. 1 combo box provides a pull down list that is used to indicate the first level of division for the unit. The
user pulls down the selection list and clicks on the appropriate level code. The level codes in the list are in the range
(0, A - Z). A division code of 0 (zero) indicates that there is no division at this level.
Div. 2
The Div. 2 combo box provides a pull down list that is used to indicate the second level of division for the unit. The
user pulls down the selection list and clicks on the appropriate level code. The level codes in the list are in the range
(0, a - z). A division code of 0 (zero) indicates that there is no division at this level.
ABO-Rh Donation Type / Intended Use Panel
This panel displays the current donation type / intended use selection . Which is made from a window that displays
after the "ABO-Rh" button has been clicked. Typically when the Full Face label window is initially displayed, this
panel will display the legend "Not Specified". Se the discussion of the use of the ABO-Rh button immediately below.
"ABO-Rh" Button
Clicking on the "ABO-Rh" button causes the ABO-Rh Label Information window to be displayed. From the ABORh Label Information window the user may specify the blood group, Rh factor and intended use/donation type for
the blood being labeled. For more information regarding the ABO-Rh Label Information window refer to the section
entitled ABO-Rh Label Information Window.
ABO-Rh Information Panel
The panel to the right of the "ABO-Rh" button displays the ABO-Rh information that has been selected by the user
for this full face label. The panel is strictly for display purposes only and does not provide the user with any entry
HemaTrax Manual.odt
Copyright © 2007 by Digi-Trax Services, Inc.
95
HemaTrax ISBT-128 Standalone Application
Full Face, Print Labels
capability.
"Date" Button
Clicking on the "Date" button causes the Date & Time Label Information window to be displayed. From the Date &
Time Label Information window the user may either calculate the expiration date and time for the product
automatically or may manually specify the date and time. For more information regarding the Date & Time Label
Information window refer to the section entitled Date & Time Label Information.
Date & Time Information Panel
The panel immediately to the right of the "Date" button displays the current collection or expiration date and time,
special test and processing facility information that have been specified for this full face label. The panel is provided
for display purposes only and does not provide the user with any entry capability.
The remaining controls of the Full Face window are common to all label printing windows and are as follows:
Number of Labels
The Number of Labels edit box provides a three digit numeric only entry. This entry determines the number of labels
that will be printed when the "Print" button is clicked. This numeric entry is common to all label printing windows.
A default value of 1 (one) will be automatically assumed if no entry is made in this edit box.
Log Memo
There are two window objects associated with Log Memo. The Log Memo edit box and the "Log Memo" button.
When the user wishes to insert a memo relevant to the current type of label being printed, an message entry is typed
into the Log Memo edit box and then the "Log Memo" button is clicked to record the message in the activity log file.
This message is marked so that it will be automatically associated with the specific type of labeling activity that is
currently being performed. The user's name, the time and date are a part of this recorded message. One of the
primary purposes for this facility is to allow users to place important label production notes in the activity log and
that will appear in the label audit report when it is printed.
"Print" Button
The "Print" button is used to initiate printing of labels. This activity can be initiated by either clicking on the "Print"
button or by pressing the Alt-P key combination. If any invalid selections have been made or if there are any required
entries that have not been specified, then typically these errors will be displayed to the user at the time this button is
actuated.
"Adjust Position" Button
Clicking on the "Adjust Position" button causes the Adjust Position window to open at center screen. The purpose
and use of this window is thoroughly covered in the section entitled "Adjust Position".
"Cancel" Button
Clicking on the "Cancel" button causes all of the selections and entries of the Full Face window to be cleared or
reset. The only control not reset is the Include Manual Entry Check Digit check box. After the window has been
reset, the cursor will be placed in the Unit Id Number edit box for the next entry.
HemaTrax Manual.odt
Copyright © 2007 by Digi-Trax Services, Inc.
96
HemaTrax ISBT-128 Standalone Application
Full Face, Print Labels
HemaTrax Manual.odt
Copyright © 2007 by Digi-Trax Services, Inc.
97
HemaTrax ISBT-128 Standalone Application
Instruction, Print Labels
Instruction
The Instruction label is not a label format that is governed by the ICCBBA ISBT-128 Technical Specification nor
the U.S. Industry Standard documents. This label is provided as a generic 2" x 2" label form for general purpose
labeling use in the facility.
To select the Instruction label printing function, first select the Print Labels pull-down menu by either clicking on the
Print Labels title of the main menu or by pressing the Alt-P key combination. With the Print Labels pull-down menu
displayed either click on the Instruction title or press the 'I' key. After selecting the Instruction label printing function
the window shown below will be displayed.
From this window the user can select and print any of the labels that have been defined through the Instruction label
maintenance function available from the Maintenance pull-down menu of the main menu.
HemaTrax Manual.odt
Copyright © 2007 by Digi-Trax Services, Inc.
98
HemaTrax ISBT-128 Standalone Application
Instruction, Print Labels
Label Title
The Label Title combo box provides the user with a pull-down list from which various instruction label titles may be
selected. The pull-down list is exposed by clicking on the down-arrow box located on the right side of the combo
box. With the pull-down list displayed the user may scroll through the entries by using the scroll bar located along
the right side of the list. Once the desired label title is found it is selected by clicking on it.
Lines 1 - 10
The Line 1 through Line 10 display the instruction label information that has been selected for printing. These lines
are for display purposes only and do not provide the user with any entry capability.
The remaining controls of the instruction label printing window are common to all label printing windows and are as
follows:
Number of Labels
The Number of Labels edit box provides a three digit numeric only entry. This entry determines the number of labels
that will be printed when the "Print" button is clicked. This numeric entry is common to all label printing windows.
A default value of 1 (one) will be automatically assumed if no entry is made in this edit box.
Log Memo
There are two window objects associated with Log Memo. The Log Memo edit box and the "Log Memo" button.
When the user wishes to insert a memo relevant to the current type of label being printed, an message entry is typed
into the Log Memo edit box and then the "Log Memo" button is clicked to record the message in the activity log file.
This message is marked so that it will be automatically associated with the specific type of labeling activity that is
currently being performed. The user's name, the time and date are a part of this recorded message. One of the
primary purposes for this facility is to allow users to place important label production notes in the activity log and
that will appear in the label audit report when it is printed.
"Print" Button
The "Print" button is used to initiate printing of labels. This activity can be initiated by either clicking on the "Print"
button or by pressing the Alt-P key combination. If any invalid selections have been made or if there are any required
entries that have not been specified, then typically these errors will be displayed to the user at the time this button is
actuated.
"Adjust Position" Button
Clicking on the "Adjust Position" button causes the Adjust Position window to open at center screen. The purpose
and use of this window is thoroughly covered in the section entitled "Adjust Position".
"Cancel" Button
Clicking on the "Cancel" button causes all of the selections and entries of the Intruction window to be cleared or
reset. After the window has been reset, the cursor will be placed in the Select Instruction Label Title to be printed
combo box for the next selection.
HemaTrax Manual.odt
Copyright © 2007 by Digi-Trax Services, Inc.
99
HemaTrax ISBT-128 Standalone Application
Intended Recipient Information, Print Labels
Intended Recipient Information
To select the Intended Recipient Information label printing function, first select the Print Labels pull-down menu by
either clicking on the Print Labels title of the main menu or by pressing the Alt-P key combination. With the Print
Labels pull-down menu displayed either click on the Intended Recipient Information title or press the 'n' key. After
selecting the Intended Recipient Information label printing function the window shown below will be displayed.
Product
The Product radio button group allows the user to quickly specify one of the common products. If the product
desired is not listed then click the Other radio button to enable the Other edit box to allow for a manual entry. The
default button setting for this radio group is the Not Specified button.
Irrad.
The Irrad. check box is used to specify whether or not this product is irradiated. To check this box click on it with
the mouse. To remove the check mark in this check box click on it with the mouse.
LKORED
The LKORED check box is used to specify whether or not this product is leukocyte reduced. To check this box click
on it with the mouse. To remove the check mark in this check box click on it with the mouse.
Other
The Other edit box provides a space for the user to enter the name of a product that isn't listed in the Product radio
button group. In order to enable the Other edit box the Product radio group button labeled Other must be selected.
HemaTrax Manual.odt
Copyright © 2007 by Digi-Trax Services, Inc.
100
HemaTrax ISBT-128 Standalone Application
Intended Recipient Information, Print Labels
Blood Relative
The Blood Relative radio group allows the user to indicate whether or not the labeled product is from a blood
relative or not. There are three choices available here (Not Spec., No, Yes). Select one of the buttons by clicking on
it with the mouse pointer. The default choice is Not Spec.
Patient Name
The Patient Name edit box allows the user to enter the patient's name to be printed on the label. This edit box will
accept any alphanumeric entry up to twenty characters in length. All alphabetic characters entered in this box are
displayed and printed as upper case (capitals).
ID Number
The ID Number edit box allows the user to enter the patient's identification number. This edit box will accept any
alphanumeric entry up to twenty characters in length. Alphabetic characters entered in this field may be in either
upper of lower case.
Hospital
The Hospital edit box allows the user to enter the name of the hospital. This edit box allows the user to enter up to
twenty alphanumeric characters. All alphabetic characters entered in this field are automatically displayed and printer
in upper case (capitals).
Birth Date
The Birth Date edit box allows the user to enter the patient's birth date. This edit box doesn't enforce any specific
date format and does not perform any date checking on the entry. The user may enter up to twelve alphanumeric
characters in this edit box. All alphabetic characters entered in this field are automatically displayed and printer in
upper case (capitals).
Examples of possible entries are:
NOV 25 1999
11-25-1999
25 NOV 1999
Collected
The Collected date edit box allows the user to enter the date of blood collection. This edit box doesn't enforce any
specific date format and does not perform any date checking on the entry. The user may enter up to twelve
alphanumeric characters in this edit box. All alphabetic characters entered in this field are automatically displayed
and printer in upper case (capitals). See the example date entries shown for Birth Date above.
Intended Use
The Intended Use combo box allows the user to specify the intended use (donation type) for this product. To access
the pull-down list the user clicks on the down-arrow box located at the right side of the combo box. With the pulldown list displayed the user clicks on the desired list entry. The pull-down list provides the following choices: (None
HemaTrax Manual.odt
Copyright © 2007 by Digi-Trax Services, Inc.
101
HemaTrax ISBT-128 Standalone Application
Intended Recipient Information, Print Labels
Specified, AUTOLOGOUS, DEDICATED, DESIGNATED and DIRECTED). The default selection for this combo
box is None Specified.
The remaining controls of the Intended Recipient Information label printing window are common to all label printing
windows and are as follows:
Number of Labels
The Number of Labels edit box provides a three digit numeric only entry. This entry determines the number of labels
that will be printed when the "Print" button is clicked. This numeric entry is common to all label printing windows.
A default value of 1 (one) will be automatically assumed if no entry is made in this edit box.
Log Memo
There are two window objects associated with Log Memo. The Log Memo edit box and the "Log Memo" button.
When the user wishes to insert a memo relevant to the current type of label being printed, an message entry is typed
into the Log Memo edit box and then the "Log Memo" button is clicked to record the message in the activity log file.
This message is marked so that it will be automatically associated with the specific type of labeling activity that is
currently being performed. The user's name, the time and date are a part of this recorded message. One of the
primary purposes for this facility is to allow users to place important label production notes in the activity log and
that will appear in the label audit report when it is printed.
"Print" Button
The "Print" button is used to initiate printing of labels. This activity can be initiated by either clicking on the "Print"
button or by pressing the Alt-P key combination. If any invalid selections have been made or if there are any required
entries that have not been specified, then typically these errors will be displayed to the user at the time this button is
actuated.
"Adjust Position" Button
Clicking on the "Adjust Position" button causes the Adjust Position window to open at center screen. The purpose
and use of this window is thoroughly covered in HELP Section 8. entitled, "Adjust Position".
"Clear" Button
Clicking on the "Clear" button causes all of the selections and entries of the Intended Recipient Information window
to be cleared or reset. After the window has been cleared, the Product radio button group will receive focus for the
next entry.
HemaTrax Manual.odt
Copyright © 2007 by Digi-Trax Services, Inc.
102
HemaTrax ISBT-128 Standalone Application
Intended Recipient Information, Print Labels
( This page intentionally blank. )
HemaTrax Manual.odt
Copyright © 2007 by Digi-Trax Services, Inc.
103
HemaTrax ISBT-128 Standalone Application
Product, Print Labels
Product
To select the Product label printing function, first select the Print Labels pull-down menu by either clicking on the
Print Labels title of the main menu or by pressing the Alt-P key combination. With the Print Labels pull-down menu
displayed either click on the Product title or press the 'P' key. After selecting the Product label printing function the
window shown below will be displayed.
"Select Product" Button
The "Select Product" button allows the user to select a product for the product label portion of the full face label. By
clicking on the "Select Product" button the Find Product window will be displayed as the first window of several that
may be presented as part of the product selection process. For more information regarding the Find Product window
refer to HELP Section 6. entitled, "Find Product".
Product Information Panel
The large panel immediately below the "Select Product" button provides the user with a description of the product
that has been selected. The panel is for display purposes only and does not provide the user with any entry capability.
HemaTrax Manual.odt
Copyright © 2007 by Digi-Trax Services, Inc.
104
HemaTrax ISBT-128 Standalone Application
Product, Print Labels
Donation Type
The Donation Type combo box is used to select the Donation Type (Intended Use) information that is to be also
encoded as part of the product bar code on the product quadrant portion of the print label.
Divided Unit
The Divided Unit check box when checked indicates that he unit is divided and enables the Div. 1 and Div. 2 combo
box controls.
Div. 1
The Div. 1 combo box provides a pull down list that is used to indicate the first level of division for the unit. The
user pulls down the selection list and clicks on the appropriate level code. The level codes in the list are in the range
(0, A - Z). A division code of 0 (zero) indicates that there is no division at this level.
Div. 2
The Div. 2 combo box provides a pull down list that is used to indicate the second level of division for the unit. The
user pulls down the selection list and clicks on the appropriate level code. The level codes in the list are in the range
(0, a - z). A division code of 0 (zero) indicates that there is no division at this level.
"Preview" Button
Clicking on the "Preview" button causes the a widow to appear which gives a graphical representation of the product
label that is to be produced. If there are unknown volumes or measures for this specific product, then the user will
first be prompted to enter those values before the preview window is displayed. An example of the review window is
shown below.
The remaining controls of the Product label printing window are common to all label printing windows and are as
follows:
HemaTrax Manual.odt
Copyright © 2007 by Digi-Trax Services, Inc.
105
HemaTrax ISBT-128 Standalone Application
Product, Print Labels
"Clear All" Button
Clicking on the "Clear All" button causes all of the entry fields and selects to be cleared in preparation for another
product label to be specified. After clicking on this button the "Select Product" button will receive focus.
Number of Labels
The Number of Labels edit box provides a three digit numeric only entry. This entry determines the number of labels
that will be printed when the "Print" button is clicked. This numeric entry is common to all label printing windows.
A default value of 1 (one) will be automatically assumed if no entry is made in this edit box.
Log Memo
There are two window objects associated with Log Memo. The Log Memo edit box and the "Log Memo" button.
When the user wishes to insert a memo relevant to the current type of label being printed, an message entry is typed
into the Log Memo edit box and then the "Log Memo" button is clicked to record the message in the activity log file.
This message is marked so that it will be automatically associated with the specific type of labeling activity that is
currently being performed. The user's name, the time and date are a part of this recorded message. One of the
primary purposes for this facility is to allow users to place important label production notes in the activity log and
that will appear in the label audit report when it is printed.
"Print" Button
The "Print" button is used to initiate printing of labels. This activity can be initiated by either clicking on the "Print"
button or by pressing the Alt-P key combination. If any invalid selections have been made or if there are any required
entries that have not been specified, then typically these errors will be displayed to the user at the time this button is
actuated.
"Adjust Position" Button
Clicking on the "Adjust Position" button causes the Adjust Position window to open at center screen. The purpose
and use of this window is thoroughly covered in HELP Section 8. entitled, "Adjust Position".
HemaTrax Manual.odt
Copyright © 2007 by Digi-Trax Services, Inc.
106
HemaTrax ISBT-128 Standalone Application
Product, Print Labels
(This page intentionally blank)
HemaTrax Manual.odt
Copyright © 2007 by Digi-Trax Services, Inc.
107
HemaTrax ISBT-128 Standalone Application
Product / Date & Time, Print Labels
Product / Date & Time
To select the Product / Date & Time label printing function, first select the Print Labels pull-down menu by either
clicking on the Print Labels title of the main menu or by pressing the Alt-P key combination. With the Print Labels
pull-down menu displayed either click on the Product / Date & Time title or press the 'r' key. After selecting the
Product / Date & Time label printing function the window shown below will be displayed.
"Product" Button
The "Product" button allows the user to select a product for the product label portion of the full face label. By
clicking on the "Product" button the Find Product window will be displayed as the first window of several that may
be presented as part of the product selection process. For more information regarding the Find Product window refer
to the section entitled Find Product.
Product Information Panel
The large panel immediately below the "Product" button provides the user with a description of the product that has
been selected. The panel is for display purposes only and does not provide the user with any entry capability.
HemaTrax Manual.odt
Copyright © 2007 by Digi-Trax Services, Inc.
108
HemaTrax ISBT-128 Standalone Application
Product / Date & Time, Print Labels
Donation Type
The Donation Type combo box is used to select the Donation Type (Intended Use) information that is to be also
encoded as part of the product bar code on the product quadrant portion of the print label.
Divided Unit
The Divided Unit check box when checked indicates that he unit is divided and enables the Div. 1 and Div. 2 combo
box controls.
Div. 1
The Div. 1 combo box provides a pull down list that is used to indicate the first level of division for the unit. The
user pulls down the selection list and clicks on the appropriate level code. The level codes in the list are in the range
(0, A - Z). A division code of 0 (zero) indicates that there is no division at this level.
Div. 2
The Div. 2 combo box provides a pull down list that is used to indicate the second level of division for the unit. The
user pulls down the selection list and clicks on the appropriate level code. The level codes in the list are in the range
(0, a - z). A division code of 0 (zero) indicates that there is no division at this level.
"Date" Button
Clicking on the "Date" button causes the Date & Time Label Information window to be displayed. From the Date &
Time Label Information window the user may either calculate the expiration date and time for the product
automatically or may manually specify a collection or expiration date and time. For more information about using the
Date/Time Information window see Section 10.0 "Date/Time Information".
Date Information Panel
The unlabeled panel immediately to the right of the "Date" button displays the current collection or expiration date
and time, special test and other processing facility information that have been specified for this full face label. The
panel is provided for display purposes only and does not provide the user with any entry capability.
The remaining controls of the Product / Data & Time label printing window are common to all label printing
windows and are as follows:
Number of Labels
The Number of Labels edit box provides a three digit numeric only entry. This entry determines the number of labels
that will be printed when the "Print" button is clicked. This numeric entry is common to all label printing windows.
A default value of 1 (one) will be automatically assumed if no entry is made in this edit box.
Log Memo
There are two window objects associated with Log Memo. The Log Memo edit box and the "Log Memo" button.
When the user wishes to insert a memo relevant to the current type of label being printed, an message entry is typed
into the Log Memo edit box and then the "Log Memo" button is clicked to record the message in the activity log file.
This message is marked so that it will be automatically associated with the specific type of labeling activity that is
currently being performed. The user's name, the time and date are a part of this recorded message. One of the
primary purposes for this facility is to allow users to place important label production notes in the activity log and
HemaTrax Manual.odt
Copyright © 2007 by Digi-Trax Services, Inc.
109
HemaTrax ISBT-128 Standalone Application
Product / Date & Time, Print Labels
that will appear in the label audit report when it is printed.
"Print" Button
The "Print" button is used to initiate printing of labels. This activity can be initiated by either clicking on the "Print"
button or by pressing the Alt-P key combination. If any invalid selections have been made or if there are any required
entries that have not been specified, then typically these errors will be displayed to the user at the time this button is
actuated.
"Adjust Position" Button
Clicking on the "Adjust Position" button causes the Adjust Position window to open at center screen. The purpose
and use of this window is thoroughly covered in HELP Section 8. entitled, "Adjust Position".
HemaTrax Manual.odt
Copyright © 2007 by Digi-Trax Services, Inc.
110
HemaTrax ISBT-128 Standalone Application
Product / Date & Time, Print Labels
( This page intentionally blank. )
HemaTrax Manual.odt
Copyright © 2007 by Digi-Trax Services, Inc.
111
HemaTrax ISBT-128 Standalone Application
Replicate Unit ID Set, Print Labels
Replicate Unit Id Set
To select the Replicate Unit Id Set label printing function, first select the Print Labels pull-down menu by either
clicking on the Print Labels title of the main menu or by pressing the Alt-P key combination. With the Print Labels
pull-down menu displayed either click on the Replicate Unit Id Set title or press the 'e' key. After selecting the
Replicate Unit Id Set label printing function the window shown below will be displayed.
Include manual entry check digit
The Include manual entry check digit check box allows the user to turn on or off the automatic calculation and
inclusion of a manual entry check digit when printing the replicant unit number sets. With this check box checked,
the program will compute the check digit for the number scanned or manually entered and include it as part of the
printed unit id set.
Note: That with this check box checked it may be possible to produce replicant unit sets that have manual entry
check digits where the original unit sets do not have check digits.
ISBT-128 Unit Id Number
The ISBT-128 Unit Id Number edit box will take either a manual entry or a bar code scan entry. The user may
manually enter the full ISBT-128 eye read number from a unit. When the "Print" button is clicked the program
checks that the number format entered matches the ICCBBA specifications.
The remaining controls of the Replicate Unit Id Set label printing window are common to all label printing windows
and are as follows:
Number of Labels
The Number of Labels edit box provides a three digit numeric only entry. This entry determines the number of labels
that will be printed when the "Print" button is clicked. This numeric entry is common to all label printing windows.
HemaTrax Manual.odt
Copyright © 2007 by Digi-Trax Services, Inc.
112
HemaTrax ISBT-128 Standalone Application
Replicate Unit ID Set, Print Labels
A default value of 1 (one) will be automatically assumed if no entry is made in this edit box.
Log Memo
There are two window objects associated with Log Memo. The Log Memo edit box and the "Log Memo" button.
When the user wishes to insert a memo relevant to the current type of label being printed, an message entry is typed
into the Log Memo edit box and then the "Log Memo" button is clicked to record the message in the activity log file.
This message is marked so that it will be automatically associated with the specific type of labeling activity that is
currently being performed. The user's name, the time and date are a part of this recorded message. One of the
primary purposes for this facility is to allow users to place important label production notes in the activity log and
that will appear in the label audit report when it is printed.
"Print" Button
The "Print" button is used to initiate printing of labels. This activity can be initiated by either clicking on the "Print"
button or by pressing the Alt-P key combination. If any invalid selections have been made or if there are any required
entries that have not been specified, then typically these errors will be displayed to the user at the time this button is
actuated.
"Adjust Position" Button
Clicking on the "Adjust Position" button causes the Adjust Position window to open at center screen. The purpose
and use of this window is thoroughly covered in the section entitled Adjust Position.
"Cancel" Button
Clicking on the "Cancel" button causes all of the entries in the window to be cleared and the cursor to be returned to
the ISBT-128 Unit Id Number edit box for another scan or manual entry.
HemaTrax Manual.odt
Copyright © 2007 by Digi-Trax Services, Inc.
113
HemaTrax ISBT-128 Standalone Application
Verification, Print Labels
Verification
To select the label bar code Verification function, first select the Print Labels pull-down menu by either clicking on
the Print Labels title of the main menu or by pressing the Alt-P key combination. With the Print Labels pull-down
menu displayed either click on the Verification title or press the 'V' key. After selecting the label bar code
Verification function the Verification window shown below will be displayed.
Scan Bar Code
The Scan Bar Code edit box provides the bar code scanning entry point for all ISBT-128 bar codes. The cursor
remains positioned in this edit box throughout the use of the verification function. When a bar code or group of
concatenated bar codes is scanned the data will momentarily appear in this box while the codes are deciphered and
the information placed in the Scanned Information panel located below this edit box. Scanning a bar code without a
valid ICCBBA ISBT-128 data identifier prefix will cause a Warning dialog box to appear with the message, "Not a
valid ISBT-128 bar code.".
Scanned Information
As valid ISBT-128 bar codes are scanned, the information and the English interpretations are displayed in the
HemaTrax Manual.odt
Copyright © 2007 by Digi-Trax Services, Inc.
114
HemaTrax ISBT-128 Standalone Application
Verification, Print Labels
Scanned Information panel. This panel lists the following information:
Unit Number
The unit number is listed without the leading "=" prefix character. Flag digits, which are not really part of the unit
identification number, and the manual entry check digit, which is not typically encoded in the bar code, are not
displayed.
Facility Name
The facility name is displayed based on the first five characters of the unit number. If the first five characters of the
unit number can not be matched with that of a facility in the database, then the message "Not On File" will be
displayed.
ABO-Rh Code
The scanned ABO-Rh alphanumeric code (four digits, not including prefix characters) is displayed here.
Group/Factor
The blood group and Rh factor description is derived from the ABO-Rh Code and displayed here.
Intended Use
The intended use/donation type information encoded in the ABO-Rh Code is interpreted and displayed here.
Product Code
The scanned alphanumeric product code (eight characters, not including prefix characters) is displayed here.
Product Desc
Based on the product code scanned, a lookup on the product database is made and if there is a match the product
description stored in the matched database record is displayed here.
Intended Use
The intended use/donation type information encoded in the Product Code is interpreted and displayed here.
Exp. (Coll.) Date Code
The scanned numeric expiration (collection) date and time code (six or ten digits, depending on the date and time
structure used, not including prefix characters) is displayed here.
Exp. (Coll.) Date Text
Based on the Exp. (Coll.) Date Code a human readable interpretation is computed and displayed here. This may
include the expiration time if that bar code data structure was scanned.
Test Code
The scanned alphanumeric Test Code (not including the prefix characters) is displayed here.
HemaTrax Manual.odt
Copyright © 2007 by Digi-Trax Services, Inc.
115
HemaTrax ISBT-128 Standalone Application
Verification, Print Labels
Test Desc
Based on the Test Code scanned a human readable interpretation is accessed from a match on the code in the test
code text file and displayed here.
"Save" Button
Clicking on the "Save" button causes all of the scanned code to be saved as a single line record in a verification text
file. This file can be used later to produce a verification report.
"Clear" Button
Clicking on the "Clear" button clears all of the scan codes and human readable interpretations from the display and
discards the scanned codes.
HemaTrax Manual.odt
Copyright © 2007 by Digi-Trax Services, Inc.
116
HemaTrax ISBT-128 Standalone Application
Verification, Print Labels
( This page intentionally blank. )
HemaTrax Manual.odt
Copyright © 2007 by Digi-Trax Services, Inc.
117
HemaTrax ISBT-128 Standalone Application
Adjust Position
Adjust Position
When the "Adjust Position" button, found on all label printing windows, is clicked, a label image offset window is
displayed for the current printer selected for label printing. From the Adjust Position window shown immediately
below, the user may move the image being printed in order for the information to be properly positioned on the
labels.
The Adjust Position window includes a text panel that gives brief instructions on the use of the window. There are
two edit boxes one used to list and change the current Vertical Offset in mm and the other for Horizontal Offset in
mm. There are two buttons located at the bottom of the window, "Test Print" and "OK".
Vertical Offset in mm
The Vertical Offset in mm edit box is found on the Adjust Position window, which is available from any label
printing window. This edit box allows the user to specify the vertical offset from the upper left-hand corner of the
label where the image is to be located. This feature allows the user to adjust for slight differences that may occur
between manufactured batches of labels, print head alignment differences and other variables that could effect the
printed image position on the labels. There is no entry length limit established on this entry. The entry may be made
as whole millimeter units such as 12 or may be entered as a number with a decimal fraction such as 5.25.
Note: While negative number entries are allowed, their use is discouraged as this may produce unexpected
results.
Horizontal Offset in mm
The Horizontal Offset in mm edit box is found on the Adjust Position window, which is available from any label
printing window. This edit box allows the user to specify the horizontal offset from the upper left-hand corner of the
label where the image is to be located. This feature allows the user to adjust for slight differences that may occur
between manufactured batches of labels, print head alignment differences and other variables that could effect the
HemaTrax Manual.odt
Copyright © 2007 by Digi-Trax Services, Inc.
118
HemaTrax ISBT-128 Standalone Application
Adjust Position
printed image position on the labels.
There is no entry length limit established on this entry. The entry may be made as whole millimeter units such as 12
or may be entered as a number with a decimal fraction such as 5.25.
Note: While negative number entries are allowed, their use is discouraged as this may produce unexpected
results.
Status Bar
At the very bottom of the window is a status bar. From left to right the status bar displays the current label being
printed, the port to which the label formats are being sent and finally the printer model that is currently established
for the port.
"Test Print" Button
The "Test Print" button is located on the Adjust Position window, which is available from any label printing window.
When this button is clicked or the Alt-T key combination is pressed, a label is printed with a simple alignment
pattern to indicate the current upper left-hand corner position of the printing image.
"OK" Button
The "OK" button found on the Adjust Position window is used to save the current vertical and horizontal offset
settings. These settings are saved to a file which is read automatically each tome the HemaTrax program is restarted.
So settings made during this printing session will be retained for the next printing session with this printer. Failure to
click on the "OK" button before exiting from Adjust Position window the will result in the loss of the settings just
made.
HemaTrax Manual.odt
Copyright © 2007 by Digi-Trax Services, Inc.
119
HemaTrax ISBT-128 Standalone Application
ABO-Rh Label Information Window
ABO-Rh Label Information Window
After clicking on the "ABO-Rh" button the ABO-Rh Label Information window, shown immediately below, will be
displayed.
From this window the user may begin specifying the contents of the 2 inch (25.4mm) square upper right-hand
quadrant (ABO-Rh) ISBT-128 label. The only required entry is the selection of a Blood Group/Rh Factor. The
following fields are available from this window:
Blood Group/Rh Factor
This combo box provides a pull-down list of the blood groups and associated Rh factors that may be selected for this
label. This is a required selection and must be made before the "Print" button is clicked. The pull-down list of
possible blood groups and Rh factors includes the following:
O Negative
O Positive
A Negative
A Positive
B Negative
B Positive
AB Negative
AB Positive
para-Bombay Negative
para-Bombay Positive
Bombay Negative
Bombay Positive
O
A
B
AB
A POOLED Rh
AB POOLED Rh
B POOLED Rh
O POOLED Rh
HemaTrax Manual.odt
POOLED ABO Rh Positive
POOLED ABO Rh Negative
POOLED ABO POOLED Rh
Autologous Collection
Biohazardous
Discard Unit
Quarantine
Do Not Transfuse
Fractionation Use Only
Research Use Only
Copyright © 2007 by Digi-Trax Services, Inc.
120
HemaTrax ISBT-128 Standalone Application
ABO-Rh Label Information Window
Selection is made by clicking on the down-arrow box located on the right side of this combo box to reveal the pulldown list. Then select the desired blood group and Rh factor by clicking on the appropriate item in the list. The list is
long so you may need to use the scroll bar located on the right edge of the pull-down list in order to find the item you
want. Move on to the next control by either pressing the 'Tab' key or using the mouse pointer and clicking on the
next object.
Intended Use
The Intended Use combo box provides a pull-down list of the intended use (donation type) information that can be
encoded as part of the bar code for the ABO-Rh label and the bar code of the Product label. This list includes the
following:
Not Specified
Dedicated Donor
Autologous Use Only
Paid Homologous Donor
Autologous Use Only, Biohazardous
Paid Directed Collection, Eligible for
Crossover
Autologous Collection, Eligible for
Crossover
Paid Research Collection
Directed Donor Use Only
Paid Source Collection
Directed Donor Use Only,
Biohazardous
Volunteer Allogeneic Donation
Directed Donation, Eligible for
Crossover
Volunteer Research Donation
Directed Donor Use Only, Medical
Exception
Volunteer Source Donation
Directed Donor Use Only, Limited
Exposure
Volunteer Therapeutic Collection
Designated Donor
Failing to make a selection, the default "Not Specified" selection will automatically be made.
Anti-Kell Results
The Anti-Kell Results combo box is used to specify this phenotype test result. This test is currently not being
specified in the United States, but may be used in other countries. To specify this test result, click on the down-arrow
box at the right-hand side of the combo box to reveal the pull-down list. Find the desired test result statement and
click on it. Press the 'Tab' key or click on the next desired control to move on.
The current items available in the Anti-Kell Results combo box pull-down list are as follows:
Not Tested
Negative
Positive
HemaTrax Manual.odt
Copyright © 2007 by Digi-Trax Services, Inc.
121
HemaTrax ISBT-128 Standalone Application
ABO-Rh Label Information Window
Note: Selection of a test result for this combo box disables the Miltenberger (Mi-III) Results combo box.
Anti-C/Anti-c Results
The Anti-C/Anti-c Results combo box is used to specify this phenotype test result. This test is currently not being
specified in the United States, but may be used in other countries. To specify this test result, click on the down-arrow
box at the right-hand side of the combo box to reveal the pull-down list. Find the desired test result statement and
click on it. Press the 'Tab' key or click on the next desired control to move on.
The current items available in the Anti-C/Anti-c Results combo box pull-down list are as follows:
Not Tested
C-Neg c-Pos
C-Pos c-Neg
C-Pos c-Pos
Note: Selection of a test result for this combo box disables the Miltenberger (Mi-III) Results combo box.
Anti-E/Anti-e Results
The Anti-E/Anti-e Results combo box is used to specify this phenotype test result. This test is currently not being
specified in the United States, but may be used in other countries. To specify this test result, click on the down-arrow
box at the right-hand side of the combo box to reveal the pull-down list. Find the desired test result statement and
click on it. Press the 'Tab' key or click on the next desired control to move on.
The current items available in the Anti-E/Anti-e Results combo box pull-down list are as follows:
Not Tested
E-Neg e-Pos
E-Pos e-Neg
E-Pos e-Pos
Note: Selection of a test result for this combo box disables the Miltenberger (Mi-III) Results combo box.
Miltenberger (Mi-III) Results
The Miltenberger (Mi-III) Results combo box is used to specify a phenotype test result. This test is currently not
being specfied in the United States, but may be used in other countries. To specify this test result, click on the downarrow box at the right-hand side of the combo box to reveal the pull-down list. Find the desired test result statement
and click on it. Press the 'Tab' key or click on the next desired control to move on.
The current items available in the Anti-E/Anti-e Results combo box pull-down list are as follows:
Not Tested
Negative
Positive
Note: Selection of a test result for this combo box disables the Anti-Kell Results, Anti-C/Anti-c Results and AntiE/Anti-e Results combo boxes.
HemaTrax Manual.odt
Copyright © 2007 by Digi-Trax Services, Inc.
122
HemaTrax ISBT-128 Standalone Application
ABO-Rh Label Information Window
"OK" Button
After making the appropriate selections for this portion of the combination label being specified, click the "OK"
button to accept these selections and return to the previous window.
"Exit" Button
If you decide to abort the selections just made, then click on the "Exit" button to return to the previous window
without making any selections.
HemaTrax Manual.odt
Copyright © 2007 by Digi-Trax Services, Inc.
123
HemaTrax ISBT-128 Standalone Application
Date & Time Label Information Window
Date & Time Label Information Window
For most products after clicking on the "Date" button the Date & Time Label Information window, shown
immediately below, will be displayed. There is a narrow range of products for which the collection date and time
window, described later, will instead be displayed.
From this window the user may begin specifying the contents of the 2 inch (25.4mm) square lower right-hand
quadrant (Expiration Date) ISBT-128 label. The only required entry is the Expiration Date. The following control
objects are available in this window:
"Product" Button
Clicking on the "Product" button or pressing the Alt-P key combination allows the user to select a product for which
the date calculations can then be automatically made.
"Calc Exp. Data/Time" Button
Once a product has been selected from the product database, then this button will become enabled. If the selected
product is not an irradiated product then clicking on this button causes the Collection Date & Time window to be
displayed. If the product selected is an irradiated product then clicking this button causes the Irradiated Product Date
& Time window to be displayed. For more information about the Collection Date & Time window refer to the
HemaTrax Manual.odt
Copyright © 2007 by Digi-Trax Services, Inc.
124
HemaTrax ISBT-128 Standalone Application
Date & Time Label Information Window
section entitled Collection Date & Time Information. For more information about the Irradiated Product Date &
Time window refer to the section entitled Irradiated Product Date & Time.
After entering the appropriate product dates and times, the current product's expiration date will be automatically
calculated. The expiration time is automatically calculated and enabled if the product has an expiration period of 72
hours or less.
Expiration Date
At the top of the Expiration Date panel are three unlabeled entry controls that are arranged in a horizontal row. From
left to right these controls are the month combo box, the day of month edit box, and the year edit box.
Include Exp. Time
The Include Exp. Time check box allows the user to force the inclusion of the expiration time on the label even
though the product being labeled may not require that a time be printed. Immediately below the check box are two
unlabeled edit boxes that are arranged horizontally. From left to right these edit boxes are the hour edit box and the
minutes edit box.
Special Test
The Special Test combo box allows the user to select a special test that has been performed for this product from this
combo box pull-down list.
Processing Legend
The Processing Legend combo box provides a brief list of standard legends that can be selected from or the user may
enter a legend. The text in this box will appear on the expiration (collection) date label just above the facility name
line located in the bottom third of the quadrant.
"Processing Facility" Button
Clicking on this button causes the Facility Information window to be displayed. From this window the user may
select a facility which will then be included as the further processing facility at the bottom of the expiration
(collection) date label.
Processing Facility Information
This unlabeled list box appears at the bottom of the Processing Facility Information panel and displays the facility
name and location that has been selected for the bottom of the date & time label.
HemaTrax Manual.odt
Copyright © 2007 by Digi-Trax Services, Inc.
125
HemaTrax ISBT-128 Standalone Application
Facility Information Window
Facility Information Window
After clicking the "Further Processing Facility" button the Facility Information window, shown immediately below,
will be displayed. From this window the user can select a facility to be included in the previous window.
To select a facility, click on (highlight) the line with the facility code and name of the desired facility in the List of
Currently Defined Facilities list box, then click on the "OK" button to make the selection. The window will be closed
and the facility selection will be returned to the previous window.
The Current facility information: list box shows the facility code, name and location information for the last selected
facility.
If you do not wish to select a facility, then click on the "Exit" button.
HemaTrax Manual.odt
Copyright © 2007 by Digi-Trax Services, Inc.
126
HemaTrax ISBT-128 Standalone Application
Facility Information Window
( This page intentionally blank. )
HemaTrax Manual.odt
Copyright © 2007 by Digi-Trax Services, Inc.
127
HemaTrax ISBT-128 Standalone Application
Collection Date & Time Window
Collection Date & Time Window
For irradiated products, Recovered Plasma, Source Leukocytes and Source Plasma the user will be prompted to enter
the Collection Date and TIme. The Collection Date & Time window is shown immediately below:
From this window you can specify a unit's collection date and time.
Collection Date
Immediately below the Collection Date label are three unlabeled entry objects. Proceeding from left to right these
are: the collection month combo box, the collection day of month edit box, and the collection year edit box.
Collection Time
Immediately below the Collection Time label are three unlabeled entry objects. Proceeding from left to right these
are: the collection hour edit box and the collection minute edit box.
"Current Date" Button
By clicking on the "Current Date" button the three unlabeled Collection Date objects will be automatically filled in
with the current system date information.
"Current Time" Button
By clicking on the "Current Time" button the two unlabeled Collection Time objects will be automatically filled in
with the current system time.
Clicking on the "OK" button returns the entered information to the previous window.
HemaTrax Manual.odt
Copyright © 2007 by Digi-Trax Services, Inc.
128
HemaTrax ISBT-128 Standalone Application
Collection Date & Time Window
( This page intentionally blank. )
HemaTrax Manual.odt
Copyright © 2007 by Digi-Trax Services, Inc.
129
HemaTrax ISBT-128 Standalone Application
Irradiated Product Date & Time Window
Irradiated Product Date & Time Window
If a date and time is being specified for an irradiated product, then after clicking on the "Calc Exp. Date/Time"
button and if the selected product is irradiated, then the Irradiated Product Date & Time window, shown immediately
below, will be displayed.
From this window you can either scan the current expiration date and time bar code from the label on the blood
container or you can manually enter the expiration date and time of the product before is was irradiated. The user
must also supply the date of irradiation. From these date and time values the program calculates the expiration date
of the irradiated product.
Scan Product Expiration Date & Time
The Scan Product Expiration Date & Time edit box provides an entry field where the user may scan the product's
expiration date and time bar code. This must be the expiration date and time of the product before is was irradiated.
If there is no label to be scanned or the bar code is not machine readable, then the user should use the 'Tab' key or
mouse pointer to position to the Product Exp. Date and Prod Exp. Time entry fields and manually enter the
expiration date and time information. Scanning the expiration date and time bar code will automatically supply the
information to the Product Exp. Date and Product Exp. Time entry fields located in the Expiration Date of Product
before irradiation panel.
HemaTrax Manual.odt
Copyright © 2007 by Digi-Trax Services, Inc.
130
HemaTrax ISBT-128 Standalone Application
Irradiated Product Date & Time Window
Product Exp. Date
Immediately below the Product Exp. Date label are three unlabeled entry fields. From left to right these are as
follows: the product expiration month combo box, the product expiration day of month edit box, and the product
expiration year edit box.
Product Exp. Time
Immediately below the Product Exp. Time label are two unlabeled entry fields, from left to right as follows: the
product expiration hour edit box and the product expiration minute edit box.
Irradiation Date
Within the Irradiation Date panel are three unlabeled entry fields and the "Current Date" button. The three unlabeled
entry fields from left to right are as follows: the irradiation month combo box, the irradiation day of month edit box,
and the irradiation year.
"Current Date" Button
By clicking on the "Current Date" button the three unlabeled Irradiation Date objects (irradiation month, day and
year) will be automatically filled in with the current system date information.
"OK" Button
After completing the entries of the Irradiated Product Date & Time window, click on the "OK" button located at the
bottom of the window to return to the previous window.
Irradiated Product Expiration Date Calculation
The expiration date for an irradiated product is either 28 days from the date of irradiation or the original expiration
date of the product before irradiation if it is sooner than the irradiation expiration date.
The program first calculates the irradiation expiration date as 28 days from the date of product irradiation. Next the
program compares the irradiation expiration date to the original expiration date and time of the product before
irradiation. The earliest date of expiration used in the comparison is taken as the product's expiration date.
Month combo boxes
The Month combo boxes provide for the entry of the month by either allowing the user to enter the first three
characters of the month or by using the pull-down list associated with this combo box and then clicking on the
desired month listed. The months listed in the pull-down list also indicate the proper entries that must be made
manually and are as follows:
Jan Feb Mar Apr May Jun Jul Aug Sep Oct Nov Dec
Skipping this entry or entering invalid character will likely result in an error message. It should be noted that date
checking is not typically performed until sometime after all of the date entries (Month, Day and Year) have been
made.
Day edit boxes
The Day edit boxes provide for the entry of the day of the month. The length on this entry is limited to two numeric
characters. Entering non-numeric characters or leaving this edit box empty will likely result in an error message at
HemaTrax Manual.odt
Copyright © 2007 by Digi-Trax Services, Inc.
131
HemaTrax ISBT-128 Standalone Application
Irradiated Product Date & Time Window
some point in processing. It should be noted that date checking is not typically performed until sometime after all of
the date entries (Month, Day and Year) have been made.
Year edit boxes
The Year edit boxes provide for the entry of the year. The length on this entry is limited to four numeric characters.
Entering non-numeric characters or leaving this edit box empty will likely result in an error message at some point in
processing. It should be noted that date checking is not typically performed until sometime after all of the date
entries (Month, Day and Year) have been made.
Hour edit box
The Hour edit box provides for the entry of the hour of the day. The length on this entry is limited to two numeric
characters. Entering non-numeric characters, entering out of range numbers or leaving this edit box empty will likely
result in an error message at some point in processing. It should be noted that time checking is not typically
performed until sometime after all of the time entries (Hour and Minute) have been made.
Minute edit box
The Minute edit box provides for the entry of the minutes after the hour. The length on this entry is limited to two
numeric characters. Entering non-numeric characters, entering out of range numbers or leaving this edit box empty
will likely result in an error message at some point in processing. It should be noted that time checking is not
typically performed until sometime after the time entries (Hour and Minutes) have been made.
HemaTrax Manual.odt
Copyright © 2007 by Digi-Trax Services, Inc.
132
HemaTrax ISBT-128 Standalone Application
Irradiated Product Date & Time Window
( This page intentionally blank. )
HemaTrax Manual.odt
Copyright © 2007 by Digi-Trax Services, Inc.
133
HemaTrax ISBT-128 Standalone Application
Activity Log Reports
Activity Log Reports
Selecting the Activity Log selection causes a pop-up menu, as shown immediately above, with the following choices
to appear:
On-Line Log
Off-Line Log
Either clicking on the title with in the pop-up menu or pressing the letter key of the underscored character within the
selection titles will cause the desired selection to be executed. The underscored letter is shown in bold face type
above.
HemaTrax Manual.odt
Copyright © 2007 by Digi-Trax Services, Inc.
134
HemaTrax ISBT-128 Standalone Application
Activity Log Reports
On-Line Activity Log Report
After clicking on the On-Line Log selection of the Activity Log pop-up menu, the window illustrated immediately
below will appear.
When the On-Line Log window is initially displayed the current month and year will appear in the Reporting Period
Month combo box and Year edit box.
If you wish to look at activities for a different one month period, then edit the contents of these boxes before clicking
on the "Load Period" button.
Month
The Month combo box is used to select the month period for which all activities are to be reported. The user makes a
month selection by clicking on the down-arrow located on the right side of the combo box and then clicking on the
desired month.
HemaTrax Manual.odt
Copyright © 2007 by Digi-Trax Services, Inc.
135
HemaTrax ISBT-128 Standalone Application
Activity Log Reports
Year
The Year edit box provides the user with the means of selecting the year for which activities will be reported. The
user must enter the appropriate four digit year in this box. Alphabetic entries will not be accepted.
"Load Period" Button
The "Load Period" button must be clicked in order to load the activities for the specified period. Clicking on this
button without supplying a valid Month or Year will cause a Warning dialog box to appear at the center of the
window with the message "A valid reporting period must be specified.". The user must either click on the "OK"
button of the dialog box or press the 'Enter' key before continuing.
With a valid reporting period entered, but one for which there are no records, when the "Load Period" button is
clicked an Information dialog box will appear at center window with the message, "No activities from "period text"
found in on-line log". The user must either click on the "OK" button of the dialog box or press the 'Enter' key before
continuing. With a valid period entered and one for which there are activity records, when the "Load Period" button
is clicked, the large panel in the window will be filled with activity records for the period specified.
"Prev" Button
The "Prev" button is used to look at the block of records previous to the current ones shown on the screen. Clicking
this button when already at the first record in the list does nothing.
"Next" Button
The "Next" button is used to look at the next block of records beyond the current ones shown in the panel of the
window. Clicking this button when already at the last record in the list does nothing.
"Screen" Button
The Screen button is used to print only the activity information currently displayed in the panel. Clicking this button
will cause one page to be printed at the printer.
"Period" Button
The "Period" button is used to print all of the records for which activity is currently in the display panel. When this
button is clicked one or more report pages will be printed, depending on the number of records that exist for the one
month period that has been specified.
For each record in the activity log two or more lines are displayed. Each record is separated from the next by a blank
line. Each record holds the name and ID number of the user logged on when an activity was logged and the date and
time of the activity. The activity code is given along with a block of text that explains the activity.
At the bottom of the On-Line Log window is a status bar that provides information about the number of records in
the specified period, the number of screen pages, the total number of report pages needed to print the entire period
and finally the current screen and report page being viewed.
HemaTrax Manual.odt
Copyright © 2007 by Digi-Trax Services, Inc.
136
HemaTrax ISBT-128 Standalone Application
Activity Log Reports
Off-Line Activity Log Report
After clicking on the Off-Line Log selection of the Activity Log pop-up menu, the window illustrated immediately
below will appear.
After the Off-Line Log window is initially displayed the user must make use of the File pull-down menu located in
the upper left corner of the window in order to select the archived log file for viewing.
File
The File pull-down menu is accessed by clicking on the word located in the upper left corner of the Off-Line Log
window or by pressing the Alt-F key combination. With the File pull-down menu displayed, the user will be able to
select from one of three choices: Open, Close, or Exit.
Open
Clicking Open or pressing the 'O' key causes the windows file open dialog box to appear as shown below. The file
open dialog box provides a list of all archived logs found in the Log directory. To select one of these archived log
HemaTrax Manual.odt
Copyright © 2007 by Digi-Trax Services, Inc.
137
HemaTrax ISBT-128 Standalone Application
Activity Log Reports
files highlight the desired file name by clicking on it and then click on the "Open" button of the Open dialog box.
The Open dialog box will be closed and the selected archived log file will be opened, read and displayed in the panel
of the Off-Line Log window.
Close
Clicking Close or pressing the 'C' key causes the archived log file currently being displayed in the Off-Line Log
window to be closed and the contents of the information display panel to be cleared. You must close an archived log
file before another one can be displayed.
Exit
Clicking Exit or pressing the 'E' key causes any archive file currently being viewed to be closed and then closes the
Off-Line Log window.
Archived Log File:
When an archived log file has been opened for viewing the name of the archived log file will be displayed
immediately above the large panel of the window.
Archived Log File Names
When sections of the active (on-line) log file are archived a file name is automatically created. The archive file name
is constructed based on the starting and ending period dates of the records being moved. For example if the activity
HemaTrax Manual.odt
Copyright © 2007 by Digi-Trax Services, Inc.
138
HemaTrax ISBT-128 Standalone Application
Activity Log Reports
records from December 1st to December 31st of the year 1998 are archived, then the file name created will be
Log1998-12-01_to_1998-12-31.Txt. The name clearly indicates that this is a log file and also clearly gives the range
of dated activity records contained within the file. The ".Txt" file extension also clearly indicates that the file is an
ASCII Text file.
"Prev" Button
The "Prev" button is used to look at the block of records previous to the current ones shown on the screen. Clicking
this button when already at the first record in the list does nothing.
"Next" Button
The "Next" button is used to look at the next block of records beyond the current ones shown in the panel of the
window. Clicking this button when already at the last record in the list does nothing.
"Screen" Button
The "Screen" button is used to print only the activity information currently displayed in the panel. Clicking this
button will cause one page to be printed at the printer. Upon clicking this button a standard windows Print dialog box
will appear. This Print dialog box allows the user to select the printer to which the report will be directed. Upon
clicking the "OK" button in this dialog box, the licensed products report will be sent to the selected printer.
"Period" Button
The Period button is used to print all of the records for which activity is currently in the display panel. When this
button is clicked one or more report pages will be printed, depending on the number of records that exist for the one
month period that has been specified. Upon clicking this button a standard windows Print dialog box will appear.
This Print dialog box allows the user to select the printer to which the report will be directed. Upon clicking the
"OK" button in this dialog box, the licensed products report will be sent to the selected printer.
Each record in the Off-Line Log file causes two or more lines to be displayed. Each record is separated from the next
by a blank line on the screen and in the report. Each record holds the name and ID number of the user logged on and
the date and time of the activity. The activity code is given along with a block of text that explains the activity.
At the bottom of the Off-Line Log window is a status bar that provides information about the number of records in
the specified period, the number of screen pages, the total number of report pages needed to print the entire period
and finally the current screen and report page being viewed.
HemaTrax Manual.odt
Copyright © 2007 by Digi-Trax Services, Inc.
139
HemaTrax ISBT-128 Standalone Application
Database Reports
Database Reports
To access Database reports place the mouse pointer on the Reports menu item and click the left mouse button or
alternatively press the Alt-R key combination. This will cause the Reports pull-down menu to appear. With the pulldown menu displayed, either place the mouse pointer on the Database item of the pull-down menu or press the 'D'
key.
A pop-up menu with the following selections will appear:
Facility Information
Instruction Label
Licensed Products
Product Label
HemaTrax Manual.odt
Copyright © 2007 by Digi-Trax Services, Inc.
140
HemaTrax ISBT-128 Standalone Application
Database Reports
( This page intentionally blank. )
HemaTrax Manual.odt
Copyright © 2007 by Digi-Trax Services, Inc.
141
HemaTrax ISBT-128 Standalone Application
Facility Information Database Report
Facility Information Database Report
After selecting Database reports the user may either click on the Facility Information title or press the 'F' key to cause
the window shown below to be displayed.
The Facility Information window contains a large panel that is used to display information for all of the facilities that
are defined in the facility database. To view facilities not shown in the display panel, the user makes use of the scroll
bar located on the right edge to move up or down through the records.
"Print" Button
The "Print" button is clicked or the Alt-P key combination pressed when a hard copy report is desired. Upon clicking
this button a standard windows Print dialog box will appear. This Print dialog box allows the user to select the
printer to which the report will be directed. Upon clicking the "OK" button in this dialog box, the licensed products
report will be sent to the selected printer.
HemaTrax Manual.odt
Copyright © 2007 by Digi-Trax Services, Inc.
142
HemaTrax ISBT-128 Standalone Application
Facility Information Database Report
(This page intentionally blank)
HemaTrax Manual.odt
Copyright © 2007 by Digi-Trax Services, Inc.
143
HemaTrax ISBT-128 Standalone Application
Instruction Label Database Report
Instruction Label Database Report
After selecting Database reports the user may either click on the Instruction Label title or press the 'I' key to cause
the window immediately below to be displayed.
The Instruction Label window contains a large panel that is used to display information for all of the instruction
labels that are defined in that database. To view instruction labels not shown in the display panel, the user makes use
of the scroll bar located on the right edge to move up or down through the records.
"Print" Button
The "Print" button is clicked or the Alt-P key combination pressed when a hard copy report is desired. Upon clicking
this button a standard windows Print dialog box will appear. This Print dialog box allows the user to select the
printer to which the report will be directed. Upon clicking the "OK" button in this dialog box, the licensed products
report will be sent to the selected printer.
HemaTrax Manual.odt
Copyright © 2007 by Digi-Trax Services, Inc.
144
HemaTrax ISBT-128 Standalone Application
Instruction Label Database Report
(This page intentionally blank)
HemaTrax Manual.odt
Copyright © 2007 by Digi-Trax Services, Inc.
145
HemaTrax ISBT-128 Standalone Application
Licensed Products Database Report
Licensed Products Database Report
After selecting Database reports the user may either click on the Licensed Products title or press the 'L' key to cause
the window immediately below to be displayed.
When initially displayed the Licensed Products window needs to have the World Facility Code for a specific facility
selected in order to find the specific product codes that are licensed for that facility. The user may also specify that
all licensed products or a range of licensed products be reported. Upon clicking the "OK" button the licensed
products specified are listed in the large panel on the screen and may then be printed as a report by clicking on the
"Print" button.
World Facility Code
The World Facility Code combo box provides the user a means of selecting one of the world facility codes that have
already been defined in the facility database. This code forms part of the key to the licensed products database and
serves to segregate the various facilities from one another within the licensed products database. The user must pull
down the list of facility codes by clicking on the down-arrow located on the right side of the combo box. With the list
of facility codes displayed the user clicks on the facility code desired.
HemaTrax Manual.odt
Copyright © 2007 by Digi-Trax Services, Inc.
146
HemaTrax ISBT-128 Standalone Application
Licensed Products Database Report
Reporting Range
The Reporting Range radio button group allows the user to specify either All Products or a Range of Products to be
reported. The default selection is All Products. If the user selects Range of Products, then the range of products is
specified by making a starting and ending code entry in the edit boxes provided for that purpose.
Starting ICCBBA Code
The Starting ICCBBA Code edit box is provided to allow the user to specify the first product code of a range of
codes to be listed and reported. If this box is empty when the "OK" button is clicked, then a value of A0000 will
automatically be inserted to give the lowest possible starting value.
Ending ICCBBA Code
The Ending ICCBBA Code edit box is provided to allow the user to specify the last product code of a range of codes
to be listed and reported. If this box is empty when the "OK" button is clicked, then a value of Z0000 will
automatically be inserted to give the highest possible ending value.
"OK" Button
The "OK" button is clicked to load the list of selected licensed products into the display panel. With the list of
products displayed it is then possible to print a report by clicking on the "Print" button.
"Print" Button
The "Print" button is clicked when a list of licensed products is displayed in the large panel of this window. Upon
clicking this button a standard windows Print dialog box will appear. This Print dialog box allows the user to select
the printer to which the report will be directed. Upon clicking the "OK" button in this dialog box, the licensed
products report will be sent to the selected printer.
HemaTrax Manual.odt
Copyright © 2007 by Digi-Trax Services, Inc.
147
HemaTrax ISBT-128 Standalone Application
Product Label Database Report
Product Label Database Report
After selecting Database reports the user may either click on the Product Label title or press the 'P' key to cause the
window immediately below to be displayed.
Since the ICCBBA Product Code database contains more than 4,500 products and each label design stored in the
database is listed and prints as about ten lines of information, it is easy to exceed the capacity of the list box to
display the entire database. It is therefore necessary to display and print sections of the product database. It is safe to
specify product ranges of up to five hundred products at a time.
For example: the user could specify a range of ICCBBA products codes such as Starting: E0001 to Ending: E0500.
Two edit boxes under the label ICCBBA Product Code Range are provided for the purpose of specifying this
product code range. These are as follows:
HemaTrax Manual.odt
Copyright © 2007 by Digi-Trax Services, Inc.
148
HemaTrax ISBT-128 Standalone Application
Product Label Database Report
Starting
The Starting edit box provides for the entry of the first ICCBBA product code to be listed (reported). This entry must
conform to ICCBBA specifications. The first character entered must be an alphabetic letter in the range (A to Z).
The first character is followed by four numeric only characters in the range (0001 to 9999). If an invalid entry is
made, it will be detected when the "OK" button is clicked (or, alternatively, the Alt-O key combination pressed).
Ending
The Ending edit box provides for the entry of the last ICCBBA product code to be listed (reported). This entry must
conform to ICCBBA specifications. The first character entered must be the letter "E". The first character is followed
by four numeric only characters in the range (0001 to 9999). If an invalid entry is made, it will be detected when the
OK button is clicked (or, alternatively, the Alt-O key combination pressed).
"OK" Button
When the "OK" button is clicked or the Alt-O key combination is pressed, the range of product codes is scanned and
added to the panel. The user may scan through the list, if it is larger than the list box, through the use of the scroll bar
that may appear along the right edge of the list box control.
"Print" Button
The "Print" button is used to print the contents of the list box to the printer as a report. Upon clicking this button a
standard windows Print dialog box will appear. This Print dialog box allows the user to select the printer to which
the report will be directed. Upon clicking the "OK" button in this dialog box, the licensed products report will be
sent to the selected printer.
HemaTrax Manual.odt
Copyright © 2007 by Digi-Trax Services, Inc.
149
HemaTrax ISBT-128 Standalone Application
Label Audit Reports
Label Audit Reports
To access Label Audit reports place the mouse pointer on the Reports main menu item and click the left mouse
button or alternatively press the Alt-R key combination. This will cause the Reports pull-down menu to appear. With
the pull-down menu displayed, either place the mouse pointer on the Label Audit item of the pull-down menu or
alternatively, press the 'L' key.
A pop-up menu with the following selections will appear:
ABO-Rh
ABO-Rh / Date & Time
Date & Time
Facility
Facility / Product
Full Face
Instruction
Intended Recipient Information
Product
Product / Date & Time
Replicated Unit ID Sets
HemaTrax Manual.odt
Copyright © 2007 by Digi-Trax Services, Inc.
150
HemaTrax ISBT-128 Standalone Application
Label Audit Reports
( This page intentionally blank. )
HemaTrax Manual.odt
Copyright © 2007 by Digi-Trax Services, Inc.
151
HemaTrax ISBT-128 Standalone Application
ABO-Rh Audit Report
ABO-Rh Audit Report
After selecting Label Audit from the Reports pull-down menu the user may either click on the ABO-Rh title or press
the 'A' key to cause the window immediately below to be displayed.
With Memos
The With Memos radio button group box allows the user to choose whether or not memo entries made while labels
were being produced will be included in the report. The default answer is Yes. To change the select merely click on
the title or button of the answer you desire.
Starting Date
Below the Starting Date label are two entry fields: the month combo box and the year edit box allow the user to
specify the month and year of the beginning of the range of ABO-Rh label printing records in the activity log file to
HemaTrax Manual.odt
Copyright © 2007 by Digi-Trax Services, Inc.
152
HemaTrax ISBT-128 Standalone Application
ABO-Rh Audit Report
be reported.
Ending Date
Below the Ending Date label are two entry fields: the month combo box and the year edit box allow the user to
specify the month and year of the end of the range of ABO-Rh label printing records in the activity log file to be
reported.
"OK" Button
Clicking on the "OK" button initiates the search of the activity log for all ABO-Rh label printing records (including
memos, if specified). All records within the range are listed in the list box at the center of the window.
"Print" Button
Clicking on the "Print" button will print the records displayed in the list box. Upon clicking this button a standard
windows Print dialog box will appear. This Print dialog box allows the user to select the printer to which the report
will be directed. Upon clicking the "OK" button in this dialog box, the report will be sent to the selected printer.
HemaTrax Manual.odt
Copyright © 2007 by Digi-Trax Services, Inc.
153
HemaTrax ISBT-128 Standalone Application
ABO-Rh / Date & Time Audit Report
ABO-Rh / Date & Time Audit Report
After selecting Label Audit from the Reports pull-down menu the user may either click on the ABO-Rh / Date &
Time title or press the 'B' key to cause the window immediately below to be displayed.
With Memos
The With Memos radio button group box allows the user to choose whether or not memo entries made while labels
were being produced will be included in the report. The default answer is Yes. To change the select merely click on
the title or button of the answer you desire.
HemaTrax Manual.odt
Copyright © 2007 by Digi-Trax Services, Inc.
154
HemaTrax ISBT-128 Standalone Application
ABO-Rh / Date & Time Audit Report
Starting Date
Below the Starting Date label are two entry fields: the month combo box and the year edit box allow the user to
specify the month and year of the beginning of the range of ABO-Rh / Date & Time label printing records in the
activity log file to be reported.
Ending Date
Below the Ending Date label are two entry fields: the month combo box and the year edit box allow the user to
specify the month and year of the end of the range of ABO-Rh / Date & Time label printing records in the activity
log file to be reported.
"OK" Button
Clicking on the "OK" button initiates the search of the activity log for all ABO-Rh / Date & Time label printing
records (including memos, if specified). All records within the range are listed in the list box at the center of the
window.
"Print" Button
Clicking on the "Print" button will print the records displayed in the list box. Upon clicking this button a standard
windows Print dialog box will appear. This Print dialog box allows the user to select the printer to which the report
will be directed. Upon clicking the "OK" button in this dialog box, the report will be sent to the selected printer.
HemaTrax Manual.odt
Copyright © 2007 by Digi-Trax Services, Inc.
155
HemaTrax ISBT-128 Standalone Application
Date & Time Label Audit Report
Date & Time Label Audit Report
After selecting Label Audit from the Reports pull-down menu the user may either click on the Date & Time title or
press the 'D' key to cause the window immediately below to be displayed.
With Memos
The With Memos radio button group box allows the user to choose whether or not memo entries made while labels
were being produced will be included in the report. The default answer is Yes. To change the select merely click on
the title or button of the answer you desire.
Starting Date
Below the Starting Date label are two entry fields: the month combo box and the year edit box allow the user to
specify the month and year of the beginning of the range of Date & Time label printing records in the activity log file
HemaTrax Manual.odt
Copyright © 2007 by Digi-Trax Services, Inc.
156
HemaTrax ISBT-128 Standalone Application
Date & Time Label Audit Report
to be reported.
Ending Date
Below the Ending Date label are two entry fields: the month combo box and the year edit box allow the user to
specify the month and year of the end of the range of Date & Time label printing records in the activity log file to be
reported.
"OK" Button
Clicking on the "OK" button initiates the search of the activity log for all Date & Time label printing records
(including memos, if specified). All records within the range are listed in the list box at the center of the window.
"Print" Button
Clicking on the "Print" button will print the records displayed in the list box. Upon clicking this button a standard
windows Print dialog box will appear. This Print dialog box allows the user to select the printer to which the report
will be directed. Upon clicking the "OK" button in this dialog box, the report will be sent to the selected printer.
HemaTrax Manual.odt
Copyright © 2007 by Digi-Trax Services, Inc.
157
HemaTrax ISBT-128 Standalone Application
Facility Label Audit Report
Facility Label Audit Report
After selecting Label Audit from the Reports pull-down menu the user may either click on the Facility title or press
the 'F' key to cause the window immediately below to be displayed.
With Memos
The With Memos radio button group box allows the user to choose whether or not memo entries made while labels
were being produced will be included in the report. The default answer is Yes. To change the select merely click on
the title or button of the answer you desire.
Starting Date
Below the Starting Date label are two entry fields: the month combo box and the year edit box allow the user to
specify the month and year of the beginning of the range of Facility label printing records in the activity log file to be
reported.
Ending Date
Below the Ending Date label are two entry fields: the month combo box and the year edit box allow the user to
HemaTrax Manual.odt
Copyright © 2007 by Digi-Trax Services, Inc.
158
HemaTrax ISBT-128 Standalone Application
Facility Label Audit Report
specify the month and year of the end of the range of Facility label printing records in the activity log file to be
reported.
"OK" Button
Clicking on the "OK" button initiates the search of the activity log for all Facility label printing records (including
memos, if specified). All records within the range are listed in the list box at the center of the window.
"Print" Button
Clicking on the "Print" button will print the records displayed in the list box. Upon clicking this button a standard
windows Print dialog box will appear. This Print dialog box allows the user to select the printer to which the report
will be directed. Upon clicking the "OK" button in this dialog box, the report will be sent to the selected printer.
HemaTrax Manual.odt
Copyright © 2007 by Digi-Trax Services, Inc.
159
HemaTrax ISBT-128 Standalone Application
Facility / Product Label Audit Report
Facility / Product Label Audit Report
After selecting Label Audit from the Reports pull-down menu the user may either click on the Facility / Product title
or press the 'c' key to cause the window immediately below to be displayed.
With Memos
The With Memos radio button group box allows the user to choose whether or not memo entries made while labels
were being produced will be included in the report. The default answer is Yes. To change the select merely click on
the title or button of the answer you desire.
Starting Date
Below the Starting Date label are two entry fields: the month combo box and the year edit box allow the user to
specify the month and year of the beginning of the range of Facility / Product label printing records in the activity log
file to be reported.
Ending Date
Below the Ending Date label are two entry fields: the month combo box and the year edit box allow the user to
HemaTrax Manual.odt
Copyright © 2007 by Digi-Trax Services, Inc.
160
HemaTrax ISBT-128 Standalone Application
Facility / Product Label Audit Report
specify the month and year of the end of the range of Facility / Product label printing records in the activity log file
to be reported.
"OK" Button
Clicking on the "OK" button initiates the search of the activity log for all Facility / Product label printing records
(including memos, if specified). All records within the range are listed in the list box at the center of the window.
"Print" Button
Clicking on the "Print" button will print the records displayed in the list box. Upon clicking this button a standard
windows Print dialog box will appear. This Print dialog box allows the user to select the printer to which the report
will be directed. Upon clicking the "OK" button in this dialog box, the report will be sent to the selected printer.
HemaTrax Manual.odt
Copyright © 2007 by Digi-Trax Services, Inc.
161
HemaTrax ISBT-128 Standalone Application
Full Face Label Audit Report
Full Face Label Audit Report
After selecting Label Audit from the Reports pull-down menu the user may either click on the Full Face title or press
the 'u' key to cause the window immediately below to be displayed.
With Memos
The With Memos radio button group box allows the user to choose whether or not memo entries made while labels
were being produced will be included in the report. The default answer is Yes. To change the select merely click on
the title or button of the answer you desire.
Starting Date
Below the Starting Date label are two entry fields: the month combo box and the year edit box allow the user to
specify the month and year of the beginning of the range of Full Face label printing records in the activity log file to
be reported.
HemaTrax Manual.odt
Copyright © 2007 by Digi-Trax Services, Inc.
162
HemaTrax ISBT-128 Standalone Application
Full Face Label Audit Report
Ending Date
Below the Ending Date label are two entry fields: the month combo box and the year edit box allow the user to
specify the month and year of the end of the range of Full Face label printing records in the activity log file to be
reported.
"OK" Button
Clicking on the "OK" button initiates the search of the activity log for all Full Face label printing records (including
memos, if specified). All records within the range are listed in the list box at the center of the window.
"Print" Button
Clicking on the "Print" button will print the records displayed in the list box. Upon clicking this button a standard
windows Print dialog box will appear. This Print dialog box allows the user to select the printer to which the report
will be directed. Upon clicking the "OK" button in this dialog box, the report will be sent to the selected printer.
HemaTrax Manual.odt
Copyright © 2007 by Digi-Trax Services, Inc.
163
HemaTrax ISBT-128 Standalone Application
Instruction Label Audit Report
Instruction Label Audit Report
After selecting Label Audit from the Reports pull-down menu the user may either click on the Instruction title or
press the 'I' key to cause the window immediately below to be displayed.
With Memos
The With Memos radio button group box allows the user to choose whether or not memo entries made while labels
were being produced will be included in the report. The default answer is Yes. To change the select merely click on
the title or button of the answer you desire.
Starting Date
Below the Starting Date label are two entry fields: the month combo box and the year edit box allow the user to
specify the month and year of the beginning of the range of Instruction label printing records in the activity log file to
be reported.
Ending Date
Below the Ending Date label are two entry fields: the month combo box and the year edit box allow the user to
HemaTrax Manual.odt
Copyright © 2007 by Digi-Trax Services, Inc.
164
HemaTrax ISBT-128 Standalone Application
Instruction Label Audit Report
specify the month and year of the end of the range of Instruction label printing records in the activity log file to be
reported.
"OK" Button
Clicking on the "OK" button initiates the search of the activity log for all Instruction label printing records (including
memos, if specified). All records within the range are listed in the list box at the center of the window.
"Print" Button
Clicking on the "Print" button will print the records displayed in the list box. Upon clicking this button a standard
windows Print dialog box will appear. This Print dialog box allows the user to select the printer to which the report
will be directed. Upon clicking the "OK" button in this dialog box, the report will be sent to the selected printer.
HemaTrax Manual.odt
Copyright © 2007 by Digi-Trax Services, Inc.
165
HemaTrax ISBT-128 Standalone Application
Intended Recipient Info Label Audit Report
Intended Recipient Information Label Audit Report
After selecting Label Audit from the Reports pull-down menu the user may either click on the Intended Recipient
Information title or press the 'n' key to cause the window immediately below to be displayed.
With Memos
The With Memos radio button group box allows the user to choose whether or not memo entries made while labels
were being produced will be included in the report. The default answer is Yes. To change the select merely click on
the title or button of the answer you desire.
Starting Date
Below the Starting Date label are two entry fields: the month combo box and the year edit box allow the user to
specify the month and year of the beginning of the range of Intended Recipient Information label printing records in
the activity log file to be reported.
Ending Date
Below the Ending Date label are two entry fields: the month combo box and the year edit box allow the user to
HemaTrax Manual.odt
Copyright © 2007 by Digi-Trax Services, Inc.
166
HemaTrax ISBT-128 Standalone Application
Intended Recipient Info Label Audit Report
specify the month and year of the end of the range of Intended Recipient Information label printing records in the
activity log file to be reported.
"OK" Button
Clicking on the "OK" button initiates the search of the activity log for all Intended Recipient Information label
printing records (including memos, if specified). All records within the range are listed in the list box at the center of
the window.
"Print" Button
Clicking on the "Print" button will print the records displayed in the list box. Upon clicking this button a standard
windows Print dialog box will appear. This Print dialog box allows the user to select the printer to which the report
will be directed. Upon clicking the "OK" button in this dialog box, the report will be sent to the selected printer.
HemaTrax Manual.odt
Copyright © 2007 by Digi-Trax Services, Inc.
167
HemaTrax ISBT-128 Standalone Application
Product Label Audit Report
Product Label Audit Report
After selecting Label Audit from the Reports pull-down menu the user may either click on the Product title or press
the 'P' key to cause the window immediately below to be displayed.
With Memos
The With Memos radio button group box allows the user to choose whether or not memo entries made while labels
were being produced will be included in the report. The default answer is Yes. To change the select merely click on
the title or button of the answer you desire.
Starting Date
Below the Starting Date label are two entry fields: the month combo box and the year edit box allow the user to
specify the month and year of the beginning of the range of Product label printing records in the activity log file to be
reported.
Ending Date
Below the Ending Date label are two entry fields: the month combo box and the year edit box allow the user to
specify the month and year of the end of the range of Product label printing records in the activity log file to be
reported.
HemaTrax Manual.odt
Copyright © 2007 by Digi-Trax Services, Inc.
168
HemaTrax ISBT-128 Standalone Application
Product Label Audit Report
"OK" Button
Clicking on the "OK" button initiates the search of the activity log for all Product label printing records (including
memos, if specified). All records within the range are listed in the list box at the center of the window.
"Print" Button
Clicking on the "Print" button will print the records displayed in the list box. Upon clicking this button a standard
windows Print dialog box will appear. This Print dialog box allows the user to select the printer to which the report
will be directed. Upon clicking the "OK" button in this dialog box, the report will be sent to the selected printer.
HemaTrax Manual.odt
Copyright © 2007 by Digi-Trax Services, Inc.
169
HemaTrax ISBT-128 Standalone Application
Product / Date & Time Label Audit Report
Product / Date & Time Label Audit Report
After selecting Label Audit from the Reports pull-down menu the user may either click on the Product / Date & Time
title or press the 'r' key to cause the window immediately below to be displayed.
With Memos
The With Memos radio button group box allows the user to choose whether or not memo entries made while labels
were being produced will be included in the report. The default answer is Yes. To change the select merely click on
the title or button of the answer you desire.
Starting Date
Below the Starting Date label are two entry fields: the month combo box and the year edit box allow the user to
specify the month and year of the beginning of the range of Product / Date & Time label printing records in the
activity log file to be reported.
Ending Date
Below the Ending Date label are two entry fields: the month combo box and the year edit box allow the user to
specify the month and year of the end of the range of Product / Date & Time label printing records in the activity log
HemaTrax Manual.odt
Copyright © 2007 by Digi-Trax Services, Inc.
170
HemaTrax ISBT-128 Standalone Application
Product / Date & Time Label Audit Report
file to be reported.
"OK" Button
Clicking on the "OK" button initiates the search of the activity log for all Product / Date & Time label printing
records (including memos, if specified). All records within the range are listed in the list box at the center of the
window.
"Print" Button
Clicking on the "Print" button will print the records displayed in the list box. Upon clicking this button a standard
windows Print dialog box will appear. This Print dialog box allows the user to select the printer to which the report
will be directed. Upon clicking the "OK" button in this dialog box, the report will be sent to the selected printer.
HemaTrax Manual.odt
Copyright © 2007 by Digi-Trax Services, Inc.
171
HemaTrax ISBT-128 Standalone Application
Replicated Unit ID Sets Audit Report
Replicated Unit ID Sets Audit Report
After selecting Label Audit from the Reports pull-down menu the user may either click on the Replicated Unit Id
Sets title or press the 'e' key to cause the window immediately below to be displayed.
With Memos
The With Memos radio button group box allows the user to choose whether or not memo entries made while labels
were being produced will be included in the report. The default answer is Yes. To change the select merely click on
the title or button of the answer you desire.
Starting Date
Below the Starting Date label are two entry fields: the month combo box and the year edit box allow the user to
specify the month and year of the beginning of the range of Replicated Unit Id Set label printing records in the
activity log file to be reported.
HemaTrax Manual.odt
Copyright © 2007 by Digi-Trax Services, Inc.
172
HemaTrax ISBT-128 Standalone Application
Replicated Unit ID Sets Audit Report
Ending Date
Below the Ending Date label are two entry fields: the month combo box and the year edit box allow the user to
specify the month and year of the end of the range of Replicated Unit Id Set label printing records in the activity log
file to be reported.
"OK" Button
Clicking on the "OK" button initiates the search of the activity log for all Replicated Unit Id Set label printing
records (including memos, if specified). All records within the range are listed in the list box at the center of the
window.
"Print" Button
Clicking on the "Print" button will print the records displayed in the list box. Upon clicking this button a standard
windows Print dialog box will appear. This Print dialog box allows the user to select the printer to which the report
will be directed. Upon clicking the "OK" button in this dialog box, the report will be sent to the selected printer.
HemaTrax Manual.odt
Copyright © 2007 by Digi-Trax Services, Inc.
173
HemaTrax ISBT-128 Standalone Application
Log Out
Log Out
Clicking on the Log Out menu selection or pressing the Alt-L key combination causes the current user to be logged
out of the HemaTrax StandaloneTM application. At Log Out the main HemaTrax menu window is closed and the
user log on window is redisplayed.
HemaTrax Manual.odt
Copyright © 2007 by Digi-Trax Services, Inc.
174
HemaTrax ISBT-128 Standalone Application
Log Out
( This page intentionally blank. )
HemaTrax Manual.odt
Copyright © 2007 by Digi-Trax Services, Inc.
175
HemaTrax ISBT-128 Standalone Application
Help
Help
Clicking on the Help menu selection causes a pull-down menu to appear.
The Help pull-down menu allows the user to select one of four possible selections as follows:
About
Displays program version and release data information.
HemaTrax
Invokes the system's browser to view the HemaTrax Standalone application help file which is now stored in the
HemaHelp directory in Adobe Acrobat PDF format.
Important Note:
The Standalone HemaTrax help file documentation is no longer provided in HTML
format. You must now have a copy of the Adobe Acrobat Reader installed on the
host system in order to access the help file document.
HemaTrax Manual.odt
Copyright © 2007 by Digi-Trax Services, Inc.
176
HemaTrax ISBT-128 Standalone Application
Help
( This page intentionally blank. )
HemaTrax Manual.odt
Copyright © 2007 by Digi-Trax Services, Inc.
177
HemaTrax ISBT-128 Standalone Application
System Error Numbers / Descriptions
HemaTrax Standalone Application
Error Numbers
The following is a numeric list of Windows error numbers and descriptions:
0
1
2
3
4
5
6
7
8
9
10
11
12
13
14
15
16
17
18
19
20
21
22
23
24
25
26
27
28
29
30
31
32
33
34
Success
Invalid Function
File Not Found
Path Not Found
Too Many Open Files
Access Denied
Invalid Handle
Arena Trashed
Not Enough Memory
Invalid Block
Bad Environment
Bad Format
Invalid Access
Invalid Data
Out Of Memory
Invalid Drive
Current Directory
Not Same Device
No More Files
Write Protected
Bad Unit
Not Ready
Bad Command
CRC Error
Bad Length
Seek Error
Not DOS Disk
Sector Not Found
Out Of Paper
Write Fault
Read Fault
General Failure
Sharing Violation
Lock Violation
Wrong Disk
36
Sharing Buffer Exceeded
38
39
Handle End Of File
Handle Disk Full
50
51
52
53
Not Supported
Rem Not List
Duplicate Name
Bar Network Path
HemaTrax Manual.odt
Copyright © 2007 by Digi-Trax Services, Inc.
178
HemaTrax ISBT-128 Standalone Application
System Error Numbers / Descriptions
54
55
56
57
58
59
60
61
62
63
64
65
66
67
68
69
70
71
72
Network Busy
Device Does Not Exist
Too Many Commands
Adapter Hardware Error
Bad Network Response
Unexplained Network Error
Bad Rem Adapter
Print Queue Full
No Spool Space
Print Cancelled
Net Name Deleted
Network Access Denied
Bad Device Type
Bad Network Name
Too Many Names
Too Many Sessions
Sharing Paused
Request Not Accepted
Redirection Paused
80
File Exists
82
83
84
85
86
87
88
89
Cannot Make
Failure I24
Out Of Structures
Already Assigned
Invalid Password
Invalid Parameter
Network Write Fault
No Process Slots
100
101
102
103
104
105
106
107
108
109
110
111
112
113
114
Too Many Semaphores
Exclusive Semaphore Already Owned
Semaphore Is Set
Too Many Semaphore Requests
Invalid At Interrupt Time
Semaphore Owner Died
Semaphore User Limit
Disk Change
Drive Locked
Broken Pipe
Open Failed
Buffer Overflow
Disk Full
No More Search Handles
Invalid Target handle
117
118
119
120
121
122
123
Invalid Category
Ivalid Verify Switch
Bad Driver Level
Call Not Implemented
Semaphore Timeout
Insufficient Buffer
Invalid Name
HemaTrax Manual.odt
Copyright © 2007 by Digi-Trax Services, Inc.
179
HemaTrax ISBT-128 Standalone Application
System Error Numbers / Descriptions
124
125
126
127
128
129
130
131
132
133
134
135
136
137
138
139
140
141
142
143
144
145
146
147
148
149
150
151
152
153
154
155
156
157
158
159
160
161
162
Invalid Level
No Volume Label
Mod Not Found
Proc Not Found
Wait No Children
Child Not Complete
Direct Access Handle
Negative Seek Error
Seek On Device Error
Is Joined Target
Is Joined
Is Substituted
Not Joined
Not Substituted
Join to Joined
Substitute to Substituted
Join to Substituted
Substitute to Joined
Busy Drive
Same Drive
Directory Not Root
Directory Not Empty
Is Substituted Path
Is Joined Path
Path Busy
Is Substituted Target
System Trace
Invalid Event Count
Too Many MUX Waiters
Invalid List Format
Label Too Long
Too Many TCBs
Signal Refused
Discarded
Not Locked
Bad Thread ID Address
Bad Arguments
Bad Pathname
Signal Pending
164
Maximum Threads Reached
167
Lock Failed
170
Busy
173
174
Cancel Violation
Atomic Locks Not Supported
180
Invalid Segment Number
182
183
Invalid Ordinal
Already Exists
HemaTrax Manual.odt
Copyright © 2007 by Digi-Trax Services, Inc.
180
HemaTrax ISBT-128 Standalone Application
System Error Numbers / Descriptions
186
187
188
189
190
191
192
193
194
195
196
197
198
199
200
201
202
203
Invalid Flag Number
Semaphore Not Found
Invalid Starting Code Segment
Invalid Stack Segment
Invalid Module Type
Invalid EXE Signature
EXE Marked Invalid
Bad EXE Format
Iterated Data Exceeds 64K
Invalid Minimum Allocation Size
Dynamic Link From Invalid Ring
IOPL Not Enabled
Invalid SEGDPL
Auto Data Segment Exceeds 64K
RING2SEG Must Be Movable
Relocated Chain Exceeds Segment Limit
Infinite Loop In Relocation Chain
Environment Variable Not Found
205
206
207
208
209
210
No Signal Sent
Filename Exceeds Range
RING2 Stack In Use
META Expansion Too Long
Invalid Signal Number
Thread 1 Inactive
212
Locked
214
215
Too Many Modules
Nesting Not Allowed
230
231
232
233
234
Bad Pipe
Pipe Busy
No Data
Pipe Not Connected
More Data
240
VC Disconnected
254
255
Invalid EA Name
EA List Inconsistent
259
No More Items
266
267
Cannot Copy
Directory Error
275
276
277
278
EAS Did Not Fit
EA File Corrupted
EA Table Full
Invalid EA Handle
282
EAS Not Supported
HemaTrax Manual.odt
Copyright © 2007 by Digi-Trax Services, Inc.
181
HemaTrax ISBT-128 Standalone Application
System Error Numbers / Descriptions
288
Not Owner
298
Too Many Posts
317
MR MID Not Found
487
Invalid Address
534
535
536
Arithmetic Overflow
Pipe Connected
Pipe Listening
994
995
996
997
998
999
EA Access Denied
Operation Aborted
I/O Incomplete
I/O Pending
No Access
Swap Error
1001
1002
1003
1004
1005
1006
1007
1008
1009
1010
1011
1012
1013
1014
1015
1016
1017
1018
1019
1020
1021
1022
Stack Overflow
Invalid Message
Can Not Complete
Invalid Flags
Unrecognized Volume
File Invalid
Full Screen Mode
No Token
Bad DB
Bad Key
Can Not Open
Can Not Read
Can Not Write
Registry Recovered Error
Registry Corrupted Error
Registry I/O Failed
Not Registry File
Key Deleted
No Log Space
Key Has Children
Child Must Be Volatile
Notify ENUM Dir
1051
1052
1053
1054
1055
1056
1057
1058
1059
1060
1061
1062
Dependent Services Running
Invalid Service Control
Service Request Timeout
Service Has No Thread
Service Database Locked
Service Already Running
Invalid Service Account
Service Disabled
Circular Dependency
Service Does Not Exist
Service Can Not Accept Control
Service Not Active
HemaTrax Manual.odt
Copyright © 2007 by Digi-Trax Services, Inc.
182
HemaTrax ISBT-128 Standalone Application
System Error Numbers / Descriptions
1063
1064
1065
1066
1067
1068
1069
1070
1071
1072
1073
1074
1075
1076
1077
1078
Failed Service Controller Connect
Exception In Service
Database Does Not Exist
Service Specific Error
Process Aborted
Service Dependency Failed
Service Logon Failed
Service Start Hung
Invalid Service Lock
Service Marked For Deletion
Service Exists
Already Running LKG
Service Dependency Deleted
Boot Already Accepted
Service Never Started
Duplicate Service Name
1100
1101
1102
1103
1104
1105
1106
1107
1108
1109
1110
1111
1112
1113
1114
1115
1116
1117
1118
1119
1120
1121
1122
1123
1124
1125
1126
1127
1128
1129
1130
1131
End Of Media
File Mark Detected
Beginning Of Media
Set Mark Detected
No Data Detected
Partition Failure
Invalid Block Length
Device Not Partitioned
Unable To Lock Media
Unable To Unload Media
Media Changed
Bus Reset
No Media In Drive
No Unicode Translation
DLL Initialization Failed
Shutdown In Progress
No Shutdown In Progress
I/O Device Error
No Serial Device
IRQ Busy
More Writes
Counter Timeout
Floppy ID Mark Not Found
Wrong Floppy Cylinder
Floppy Unknown Error
Bad Floppy Registers
Disk Recalibrate Failed
Disk Operation Failed
Disk Reset Failed
EOM Overflow
Not Enough Server Memory
Possible Deadlock
1200
1201
1202
1203
Bad Device
Connection Unavailable
Device Already Remembered
No Network or Bad Path
HemaTrax Manual.odt
Copyright © 2007 by Digi-Trax Services, Inc.
183
HemaTrax ISBT-128 Standalone Application
System Error Numbers / Descriptions
1204
1205
1206
1207
1208
1209
1210
1211
1212
1213
1214
1215
1216
1217
1218
1219
1220
1221
Bad Provider
Cannot Open Profile
Bad Profile
Not Container
Extended Error
Invalid Group Name
Invalid Computer Name
Invalid Event Name
Invalid Domain Name
Invalid Service Name
Invalid Network Name
Invalid Share Name
Invalid Password Name
Invalid Message Name
Invalid Message Destination
Session Credential Conflict
Remote Session Limit Exceeded
Duplicate Domain Name
1300
1301
1302
1303
1304
1305
1306
1307
1308
1309
1310
1311
1312
1313
1314
1315
1316
1317
1318
1319
1320
1321
1322
1323
1324
1325
1326
1327
1328
1329
1330
1331
1332
1333
1334
Not All Assigned
Some Not Mapped
No Quotas For Account
Local User Session Key Error
Null LM Password Error
Unknown Revision Error
Revision Mismatch
Invalid Owner
Invalid Primary Group
No Impersonation Token
Can Not Disable Mandatory
No Logon Servers
No Such Logon Session
No Such Privelege
Privelege Not Held
Invalid Account name
User Already Exists
No Such User
Group Already Exists
No Such Group
Member Already In Group
Member Not In Group
Last Admin
Wrong Password
Ill-Formed Password
Password Restriction
Log On Failure
Account Restriction
Invalid Log On Hours
Invalid Workstation
Password Required
Account Disabled
None Mapped
Too Many LU Ids Requested
LU Ids Exhausted
HemaTrax Manual.odt
Copyright © 2007 by Digi-Trax Services, Inc.
184
HemaTrax ISBT-128 Standalone Application
1335
1336
1337
1338
1340
1341
1342
1343
1344
1345
1346
1347
1348
1349
1350
1351
1352
1353
1354
1355
1356
1357
1358
1359
1360
1361
1362
1363
1364
1365
1366
1367
1368
1369
1370
1371
1372
1373
1374
1375
1376
1377
1378
1379
1380
1381
1382
1383
1384
1385
1386
1387
1388
1389
System Error Numbers / Descriptions
Invalid SUB Authority
Invalid ACL
Invalid SID
Invalid Security Description
Bad Inheritance ACL
Server Disabled
Server Not Disabled
Invalid ID Authority
Allotted Space Exceeded
Invalid Group Attributes
Bad Impersonation Level
Can Not Open Anonymous
Bad Validation Class
Bad Token Type
No Security On Object
Can Not Access Domain Info
Invalid Server State
Invalid Domain State
Invalid Domain Role
No Such Domain
Domain Exists
Domain Limit Exceeded
Internal DB Corruption
Internal Error
Generic Not Mapped
Bad Descriptor Format
Not Log On Process
Log On Session Already Exists
No Such Package
Bad Log Oon Session State
Log On Session Collision
Invalid Log On Type
Con Not Impersonate
RXACT Invalid State
RXACT Commit Failure
Special Account Error
Special Group Error
Special User Error
Members Primary Group Error
Token Already In Use
No Such Alias
Member Not In Alias
Member Alread In Alias
Alias Already Exists
Log On Not Granted
Too Many Secrets
Secret Too Long
Internal DB Error
Too Many Context IDs
Log On Type Not Granted
NT Cross Encryption Required
No Such Member
Invalid Member
Too Many SIDs
HemaTrax Manual.odt
Copyright © 2007 by Digi-Trax Services, Inc.
185
HemaTrax ISBT-128 Standalone Application
System Error Numbers / Descriptions
1390
1391
1392
1393
1394
LM Cross Encryption Required
No Inheritance
File Corrupt
Disk Corrupt
No User Session Key
1400
1401
1402
1403
1404
1405
1406
1407
1408
1409
1410
1411
1412
1413
1414
1415
1416
1417
1418
1419
1420
1421
1422
1423
1424
1425
1426
1427
1428
1429
1430
1431
1432
1433
1434
1435
1436
1437
1438
1439
1440
1441
1442
1443
1444
1445
1446
1447
Invalid Window Handle
Invalid Menu Handle
Invalid Cursor handle
Invalid ACCEL Handle
Invalid Hook Handle
Invalid DWP handle
TLW With WSCHILD
Can Not Find Windows Class
Window Of Other Thread
Hotkey Already Registered
Class Already Exists
Class Does Not Exist
Class Has Windows
Invalid Index
Invalid ICON Handle
Private Dialog Index
List Box ID Not Found
No Wildcard Characters
Clipboard Not Open
Hotkey Not Registered
Window Not Dialog
Control ID Not Found
Invalid COMBO Box Message
Window Not COMBO Box
Invalid Edit Height
DC Not Found
Invalid Hook Filter
Invalid Filter Process
Hook Needs HMOD
Global Only Hook
Journal Hook Already Set
Hook Not Installed
Invalid LB Message
Set Count On Bad LB
LB Without Tab Stops
Destroy Object Of Other Thread
Child Window Menu
No System Menu
Invalid Message Box Style
Invalid SPI Value
Screen Already Locked
HWNDS Have Different Parent
Not Child Window
Invalid GW Command
Invalid Thread ID
Non-MDI Child Window
Pop-Up Already Active
No Scollbars
HemaTrax Manual.odt
Copyright © 2007 by Digi-Trax Services, Inc.
186
HemaTrax ISBT-128 Standalone Application
System Error Numbers / Descriptions
1448
1449
Invalid Scrollbar Range
Invalid ShowBar Range
1500
1501
1502
1503
Event Log File Corrupt
Event Log Can Not Start
Log File Full
Event Log File Changed
HemaTrax Manual.odt
Copyright © 2007 by Digi-Trax Services, Inc.
187
HemaTrax ISBT-128 Standalone Application
License Agreement
License Agreement
IMPORTANT: PLEASE READ THE TERMS OF THIS LICENSE AGREEMENT CAREFULLY BEFORE YOU INSTALL THE
SOFTWARE. Digi-Trax Services, Inc. WILL LICENSE THE SOFTWARE WARE TO YOU, AN INDIVIDUAL OR A LEGAL ENTITY,
PROVIDED THAT YOU AGREE TO AND ACCEPT ALL OF THE CONDITIONS AND TERMS SET FORTH IN THIS LICENSE
AGREEMENT. THIS LICENSE AGREEMENT IS A LEGALLY ENFORCEABLE CONTRACT BETWEEN YOU AND Digi-Trax Services,
Inc.. THE ACT OF INSTALLING THIS SOFTWARE ON A COMPUTER SYSTEM INDICATES THAT YOU ARE IN FULL AGREEMENT
WITH THE CONDITIONS AND TERMS OF THIS LICENSE. IF YOU DO NOT AGREE WITH ONE OR MORE OF THE TERMS IN THIS
AGREEMENT THEN YOU HAVE SIXTY (60) DAYS FROM THE DATE OF PURCHASE OF THE SOFTWARE TO CONTACT Digi-Trax
Services, Inc. TO OBTAIN A REFUND OF THE MONEY YOU PAID DIGI-TRAX FOR THE SOFTWARE (LESS SHIPPING, HANDLING
AND ANY APPLICABLE TAXES).
You as an individual, a company, or other legal entity will be referred to below as "licensee". The Digi-Trax Services, Inc. is referred to below as
"licensor".
License Conditions and Terms
1. Licensor Ownership and Licensee Rights
The software and any documentation that accompanies this license is solely the property of the licensor and is protected by copyright law.
Though the licensor maintains full ownership of the software, the licensee, having fully accepted the terms and conditions of this license, has
certain rights to the use of the software. This license governs any releases, revisions, or enhancements to the software that the licensor may
provide to the licensee.
2. Use
a. This software is licensed for installation and use on one computer system. Only through the purchase of additional original copies of the
licensed software can more than one computer be installed with and operate this software.
b. The licensee may not provide the functionality of this software to other parties through a timesharing or service provider arrangement.
c. The licensee may not rent, sublicense, or lease this software nor any portion of it.
d. The licensee may not provide simultaneous multiple user access to the software over a network unless multiple licensed original copies of
the software have been purchased from the licensor.
3. Copying
The licensee agrees that no more than one copy of the originally purchased software or subsequent software updates and any accompanying
databases, libraries, or documentation may be made. Any copy that is made is to be used for back up purposes only. A copy may not be used
for distribution or installation on any computer other than the computer that is currently installed with the original copy.
4. Modification
The licensee agrees to not attempt to modify, disassemble, or reverse engineer any of the software components, including but not limited to
executible binary files and library files. The licensee further agrees to not export or convert the contents of the flat files and database tables,
originally supplied as part of the software distribution, for use with any software not provided by the licensor.
5. Damage Disclaimer
TO THE MAXIMUM EXTENT PERMITTED BY APPLICABLE LAW AND REGARDLESS OF WHETHER ANY REMEDY SET
FORTH HEREIN FAILS OF ITS ESSENTIAL PURPOSE, IN NO EVENT WILL THE LICENSOR BE LIABLE TO THE LICENSEE FOR
ANY SPECIAL, CONSEQUENTIAL, INDIRECT, OR SIMILAR DAMAGES, INCLUDING LOST PROFITS OR LOST DATA ARISING
OUT OF THE USE OR INABILITY TO USE THE SOFTWARE EVEN IF THE LICENSOR HAS BEEN MADE AWARE OF THE
POSSIBILITY OF SUCH DAMAGES. IN NOCASE SHALL THE LICENSOR'S LIABILITY EXCEED THE PURCHASE PRICE FOR
THE SOFTWARE.
SOME STATES AND COUNTRIES DO NOT ALLOW THE LIMITATION OR EXCLUSION OF LIABILITY FOR INCIDENTAL OR
CONSEQUENTIAL DAMAGES, SO THE ABOVE LIMITATION OR EXCLUSION MAY NOT APPLY.
6. U.S. Government Rights
All of the licensor's products and documentation are commercial in nature. The software and software documentation are "Commercial
Items" as defined in 48 CFR section 2.101, consisting of "Commercial Computer Software" and "Commercial Computer Software
Documentation", as such terms are defined in 48 CFR section 252.227-7014(a)(5) and 48 CFR section 252.227-7014(a)(l), and used in 48
CFR section 12.212 and 48 CFR section 227.7202, as applicable. Consistent with 48 CFR section 12.212, 48 CFR section 252.227-7015, 48
CFR section 227.7202 through 227.7202-4, 48 CFR section 52.227-14, and other relevant sections of the Code of Federal Regulations, as
HemaTrax Manual.odt
Copyright © 2007 by Digi-Trax Services, Inc.
188
HemaTrax ISBT-128 Standalone Application
License Agreement
applicable, the licensor's computer software and computer software documentation are licensed to United States Government end users with
only those rights as granted to all other end users, according to the terms and conditions contained in this license agreement.
7. Governing Law
This agreement is governed by the laws of Illinois in the United States of America.
8. Sole Agreement
This license agreement is the entire agreement between the licensee and licensor relating to the software and supersedes all prior or
contemporaneous oral or written communications, proposals, and representations with respect to its subject matter, and prevails over any
conflicting or additional terms of any quote, order, acknowledgement, or similar communications between the licensee and licensor.
9. Breach of Agreement
This agreement will be terminated when the licensee breaches any condition or term of this agreement and the licensee shall cease all use of
and destroy all copies of the software. The disclaimers of warranties and damages and limitations on liability shall survive termination.
HemaTrax Manual.odt
Copyright © 2007 by Digi-Trax Services, Inc.
189
HemaTrax ISBT-128 Standalone Application
Product Warranty
Product Warranty
Limited Warranty
Digi-Trax Services, Inc. warrants the the media on which the software is distributed will be free from defects for a period of sixty (60) days from
the date of delivery of the software to you. Your sole remedy in the event of a breach of this warranty will be that Digi-Trax Services, Inc. will, at
its option, replace any defective media returned to Digi-Trax Services, Inc. within the warranty period or refund the money you paid for the
software (less any handling, shipping charges or applicable taxes that were paid).
Digi-Trax Services, Inc. does not warrant that the software will meet your requirements or that the operation of the software will be uninterrupted
or that the software will be error-free.
TO THE MAXIMUM EXTENT PERMITTED BY APPLICABLE LAW, THE ABOVE WARRANTY IS EXCLUSIVE AND IN LIEU OF ALL
OTHER WARRANTIES, WHETHER EXPRESS OR IMPLIED, INCLUDING THE IMPLIED WARRANTIES OF MERCHANTABILITY,
FITNESS FOR A PARTICULAR PURPOSE, AND NONINFRINGEMENT OF INTELLECTUAL PROPERTY RIGHTS. tHIS WARRANTY
GIVES YOU SPECIFIC LEGAL RIGHTS. YOU MAY HAVE OTHER RIGHTS, WHICH VARY FROM STATE TO STATE AND COUNTRY
TO COUNTRY.
HemaTrax Manual.odt
Copyright © 2007 by Digi-Trax Services, Inc.
190
HemaTrax ISBT-128 Standalone Application
Product Warranty
( This page intentionally blank. )
HemaTrax Manual.odt
Copyright © 2007 by Digi-Trax Services, Inc.
191
INDEX
Alphabetical Index
ABO-Rh...................................................................... 1, 11, 71, 73p., 77p., 94p., 115, 120p., 150, 152pp.
ABO-Rh / Date & Time.................................................................................................. 71, 77, 150, 154p.
ABO-Rh / Date & Time Audit Report................................................................................................... 154
ABO-Rh Audit Report........................................................................................................................... 152
ABO-Rh Donation Type / Intended Use Panel........................................................................................ 95
ABO-Rh Information Panel..................................................................................................................... 95
ABO-Rh Label Information window............................................................................................... 95, 120
ABO-Rh Label Information Window...............................................................................................95, 120
Activity Log Reports.............................................................................................................................. 134
Add Processing Legend............................................................................................................................39
Add to Qwik-Pik List............................................................................................................................... 52
Adding a New Instruction Label.............................................................................................................. 36
Adding a New Label Format.................................................................................................................... 57
Adding a New User............................................................................................................................... 63p.
Adding Licensed Products....................................................................................................................... 38
additional attributes..................................................................................................................................48
Additional Attributes.............................................................................................................................48p.
additive solution................................................................................................................................. 44, 47
Additive Solution......................................................................................................................... 44, 47, 68
Adjust Position..........................................................76, 79, 83, 87, 91, 96, 99, 102, 106, 110, 113, 118p.
Alternative RH Factor Lines.................................................................................................................... 19
Anti-C/Anti-c Results................................................................................................................... 75p., 122
Anti-E/Anti-e Results....................................................................................................................75p., 122
Anti-Kell Results........................................................................................................................75p., 121p.
anticoagulant................................................................................................................................ 44, 46, 48
Anticoagulant............................................................................................................................... 44, 50, 68
Aphr. Vol..................................................................................................................................................68
Archive Activity Log.....................................................................................................................25, 27pp.
Archive Activity Log Error Recovery...................................................................................................... 29
attributes..............................................................................................................................38, 41, 43, 47p.
Attributes.................................................................................................................................41, 43, 47pp.
audit report....................................................................... 1, 76, 79, 83, 86, 90, 96, 99, 102, 106, 110, 113
Audit Report...........................................................152, 154, 156, 158, 160, 162, 164, 166, 168, 170, 172
Auto log off time...................................................................................................................................17p.
AUTOLOGOUS DONOR............................................................................................................ 11, 17pp.
baud rate................................................................................................................................................... 21
Baud Rate........................................................................................................................................... 11, 21
birth date.................................................................................................................................................101
Birth Date............................................................................................................................................... 101
Blood Group/Rh Factor....................................................................................................................73, 120
Blood Relative........................................................................................................................................101
Index - 1
INDEX
Change Processing Legend...................................................................................................................... 40
Changing an Existing Instruction Label...................................................................................................36
Changing an Existing Label Format.........................................................................................................59
Changing Existing Facility Information...................................................................................................32
Changing User Information......................................................................................................................64
collection date.............................................................................................................................. 19, 47, 81
Collection Date................................................................................................................11, 47, 124p., 128
Collection Date & Time window................................................................................................... 124, 128
Collection Date & Time Window.......................................................................................................... 128
Collection Date Required.........................................................................................................................47
Collection Time......................................................................................................................................128
COM CRC................................................................................................................................................22
Communications Settings........................................................................................................................ 12
Database reports..................................................................................................... 140, 142, 144, 146, 148
Database Reports....................................................................................................................................140
date & time.................................................................................................................................19, 39, 125
Date & Time.........................................19, 71, 77, 81p., 96, 108p., 124p., 128, 130p., 150, 154pp., 170p.
Date & Time Information Panel...............................................................................................................96
Date & Time Label Audit Report...................................................................................................156, 170
Date & Time Label Information window.................................................................................96, 109, 124
Date & Time Label Information Window..............................................................................................124
Date Collected........................................................................................................................................101
Delete from Qwik-Pik List.......................................................................................................................52
Deleting a User Record............................................................................................................................ 64
Deleting an Existing Facility....................................................................................................................32
Deleting an Existing Instruction Label.....................................................................................................36
Deleting Licensed Products .....................................................................................................................38
Divided Unit.......................................................................................................................90, 95, 105, 109
Divided Unit Information.........................................................................................................................90
donation type............................................................................................ 19, 37, 74, 90, 95, 101, 115, 121
Donation Type........................................................................................................78, 89p., 94p., 105, 109
donor type..................................................................................................................................18p., 90, 94
Donor Type........................................................................................................................................ 90, 94
Draw Vol............................................................................................................................................45, 68
draw volume.......................................................................................................................................45, 48
Draw Volume........................................................................................................................................... 50
error detection protocol......................................................................................................................... 11p.
Error Detection Protocol.......................................................................................................................... 12
Ethernet................................................................................................................................................ 1, 21
Exp. (Coll.) Date Code...........................................................................................................................115
Exp. (Coll.) Date Text............................................................................................................................115
expiration date.......................................................................................19, 47, 78, 82, 96, 109, 125, 130p.
Expiration Date................................................................................... 1, 11, 17, 19, 78, 81p., 124p., 130p.
Expiration Date and Time ......................................................................................................................... 1
Expiration Date format.............................................................................................................................11
Index - 2
INDEX
Expiration Date Format......................................................................................................................17, 19
expiration period........................................................................................................................ 48, 82, 125
Expiration Period......................................................................................................................... 11, 47, 78
expiration unit.......................................................................................................................................... 48
Expiration Unit......................................................................................................................................47p.
facility.........1, 11p., 31pp., 37p., 76, 79, 82p., 85p., 89p., 93p., 96, 98p., 102, 106, 109, 113, 115, 125p.,
142, 146
Facility........1, 11p., 25, 31pp., 37p., 71, 78, 82, 85p., 89p., 93p., 115, 125p., 140, 142, 146, 150, 158pp.
Facility / Product............................................................................................................. 71, 89, 150, 160p.
Facility / Product Label Audit Report.................................................................................................... 160
Facility City, State & Zip Code................................................................................................................31
facility information..........................................................................................................31p., 96, 109, 126
Facility Information.......................................................11, 25, 31p., 37, 82, 85p., 89, 94, 125p., 140, 142
Facility Information Database Report.................................................................................................... 142
Facility Information panel................................................................................................................ 82, 125
Facility Information Panel........................................................................................................................94
Facility Information window...............................................................................82, 85, 89, 94, 125p., 142
Facility Information Window...........................................................................................................94, 126
Facility Information, Maintenance........................................................................................................... 31
Facility Label Audit Report....................................................................................................................158
facility name.................................................................................................................32, 82, 93, 115, 125
Facility Name............................................................................................................................ 1, 31p., 115
Facility Registration Number................................................................................................................... 32
facility world code..............................................................................................................................32, 37
Facility World Code................................................................................................................... 31pp., 37p.
Find Product................................................................................... 41, 51, 67, 69, 78, 81, 89, 94, 104, 108
format name........................................................................................................................... 23, 55, 57, 59
Format Name.................................................................................................................................55, 57pp.
full face..................................................................................1, 11, 17, 19, 31p., 37, 73, 94pp., 104, 108p.
Full face....................................................................................................................................................71
Full Face.....................................................................................................11p., 17p., 93p., 96, 150, 162p.
Full Face Label Audit Report.................................................................................................................162
Group/Factor.......................................................................................................................................... 115
Hardware Set Up...................................................................................................................................... 12
help...............................................................................................................................................1, 29, 176
Help........................................................................................................................................................ 176
HELP............................................................................................................76, 79, 91, 102, 104, 106, 110
HIGH VALUE......................................................................................................................................... 50
Hints...................................................................................................................................................... 14p.
Holder City, State & Zip Code.................................................................................................................32
Horizontal Offset in mm........................................................................................................................ 118
Hospital.................................................................................................................................................. 101
iccbba......................................................................................................................................................... 1
ICCBBA............................................................ 1, 19, 33, 38, 41, 43, 46p., 51, 67p., 98, 112, 114, 147pp.
ID Number..............................................................................................................................................101
Index - 3
INDEX
Include Exp. Time............................................................................................................................ 82, 125
Include License No.............................................................................................................................86, 94
Include manual entry check digit........................................................................................................... 112
Include Manual Entry Check Digit.................................................................................................... 93, 96
Initial Logon............................................................................................................................................... 9
Initial User ID & Password........................................................................................................................ 9
Insert in Qwik-Pik List.............................................................................................................................52
installation..................................................................................................................................... 6p., 9, 14
Installation..................................................................................................................................................6
instruction...................................................................................................6, 11pp., 23, 35p., 99, 118, 144
Instruction..................................................................... 1, 11, 13, 25, 35p., 71, 98p., 140, 144, 150, 164p.
instruction label.................................................................................................................11, 35p., 99, 144
instruction Label.......................................................................................................................................36
Instruction label.........................................................................................................................1, 98, 164p.
Instruction Label......................................................................................... 11, 25, 35p., 99, 140, 144, 164
Instruction Label ..................................................................................................................................... 25
Instruction Label Audit Report.............................................................................................................. 164
Instruction Label Database Report......................................................................................................... 144
Instruction Label Lines 1 - 10.................................................................................................................. 99
Instruction Label, Maintenance................................................................................................................35
Intended Recipient.......................................................................................1, 11, 71, 100, 102, 150, 166p.
Intended Recipient Information...................................................................................100, 102, 150, 166p.
Intended Recipient Information Label Audit Report..............................................................................166
intended use....................................................................................................19, 74, 90, 95, 101, 115, 121
Intended Use.................................................................48, 68, 74, 77p., 89, 94p., 101, 105, 109, 115, 121
irradiated................................................................................................................. 45, 82, 100, 124, 130p.
Irradiated............................................................................................................. 45p., 68, 82, 124p., 130p.
IRRADIATED......................................................................................................................................... 47
Irradiated Product Date & Time window........................................................................... 82, 124p., 130p.
Irradiated Product Date & Time Window.............................................................................................. 130
Irradiation Date...................................................................................................................................... 131
ISBT-128 Unit Id Number.................................................................................................................. 112p.
Label Assignment.........................................................................................................................11, 14, 16
Label Audit reports.................................................................................................................................150
Label Audit Reports............................................................................................................................... 150
Label Compliance Authority.................................................................................................................... 18
label form........................................................................................... 1, 11, 14, 16, 22, 55, 57, 59, 98, 119
Label Form.................................................................................................................... 22p., 25, 55, 57, 59
label title...................................................................................................................................................99
Label title....................................................................................................................................... 144, 148
Label Title....................................................................................................................................... 35p., 99
label type.................................................................................................................................. 1, 16, 56, 58
Label Type...........................................................................................................................................56pp.
Labeling Compliance Authority.........................................................................................................11, 17
License Holder City, State & Zip Code................................................................................................... 32
Index - 4
INDEX
license holder name..................................................................................................................................32
License Holder Name...............................................................................................................................32
license number.......................................................................................................................... 32, 37, 94p.
License Number........................................................................................................................... 32, 86, 94
licensed products...............................................................................12, 32, 38, 139, 142, 144, 146p., 149
Licensed products.....................................................................................................................................37
Licensed Products..................................................................................................... 11, 25, 37p., 140, 146
Licensed Products Database Report....................................................................................................... 146
Licensed Products, Maintenance..............................................................................................................37
Log Memo............................................................................ 76, 79, 83, 86, 90, 96, 99, 102, 106, 109, 113
Log Out.................................................................................................................................................. 174
log-on......................................................................................................................................................... 1
Logon......................................................................................................................................................... 9
LOW VALUE.......................................................................................................................................... 50
Maintenance pull-down menu...........................................................................11p., 18, 23, 25, 27, 61, 98
Maintenance Pull-Down Menu................................................................................................................ 25
manual entry check digit.......................................................................................................... 93, 112, 115
Manual Entry Check Digit................................................................................................................. 93, 96
Miltenberger (Mi-III) Results........................................................................................................75p., 122
Not Used in U.S.A................................................................................................................................... 45
number of labels.........................................................1, 58, 76, 78, 82, 86, 90, 96, 99, 102, 106, 109, 112
Number of Labels..................................................56, 58p., 76, 78, 82, 86, 90, 96, 99, 102, 106, 109, 112
Off-Line Activity Log Report................................................................................................................ 137
On-Line Activity Log Report................................................................................................................. 135
Optional Hardware................................................................................................................................... 13
options...................................................................................................................................................... 17
Options.............................................................................................................................. 11, 14, 17pp., 90
Patient Name.......................................................................................................................................... 101
port address.............................................................................................................................................. 21
Port Address............................................................................................................................................. 21
port configuration.....................................................................................................................................22
Port Configuration.....................................................................................................................11, 14, 20p.
port description.........................................................................................................................................16
Port Description....................................................................................................................................... 21
port device.............................................................................................................................................21p.
Port device................................................................................................................................................21
Port Device...............................................................................................................................................21
port number........................................................................................................................................ 11, 21
Port Number............................................................................................................................................. 20
Print Image Offsets...................................................................................................................................22
Print Labels...................................................... 18, 71, 73, 77, 81, 85, 89, 93, 98, 100, 104, 108, 112, 114
Printer Set Up...........................................................................................................................................12
processing facility information.........................................................................................................96, 109
Processing Facility Information....................................................................................................... 82, 125
processing legend.................................................................................................................................. 39p.
Index - 5
INDEX
Processing Legend.............................................................................................................25, 39p., 82, 125
processing legends.................................................................................................................................39p.
Processing Legends............................................................................................................................ 25, 39
Processing Legends, Maintenance........................................................................................................... 39
product.....1, 18, 37p., 41pp., 51pp., 67pp., 78, 81p., 89p., 94pp., 100p., 104p., 108p., 115, 124p., 130p.,
146pp.
Product........... 1, 11p., 25, 38, 41pp., 46p., 49, 51p., 67pp., 71, 74, 78, 81p., 89p., 94p., 100, 102, 104p.,
108p., 115, 121, 124p., 130p., 140, 148, 150, 160p., 168pp.
Product / Date & Time.................................................................................................. 71, 108, 150, 170p.
product category........................................................................................................................... 43, 47, 68
Product Category.............................................................................................................................43, 67p.
product code................................................................................................ 38, 41p., 67p., 94, 115, 146pp.
Product Code.............................................................................................................38, 41p., 47, 115, 148
Product Exp. Date............................................................................................................................... 130p.
Product Exp. Time.............................................................................................................................. 130p.
Product Information Panel....................................................................................................... 95, 104, 108
product label...............................................................................................1, 42, 46pp., 90, 94, 104p., 108
Product label........................................................................................11, 74, 89, 104p., 121, 160p., 168p.
Product Label....................................................................... 1, 25, 41pp., 46p., 49, 51, 140, 148, 160, 168
Product Label Audit Report........................................................................................................... 160, 168
Product Label Database Report..............................................................................................................148
Product Label Information........................................................................................................ 41, 46p., 49
Product Label Information, Maintenance.................................................................................................46
Product Label, Maintenance.....................................................................................................................41
Product Modifier................................................................................................................................ 44, 68
product name.........................................................................................................................................46p.
Product Name...........................................................................................................................................46
Product Search Attributes.................................................................................................................. 41, 43
Qwik-Pik List Functions....................................................................................................................... 51p.
Qwik-Pik Product List...............................................................................................................12, 25, 51p.
Qwik-Pik Product List, Maintenance....................................................................................................... 51
Qwik-Pik product selection......................................................................................................................52
Qwik-Pik Product Selection.....................................................................................................................69
Registration Number................................................................................................................................ 32
replicant unit id........................................................................................................................................ 11
replicant unit ID....................................................................................................................................... 23
Replicant Unit Id.......................................................................................................................... 11, 14, 23
Replicant Unit ID..................................................................................................................................... 14
replicant unit ID format............................................................................................................................23
Replicant Unit Id Format..............................................................................................................11, 14, 23
Replicant Unit ID Format.........................................................................................................................14
replicant unit identification number......................................................................................................... 23
Replicant Unit Identification Number......................................................................................................23
Replicate Unit Id Set.............................................................................................................................. 112
Replicate Unit ID Set............................................................................................................................... 71
Index - 6
INDEX
Replicated Unit ID Sets Audit Report....................................................................................................172
Restoring a Deleted User Record............................................................................................................. 65
Rh Negative Text..................................................................................................................................... 19
Rh Positive Text.......................................................................................................................................19
SATO.............................................................................................................................................. 1, 11pp.
Scan Bar Code........................................................................................................................................114
Scanned Information........................................................................................................................... 114p.
Security Level...........................................................................................................................................64
security levels...........................................................................................................................................18
Security levels.......................................................................................................................................... 11
Security Levels...................................................................................................................................... 17p.
Selected Facility Information................................................................................................................... 86
Selecting a Facility................................................................................................................................... 38
set height............................................................................................................................................ 56, 58
Set Height............................................................................................................................................56pp.
set up................................................................................................................................ 11, 14, 23, 65, 90
Set Up..............................................................................................................................................11p., 14
set width................................................................................................................................................ 56p.
Set Width.........................................................................................................................................56p., 59
Setup Functions........................................................................................................................................14
software set up..........................................................................................................................................90
Software Set Up................................................................................................................................. 11, 14
special test.......................................................................................................................... 82, 96, 109, 125
Special Test................................................................................................................................ 78, 82, 125
status bar.................................................................................................................................119, 136, 139
Status Bar............................................................................................................................................... 119
storage temperature...................................................................................................................... 44, 46, 48
Store Temp......................................................................................................................................... 44, 68
System Opened...................................................................................................................................45, 68
Terminal Server........................................................................................................................................13
test code..................................................................................................................................................116
Test Code............................................................................................................................................ 115p.
Test Desc................................................................................................................................................116
Total Number of Labels in Set........................................................................................................ 56, 58p.
U.S. Industry Consensus Standards..........................................................................................................19
unit id label format................................................................................................................................... 55
Unit Id Label Format....................................................................................................................23, 55, 59
Unit ID Label Format............................................................................................................................... 25
Unit Id Label Format, Maintenance......................................................................................................... 55
unit id number.......................................................................................................................................... 55
Unit Id Number....................................................................................................................... 93, 96, 112p.
unit identification number................................................................................................................ 23, 115
Unit identification number....................................................................................................................... 23
Unit Identification Number...................................................................................................................... 23
unknown volumes............................................................................................................................ 49, 105
Index - 7
INDEX
Unknown Volumes.............................................................................................................................42, 49
Use Alternate Rh Factor Lines................................................................................................................. 19
user id................................................................................................................................................... 9, 12
User Id......................................................................................................................................... 9, 18, 63p.
User ID....................................................................................................................................................... 9
user password........................................................................................................................................... 64
User Password.............................................................................................................................9, 11, 63p.
User Password Expiration Period.......................................................................................................17, 18
user/password...............................................................................................................................61p., 64p.
User/Password.....................................................................................................................12, 18, 25, 61p.
User/Password, Maintenance................................................................................................................... 61
verification............................................................................................................................ 28p., 114, 116
Verification...................................................................................................................................... 71, 114
Vertical Offset in mm.............................................................................................................................118
Virus Detection.......................................................................................................................................... 6
Volume or Measure Request Prompt....................................................................................................... 49
Volume Type............................................................................................................................................50
VOLUNTEER DONOR..................................................................................................................11, 18p.
Zebra............................................................................................................................................... 1, 11pp.
"Adjust Position" button.............................................. 76, 79, 83, 87, 91, 96, 99, 102, 106, 110, 113, 118
"Adjust Position" Button......................................................76, 79, 83, 87, 91, 96, 99, 102, 106, 110, 113
"Calc Exp. Data/Time" Button.........................................................................................................82, 124
"Cancel" button......................................................................................... 36, 38, 42, 57, 64p., 96, 99, 113
"Cancel" Button..........................................................................................................................96, 99, 113
"Clear All" button...................................................................................................................................106
"Clear All" Button..................................................................................................................................106
"Clear" button.................................................................................................................................102, 116
"Clear" Button................................................................................................................................ 102, 116
"Current Date" button.....................................................................................................................128, 131
"Current Date" Button.................................................................................................................... 128, 131
"Current Time" button............................................................................................................................128
"Current Time" Button........................................................................................................................... 128
"Date" button......................................................................................................................78, 96, 109, 124
"Date" Button................................................................................................................................... 96, 109
"Facility" button.............................................................................................................................. 89, 93p.
"Facility" Button.................................................................................................................................89, 93
"OK" button..6, 23, 28p., 52p., 62, 67, 69, 119, 123, 126, 128, 131, 136, 139, 142, 144, 146p., 149, 153,
155, 157, 159, 161, 163, 165, 167, 169, 171, 173
"OK" Button................... 119, 123, 131, 147, 149, 153, 155, 157, 159, 161, 163, 165, 167, 169, 171, 173
"Preview" button.............................................................................................................................. 42, 105
"Preview" Button....................................................................................................................................105
"Print" button.. 76, 79, 83, 87, 90p., 96, 99, 102, 106, 109p., 112p., 120, 142, 144, 146p., 149, 153, 155,
157, 159, 161, 163, 165, 167, 169, 171, 173
"Print" Button......76, 79, 83, 87, 91, 96, 99, 102, 106, 110, 113, 142, 144, 147, 149, 153, 155, 157, 159,
161, 163, 165, 167, 169, 171, 173
Index - 8
INDEX
"Processing Facility" button..................................................................................................................... 82
"Processing Facility" Button............................................................................................................ 82, 125
"Product" button..................................................................................................38, 67, 89, 94p., 108, 124
"Product" Button.......................................................................................................... 81, 89, 94, 108, 124
"Select Product" button................................................................................................................. 51p., 104
"Select Product" Button......................................................................................................................... 104
"Test Print" button..................................................................................................................................119
"Test Print" Button................................................................................................................................. 119
Index - 9
INDEX
Index - 10