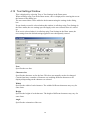
1
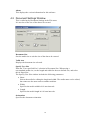
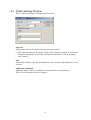
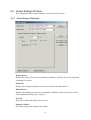
MANUAL NO. OPS647-UM-151
USER’S MANUAL
Software Usage Agreement
Graphtec Corporation (“Graphtec”) hereby grants the purchaser and authorized User (the
“User”) the right to use the software (the “Software”) in accordance with the terms and
conditions specified. By its purchase and use of the Software, the User hereby accepts and
agrees to abide by the terms and conditions set forth herein.
1. Copyrights
All copyrights relating to the Software and accompanying printed materials such as
manuals shall be retained by the individuals or organizations indicated in the Software or
printed material.
2. License
The User may use the Software on one computer at a time.
3. Copying and modification
(1) The User may copy the Software for backup purposes.
In that case, the User should label the copy with the same copyright notices as apply
to the Software.
(2) The User may not modify, combine, amend, or otherwise adapt the Software by any
means, including disassembly and decompiling.
4. Third-party use
The User may not transfer, assign, or otherwise dispose of the rights relating to the
Software or its use to third parties.
5. Warranty
(1) Should the Software not operate correctly due to physical defects in the Software
storage medium, contact your dealer. The product will be exchanged free of charge in
the case of a physical manufacturing defect.
(2) Graphtec only guarantees the storage medium under the above situation.
(3) Graphtec provides the Software on an “as is” basis. Neither Graphtec nor the supplier
guarantees the performance or results that may be achieved using the Software and
accompanying documentation. Neither Graphtec nor the supplier gives any explicit or
implicit guarantees regarding the infringement of a third party’s rights arising from the
use of the Software or accompanying manuals, their commercial performance, or their
suitability for specific purposes. Neither Graphtec nor the supplier assumes any
responsibility for incidental, secondary, or special damages resulting from the use of
the Software or accompanying manuals under any circumstances, including cases in
which the possibility of that particular damage arising is indicated to the User by the
retailer. Moreover, neither Graphtec nor the supplier assumes any responsibility for
claims from third parties.
Registered Trademarks
◆ The company names and product names described in this manual are registered
trademarks of their respective owners.
◆ The OPS647 software and this manual are copyrights of Graphtec Corporation.
Notes on this Manual
◆ The contents of this manual may not be copied in part or whole without permission.
◆ The details and product specifications in this manual are subject to change without notice.
◆ The greatest effort has been taken to ensure the clarity and accuracy of the information in
this manual. Please contact Graphtec or your retailer with any questions you may have.
◆ Please note that Graphtec assumes no responsibility for any liabilities arising out of the
use of this manual and product.
CONTENTS
1 Introduction ................................................. 1
1.1
Features..........................................................................................................................1
1.2
System Requirements ....................................................................................................1
1.3
Precaution Items ............................................................................................................1
2 Setup .......................................................... 2
2.1
Graphtec Windows Plotter Driver Setup .......................................................................2
2.2
OPS647 Setup ................................................................................................................2
3 Basic Operations ........................................ 3
3.1
Preparation.....................................................................................................................3
3.2
Cutting Text Outlines.....................................................................................................3
3.3
To Cut Around Text Placed in an Ellipse.......................................................................4
3.4
Cutting Around a Printed Image ....................................................................................5
3.5
For Easy Operation ........................................................................................................6
4 Function Details .......................................... 7
4.1
Main Window ................................................................................................................7
4.1.1
[File] Menu .............................................................................................................7
4.1.2
[Edit] Menu.............................................................................................................8
4.1.3
[View] Menu ...........................................................................................................9
4.1.4
[Draw] Menu ........................................................................................................10
4.1.5
[Insert] Menu ........................................................................................................13
4.1.6
[Window] Menu....................................................................................................13
4.1.7
[Help] Menu..........................................................................................................13
4.2
Document Settings Window ........................................................................................14
4.3
Plotter Settings Window ..............................................................................................15
4.4
Preview ........................................................................................................................16
4.4.1
[Output] Menu ......................................................................................................16
4.4.2
[View] Menu .........................................................................................................16
4.5
Output Settings Window..............................................................................................17
4.5.1
Items Always Displayed .......................................................................................17
4.5.2
Common Settings..................................................................................................18
4.5.3
Print Settings.........................................................................................................19
4.5.4
Cutting Settings ....................................................................................................20
4.6
Cut Specifications Window .........................................................................................22
4.7
Edit Media List Window..............................................................................................23
4.8
Condition Settings Window .........................................................................................25
4.9
Registration Mark Settings Window............................................................................26
4.10 Line Settings Window..................................................................................................28
4.11 Fill Settings Window ...................................................................................................29
4.12 Text Settings Window..................................................................................................30
5 Error Messages ........................................ 32
1 Introduction
OPS647 is an editing and output software application that creates outline data for simple
figures and text for outputting to a cutting plotter. It also supports handy printing and
cutting functions, including image data importing and automatic registration mark
generation.
1.1 Features
OPS647 includes the following features.
(1) Supports automatic registration mark generation.
(2) Allows previewing of print images, cutting images, and overlaid print and cutting
images.
(3) Capable of loading AutoCAD R13 DXF format files.
(4) Allows cutting conditions to be managed using media names.
(5) Allows selection of output or non-output for different colors when cutting or output
using different cutting conditions.
(6) Allows the Weed Border function to be used for cutting output to automatically
output a weeding border for the cutting media.
(7) Allows the Tiling function to be used for cutting output to output figures that
exceed the plotter’s output range on a number of pages.
1.2 System Requirements
The minimum system requirements to run the software are as follows.
◆ Operating System : Windows 95 + Internet Explorer 4.0 or later / Windows 98 /
Windows Me / Windows NT4.0 + Service Pack 5 or later /
Windows 2000 / Windows XP
◆ CPU
: Pentium II 300 MHz or higher (at least Pentium III 866 MHz
recommended)
◆ Memory
: 32 MB or more (at least 256 MB recommended)
◆ Monitor
: 1024 × 768 256 colors (True Color recommended)
◆ Cutting plotter
: Any of the following Graphtec plotters
CE3000 Series, CE2000 Series, FC2230 Series,
FC4100 Series, FC4200 Series, FC5100 Series,
LC5200 Series
◆ Printer (or plotter):
Windows-compatible printer (or plotter) supporting raster output.
1.3 Precaution Items
◆ When outputting from this software, the plotter "Command" setting should be set
to "GP-GL".
◆ Only the following DXF objects can be loaded. Lines, polylines, splines, circles,
arcs, and ellipses. Block-referenced objects, splines, text, and dimension lines
cannot be loaded.
◆ For details of how to set and use the plotter, refer to the relevant instruction
manual.
1
2 Setup
2.1 Graphtec Windows Plotter Driver Setup
OPS647 uses the Graphtec Windows plotter driver (OPS628) as the output destination
for cutting output. Install the plotter driver for the plotter used before installing
OPS647.
2.2 OPS647 Setup
Running the Setup.exe file launches the OPS647 Setup program. When this starts,
follow the instructions given on the screen.
2
3 Basic Operations
Installing this software adds OPS647 to the Start menu. The software can then be
started by clicking the OPS647 icon in the Windows Start menu.
3.1 Preparation
(1) Create New Data
Select [New] in the [File] menu to display the Document Settings window.
Set the Document Size to suit the required output size, and press the OK button.
(2) Set Driver
Select [Output Settings] in the [File] menu to display the Output Settings window.
Select the printer and plotter drivers. Next, select the Printer Settings tab and select
the media size to suit the desired output size.
3.2 Cutting Text Outlines
(1) Enter Text
Select [Text] in the [Draw] menu to display the Text Settings window.
Set the Font, Character Set, Width, Height, and Angle, as required, and then input
the desired text.
Select the Outline checkbox.
Press the OK button to display the text at the mouse cursor position. Move the
cursor to the required position for the text and click the left mouse button.
If the Use Mouse to Set Angle checkbox is selected, the angle for the text can also
be specified. Move the mouse to change the text angle, and then click the left
mouse button. Holding the [Shift] key down while moving the mouse changes the
angle in 45° increments.
(2) Set Cutting Data
Select [Output Settings] in the [File] menu to display the Output Settings window.
Select the Cutting Settings tab and press the Cutting Condition Settings button.
In the Cutting Specifications window displayed, select the required text outline
color and press the OK button.
(3) Check Output Image
Select [Preview] in the [File] menu to display the Preview window.
Select [Cut Image Only] in the [View] menu to check the image to be output.
(4) Output Cutting Data
Select [Cut] in the [Output] menu to display the cutting output window.
Check the details and press the OK button to start cutting the outlines.
3
3.3 To Cut Around Text Placed in an Ellipse
(1) Set Registration Marks
Create new data.
Select [Registration Mark Settings] in the [Edit] menu to display the Registration
Mark Settings window.
Select Use Registration Marks and select the Mode and Pattern.
(2) Fill Settings
Select [Fill Settings] in the [Draw] menu to display the Fill Settings window.
Deselect "No Fill" and press the Modify button to select the color to be used for
filling.
(3) Draw Ellipse
Select [Ellipse] in the [Draw] menu.
First, left-click the center of the ellipse with the mouse.
Move the mouse to display the desired ellipse and then click the left mouse button
once more to set the ellipse shape.
(4) Enter Text
Select [Text] in the [Draw] menu to display the Text Settings window.
Set the Font, Width, and Height, as required, and then enter the text to be added.
Press the OK button to add the text.
(5) Set Text Color
Select [Line Settings] in the [Draw] window to display the Line Settings window.
Press the [Line Color] Modify button to select the text (or line) color.
(6) Adjust Text
Select [Select] in the [Draw] menu and click on the text to display a border around
the text. The text position, width and height can now be modified.
For details of editing the position and size of drawings, refer to "Select" in "4.1.4
[Draw] Menu".
(7) Set Drawing Color
Select [Line Settings] in the [Draw] menu to display the Line Settings window.
Press the [Line Color] Modify button to select the color to be used for cutting data
(a color not used for printing).
(8) Fill Settings
Select [Fill Settings] in the [Draw] menu to display the Fill Settings window.
Select "No Fill".
(9) Draw Cutting Data
Select [Ellipse] in the [Draw] menu.
First, left-click the center of the ellipse with the mouse.
Move the mouse to display the desired ellipse and then click the left mouse button
once more to set the ellipse shape.
4
(10) Set Cutting Data
Select [Output Settings] in the [File] menu to display the Output Settings Window.
Select the Cutting Settings tab and press the Cutting Condition Settings button.
In the Cutting Specifications window displayed, select the color for the ellipse to
be cut. Now select the Printer Settings tab and deselect "Print Cutting Lines".
(11) Check Output Image
Select [Preview] in the [File] menu. Switch between [Print] and [Cut] in the
[View] menu to check the image to be output.
(12) Output to Printer
Select [Print] in the [File] menu to display the Print window.
Check the details and press the OK button to start printing.
(13) Scan Registration Marks
Load the printed medium in the plotter and scan the registration marks.
(14) Output to Plotter
Select [Cut] in the [File] menu to display the Plot window.
Check the details and press the OK button to start cutting the cutting lines.
3.4 Cutting Around a Printed Image
(1) Set Registration Marks
Create new data.
Select [Registration Mark Settings] in the [Edit] menu to display the Registration
Mark Settings window.
Select Use Registration Marks and select the Mode and Pattern.
(2) Import Image File
Select [Image File] in the [Insert] menu, and specify the file to be imported in the
window displayed.
Move and click the image frame displayed on the screen to specify the position.
(3) Adjust Image
Small squares appear at the four corners of image data to show that it is currently
selected.
If not selected, select [Select] in the [Draw] menu and click on the object to be
selected. The image data can now be moved or zoomed in/out.
For details of editing the position and size of drawings, refer to "Select" in "4.1.4
[Draw] Menu".
(4) Create Polygon
Select [Polygon] in the [Draw] menu.
Click the points to be cut using the mouse.
The view can be zoomed in while inputting points by selecting the view area using
the right mouse button. The view can also be scrolled using the scrollbar or cursor
keys. To return to the original view, press the F2 key.
5
Finally, double-click to close the polygon.
Polygons can be fine-adjusted immediately they have been created by moving the
small square displayed at each individual point. Fine adjustment is also possible
later using the Edit Anchor Point button.
(5) Specify Polygon as Cutting Data
Select [Output Settings] in the [File] menu to display the Output Settings window.
Select the Cutting Settings tab and press the Cutting Condition Settings button.
In the Cutting Specifications window displayed, select the color for the polygon to
be cut. Now select the Printer Settings tab and deselect "Print Cutting Lines".
(6) Output to Printer
Select [Print] in the [File] menu to display the Print window.
(7) Scan Registration Marks
Load the printed medium in the plotter and scan the registration marks.
(8) Output to Plotter
Select [Plot] in the [File] menu to display the Plot window.
Check the details and press the OK button to start cutting the cutting lines.
3.5 For Easy Operation
Shortcuts are available for the following operations.
● Dragging with the right mouse button held down to specify an area displays the
specified area.
● Areas can also be displayed in the preview screen in the same way by dragging with
the right mouse button held down.
● Pressing the F2 key displays the entire medium.
● Pressing the F3 key switches to Move mode. Dragging with the left mouse button
held down scrolls the screen in that direction. Press the F3 key again to cancel Move
mode.
6
4 Function Details
4.1 Main Window
4.1.1 [File] Menu
New
Creates new data.
Selecting [New] displays the Media Settings window.
Specify the document size to suit the size and orientation of the data to be created, and
then press the OK button.
For details of the Document Settings window, refer to "4.2 Document Settings
Window".
Open
Opens data saved previously.
DXF Load
Loads files in the AutoCAD R13 DXF format.
∗ Only the following DXF objects can be loaded. Lines, polylines, splines, circles,
arcs, and ellipses.
7
Thumbnail View
Calls up the Thumbnail View window. The Thumbnail View displays the saved data
and DXF data in rows within the folder specified. Files can be loaded by
double-clicking the image displayed.
Close
Closes data currently being worked on.
Save
Saves the data open over the previous data.
Save As
Saves data by specifying the save location.
Document Settings
Displays the Document Settings window.
For details of the Document Settings window, refer to "4.2 Document Settings
Window".
Plotter Settings
Displays the Plotter Settings window.
For details of the Plotter Settings window, refer to "4.3 Plotter Settings Window".
Preview
Displays the output image showing how the data currently being worked on will be
printed or cut.
For details of the Preview display, refer to "4.4 Preview Display".
Print
Outputs to the printer.
Cut
Outputs to the cutting plotter.
Output Settings
Displays the settings window for setting the general output to the printer and cutting
plotter.
For details of the Output Settings window, refer to "4.5 Output Settings Window".
Exit
Exits OPS647.
4.1.2 [Edit] Menu
Undo
Cancels the last editing operation performed.
Redo
Repeats the editing operation canceled by Undo.
8
Cut
Cuts the object selected.
Copy
Copies the object selected.
Paste
Pastes the object cut or copied.
Delete
Deletes the object selected.
Bring to Front
Moves the object selected to the front of the display.
This is used to change the display order when filled objects overlap with other objects.
Send to Back
Moves the object selected to the rear of the display.
This is used to change the display order when filled objects overlap with other objects.
Group
Grouping a number of selected objects enables them to be treated as a single object.
* Images cannot be grouped or selected together with other objects.
Ungroup
Cancels the grouping of objects.
Registration Mark Settings
Displays the Registration Mark Settings window.
For details of the Registration Mark Settings window, refer to "4.9 Registration Mark
Settings Window".
Note: The "Registration Mark Settings" functions cannot be used simultaneously with
the Weed Border function.
4.1.3 [View] Menu
Fit
Changes the display range and display scale of the data being worked on so that the
entire document is displayed.
Zoom In
Enlarges the view of the data currently being worked on.
Zoom Out
Reduces the view of the data currently being worked on.
9
Move
Selecting Move switches to Move mode. Selecting it once again cancels Move mode.
Move mode allows the screen to be dragged with the mouse in the same way as
moving paper on a desktop to move the area viewed. Note that the area viewed cannot
be moved when the entire document is displayed.
Toolbar
Status Bar
Draw Tools
Line Tools
Fill Tools
These select whether the respective tool buttons or bars are displayed in the main
window.
The tool buttons and bars allow the same functions that can also be selected from the
menus to be called up simply by clicking. Hovering the mouse for a few seconds over a
tool button or bar allows the particular function to be checked.
Registration Marks
This is only available when "Use Registration Marks" is selected in Registration Mark
Settings. This specifies whether the registration marks are displayed on the screen.
Print Area
This is the effective printing area excluding the margins specific to the printer and
based on the area specified in the Printer Settings tab in the Output Settings window.
When this setting is selected, the number of print areas necessary to cover the media
size specified in the Media Settings window are displayed.
4.1.4 [Draw] Menu
Select
This tool is used to select objects that have already been created.
When selected, an object is displayed surrounded by small squares or triangles. In this
state, the following operations are available.
• The mouse cursor changes to a hand symbol when moved over the object,
allowing the object to be dragged to a new position.
• The mouse cursor changes to a double-ended arrow when moved over the small
black squares or triangles. This allows the object height or width to be changed
by dragging with the mouse. Dragging the black squares while holding down the
[Shift] key allows the object size to be changed while maintaining a constant
aspect ratio.
• Clicking once more on an object displays small black circles at the four corners
of the object. The mouse cursor changes to two arrows arranged in a circle when
moved over the small black circles. This allows the object to be rotated by
dragging.
* Lines and images cannot be rotated.
Edit Anchor Point
This tool is used to move or transform the anchor points of objects.
10
The operation of the tool varies depending on the particular type of object.
• If polylines or polygons are clicked, small black squares are displayed at each
anchor point, allowing them to be moved as desired. Additional anchor points
can also be created by right-clicking on a line. Moving these additional anchor
points allows more complex figures to be created. Similarly, anchor points can be
deleted by right-clicking on the anchor point.
• If arcs are clicked, small black squares are displayed at each end of the arc,
allowing the start and end points of the arc to be changed. (The center point and
radius remains fixed.)
Note: Clicking other objects (lines, text, rectangles, circles, ellipses, images, and
grouped objects) activates the Select tool.
Text
This selects the tool for creating text.
Text is created as follows.
• Selecting the Text tool displays the Text Settings window.
• Set the required parameters in the Text Settings window, and press the OK
button.
• The text entered is displayed at the cursor position. Click the desired location to
set the text.
Note: For details of the Text Settings window, refer to "4.12 Text Settings
Window".
Line
This selects the tool for creating lines.
Lines are created as follows.
• When the Line tool is selected, the mouse cursor changes to crosshairs.
• Click to specify the start point.
• Click to specify the end point.
Note: Clicking while holding down the [Shift] key limits the end points that can be
specified in increments of 45° from the start point.
Polyline
This selects the tool for creating polylines.
Polylines are created as follows.
• When the Polyline tool is selected, the mouse cursor changes to crosshairs.
• Click to specify the start point.
• Click in sequence to specify intermediate points.
• Double-click to specify the end point.
Note: Clicking while holding down the [Shift] key limits the intermediate or end
points that can be specified in increments of 45° from the start point.
Rectangle
This selects the tool for creating rectangles.
Rectangles are created as follows.
• When the Rectangle tool is selected, the mouse cursor changes to crosshairs.
• Click to specify any one corner of the rectangle to be created.
11
• Click to specify the diagonally opposite corner.
Note: Clicking while holding down the [Shift] key creates a square.
Polygon
This selects the tool for creating polygons.
Polygons are created as follows.
• When the Polygon tool is selected, the mouse cursor changes to crosshairs.
• Click to specify any one vertex of the polygon to be created.
• Click in sequence to specify adjacent vertices.
• Double-click to specify the final vertex.
Note: Clicking while holding down the [Shift] key limits the positions of vertices
that can be specified in increments of 45° from the previous vertex.
Circle
This selects the tool for creating circles.
Circles are created as follows.
• When the Circle tool is selected, the mouse cursor changes to crosshairs.
• Click to specify the center point of the circle to be created.
• Click a point through which the circle passes to specify the circle size.
Arc
This selects the tool for creating arcs.
Arcs are created as follows.
• When the Arc tool is selected, the mouse cursor changes to crosshairs.
• Click to specify the center point of the circle containing the arc to be created.
• Click a point on the smallest square encompassing the circle containing the arc to
be created to specify the circle size. The intersection between the circle and the
line connecting this point and the circle center forms the start point of the arc.
• Click to specify the end point of the arc.
Note: Holding down the [Shift] key when specifying the start and end points of the
arc limits the positions that can be specified in increments of 45° from the
circle center.
Ellipse
This selects the tool for creating ellipses.
Ellipses are created as follows.
• When the Ellipse tool is selected, the mouse cursor changes to crosshairs.
• Click to specify the center point of the ellipse to be created.
• Click a point on the smallest rectangle encompassing the ellipse.
Note: Clicking while holding down the [Shift] key creates a circle.
Line Settings
This displays the Line Settings window for setting parameters such as line type, line
width, and color.
The new settings specified apply to the object selected when it is called up.
If no objects are selected when it is called up, the new settings apply to objects
subsequently created.
12
For details of the Line Settings window, refer to "4.10 Line Settings Window".
Fill Settings
This displays the Fill Settings window for setting the filling of closed objects.
The new settings specified apply to the object selected when it is called up.
If no objects are selected when it is called up, the new settings apply to objects
subsequently created.
For details of the Fill Settings window, refer to "4.11 Fill Settings Window".
Text Settings
This displays the Text Settings window for setting text parameters such as font and
size.
The new settings specified apply to the text selected when it is called up.
If no text is selected when it is called up, the new settings apply to text subsequently
created.
For details of the Text Settings window, refer to "4.12 Text Settings Window".
4.1.5 [Insert] Menu
Select Source
This selects the scanner TWAIN driver included in Windows.
Acquire
This launches the TWAIN driver selected and scans the raster image from the scanner.
Once scanned, a rectangle indicating the image size is displayed next to the cursor.
Move the cursor to the desired image position and click.
4.1.6 [Window] Menu
Cascade
Rearranges the non-minimized windows for documents that are open in an overlapping
style.
Tile Vertical
Rearranges the non-minimized windows for documents that are open vertically.
Tile Horizontal
Rearranges the non-minimized windows for documents that are open horizontally.
Arrange Icons
Rearranges the minimized windows for documents that are open at the bottom left of
the window.
4.1.7 [Help] Menu
Support Information
If the PC is connected to the Internet, this launches the browser and displays the
Graphtec web site.
13
About
This displays the version information for this software.
4.2 Document Settings Window
This is called up by Document Settings in the File menu.
It is used to set the size of the data to be created.
Document Size
Sets the media size to suit the size of the data to be created.
Valid Area
Displays the document size selected.
Specify User Size
Edits the "User-specified Size" selection in Document Size. When using a
non-standard media size, set the length and width for the user defined size, and select
this in Paper Size.
The Specify User Size window includes the following parameters.
• Name
Selects the media for editing the length and width. The media name can be edited,
but cannot use the same name as another medium.
• Width
Specifies the media width in 0.01 mm intervals.
• Length
Specifies the media length in 0.01 mm intervals.
Orientation
Specifies the document orientation.
14
4.3 Plotter Settings Window
This is called up by Plotter Settings in the File menu.
Step Size
Specifies the unit size for the position data sent to the plotter.
∗ This setting must match the plotter setting. If this setting is changed, it must also be
changed for the plotter. For details of the plotter instructions, refer to the plotter
user's manual.
Unit
Selects mm or inches. The unit specified here is used for all length dimensions in this
software.
Additional Commands
Additional plotter control commands can be specified for special purposes.
These do not normally need to be changed.
15
4.4 Preview
Selecting Preview in the File menu switches to the main window to Preview mode.
4.4.1 [Output] Menu
Print
Outputs the data currently being worked on to the printer.
Cut
Outputs the data currently being worked on to the plotter.
Exit
Exits Preview mode.
4.4.2 [View] Menu
Fit
Changes the display range and display scale of the preview data so that the entire
document is displayed.
Zoom In
Enlarges the preview display.
Zoom Out
Reduces the preview display.
Print and Cut
Switches between the objects previewed.
It displays the printer and cutting plotter output images overlaid.
Print Image Only
Switches between the objects previewed.
It displays the printer output image only.
Cut Image Only
Switches between the objects previewed.
It displays the cutting plotter output image only.
This cannot be selected if the color used for cutting lines is not selected in the Cutting
Settings dialog box.
16
4.5 Output Settings Window
This is displayed when Output Settings is selected in the File menu.
4.5.1 Items Always Displayed
Printer Driver
Displays all of the printer drivers installed on Windows. Specifies the driver used when
outputting to a printer.
Properties
Displays the settings dialog box for the driver selected in Printer Driver.
Plotter Driver
Displays the Graphtec plotter drivers installed on Windows. Specifies the driver used
when outputting cutting data to a plotter.
Preview
Enters the settings and displays the preview.
Output to Printer
Enters the settings and outputs to the printer.
17
Output to Plotter
Enters the settings and outputs to the cutting plotter.
4.5.2 Common Settings
Scaling
Enlarges or reduces the size of the drawing output in the range 25% to 400%. The
percentage specified applies to the dimension along one side. 25% gives an area ratio
of 1/16.
Offset
Offsets the output position by the amount specified. Enter the X-axis offset in the
left-hand box and the Y-axis offset in the right-hand box.
Weed Border
Outputs a border for weeding cutting media scraps. Using this function eliminates the
need to include a weed border in the data itself.
When Weed Border is selected, the border is output together with the drawing.
The border in this case is a rectangle larger than the area specified in the Document
Settings window by the size specified for all four sides.
Note: The "Weed Border" functions cannot be used simultaneously with the
Registration Mark.
18
4.5.3 Print Settings
Paper Size
Specifies the size of the media used for printing or cutting.
Orientation
Specifies the orientation of the media (printing).
Print Cut Lines
When this is selected, lines to be cut are also printed in the cutting output.
19
4.5.4 Cutting Settings
Rotate
Rotates the data before outputting. This can be selected as None, 90°, 180°, or 270°.
Feed Medium
Sets how the medium is fed after output is complete.
Selecting "From the Start Point" feeds by the specified length from the start position of
the plotting area. Selecting "From the End Point" feeds by the specified length from the
end position of the plotting area.
∗ The feed length specified in Feed Medium is only valid when using roll media with
a grit-rolling (friction feed) type plotter. In all other cases, the pen carriage will be
retracted for the medium to be exchanged, regardless of the value entered.
Tiling
Tiling is used to output data that exceeds the size of the media used by dividing it over
a number of pages.
When Tiling is selected, output will continue on the next page if an object does not fit
within the tile size specified. Page borders will always be cut.
20
Specifying an overlap other than 0 outputs an overlap between the pages by the amount
specified. This should be used when an overlap section is required for positioning
purposes.
Cutline Settings
Calls up the Cut Specifications window.
The Cut Specifications window is used to specify the color of lines for cut lines. For
details, refer to "4.6 Cut Specifications Window".
21
4.6 Cut Specifications Window
This is displayed by pressing the Cutline Settings button on the Cutting Settings tab in
the Output Settings window.
This window allows particular color lines to be specified as cut lines and assigned to
individual media setting files describing the cutting conditions.
Default Settings
Specifies the individual media setting file used when "Default Settings" is selected in
Media Selection. This setting is also used for weed border and tiling.
Media Selection List
• Color
Lists all of the colors used for external lines of objects in the data.
Select those colors to be used as cut lines.
• 1st, 2nd…
Selects the individual media setting files from drop-down lists. If "Use Default"
is selected, the media setting file specified in "Default Settings" is used. "1st"
must always be specified. "2nd" to "5th" should be specified when multiple
output is required.
Line colors that are not selected do not need to be specified.
Edit Media List
Displays the Edit Media List window.
The Edit Media List window organizes the individual media setting files available for
assignment in the Cut Specifications dialog box. For details, refer to "4.7 Edit Media
List Window".
22
4.7 Edit Media List Window
This is displayed by pressing the Edit Media List button in the Cut Specifications
window.
It organizes the individual media setting files available for assignment in the Cut
Specifications dialog box.
[Close] Button
Exits media editing.
[New] Button
Displays the Condition Settings window for creating new individual media setting
files.
For details of the Condition Settings window, refer to "4.8 Condition Settings
Window".
Note: Media cannot be created with a name that already exists on the list.
[Copy] Button
Copies the details of the media setting file currently selected and displays the
Condition Settings window.
Saving with a new media name creates a new medium.
For details of the Condition Settings window, refer to "4.8 Condition Settings
Window".
[Modify] Button
Displays the Condition Settings window to modify the details of the media setting file
currently selected. For details of the Condition Settings window, refer to "4.8
Condition Settings Window".
[Delete] Button
Deletes the media setting file currently selected.
23
[Load] Button
Loads media setting files saved with standard settings to suit different plotters and
media, and adds them to the list.
Note: Media setting files saved with standard settings are provided as a guide. There is
no guarantee that these offer the optimum settings even if used unchanged. The
actual optimum settings will vary depending on the media manufacturer, type
and usage. Similarly, changes will also occur due to cutter blade wear. Use the
test plotting function on the plotter to determine the optimum settings before
modifying and adding settings on the list.
24
4.8 Condition Settings Window
This is displayed by pressing the New, Copy or Modify button in the Edit Media List
window.
Name
Displays the current media name. The media name can be specified as required.
Cond. No.
Specifies the plotter condition setting numbers. Condition numbers can be selected
from 1 to 8, but numbers that cannot be set for the plotter should not be specified.
(Numbers 5 to 8 may not be available on some plotters.)
Speed
Specifies the pen/cutter movement speed over the media when cutting or plotting. The
speed can be specified in the range 0 to 100, but the optimum settings will vary
depending on the particular medium and cutter/pen used. Certain values may not be
available on some plotters. For details, refer to the plotter user's manual.
Specifying 0 disables this setting, and the speed will be set to the speed used for the
condition setting number specified above.
Force
Specifies the force on the pen/cutter when cutting or plotting. This setting only takes
effect when specified together with "Quality". The force can be specified in the range 0
to 100, but the optimum settings will vary depending on the particular medium and
cutter/pen used. Certain values may not be available on some plotters. For details, refer
to the plotter user's manual.
Specifying 0 disables this setting, and the force will be set to the force used for the
condition setting number specified above.
Quality
Specifies the acceleration for the pen/cutter when cutting or plotting. Reducing the
value increases the quality. This setting only takes effect when specified together with
"Force". Quality can be specified in the range 0 to 10, but the optimum settings will
vary depending on the particular medium and cutter/pen used. Certain values may not
be available on some plotters. For details, refer to the plotter user's manual.
Specifying 0 disables this setting, and the quality will be set to the value used for the
condition setting number specified above.
25
4.9 Registration Mark Settings Window
This is displayed by selecting Registration Mark Settings in the Edit menu.
Use Registration Marks
Selects whether or not registration marks are printed.
Mode
Selects whether two or three registration marks are used.
Mark
Selects the registration mark pattern.
Size
Specifies the registration mark size.
Width
Specifies the registration mark width.
Origin
Indicates the position at which the registration marks are set with respect to the media
specified in Media Settings.
The left-hand input box specifies the horizontal direction, and the right-hand input box
specifies the vertical direction.
If the origin is changed, the first registration mark moves to this position, and the
second and third registration marks move to the positions calculated using Distance
(1-2) and Distance (1-3).
26
Distance (1-2)
Specifies the horizontal distance between the first and second registration marks.
Distance (1-3)
Specifies the vertical distance between the first and third registration marks.
Fit to Document
Automatically positions the second and third registration mark positions to ensure that
they fit on the media corresponding to the first registration mark position.
27
4.10 Line Settings Window
This is displayed by selecting Line Settings in the Draw menu.
The new settings specified apply to the object selected when it is called up.
If no objects are selected when it is called up, the new settings apply to objects
subsequently created.
Line Type
Selects the line type from the list.
Note: When using as cut lines, the line type details will be ignored and lines cut as
solid lines.
Line Width
Selects the line width. Allows the width value to be entered.
Modify
Opens the Color window to specify the line color.
28
4.11 Fill Settings Window
This is displayed by selecting Fill Settings in the Draw menu.
The new settings specified apply to the object selected when it is called up.
If no objects are selected when it is called up, the new settings become the default
settings applied to objects subsequently created.
No Fill
Leaves the external lines of objects only when selected. This should not be selected if
filling is required.
Modify
Opens the Color window to specify the fill color.
29
4.12 Text Settings Window
This is displayed by selecting Text or Text Settings in the Draw menu.
When called up using Text in the Draw menu, a box is displayed for entering the text at
the bottom of the dialog box.
The text entered here will be added to the document using the settings in the dialog
box.
If text already created is selected when this window is called up using Text Settings in
the Draw menu, the new settings specified apply to the text selected when it is called
up.
If no text is selected when it is called up using Text Settings in the Draw menu, the
new settings form the default settings applied to text subsequently created.
Font
Specifies the text font.
Character Set
Specifies the character set for the font. This does not normally need to be changed.
Certain fonts have a number of character sets enabling different characters to be
displayed depending on the character set selected.
Width
Specifies the width of each character. The width of different characters may vary for
some fonts.
Height
Specifies the height of each character. The height of different characters may vary for
some fonts.
Angle
Specifies the orientation of the text.
30
Use Mouse to Set Angle
When selected, the text orientation is specified using the mouse.
Italic
Sets italic text.
Bold
Sets bold text.
Underline
Adds an underline to the text.
Outline
Converts the text to outline style.
When this setting is selected, Bold and Underline cannot be selected and are displayed
in gray.
31
5 Error Messages
◆ The overlap width exceeds the tiled plotting area.
● The overlap width specified for tiled output exceeds the tile width or height.
→ Recheck the tiled output settings in the Output Settings window Cutting
Output Settings tab, and reset to appropriate values.
◆ The registration mark position exceeds the document area.
● The registration marks have been specified outside the document area.
→ Recheck the layout in the Registration Mark Settings window, and reset so
that registration marks do not lie outside the document area.
◆ There is an error in the file contents.
● An error occurred while loading the DXF file. The file may not be a DXF file.
→ Recheck the data by loading the DXF file in the software used to create it.
◆ No valid data.
● The DXF file does not contain data that can be handled by OPS647.
→ This data cannot be used.
◆ Printer initialization failed. Cannot output.
● The printer driver specified cannot be used.
→ Recheck the printer connection.
TWAIN errors
◆ An error occurred in the TWAIN device.
● An error occurred in the TWAIN device selected in the Model Setup dialog box.
→ Check the TWAIN device's connections.
◆ The specified image is not supported.
● The TWAIN device output a file format that cannot be read in this software.
→ Set it up to output bilevel, 8-bit/pixel grayscale, 8-bit color or 24-bit color
image in the TWAIN device settings.
File loading errors
◆ This file format is not supported.
● Attempted to load a file format that is not supported.
→ The file specified cannot be loaded.
◆ The header information contains an error.
● The file header information contains an error.
→ The file specified cannot be loaded.
32
◆ The file was incorrectly compressed.
● The file format to be loaded contains an error.
→ The file specified cannot be loaded.
◆
◆
◆
◆
◆
◆
Tile-divided files cannot be read.
Files compressed using LZW cannot be read.
CALS Type 2 files cannot be read.
Files compressed using CCITT 2D cannot be read.
INTERGRAPH non-compressed files cannot be read.
INTERGRAPH files compressed using RLE cannot be read.
● The preceding error messages appear if you attempt to load a file with a file
format not supported by OPS647.
→ The file specified cannot be loaded.
33
The specifications, etc., in this manual are
subject to change without notice.
OPS647-UM-151
March 12, 2003 1st edition-01
GRAPHTEC CORPORATION