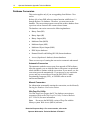
1
Technical Bulletin
Issue Date
July 30, 2004
Operator Workstation Appendix
Operator Workstation Appendix ..........................................................3
Introduction......................................................................................................... 3
Key Concepts...................................................................................................... 4
Autoexec.bat and Config.sys Files.................................................................................... 4
Operator Transaction PCFile Archiving............................................................................. 6
Printer Notes ..................................................................................................................... 7
Sound Capabilities ............................................................................................................ 9
Release 6.0 and Later NCM Memory Requirements ...................................................... 11
Database Conversion...................................................................................................... 12
Troubleshooting Chart..................................................................................................... 17
ARCNET Troubleshooting............................................................................................... 19
Windows NT Operating System or Windows 2000 Professional Operating System
Details ............................................................................................................................. 26
Connecting Metasys System Release 9.01 OWS to a Metasys System Release 10.01 or
Later Network.................................................................................................................. 28
Ordering Information ....................................................................................................... 29
Print Change-of-State (COS) Reports............................................................................. 29
Hardware Commissioning ............................................................................................... 29
Commissioning Software: New Job ................................................................................ 32
Detailed Procedures......................................................................................... 35
Direct Connecting to N1 LAN - ARCNET Network .......................................................... 35
Configuring a Printer for Change-of-State (COS) Reports .............................................. 35
Removing Additional Drivers ........................................................................................... 36
Troubleshooting HP Printers Installed with Metasys Software........................................ 37
Manually Starting the Database Conversion................................................................... 38
Saving a Database.......................................................................................................... 39
Restoring a Database ..................................................................................................... 40
Installing the Previous Release of Person-Machine Interface (PMI) Software................ 40
© 2004 Johnson Controls, Inc.
Code No. LIT-1201696
www.johnsoncontrols.com
Software Release 5.4
Historical Purposes Only—For current version, refer to the
Operator Workstation Technical Bulletin (LIT-636013)
2
Operator Workstation Appendix Technical Bulletin
Modifying the .INI Files.................................................................................................... 41
Performing the N1 Signature Test................................................................................... 41
Getting the Total Available Memory in the Network Control Module (NCM) ................... 42
Disabling the Microsoft IntelliMouse Wheel .................................................................... 42
Using PREP-FOR with Windows NT Operating System Software.................................. 42
Historical Purposes Only—For current version, refer to the
Operator Workstation Technical Bulletin LIT-636013
Operator Workstation Appendix Technical Bulletin
3
Operator Workstation Appendix
Introduction
Use this Operator Workstation (OWS) appendix as a reference to help
troubleshoot some Operator Workstation situations.
This appendix describes how to:
•
direct connect to N1 LAN – ARCNET® network
•
configure a printer for Change-of-State (COS) reports
•
remove additional drivers
•
troubleshoot HP® printers installed with Metasys® software
•
manually start the database conversion
•
save a database
•
restore a database
•
install the previous release of Person-Machine Interface (PMI)
software
•
modify the .INI files
•
perform the N1 Signature test
•
get the total available memory in the Network Control Module
(NCM)
•
disable the Microsoft® IntelliMouse® wheel
•
use PREP-FOR with Windows NT® operating system software
Historical Purposes Only—For current version, refer to the
Operator Workstation Technical Bulletin LIT-636013
4
Operator Workstation Appendix Technical Bulletin
Key Concepts
Autoexec.bat and Config.sys Files
During the setup program, you are asked whether you want the
program to automatically update the Config.sys and Autoexec.bat files
on your computer, or whether you want to make the updates later.
If you select to make the updates later, the setup program creates
two files with the necessary changes: Config.jci and Autoexec.jci. In
this case, it is your responsibility to make sure the changes are added
to the Config.sys and Autoexec.bat files so the Metasys system can
operate.
Verify that the Config.sys and Autoexec.bat files contain the lines
shown in the following examples (your versions may contain
additional lines). These files are in the root directory.
Note:
See the Install.ows and Readme.ows files on the
Metasys system CD for any changes.
Config.sys
On Windows® 98 Operating System (OS) platforms, the Config.sys
file must contain the following line:
SHELL=C:\WINDOWS\COMMAND.COM /P /E:2048
On Windows NT operating system or Windows 2000 Professional
operating system platforms, in the CONFIG.NT file, normally located
under c:\winnt\system32\config.nt, the following line
must appear:
shell=%systemroot%\system32\command.com e:2048
Replace %systemroot% with the location where Windows NT
operating system or Windows 2000 Professional operating system
software was installed.
Historical Purposes Only—For current version, refer to the
Operator Workstation Technical Bulletin LIT-636013
Operator Workstation Appendix Technical Bulletin
5
Autoexec.bat
For all platforms, the Autoexec.bat file should look similar to the
following example.
In this example, indented text indicates a continuation of a single line
that could not fit on one line on the page. These lines must be present,
but they may appear in a different order. The Autoexec.bat file might
also include additional lines that were present in the original
Autoexec.bat.
@ECHO OFF
PROMPT $p$g
PATH=C:\WINDOWS;C:\WINDOWS\COMMAND;C:\BATCH;C:\
DFEDIT;C:\FMS\BIN;C:\FMS\BIN\GPL (Note 1)
SET DFEDIT=C:\DFEDIT
SET TMP=C:\GPLTMP
SET GPLUMAC=C:\CUSTUMAC
SET GPLCMP=C:\
SET GPLPATH=C:\FMS\DATA
SET FMSDATA=C:\FMS\DATA
SET DRIVE=A:
SET TEMP=C:\TEMP
SET FMSDOS=C:\FMS\DATA
SET FMSPATH=C:\FMS
*IF EXIST C:\BATCH\SETARCH.BAT CALL
C:\BATCH\SETARCH.BAT
Note:
Though all elements of the path must be present in the path
line, they may be in a different order.
*
These lines do not appear for Windows NT operating system
or Windows 2000 Professional operating system software.
Daylight Saving Time
When transitioning from standard time to daylight saving time or
vice versa, it is possible that the time on the OWS and NCM is not set
correctly. This problem can also occur in time zones that do not
support daylight saving time. If you encounter this problem, add the
appropriate line from Table 1 to the Autoexec.bat file on each
workstation on the Metasys Network. You must restart the OWS after
making the change.
Historical Purposes Only—For current version, refer to the
Operator Workstation Technical Bulletin LIT-636013
6
Operator Workstation Appendix Technical Bulletin
Table 1: Autoexec.bat Command
Command
Description
SET TZ=CST6
Central Standard Time
SET TZ=EST5
Eastern Standard Time
SET TZ=MST7
Mountain Standard Time
SET TZ=PST8
Pacific Standard Time
SET TZ=IND5
Indiana, a time zone that does not support daylight
saving time
SET TZ=ASTx
All other time zones. See Note.
Note:
For all other time zones, x is the time zone difference in hours from
Greenwich Mean Time (GMT). For example, in Hawaii the command is SET
TZ=AST10. In New Delhi, the command is SET TZ=AST5:30.
Date/Time Properties
For all platforms, you must disable the automatic adjustment for
daylight saving time. Disable this feature in the Date/Time Properties
dialog box in the Windows operating system Control Panel.
Once the year changes in the Windows Date/Time window, it also
changes in the Johnson Controls® Date/Time box. This change occurs
without clicking OK or Apply. The date change is also propagated to
all nodes of the Metasys Network. The date change affects
date-sensitive programs on any workstations on the Metasys Network,
such as Original Equipment Manufacturer (OEM) Historian. This
situation occurs with Windows 98 operating system software. The date
change does not affect Windows NT operating system at Service
Pack 4 or later or Windows 2000 Professional operating system
software. A patch, Windowshotfix.zip, is available from the
Microsoft Corporation and is posted on The Advisor.
Operator Transaction PCFile Archiving
If you are using Windows 2000 Professional operating system with
SP2 on an M5 Workstation Release 5.0 with PMI software, the
Operator Transaction Archive command does not work properly.
Although, Delete archive file when archive
completes is unchecked, when you select Archive then MSBackup,
the system deletes all the data and the record summary displays 0.
The OPTRANS.DBF file is copied to
c:\project\contract\netname\pcfilename\archive directory with a new
file name. The MSBackup does not work because the OPTRANS.DBF
file is cleared. You must back up the OPTRANS.DBF file manually.
Historical Purposes Only—For current version, refer to the
Operator Workstation Technical Bulletin LIT-636013
Operator Workstation Appendix Technical Bulletin
7
Printer Notes
The following notes apply to printers attached to the OWS. For
information on printers directly attached to an NCM, refer to the
Network Control Module 200 Series Technical Bulletin (LIT-636025)
and the Network Control Module 300 Series Technical Bulletin
(LIT-6360251).
NCM Printers
A printer directly connected to an NCM must be a Lexmark®
Proprinter® printer. The specific control codes that must be
compatible are: Line Feed, Carriage Return, Form Feed, Compress
Print On, and Compress Off.
Metasys Software
The Metasys Network and applications that run with Metasys software
print to the printer specified with the Change Printer option in the Item
menu. The printer may be attached to a local port on the workstation or
to a printer on a remote workstation.
Define the Printer
When defining the printer on the OWS, note that the Windows
operating system Printer Name and driver settings in the Printer
Definition and Focus windows must match the settings as listed on the
Windows operating system printer test page. From the Control Panel,
select Printers and select this printer as the default printer in the
Printers dialog box.
Note:
This is also true for DDL, where the Windows operating
system Printer Name and printer driver parameters must match the
Control Panel settings (the DDL default for Windows operating
system Printer Name is Lexmark PROPRINTERS, and the default
for Windows operating system Printer Driver Name is PROPRINT).
Also, the settings must match the Windows operating system printer
test page.
Third-Party Packages
Third-party packages (for example, PC Paintbrush® software) print to
the printer specified with the Change Printer option in the Item menu.
Attach the printer to a port on the workstation or to a port on another
workstation.
Historical Purposes Only—For current version, refer to the
Operator Workstation Technical Bulletin LIT-636013
8
Operator Workstation Appendix Technical Bulletin
Draft and Quality Modes of Printing
Summaries to any network printer are printed in Draft mode (for
printers whose Windows operating system drivers support Draft
mode). Windows operating system drivers with graphic elements (for
example, an Object Focus window with a Trend line graph) are printed
in Quality mode.
If you want summaries to print in Quality mode, set the following flag
in the [METASYS] section of the METASYS.INI file:
NearLetterQuality=1
Disable Form Feeds
If you print frequently and want to cut down on paper usage by
disabling form feeds, set the following flag in the [METASYS] section
of the METASYS.INI file:
DisableFormFeed=1
Windows Operating System Printer Name
The Metasys Network does not support printer names longer than
24 characters. The Windows operating system Printer Name field in
the Metasys Network allows for a maximum of 24 characters. One
symptom of this problem is that schedule summaries do not print.
Printer Command Language (PCL)-type printers and
Hewlett-Packard® (HP) Print Performance Architecture (PPA)-type
printers can categorize this problem.
PCL-Type Printers
To restore printing on printers that use the PCL printer language,
change the printer name to a name that is 24 characters or fewer.
Windows Operating System Only (Hewlett Packard Printing
Performance Architecture [PPA])-Type Printers
Do not purchase or use Windows operating system only
Hewlett-Packard PPA-type printers. The printer name on
Hewlett-Packard PPA-type printers, also known as Windows
operating system only-type printers, cannot be changed, and there is
currently no workaround.
Historical Purposes Only—For current version, refer to the
Operator Workstation Technical Bulletin LIT-636013
Operator Workstation Appendix Technical Bulletin
9
Hewlett-Packard Printers
The following points are issues with HP printers and
Metasys software:
•
Printing may be garbled or in the wrong font.
•
Improper characters appear on the screen.
•
There are Direct-Connect Printer (DCP) errors.
For more information, see the Troubleshooting HP Printers Installed
with Metasys Software detailed procedure in this document.
Printers with Mixed Operating Systems
You must use printer drivers that have the same name if you are trying
to print using different OSs.
You may have to choose an emulation driver to effect printing across
mixed OSs. Printers change so quickly that you should confirm that
the printer is working properly before you purchase it. Confirmation is
especially important if you intend to mix OSs across OWSs.
Panasonic® Printers
Difficulties may occur when using the Panasonic KX-P2180 printer
across multiple OSs.
Sound Capabilities
With the addition of a sound card to your OWS, you can use
multimedia technology, together with Metasys software to differentiate
among Critical Alarm Levels 1 to 4. Previously, the OWS received
Critical 1, 2, 3, and 4 alarms with a sounded alarm that was identical
for each priority. The sound card together with the Windows
Multimedia drivers allows you the flexibility to select a unique tone
for each alarm level. The alarm sounds when the dialog box displays
the alarm level.
In addition, you can assign the Reminder dialog box its own unique
sound as well.
Historical Purposes Only—For current version, refer to the
Operator Workstation Technical Bulletin LIT-636013
10
Operator Workstation Appendix Technical Bulletin
Alarm Sounds
There are four kinds of alarm sounds that correspond to the
four critical alarm levels. The Windows Multimedia sound driver
sounds the alarm by using a .WAV file. The .WAV file name is
defined in the Windows operating system WIN.INI file. Tailor any of
the four sounds by using the Windows Multimedia recording
functions. If you do not define the parameters in the WIN.INI file, then
the system uses the default sound setting.
To enable sound, you must modify the METASYS.INI file and the
WIN.INI file, and enable the horn through the Metasys system.
Required Hardware
To use the multimedia features, you must install a 100%
Sound Blaster® compatible sound card. You can use either the internal
Personal Computer (PC) or external speakers and the Windows
Multimedia driver automatically selects the proper speaker type.
If the OWS does not have any internal speaker (only a piezoelectric
reed), then you need to add the following METASYS.INI parameter:
MultiMediaSound=0
This parameter specifies that the default beep is used rather than the
multimedia sound .WAV file.
Note:
Windows NT operating system and Windows 2000
Professional operating system software do not provide support for the
PC speaker. Install a compatible sound card to use multimedia
features.
Historical Purposes Only—For current version, refer to the
Operator Workstation Technical Bulletin LIT-636013
Operator Workstation Appendix Technical Bulletin
11
Release 6.0 and Later NCM Memory Requirements
This section applies only if you are upgrading from Release 5.0 or earlier.
New features added to the PMI software at Release 6.0 and later
increase the size of some objects in the NCM. The size increase may
cause the data downloaded into the NCM to use more memory than
previous releases. Before you start the Release 6.0 or later upgrade,
verify that each NCM has enough available memory to handle the
additional memory requirements. You must have a minimum of 50 K
allocated memory to use at runtime after the download is complete.
The NCMs most vulnerable to this increase include NCM101 class
devices (101, 102, and 401) and NCM200s with NIM102 or NIM202
modules.
Use Table 2 to determine the additional memory required for each
NCM on the job. Calculate the memory for each NCM by entering the
number of objects of each type listed, multiply by the given impact
factor, and total accordingly.
Find number of objects of each type by using an UNDDL listing for
each NCM.
Table 2: Memory Requirements
NCM Number
Object Type
Number of
Objects
Multiply By
Binary Data (BD)
x 10
Binary Input (BI)
x 10
Binary Output
(BO)
x1
Multistate Data
(MSD)
x 10
Multistate Input
(MSI)
x 10
Multistate Output
(MSO)
x1
DLLR
x 122
LOADS
x2
FIRE
x 12
Additional Memory
Required (in bytes)
Additional Memory Required for this NCM
Note:
If the NCM type is a standard NCM101, you may reduce this Additional
Memory Required value by 3000 bytes. This decrease only applies to this type.
To determine if the additional memory required may result in an NCM
memory problem, compare the total Additional Memory Required
number above to the Total available allocable memory in the NCM. If
the memory available is less than the additional memory required, the
NCM fails to download.
Historical Purposes Only—For current version, refer to the
Operator Workstation Technical Bulletin LIT-636013
12
Operator Workstation Appendix Technical Bulletin
Database Conversion
This section applies only if you are upgrading from Release 5.0 or
earlier.
Release 6.0 or later PMI software cannot function with Release 1 0
through Release 5.0 databases. Therefore, you must convert the
database. The conversion program converts the archive database from
a previous release format to the current release format.
The database conversion converts the following databases:
•
Binary Data (BD)
•
Binary Input (BI)
•
Binary Output (BO)
•
Multistate Data (MSD)
•
Multistate Input (MSI)
•
Multistate Object Output (MSO)
•
FIRE object databases
•
Demand Limit/Load Rolling (DL/LR) feature databases
•
Access (Superbase 4 database) feature databases
There are two ways of starting the conversion: automatic and manual.
Automatic Conversion
The automatic method occurs as part of an upgrade of PMI software.
After the upgrade, you are informed that a conversion is required and
asked whether to continue with the conversion. If you answer yes, the
conversion proceeds automatically. If you answer no, no conversion
occurs, and you are not allowed to use the PMI, DDL, Graphic
Programming Language (GPL), or UNDDL software on the
unconverted database.
Manual Conversion
For information on manually starting the conversion, see the Manually
Starting the Database Conversion section.
Win Prep-For Utility
Use Win Prep-For to prepare the PC for database conversion or
restoration. Refer to the Win Prep-For Utility Technical Bulletin
(LIT-1201656) for more information.
Note:
Do not use the MS DOS version of Prep-For with the
Metasys system Web Access (MWA) software.
Historical Purposes Only—For current version, refer to the
Operator Workstation Technical Bulletin LIT-636013
Operator Workstation Appendix Technical Bulletin
13
PREP-FOR Command
The PREP-FOR command prepares the PC for database conversion or
restoration. When using a Windows NT operating system or Windows
2000 Professional operating system, issue the PREP-FOR command
with c:\winnt behind it to direct the PREP-FOR command to the
location of the win.ini file. The PREP-FOR command should look like
this:
PREP-FOR C: \PROJECT\YOURJOB C:\WINNT
When you use the PREP-FOR command with Windows NT operating
system software for C:>PREP-FOR C: \PROJECT\99999999
C:\WINNT, use the Cmd.exe file instead of the Command.com file. If
you use the Command.com file and press Enter twice, the PREP-FOR
command does not work, regardless of the resulting message.
Database Conversion Guidelines
When converting an older database for a software upgrade, adhere to
the following guidelines:
•
Before doing a conversion, save the previous database and clearly
label the backup.
•
Keep clearly labeled backup copies of both the old and new
databases. (Since databases converted to the current format do not
function with previous release PMI software, if you reinstall the
previous software, you must restore the previous database.)
•
Before doing a manual conversion (by typing CONVERT), do a
PREP-FOR to set up environment variables.
•
After the conversion is complete, save the database immediately
(using the SAVEDB function) so you have a backup of the
converted database.
Remember a Release 1-5 database is incompatible with Release 6.0
or later software, and a Release 6.0 or later database is
incompatible with Release 1-5 software. Therefore:
-
Do not use Release 6.0 or later tools (DDL and GPL) to
generate a database for a job at an earlier release.
-
Do not copy files from an earlier database into a Release 6.0 or
later database.
For more information, see the Manually Starting the Database
Conversion detailed procedure in this document.
Historical Purposes Only—For current version, refer to the
Operator Workstation Technical Bulletin LIT-636013
14
Operator Workstation Appendix Technical Bulletin
Conversion Screens
When the conversion program first starts (before performing any
actual converting), it checks to see if there is a database to convert and
if there is enough available disk space for the conversion. If there is no
database to convert or if there is not enough disk space for the
conversion, the conversion program exits and, if appropriate, informs
you of how much disk space is required.
If there is a database to convert and enough disk space, a screen
message informs you that a database backup is strongly recommended
and asks whether you want to continue with the conversion (Y or N).
Enter N (no) if you need to first perform the backup. In this case,
perform the backup and then start the conversion manually by typing
CONVERT at the DOS prompt. Enter Y (yes) if you already have a
backup and want to go ahead with the conversion.
The screen informs you of the progress of the conversion. Specifically,
it tells you which network and which NCM is being converted at any
moment, and whether it is reading or writing the data. The conversion
reads all data from one network, writes all data back to that network in
Release 6.0 format, and then proceeds to the next network.
A Conversion Complete message appears at the end of the
process. If errors were found, a message appears directing you to the
log file.
Convert.log
There is a log file that records the conversion and any errors that were
FMSDATA is the directory specified by PREP-FOR (FMS\DATA or
project\contract#).
Sometimes the conversion process detects errors in the old database
(for example, a parameter out of range). The conversion continues;
however, the errors are still in the converted database. The log file
describes these errors and their locations in a format similar to DDL
found. The log file resides in the FMSDATA directory. Then fix the
errors in the converted database (through online generation, DDL, or
GPL). Use the DDL Programmer’s Manual to check for valid ranges.
Historical Purposes Only—For current version, refer to the
Operator Workstation Technical Bulletin LIT-636013
Operator Workstation Appendix Technical Bulletin
15
Convert.log Error Message Examples
Binary Outputs (BOs) Mapped to XRLs - The most common error
message in the CONVERT.LOG file is for BO objects mapped to
XRLs. The pulse duration of these BOs has a range of 12 to 3060;
however, on many jobs the value in the database is zero. An example
of the Convert.log entry for this database problem is:
Error Found in Database of BO: Chiller\P3-C
XMHW 3, 1, 0, Y
^ Parameter 3 value out of range
Conversion continued, error remains in the
database
Changed or Deleted Network Name - A database with a changed
network name or a deleted network may result in the following
message:
C:\project\contract\net.dob is a directory that
contains files, which appear to be from an old
(but currently unreferenced) network. To
prevent problems this directory has been
renamed to C:\project\contract\net.old. It is
recommended that you delete this directory and
its corresponding directory
C:\project\contract\net.
In this case, check these directories for any files that may need to be
saved (DDL source, GPL source, and Computer Aided Engineering
[CAE] drawings). Save the necessary files, and then delete the
directories from the disk.
Demand Limiting/Load Rolling - The following message appears in
the log file if:
All NCMs are not archived on the same OWS and a Demand
Limiting/Load Rolling object has loads on an NCM archived on a
different OWS.
- or The BO was deleted from the database but not from the Demand
Limiting/Load Rolling load list.
Load Group DEMAND\LOADGRP has a BO Load named
AHU1\BO7. This BO Load could not be found in
the archive database of this OWS. The BO’s Load
priority is 4. This load will need to be
entered manually.
Historical Purposes Only—For current version, refer to the
Operator Workstation Technical Bulletin LIT-636013
16
Operator Workstation Appendix Technical Bulletin
The following message appears in the log file if:
all NCMs are not archived on the same OWS and the BO’s Load
Group is archived on a different OWS
- or the Demand Limiting/Load Rolling object was deleted from the
database
GEO1ST\FNST11 is a BO Load whose Load Group
cannot be found in the archive database of this
OWS. The BO’s Load information must be entered
manually after conversion. The following Load
information has not been converted and must be
entered manually:
load locked = N
load rating = 8
minimum release time in minutes = 30
maximum shed time in minutes = 10
comfort system name =
comfort object name =
minimum shed time in minutes = 0
Previous PMI Software
After you upgrade and convert to the new database, if you need to go
back to the old PMI software and an old database, refer to the
Operator Workstation Technical Bulletin (LIT-636013).
Restore Previous Release Database over Converted
Database
If you need to restore a database saved at Release 5.0 or earlier, you
must convert the database after the restore is complete. Restore a
previous release database over a converted database only if
absolutely necessary. Note the following before restoring the
previous database:
If the Save of the previous database was a Save All, you must delete
the entire archive database on the hard disk before restoring. You must
remove the FMSDATA directory and its entire contents and
subdirectories from the hard disk.
If the Save was of a single network, you must delete the entire network
database on the hard disk before restoring the database. You must
remove the FMSDATA\network directory and its entire contents and
subdirectories and the FMSDATA\network.dob directory and its
entire contents from the hard disk.
Historical Purposes Only—For current version, refer to the
Operator Workstation Technical Bulletin LIT-636013
Operator Workstation Appendix Technical Bulletin
17
Troubleshooting Chart
Use Table 3 to help troubleshoot the OWS. Only problems specific to
the Metasys Network are covered. See the ARCNET Troubleshooting
section in this document for ARCNET tips. For other hardware and
software problems, refer to the manufacturer’s literature.
Table 3: Troubleshooting Steps
Problem
Solution
The Windows operating system
desktop screen does not appear when
you try to run Metasys software.
Check to see that:
The PC has enough conventional and extended memory available.
Conventional memory must be at least 530 K.
The following files are present and contain the proper statements:
AUTOEXEC.BAT, CONFIG.SYS, WIN.INI.
Metasys software is fully installed.
All required third-party software is properly installed.
All cables are securely attached.
The monitor is turned on.
Blank Windows operating system
desktop screen appears and Metasys
software does not run.
Check to see that:
The PC has enough conventional memory. Conventional memory
must be at least 530 K.
ARCNET board is set up correctly.
The following error message appears
during Metasys system startup if a
driver other than the Metasys system
ARCNET driver is detected:
Metasys load aborted due to
detection of an active non
Metasys system ARCNET driver.
Remove the driver via Control
Panel – Network then restart
Metasys system.
The EnaArcChk parameter has detected a non Metasys system
ARCNET driver. Remove all non Metasys ARCNET cards:
In the Windows operating system Control Panel, double-click the
Network icon.
Select the Configuration tab.
Select an ARCNET driver.
Click Remove.
Repeat this solution for all ARCNET drivers.
Reboot the PC.
Logon screen appears, but when you
Check to see that the PC has enough extended memory.
try to log on, system stops responding.
The message N1 Initialization Failure
displays when you try to run the
Metasys Network.
Check to see that:
The ARCNET board is installed.
If you have a Lexmark computer, the interrupt level and
Input/Output (I/O) address of the ARCNET board are set correctly,
and match the settings in the METASYS.INI file.
If you have a Compaq® computer, interrupt level, I/O address, and
node ID of the ARCNET board are set correctly.
The node addresses on the switches match the node address on
the OWS.
The DDL file for the BAS is correct and compiled.
Continued on next page . . .
Historical Purposes Only—For current version, refer to the
Operator Workstation Technical Bulletin LIT-636013
18
Operator Workstation Appendix Technical Bulletin
Problem (Cont.)
Solution
The Metasys Network begins to
boot, but a series of message
boxes appear indicating that
certain files cannot be found.
Check to see that:
The statements DATA=C:\FMS and FMSDATA=C:\FMS\DATA are in the
METASYS.INI file. (If your system uses a different directory structure, for
example, C:\project\contract#, these statements reflect the settings
defined by the PREP-FOR command.)
OWS is not communicating with
other nodes on the N1 LAN.
Check to see that:
T-connector is secured to the ARCNET board on the Workstation.
One N1 LAN cable segment is attached to each side of the T-connector;
or, one N1 LAN cable segment and a 93 ohm terminator cap are attached
to the ends of the T-connector (only if this node is at the end of line).
The following parameters for the ARCNET board are properly configured:
node ID, interrupt level, I/O address, memory address, and topology
(SMC® board only).
The DDL file for the BAS is correct and compiled.
Logon screen does not appear.
Check to see that:
Global DDL file is present and compiled.
Network DDL file is present and compiled.
The message Archive
database is incompatible
with current software
release. DATABASE
CONVERSION IS REQUIRED
appears when the PMI software
is loading.
The archive database is at Release 5 or earlier and needs to be
converted. Run the manual CONVERT program as described in the
Database Conversion section.
The message Incorrect DOS
Version appears when doing a
SAVEDB.
Appears when a SAVEDB backup is attempted with the incorrect DOS
version.
An error message, either
Internal Error or Incoming
Call appears in Metasys
software when a laptop
computer with a PCMCIA modem
attempts to dial out.
The problem is a communication port problem.
To fix the problem:
Create a text file called fixcom1.deb if you are using COM1, containing
the following lines:
E40:0
F8 03
q
Create a text file called fixcom2.deb if you are using COM2, containing
the following lines:
E40:2
F8 02
q
Add the following line to the beginning of the autoexec.bat file:
debug<fixcom1.deb>NUL if you are using COM1, or
debug<fixcom2.deb>NUL if you are using COM2.
Reboot the laptop computer.
Historical Purposes Only—For current version, refer to the
Operator Workstation Technical Bulletin LIT-636013
Operator Workstation Appendix Technical Bulletin
19
ARCNET Troubleshooting
This section contains tips for troubleshooting ARCNET boards.
ARCNET Interrupt
The ARCNET interrupt signals the PC when its buffer has information
that needs to be sent to the Metasys system. The default ARCNET
interrupt (IRQ) for Metasys software is 7. If IRQ 7 is not available,
set up Metasys software to use an IRQ of 2, 3, 4, 5, or 6. If you need a
different interrupt other than 7, configure the ARCNET board for the
new IRQ level and modify the METASYS.INI file. See the following
example for specific details.
The majority of PC vendors define IRQ 7 as the local printer, LPT1.
In most cases, this does not affect the Metasys system since the use of
IRQ 7 by the printer is only in diagnostic mode. IRQ 7 can be
shared/used with the ARCNET board. There are some PCs that cannot
share IRQ 7. For these cases, change Metasys software ARCNET IRQ
to an available interrupt.
Example
Problem Description—Typical problem scenario: N1 appears to be
online; however, the OWS cannot communicate with any nodes on the
N1. There may be several causes for this symptom. One cause is due
to an interrupt conflict.
Verification—Metasys software uses IRQ 7 as the default interrupt. To
determine which interrupts are available, run a diagnostic package
such as Microsoft Diagnostic software (MSD). MSD comes standard
with Windows operating system software. Run MSD by typing MSD at
the DOS prompt (it is suggested that Windows operating system
software is not active when running MSD). View the information
block titled IRQ Status. Under the IRQ column, all hardware interrupts
used with this PC are identified. From this list, determine the open
IRQ levels.
Resolution—Once you have identified an unused interrupt and your
ARCNET board supports it, set the jumper on the ARCNET board
accordingly. Additionally, the METASYS.INI file needs to include
this interrupt change. Modify the following line in the METASYS.INI
file: ARCNETINT=x where x is the new interrupt level on the
ARCNET board. Add this line if it is not already in the
METASYS.INI file (this line is not automatically created by the
installation program).
Historical Purposes Only—For current version, refer to the
Operator Workstation Technical Bulletin LIT-636013
20
Operator Workstation Appendix Technical Bulletin
If the interrupt was changed from the default of IRQ=7, you must
document this change. It is suggested that you create an
ARCNET.OWS file describing all ARCNET settings for this PC. Keep
this file in the BATCH subdirectory. Do not keep it in the FMS
subdirectory, because it may be deleted during the next PMI update. A
sample of a typical ARCNET.OWS file is included in this section,
under ARCNET.OWS.
A second cause is a vendor conflict between the ARCNET card and
the PC. To solve the conflict, change the card to a CCSI ARCNET
Card.
ARCNET I/O Address
The ARCNET I/O address responds to commands being sent from the
PC to the ARCNET board and enables the ARCNET status to be
returned. The Metasys system default ARCNET I/O address for all
Industry Standard Architecture (ISA) bus boards is 2E0 (hex). Use any
unused I/O address if an I/O address conflicts with other controllers. If
you change the ARCNET I/O address, you must update the
METASYS.INI file to reflect the same change. Specifically, in the
METASYS.INI file, change the line ARCNETIO=x, where x is the
ARCNET I/O address decimal equivalent of the hex address set on the
ARCNET board.
Example
Problem Description—May exhibit same symptoms as an interrupt
conflict or the Metasys system could indicate N1 Initialization Errors.
There may be several causes for these symptoms. For this example,
assume an ARCNET I/O address conflict.
Verification—Metasys default is 2E0 (hex). Generally, all devices with
I/O capability require an I/O address (for example, CD-ROMs, tape
drives, communication ports, Ethernet boards, and video boards). To
determine which I/O addresses are being used, refer to the I/O device
manuals.
Resolution—Once all I/O addresses are identified, refer to the
ARCNET manual for which addresses are configurable for the
installed ARCNET board. To change the ARCNET I/O address to an
unused address, both the ARCNET board and the METASYS.INI file
must be modified. On the ARCNET board, set the appropriate
jumper/switches per your ARCNET user’s manual. For the
METASYS.INI file, change the ARCNETIO=x line, where x is the
decimal equivalent to the hex address set on the ARCNET board
(2E0 hex = 736 decimal).
Historical Purposes Only—For current version, refer to the
Operator Workstation Technical Bulletin LIT-636013
Operator Workstation Appendix Technical Bulletin
21
Note:
If the ARCNET I/O address was changed from the default of
2E0, you must document this change. It is suggested that you create an
ARCNET.OWS file describing all ARCNET settings for this PC. Keep
this file in the BATCH subdirectory. Do not keep it in the FMS
subdirectory, because it may be deleted during the next PMI update. A
sample of a typical ARCNET.OWS file is included in this section,
under the ARCNET.OWS section.
ARCNET Base Memory Address
The ARCNET base memory address is the input/output address buffer
for the ARCNET board. Up to a 16 K block of memory is mapped to
the ARCNET board. Use any available 16 K block of memory that can
be set on the ARCNET board (refer to the ARCNET user’s manual for
available base memory address settings). Metasys system
documentation recommends default settings for some PC types. If
there is a conflict with other adapters using the same base memory
address, then an alternate 16 K memory block needs to be set on the
ARCNET board. A change in the METASYS.INI file is not required.
Example
Problem Description—Typical Metasys system error messages include
N1 Memory Failures and/or N1 Initialization
Failures. These are caused by the computer’s not recognizing the
16 K base memory segment block used by the ARCNET board.
Verification—To verify that the PC is communicating to the ARCNET
board, an N1 Signature test must be run. This test uses a DOS program
called Debug. In running this test, Debug reads the memory address
segment of the ARCNET board and responds with the N1 Node
address set on the ARCNET board. (Do not run the Metasys system
until after performing this test.)
Historical Purposes Only—For current version, refer to the
Operator Workstation Technical Bulletin LIT-636013
22
Operator Workstation Appendix Technical Bulletin
Here is an example of a CompuAdd PC whose ARCNET network base
memory is set to C800.
c:\debug
-D C800:0000
C800:0000 D1
C800:0010 75
C800:0020 F8
C800:0030 74
C800:0040 B1
C800:0050 8C
C800:0060 94
C800:0070 EC
64
FF
EF
FF
FF
FF
FF
FF
EE
8B
FD
F5
F5
BB
7F
FB
FF
FF
FF
FF
FD
FF
FD
FF
DF
74
B9
CB
41
8F
E7
75
FF
FF
FF
FF
FF
FF
FF
FF
8F
F7
27
F9
5D
FC
B8
AE
FF-4D
FF-95
FF-D4
FF-C9
FF-3F
FF-03
FF-5F
FF-64
FF
FF
EF
FF
DF
FF
FF
F7
47
3A
3A
FA
6F
ED
EE
5E
F7
FF
FD
FF
FA
FF
FF
FF
D0
0E
49
F6
DD
77
FE
6F
FF
FF
7F
FF
FF
FE
FF
EF
B3
5D
9F
35
7A
FB
1F
7F
FF
FF
FF
FF
DF
FF
FF
DF
To verify that the computer can read the ARCNET base memory, the
first location dumped from debug must be the signature recognition of
D1. Immediately following the D1 is the ARCNET node address that
is set on the N1 node address switches. In the previous example, the
first line dumped contains the signature of D1 immediately followed
with a 64 (hex). The 64 converts to the N1 node address of 100
(decimal) set on the ARCNET board of the PC.
If the first address is not D1, then a conflict exists.
Resolution—Remove the ARCNET board and run MSD (refer to the
ARCNET Interrupt section for details on MSD). View the information
block titled Memory to see if the 16 K block set on the ARCNET
board is being used by some other application. If you find this base
memory is already in use, then select an available 16 K block that can
be addressed by your ARCNET board (refer to your user’s manual for
available selections). Configure the new base memory address on the
ARCNET board. Install the ARCNET board and rerun the N1
Signature test.
Certain PC platforms disable the shared memory for ISA boards and
are controlled by the PC’s setup configuration utilities. Typically, if
the PC setup utilities disable ISA shared memory, the N1 Signature
test responds with all data at FF. For examples with resolution, refer to
the OWS troubleshooting tips on the Johnson Controls intranet site,
The Advisor.
Note:
Since the ARCNET base memory address is PC
configurable, you must document this information. We suggest
creating an Arcnet.ows file describing all ARCNET settings for this
PC. Keep this file in the BATCH subdirectory. Do not keep it in the
FMS subdirectory, because then it might be deleted during the next
PMI update. A sample of a typical Arcnet.ows file is included in this
section, under the Arcnet.ows section.
Historical Purposes Only—For current version, refer to the
Operator Workstation Technical Bulletin LIT-636013
Operator Workstation Appendix Technical Bulletin
23
ARCNET Node Address
All ARCNET N1 devices require a node address. For the OWS, the
address is set by the node address switches on the ARCNET board. On
ISA boards, it is set via DIP switches. Additionally, this address needs
to match the address defined in the Net.ddl and Global.ddl files.
Example
Problem Description—A typical example of a node address mismatch
is N1 Initialization failure.
Verification—To ensure the address Metasys software is using for the
PC matches the ARCNET Node address, both the N1 Signature Test
and a decompile of the NET database must be done. Run the N1
Signature test as explained in the ARCNET Base Memory Address
section. The parameter immediately following D1 is the Hex node
address of the ARCNET board. Now do a decompile (UNDDL) of the
NET database operating on this OWS. Compare the Node address in
the decompiled NET file with that of the N1 Signature test. Both node
addresses must match. (Note, however, that the address displayed
during the signature test is in Hex, while the address in the NET file is
in decimal.)
Resolution—If a mismatch occurs, make the appropriate corrections.
Note:
Since the ARCNET address is PC configurable, you must
document this information. We suggest creating an Arcnet.ows file
describing all ARCNET settings for this PC. Keep this file in the
BATCH subdirectory. Do not keep it in the FMS subdirectory,
because then it might be deleted during the next PMI update. A sample
of a typical ARCNET.OWS file is included in this section, under the
Arcnet.ows section.
N1 Bus/Star Setup
The N1 Bus/Star setup configures the communication mode to be in
either a high impedance state (twisted pair wires for Bus mode) or in a
low impedance state (coax cable for Star mode). In a star
configuration, enable an internal End-of-Line (EOL) 93 ohm resistor.
In a bus configuration, the board is set to a high impedance state thus
requiring an external EOL. We recommend that all Metasys system
applications configure the ARCNET board in the bus configuration
setup. If this OWS is at the end of its N1 Bus, then a T-type coax
connector can be installed with one side being the N1 and the other
side being the external EOL terminator.
With the ARCNET board always being configured in the bus type
configuration, the placement of the EOL terminator can be easily
determined.
Historical Purposes Only—For current version, refer to the
Operator Workstation Technical Bulletin LIT-636013
24
Operator Workstation Appendix Technical Bulletin
Example
Problem Description—Strange N1 communication problems are
occurring.
Verification—Always set the OWS ARCNET board to Bus
configuration. If the OWS is at the physical end of the N1 Bus, you
must install a coax T-type connector with a 93 ohm terminator. Verify
that the other physical end of the N1 Bus also has a 93 ohm terminator.
If these are the only EOL installed, then double check the ARCNET
configuration setup on the board to make sure it is set for Bus mode.
Resolution—Remove all incorrect EOL from the N1.
N1 Enhanced/Compatible Setup
The Thomas-Conrad ARCNET board has an Enhanced/Compatible
option. The Enhanced mode uses special Thomas-Conrad accelerator
drivers to optimize performance and minimize memory conflicts. In
the Compatible mode, drivers other than Thomas-Conrad drivers are
used to control the ARCNET board. The Metasys Network uses its
own driver to control the ARCNET board in both the OWS and all
NCMs. Thus, Metasys software requires this setup option to be in the
Compatible mode for all applications.
ARCNET Model
The ARCNET model is defined in the METASYS.INI file. The
ARCNETMODEL=x line (where x is the style ARCNET board
installed in this OWS) is used by Metasys software to help determine
the base memory address.
Config.sys and Autoexec.bat
These two files are key elements in configuring the PC. When Metasys
or GPL programs are first loaded, changes occur to both the
Autoexec.bat and the Config.sys files. The current Autoexec.bat file is
appended to add specific setup information for Metasys or GPL
software. The Config.sys file is replaced with a new Config.sys file
specific to the operation of Metasys and GPL software.
Example
Problem Description—Metasys system is unable to directly
communicate to an NCM over the PC’s COM1 port. The PC runs
WNCSETUP over the COM1 port.
Verification—The latest revision of Metasys software was just loaded.
Both the Autoexec.bat and the Config.sys files matched the sample
files shown in the Config.sys and Autoexec.bat section of ARCNET
Troubleshooting in this document.
Historical Purposes Only—For current version, refer to the
Operator Workstation Technical Bulletin LIT-636013
Operator Workstation Appendix Technical Bulletin
25
Resolution—Prior to loading Metasys and GPL software, the
Config.sys file had specific drivers installed. These drivers are needed
to enable COM1 operation within the Windows operating system
environment. Since both Metasys system and GPL software replaced
the Config.sys file with a Metasys specific file, these drivers were no
longer loaded on a reboot. Reinstall the original drivers into the
Config.sys file so the Metasys system can communicate over COM1 to
an NCM.
To prevent this problem from happening, review both the
Autoexec.bat and Config.sys files before installing Metasys or GPL
software. Check these files again after loading the new system and
modify if necessary.
Arcnet.ows
It is highly recommended that all OWS setup parameters be stored in a
text file for future reference. The recommended file Arcnet.ows should
be stored in the BATCH subdirectory. Include base I/O address, base
memory, Interrupt Request (IRQ) setting, or any other specific
configuration settings for the OWS to quickly identify the ARCNET
parameter settings needed for anyone who has to work on this OWS.
Here is a sample Arcnet.ows file:
Job Name: JCI Corporate Office Building
JCI Installing Engineer: Jerry Gervenak
Date ARCNET was commissioned: January 17, 1995
OWS Type: CompuAdd 450
OWS node address 101
ARCNET IRQ: 7
Other IRQs changed: Sound board changed to IRQ=10
ARCNET I/O address: 2E0
ARCNET base memory address: C800
EOL terminator locations: OWS1 and NC14
Special configuration notes: none
Historical Purposes Only—For current version, refer to the
Operator Workstation Technical Bulletin LIT-636013
26
Operator Workstation Appendix Technical Bulletin
Windows NT Operating System or Windows 2000 Professional
Operating System Details
The architectural design of Windows NT operating system and
Windows 2000 Professional operating system software is different
from Windows 98 operating system software. This troubleshooting
section contains details regarding Windows NT operating system and
Windows 2000 Professional operating system software differences.
OWS Configuration
Table 4: Base Hardware Requirements
Component
Requirement
Processor
Pentium® processor
RAM Memory
256 MB recommended (128 MB minimum)
Bus
ISA, PCI
Hard Disk Capacity
8 GB minimum
Hard Disk Interface
IDE
CD-ROM
Required to install Windows operating system software. Metasys system
media distributed on CD.
Printer and Cable
Must be supported by Windows operating system software.
Mouse
Microsoft
Monitor
VGA (640 x 480), Super VGA, (800 x 600) or greater
Sound Card
Windows operating system compatible, PC speaker is not supported.
Tape Backup Device
Windows operating system compatible, backup to disks is not supported.
Graphics Support
VGA or SVGA
Video chip EGA support required (for GPL).
Table 5: Minimum Software Requirements for Windows NT Operating System Software
Software
Revision
File System
Configured as FAT 16; FAT 32 is not supported. NTFS was not tested.
Metasys System
Release 9.01 or later
Table 6: Minimum Software Requirements for Windows 2000 Professional Operating System
Software
Software
Revision
File System
Configured as FAT 32.
Metasys System
Release 12.00 or later
IMPORTANT: Disable screen savers on Windows NT operating system
or Windows 2000 Professional operating system workstations. If the
screen saver is enabled and the mouse/keypad is pressed to re-enable the
workstation, the system may stop responding.
Historical Purposes Only—For current version, refer to the
Operator Workstation Technical Bulletin LIT-636013
Operator Workstation Appendix Technical Bulletin
27
Database Backup and Restore
See the Detailed Procedures section for information on how to save
and restore your database.
Restore a Database
Restoring the database copies the database on tape to the workstation.
The tape copy overwrites the database at the workstation. Use the
following procedure to restore the database.
See the Restoring a Database detailed procedure in this document for
information on how to perform the procedure.
Unsupported Features
The following features are not supported on Windows NT operating
system or Windows 2000 Professional operating system workstations:
Fire OWS, GWS Interface, Guard Tour, and Remote User Interface.
Microsoft IntelliMouse Pointing Device
The Microsoft IntelliMouse pointing device is not supported on
Metasys Operator Workstations with Windows NT operating system
or Windows 2000 Professional operating system software at this time.
Some manufacturers install the wheel feature on this mouse as part of
their standard features. To use this mouse with the Metasys software,
you must disable the wheel. If the wheel is not disabled, problems such
as system lockups may occur. See the Disabling the Microsoft
IntelliMouse Wheel detailed procedure in this document.
PREP-FOR
When running a PREP-FOR (Prep.for) on a Windows NT operating
system machine, use Cmd.exe, not Command.com, to execute the
DOS window. Follow the steps in the Using PREP-FOR with
Windows NT Operating System Software detailed procedure.
Historical Purposes Only—For current version, refer to the
Operator Workstation Technical Bulletin LIT-636013
28
Operator Workstation Appendix Technical Bulletin
Connecting Metasys System Release 9.01 OWS to a
Metasys System Release 10.01 or Later Network
You may corrupt your global database when you connect an OWS
with Metasys system Release 9.01 or earlier software (NC direct or
NC dial) to a network at Metasys system Release 10.01 or later.
Symptoms of a corrupt global database include dimmed and/or
inaccessible system names when logging on with the default Metasys
system password, and Network Control Modules (NCMs) that go
offline. See Table 7 and Table 8 for interconnection details.
To correct the corrupt database, download the correct Metasys system
Release 10.01 or later global database from a Metasys system Release
10.01 OWS.
To avoid this problem, make sure your OWS is running the same
release as the network.
Note:
Do not use Metasys system Release 10.00 software. Upgrade
all Metasys systems at Release 9.01 or earlier to Release 10.01 or later.
Interconnection Issues
Use the following tables to determine which OWS release can go with
which Metasys system release.
Table 7: N1 Connections
OWS
NCM
9.01 or earlier
9.01 or earlier
OK?
Yes
9.01 or earlier
10.01 or later
Yes*
10.01 or later
9.01 or earlier
Yes*
10.01 or later
10.01 or later
Yes
*
Do not modify passwords or report groups, or perform global downloads if a
single network must temporarily run mixed revision nodes.
Table 8: NC Direct or NC Dial Connections
OWS
NCM
9.01 or earlier
9.01 or earlier
Yes
9.01 or earlier
10.01 or later
No1
10.01 or later
9.01 or earlier
Yes2
10.01 or later
10.01 or later
Yes
1.
2.
OK?
This could cause global database corruption and connection failure.
Do not change passwords or report group databases. You only need to
compile the Net file to connect. If you compiled the global file and
downloaded while not connected, be sure to delete the GLOBLREV.DBF file
from the online global database
(C:\PROJECT\CONTRACT\NETNAME\GLOBLREV.DBF) before connecting.
Historical Purposes Only—For current version, refer to the
Operator Workstation Technical Bulletin LIT-636013
Operator Workstation Appendix Technical Bulletin
29
Make sure all nodes are at Metasys system Release 10.01 or later
before changing password or report group data when you upgrade
from Metasys system Release 9.01 or earlier software to Metasys
system Release 10.01 or later software. Where possible, update all
nodes during one visit. If all nodes are not upgraded to the same
Metasys software release, global database corruption may result. If
global data becomes corrupt, perform a global download from the
archive PC (at Metasys system Release 10.01 or later) to resolve the
issue.
Ordering Information
Refer to the Metasys Software Installation and Platform Requirements
Technical Bulletin (LIT-12012) to help you decide which hardware
and software components to order.
Print Change-of-State (COS) Reports
You cannot use an OWS serial printer with Windows NT operating
system or Windows 2000 Professional operating system software for
COS reports.
When the Metasys Network prints COS and transaction reports, it sets
the printer to condensed type to ensure that these messages print
properly. The printer is set internally by assigning the printer to a
character code of 15. Most printers use character Code 15 as the
default switch for condensed print; however, if your printer does not
work with Code 15, you need to find the correct code in the printer’s
literature. Then, add a statement in the METASYS.INI file in the
[METASYS] section that identifies the code. (Refer to the
Initialization Parameters Technical Bulletin [LIT-636345].) Follow
the steps in the Configuring a Printer for Change-of-State (COS)
Reports detailed procedure to configure the printer in either case.
Hardware Commissioning
Commissioning hardware can involve the installation of the following
equipment: memory, a Network Interface Card (NIC), extra serial
boards, and a mouse. Specific procedures may depend on the model
and brand of equipment being used.
Computer Platforms
The hardware required for an OWS may include: added memory, an
NIC, extra serial boards, and a mouse. Refer to the Metasys Software
Installation and Platform Requirements Technical Bulletin
(LIT-12012) for the specific requirements of your system.
IMPORTANT: When installing hardware, follow anti-static precautions.
Historical Purposes Only—For current version, refer to the
Operator Workstation Technical Bulletin LIT-636013
30
Operator Workstation Appendix Technical Bulletin
IMPORTANT: Disconnect the computer from all AC voltage sources before
installing boards. Dangerous voltages in the power supply and display
monitor can be present.
Memory
Computers may require additional memory to run Metasys system
software. A Single Inline Memory Module (SIMM) or expansion
board provides memory. Install the module or expansion board, and
refer to the manufacturer’s literature for instructions.
Network Interface Card (NIC)
The following information does not apply to any portable OWS that
directly or remotely connects to an NCM.
The OWS requires an NIC to communicate on the N1 LAN. (The
OWS cannot operate without an NIC on the N1 LAN.) You can use
either an ARCNET card or an Ethernet card. This section includes
instructions for installing the ARCNET card. For details on installing
the Ethernet card, refer to the N1 Ethernet/IP Network Technical
Bulletin (LIT-6360175).
If you are experiencing problems with the ARCNET N1
communications, see the ARCNET Troubleshooting section on page 19
for troubleshooting tips.
Contemporary Control Systems, Incorporated (CCSI) is the supplier
for ARCNET Network Adapter cards. Their model number is
PCA66-CXB. The card is configurable for either 8-bit or 16-bit
operation and can be used in both the NU-NCM300/350 and the OWS.
Historical Purposes Only—For current version, refer to the
Operator Workstation Technical Bulletin LIT-636013
Operator Workstation Appendix Technical Bulletin
31
When you order an ARCNET Network Adapter card from
Johnson Controls Customer Service, use model number
NU-NET101-0. This model number applies to the preferred Network
Adapter card for this application. At this time, it applies to the
PCA66-CXB ARCNET interface card supplied by CCSI.
The PCA66-CXB is not a Plug and Play Network Interface card
(Figure 1) and requires manual setup in an OWS. There are sufficient
jumpers to allow the selection of Base Input/Output (I/O) Address,
Base Memory Address, and Interrupt Request line settings compatible
with the operation of all components within the OWS.
Use the suggestions shown in Table 9 and Table 10 as starting points.
Each PC configuration may need to be examined and have the
suggested settings changed in order to make the OWS function
properly. Please refer to the PCA66-CXB ARCNET interface card
user manual supplied by CCSI to determine alternate jumper setting
combinations. See Table 9 and Table 10 for suggested jumper and
interrupt settings when using the Contemporary Control Systems,
Incorporated (CCSI) ARCNET PCA66-CXB in an OWS.
IOS0
IOS1
IOS2
IOS0
IOS1
IOS2
ENROM
MS0
MS1
MS2
MS3
MS4
MS0
MS1
Ms2
MS3
MS4
CCSI ARCNET PCA66, 16-bit
(Not installed)
Bayonet-Neill-Concelman (BNC)
Standard
Microsystems
Corporation
(SMC )
COM90C66
IRQ15
IRQ14
IRQ12
IRQ11
IRQ10
IRQ7
IRQ6
IRQ5
IRQ4
IRQ3
IRQ2/9
Typically No
Connections
BALE
IOCHRDY
OWS
MEMEN16B
Boot ROM
(Not installed)
Dual Light-Emitting Diode (LED)
Yellow=Accessed
Green=Transmitting
Used for bus speed
compatibility settings.
12 3 4 5 6 78
E4
Least Significant Bit (LSB)
Open = 1
Close = 0
Node
ID
Most Significant Bit (MSB)
ccsiarcnet
Figure 1: CCSI ARCNET Board
Historical Purposes Only—For current version, refer to the
Operator Workstation Technical Bulletin LIT-636013
32
Operator Workstation Appendix Technical Bulletin
Table 9: Jumper Settings for the CCSI ARCNET PCA66-CXB in an OWS
Switch
Value
Base I/O
Address
SW1
2E0h
Base
Memory
Address
SW1
CC000
h
Note:
Jumper Settings
MS0 MS1
MS2
On
On
On
MS3
Off
MS4
IOS0
IOS1
IOS2
On
Off
On
On
Address jumper must be On in order to create a logic zero.
Table 10: IRQ (Interrupt) Settings for the CCSI PCA66-CXB in an OWS
Value
Interrupt
IRQ5
Interrupt Setting
2/9
3
4
5
6
7
10
11
12
14
15
Off
Off
Off
Jumper
Off
Off
Off
Off
Off
Off
Off
Extra Serial Boards
The following information does not apply to any portable platforms.
If you want the OWS to connect to multiple NCMs, additional serial
connections are required. The workstation supports up to three serial
connections: COM1, COM2, and COM3. Standard systems typically
provide COM1 and COM2. For COM3, install an Industry Standard
Architecture (ISA) serial board. (For ordering information, refer to
Metasys Software Installation and Platform Requirements Technical
Bulletin [LIT-12012].)
Mouse
When you install the mouse, refer to the mouse literature for detailed
installation instructions.
For portable platforms, install the mouse into serial port COM1, the
dedicated mouse port. (Use serial port COM2 for direct or dial-up
connection to an NCM.) Other portable platforms may have either a
dedicated mouse port or a built-in track ball.
Commissioning Software: New Job
ARCNET Driver Conflict
While not recommended, some users run Metasys system database
applications in a DOS window while keeping Metasys software active
on the OWS. If the OWS has the ARCNET drivers that come with
Windows operating system software loaded (instead of the Metasys
system ARCNET drivers), this can cause a serious network (N1)
corruption. The typical Metasys system database applications
performed are DDL, UNDDL, or GPL. This ARCNET driver conflict
causes NCMs to randomly reset.
Historical Purposes Only—For current version, refer to the
Operator Workstation Technical Bulletin LIT-636013
Operator Workstation Appendix Technical Bulletin
33
The solution is to remove the additional ARCNET driver added by
Windows operating system software, and not to run Metasys system
database generation tools such as GPL, UNDDL, and DDL while
Metasys PMI is currently active on the same workstation. See the
Removing Additional Drivers detailed procedure.
Install Designer
Install Micrografx Designer Version 3.1 (plus OLE) or Micrografx®
DRAW software (optional). The Micrografx Designer or DRAW
program is required to create Metasys system graphics.
Micrografx Designer and Micrografx DRAW software are supported
through Release 10.02. Use M-Graphics and M5 Workstation software
with Metasys system Release 11.00 or later.
Micrografx Designer Version 4.0 software is not compatible with
Metasys system software. It is recommended that you do not use
Micrografx Designer Version 4.0 software for Metasys system
graphics.
Install Micrografx Designer or Micrografx DRAW software as
described in the manuals provided with the software. The
Micrografx Designer software installation program asks whether you
want to install various options. The recommendations follow:
Table 11: Designer Options
Micrografx Designer Software Installation Recommended for Metasys Software
Option
Micrografx Designer Software
Yes
Adobe® Type Manager (ATM)
No
TypeAlign
No
Outline Fonts
Optional*
Drivers
No
Telegrafx
No
Translators
AutoCAD® DXF File Translator only
Samples
No
Clip Art
No
*
Windows 95 operating system software: If you are using Roman fonts, you must install outline fonts.
Since you are not installing most of the options, you may be using
only one (or two) of the Micrografx Designer software disks during
installation.
The Micrografx Designer program is installed under the
C:\WINDOWS\DESIGNER directory.
Historical Purposes Only—For current version, refer to the
Operator Workstation Technical Bulletin LIT-636013
34
Operator Workstation Appendix Technical Bulletin
If Micrografx Designer software is installed before the OWS software
(as described in this document), the DESIGNER parameter is
automatically set to Yes in the METASYS.INI file and the Designer
path is added to the Autoexec path line. If Micrografx Designer
software is installed after the OWS software, you must change the
DESIGNER parameter to Yes in the METASYS.INI file, and add the
path of the Designer files to the path line in the Autoexec.bat file.
Historical Purposes Only—For current version, refer to the
Operator Workstation Technical Bulletin LIT-636013
Operator Workstation Appendix Technical Bulletin
35
Detailed Procedures
Direct Connecting to N1 LAN – ARCNET Network
To direct connect to N1 LAN - ARCNET Network:
1.
Install a T-connector into the port of the workstation’s NIC.
(The OWS cannot operate without an NIC on the N1 LAN.)
2.
Connect the N1 LAN cable to one end of the T-connector. If the
workstation is at the end of line, connect a 93 ohm terminator cap
to the other end of the T-connector. If the workstation is not at the
end of line, connect the other segment of N1 LAN cable (that goes
to the next node) to the T-connector.
Note:
3.
If you have a printer, connect the printer cable to
parallel or serial port on the OWS.
Connect the keyboard, monitor, and mouse to the appropriate
ports on the workstation.
After you make the physical connection and turn on the workstation,
the initialization and connection process begins. A message window
appears on the workstation screen displaying the status of the
connection. Do not close this message window (by double-clicking
the Control menu box), unless you want to cancel the connection.
Closing the window cancels the connection.
Configuring a Printer for Change-of-State (COS) Reports
Note:
You cannot use an OWS serial printer with Windows 2000
Professional operating system or Windows XP Professional operating
system software for COS reports.
To configure a printer for COS reports:
1. Install the printer in both Windows and Metasys software as
described in the detailed procedures: Adding a Windows Operating
System Printer in Windows 2000 Professional Operating System or
Windows XP Professional Operating System Software.
2. Identify the Windows Printer Name from the test page as described
in the Configuring Metasys Workstations for Printers detailed
procedure.
Historical Purposes Only—For current version, refer to the
Operator Workstation Technical Bulletin LIT-636013
36
Operator Workstation Appendix Technical Bulletin
Note:
If a printed report looks fine, the condensed code is set
correctly. If a printed report contains garbled text, the
condensed code is incorrect. Refer to the literature that comes
with your printer to find the code for condensed print. If the
printer requires more than one code, separate each with a
comma on the same line. Add the following line under the
[METASYS] section of the METASYS.INI file. Refer to the
Initialization Parameters Technical Bulletin (LIT-636345).
<Windows Printer Name>=<condensed code char num>
[,<condensed code char num>]
For example, if your Metasys Printer Name is LP-217 and
the condensed code is 10, the statement is:
LP-217=10
For HP DeskJet series printers, the escape sequence for
condensed printing is as follows:
LP-217=27,40,115,49,52,72
where LP-217 is the Windows Printer Name identified
previously.
3. Update the following statement in the [METASYS] section of the
METASYS.INI file (by changing the 0 to 1) if you want to turn off
the automatic form feed at the beginning of every summary:
DisableFormFeed=1
Removing Additional Drivers
Note:
Remove additional drivers if the OWS has the ARCNET
drivers that come with Windows operating system software loaded
(instead of the Metasys ARCNET drivers), because this can cause a
serious network (N1) corruption.
To remove additional drivers:
1. In the Windows operating system Control Panel, double-click the
Network icon.
2. Select the Configuration tab.
3. Select an ARCNET driver.
4. Click Remove (Figure 2).
Historical Purposes Only—For current version, refer to the
Operator Workstation Technical Bulletin LIT-636013
Operator Workstation Appendix Technical Bulletin
37
Figure 2: Network Dialog Box
5. Repeat Steps 3 and 4 for all ARCNET drivers.
6. Reboot the PC.
Metasys system Release 9.01 or later software provides the
EnaArcChk parameter to test for drivers that are not
Metasys ARCNET drivers. For details, refer to the Initialization
Parameters Technical Bulletin (LIT-636345).
Troubleshooting HP Printers Installed with Metasys Software
To troubleshoot HP printers installed with Metasys software:
1. Install the HP printer using the correct drivers provided on the
OWS where the printer is physically connected. Ensure the printer
works correctly with any other applications installed on the system.
2. Install one of the following printers on the same OWS:
a. HP510 for black and white only printing (best option)
b. HP500C for color printing
Historical Purposes Only—For current version, refer to the
Operator Workstation Technical Bulletin LIT-636013
38
Operator Workstation Appendix Technical Bulletin
Note: These are generic printers; the drivers are on your Operating
System CD.
3. Make the printer the default driver on the desired OWS.
4. Install the same driver on all other OWSs in the system.
Configure as described in Configuring Metasys Workstations for
Printers detailed procedure in the Operator Workstation Technical
Bulletin (LIT-636013).
Manually Starting the Database Conversion
To manually start the database conversion:
1. Save the old database (using SAVEDB) and clearly label the
backup with its release number
(for example, Release 5.00 or 5.02).
2. Do a PREP-FOR to ensure the environment variables are correct.
3. Type CONVERT at the DOS prompt.
4. Type Y (Yes) when asked whether to continue. Then wait for the
conversion to finish.
Note: If errors were found, check the Log file for their descriptions
and locations.
5. Save the converted database after the conversion completes (using
SAVEDB) and clearly label the backup as Release 7.0 (or the
appropriate release number).
Historical Purposes Only—For current version, refer to the
Operator Workstation Technical Bulletin LIT-636013
Operator Workstation Appendix Technical Bulletin
39
Saving a Database
Note:
Use the following instructions to save your database to tape
if you are using Windows NT operating system software or
Windows 2000 Professional operating system software.
To save a database:
1. From the Metasys system Exit menu, select Backup Utility. A
submenu appears allowing you to choose either Backup or Restore.
2. Choose Backup. A message appears stating that you are about to
exit the Metasys system. The Windows operating system
Backup/Restore procedure is initiated.
3. From the Windows operating system drop-down menu, select the
Drives option.
4. Select the files you want to back up by clicking the check box next
to each file.
Selecting a directory selects all of the files within the directory. You
may select the files you want, or you may select all files by selecting
an entire directory. As a minimum, we recommend you include the
following:
\CUSTOMAC
\FMS\BIN\GPL\JCIMACS
\FMS\GRFXLIB
\FMS\ERRORLOG
\FMS\SAVE
\FMS\STATIC\*SBQ
\FMS\DATA\N1NET.DBF
\FMS\DATA\PCDEVICE.DBF
\FMS\DATA\Win.ini
\FMS\DATA\NETNAME.NDX
\FMS\DATA\PCCONFIG.DBF
\FMS\DATA\PCPORT.NDX
\FMS\DATA\DDL\*.DDL
\FMS\DATA\MODELS
\FMS\DATA\HVACPRO
\FMS\DATA\SYSTEM91
\FMS\DATA\“NETWORK NAME”
\FMS\DATA\“NETWORK NAME”.DOB
Replace the NETWORK NAME with the actual name of the network
being backed up.
Historical Purposes Only—For current version, refer to the
Operator Workstation Technical Bulletin LIT-636013
40
Operator Workstation Appendix Technical Bulletin
5. Click Backup when finished. The Backup Information dialog box
appears.
6. Enter Full Metasys system backup for the description.
7. Click OK. The backup begins.
8. Open the Metasys system Full Save File and verify that all files
selected are present.
Note:
Blank directories are not saved.
Restoring a Database
Note:
A database saved with the DOS program SAVEDB.BAT
using either Windows operating system Version 3.1, Windows 95
operating system, or Windows 98 operating system software can be
restored on a Windows NT operating system or Windows 2000
Professional operating system machine using the DOS program
RESTDB.bat (DOS program).
To restore a database:
1. From the Metasys system Exit menu, select Backup Utility. A
submenu appears allowing you to choose either Backup or Restore.
2. Choose Backup. A message appears stating that you are about to
exit the Metasys system. The Windows operating system
Backup/Restore procedure is initiated. The tape drive activates.
3. Double-click the directory in the right window. A detail tree of the
files that reside on tape appears.
4. Click on the check box next to the files you want to restore.
When the process is complete, check the \winnt\backup.log to
verify that the files were restored and no error messages are present.
Installing the Previous Release of PMI Software
To install the previous release of PMI Software:
1.
Delete the new database.
2.
Use the RESTDB command to get the backup of the previous
release database and restore it.
Note:
3.
For information on the RESTDB command, refer to the
Move Utility Technical Bulletin (LIT-636110).
Delete the old manufacturing file (MFG$$$.OWS).
Historical Purposes Only—For current version, refer to the
Operator Workstation Technical Bulletin LIT-636013
Operator Workstation Appendix Technical Bulletin
41
Note:
An install of old PMI software over new PMI software is not
allowed unless the manufacturing files are deleted. The manufacturing
files are in the C:\FMS\BIN directory (provided that the default,
C:\FMS, was selected during installation).
Modifying the .INI Files
METASYS.INI
To enable multimedia sound, add the parameter:
MultiMediaSound=1
Refer to the Initialization Parameters Technical Bulletin (LIT-636345)
for details.
Add the following parameters to the [METASYS] section of the
METASYS.INI file to enable sound for the Critical Alarm Reminder
Box:
SystemAlarmRem=
Add all the following parameters to the same section for the .WAV
files associated with each alarm:
SystemAlarmCrit1=
SystemAlarmCrit2=
SystemAlarmCrit3=
SystemAlarmCrit4=
SystemDefault=
Note:
Be sure to add all the parameters and write the .WAV file
name after the =. For example,
SystemAlarmCrit1=C:\WINDOWS\MEDIA\ALARM.WAV.
Refer to the Initialization Parameters Technical Bulletin (LIT-636345)
for the description of each parameter.
Performing the N1 Signature Test
To perform the N1 Signature test:
1. Cycle power on your PC and boot up in DOS mode.
2. Type debug at the DOS prompt (with no applications running) and
press Enter.
3. Type D xxxx:0000, where xxxx = the starting ARCNET memory
address (as determined from board switch settings) and press
Enter.
4. To exit, type quit.
Historical Purposes Only—For current version, refer to the
Operator Workstation Technical Bulletin LIT-636013
42
Operator Workstation Appendix Technical Bulletin
Getting the Total Available Memory in the Network Control Module
(NCM)
To get the Total available allocable memory in the NCM:
1. Choose the NCM on the Network Map.
2. Select Diagnostics from the Action menu.
3. Choose NCM Miscellaneous Data.
Disabling the Microsoft IntelliMouse Wheel
To disable the Microsoft IntelliMouse wheel:
1. From the Start Menu, go to Settings > Control Panels.
2. Double-click on the Mouse icon.
3. From the wheel properties, disable the wheel function.
Using PREP-FOR with Windows NT Operating System Software
Note:
When running PREP-FOR (Prep.for) on a Windows NT
operating system machine, use Cmd.exe, not Command.com, to
execute the DOS window.
To use PREP-FOR with Windows NT Operating System software:
1. From the Windows operating system Start menu, select Settings >
Taskbar.
2. Click the Start Menu Programs tab.
3. Click the Advanced button.
4. Click the DOS icon.
5. Right-click the icon and select Properties.
6. Select the Shortcut tab.
7. Enter Cmd.exe in the Target field if it does not already appear.
If the target name is not changed to Cmd.exe, and Prep.for is executed,
the program appears to work but then returns an error.
Controls Group
507 E. Michigan Street
P.O. Box 423
Milwaukee, WI 53201
www.johnsoncontrols.com
Published in U.S.A.
Historical Purposes Only—For current version, refer to the
Operator Workstation Technical Bulletin LIT-636013