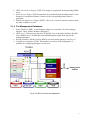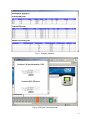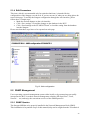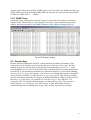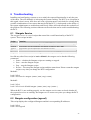
1
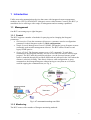
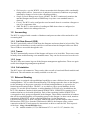
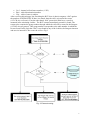
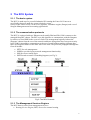
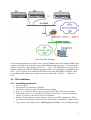
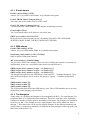
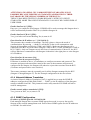
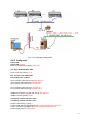
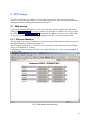
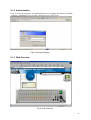
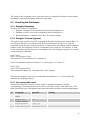
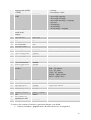
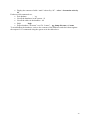
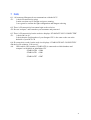
ATEUS ® - STARGATE
Remote Control Unit (RCU)
User’s Guide
Version: 3.0
CONTENTS
1
INTRODUCTION............................................................................................................ 3
1.1
MANAGEMENT ............................................................................................................ 3
1.1.1
Control ............................................................................................................... 3
1.1.2
Monitoring.......................................................................................................... 3
1.2
ACCOUNTING .............................................................................................................. 4
1.2.1
Call Data Record (CDR).................................................................................... 4
1.2.2
Traces ................................................................................................................. 4
1.2.3
Logs .................................................................................................................... 4
1.2.4
Call statistics ...................................................................................................... 4
1.3
EXTERNAL ROUTING ................................................................................................... 4
2
THE RCU SYSTEM ........................................................................................................ 6
2.1.1
2.1.2
2.1.3
2.1.4
3
The basic system................................................................................................. 6
The communication protocols ............................................................................ 6
The Management Services Engines.................................................................... 6
The Management Databases .............................................................................. 7
INSTALLATION ............................................................................................................. 8
3.1
PRE-INSTALLATION ..................................................................................................... 8
3.1.1
Topology............................................................................................................. 8
3.1.2
Assigning IP addresses....................................................................................... 8
3.2
OS INSTALLATION ....................................................................................................... 9
3.2.1
Installation procedure ........................................................................................ 9
4
CONFIGURATION ....................................................................................................... 10
4.1
BASIC CONFIGURATION ............................................................................................. 10
4.1.1
E-mail alarms ................................................................................................... 11
4.1.2
SMS alarms ...................................................................................................... 11
4.1.3
The Stargates.................................................................................................... 11
4.1.4
Network Address Translation........................................................................... 12
4.1.5
SNMP Configuration........................................................................................ 12
4.1.6
Binding Stargates to databases ........................................................................ 13
4.1.7
External routing ............................................................................................... 14
4.2
WEB CONFIGURATION ............................................................................................... 14
4.3
TESTING .................................................................................................................... 14
4.4
CONFIGURATION EXAMPLE ....................................................................................... 15
4.4.1
IP map Table .................................................................................................... 15
4.4.2
Configuration ................................................................................................... 16
4.4.3
Web pass........................................................................................................... 18
4.4.4
Starting ............................................................................................................. 18
4.4.5
Testing .............................................................................................................. 19
5
RCU USAGE .................................................................................................................. 20
5.1
WEB ACCESS ............................................................................................................. 20
5.1.1
Welcome Massage ............................................................................................ 20
5.1.2
Authentication .................................................................................................. 21
5.1.3
Web Overview .................................................................................................. 21
1
5.1.4
Edit Parameters................................................................................................ 24
5.2
SNMP MANAGEMENT .............................................................................................. 24
5.2.1
SNMP Queries.................................................................................................. 24
5.2.2
SNMP Traps ..................................................................................................... 25
5.3
ACCOUNTING ............................................................................................................ 25
6
TROUBLESHOOTING................................................................................................. 27
6.1
STARGATE SERVICE .................................................................................................. 27
6.2
STARGATE CONFIGURATION (SGCONF) ...................................................................... 27
6.3
CHECKING THE DATABASES ...................................................................................... 28
6.3.1
Stargate Databases .......................................................................................... 28
6.3.2
Stargate Terminal (sgterm) .............................................................................. 28
6.3.3
Accessing table main ........................................................................................ 28
7
FAQ ................................................................................................................................. 31
APPENDIX 1: THE TRAP TABLE ..................................................................................... 32
2
1 Introduction
Unlike most telecommunications devices that come with integrated remote management
modules, the ATEUS ® STARGATE (Stargate) comes with a Remote Control Unit (RCU), a
standalone device offering a wider range of management and accounting capabilities.
1.1 Management
One RCU can manage up to eight Stargates.
1.1.1 Control
The RCU supports a number of methods for querying and or changing the Stargates’
parameters:
• Web interface: From the common web browser, customers can alter configuration
parameters in their Stargates on the fly (Web configuration).
• Simple Network Management Protocol (SNMP): Designed to proxy Stargates to most
commonly used network management software, The RCU allows clients to send
legacy SNMP queries.
• Secure AT shell: The Stargate supports a set of AT commands. To send these
commands to the Stargates remotely, one has to use telnet, an insecure remote login
protocol. The RCU nails this problem such that, over the insecure Internet, telnet
traffic is tunneled through Secure Shell (SSH) and only allowed in the LAN where the
climate is relatively friendly. This allows clients to send configuration or query
commands to the managed Stargates without having to worry that an evil cracker
could be tapping the communication (see Fig.1).
Fig.1: AT command tunneling over SSH
1.1.2 Monitoring
The RCU comes with a number of Stargate monitoring methods:
3
•
•
•
•
Web interface: over the WWW, clients can monitor their Stargates while comfortably
sitting in their offices. Occurrences of undesired (erroneous) conditions are promptly
indicated by changes of color in the offending modules.
Simple Network Management System (SNMP): The RCU continuously monitors the
attached Stargates and sends an SNMP trap every time a non standard status is
observed
E-mail: The RCU can be configured to send an email alarm in event that a Stargate or
one of its components fails
SMS: The RCU is also capable of sending an SMS alarm when so configured, to
announce faults in the managed devices.
1.2 Accounting
The RCU is equipped with a number of databases and processes that collect and archive call
accounting data
1.2.1 Call Data Record (CDR)
The RCU periodically collects CDRs from the Stargates and stores them in its local disk. This
removes the risk that these records would be overwritten when the Stargate buffers are filled.
These CDRs are accessible through the web.
1.2.2 Traces
The RCU automatically reroutes all the Stargate call traces to its local disk. These traces come
in handy when troubleshooting a non standard status. They can also be accessed over the web.
1.2.3 Logs
The RCU also stores status logs on all the Stargate management applications. These are again
useful when diagnosing management problems.
1.2.4 Call statistics
The RCU stores call summaries. These can be either overall or based on differed modules and
SIM cards. The call statistics are readily available over the web
1.3 External Routing
The Stargate is equipped with an additional capability to route calls based on an external
routing database – the so-called External Routing. This design opens the doors to the Stargate,
to take advantage of the greater capacities of external routing databases as opposed to its
limited internal routing buffers. The RCU, as we shall see, has a special database for this
purpose. To use this special function, a routing database (LCR) has to be installed into the
RCU. This database contains 9 tables named SGROUTE0-8. SGROUTE0 contains a list of
numbers that have to be denied (blacklist). Each of the remaining 8 tables SGROUTE1-8
corresponds to the 8 groups configurable in the Stargate. These tables contain lists of numbers
that will be routed through the corresponding groups in the Stargate, in other words, numbers
contained in SGROUTE1 will be routed through group 1 in the Stargate etc.
External routing works in such a way that, when a call comes into the Stargate either from the
PRI interface (SETUP) or from the GSM network (RING), the Stargate opens a telnet
connection to the RCU and requests for instructions on how to route the call. This request is
of the form *ring: ch,cref,dial,clip where:
• Ch – module number (0-31) or PRI channel 97-111 and 113-127 (timeslot +96)
4
• Cref – internal call reference number (1-255)
• Dial – called (destination) number
• Clip – callers (source) number
After receiving this message, the first thing the RCU does is that it compares “dial” against
the numbers in SGROUTE0. If there is a match, then the call is rejected with a cause
(AT^CR=ch, cref,cause). If on the other hand, “dial” passes this initial test, a search is
mounted in the remaining 8 tables. The RCU returns immediately a match is found. The
return value contains the group number through which the call will be routed in the Stargate
(AT^RG=ch,cref,groups). This group number corresponds to the table number in which the
hit was found. In the case that “dial” is not found in any of the 9 tables, the Stargate timesout
and uses its internal LCR to route the call see Fig.2.
Fig. 2: External routing
5
2 The RCU System
2.1.1 The basic system
The RCU is made up of a powerful industrial PC running the Linux OS. Linux was
specifically chosen to make the system relatively secure.
On top of the Linux OS are a web server (Apache), a database engine (Postgre) and a set of
Stargate Management and Accounting applications.
2.1.2 The communication protocols
The RCU is equipped with two Ethernet cards usually Eth0 and Eth1. Eth1 connects to the
managed Stargates’ subnet. The RCU uses this interface to communicate with the Stargates
by telnet or to send SMS in the event of a fault. This arrangement logically isolates the
Stargates’ subnet from the rest of the network and hence using telnet does not open security
holes. Eth0 is intended to communicate to the rest of world without making it known that
there are Stargates hidden on the other side of the wall! The protocols propagated through the
firewall include:
• HTTP for web management
• SNMP to provide legacy network management functionality
• SSH for secure remote login
• SMTP sends an email if something happens (see Fig.3).
Fig.3: The RCU Protocols
2.1.3 The Management Services Engines
The RCU hosts a total of four management services:
• Routing Service Engine (RSE): Serves for external routing
6
•
•
•
ISDN Trace Service Engine (ITSE): This engine is responsible for downloading ISDN
traces
Status Service Engine (SSE): Responsible for periodically downloading statuses of the
Stargates. If an undesired status is observed, the corresponding status alarm is
generated.
SMS and E-mail Service Engine (SESE): This service can be invoked to send an alarm
by either an SMS or e-mail
2.1.4 The Management Databases
•
•
•
•
Status Database (SDB): Actual Stargate statuses are stored here for each managed
Stargate. These include databases Stargate0-7
ISDN traces, CDR and Log database (IC&LDB): Just as the name indicates, this DB
stores ISDN traces, Call Data Records and Management application logs for the
managed Stargates
Routing Database (RDB): Used by RSE for external routing purposes (see Fig. 4.)
Configuration database (CDB): This database is used for web configuration, a
platform for configuring Stargate over the web.
Fig.4: The RCU services and databases
7
3 Installation
3.1 Pre-installation
For a comprehensive and painless installation, a pre-installation preparation is mandatory.
3.1.1 Topology
The RCU can communicate with Stargates in any one of the following modes:
• RS-232 serial communication through COM1&COM2. This mode can be used if at
least one of the Stargates is within the proximity of the RCU. It is recommended that
this mode be used when only one Stargate is to be managed by the RCU
• Ethernet (10BaseT). There exists, as many logical network topologies, as there are
network technicians. In the following chapter, only those parameters that a technician
needs to know in order to either fit in the RCU into an existing network or to come up
with a network for this purpose will be presented.
3.1.2 Assigning IP addresses
The RCU demands two logical sub-networks.
• The Stargate sub-network (SG-SUBNET): Eth1 of the RCU and all the Stargates must
belong to the SG-SUBNET. If different Stargates are placed in different logical
network segments then you may consider implementing Network Address
Translation (NAT) so that all the Stargates will appear to belong to the same network
segment. Majority of network technicians put both Eth1 and the Stargates in to a
private LAN (10.0.0.0, 192.168.0.0 etc.). The communication protocol in this
segment is TELNET.
• The Management sub-network (MNGMNT-SUBNET): Eth0 interface on the RCU is
assigned an IP address from this segment. The management station must be reachable
from Eth0. If traffic between RCU and the management station goes through a
firewall, then, depending on the desired services the following protocols may need to
be enabled:
Application protocol
HTTPS
SSH
SNMP
SMTP
Transport Protocol
TCP
TCP
UDP
TCP
Port
443
22
161,162
25
Table1: Protocols to consider allowing through the Firewall
8
Fig.5: The RCU Topology
For each managed Stargate, the RCU runs a separate SNMP agent. Each running SNMP agent
requires an IP address to communicate with the SNMP management node. Let us assume that
our RCU will proxy eight Stargates (SG0, SG1, …, SG7), The SNMP agent for SG0 will use
Eth0 to communicate with the SNMP management node. The remaining seven SNMP agents
(SG1 – SG7) will need seven additional IP addresses from the MNGMNT-SUBNET. These
seven additional IP addresses are added as aliases to Eth0 (Eth0:1, Eth0:2, …, Eth0:7) see
Fig.5.
3.2 OS installation
3.2.1 Installation procedure
•
•
•
•
•
•
•
Power the RCU
Insert the RCU-CD into the CD-ROM
Press Enter to Boot from the CD-ROM when prompted
Type “y” to format the HD and to go on and install the RCU SW when prompted
Wait for the system to eject the RCU-CD and press the “Reset” button to reboot the
system. If you have gone this far, the OS is installed!
Stand by for the system to reboot and press any key enter HW configuration. Please
pass the screens picking the defaults, this will usually do, alternatively, tweak to taste!
Type “root“ at the login prompt. “skakal pes pres oves++” is the default password.
9
4 Configuration
4.1 Basic configuration
Type sgsetup at the bash prompt to run the management software configuration script
bash-2.05a#
bash-2.05a# sgsetup
The SGSETUP configuration script will guide you through the entire configuration process
needed to set up the RCU. The text below will take us through the different options
Enter current date [07.08.2003]:
Today’s date
Enter current time [15:01]:
The time now
eth0: IP address [192.168.100.100]:
IP address assigned the Eth0
eth0: Netmask [255.255.255.0]:
Subnet mask for the MNGMNT-SUBNET
eth0: Gateway [192.168.100.1]:
IP address of the gateway used to reach the network management station (not necessary if the
RCU’sEth0 and the management station are in the same network segment)
eth1: IP address [192.168.10.2]:
IP address assigned to Eth1
eth1: Netmask [255.255.255.0]:
Subnet mask for the SG-SUBNET
SNMP trap IP address (1) [192.168.100.3]:
Management stations IP address
SNMP trap IP address (2) [192.168.100.3]:
Backup management station (The same management station can be used for redundancy)
SNMP community [public]:
Every device managed by SNMP must belong to an SNMP community (Public community is
the default. The same community name must be set in the management node)
10
4.1.1 E-mail alarms
Enable e-mail sending? [YES]:
Answer yes (y) to enable e-mail alarms, no (n) disables this option
E-mail 'FROM' address [[email protected]]:
This entry acts as the sender (source) of the e-mail
E-mail 'TO' address [[email protected]]:
You must enter the e-mail address of the Stargate monitoring crew here.
E-mail subject [Test]:
The e-mail alarm subject will always be set to this entry.
SMTP server address [10.254.1.254]:
Please be sure to enter your mail server’s IP address (DO NOT USE YOUR MAIL
SERVER’S HOST NAME, THE RCU DOES NOT USE DNS).
4.1.2 SMS alarms
Enable SMS sending? [YES]:
Answer yes (y) to enable alarm SMSs, no (n) disables this option
Destination phone number [+420737235896]:
SMS recipients GSM phone number
MS Center number [+420603052000]:
The provider’s SMS center number. (Note: Provider’s SMS center number is currently not
implemented, please set a valid SMS center in the selected SIM card.)
SMS0 stargate device number (or type '-' to disable it) [7]:
SMS2 stargate device number (or type '-' to disable it) [-]:
SMS2 stargate device number (or type '-' to disable it) [-]:
The Stargate through which the SMS alarm is sent (one of 0 - 7 managed Stargates). Up to
three different Stargates can be used for this purpose. Typing “–“ disables the particular
choice.
SMS0 module number [2]:
SMS1 module number [2]:
SMS2 module number [2]:
The GSM module from which the SMS alarm is sent, Three GSM modules can be set, they
must belong to the Stargates selected above.
4.1.3 The Stargates
At this stage, we configure the Stargates to be managed by the RCU. For each Stargate, five
parameters have to be configured as shown below. These five items have to be repeatedly
configured a number of times equal to the number of Stargates. The Stargates are numbered
from zero, so that, if for example we have eight Stargates, they will be numbered from 0
through 7. This same order will be used to map the Stargates to the different databases and
storage tables. It is therefore mandatory to maintain the same Stargate numbering as the one
that comes with the RCU CD.
11
ATTENTION: SWAPPING CPU CARDS BETWEEN STARGATES IS NOT
POSSIBLE BECAUSE INDIVIDUAL STARGATES ARE BOUND TO THEIR
DATABASES BY THE SERIAL NUMBERS OF THEIR CPUs!
THE RCU HAS BEEN TESTED TO WORK RELIABLY WITH UP TO EIGHT
STARGATES. MORE THAN EIGHT STARGATES CAN ONLY BE CONFIGURED AT
USER’S RISK.
Enable StarGate #0 ? [YES]:
Enter yes (y) to enable the first Stargate. If SNMP will be used to manage this Stargate then it
will be automatically bound to Eth0. No (n) disables Stargate #0
Enable StarGate LCR #0 ? [YES]:
Yes (y) switches on External Routing, No (n) turns it off
Enter StarGate #0 IP address or '-' [192.168.10.3]:
This parameter has a number of meanings. The first is that we choose the mode of
communication. By entering „-“(dash) we tell the RCU that it will communicate with
Stargate #0 through the serial ports (COM1 and COM2). Make sure that Stargate #0 is
connected to the RCU by serial cables (Stargate COM1 to RCU COM1 and Stargate COM2 to
RCU COM 2). Only one Stargate can use this form of communication. If however, the RCU
will use Ethernet to communicate with Stargate #0 then this is the right place to enter Stargate
#0’s IP address.
Enter StarGate #0 user name [2n]:
Enter StarGate #0 user password [2n]:
If Ethernet is enabled as above, it is mandatory to configure username and password. The
username and password entered here must be the same as the username and password
configured in the Stargate, the Stargate will otherwise reject telnet sessions from the RCU.
(Username and password are case sensitive!)
These same parameters must be repeatedly set for all the Stargates managed by the RCU
(Stargate #1 though Stargate #7). See the Example configuration in the next section.
4.1.4 Network Address Translation
A classical Network Address Translation (NAT) is applied here to map the SNMP IP
addresses configured on Eth0 (Eth0, Eth0:1, … Eth0:7) to the IP addresses of the Stargates
usually reachable from Eth1. This parameter can be safely turned off if SNMP will not be
used for management.
Enable network address translation? [YES]:
Yes (y) turns on NAT, no (n) turns it off
4.1.5 SNMP Configuration
IP address of SNMP agent #0: 192.168.20.100
Each managed Stargate has a separate SNMP agent whose task is to proxy the specific
Stargate to the network management node. Each of these SNMP agents uses the IP addresses
set on Eth0. See table below.
12
Interface
Eth0
Eth0:1
Eth0:2
.
.
Eth0:n
Agent
agent #0
agent #1
agent #2
.
.
agent #n
Stargate
Stargate #0
Stargate #1
Stargate #2
.
.
Stargate #n
Table2: Interface, SNMP agent and Stargate Mapping
Stargate #0 is automatically bound to Eth0, which is already configured. Stargates #1 through
n have to be manually assigned SNMP IP addresses, these are the IP addresses made for
Eth0:1 through Eth0:n, n is the number of Stargates to be managed by the RCU minus 1, the
maximum value n can take is 7.
4.1.6 Binding Stargates to databases
Stargate CPUs are usually bound to the RCU databases before shipping. In this case no
additional binding is required. It may happen however, that the RCU and the Stargates are
shipped separately or that a customer decides to buy additional Stargates and therefore preshipment binding is not done. This subsection is devoted to binding Stargate CPUs to the
RCU databases when this becomes necessary.
For each Stargate CPU that has not already been bound to a database in the RCU, 3 digit
strings are provided at the back of the RCU CD, Please prepare this strings for each Stargate
and follow the procedure below.
• Run “chcpusn”
bash-2.05a#
bash-2.05a# chcpusn
Enter number of database (0 7)
Pick a database for this Stargate, it must be free (not previously allocated to another
Stargate).
Enter 1. string:
Enter the first string for this Stargate
Enter 2. string:
Enter the second string for this Stargate
Enter 3. string:
Enter the third string for this Stargate
•
Test database to Stargate CPU binding
bash-2.05a#
bash-2.05a# sgterm n “ati4”
13
The output of this AT command is the CPU serial number of the Stargate bound to
database number n (If we chose 5 in Enter number of database (0 7) above, then use
‘sgterm 5 “ati4”’ to retrieve the CPU serial number for the database Stargate5 and
compare it with the one given at the back of the RCU CD).
4.1.7 External routing
Before external routing can be activated, the RCU has to be prepared for this. Please follow
the following steps to prepare the RCU for external routing.
• Edit the text file /var/local/stargate/routing_list.txt. This file comes with a default
configuration, which is usually not usable; please edit this file so that the first column
contains the list of dialed numbers. The second column must contain the target groups
through which the Stargate will route the calls. Use groups 1-8 for calls that will be
routed. Numbers that will be blocked should have 0 in the second column. Be sure to
follow the format in the default file.
• Run “sgrt”
bash-2.05a#
bash-2.05a# sgrt
This script uploads the contents of routing_list.txt in to the appropriate tables in the
routing database. Any duplicate entries are removed during this operation. Before you
consider using external routing, make sure you have a fast Ethernet connection between
the Stargate and the RCU.
4.2 Web configuration
All the Stargates are now available on the web. Only authorized users can however access this
information. To be able to access the individual Stargates over the web, we will need to create
a web username and password for each managed Stargate. You are advised to set the same
username and password for all the Stargates to avoid errors during automatic actualization.
bash-2.05a#
At the bash prompt, type ‘webpass’ to invoke the web password configuration script
bash-2.05a# webpass
Stargate num.:
Enter the Stargate Number (0 through n)
Username:
New password:
Re-type new password:
The username and password for the Stargate number set above.
This procedure has to be repeated n times to have all n Stargates accessible over the web.
4.3 Testing
The first thing to do after configuration is to restart the Stargates services. This forces them to
re-read the current configuration files.
14
bash-2.05a#
bash-2.05a# service stargate restart
To troubleshoot the Stargate service use the commands ”service stargate status “ and „sgconf“
for further information, see the example in the next section.
4.4 Configuration Example
Refer to Fig. 6
4.4.1 IP map Table
Stargate
SG0
Stargate IP address
192.168.10.2
Interface
Eth0
SG1
SG2
SG3
SG4
SG5
SG6
SG7
192.168.10.3
192.168.10.4
192.168.10.5
192.168.10.6
192.168.10.7
192.168.10.8
192.168.10.9
Eth0:1
Eth0:2
Eth0:3
Eth0:4
Eth0:5
Eth0:6
Eth0:7
Eth1
Interface IP address Interface Use
192.168.20.2
SNMP SG0, SSH,
SMTP, HTTPS
192.168.20.3
SNMP SG1
192.168.20.4
SNMP SG2
192.168.20.5
SNMP SG3
192.168.20.6
SNMP SG4
192.168.20.7
SNMP SG5
192.168.20.8
SNMP SG6
192.168.20.9
SNMP SG7
192.168.10.1
Telnet, HTTPS, SMS
Table3: IP address and protocol plan
Default gateway 192.168.20.1, Management Station 192.168.30.5
15
Fig. 6: An example configuration.
4.4.2 Configuration
bash-2.05a#
bash-2.05a# sgsetup
Enter current date [07.08.2003]: 09.08.2003
Sat Aug 9 00:00:00 CEST 2003
Enter current time [15:01]: 21.33
Sat Aug 9 21:33:00 CEST 2003
Date and time are updated.
eth0: IP address [192.168.100.100]:192.168.20.2
eth0: Netmask [255.255.255.0]: 255.255.255.0
eth0: Gateway [192.168.100.1]: 192.168.20.1
eth1: IP address [192.168.10.2]: 192.168.10.1
eth1: Netmask [255.255.255.0]: 255.255.255.0
SNMP trap IP address (1) [192.168.100.3]: 192.168.30.5
SNMP trap IP address (2) [192.168.100.3]: 192.168.30.5
SNMP community [public]: Buster
Configuring network interface eth0 ...
Configuring network interface eth1 ...
Enable e-mail sending ? [YES]: y
E-mail 'FROM' address [[email protected]]: [email protected]
E-mail 'TO' address [[email protected]]: [email protected]
E-mail subject [Test]: Stargate watch
16
SMTP server address [10.254.1.254]:192.168.30.2
Enable SMS sending ? [YES]: y
Destination phone number [+420737235896]: +420900333777
SMS Center number [+420603052000]: +420900600000
SMS0 stargate device number (or type '-' to disable it) [7]:1
SMS0 module number [2]: 3
SMS1 stargate device number (or type '-' to disable it) [-]:3
SMS1 module number [2]: 5
SMS2 stargate device number (or type '-' to disable it) [-]:5
SMS2 module number [2]: 7
Enable StarGate #0 ? [YES]: y
Enable StarGate LCR #0 ? [YES]:n
Enter StarGate #0 IP address or '-' [192.168.10.3]:192.168.10.2
Enter StarGate #0 user name [2n]: spinner
Enter StarGate #0 user password [2n]: secrets
Enable StarGate #1 ? [YES]: y
Enable StarGate LCR #1 ? [YES]:n
Enter StarGate #1 IP address or '-' [192.168.10.10]:192.168.10.3
Enter StarGate #1 user name [2n]: spinner
Enter StarGate #1 user password [2n]: secrets
Enable StarGate #2 ? [YES]: y
Enable StarGate LCR #2 ? [YES]:n
Enter StarGate #2 IP address or '-' [192.168.10.6]:192.168.10.4
Enter StarGate #2 user name [2n]: spinner
Enter StarGate #2 user password [2n]: secrets
Enable StarGate #3 ? [YES]: y
Enable StarGate LCR #3 ? [YES]:n
Enter StarGate #3 IP address or '-' [192.168.10.7]:192.168.10.5
Enter StarGate #3 user name [2n]: spinner
Enter StarGate #3 user password [2n]: secrets
Enable StarGate #4 ? [YES]: y
Enable StarGate LCR #4 ? [YES]:n
Enter StarGate #4 IP address or '-' [192.168.10.7]:192.168.10.6
Enter StarGate #4 user name [2n]: spinner
Enter StarGate #4 user password [2n]: secrets
Enable StarGate #5 ? [YES]: y
Enable StarGate LCR #5 ? [YES]:n
Enter StarGate #5 IP address or '-' [192.168.10.7]:192.168.10.7
Enter StarGate #5 user name [2n]: spinner
Enter StarGate #5 user password [2n]: secrets
Enable StarGate #6 ? [YES]: y
Enable StarGate LCR #6 ? [YES]:n
Enter StarGate #6 IP address or '-' [192.168.10.7]:192.168.10.8
Enter StarGate #6 user name [2n]: spinner
Enter StarGate #6 user password [2n]: secrets
Enable StarGate #7 ? [YES]: y
Enable StarGate LCR #7 ? [YES]:n
Enter StarGate #7 IP address or '-' [192.168.10.7]:192.168.10.9
Enter StarGate #7 user name [2n]: spinner
Enter StarGate #7 user password [2n]: secrets
17
Enable network address translation ? [YES]: y
IP address of SNMP agent #0: 192.168.20.2
IP address of SNMP agent #1 [192.168.100.101]:192.168.20.3
IP address of SNMP agent #2 [192.168.100.102]: 192.168.20.4
IP address of SNMP agent #3 [192.168.100.103]: 192.168.20.5
IP address of SNMP agent #4 [192.168.100.104]: 192.168.20.6
IP address of SNMP agent #5 [192.168.100.105]: 192.168.20.7
IP address of SNMP agent #6 [192.168.100.106]: 192.168.20.8
IP address of SNMP agent #7 [192.168.100.107]: 192.168.20.9
Configuring network interface eth0:1 ...
Configuring network interface eth0:2 ...
Configuring network interface eth0:3 ...
Configuring network interface eth0:4 ...
Configuring network interface eth0:5 ...
Configuring network interface eth0:6 ...
Configuring network interface eth0:7 ...
Setting firewall...
Saving new firewall configuration...
Finished.
bash-2.05a#
4.4.3 Web pass
bash-2.05a#
bash-2.05a# webpass
Stargate num.:0
Username:stargateguru
New password: topsecret
Re-type new password: topsecret
Updating password for user stargateguru
bash-2.05a#
bash-2.05a# webpass
Stargate num.:1
Username: stargateguru
New password: topcecret
Re-type new password: topsecret
Updating password for user stargateguru
etc
4.4.4 Starting
bash-2.05a#
bash-2.05a# service stargate restart
Shutting down StarGate SNMP daemon:
Shutting down StarGate Agent:
Shutting down StarGate Trace Logger:
Shutting down StarGate Least Cost Routing:
Shutting down StarGate Network Server:
Starting StarGate SNMP daemon #0
Starting StarGate Network Server #0
Starting StarGate Agent #0
Starting StarGate Trace Logger #0
[ OK ]
[ OK ]
[ OK ]
[FAILED]
[ OK ]
[ OK ]
[ OK ]
[ OK ]
[ OK ]
18
Starting StarGate SNMP daemon #1
Starting StarGate Network Server #1
Starting StarGate Agent #1
Starting StarGate Trace Logger #2
Starting StarGate SNMP daemon #2
Starting StarGate Network Server #2
Starting StarGate Agent #2
Starting StarGate Trace Logger #2
Starting StarGate SNMP daemon #3
Starting StarGate Network Server #3
Starting StarGate Agent #3
Starting StarGate Trace Logger #3
[
[
[
[
[
[
[
[
[
[
[
[
OK
OK
OK
OK
OK
OK
OK
OK
OK
OK
OK
OK
]
]
]
]
]
]
]
]
]
]
]
]
4.4.5 Testing
bash-2.05a#
bash-2.05a# service stargate status
snmpd (pid 16705 16645) is running...
sgagent (pid 16734 16671) is running...
sgtrace (pid 16746 16682) is running...
sglcr is stopped
sgethsvr (pid 16722 16660) is running...
bash-2.05a#
bash-2.05a# sgconf
StarGate #0:
StarGate #1:
StarGate #2:
StarGate #3:
StarGate #4:
StarGate #5:
StarGate #6:
StarGate #7:
StarGate #8:
StarGate #9:
YES
YES
YES
YES
YES
YES
YES
YES
NO
NO
-
192.168.10.2
192.168.10.3
192.168.10.4
192.168.10.5
192.168.10.6
192.168.10.7
192.168.10.8
192.168.10.9
startage 0: OK
startage 1: OK
startage 2: OK
startage 3: OK
startage 4: OK
startage 5: OK
startage 6: OK
startage 7: OK
startage 8: DISABLED
startage 9: DISABLED
19
5 RCU Usage
The RCU can be used in a number of ways as has already been explained in the previous
chapters. In the following sections, we will explore methods of retrieving and interpreting the
management and accounting data gathered by the RCU.
5.1 Web access
To access the managed Stargates over the web, open your favorite web browser and for the
URL type http://IPaddress. If, as in our example, the IP address of Eth0 is 192.168.20.2, then
the URL would be http://192.168.20.2. Note that the IP address can be any one of Eth0, Eth1
or any of the aliases depending on the reachability of the RCU from the control station.
5.1.1 Welcome Massage
The first page that comes up contains a welcome message and two button columns for each of
the eight manageable Stargates (Stargate 0-7).
The two button columns are a ‘Web Overview’ column for web monitoring of each Stargate
and an ‘Edit Parameters’ column.
Clicking on any of the buttons will take us to a login dialogue if we are not already logged in
(see Fig. 7&8).
Fig.7: Web access welcome page
20
5.1.2 Authentication
Here, it is enough to type the username and password configured in the RCU with the
‘webpass’ command. Let us visit the ‘Web Overview’ first (Fig.9).
Fig.8: Web login dialogue
5.1.3 Web Overview
Fig.9: Web Overview
21
The Web Overview is the main monitoring page as can be seen in the Fig.9. On the lower part
is the front view of the Stargate. Counting from right, we have the power supply, the CPU
card, the AUX card, the PRI card and 16 GSM cards. When something happens to any of the
cards, the card color changes from gray to red. If we however put one of the GSM modules to
’sleep’ or ‘block’ mode, the corresponding card turns yellow (Fig. 10). This page refreshes
automatically every 20 seconds so that any faults investing the Stargate are diagnosed in 20
seconds latest. Please consult the Stargate manual for more information.
At the top mid-left, we have a blue bubble button with a white pointer and half surrounded by
little spherical buttons, the first of which is green and the rest are blue. Immediately below
this cluster is a rectangular screen with ‘Serial Number:’ and ‘M111-2-150-15’ on display.
This part of the menu contains the System Settings as configured with the Stargate program.
Each of the little spherical buttons represents an item of the System Settings menu. Clicking
on any one of them not only toggles the white pointer to point to the selected button, but also,
the corresponding System Settings menu item is displayed on the screen.
On the immediate left of the blue bubble button are three additional buttons. These buttons are
yours for the clicking. The left most button actualizes the web overview page. Click the
middle button to display call statistics (Fig.11). The right most button is used for downloading
CDRs and ISDN PRI traces (Fig.12).
Finally, at the top right we have a stopwatch like button with a green display in the middle.
Clicking on one of the triangular buttons below the display will toggle either the date or the
time in the Stargate.
Fig.10: Error conditions
22
Fig.11: Stargate statistics
Fig.12: CDR and Trace download
23
5.1.4 Edit Parameters
This item, which is recommended only for trained technicians, is intended for the
configuration of the Stargate over the web. If you are not sure of what you are doing please do
not use this page. To modify the Stargate configuration through the web interface, please
follow these 3 simple steps
• Make the desired changes on the web interface
• Click “Save settings” to send the changes to the database in the RCU
• Click “Send settings to the STARGATE unit” to load the setting from the database
into the Stargate.
Please note that these steps have to be repeated on each page.
Fig.13: Web configuration
5.2 SNMP Management
Users operating a network management system either locally or by outsourcing can readily
incorporate the RCU in to their network management software (HP OpenView, Tivoli,
Netcool … etc) and enjoy the convenient services of the SNMP protocol.
5.2.1 SNMP Queries
The Stargate MIB has to be properly installed in the Network Management Node (NMN).
This installation is beyond the scope of this manual (help can be sought from the 2N technical
24
support stuff). When all is installed, SNMP queries can be send from the NMN to the RCU on
all the SNMP objects in the Stargate MIB. Different Stargates are represented by their SNMP
IP addresses (Eth0, Eth0:1, …, Eth0:n).
5.2.2 SNMP Traps
Immediately after configuration, the RCU begins to send event driven alarms to announce
changes in the different statuses of the Stargate. Each trap is again identified by the source
address, which corresponds to the SNMP IP address of the respective Stargate (Fig.14)
Fig.14: RCU alarms (traps)
5.3 Accounting
Besides Stargate management, the RCU collects different accounting information. This
information can be thereafter retrieved at the discretion of the user in two ways. The first
method employs the web interface as has already been mentioned in section 5.1.3. In the
second method, we use a Secure Shell (SSH) client to download the accounting data directly
from the RCU. All accounting information for individual Stargates is stored in the /var/log
directory (Fig. 15). If you, for example, wish to retrieve accounting information on Stargate 0,
please connect to the RCU by SSH and move to /var/log/stargate0. This directory contains
specific accounting information for Stargate 0. Billing information (CDR) is stored in files of
the form b-yyyy-mm-dd.log. An example is b-2003-09-18.log i.e. the CDR for 18th of
September 2003.The other useful information is found in the trace files. They too have a
similar format t-yyyy.mm.dd.log. You will find a lot of other information useful for
troubleshooting when something goes wrong. These include logs and error messages.
25
Fig.15: RCU accounting data.
26
6 Troubleshooting
Installing and configuring a system so as to satisfy the expected functionality is only the part
of the show. The real challenge is in keeping the system working. The RCU is no exception in
this regard, what is worse, there does not exist a question-answer cook book for solving all the
possible combinations of error states that may befall the RCU. A lot depends on the ability of
the system administrator to troubleshoot and closely follow all leads towards the resolution of
the problem. The following sections elaborate on the tools that can be used in troubleshooting
the RCU.
6.1 Stargate Service
The stargate service is a set of scripts that control the overall functionality of the RCU
system. These scripts include:
Script
sgethsvr
sgagent
sgtrace
sglcr
snmpd
Function
Communicates with the Stargates by TELNET (Needs Ethernet connectivity)
Responsible for the automatic download of statuses and CDRs
Responsible for the automatic download of traces.
Takes care of external routing
Communicates with the management station by the SNMP protocol
Just like any other Linux script in /etc/rc.d/init.d/, the stargate service has the following
parameters.
• Status – whether the Stargate scripts are running or stopped
• Start – start the Stargate scripts
• Stop – stop the Stargate scripts
• Restart – First stops the Stargate scripts and then starts them. Please restart the stargate
scripts every time you change the RCU configuration.
Method1:
bash-2.05a#
bash-2.05a# service stargate {status | start | stop | restart }
Method2:
bash-2.05a#
bash-2.05a# /etc/rc.d/init.d/stargate {status | start | stop | restart }
When the RCU is not working properly, use the stargate service status to check whether all
the expected services are running. Do stargate service restart every time you change the RCU
configuration.
6.2 Stargate configuration (sgconf)
This script displays the configured Stargates and their corresponding IP addresses.
bash-2.05a#
bash-2.05a# sgconf
27
The output of this command can be used against the pre-installation IP map to check whether
the Stargate ordering and configuration are in agreement.
6.3 Checking the Databases
6.3.1 Stargate Databases
The RCU has a total of 21 databases:
• Databases stargate0–9 store status information from Stargates 0-9.
• Databases conf0–9 store web configuration data of Stargates 0-9.
• Routing Database - a database of prefixes for external routing
6.3.2 Stargate Terminal (sgterm)
The sgterm script is used to send AT commands to the individual Stargates from the RCU. A
user sitting in the office can connect to the RCU by SSH and use the sgterm to send AT
commands to any Stargate connected to the RCU. Sgterm takes the Stargate number (database
number) as the first parameter and an AT command as the second one. For instance, to send
an AT command to get the processor serial number of the first Stargate (stargate0) you would
use the following command:
bash-2.05a#
bash-2.05a# sgterm 0 “ati4“
This sends the AT command “ati4” to Stargate0.
If an AT command contains the character “!”, please place a “\” before “!”.
bash-2.05a#
bash-2.05a# sgterm 0 at\!q
This command sends the AT command “at!q“ to the Stargate
The Stargate terminal can be used to troubleshoot the databases, i.e., to test whether the
databases are updating properly.
6.3.3 Accessing table main
Table below shows the structure of table “main“ in databases stargate0-9 and the
corresponding AT commands that can be used to crosscheck values of the table fields. This
table contains the basic configuration and status information from the corresponding Stargate.
Id
0
1
2
3
4
Description
Stargate’s CPU serial
number
Bootware and
Firmware versions
Stargate IP address
Stargate IP netmask
Mode of routing
sgterm 0-9
ATI4
Meaning
ATI3
AT&V, S70
AT&V, S71
AT&V, S90
0 = cyclic
28
5
6
7
8
9
10
11
12
13
14
15
16
17
18
19
20
21
22
23
24
25
26
27
outgoing calls (ISDN
to GSM)
Saving call data
AT&V, S91
CDRs
Number of GSM
boards in the
Stargate
Time and date
PIN
CPU type
CPU utilization
Serial port status
Ethernet port status
Trace mode
Type of AUX board
Status of AUX board
Status of AUX layer
3
Type of PRI board
Status of PRI board
Mode of PRI
interface
TEI Number
Not used
PRI ISDN layer1
PRI ISDN layer2
PRI ISDN layer3
Number of current
calls
Max. Number of
simultaneous calls
PRI reject causes
1 = Locked
2 =According to credit
0 = no calls
1 = successful outgoing
2 = successful incoming
3 = successful incoming + outgoing
4 = not used
5 = all outgoing
6 = all incoming
7 = all incoming + outgoing
AT&V, S99
AT&V, S98
ATI4
AT! P
AT&V, S92
AT&SAX
AT&SAX
AT&SAX
AT&SPR
AT&SPR
AT&VI
0-32, 1 = layers 3&4, 9 = layers 2,3&4 …
TE/S = TE, Slave
TE/M = TE, Master
NT/S = NT, Slave
NT/M = NT, Master
QSIG/M = QSIG, Master
QSIG/S = QSIG, Slave
AT&VI, I01
AT&SPR
AT&SPR
AT&SPR
AT&XC, AT&XP,
AT&XG
Stargate user manual
AT&VI, I05
To retrieve the contents of main for a particular Stargate, you should.
• Connect to database – psql db-name (db-name can be one of stargate0-9)
29
•
Display the contents of table “main” ordered by “id” – select * from main order by
id;
Further useful commands are:
• Exit database
- \q
• List all the databases in the system - \l
• List all the tables in the database - \d
• Help!
- \help
• Export database ”db-name” to a file “f-name” – pg_dump db-name > f-name
To troubleshoot the databases, retrieve the contents of the databases and check them against
the output of AT commands using the sgterm as in the table above.
30
7 FAQ
Q1: All connected Stargates do not communicate with the RCU
A1: 1-check IP connectivity (ping)
2-make sure that service stargate scripts are running
3-use sgconf to confirm the right configuration and Stargate ordering
Q2: There is IP connectivity but cannot login to the webview
A2: Re-run “webpass” and remember your username and password
Q3: There is IP connectivity but the webview displays “STARGATE NOT CONNECTED”
A1: 1-check 2&3 in Q1
2-check that the serial number of your Stargate CPU is the same as the one at the
backside of your RCU CD
Q4: IP connectivity works, but the web view displays “STARGATE NOT CONNECTED”
and the log file contains “Call service”
A4: Check which CPU number (STARGATE) is connected to which database and
compare it with labels on installation CD.
STARGATE0 = DB0
STARGATE1 = DB1
…
…
STARGATE7 = DB7
31
Appendix 1: The Trap Table
32
Base OID:
1.3.6.1.4.1.6530.0
Trap ID
Source MIB Object
Event
Form
The Event Log
Message in HP
OpenView
Related
NNM definition Severity trap
501 CPUBoard.Status.SerialPort
a value change No response from No response
to NOK
serial port
from serial port Critical
502
502 CPUBoard.Status.SerialPort
Serial
a value change communication
to OK
restored
Serial
communication
restored
Major
501
503 CPUBoard.Status.CPUUtilization
a value
CPU Utilization :
increased to > <Source MIB
CPU Utilization
80
Object Value>
: $1
Major
504
504 CPUBoard.Status.CPUUtilization
a value
CPU Utilization :
decreased to < <Source MIB
CPU Utilization
60
Object Value>
: $1
Warning
503
511 AUXBoard.Type
a value change AUX board
to NONE
missing
AUX board
missing
Major
512
512 AUXBoard.Type
a value change AUX board
to <>NONE
inserted
AUX board
inserted
Warning
511
513 AUXBoard.GeneralStatus
AUX board
status: <Source
a value change MIB Object
to <>OK
Value>
AUX board
status: $1
Major
514
514 AUXBoard.GeneralStatus
a value change AUX board
to OK
status: OK
AUX board
status: OK
Warning
513
521 PRIBoard.Type
a value change PRI board
to NONE
missing
PRI board
missing
Critical
522
522 PRIBoard.Type
a value change PRI board
to <>NONE
inserted
PRI board
inserted
Major
521
523 PRIBoard.GeneralStatus
PRI board status:
a value change <Source MIB
PRI board
to <>OK
Object Value>
status: $1
Major
524
524 PRIBoard.GeneralStatus
a value change PRI board status: PRI board
to OK
OK
status: OK
Warning
523
525 PRIBoard.Status.Layer1/net
a value change PRI link
to <>ACTIVE unplugged
Critical
526
PRI link
unplugged
527 PRIBoard.Status.Layer2
a value change PRI link plugged PRI link
to ACTIVE
in
plugged in
Major
Multiple frame
Not
a value change Multiple frame
to <>OKEST Not Established Established
Minor
528 PRIBoard.Status.Layer2
a value change Multiple frame
to OKEST
Established
Multiple frame
Warning
Established
527
529 PRIBoard.Status.BusyBChanCurrent
Number of busy B
channels
Number of
increased to
a value
busy B
channels
increased over <Source MIB
26
Object Value>
increased to $1 Warning
530
526 PRIBoard.Status.Layer1/net
530 PRIBoard.Status.BusyBChanCurrent
a value
decreased
under 27
Number of busy B Number of
channels
busy B
decreased to
channels
<Source MIB
decreased to
Object Value>
$1
Warning
33
525
528
529
Number of busy B Number of
channels
busy B
decreased to
channels
<Source MIB
decreased to
Object Value>
$1
531 PRIBoard.Status.BusyBChanCurrent
a value
decreased
under 3
532 PRIBoard.Status.BusyBChanCurrent
Number of busy B
channels
Number of
increased to
a value
busy B
channels
increased over <Source MIB
2
Object Value>
increased to $1 Warning
531
541 GSMBoardTab.GSMBoardEntry.Type
GSM board in slot
a value change <SlotNumber>
GSM board in
to NONE
missing
slot $1 missing Major
542
542 GSMBoardTab.GSMBoardEntry.Type
GSM board in slot GSM board in
slot $1
a value change <SlotNumber>
to <>NONE
inserted
inserted
Warning
541
543 GSMBoardTab.GSMBoardEntry.GeneralStatus
GSM board in slot
GSM board in
<SlotNumber>
a value change status: <Source slot $1 status:
to <>OK
MIB Object>
$2
Major
544
544 GSMBoardTab.GSMBoardEntry.GeneralStatus
GSM board in slot GSM board in
a value change <SlotNumber>
slot $1 status:
to OK
status: OK
OK
Warning
543
GSM module
<ModuleNumber> GSM module
$1 status: Low
a value change status: Low
signall
551 GSMModuleTab.GSMModuleEntry.Status.SignalLevel to < -100
signall
Warning
552
GSM module
GSM module
a value change <ModuleNumber> $1 status:
status: Signall OK Signall OK
552 GSMModuleTab.GSMModuleEntry.Status.SignalLevel to > - 95
Warning
551
GSM module
<ModuleNumber>
Layer1/net status: GSM module
<Source MIB
$1 Layer1/net
Object Value>
status: $2
Warning
553
554 GSMModuleTab.GSMModuleEntry.Status.Layer2
any change
between
irregular states
or between
irregular and
regular state
GSM module
<ModuleNumber>
Layer2 status:
GSM module
<Source MIB
$1 Layer2
Object Value>
status: $2
Warning
554
NOT IN MIB ( 1[Num of rejected + Num of failed] /
[Total num of calls] in %, on a SIM card - from
555 statistics table in stargateX database )
a value
increased over
<high
watermark
defined in
trapconf
session>
GSM Module
<Module
Number> SIM
card <SIM card
number> : Call
success rate
LOW
GSM module
$1 SIM Card
$2: Call
success rate
LOW
Major
556
NOT IN MIB ( [Num of rejected + Num of failed] /
[Total num of calls] in %, on a SIM card - from
556 statistics table in stargateX database )
a value
decreased
under <low
watermark
defined in
trapconf
session>
GSM Module
<Module
Number> SIM
card <SIM card
number> : Call
success rate OK
GSM module
$1 SIM Card
$2: Call
success rate
OK
Warning
555
any value
553 GSMModuleTab.GSMModuleEntry.Status.Layer1/net change
Minor
34
532
35