1
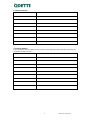
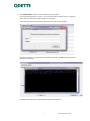
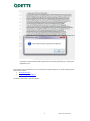
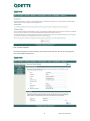
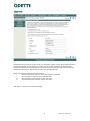
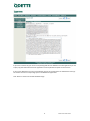
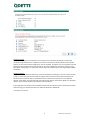
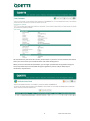
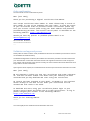
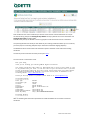
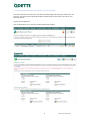
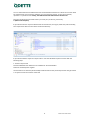
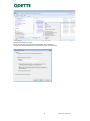
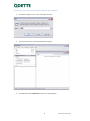
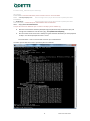
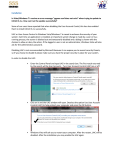
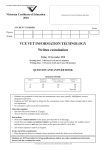
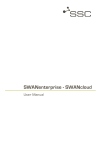
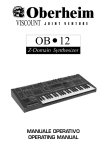
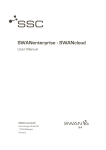
How to Order and Install Odette Certificates
Odette CA Help File and User Manual
1
Release date 20.07.2015
Contents
Preparation for Ordering an Odette Certificate........................................................................................ 3
Step 1: Prepare the information you need for the order process .................................................. 3
Step 2: Generate a Certificate Signing Request .............................................................................. 5
Log on to the Odette CA and start the order process ............................................................................... 9
Order confirmation ................................................................................................................................. 18
Validation and approval process ............................................................................................................ 18
Download the certificate ........................................................................................................................ 19
Renew a certificate ................................................................................................................................. 20
Annexes .................................................................................................................................................. 22
1. How to download and install the certificate on your local computer ....................................... 23
2. How to find your certificate in the Windows keystore after installation .................................. 28
3. How to create a CSR with batch files ........................................................................................ 32
4. How to revoke a certificate ....................................................................................................... 34
2
Release date 20.07.2015
Preparation for Ordering an Odette Certificate
What you should know about certificates:
Certificates are used in a Public Key Infrastructure, where an asymmetric key pair is used to protect
your data and communication. This key pair consists of a private key and a public key. The private key
must remain securely on your computer and is not to be given to any other partner (including
Odette). The public key is the one you share with your partners. It bears a number of attributes which
basically identify the entity to which it belongs.
A certificate is a public key that has been signed by a Certification Authority (CA), a trusted third party
entity, indicating that the information on the certificate has been checked and actually represents the
entity that is listed as subject of the certificate.
Your partner’s system will use the public key to encrypt information to be sent to you and your
system will use the private key to decrypt the information. The decryption process can only be done
with the private key; therefore your certificate is useless if you do not possess the private key.
Similarly, when you send information, your system uses the appropriate public key (certificate) of
your partner to encrypt data and your partner uses his/her private key to decrypt the information.
When ordering an Odette Certificate you should follow the steps below.
Step 1: Prepare the information you need for the order process
1. Certificate Attributes
Common Name (recommended:
DHN e.g. edi.xyz.com)
Email Address
Location (City, Town)
Country Code
(2 alpha ISO Code)
State or Province
(optional)
Company Name
Department / Organisational Unit
(optional)
OFTP2 Server’s Domain Host
Name DHN (e.g. edi.xyz.com )
IP Address
(optional)
Odette ID (SSID)
3
Release date 20.07.2015
2. Technical Contact
Name
Company
Position
Email
Address Line 1
Address Line 2
City
Postal Code
Telephone Number
3. Invoicing Address
Invoicing address details (if different from Technical Contact details) and VAT Number (mandatory for
companies located in the EU).
Name
Company
Position
Email
Address Line 1
Address Line 2
City
Postal Code
Telephone Number
VAT Number
4
Release date 20.07.2015
4. Authentication Contact
Note: Odette uses the Authentication Contact to authorise and confirm that the person ordering the
certificate (the Technical Contact) is entitled to obtain a certificate on behalf of the company or
business unit. The Authentication Contact must work in the organisation where the certificate will be
used, must hold a position giving her/him the necessary authority (e.g. head of EDI department, head
of IT, managing director …) to authenticate the request and must have a company email address in
his/her own name (generic addresses such as info@..., or admin@...) are not acceptable
Name
Company
Position
Email
Address Line 1
Address Line 2
City
Postal Code
Telephone Number
Step 2: Generate a Certificate Signing Request
You can use any computer with internet access to prepare the CSR and to order the certificate but
please note that if you do not use the computer which is deployed as the OFTP2 server you will need
to transfer the certificate to the OFTP2 server at the end of the process.
For Windows users we have developed a toolkit application which provides an easy way of
preparing the CSR.
The application has been successfully tested on Windows 7 and Windows 8, both 32 bit and 64 bit.
Pre-conditions are:
• the right to install software on the computer as a local administrator
• the .net framework 3.5 SP1
• access to the web and the ability to download files
If you do not have sufficient rights on the data exchange server you can use any desktop computer for
the process and when you have downloaded the signed certificate from Odette on to this computer
you can transfer the private key and public key (certificate) as individual files or as PKC#12 keystore
file (.pfx).
These are the steps to follow:
1. Download Odette CA Tools from:
https://www.odette.org/repository/Odette-CA-Tools-2014-SHA1.zip
2. Extract the zip file to a folder where you have appropriate access rights.
3. Open the directory with the tools (e.g. C:\ Odette-CA-Tools-2014-SHA1) in Windows
explorer.
4. Start the programme OdetteCATools-2014.exe
Starting the programme for the first time you may see a dialogue window asking whether to trust the
unknown application. Select the trust option.
5
Release date 20.07.2015
You will see this form:
5.
Fill in the necessary fields.
Example:
6. Click Save to store your certificate details permanently. Your settings will be saved and
retrieved when you start the application next time.
6
Release date 20.07.2015
7.
Click Create CSR to create the actual certificate signing request.
First, the system generates a key pair – your private key (which remains on your computer)
and a public key that will be used to obtain the certificate.
The private key has to be protected by a password. You will see this dialogue:
Once you have typed your password and repeated it correctly, click OK and the system will
generate the two keys …
followed by the CSR, which is automatically copied to the clipboard.
7
Release date 20.07.2015
In parallel, a text file with the CSR is generated in your working directory (i.e. where your
application runs).
If you prefer to use a different tool, such as Portecle or Keystore Explorer, to create the CSR, please
refer to these videos:
• Portecle (German)
• Keystore Explorer (English)
Continue as described in the next chapter
8
Release date 20.07.2015
Log on to the Odette CA and start the order process
Log on to the Odette CA web site via https://www.odetteca.com
If you are ordering a certificate for the first time, click on New Customer (your user account will be
created during the order process).
If you have bought an Odette certificate previously and want to renew it or order a different one or if
you want to download or revoke an existing Odette certificate, click on Existing Customer Login.
9
Release date 20.07.2015
Click on Order Certificate
You will be prompted to enter the details of the Technical Contact, who will also be the registered
user of the Odette CA application.
10
Release date 20.07.2015
The Authentication Contact is used to verify your certificate request. He/she will be asked to confirm
the data provided by you and that you are authorised to request a certificate on behalf of your
company or department. Depending on the structure of your company the Authentication Contact
could be the head of your department, the CIO or the managing director.
Please note that the Authentication Contact must:
i.
Belong to the organisation for which the certificate is intended
ii.
Be in a position to authorise the certificate order
iii.
Have a company email address in their own name
iv.
Be a different person from the Technical Contact.
Click ‘Next’ to continue to the Import CSR Page.
11
Release date 20.07.2015
If you have created a key pair and a corresponding CSR with the Odette CA Toolkit application you can
simply copy the CSR content from the application to the clipboard and paste it into this form.
If you used a different tool or the manual (Batch) process you should open the CSR text file and copy
the content into the corresponding space in the Odette CA application.
Click ‘Next’ to continue to the CSR Validation Page.
12
Release date 20.07.2015
Certificate Usage
In the above example, the certificate can be used for various purposes. By default, all the listed
certificate usage attributes are enabled. If you want to connect your OFTP2 system to other OFTP2
systems, at least “Secure Session (SSL/TLS)” must be enabled, Encryption (i.e. file encryption) and File
Signing are advanced functions of OFTP2 and can be used in addition to TLS session security. Email
(encryption and signing) is an application outside the scope of OFTP2 but is also supported by Odette
certificates.
Certificate Details
Check that all your certificate details are correctly submitted. If anything is incorrect, you will need to
create a correct CSR and import the CSR once again. Please note that current implementations of
OFTP2 at some companies require the OFTP2 servers of their business partners to use qualified
domain names which are registered and resolvable by the domain name system (DNS). This qualified
domain name must be shown in the attribute ‘Common Name’.
If your CSR does not already contain a SSID for OFTP2 and you intend to use the certificate for OFTP2
data exchange, you should now enter your SSID (aka OFTP ID or Odette ID).
Click ‘Next’ to continue.
13
Release date 20.07.2015
On this page you select the desired validity period of the certificate (1, 2, 3 or 4 years).
Before continuing, you must also accept the Odette CA terms and conditions.
Click Next to continue.
14
Release date 20.07.2015
Purchase Order: You need to enter an order reference which will be included in your invoice.
By default, the invoicing address is the one entered for the Technical Contact.
If you wish the invoice to be sent to a different address or a different company, tick the box “Bill to
new address” and enter the different address data.
Companies situated in the EU must provide their VAT registration number (including the appropriate
country prefix).
Click Next to continue.
15
Release date 20.07.2015
A summary of your order will be displayed. Check carefully and, if OK, click Complete Order.
16
Release date 20.07.2015
We recommend to print the order summary and to keep it in your files. You will need this information
when you have to renew your certificate at the end of the validity period.
When you click on the Control Panel button, you can logon yourself onto the application using the
email and password you have selected during the registration process and you will find your
certificates / requests there.
17
Release date 20.07.2015
Order confirmation
You will receive an order confirmation by email.
Dear [user name],
Thank you for purchasing a digital certificate from ODETTE.
Your unique certificate order number is: 4538. Please keep a record of
this number in case of any problems with your order. To view the status
of your certificate order or purchase further certificates please log
into your account control panel using your email address and password
provided during purchase. The account control panel is available at the
following address: https://www.odetteca.com
Should you have any queries or problems please email us at
[email protected]
Certificate Details:
********************
...
Validation and approval process
Shortly after the order has been made, the Odette CA will start the validation process which is based
on the Odette CA Certificate Policy.
The Odette CA Registration Authority will validate the information provided in the CSR. Furthermore
your authentication contact will receive documents to be signed and returned in order to approve
your request and initiate the issuing process. Usually, the return of these documents determines how
long it takes to issue the certificate.
Upon approval of the request, the certificate will be issued and you will receive information via email:
Dear [user name],
We are pleased to inform you that your certificate with order reference
of: xxxx has now been issued. This means that your identity has been
confirmed and you may download and start using the certificate.
An invoice has been attached to this email. If payment is not received
within 30 days of the date of this email your certificate will be
revoked and will cease to be valid.
To download and start using your certificate please login to your
account control panel and follow the on screen instructions. To log in
please navigate your browser to the following address:
https://www.odetteca.com
Thank you for choosing ODETTE.
~~~~~~~
The invoice (pdf) for the certificate will be attached to this email.
18
Release date 20.07.2015
Download the certificate
Click Existing Customer Login to log into the CA application with your user credentials.
The control panel will show your certificates and their status.
Click the Download icon alongside the appropriate certificate to start the download process.
Further details on installation of Odette certificates can be found in Annexe 1.
19
Release date 20.07.2015
Renew a certificate
Important Note:
In the environment of the Odette CA renewal means to issue a new certificate with the same
properties as the previous one. However, to protect your privacy a renewed certificate also requires a
new private and public key.
Some OFTP2 software systems use their own key store and are programmed in a way that they only
accept a renewed certificate if it refers to the existing private key. In these systems you cannot use
the renewal process as described here; instead you must install a new certificate when the existing
one expires or becomes invalid.
Prepare a new Certificate Signing Request as described in chapter Generate a Certificate Signing
Request .
Log into the Odette CA application under https://www.odetteca.com .
Click Existing Customer Login to log into the CA application with your user credentials.
Important Note
Before starting the Renew process, please ensure that your user details are correct and up to date.
These details will be used as the Technical Contact details for the Certificate Order and cannot be
amended during the Renew process.
You can check and update your User details by going to the ‘My Account’ page from your Certificate
Control Panel.
20
Release date 20.07.2015
Click the Renew icon of the certificate you want to renew. Please note that Renewal can only be
carried out during the period starting 60 days before the expiry date of the current certificate and
ending 30 days after the expiry date.
Outside of this period, the Renew icon will be greyed out and the function will be unavailable.
The portal application will show you the details of your existing certificate. Before you can continue,
you must prepare a matching CSR (see Step 2: Generate a Certificate Signing Request).
The Odette CA will check that the new certificate request’s attribute values match the existing
certificate.
The further process matches the order process (see here ).
You will receive a confirmation email.
Dear [user name],
Thank you for renewing your existing ODETTE digital certificate.
Your unique certificate order number is: 3845 Please keep a record of this number in case
of any problems with your order. To view the status of your certificate order or purchase
further certificates please log into your account control panel using your email address
and password provided during purchase. The account control panel is available at the
following address: http://www.odetteca.com
Should you have any queries of problems please email us at [email protected]
Certificate Details:
********************
Order Type:
Certificate Type:
Location:
Country:
Organisation:
Department:
Common Name:
Domain Name/IP Address:
OFTP2 ID (SSID):
Renewal
Unknown
London
United Kingdom
Odette International Ltd
CO
oftp2.odette.org
oftp2.odette.org
oftp://O01770000000000A001000000
Purchasing Details:
*******************
...
After re-validating the information provided in the CSR the Odette CA will issue the renewed
certificate.
21
Release date 20.07.2015
Annexes
Part 1 How to download and install the certificate on your local computer
Part 2 How to find your certificate in the Windows keystore after installation.
Part 3 How to create a CSR with batch files
22
Release date 20.07.2015
1. How to download and install the certificate on your local computer
This section provides instructions for users who are downloading and installing a certificate for the
first time. The example is for Microsoft Windows. Please follow the instructions relevant to your
operating system.
Log into the CA application.
Click the 'Download' icon to start the certificate download dialogue.
23
Release date 20.07.2015
You can select between two different formats and two different extensions. Select the one that meets
the requirements of your keystore software or of your business partner, if you have to submit /
upload it in a specific format. Usually, the PEM format with CER extension should work.
Store the certificate into the folder where you have your private key, most likely
C:\Odette-CA-Tools(win).
If your OFTP2 solution requires individual files for the Root CA, Issuing CA, Public Key and Private Key,
then import these files from the above mentioned directory.
If your OFTP2 software requires a keystore file or uses the Windows keystore continue with the
following steps:
1. Create a keystore file
Start the OdetteCATools-2014.exe in the Odette-CA-Tools-2014 folder
Select the Create Keystore register.
Use the buttons to select the (downloaded) certificate file and the private key file that was generated
in conjunction with the creation of the CSR.
24
Release date 20.07.2015
You’ll see the password dialogue again. Provide the password that you have assigned during the CSR
process.
The resulting keystore file name will be generated automatically.
Press Create and the application will generate the .pfx file.
For Windows, click the right mouse button and select install PFX from the context menu.
25
Release date 20.07.2015
Follow the installation process.
Do not tick the first option (Enable strong private key protection).
Tick the second option (Mark key as exportable) at your own discretion.
26
Release date 20.07.2015
We recommend to use the automatic selection as shown above.
When prompted with this warning, confirm with Yes.
27
Release date 20.07.2015
2. How to find your certificate in the Windows keystore after installation
1.
Click Start and type “mmc” in the entry field. Click OK
2.
The Console will open. Select File/Add Remove Snap-in
3.
Click Add and select Certificates from the list. Click Add again.
28
Release date 20.07.2015
4.
For Windows7 you will usually have to select “My user account”
29
Release date 20.07.2015
5.
Click OK.
Close the snap-in selection window.
6.
Click OK to close the Add/Remove Snap-in dialog.
You will now see the Windows certificate store:
7.
Expand Certificates, then expand Personal and select Certificates. You will be able to see the
certificate in right panel of the Windows Management Console. This is where your
downloaded certificate has been stored.
30
Release date 20.07.2015
The little key on the upper left corner of the certificate symbol indicates that you have the certificate
and the matching private key in your certificate store.
Double click on the certificate to see the details.
Click OK to close the certificate details window and close the MMC-application.
At this point, if you wish, you can save the Console as a shortcut so that it can be accessed quickly in
future.
31
Release date 20.07.2015
3. How to create a CSR with batch files
1.
2.
3.
4.
5.
6.
7.
Download openSSL from
32 Bit Windows: http://www.odette.org/repository/openssl-win32bit.zip .
64 Bit Windows: http://www.odette.org/repository/openssl-win64bit.zip
Install the Visual C++ library (included in the downloaded zip file).
Install openSSL. Note the path to the directory where openSSL has been installed.
_________________________________________________
Download Odette CA Tools from here:
http://www.odette.org/repository/odette-ca-tools-win.zip.
Extract the Zip file, preferably to C:\
Check/edit the file settings.bat in the directory \Odette-CA-Tools(win)
The highlighted part in set OPENSSLDIR=C:\OpenSSL-Win%BITS% must point to your actual
openSSL installation directory.
Edit the file odette-ca-csr.cfg in the directory \Odette-CA-Tools(win) with an text editor and
enter the values specific for your certificate (you might see a warning, click run to continue).
Note: If your certificate attribute values contain special characters (e.g. äöüÄÖÜß etc.) then
edit the file odette-ca-csr-utf8.cfg with an UTF-8 compatible editor (Notepad++ is
recommended), encode the file as UTF-8 without BOM and run the create-csr-utf8.bat !
The following example explains the different entry fields; grey lines should not be changed!
Please replace with your actual certificate details as prepared in Step 1!
# lines preceded by a #-sign are treated as comments by the interpreter
[ req ]
default_bits
= 2048
default_keyfile
= privkey.pem
distinguished_name
= req_distinguished_name
req_extensions
= req_ext
prompt
= no
[ req_distinguished_name ]
# Country
C
= GB
# State (default: empty)
#ST
=
#Location
L
= MyTown
#Organisation
O
= My Company
# Organisation Unit
OU
= My Department
# Common Name
CN
= edi.mycompany.com
# Email Address
emailAddress
= [email protected]
[ req_ext ]
subjectAltName
= @alt_names
# If none of the below mentioned attributes shall be contained
# in your certificate, please enter the #-sign in front of URI.1 and
32
Release date 20.07.2015
# in front of req_extensions (line 5 from top)
[alt_names]
# HOSTNAME -should be submitted, if the common name is not set to DHN!
DNS.1 = edi.mycompany.com
# Put a #-sign in front, if you do not wish to specify this value.
# IP Address
IP = 98.88.46.37
# Put a #-sign in front, if you do not wish to specify this value.
# OFTP ID (SSID) – should always be submitted for OFTP2 certificates
URI.1 = oftp://O01770000000000XXXX
# If you do not have an OFTP2 ID you can order it at https://oscar.odette.org
8.
9.
Start the command line interface (Start/All Programs/Accessories/Command Prompt) and
change to the Odette CA Tools directory (e.g. cd C:\Odette-CA-Tools(win) )
Run the create-csr.bat and create a CSR by using the certificate attributes you have prepared
in Step 6. You will be prompted to enter a name.
Enter the Name: enter a memorisable name for your certificate files
The batch process will then create a private key file and a CSR file.
33
Release date 20.07.2015
The system generates two files:
XYZ-private-key.pem and XYZ-signing-request.csr (XYZ stands for the name you entered as file name).
We recommend to keep the odette-ca-csr.cfg file with your certificate details safely – you need the
same configuration (i.e. attribute values) for any subsequent renewal of the certificate.
4. How to revoke a certificate
If you need to revoke a certificate y any reason, please login at https://www.odetteca.com and click
the appropriate revoke button in the appropriate certificate row.
You will be prompted to provide the reason for revocation,
Once you pushed the Revoke Certificate button the certificate will be marked as revoked in the
Odette CA certificate revocation list and cannot be used anymore.
34
Release date 20.07.2015