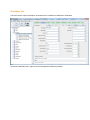
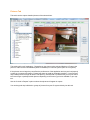
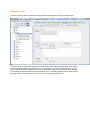
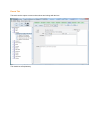
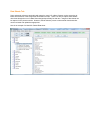
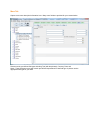
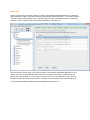
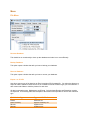
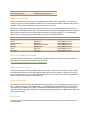
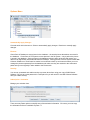
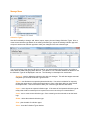
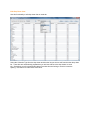
1
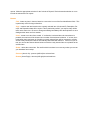
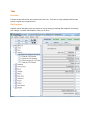
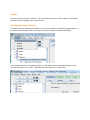
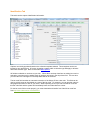
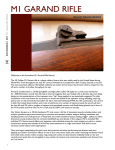
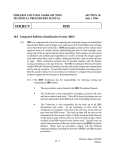
NM Collector Software JE (Java Edition) Printable Help Saturday, January 04, 2014 Contents Introduction ..................................................................................................... 3 About nmCollector.Net LLC ............................................................................... 3 Contacting Us ............................................................................................... 3 NM Collector Software JE.................................................................................... 4 About ......................................................................................................... 4 Overview ..................................................................................................... 4 Tree View ....................................................................................................... 6 Overview ..................................................................................................... 6 Select an Item ............................................................................................... 7 Drag and Drop .............................................................................................. 7 Sub Folders ............................................................................................... 7 Buttons .................................................................................................... 8 Tabs ............................................................................................................. 9 Overview ..................................................................................................... 9 Edit Captions ................................................................................................ 9 Buttons ..................................................................................................... 10 Identification Tab ......................................................................................... 12 Description Tab ........................................................................................... 13 Pictures Tab ............................................................................................... 14 Receipt Tab................................................................................................ 15 Disposition Tab ........................................................................................... 16 Maintenance Tab ......................................................................................... 17 Events Tab ................................................................................................ 18 Data Sheets Tab .......................................................................................... 19 More Tab ................................................................................................... 20 Statistics ...................................................................................................... 22 Menu .......................................................................................................... 23 File Menu .................................................................................................. 23 Re-Index Database .................................................................................... 23 Backup Database ...................................................................................... 23 Recover Database ..................................................................................... 23 Export > to JE CSV .................................................................................... 23 Export > to Android CSV ............................................................................. 24 Import > from NM Gun Collector Data .............................................................. 24 Import > from Android CSV .......................................................................... 24 Import > from JE CSV ................................................................................. 24 Write To Disk ........................................................................................... 24 Options Menu ............................................................................................. 25 Pictures .................................................................................................. 25 Security .................................................................................................. 25 Subscription > Activation ............................................................................. 25 Manage Menu ............................................................................................. 26 Collection Types ....................................................................................... 26 Edit Drop Down Lists .................................................................................. 27 Format Menu .............................................................................................. 28 Reports Menu ............................................................................................. 29 Help Menu ................................................................................................. 29 Examples ..................................................................................................... 30 Migrate Pictures ..................................................................................... 30 Home Inventory ..................................................................................... 30 Group Items in a Collection Using Folders...................................................... 30 Create a Wish List .................................................................................. 30 Duplicate a Collection Type ....................................................................... 30 Support........................................................................................................ 31 Initial Suggestions ........................................................................................ 31 Frequently Asked Questions (FAQ) ................................................................... 31 Introduction About nmCollector.Net LLC nmCollector.Net LLC is a New Mexico based company that was officially licensed in April of 2001 to develop and sell collecting software over the internet. Our current efforts are focused around a general product applicable to any collection which can be run on any computer operating system. This product is called NM Collector Software JE (Java Edition). Contacting Us email: [email protected] web contact form: http://www.nmcollector.net/nmguncollector/contactForm/feedback.php physical address: Clayton J. Pryor C/O R. B. White, P.C. 9007 Washington NE Suite A Albuquerque, New Mexico 87113 NM Collector Software JE About NM Collector Software JE (Java Edition) is a truly portable software designed to be run on any computer with any operating system from a USB Flash drive. Although it can be installed on the computer hard drive it is also designed to run entirely off of a USB flash drive that can be plugged into any computer making it a truly portable application. * Java 6 run-time engine required - comes with Windows, Mac OS, and Linux It comes with templates for coin collections, knife collections, Japanese sword collections, stamp collections, gem collections and others built in. You can even define your own collection types from scratch if you wish. With NM Collector Software JE you can customize the following to your preferences: Look and Feel - pick and choose your own fonts including style and size as well as foreground and background colors. Field Headings - standard headings available which you can modify and/or make your own. Drop Down Values - many provided for each type of collection but you can add and modify your own. Collection Type Templates - many are provided and you can create your own. If you do not like the fields provided you can redefine them to your own. You get over 32 fields that you can define. General Notes Dates can be cleared by selecting “none” in the bottom right corner of the Date Pop-up window. Data can be sorted in any order in the Statistics Window. You can then go directly to any item by double clicking on it in the Statistics Window. When exporting data, remember that you are selecting the directory to export to. Do not try to specify a file name. The program names the export file in accordance with the collection type that you are exporting. When importing data from another system, export the data from NM Collector Software and then rearrange the data you want to import so that it matches the fields in the exported file. This will help insure a successful import. Backup! Backup! Backup! Always back up your data before any major operation, such as an import, so you can easily recover your data as it was in case something goes wrong. The best way to backup is to copy your entire installation directory (generally the contents of the USB flash drive or wherever you chose to place the application on your desktop – generally “C:\NM Collector Software JE” for windows). Overview The NM Collector Software JE user interface is broken down into two major components; a tree view and tabs. The tree view provides your main interface to the entire contents of your collection. Using the tree view you can add, delete, and select items to view and update. You can also modify their location relative to other items in the tree view. The tabs provide a means for organizing, viewing, and updating data specific to the individual item selected in the tree view. There is room for a lot of data so the tabs provide a logical and intuitive organization for that data. Tree View Overview The tree view is your main tool for organizing your collection and selecting the items you wish to edit. Following the screen capture below is a description of the tree functionality. As you can see from this excerpt, we can view all or parts of our collections in this tree view. Collection types are shown as a special "NM" folder while items in the collection type are listed under the collection type. Some items themselves look like folders while others look like a simple sheet of paper. More on this later under "Sub Folders" (below). The buttons at the top are enabled and disabled as appropriate for where we are in the tree. In this case we have a collection type (Firearms) selected so only buttons that apply to an entire collection type are enabled. At this point it makes sense to Find an item in the collection or to Insert a new item in the collection. More on the buttons later. Select an Item In the picture above we have selected an item to edit. The values for the selected item are populated in the tabs for easy viewing and editing. Also note that all of the buttons above the tree are now enabled. All of them make sense when an individual item is selected. Drag and Drop You can move an item to any location in the Tree view by simply clicking on it and holding the mouse button while you move it in the tree then letting go of the mouse button when it is where you want it. Sub Folders As noted above, some items look like folders while others don't. You can create sub folders to associate items with other items or to collect items for whatever reason that makes sense to you. To convert an item to a sub folder simply select it and click the "Ins" button to insert a new item to be associated with it. Another approach is to "Demote" (Arrow Pointing to the Right) the item located directly below it. Now you can add other items to the folder by inserting new items in the sub folder or dragging and dropping other items to it. Notice that the sub folder still retains its identity as an item so you can manage information about it. In other cases there is no information to manage at the folder level. An example of a folder that would not require any data would be a location folder (such as bedroom safe) created simply to contain items stored in that location. Exclude Sub Folders From Reports If the sub folder is an actual item with other items associated with it, you will want to include it in reports. However, if the sub folder is simply a holding place for other items then you will not want to include it in reports. Make the appropriate selection for the “Include in Reports” filed to determine whether or not to include the selected item in reports. Buttons Find - locate any item in the tree based on a text value in one of the first Identification fields. This is particularly useful for large collections. Copy - create a new item based on the currently selected item. All relevant ID, Description, Receipt, and Disposition data will be copied. This is particularly useful if you acquire many similar items at the same time. Be sure to change something immediately after the duplication so as to distinguish the items one from another. Insert - create a new item from scratch. If a collection is selected when the Insert button is pressed, the new item will be inserted as a member of that selected collection. If an item is selected when the Insert button is clicked the currently selected item will be converted to a folder and the newly inserted item will be automatically associated with that item. If this is not your intent you can use the Demote button below to make the newly inserted item an equivalent to the selected item. Delete - delete the current item. Be careful with this as there is no recovery unless you recover your database from backup. Promote (Arrow Left) - promote (shift left) the selected item. Demote (Arrow Right) - demote (shift right) the selected item. Tabs Overview The tabs contain data for the item selected in the tree view. There are so many available fields the tabs provide a logical way to organize them. Edit Captions Captions can be changed to meet your needs on any tab simply by checking "Edit Captions" and making your changes. Uncheck "Edit Captions" when you are done. Buttons There are buttons at the top of each tab. The actual buttons vary by tab. When a button is not enabled that means it does not apply to the current situation. Auto Apply Changes Selected The buttons also vary depending on whether or not you have selected to automatically apply changes. If this option is selected there will be fewer buttons since your changes are saved automatically. Even though changes are automatically applied, you still might feel more comfortable telling it to save your data manually once in a while. That is what the save button is for on this screen. Auto Apply Changes Not Selected With this option you get to choose when to save your changes or not. Buttons are present to support this additional functionality. The actual buttons vary by tab. When a button is not enabled that means it does not apply to the current tab or data condition (data changed or not changed since last save). The function of the buttons is as follows: Clear - clears the contents so you can start from scratch. Revert - if changes have been made on the current page, this button is enabled. It allows you to revert your data to the last saved values. Apply - if changes have been made on the current page, this button is enabled. It saves the current values in memory. Note: the changes are not stored to disk until you properly close the program. You may save date to disk at any time by clicking the Save button. Save - this writes your current data which is loaded in memory to disk including all of your changes since the last write to disk. Statistics - this takes you to the Statistics page. Close - closes NM Collector Software JE and save your data to disk. Identification Tab This tab is used to capture identification information. Captions are initially populated based on the collection template selected. These captions can be customized to your preferences. Of course, changing a caption within a collection type will apply to all items within that collection type. More on that under Edit Captions. All fields are editable so use them as you wish. Where there are drop down lists an existing item can be selected or new items can be added simply by typing a new value in the drop down field. The next time you need the item it will appear in the drop down and can be selected. The bar code field contains an automatic conversion of the Unique ID into a bar code. This field can be used to quickly locate an item based on a scan of the bar code. For example, you can print bar codes to hang tags and tie them to each of your items. While inspecting an item you can scan the bar code into this bar code field and the system will immediately locate and make that item current. For the bar code field to render properly, you must download and install a free Code 39 bar code font from http://www.idautomation.com/fonts/free/ Description Tab This tab is used to capture descriptive information that is in addition to identification information. As with the identification tab, captions can be changed and all fields are editable. Pictures Tab This tab is used to capture detailed pictures of the selected item. This tab should be self-explanatory. Depending on the picture option selected (Options > Pictures) the picture is either saved in the database (Save in Database) or in the file system (Save in File System). If the pictures are too large they can affect the performance of the application and may not load properly or show up in reports with images. Please keep them as small as reasonably possible. I have successfully loaded pictures as large as 2048 x 1360 pixels (1,400 KB) with no problems but you may be able to load even larger or perhaps smaller pictures depending on the memory you have available on your system. Use the “Include In Reports” option to select what pictures will appear in reports. You can drag and drop individual or groups of pictures from your file system directly into this tab. Receipt Tab This tab is used to capture information on your acquisition of the item. There can be multiple receipts for any item since an item can be disposed of and then brought back into the collection for one reason or another. Disposition Tab This tab is used to capture information on your disposition of the item. There can be multiple dispositions for any item since an item can be disposed of and then brought back into the collection for one reason or another and then disposed of again. Maintenance Tab This tab is used to capture maintenance and repair that has been performed on the selected item. The intent of the Increment and Units field is to identify the interval (other than date) at which the operation was performed and is to be performed next. For example, if you were to change the oil in your car every 3 months or three thousand miles, your Completed Increment would be the actual miles at which the oil change was performed and the Units would be miles. The Next due date would be three months later and the Next Due increment would be the current increment plus 3000 miles. Events Tab This tab is used to capture events such as shows and outings with the item. This should be self-explanatory. Data Sheets Tab Some advanced collectors, particularly with regard to many U.S. military firearms, require extensive detailed documentation of the components found within an item. There is no way to capture these details other than through the use of a Data Sheet designed specifically for that item. Images of data sheets can be captured in the pictures section. However, this tab allows a person to enter textual data sheets that can be reviewed and updated as appropriate. Here is an example of a blank M1 Garand Data sheet. More Tab Capture even more descriptive information here. Many more fields are provided for your customization. Please note the pre-defined field types including Text (with drop downs), Currency, Date, and Notes. These field types come with certain pre-defined expectations for that field type so please use the appropriate field type for your data. Links Tab Capture just about any document, web-site, or folder of information associated with this item. Drag and drop documents, images, or files and they will be automatically added to the table. You can also click the “Add Link” button to manually add a link. The table starts out with a placeholder in order to enable drag and drop. Use the “Delete” button to delete the Placeholder or any other row. Select a row and click the “Open Link” button to open the item with the appropriate application on your system. PDF files are opened with Adobe, Word files are opened with Word, html files and urls are opened with a web browser, ect. If you chose to open a urls in your Links table this is one of the only times the software will connect to the internet. The other is if you choose an item from the help menu. If you resize the window the Description column will adjust to fit the text in it. Statistics This feature can be your best friend if you have a large collection. It is also extremely useful if you track purchase, sale, and appraised values as it will summarize total cost and values for you. Make changes here or double click on an item in the table to go to it in the main window. Export the data in various forms including HTML, XML, and CSV (for importing into Excel). The Refresh button is used to update any changes made here in the main window. Menu File Menu Re-Index Database This should be run occasionally to clean up the database and make it run more efficiently. Backup Database This option opens a window that tells you how to backup your database. Recover Database This option opens a window that tells you how to recover your database. Export > to JE CSV Use this to export most of the data into an Excel compliant CSV formatted file. You select the directory to export to and the software names the csv file in accordance with the collection type you have selected. It also creates sub-folders to hold the pictures for each item. All data is exported except: Maintenance and Events. Only the latest Receipt and Disposition records are exported. The following table lists examples of the names of the exported csv file for each collection type. JE Collection Type Firearms Knives Home Inventory Nihonto Stamps Exported CSV File Name JEFirearms.csv JEKnives.csv JEHome Inventory.csv JENihonto.csv JEStamps.csv Coins OtherCollectionName JECoins.csv JEOtherCollectionName.csv Export > to Android CSV Export your data for later import into the appropriate Android NM Collector application. You select the directory to export to and the software names the csv file in accordance with the collection type you have selected. It also creates sub-folders to hold the pictures for each item. Be sure to copy the pictures directory as well as the csv file to your Android SD card for import into the appropriate Android NM Collector app. The export function determines the appropriate Android collection type to export to based on the currently selected collection type as follows (NOTE: If you change the name of one of the collection types listed below they will be exported to NMItems): JE Collection Type Firearms Knives Home Inventory Nihonto Stamps Coins All Others Android Application NM Guns NM Knives NM Home NM Japanese Swords NM Stamps NM Coins NM Items Exported CSV File Name AndroidNMGuns.csv AndroidNMKnives.csv AndroidNMHome.csv AndroidNMSwords.csv AndroidNMStamps.csv AndroidNMCoins.csv AndroidNMItems.csv Import > from NM Gun Collector Data This menu item has one purpose - to facilitate the migration of data from NM Gun Collector Software to NM Collector JE. Additional information can be found at http://www.nmcollectorsoftware.com/support/Import.htm. Import > from Android CSV Use this to bring data in from your Android NM Collector apps. It will bring in new items, update existing items with data captured in the Android apps and add pictures from the Android. Whatever csv file you pick will be imported into your currently selected collection type so be sure to pick the correct Android file for the collection type you have currently selected. Import > from JE CSV This allows you to bring in data from other NM Collector JE users or from other applications such as Gunsafe. To bring data in from other applications, 1) export NM Collector Software data to see what fields are available, 2) use MS Excel (or other compatible spreadsheet application such as Open Office) to arrange the data from your other application to match the data format exported from NM Collector Software, and 3) import the data. Save To Disk This writes your current data which is loaded in memory to disk including all of your changes since the last save to disk. Options Menu Automatically Apply Changes Covered earlier in this document. Select to automatically apply changes. Deselect to manually apply changes. Pictures Chose Save in Database to save pictures in the database – the actual pictures themselves are stored in the database. Chose Save in File System to store pictures in the file system – only a path to the picture is stored in the database. Saving pictures in the database makes it easier to backup and restore your data but can significantly slow down NM Collector Software. Storing pictures in the file system makes NM Collector Software run much faster but makes it more difficult to back up and restore because you must manage the pictures separately from the database and make sure they are restored to the exact same paths as they were originally in when added to the Pictures tab. Security You can set a password and enable security to prevent others from using your copy of NM Collector Software. Be sure to put the password in a safe place for you will need it to use NM Collector Software after you enable security! Subscription > Activation Manage your activation here. There are many Paste options to simplify entry of the activation information. Of course, you must copy the information before it is available to paste. Manage Menu Collection Types Use this functionality to change, add, delete, import, export, print and change Collection Types. Hint: to create a new collection type based on an existing collection type, export the existing collection type and re-import it as the new collection type then make your changes to the new collection type. You can edit values (other than the ID which is set for you and maintained by the system) by clicking a value within the table and typing within that cell. The "Show in Tree" checkbox determines whether or not the Collection Type will be displayed in the tree. The following is a description for each button: Resynch - used to update the main tree view with your changes. This will also happen automatically when you close the Collection Types window. Export - use this button to export the selected collection. You select a collection for export by clicking the name prior to clicking the Export button or from a drop down after you have clicked the Export button. This can be used to share your collection type definition with others. Import - use to import an exported collection type. If the name of the imported collection type already exists it will be renamed prior to import so as not to over write your current definition. Insert - use to create a new collection type. Once created go to the main tabs to set the headings. Delete - delete the selected collection type. Print - print the table of collection types. Close - close the Collection Types window. Edit Drop Down Lists Use this functionality to edit drop down lists on each tab. Select the Collection Type from the drop down and then the list you want to edit from the other drop down list. These lists are automatically populated as you add new values to the drop downs on each tab. Sometimes you will unintentionally add an item that does not belong or need to correct the spelling. Use this tool to make those corrections. Format Menu Use the Format menu to change the default formats for buttons, captions, and fields. Here is an example for fields: You can change the font type, font color, and background color. You can also change individual items by double right clicking the item and selecting the appropriate values to change form the pop up menu. Here is an example of a special format applied to a key identification field: Reports Menu There are many reports available. You can select them through this menu item. If you store pictures in the file system rather than the database you would choose the “In File System” version of any report with pictures. If you need a report that you cannot find, please let us know what that report is so we can develop it for you and others. Help Menu Various links to help are provided in this menu item. These links will open a browser and connect to an external site to retrieve the requested information. This is one of the only times the software will connect to the internet. The other is if you have urls in your Links table. Examples Nothing helps understanding of a system better than examples. Here are links to some useful examples. Please give them a try before asking for help. Migrate Pictures - (Demonstrates: Migrate Pictures from database to file system, migrate pictures from file system to database, consolidate pictures spread throughout a file system to the NM Collector Software directory) Home Inventory - (Demonstrates: Creation of new Collection Type, Creation of new Field Labels, Creation of new Drop Down Lists) Group Items in a Collection Using Folders - (Demonstrates: Creation of folders within an existing collection) Create a Wish List - (Demonstrates: Creation of folder to track wish list and then moving items when wish list item acquired) Duplicate a Collection Type - (Demonstrates: Creation of a new collection based on an existing collection) Support Initial Suggestions If you encounter problems with your activation please study our Activation Example. Please do so before requesting support. Before trying anything else, please make sure you have the latest release! Make sure you have the pre-requisite Java installed - at least 1.6 ( http://www.java.com/en/download/manual.jsp ). NM Collector Software JE will not start without it and you will see a message to that effect. If all goes well, it will then automatically send you to the Java download page. If not just use the link above. Frequently Asked Questions (FAQ) Question: How do I start NM Collector Software on the Custom USB Flash Drive? Answer: Run in accordance with computer as listed below: Windows: Run NMCollectorJE6.exe Mac: Run NMCollectorJE.app Linux: Issue the following command: java -jar NMCollectorJE6.jar Question: Why can't I enter data? All of the fields appear to be disabled. Answer: You need to select a collection type and then insert an item or edit an existing item already in the collection. Please see the Create a Wish List example to see how this works. Question: How do I install and run NM Collector Software on my Mac? Answer: I created the following step by step instructions. Please carefully follow them! Thanks. Question: How do I copy NM Collector Software from one computer to another? Answer: You can copy your entire NM Collector Software directory to any computer you want to run it on no need to install it on the new computer. Then, to update the data only from one system to the other just copy the database (nmcswDB) between computers. Please be careful not to overwrite more recent data with older data! [Note - you must use the USB version of the software to run on multiple operating systems using the method described above] Question: Why is NM Collector Software behaving strangely on my 64 bit Windows system? Answer: Most likely you are not running the correct Java for your Windows system. Please see these detailed instructions for Java on 64 bit Windows Systems: http://www.java.com/en/download/faq/java_win64bit.xml Question: How do I import my data from NM Gun Collector software? Answer: Please see Import Data From NM Gun Collector Question: Will NM Collector Software meet the approval of a BATFE C&R FFL inspection? Answer: Given the new BATFE requirements for alternate records (found here) the answer is "no". How- ever, given the BATFE definition for a "Bound Book"(found here) you can print a C&R report from NM Collector Software and assemble the pages to make up your bound book. Further, the rulings listed above may change at any time. It is up to you to keep track of the latest BATFE rulings and make your own decision as to the suitability of this software for your purposes. Question: When I use my USB flash drive in a computer other than the one I originally stored my pictures on the pictures go away. I store my pictures on the USB flash drive. However, the drive letter changes on different computers. Answer: You can manually set your USB drive letter so that it is the same on any computer. Search for "assign drive letter" to find instructions on how to do it for your operating system!